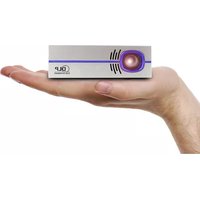
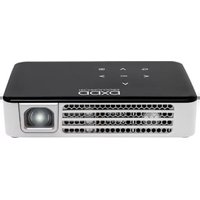
P8 - Video projector AAXA Technologies - Free user manual and instructions
Find the device manual for free P8 AAXA Technologies in PDF.


| Product Type | Portable LED Video Projector |
| Brand | AAXA Technologies |
| Model | P8 |
| Display Technology | DLP (Digital Light Processing) |
| Native Resolution | 854 x 480 pixels (WVGA) |
| Brightness | Up to 150 lumens |
| Contrast Ratio | 1000:1 |
| Light Source | LED, rated for 30,000 hours |
| Projection Size | 15 to 120 inches diagonal |
| Throw Ratio | 1.6:1 |
| Keystone Correction | Manual ±15 degrees |
| Inputs | HDMI, USB-A, MicroSD card slot |
| Audio | Built-in 1W mono speaker |
| Power Supply | Rechargeable lithium-ion battery (5V/2A via micro USB) |
| Battery Life | Up to 2.5 hours |
| Dimensions (W x D x H) | 105 x 105 x 32 mm (4.1 x 4.1 x 1.3 in) |
| Weight | 280 g (9.9 oz) |
| Operating System | None (external source required) |
| Supported Video Formats | MP4, AVI, MKV via USB (up to 1080p) |
| Cooling Fan | Yes, automatic thermal management |
| Mounting Options | Standard 1/4 inch tripod mount |
| Package Contents | Projector, remote control, micro USB cable, quick start guide |
| Cleaning | Use a soft, dry cloth; do not use liquids |
| Safety | Avoid looking into lens; do not block vents |
| Repairability | User-replaceable battery, contact support for other parts |
Frequently Asked Questions - P8 AAXA Technologies
User questions about P8 AAXA Technologies
0 question about this device. Answer the ones you know or ask your own.
Ask a new question about this device
Download the instructions for your Video projector in PDF format for free! Find your manual P8 - AAXA Technologies and take your electronic device back in hand. On this page are published all the documents necessary for the use of your device. P8 by AAXA Technologies.
USER MANUAL P8 AAXA Technologies
natural_image
Hand holding a DLP phone with a smartphone displaying a mountain landscape (no text or symbols visible on device body)User Guide
Caution!
WARNING: Please use this product as instructed. Misuse may cause injury or death.
DO NOT use while driving
DO NOT expose to water or wet surfaces. Electric shock may occur
DO NOT expose the projected LED image to your eyes or the eyes of others
DO NOT block or restrict airflow from ventilation holes as this may cause the projector to overheat
Keep the projector, battery, or charger away from any heat sources
Table of Contents
Chapter 1: P8 at a Glance
P8 Introduction 1
Remote & Keypad2
Accessories 3
Chapter 2: Getting Started
Powering On / Off 4
Focus Adjustment / Throw Distance 5
Connecting to Speaker/ Headphone 6
Loading External Content 7
Chapter 3: Menu Screens
Main Menu 11
Brightness Menu 12
*Wifi Menu 13
*Mirroring Menu 14
Connecting to Digital Input • • • 27
Chapter 4: Settings Menu 30
Keystone & Projection Direction 34
Chapter 5: Technical Details
Troubleshooting 40
Specifications 43
Notes 44
P8 at a Glance
Chapter 1
Main Unit
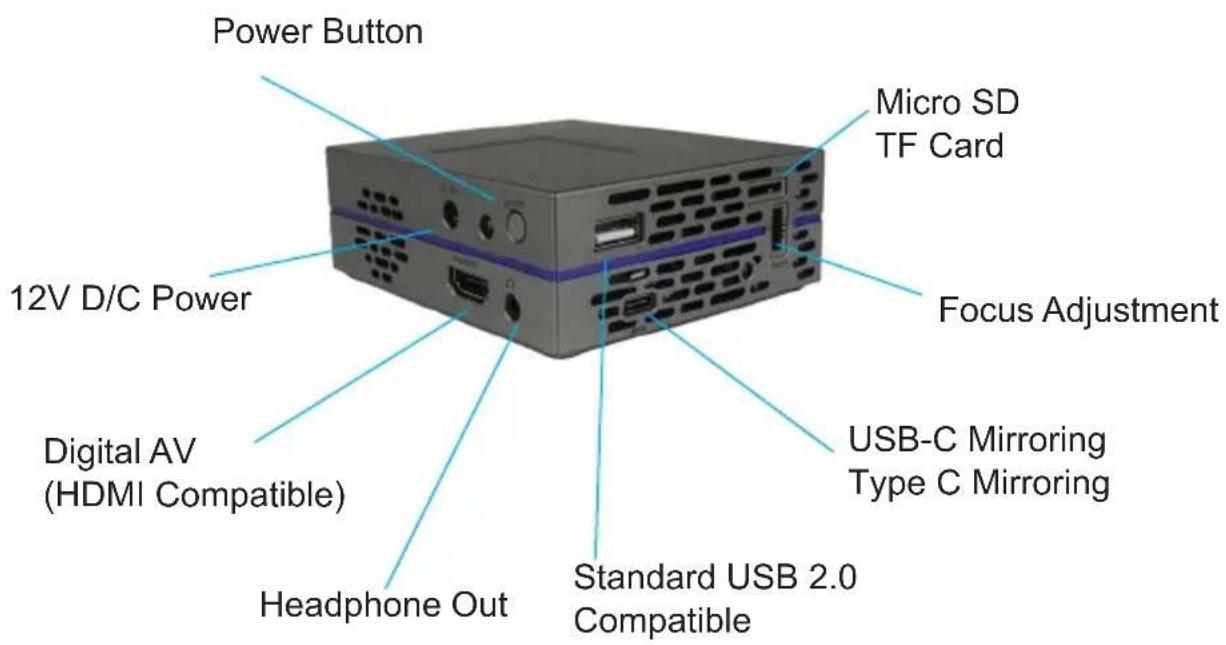
Remote & Keypad

Both the keypad and remote can be used to navigate through the menus. The Main Menu Navigation on the remote functions exactly the same as the directional pad on the P8 unit.
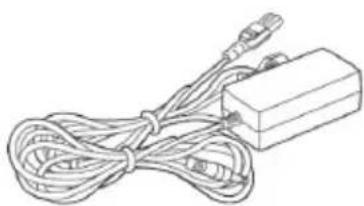
Accessories
natural_image
Line drawing of a cable and connector with connectors (no text or symbols)Power Adapter

*Under various circumstances, the actual accessories may be different from those shown in the pictures above.
Additional accessories are available for purchase at www.aaxatech.com
Getting Started
Chapter 2
Powering ON the projector
- Connect the power cord to the P8.
- Connect the other end of the power cord into the wall power source.
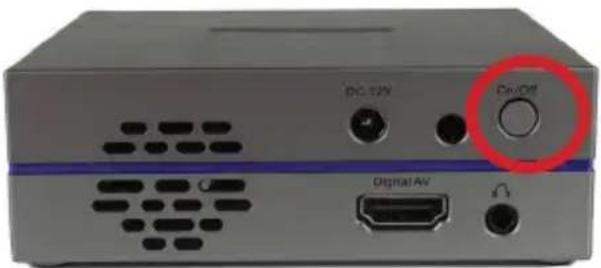
- Press the On/Off button at the back of the P8 for about 3 seconds, wait shortly and the projector should automatically boot up and turn on.
Powering OFF the projector
- To turn off the projector, press the "On/Off" button. This will fully turn off the projector.
- Unplug and disconnect the P8 from the power source
Focus Adjustment / Throw Distance
Focus Adjustment
- Spin the focus wheel up or down until the image becomes clear.

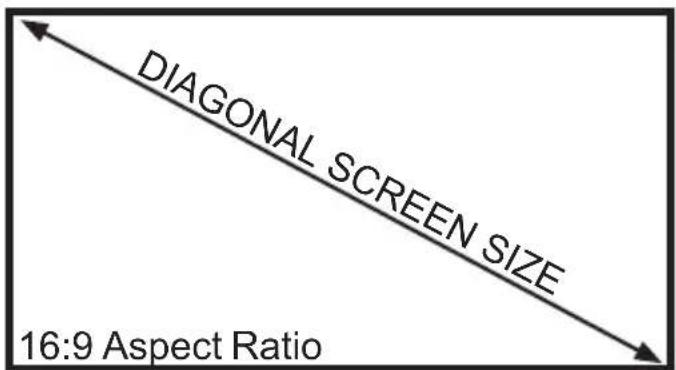
Throw Distance Chart
| Throw Distance | Diagonal Size |
| Units: Inches | Units: Inches |
| 20 | 19 |
| 30 | 29 |
| 40 | 38 |
| 50 | 48 |
| 60 | 57 |
| 70 | 67 |
| 80 | 76 |
| 90 | 86 |
Throw Ratio 1.20
Projection Angle: 100% Offset
*minimum throw distance: 16 inches
Connecting Speakers / Headphones
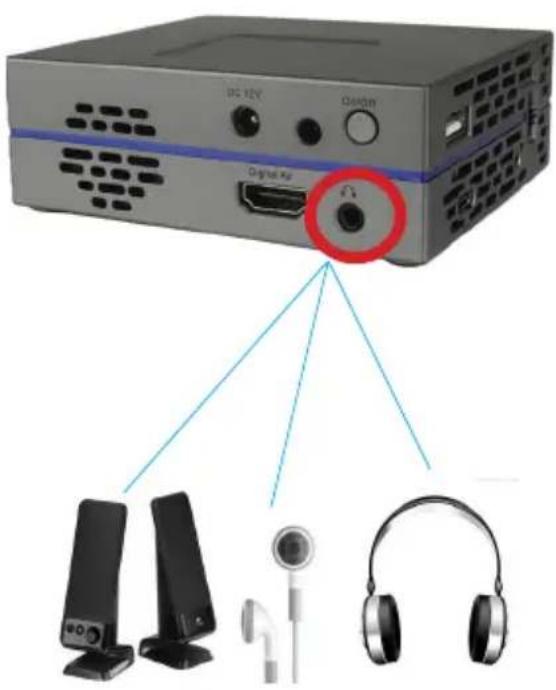
Step 1: Connect your speakers/headphones to the projector's audio port.
Step 2: Ensure that the projector and/or the headphones are powered on.
Step 3: Place the headphones on and enjoy!
*CAUTION: Prolonged use of headphones at a high volume may impair hearing.
Loading External Content
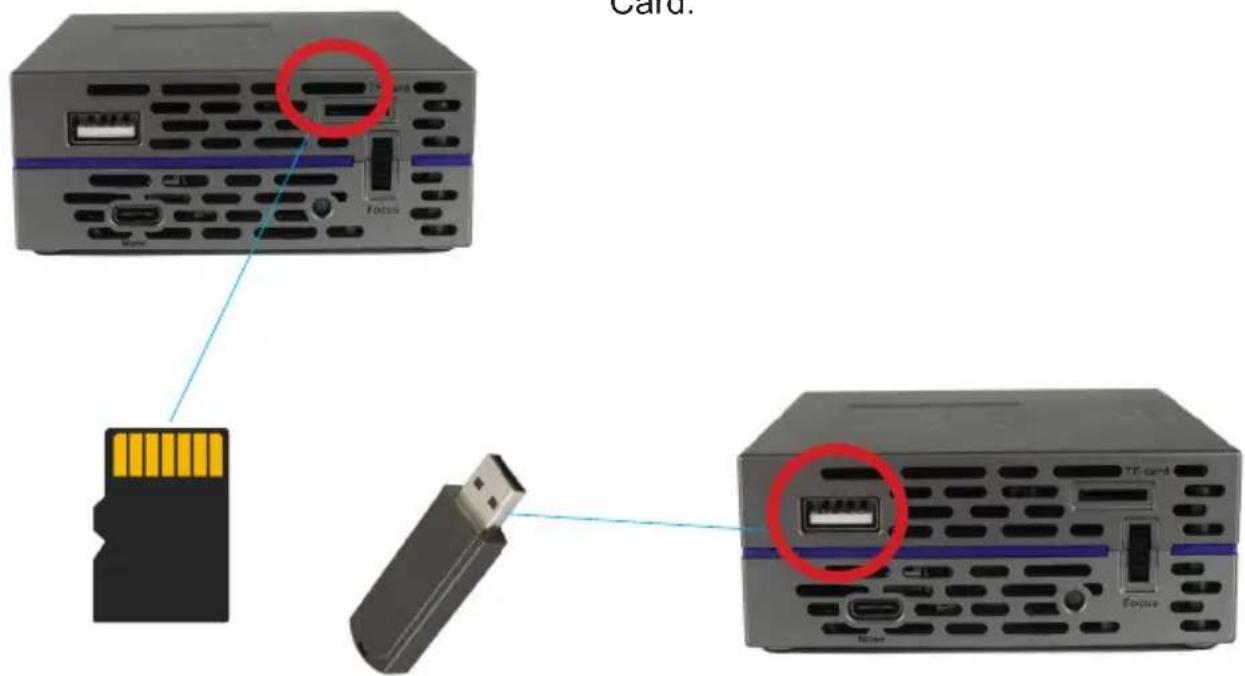
The P8 can read files directly from both a TF Card and USB Drive.

natural_image
Front view of a computer rack unit with labeled ports and a red circle highlighting a component (no readable text or symbols)Supported file types include:
MP3 / WMA / OGG / WAV / AVI / MP4 /
JPG / GIF
PDF / DOC / XLS / PPT
(up to 64 GB)

natural_image
Black USB flash drive with a small blue cable (no text or symbols visible)(up to 64 GB)

Loading External Content Cont.
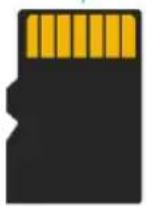
How to insert your TF Card
- Slide in your TF card into the TF card slot on the side of the P8 (as shown in picture).
• Gently slide the TF card until it clicks into place.

natural_image
Diagram showing a device with a USB flash card inserted into a memory unit (no text or symbols visible)(up to 64 GB)
Loading External Content Cont.
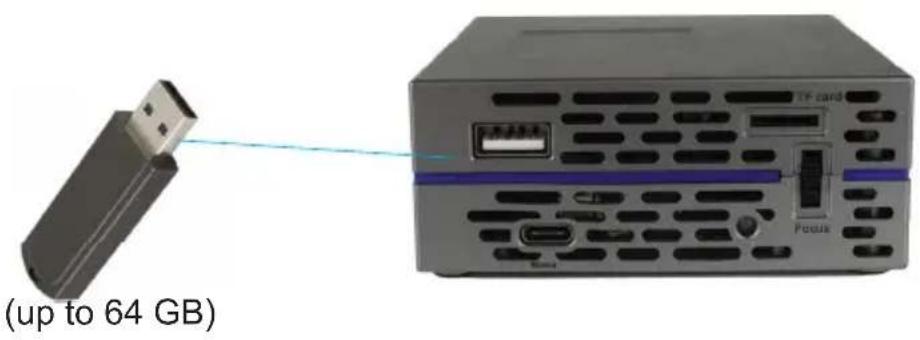
How to insert your USB Drive
- Slide your USB Drive into the USB port.
• Gently slide the drive until it cannot go in any further.
Loading External Content Cont.
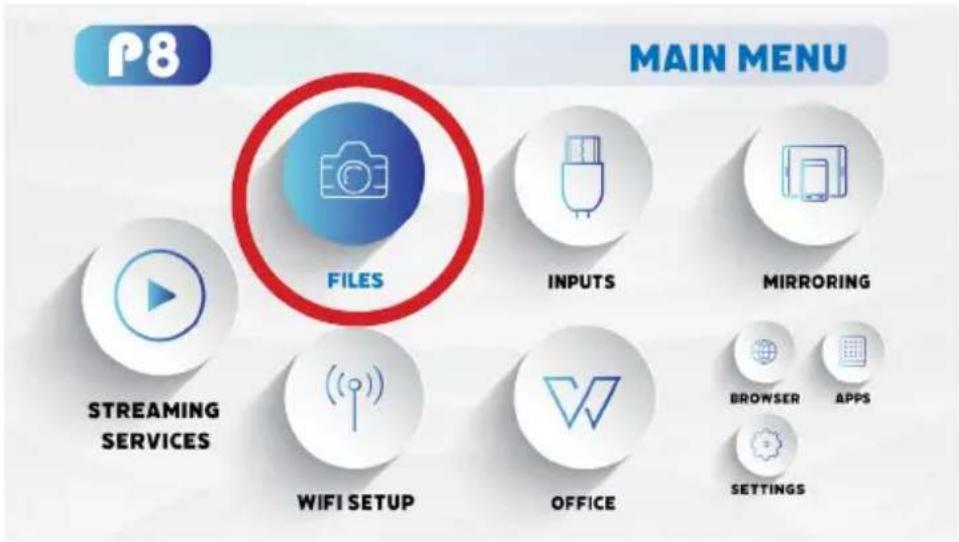
Once your TF Card or USB Drive is inserted into the projector, the TF Card or USB Drive Storage will be loaded automatically and the content can be found through the Files icon on the Main Menu (See Page 21 for File Viewer Sub-menu).
To load Text documents, select the Office icon. ( See Page 19 to learn more)
Menu Screens
Chapter 3
Main Menu
The P8 features Android 10.0 Onboard and an Onboard Media Player.
This function allows the projector to play videos, pictures, and music files directly from your connected devices.

Menu Exit/Back
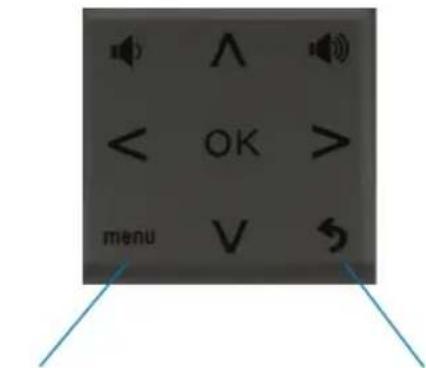
- Press the left and right directional buttons to choose an icon from the main menu.
- To select a menu option, press the "OK" button in the middle of the navigation pad.
- To go back to the previous screen, press the "Back" button.
- To Jump back to the submenu, press the "Menu" button once.
- To return to the main menu, press the "Return" button twice.
Brightness Menu
To change the brightness on your P8:
- Select the "Settings" icon (Fig. 3.1) in the Main Menu then choose "Brightness" (Fig. 3.2)
- Select the brightness you wish (Fig. 3.3): Eco Mode/ Standard Mode/ Boost Mode

Fig. 3.1 Fig. 3.2
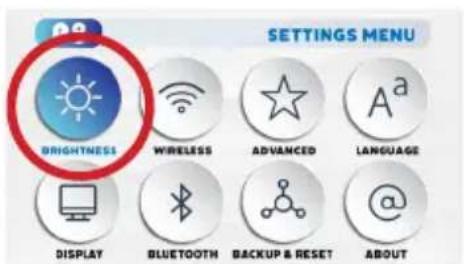
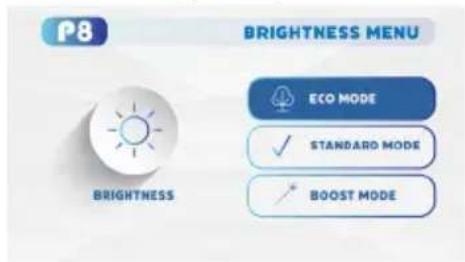
Fig. 3.3
"Boost mode" should only be used in low temperature, low altitude environments with adequate clearance of exhaust/intake vents. A tripod is highly recommended. DO NOT block vents while operating in Boost mode.
Wifi Menu (How to connect to Wifi)
How To Screen Mirror Smartphone:
- In the Main Menu, choose the "Wifi Setup" icon (Fig 3.4)
- In the Wifi Menu, toggle the Wifi icon to "On" and select the Wifi network you desire. Enter password and connect. (Fig 3.5)
Fig. 3.4 Fig. 3.5


Mirroring Menu
How To Screen Mirror Smartphone:
- After connecting the P8 to wifi, in the Main Menu, choose "Mirroring" icon (Fig 3.6)
• In the Mirroring Menu, choose Android or iOS (Fig 3.7) - Use built-in AirPlay, AirPinCast, AirPinPCSender to screen mirror from your iOS devices, Android portable devices or Windows PC
Fig. 3.6 Fig. 3.7

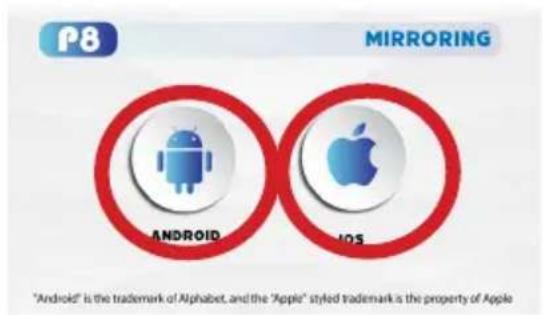
Mirroring Menu
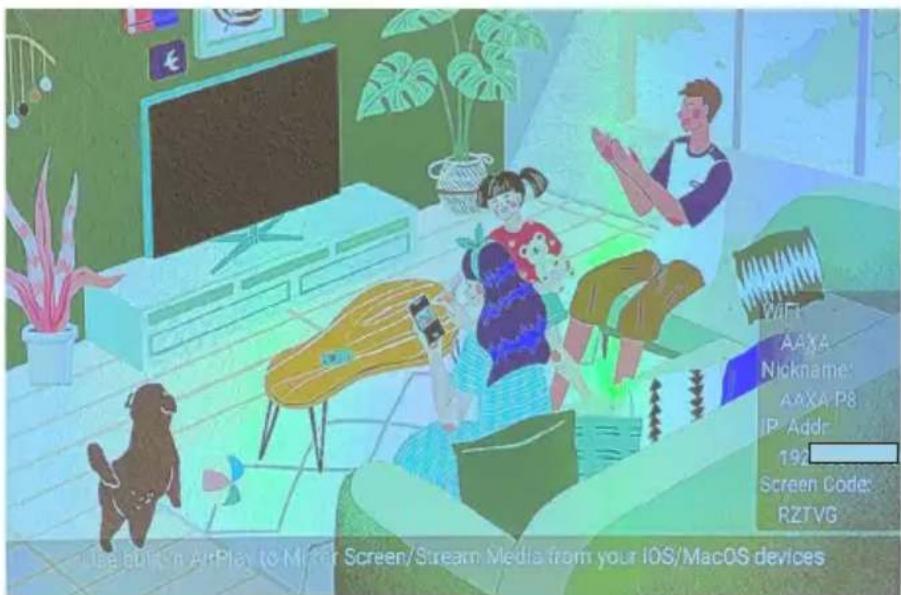
To screen mirror, your devices and the P8 have to be connected to the same Wifi network. DMCA (copyright) content cannot be wirelessly mirrored. This includes content from streaming services such as Netflix, Hulu, Disney+, etc.
Mirroring Menu
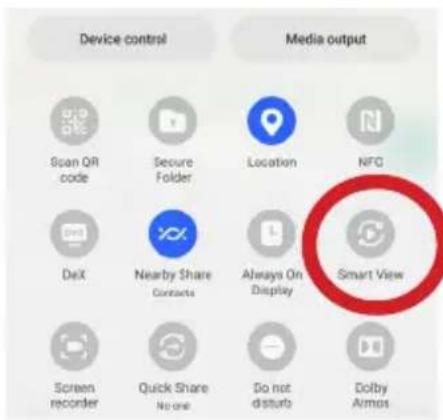
To screen mirror Android device, after connecting the P8 and your device to the same WiFi network, please use "Smart View".
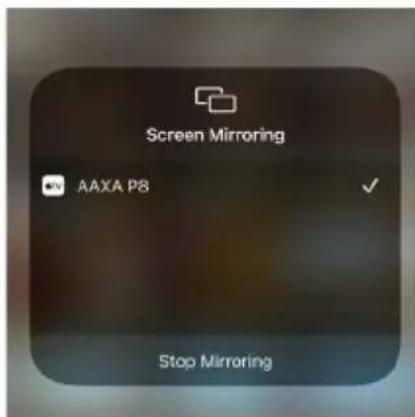
To screen mirror iOS device, after connecting the P8 and your device to the same WiFi network, please select "AAXA P8" in the Screen Mirroring menu.
Streaming Services Menu
After connecting the P8 to Wifi, select the “Streaming Services” icon in the Main Menu. Select the streaming service you wish to open.

Streaming Services require subscription including paid subscription. Users are responsible for their own subscriptions. Not all streaming apps are compatible in all regions.
Office Menu
In the Main Menu, select the "Office" icon to access the N Docs app.

FAQ: How to load a file in Office
Load your external content to the P8 by using a USB stick or a Micro SD/ TF Card.
FAQ: How to load a file in Office

In the main menu, select the "Office" icon. The office documents (Word, Excel, PowerPoint or Templates) should show in "Office - Microsoft"

Select "Microsoft" and choose the file you wish to open. Use the keypad on the top of the P8 or the remote control to nagivate.
Files Menu
Opening A File:
- Select the "Files" icon in the Main Menu (Fig 3.8)
- In the Files Menu, select the external content device (USB/ Micro SD - TF Card) that contains the file you wish to open (Fig 3.9)
Fig. 3.8
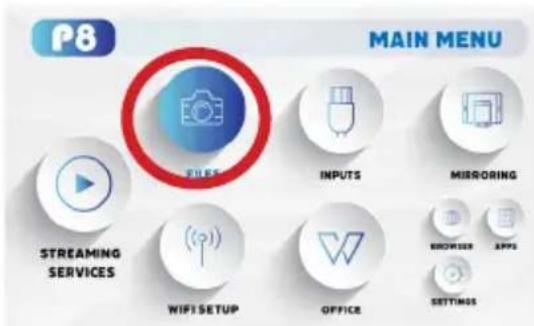
Fig. 3.9
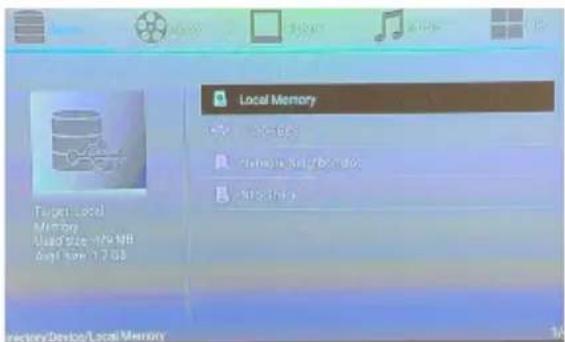
The P8 will show all folders and files you have on your USB or TF Card drive. Use the navigation buttons to select folders or files.
Browser Menu
How to open an internet browser in the P8
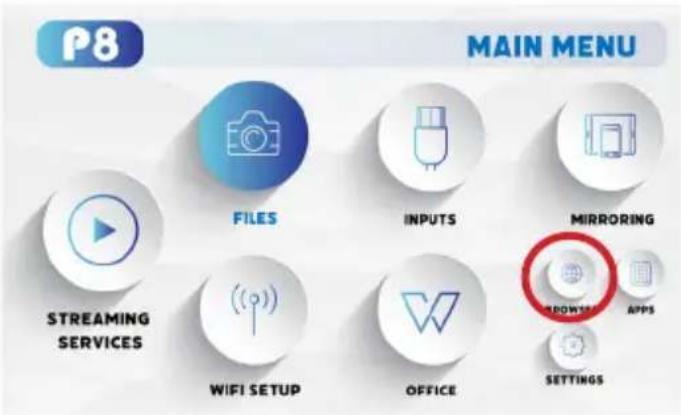
In the Main Menu, select the "Browser" icon. Once the Chrome browser opens, press the ◀ button on the navigation pad or the remote control to search or type web address

Apps Menu
To access more apps in the P8:
- In the Main Menu, select the "Apps" icon (Fig 3.10)
• In the Apps Menu, select the app you wish to open (Fig 3.11)
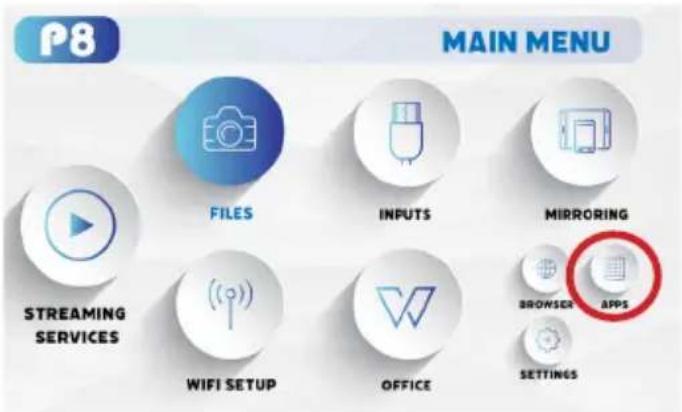
Fig. 3.10 Fig. 3.11
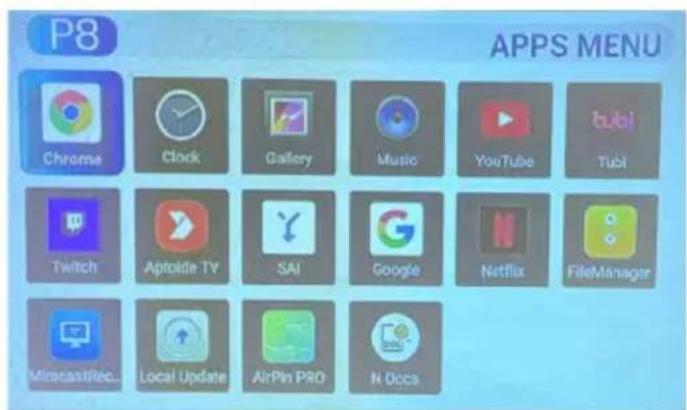
Note: It is not recommended that users load their own apps onto the P8
FAQ: How to view photos as a slideshow FAQ:
How do I play a slideshow?
- Connect the USB or Micro SD Card to the P8
- In the Main Menu, select the "Apps" icon
- In the Apps Menu, select the "Gallery" icon (Fig 3.12)
- In the Gallery app, your photos and videos will be available to view as slideshows. Select the files you wish to open.

Fig. 3.12

Fig. 3.13
FAQ: How to zoom in and zoom out an image
How to zoom in and zoom out an image
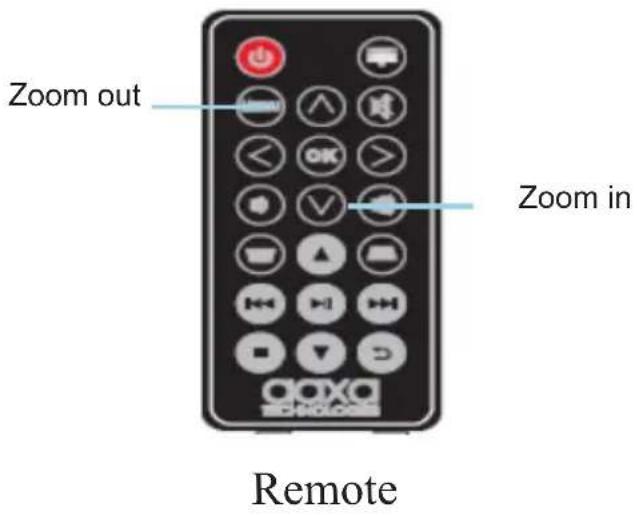
- Open the image in the Gallery App
- Use the "up" and "down" button on the remote control to adjust the size of the image
- To "zoom in" an image, press the "down" button on the remote control
- To "zoom out" an image, press the "up" button on the remote control
FAQ: How to adjust brightness of an image FAQ: Hov
How to adjust brightness of an image
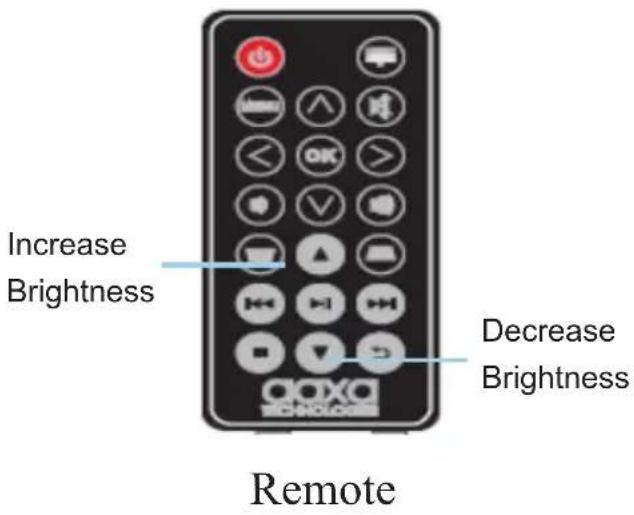
- Open the image in the Gallery App
- Use the "up" and "down" button on the remote control to adjust the brightness level of the image
- To make the image brighter, press the "up" button on the remote control
- To make the image dimmer, press the "down" button on the remote control
Connecting to Device via Digital Input
First, a digital input cable is required from your P8 to your other device.
In the Main Menu
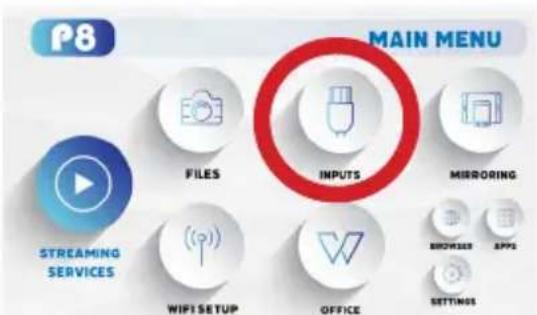

Select the "Inputs" Icon Then select the "Digital Video" Icon
Connectivity to Multimedia Devices
The P8 can connect to many media devices including: computers, laptops, iPhones, iPads, DVD players, smart phones, cameras, video game consoles and other peripherals with ease. The P8's digital input is compatible with HDMI interface. The connection type is "full sized".
*Some smartphones require video out capabilities to be displayed with the P8. Check with your phone manufacturer.
Connecting to Digital Input Video Devices
Step 1:
Connect one end of the Digital Input Cable to your device's Digital Input port.
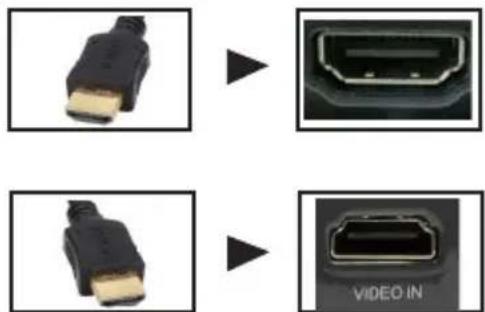
Step 2:
Connect the other end of the Digital Input Cable to your P8's Digital Input port.
Step 3:
In the Main Menu, select the “Digital Video” Icon. Your P8 should now be mirroring the content from your device.
Note:
If you're connecting to a computer or laptop and the projector does not automatically mirror it, read onto the next page for more information.
Connecting to a Computer via Digital Input
Step 4:
After connecting your projector to your computer or laptop via a digital input cable, you may need to enable Digital Video output on your computer. To enable Digital Video output on your computer most computers require "turning on" the video output feature. Each computer is different. Please consult your owner's manual for instructions to enable Digital Video output. Below are standard instructions for a Windows 10 computer – not all systems are the same.
Step 5:
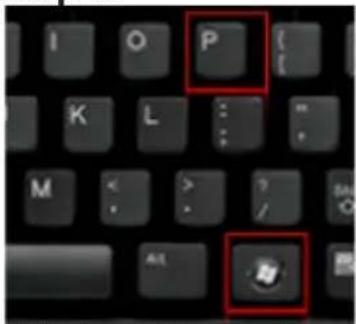
Press Windows+P to toggle through display settings. Select either "Duplicate" or "Extend" depending on your viewing option.
*NOTE: Different operating systems may differ
Step 6:
Scale and layout
Change the size of text, apps, and other items
100% (Recommended)
Custom scaling
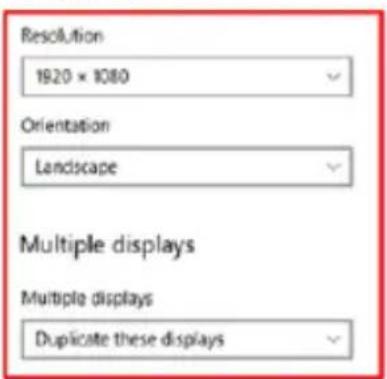
- Right click on computer desktop and select "Screen Resolution."
- Display Properties window will pop up and select the Advance Display Settings.
- Please make sure the "Multiple displays" has the "Duplicate these displays" option selected and the Resolution is 1920 x 1080 or below as pictured in the red box.
- If the image is blurry or the text is not legible, adjust the screen resolution.
Settings Menu
Chapter 4
The Settings Menu can be accessed by selecting "Settings" on the Main Menu.
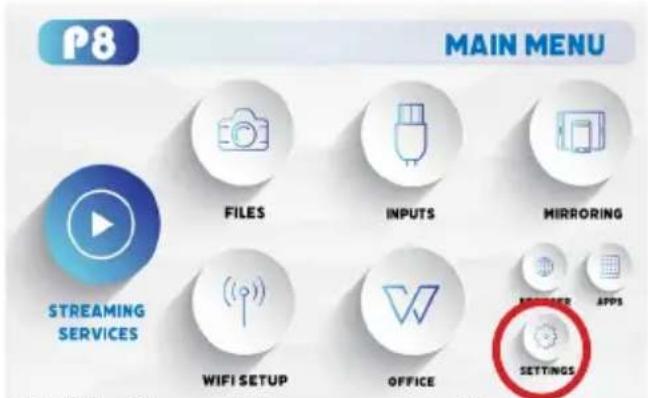
Within the settings menu, there are eight more submenus that allow you to customize your P8 to the settings you want:
Brightness
• Eco
- Standard
- Boost
Wireless (Wifi Menu)
Advanced
• Network & Internet
- Bluetooth
• Accounts & Sign In
• Device Preference
Language
Display
- Keystone
- Projection Direction
- Mode image
• Color Temperature
Bluetooth
Backup Reset
- Reset
- Update Android
- Update CPU
About
Advanced Settings

In the Advanced setting menu, you can set up:
• Network & Internet
- Bluetooth
- Accounts Sign in
- Apps
• Device Preferences: About, Date & Time, Language, Keyboard & Autofill, Mouse Mode, Display, Inputs, Sound, Storage, Screen saver, Developer Options, Location, Security & restrictions, Accessibility and Rest
Language
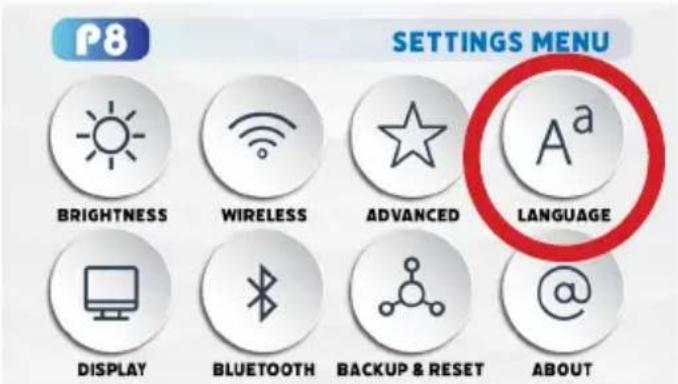
In the Advanced setting menu, you can select your preferred language
Display Settings
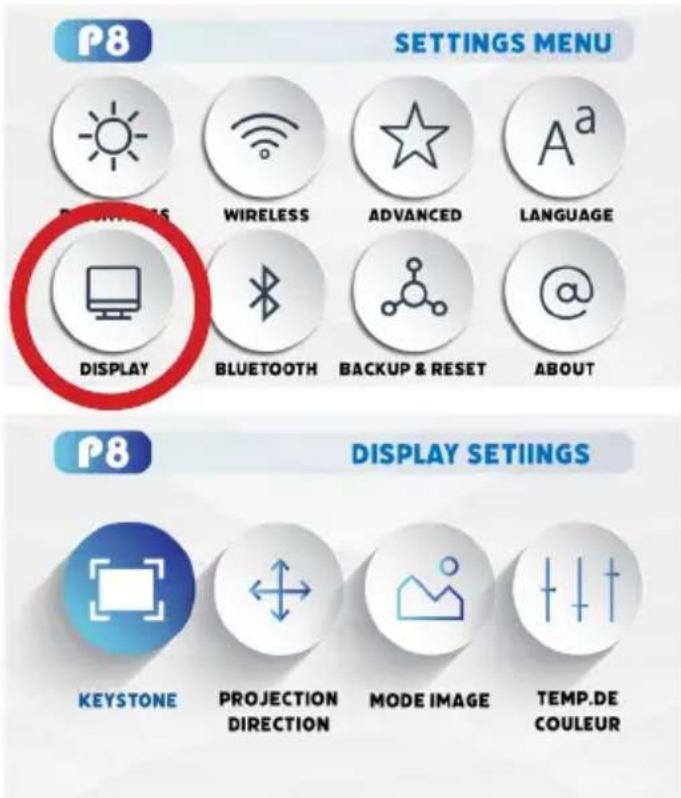
In the Advanced setting menu, you can set up:
- Keystone
- Projection Direction
- Mode Image
• Color Temperature
Keystone
- Reset Keystone, Keystone Up, Keystone Down
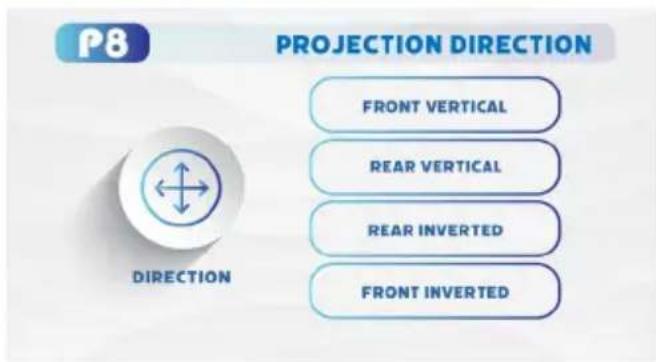
Projection Direction
- Front Vertical, Rear Vertical, Rear Inverted, Front Inverted
Mode Image
• Auto Mode, 4:3, 16:9
Color Temperature
• Medium, Cool, Warm
Keystone & Projection Direction
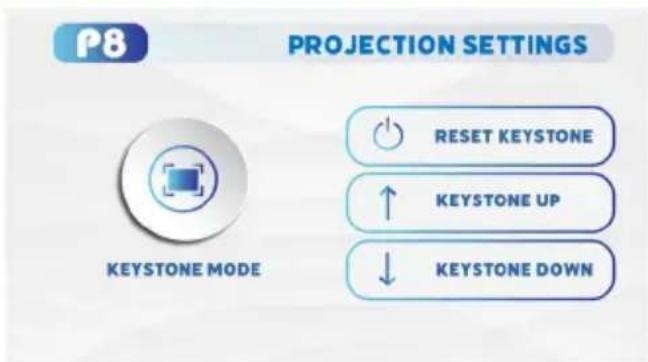
Keystone reset
- Reset keystone in the P8
- Add Keystone Up to the projection
- Add Keystone Down to the projection
Keystone up
Keystone down
- Front Vertical
- Rear Vertical
- Rear Inverted
- Front Inverted
Keystone Adjustments FAQ
What is keystone?
- “Keystoning” occurs when a projector is aligned non-perpendicularly to a screen, or when the projection screen has an angled surface. The image that results from one of these misalignments will look trapezoidal rather than square.
Keystone Adjustment
Keystone Adjustment
Remote
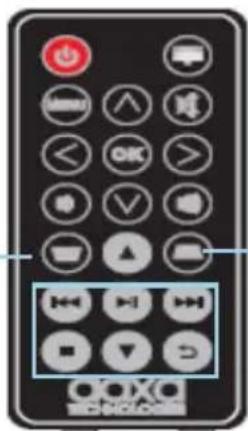
How to correct Keystone using the remote control?
- If the image looks trapzoidal, press the “keystone adjustment” buttons on the remote control until the keystone effect corrects and the the picture turns into a square projection.
Mode Image menu & Color Temp.


Auto Mode
- Set the image mode to Auto Mode
4:3 - Set the image mode to 4:3
16:9 - Set the image mode to 16:9
MediumMedium
- Set the color temperature to Medium
CoolCool
• Set the color temperature to Cool
WarmWarm - Set the color temperature to Warm
Bluetooth Menu
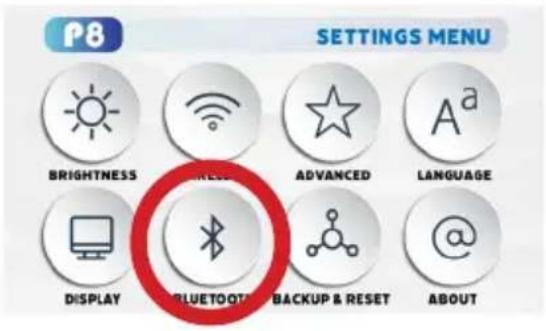

How to connect the P8 to bluetooth for audio out
- In the Settings Menu, go to the Bluetooth menu by selecting the bluetooth icon
- In the Bluetooth submenu, toggle the "On/Off" switch beneath the bluetooth icon to "On"
- Select the desired bluetooth device. Make sure that your device is not connected to any other devices and it is placed near the P8.
- Note: Bluetooth is for audio output only – does not accept audio input or video streaming
Backup Reset Menu


How to reset the P8
- In the Settings Menu, go to the Backup Reset menu by selecting the Backup Reset icon
- In the Backup Reset menu, you can choose to Reset the P8, or Update Android or Update CPU
About Menu
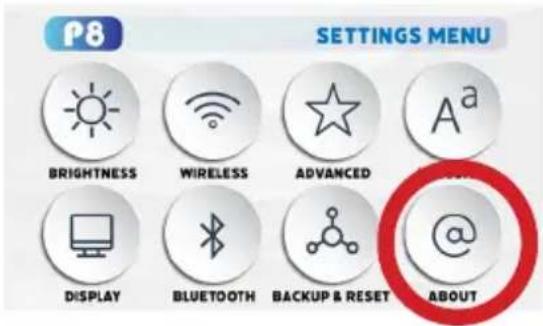
How to view P8 "About" information
- In the Settings Menu, go to the About Menu by selecting the about icon
- In the About menu, you can Update System, check Device Name, Restart, Check Status & Legal Information, check Model Name & Android Version, check Android Security Patch Level, Kernel version and Build,
Technical Details
Troubleshooting
I cannot connect my iOS devices to the P8
| Possible Causes Solution | |
| (For wired connection) Incorrect cables or connectors | To connect your iOS devices to the P8, please use the Official Apple Lightning to Digital AV Adapter and connect via the Digital AV port. |
AIRPLAY DOES NOT WORK
Be sure to connect your iOS device and the P8 Projector to the same WiFi network. Choose "AAXA P8" as the device you wish to screen mirror from your iOS device, unless you have changed the P8's nickname.
I cannot wirelessly screen mirror Netflix, Amazon Prime, Disney Plus, etc.
| Possible Causes Solution | |
| For wireless connection, DMCA content including Netflix, Amazon Prime, Disney Plus content is not sharable wirelessly). | Please use the built-in apps to stream DMCA Content or connect your devices to the P8 using the proper cables/ converters. |
Technical Details
Troubleshooting
IMAGE IS BLURRED
| Possible Causes Solution | |
| The Projector is not in focus. Adjust the focus with the focus adjustment buttons on the remote control until the image comes into focus, or use the focus adjustment buttons on the side of the projector | |
| The Projector is offset from plane / angle of operation. | Move the projector so that it is both 180 degrees and on an evern plane with the screen or adjust the keystone through the remote, keypad or Settings Menu |
NO SYNC, NO SIGNAL
Be sure to setup the computer to enable a video signal output. On some laptops this is done by pressing and holding Function F5 key. If using the P8 as an external monitor on Windows based systems, this can be done by selecting “extend my desktop to this monitor”. Depending on the video driver different resolutions may need to be selected for proper output.
Technical Details
Troubleshooting
THE PROJECTOR DOES NOT TURN ON
| Possible Causes Solution | |
| There is no power. Check to ensure the power outlet | source is good.Check the power adapter to ensure a proper connection with the wall outlet as well as the projector. |
| Cannot power on the projector from the remote control. | To power on the projector, press and hold the “On/Off” button at the back of the projector. Next, if the projector is not powered on, press the Power button on the remote control. |
NO PICTURE / FILE NOT SUPPORTED
| Possible Causes Solution | |
| The video source is not properly connected or selected | Check the video source signal to ensure that it is properly connected. Select the current input source by choosing the input desired from the main menu |
| Incorrect file extension / Video is encoded with incorrect codec | Please refer to “Specifications” page to see which file types and codex are supported. Verify that the file was encoded properly. |
Specifications
| Brightness: | 430 Lumens |
| Native Resolution: | 960 x 540 (qHD) |
| Contrast Ratio: | 2000:1 |
| Aspect Ratio: | 16:9 |
| Projection Lens: | Manual Focus |
| Image Size: | 16~200 inches |
| Lamp: | RGB LEDs with Vibrant Color Technology Life 30,000hrs |
| Video in: | HDMI (Compatible); 1080P, Type C Compatible |
| File Play Back | USB Memory Stick reader (up to 64GB) Micro SD/TF Card Reader (up to 64GB) |
| Audio Output: | 2W High-Low Frequency Speaker 3.5mm Stereo Headphone Jack |
| USB Power Output: | 5V 1A (5 watts) |
| Operating System: | Android 10.0 |
| USB: | 5 Pin USB 2.0 (Full Size), 34 Watts |
| Power Consumption: | 34 Watts |
| Dimensions: | 3.9" x 3.4" x 1.4" |
| Weight: | 8.8 oz |
| Supported File Formats: | MP3 / WMA / OGG / WAV / AVI / MP4 / JPG / GIF PDF / DOC / XLS / PPT |
| Wireless Mirroring: | Supports iOS, Android |
| Bluetooth Output: | 4.0 Supported |
| Wirless (WiFi) | 2.4ghz/ 5 ghz |
*HDMI™ is a registered trademark of HDMI Licensing LLC. AAXA Technologies is not affiliated with HDMI Licensing LLC.
Notes
Please direct all customer service inquiries to:
AAXA Technologies, Inc. 17781 Sky Park Circle, Suite #F Irvine, CA 92614 (714) 957-1999
info@aaxatech.com

- Caution!
- Table of Contents
- Chapter 1: P8 at a Glance
- Chapter 2: Getting Started
- Chapter 3: Menu Screens
- Chapter 4: Settings Menu 30
- Chapter 5: Technical Details
- P8 at a Glance
- Chapter 1
- Main Unit
- Remote & Keypad
- Accessories
- Getting Started
- Chapter 2
- Powering ON the projector
- Powering OFF the projector
- Focus Adjustment / Throw Distance
- Focus Adjustment
- Connecting Speakers / Headphones
- Loading External Content
- Loading External Content Cont.
- How to insert your TF Card
- How to insert your USB Drive
- Menu Screens
- Chapter 3
- Main Menu
- Brightness Menu
- To change the brightness on your P8:
- Wifi Menu (How to connect to Wifi)
- How To Screen Mirror Smartphone:
- Mirroring Menu
- Streaming Services Menu
- Office Menu
- FAQ: How to load a file in Office
- Files Menu
- Opening A File:
- Browser Menu
- How to open an internet browser in the P8
- Apps Menu
- To access more apps in the P8:
- FAQ: How to view photos as a slideshow FAQ:
- How do I play a slideshow?
- FAQ: How to zoom in and zoom out an image
- How to zoom in and zoom out an image
- FAQ: How to adjust brightness of an image FAQ: Hov
- How to adjust brightness of an image
- Connecting to Device via Digital Input
- Connectivity to Multimedia Devices
- Connecting to Digital Input Video Devices
- Step 1:
- Step 2:
- Step 3:
- Note:
- Connecting to a Computer via Digital Input
- Step 4:
- Step 6:
- Settings Menu
- Chapter 4
- Brightness
- Wireless (Wifi Menu)
- Advanced
- Language
- Display
- Bluetooth
- Backup Reset
- About
- Advanced Settings
- Display Settings
- Keystone
- Projection Direction
- Mode Image
- Color Temperature
- Keystone & Projection Direction
- Keystone reset
- Keystone up
- Keystone down
- Keystone Adjustments FAQ
- What is keystone?
- How to correct Keystone using the remote control?
- Mode Image menu & Color Temp.
- Auto Mode
- MediumMedium
- Bluetooth Menu
- How to connect the P8 to bluetooth for audio out
- Backup Reset Menu
- How to reset the P8
- About Menu
- How to view P8 "About" information
- Technical Details
- Troubleshooting
- AIRPLAY DOES NOT WORK
- NO SYNC, NO SIGNAL
- Specifications
- Notes
Brand : AAXA Technologies
Model : P8
Category : Video projector