Apocalypse Atom 1300 PRO - Loudspeaker Deaf Bonce - Free user manual and instructions
Find the device manual for free Apocalypse Atom 1300 PRO Deaf Bonce in PDF.


| Product Type | Car Audio Subwoofer |
| Brand | Deaf Bonce |
| Model | Apocalypse Atom 1300 PRO |
| Size | 12 inches (30 cm) |
| Impedance | Dual 2 Ohm or Dual 4 Ohm (depending on variant) |
| RMS Power Handling | 1300 Watts |
| Peak Power Handling | 2600 Watts |
| Sensitivity | 86 dB (1W/1m) |
| Frequency Response | 20 Hz – 500 Hz |
| Recommended Enclosure Volume | Sealed: 1.5 ft³; Ported: 2.0 ft³ |
| Mounting Depth | 6.5 inches (165 mm) |
| Mounting Hole Diameter | 11.0 inches (280 mm) |
| Voice Coil | High-temperature aluminum voice coil |
| Cone Material | Pressed paper with non-pressed surround |
| Magnet Type | Ferrite magnet |
| Weight | Approximately 12 kg (26.5 lbs) |
| Power Supply | 12V DC (vehicle electrical system) |
| Maintenance | Dust with soft cloth; avoid moisture |
| Safety | Do not exceed RMS power rating; ensure proper enclosure |
| Spare Parts / Reparability | Recone kits and voice coils available; professional recone recommended |
Frequently Asked Questions - Apocalypse Atom 1300 PRO Deaf Bonce
User questions about Apocalypse Atom 1300 PRO Deaf Bonce
0 question about this device. Answer the ones you know or ask your own.
Ask a new question about this device
Download the instructions for your Loudspeaker in PDF format for free! Find your manual Apocalypse Atom 1300 PRO - Deaf Bonce and take your electronic device back in hand. On this page are published all the documents necessary for the use of your device. Apocalypse Atom 1300 PRO by Deaf Bonce.
USER MANUAL Apocalypse Atom 1300 PRO Deaf Bonce
- Introduction
- Safety instructions
- Typical installation sequence
- Selection of the diameter of power cables and speaker cables
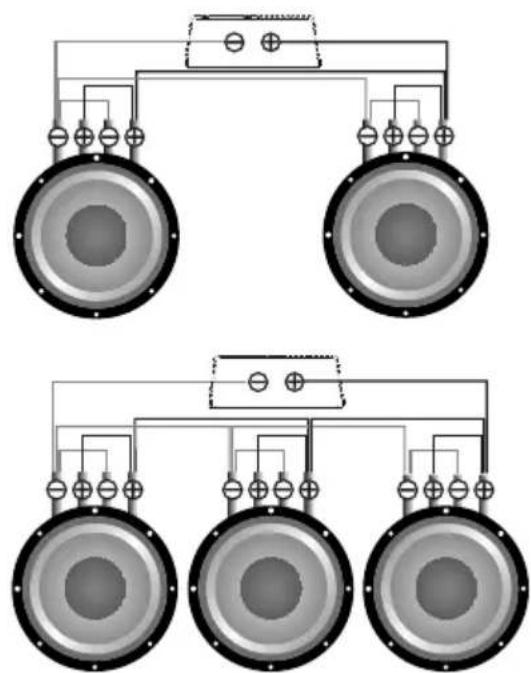
- Wiring diagrams
- Connection methods
- Specifications
- Possible faults and their solutions
- Box contents
- Information on disposal of the electrical and electronic equipment (for the European countries with separate waste collection)
GLOBAL SPONSOR
dbDRA
2. SAFETY INSTRUCTIONS
- Make sure that your vehicle has a 12V DC electrical system with negative grounding. Before installing the amplifier in cars, trucks or buses, check the battery voltage.
- Check the state of on-board power supply of your vehicle, the battery and the alternator. When the engine is running, depending on the ambient temperature, the voltage to be outputted by the alternator must be within the range of 14 to 14.7 V. Open circuit voltage (OCV) of the battery must be within the range of 12.5 to 13 V. Make sure that the rated current of the alternator and the battery capacity is enough to provide increased consumption.
For example, for the power of the amplifier 1000 W, the rated current of the alternator is required at the rate of 1000 W / 13 V = 77 amperes. A more powerful amplifier requires a more powerful alternator as well as an additional battery. - Do not place the amplifier in the engine compartment and also in the places exposed to water, moisture, dust or dirt.
- Never stretch the cables outside of the car and near the moving parts of the car. This can lead to destruction of the insulating layer, short circuit and fire.
- The amplifier should be installed in areas of the car where the temperature varies from 0 °C (32 °F) to 55 °C (131 °F). The amplifier should be in a place with a good air circulation. The horizontal position of the amplifier is the best way to install.
- During the operation the amplifier may be heated up to 80 °C (176 °F). Before you touch it, make sure it is not overheated that may be dangerous.
- To improve the cooling of the amplifier, it is recommended to clean periodically the heatsink from dust. When cleaning the heatsink strong solvents should not be used as they may damage the amplifier. Do not use compressed air, because solids can penetrate inside the amplifier. Cleanings best done with wet towels or cloth.
- Make sure that the location of the amplifier does not violate the proper operation of mechanical and electrical devices of the vehicle.
- Make sure that during the installation and connection of the battery, the power cables are not shorted.
- When performing plumbing, drilling or cutting works with the car, make sure that there is no wiring, brake lines, fuel pipe or other structural elements under the place of work. Follow the safety rules! Use protective glasses and gloves.
- To protect the wires use rubber gaskets if the wire passes through a hole in the plate, or other similar materials if it lies close to the parts exposed to heat.
- Make sure that all the cables are fixed over the entire length. Also make sure that their outer protective shell is non-combustible. Use a clamping screw to secure the positive and negative cables next to the appropriate terminals of the amplifier.
- Select a diameter of the power cable in accordance with the power of the amplifier and the recommendations provided here. Power cables are extremely important since they directly affect the system damping factor and sound quality. The cables to the battery must be in the copper crimp terminals pressed with the help of a hydraulic press, and well fixed to the battery terminals.
- To avoid accidental damage, keep the amplifier in its original packaging prior to installation.
- Use high-quality copper speaker and power cables.
CAUTION!!! High sound pressure can damage your health!
Please use the common sense when controlling volume!
3. TYPICAL INSTALLATION SEQUENCE
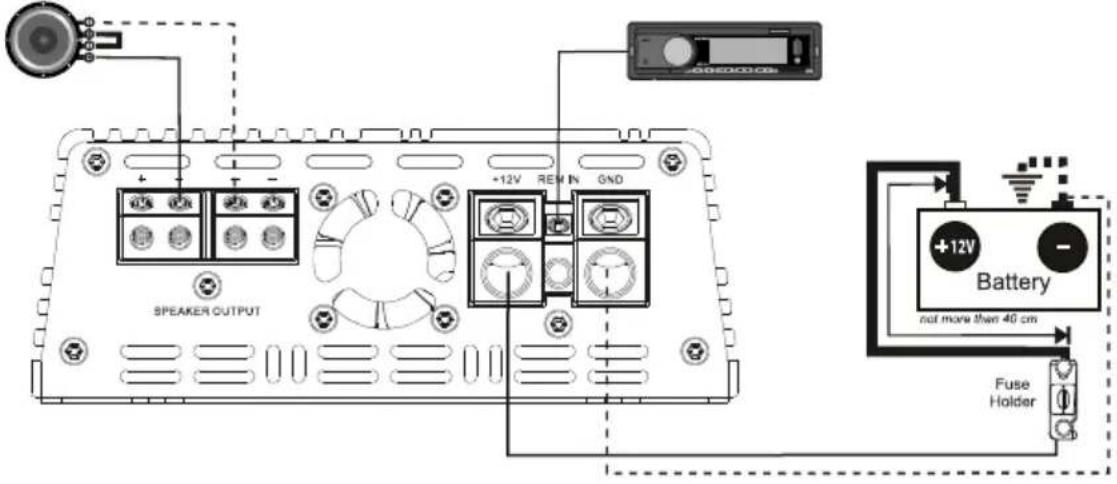
Step 1. Connect the speaker cable from (+) terminal of the amplifier to (+) terminal of the subwoofer.
Step 2. Connect the speaker cable from (-) terminal of the amplifier to (-) terminal of the subwoofer.
Step 3. Connect one end of the power cable from (+) terminal of the battery and the second end to the amplifier terminal marked with +12V. Do not forget to protect positive power cable with appropriate fuse.
Step 4. Connect one end of the power cable from (-) terminal of the battery and the second end of the grounding cable to the terminals marked with GND.
Step 5. Connect one end of the cable to the Remote output terminal at the HU and the second end to the amplifier terminal marked with REM IN.
Step 1. Connect one end of the RCA cable to the RCA output terminals at the HU and the second end to the amplifier RCA input terminals marked with INPUT.
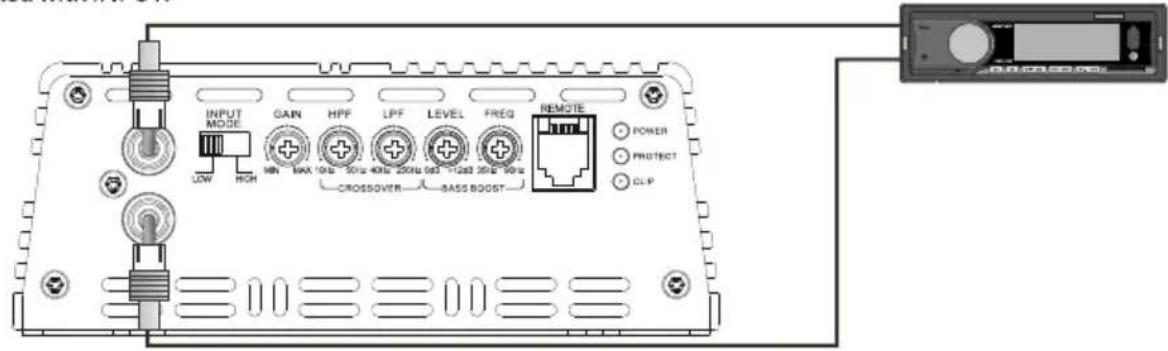
Application of connectors and controls
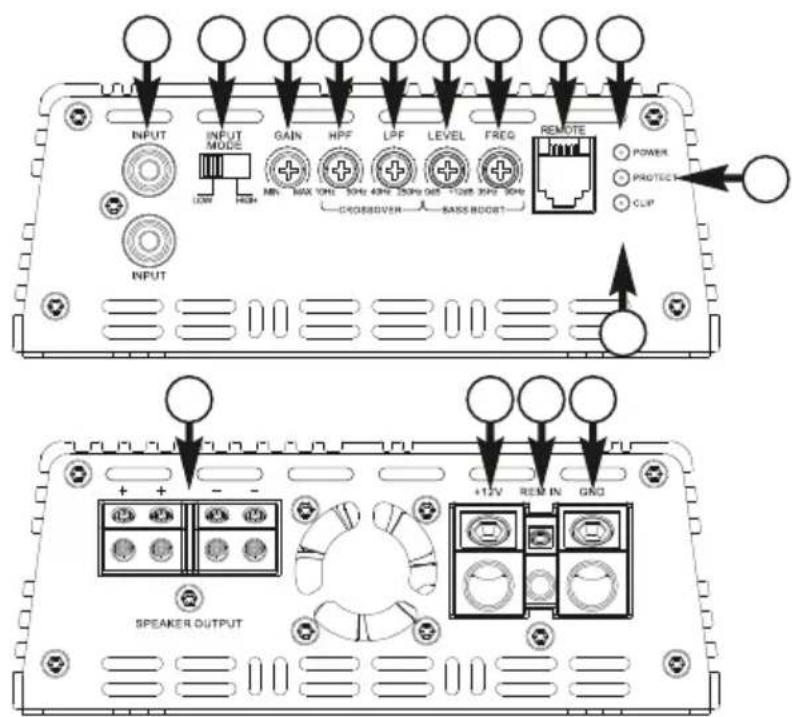
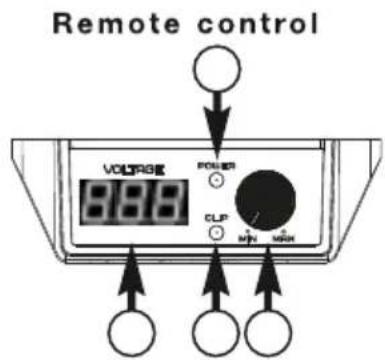

natural_image
Solid black horizontal bar with no text or symbols
natural_image
Solid black horizontal bar with no text, symbols, or markings
natural_image
Solid black horizontal bar with no text, symbols, or markings$$ \overline\overline\overline\overline\overline\overline\overline\overline\overline\overline\overline{\overline{\overline{\overline{\overline{\overline{\overline{\overline{\overline{\overline{\overline{\overline{\overline{\overline{\overline{\overline{\overline{\overline{\overline{\overline{\overline{\overline{\overline{\overline{\Bigl\downarrow}}}}}}}}}}}}}}}}}}}}}}}} $$

natural_image
Solid black image with no visible content, text, or symbols.
natural_image
Solid black image with no visible content, text, or symbols.
natural_image
Three identical circular speaker buttons with no visible text or symbols
natural_image
Completely black image with no visible content, text, or symbols.
natural_image
Pure electrical circuit lines without any symbols
natural_image
Pure electrical circuit lines without any symbols| 10 | 12 |

natural_image
Pure black rectangle with no visible text, symbols, or features

natural_image
Pure electrical circuit lines without any symbols
natural_image
Pure electrical circuit lines without any symbols
natural_image
Pure graphical element with a circular object and horizontal line, no text or symbols present
natural_image
Solid black image with no visible content, text, or symbols.
natural_image
Simple line drawing of a rectangular shape with two small circles and a plus sign, no text or symbols present.
flowchart
graph TD
    A[" "] --> B[" "]
    B --> C[" "]
    C --> D[" "]
    D --> E[" "]
    E --> F[" "]
    F --> G[" "]
    G --> H[" "]
    H --> I[" "]
    I --> J[" "]
    J --> K[" "]
    K --> L[" "]
    L --> M[" "]
    M --> N[" "]
    N --> O[" "]
    O --> P[" "]
    P --> Q[" "]
    Q --> R[" "]
    R --> S[" "]
    S --> T[" "]
    T --> U[" "]
    U --> V[" "]
    V --> W[" "]
    W --> X[" "]

natural_image
Two speaker lamps with circular heads and a blank rectangular border (no text or symbols)
natural_image
Two speaker speakers with black buttons, one emitting sound waves (no text or symbols visible)
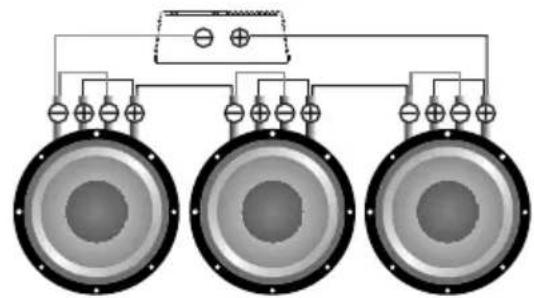
natural_image
Pure electrical circuit lines without any symbols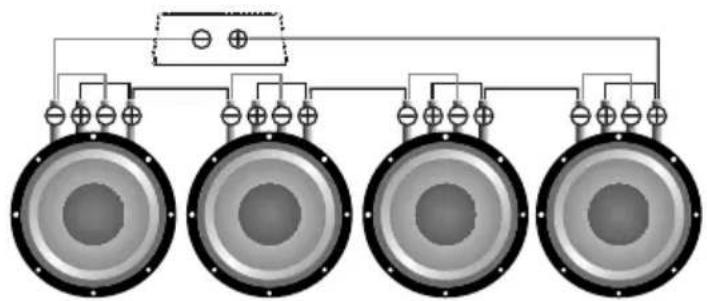
natural_image
Pure electrical circuit lines without any symbols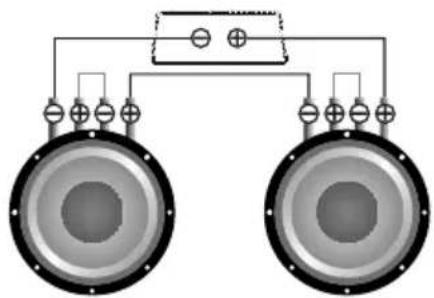
natural_image
Pure electrical circuit lines without any symbols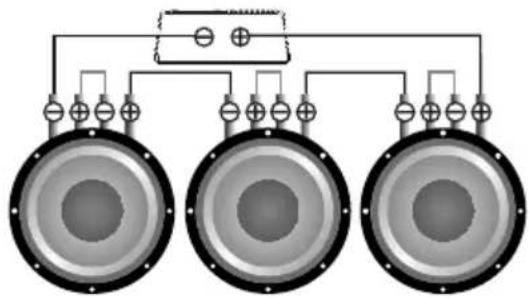
natural_image
Pure electrical circuit lines without any symbols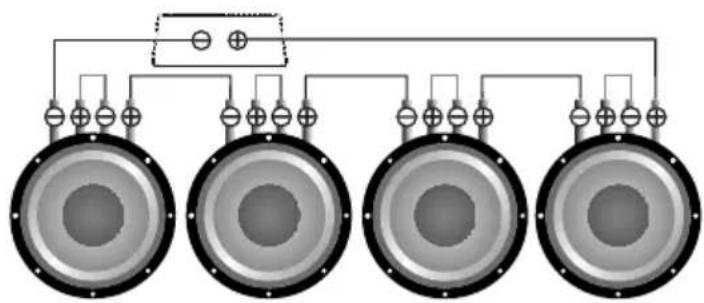
natural_image
Pure electrical circuit lines without any symbols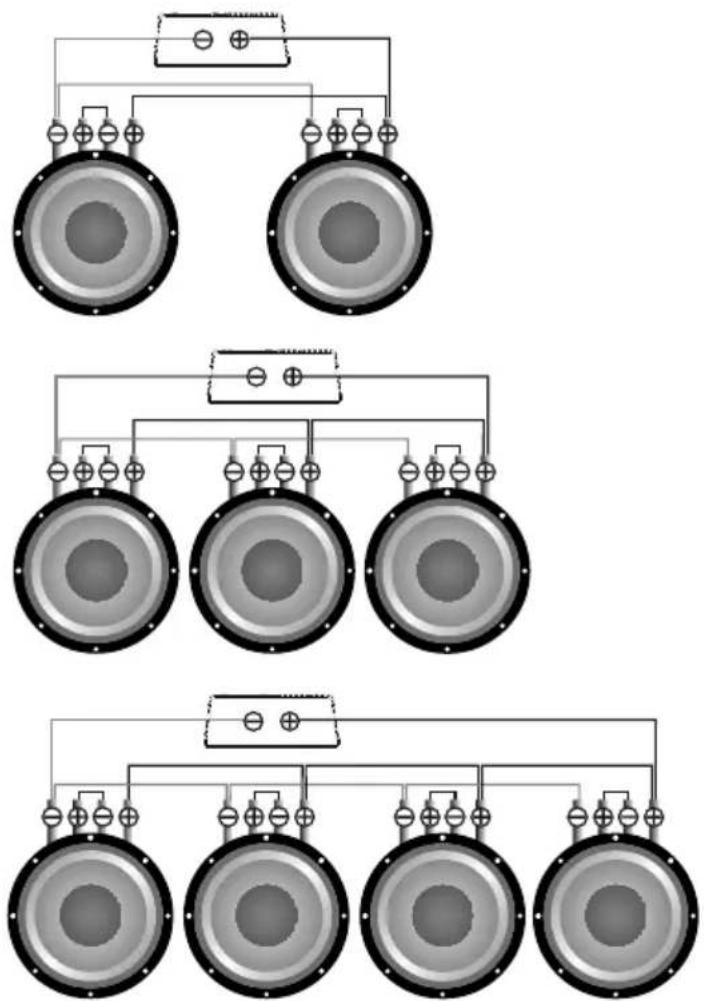
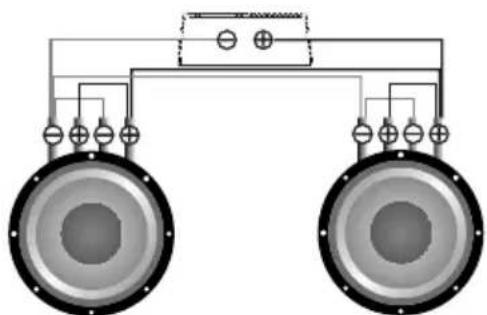
natural_image
Pure electrical circuit lines without any symbols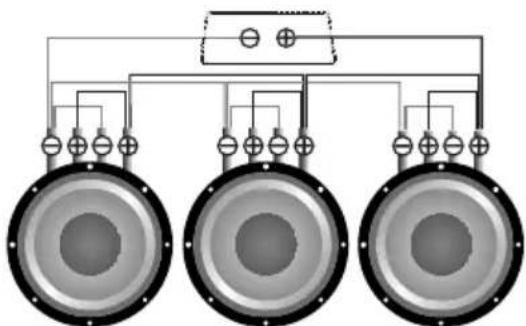
natural_image
Pure electrical circuit lines without any symbols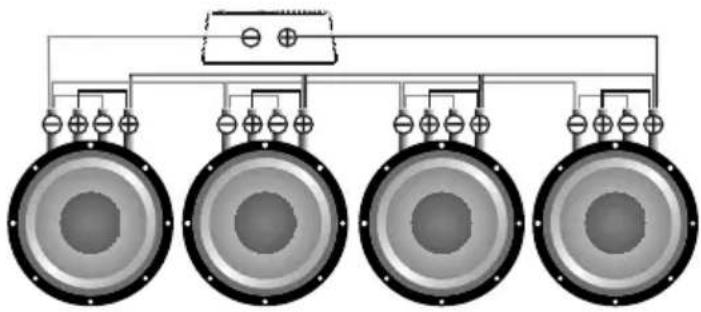
natural_image
Pure electrical circuit lines without any symbolsItems marked "crisscrossed wheeled bin" are not allowed to be disposed of together with usual household waste. These electrical and electronic products should be disposed of in special reception centers, equipped for recycling such products and components. For information about the location of the nearest disposal / recycling spot and the rules of delivery of waste please contact your local municipal office. Recycling and proper disposal helps to protect the environment and prevent harmful effects on health.




Manufacturer: Ningbo Sound Solution I&E Trading Co., Ltd
Made in China
СОДЕРЖАНИЕ
RU
natural_image
Two identical grayscale grid patterns with varying shades, no text or symbols present
natural_image
Pure black horizontal bar with no text or symbols
natural_image
Pure black rectangle with no visible text, symbols, or features
natural_image
Completely black image with no visible content, text, or symbols.
natural_image
Pure horizontal line with no text, numbers, or symbols
natural_image
Pure horizontal black line on white background (no text or symbols)
natural_image
Three identical grayscale camera lens icons arranged horizontally on a white background (no text or symbols)
natural_image
Pure black horizontal bar with no text, symbols, or markings
natural_image
Pure electrical circuit lines without any symbols| 100 | |

natural_image
Completely black image with no visible content or text.
natural_image
Pure electrical circuit lines without any symbols
| 10 | |
| 10 | 10 |
| 10 | 10 |
| 10 | 10 |
| 10 | 10 |
| 10 | 10 |
| 10 | 10 |
| 10 | 10 |
| 10 | 10 |
| 10 | 10 |
| 10 | 10 |
| 10 | 10 |
| 10 | 10 |
| 10 | 10.5 |
| 10 | 10.5 |
| 10 | 10.5 |
| 10 | 10.5 |
| 10 | 10.5 |
| 10 | 10.5 |
| 10 | 10.5 |
| 10 | 10.5 |
| 10 | 10.5 |
| 10 | 10.5 |
| 10 | 10. 5 |
| 10 | 10.5 |
| 10 | 10.5 |
| 10 | 10.5 |
| 10 | 10.5 |
| 10 | 10.5 |
| 10 | 10.5 |
| 10 | 10.5 |
| 10 | 10.5 |
| 10 | 10.5 |
| 10 | 10 . 5 |
| 10 | 10 . 5 |
| 10 | 10 . 5 |
| 10 | 10 . 5 |
| 10 | 10 . 5 |
| 10 | 10 . 5 |
| 10 | 10 . 5 |
| 10 | 10 . 5 |
| 10 | 10 . 5 |
| 10 | 10 . 25 |
| 10 | 10 . 25 |
| 10 | 10 . 25 |
| 10 | 10 . 25 |
| 10 | 10 . 25 |
| 10 | 10 . 25 |
| 10 | 10 . 25 |
| 10 | 10 . 25 |
| 10 | 10 . 25 |

natural_image
Completely black image with no visible content or text.
natural_image
Simple line drawing of a container with two small items, no text or symbols present
natural_image
Pure electrical circuit lines without any symbols
| 2017 | 2016 | |
| m | m | m |
| kA | 3.5 | 3.4 |
| mA | 3.8 | 3.9 |
| kW | 3.6 | 3.7 |
| kN | 3.5 | 3.6 |
| mL | 3.4 | 3.5 |
| kV | 3.3 | 3.4 |
| kW | 3.2 | 3.3 |
| kN | 3.1 | 3.2 |
| kW | 3.0 | 3.1 |
| kN | 2.9 | 2.8 |
| kW | 2.8 | 2.7 |
| kN | 2.7 | 2.6 |
| kW | 2.6 | 2.5 |
| kN | 2.5 | 2.4 |
| kW | 2.4 | 2.3 |
| kN | 2.3 | 2.2 |
| kW | 2.2 | 2.1 |
| kN | 2.1 | 2.0 |
| kW | 2.0 | 1.9 |
| kN | 1.9 | 1.8 |
| kW | 1.8 | 1.7 |
| kN | 1.7 | 1.6 |
| kW | 1.6 | 1.5 |
| kN | 1.5 | 1.4 |
| kW | 1.4 | 1.3 |
| kN | 1.3 | 1.2 |
| kW | 1.2 | 1.1 |
| kN | 1.1 | 1.0 |
| kW | 1.0 | 0.9 |
| kN | 0.9 | 0.8 |
| kW | 0.8 | 0.7 |
| kN | 0.7 | 0.6 |
| kW | 0.6 | 0.5 |
| kN | 0.5 | 0.4 |
| kW | 0.4 | 0.3 |
| kN | 0.3 | 0.2 |
| kW | 0.2 | 0.1 |
| kN | 0.1 | 0.0 |

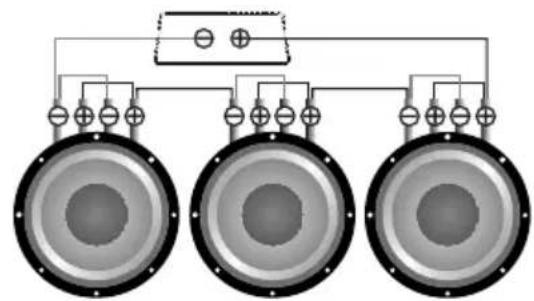
natural_image
Pure electrical circuit lines without any symbols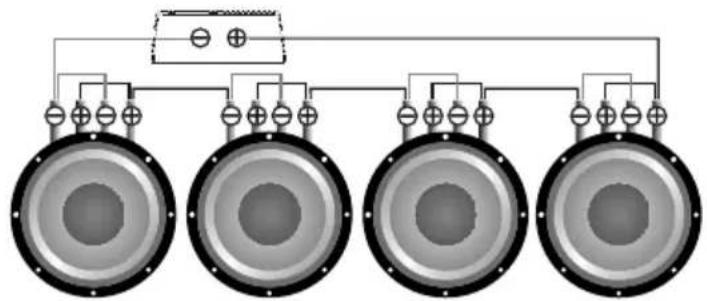
natural_image
Pure electrical circuit lines without any symbols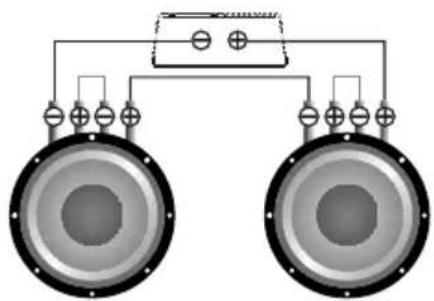
natural_image
Pure electrical circuit lines without any symbols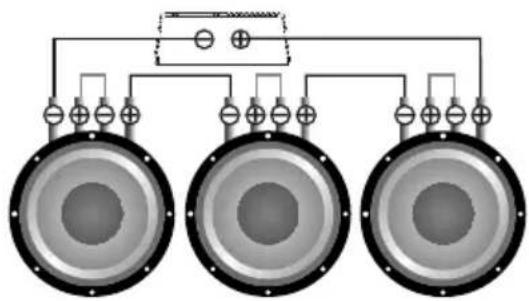
natural_image
Pure electrical circuit lines without any symbols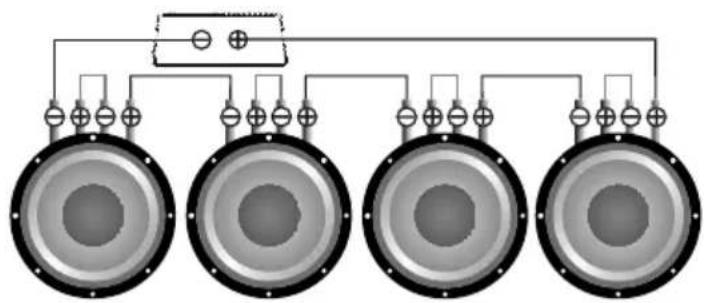
natural_image
Pure electrical circuit lines without any symbols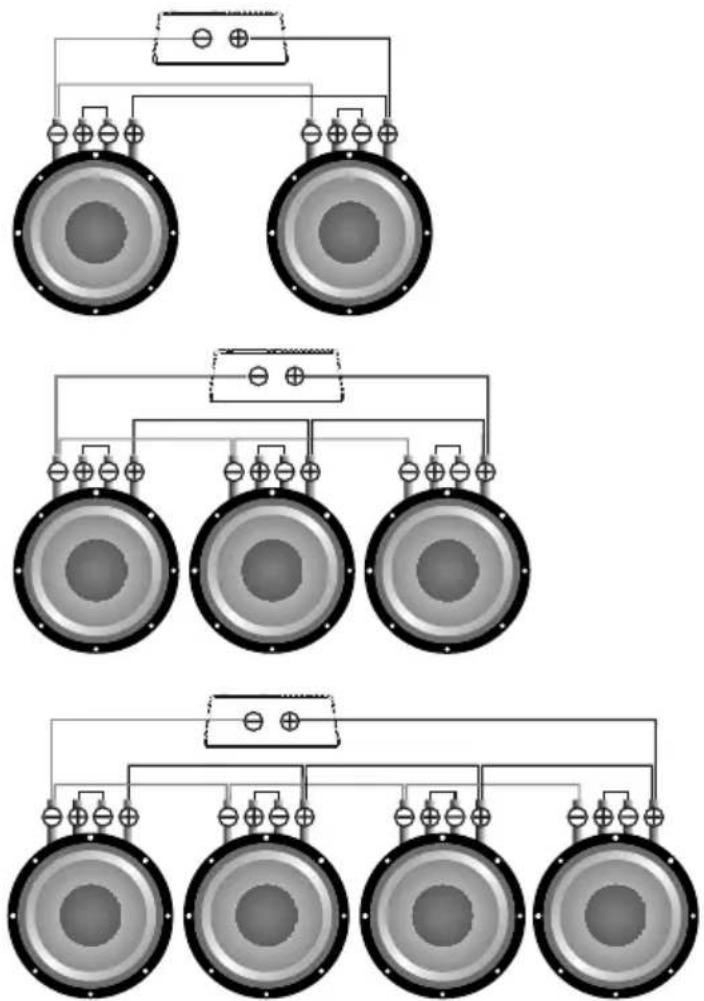
flowchart
graph TD
    A["Top Panel"] --> B["Speaker 1"]
    A --> C["Speaker 2"]
    B --> D["Switch Point 1"]
    B --> E["Switch Point 2"]
    C --> F["Switch Point 3"]
    C --> G["Switch Point 4"]
    D --> H["Switch Point 5"]
    E --> I["Switch Point 6"]
    F --> J["Switch Point 7"]
    G --> K["Switch Point 8"]
    H --> L["Output"]
    I --> M["Output"]
    J --> N["Output"]
    K --> O["Output"]
natural_image
Pure electrical circuit lines without any symbols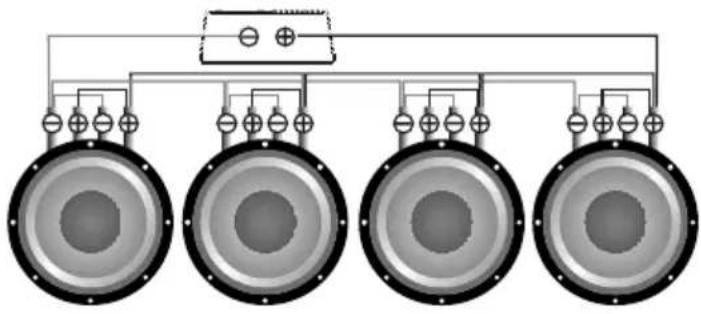
natural_image
Pure electrical circuit lines without any symbols

natural_image
Pure black horizontal bar with no text, symbols, or markings
natural_image
Solid black image with no visible content, text, or symbols.
natural_image
Completely black image with no visible content, text, or symbols.
natural_image
Completely black image with no visible content, text, or symbols.




Brand : Deaf Bonce
Model : Apocalypse Atom 1300 PRO
Category : Loudspeaker