
PJS909 - Video projector GPX - Free user manual and instructions
Find the device manual for free PJS909 GPX in PDF.


| Product Type | Video Projector |
| Brand | GPX |
| Model | PJS909 |
| Display Technology | LCD |
| Native Resolution | 800 x 480 pixels |
| Brightness | 2000 Lumens |
| Contrast Ratio | 1000:1 |
| Lamp Life | Up to 20,000 hours |
| Keystone Correction | ±15° vertical |
| Projection Size | 50 - 150 inches |
| Aspect Ratio | 4:3 / 16:9 |
| Inputs | HDMI, USB, VGA, AV |
| Audio Output | 3.5mm headphone jack |
| Built-in Speaker | 2W |
| Power Supply | AC 100-240V, 50/60Hz |
| Power Consumption | 50W |
| Dimensions (W x D x H) | 25 x 20 x 8 cm |
| Weight | 1.2 kg |
| Remote Control | Included |
| Lens Cleaning | Use a soft, dry cloth |
| Safety | Do not expose to rain or moisture |
| Spare Parts | Replacement lamp and remote available |
| Reparability | User-replaceable lamp; service by qualified personnel |
Frequently Asked Questions - PJS909 GPX
User questions about PJS909 GPX
0 question about this device. Answer the ones you know or ask your own.
Ask a new question about this device
Download the instructions for your Video projector in PDF format for free! Find your manual PJS909 - GPX and take your electronic device back in hand. On this page are published all the documents necessary for the use of your device. PJS909 by GPX.
USER MANUAL PJS909 GPX
natural_image
Abstract geometric line drawing with layered rectangles and vertical supports (no text or symbols)INDOOR/OUTDOOR
PROJECTOR SCREEN
User's Guide for Model PJS909-01
For the most up-to-date version of this User's Guide, go to www.gpx.com
Please read through this user guide before utilizing the screen.
Correct usage and maintenance will ensure a long product life.
Care & User Instructions
- Please be sure to distinguish between the front and back of the screen fabric when setting up the projection screen. CineWhite™(front projection) has a black backing and Wraith Veil (rear projection) is labeled front, back.
- Dust, dirt and scratches on the projection surface will affect the picture quality, please take note of the
points below to prevent that from occurring:
-
Do not touch the projection surface with your hands
-
Do not write or draw on the projection surface
-
Do not use fingers or sharp objects to point on the projection surface; this will damage the screen
material.
-
Use a soft-damp cloth to clean the projection surface; do not use chemical cleaning agents or alcohol.
-
Use clean water when dampening the cleaning cloth and do not rub against the material to clean it.
• After using the screen, disassemble it and store it in the carrying bag provided.
• To avoid damage and injury, the screen should only be operated by adults.
Product Description
Design: The aluminum frame is designed to be light weight and easily operated making it easy to carry, assemble and disassemble.
Screen Fabric: The screen fabric is attached to the rectangular frame and held in place by several press studs, which ensure and evenly stretched and flat surface. The CineWhite™ (front projection) and WraithVeil (rear projection) screen materials are durable and can be folded many times without causing damage or distortion to the surface.
Parts Diagram
| A. Folding frame x 1 | B. Left and right folding legs x 2 | C. Screen material bag x 1 | |
| D. Projection screen material x 1 | E. Knob screw x 2 | F. Eye bolt x 2 | |
| G. Rope x 2 | H. Carrying Bag x 1 | I. Stake x 4 |
Note: The parts list above is subject to change without notice.
Correct usage of the projection screen will ensure better viewing results.
For front projection, assemble and view the screen as indicated in Fig. 1
For rear projection, assemble and view the screen as indicated in Fig. 2

Frame Assembly and Screen Material Attachment
- Take the folding frame (A) out of the carrying bag (H) and place it on a flat surface. Unfold the longer sections first as shown in Fig. 3-4.

- Unfold the frame until the latch on the hinge "clicks" into place. Repeat the procedure for the shorter sections. (Fig. 5-6)

- Make sure all 4 corners of the frame are at a 90^ angle and the hinged support bar is straight and not bending. (Fig. 7-9)


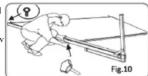
- Insert the frame legs (B) into the openings located at the left and right bottom sides of the folding frame (A). Secure them by fastening the knob screw (E) into the adjacent hole. Next, screw the eye bolts (F) into the openings located at the top of the frame (Fig. 10).
- Take the screen material (D) out of the screen material bag (C) and align the corners of the screen material with the inside corners of the frame. Unfold as shown in the diagram (Fig. 11-12)


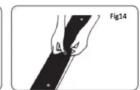
- Once the screen material (D) is fully extended, secure the material by snapping the buttons onto the frame studs as shown in Fig. 13-15. Fasten the buttons in the following order AB→CD→EF→GH.


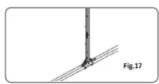
- Tie 2 pieces of rope (1 on the left and 1 on the right) to the eye bolts (F) that are located at the top of the frame. Next, lift the screen up while simultaneously opening the frame legs. Two people are needed for this step. Fig. 16-17

- To secure the frame, place a stake (I) into each hole located on the frame footing, and hammer it into the ground. Finally tie the 4 ropes (G) to the stakes to prevent the screen from tilting or failing over. As shown in fig. 18.

Screen Disassembly
-
Remove ropes (G) and stacks (I) from the ground.
-
Unlatch the hinged support bars on front side of each leg so that it is bent and fold that half of the legs up for the next step.
-
Slowly lower the screen to the ground (towards the closed legs). Two people are needed for this step.

-
Unlatch the hinged support bars and fold down other half of legs.
-
Loosen and remove the ropes, knob screws (E) and eye bolts (F) from each leg.

-
Remove the frame legs (B) from the folding frame (A).
-
Detach the screen material (D) from the folding frame (A) by carefully unsnapping each button as
shown.
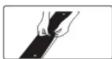
- Fold screen material (D) in half, folding the bottom of the screen towards the top. Then, fold in half again in the same way. Lastly, fold the material into thirds to condense the length, see Fig. 19-21. • If you prefer to roll the material, instead of folding into thirds, roll from one end to the other after folding in half twice.

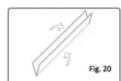

- Unlatch the hinged support bars in each corner of the folding frame (A).

- Press in the silver locking buttons, near the folding joints, and slowly gather the sides of the folding frame.

- Again, press in the silver locking buttons. Then, pick up one end of the folding frame, and walk it to the other end, folding the longer sections into thirds.

- Store the screen in the provided carrying bag (H). Be sure to place folding frame, legs, and smaller parts into the carrying bag first and place the material on top to keep material from creasing or tearing.

Brand : GPX
Model : PJS909
Category : Video projector