PC 25/1 - Stapler Power Craft - Free user manual and instructions
Find the device manual for free PC 25/1 Power Craft in PDF.


| Product Type | Heavy Duty Stapler |
| Brand | Power Craft |
| Model | PC 25/1 |
| Dimensions (H × W × D) | 200 × 80 × 250 mm (approx.) |
| Weight | 1.5 kg (approx.) |
| Power Source | Manual (hand operated) |
| Staple Size | 25/1 (25 mm leg, 1 mm wire) |
| Staple Capacity | 100 staples |
| Drive Mechanism | Lever action with spring return |
| Safety Features | Trigger lock, anti-jam mechanism |
| Main Body Material | Metal with rubberized grip |
| Applications | Upholstery, woodworking, insulation |
| Cleaning Instructions | Wipe with a dry, lint-free cloth |
| Lubrication | Occasional oiling of moving parts |
| Repairability | Replaceable anvil and spring |
| Warranty | 2 years limited manufacturer warranty |
| Country of Origin | China |
Frequently Asked Questions - PC 25/1 Power Craft
User questions about PC 25/1 Power Craft
0 question about this device. Answer the ones you know or ask your own.
Ask a new question about this device
Download the instructions for your Stapler in PDF format for free! Find your manual PC 25/1 - Power Craft and take your electronic device back in hand. On this page are published all the documents necessary for the use of your device. PC 25/1 by Power Craft.
USER MANUAL PC 25/1 Power Craft
Operating and Maintenance Instructions Pneumatic Stapler
POWER CRAFT
7
CE
natural_image
Close-up of a black industrial dazda presser with threaded component (no visible text or symbols)PC
25/1

Follow the operating instructions!

Wear safety goggles!

Wear ear muffs!
GB
Dear Customer,
Before you use the stapler for the first time, please read these instructions and note the information for the tool's operation and maintenance. Always keep this manual with the tool.
1. Technical data
Permissible working pressure max. 6 bar
Air consumption approx. ca. 011 L/min.
Staple width 5 mm
Staple length 13-40 mm
Nail length 16-50 mm
Recommended hose diameter 9 mm i ∅
●Air quality cleaned and oiled
●Compressor capacity
approx. 250 l/min. equivalent to a motor rating of 2.2 kW
●Work settings
6 bar working pressure set at the pressure reducer or filter pressure reducer
Please note:
When working with the stapler, be sure to wear the necessary protective clothing, particularly goggles.
Observe the safety regulations.
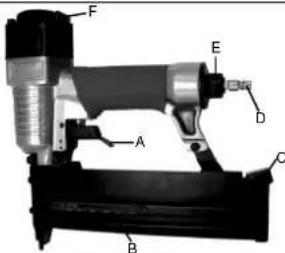
2. Illustration
Item. Description
A trigger lever
B magazine
C magazine lever
D plug-in nipple for the air supply
E air connection - will accept any standard -
male/female air connector
F Swivel air-outlet
3. Proper use
●The stapler is a pneumatic tool for DIY uses such as upholstery of furniture, fixing skirting boards, fixing wooden floor boards etc.
●The exhaust air leaves the housing to the front.
●Repairs and maintenance work are to be carried out only by authorized specialist workshops.
●Gun should operate on most compressors with the correct connector fitted.
Please note!
The power of the tool will be reduced if you use a hose that has too small an inner diameter or which is too long.
4. Safety regulations
Take suitable precautions to protect yourself and your environment from potential hazards.
●Never put the stapler to any use other than that intended.
- KEEP TOOLS AWAY FROM CHILDREN.
●Always concentrate while you work. Do not work if you are tired.
- Use only a quick-release coupling to connect up the air supply.
●It is imperative to use a pressure reducer to set the working pressure.
●Never use oxygen or combustible gases as an energy source.
●Always disconnect the tool from the air supply before carrying out any repairs or maintenance work.
GB
●Use only original replacement parts.
●Wear the necessary protective clothing, particularly goggles and safety gloves, when working with the stapler.
●Do not exceed a maximum pressure of 6 bar.
●Never point the stapler at any persons when it is connected up and loaded.
●Do not remove any protective devices or contact guards.
●Never leave the tool unattended when loaded.
●Never use defective tools.
- Contact Helpline:
0044 (0) 151 649 1500
for information on spaces.
- When the tool is disconnected it must not be under any pressure.
●Never use the tool without staples.
●Never point an operational stapler directly at yourself or at any other person.
●Whilst working with the stapler, hold it in such a way that your head and body cannot be injured in case of kickback caused by disruption of the power supply or by hard areas of the workpiece.
●Never trigger the stapler into the open air. This is important to avoid the hazards of free-flying staples and of overloading the appliance.
- For the purposes of transportation, the stapler must be disconnected from the compressed-air system, especially if you are using a ladder or are adopting an unusual posture.
●In the workplace, carry the stapler only by its
handle and ensure that the trigger is inactivated.
●Make allowance for the workplace conditions. Staples can potentially go straight through thin workpieces or they can slide off workpieces when working on comers and edges, thus putting persons at risk.
●For you own personal safety, always use suitable protective equipment such as, for example, hearing and eye protection.
5. Putting into operation
Ensure the air compressor is suitable for use with the pneumatic gun.
Ensure that the user is wearing the correct safety equipment.
To fill the magazine:
-
Press on the magazine lever and pull back the magazine shaft as far as the stop.
-
Insert the staples or nails into the magazine rail - do not overload or the magazine will not close.
-
Connect the stapler to the air supply and place in position for use and pull the trigger.
-
The trigger must be released after each shot.
-
Automatic operation - if the trigger remains depressed the staples/nails will be shot automatically when the stapler is placed against the next work area.
-
Be careful not to staple twice in the same place.
WARNING
If a staple/nail becomes stuck in the piston shaft, first disconnect the stapler and make sure it is not under any pressure before you remove the cover plate. With the magazine open and the rest of the staples/nails removed you can then take out the jammed staple. Clean the shaft if necessary and close again.
6. Maintenance and cleaning
Observance of the following maintenance instructions will ensure that this quality tool gives you years of troublefree service. Before starting to work, always check that the magazine is secure. Clean the tool thoroughly when you are finished with your work.
Regular lubrication is vital for the long-term, reliable operation of your stapler. Use only special tool oil for this purpose.
You can lubricate the tool as follows:
6.1 By mist oiler
A complete conditioning unit includes a mist oiler and is fitted to the compressor.
6.2 By hand
Feed 3-5 drops of special tool oil (as supplied with your stapler) into the air connection each time before you use your stapler.
If the tool has not been used for several days you must fee 6-10 drops of oil into the air connection before you switch on.
Keep your pneumatic tool in dry room only.
Never use on wet or damp conditions.
7. Ordering replacement parts
Please quote the following data when ordering replacement parts:
●Type of machine
●Article number of the machine
●Identification number of the machine
●Replacement part number of the part required
The warranty does not cover:
●Wearing parts
●Damage caused by an unacceptable level of
working pressure
●Damage caused by unconditioned compressed
air
●Damage caused by improper use or unauthorized tampering.
natural_image
Simple line drawing of a trash bin with two crossed lines indicating no waste or prohibition (no text or symbols)For EU countries only
Never place any electric tools in your household refuse.
To comply with European Directive 2002/96/EC concerning old electric and electronic equipment and its implementation in national laws, old electric tools have to be separated from other waste and disposed of in an environment-friendly fashion, e.g. by taking to a recycling depot.
GB Recycling alternative to the demand to return electrical devices:
As an alternative to returning the electrical device, the owner is obliged to cooperate in ensuring that the device is properly recycled if ownership is relinquished. This can also be done by handling over the used device to a returns center, which will dispose of it in accordance with national commercial and industrial waste management legislation. This does not apply to the accessories and auxiliary equipment without any electrical components which are included with the used device.
7
GUARANTEE
We provide a guarantee under the following conditions. The guarantee is valid for three years, beginning from the date of purchase. Please keep the till receipt as proof of your purchase. Within this guarantee period we undertake to either refund or replace the unit should any operational defects develop as a result of peer manufacture or material defects.
Once the guarantee period has expired, you may contact the helpline number to receive advice regarding repairs/parts. However, any parts needed after expiry of the guarantee period will be chargeable.
This guarantee is no way affects your statutory rights.
Exceptions: The guarantee does not cover natural wear and tear of the device, or for damage occurring during transport, neither does it cover damage which results from non-adherence to the operating instructions or from incorrect installation and use. The manufacturer accepts no liability for indirect consequential or material damages.
For any claims, malfunction or spare parts please contact:
Helpline No.: 0044 (0) 151 649 1500
GB Einhell UK Ltd
Unit 5 Morpeth Wharf
Twelve Quays
Birkenhead, Wirral
CH 41 1NG
Tel. 0151 6491500, Fax 0151 6491501
GB
The reprinting or reproduction by any other means, in whole or in
part, of documentation and papers accompanying products is
permitted only with the express consent of ISC GmbH.
Technical changes subject to change
EH 11/2004
Brand : Power Craft
Model : PC 25/1
Category : Stapler