
CM2016 - Weather Station ClimeMET - Free user manual and instructions
Find the device manual for free CM2016 ClimeMET in PDF.


| Product Type | Wireless Weather Station |
| Brand | ClimeMET |
| Model | CM2016 |
| Power Supply (Base Station) | 3 x AA 1.5V LR6 Alkaline batteries |
| Power Supply (Outdoor Sensor) | 2 x AA 1.5V LR6 Alkaline batteries |
| Battery Life (Base Station) | Minimum 12 months |
| Battery Life (Outdoor Sensor) | Minimum 24 months |
| Wireless Transmission Distance | Up to 100 meters (330 feet) in open field |
| Wireless Frequency | 868 MHz |
| Outdoor Temperature Measurement Range | -40°C to +65°C |
| Indoor Temperature Measurement Range | 0°C to +60°C (reading range: -20°C to +65°C) |
| Temperature Resolution | 0.1°C |
| Humidity Measurement Range | 10% to 99% |
| Humidity Resolution | 1% |
| Wind Speed Measurement Range | 0 to 180 km/h |
| Rain Volume Measurement Range | 0 to 9999 mm |
| Rain Resolution | 0.3 mm (if <1000 mm) or 1 mm (if ≥1000 mm) |
| Barometric Pressure Range | 300 to 1100 hPa |
| Barometric Pressure Accuracy | ±3 hPa (919-1100 hPa) |
| Pressure Resolution | 0.1 hPa (0.01 inHg) |
| Weather Forecast Icons | Sunny, Partly Cloudy, Cloudy, Rainy |
| Storm Warning | Yes, adjustable threshold 3-9 hPa |
| Radio Controlled Time | DCF (manual setting also available) |
| Display Backlight | Green LED |
| Mounting Options | Wall hanging or free standing with foldable stand |
| Included Accessories | Display console, thermo-hygro transmitter, rain gauge, wind cups, stainless steel mounting pole & bracket, instruction manual |
Frequently Asked Questions - CM2016 ClimeMET
User questions about CM2016 ClimeMET
0 question about this device. Answer the ones you know or ask your own.
Ask a new question about this device
Download the instructions for your Weather Station in PDF format for free! Find your manual CM2016 - ClimeMET and take your electronic device back in hand. On this page are published all the documents necessary for the use of your device. CM2016 by ClimeMET.
USER MANUAL CM2016 ClimeMET
Wireless Weather Station
CM2016
Instruction Handbook
natural_image
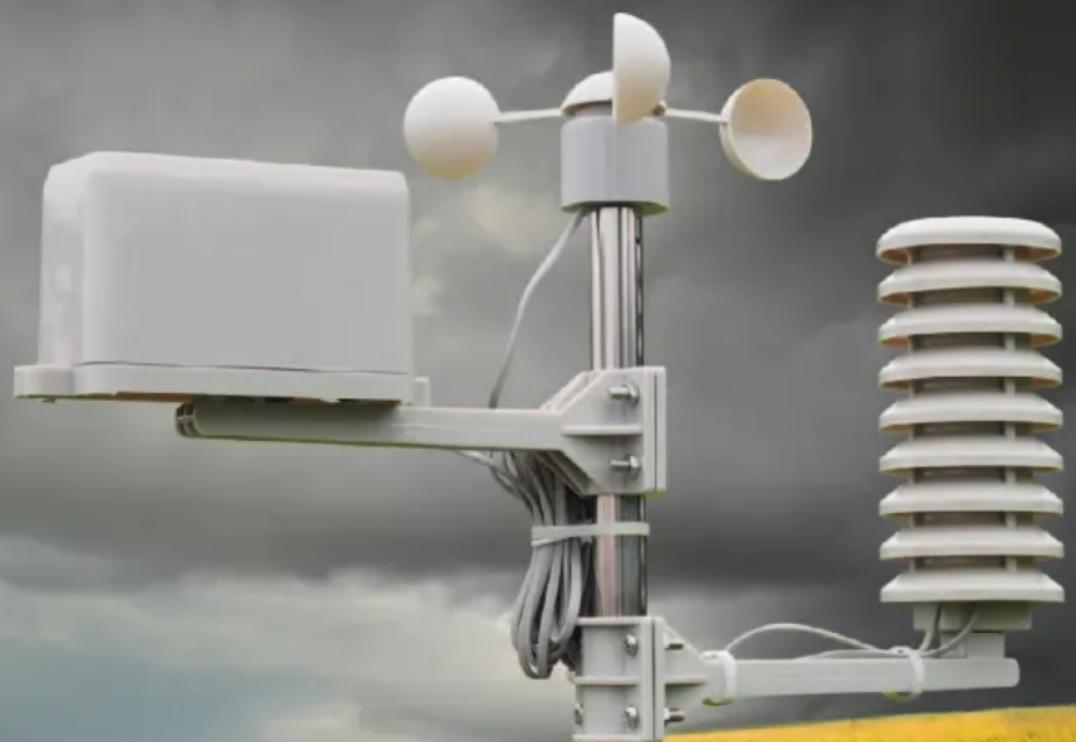
Outdoor weather monitoring equipment including a weather gauge, sensor, and insulator against a cloudy sky (no text or symbols visible)ClimeMET
| SET | * | HISTORY | ALARM | MON/MAX |
Welcome to the ClimeMET CM2016 Wireless Weather Station.
Congratulations on the purchase of your new home weather station, the latest in weather technology from ClimeMET.
This system can be set up to measure the indoor & outdoor temperature, humidity, wind speed, rainfall and more at your location. You'll be able to go back and view maximum and minimum historical records, while you can also set various alarms to let you know if and when certain conditions are met.
The CM2016 is packed with numerous features that will enable you to bring the joy of the great outdoors into your home, so please make sure to begin by reading through this manual in order to get the most out of your new weather station.
Thank you for choosing ClimeMET.
This manual should be kept in a safe place for future reference as it contains important notes on the setup and operation of your weather station.
Contents
What's in the Box? Page 3
Base Station Features ...... Page 4 & 5
Battery Installation...... Page 6 - 8
Choosing your Location...... Page 8 & 9
Mounting Page 9 & 10
LCD Overview...... Page 11 & 12
Weather Forecasting...... Page 13 & 14
Programme Mode Page 14
Quick Display Mode Page 15
Setting Modes....Pages 15 & 16
History Modes...... Pages 16
Alarm Modes Page 16 - 18
Minimum & Maximum Mode ...... Page 19
Maintenance & Troubleshooting...... Pages 20 & 21
Weather Station Specifications...... Page 22
What's in the Box?
CM2016 Display Console
CM2016 Thermo-Hygro Transmitter
CM2016 Rain Gauge
CM2016 Wind Cups
Stainless Steel Mounting Pole & Bracket
Operating Instructions
You May Also Need:
A suitable mounting pole, such as the ClimeMET Installation Kit
Phillips Screwdriver
A compass to orient the sensor suite
3 x AA 1.5V LR6 Alkaline batteries for use with the Display Console
2 x AA 1.5V LR6 Alkaline batteries for use with the Thermo-Hygro Sensor

Please help in the preservation of the environment and return used batteries to an authorized depot.
All rights reserved. This handbook must not be reproduced in any form, even in excerpts, or duplicated or processed using electronic, mechanical or chemical procedures without written permission of the publisher.
Base Station Features
The received data is continuously updated to bring you the latest weather information on the base station's LCD. The outdoor thermo-hygro sensor is the main data communication unit since both the wind and rain sensors are connected to the thermo-hygro sensor for operating power and rely on it to communicate to the base station. Weather data sent from the thermo-hygro sensor is transmitted wirelessly to the base station.
- Indoor and outdoor temperature displayed in degrees Fahrenheit or Celsius (user selectable)
- Indoor and outdoor relative humidity displays
- Barometric pressure reading in inHg or hPa; absolute or relative (user selectable)
- Detailed display of rainfall data in 1 hour, 24 hours, one week, one month and total since last reset (user selectable in mm or inch)
• Wind speed in mph, km/h, m/s, knots or Beaufort (user selectable)
• Wind chill temperature display
- Dew point temperature display
- Weather forecast display by weather icons (sunny, cloudy, rainy)
- Weather forecast tendency arrow
- Storm warning alarm
- Display of extensive weather data, in all cases with programmable alarm functions for certain weather conditions as well as records of all minimum and maximum values along with time and date of their recordings
- Green LED backlit screen
- DCF Radio controlled time and date with manual setting option
• 12 or 24 hour time display
- Perpetual calendar
- Time zone setting
- Automatic daylight saving time function based on German DST system (for those users using the clock outside the time zone of Germany, the DST automatic time change will be delayed or triggered earlier according to the time zone difference)
• Wall hanging or free standing
- Synchronized instant reception for outdoor weather data as well as radio controlled time signal
Base Station Features Continued
Wind Sensor Features:
The wind sensor measures wind speed and sends the data to the thermo-hygro sensor, which in turn transmits the data to the base station.
Rain Sensor Features:
The rain sensor measures the rainfall and sends the data to the thermo-hygro sensor, which in turn transmits the data to the base station. Operating power is taken from the thermo-hygro sensor by a cable connection.
Setup Guide
Battery Installation:
Setting up using batteries:

Note: To avoid operating problems, please take note of battery polarity before/when inserting any alkaline batteries. Use good quality alkaline batteries and avoid using rechargeable batteries. Please do not put the sensor close to large metal objects that may interfere with signal transmission.
1) Pull away the shower proof casing of the thermo-hygro sensor to reveal the two sockets (for the wind sensor and rain sensor).
2) Connect the wind and rain sensors to the corresponding sockets of the thermo-hygro sensor by clicking them into place. Make sure that rain and wind sockets are correctly installed when plugging these in.
3) Open the base station's battery cover located at the back of the unit and insert 3 x AA 1.5V alkaline batteries into the battery compartment and close the cover (ensuring correct polarity).
4) Open the battery cover of the thermo-hygro sensor located below the two sockets and insert 2 x AA 1.5V alkaline batteries in the correct orientation and close the cover.
Battery Installation Continued:
Every time the thermo-hygro sensor is powered up (for example after a change of batteries) the LED indicator will light-up for 4 seconds. If no LED lights up or is permanently on make sure the batteries are inserted correctly or a full reset has been performed. After the thermo-hygro sensor is powered up, the sensor will transmit weather data for 24 seconds and then the sensor will start radio controlled time reception. During the Radio Controlled Clock time reception period (maximum 5 minutes) no weather data will be transmitted. The LED indicator will blink 5 times once the RCC signal is synchronized and the LED indicator will not light during any RCC reception routines thereafter. A regular radio frequency link will be established once RCC reception routine is finished.
When the base station is powered up, a short beep will sound and all LCD segments will light up for about 3 seconds before it enters into initiation mode to learn the sensors security code.
Note: DO NOT PRESS ANY KEY during the first 10 minutes after setup or before radio controlled time is displayed on the receiver. After both outdoor weather data and radio controlled time are displayed you can place your remote sensors outdoors and set your time (if no RCC reception is possible). If there is no temperature reading showing on the indoor station, make sure the units are within range of each other or repeat the battery installation procedure. If a key is pressed before the weather station receives the temperature signal, you will need to follow the battery installation procedure again.
After removing the batteries please wait a minimum of 10 seconds before reinserting the battery again to allow for a proper reset for both transmitter and receiver.
If the transmitter battery is changed the base station will be resynchronized to the transmitter again within the next 3 hours. If you want to shorten this time re-install the batteries in the base station so that it can detect the new signal right away; please note in doing this the previous weather data and alarm value settings in the base station will be lost.
Battery Installation Continued:
Note for Radio Controlled Time DCF:
The time and date display is based on the signal provided by a highly accurate government operated atomic clock. The outdoor sensor will continue to scan for the radio controlled time signal each day despite it being manually set. If reception has been unsuccessful, then the radio controlled time icon will not appear but reception will still be attempted continually. If reception has been successful, the received time and date will overwrite the manually set time and date.
If your time zone is not at UTC+1:00, then manually set the time zone so that your clock time will be updated correctly after radio controlled time is received.
Choosing Your Location
The ClimeMET CM2016 uses a fixed sensor-suite, which ensures that the system is straightforward to install and requires low maintenance. As all of the sensors are part of one unit, choosing the location to install the system can have a significant impact on some of the parameters that the station will measure. It generally won't be possible to attain a scientific-standard installation with a fixed sensor-suite, so you may want to compromise depending on which readings are of most-interest. Please consider the following:
- Air Temperature is typically measured at 1 to 1.5 Metres above ground level. The shield covering the temperature sensor ensures that the sensor itself is shaded and ventilated, which will maintain the accuracy of the temperature readings. A general rule for achieving the best accuracy is keeping the station at twice the distance of any nearby object's height, so for example 20ft away from a 10ft tree.
- Rainfall is normally measured at around 30cm above ground level. At elevated heights, higher-wind speeds will have an effect on the catchment of rainfall so readings may be reduced. Further down the line, the rain collector may also need to be cleared if any leaves or debris create a blockage, so it's worth considering the accessibility of the station beforehand.
Choosing Your Location Continued
The optimal height for wind speed measurements is around 10 metres above ground. This will typically not be possible for residential installations, so it's often advised to mount alongside a chimney or existing mast if available. If doing so, try to have a clearance of at least a metre in height between the weather station and roof line.
Mounting
1) Base station
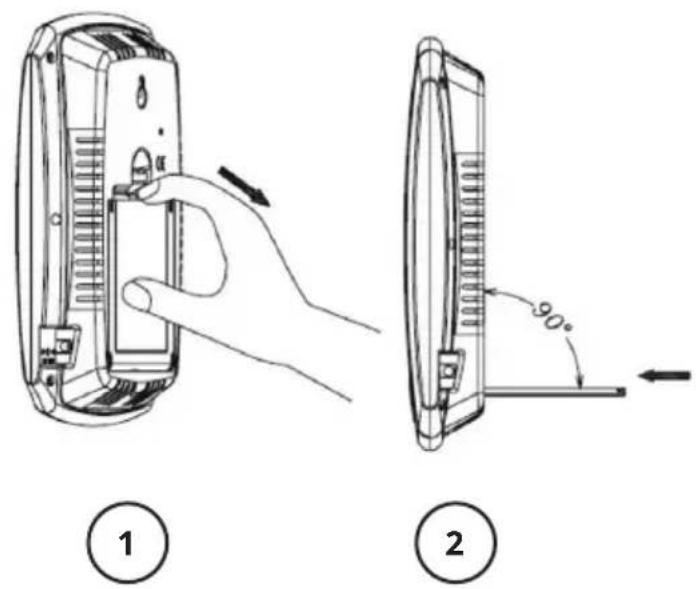
With a foldable stand at the back of the unit, the base station can be placed onto any flat surface or wall mounted at the desired location by using the hanging holes at the back of the unit. To use the table mount simply pull the plastic stand down and push it firmly in towards the back of the station until you hear a click, see diagram 2e for further details. It is important to check that outdoor sensor data can be received before permanently mounting any of the units.
2) Remote sensor
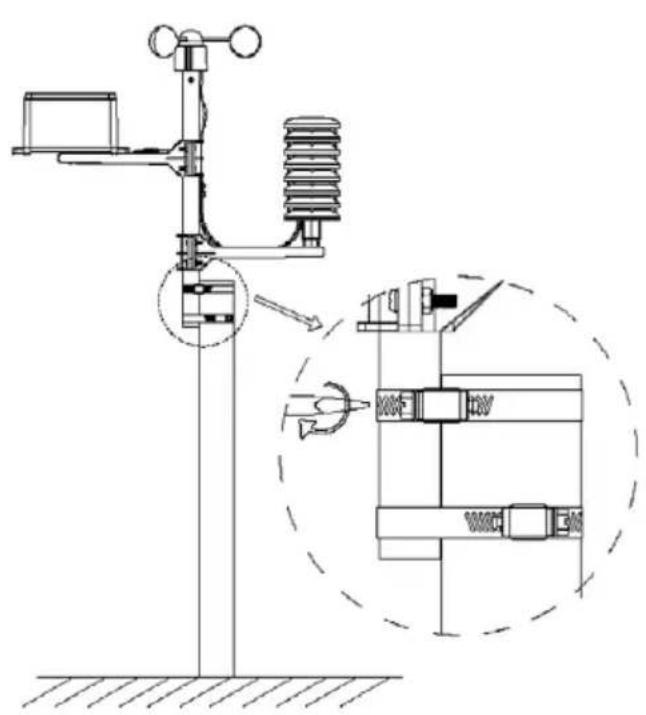
For accurate results, the remote sensor mast should be securely mounted onto a horizontal surface and in an open area away from trees or other coverings where rainfall or wind speed may be reduced causing inaccurate readings. Please see notes on choosing your location for further information.
2a) Mounting the wind sensor onto a mast
Firstly, check that the wind-cups can rotate freely before fixing the unit. The wind sensor should now be mounted using the screw onto a mast provided to allow the wind to travel around the sensor unhindered from all directions.

natural_image
Technical line drawing of a mechanical assembly with two circular components and a central component (no text or symbols)Front Back

Mounting Continued
2b) Mounting the rain sensor

2c) Mounting the thermo-hygro sensor

2d) Fix the whole set to a pole with the two adjustable clips
natural_image
Technical line drawing of a weather monitoring instrument with a magnified inset showing internal components (no text or labels)2e) Pull out the board hinge and push in until this clicks into place.
Once the wind sensor and rain sensor are fixed onto the mast, connect the cable to the corresponding thermo-hygro sensor socket.
LCD Overview
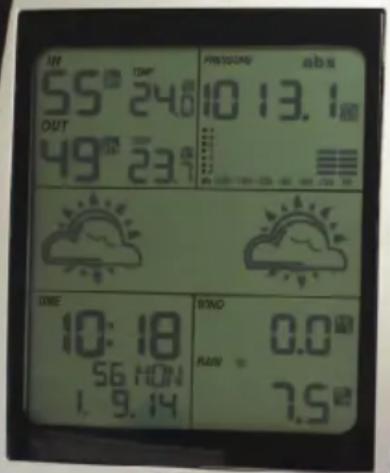
The following illustration shows the full segments of the LCD for description purposes only and will not appear like this during the normal operation and use.

other
| Measurement | Value | | :--- | :--- | | 1. IN HI AL LO AL RX | 88.0 | | 2. TEMPERATURE REL abs HI AL LO AL | 188.8 | | 3. OUT HI AL LO AL TX WIND CHILL TEMP DEW POINT | 88.0 | | 4. MAX mem min mem | max mem min mem |LCD Overview Continued
- Indoor temperature and humidity low alarm and high alarm
- Temperature display unit
- General indoor alarm icon
- Indoor humidity display
- Indoor temperature display
- Outdoor transmitter low battery indicator
- Outdoor temperature and humidity low alarm and high alarm
- General outdoor alarm icon
- Outdoor humidity display
- Outdoor temperature, Wind chill and dew point temperature display
- Weather forecast icon
- Time Alarm on indicator
- Time
- Day of week/ time zone / history
- Radio controlled time version DCF
- Radio controlled time reception icon
- Date
- Rain display
- Rainfall display unit (mm/in)
- Rainfall alarm on indicator
- Rainfall 1h, 24h, week, month or total hour
- Wind speed display unit (m/s, km/h, knots, chill mph, bft)
- Wind display
- Wind alarm on indicator
- Wind speed high alarm
- Weather tendency indicator
- MIN/MAX information
- Pressure with 24 hour history graph
- Pressure display unit (inHg or hPa)
- Pressure unit (relative or absolute)
- Pressure alarm on indicator
- Pressure low alarm and high alarm
Weather Forecasting

Sunny Partly Cloudy Cloudy Rainy
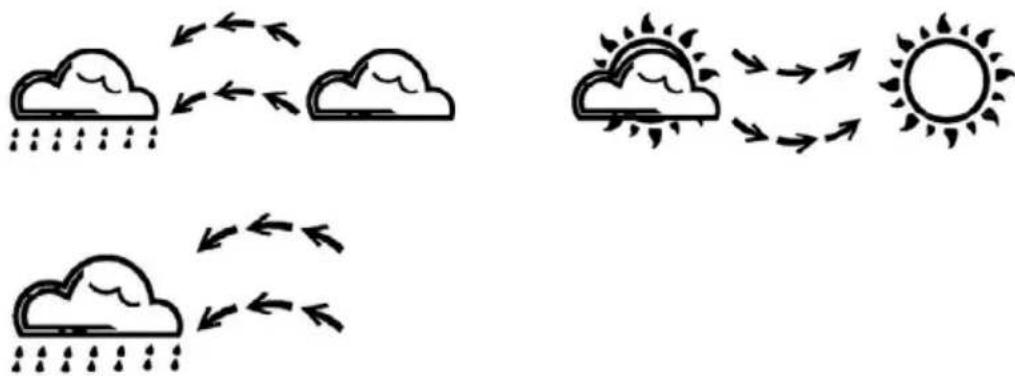
The four weather icons - 'Sunny', 'Partly Cloudy', 'Cloudy' and 'Rainy' represent a generalised forecasting of the forthcoming weather conditions. For every sudden or significant change in air pressure the weather icons will update accordingly to indicate this development.
Weather Forecast Tendency Indicator:
The weather tendency indicator arrow is located between the weather icons to show the air pressure tendency, providing a forecast of the forthcoming weather through the increase and decrease of air pressure. The right-facing arrow means that the air pressure is increasing and the weather is expected to become better, whereas the left-facing arrow means that the air pressure is decreasing and the weather is expected to become worse.
The weather forecast icon changes in accordance with the relationship between current relative pressure and the pressure change within the last twelve hours. When the weather is changing the weather tendency indicator (animated arrows) will be flashing - if the weather conditions have steadied after three hours the arrows will stay fixed to represent stability.
Examples of changing weather icons:
Weather Forecasting Continued
Storm warning indicator:
The storm threshold can be set to suit the user's requirement for storm forecasting from 3-9hPa (default 4hPa). When there is a fall in pressure over 3 hours the storm forecasting will be activated - the clouds/rain icon and tendency arrows will flash for 3 hours indicating this.
Notes to pressure sensitivity setting for weather forecasting:
The pressure threshold can be set to suit the user's requirement for weather forecasting from 2-4hPa (default 2hPa). Areas that experience frequent changes in air pressure require a higher setting than an area where the air pressure is more stable. For example, if 4hPa is selected there must be a fall or rise in air pressure of at least 4hPa before the weather station will register this as a change in weather.
Program Mode
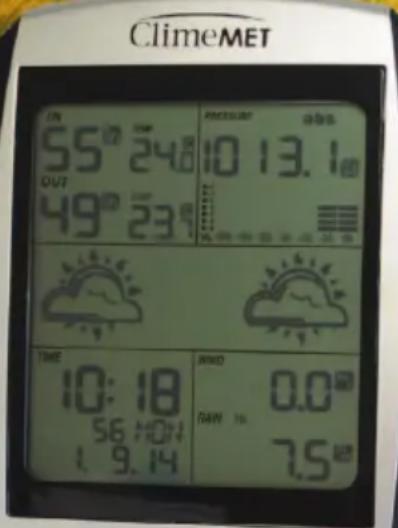
The base station has five keys for easy usage: 'SET', '+', 'ALARM', 'HISTORY' and 'MIN/MAX'.
There are also five program modes available:
Quick Display Mode, Setting Mode, Alarm mode, History Mode and Min/Max Mode.
The program mode can be exited at any time by either pressing the HISTORY key or waiting for the 30-second time-out to take effect.
Quick Display Mode
- While in Normal Mode, press the SET key to enter the Quick Display Mode as follows:
- Outdoor Temperature/Wind Chill/Dew Point (pressing the + key or MIN/MAX key shifts the display between outdoor temperature, wind chill and dew point).
- Absolute pressure/ Relative pressure (pressing the + key or MIN/MAX key shifts the display between the absolute pressure and relative pressure).
- Wind speed/ Gust speed (pressing the + key or MIN/MAX key shifts the display between the wind speed and gust speed).
- 1 hour/24 hour/week/month/total rainfall quantity (pressing the + key or MIN/MAX key shifts the display between the selectable rainfall quantities), while displaying the total rainfall quantity, pressing the SET key for two seconds will reset the rainfall total value to zero and time recording to the current time.
- Press the SET key to accept the change and advance to the next display mode. Continue to press the SET key to toggle through the display mode until returning to normal Mode.
Setting Modes
- Press the SET key for 3 seconds to enter the normal setting mode.
-
Press the SET key to select the following setting in sequence:
-
Time zone setting
- 12/24 hour format
- Manual time setting (hours/minutes)
- Calendar setting (year/month/day)
- Temperature display in Celsius or Fahrenheit
- Air pressure display in hPa or inHg
- Relative pressure setting from 919.0hPa to 1080.0hPa (default 1013.2hPa)
- Pressure threshold setting (default 2hPa)
- Storm threshold setting (default 4hPa)
- Wind speed and gust in km/h, mph, m/s, knots, bf
- Rainfall display in mm or inch
Setting Modes Continued
- In the setting modes, press the + key or MIN/MAX key to select the units or scroll through the values. Holding the + key or MIN/MAX key for 3 seconds will increase/decrease digits in large steps.
- Press the HISTORY key or leave the console idle for 10 seconds to return to normal mode.
Please note: first set the units before changing the value. When changing the measuring units, the previous value will be changed according to the new units being used. However, this may cause resolution loops due to the calculation algorithm of the station.
History Modes
- While in normal mode, press the HISTORY key to enter History mode.
- In History mode, pressing the + key allows you to view the record of the last 24 hours at increments of 3 hours.
- Press the HISTORY key or leave the console idle for 10 seconds to return to normal mode.
Alarm Modes
- While in normal mode, press the ALARM key to enter High Alarm mode. Pressing the ALARM key again enters Low Alarm mode.
Please note: after initially pressing the ALARM key the display will be refreshed to show current high and low values for alarms already activated. If no alarms are activated values will display '---' instead.
- Press the ALARM key again to return to normal mode.
Alarm Modes Continued
- In the High Alarm mode, press the SET key to select the following alarm modes:
- Indoor humidity high alarm
- Indoor temperature high alarm
- Outdoor humidity high alarm
- Outdoor temperature high alarm
- Wind chill high alarm
- Dew point high alarm
- Pressure high alarm
- Wind speed high alarm
- Gust speed high alarm
- 1 hour rain high alarm
-
24 hour rain high alarm
-
Time alarm (in Low Alarm setting mode, the same time alarm setting sequence will repeat)
- In the Low Alarm mode, press the SET key to select the following modes:
- Indoor humidity low alarm
- Indoor temperature low alarm
- Outdoor humidity low alarm
- Outdoor temperature low alarm
- Wind chill low alarm
- Dew point low alarm
-
Pressure low alarm
-
Time alarm (in High Alarm setting mode, the same time alarm setting sequence will repeat)
-
In the alarm mode press the + key to change and scroll the value upward or the MIN/MAX key to move downward. Hold either key for 3 seconds to change the value in a large step. Press the ALARM key to choose whether the alarm is on or off (if the alarm is enabled the speaker icon on the LCD will be turned on indicating an alarm is active). Press the SET key to toggle through each alarm mode until eventually returning to the normal display mode.
- Press the HISTORY key or leave the console idle for 30 seconds to return to normal mode.
Alarm Modes Continued
Canceling the Temperature Alarm While Sounding:
a. When a set weather alarm condition has been triggered, that particular alarm will sound for 120 seconds and flash until the weather condition doesn't meet the user set level. Press any key to mute the alarm. If the weather alarm condition is activated again within 10 minutes the alarm will not sound but will continue to flash until weather conditions have become steady. This feature is useful to avoid repeated triggering of the same alarm value.
b. The alarm will reactivate automatically once the value has fallen below the set value.
The Outdoor Weather Alarm:
When a set weather condition has been triggered it will flash on the LCD display alongside the alarm icon. For example, in outdoor display mode, when a dew point high alarm is triggered the Dew Point icon will flash along with the general and high alarm icons alerting you that the source of the alarm is the dew point.
Temperature display mode

Dew point high alarm was triggered

Min/Max Mode
- While in normal mode press the MIN/MAX key to enter maximum mode.
- Press MIN/MAX again to enter the minimum mode.
- Press MIN/MAX once again to return to normal mode.
-
In the maximum mode press the + key to display the following maximum values together with the time and date these values were recorded. If you press SET in each individual value it will be reset to the current reading with the present time and date.
-
Indoor humidity maximum
- Indoor temperature maximum
- Outdoor humidity maximum
- Outdoor temperature maximum
- Wind chill temperature maximum
- Dew point temperature maximum
- Pressure maximum
- Wind speed maximum
- Gust speed maximum
- 1 hour rain maximum
- 24 hour rain maximum
- Week rainfall maximum
- Month rainfall maximum
In the minimum reading mode, press the + key to display the following minimum values together with the time and date these values were recorded. If you press SET while in each individual value it will be reset to the current reading with the present time and date.
- Indoor humidity minimum
- Indoor temperature minimum
- Outdoor humidity minimum
- Outdoor temperature minimum
- Wind chill temperature minimum
- Dew point temperature minimum
- Pressure minimum
- Press the HISTORY key or leave the console idle for 10 seconds to return to normal mode.
Maintenance and Troubleshooting
The ClimeMET CM2016 has been designed with dependability in mind and will require minimal attention once set up. After the system has been installed, you should find that the only maintenance required will be an occasional check and clean of the sensors in order to ensure they provide you with years of service. This weather station uses 2 x AA batteries to power the outdoor sensor-suite - it will depend on the quality of the batteries used, but we'd normally expect these to last for around 12 months. At the same time you access the station to change the batteries, you may want to clean the sensors and carry out some brief checks.
If you are experiencing difficulties with your weather station, please see the below guide for further information.
Display Console:
Outdoor data is not displaying and dashes are shown instead
Ensure that the outdoor sensor suite is within range of the display console – the maximum range is 100 metres, or just over 300 feet. Please note that obstacles such as trees/walls/etc will have an impact on this communication range, so try to make sure the line of sight is as clear as possible.
Check that the batteries inside the sensor suite are not depleted – insert new batteries if you cannot be sure.
Indoor Temperature and Humidity:
Temperature readings are too high/low
If the indoor temperature readings appear to be high, make sure that the display console has not been placed in a location where it will be in direct sunlight during the day. This can cause the plastic casing to heat up which takes some time to cool down again, which may ultimately result in false readings. If the indoor temperature readings seem too low, check that the display console has not been mounted against an interior wall that cools down significantly throughout the day, as this could be affecting the readings measured. It's also worth checking that the console is not in the path of any air-conditioning units or located near an air vent. Similarly, make sure the outdoor sensor suite is not placed too close to surfaces that will radiate heat or affect nearby temperatures in a similar manner.
Maintenance and Troubleshooting
Dew Point:
Dew Point figure appears to be incorrect
Dew point measurements depend upon the outdoor temperature and humidity figures, so it's vital to make sure that these readings are correct in order to calculate the dew point reading.
Wind:
Wind readings appear to be lower than expected
Wind readings can be significantly affected by the location of the system. Make sure that there is nothing in the surrounding area that could be shielding the CM2016 from the effects of the wind as this will reduce the strength of the readings received. Please remember that mounting the station a few feet higher or lower can alter the readings considerably.
Wind Chill:
Wind chill figure appears to be incorrect
Wind chill readings are reliant upon the wind speed and outdoor temperature measurements. If your wind chill readings appear to be inaccurate, please check these readings.
Specification
Outdoor Data
| Transmission distance in open field: 100 metres | |
| Frequency: | 868MHz |
| Temperature range: -40°C to +65°C (show OFL if outside range) | |
| Resolution: 0.1°C | |
| Measuring range rel. humidity: 10%~99% | |
| Rain volume display: 0 - 9999mm (show OFL if outside range) | |
| Resolution: 0.3mm (if rain volume < 1000mm) or 1mm (if rain volume > 1000mm) | |
| Wind speed: 0~180km/h (show OFL if outside range) | |
| Measuring interval thermo-hygro sensor: | 48 seconds |
| Water proof level: IPX3 | |
Indoor Data
| Pressure / temperature: 48 seconds | |
| Indoor temperature measure range: 0°C to +60°C (reading range: -20°C to +65°C) | |
| Resolution: | 0.1°C |
| Measuring range rel. humidity: 10%~99% | |
| Resolution: | 1% |
| Measuring range air pressure: 300-1100hPa (8.85-32.5inHg) | |
| Accuracy: +/-3hpa under 919-1100hPa | |
| Resolution: 0.1hPa (0.01inHg) | |
| Alarm duration: | 120 sec |
Power Consumption
| Base station: | 3XAA 1.5V LR6 Alkaline batteries |
| Remote sensor: | 2xAA 1.5V LR6 Alkaline batteries |
| Battery life: | Minimum 12 months for base stationMinimum 24 months for thermo-hygro sensor |
Where outdoor temperature is lower than -20^ , make sure that the proper type of batteries are to be used to assure that the device can get enough power to properly maintain its functions. With some batteries the ability is greatly reduced in outdoor temperatures of lower than -20^ .
ClimeMET
www.ClimeMET.com

| SET | * | HISTORY | ALARM | MIN/MAY |


- Instruction Handbook
- Welcome to the ClimeMET CM2016 Wireless Weather Station.
- Contents
- What's in the Box?
- You May Also Need:
- Please help in the preservation of the environment and return used batteries to an authorized depot.
- Base Station Features
- Base Station Features Continued
- Wind Sensor Features:
- Rain Sensor Features:
- Setup Guide
- Battery Installation:
- Battery Installation Continued:
- After removing the batteries please wait a minimum of 10 seconds before reinserting the battery again to allow for a proper reset for both transmitter and receiver.
- Note for Radio Controlled Time DCF:
- Choosing Your Location
- Choosing Your Location Continued
- Mounting
- 1) Base station
- 2) Remote sensor
- 2a) Mounting the wind sensor onto a mast
- Mounting Continued
- LCD Overview
- LCD Overview Continued
- Weather Forecasting
- Weather Forecast Tendency Indicator:
- Examples of changing weather icons:
- Weather Forecasting Continued
- Storm warning indicator:
- Notes to pressure sensitivity setting for weather forecasting:
- Program Mode
- Quick Display Mode
- Setting Modes
- Setting Modes Continued
- History Modes
- Alarm Modes
- Alarm Modes Continued
- Canceling the Temperature Alarm While Sounding:
- The Outdoor Weather Alarm:
- Min/Max Mode
- Maintenance and Troubleshooting
- Display Console:
- Outdoor data is not displaying and dashes are shown instead
- Indoor Temperature and Humidity:
- Temperature readings are too high/low
- Dew Point figure appears to be incorrect
- Wind readings appear to be lower than expected
- Wind chill figure appears to be incorrect
- Specification
- ClimeMET
Brand : ClimeMET
Model : CM2016
Category : Weather Station