CM2026 - Weather Station ClimeMET - Free user manual and instructions
Find the device manual for free CM2026 ClimeMET in PDF.


| Product Type | Weather Station |
| Brand | ClimeMET |
| Model | CM2026 |
| Dimensions (approx.) | 200 x 150 x 50 mm |
| Weight (approx.) | 0.5 kg |
| Power Supply | 2 x AAA batteries (not included) |
| Display Type | LCD screen |
| Main Functions | Indoor/outdoor temperature, humidity, barometric pressure, weather forecast, time/date, alarm |
| Outdoor Sensor Range | Up to 100 m (open area) |
| Temperature Measurement Range | Indoor: 0°C to 50°C; Outdoor: -20°C to 60°C |
| Humidity Measurement Range | 20% to 95% RH |
| Barometric Pressure Range | 800 to 1100 hPa |
| Weather Forecast Icons | Sunny, partly cloudy, cloudy, rainy, stormy |
| Mounting Options | Table stand or wall mount |
| Maintenance | Clean with a soft, dry cloth. Avoid water and solvents. |
| Safety Precautions | Do not expose to extreme temperatures or moisture. Keep away from children. |
| Spare Parts / Repairability | Batteries and outdoor sensor are replaceable. Other parts not user-serviceable. |
| General Information | User manual available for free download in PDF format from notice-facile.com. |
Frequently Asked Questions - CM2026 ClimeMET
User questions about CM2026 ClimeMET
0 question about this device. Answer the ones you know or ask your own.
Ask a new question about this device
Download the instructions for your Weather Station in PDF format for free! Find your manual CM2026 - ClimeMET and take your electronic device back in hand. On this page are published all the documents necessary for the use of your device. CM2026 by ClimeMET.
USER MANUAL CM2026 ClimeMET
Home Weather Station
CM2026
Instruction Handbook
natural_image
Exterior view of a weather station with visible vane, sensor, and antenna against cloudy sky (no text or symbols)ClimeMET

SET
+
HISTORY
ALARM
MIN/MAX/-
natural_image
Vertical metallic cylindrical object with four rounded rectangular cutouts, no visible text or symbolsWelcome to the ClimeMET CM2026 Home Weather Station.
Congratulations on the purchase of your new home weather station, the latest in weather technology from ClimeMET.
This system can be set up to measure the indoor & outdoor temperature, humidity, wind speed, wind direction, rainfall and more at your location. You'll be able to go back and view maximum and minimum historical records, while you can also set various alarms to let you know if and when certain conditions are met.
The CM2026 is packed with numerous features that will enable you to bring the joy of the great outdoors into your home, so please make sure to begin by reading through this manual in order to get the most out of your new weather station.
Thank you for choosing ClimeMET.
Contents
What's in the Box? Page 3
The Sensor Suite...... Page 4
The Display Console...... Page 5
Battery Installation...... Page 6 & 7
Sensor Assembly...... Pages 8 & 9
Choosing your Location...... Page 9
Console Setup...... Page 10
Programme Mode...... Page 11
Calibration Mode...... Page 11 & 12
History Mode ...... Pages 13
Alarm Mode Page 13 & 14
Minimum & Maximum Mode ...... Page 15
Factory....Pages 16
Maintenance & Troubleshooting...... Pages 16 - 19
Weather Station Specifications...... Page 20
What's in the Box?
CM2026 Display Console
CM2026 Thermo-Hygro Transmitter
CM2026 Rain Gauge
CM2026 Wind Cups & Wind Vane
Stainless Steel Mounting Bracket with Fixing Hardware
Operating Instructions
You May Also Need:
A suitable mounting pole, such as the ClimeMET Installation Kit
Phillips Screwdriver
A compass to orient the sensor suite

Please help in the preservation of the environment and return used batteries to an authorized depot.
All rights reserved. This handbook must not be reproduced in any form, even in excerpts, or duplicated or processed using electronic, mechanical or chemical procedures without written permission of the publisher.
The Sensor Suite

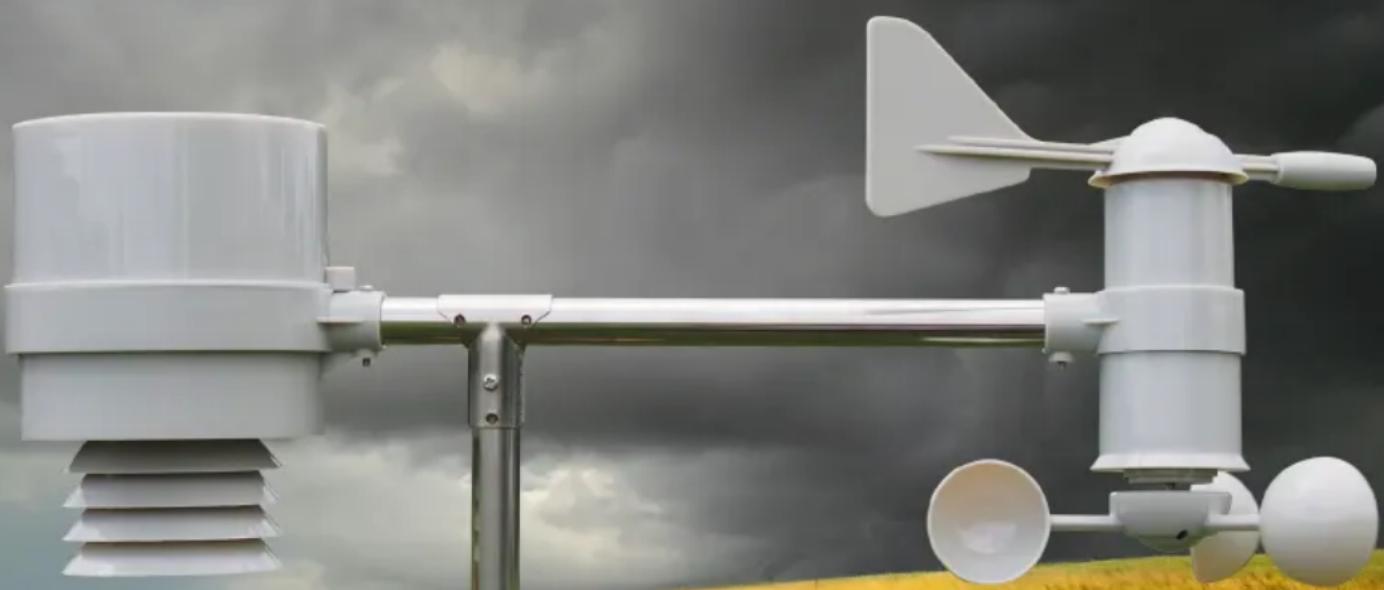
1 Thermo-Hygro Transmitter – Measures the outdoor temperature and humidity, but is also responsible for transmitting all outdoor readings to the display console.
2 Rain Collector – Self-emptying rain collector that uses a tipping-mechanism to measure rainfall.
(3) Anemometer – A set of wind cups used to measure wind speed readings.
4 Wind Vane – Rotating sensor used to measure wind direction.
5 Installation Bracket – Used to attach mounting pole for easy installation.
6 Bubble Level – To ensure that the sensor suite has been installed level. For the sake of accuracy, it's vital to ensure that the sensors have been installed evenly – make sure to check this when setting up the station.
The Display Console
The display console utilizes five keys for easy use: SET, +, HISTORY, ALARM and MIN/MAX. While in any stage of the setup menu, you can exit to the home screen at any time by simply pressing the HISTORY key, or leaving the console for 30 seconds without pressing any key.

- Time Alarm Icon
- Daylight Savings Time Icon
- Radio Controlled Clock Icon
- Weekday Display
- Date
- Wind Direction Alarm Icon
- Maximum Record Display
- Wind Direction Reading
- Minimum Record Display
- Rainfall Alarm Icon
- Indoor Temperature High/Low Alarm Icon
- Temperature Measurement Unit
- Indoor Temperature Reading
- Indoor Humidity High/Low Alarm Icon
-
Indoor Humidity Reading
-
Rainfall Measurement Unit
- Outdoor Temperature High/Low Alarm Icon
- Outdoor Temperature Reading
- Sensor Suite Reception Signal
- Outdoor Humidity Reading
- Sensor Suite - Low Battery Indicator
- Outdoor Humidity High/Low Alarm Icon
- Rainfall Reading
- Rainfall Display Selection: 1 Hour, 24 Hours, Week, Month or Total
- Wind Speed Reading
- Wind Speed Measurement Unit
- Wind Speed Alarm Icon
- Time
Installation
Battery Installation:
Inserting the batteries into the outdoor sensor suite will power up the station and activate the attached sensors.
- Locate the battery compartment underneath the Rain Collector. Turn the screw anti-clockwise to loosen the metal latch which can be moved aside to gain access to the battery compartment.

natural_image
Technical line drawing of a mechanical assembly with gears and shafts (no text or symbols)
- Carefully pull out the battery tray using the handle.

- Insert 2 x AA Alkaline batteries into the battery tray, then firmly slide the tray back into the battery compartment. Ensure that the station is powered-up by making sure that the LED next to the battery tray illuminates for 4 seconds.
Battery Installation Continued:
Now power the display console by inserting 3 x AA batteries into the battery compartment at the back of the unit. When the console initially starts up, all segments of the display will illuminate briefly to ensure the screen is functioning correctly.
Following this, the weather station will make an initial measurement and begin receiving the outdoor readings. Do not press any keys before the outdoor data is received, as this will stop the console from searching for the outdoor sensor suite and the connection will not be established. After the outdoor readings have been registered, the console will enter the normal display mode and all functions will be available. Every time there is a transmission of data between the sensor suite and the display console, the LED next to the battery compartment will flash.
The display console will then begin searching for the Radio Controlled Clock (RCC) signal in order to automatically set the time and date. Once this signal has been received, the time will automatically adjust and the RCC tower icon will be displayed on the console. If no signal is detected during the initial setup phase, or if the signal is lost for over 12 hours, the transmitter will attempt to receive this signal at 2-hour intervals until it is picked up. The best time to receive the RCC signal is during the night – normally between 0:00 and 4:00 when there is significantly less atmospheric interference.
Please note: If you change the batteries in the outdoor transmitter unit, the display console will take around three hours to receive the outdoor signal again. If you'd like to speed this synchronization process up, you can re-insert the batteries into the display console again so that the new identification code is learned straight away, but any stored weather data and alarm settings will be lost.
The ClimeMET CM2026 has a transmission range of 100 metres in an open field - please remember that any obstacles such as buildings or trees will reduce this range. Nearby electronics such as computers, radios and televisions can also interfere with the radio signal used by the station, so please keep this in mind if you encounter any problems and re-locate the system accordingly.
Sensor Assembly
Before mounting the station at your chosen location, it's worth setting up the weather station properly so that all functions can be tested prior to installation. If there are any problems during the assembly of the sensors, it may not be so easy to access the system later on.
The ClimeMET CM2026 uses a mast that will already have the majority of the sensors installed – the thermo-hygro transmitter, rain collector and wind direction sensor will already be attached. The only sensor that needs to be connected is the set of wind cups.
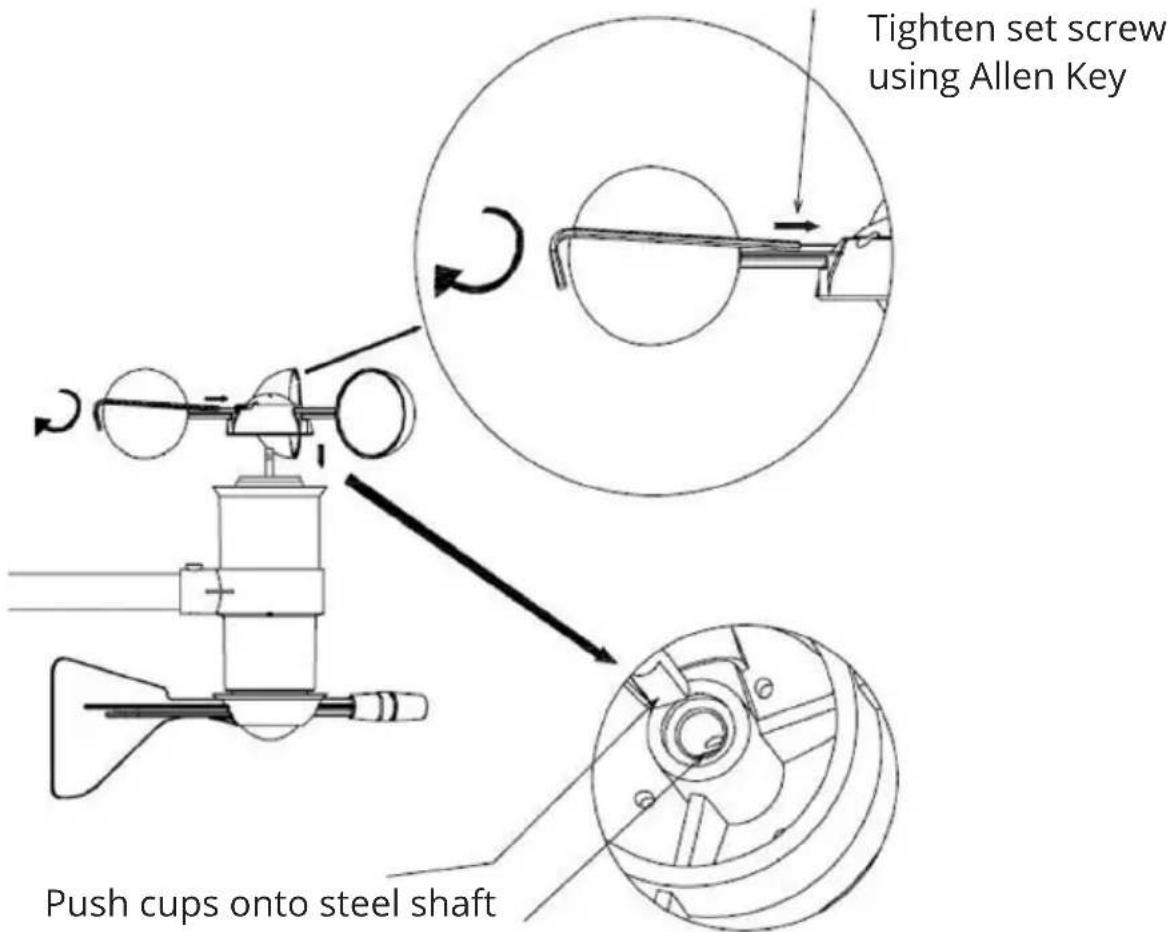
Attaching the Wind Cups:
- Push the wind cups firmly onto the steel shaft at the bottom of the anemometer unit, directly underneath the wind vane. Look closely at the shape of the shaft to be sure the cups are being attached securely.
- Using the Allen Key supplied, tighten the set screw on the side of the wind cups.
- Spin the wind cups in order to test they are connected correctly. If the wind cups rotate freely and do not 'stick', the anemometer is ready for installation.
Sensor Assembly Continued
Please note: On the edge of the wind direction sensor there are the letters N, E, S & W representing the four cardinal directions. When installing the weather station in your chosen location, it's vital to ensure that the sensor suite is properly oriented otherwise the wind direction readings will be incorrect. It's also important to make sure that the sensor suite is level – please use the bubble level to verify this.
Choosing Your Location
The ClimeMET CM2026 uses a fixed sensor-suite, which ensures that the system is straightforward to install and requires low maintenance. As all of the sensors are part of one unit, choosing the location to install the system can have a significant impact on some of the parameters that the station will measure. It generally won't be possible to attain a scientific-standard installation with a fixed sensor-suite, so you may want to compromise depending on which readings are of most-interest. Please consider the following:
Air Temperature is typically measured at 1 to 1.5 Metres above ground level. The shield covering the temperature sensor ensures that the sensor itself is shaded and ventilated, which will maintain the accuracy of the temperature readings. A general rule for achieving the best accuracy is keeping the station at twice the distance of any nearby object's height, so for example 20ft away from a 10ft tree.
- Rainfall is normally measured at around 30cm above ground level. At elevated heights, higher-wind speeds will have an effect on the catchment of rainfall so readings may be reduced. Further down the line, the rain collector may also need to be cleared if any leaves or debris create a blockage, so it's worth considering the accessibility of the station beforehand.
- The optimal height for wind speed measurements is around 10 metres above ground. This will typically not be possible for residential installations, so it's often advised to mount alongside a chimney or existing mast if available. If doing so, try to have a clearance of at least a metre in height between the weather station and roof line.
Console Setup
While on the home screen, press and hold the SET key for two seconds to enter the Setup menu. When you enter the setup menu, the time will no longer be shown on the display console and you will instead see flashing values that can be altered. To move through each different option in the setup menu, simply press the SET key. While on a section that you wish to change, use the + key to increase the values and the MIN/MAX key to decrease. Holding down either of these keys will change these values quicker. To exit the Setup menu at any time, press the HISTORY key.
The different sections of the Setup menu are as follows:
- LCD Screen Contrast - Can be changed from 0 (lighter) to 8 (darker)
- Time Zone Setting – Please note: This console receives the DCF77 Radio Signal broadcast from Frankfurt, Germany. This means that the Time Zone values are one hour ahead of regular GMT time zones. For example, when the time zone is set to '0' it will display German time as received through the DCF77 signal, so for use in the UK this would need to be set to '-1'
- 12/24 Hour Display
- Manual Time Setting (Hours/Minutes)
- Date Format - DD/MM or MM/DD
- Calendar Setting (Year/Month/Date)
- Wind Speed units – km/h, m/s, bft, mph or knots
- Wind Direction
- Rainfall Units - mm or inch
- Temperature Units – Celsius or Fahrenheit
Programme Mode
Quick Display Mode:
While on the home screen, press the SET key to enter the Quick Display mode. Pressing the SET key multiple times will scroll through the following values:
- Wind speed - Pressing the + key while viewing this figure will toggle between Wind speed and Gust speed.
- Rainfall figures - Pressing the + key will scroll through the selectable time periods of 1 hour, 24 hours, week, month and total. If you need to clear your rainfall reading, use + to scroll until you are viewing the total reading, then press and hold SET for two seconds to reset this value to zero.
- Outdoor Temperature / Wind Chill / Dew Point – Press the + key to scroll between these three measurements.
Calibration Mode
To enter the Calibration Mode, press and hold the HISTORY key for eight seconds. You can then press the SET key to scroll through each menu and press the + or MIN/MAX keys to increase or decrease the values accordingly. To exit the Calibration mode press the HISTORY key at any time.
Calibration options are as follows:
- Wind Speed Calibration (Default 1.0, adjustment range 0.75 to 1.25)
- Rainfall Data Calibration (Default 1.0, adjustment range 0.75 to 1.25)
- Historic Rainfall Calibration
- Outdoor Humidity Calibration
- Outdoor Temperature Calibration
- Indoor Humidity Calibration
- Indoor Temperature Calibration
Please take care when changing any data, as certain figures will affect other measurements calculated by your console. For example, the wind chill measurement will be worked out using a combination of the wind speed and outdoor temperature readings. Therefore, if the outdoor temperature reading is calibrated using this menu, please be wary that this would also change the calculation of the wind chill readings.
Wind Speed:
Wind speed is the parameter most-affected by the possible constraints of the installation. Ensure that the weather station isn't located close to buildings, trees or other obstructions. The wind gain multiplier can be changed to increase/decrease your wind speed readings if you can be certain they are being significantly affected by the surroundings and you have an appropriate, calibrated source to compare these to.
Rainfall:
The rain collector is calibrated to tip per 0.3mm or rainfall. If you believe this reading to be incorrect, place a 5" diameter cylindrical rain gauge next to the station at the exact same height – small rain gauges will not be comparable. With the rain gauges placed next to each other, compare the rainfall totals for three storms and develop an average based on this to determine how far off the readings are.
Temperature:
It may be possible for temperature readings to be affected when placed too close to a heat source, such as a nearby surface that radiates heat. If you need to calibrate the temperature, we'd recommend comparing this to a spirit thermometer as some digital thermometers will have their own margin of error. Comparing temperature readings to another nearby station is also not generally recommended due to discrepancies in timing, height, location and surrounding objects, as well as potential calibration errors residing in the other system. If you need to calibrate the temperature, place the ClimeMET CM2026 in a shaded, controlled environment next to a fluid thermometer and allow the sensor to stabilize for 48 hours. You can then compare the temperature reading to that of the fluid thermometer and adjust the console as necessary.
Humidity:
Humidity can be a difficult parameter to measure electronically as the reading can drift over time. Location can also have an adverse effect on humidity readings – installing above dirt as opposed to over grass, for example. Industrial systems often recalibrate humidity sensors on a yearly basis – typically using an accurate source such as a sling psychrometer.
Please remember that calibration is optional and is only recommended if you have a known calibrated-source to compare your readings against. Calibration can correct your readings against electronic variation and degradation of moving parts, which may happen over time. Do not compare the readings obtained by your ClimeMET CM2026 too closely to those found on the internet or radio – the purpose of your weather station is to measure the conditions of your own surroundings, which will vary significantly from location to location.
History Mode
While on the Home Screen, press the HISTORY key to enter the History Mode.
- While in the History Mode, press the MIN/MAX key to view records over the past 24 hours at increments of -3 hours, -6 hours, -9 hours, -12 hours, -15 hours, -18 hours, -21 hours and -24 hours.
- If you need to clear your data, press the SET key to begin the clear history procedure. The word 'CLEAR' will be flashing at the top section of the screen – simply hold the SET key for two seconds to fully clear all historic weather records.
To leave the History Menu at any time simply press the HISTORY key, or do not press any key for 30 seconds.
Alarm Mode
While on the Home Screen press the ALARM key to enter the High Alarm Mode, and press the ALARM key again to enter Low Alarm Mode. Pressing the ALARM key for a third time will return the display console to normal mode.
In the High Alarm Mode, press the SET key to select the following alarms:
- Time Alarm
- Wind Speed High Alarm (0-50 m/s)
- Gust Speed High Alarm (0-50 m/s)
- Wind Direction Alarm
- 1 Hour Rainfall High Alarm (0-999.9 mm)
- 24 Hour Rainfall High Alarm (0-999.9 mm)
- Outdoor Humidity High Alarm (1% - 99%)
- Outdoor Temperature High Alarm (-40°C - 60°C)
- Wind Chill High Alarm (-40°C - 60°C)
- Dew Point High Alarm (-40°C - 60°C)
- Indoor Humidity High Alarm (1% - 99%)
- Indoor Temperature High Alarm (-9.9°C - 60°C)
Alarm Mode Continued
In the Low Alarm Mode, Press the SET key to select the following alarms:
- Time Alarm
- Outdoor Humidity Low Alarm (1% - 99%)
- Outdoor Temperature Low Alarm (-40°C - 60°C)
- Wind Chill Low Alarm (-40°C - 60°C)
- Dew Point Low Alarm (-40°C - 60°C)
- Indoor Humidity Low Alarm (1% - 99%)
- Indoor Temperature Low Alarm (-9.9°C - 60°C)
When in either Alarm Mode, press + or MIN/MAX to change the alarm value – hold either key down to increase/decrease quickly. To set or cancel an alarm, press the ALARM key when the selected parameter is shown alongside the desired value. When an alarm is active, the speaker icon will be displayed on the LCD screen to confirm this.
Press the SET key to scroll through the different parameters (as shown above) until you return back to the Home Screen.
To leave the Alarm Mode and return to the normal display, simply press the HISTORY key at any time, or leave the display console for 30 seconds without pressing anything.
Cancelling an alarm while sounding:
When an alarm has been set and the condition to activate this has been met, the alarm will sound for 120 seconds and flash until the weather conditions no longer meet the value set using the alarm. While the alarm is sounding, press any key to mute the audible alarm. The alarm will reactivate automatically once the value has fallen outside of the set conditions and then within again.
Minimum/Maximum Mode
- While in normal mode, press the MIN/MAX key to enter the maximum mode.
- Press the MIN/MAX key again to enter the minimum mode.
- Press the MIN/MAX key again to return to the normal mode.
In the maximum reading Mode, press the + key to display the following maximum values together with the time and date stamp showing when these values recorded. To clear a value, navigate to the record you'd like to reset, then press and hold the SET key for three seconds to reset this to the current reading. The maximum records available are as follows:
- Wind Speed Maximum
- Gust Speed Maximum
- 1 Hour Rainfall Maximum
- 24 Hour Rainfall Maximum
- Weekly Rainfall Maximum
- Monthly Rainfall Maximum
- Outdoor Humidity Maximum
- Outdoor Temperature Maximum
- Wind Chill Temperature Maximum
- Dew Point Temperature Maximum
- Indoor Humidity Maximum
- Indoor Temperature Maximum
While in the minimum records mode, press the + key to display the following minimum values along with the time and date these were recorded. Again, you can hold the SET key for three seconds to reset the current reading. The minimum records available are as follows:
- Outdoor Humidity Minimum
- Outdoor Temperature Minimum
- Wind Chill Temperature Minimum
- Dew Point Temperature Minimum
- Indoor Humidity Minimum
- Indoor Temperature Minimum
To exit the Min/Max mode, press the HISTORY key or do not press any key for 30 seconds.
Reset to Factory Defaults
If you need to reset all settings back to their factory defaults, press and hold the + key for 20 seconds. This will clear all settings, remove all records and erase any stored data, so make sure this is exactly what is desired before using this function.
Maintenance & Troubleshooting
The ClimeMET CM2026 has been designed with dependability in mind and will require minimal attention once set up. After the system has been installed, you should find that the only maintenance required will be an occasional check and clean of the sensors in order to ensure they provide you with years of service. This weather station uses 2 x AA batteries to power the outdoor sensor-suite - it will depend on the quality of the batteries used, but we'd normally expect these to last for around 12 months. At the same time you access the station to change the batteries, you may want to clean the sensors and carry out some brief checks.
If it appears that any problems are occurring with your weather station, please see the below guide for further information:
Display Console:
Outdoor data is not displaying and dashes are shown instead
Ensure that the outdoor sensor suite is within range of the display console – the maximum range is 100 metres, or just over 300 feet. Please note that obstacles such as trees/walls/etc will have an impact on this communication range, so try to make sure the line of sight is as clear as possible.
Check that the batteries inside the sensor suite are not depleted – insert new batteries if you cannot be sure.
Maintenance and Troubleshooting
Indoor Temperature and Humidity:
Temperature readings are too high/low
If the indoor temperature readings appear to be high, make sure that the display console has not been placed in a location where it will be in direct sunlight during the day. This can cause the plastic casing to heat up which takes some time to cool down again, which may ultimately result in false readings. If the indoor temperature readings seem too low, check that the display console has not been mounted against an interior wall that cools down significantly throughout the day, as this could be affecting the readings measured. It's also worth checking that the console is not in the path of any air-conditioning units or located near an air vent. Similarly, make sure the outdoor sensor suite is not placed too close to surfaces that will radiate heat or affect nearby temperatures in a similar manner.
Dew Point:
Dew Point figure appears to be incorrect
Dew point measurements depend upon the outdoor temperature and humidity figures, so it's vital to make sure that these readings are correct in order to calculate the dew point reading. Each of these measurements can be calibrated if required.
Wind:
Wind readings appear to be lower than expected
Wind readings can be significantly affected by the location of the system. Make sure that there is nothing in the surrounding area that could be shielding the CM2026 from the effects of the wind as this will reduce the strength of the readings received. Please remember that mounting the station a few feet higher or lower can alter the readings considerably.
Wind Chill:
Wind chill figure appears to be incorrect
Wind chill readings are reliant upon the wind speed and outdoor temperature measurements. If your wind chill readings appear to be inaccurate, please check these readings and calibrate them slightly if necessary in order to improve the wind chill calculation.
Maintenance and Troubleshooting
Cleaning your Wind Sensors:
It's also a good idea to keep your wind sensors clean in order to ensure they can move freely enough to produce accurate readings. Use the supplied Allen key to remove the wind vane and cups and then use a cloth to clean the metal shaft to remove any built-up dirt or grit. Over time this can cause the wind sensors to 'stick' slightly, so keeping these clean and firmly tightened will ensure the sensors will operate as they should.
The wind sensor can also be fully unscrewed from the sensor suite for easier cleaning.

natural_image
Line drawing of a hand using a tool to adjust or install a mechanical component, with no visible text or symbols.Rainfall:
Low/No Rainfall readings are being received
The rainfall readings are measured by a tipping mechanism within the rain collector – for these readings to be correct it is vital that this part is able to move freely. As the rain gauge requires a small opening for rainfall to fall through and activate the mechanism, it's also possible that over time some form of debris may block this opening, or alternatively get stuck around the internal mechanism preventing it from moving fully. If your rainfall readings remain at zero, or appear to be significantly lower than expected, it's worth clearing around the rain gauge and cleaning the internal tipping-mechanism to ensure that nothing is preventing it from operating as it should.
Maintenance and Troubleshooting
Cleaning your Rain Collector:
Over time, you may find that blockages are created in your rain gauge due to leaves, insects or something else. Though these items may be small, they can prevent the tipping-mechanism from moving freely and therefore impact upon your rainfall readings if they are left to build up.
To access the mechanism, firstly locate the three holes on the underside of the rain collector as shown. Inside each of these holes is a screw which must be removed using a Philips screwdriver.

natural_image
Technical line drawing of a mechanical assembly with internal components and directional arrows (no text or symbols)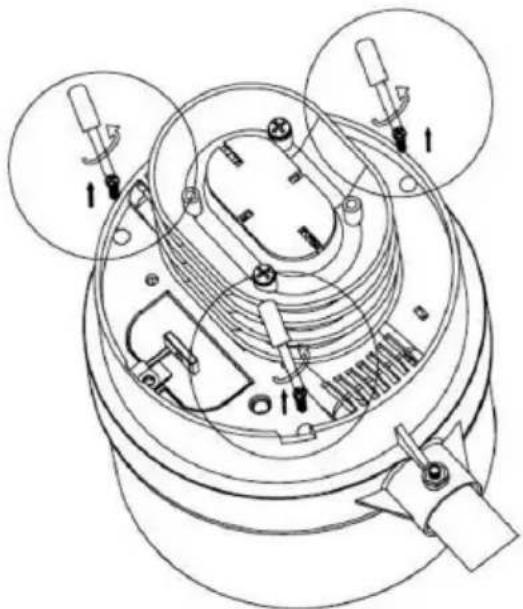
natural_image
Technical line drawing of a mechanical assembly with no visible text or symbolsOnce these screws have been removed, you can carefully lift the rain collector cover in order to access the tipping-mechanism.
Any blockages should be obvious but it's a good idea to carefully clean around the mechanism itself, as well as making sure the slits found at the base are clear in order to allow the water to empty out. Once all appears to be correct, simply fit the cover back into place and insert the screws to securely re-attach the rain gauge.
Specification
Outdoor Data
| Temperature Measuring Range -40°C - 65°C (-40°F - 149°F) Temperature Accuracy +/- 1°C Temperature Resolution 0.1°C | |
| Humidity Measuring Range 1% - 99% Humidity Accuracy +/-5% | |
| Rainfall Volume Display 0 - 9999mm (Will show ‘---’ if outside range) Rainfall Accuracy +/- 10% Rainfall Resolution 0.3mm (if rain volume < 1000mm) 1mm (if rain volume > 1000mm) | |
| Wind Speed Measuring Range 0 - 180 km/h (0 - 110 mph) Wind Speed Accuracy +/- 1 m/s (if wind speed < 10 m/s) +/- 10% (if wind speed > 10 m/s) | |
| Transmission Range 100m (Measured in an open field) Transmission Frequency 868 MHz | |
| Measuring Interval 48 Seconds | |
| Waterproof Level IPX3 |
Indoor Data
| Temperature Measuring Range -9.9°C | - 60°C (14°F – 140°F) |
| Temperature Resolution 0.1°C | |
| Humidity Measuring Range 1% - 99% Humidity Resolution 1% | |
| Measuring Interval 30 Seconds | |
| Alarm Duration | 120 Seconds |
Power Consumption
| Display Console | 3 x AA 1.5V LR6 Alkaline Batteries |
| Thermo-Hygro Transmitter | 2 x AA 1.5V LR6 Alkaline Batteries |
Weather Notes
Wind Speed in the Beaufort Scale
| Beaufort Scale | Avg. MPH | SPEED Km/H | Description Observation | |
| 0 | 0 | 0 | Calm Smoke rises vertically. | |
| 1 | 2 | 3 | Light | airs Smoke drifts in the wind |
| 2 | 5 | 9 | Light | breeze Leaves rustle. |
| 3 | 10 | 15 | Gentle | breeze Leaves and small twi constantly. Small flags extended. |
| 4 | 15 | 25 | Moderate | wind Wind raises dust and loose |
| 5 | 21 | 35 | Fresh | Wind Small trees sway. |
| 6 | 28 | 45 | Strong wind | Large branches move. Whistling in phone wires. Difficult to use umbrellas. |
| 7 | 35 | 56 | Very strong wind | Whole trees in motion. |
| 8 | 43 | 68 | Gale | Twigs break off trees. Difficult to walk. |
| 9 | 50 | 81 | Sever | gale Chimney pots and slates r |
| 10 | 59 | 94 | Storm | Trees uprooted. Structural damage. |
| 11 | 69 | 110 | Severe storm | Widespread damage. |
| 12 | Over 74 | Over 119 | Hurricane | Widespread damage. |
These figures apply to steady winds averaged over a 15 second period. Gusts can be much stronger but only last for a few seconds. Describe the gust in you weather diary. For example, June 5th gusting to force 8.
ClimeMET
ClimeMET Ltd, 9 Church Field Road, Chilton Industrial Estate,
Sudbury, Suffolk, CO10 2YA
www.ClimeMET.com
ClimeMET
www.ClimeMET.com

natural_image
Exterior view of a weather station with visible vane, sensor, and antenna against cloudy sky (no text or symbols)ClimeMET

SET
+
HISTORY
ALARM
MIN/MAX/-


- Instruction Handbook
- Welcome to the ClimeMET CM2026 Home Weather Station.
- Contents
- What's in the Box?
- You May Also Need:
- Please help in the preservation of the environment and return used batteries to an authorized depot.
- The Sensor Suite
- The Display Console
- Installation
- Battery Installation:
- Battery Installation Continued:
- Sensor Assembly
- Attaching the Wind Cups:
- Sensor Assembly Continued
- Choosing Your Location
- Console Setup
- Programme Mode
- Quick Display Mode:
- Calibration Mode
- Wind Speed:
- Rainfall:
- Temperature:
- Humidity:
- History Mode
- Alarm Mode
- Alarm Mode Continued
- Cancelling an alarm while sounding:
- Minimum/Maximum Mode
- Reset to Factory Defaults
- Maintenance & Troubleshooting
- Display Console:
- Outdoor data is not displaying and dashes are shown instead
- Maintenance and Troubleshooting
- Temperature readings are too high/low
- Dew Point:
- Dew Point figure appears to be incorrect
- Wind:
- Wind readings appear to be lower than expected
- Wind Chill:
- Wind chill figure appears to be incorrect
- Cleaning your Wind Sensors:
- Low/No Rainfall readings are being received
- Cleaning your Rain Collector:
- Specification
- Weather Notes
- ClimeMET
Brand : ClimeMET
Model : CM2026
Category : Weather Station