
ROWER-800F - Rowing Machine LifeSpan - Free user manual and instructions
Find the device manual for free ROWER-800F LifeSpan in PDF.


| Product Type | Rowing Machine |
| Brand | LifeSpan |
| Model | ROWER-800F |
| Dimensions (L x W x H) | 82 x 21 x 27.5 inches (208 x 53 x 70 cm) |
| Weight | 73 lbs (33 kg) |
| Maximum User Weight | 250 lbs (113 kg) |
| Resistance Type | Magnetic |
| Resistance Levels | 8 |
| Display Type | LCD |
| Display Metrics | Time, Distance, Calories, Strokes, Pulse |
| Heart Rate Monitor | Hand grip pulse sensors |
| Foldable | Yes |
| Transport Wheels | Yes |
| Power Source | Battery (2 AA, included) |
| Frame Material | Steel |
| Seat | Ergonomic, cushioned |
| Foot Pedals | Adjustable with straps |
| Maintenance | Wipe with damp cloth; check bolts monthly |
| Safety | Keep children away; use on level surface |
| Spare Parts | Seat cushion, pedal straps, batteries |
| Warranty | Frame: 1 year; Parts: 6 months |
Frequently Asked Questions - ROWER-800F LifeSpan
User questions about ROWER-800F LifeSpan
0 question about this device. Answer the ones you know or ask your own.
Ask a new question about this device
Download the instructions for your Rowing Machine in PDF format for free! Find your manual ROWER-800F - LifeSpan and take your electronic device back in hand. On this page are published all the documents necessary for the use of your device. ROWER-800F by LifeSpan.
USER MANUAL ROWER-800F LifeSpan
natural_image
Lifespan powertrain with black frame and white body, no visible text or symbols on the device itselfProduct may vary slightly from the item pictured due to model upgrades.

Read all instructions carefully before using this product. Retain this owner's manual for future reference.
NOTE:
This manual may be subject to updates or changes. Up to date manuals are available through our website at www.lifespanfitness.com.au
TABLE OF CONTENTS
I. Important Safety Instructions 05
II. Care Instructions 06
III. Assembly Instructions 07
IV. Operation Guide ...... 11
V. Exercise Guide ...... 16
VI. Exploded Diagram 18
VII. Parts List 20
VIII. Warranty 22
I. IMPORTANT SAFETY INSTRUCTIONS
WARNING: Read all instructions before using this machine.
It is important your machine receives regular maintenance to prolong its useful life. Failing to regularly maintain your machine may void your warranty.
Please keep this manual with you at all times.
- It is important to read this entire manual before assembling and using the equipment. Safe and effective use can only be achieved if the equipment is assembled, maintained and used properly. PLEASE NOTE: It is your responsibility to ensure that all users of the equipment are informed of all warnings and precautions
- Before starting any exercise program you should consult your doctor to determine if you have any medical or physical conditions that could put your health and safety at risk, or prevent you from using the equipment properly. Your doctor's advice is essential if you are taking medication that affects your heart rate, blood pressure or cholesterol level.
- Be aware of your body's signals. Incorrect or excessive exercise can damage your health. Stop exercising if you experience any of the following symptoms: pain, tightness in your chest, irregular heartbeat, and extreme shortness of breath, lightheadedness, dizziness or feelings of nausea. If you do experience any of these symptoms, you should consult your doctor before continuing with your exercise program.
- Keep children and pets away from the equipment. This equipment is designed for adult use only.
- Use the equipment on a solid, flat level surface with a protective cover for your floor or carpet. To ensure safety, the equipment should have at least 2 meters of free space around it.
- Before using the equipment, check that the nuts and bolts are securely tightened. If you hear any unusual noises coming from the equipment during use and assembly, stop immediately. Do not use the equipment until the problem has been rectified.
- Wear suitable clothing while using the equipment. Avoid wearing loose clothing that may get caught in the equipment or that may restrict or prevent movement.
- This equipment is designed for indoor and family use only.
- Care must be taken when lifting or moving the equipment so as not to injure your back.
• Always keep this instruction manual and assembly tools at hand for reference.
- The equipment is not suitable for therapeutic use.
- The pulse or heart rate sensors are not medical devices. Various factors, including the user's movement, may affect the accuracy of heart rate readings. The pulse sensors are intended only as exercise aids in determining heart rate trends in general.
II. CARE INSTRUCTIONS
- Lubricate moving joints with grease after periods of usage.
- Be careful not to damage plastic or metal parts of the machine with heavy or sharp objects.
- The machine can be kept clean by wiping it down using dry cloth.
- All nuts and bolts are to be checked and tightened on a regular basis. This includes pedals and other moving parts. Failure to do so may cause damage to your thread and void your warranty.
- Check AC adaptor is plugged in correctly and do not use if cord is damaged.
III. ASSEMBLY INSTRUCTIONS


30 M8*20*S5 2PCS

38 d8 2PCS

31 d8*Φ20*2 2PCS

11 M5*10 2PCS

67 M6*30*S5 2PCS

68 d6 2PCS

66 Φ27 2PCS

STEP 1
- Secure rear support frame(40) with aluminium rail(41) using bolts(30), spring washers(38) and washers (31) by spanner (A);
- Attach seat (51) onto aluminium rail (41);
- Install locating mounts (66) to aluminium rail (41) using bolts (67) and washers (68) by spanner (A);
- Attach back end cap (77) to aluminium rail (41) using screws (11) by spanner(B).

- Connect aluminium rail (41) with main frame (24);
- Then secure them using bolts (30), spring washers (38) and washers (31) by spanner (A).


- Attach front stabilizer (48) to main frame (24) using bolts (30) and washer (31) by spanner (A).
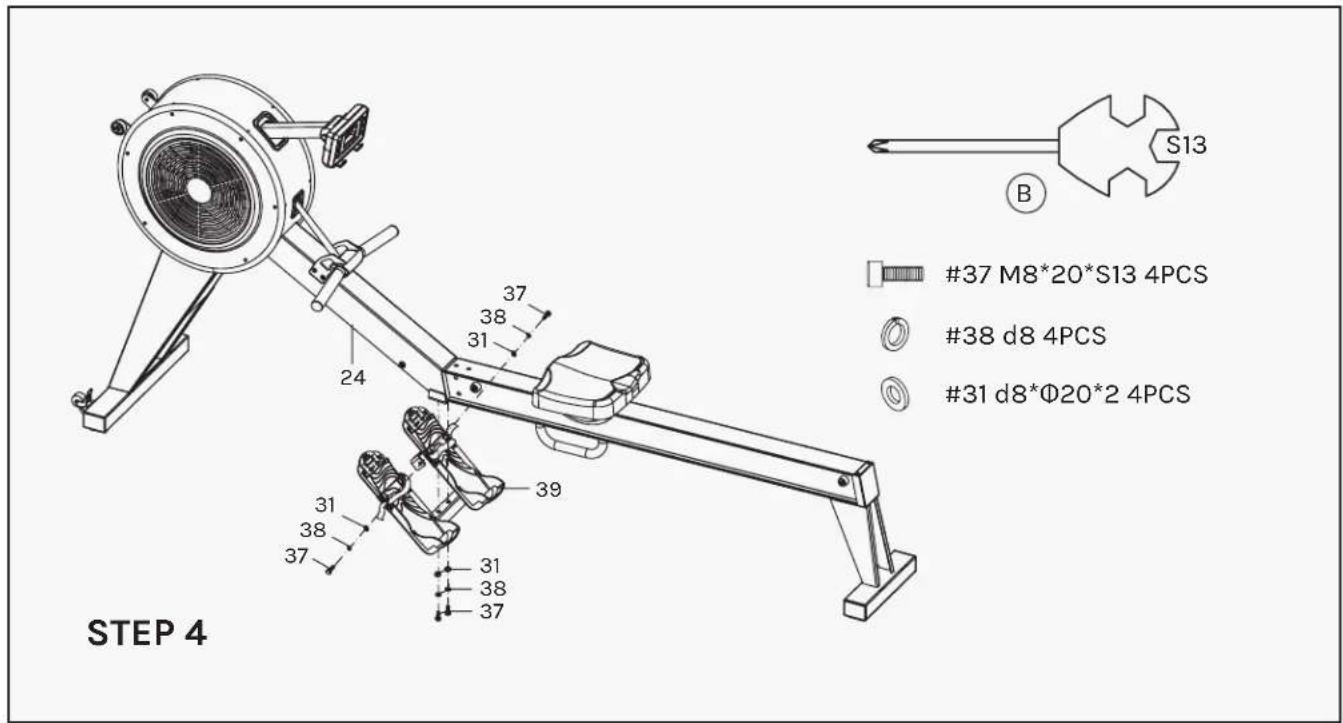
- Secure pedal plate (39) to main frame (24) using bolts (37), spring washers (38) and washers (31) by wrench (B).

- Insert the adapter line (8) to power hole on the back of main frame (24), then plug the adapter into an outlet.
! Attention: Cut off the power source when not in use for many days.

natural_image
Technical line drawing of a mechanical fan or fan assembly with internal blades and mounting brackets (no text or symbols)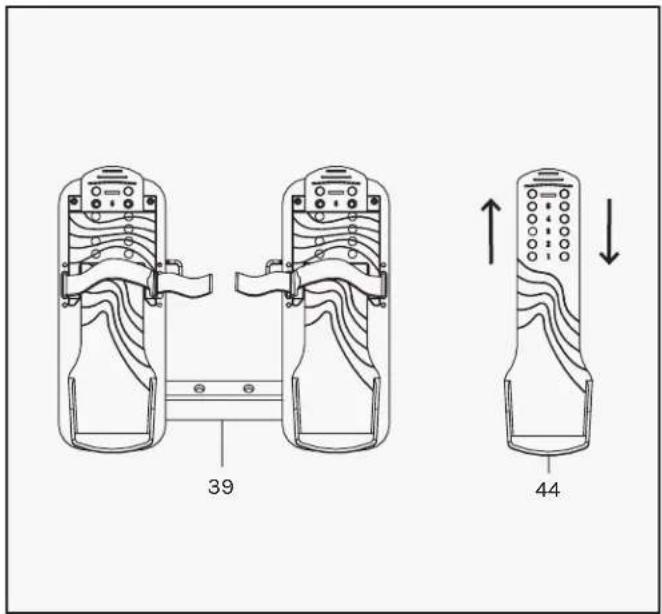
ADJUSTING DISPLAY ANGLE
The rotation angle of computer post can be adjusted to obtain the best view of the console LCD Screen.
ADJUSTING PEDAL STRAPS
The pedal strap and the pedal is adjustable and can be personalised to fit the user's foot size.

natural_image
Line drawing of a person using a rowing machine with a circular head and lever mechanism (no text or symbols)
natural_image
Technical line drawing of a stationary exercise machine with attached frame and wheel (no text or symbols)MOVING THE MACHINE
To move the machine, one hand hold the handlebar, another hand hold the rail to lift up the rail until the transportation wheels on the front stabilizer touch the ground. With the wheels on the ground, you can transport the bike to the desired location with ease.
STORING THE MACHINE
When not in use you can save space by pulling down the brake pad of the caster (32) and stand up the rowing machine.
IV. OPERATION GUIDE
1. DISPLAY
COUNT: Showing your current speed. Range: 0.0\~999 count.
RPM: Showing the current rotate per minute. Range: 0\~999.
TIME: The accumulative exercise time, range: 0:00\~99M59S. The preset time range is 5:00\~99M00S. The computer will start to count down from preset time to 0:00 with average time for each resistance level. When it reaches to zero, the program will stop and computer alarm. If you do not preset the time, it will run with one-minute decrement each resistance level.
DIST: The exercise accumulative distance. Range: 0.0\~99.9\~999KM the preset distance range: 1.0\~99.0\~999. When the distance reaches 0, the program will stop, and the computer will alarm.
CALORIE: The exercise accumulative calories burnt. Range: 0.0\~99.9\~999 the preset calories range: 10.0\~90.0\~990. When the calorie reaches 0, the program will stop, and the computer will alarm.
PULSE: Showing the exercise heart rate value. Range: 60\~240BPM (beat per minute).
RESISTANCE LEVEL: Showing level. Range:1\~16.
WATT: Show the exercise watt, the interval should be 10, between 30-350.
2. BUTTONS
I. ENTER:
- In "stop" mode, press ENTER button to enter program selection and setting value which flash in related window.
A. When you choose the program, press Enter to confirm the one you like.
B. When in setting, press ENTER to confirm the value that you would like to preset.
- During the start mode, press ENTER to choose to display the count or RPM or switch automatically.
II. START/STOP:
- Press START/STOP button to start or stop the programs.
- During any mode, hold down this button for 2 seconds to totally reset the computer.
III. UP:
- In stop mode and the dot matrix character flash, press this button to select the program up. If the related window value flash, press this button to increase the value.
- During the start mode, press this button to increase the training resistance.
IV. DOWN:
- In stop mode and the dot matrix character flash, press this button to select the program down. If the related window value flash, press this button to decrease the value.
- During the start mode, press this button to decrease the training resistance.

NOTE:
- To press or rotate of UP, DOWN button should be followed by different model.
- It is suggested to cover your finger within the marked region to select functions in case of any wrong action.
3. OPERATION
I. Turn on the computer.
Plug in one end of the adaptor to the AC electrical source and connect the other end to the computer. The computer will beep and enter into initial mode.
II. Program select and value setting.
- Manual Program and Pre-set Program P1~P10
A. Press UP, DOWN button to select the program that you like.
B. Press ENTER button to confirm the selected program and enter time setting window.
C. The time will flash, and then press UP, DOWN button to set up your desired time. Press ENTER to confirm the value.
D. The distance will flash, and then press UP, DOWN button to set up the desired distance value Press ENTER to confirm the value.
E. The calories will flash, and then press UP, DOWN to set up the desired calories to be consumed. Press ENTER to confirm the value.
F. Press START/ STOP to begin exercise.
• Watt Control Program (WATT PRO: P16)
A. Press UP, DOWN to select the watt control program.
B. Press ENTER to confirm the selected watt control program and enter into time setting window.
C. The time will flash, and then press UP, DOWN button to set up the desired time. Press ENTER to confirm the value.
D. The distance will flash, and then press UP, DOWN button to set up the desired distance value. Press ENTER to confirm the value.
E. The calories will flash, and then press UP, DOWN button to set up the desired calories to be consumed. Press ENTER to confirm the value.
F. The watt display will flash, and then press UP, DOWN button to set up the watt to do the exercise. Press ENTER to confirm the value.
G. Press START/ STOP to begin exercise.

NOTE:
The WATT value is decided by the TORQUE and RPM. In this program, the WATT value will keep at constant value. It means that if you peddle quickly, the load resistance will decrease and if you peddle slowly, the load resistance will increase to ensure you at the same watt value.
• Heart Rate Control Program: 55% H.R, 75% H.R and 95% H.R (PULSE PRO: P17-P19)
The maximum heart rate depends on different age and this program will ensure you do the healthy exercise within maximum heart rate.
A. Press UP, DOWN button to choose the heart rate control program.
B. Press ENTER to confirm the heart rate control program and enter AGE setting window.
C. The time will flash, and then press UP, DOWN button to set up the desired time. Press ENTER to confirm the value.
D. The distance will flash, and then press UP, DOWN button to set up the desired distance value. Press ENTER to confirm the value.
E. The calories will flash, and then press UP, DOWN button to set up the desired calories to be consumed. Press ENTER to confirm the value.

F. The age will flash, and then press UP, DOWN button to set the user's age. Press ENTER to confirm the value.
G. When the target heart rate control program flash, the computer will display the user's target heart rate according to user's age.
H. Press START/ STOP to begin exercise.
• Heart Rate Control Program: Target Heart Rate (PULSE PRO: P20)
The user can set any target heart rate to do the exercise.
A. Press UP, DOWN button to select TARGET HEART RATE program.
B. Press ENTER to confirm your choice and enter time setting window.
C. The time display will flash, and then press UP, DOWN button to set the desired time to do the exercise. Press ENTER to confirm the value.
D. The distance will flash, and then press UP, DOWN button to set up the desired distance value. Press ENTER to confirm the value.
E. The calories will flash, and then press UP, DOWN button to set up the desired calories to be consumed. Press ENTER to confirm the value.
F. The target heart rate will flash, and then press UP, DOWN button to set up your target heart rate. Press ENTER to confirm the value.
G. Press START/ STOP to begin exercise.

NOTE:
During exercise, the user's heart rate value depends on resistance level and count. The heart rate control program is to ensure your heart rate within the preset value. When the computer detects your current heart, rate is higher than preset, it will decrease the resistance level automatically or you may slow down exercise. If your current heart rate is lower than preset, it will increase resistance and you may count up.
- User Profile Programs: CUSTOM1\~CUSTOM5 (P11-P15)
A. Press UP, DOWN button to select the user.
B. Press ENTER to confirm your choice and enter time setting window.
C. The time display will flash, and then press UP, DOWN button to set up the desired time to do the exercise. Press ENTER to confirm the value.
D. The distance will flash, and then press UP, DOWN button to set up the desired distance value. Press ENTER to confirm the value.
E. The calories will flash, and then press UP, DOWN button to set up the desired calories to be consumed. Press ENTER to confirm the value.
F. The first resistance level will flash, and then press UP, DOWN button to set the desired load resistance. Press ENTER to confirm. Then repeat above operation to set the resistance from 2 to 10.

NOTE:
If the computer is also equipped with wireless heart rate measuring via the transmitter belt, and with hand pulse function, the hand-measurement-signal-detecting is preferred. If the computer is also equipped with wireless heart rate measuring via the transmitter belt, and with hand pulse function, the hand-measurement-signal-detecting is preferred.
ADAPTER
Input: AC 230V Output: 8VDC 500MA
4. PROGRAMS
• 21 Programs
1 Manual Program 1 Watt Control Program (WATT PRO: P16)

other
| TIME | COUNT | PULSE | | :--- | :--- | :--- | | 0:00 | 0.0 | P | | DIST. KM | 0.0 | LEVEL | | 0.0 | 0.0 | 6 | | MANUAL | 0.0 | | | 0.0 | 16 | P | | 0.0 | 16 | LEVEL | | 0.0 | 16 | 6 | | 0.0 | 16 | WATT PRO | | 0.0 | 16 | | | 0.0 | 16 | |10 Preset Program Profile (PROGRAM: P1-P10)

4 Heart Rate Control Program: (PULSE PRO: P17-P20)55%H.R, 75%H.R, 95%H.R and TARGET H.R
5 User Setting Programs: CUSTOM1 to CUSTOM5 (P11 \~ P15)
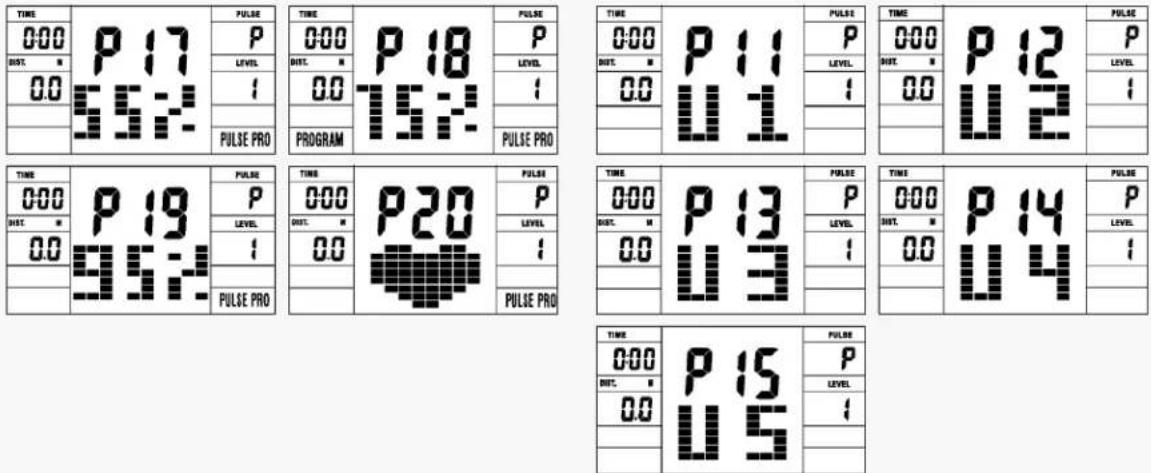

- Record the user's data of 5 User Setting Programs.
- Display Count (RPM), TIME and WATT., CAL and DIST, at the same time.
- The computer will turn off automatically if there is no operation, count signal and pulse signal over 4 minutes. Meanwhile, it will store your current exercise data and urn the loading resistance to the minimum. Once you press any button or in motion, the computer will turn on automatically.
V. EXERCISE GUIDE
! PLEASE NOTE:
Before beginning any exercise program, consult your physician. This is important especially if you are over the age of 45 or individuals with pre-existing health problems.
The pulse sensors are not medical devices. Various factors, including the user's movement, may affect the accuracy of heart rate readings. The pulse sensors are intended only as an exercise aid in determining heart rate trends in general.
Exercising is great way to control your weight, improving your fitness and reduce the effect of aging and stress. The key to success is to make exercise a regular and enjoyable part of your everyday life.
The condition of your heart and lungs and how efficient they are in delivering oxygen via your blood to your muscles is an important factor to your fitness. Your muscles use this oxygen to provide enough energy for daily activity. This is called aerobic activity. When you are fit, your heart will not have to work so hard. It will pump a lot fewer times per minute, reducing the wear and tear of your heart.
So as you can see, the fitter you are, the healthier and greater you will feel.

natural_image
Four sequential line drawings of a person performing a stretching or martial arts pose, no text or symbols present.WARM UP
Start each workout with 5 to 10 minutes of stretching and some light exercises. A proper warm-up increases your body temperature, heart rate and circulation in preparation for exercise. Ease into your exercise.
After warming up, increase the intensity to your desired exercise program. Be sure to maintain your intensity for maximum performance. Breathe regularly and deeply as you exercise.
COOL DOWN
Finish each workout with a light jog or walk for at least 1 minute. Then complete 5 to 10 minutes of stretching to cool down. This will increase the flexibility of your muscles and will help prevent post-exercise problems.
WORKOUT GUIDELINES

line
| AGE | HEART RATE | | --- | --- | | 40 | 160 | | 75 | 100 |This is how your pulse should behave during general fitness exercise. Remember to warm up and cool down for a few minutes.
VI. EXPLODED DIAGRAM

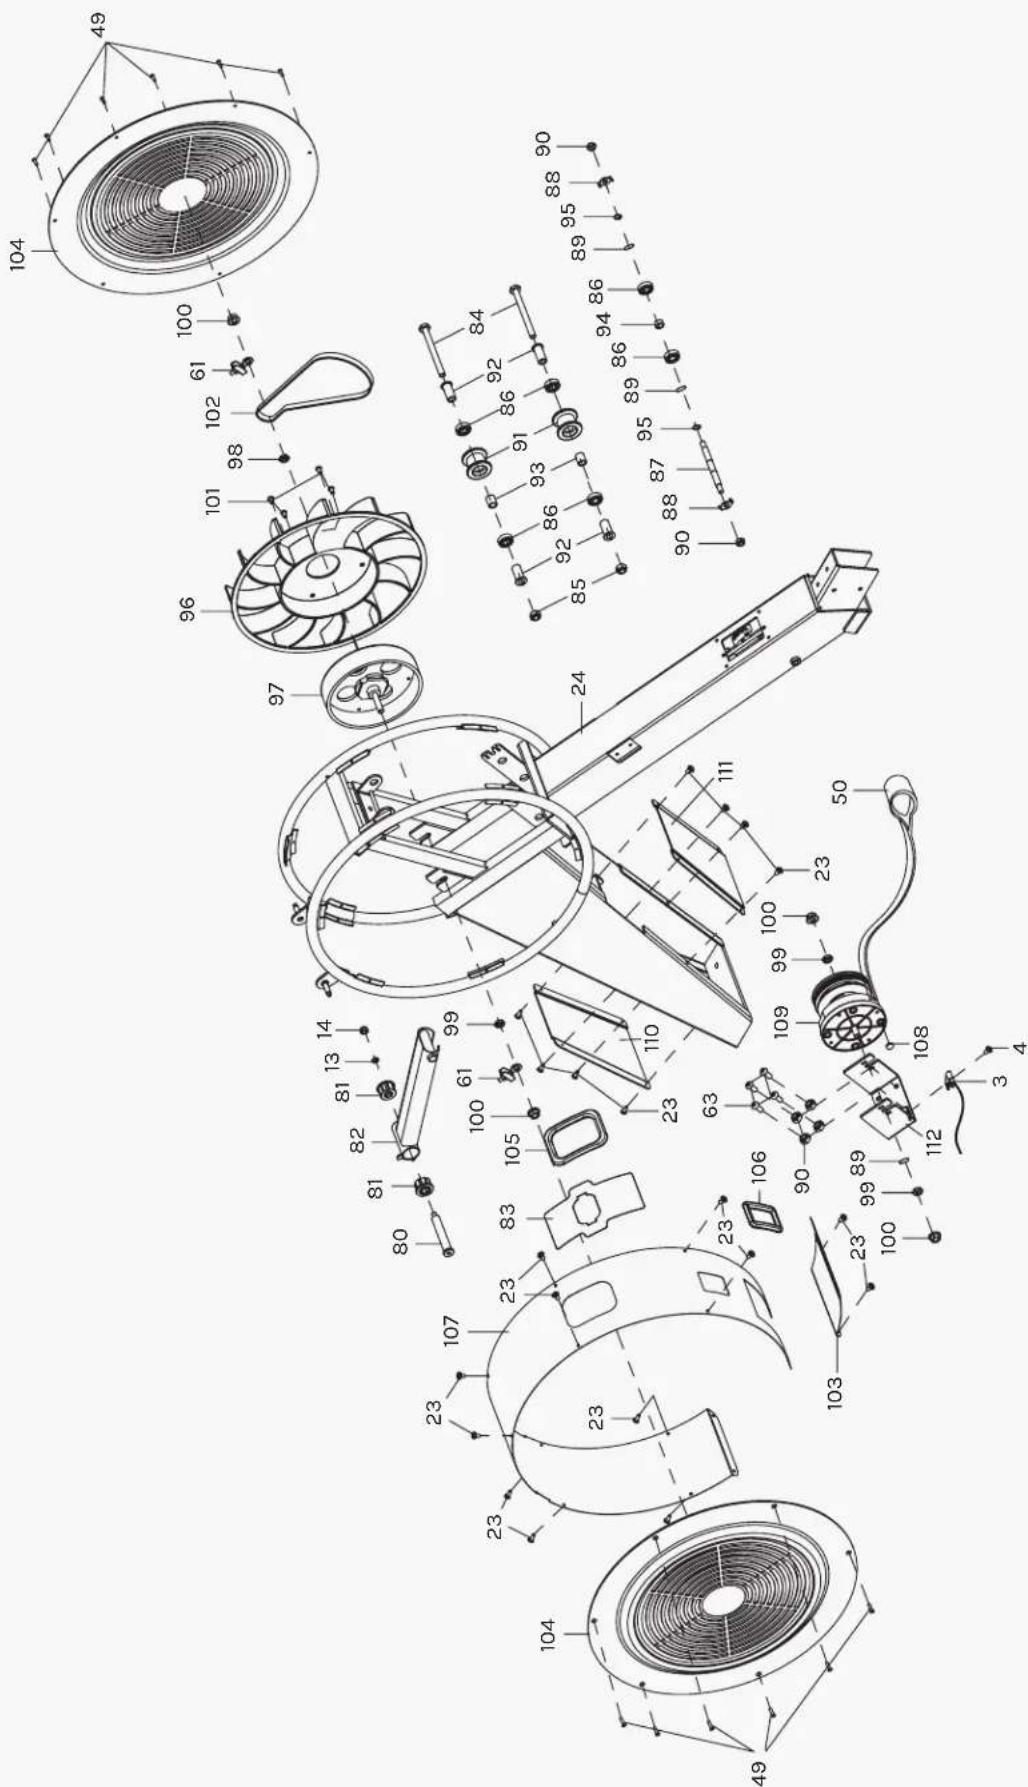
VII. PARTS LIST


30 M8*20*S5 10PCS

38 d8 12PCS

31 d8*Φ20*2 14PCS

11 M5*10 2PCS

67 M6*30*S5 2PCS

37 M8*20*S13 4PCS

68 d6 2PCS
66 Φ27 2PCS
No. Description Qty
| 1 Console 1 | ||
| 2 Console Connector 1 | ||
| 3 Sensor 2 | ||
| 4 Screw 1 | ||
| 5 Screw ST4.2*10 4 | ||
| 6 Motor 1 | ||
| 7 Tension Wire 1 | ||
| 8 Adapter 1 | ||
| 9 Power Line 1 | ||
| 10 Thin Nut M12 1 | ||
| 11 Bolt M5*10 6 | ||
| 12 Bolt M8*90 1 | ||
| 13 Washer d8*Φ20*2 2 | ||
| 14 Nylon Nut M8*H7.5*S13 2 | ||
| 15 Bolt M4*12 4 | ||
| 16 Foam Grip 2 | ||
| 17 Round End Cap Φ32 2 | ||
| 18 Upper Cover of Handlebar 1 | ||
| 19 Bottom Cover of Handlebar 1 | ||
| 20 Handlebar Seat 2 | ||
| 21 Screw ST4.2*13 2 | ||
| 22 Bolt M6*10 4 | ||
| 23 Bolt M4*10 4 | ||
| 24 Main Frame 1 | ||
| 25 Handlebar 1 | ||
| 26 End Cap J50*70 4 | ||
| 27 Screw ST4.2*19 12 | ||
| 28 Washer d5*10*1.0 8 | ||
| 29 Footpad 4 | ||
| 30 Bolt M8*20*S5 10 | ||
| 31 Washer d8*Φ20*2 14 |
No. Description Qty
| 32 | Caster | 2 | |
| 33 | Bolt M5*12 | 4 | |
| 34 | Bolt M5*25 | 4 | |
| 35 | Spring Washer d5 | 8 | |
| 36 | Spacer 5.2*10*15 | 4 | |
| 37 | Bolt M8*20*S13 | 4 | |
| 38 | Spring Washer d8 | 12 | |
| 39 | Pedal Plate | 1 | |
| 40 | Rear Support Frame | 1 | |
| 41 | Aluminum Rail | 1 | |
| 42 | Bolt M4*6 | 8 | |
| 43 | Strap Fixation | 4 | |
| 44 | Pedal | 2 | |
| 45 | Pedal Plate | 2 | |
| 46 | Strap | 2 | |
| 47 | Holder for Pedal | 2 | |
| 48 | Front Stabilizer | 1 | |
| 49 | Bolt M4*10 | 12 | |
| 50 | Mesh belt 22*2150 | 1 | |
| 51 | Seat | 1 | |
| 52 | Roller for Seat Slider | 4 | |
| 53 | Axle | 2 | |
| 54 | Washer d22*1.2 | 4 | |
| 55 | Bearing 608 | 4 | |
| 56 | Nylon Nut | 6 | |
| 57 | Seat Slider | 2 | |
| 58 | Roller Φ35*8 | 2 | |
| 59 | Bolt M8*28 | 2 | |
| 60 | Spacer 12.5*8.2*4.5 | 2 | |
| 61 | Hex Head Bolt | 4 | |
| 62 | Washer d8*Φ16*1.5 | 8 |
| No. | Description | Qty | ||
| 63 | Bolt M8*20 | 4 | ||
| 64 | Bolt M5*12 | 4 | ||
| 65 | Seat Cover | 2 | ||
| 66 | Locating Mount | 2 | ||
| 67 | Bolt M6*30 | 2 | ||
| 68 | Washer d6*Φ12*1 | 4 | ||
| 69 | Nut M6*14 | 4 | ||
| 70 | End Cap Φ25 | 1 | ||
| 71 | Handlebar | 1 | ||
| 72 | Bolt M6*20 | 2 | ||
| 73 | Transportation Wheel | 2 | ||
| 74 | Washer d8*φ12*1.5 | 2 | ||
| 75 | Cap Nut M6*H11*S10 | 2 | ||
| 76 | Short Bushing | 2 | ||
| 77 | Back End Cap | 1 | ||
| 78 | Nut Plate | 1 | ||
| 79 | Bolt | 2 | ||
| 80 | Bolt Φ14*81.5 | 1 | ||
| 81 | Bushing Φ32 | 2 | ||
| 82 | Computer Post | 1 | ||
| 83 | Ditchplatte | 1 | ||
| 84 | Bolt M10*112 | 2 | ||
| 85 | Nylon Nut M10*H9.5*S17 | 2 | ||
| 86 | Bearing 6000 | 6 | ||
| 87 | Pressure Shaft | 1 | ||
| 88 | Locating Plate | 2 |
| No. | Description | Qty |
| 89 | Wave Washer d10 3 | |
| 90 | Nylon Nut M8*H7.5*S13 | 6 |
| 91 | Pulley | 2 |
| 92 | Spacer | 4 |
| 93 | Spacer 15* 10.2*19 | 2 |
| 94 | Spacer 15* 10.2*8 | 1 |
| 95 | Washer d10*1.0 | 2 |
| 96 | Fanwheel | 1 |
| 97 | Flywheel | 1 |
| 98 | Nut M10*1*H5*S17 1 | |
| 99 | Nut M10*1*H5*S17 3 | |
| 100 | Nut | 4 |
| 101 | Bolt M6*10 4 | |
| 102 | Belt | 1 |
| 103 | Fan Shell Connector | 1 |
| 104 | Chain Cover | 2 |
| 105 | Seal Ring | 1 |
| 106 | Seal Ring | 1 |
| 107 | Fan Shell | 1 |
| 108 | Round Magnet | 1 |
| 109 | Ribbon Wheel | 1 |
| 110 | Front Plate | 1 |
| 111 | Rear Plate | 1 |
| 112 | Scroll Wheel | 1 |
| A | Spanner S5 | 1 |
| B | Wrench S13-14-15 | 1 |
VIII. WARRANTY
AUSTRALIAN CONSUMER LAW
Many of our products come with a guarantee or warranty from the manufacturer. In addition, they come with guarantees that cannot be excluded under the Australian Consumer Law. You are entitled to a replacement or refund for a major failure and compensation for any other reasonably foreseeable loss or damage.
You are entitled to have the goods repaired or replaced if the goods fail to be of acceptable quality and the failure does not amount to a major failure. Full details of your consumer rights may be found at www.consumerlaw.gov.au.
Please visit our website to view our full warranty terms and conditions: http://www.lifespanfitness.com.au/warranty-repairs
WARRANTY AND SUPPORT
Any claim against this warranty must be made through your original place of purchase. Proof of purchase is required before a warranty claim may be processed.
If you have purchased this product from the Official Lifespan Fitness website, please visit https://lifespanfitness.com.au/warranty-form
For support outside of warranty, if you wish to purchase replacement parts or request a repair or service, please visit https://lifespanfitness.com.au/warranty-form and fill in our Repair/Service Request Form or Parts Purchase Form.
Scan this QR code with your device to go to lifespanfitness.com.au/warranty-form


- TABLE OF CONTENTS
- IMPORTANT SAFETY INSTRUCTIONS
- WARNING: Read all instructions before using this machine.
- CARE INSTRUCTIONS
- ASSEMBLY INSTRUCTIONS
- M8*20*S5 2PCS
- d8 2PCS
- d8*Φ20*2 2PCS
- M5*10 2PCS
- M6*30*S5 2PCS
- d6 2PCS
- Φ27 2PCS
- ADJUSTING DISPLAY ANGLE
- ADJUSTING PEDAL STRAPS
- MOVING THE MACHINE
- STORING THE MACHINE
- OPERATION GUIDE
- DISPLAY
- BUTTONS
- ENTER:
- START/STOP:
- UP:
- DOWN:
- NOTE:
- OPERATION
- Turn on the computer.
- Program select and value setting.
- - Manual Program and Pre-set Program P1~P10
- • Watt Control Program (WATT PRO: P16)
- - User Profile Programs: CUSTOM1\~CUSTOM5 (P11-P15)
- ADAPTER
- PROGRAMS
- • 21 Programs
- EXERCISE GUIDE
- ! PLEASE NOTE:
- WARM UP
- COOL DOWN
- WORKOUT GUIDELINES
- EXPLODED DIAGRAM
- PARTS LIST
- M8*20*S5 10PCS
- d8 12PCS
- d8*Φ20*2 14PCS
- M8*20*S13 4PCS
- WARRANTY
- AUSTRALIAN CONSUMER LAW
- WARRANTY AND SUPPORT
Brand : LifeSpan
Model : ROWER-800F
Category : Rowing Machine