
NS-IMC44S3 - Ice Maker INSIGNIA - Free user manual and instructions
Find the device manual for free NS-IMC44S3 INSIGNIA in PDF.


| Product Type | Portable Ice Maker |
| Brand | Insignia |
| Model | NS-IMC44S3 |
| Ice Production Capacity | Up to 44 lbs (20 kg) per day |
| Ice Cube Shape | Bullet-shaped ice |
| Ice Storage Basket Capacity | Approximately 2.5 lbs (1.1 kg) |
| Water Reservoir Capacity | 2.2 liters |
| Dimensions (W x D x H) | 10.2 x 12.6 x 14.8 inches (25.9 x 32.0 x 37.6 cm) |
| Weight | 25 lbs (11.3 kg) |
| Power Supply | 120V / 60Hz / 150W |
| Refrigerant Type | R600a (environmentally friendly) |
| Control Panel | Touch button with indicator lights (Power, Ice Full, Water Add) |
| Self-Cleaning Function | Yes, with dedicated cleaning cycle |
| Ice Making Cycle Time | Approximately 6 to 15 minutes per batch (varies with ambient temp) |
| Automatic Shut-Off | When ice basket is full or water level is low |
| Included Accessories | Ice scoop, removable ice basket, water filter |
| Maintenance | Regular descaling recommended; wipe exterior with damp cloth |
| Safety Certifications | ETL listed for North America |
| Warranty | 1 year limited warranty |
Frequently Asked Questions - NS-IMC44S3 INSIGNIA
User questions about NS-IMC44S3 INSIGNIA
0 question about this device. Answer the ones you know or ask your own.
Ask a new question about this device
Download the instructions for your Ice Maker in PDF format for free! Find your manual NS-IMC44S3 - INSIGNIA and take your electronic device back in hand. On this page are published all the documents necessary for the use of your device. NS-IMC44S3 by INSIGNIA.
USER MANUAL NS-IMC44S3 INSIGNIA
natural_image
Line drawing of a small industrial machine with control panel and fan (no text or symbols)ENGLISH....3
ESPAÑOL....18
Contents
ENGLISH
Introduction 3
Important Safety Instructions....3
Features 5
Setting up your ice maker 7
Using your ice maker 8
Cleaning and maintaining your ice maker 10
Troubleshooting 13
Specifications 15
ONE-YEAR LIMITED WARRANTY....16
ESPAÑOL
Introducción....18
Congratulations on your purchase of a high-quality Insignia product. Your NS-IMC44S3 represents the state of the art in ice maker design and is designed for reliable and trouble-free performance.
Important Safety Instructions
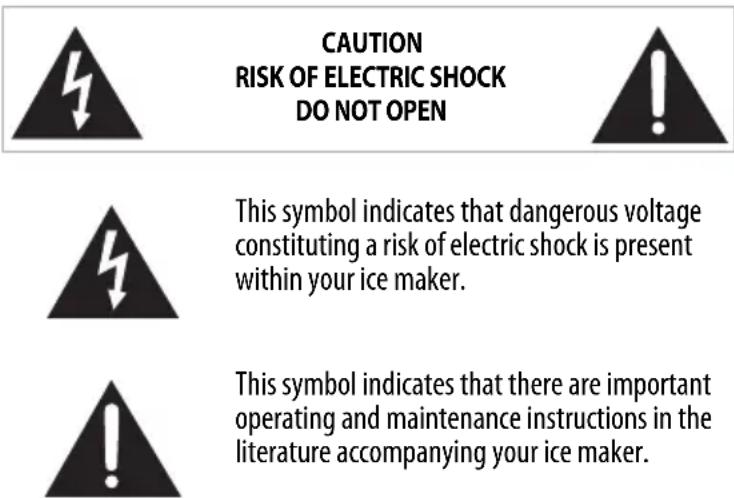
This symbol indicates that dangerous voltage constituting a risk of electric shock is present within your ice maker.
This symbol indicates that there are important operating and maintenance instructions in the literature accompanying your ice maker.
WARNING
Read these instructions.
- Keep these instructions.
- He e e d a l l w a r n i n g s .
- Follow all instructions.
- Do not operate your ice maker with a damaged cord.
- Your ice maker requires a standard 110-120 Volt, 60Hz electrical outlet with a three-prong ground.
- Connect to a properly polarized outlet only. No other appliance should be plugged into the same outlet.
- Make sure that the plug is fully inserted into the outlet.
- Do not run the power cord over carpeting or other heat insulators. Do not cover the cord. Keep the cord away from traffic areas, and do not submerge in water.
- We do not recommend the use of an extension cord because it may overheat and become a risk of fire. If you must use an extension cord, use No.14 AWG minimum size and rated no less than 1875 watts.
- Unplug your ice maker before cleaning or making any repairs or servicing.
- Exercise caution and use reasonable supervision when your ice maker is used near children.
- Do not use your ice maker outdoors.
- Place your ice maker away from direct sunlight and make sure that there is at least 6 inches (15 cm) of space between the back and sides of your ice maker and surrounding walls.
- Do not use any other liquid besides water to make ice cubes.
- Do not clean your ice maker with flammable fluids. The fumes can create a fire hazard or explosion.
- Do not tip over.
- If your ice maker is brought in from outside storage in winter, wait a few hours for it to warm up to room temperature before plugging it in.
• To avoid a hazard due to instability of your ice maker, it must be placed on an even or flat surface.

WARNING
Electric Shock Hazard
Failure to follow these instructions can result in electric shock, fire, or death.

DANGER: Risk of fire or explosion. Flammable refrigerant used.
- Ensure that servicing is done by factory authorized service personnel to minimize product damage or safety issues.
- Consult repair manual or owner's guide before attempting to service this product. All safety precautions must be followed.
- Follow handling instructions carefully.
1 WARNING-Do not operate this, or any other appliance with a damaged cord. Make sure that the plug is fully inserted into the receptacle.
2 WARNING-Keep ventilation openings in the appliance enclosure clear of obstruction.
3 WARNING-Do not touch the interior of the ice maker compartment with wet hands. This could result in frost bite.
4 WARNING-Do not use mechanical devices or other means to accelerate the defrosting process, other than those recommended by the manufacturer.
5 WARNING-Do not damage the refrigerant circuit when handling, moving, or using your ice maker.
6 WARNING-Do not use electrical appliances inside the storage compartment of the cooler, unless they are of the type recommended by the manufacturer.
7 Unplug your ice maker before carrying out user maintenance on it.
8 Please dispose of your ice maker according to local regulations as the cooler contains flammable gas and refrigerant.
9 This ice maker should be installed in accordance with the safety standard for Refrigeration Systems, ASHRAE15. Your ice maker shall not be installed in corridors or hallways of public buildings.
10 This ice maker is intended to be used in household and similar environments, such as:
• Staff kitchen areas in shops, offices, and other working environments
- Farm houses and by clients in hotels, motels, and other residential environments
• Bed and breakfasts
• Catering and similar non-retail applications
Features
- Clear ice keeps your beverage cold longer and creates less fizz than white or bullet ice
- Fast-working system produces your first ice in about 14 minutes
- 2.6 lbs. (1.2 kg) storage capacity gives you plenty of ice for any occasion
- Reduces water waste by letting you add water manually
- Stainless steel surface is easy to keep clean and looks great in any kitchen
• Digital controls make using your ice maker simple and easy - Included scoop makes it easy to pour ice into individual glasses
• Auto cleaning mode keeps your ice maker in good working condition
Note: Ice clarity may vary, depending on several factors.
Package contents
- Clear Ice Maker
• I c e s c o o p
• Ice basket (pre-installed) - User Guide
Product overview
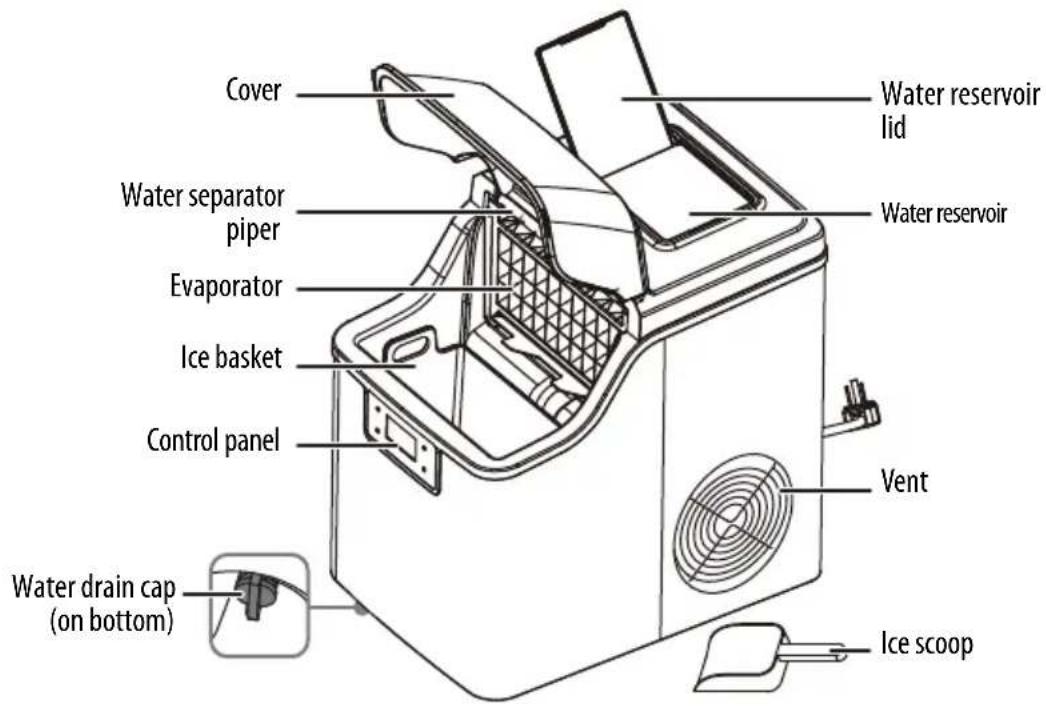
Control panel and display
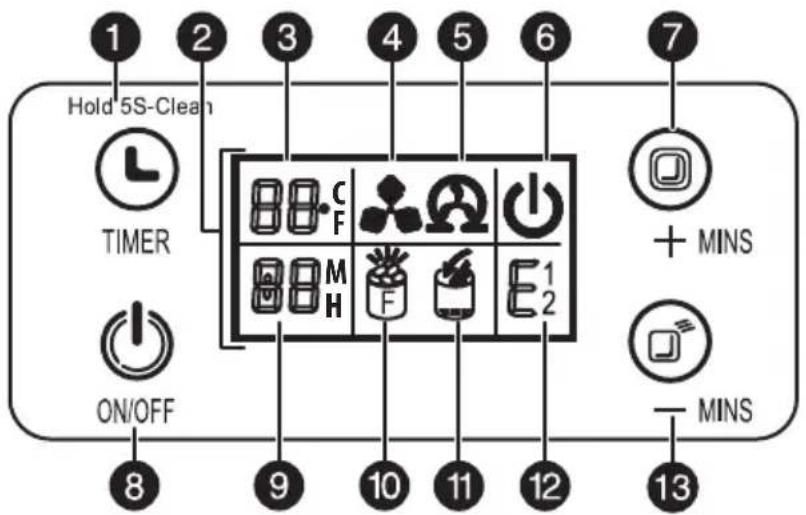
| # | IC | ONBU | TTON/DISPLA |
| 1 |  | TI | M E Rbegin the automatic cleaning cycle or to turn off the blinking self-clean indicator. |
| 2 LCD display screen Lights to show indicators, timer settings and countdown, and ambient temperature. | |||
3 Am  | temperature and ice maker countdown | M - indicates timer/ice maker countdownFor C - indicates ambient temperature in Fahrenheit or Celsius. | |
| 4 |  | Ice making symbol | When this symbol blinks, your ice maker is emptying the ice tray. When the symbol rotates, your ice maker is making ice. |
| 5 |  | Self-clean indicator | Lights when the automatic self-clean program is activated.Blinks when it's time to run the automatic cleaning cycle. |
| 6 Power on indicator Lights when your ice maker is turned on. | |||
| 7 +/ice maker timer/ice thickness increase | When your ice maker is making ice, press to make thicker ice. When setting the timer, press to increase the time. Press and hold for more than five seconds to switch the temperature display between °F and °C. | ||
| 8 |  | ON | /O F FPress and hold for more than five seconds to stop the ice making process and have the ice tray eject the ice cubes. |
| 9 |  | Time setting indicator | M - indicates how many minutes increase or decrease.H - indicates how long until your ice maker turns on or off. |
| 10 |  | Ice full warning | Lights to indicate that the ice basket is full. |
| 11 |  | Low water warning | Lights to indicate that your ice maker needs water. |
| # | I C | O N B U | T T O N / D I S P L A |
| 12 |  | Error code indicator | E - Indicates an ice making problem or a refrigerant leak.E1 - Indicates that the ambient temperature sensor is bad.E2 - Indicates that the water temperature sensor is bad. |
| 13 | -/ice maker | er timer/ice thickness decrease | When your ice maker is making ice, press to make thinner ice. When setting the timer, press to decrease the time. Press and hold for more than five seconds to switch the temperature display between °F and °C. |
Setting up your ice maker
Before using your ice maker
WARNINGS: Before plugging in your ice maker, wait four hours for the refrigerant fluid to settle.
- Remove the exterior and interior packing.
- Remove all tape and take out the accessories from the unit. If any parts are missing, contact customer service.
- Clean your ice maker (see Cleaning and maintaining your ice maker on page 10), then run two or three cycles of ice and dispose of them to remove any plastic odor or residue from the manufacturing and shipping process.
Finding a suitable location
- Your ice maker is designed to be free standing only, and should not be recessed or built-in.
- Place your ice maker on a counter top that is strong enough to support it when it is fully loaded.
- Allow six inches (15 cm) of space between the back and sides of your ice maker and any surrounding walls to allow for proper air ventilation.
- Place your ice maker away from direct sunlight and sources of heat, such as a stove, heater, or radiator. Direct sunlight may affect the acrylic coating and heat sources may increase electrical consumption. Extremely cold temperatures may also prevent your ice maker from performing properly.
Providing a proper power supply
WARNINGS: Improper use of the grounded plug can result in the risk of electrical shock. If the power cord is damaged please call our customer service.
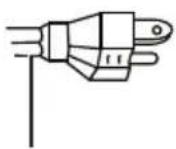
This appliance requires a standard 110-120 Volt, 60Hz electrical outlet with good grounding means.
This unit should be properly grounded for your safety. The power cord of this appliance is equipped with a grounding plug which mates with standard grounding wall outlets to minimize the possibility of electric shock.
Using a 3-prong plug and outlet
3-prong receptacle
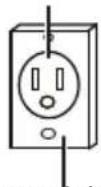
Using a grounding adapter
Grounding lead
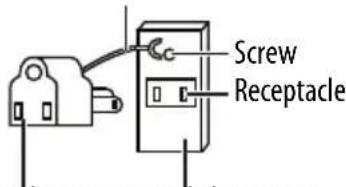
Receptacle box cover3-prong pGrounding adapter Receptacle box cover
Notes:
- Your ice maker should always be plugged into its own individual electrical outlet which has a voltage rating that matches the rating plate.
- Never unplug your ice maker by pulling on the power cord. Always grip the plug firmly and pull straight out from the outlet.
- Do not, under any circumstances, damage the grounding prong of the plug. Any questions concerning power and/or grounding should be directed toward a certified electrician.
Using your ice maker
Making ice
CAUTIONS:
- Fill the reservoir with drinking water only.
- Change water in the water reservoir every 24 hours to make sure that it is fresh. If the unit isn't to be used for an extended period, drain the water and dry the water reservoir.
- Do not pour water into the internal water tank under the ice basket, as this will negatively affect the performance of your ice maker.
Tips:
To improve ice clarity:
- Try using distilled or purified water in your ice maker
• Make sure that you are running the ice maker auto clean cycle frequently
Note: When there is no more water in the top water reservoir, the water tank symbol lights.
1 Open the water reservoir lid and fill the reservoir with drinking water. Keep the water level below the maximum FULL level.
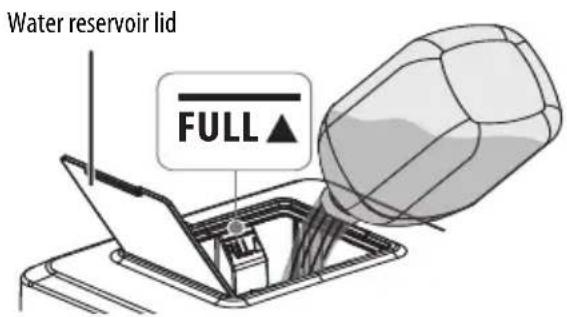
2 Close the water reservoir lid.
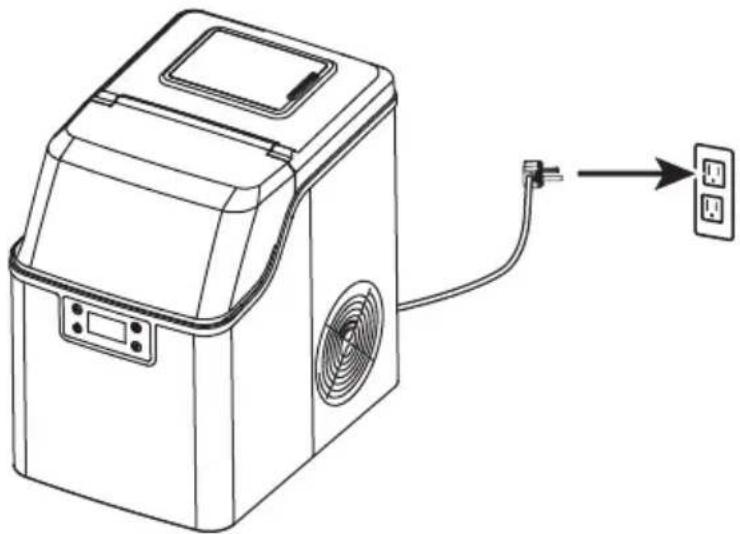
3 Plug in your ice maker. The power indicator on the display begins to blink and the ambient temperature (in degrees Fahrenheit) is shown.
natural_image
Line drawing of a portable appliance with a power outlet and three buttons, showing no text or symbols.4 Press the ⏻ (ON/OFF) button to turn on your ice maker. The ⏻ symbol stops blinking (stays on), the ice making symbol begins rotating, and the ambient temperature turns off.
Notes:
• The ice making cycle lasts between 13 and 25 minutes, depending on the ambient temperature.
- The first time you make ice, depending on the initial water temperature, ice-making time will be a little longer. In a very hot room, ice-making time may vary, but will not exceed 35 minutes.
- To stop the ice making process at any time, press and hold the ⏻ (ON/OFF) button for more than five seconds to cause the ice tray to eject the ice cubes.
- If the low water icon 📋 is on, add water then press the ⏻ (ON/OFF) button to restart the ice maker.
• After several minutes, the countdown is shown on the display, indicating the time (in minutes) until the ice making process is complete.
• Water flows from the top water reservoir to the bottom water tank and the water tank symbol turns on.
5 When the ice making symbol blinks, the cycle is over.
6 To make additional ice cubes, leave your ice maker on and refill the top water reservoir. When the water float in the bottom tank detects a full tank, the water tank symbol turns off and the next ice making cycle begins.
OR
Press the (ON/OFF) button to turn your ice maker off.
Changing the thickness of the ice cubes
- Press the + or - buttons prior to the ice making cycle to increase or decrease the ice making time in one minute increments. More time for thicker ice cubes, and less time for thinner.
Removing ice
1 Your ice maker stops making ice when the ice basket is full. When this happens, the full indicator appears on the display.
2 Open your ice maker lid and remove the ice basket.
3 Empty the ice basket and replace it into your ice maker.
Note: If it has been a while since you last made ice, we suggest that you drain the water from below the ice basket.
4 Your ice maker resumes making ice.
Using the timer to turn on your ice maker and start making ice
You can use the timer to turn your ice maker on.
Note: Make sure that the water reservoir has water in it.
1 With your ice maker off, press the ⏻ (TIMER) button. The display shows "1" (indicating one hour) and a blinking "H".
2 Press the + button to add additional time to the setting, or the - button to subtract time from the setting. After five seconds, the time setting stays on and the timer is set.
The time on the display begins to count down from the time you set and your ice maker turns on and starts making ice when the time gets to "0".
Using the timer to turn off your ice maker
You can use the timer to turn off your ice maker.
1 With your ice maker on, press the Ⓞ (TIMER) button. The display shows "1" (indicating one hour) and a blinking "H".
2 Press the + button to add additional time to the setting, or the - button to subtract time from the setting. After five seconds, the time setting stays on and the timer is set.
The time on the display begins to count down from the time you set and your ice maker turns off when the time gets to "0".
Cleaning and maintaining your ice maker
Clean your ice maker at least every week by running the cleaning cycle. Every three days is recommended.
CAUTION:
• To prevent damage to the finish, do not use gasoline, benzine, thinner, or other similar solvents, or abrasive cleaners to clean the exterior.
- Do not use bleach or vinegar to clean the internal components of your ice maker.
If you don't plan to use your ice maker for an extended period of time, drain the water from the water reservoir.
Draining the water from your ice maker
1 Make sure that your ice maker is plugged in.
2 Move your ice maker to the edge of the countertop, then place a large bowl under it or make sure the edge is above the sink.
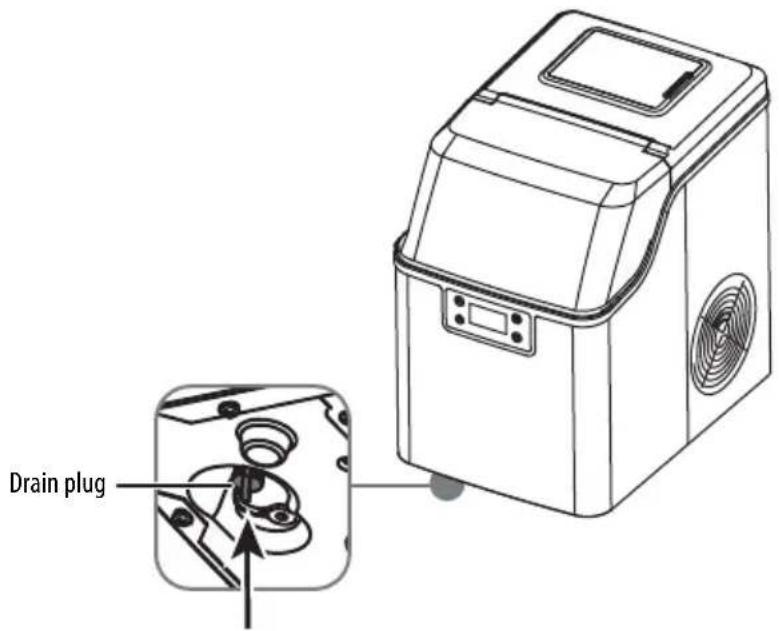
3 Pull the drain plug from the bottom of your ice maker and let the water drain from the tank.
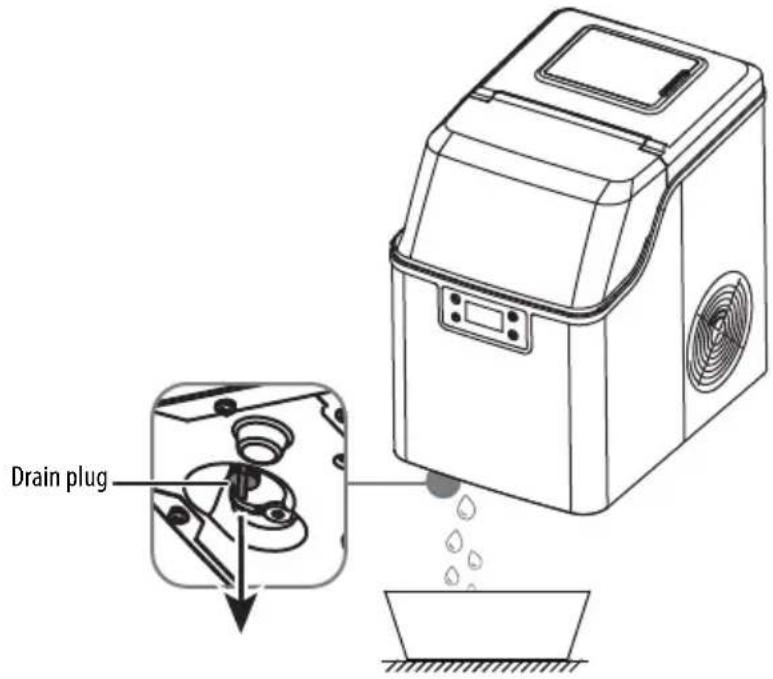
4 Replace the drain plug into the bottom of your ice maker. Your ice maker is ready to use.
Running the automatic self-cleaning program
Run the automatic self-cleaning program before using your ice maker for the first time. After that, we suggest running a cleaning cycle at least every week. When the running time on the compressor reaches 40 hours (approximately every three to seven days), the automatic self-clean icon 🌐links to remind you to clean your ice maker. Run the automatic self-clean program to turn off the blinking icon.
1 Fill the water reservoir with about .5 gal. (2 L) of water.
2 Plug in your ice maker, but do not press the power ⏻ (ON/OFF) button.
3 With your ice maker still powered off, press and hold (for over five seconds) the ⏻ (TIMER) button. The 🔒 (clean) indicator turns on and the time counts down from 20 minutes. When the self-cleaning cycle is done, the indicator light turns off.
Note: To stop the self-cleaning cycle at any point, press the ⏻ (ON/OFF) button.
4 Drain the water from the tank (see Draining the water from your ice maker on page 10.)
Cleaning the parts
1 Unplug your ice maker.
2 Open your ice maker and remove the ice basket.
3 Clean the inside with a damp, warm cloth and lemon water, or use a sponge brush.
4 Use clean water to rinse out the inside of your ice maker, then drain the water by removing the plug from the water drain on the bottom.
5 Dry the inside of your ice maker with a soft cloth.
6 Replace the ice basket.
7 Clean the outside of your ice maker with a soft cloth using mild, diluted detergent in warm water.
Deep cleaning your ice maker
After using your ice maker for a long period of time (three months using relatively soft water or one month using harder water), we also suggest deep cleaning your ice maker to keep it running efficiently and the ice tasting good. Special attention should be given to the water separator pipe.
Notes:
- Because the water in the water reservoir is controlled by a valve, you must plug in your ice maker (but don't turn it on), then remove the water drain plug on the bottom and wait for several minutes for the water to drain completely.
- If you find that there is an ice cube left in the evaporator that cannot be easily removed, you can turn on your ice maker to let the unit enter the ice making process, then press and hold the ⏻ (ON/OFF) button for more than five seconds to cause the ice tray to eject the ice cubes.
1 Turn off and unplug your ice maker, then completely drain the water reservoir (see Draining the water from your ice maker on page 10).
2 Gain access to the water separator pipe by lifting the left and right sides of the pipe from its recess, do not pull the pipe out of the silicone tube on the right.
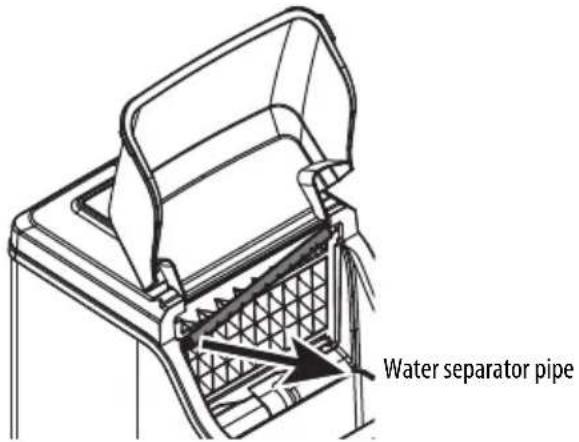
3 Clean each hole in the water separator pipe with a paper clip or toothpick.
4 Reattach the left and right sides of the water pipe by inserting it into the recess from which it was removed. Make sure that the holes are facing down.
5 Clean the water tank and water reservoir with lemon water, using a soft cloth.
6 Drain the water tank and water reservoir, then rinse with clean water and drain again (see Draining the water from your ice maker on page 10).
Troubleshooting
CAUTION: Do not try to repair your ice maker yourself. Doing so invalidates the warranty.
Notes:
- Make sure that the water tank, water filter, and water separator pipe are not blocked.
• Water temperature affects the speed at which ice is made. The lower the temperature, the faster ice cubes are made.
• The cooler the ambient temperature, the faster ice cubes are made.
• Always use good quality water (clean and relatively soft) in your ice maker. If you use hard or dirty water, your ice maker will still work, but the pump may be noisy. - If you turn your ice maker off then turn it back on, the compressor takes three minutes to restart.
| PROBLEM POSSIBLE CAUSE POSSIBLE SOLUTION | ||
| The (add water) indicator lights | No water in the reservoir. | Turn off your ice maker and add water to the water reservoir, then press the (ON/OFF) button to turn on your ice maker and begin making ice. |
| The (add water) indicator lights with water in the reservoir | The water inlet valve is not working. | Have your ice maker serviced by a qualified technician. |
| The ice has a bad taste or there is an odor | Various • Make a few loads | of ice after unpacking and discard the ice• Clean your ice maker with lemon water• Use filtered water |
| The (ice full) indicator lights | Too much ice in the ice basket. | Remove some ice from the ice basket. |
| The ice making cycle is normal, but no ice is made | The room temperature or water temperature may be too high. | The room temperature should be no higher than 86°F (30°C). The water temperature should be no higher than 77°F (25°C) and no lower than 50°F (10°C). |
| The refrigerant liquid may have leaked. | Contact a qualified service technician for repair. | |
| A pipe in the cooling system may be blocked. | Contact a qualified service technician for repair. | |
| The ice making cycle is too short. | Press the + button to lengthen the ice making cycle. | |
| The ice cubes stick together | The ice cycle is too long for the room temperature. | Stop your ice maker, and restart it when the ice blocks melt. Press the - button to shorten the ice making cycle. |
| My ice maker makes ice too slowly | The hot air outlet is blocked. | Check the hot air outlet and remove any blockage. |
| The water temperature in the water reservoir is too high. | The water temperature should be no higher than 77°F (25°C) and no lower than 50°F (10°C). | |
| The refrigeration system is malfunctioning. | Have your ice maker serviced by a qualified technician. | |
| There is no water in the water separator pipe | The holes in the separator pipe are blocked. | Use a thin wire or paper clip to clean the holes in the water separator pipe |
| The ice cubes are too thick and can't drop into the ice basket | The ice making cycle is too long. | Press the - button to shorten the ice making cycle. |
| The ice cubes are too thin | The ambient temperature is too high. | Move your ice maker to a cooler place. The temperature should be no higher than 86°F (30°C). The water temperature should be no higher than 77°F (25°C) and no lower than 50°F (10°C). |
| There is a refrigerant system leak or blockage. | Have your ice maker serviced by a qualified technician. | |
| My ice maker is leaking water | The drain plug is loose or missing. | Replace the drain plug into the drain line. |
| A pipe joint in your ice maker may be loose. | Have your ice maker serviced by a qualified technician. | |
| The seal has reached the end of its service life. | Have your ice maker serviced by a qualified technician. | |
| "E1" appears on the display | The ambient temperature sensor is not working. | Have your ice maker serviced by a qualified technician. |
| "E2" appears on the display | The water temperature sensor is not working. | Have your ice maker serviced by a qualified technician. |
| My ice maker is noisy | Your ice maker makes noise during the freezing cycle and when it is dumping ice. | This is normal. |
| My ice maker will not stop | Ice full indicator board is broken. | Have your ice maker serviced by a qualified technician. |
Specifications
| Dimensions (HxWxD) 14.6 x | 9.9 x 14.2 in. (37.1 x 25.2 x 36 cm) |
| Weight 22 lbs. (10 kg) | |
| Power requirements 115V~ | 60Hz |
| Current Ice making - 2.2A | Ice harvest - 2.5A |
| Noise level <44 dB | |
| Operating temperature 50~ | 100.4° F (10~38°C) |
| Cube shape and size Square |
ONE-YEAR LIMITED WARRANTY
Definitions:
The Distributor* of Insignia branded products warrants to you, the original purchaser of this new Insignia-branded product ("Product"), that the Product shall be free of defects in the original manufacturer of the material or workmanship for a period of one (1) year from the date of your purchase of the Product ("Warranty Period").
For this warranty to apply, your Product must be purchased in the United States or Canada from a Best Buy branded retail store or online at www.bestbuy.comor www.bestbuy.ca and is packaged with this warranty statement.
How long does the coverage last?
The Warranty Period lasts for 1 year (365 days) from the date you purchased the Product. Your purchase date is printed on the receipt you received with the Product.
What does this warranty cover?
During the Warranty Period, if the original manufacture of the material or workmanship of the Product is determined to be defective by an authorized Insignia repair center or store personnel, Insignia will (at its sole option): (1) repair the Product with new or rebuilt parts; or (2) replace the Product at no charge with new or rebuilt comparable products or parts. Products and parts replaced under this warranty become the property of Insignia and are not returned to you. If service of Products or parts are required after the Warranty Period expires, you must pay all labor and parts charges. This warranty lasts as long as you own your Insignia Product during the Warranty Period. Warranty coverage terminates if you sell or otherwise transfer the Product.
How to obtain warranty service?
If you purchased the Product at a Best Buy retail store location or from a Best Buy online website (www.bestbuy.com or www.bestbuy.ca), please take your original receipt and the Product to any Best Buy store. Make sure that you place the Product in its original packaging or packaging that provides the same amount of protection as the original packaging.
To obtain warranty service, in the United States and Canada call 1-877-467-4289. Call agents may diagnose and correct the issue over the phone.
Where is the warranty valid?
This warranty is valid only in the United States and Canada at Best Buy branded retail stores or websites to the original purchaser of the product in the country where the original purchase was made.
What does the warranty not cover?
This warranty does not cover:
- Food, beverage, and/or medicine loss/spoilage.
- Customer instruction/education
• Installation
- Setup adjustments
- Cosmetic damage
- Damage due to weather, lightning, and other acts of God, such as power surges
- Accidental damage
- Misuse
- Abuse
• Negligence
- Commercial purposes/use, including but not limited to use in a place of business or in communal areas of a multiple dwelling condominium or apartment complex, or otherwise used in a place of other than a private home.
- Modification of any part of the Product, including the antenna
- Display panel damaged by static (non-moving) images applied for lengthy periods (burn-in).
- Damage due to incorrect operation or maintenance
- Connection to an incorrect voltage or power supply
- Attempted repair by any person not authorized by Insignia to service the Product
- Products sold "as is" or "with all faults"
- Consumables, including but not limited to batteries (i.e. AA, AAA, C etc.)
- Products where the factory applied serial number has been altered or removed
- Loss or Theft of this product or any part of the product
- Display panels containing up to three (3) pixel failures (dots that are dark or incorrectly illuminated) grouped in an area smaller than one tenth (1/10) of the display size or up to five (5) pixel failures throughout the display. (Pixel based displays may contain a limited number of pixels that may not function normally.)
- Failures or Damage caused by any contact including but not limited to liquids, gels or pastes.
REPAIR REPLACEMENT AS PROVIDED UNDER THIS WARRANTY IS YOUR EXCLUSIVE REMEDY FOR BREACH OF WARRANTY. INSIGNIA SHALL NOT BE LIABLE FOR ANY INCIDENTAL OR CONSEQUENTIAL DAMAGES FOR THE BREACH OF ANY EXPRESS OR IMPLIED WARRANTY ON THIS PRODUCT, INCLUDING, BUT NOT LIMITED TO, LOST DATA, LOSS OF USE OF YOUR PRODUCT, LOST BUSINESS OR LOST PROFITS. INSIGNIA PRODUCTS MAKES NO OTHER EXPRESS WARRANTIES WITH RESPECT TO THE PRODUCT, ALL EXPRESS AND IMPLIED WARRANTIES FOR THE PRODUCT, INCLUDING BUT NOT LIMITED TO ANY IMPLIED WARRANTIES OF AND CONDITIONS OF MERCHANTABILITY AND FITNESS FOR A PARTICULAR PURPOSE, ARE LIMITED IN DURATION TO THE WARRANTY PERIOD SET FORTH ABOVE AND NO WARRANTIES, WHETHER EXPRESS OR IMPLIED, WILL APPLY AFTER THE WARRANTY PERIOD. SOME STATES, PROVINCES AND JURISDICTIONS DO NOT ALLOW LIMITATIONS ON HOW LONG AN IMPLIED WARRANTY LASTS, SO THE ABOVE LIMITATION MAY NOT APPLY TO YOU. THIS WARRANTY GIVES YOU SPECIFIC LEGAL RIGHTS, AND YOU MAY ALSO HAVE OTHER RIGHTS, WHICH VARY FROM STATE TO STATE OR PROVINCE TO PROVINCE.
Contact Insignia:
1-877-467-4289
www.insigniaproducts.com
INSIGNIA is a trademark of Best Buy and its affiliated companies.
* Distributed by Best Buy Purchasing, LLC
7601 Penn Ave South, Richfield, MN 55423 U.S.A
©2023 Best Buy. All rights reserved.
ESPAÑOL
Introducción
natural_image
Line drawing of a portable appliance with a power outlet and three labeled outlets (no text or symbols on the device itself)natural_image
Technical line drawing of a mechanical device with internal components and an arrow indicating motion (no text or symbols)7601 Penn Avenue South, Richfield, MN 55423 E.U.A.
INSIGNIA is a trademark of Best Buy and its affiliated companies.
Distributed by Best Buy Purchasing, LLC
7601 Penn Ave South, Richfield, MN 55423 U.S.A.
©2023 Best Buy. All rights reserved.
- Contents
- ENGLISH
- ESPAÑOL
- Important Safety Instructions
- WARNING
- Electric Shock Hazard
- Features
- Package contents
- Product overview
- Setting up your ice maker
- Before using your ice maker
- Finding a suitable location
- Providing a proper power supply
- Notes:
- Using your ice maker
- Making ice
- CAUTIONS:
- Tips:
- Changing the thickness of the ice cubes
- Removing ice
- Using the timer to turn on your ice maker and start making ice
- Using the timer to turn off your ice maker
- Cleaning and maintaining your ice maker
- CAUTION:
- Draining the water from your ice maker
- Running the automatic self-cleaning program
- Cleaning the parts
- Deep cleaning your ice maker
- Troubleshooting
- ONE-YEAR LIMITED WARRANTY
- Definitions:
- How long does the coverage last?
- What does this warranty cover?
- How to obtain warranty service?
- Where is the warranty valid?
- What does the warranty not cover?
- Introducción
Brand : INSIGNIA
Model : NS-IMC44S3
Category : Ice Maker