
BG-ADAMO-JR - Security Camera BZBGear - Free user manual and instructions
Find the device manual for free BG-ADAMO-JR BZBGear in PDF.


| Product Type | Security Camera |
| Brand | BZBGear |
| Model | BG-ADAMO-JR |
| Dimensions | 110 x 60 x 60 mm |
| Weight | 200 g |
| Power Supply | DC 5V 1A (USB) |
| Video Resolution | 1080p Full HD |
| Night Vision | Up to 10 meters |
| Motion Detection | Yes, with alerts |
| Two-Way Audio | Yes |
| Field of View | 120 degrees |
| Storage | MicroSD card up to 128 GB |
| Connectivity | Wi-Fi 2.4 GHz |
| Waterproof Rating | IP65 (indoor/outdoor) |
| Mounting | Wall mount with included hardware |
| Operating Temperature | -10°C to 50°C |
| Compatibility | iOS and Android apps |
| Cleaning Instructions | Wipe with a soft dry cloth |
| Safety Warnings | Use only the provided power adapter |
| Spare Parts Availability | Contact BZBGear support |
| Repairability | Not user-serviceable; contact support |
| Included Accessories | Camera, USB cable, wall mount, manual |
Frequently Asked Questions - BG-ADAMO-JR BZBGear
User questions about BG-ADAMO-JR BZBGear
0 question about this device. Answer the ones you know or ask your own.
Ask a new question about this device
Download the instructions for your Security Camera in PDF format for free! Find your manual BG-ADAMO-JR - BZBGear and take your electronic device back in hand. On this page are published all the documents necessary for the use of your device. BG-ADAMO-JR by BZBGear.
USER MANUAL BG-ADAMO-JR BZBGear
Live Streaming PTZ Camera with Tally Lights
User Manual

Table of Contents
Statement 3
Safety Precaution 3
Introduction 4
Features 4
Packing List 5
Specifications 5
Installation and Handling Caution 7
Camera Interface 7
Mounting 8
Wall Mounting 8
Ceiling Mounting 9
Operating Instructions 9
Power on and Self-check 9
Remote 10
Remote Buttons Introduction 10
Network Connection 14
Web Client Login 17
SD Card Recording 19
Auto-Tracking Configuration 20
Zone Tracking Setup 21
General Configuration 22
Streaming 23
Serial Port Communication and Control 26
VISCA Protocol List 26
VISCA PROTOCOL RETURN COMMAND 26
VISCA PROTOCOL CONTROL COMMANDS 26
VISCA PROTOCOL INQUIRY COMMANDS 30
PELCO-D PROTOCOL COMMAND LIST 33
PELCO-P PROTOCOL COMMAND LIST 33
Maintenance and Troubleshooting 35
MAINTENANCE 35
TROUBLESHOOTING 35
Tech Support 36
Warranty 36
Mission Statement 36
Copyright 36
Statement
Please read these instructions carefully before connecting, operating, or configuring this product. Please save this manual for future reference.
Safety Precaution
- To prevent damaging this product, avoid heavy pressure, strong vibration, or immersion during transportation, storage, and installation.
- The housing of this product is made of organic materials. Do not expose to any liquid, gas, or solids which may corrode the shell.
- Do not expose the product to rain or moisture.
- To prevent the risk of electric shock, do not open the case. Installation and maintenance should only be carried out by qualified technicians.
- Do not use the product beyond the specified temperature, humidity, or power supply specifications.
- Wipe the lens with a soft, dry cloth when cleaning. Wipe it gently with a mild detergent if needed. Do not use strong or corrosive detergents to avoid scratching the lens and affecting the image.
- This product does not contain parts that can be maintained or repaired by users. Damage caused by dismantling the product without authorization from BZBGEAR is not covered under the warranty policy.
- Installation and use of this product must strictly comply with local electrical safety standards. The power supply of the product is ±12V , and the max electrical current is 2A.
- Electromagnetic fields at specific frequencies may affect the video image. This product is Class A and may cause radio interference in household applications and appropriate measures may be required for proper operation.
Introduction
The BZBGEAR BG-ADAMO-JRND is an ultra-high-definition PTZ camera that delivers 1080P resolution video at 60 fps. Available in a 12x optical zoom lens with a 70.28° wide-angle, 20x optical zoom lens with a 60.05° wide-angle, or 30X optical zoom 58.1° wide-angle lens. Featuring USB 2.0, USB 3.0, LAN, HDMI, 3G-SDI, and NDI HX|3 video connections allowing for flexible workflow options. The 3D noise reduction technology combined with the low-noise CMOS sensor ensures impeccable image clarity. The innovative auto-tracking software is intuitively designed for ease-of-use with two modes (presenter and zone) for exceptional results.
Features
- 1080P HD Resolution: The SONY CMOS sensor captures images in resolutions up to 1920x1080 with a frame rate of up to 60fps.
- Interfaces / Multiple Simultaneous Streaming Outputs: With a variety of outputs such as HDMI 2.0, 3G-SDI, USB3.0, USB 2.0, and LAN/NDI HX|3, the ADAMO can simultaneously broadcast multiple streams to multiple outputs.
- Optical Zoom Lens: The ADAMO features either a 12X optical zoom 70.28° wide-angle lens, or 20X optical zoom 60.05° wide-angle lens or 30X optical zoom 58.1° wide-angle lens.
- Multiple Audio/Video Compression Standards: H.264/H.265 video compression is supported by the LAN interface, USB 3.0 supports YUY2, and USB 2.0 supports MJPG, H.264, YUY2, NV12, H.265. USB 3.0 supports YUY2. The A-IN supports AAC audio compression coding.
- Advanced Auto Focusing Algorithm: The lens promptly snaps into focus with dependable accuracy and stability.
- Low Noise and High SNR: A high SNR (Signal to Noise Ratio) image is achieved using low noise CMOS sensors. The sophisticated 3D noise reduction technology further reduces the noise while ensuring high image clarity, even in low light.
• Supported Network Protocol: ONVIF, GB/T28181, RTSP, RTMP, NDI HX|3. - Control Options: 5-pin Phoenix terminal (compatible with RS232 andRS485), LAN, or IR remote control. Protocols include VISCA, PELCO-P/D, ONVIF, and VISCA over IP.
- Multiple Presets: Configure up to 255 presents using the Web GUI, or 10 presents via the IR remote control.
- Two Mode Auto-Tracking Software: Presenter mode continuously tracks keeping the subject perfectly framed. Zone mode holds the frame in predetermined zones.
Packing List
• 1 x BG-ADAMO-JRND
- 1 x User Manual
• 1 x IR Remote Control
• 1 x 12V/1.5A Power Supply
Specifications
| Camera Parameters | |||
| Optical Zoom | 12Xf=4.1 mm~ 49.2mm ±5% | 20Xf=5.05 mm~ 91.49 mm ±5% | 30Xf=5.2 mm~ 148.4 mm ±5% |
| View Angle | Horizontal: 6.57° (N) ~70.28° (W)Vertical: 3.76° (N) ~ 42.06°(W) | Horizontal: 3.45° (N) ~60.05° (W)Vertical: 1.96° (N) ~ 35.07°(W) | Horizontal: 2.14° (N) ~58.1° (W)Vertical: 1.2° (N) ~ 33.8° (W) |
| Iris Value | F1.8(Wide) ~ F2.68(Tele)±5% | F1.80(Wide) ~ F2.90(Tele)±5% | F1.3(Wide) ~ F4.8(Tele) ±5% |
| Sensor | 1/2.8 inch SONY CMOS sensor | ||
| Effective Pixels | 2M megapixel 16:9 | ||
| Video Format | HDMI :1080P60/50/30/25/59.94/29.97/24/23;1080I60/50/59.94; 720P60/50/59.94SDI :1080P60/50/30/25/59.94/29.97/24/23;1080I60/50/59.94; 720P60/50/59.94USB 2.0:MJPG :1920*1080/1280*720/1024*768/1024*576/800*600/720*576/720*480/704*576/640*360/352*288/320*240/640*480P30/25/20/15/10/5;H264:1920*1080/1280*720/1024*768/1024*576/800*600/720*576/720*480/704*576/640*480/640*360/352*288/320*240P30/25/20/15/10/5;HEVC:1920*1080/1280*720/1024*768/1024*576/800*600/720*576/720*480/704*576/640*480/640*360/352*288/320*288/320*240P30/25/20/15/10/5YUY2 : 640*360 /432*240P30/25/20/15/10/5NV12 : 640*360 /432*240P30/25/20/15/10/5USB 3.0:YUY2 : 1920*1080P30/25;1280*720P60/50/30/25;960*540/800*600/640*480P30; | ||
| Minimum Illumination | 0.5Lux (F1.8, AGC ON) | ||
| DNR | 3D DNR | ||
| White Balance | Auto / Manual/ One Push/ Specified Temperature | ||
| Focus | Auto/Manual/One Push Focus | ||
| Exposure Mode | Auto/Manual/Shutter priority/Aperture priority/brightness priority | ||
| Aperture | F1.8 ~ F11 CLOSE | ||
| Shutter Speed | 1/25~1/10000 | ||
| BLC | ON/OFF | ||
| Video Adjustment | Brightness, Color, Saturation, Contrast, Sharpness, B/W mode | ||
| SNR | ≥50dB | ||
| Interface | |||
| Product Interfaces | HDMI, 3G-SDI, LAN (supports PoE+), USB 2.0, A-IN, USB 3.0, SD (FAT32), 5-pin Phoenix terminal (compatible with RS232 andRS485), DC12V, Power Switch | ||
| Video Compression Format | LAN Interface: H.264, H.265USB 2.0 Interface: MJPG, H264, YUY2, NV12USB3.0 Interface: YUY2 | ||
| Audio Input Interface | Stereo 3.5mm AUX | ||
| Audio Output Interface | HDMI, LAN, 3G-SDI, USB 2.0, USB 3.0, NDI | ||
| Audio Compression Format | AAC | ||
| Network Interface | 10M/100M/1000M adaptive Ethernet port, PoE Plus power supply, audio and video output | ||
| Network Protocols | RTSP, RTMP, ONVIF, GB/T28181, NDI; VISCA IP control protocol | ||
| Control Interface | 5 pin Phoenix terminal (compatible with RS232 andRS485), LAN | ||
| Serial Communication Protocol | VISCA/Pelco-D/Pelco-P;Baud Rate: 115200/38400/9600/4800/2400 | ||
| USB Communication Protocol | UVC (Video) | ||
| Power Interface | HEC3800 outlet (DC12V), PoE+ | ||
| Supply Adapter | AC110V~AC220V to DC12V/2.5A | ||
| Input Voltage | DC12V±10% | ||
| Input Current | <2.5A | ||
| Power Consumption | <30W | ||
| PTZ Parameters | |||
| Pan Rotation | -170°~+170° | ||
| Tilt Rotation | -30°~90° | ||
| Pan Control Speed | 0.1°/s ~100°/s | ||
| Tilt Control Speed | 0.1°/s ~70°/s | ||
| Preset Speed | Pan: 78.8°/s, Tilt: 31.7°/s | ||
| Preset Number | 255 presets via Web GUI (10 presets using remote control) | ||
| Other Parameters | |||
| Stored Temperature | -10°C~+60°C | ||
| Storage Humidity | 20%~95% | ||
| Working Temperature | -10°C~+50°C | ||
| Working Humidity | 20%~80% | ||
| Dimension | (L)mm*mm(W)*mm(H) | ||
| Weight | ~4 Lbs | ||
| Application | Indoor | ||
Installation and Handling Caution
- Do not manually rotate the camera head as it could cause mechanical failure.
- Place the camera on a stable table or horizontal surface. Installing on a slanted surface will result in a slanted image.
- Do not place obstacles within the camera's rotation circumference.
- For proper operation and synchronization, do not power the camera on until the cable installation has been completed.
Camera Interface

- USB 3.0: Connect USB 3.0 type B cable to a PC for plug & play connectivity for any conferencing service like Skype or Zoom, supporting resolution up to 1080p@60Hz.
- USB 2.0: Connect USB 2.0 type A cable to a PC for plug & play connectivity for any conferencing service like Skype or Zoom, supporting resolution up to 1080p@60Hz.
- 3G-SDI: Connect to an SDI device up to 330ft such as a video production switcher or a video display at resolutions up to 1080p@60Hz over SDI cabling.
- HDMI: Connect to an HDMI device such as a video production set or a video display up to 1080p@60Hz.
- MicroSD: Record up to 1 TB.
- Audio In: Connect external audio sources such as a microphone small audio mixer to embed the sound into all video output inte
- RS-232, RS-485: Connect cascading RS-232 or RS-485 to conti camera(s) with a joystick controller or control software.
- LAN: Connect to a network switch via category cable to supply (PoE), control (TCP/IP or webGUI) and stream.
- Power: Connect supplied 12V power adapter.
Mounting
Note: Ceiling or wall mounting brackets should be mounted to a wooden or concrete wall. Mounting to plasterboard is not recommended for safety reasons.
Wall Mounting

Anti-vibrate Cushion

Limited Post

1/4-20 UNC Bolt

M6 Nut and Shim

M6 Swelling Bolts

Wall Mounting Bracket

Camera
| STEP 1 Anti - vibrate Cushion Wall Mount | STEP 2 M6 Swelling Bolt Wall | STEP 3 Limited Post Wall Mount |
| STEP 4 Wall Wall Mount M6 Nut and Shim | STEP 5 Camera Wall Mount 1/4-20UNC Bolt | FINISH |
Ceiling Mounting

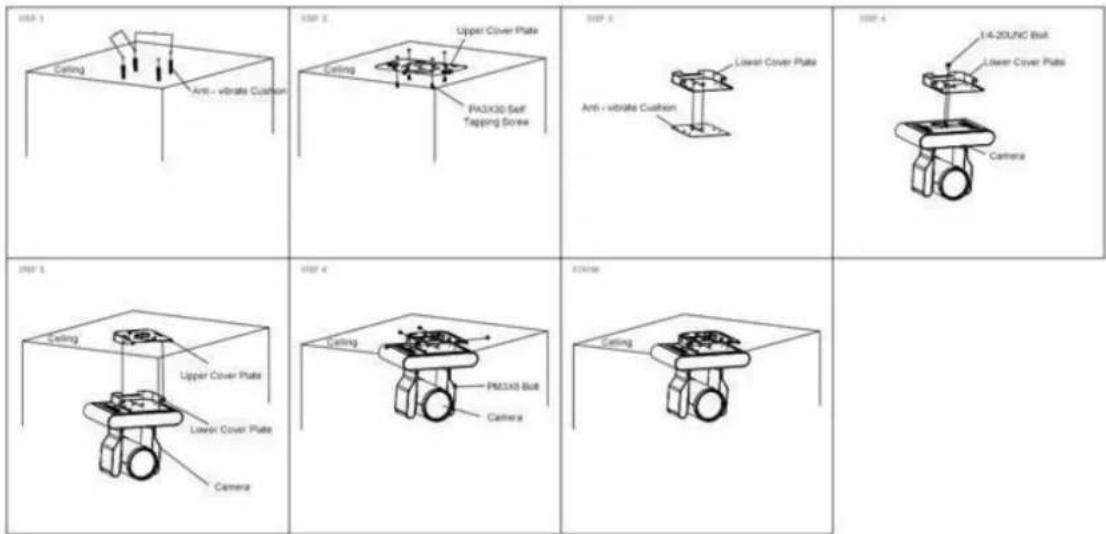
Operating Instructions
POWER ON AND SELF-CHECK
-
Power-on: Connect the DC12V power adaptor to the power supply socket on the back of the camera. or connect to a PoE enabled network switch using a category cable.
-
Camera Self-check: The remote-control IR indicator and tally lights will flash when powered on. The camera will pan-tilt to the lowest left position, then return to the HOME position (both the horizontal and vertical positions are in the middle). The lens/zoom will move through its complete range. Once the remote-control IR indicator and tally lights stop flashing, the self-check has been completed.
Notes:
-
After the power-on and self-check, the camera will automatically return to the preset 0 position.
-
The factory default address for the IR remote-control is #1.
REMOTE
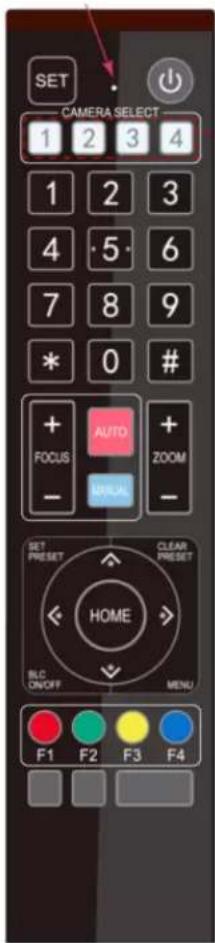
One-to-One Code Matching:
Out of the box the remote is automatically paired with the camera. Should the camera need to be re-pair with the remote, perform the steps below.
- Press the "set" and "*" keys combined for 3 seconds. The LED indicator will start flashing.
- The camera will receive the signal and power on if not already on.
- The LED indicator will turn off if the code matching is successful.
If the one-to-one code matching has failed, the LED indicator will flash for 20 seconds and turn off. The camera will stop code matching and go into sleep mode. Press any key to wake the camera up and reattempt code matching.
REMOTE BUTTONS INTRODUCTION
In this manual, “press the button” means a click rather than a “press and hold”. Special instructions will be given if pressing and holding the button for more than one second is required. When a button-combination is required, perform the actions in sequence. For example, 【*】 + 【#】 + 【F1】 means press “【*】” first, then “【#】” and press “【F1】” last.
1. Camera Remote Control Address Setting

【*】+【#】+【F1】:Camera Address No.1
【*】+【#】+【F2】:Camera Address No. 2
Select the camera's address to control it.
3. Pan/Tilt Control

Up: press ▲ Down: press ▼ Left: press ◀ Right: press ▶
Return to middle position: press 【HOME】
Press and hold the up, down, left, or right button to pan/tilt the camera. The camera will continue to move in the arrow direction until either the button is released or the camera has reached its full range of motion.
4. Focus Control and Zoom

FOCUS + (near) : Press to adjust the lens focus.
FOCUS - (far) : Press to adjust the lens focus.
MANUAL : Press to enter manual focus mode.
AUTO : Press to return to auto focus mode.
ZOOM + : Press to zoom in.
ZOOM - : Press to zoom out.
5. Set and Clear Presets
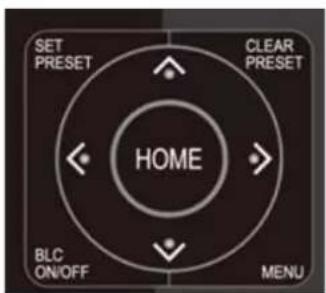
Set Preset: Press the 【SET PRESET】 button, then press the number buttons 0-9 to set the preset positions.
Note: 10 presets are available via remote control.
Call Preset: Press the 0-9 number buttons to call a preset position.

Clear Preset: Press the 【CLEAR PRESET】 button, then press the desired number button to clear its preset position.
BLC ON/OFF: Turn on/off the BLC.
Menu: Enter/Exit OSD menu or return to the previous menu.
Note: Pressing the 【#】 key three times in a row will clear all presets.
6. Auto Tracking Buttons
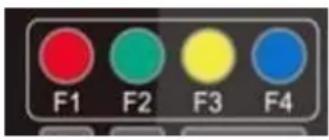
F1: Turn off auto tracking
F2: Turn on auto tracking
F3: Switch auto tracking modes
F4: Switch auto tracking to follow a different person
7. Key Combinations
[*] + 【#】 + 【3】: The menu is set to Chinese
- Direct connection: Connect the camera directly to the computer using an ethernet cable.
- Internet connection mode: Connect the camera and computer to a router or switch and access via the local area network (LAN).
Note: Ensure power and network connections are secured to prevent video issues caused by poor connection quality.
The computer must be on the same subnet as the camera to connect successfully. The device will not be accessible otherwise. The camera's default IP address is 192.168.5.163, therefore the computer must be connected to the 192.168.5.x subnet.
- To connect to the camera, open the Local Area Connection Properties on the computer.
- For Windows users right-click on the internet connection in the lower right hand corner of the desktop. Select "Open Network & Internet Settings".
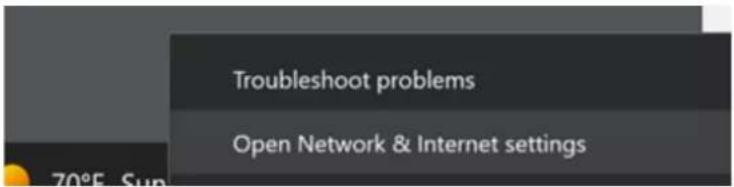
- Select "Change Adapter Options"


Show available networks
View the connection options around you.
Advanced network settings

Change adapter options
View network adapters and change connection settings.

Network and Sharing Center
For the networks you connect to, decide what you want to share.

Network troubleshooter
Diagnose and fix network problems.
- Right-click on your connection and select "Status".
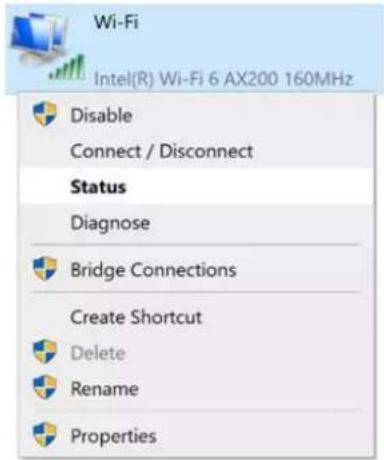
Then click "B" Take note of your current IPv4 Address and Default Gateway as you will need this information later. Close the Details and Status windows.
- Right-click on your connection (Wi-Fi or Ethernet) and select "Properties".
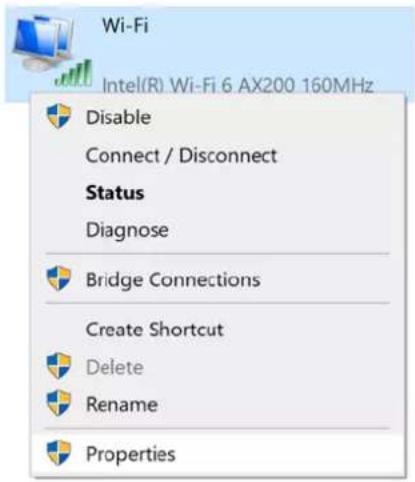
- Select "Internet protocol version 4 (TCP/IPv4" as shown below and click "Properties".

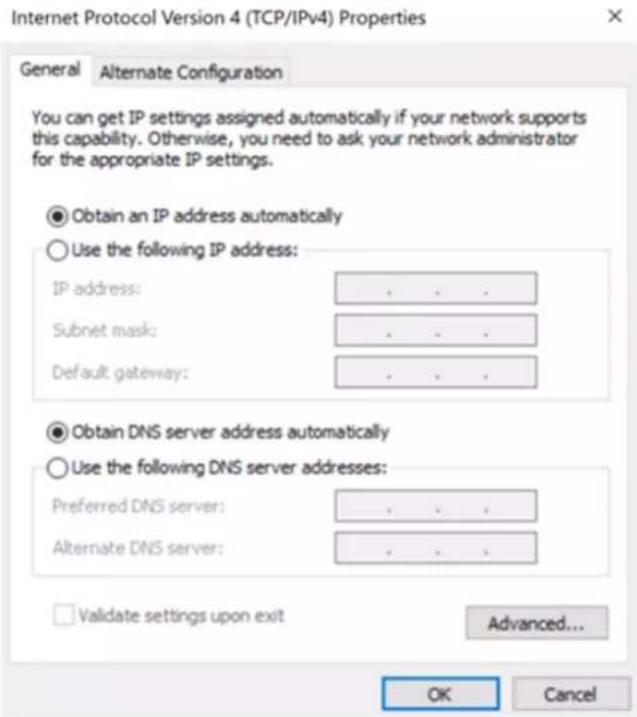
For the following steps refer to the diagram below.
- Click on the bubble for "Use the following IP address"
- In the IP address field, enter a non-conflicting IP address on the same subnet as the camera. If there is another device with the same IP address, you will not be able to connect. In the example below uses 192.168.5.200
• In the Subnet mask field enter 255.255.255.0
• In the Default gateway field type 192.168.5.1 - Leave the DNS fields blank.
- Click "OK" to apply the settings.

Web Client Login
- Enter 192.168.5.163 in the address bar of your internet browser and click "Enter". Login as the administrator (Default Username/Password: admin). Users can preview and configure in the Web Client.
- When logged in as a normal user (Default Username/Password: user1 or user2), users can only preview with no options for configuration.

- Navigate to Configuration in the top left corner of the screen. Click "Ethernet" on the left-hand side.

- Enter an unused IP address on your network.
Note: you should have this information from the "Status" and "Details" pages of your internet connection noted above.
• In this example we use 192.168.30.116
- Change the Subnet Mask to 255.255.255.0
- Default gateway of your network
- Click "Save"
- Reboot the Camera
Navigate to Configuration -> DNS

- In the "Preferred DNS Server" type 8.8.8.8
- In the “Alternative DNS Server” type 8.8.4.4
- Click "Save" and reboot the camera once more.
- Once you have completed the camera network setup, repeat the steps on your computer to adjust the “Internet Protocol Version 4 (TCP/IPV4) Properties.” Select the bubbles to “Obtain an IP address automatically” and “Obtain DNS server address automatically.”
- Preview

After successfully logging into the management interface, the web portal will enter the "Preview" tab. In Preview, users can control pan/tilt, zoom, focus, video capture, sound, focus, full screen preview, as well as set the preset position, run, delete, and other operations.
SD Card Recording
- The recording option will appear in the bottom right corner of the "Preview Screen" after a compatible SD card is inserted into the camera.
The BG-ADAMO line of cameras currently only supports FAT32 format at this time. Before recording, ensure the SD card has been formatted properly.
- The BG-ADAMO is capable of using micro SD cards up to 1Tb when properly formatted.
Note: If your SD card does not allow you to format it to FAT32 a program such as "rufus-3.21.exe" may be required.
Note: FAT32 only allows for file sizes up to 4Gb so longer/higher resolution recordings may be broken up into several files.
- Recording parameters are changed by editing the Video Encode "Main Stream" settings.
- Synchronize the camera time before recording as file names will be generated based on system time.
- WARNING! Be careful when inserting a Micro SD card into the unit as there is an air gap above the SD socket and it may be possible to push a SD card into the housing if not properly inserted.
Auto-Tracking Configuration

To set up or enable auto-tracking, select "Track Configuration" on the top right corner.
Select "On" under the option for Monocular Tracking.
You have 2 modes for tracking:

Presenter: The camera will continuously follow the subject until either the subject moves beyond the camera's physical range of motion, a new more prominent target is in frame, or the tracking is disabled. The Adamo can accurately track subjects up to 6-7 meters away walking at speeds of up to 5-6 mph.
Headroom: Select from Low, Medium (default), or High settings to adjust space the tracking subject (only available in Presenter mode)
Zone: The camera holds its frame in predetermined zones. The camera tracks and moves only when the subject has left one zone and entered the next, then holds the frame in the new zone. If the subject exits the preset zones entirely, the camera will reset to the first zone. The minimum zone allowance is 2 and the maximum is 4 zones. The zone size limits are -170°~+170° horizontal, and -30°~+90° vertical. See the next section “Zone Tracking Setup” for instructions.
ZONE TRACKING SETUP

- Zone tracking must be set up using the web interface. However, it can be activated using the remote once the setup process has been completed.
- Using either the remote or web interface, adjust the camera to the desired shot.
- Select "Set" to save the shot on the desired region.
- Preset images will be shown below the preview image.
- Click the Check box on the region to enable tracking for the new zone and to save the preset.
- Perform the steps again for at least 1 more zone (up to 4).
Note: Each preset preview image must be continuous from left to right and overlap when setting the tracking regions. See the picture below for an example:

General Configuration
To access system settings select "Configuration" in the top left corner of the web interface.
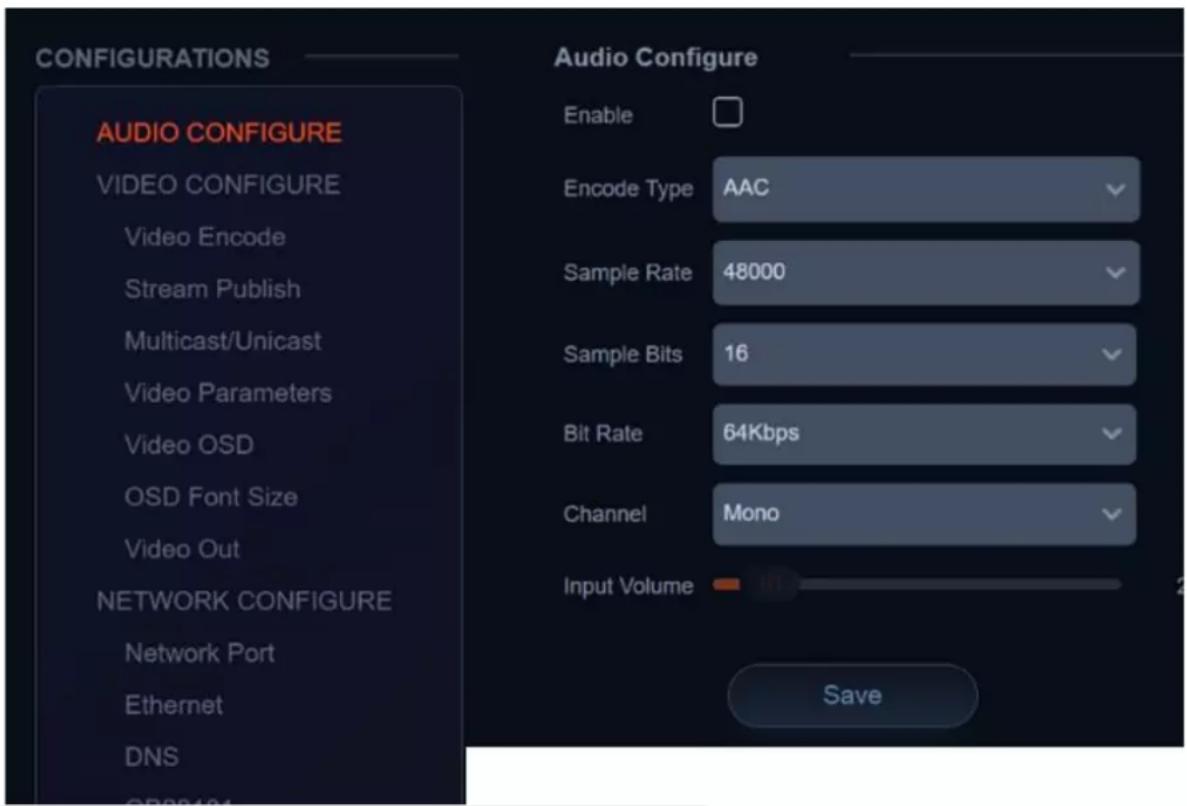
| Menu | Explanation |
| Audio Configure | Includes audio compression formats, sampling frequency, sampling precision, compressing code rate settings etc. |
| Video Configure | Includes video encoding, video parameters, character-overlapping, character size, video output setting etc. |
| Network Configure | Includes Network Ports for video formats, Ethernet static or DHCP, DNS, GB28181, SRT, and RTSP |
| System Configure | Includes device name, system time, user management, version update, reset, and restore factory defaults |
Streaming
Navigate to Configuration -> Video Encode
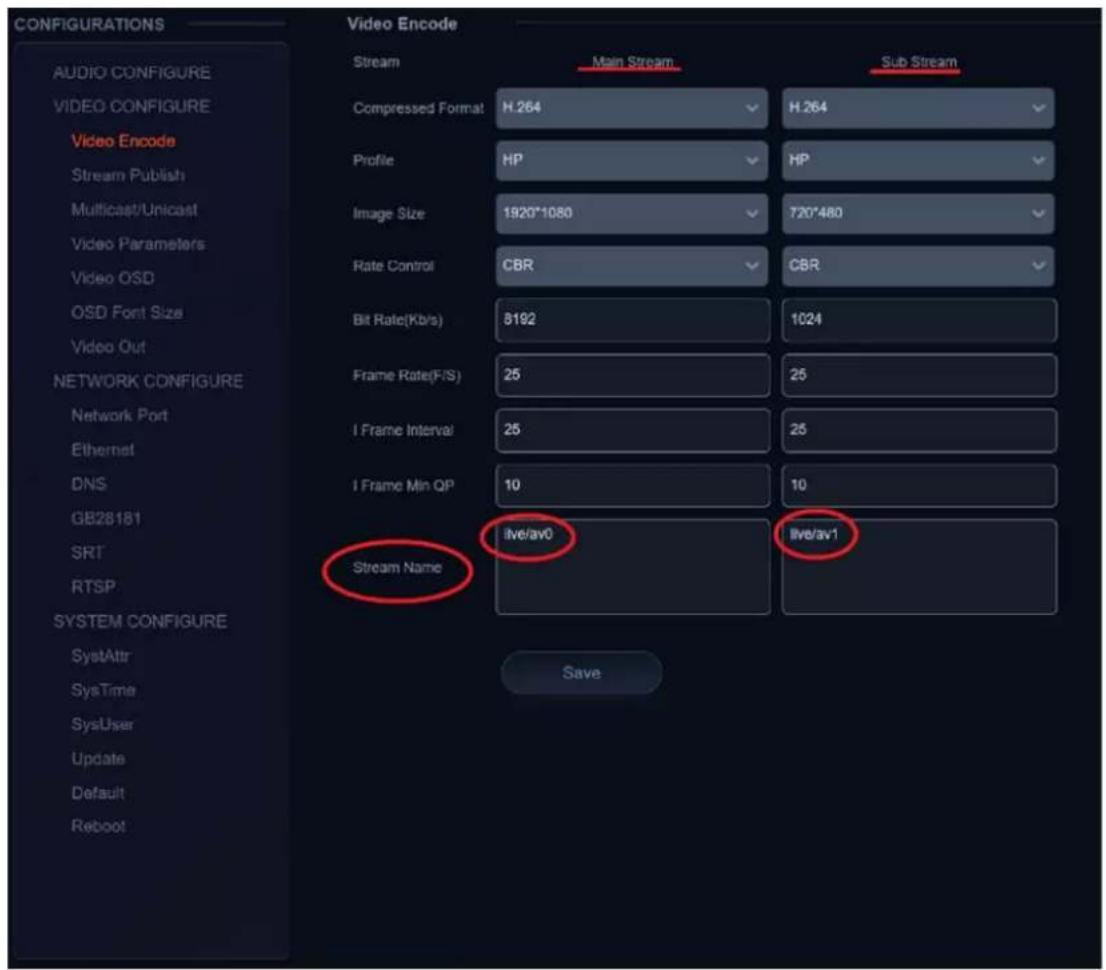
Configure the parameters according to the network environment.
Note: stream name - live/av0 (live/ XXX)
For example:
The default IP address of the camera is 192.168.5.163. To obtain the RTSP video stream, see below:
rtsp://192.168.5.163:554/live/av0 (av0 main stream)
rtsp://192.168.5.163:554/live/av1 (av1 sub stream)
The default IP address of the camera is 192.168.5.163. To obtain the RTMP video stream, see below:
rtmp://192.168.5.163:1935/live/av0 (av0 main stream)
rtmp://192.168.5.163:1935/live/av1 (av1 sub stream)
LIVE STREAM PUBLISH
Navigate to Configuration -> Audio Configure

Ensure the check box next to "Enable" is toggled.
- Select AAC as the "Encode Type."
- Change "Bitrate" to 128kbps.
- Click Save and Reboot the camera.
Note: It may be necessary to adjust the Image Size under "Video Encode" to Live Stream due to bandwidth limitations on certain platforms.
Navigate to Configuration -> Stream Publish

- To push an RTMP stream to a public network, such as Facebook or YouTube, the camera must be connected to a network otherwise it will fail to connect to a server.
- Host Address: Server address, domain name, or an IP address.
- Host Port: Server default port number (Facebook 443 / YouTube 1935).
- Stream Name: Stream key provided by streaming platform.
- Username and Password: Leave blank as they are set by the server.
- Click "Save"
NDI

- The BG-ADAMO-JRND has NDI enabled by default.
- Change the NDI Name and NDI Group on this screen.
Note: Please consult your streaming software instructions on how to connect to the NDI stream from the camera.
Serial Port Communication and Control
The camera can be controlled through an RS232/RS485 interface. RS232C serial parameters are as follows: Baud rate: 2400/4800/9600/115200 bits / sec; Start bit: 1; data bits: 8; Stop bit: 1; Parity: None
VISCA Protocol List
VISCA PROTOCOL RETURN COMMAND
| Ack/Completion Message | ||
| Command packet | Note | |
| ACK | z0 41 FF | Returned when the command is accepted. |
| Completion | z0 51 FF | Returned when the command has been executed. |
z= camera address + 8
| Error Messages | ||
| Command packet | Note | |
| Syntax Error | z0 60 02 FF | Returned when the command format is different or when a command with illegal command parameters is accepted |
| Command Not Executable | z0 61 41 FF | Returned when a command cannot be executed due to current conditions. For example, when commands controlling the focus manually are received during auto focus. |
VISCA PROTOCOL CONTROL COMMANDS
| Command | Function | Command packet | Note |
| AddressSet | Broadcast | 88 30 0p FF | p : Address setting |
| IF_Clear | Broadcast | 88 01 00 01 FF | I/F Clear |
| CommandCancel | 8x 21 FF | ||
| CAM_Power | On | 8x 01 04 00 02 FF | Power ON/OFF |
| Off | 8x 01 04 00 03 FF | ||
| CAM_Zoom | Stop | 8x 01 04 07 00 FF | |
| Tele(Standard) | 8x 01 04 07 02 FF | ||
| Wide(Standard) | 8x 01 04 07 03 FF | ||
| Tele(Variable) | 8x 01 04 07 2p FF | ||
| Wide(Variable) | 8x 01 04 07 3p FF | p = 0(low) - F(high) | |
| Direct | 8x 01 04 47 0p 0q 0r 0s FF | ||
| CAM_Focus | StopFar(Standard) | 8x 01 04 07 00 FF8x 01 04 08 00 FF | |
| Near(Standard) | 8x 01 04 08 02 FF | ||
| Far(Variable) | 8x 01 04 08 03 FF | p = 0(low) - F(high) | |
| Near (Variable) | 8x 01 04 08 2p FF | ||
| Direct | 8x 01 04 08 3p FF | pqrs: Focus Position | |
| Auto Focus | 8x 01 04 48 0p 0q 0r 0s FF | ||
| Manual Focus | 8x 01 04 38 03 FF | ||
| One Push mode | 8x 01 04 38 04 FF | ||
| CAM _Zoom Focus | Direct | 8x 01 04 47 0p 0q 0r 0s0t 0u 0v 0w FF | pqrs: Zoom Positiontuvw: Focus Position |
| CAM_WB | Auto | 8x 01 04 35 00 FF | |
| 3000K | 8x 01 04 35 01 FF | ||
| 4000k | 8x 01 04 35 02 FF | ||
| One Push mode | 8x 01 04 35 03 FF | ||
| 5000k | 8x 01 04 35 04 FF | ||
| CAM_WB (cont.) | Manual | 8x 01 04 35 05 FF | |
| 6500k | 8x 01 04 35 06 FF | ||
| 3500K | 8x 01 04 35 07 FF | ||
| 4500K | 8x 01 04 35 08 FF | ||
| 5500K | 8x 01 04 35 09 FF | ||
| 6000K | 8x 01 04 35 0A FF | ||
| 7000K | 8x 01 04 35 0B FF |
| Command | Function | Command packet | Note |
| CAM_RGain | Reset | 8x 01 04 03 00 FF | Manual Control of R Gain |
| Up | 8x 01 04 03 02 FF | ||
| Down | 8x 01 04 03 03 FF | ||
| Direct | 8x 01 04 43 00 00 0p 0q FF | pq: R Gain | |
| CAM_Bgain | Reset | 8x 01 04 04 00 FF | Manual Control of B Gain |
| Up | 8x 01 04 04 02 FF | ||
| Down | 8x 01 04 04 03 FF | ||
| Direct | 8x 01 04 44 00 00 0p 0q FF | pq: B Gain | |
| CAM_AE | Full Auto | 8x 01 04 39 00 FF | Automatic Exposure mode |
| Manual | 8x 01 04 39 03 FF | Manual Control mode | |
| Shutter priority | 8x 01 04 39 0A FF | Shutter Priority Automatic Exposure mode | |
| Iris priority | 8x 01 04 39 0B FF | Iris Priority Automatic Exposure mode | |
| Bright | 8x 01 04 39 0D FF | Bright mode | |
| Full Auto | 8x 01 04 39 00 FF | Automatic Exposure mode | |
| CAM_Shutter | Reset | 8x 01 04 0A 00 FF | Shutter Setting |
| Up | 8x 01 04 0A 02 FF | ||
| Down | 8x 01 04 0A 03 FF | ||
| Direct | 8x 01 04 4A 00 00 0p 0q FF | pq: Shutter Position | |
| CAM_Iris | Reset | 8x 01 04 0B 00 FF | Iris Setting |
| Up | 8x 01 04 0B 02 FF | ||
| Down | 8x 01 04 0B 03 FF | ||
| Direct | 8x 01 04 4B 00 00 0p 0q FF | pq: Iris Position | |
| CAM_Gain Limit | Gain Limit | 8x 01 04 2C 0p FF | p: Gain Position |
| Reset | 8x 01 04 0D 00 FF | ||
| CAM_Bright | Up | 8x 01 04 0D 02 FF | |
| Down | 8x 01 04 0D 03 FF | Bright Setting | |
| Direct | 8x 01 04 4D 00 00 0p 0q FF | pq: Bright Position | |
| CAM_ExpComp | On | 8x 01 04 3E 02 FF | Exposure Compensation ON/OFF |
| Off | 8x 01 04 3E 03 FF | ||
| Reset | 8x 01 04 0E 00 FF | Exposure Compensation Amount Setting | |
| Up | 8x 01 04 0E 02 FF | ||
| CAM_ExpComp | Down | 8x 01 04 0E 03 FF | |
| Direct | 8x 01 04 4E 00 00 0p 0q FF | pq: ExpComp Position | |
| CAM_Back Light | On | 8x 01 04 33 02 FF | Back Light Compensation |
| Off | 8x 01 04 33 03 FF | ||
| CAM_WDRStrength | Reset | 8x 01 04 21 00 FF | WDR Level Setting |
| Up | 8x 01 04 21 02 FF | ||
| Down | 8x 01 04 21 03 FF |
| Command | Function | Command packet | Note |
| CAM_WDRStrength (cont.) | Direct | 8x 01 04 51 00 00 00 0p FF | p: WDR Level Position |
| CAM_NR (2D) | 8x 01 04 53 0p FF | P=0-7 0:OFF | |
| CAM_NR (3D) | 8x 01 04 54 0p FF | P=0-8 0:OFF | |
| CAM_Gamma | 8x 01 04 5B 0p FF | p = 0 - 40: Default 1 : 0.45 2 : 0.50 3 : 0.55 4 : 0.63 | |
| CAM_Flicker | OFF | 8x 01 04 23 00 FF | OFF |
| 50HZ | 8x 01 04 23 01 FF | 50HZ | |
| 60HZ | 8x 01 04 23 02 FF | 60HZ | |
| CAM_Aperture | Reset | 8x 01 04 02 00 FF | Aperture Control |
| Up | 8x 01 04 02 02 FF | ||
| Down | 8x 01 04 02 03 FF | ||
| Direct | 8x 01 04 42 00 00 0p 0q FF | pq: Aperture Gain | |
| CAM_Memory | Reset | 8x 01 04 3F 00 pq FF | pq: Memory Number(=0 to 254)Corresponds to 0 to 9 on the Remote Commander |
| Set | 8x 01 04 3F 01 pq FF | ||
| Recall | 8x 01 04 3F 02 pq FF | ||
| CAM_LR_Reverse | On | 8x 01 04 61 02 FF | Image Flip Horizontal ON/OFF |
| Off | 8x 01 04 61 03 FF | ||
| CAM_PictureFlip | On | 8x 01 04 66 02 FF | Image Flip Vertical ON/OFF |
| Off | 8x 01 04 66 03 FF | ||
| CAM_ColorSaturation | Direct | 8x 01 04 49 00 00 00 0p FF | P=0-E0:60% 1:70% 2:80% 3:90% 4:100%5:110% 6:120% 7:130% 8:140%9:150% 10:160% 11:160%12:180% 13:190% 14:200% |
| CAM_IDWrite | 8x 01 04 22 0p 0q 0r 0s FF | pqrs: Camera ID (=0000 to FFFF) | |
| SYS_Menu | ON | 8x 01 04 06 06 02 FF | Turn on the menu screen |
| OFF | 8x 01 04 06 06 03 FF | Turn off the menu screen | |
| IR_Receive | ON | 8x 01 06 08 02 FF | IR(remote commander)receive On/Off |
| OFF | 8x 01 06 08 03 FF | ||
| IR_ReceiveReturn | On | 8x 01 7D 01 03 00 00 FF | IR(remote commander)receive message via |
| Off | 8x 01 7D 01 13 00 00 FF | ||
| IR_ReceiveReturn | Reset | 8x 01 04 A0 10 FF | Reset Factory Setting |
| CAM_Brightness | Direct | 8x 01 04 A1 00 00 0p 0q FF | pq: Brightness Position |
| CAM_Contrast | Direct | 8x 01 04 A2 00 00 0p 0q FF | pq: Contrast Position |
| CAM_Flip | OFF | 8x 01 04 A4 00 FF | Single Command For Video Flip |
| Flip-H | 8x 01 04 A4 01 FF | ||
| Flip-V | 8x 01 04 A4 02 FF | ||
| Flip-HV | 8x 01 04 A4 03 FF |
| Command | Function | Command packet | Note |
| CAM_VideoSystem | Set camera video system | 8x 01 06 35 00 0p FF | P: 0~E Video format0:1080P60 8:720P301:1080P50 9:720P252:1080i60 A : 1080P59.943:1080i50 B : 1080i59.944:720P60 C : 720P59.945:720P50 D : 1080P29.976:1080P30 E : 720P29.977:1080P25 |
| Pan_tiltDrive | Up | 8x 01 06 01 VV WW 03 01 FF | VV: Pan speed 0x01 (low speed) to 0x18 (high speed)WW: Tilt speed 0x01 (low speed) to 0x14 (high speed)YYYY: Pan Position ZZZZ: Tilt Position |
| Down | 8x 01 06 01 VV WW 03 02 FF | ||
| Left | 8x 01 06 01 VV WW 01 03 FF | ||
| Right | 8x 01 06 01 VV WW 02 03 FF | ||
| Upleft | 8x 01 06 01 VV WW 01 01 FF | ||
| Upright | 8x 01 06 01 VV WW 02 01 FF | ||
| DownLeft | 8x 01 06 01 VV WW 01 02 FF | ||
| DownRight | 8x 01 06 01 VV WW 02 02 FF | ||
| Stop | 8x 01 06 01 VV WW 03 03 FF | ||
| AbsolutePosition | 8x 01 06 02 VV WW0Y 0Y 0Y 0Y 0Z 0Z 0Z FF | ||
| RelativePosition | 8x 01 06 03 VV WW0Y 0Y 0Y 0Y 0Z 0Z 0Z FF | ||
| Home | 8x 01 06 04 FF | ||
| Reset | 8x 01 06 04 FF | ||
| Pan-tiltLimitSet | Set | 8x 01 06 07 00 0W0Y 0Y 0Y 0Y 0Z 0Z 0Z FF | 8x 01 06 07 01 0W07 0F 0F 0F 07 0F 0F 0F FF |
| Clear | 8x 01 06 07 01 0W07 0F 0F 0F 07 0F 0F 0F FF |
| Command | Function | Command packet | Note |
| Red On | Tally Light On | 81 01 7E 01 0A 00 02 00 FF | Red Tally Light On |
| Red Off | Tally Light Off | 81 01 7E 01 0A 00 03 00 FF | Red Tally Light Off |
| Green On | Tally Light On | 81 01 7E 01 0A 00 00 02 FF | Green Tally Light On |
| Green Off | Tally Light Off | 81 01 7E 01 0A 00 00 03 FF | Green Tally Light Off |
VISCA PROTOCOL INQUIRY COMMANDS
| Command | Command Packet | Return Packet | Note |
| CAM_PowerInq | 8x 09 04 00 FF | y0 50 02 FF | On |
| y0 50 03 FF | Off(Standby) | ||
| CAM_ZoomPosInq | 8x 09 04 47 FF | y0 50 0p 0q 0r 0s FF | pqrs: Zoom Position |
| CAM_FocusAFModelInq | 8x 09 04 38 FF | y0 50 02 FF | Auto Focus |
| y0 50 03 FF | Manual Focus | ||
| y0 50 04 FF | One Push mode | ||
| CAM_FocusPosInq | 8x 09 04 48 FF | y0 50 0p 0q 0r 0s FF | pqrs: Focus Position |
| Command | Command Packet | Return Packet | Note |
| CAM_WBModelInq | 8x 09 04 35 FF | y0 50 00 FF | Auto |
| y0 50 01 FF | 3000K | ||
| y0 50 02 FF | 4000K | ||
| y0 50 03 FF | One Push Mode | ||
| CAM_FocusPosInq | 8x 09 04 48 FF | y0 50 0p 0q 0r 0s FF | pqrs: Focus Position |
| Command | Command Packet | Return Packet | Note |
| y0 50 04 FF | 5000K | ||
| y0 50 05 FF | Manual | ||
| y0 50 00 FF | 6500K | ||
| y0 50 06 FF | 6500K | ||
| y0 50 07 FF | 3500K | ||
| y0 50 08 FF | 4500K | ||
| y0 50 09 FF | 5500K | ||
| y0 50 0A FF | 6000K | ||
| CAM_RGainInq | 8x 09 04 43 FF | y0 50 0B FF | 7000K |
| CAM_BGainInq | 8x 09 04 44 FF | y0 50 00 00 0p 0q FF | pq: B Gain |
| CAM_AEmodelInq | 8x 09 04 39 FF | y0 50 00 FF | Full Auto |
| y0 50 03 FF | Manual | ||
| y0 50 0A FF | Shutter priority | ||
| y0 50 0B FF | Iris priority | ||
| CAM_ShutterPosInq | 8x 09 04 4A FF | y0 50 00 00 0p 0q FF | pq: Shutter Position |
| CAM_IrisPosInq | 8x 09 04 4B FF | y0 50 00 00 0p 0q FF | pq: Iris Position |
| CAM_Gain LimitInq | 8x 09 04 2C FF | y0 50 0p FF | p: Gain Position |
| CAM_BrightPosInq | 8x 09 04 4D FF | y0 50 00 00 0p 0q FF | pq: Bright Position |
| CAM_ExpCompModelInq | 8x 09 04 3E FF | y0 50 02 FF | On |
| y0 50 03 FF | Off | ||
| CAM_ExpCompPosInq | 8x 09 04 4E FF | y0 50 00 00 0p 0q FF | pq: ExpComp Position |
| CAM_BacklightModelInq | 8x 09 04 33 FF | y0 50 02 FF | On |
| y0 50 03 FF | Off | ||
| CAM_WDRStrengthInq | 8x 09 04 51 FF | y0 50 00 00 00 0p FF | p: WDR Strength |
| CAM_NRLevel(2D) InqCAM_FocusPosInq | 8x 09 04 53 FF8x 09 04 48 FF | y0 50 0p FFy0 50 0p 0q 0r 0s FF | P: 2DNRLevelpqrs: Focus Position |
| Command | Command Packet | Return Packet | Note |
| CAM_NRLevel(3D) Inq | 8x 09 04 54 FF | y0 50 0p FF | P:3D NRLevel |
| CAM_FlickerModelInq | 8x 09 04 55 FF | y0 50 0p FF | p: Flicker Settings(0: OFF, 1: 50Hz, 2:60Hz) |
| CAM_ApertureInq | 8x 09 04 42 FF | y0 50 00 00 0p 0q FF | pq: Aperture Gain |
| CAM_PictureEffectModelInq | 8x 09 04 63 FF | y0 50 00 FF | Off |
| y0 50 04 FF | B&W | ||
| CAM_MemoryInq | 8x 09 04 3F FF | y0 50 0p FF | p: Memory number last operated. |
| Command | Command Packet | Return Packet | Note |
| SYS_MenuModelnq | 8x 09 06 06 FF | y0 50 02 FF | On |
| y0 50 03 FF | Off | ||
| CAM_LR_Reverselnq | 8x 09 04 61 FF | y0 50 02 FF | On |
| y0 50 03 FF | Off | ||
| CAM_PictureFlipInq | 8x 09 04 66 FF | y0 50 02 FF | On |
| y0 50 03 FF | Off | ||
| CAM_ColorSaturationInq | 8x 09 04 49 FF | y0 50 00 00 00 0p FF | p: Color Gain setting 0h (60%) to Eh (130%) |
| CAM_IDInq | 8x 09 04 22 FF | y0 50 0p FF | p: Gamma ID |
| IR_ReceiveInq | 8x 09 06 08 FF | y0 50 02 FF | On |
| y0 50 03 FF | Off | ||
| IR_ReceiveReturn | y0 07 7D 01 04 00 FF | Power ON/OFF | |
| y0 07 7D 01 04 07 FF | Zoom tele/wide | ||
| y0 07 7D 01 04 38 FF | AF ON/OFF | ||
| y0 07 7D 01 04 33 FF | Camera _Backlight | ||
| y0 07 7D 01 04 3F FF | Camera _Memory | ||
| y0 07 7D 01 06 01 FF | Pan_titleDriver | ||
| CAM_BrightnessInq | 8x 09 04 A1 FF | y0 50 00 00 0p 0q FF | pq: Brightness Position |
| CAM_ContrastInq | 8x 09 04 A2 FF | y0 50 00 00 0p 0q FF | pq: Contrast Position |
| CAM_FlipInq | 8x 09 04 A4 FF | y0 50 00 FF | Off |
| y0 50 01 FF | Flip-H | ||
| y0 50 02 FF | Flip-V | ||
| y0 50 03 FF | Flip-HV | ||
| CAM_GammaInq | 8x 09 04 5B FF | y0 50 0p FF | p: Gamma setting |
| CAM_VersionInq | 8x 09 00 02 FF | y0 50 ab cdmn pq rs tu vw FF | ab cd : vender ID ( 0220 )mn pq : model ID ST ( 0510 )、U2( 0512 )、U3 ( 0513 )rs tu : ARM Version vw : reserve |
| VideoSystemInq | 8x 09 06 23 FF | y0 50 0p FF | P: 0~E Video format 0:1080P608:720P301:1080P509:720P252:1080i60 A : 1080P59.943:1080i50 B : 1080i59.944:720P60 C : 720P59.945:720P50 D : 1080P29.976:1080P30 E : 720P29.977:1080P25 |
| Pan-tiltMaxSpeedInq | 8x 09 06 11 FF | y0 50 ww zz FF | ww: Pan Max Speed zz: Tilt Max Speed |
| Pan-tiltPosInq | 8x 09 06 12 FF | y0 50 0w 0w 0w 0w 0z 0z 0z 0z FF | www: Pan Position zzzz: Tilt Position |
Note: [X] in the above table indicates the camera address to be operated, [y]=[x+8] .
PELCO-D PROTOCOL COMMAND LIST
| Function | Byte1 | Byte2 | Byte3 | Byte4 | Byte5 | Byte6 | Byte7 |
| Up | 0xFF | Address | 0x00 | 0x08 | Pan Speed | Tilt Speed | SUM |
| Down | 0xFF | Address | 0x00 | 0x10 | Pan Speed | Tilt Speed | SUM |
| Left | 0xFF | Address | 0x00 | 0x04 | Pan Speed | Tilt Speed | SUM |
| Right | 0xFF | Address | 0x00 | 0x02 | Pan Speed | Tilt Speed | SUM |
| Upleft | 0xFF | Address | 0x00 | 0x0C | Pan Speed | Tilt Speed | SUM |
| Upright | 0xFF | Address | 0x00 | 0x0A | Pan Speed | Tilt Speed | SUM |
| DownLeft | 0xFF | Address | 0x00 | 0x14 | Pan Speed | Tilt Speed | SUM |
| DownRight | 0xFF | Address | 0x00 | 0x12 | Pan Speed | Tilt Speed | SUM |
| Zoom In | 0xFF | Address | 0x00 | 0x20 | 0x00 | 0x00 | SUM |
| Zoom Out | 0xFF | Address | 0x00 | 0x40 | 0x00 | 0x00 | SUM |
| Focus Far | 0xFF | Address | 0x00 | 0x80 | 0x00 | 0x00 | SUM |
| Focus Near | 0xFF | Address | 0x01 | 0x00 | 0x00 | 0x00 | SUM |
| Stop | 0xFF | Address | 0x00 | 0x00 | 0x00 | 0x00 | SUM |
| Set Preset | 0xFF | Address | 0x00 | 0x03 | 0x00 | Preset ID | SUM |
| Clear Preset | 0xFF | Address | 0x00 | 0x05 | 0x00 | Preset ID | SUM |
| Call Preset | 0xFF | Address | 0x00 | 0x07 | 0x00 | Preset ID | SUM |
| Query Pan Position | 0xFF | Address | 0x00 | 0x51 | 0x00 | 0x00 | SUM |
| Query Pan Position Response | 0xFF | Address | 0x00 | 0x59 | Value High Byte | Value Low Byte | SUM |
| Query Tilt Position | 0xFF | Address | 0x00 | 0x53 | 0x00 | 0x00 | SUM |
| Query Tilt Position Response | 0xFF | Address | 0x00 | 0x5B | Value High Byte | Value Low Byte | SUM |
| Query Zoom Position | 0xFF | Address | 0x00 | 0x55 | 0x00 | 0x00 | SUM |
| Query Zoom Position Response | 0xFF | Address | 0x00 | 0x5D | Value High Byte | Value Low Byte | SUM |
PELCO-P PROTOCOL COMMAND LIST
| Function | Byte1 | Byte2 | Byte3 | Byte4 | Byte5 | Byte6 | Byte7 |
| Query Zoom Position Response | 0xFF | Address | 0x00 | 0x5D | Value High Byte | Value Low Byte | SUM |
| Up | 0xA0 | Address | 0x00 | 0x08 | Pan Speed | Tilt Speed | 0xAF |
| Down | 0xA0 | Address | 0x00 | 0x10 | Pan Speed | Tilt Speed | 0xAF |
| Left | 0xA0 | Address | 0x00 | 0x04 | Pan Speed | Tilt Speed | 0xAF |
| Right | 0xA0 | Address | 0x00 | 0x02 | Pan Speed | Tilt Speed | 0xAF |
| Upleft | 0xA0 | Address | 0x00 | 0x0C | Pan Speed | Tilt Speed | 0xAF |
| Upright | 0xA0 | Address | 0x00 | 0x0A | Pan Speed | Tilt Speed | 0xAF |
| DownLeft | 0xA0 | Address | 0x00 | 0x14 | Pan Speed | Tilt Speed | 0xAF |
| DownRight | 0xA0 | Address | 0x00 | 0x12 | Pan Speed | Tilt Speed | 0xAF |
| Zoom In | 0xA0 | Address | 0x00 | 0x20 | 0x00 | 0x00 | 0xAF |
| Zoom Out | 0xA0 | Address | 0x00 | 0x40 | 0x00 | 0x00 | 0xAF |
| Stop | 0xA0 | Address | 0x00 | 0x00 | 0x00 | 0x00 | 0xAF |
| Focus Far | 0xA0 | Address | 0x01 | 0x00 | 0x00 | 0x00 | 0xAF |
| Focus Near | 0xA0 | Address | 0x02 | 0x00 | 0x00 | 0x00 | 0xAF |
| Set Preset | 0xA0 | Address | 0x00 | 0x03 | 0x00 | Preset ID | 0xAF |
| Clear Preset | 0xA0 | Address | 0x00 | 0x05 | 0x00 | Preset ID | 0xAF |
| Call Preset | 0xA0 | Address | 0x00 | 0x07 | 0x00 | Preset ID | 0xAF |
| Query Pan Position | 0xA0 | Address | 0x00 | 0x51 | 0x00 | 0x00 | 0xAF |
| Query Pan Position Response | 0xA0 | Address | 0x00 | 0x59 | Value High Byte | Value Low Byte | 0xAF |
| Query Tilt Position | 0xA0 | Address | 0x00 | 0x53 | 0x00 | 0x00 | 0xAF |
| Query Tilt Position Response | 0xA0 | Address | 0x00 | 0x5B | Value High Byte | Value Low Byte | 0xAF |
| Query Zoom Position | 0xA0 | Address | 0x00 | 0x55 | 0x00 | 0x00 | 0xAF |
| Query Zoom PositionResponse | 0xA0 | Address | 0x00 | 0x5D | Value HighByte | Value Low Byte | 0xAF |
Maintenance and Troubleshooting
MAINTENANCE
- Turn the camera off and disconnect the power adapter when not in use for an extended period.
- Use a soft cloth or tissue to clean the camera cover.
- Wipe the camera lens with a soft, dry cloth when cleaning. Gently wipe the lens with a mild detergent if needed. Do not spray the lens directly. Do not use strong or corrosive detergents to avoid scratching the lens and affecting the video quality.
TROUBLESHOOTING
No video output:
- Check whether the camera power supply is connected, the voltage is normal, and the power indicator is lit.
- If using PoE ensure PoE is enabled on the port and switch has required power available.
- Check whether the camera can perform a self-test after restart.
- Verify that the output cable and display monitor are working properly.
Image cuts out or appears abnormal:
- Check whether the video output or video display is functioning correctly.
Image distorts while came is moving or appears shaky:
- Ensure the camera is installed in a solid position.
- Ensure there are no objects near the camera that can be transmitting vibration.
Remote control does not work:
- Check the remote control batteries.
- Verify the remote control address is set to 1.
- Verify the camera is in normal operating mode.
- Verify camera is not in the on-screen menu as the camera cannot be controlled in this mode.
Serial Port is not working:
- Verify that the camera serial device protocol, baud rate, and address are all correct.
- Check that the control cable is connected properly.
- Check whether the camera is in normal operating mode.
Cannot connect to the web interface:
- Check if the camera will output to a screen directly.
- Ensure the network cable is connected properly (green/yellow lights should be visible on the port and flashing indicating network activity)
- Verify you are connected to the same subnet as the camera and are not attempting to use the same IP address.
Tech Support
Have technical questions? We may have answered them already!
Please visit BZBGEAR's support page (bzbgear.com/support) for helpful information and tips regarding our products. Here you will find our Knowledge Base (bzbgear.com/knowledge-base) with detailed tutorials, quick start guides, and step-by-step troubleshooting instructions. Or explore our YouTube channel, BZB TV (youtube.com/c/BZBTVchannel), for help setting up, configuring, and other helpful how-to videos about our gear.
Need more in-depth support? Connect with one of our technical specialists directly:
| Phone |
| 1.888.499.9906 |
| support@bzbgear.com |
| Live Chat |
| bzbgear.com |
Warranty
BZBGEAR Pro AV products and cameras come with a three-year warranty. An extended two-year warranty is available for our cameras upon registration for a total of five years.
For complete warranty information, please visit bzbgear.com/warranty.
For questions, please call 1.888.499.9906 or email support@bzbgear.com.
Mission Statement
BZBGEAR is a breakthrough manufacturer of high-quality, innovative audiovisual equipment ranging from AVoIP, professional broadcasting, conferencing, home theater, to live streaming solutions. We pride ourselves on unparalleled customer support and services. Our team offers system design consultation, and highly reviewed technical support for all the products in our catalog. BZBGEAR delivers quality products designed with users in mind.
Copyright
All the contents in this manual and its copyright are owned by BZBGEAR. No one is allowed to imitate, copy, or translate this manual without BZBGEAR's permission. This manual contains no guarantee, standpoint expression or other implies in any form. Product specification and information in this manual is for reference only and subject to change without notice.
All rights reserved. No reproducing is allowed without acknowledgement.
- TABLE OF CONTENTS
- STATEMENT
- SAFETY PRECAUTION
- INTRODUCTION
- FEATURES
- PACKING LIST
- INSTALLATION AND HANDLING CAUTION
- CAMERA INTERFACE
- MOUNTING
- WALL MOUNTING
- CEILING MOUNTING
- OPERATING INSTRUCTIONS
- POWER ON AND SELF-CHECK
- NOTES
- REMOTE
- REMOTE BUTTONS INTRODUCTION
- CAMERA REMOTE CONTROL ADDRESS SETTING
- PAN/TILT CONTROL
- FOCUS CONTROL AND ZOOM
- SET AND CLEAR PRESETS
- AUTO TRACKING BUTTONS
- KEY COMBINATIONS
- WEB CLIENT LOGIN
- SD CARD RECORDING
- AUTO-TRACKING CONFIGURATION
- GENERAL CONFIGURATION
- STREAMING
- LIVE STREAM PUBLISH
- NDI
- SERIAL PORT COMMUNICATION AND CONTROL
- VISCA PROTOCOL LIST
- VISCA PROTOCOL RETURN COMMAND
- VISCA PROTOCOL CONTROL COMMANDS
- MAINTENANCE AND TROUBLESHOOTING
- MAINTENANCE
- TROUBLESHOOTING
- NO VIDEO OUTPUT
- IMAGE DISTORTS WHILE CAME IS MOVING OR APPEARS SHAKY
- REMOTE CONTROL DOES NOT WORK
- SERIAL PORT IS NOT WORKING
- CANNOT CONNECT TO THE WEB INTERFACE
- TECH SUPPORT
- WARRANTY
- MISSION STATEMENT
- COPYRIGHT
Brand : BZBGear
Model : BG-ADAMO-JR
Category : Security Camera