
MK-GJ1700 - Chopper PANASONIC - Free user manual and instructions
Find the device manual for free MK-GJ1700 PANASONIC in PDF.


| Product Type | Electric Meat Grinder / Mincer |
| Dimensions (H x W x D) | Approx. 20 x 18 x 25 cm |
| Weight | Approx. 3.5 kg |
| Power Supply | 220-240 V ~ 50/60 Hz, 400 W |
| Cutting Plate Hole Diameters | Fine (3 mm), Medium (5 mm), Coarse (8 mm) |
| Main Functions | Mincing meat, making sausages (with optional stuffing tube), grinding vegetables |
| Motor Protection | Thermal overload cut-off |
| Housing Material | Die-cast aluminium and plastic |
| Feeding Tray Capacity | Approx. 1 kg |
| Cord Length | 1.2 m |
| Accessories Included | 3 cutting plates, stainless steel knife, pusher, sausage stuffing tube, cleaning brush |
| Maintenance and Cleaning | Detachable parts dishwasher-safe; body wipe with damp cloth |
| Safety Features | Non-slip feet, locking arm, safety switch prevents operation without proper assembly |
| Spare Parts and Repairability | Blades and plates available as spare parts; motor brush replacement possible |
| General Information | Model MK-GJ1700, manufactured by Panasonic, suitable for home use |
Frequently Asked Questions - MK-GJ1700 PANASONIC
User questions about MK-GJ1700 PANASONIC
0 question about this device. Answer the ones you know or ask your own.
Ask a new question about this device
Download the instructions for your Chopper in PDF format for free! Find your manual MK-GJ1700 - PANASONIC and take your electronic device back in hand. On this page are published all the documents necessary for the use of your device. MK-GJ1700 by PANASONIC.
USER MANUAL MK-GJ1700 PANASONIC
Operating Instructions
Meat Grinder (Household Use)
MK-GJ1700
Model No. • MK-GJ1500
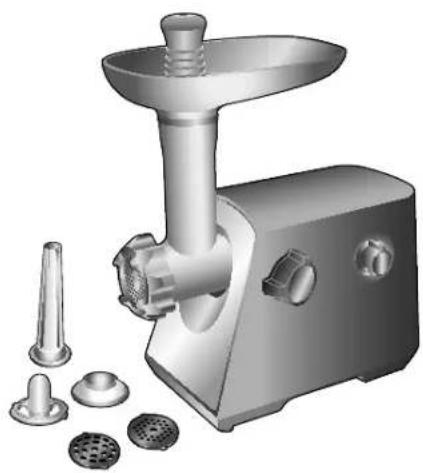
natural_image
3D rendering of a stainless steel kitchen tool with multiple kitchen utensils (no text or symbols visible)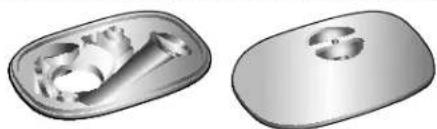
natural_image
Two metallic 3D-rendered objects: a rectangular mold with internal cavities and a circular cutout on the right (no text or symbols)For MK-GJ1700 only
TABLE OF CONTENTS
Safety Precautions EN2
Parts Identifi cation EN4
Before Use EN5
How to Use EN6
After Use EN8
Circuit Breaker Protection EN9
Troubleshooting EN9
Specifications EN9
Thank you for purchasing this Panasonic product.
- Please read this Operating Instructions carefully in order to use this product correctly and safely.
- Before using this product, please give your special attention to the Safety Precautions.
- Please keep this Operating Instructions for future use.
- Panasonic will not accept any liability if the appliance is subject to improper use, or failure to comply with these instructions.
Safety Precautions
Make sure to follow these instructions
In order to prevent accidents or injuries to the user, other people, and damage to property, please follow the instructions below.
■ The following indications indicate the degree of damage caused by incorrect operation.

WARNING
CAUTI

Indicates serious injury or death.
Indicates risk of injury or property damage.
■ The symbols are classified and explained as follows.

This symbol indicates prohibition.

This symbol indicates requirement that must be followed.

WARNING
To prevent electric shock, fi re caused by a short circuit, burning, injury or smoke.

● Do not damage the Cord or the Plug.
Following actions are strictly prohibited:
Modifying, touching on or placing near heating elements, bending, twisting, pulling, pulled over sharp edges, putting heavy objects on top, bundling the Cord and carrying the appliance by the Cord.
- Do not use the appliance if the Cord or the Plug is damaged or the Plug is loosely connected to the outlet.
- If the Cord is damaged, it must be replaced by the manufacturer, its Service Centre or similarly qualified persons in order to avoid a hazard.
● Do not plug or unplug with wet hands. - Do not operate the appliance when the Cord is wound.
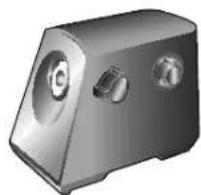
● Do not immerse the Motor Housing in water or splash water on it.
● Do not disassemble, repair or modify the appliance. - Please contact your Service Centre for repairing.
- Do not insert any objects in the vent or the gap.
- Especially metal objects such as pins or wires.
- Do not feed ingredients with hands. Use the Food Pusher.
● Never remove or attach the Hopper Plate, Head or Cap when the motor is operating. - Do not allow infants and children to play with packaging material.

● This appliance is not intended for use by persons (including children) with reduced physical, sensory or mental capabilities, or lack of experience and knowledge, unless they have been given supervision or instruction concerning use of the appliance by a person responsible for their safety. Children should be supervised to ensure that they do not play with the appliance.
● Make sure the voltage indicated on the label of the appliance is the same as your local supply. Also avoid plugging other devices into the same outlet to prevent electric overheating. However, if you are connecting a number of Plugs, make sure the total wattage does not exceed the rated wattage of the outlet.
- Insert the Plug firmly.
- Otherwise it may cause electric shock and fire caused by the heat that may generate around the Plug.
● Clean the Plug regularly.
- A soiled Plug may cause insufficient insulation due to the moisture, and may cause fire.
EN2
WARNING
● Discontinue using the appliance immediately and unplug in the unlikely event that this appliance stops working properly.
e.g. for abnormal or breaking down:
• The Plug or the Cord becomes abnormally hot.
- The Cord is damaged or there has been a power failure.
- The Motor Housing is deformed, has visible damage or is abnormally hot.
→ Please unplug the appliance immediately and contact the Service Centre for advice or a repair.
● Pay special attention to hands or fingers of children as they are so small and can be involved into the Head or holes of the Cutting Plate.
CAUTION
To prevent electric shock, fi re caused by a short circuit, burning, injury or smoke.

● Do not leave the appliance unattended when it is in operation.
- When leaving the appliance unattended, turn the power Off.
● Do not use the appliance on following places:
- The place where is uneven surface, on carpet or table cloth etc.
- The place where it may be splashed with water or near a heat source.
- Do not replace any parts of the appliance with non-genuine spare parts.
- Do not operate more than 15 minutes at one time. When operating reverse function, do not operate more than 5 seconds.
- Do not disassemble the appliance or place anything (especially finger, spoon, fork, etc.) in the appliance during operation.

● Unplug the appliance when not in use.
● Make sure to hold the Plug when unplugging. Never pull on the Cord.
- When carrying the appliance, be sure to hold the Motor Housing with both hands; do not hold only the Hopper Plate.
- Switch off the appliance and disconnect from supply before changing Attachments or approaching parts that move in use.
● This product is intended for household use only.
● Ensure to clean the surfaces in contact with food after use. (See page EN8 "After Use")
● Care shall be taken when handling the sharp Cutting Blade and Cutting Plates.
● Always keep infants and children away from the appliance including the Cord.
EN3
Parts Identifi cation
Wash all detachable parts before using the appliance for the first time and dry well. (Page EN8) The Cutting Plates are coated with petroleum jelly to prevent from rusting. If it is hard to remove it, please clean them with a soft sponge under running warm water.
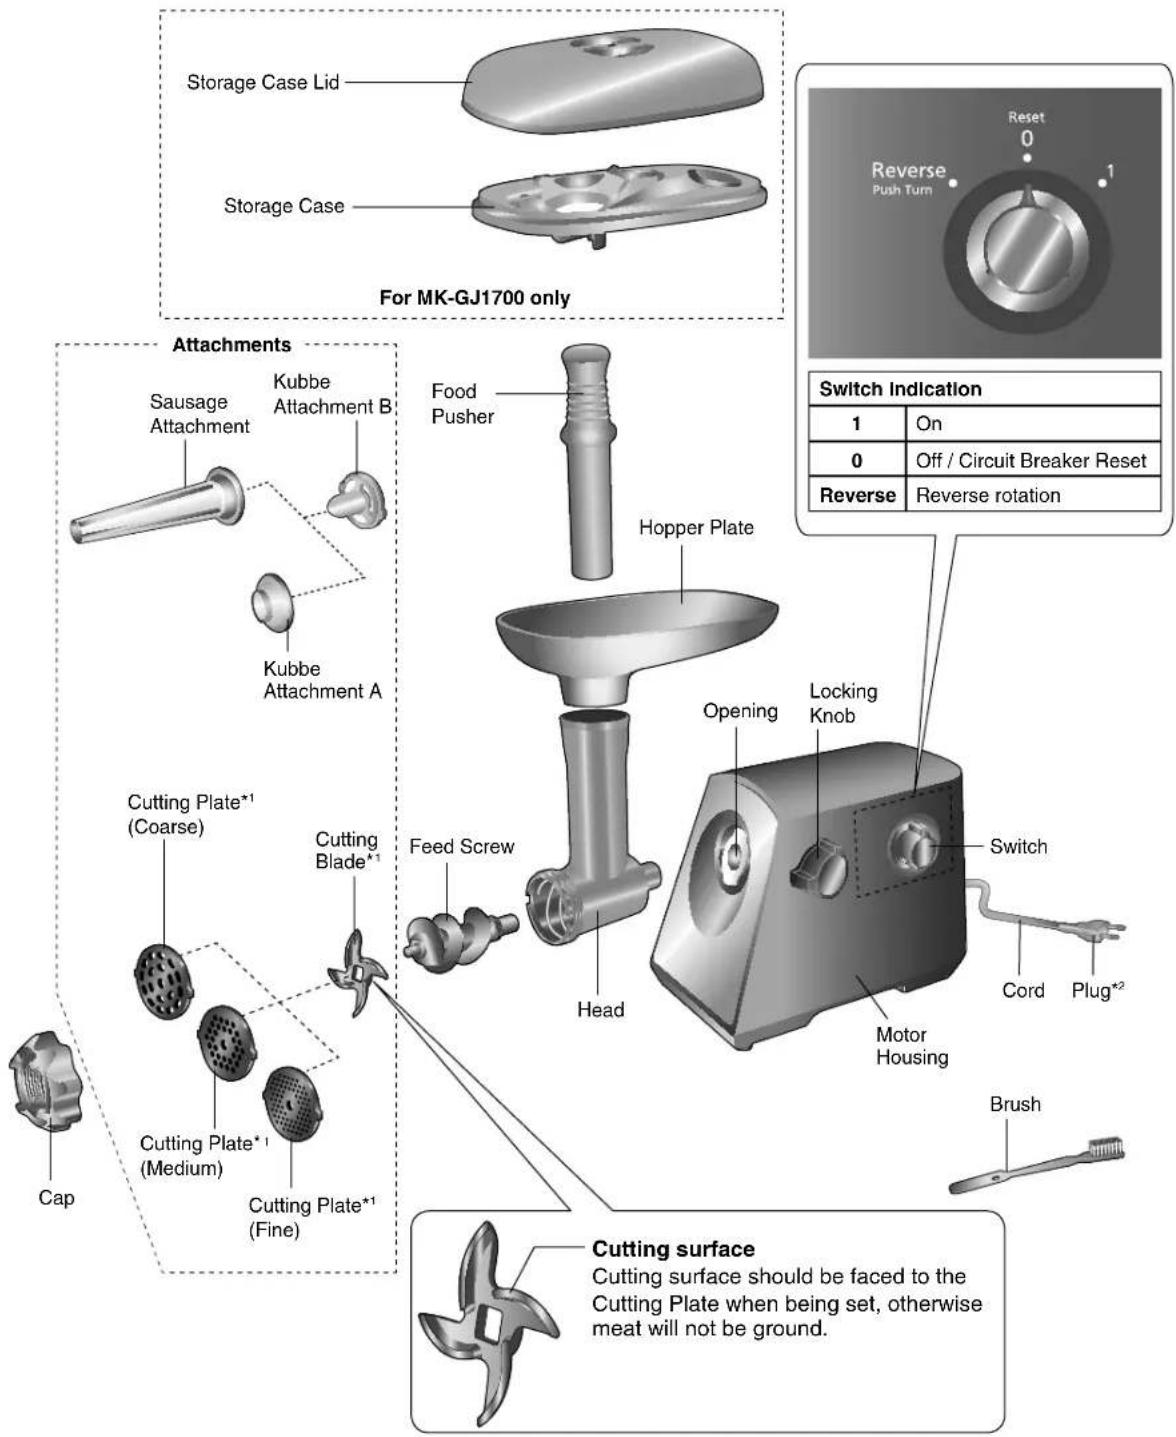
*1 Cutter represents the Cutting Plates and Cutting Blade.
*2 The shape of the Plug may vary according to regions or countries.
EN4
Before Use
Note:
- Do not grind hard ingredients such as bones, nuts and frozen meats. (They may cause jamming.)
- Do not grind ginger and other ingredients with hard fiber. (They will not be ground.)
- Do not operate more than 15 minutes at one time. (It may cause a malfunction.)
- When operating reverse function, do not operate more than 5 seconds. (It may cause a malfunction.)
• To avoid jamming, do not feed ingredients with excessive force.
If the appliance is jammed due to hard ingredients lodged onto the Feed Screw or the Cutting Blade, switch off immediately and clean the appliance. When the Circuit Breaker activates, switch off. (See page EN6 "When meat is jammed inside of the Head".) - Do not fix the Cutting Blade and the Cutting Plate when using the Kubbe Attachments and Sausage Attachment.
- The Head may wobble slightly during use, but it is normal. Do not overtighten the Locking Knob to stop this wobbling. It may cause damage. If the Locking Knob gets loosened, tighten the Locking Knob again.
- The Circuit Breaker may be activated easily when grinding large or hard ingredients, but it is normal.
To Assemble
Unplug when assembling the unit. Before plugging in, ensure the Switch is off.
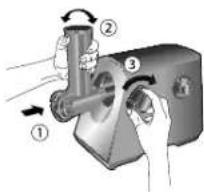
1
Place the Head onto the Opening of the Motor Housing.
- Align the Head vertically before pushing fully into the Opening.
- If the Head is not set properly, the Head is needed to turn right and left slightly to get the correct alignment before pushing in.
- Hold the Head with one hand and tighten the Locking Knob clockwise.
English
2
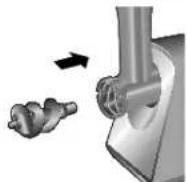
Place the Feed Screw into the Head, long end first, by turning the Feed Screw slightly until it is set into the slot of the Head.
3
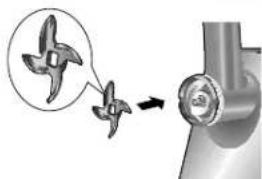
Place the Cutting Blade onto the Feed Screw shaft with the blade facing the front as illustrated.
- Cutting surface should be faced to the Cutting Plate when being set, otherwise meat will not be ground.
natural_image
Mechanical component diagram showing a propeller being inserted into a cylindrical housing (no text or symbols)4
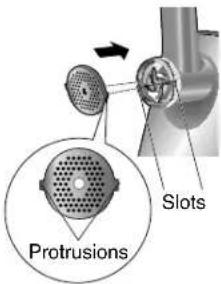
Place the desired Cutting Plate over the Cutting Blade by fi tting the Protrusions in the slots.
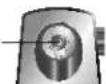
- If the Cutting Plate is not set properly, meat juice may leak out around the shaft in the Opening of the Motor Housing. When meat juice leaks out, clean around the shaft in the Opening of the Motor Housing. Wipe with a well-wrun cloth.
Shaft in the
Opening of the Motor Housing
5
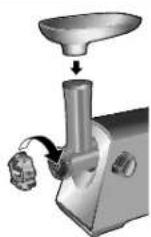
Screw the Cap into the Head firmly in clockwise direction.
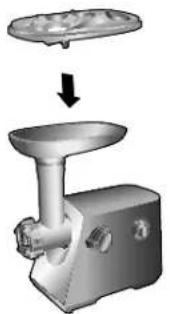
Place the Hopper Plate on the Head and fi x it into position. Set the unit on a fi rm surface.
- The air vents at the bottom and the side of the Motor Housing should be kept free and not blocked.
EN5
How to Use
How to Grind Meat
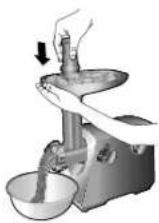
Cut all foods into pieces so that they fit easily into the Hopper Plate opening.
Plug in, then switch on.
Place ingredients on the Hopper Plate and feed them into the Hopper Plate opening.
- Use the Food Pusher.
- Hold the Hopper Plate with one hand when using the Food Pusher.
- Meat juice will splash out of the Cutting Plate hole when grinding the meat.
After use, switch off and unplug.
When meat does not come out from the Cutting Plate, follow the below steps to release it.
① Switch off and wait until the motor has stopped completely.
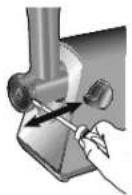
② Hold on to the Motor Housing then push in and turn the Switch to "Reverse" for a few seconds. (Do not turn it more than 5 seconds.) Then turn the Switch back to "0".
③ If prohibited ingredients are used, remove them. Unplug and disassemble the parts by reversing steps on "To Assemble" from 2-5 of page EN5 to remove ingredients in the Head.
④ Assemble the parts again and continue grinding meat.
How to Use the Sausage Attachment
Meat should be ground and seasoned before making sausage links. (See page EN6 "How to Grind Meat".) Attach the Coarse Cutting Plate to the grinder. For fi ner textured sausages, use the Fine Cutting Plate. Disassemble by reversing steps on "To Assemble" from 3-5 of page EN5 to remove the Cutting Plate and the Cutting Blade.
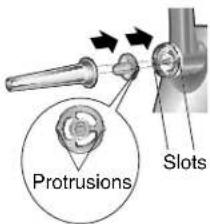
1 Place the Kubbe Attachment B and the Sausage Attachment onto the Feed Screw shaft together, fi tting the Protrusions in the slots.
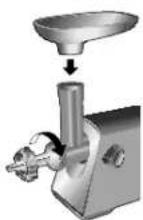
2 Screw the Cap into the Head firmly in clockwise direction. Place the Hopper Plate on the Head and fix it into position. Set the unit on a firm surface.
- The air vents at the bottom and the side of the Motor Housing should be kept free and not blocked.
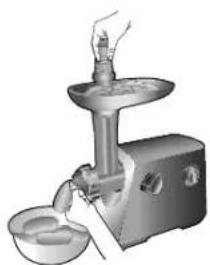
3 Cut the Casing into 60 or 90 cm lengths. Put and gather all of the Casing over the Sausage Attachment except the last 10-15 cm as shown in the illustration. Plug in, then switch on.
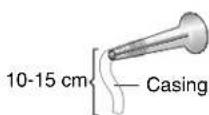
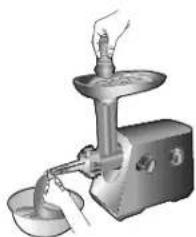
4 Place seasoned meat into the Hopper Plate and press it through grinder with the Food Pusher. Stuff the Casing naturally with little resistance as the sausage comes out of the spout. To make a link, pinch at desired length and press the sausage meat back a little. Then twist 3-4 times. Pinch the next sausage and twist the sausage in the opposite direction 3-4 times to secure the link. When the Casing is filled, tie securely at the end with a string. • Never push the food mixture into the grinder with your hands. Always use the Food Pusher. • When the meat is forced into the Casing too tightly, the sausage is likely to break immediately. If necessary, prick tiny holes at the end of the Casings to let air escape. After use, switch off and unplug.
natural_image
Illustration of a hand using a manual electric shaver on a mounted device (no text or symbols visible)EN6
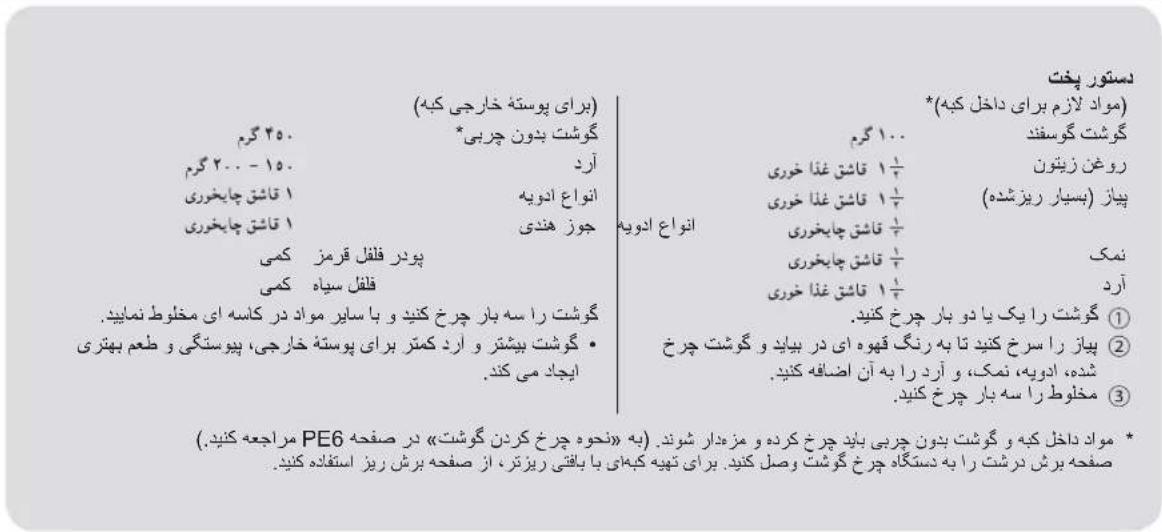
How to Make Kubbe
Recipe
(Stuffi ng)* (Outer shell)
Mutton 100 gLean meat* 450 g
Olive oil 1 1/2 tablespoons Flour 150-200 g
Onion (cut finely) 1 1/2 tablespoons Allspice 1 teaspoon
Allspice 1/3 teaspoon Nutmeg 1 teaspoon
Salt
1/2 teaspoon Powdered red pepper a pinch
Flour
1 1/2 tablespoons Pepper
dash
① Grind mutton once or twice.
② Fry onion until brown and add minced mutton, allspice, salt and fl our.
③ Grind the mixture three times.
Grind meat three times and mix all ingredients together in a bowl.
- More meat and less fl our for outer shell creates better consistency and taste.
* Stuffing and lean meat should be ground and seasoned. (See page EN6 "How to Grind Meat".) Attach the Coarse Cutting Plate to the grinder. For fi ner textured kubbe, use the Fine Cutting Plate.
For making the cylindrical outer shell, disassemble by reversing steps on "To Assemble" from 3-5 of page EN5 to remove the Cutting Plate and the Cutting Blade.
1 Place the Kubbe Attachments A and B onto the Feed Screw shaft together, fitting the Protrusions in the slots.
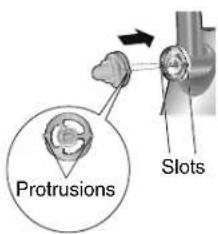
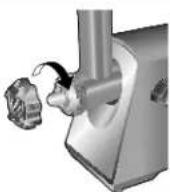
2 Screw the Cap into the Head firmly in clockwise direction.
- Do not overtighten.
- The air vents at the bottom and the side of the Motor Housing should be kept free and not blocked.
Plug in, then switch on.
3 Place seasoned lean meat (already ground) into the Hopper Plate and press it through grinder with the Food Pusher.
Pinch at desired length to make a short cylindrical outer shell.
After use, switch off and unplug.
natural_image
Illustration of a hand using a manual electric shaver on a metal cutting machine (no text or symbols visible)4 Form kubbe as illustrated below and deep fry.

flowchart
graph LR
    A["Stuffing"] --> B["Cylindrical outer shell"]
    B --> C["Final Product"]
EN7
After Use
Before disassembling parts, make sure that the motor has stopped completely, then disconnect the Plug from the outlet.
Note:
- Do not use benzine, thinner, alcohol, bleach, polishing powder or metal brush otherwise the surface will be damaged.
- Do not put in the dishwasher.
- Make sure to clean the appliance after every use. (Otherwise, it may cause a malfunction.)
To Disassemble
Disassemble by reversing steps from 1-5 of page EN5 (To Assemble).
If it is hard to remove the Cap, place a screwdriver (not provided) between the protrusions and unscrew.
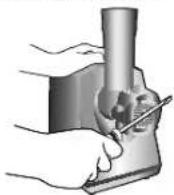
If it is hard to remove the Cutting Plate, place a screwdriver (not provided) between the Cutting Plate and the Head as illustrated and lift up.
Cleaning
Remove meat and other ingredients before cleaning.
Wash with diluted dish soap (neutral) and a soft sponge, then dry well.
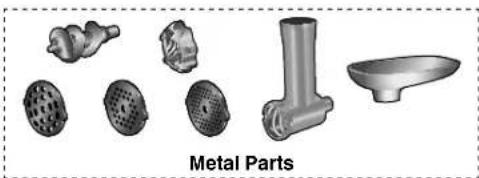
natural_image
Collection of metal parts including gears, flanges, and a kitchen utensil (no text or symbols on parts)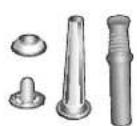
Wipe with a damp cloth.
When cleaning the Cutting Blade, please use the provided Brush.

Note:
• Leaving the Metal Parts (including the Cutting Blade) wet after cleaning may cause corrosion.
- Rubbing a little salad oil after washing and drying will help prevent the Cutter and Feed Screw from rusting and keep them lubricated.
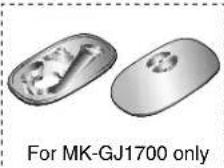
Storing (For MK-GJ1700 only)
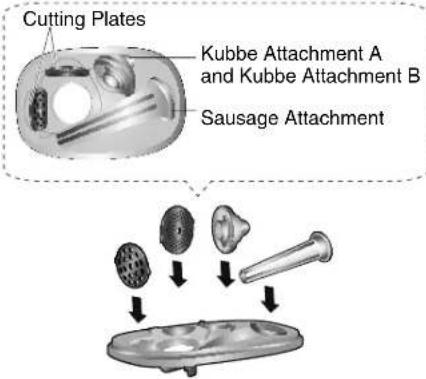
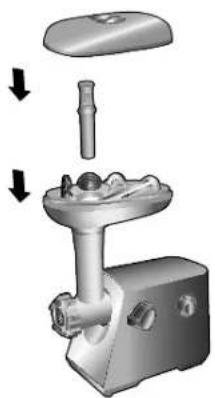
1 Place the Storage Case on the Hopper Plate.
natural_image
3D illustration of a kitchen tool with a lid and base, showing a downward arrow indicating process (no text or symbols)2 Place the Attachments onto the Storage Case as illustrated.
3 Place the Food Pusher into the Hopper Plate opening and cover it with the Storage Case Lid.
natural_image
Mechanical assembly diagram showing a motor with handle and screw base, no text or symbols presentEN8
Circuit Breaker Protection
When the Circuit Breaker automatically stops the motor due to overloading, follow the below steps:
1 Switch off to reset the Circuit Breaker.
2 Unplug and disassemble the parts by reversing steps on "To Assemble" from 2-5 of page EN5 to remove ingredients in the Head.
3 Assemble the parts again and continue grinding meat by pushing the meat slowly.
Note:
- Circuit Breaker may not reset over 40 °C room temperature. In that case please move appliance to the room temperature under 35 °C and wait until it is cooled down.
Troubleshooting
Please check following points before arranging for service.
Ensure to turn off the appliance and the power supply before taking the actions in the table below:
Problems Causes Actions
| The appliance does not run after the Switch is turned on. | The Plug is not inserted into an outlet. | Insert the Plug firmly into an outlet. |
| The appliance stopped suddenly. The Circuit Breaker Protection is activated.Prohibited ingredients are used.The volume of ingredients is too large.The ingredients are too hard. | See "Circuit Breaker Protection". | |
| The Switch does not turn. This is a malfunction. Please contact the Service Centre for repair. | ||
| The Feed Screw is not turning even the motor is on. | ||
Specifications
| Model No. | MK-GJ1700 | MK-GJ1500 |
| Power Supply | 220 - 240 V ~ 50 - 60 Hz | |
| Power Consumption | 240 - 290 W | 220 - 250 W |
| Dimension (Approx.)W x D x H | 172 mm × 327 mm × 398 mm | 172 mm × 327 mm × 392 mm |
| Mass (Approx.) | 4.0 kg | 3.7 kg |
Memo
Memo
محافظت از فيوز
natural_image
Collection of various kitchen utensils including a dough cone, meshing bowl, and metal spoon (no text or labels visible)قطعات فلزى
natural_image
Mechanical assembly diagram showing a motor with handle and screw base, no text or symbols presentnatural_image
Illustration of a food vendor's meat processing step showing a ladle lifting a bowl (no text or symbols)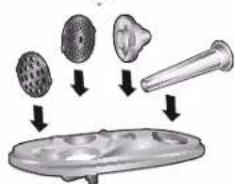
طرز تهیه کبه
natural_image
Illustration of a hand using a food grater to lift a bowl (no text or symbols visible)natural_image
Illustration of a hand using a manual skewer to lift a cup (no text or symbols visible)natural_image
Diagram showing a propeller being inserted into a mechanical component, with no visible text or symbols.natural_image
Collection of various kitchen utensils including a dough cutter, meshing bowl, and kitchen utensil (no text or labels visible)الأجزاء المعدنية

natural_image
3D illustration of a kitchen tool with a handle and screw base, showing mechanical assembly (no text or symbols)natural_image
3D illustration of a kitchen tool with a lid and base, showing a downward arrow indicating process (no text or symbols)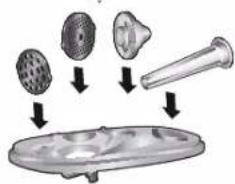
AR8
كيفية عمل الكتابة
natural_image
Illustration of a hand using a food grater to add liquid into a bowl (no text or symbols visible)natural_image
Illustration of a hand using a manual skewer to lift a cylindrical object (no text or symbols visible)natural_image
Diagram showing a propeller being inserted into a mechanical component, with no visible text or symbols.natural_image
3D rendering of a stainless steel kitchen tool with handle, spout, and mesh components (no text or symbols visible)
AR2 احتيطات الأمن
natural_image
Two metallic oval-shaped objects with internal cutouts, one showing a circular hole and the other a smooth surface (no text or symbols)Mozol MK-GJ1700
MK-GJ1700
Panasonic Corporation
http://www.panasonic.com
Printed in Japan
ضع في الابlan
چلپ در زاین
© Panasonic Corporation 2018
MZ50J155
Y1118P0

- Operating Instructions
- Meat Grinder (Household Use)
- TABLE OF CONTENTS
- Safety Precautions
- WARNING
- CAUTI
- To prevent electric shock, fi re caused by a short circuit, burning, injury or smoke.
- CAUTION
- Parts Identifi cation
- Before Use
- Note:
- To Assemble
- 1
- 2
- 3
- 4
- 5
- How to Use
- How to Grind Meat
- How to Use the Sausage Attachment
- How to Make Kubbe
- Recipe
- After Use
- To Disassemble
- Cleaning
- Storing (For MK-GJ1700 only)
- Circuit Breaker Protection
- Troubleshooting
- محافظت از فيوز
- طرز تهیه کبه
- كيفية عمل الكتابة
- Panasonic Corporation
Brand : PANASONIC
Model : MK-GJ1700
Category : Chopper