
P.I.P.-FMX - Professional audio equipment CROWN - Free user manual and instructions
Find the device manual for free P.I.P.-FMX CROWN in PDF.


| Product Type | Audio Processor / Amplifier Module |
| Brand | Crown |
| Model | P.I.P.-FMX |
| Dimensions (H x W x D) | 1.75 x 19 x 12 inches (1U rackmount) |
| Weight | 2.5 kg (5.5 lbs) |
| Power Supply | 100-240V AC, 50/60Hz, 30W maximum |
| Input Connectors | Balanced XLR and 1/4" TRS |
| Output Connectors | Balanced XLR, barrier strip |
| Frequency Response | 20 Hz - 20 kHz ±0.5 dB |
| Signal-to-Noise Ratio | > 110 dB |
| Total Harmonic Distortion | < 0.01% |
| Functions | Input mixing, equalization, limiting, crossover, delay |
| Controls | Front panel: gain, mode switches; rear: DIP switches |
| Indicators | Power LED, signal present, clipping |
| Operating Temperature | 0°C to 40°C (32°F to 104°F) |
| Maintenance | Clean with dry cloth; do not use solvents |
| Safety Features | Overcurrent protection, thermal shutdown |
| Spare Parts Available | Fuses, power supply, connectors |
| Repairability | Modular design; user-serviceable fuses |
| Included Accessories | User manual, rack ears, power cord |
Frequently Asked Questions - P.I.P.-FMX CROWN
User questions about P.I.P.-FMX CROWN
0 question about this device. Answer the ones you know or ask your own.
Ask a new question about this device
Download the instructions for your Professional audio equipment in PDF format for free! Find your manual P.I.P.-FMX - CROWN and take your electronic device back in hand. On this page are published all the documents necessary for the use of your device. P.I.P.-FMX by CROWN.
USER MANUAL P.I.P.-FMX CROWN
© 1998 by Crown International, Inc., P.O. Box 1000, Elkhart, IN 46515-1000 U.S.A. Telephone: 219-294-8000. Fax: 219-294-8329. P.I.P. modules are produced by the Professional Audio Division of Crown International, Inc. Trademark Notice: Crown ® , Macro-Tech ® , Com-Tech ® , IOC ® and P.I.P. ® are registered trademarks of Crown International, Inc. Other trademarks are the property of their respective owners.
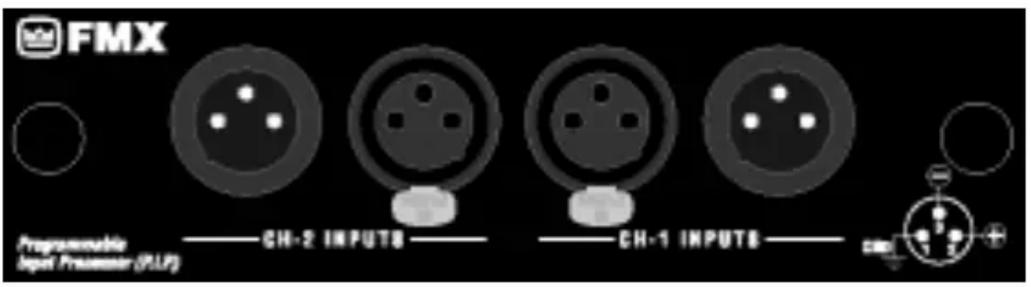
Fig. 1.1 PIP-FMX
1 Welcome
Thank you for purchasing the Crown® P.I.P.-FMX accessory. P.I.P.® modules are designed to quickly install in the rear panel of many Crown amplifiers. P.I.P. stands for “Programmable Input Processor.” Their versatile features expand the capabilities of your amplifier and enable you to customize it for your particular needs.
FMX means Female and Male XLRs to signify that the unit uses female and male XLR connectors for “daisy chain” input/output.
Features
☐ 3-pin female XLR connectors are provided for input.
☐ 3-pin male XLR connectors are provided for daisy chaining the input to other amplifiers.
☐ Male or female connectors can
be used for input or daisy chaining since they are wired in parallel.
☐ The 14 -inch phone jack inputs can also be used for daisy chaining other amplifiers equipped with 14 -inch inputs (such as the Macro-Tech ircledR series).
☐ The XLR connectors are wired with pin 1 as the signal ground (shield), pin 2 as a noninverted input (+), and pin 3 as an inverted input (−).
2 Installation
You may need a Phillips screw-driver to remove the existing P.I.P. module or panel from your amplifier.
CAUTION: Before connecting this or any P.I.P. to your amplifier, it is important to turn the amplifier's level controls down, turn it off and remove the AC power. Don't touch the circuitry. Even though the amplifier is off, there could still be enough energy remaining to cause electric shock.
- Turn down the level controls (full counterclockwise), turn off the amplifier and unplug it from the AC power source.
- Remove the existing P.I.P. module or panel (two screws). For PIP2 amplifiers, this may involve disconnecting the P.I.P. from a PIP2 input adapter (see Figures 2.2 and 2.3). If a PIP2 input adapter is already present, do not remove the ribbon cables from the adapter. Otherwise you will have to reconnect them in the next step.

Fig. 2.1 Installation into a Standard P.I.P. Amplifier
- Standard P.I.P. Amplifiers: Align the edges of the P.I.P.-FMX in the P.I.P. card rails and firmly push the unit in until it is seated against the mounting bracket (see Figure 2.1).
PIP2Amplifiers: (Requires a PIP2 input adaptor, Crown part number Q43528-1.) Connect the PIP2 input adapter to the two input cables of the amplifier (see Figure 2.2). Notice that the PIP2 input adapter should be positioned with the P.I.P. edge connector on top and facing away from the amplifier. The 20-pin cable (A) is connected first, then the 18-pin cable (B) is connected. Both ribbon cables should extend below the PIP2 input adapter.
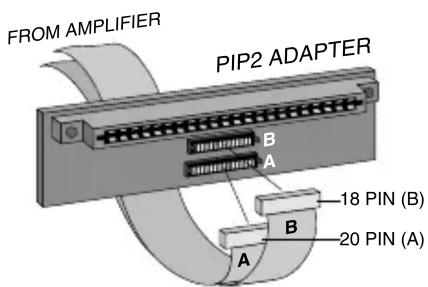
Fig. 2.2 PIP2 Input Adapter Connection
Next, insert the edge connector of the P.I.P.-FMX into the PIP2 input adapter (see Figure 2.3) and insert the assembly into the P.I.P. opening in the back of the amplifier.

Fig. 2.3 Installation into a PIP2 Amplifier
- Tighten the two P.I.P. mounting thumbscrews.
- Reconnect input wiring.
- Plug in the amplifier and turn it on. Adjust its level controls to a desired setting.
Do not tamper with the circuitry. Circuit changes made by unauthorized personnel, or unauthorized circuit modifications, are not allowed.
Remember: Crown is not liable for any damage resulting from over-driving other components in your sound system.
Crown Audio Division
Technical Support / Factory Service Plant 2 SW, 1718 W. Mishawaka Rd., Elkhart, Indiana 46517 U.S.A.
| Telephone: | 219-294-8200800-342-6939(North America,Puerto Rico, andVirgin Islands only) |
| Facsimile: | 219-294-8301(Technical Support) |
| 219-294-8124(Factory Service) |
| Fax Back: | 219-293-9200800-294-4094(North America only)219-294-8100(International) |
Internet: http://www.crownaudio.com
Brand : CROWN
Model : P.I.P.-FMX
Category : Professional audio equipment