IM-661C - Sorbet maker SPT - Free user manual and instructions
Find the device manual for free IM-661C SPT in PDF.


| Brand | SPT |
| Model | IM-661C |
| Product Type | Automatic Ice Maker |
| Ice Production Capacity | 66 lb per 24 hours (at 77°F ambient, 50°F water) |
| Ice Storage Capacity | 15 lb |
| Power Input | 300 W |
| Voltage / Frequency | 115 V / 60 Hz (typical US standard, dedicated circuit recommended) |
| Unit Dimensions (W x D x H) | 16 x 22 x 26.88 inches |
| Weight | Approximately 70 lb (estimated) |
| Water Pressure Required | 14.7 - 117 psi |
| Ambient Temperature Range | 50°F to 100°F |
| Refrigerant Type | Not specified (typical R134a or R290, consult service) |
| Control Panel Features | Power switch, indicator lights: Run, Ice Full, Water Low, Fault; auto-clean/self-inspection cycle |
| Installation | Free-standing; requires 7 inches clearance on back and sides; level surface; water inlet and drain connections |
| Electrical Requirements | 3-prong grounding plug; dedicated circuit recommended; do not use with switch or pull chain |
| Water Supply | Connect to potable water only; filtered or purified water recommended to reduce mineral buildup |
| Accessories Included | Water inlet tube, squeeze hose clamp, water drainage pipe, ice scoop |
| Cleaning and Maintenance | Auto-clean function; manual cleaning with water/vinegar solution (10:1); discard first batches after cleaning; sanitize periodically |
| Safety Features | Automatic shutoff when ice bin full; water low indicator; fault indicator; compressor protection (3-5 min restart delay) |
| Warranty | 1 year limited warranty (parts and labor) from date of purchase; USA only |
| Customer Support | Sunpentown International Inc., tel: 800-330-0388, service@sunpentown.com |
Frequently Asked Questions - IM-661C SPT
User questions about IM-661C SPT
0 question about this device. Answer the ones you know or ask your own.
Ask a new question about this device
Download the instructions for your Sorbet maker in PDF format for free! Find your manual IM-661C - SPT and take your electronic device back in hand. On this page are published all the documents necessary for the use of your device. IM-661C by SPT.
USER MANUAL IM-661C SPT
natural_image
Line drawing of a server cabinet with ventilation grilles and a door (no text or symbols)IM-441C
IM-661C
IM-1109C
Thank you for selecting SPT Automatic Ice Maker!
To ensure the proper operation of this ice maker, please read the instruction manual carefully before use and keep it in a safe place.
CONTENT
Introduction 1
Safety Tips 1
Structure 2
Accessory 2
Electrical Requirements 3
Installation 3-4
Control Panel 4
Operation 4-5
Ice Storage & Sounds 5
Cleaning and Maintenance 5
Storage 6
Disposal 6
Troubleshooting 7
Circuit Diagram 8
Technical Parameters 9
Warranty
Introduction
Please take a few moments to carefully read through this manual. Correct maintenance and operation of this machine will provide the best possible performance.
Safety Tips
· Do not connect or disconnect the electric plug with wet hands.
· Never clean the ice maker with flammable fluids. These fumes can create a fire hazard or explosion. Do not store gasoline or other flammable vapors/liquids in the vicinity of this or any other appliance.
· Always turn unit off and disconnect power and water line before servicing.
- Replace all panels after servicing or maintenance.
· Do not attempt to repair or replace any part of the ice maker unless specifically recommended by the manufacturer. All other servicing should be referred to a qualified technician.
· Have two or more people to move and install this ice maker. Failure to do so may result in injury.
- Never install or operate the unit in an enclosed area, such as a closed cabinet. Choose a well-ventilated area with temperatures between 50^ to 100^ . The unit MUST be installed in an area protected from the elements, e.g., wind, rain, water spray or drips.
· Do not locate next to ovens, grills or other sources of high heat.
- The ice maker must be installed with all electrical, water and drain connections in accordance with state and local codes.
· Do not kink or pinch the power supply cord between the ice maker and cabinet.
· The unit must be leveled in order to work properly.
· Make certain the pipes are not pinched or kinked or damaged during installation.
- Check for leaks after water line connection.
· Never allow children to operate, play with or crawl inside the ice maker.
- Although the unit has been tested at the factory, due to long-term transit and storage, the first batches of cubes must be discarded.
· Never turn the water supply tap off when the ice maker is working.
·Never tile the ice maker more than 45 degrees
- Be sure supplied water pressure is between 14.7-117 psi.
· If the ice maker has not been used for a long time, clean thoroughly before use. Follow instructions provided for cleaning and sanitizing. Do not leave any solution inside the unit after cleaning.
· The plug must be accessible after installation.
· Do not use this appliance for other than its intended purpose.
· Do not touch the evaporator by hand when unit is operating.
· This appliance is not intended for use by persons (including children) with reduced physical, sensory or mental capabilities or lack of experience and knowledge, unless they have been given supervision /instruction concerning the use of this appliance by person responsible for their safety.
- Connect to a potable water supply only.
- If the supply cord is damaged, it must be replaced by the manufacturer, a service agent or similarly qualified person in order to avoid a hazard.
· SAVE THESE INSTRUCTIONS.
Structure
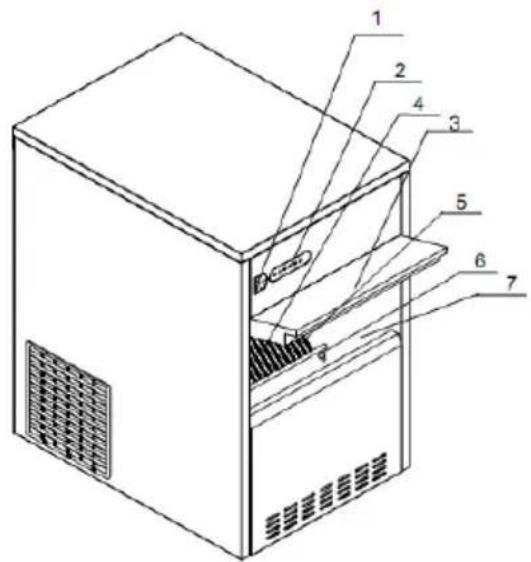
- Power Switch
- Display Panel
- Ice Maker Door
-
Shelf
-
Water Reservoir
- Ice Full Sensor
- Ice Storage Cabinet
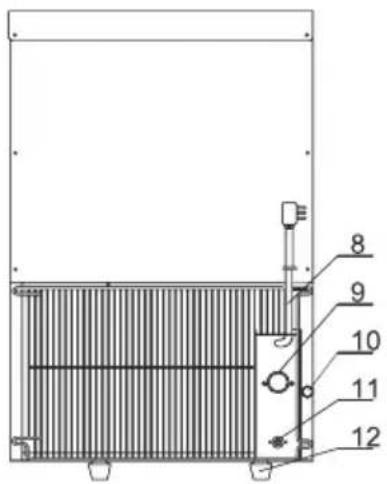
-
Power Cord
-
Water Inlet
- Drain Spout
- Drain Outlet
- Foot
Accessory
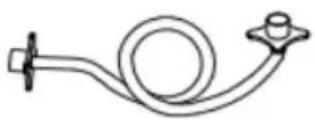
Water Inlet Tube
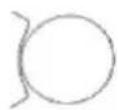
Squeeze Hose Clamp
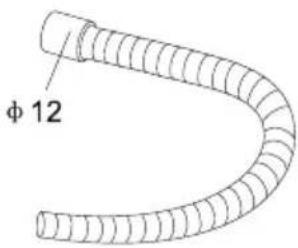
Water Drainage Pipe
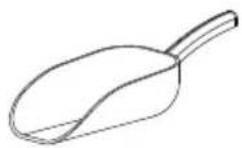
Ice Spoon
Electrical Requirements
Read all safety precautions listed at the beginning of this manual. It is recommended to use a dedicated circuit for this ice maker. Do not use receptacles that can be turned off by a switch or pull chain.
The ice maker is equipped with a 3-prong grounding plug. To minimize possible shock hazard, the cord must be plugged into a mating 3-pronged and grounding-type wall receptacle. Do not cut or remove the ground prong. If a mating wall receptacle is not available, it is the responsibility of the customer to have a properly grounded 3-prong wall receptacle installed by a certified electrician.
Installation
IMPROPER WATER LINE CONNECTION MAY RESULT IN FLOODING.
YOU MUST USE A LICENSED PLUMBER
REVIEW STATE AND LOCAL PLUMBING CODES BEFORE INSTALLATION
Before connecting power, please allow unit to stand upright for at least 24 hours to allow the refrigerant to settle.
- Remove all packaging materials: protective film, shipping tape, glue, etc.
- Remove the Ice scoop, water inlet tube, and water drainage pipe from the storage cabinet.
- The unit should be located on a firm and level surface that can support the ice maker's total weight with water/ice.
- This unit is designed for free-standing application, allowing you to install the unit anywhere provided the requirements for clearance, water and electrical are met.
- This unit must be placed in a well ventilated area with temperature between 50^ and 100^ , with at least 7 inches of space around the back and sides for proper air circulation.
- Do not place unit next to ovens, grills or other high heat sources.
- Position the unit so that power and water supply is accessible.
- If necessary, adjust the leveling legs. Efficiency of the ice maker can be reduced if unit is unevenly located.
- Not all the necessary hardware is PROVIDED for water inlet installation (as the plumbing fixtures at the installation point may differ). So it is necessary to hire a professional plumber to complete the installation.
- For unit's longevity, use of filtered or purified water is required; or unit must be cleaned once every other week with citric acid to remove mineral build up.
Installation
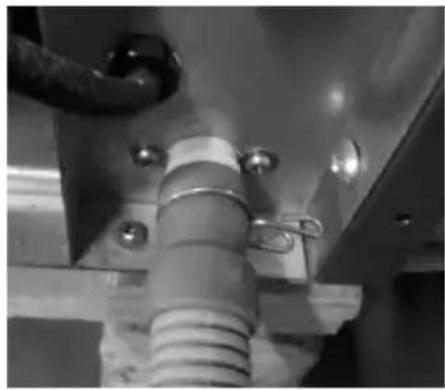
- Install the Squeeze Hose Clamp to one end of the Water Drainage Pipe.
-
Connect the end with the clamp to the Drain Outlet located at the rear of the ice ice maker. Be sure the clamp is firmly over the drain hose and drain spout connection (refer to image on right).
-
Attach the other end to drain receptacle.
-
Connect one end of the Water Inlet Tube to your water source. Connect the other end to the Water Inlet located at the rear of the unit.
natural_image
Close-up of a mechanical pipe fitting with bolts and a coiled spring (no visible text or symbols)Control Panel

Operation
This appliance features an Auto-Clean function: Each time the ice maker is powered on, the unit will go through a self-inspection/auto-clean process which lasts 5 to 10 minutes. During this process the water is cycled through and indicators (Run + Fault + Water Low) will flash.
When using your ice maker for the first time (or after a period of inactivity), it is suggested to discard the first four batches of ice to ensure machine is thoroughly clean.
- Connect the ice maker to a grounded outlet.
- Press the Power switch to the ON position (I). The switch light illuminates and unit goes through the auto-clean/self-inspection process. Then the ice making process will begin.
Notes:
- As soon as the ice storage cabinet is full the ICE FULL indicator on the display panel will illuminate and ice maker will stop automatically. Ice production resumes once ice has been removed from the cabinet.
-
If water supply is insufficient, the WATER LOW indicator will illuminate and ice maker will stop operation. Check water supply.
-
If any error or failure occurs, the FAULT indicator will illuminate and ice production stops. Please refer to Troubleshooting page.
- Switch off the ice maker and disconnect from power supply when not in use.
- If unit powered off for any reason, please wait at least 3-5 minutes before powering it back on. This is to protect the compressor.
ICE STORAGE
The ice maker will automatically shut off when the ice storage cabinet is full. The ice storage cabinet is insulated but not refrigerated.
SOUNDS THE UNIT MAY MAKE
Your new icemaker may make sounds that are not familiar to you. Most of these sounds are normal. Hard surfaces like the floor or wall can make the sounds seem louder than they actually are. The following describes the possible sounds you may expect to hear:
· The high efficiency compressor makes a pulsating or high-pitched sound.
· Water running from the evaporator to the water bin makes a splashing sound.
- At the end of each cycle, you may hear a gurgling sound due to refrigerant flowing in the unit.
- Sound of air being forced over the condenser by the condenser fan.
· During the harvest cycle, you may hear ice cubes falling into the bin.
Cleaning and Maintenance
Periodic cleaning and proper maintenance will ensure efficiency, performance and extend unit's life span.
· Always power off and disconnect power supply before cleaning.
· Never use solvent-based cleaning agents, which may leave harmful residues.
· DO NOT wash the main unit, instead wipe the exterior with a damp cloth.
· Dry the interior and exterior with a soft cloth.
- Check the connectors of the water inlet and outlet tubes regularly for leaks.
- Sanitizing solution - 10:1 ratio of water to vinegar or lemon juice.
- Wipe the interior, including evaporator rods, with the solution.
- Remove the water inlet hose and use the same solution to clean the hose.
, discard the first two batches. 4. Reinst And then drain residue water via drain spout (Part 10 at Page 2)
STRANGE TASTE
If the ice has a strange taste.
If the ice has developed an unappealing taste or there is musty odor in the unit, clean the interior following steps above. Soak the inlet hose in hot water with couple tablespoons of baking soda for couple hours. Drain the solution, rinse thoroughly and reinstall. Run the ice maker and discard the first two batches of ice.
STORAGE
If the ice maker will not be used for an extended period of time, disconnect power, drain water from the reservoir via the drain spout (Part 10 at Page 2) and dry the interior with a clean soft cloth. Disconnect water hoses, rinse and allow to air dry.
Note: Do not touch the power plug with wet hands.
Note: Never unplug the unit by pulling on the cord.
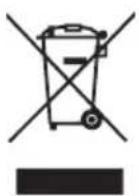
The symbol 📀 on the product or on its packaging indicates that this product may not be treated as household waste. Instead it shall be handed over to be applicable collection point for the recycling of electrical and electronic equipment. By ensuring this product is disposed of correctly, you will help prevent potential negative consequences for the environment and human health which could otherwise be caused by inappropriate waste handling of this product. For more detailed information about recycling of this product, please contact your local city office, your household waste disposal service or the shop where you purchased the product.
Troubleshooting
If the unit appears to be malfunctioning, please wait for the unit to stop automatically. The issue may be solved by referring to the table below. However, do not open to check or repair the unit unless instructed to do so.
Note
- The RUN light does not come on when unit is powered on. It is on when the compressor is running.
- The ice maker has a self-checking feature. Any fault will be displayed in the display panel with different lights flashing.
| Problem | Possible Cause | Suggested Solution |
| No power(no indicator lights) | Unit is unpluggedPower supply is interruptedSupplied power voltage is incorrect | Plug in the ice makerCheck power supplyContact qualified electrician |
| The Switch light is onbut unit does not run | Supplied power voltage is incorrectPCB damaged | Contact qualified electricianContact Sunpentown |
| Ice Full indicatorlight is on | Ice basket is fullAmbient temperature is below 42°F | Remove ice cubes from the basketRestart unit once ambient temperature is above 43°F |
| (Run + Fault + Water Low)indicators flashing | Unit just powered on and is going through the auto-clean/self-inspection process. | This is normal process. Please allow 5 to 10 minutes and unit will automatically begin making ice. |
| (Fault + Ice Full)indicators flashing | Ice Full Sensor is faulty | Contact Sunpentown |
| Fault indicator flashing · Condenser sensor is faulty · Contact Sunpentown | ||
| (Ice Full + Water Low)indicators flashing orthe Fault indicatorflashes rapidly | Refrigerant leakFaulty compressorAmbient temperature is below 42°For above 109°F | Contact SunpentownContact SunpentownRestart unit once ambient temperature is within the working temperature range |
| (Fault + Ice Full + Water Low)indicators flash slowly | Faulty HALL sensorFaulty paddle motor | Contact SunpentownContact Sunpentown |
| Fault indicator flashesrapidly | Water tray blocked by ice cubesBroken water trayFaulty ice motorFaulty micro-switches | Remove the ice cubesContact SunpentownContact SunpentownContact Sunpentown |
| Unit stops 2 minutesafter powering on. TheWater Low indicatorflashes | Insufficient water supplyWater inlet valve damaged or not properly connectedFaulty water level sensor | Check water supplyCheck valveContact Sunpentown |
| Water Low indicatoris on steady | Unit is without water supply for more than 24 hours | Stop the machine and restart once water supply is ready. |
| Ice cubes are stuck tothe water box | Faulty electric valvesSome ice remain in the water box | Contact SunpentownStop the machine and remove the cubes |
| No ice making - no lightindications | Faulty electric valveCompressor not running | Contact SunpentownContact Sunpentown |
| Ice cube sizes arenot uniform | Low refrigerant | Contact Sunpentown |
| Unit goes through icemaking process but noice made or ice cubesare very thin and small | Room temperature or water may betoo hot | Please keep unit away from direct sunlight or sources of heat.Use colder water or allow the unit torun a few more batches |
| Fault indicator flashestwice approx. every3 seconds | Compressor is overheated | Unit will resume ice making oncethe compressor cools down.Need to improve the ventilation |
Circuit Diagram
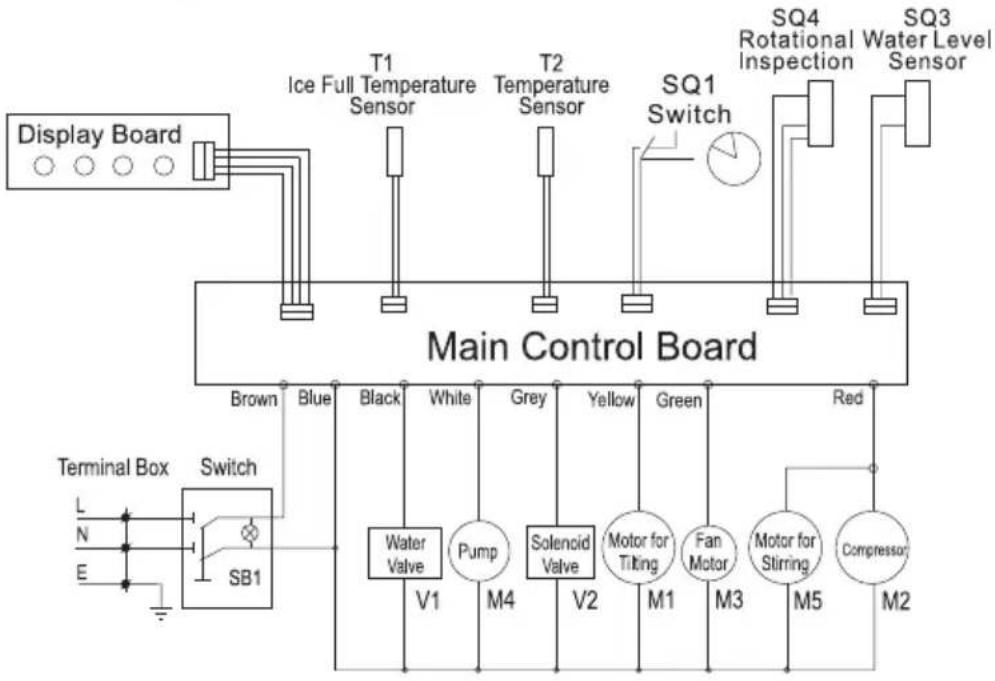
flowchart
graph TD
    A["Display Board"] --> B["Main Control Board"]
    B --> C["T1 Ice Full Temperature Sensor"]
    B --> D["T2 Temperature Sensor"]
    B --> E["SQ1 Switch"]
    B --> F["SQ4 Rotational Inspection"]
    B --> G["SQ3 Water Level Sensor"]
    H["Terminal Box"] --> I["Switch SB1"]
    I --> J["Water Valve V1"]
    I --> K["Pump M4"]
    I --> L["Solenoid Valve V2"]
    I --> M["Motor for Tiling M1"]
    I --> N["Fan Motor M3"]
    I --> O["Motor for Stirring M5"]
    I --> P["Compressor M2"]
    Q["Brown"] --> I
    R["Blue"] --> I
    S["Black"] --> I
    T["White"] --> I
    U["Grey"] --> I
    V["Yellow"] --> I
    W["Green"] --> I
    X["Red"] --> I
    Y["Terminal Box"] --> Z["Switch SB1"]
Technical Parameters
| Model | Ice making capacity (lb/24h)* | Power Input (W) | Ice Storage (lb) | Unit Dimension (in.) |
| IM-441C | 44 | 280 | 9 | 13.5W x 20.5D x 23.88H |
| IM-661C | 66 | 300 | 15 | 16W x 22D x 26.88H |
| IM-1109C | 110 | 420 | 15 | 16W x 22D x 26.88H |
* Tested under the following conditions: ambient temperature 77°F and water temperature 50°F. The actual quantity of ice produced in a 24-hour period may vary with room and water conditions.
SPT®
Your Guarantee
If this product is found to be faulty as a result of faulty materials or workmanship within one year from date of purchase, it will be repaired free of charge.
This guarantee is subject to the following terms:
- Sunpentown must be notified of the fault.
- Proof of purchase must be presented to Sunpentown's nominated representative.
- The warranty will be void if the product if modified, misused or repaired by an unauthorized person.
- The warranty after repair will not be extended beyond the original one-year period.
- All replacement parts will be new or reconditioned.
- Parts, which are replaced, become the property of Sunpentown.
- The warranty applies for the use of the product in the USA only.
What is NOT COVERED:
- Warranty does not include freight charges.
- Damage due to installation error, product abuse and/or misuse.
- Incidental or consequential damage caused by possible defects with this product.
- Labor cost incurred for the installation and/or removal of a possible defective unit.
- Damage to product caused by improper power supply voltage, accident, fire, floods or acts of nature.
- Failure of product resulting from unauthorized modifications to the product.
- Improper installation or failure to perform the necessary maintenance.
- Normal wear and tear on parts or replacement of parts designed to be replaced.
- Damage to personal property from use of product.
- Replacement or repair of household fuses, circuit breakers, wiring or plumbing.
This GUARANTEE is in addition to your Statutory Rights
SUNPENTOWN INTERNATIONAL INC.
14625 Clark Ave. City of Industry, CA 91745
Tel: 800-330-0388
service@sunpentown.com
www.sunpentown.com
Brand : SPT
Model : IM-661C
Category : Sorbet maker