IM-123S - Sorbet maker SPT - Free user manual and instructions
Find the device manual for free IM-123S SPT in PDF.


| Product Type | Portable Ice Maker |
| Brand | SPT (Sunpentown) |
| Model | IM-123S (Silver) |
| Dimensions (W x D x H) | 11.02 x 14.57 x 13.19 inches |
| Net Weight | 24.25 lbs |
| Power Supply | 110-120V, 60Hz |
| Rated Power | 140W |
| Rated Current | 1.8A |
| Ice Making Capacity | 26 lbs per 24 hours |
| Water Tank Capacity | 1.8 liters |
| Ice Storage Capacity | 1.5 lbs |
| Ice Cube Size Options | Small, Medium, Large |
| Refrigerant | R134a, 50g |
| Insulation Layer | EPS |
| Control Panel | Power button, Ice size select button |
| Indicators | Small/Medium/Large cube, Add Water, Ice Full |
| Clearance Required | At least 6 inches around unit |
| Drain Location | Bottom front side with drain cap |
| Included Accessories | Ice basket, ice scoop |
| Warranty | 1 year limited (USA only) |
| Color | Silver |
| Usage Location | Indoor, flat surface, away from heat sources |
Frequently Asked Questions - IM-123S SPT
User questions about IM-123S SPT
0 question about this device. Answer the ones you know or ask your own.
Ask a new question about this device
Download the instructions for your Sorbet maker in PDF format for free! Find your manual IM-123S - SPT and take your electronic device back in hand. On this page are published all the documents necessary for the use of your device. IM-123S by SPT.
USER MANUAL IM-123S SPT
natural_image
Line drawing of a portable kitchen appliance with ventilation slots and lid (no text or symbols)IM-123B (Black)
IM-123S (Silver)
INSTRUCTION MANUAL
It is important that you read these instructions before using your portable ice maker and we strongly recommend that you keep them in a safe place for future reference.
TABLE OF CONTENTS
IMPORTANT SAFETY INSTRUCTIONS 2
GETTING TO KNOW YOUR UNIT 4
- Structure drawing
■ Control panel operation
- Unpacking and moving the ice maker
- Connecting your ice maker
- Cleaning and maintaining your ice maker
- Operating instructions
TROUBLESHOOTING 7
TECHNICAL DATA 7
WARRANTY 8
PREPARING YOUR ICE MAKER FOR USE
Your safety and the safety of others are very important.
We have provided many important safety messages regarding your appliance.
Please read and obey all safety regulations
When using electrical appliances, basic safety precautions should be followed to reduce the risk of fire, electric shock, and injury to persons or property. Read all instructions before using any appliance.
- Do not operate this, or any other appliance with a damaged cord.
- If the supply cord is damaged, it must be replaced by the manufacturer or its service agent or a similarly qualified person in order to avoid a hazard.
- This ice-maker must be positioned so that the plug is accessible.
- Connect to properly polarized outlets only. No other appliance should be plugged into the same outlet. Be sure that the plug is fully inserted into the receptacle.
- Do not run the power cord over carpeting or other heat insulators. Do not cover the cord. Keep cord away from traffic areas, and do not submerge in water.
- We do not recommend the use of an extension cord, as it may overheat and become a risk of fire. If you must use an extension cord, use No.14AWG minimum size and rated no less than 1875 watts.
- Unplug the ice maker before cleaning or making any repairs or servicing.
- Exercise caution and use reasonable supervision when appliance is used near children.
- Do not use your ice-maker outdoors. Place the ice-maker away from direct sunlight and make sure that there is at least 6 inches of space between the back of your unit and wall. Keep a minimum clearance of 6 inches around the unit.
- Do not use any liquid other than water to make the ice-cube.
- Do not clean your ice maker with flammable fluids. The fumes can create a fire hazard or explosion.
- Do not tip over.
- If the ice maker is brought in from outside during the wintertime, give it a few hours to warm up to room temperature before plugging it in.
- Do not move the unit when power is on.
- Unplug unit by grasping the plug, do not pull on the cord.
- Change the water regularly to ensure the quality of the ice cube.
- When cleaning, do not move the sensor or wires inside the unit.
- Water should not be filled over the MAX water level.
- Do not frequently turn the unit on and off. To protect the compressor, please allow a 3-minute grace period.
- This appliance is not intended for use by persons (including children) with reduced physical, sensory or mental capabilities, or lack of experience and knowledge, unless they have been given supervision or instruction concerning use of the appliance by a person responsible for their safety.
- Children should be supervised to ensure that they do not play with the appliance.
WARNING: This appliance must be grounded.
To avoid a hazard due to instability of the appliance, it must be placed at an even or flat surface.
CORRECT DISPOSAL OF THIS PRODUCT

This mark indicates that this product should not be disposed with other household wastes. To prevent possible harm to the environment or human health from uncontrolled waste disposal, recycle it responsibly to promote the sustainable reuse of material
resources. To return your used device, please use the return and collection systems or contact the retailer where the product was purchased. They can take this product for environmental safe recycling
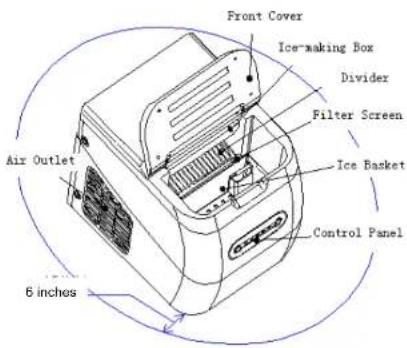
GETTING TO KNOW YOUR UNIT
Structure drawing
Control panel operation
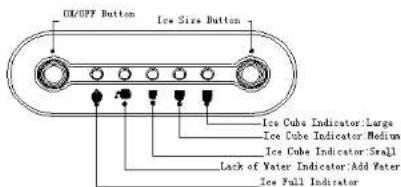
A. START and STOP button
B. Ice cube size selection button
C. Small cube indicator
D. Medium cube indicator
E. Large cube indicator
F. Add water indicator
G. Ice full indicator
UNPACKING AND MOVING THE ICE MAKER
- Remove the exterior and interior packaging materials. Check if ice basket and ice scoop are inside. If any parts are missing, please contact our customer service (800-330-0388).
- When taking out the unit, pay attention to not tilt unit over 45 degrees.
- Remove all packaging materials. Clean the tank & ice basket.
- Put the ice maker on a level & flat countertop without direct sunlight and other sources of heat (i.e.: stove, furnace, radiator). Make sure that there is at least 6 inches of clearance around the unit.
- Allow at least one hour for the refrigerant fluid to settle before plugging the ice maker in.
- The appliance must be positioned so that the plug is accessible.
CONNECTING YOUR ICE MAKER
DANGER
* Improper use of the ground plug can result in the risk of electrical shock. If the power cord is damaged please call our customer service.
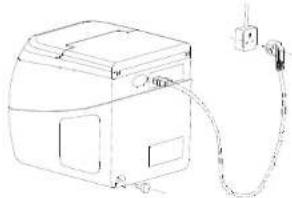
1. This unit should be properly grounded for your safety. The power cord of this appliance is equipped with a three-prong plug which mates with standard three prong wall outlets to minimize the possibility of electric shock.
2. Plug your appliance into an dedicated, properly installed and grounded wall outlet. Do not, under any circumstances, cut or remove the third (ground) prong from the power cord. Any questions concerning power and/or grounding should be directed toward a certified electrician.
3. This appliance requires a standard 110-120volt, 60Hz electrical outlet with three-prong ground.
natural_image
Line drawing of a portable electronic device connected to a cable (no text or symbols)CLEANING AND MAINTAINING YOUR ICE MAKER
Before using your ice maker, it is strongly recommended to clean it thoroughly.
- Take out the ice basket.
- Clean the interior with diluted mild detergent and warm water solution and a soft cloth.
- Drain the water through the drain cap (located on the bottom front side).
- Rinse thoroughly with clean water and drain.
- The outside of the ice maker should be cleaned regularly with a mild detergent and warm water solution.
- Dry the interior and exterior with a clean soft cloth.
- When the machine is not to be used for a long time, clean and drain water. To prevent mold growth, be sure the interior is completely dry before storage.
OPERATING INSTRUCTIONS
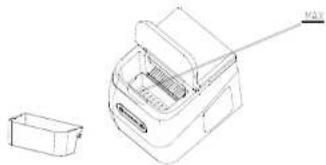
- Lift cover, remove the ice basket and pour clean drinking water into tank. Keep water level below the MAX water level mark.
- Press "Power" button on the control panel to begin the ice making cycle.
- Select the ice cube size by pressing the "Select" button.
- The ice making cycle lasts approx. 5 to 13 minutes, depending on selection of ice cube size and the ambient temperature. The recommended room temperature is 50 to 100°F.
- If water pump can't inject water, the ice maker will stop automatically, and the "Add Water" indicator will illuminate. Press "Power" button to turn unit off and add water. Wait at least 3 minutes (to allow refrigerant to settle) then press "Power" button again to start making ice.
- The ice maker will stop when the ice basket is full, the "Ice Full" indicator will illuminate. Warning: Direct sunlight or sunlight reflection may cause infrared sensor malfunction. If the unit doesn't stop when basket is full, move the unit to where there is no direct sunlight or close curtains and blinds to block sunlight.
- Change water in the water reservoir every 24 hours to ensure a reasonable hygiene level. If unit is not to be used for a couple days, drain all the water and dry the tank.
natural_image
Technical line drawing of a mechanical device with a separate box and a paperclip (no text or symbols)TROUBLE SHOOTING
| PROBLEM | POSSIBLE CAUSE | SOLUTION |
| “Add Water” indicator is on but there is water in tank. | Sensor malfunction | Contact Sunpentown |
| “Ice Full” indicator is on but basket is not full. | Room temperature is too low | Remove ice basket and wait for the indicator light to go off, replace ice basket. |
| Compressor makes a buzzing noise | The voltage is low | Turn off the icemaker and wait for voltage to return to normal before restarting. |
| No power Indicator light | Unit is not properly plugged in. | Check and ensure the unit is properly plugged |
| Fuse is burnt on the PCB | Contact Sunpentown | |
| Add Water and Ice Full indicators flash at the same time | Ice cubes are too large and have stuck together and cannot be dropped from the evaporator | Turn the unit off and wait for the ice to melt. Restart the unit and select a smaller ice cube size. |
TECHNICAL DATA
| revlis( S321-MI / )kcalb( B321-Mi4a) | |
| epyt atikC | N |
| Ice making capacity | 26 lbs/24h |
| egarots ecl | sb5.1 |
| Water tank capacity | 1.8 liters |
| Rated voltage / Frequency | 110-120V / 60Hz |
| tnerruc dRa | A8.1 |
| Input power | 140W |
| edarg ndcetorp kcohS | I |
| tnaregiRe | g05/a481 |
| Insulation layer | EPS |
| Unit dimension | 11.02W x 14.57D x 13.19H inches |
| Net weight | 24.25 lbs |
(the above data is for reference only, subject to the rating label)

Your Guarantee
If this product is found to be faulty as a result of faulty materials or workmanship within one year from date of purchase, it will be repaired free of charge.
This guarantee is subject to the following terms:
. Sunpentown must be notified of the fault.
Proof of purchase must be presented to Sunpentown's nominated representative.
The warranty will be void if the product was modified, misused or repaired by an unauthorized person.
. The warranty after repair will not be extended beyond the original one-year period.
All replacement parts will be new or reconditioned.
. Parts, which are replaced, become the property of Sunpentown.
The warranty applies for the use of the product in the USA only.
What is NOT COVERED:
Warranty does not include freight charges.
. Incidental or consequential damage caused by possible defects with this product.
Damage to product caused by improper power supply voltage, accident, fire, floods or acts of nature.
Failure of product resulting from unauthorized modifications to the product.
Improper installation or failure to perform the necessary maintenance.
This GUARANTEE is in addition to your Statutory Rights
SUNPENTOWN INTERNATIONAL INC.
14625 Clark Ave. City of Industry, CA 91745
Tel: 800-330-0388
service@sunpentown.com
www.sunpentown.com
- INSTRUCTION MANUAL
- TABLE OF CONTENTS
- PREPARING YOUR ICE MAKER FOR USE
- CORRECT DISPOSAL OF THIS PRODUCT
- GETTING TO KNOW YOUR UNIT
- Structure drawing
- Control panel operation
- UNPACKING AND MOVING THE ICE MAKER
- CONNECTING YOUR ICE MAKER
- DANGER
- CLEANING AND MAINTAINING YOUR ICE MAKER
- OPERATING INSTRUCTIONS
- Your Guarantee
- SUNPENTOWN INTERNATIONAL INC.
Brand : SPT
Model : IM-123S
Category : Sorbet maker