
IV-S2 - Uncategorized CANON - Free user manual and instructions
Find the device manual for free IV-S2 CANON in PDF.


| Product Type | Printing Calculator |
| Dimensions (approx.) | 200 x 150 x 50 mm |
| Weight (approx.) | 300 g |
| Power Supply | AC adapter (included) or 4 x AA batteries |
| Display Type | 12-digit LCD |
| Printer Type | Thermal printer, 2-color (black/red) |
| Printing Speed | Approx. 2 lines per second |
| Basic Arithmetic | Addition, subtraction, multiplication, division |
| Percentage Calculations | Yes |
| Tax Functions | Tax rate setting and automatic tax calculation |
| Memory Functions | 3-key memory (M+, M-, MR/RC) |
| Grand Total | Yes |
| Item Count | Yes, with subtotal |
| Decimal Selector | F (floating), 0, 2, 3, 4, ADD2 |
| Rounding Selector | 5/4, cut, up |
| Paper Roll Width | 57 mm |
| Maintenance | Clean exterior with a soft dry cloth; do not use solvents |
| Safety Precautions | Keep away from water and extreme temperatures; unplug when not in use |
| Spare Parts / Repairability | Contact authorized Canon service center for replacement parts |
| General Information | Designed for office and home use; quiet printing technology |
Frequently Asked Questions - IV-S2 CANON
User questions about IV-S2 CANON
0 question about this device. Answer the ones you know or ask your own.
Ask a new question about this device
Download the instructions for your Uncategorized in PDF format for free! Find your manual IV-S2 - CANON and take your electronic device back in hand. On this page are published all the documents necessary for the use of your device. IV-S2 by CANON.
USER MANUAL IV-S2 CANON
JPN. PAT. 176637 187594 379444 383724 400878 U.S.A. PAT. 2643597
Your CANON CAMERA and CANON LENS are the products of the highest grade of precision engineering and optical research.
The camera is strong, compact and simple to operate. As it is a precision instrument, it is advisable that you understand how to operate it by studying the direction carefully.
The superior resolving power of the CANON LENS will produce negatives of extreme sharpness; the lens will resolve to a higher degree than the emulsion of modern high-grade film.
● USE YOUR CAMERA INTELLIGENTLY
● LEARN TO USE IT IN EVERY POSSIBLE WAY
● TREAT IT WITH RESPECT
Although fully guaranteed for five (5) years, it will, with care, last you a lifetime and give you photographs you will be proud to own.
DESCRIPTIONS
Lens Focusing Lever
Page 10
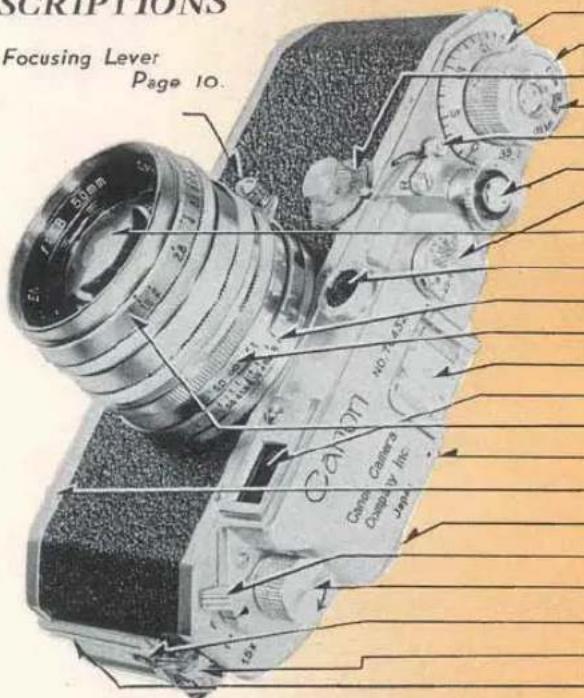
Exposure Counting Dial Page 22
Film Winding Knob 8
Slow Shutter Speed Dial 5
Film Speed Indicator 23
Reversing Lever 24
Shutter Release Button 14
High Shutter Speed Dial 4
Lens 25
Rangefinder Window
Depth of Field Scale 8
Distance Scale 9
Accessory Clip 17
Range-View Finder Window
Lens Aperture Scale 7
Film Plane Indicator 9
Base Plate 18
Rangefinder Eyepiece 10
Range-View Finder Magnification Control Lever.... 12
Film Rewinding Knob 24
Flash Synchronizer Terminal 27
Eye for Neck Strap
Flash Unit Mounting Bracket 27
CONTENTS
Page
I. HOW TO OPERATE YOUR CANON CAMERA . . . 3\~17
II. HOW TO LOAD AND UNLOAD FILM ..... 18\~24
III. HOW TO CHANGE YOUR CANON LENSES ..... 25\~26
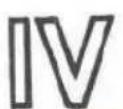
IV. HOW TO USE BUILT-IN FLASH SYNCHRONIZER...27\~30
V. EVOLUTION OF CANON CAMERAS
AND HOW TO IDENTIFY YOUR CAMERA . . . . 31\~37
VI. CANON ACCESSORIES ..... 38\~40
● BRIEF HISTORY OF CANON CAMERA CO., INC. . . . 41
Read the direction carefully. You can learn how to use your camera in a few minutes
natural_image
Close-up of a vintage camera with a hand adjusting the dial, showing mechanical adjustment (no visible text or symbols)
HOW TO OPERATE YOUR CANON CAMERA
- Remove the Lens Cap. By sure to replace this Cap when your camera is not in use.
- See that the Reversing Lever is at the "A" (Advance) position.
Then turn the Film Winding Knob one complete turn when it will stop. By doing so you will advance one film frame and wind the shutter at the same time.
NOTE: Always wind the Film Winding Knob just before taking a picture. Do not leave it wound over long periods as this may weaken the Shutter Spring and may cause accidental exposure if the Shutter Release Button is pressed by mistake.
Setting The Shutter Speed Dials
There are two Shutter Speed Dials:
High: for speeds between 1/25 to 1/1000 sec. (1/500 sec. on Model II-D) & B (Bulb)
Slow: for speeds between 1/25 to 1 sec. & T (Time)
Index Mark
High Shutter Speed Dial
Correct exposures are best obtained with an exposure meter or by following the instruction supplied with the film.
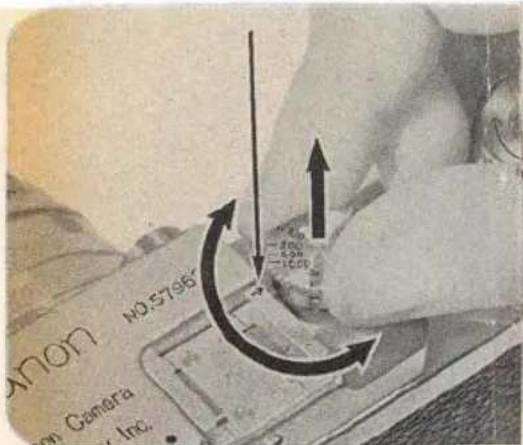
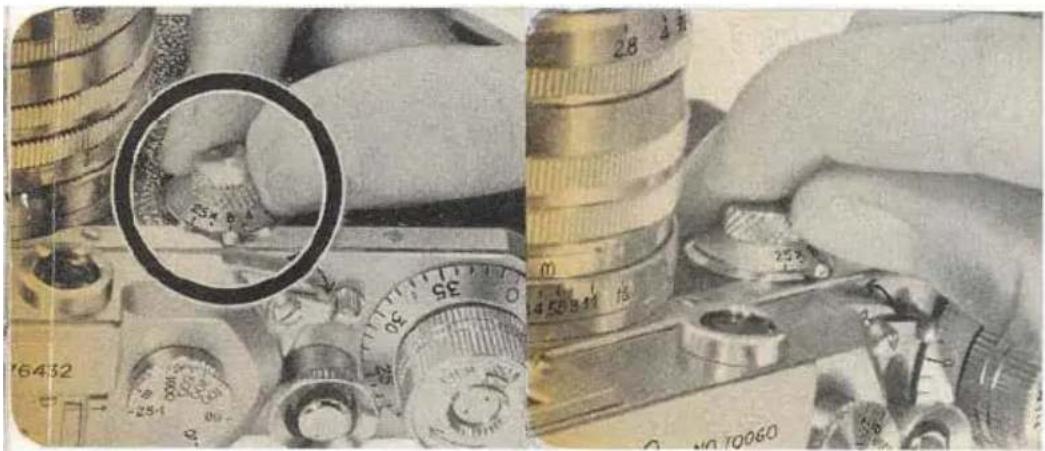
To operate the camera at any of the speeds shown on the High Shutter Speed Dial, first turn the Film Winding Knob. Raise the dial with thumb and forefinger and turn until the speed required is exactly opposite the Index Mark and let the dial fall. For 1/1000 sec., the dial drops only half the distance of the other speeds. Intermediate speeds can not be used.
NOTE: When the High Shutter Speed Dial is in use the Slow Shutter Speed Dial must be set at 25 (1/25 sec.).
natural_image
Close-up of a hand using a magnifying glass to measure a small object, surrounded by other electronic devices and tools (no readable text or symbols)Slow Shutter Speed Dial
The Slow Shutter Speed Dial will offer speeds between 1/25 to 1 sec. and T (Time) by turning the dial to the correct position so that the required speed registers uppermost opposite the index mark. The Dial is locked only at 25, to release it press Spring Lock with your thumbnail and turn the Dial to your left. Be sure that the High Shutter Speed Dial is set at 25-1 (1/25 sec.).
NOTE: Speeds intermediate between 1/25, 1/8, 1/4, 1/2 and 1 sec. may be obtained by setting the dial to the estimated position.
Time Exposures Longer Than One Second
A time exposure may be obtained by using the B (Bulb) position on the High Shutter Speed Dial. The shutter remains open from the time you press the Shutter Release Button until the pressure is removed.
You may also obtain a time exposure with the Slow Shutter Speed Dial at T (Time). Press the Shutter Release Button and the shutter will open and remain open until you turn the Slow Shutter Speed Dial to 1. The shutter will close only when this method is used.
NOTE: For speed slower than 1/25 sec. a solid tripod is essential, and preferably a Canon Camera Holder and Canon Cable Release.
Lens Aperture Scale
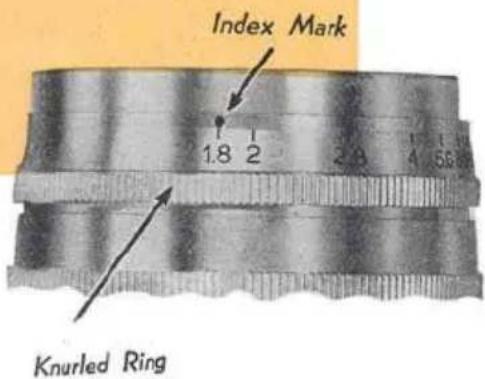
The Lens Aperture controls the amount of light entering the lens and also the Depth of Field. Set the Lens Aperture (f-stop) by turning the Aperture Scale (knurled ring) to the proper position. This is best determined with an exposure meter or by following the instructions given with the film.
When the Lens Aperture is closed by one stop; the amount of light entering the Lens is decreased by one half, two stops, by one quarter and so on. Therefore you should adjust the Lens Aperture in conjunction with your shutter speed. Suppose your exposure meter indicates a speed of 1/200 sec. at f:5.6. If you want to expose for a slower speed say 1/100 sec., then you must close down the Lens Aperture to f:8. In other words, as you have doubled the time of the shutter opening, you must reduce the amount of light entering the lens by half to obtain the correct exposure.
Depth of Field Scale
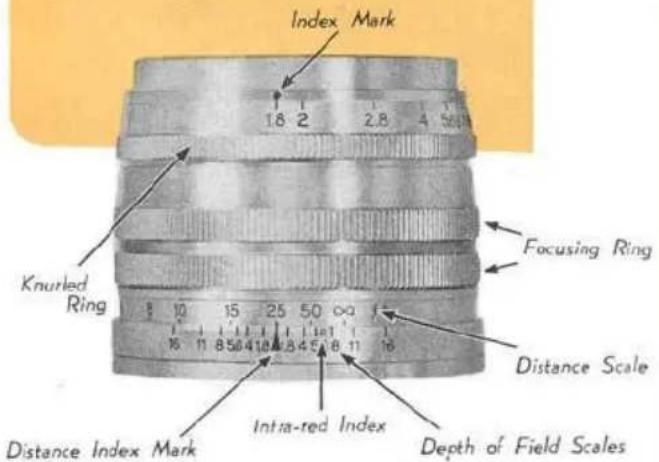
The Distance Scale and the Depth of Field Scale are used together.
Depth of Field means the range of objects which will be in focus on your film. This range varies with the distance of the object of sharp focus and the Lens Aperture. It extends from in front of the object of sharp focus to beyond it. The greater the Lens Aperture, the less will be the Depth of Field. Depth of Field also diminishes as the distance of the object of sharp focus from the film plane decreases.
The illustration shows the Lens Aperture at f:1.8 and the Distance Scale at 25 feet. An object at 25 ft is in sharp focus. The Depth of Field Scale shows that the nearest object also in focus is approximately 21 feet and the farthest object in focus is approximately 30 feet. If the Lens Aperture Scale is set at f:11 the object in focus will extend from 12 feet to infinity (∞). See illustration on next page.
Infrared Index
R marking indicates the position at which focusing should be set when using an infrared film. Be sure to use proper infrared filter which is recommended by manufacturer of infrared films. After accurate focusing is done in the usual manner read the object distance off the Distance Scale of the lens. Then turn the lens so that the object distance will be exactly opposite the R index mark. The lens is now in focus for infrared photography.
Distance Scale
When accurate focus (see page 10) has been made on any object, the actual distance from the film* to the object is shown by the Distance Scale which is marked from 3.5 to infinity (∞) in feet. Lenses with metric scales are provided when specially ordered.
*Shown by the Red Dot near the Accessory Clip.
natural_image
Black-and-white photo of a person holding a camera, no visible text or symbolsFocusing
natural_image
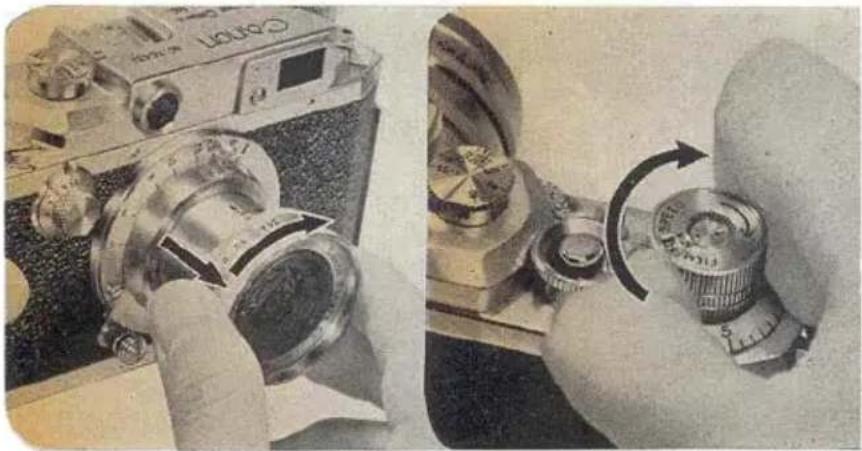
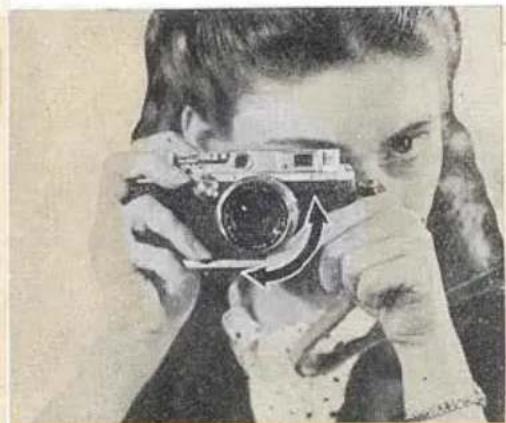
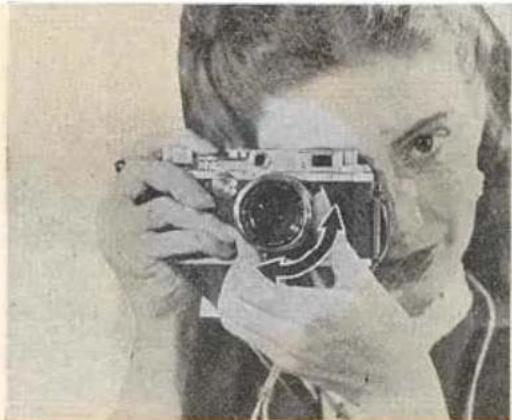
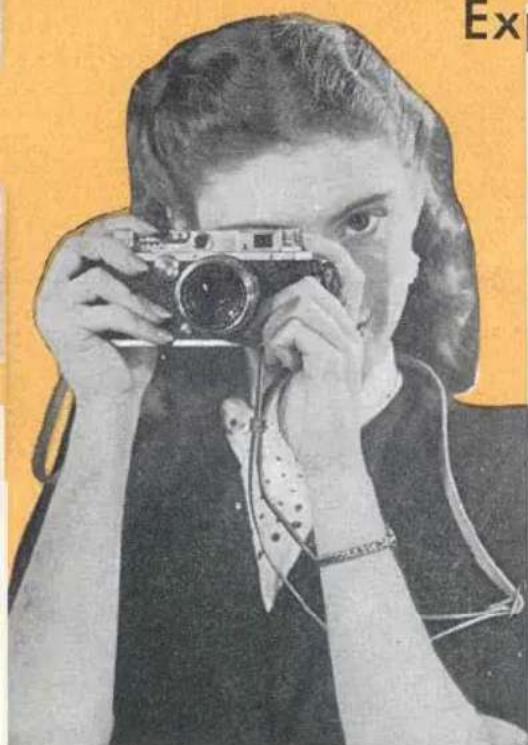
Black-and-white photo of a person holding a vintage camera (no visible text or symbols)It is recommended that the camera be held as illustrated. It should rest comfortably on the heel of the left hand and be balanced by the right hand. Hold the camera to your cheek to keep it steady while sighting through the Range-View Finder* Eyepiece. Manipulate the Focusing Lever with either your left or right forefinger whichever is more comfortable. More precise focusing is possible by setting the Magnification Control Lever at 1.5x (see page 12) and rotating the Milled Focusing Ring as shown in right illustration.
NOTE: The Focusing Lever is released from the Infinity Catch on the lens by depressing the knob and turning. * JPN. PAT. 176637 175722
natural_image
Simple line drawing of a street lamp with two rectangular windows and a vertical pole, set against a plain background (no text or symbols)Out of focus
In correct focus
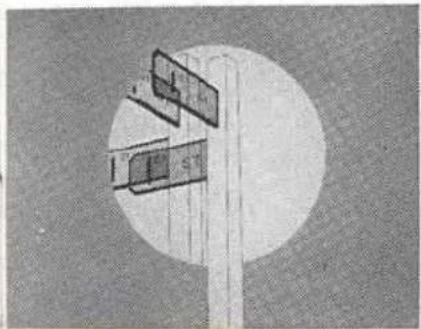
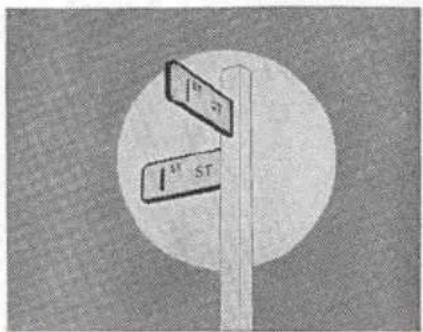
As you look through the Range-View Finder Eyepiece and rotate the Focusing Lever you will see two images of the same object. The images move apart or together as the lever is rotated. Turn the Focusing Lever until the two images of the object on which you are focusing coincide exactly. Your lens is now in sharp focus on the object. At the same time all objects in the range shown on the Depth of Field Scale will also be in focus at the f-stop you select for the exposure.
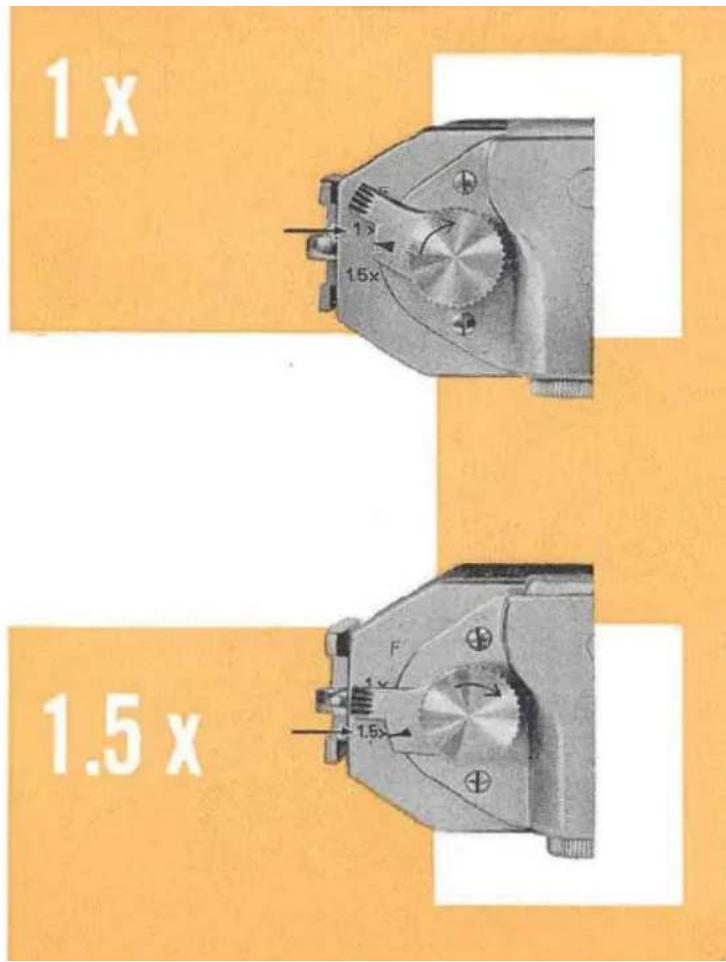
Magnification Control\*
There are three positions for the Magnification Control Lever; F, 1x, and 1.5x. When really sharp focusing is required, turn the Lever to 1.5x when the object will be magnified 1.5 times. Remember, however, the actual image recorded on the film will be the picture seen at the F position of the Lever.
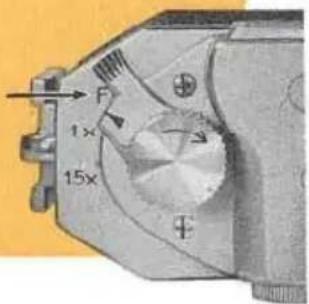
The 1x position corresponds to the image seen and recorded by any CANON LENS with a focal length of 100mm. The 1.5x position shows the image for any CANON LENS with a focal length of 135mm.
A certain difference between the picture seen through the Range-View Finder Eyepiece and the image recorded by the
lens is inevitable. For normal photography the difference is immaterial being so slight. But for certain work compensation should be allowed.
* JPN. PAT. 379444
When the Lever is set at 1x for CANON LENSES with focal length of 100mm, and the object distance is less than 13 feet a special viewfinder with parallax compensation adjustment should be used.
NOTE: Specially designed Viewfinders to compensate for parallax are available for all CANON LENSES except for the Standard 50 mm CANON LENSES.
At 1.5 x with 135 mm CANON LENSES for distance less than 14 feet it is essential to use the special viewfinder available for each type of lens.
natural_image
Black-and-white photo of a person holding a vintage camera, no visible text or symbolsExposure & Composition
To expose and compose your picture are the last steps and perhaps the most important. Be sure that the main object in the scene you are photographing is in sharp focus.
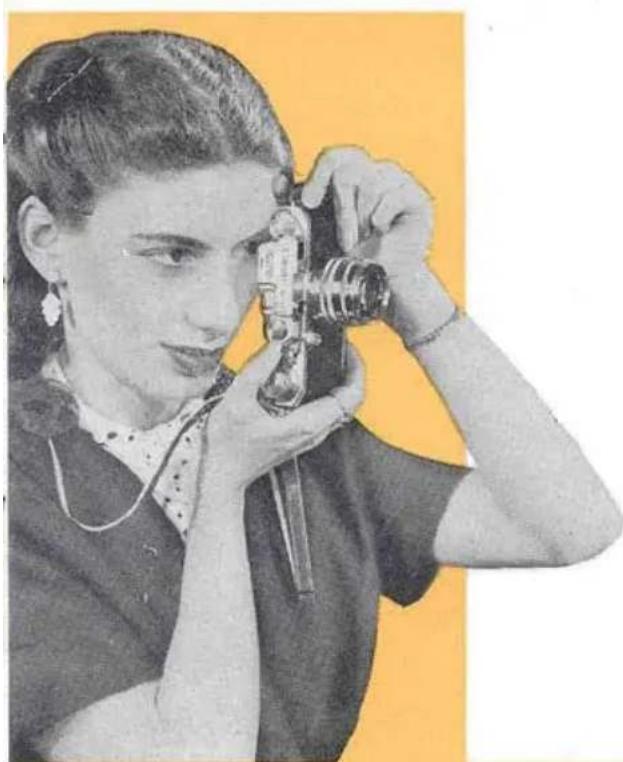
For 50 mm CANON LENSES, the image recorded on the film will be the one seen through the Eyepiece with the Magnification Control Lever at "F". Having composed your picture gently press the Shutter Release Button with your forefinger. Never jerk while making an exposure. The slightest movement for an exposure made at 1/25 sec. or slower will give you a blurred picture.
By pressing the camera to your cheek, keeping your elbows into your side and by holding your breath just before and during the actual instant of exposure you will get an extremely sharp picture.
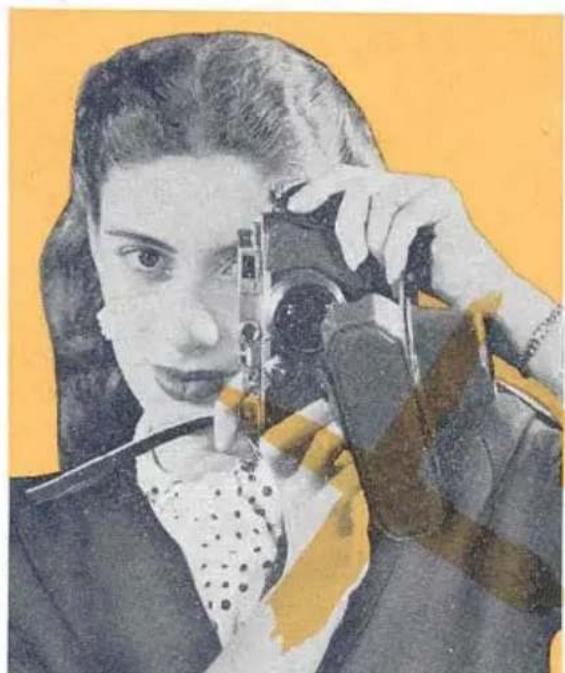
There are two ways to hold the camera. One is for horizontal pictures as shown in this page and the other is for vertical pictures as shown in next page.
natural_image
Black-and-white illustration of a woman holding a vintage camera, no text or symbols visible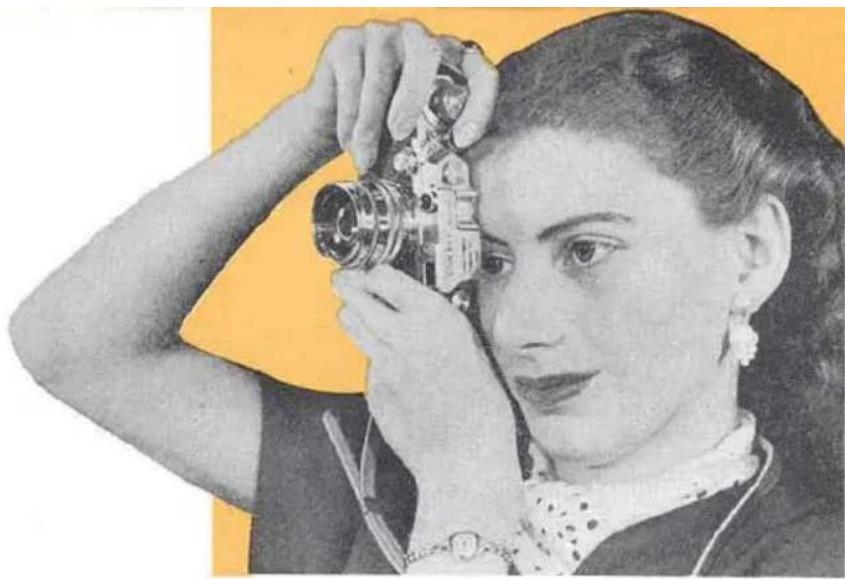
natural_image
Black-and-white portrait of a woman holding a vintage camera, no visible text or symbolsNOTE: Make sure your finger does not touch the High Shutter Speed Dial as it will alter the correct speed. Give particular attention to this when gloves are worn.
NOTE: When taking vertical picture care should be taken that the cover does not swing in front of the lens. It is recommended to detach the flap from the case.
natural_image
Portrait of a woman holding a camera, with no visible text or symbols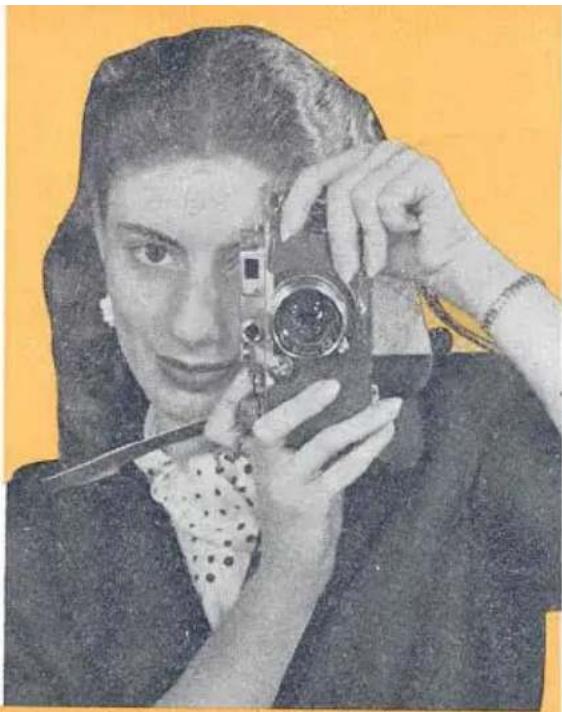
natural_image
Black-and-white portrait of a woman holding a vintage camera against a yellow background (no visible text or symbols)Double Exposures
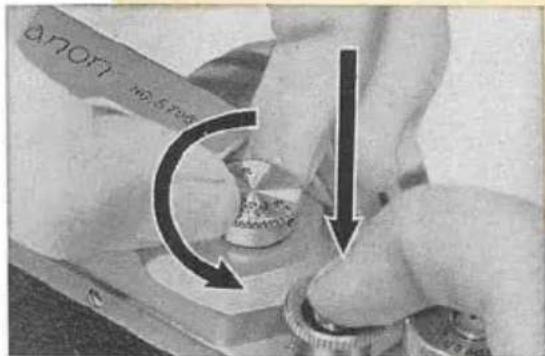
Double exposures are normally quite impossible on the CANON CAMERA, but for special effects they are sometimes needed. Expose the first picture as usual. Then while keeping the Shutter Release Button pressed down, turn the High Shutter Speed Dial COUNTER-CLOCK-WISE without lifting the Dial until you hear a "Click" and the Dial turns no further. Release the Shutter Release Button first then the Dial. The Shutter is now completely rewound and the second exposure may be made. This action may be repeated any number of times, and be adjusted to another speed, if required.
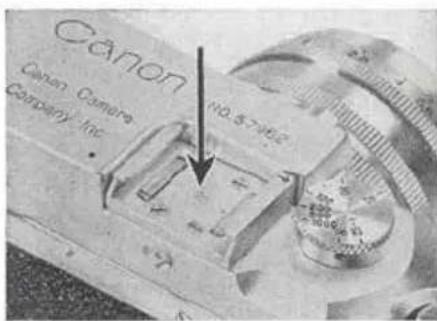
Accessory Clip
This is used for fitting attachments such as the Special Viewfinder, Universal Viewfinder, etc.
HOW TO LOAD AND UNLOAD FILM
Loading
Always load in subdued light. Before you begin loading, set the Reversing Lever to "A" (Advance) and turn the Film Winding Knob until it stops. Press the Shutter Release Button. Keep the Lens Cap in place.
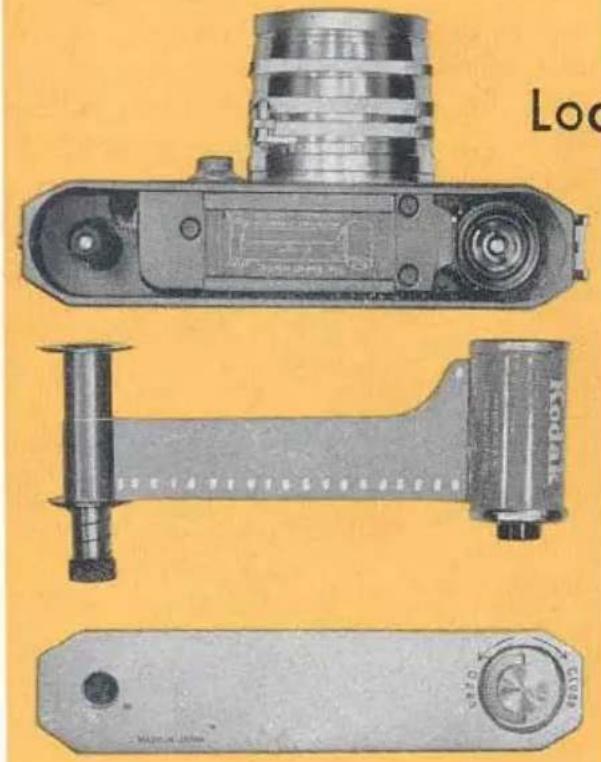
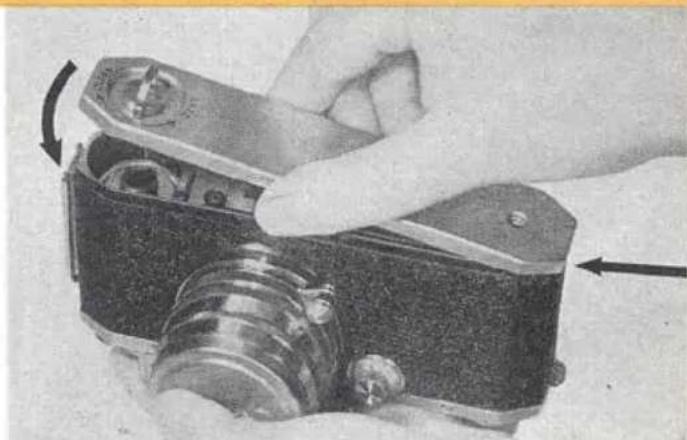
Open the Baseplate by lifting the lock handle and turn it in the direction shown by the arrow, from "Close" to "Open"
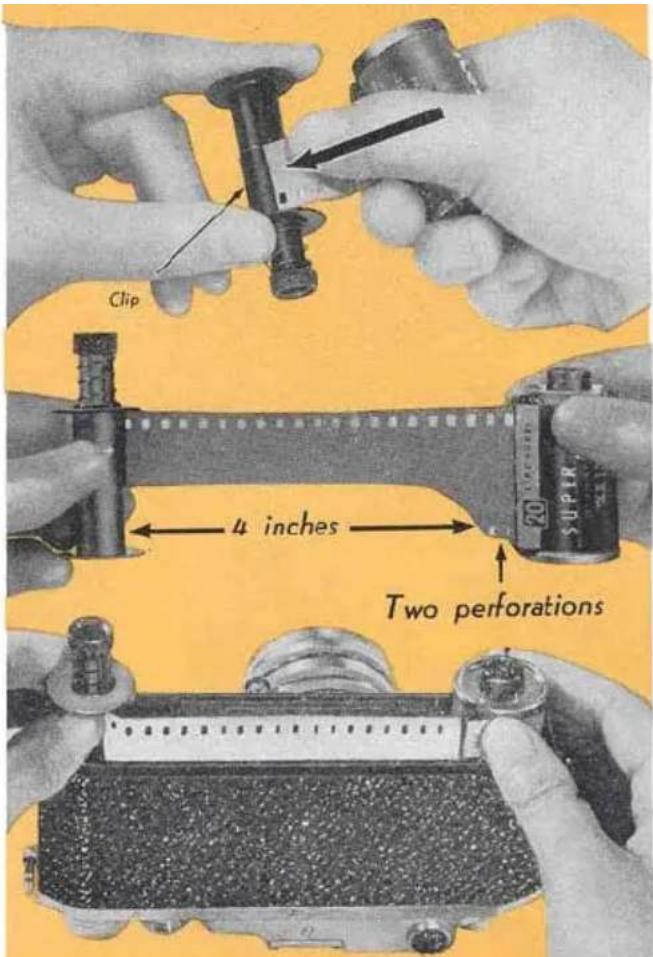
Pull out the Take-up Spool,* and slide the ready-cut-leader end up under the Take-up Spool Clip as far as it will go. The glossy side of the film should face the spool. Make sure that the perforated edge of the film is flush with flange of the Take-up Spool. Do not wind the film around the spool.
With the Take-up Spool in your left hand and the film magazine in your right hand, draw out the film about four inches so that the first two perforations are showing. See diagram plate inside the camera.
Slide both the film magazine and the Take-up Spool evenly and gently into their correct chambers all the way down. The dull (emulsion) side of the film should be facing the lens.
*JPN. PAT. 391935
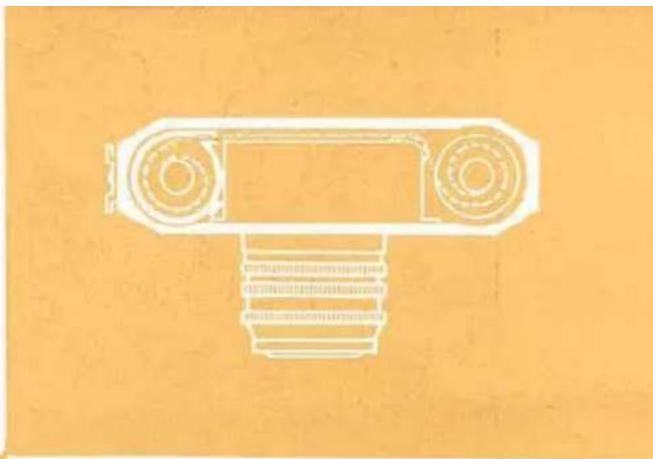
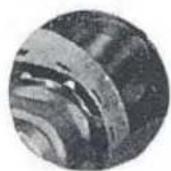
Turn the Film Winding Knob slightly to engage the sprockets in the film perforations as shown.
The dotted line as shown in the diagram indicates the film path when correctly loaded.
natural_image
Architectural line drawing of a mechanical component with circular and rectangular features on an orange background (no text or symbols)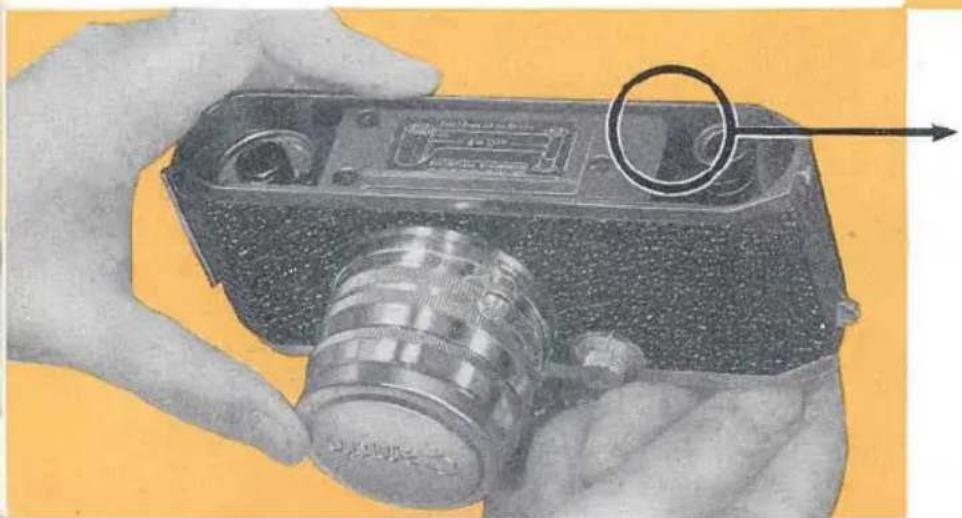
natural_image
Close-up of hands holding a vintage camera with a magnifying glass and a circular lens, against a plain yellow background (no text or symbols visible)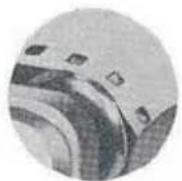
Correct
Not correct
natural_image
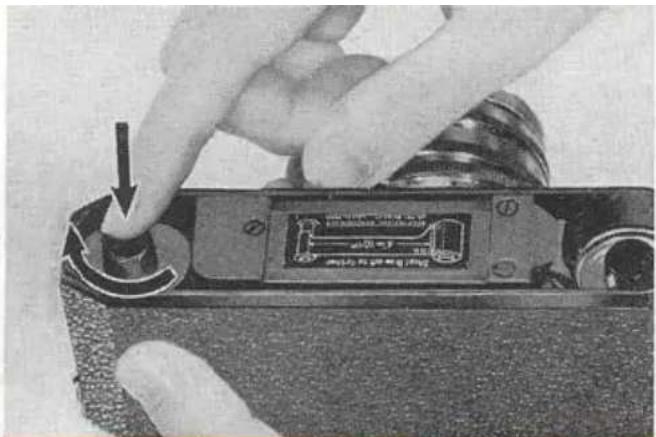
Close-up of a hand pressing down on a mechanical component with a black arrow indicating the press direction (no visible text or symbols)The Take-up Spool has a spring catch to facilitate its easier removal from the camera body. By turning the top of the Take-up Spool slightly, it will jump up and allow you to get a better grip. Re-lock this spring as shown in the illustration after you have loaded your camera and before you replace the Baseplate.
Replace the Baseplate by hooking it into the lug first and lock the Baseplate.
natural_image
Close-up of a hand holding a vintage camera with visible lens and adjustment arrows (no text or symbols)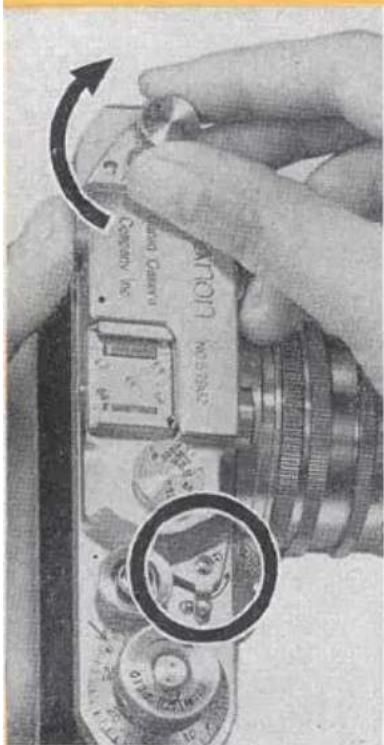
Keep the Reversing Lever still at "A". Pull up and turn the Rewinding Lever gently in the direction shown by the arrow in the diagram. When it will not turn further, your film is taut, having taken up the slack film in the magazine. Lastly, turn the Film Winding Knob and press the Shutter Release Button. Repeat this process once again. By doing this you ensure that you will not use the first two frames which have been exposed to light while you were loading. See note on page 23 to vary if that you have correctly loaded the film.
natural_image
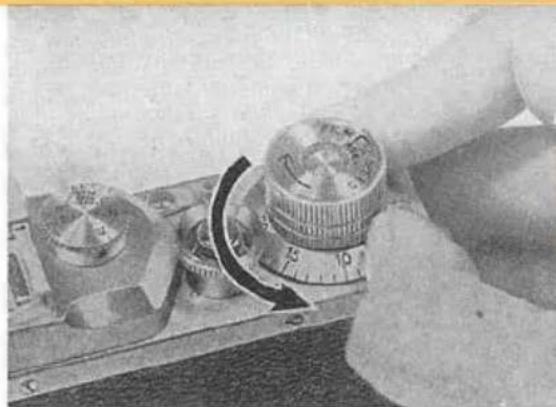
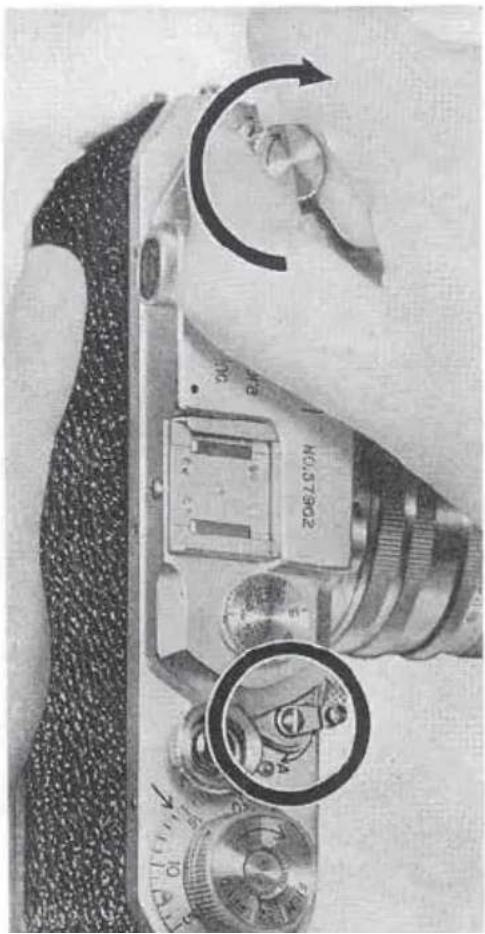
Close-up of a hand operating a rotary switch with a dial (no visible text or symbols)Next set the Exposure Counting Dial at the base of the Film Winding Knob to "1" by turning it counterclockwise with your thumb nail catching one of the lugs on the Dial. Each time the Winding Knob is turned this Dial automatically registers the next number.
natural_image
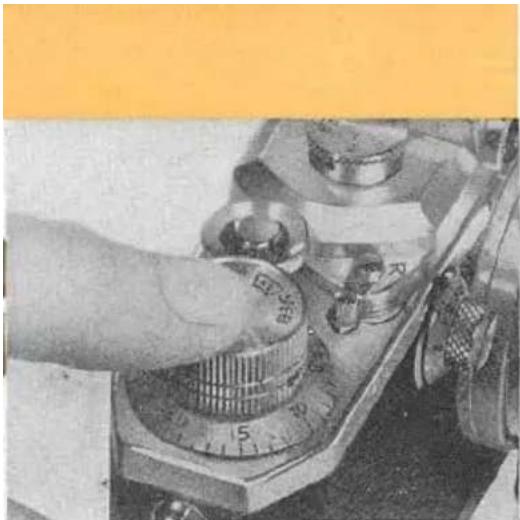
Close-up of a hand operating a vintage rotary dial with buttons and dials (no visible text or symbols)Next set the Film Speed Indicator* at the top of the Film Winding Knob to the speed of your film. This will serve as a reminder that your camera is loaded and will show speed of the film you are using.
NOTE: Each time the Winding Knob is turned the Rewinding Knob rotates in a reverse direction. This indicates that the film is properly passing to the Take-up Spool for the next exposure, provided you have taken care to make the film taut by tightening the film wound in the magazine. Should the Rewinding Knob not turn, obviously the sprockets are not engaging the film perforations. You should then rewind the film until it disengages the Take-up Spool, open the Baseplate and reload again.
STOP THE REWINDING MOTION (SEE NEXT PAGE) AS SOON AS THE REVOLVING OF THE SHUTTER RELEASE BUTTON CEASES. THIS WILL PREVENT THE LEADER FROM DRAWING COMPLETELY INTO THE MAGAZINE.
* JPN. PAT. 40087B
natural_image
Close-up of a vintage camera with visible adjustment knob and rotary dial (no text or symbols)Unloading
When the Film Winding Knob no longer turns, you have come to the end of your film roll. DO NOT FORCE IT. Make sure to release the shutter first and then turn the Reversing Lever from "A" to "R" (Rewind). Raise the Rewinding Knob and rewind the whole film back into its original magazine. When you have done this, you may open the Baseplate and take out the film magazine. The film is now ready for developing.
During the rewinding operation the Shutter Release Button turns and stops the moment the film leader is pulled off from the Take-up Spool. Rewind a few more turns so that the leader will be drawn completely into the magazine.
HOW TO CHANGE YOUR CANON LENSES
Dismounting
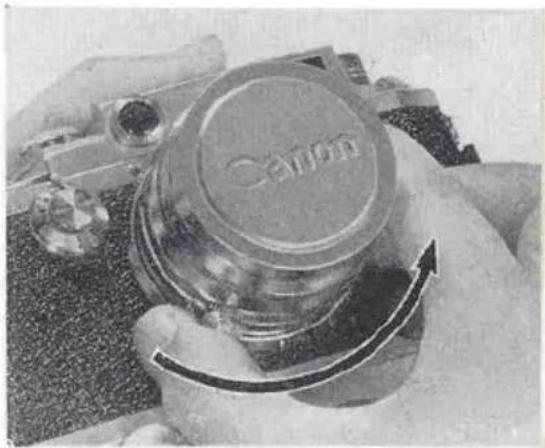
Place your CANON CAMERA in your hand. Grasp the base of the lens barrel by the Lens Focusing Lever and twist counter-clockwise. The lens will
unscrew without difficulty. The Lens Focusing Lever should be kept locked in the Infinity Catch at all the while.
Immediately the lens has been taken off, place it into a clean container (Canon Leather Lens Case or Canon Plastic Lens Case) to prevent the lens elements being scratched or contaminated by dirt or finger marks.
natural_image
Close-up of hands holding a transparent cylindrical container with a curved arrow, no visible text or symbolsMounting
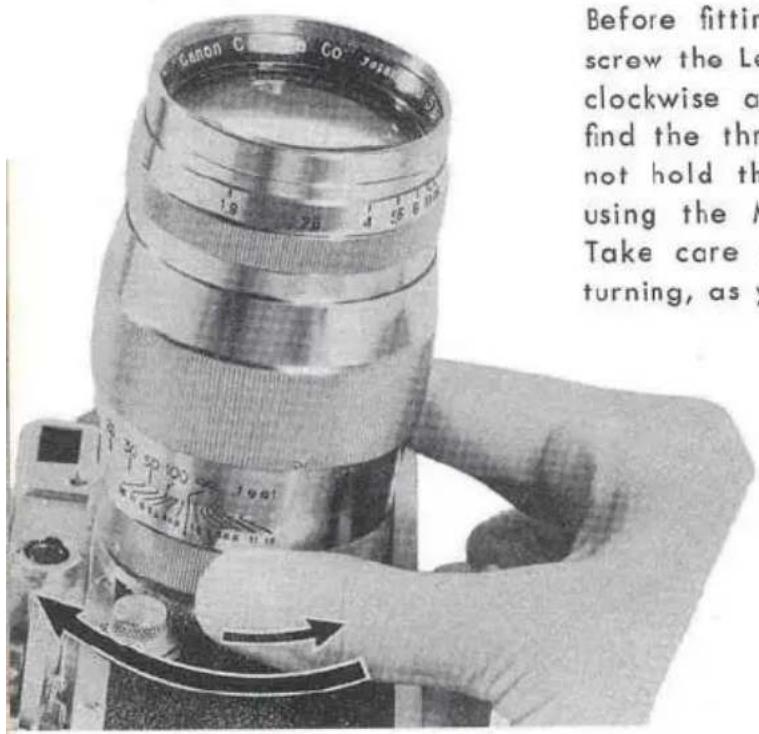
Before fitting the new lens into place be sure to unscrew the Lens Dust Cap. First turn the lens counterclockwise a little way and then clockwise. You will find the thread will be introduced more easily. Do not hold the lens by any part other than the base using the Milled Ring or the Lens Focusing Lever. Take care not to use force if the threads bind while turning, as you have crossed the thread.
NOTE: During the interchange, do not face the Lens Opening of the camera to strong light. It is recommended that you shield the Opening while the new lens is being prepared
HOW TO USE
natural_image
Pure mechanical component diagram without any text, numbers, or symbolsFlash Synchronizer\*
There are three types of built-in flash synchronization in the Canon camera, model IV-S2:
- High shutter speed synchronization.
- Speedlight synchronization.
- Slow shutter speed synchronization.
One and three are to be used with any of the synchronized Canon Flash Units. Two, with Speedlight units.
NOTE: Only the Canon camera MODEL IV-S2 is synchronized. Models II-D and III-A are not synchronized and Canon Flash Unit, model B-III must be used.
* JPN PAT. 187594 U.S.A. PAT. 2643597
High Shutter Speed Synchronization
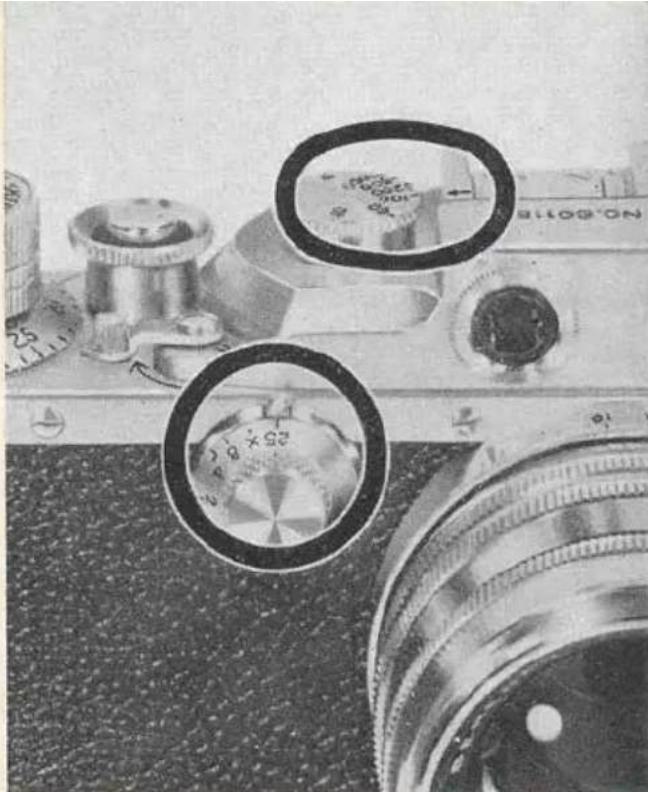
This system is generally for focal-plane flash bulbs GE No. 6, 31; Sylvania FP-26, 2A; Westinghouse No. 6; etc.. Be sure to keep the Slow Shutter Speed Dial at "25" at all times when using this system. For guide numbers and Micro Sync settings please refer to the cards which accompany the instruction booklet for the Canon Flash Unit.
natural_image
Close-up of a vintage camera with two circular dial indicators and a magnified view of the lens (no readable text or symbols)Do not press the Shutter Release Button even though the shutter is not wound, as it will fire the flash bulb.
WARNING:
Speedlight Synchronization
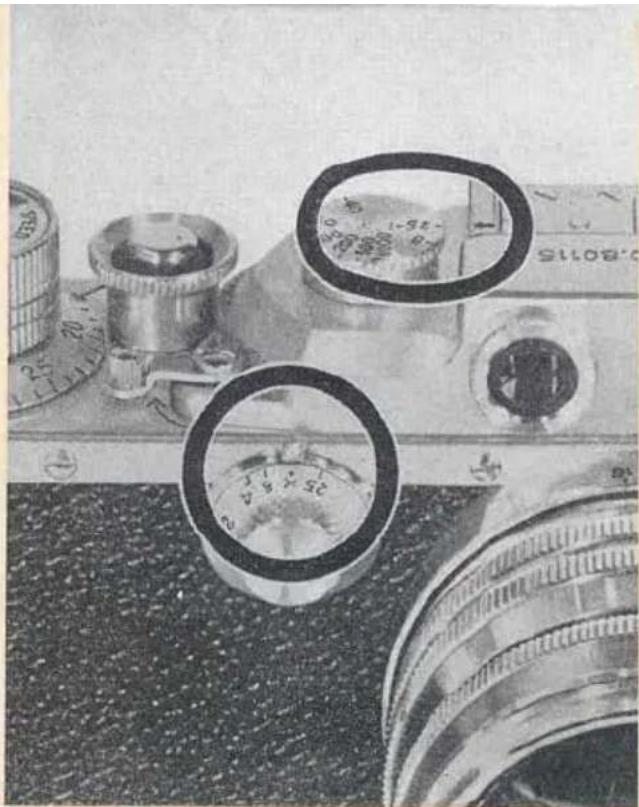
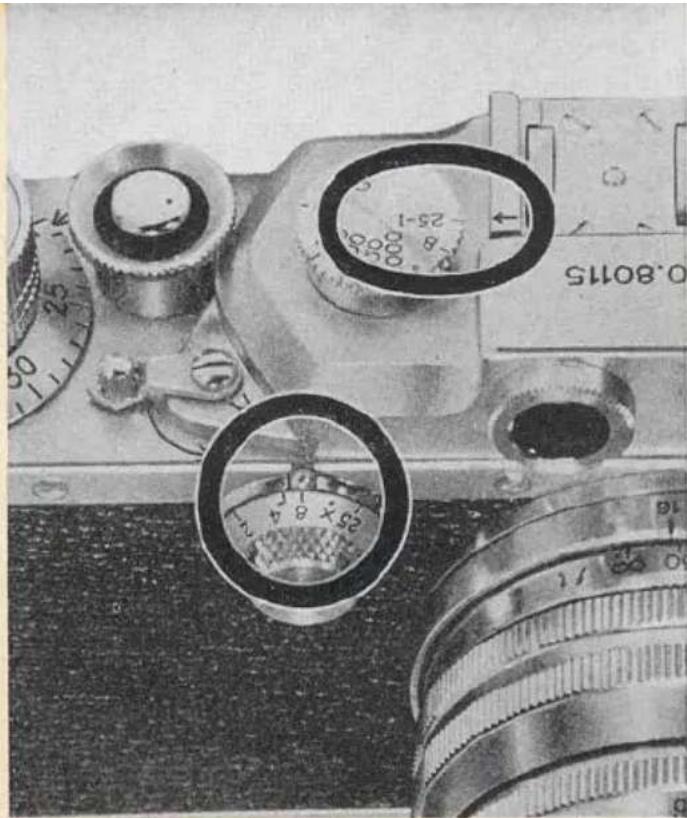
Speedlight unit (having not more than 10 millisecond delay) is connected with a Canon Extension Cord "A" (15ft) through a Canon Self-Extension Adapter fitted to the Flash Mounting Bracket* of the camera. Make sure to set the Slow Shutter Speed Dial to "X" keeping the High Shutter Speed Dial at 1/25 sec. DO NOT USE OTHER SPEEDS. Aperture openings (f-stops) should be determined by instruction given with the speedlight unit.
natural_image
Close-up of a vintage camera with visible lens and control knobs, no readable text or symbols present.* JPN, PAT. 383724
WARNING:
Do not press the Shutter Release Button except for checking the connection, even though the shutter is not wound, as it discharges the speedlight.
Slow Shutter Speed Synchronization
This is generally for peak type flash bulbs such as GE No. 5, 11, 22, 50; Sylvania No. 0, 2, 3, 25, 40; etc. However, focal-plane flash bulbs can be used just as well. Keep the High Shutter Speed Dial set at 1/25 sec. For settings please refer to the cards which are furnished with the instruction booklet for the Canon Flash Unit.
natural_image
Close-up of a vintage camera with dual rotary dials and adjustment knobs (no readable text or symbols)Do not press the Shutter Release Button even though the shutter is not wound. Otherwise the flash bulb will fire.
WARNING:
EVOLUTION OF CANON CAMERAS AND HOW TO IDENTIFY
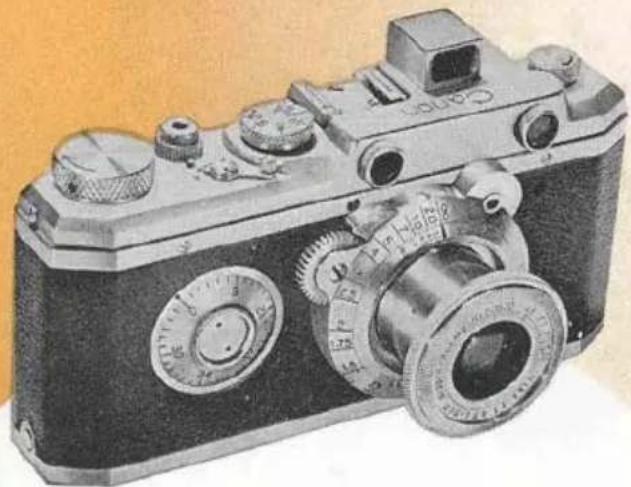
1935-37 Original Model
natural_image
Vintage black-and-white photograph of a vintage camera with dual rotary knobs and adjustment knobs (no visible text or symbols)31
The original model equipped with collapsible viewfinder. Shutter speeds provide 1/20 to 1/500 sec. & B. Bayonet-type-mount Nikkor 50 mm f: 4.5 mounted.
YOUR CAMERA
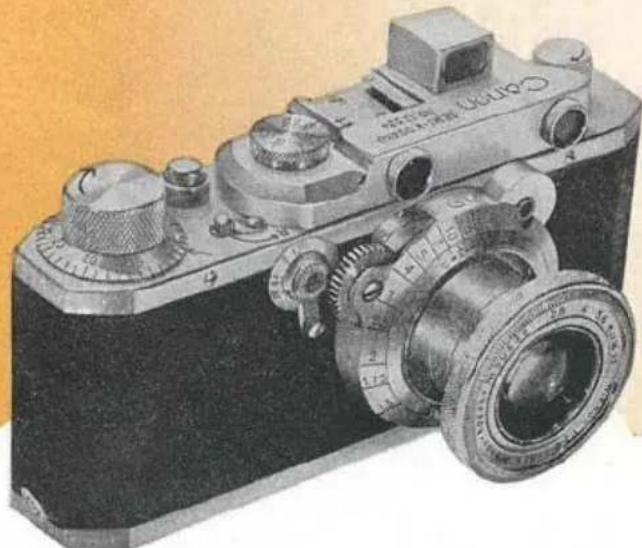
1937-39 Model S
natural_image
Vintage black-and-white photograph of a vintage camera with visible caliper and adjustment knobs (no text or symbols)Exposure counting dial moved to the base of the film winding knob. Slow shutter speeds (1-1/20 sec.) installed. Bayonet-type-mount Nikkor 50 mm f: 2.8 lens mounted.
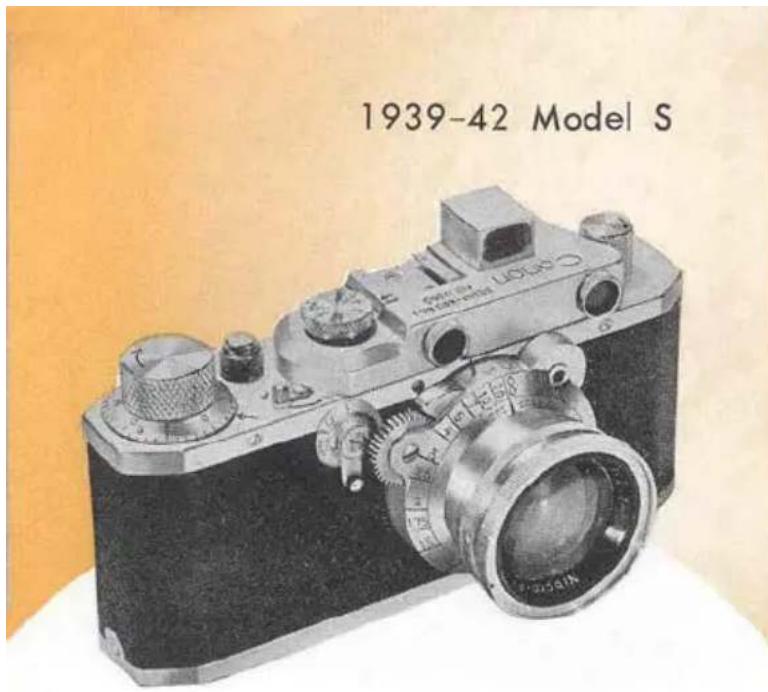
Exactly same as the previous model except bayonet-type-mount Nikkor 50 mm f:2 lens replaces Nikkor 50 mm f:2.8 lens.
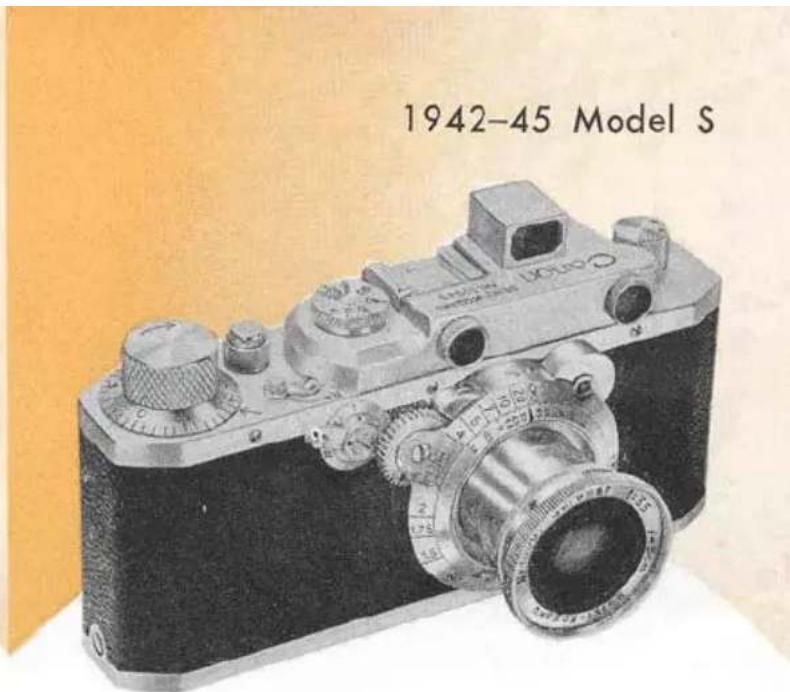
All the Nikkor lenses replaced by Canon's own Serenar lens, collapsible Serenar 50 mm f:3.5.
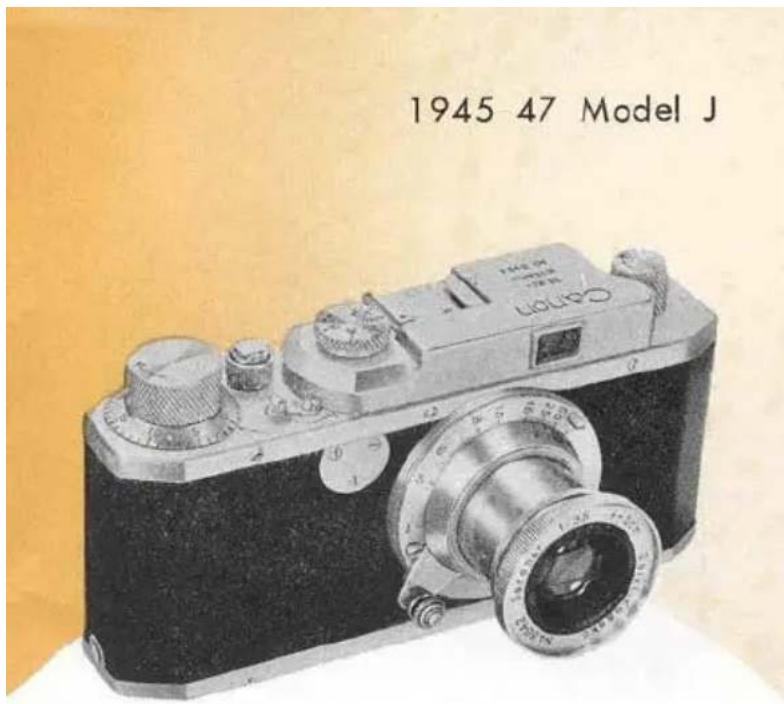
The model with the built-in view finder but without rangefinder, No slow shutter speed.
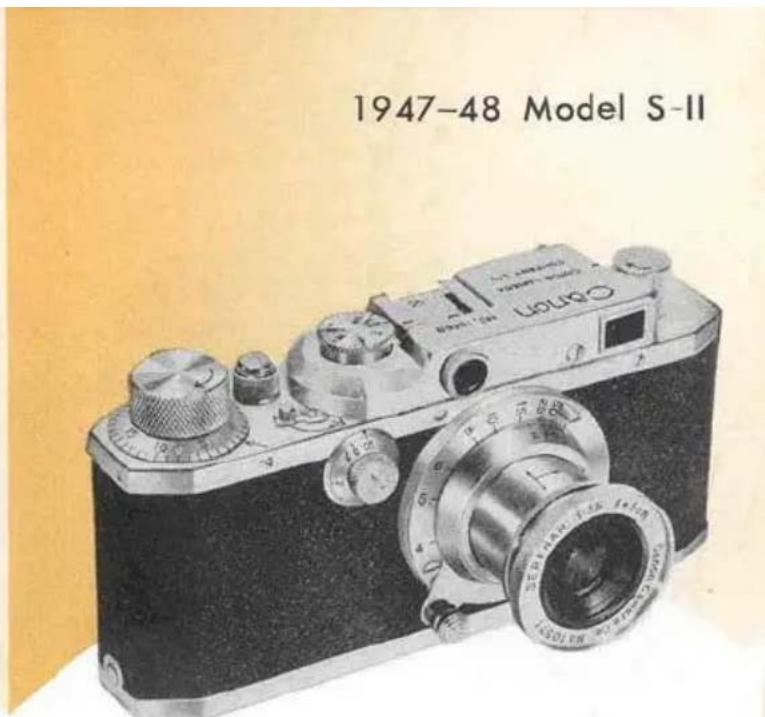
Model J was replaced by Model S-II with built-in rangefinder. The camera has speeds 1 to 1/500 sec. & B.
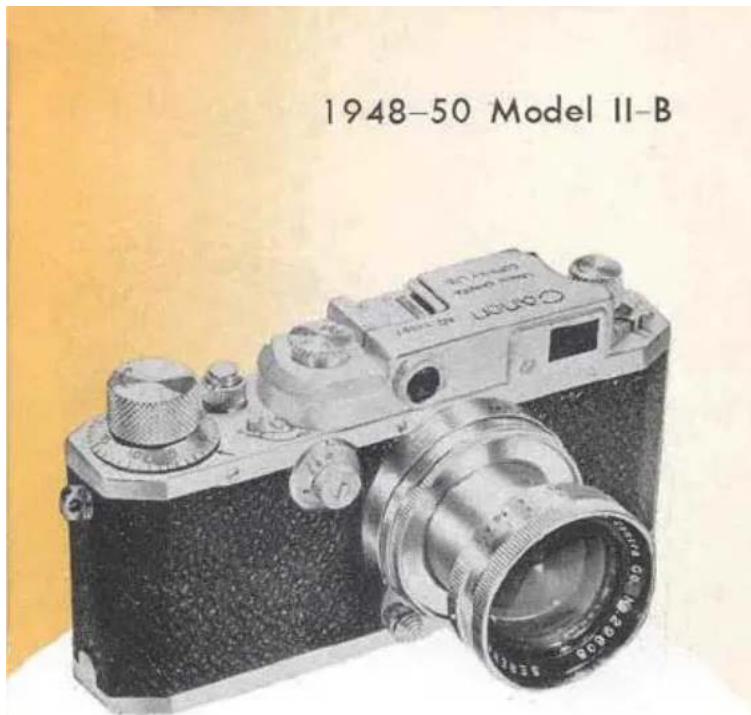
Collapsible Serenar 50 mm f:2 lens replaces Serenar 50 mm f:3.5 lens. It is distinguished by a remarkable single window combined view rangefinder with three degrees of magnification control.
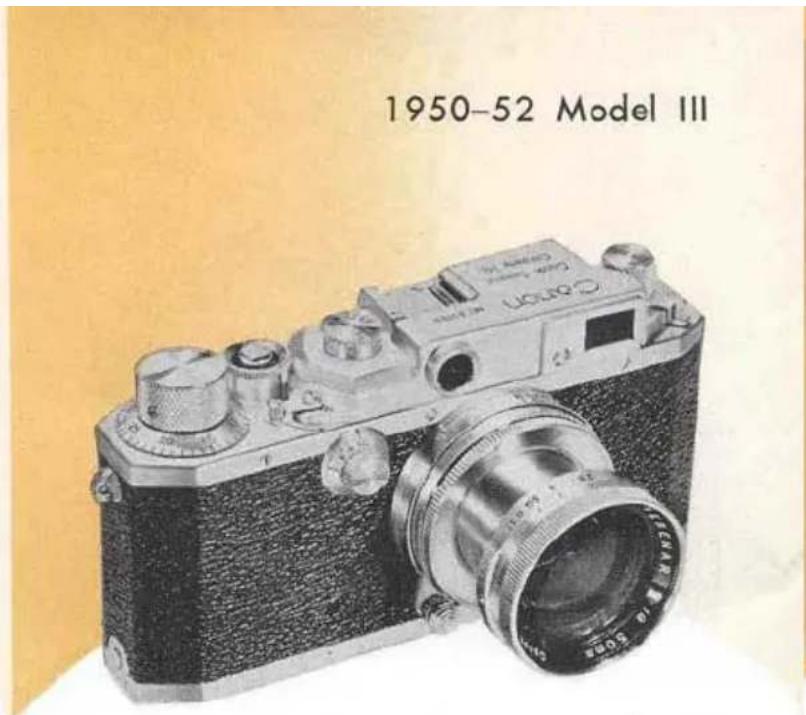
Shutter speeds of 1/1000 sec. as well as T added. Collapsible Serenar 50 mm f: 1.9 lens replaces collapsible Serenar 50 mm f: 2 lens.
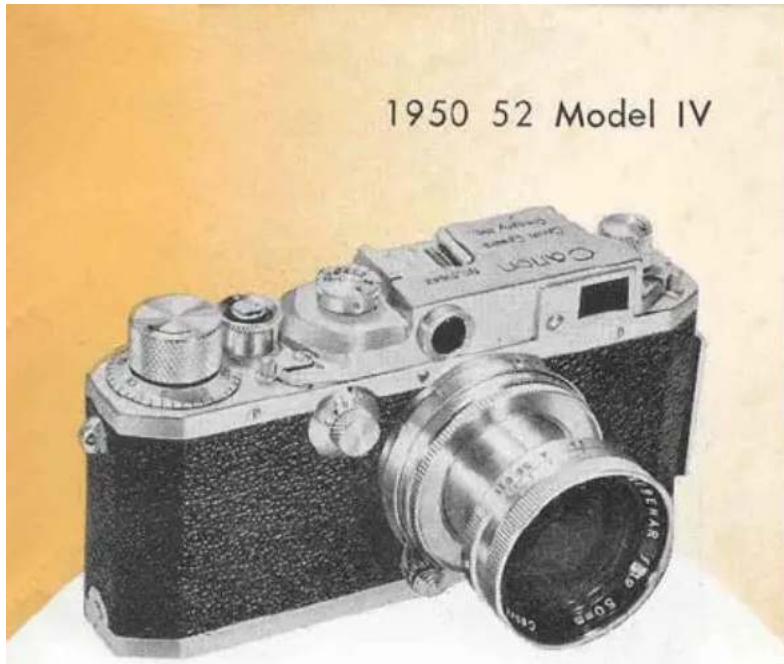
Built-in Flash Synchronizer equipped. Rail on one end of the camera to accommodate flash unit. Construction is similar to the Canon III.
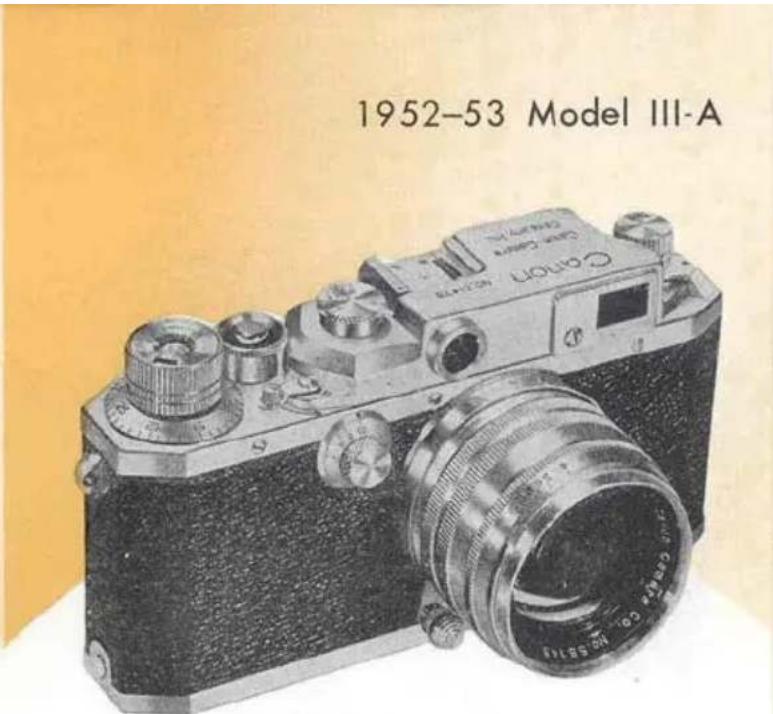
Serenar 50 mm f:1.8 replaces 50 mm f:1.9. It is not synchronized. Film Speed Indicator equipped the top of the Film winding Knob. Click stops on the diaphragm control, and a non-collapsible mount.
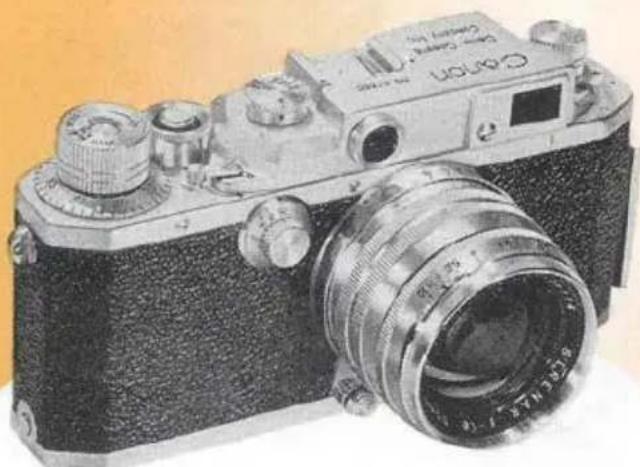
1952 Model IV-F (later renamed as IV-S)
natural_image
Vintage black-and-white photograph of a Canon EF310 camera with lens and control knobs (no visible text or symbols)Similar to Canon IV except collapsible Serenar 50 mm f:1.9 replaced by non-collapsible standard Serenar 50 mm f:1.8 lens.
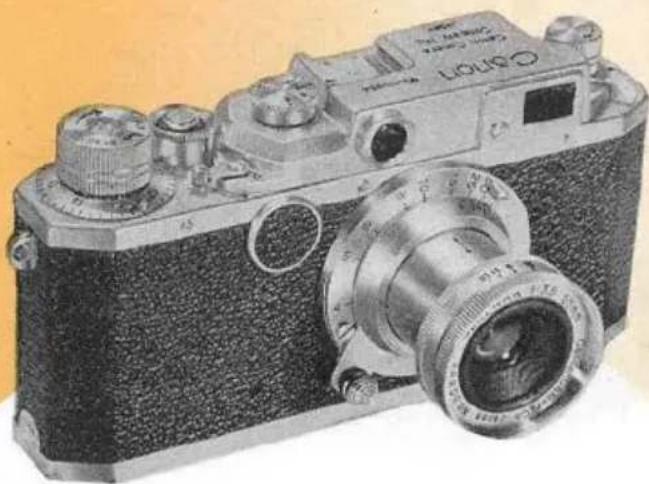
1952 Model II-A
natural_image
Vintage photograph of a classic camera with visible lens and control knobs (no text or symbols)No slow shutter speeds. 1/25 to 1/500 sec. & B. New Serenar 50 mm f:3.5 (type II) lens mounted.
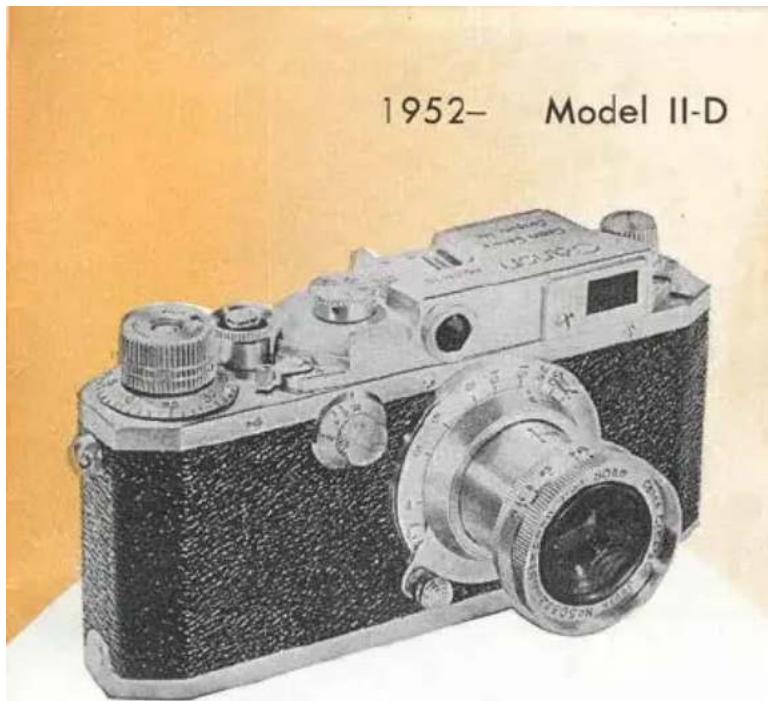
No change except slow shutter speeds added to the previous model II-A.
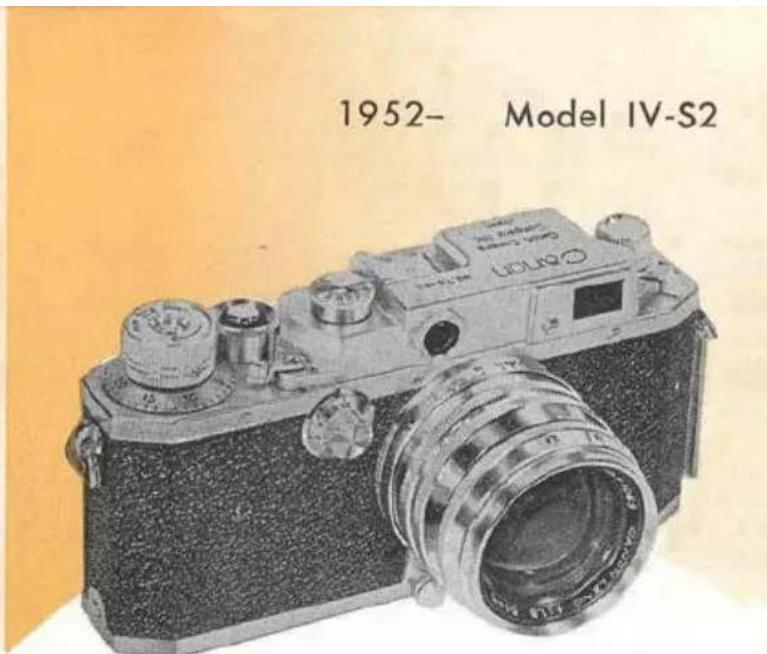
Same as Model IV-S except speedlight (x) synchronization added into the flash synchronizer, and the lock provided on the slow shutter speed dial.
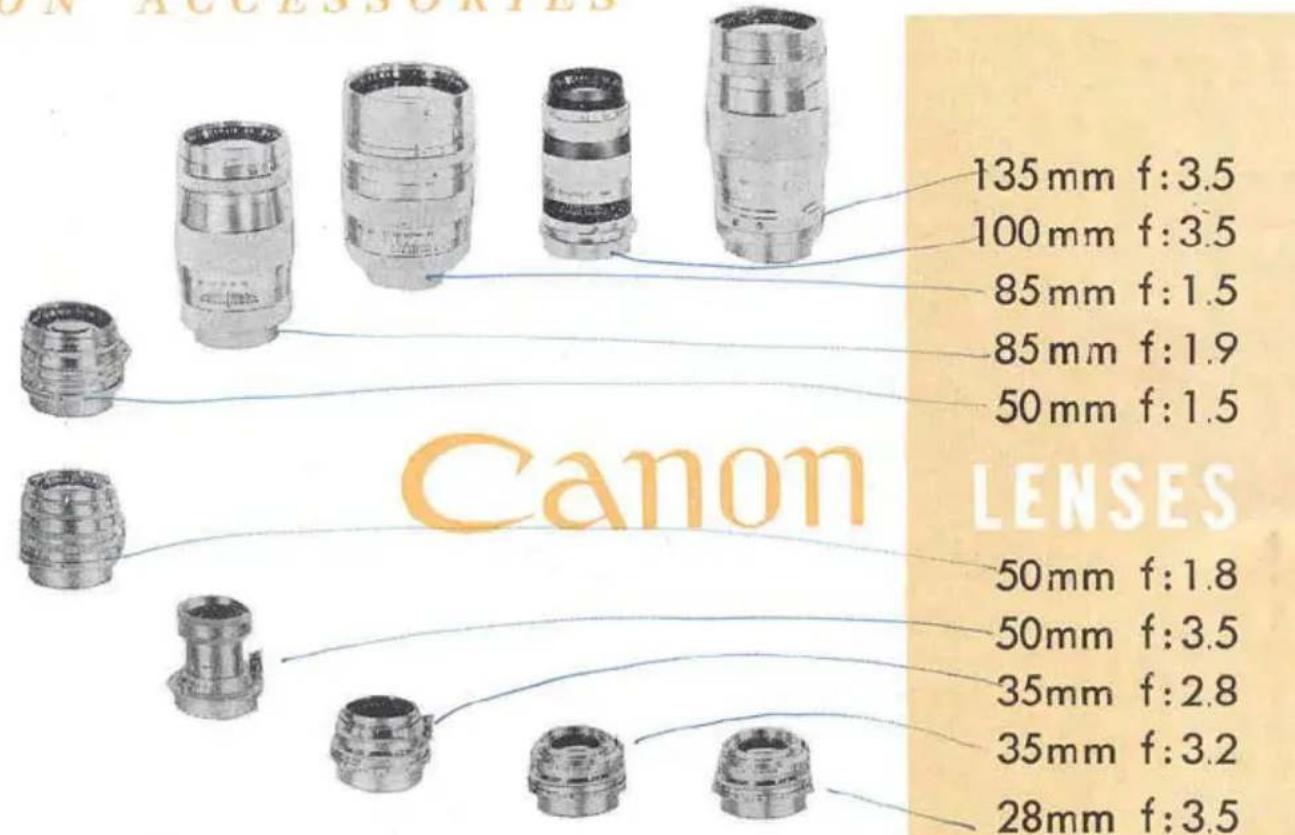
CANON ACCESSORIES
natural_image
Vintage Canon DSLR camera with visible lens and control panel (no text or symbols on body)CANON CAMERA HOLDER\*
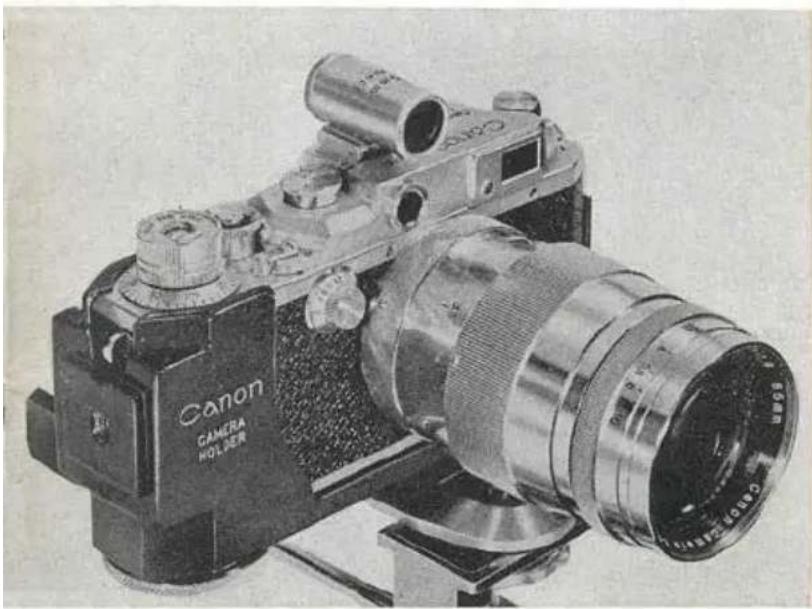
The Canon CAMERA HOLDER is an ideal accessory for close-up, telephoto and long exposure shots. It is designed to hold the camera sturdy in a balanced position when using a tripod. The camera can be easily seated either vertically or horizontally. Spirit Level assures accurate composition of subject.
JPN. PAT. 384742 384743 U.S.A. PAT. 2589892
natural_image
Close-up of a Canon Auto-UP camera with visible lens and control panel (no text or symbols on body)CANON AUTO-UP
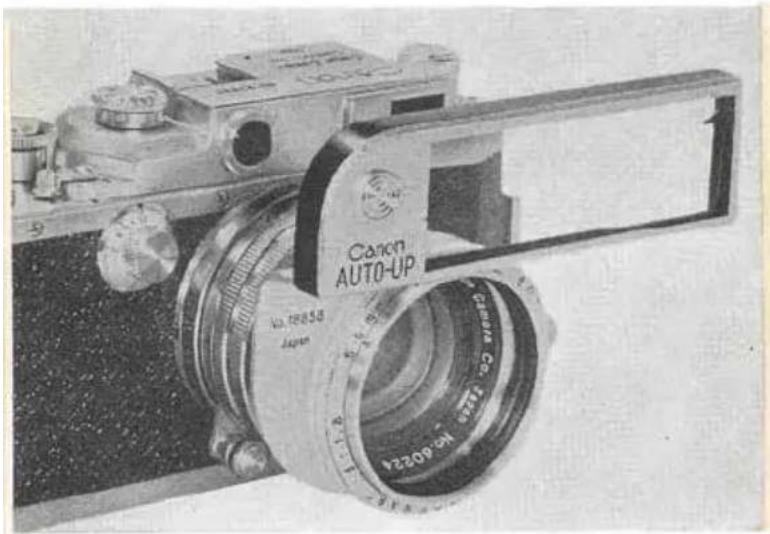
Ideal for photographing flowers, insects and other small objects. The Canon AUTO-UP is a close-up lens for use with the Canon 50 mm f:1.8 lens. Subject lying between 22 inches and 40 inches can be accurately focused with the rangefinder of the camera. It is not necessary to dismount the lens to use the AUTO-UP, simply mount the AUTO-UP onto the 50 mm f:1.8.
BRIEF HISTORY OF CANON CAMERA COMPANY, INC.
Canon Camera Company, Inc. was first established as a Research Institute in the year of 1933 for the objective of studying and manufacturing the very best miniature cameras in Japan. In 1935, through intensive researches and designs, the first model named as “Kannon” (Goddess of Mercy) was produced and put on market with pride and confidence under the trade name “CANON”.
Very little number of cameras were being produced during the early stage but continued efforts have been made to improve the quality and to increase the production as well as to put out variety of accessories for Canon cameras.
Canon Camera Company, Inc. is now equipped with various superfine precision machineries, testing instruments, and operated by a number of top grade engineers, technicians, and designers. Lifelong experience and natural skill of these staff enable the company to fabricate the entire works within the company. Optical glass dissolving, lens polishing as well as shutter and metal assembling are all done through modern streamlined operation.
Lenses produced by Canon Camera Company, Inc. have been called "SERENAR" but they are now named as "CANON LENSES".
Canon Camera Company, Inc. is the largest camera manufacturer in Japan with the longest history and the greatest reputation.

natural_image
Vintage camera with a circular fan and mounted lens, no visible text or symbolsNo. 230 (JMC-4)
2M K-7-53
Printed in Japan
Daito
- DESCRIPTIONS
- CONTENTS
- HOW TO OPERATE YOUR CANON CAMERA
- Setting The Shutter Speed Dials
- High Shutter Speed Dial
- Slow Shutter Speed Dial
- Time Exposures Longer Than One Second
- Lens Aperture Scale
- Depth of Field Scale
- Infrared Index
- Distance Scale
- Focusing
- Magnification Control\*
- Exposure & Composition
- Double Exposures
- Accessory Clip
- HOW TO LOAD AND UNLOAD FILM
- Loading
- Unloading
- HOW TO CHANGE YOUR CANON LENSES
- Dismounting
- Mounting
- Flash Synchronizer\*
- High Shutter Speed Synchronization
- Speedlight Synchronization
- Slow Shutter Speed Synchronization
- EVOLUTION OF CANON CAMERAS AND HOW TO IDENTIFY
- YOUR CAMERA
- CANON CAMERA HOLDER\*
- CANON AUTO-UP
- BRIEF HISTORY OF CANON CAMERA COMPANY, INC.
Brand : CANON
Model : IV-S2
Category : Uncategorized