
SKAARHOJ RC-SK5 - Uncategorized CANON - Free user manual and instructions
Find the device manual for free SKAARHOJ RC-SK5 CANON in PDF.


| Product Type | PTZ Camera Controller |
| Brand | SKAARHOJ |
| Model | RC-SK5 |
| Power Supply | 12V DC power adapter (included) or PoE (IEEE 802.3af, 48V) |
| Power Consumption | Less than 9 Watts |
| Network Connection | Ethernet via Cat6 cable or higher, PoE enabled |
| Camera Compatibility | Canon PTZ cameras (e.g., CR-N100, CR-N700, EOS C300); with Pro License supports Sony, Panasonic, BirdDog, etc. |
| Control Interface | Joystick for pan/tilt with twist zoom, zoom rocker, manual focus dial, iris dial, 4x menu setting dials, 20 menu pages |
| Presets | Up to 100 per camera, recall and store via dedicated buttons, paging for multiple pages |
| Display | Screen for menu navigation and camera status |
| Software | Reactor platform, web UI for configuration, OTA updates |
| Operating System | skaarOS |
| Maintenance | Clean with oil-free brush or dust blower; avoid organic solvents |
| Safety | Do not disassemble; use only supplied power adapter; dispose as WEEE |
| Regulatory Compliance | EU WEEE, RoHS (implied) |
Frequently Asked Questions - SKAARHOJ RC-SK5 CANON
User questions about SKAARHOJ RC-SK5 CANON
0 question about this device. Answer the ones you know or ask your own.
Ask a new question about this device
Download the instructions for your Uncategorized in PDF format for free! Find your manual SKAARHOJ RC-SK5 - CANON and take your electronic device back in hand. On this page are published all the documents necessary for the use of your device. SKAARHOJ RC-SK5 by CANON.
USER MANUAL SKAARHOJ RC-SK5 CANON
Exclusively for Canon
User Guide | January 2024
Get the latest version of this User Guide at: https://www.skaarhoj.com/support/manuals/
Contents
Introduction 4
What's In the Box 4
Overview 4
System Configuration 5
Setup 5
Power 5
Setup 5
Identifying the IP Address 5
Logging into the RC-SK5 Web UI 6
Update the Software 7
Configurations 8
Discovering Cameras 8
Adding Cameras Manually0
Managing Cameras 13
Manage Projects 14
Customizing the Settings 15
Undo 17
More information 18
Simulator 18
Access the Control Panel via the Web UI 18
The Standard Config 19
Introduction 19
RC-SK5 & Frame Shot Pro 41
Overview of Benefits 42
Network Connected 42
Setup2
Visual Presets 43
Functional Description 44
Persistent Thumbnail Storage 45
Side By Side 45
Extended Camera Selector 46
Customizing User Buttons 46
RC-SK5 Pro License 49
Overview of Benefits 49
Control Any Camera and Device 49
Preset Labels 51
More Configurations 52
Tally and Routing Triggers 52
Advanced Customization 54
SKAARHOJ Ecosystem 55
Control Hub 56
Software Applications 56
Important Information 58
Legal Notice 58
Warnings 58
Maintenance Precautions 58
Regulatory Compliance 58
Introduction
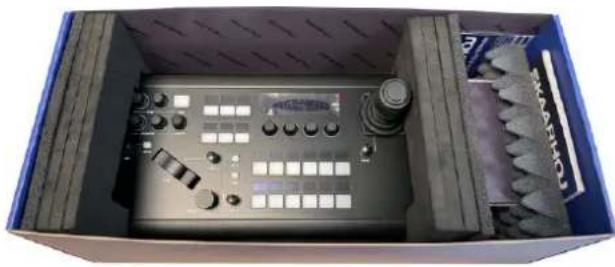
What's In the Box
natural_image
Interior view of a box containing an electronic control panel with buttons and a gear-like component (no visible text or symbols)1 x RC-SK5 Controller
1 x 12V DC Power Supply including power plug for EU, UK and US
Overview
This user guide is suitable for the following models
- RC-SK5
- RC-SK5 Pro License
- Frame Shot Pro - Red Edition
System Configuration
Setup
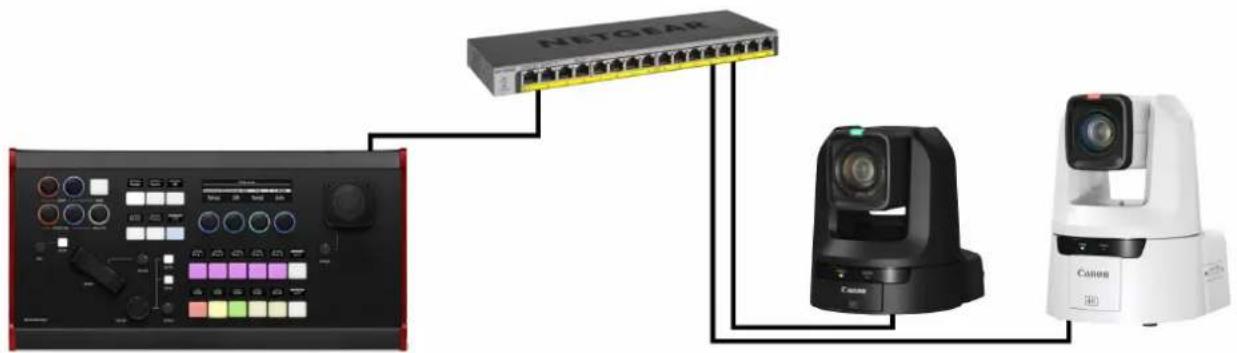
- Connecting the Control Panel: Use a Cat6 cable (or higher grade) to connect the RC-SK5 control panel to a Power over Ethernet (PoE) capable ethernet switch.
- Camera Connection: Connect your Canon cameras to the same ethernet switch to ensure network integration.
flowchart
graph TD
    A["NETGEAR"] --> B["Canon"]
    A --> C["Canon"]
Power
- DC Power Adapter: Only use the DC power adapter provided with the RC-SK5 controller. Substituting with a different DC power adapter may lead to malfunctions or damage.
- PoE Power Supply:
- If powering the controller via PoE, confirm that the network switch is PoE-enabled and adheres to the 48V IEEE 802.3af standard.
- Ensure that your PoE source has a sufficient power budget. Inadequate power will prevent the controller from functioning correctly.
- Power Consumption: The controller's power consumption is less than 9 Watts.
Setup
Identifying the IP Address
• Finding the IP Address: Once the cameras and the RC-SK5 are connected to the same network, the IP address of the RC-SK5 will typically be displayed on its screen.
- Accessing the Controller: To access the RC-SK5, enter the displayed IP address into a web browser from any computer on the same network.
- Troubleshooting IP Issues: If the IP address is not displayed, please consult the SKAARHOJ "Getting Started" guide for troubleshooting tips. Note that the RC-SK5 is configured to connect to a network with an active DHCP server. Without DHCP, it may not correctly obtain an IP address.
Logging into the RC-SK5 Web UI
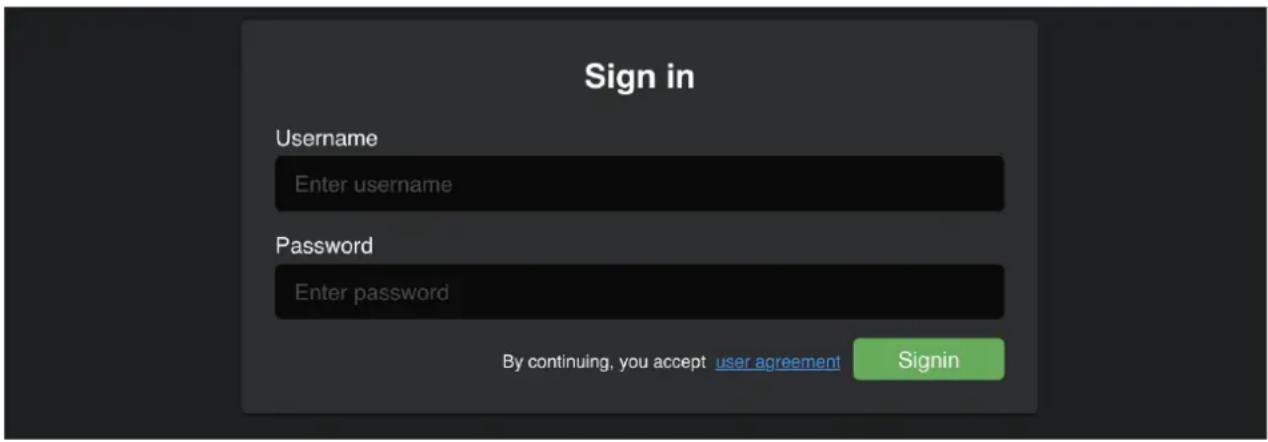
- Accessing the Login Page: Navigate to the IP address in your web browser.
- Accepting the Agreement: You will first need to read and accept the "End-User License and Product Support Agreement for Canon RC-SK5™, Reactor™, and the Blue Pill Platform™".
- Entering Login Credentials:
- Username: admin
- Password: skaarhoj
- Security Recommendation: If you are operating the RC-SK5 on an insecure network, it is strongly recommended to change the default username and password. This can be done in the Settings tab.
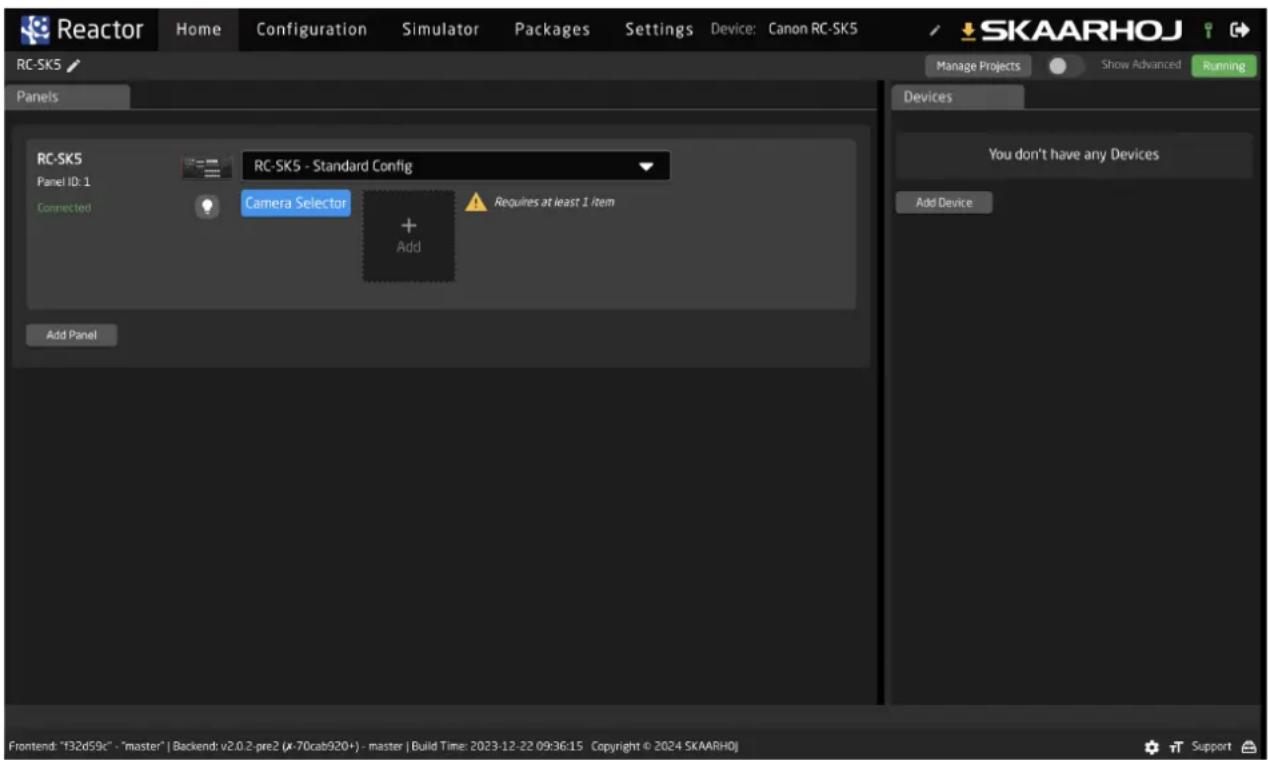
After logging in, you will be directed to the Home screen of Reactor, where most configuration settings can be managed.
Update the Software
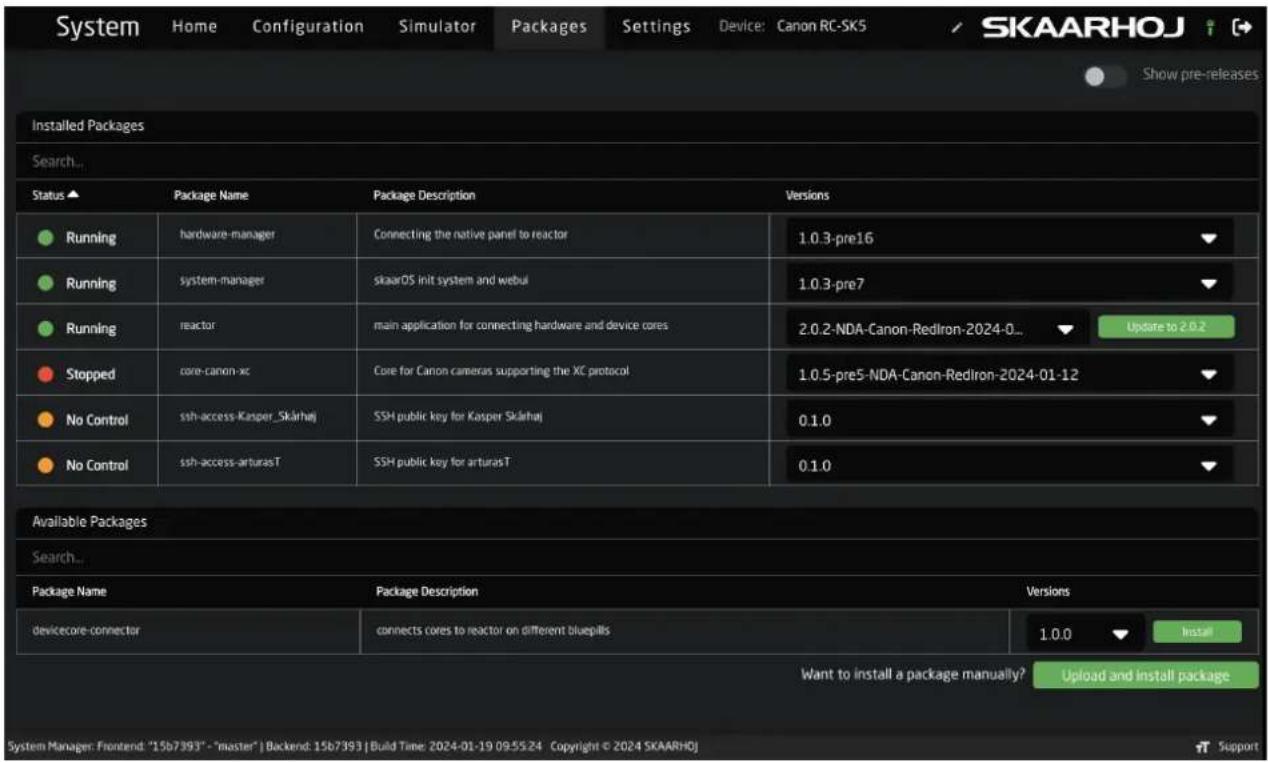
We advise you to promptly updating the software on your RC-SK5. The process is straightforward and can be done via the Packages tab. Please follow these steps:
- Internet Connection Check: Ensure that the RC-SK5 is connected to the internet. A green tower icon in the upper right corner indicates an active internet connection.
- Performing an Update: If there are available updates for any package, you will see a green "Update to..." button next to the respective package. Click this button to automatically download and install the update for that package.
- Manual Update Process: In instances where the RC-SK5 is not connected to the internet, visit https://devices.skaarhoj.com/ to download the necessary packages. Use the "Upload and Install Package" button on the RC-SK5 to manually install these packages.
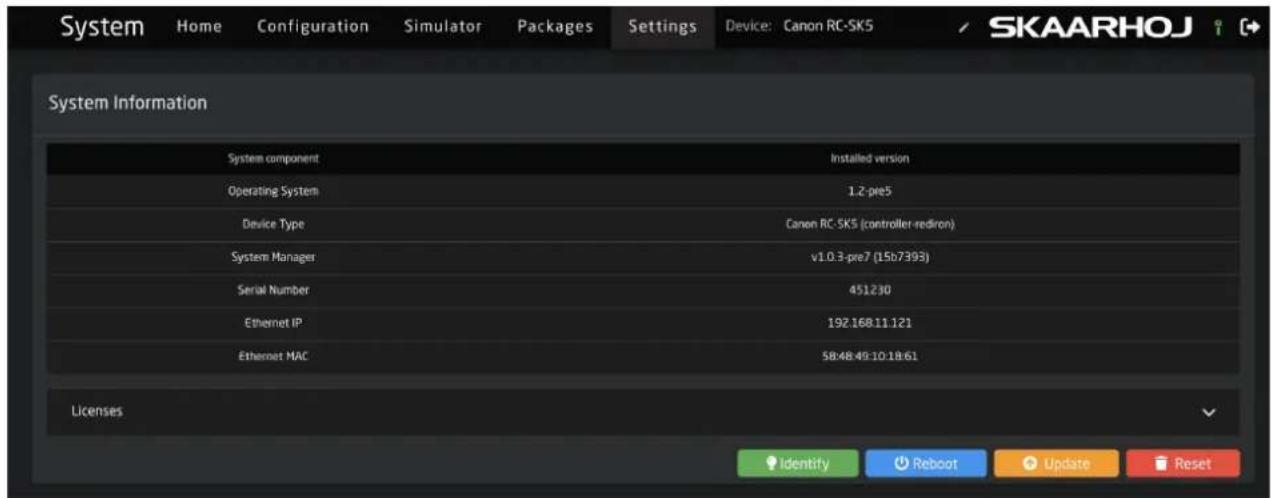
In addition, check for a newer version of the skaarOS operating system by going to the Settings tab and clicking the orange Update button.
Configurations
The Reactor Home screen is where you initiate the setup for the RC-SK5. Your screen should resemble the following view:

The dropdown menu labeled "RC-SK5 - Standard Config" is where you choose the operational setup for your RC-SK5. This manual details the functionality of this particular configuration. In the standard RC-SK5 version, this is the default configuration, with the only other option being the configuration that incorporates Frame Shot Pro. Be aware that switching configurations from this dropdown will erase any customizations like added cameras. It is advised to only change configurations if you have a specific reason.
Discovering Cameras
In the Reactor Home screen, click the square "+" icon located to the right of the blue "Camera Selector" button to open the Select Device dialog. Use the "Discover Devices" option to find your Canon cameras, which should appear in the list if they are connected and the network is set up correctly.
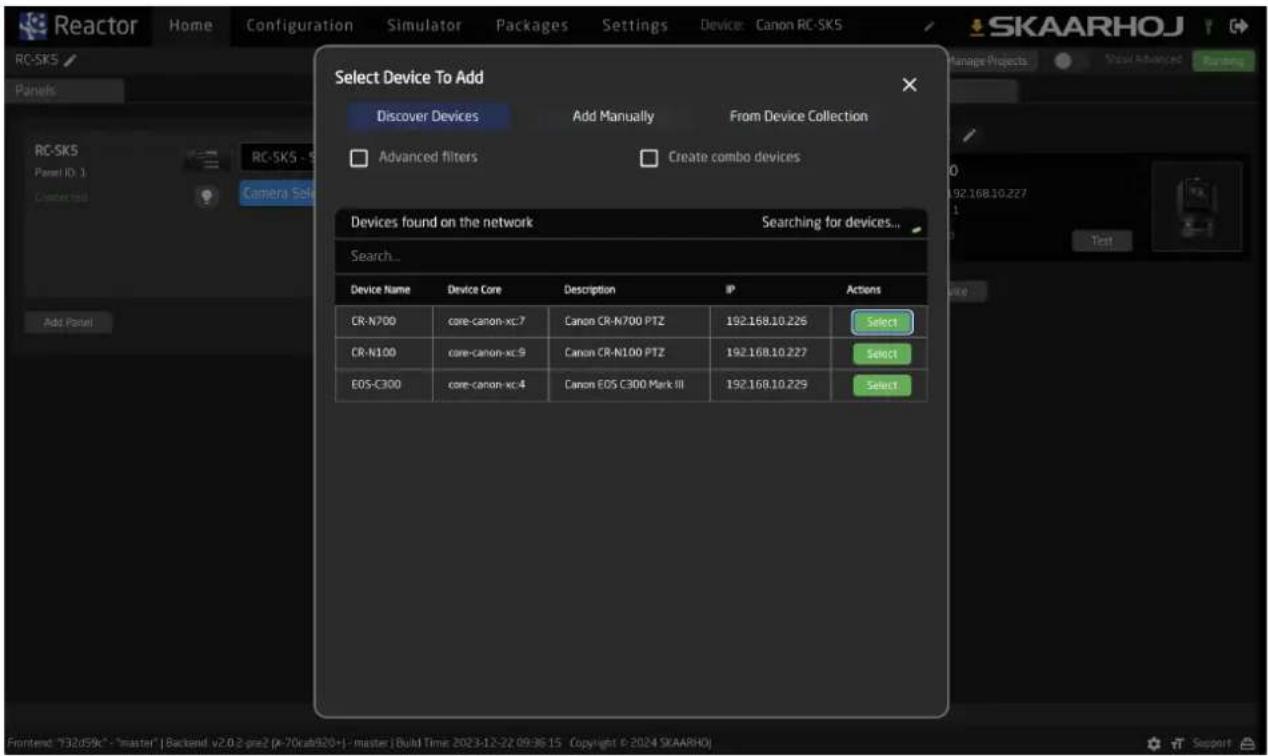
Click "Install" for each camera you want to add to RC-SK5, holding down Shift to select multiple cameras simultaneously.
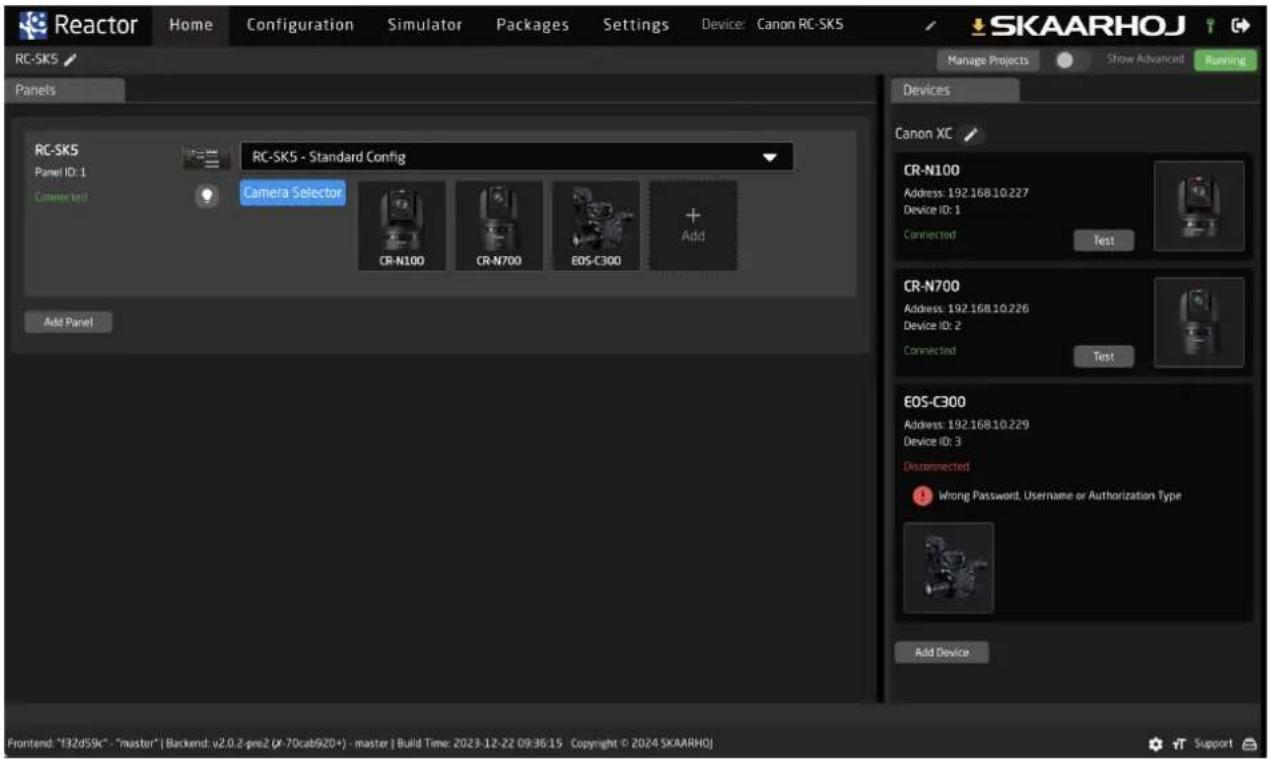
After adding your cameras, they will receive a unique Device ID. For some models, like the EOS-C300, you may need to enter additional details like username and password, as indicated in the Devices tab on the right side of the Home Screen.
Adding Cameras Manually
If your cameras are not automatically discovered, you have the option to select them manually. Click on "Add Device Manually" to view a list of all supported Canon cameras. In this manual selection process, you will need to enter details such as the IP address for each camera.
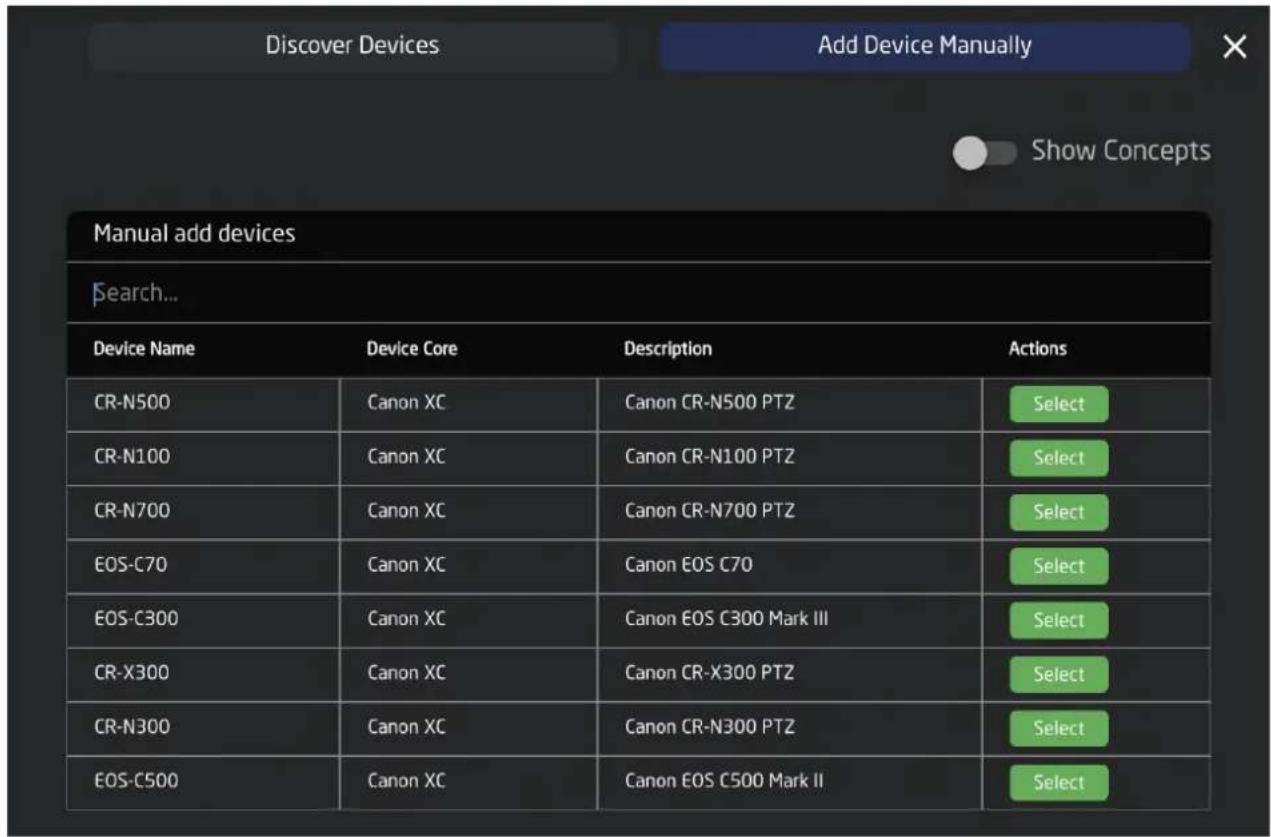
Cameras can also be added using the "Add Device" button found in the Devices tab. When a device is added this way, it connects to the RC-SK5, but it isn't automatically included in the camera selector. Cameras are only added to the selector when listed next to the blue "Camera Selector" button. This approach allows for flexible design of the camera selector, including the option to exclude certain cameras or to add the same camera multiple times, such as making it appear on multiple pages of the RC-SK5.
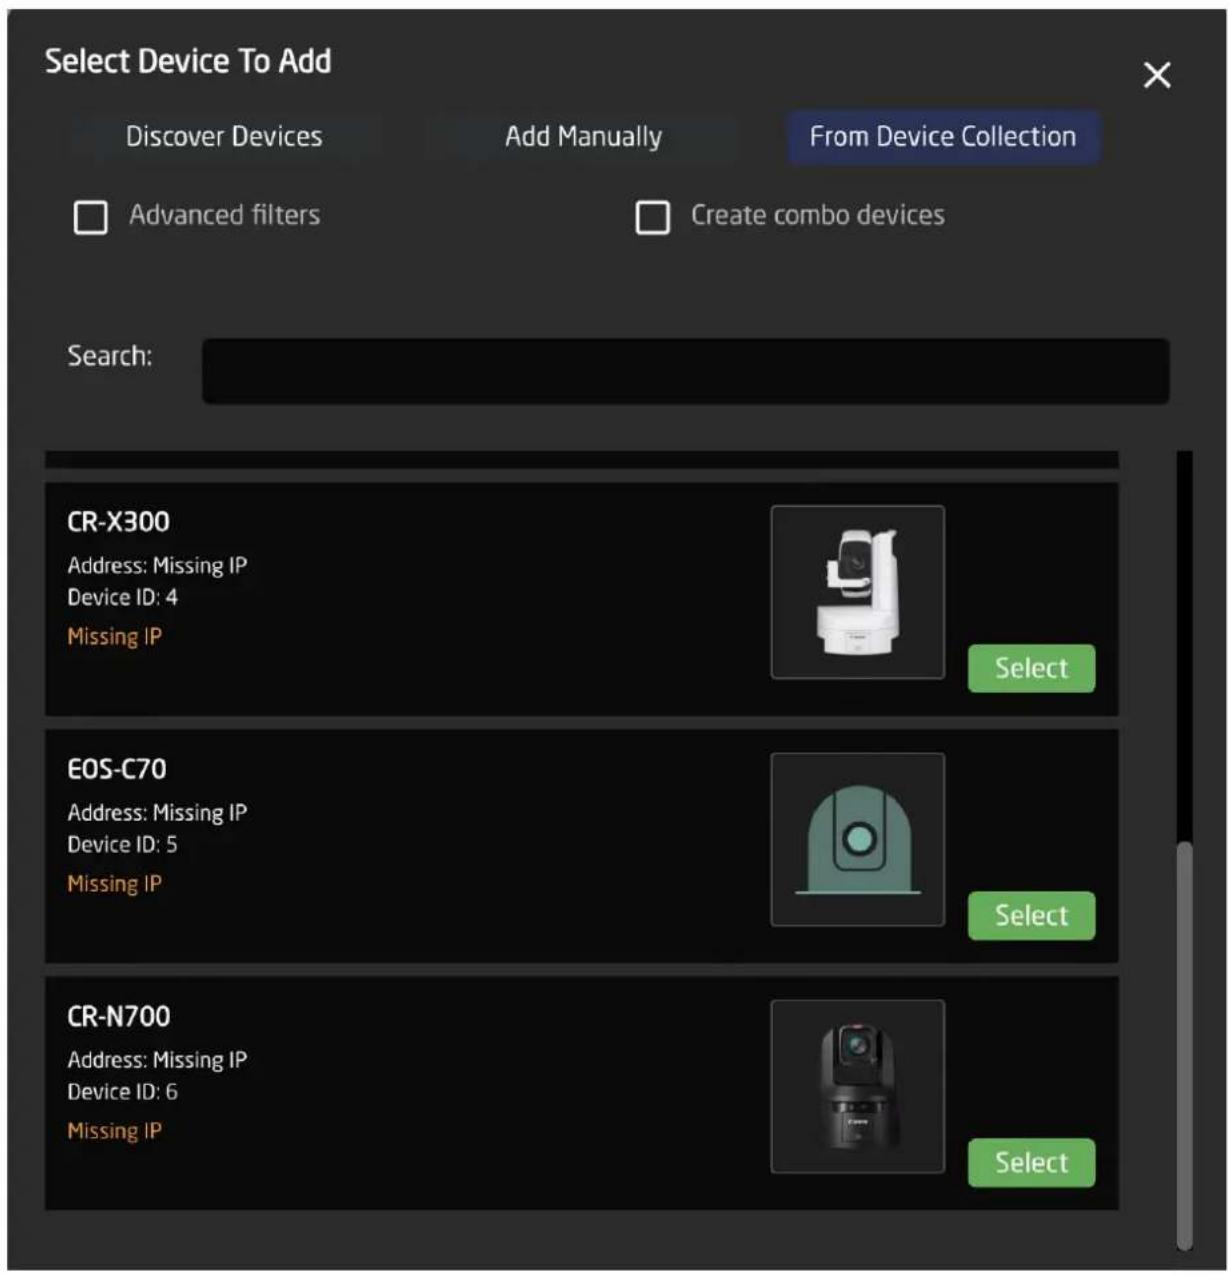
To include cameras in the Camera Selector that are already present in the Device list, simply choose the "From Device Collection" tab in the "Select Devices to Add" dialog.
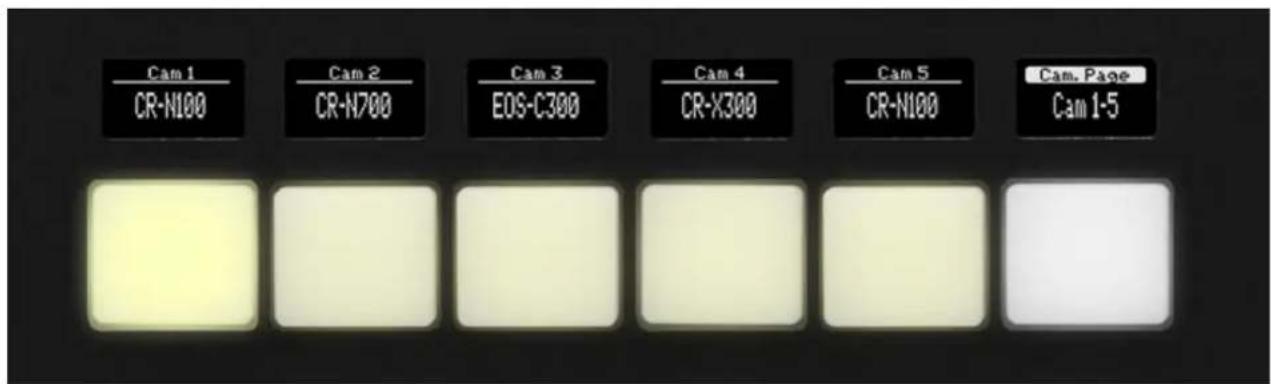
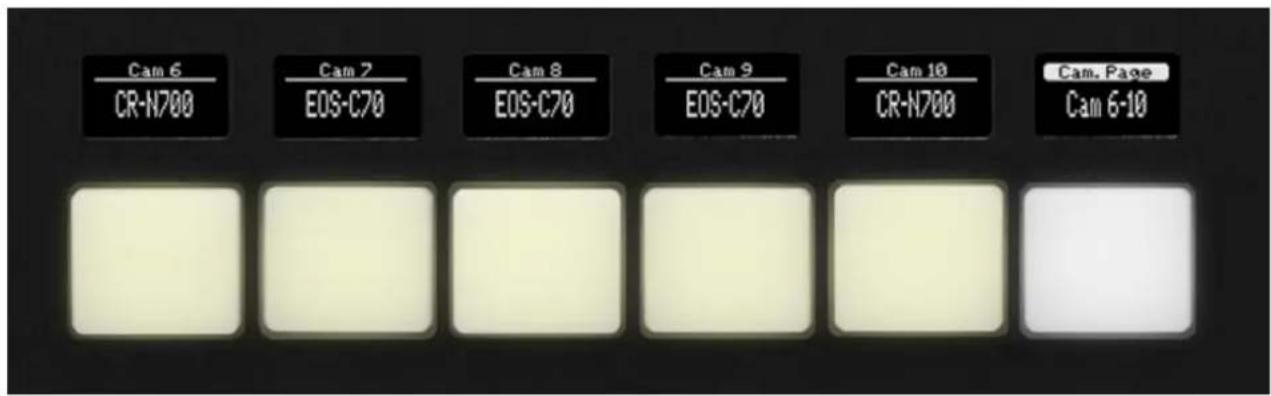
The screenshot below illustrates a scenario where multiple cameras are added. The CR-N100 and CR-N700 are connected, while the EOS-C300 requires a password and the CR-X300 is pending IP address assignment. Additionally, 10 cameras have been integrated into the controller's camera selector.
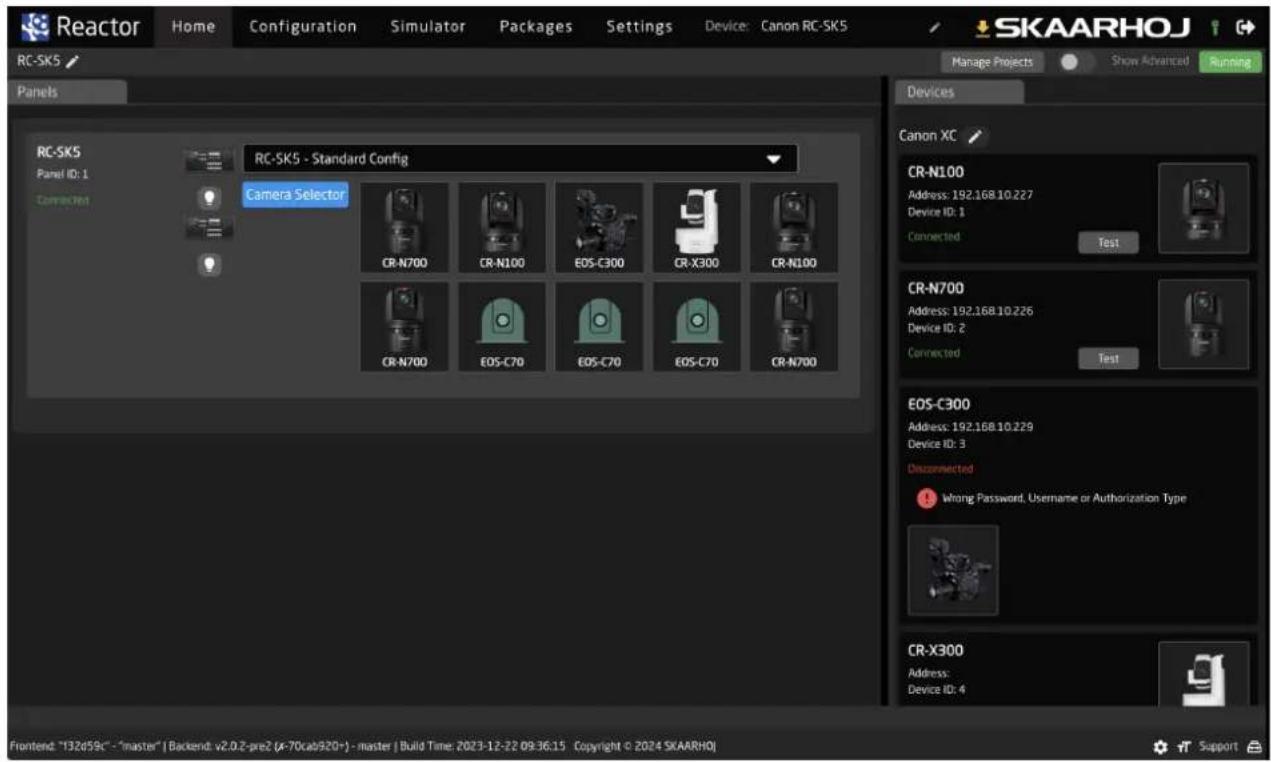
On the controller, the cameras selector would look like this on the first page:
The second page would look like this:
Managing Cameras
To reorganize your cameras, drag and drop them within the grid to the right of the blue Camera Selector button. For editing details like the IP address or to remove a camera, right-click on the respective camera icon.
Manage your cameras in list format by clicking the Camera Selector button; here, you can adjust the order as displayed on the RC-SK5. Muting a camera will hide it from the selector, leaving its button blank, while editing the Camera Name will update the button's label on the displays.
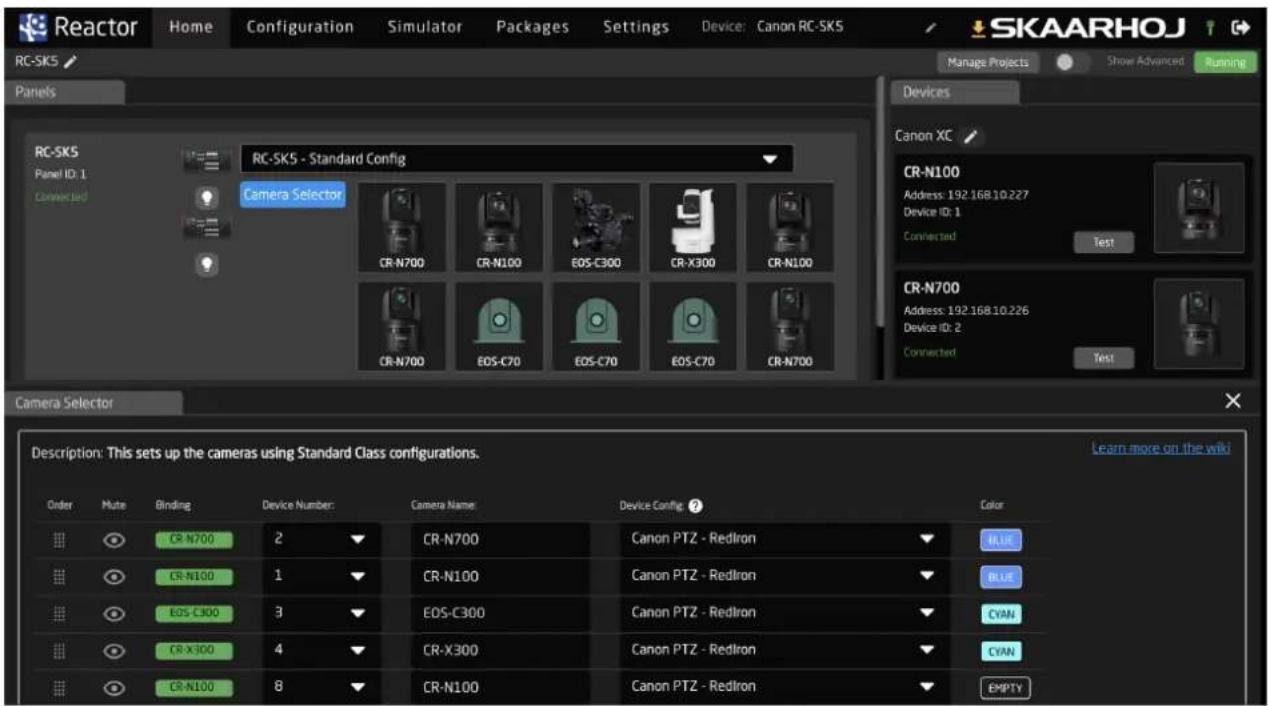
The Device Number, corresponding to the Device ID from the Device List, should remain unchanged, as it's a unique identifier for each camera. The Device Config is a preset value determining sub-configuration for the cameras and is particularly relevant when using an RC-SK5 Pro License to manage a diverse camera setup; the standard version typically offers only one option.
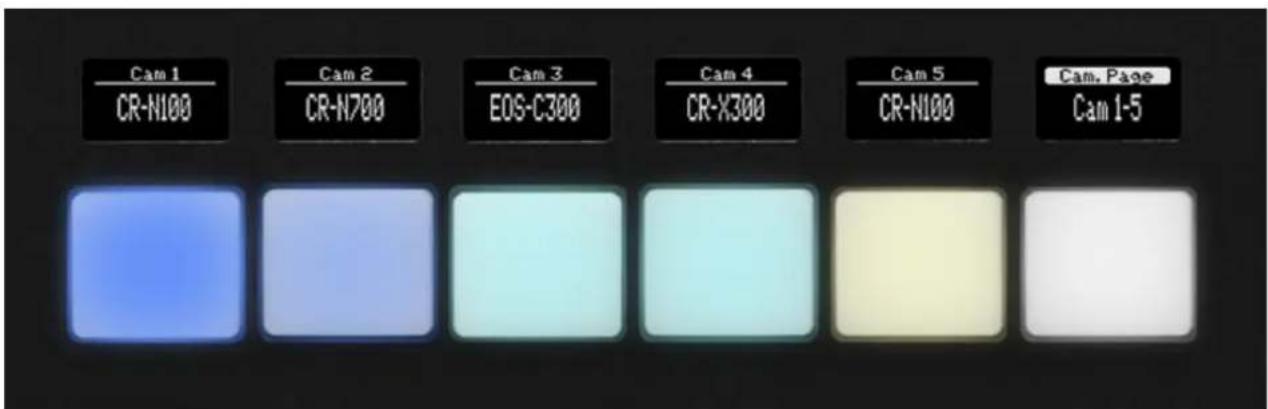
The Color field allows for the color-coding of camera selector buttons for easy identification: as seen in the examples, the first two cameras are marked in blue, the next two in cyan, with the remaining using the default warm white color.
Manage Projects
Clicking the "Manage Projects" button opens a dialog where new projects can be created. Each project encompasses the configuration of panels, devices, and settings. This feature allows you to set up projects for different locations, enabling easy portability of the RC-SK5 and quick application in various contexts.
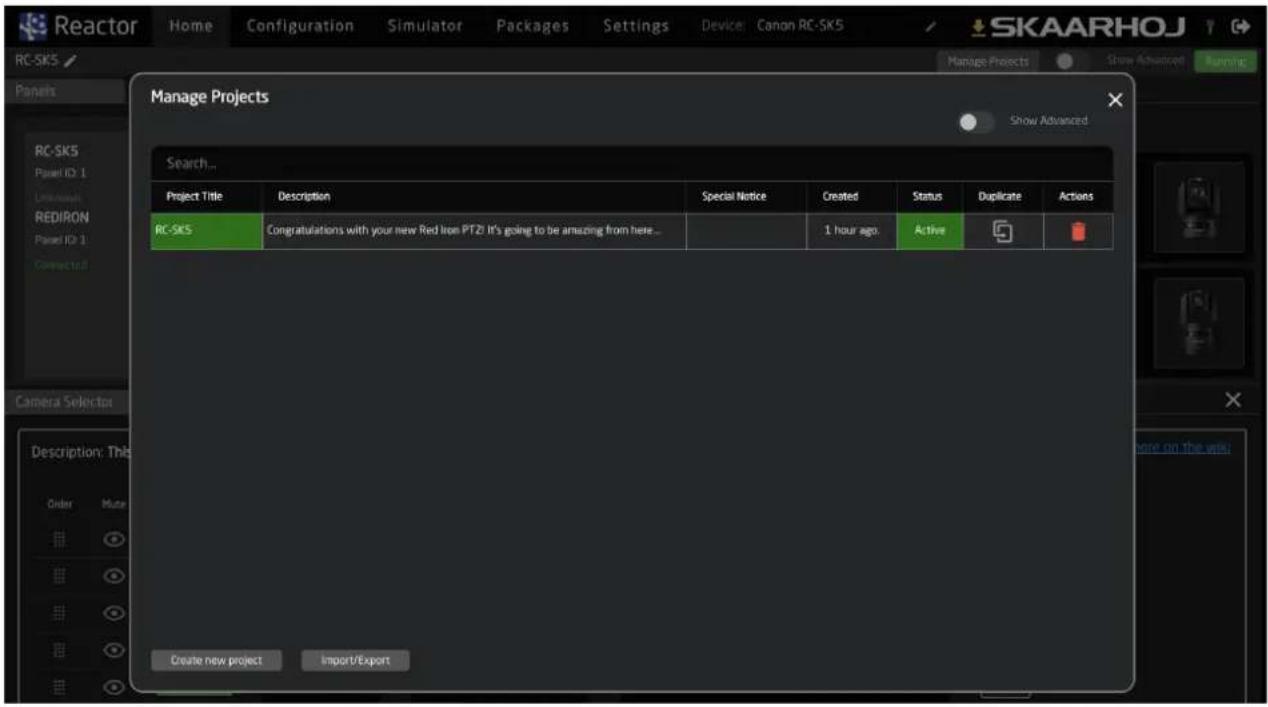
For this and many more features in Reactor, please consult the general guides on SKAARHOJ's products where you will find more details.
Customizing the Settings
The RC-SK5 features 20 menu pages for configuring the four encoders, customizable via the Configuration tab. Configuring the settings pages gives you a preview of the extensive customization available with the RC-SK5 Pro License, which offers unlimited configuration options.
With the standard version of the RC-SK5, changes to settings are restricted to the menu pages. These can be accessed directly on the RC-SK5 or selected through the menu selector at the bottom of the configuration screen.
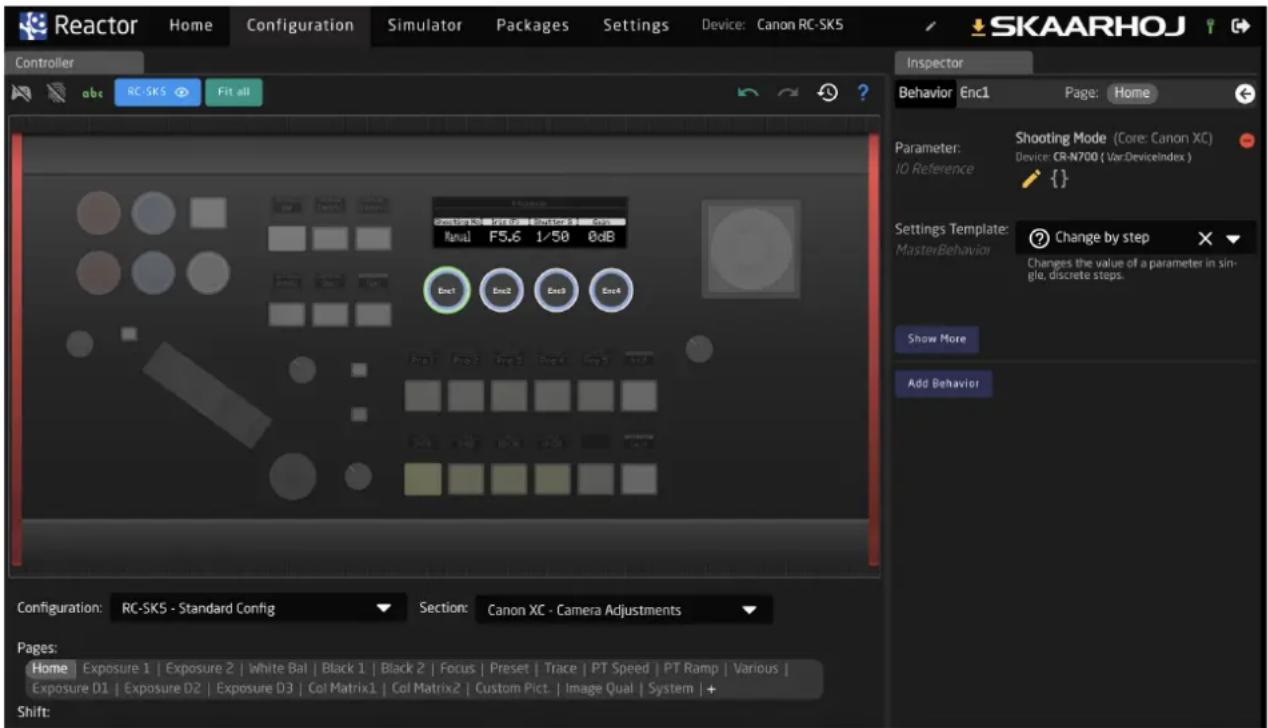
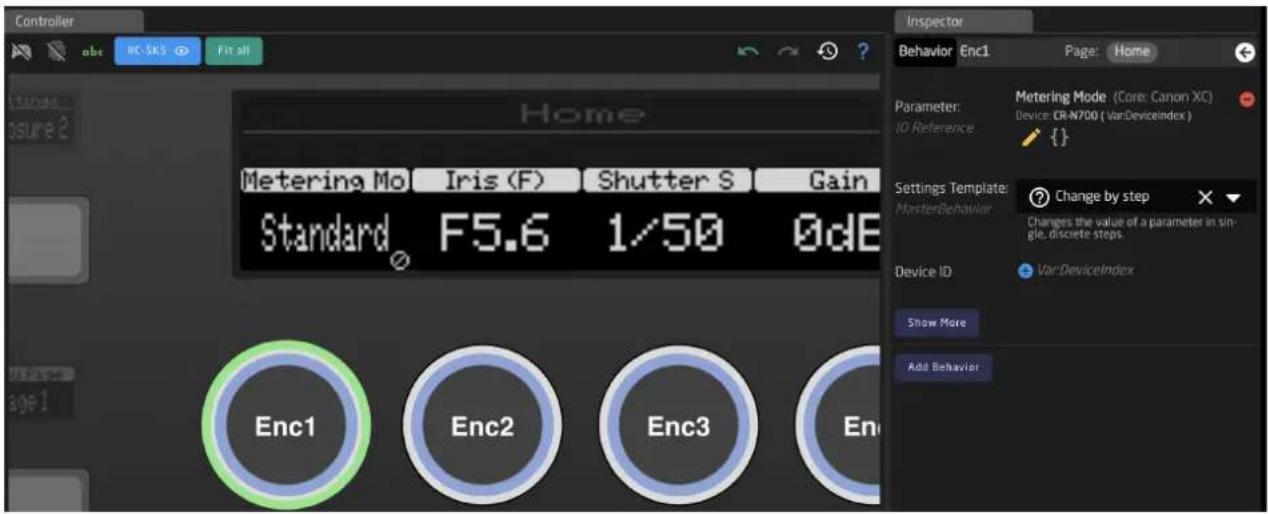
In the provided example, when the Home menu is selected and the first encoder on the left, labeled 'Shooting Mode,' is activated, the Inspector tab on the right displays the behavior details of this control. It is set to adjust the "Shooting Mode" parameter using a "Change by step" template, allowing it to cycle through available options as the knob is turned. Other knobs are configured to function similarly.
By clicking the white arrow in the upper right corner of the Inspector tab, you can return to the overview of all available parameters for all cameras that have been added.
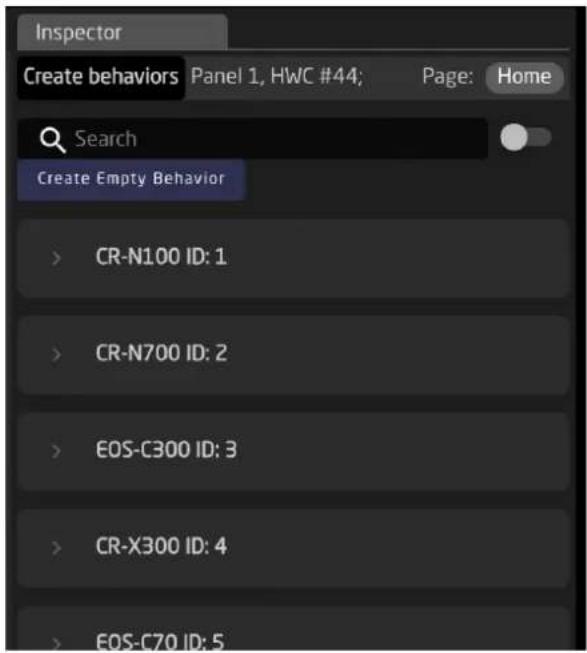
We suggest activating the gray toggle labeled "Group by device core" in the upper right corner. This setting ensures that the parameters automatically apply to the camera currently selected on the controller, rather than being fixed to a specific camera as listed above.
In the example below, we change the behavior for the Shooting Mode knob to Metering Mode instead.
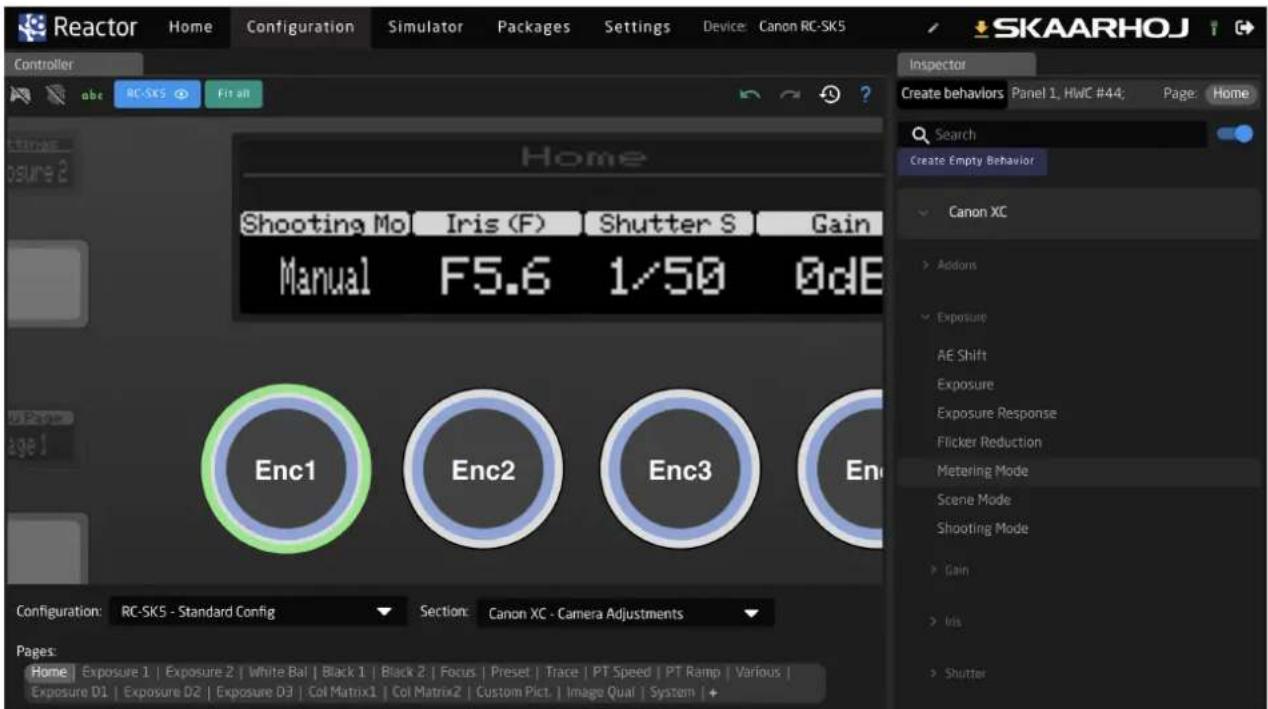
Selecting this behavior results in an instant change in the display:
Undo
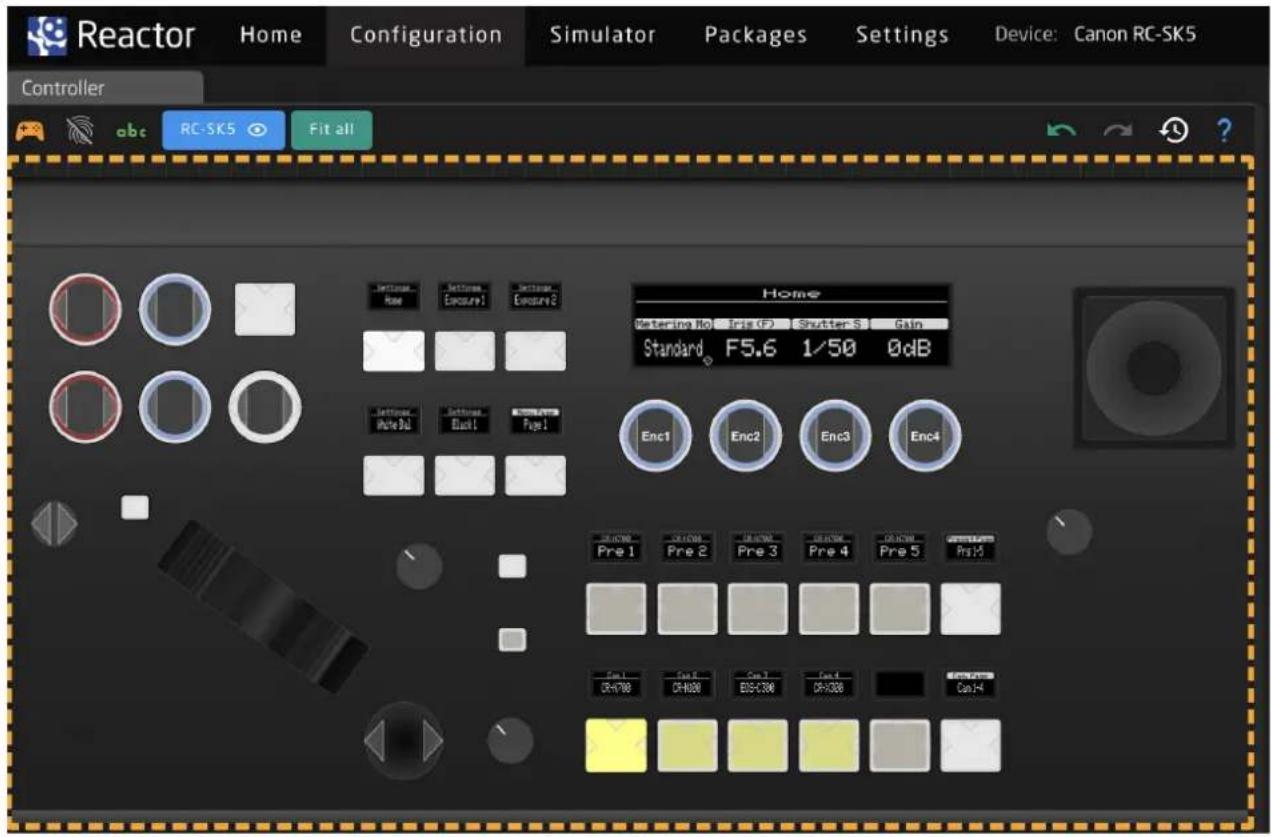
In the Configuration section, the ability to revert to a previous state can be crucial if unexpected changes occur. On the right side of the menu bar, above the Controller Tab, you'll find Undo and Redo buttons accompanied by a history overview. Additionally, pay attention to the question mark icon; it provides guidance on navigating the canvas within the Configuration section.

On the left side, the icon resembling a game controller activates the Simulation Mode within the Configuration section. In Simulation Mode, clicking on any hardware component will simulate pressing it on the actual panel, rather than opening the component for editing in the Inspector tab.
More information
For detailed guidance on configuring your RC-SK5, please refer to SKAARHOJ's comprehensive resources on Reactor and configuration techniques. It's important to note that the standard RC-SK5 has limited configuration capabilities. Many options and features seen in other resources, which may currently seem unavailable, can be unlocked for your RC-SK5 with the purchase of the RC-SK5 Pro License.
Simulator
Access the Control Panel via the Web UI
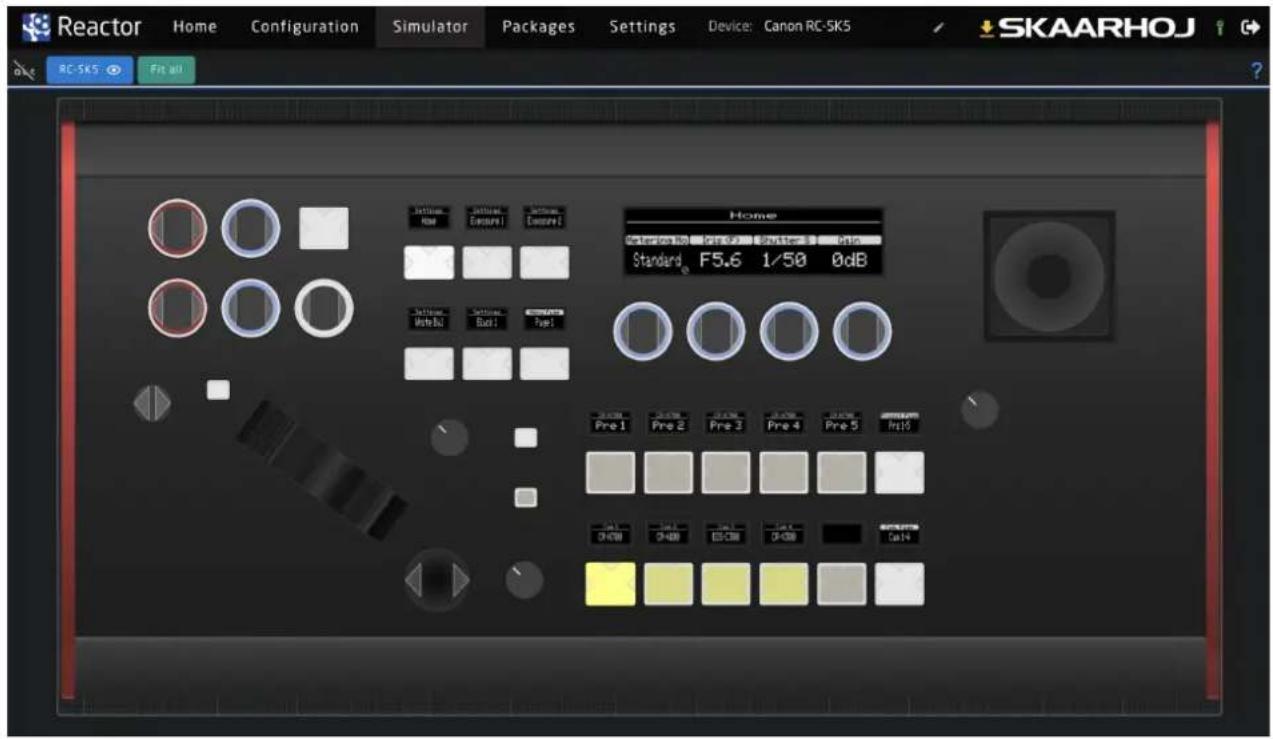
The RC-SK5 includes a Simulator tab, which is a straightforward, web browser-based tool that fully simulates the physical controller. This feature allows for online interaction and testing of the controller's functionalities.
The Standard Config
Introduction
In the subsequent pages, you will find a comprehensive description of the functions for every knob and menu item in the default configuration of the RC-SK5.
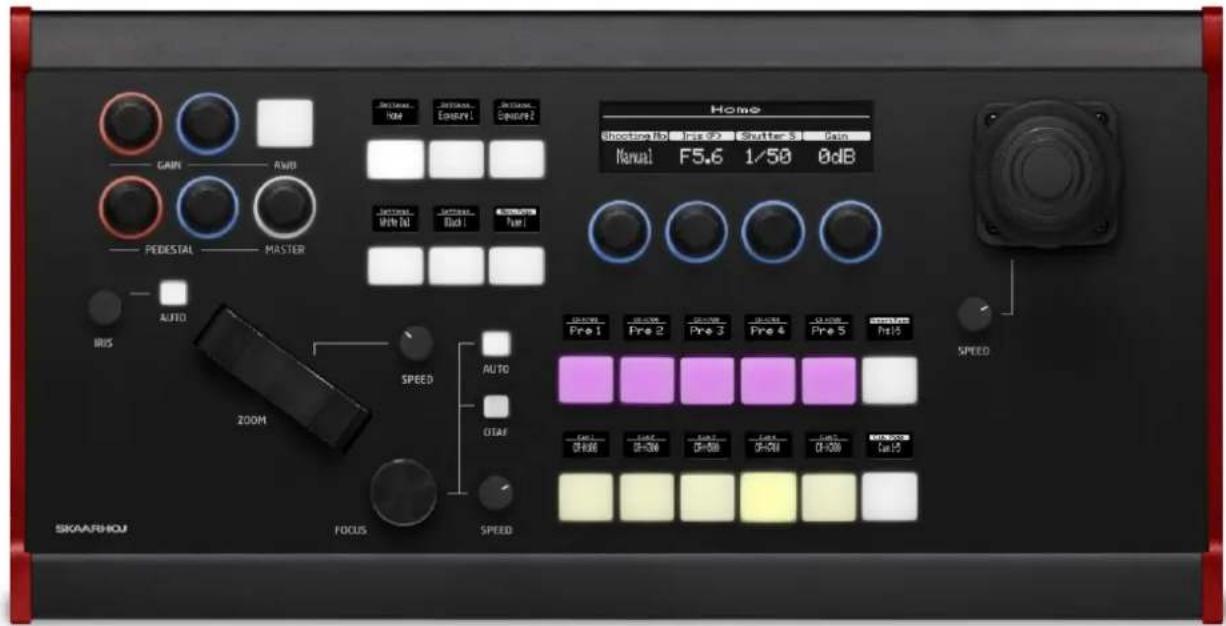
SKAARHOJ RC-SK5 PTZ Controller Functional Overview
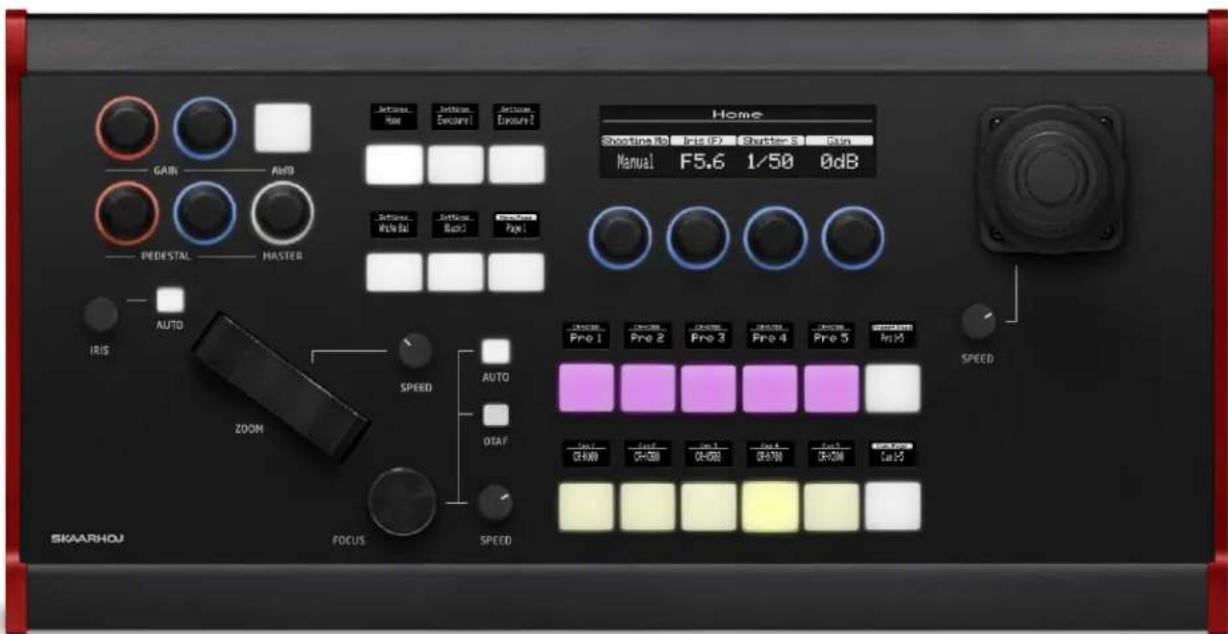
This is an overview of the SKAARHOJ RC-SK5, a sophisticated PTZ camera controller. Upon powering up, the controller defaults to this main interface, providing a user-friendly and visually clear overview of the primary functions and settings. The layout is thoughtfully designed to facilitate quick access to essential controls and information. It prominently displays the status of connected cameras, including their current operational modes and settings. Key features like pan, tilt, and zoom adjustments are readily accessible from the control panel, ensuring seamless operation for users. Interactive elements are strategically placed for ergonomic ease, allowing operators to efficiently navigate through various control layers and settings. The design is a blend of functionality and simplicity, making it ideal for both novice and experienced users in various broadcasting and AV scenarios.
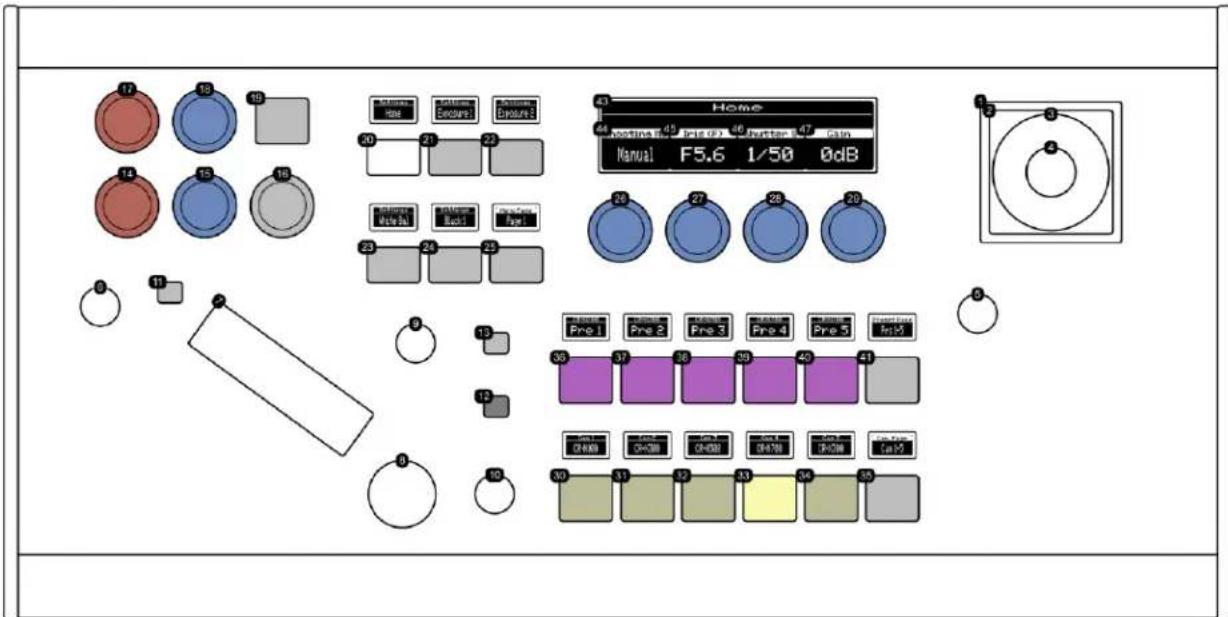
- 30-34: Camera Selector: Select individual or multiple cameras for control. Multiple selection is enabled by pressing and holding a button. The camera selector buttons will display tally colors corresponding to the tally settings configured in the cameras.
- 35: Camera Selector Paging Button: Navigates through additional camera selection pages. The left and right sides navigate back and forth, while the top and bottom edges cycle through pages.
- 36-40: Preset Recall and Store Buttons: Recall a preset by pressing a button. Hold for 1 second to store the current camera position as a preset. Preset status is indicated by a pink color, and storing confirmation by a brief green blink. With the RC-SK5 Pro License, you can customize the display labels for each camera individually.
- 41: Preset Paging Button: Accesses additional preset pages, with a total of 100 presets. Navigation similar to the camera selector paging button.
• 1-2: Joystick: Controls camera pan and tilt. Movement speed is proportional to joystick displacement.
• 3: Joystick Twist for Zoom: Twist left for zoom out, right for zoom in. Twisting degree determines zoom speed.
• 5: Pan/Tilt Speed Dial: Adjusts the maximum speed for pan and tilt movements when operating the joystick.
• 9: Zoom Speed Dial: Sets the maximum zoom speed, applicable to both joystick handle twist and zoom rocker operation.
• 7: Zoom Rocker: Controls zooming in (tele) on the left side and zooming out (wide) on the right side.
• 6: Iris Adjustment Knob: Manually adjusts the iris within its allowed range, applicable when manual iris mode is enabled. - 11: Auto Iris Button: Toggles auto iris mode and brings up the Exposure 1 menu. Manual settings require disabling Full Auto mode first.
- 8: Manual Focus Dial: Adjusts focus. Clockwise for closer focus, counter-clockwise for farther. Requires manual focus mode and is influenced by focus speed dial settings (10).
- 10: Focus Speed Dial: Sets the speed of manual focus adjustment. Options include slow, medium, and fast, with medium as the recommended default.
- 13: Auto Focus Button: Toggles auto focus. Indicates status with orange for enabled, white for disabled (manual focus). Accesses Focus menu.
• 12: One-Touch Auto Focus Button: Activates auto focus temporarily in manual mode, then reverts back to manual focus.
• 17-18: Red/Blue Gain Adjustment Dials: Adjusts Red/Blue Gain levels and opens the White Balance menu.
• 14-15: Red/Blue Pedestal Adjustment Dials: Adjusts Red/Blue Pedestal levels and opens the Black 1 menu.
• 16: Master Pedestal Dial: Adjusts overall Master Pedestal level and opens the Black 1 menu.
• 19: Auto White Balance Button: Enables auto white balance and displays the White Balance menu.
• 20-24: Menu Selection Buttons: Each button accesses a specific menu page, showing settings on the large display. - 25: Menu Paging Button: Cycles through 20 pages of menu settings. Left and right sides navigate back and forth, top and bottom edges cycle through pages.
• 43: Menu Page Title Display: Shows the title of the currently selected menu page.
• 26-29,44-47: Menu Setting Dials: Adjusts various settings and displays the corresponding values for each setting.
• 4: Joystick Top Button: Resets and returns to the Home menu.
Home Menu
This menu provides settings crucial for basic camera operations and image quality. The Auto/Manual Shooting Mode Selector allows users to switch between automatic and manual modes, impacting other camera settings. The Iris Control mirrors the Iris Dial, essential for managing light entry, depth of field, and exposure. The Shutter Speed Setting is key for controlling exposure time and motion blur, offering options for both fast and slow shutter speeds. Lastly, the Video Gain Setting is vital for enhancing video clarity in low-light conditions, though it should be balanced with iris and shutter speed to avoid noise.
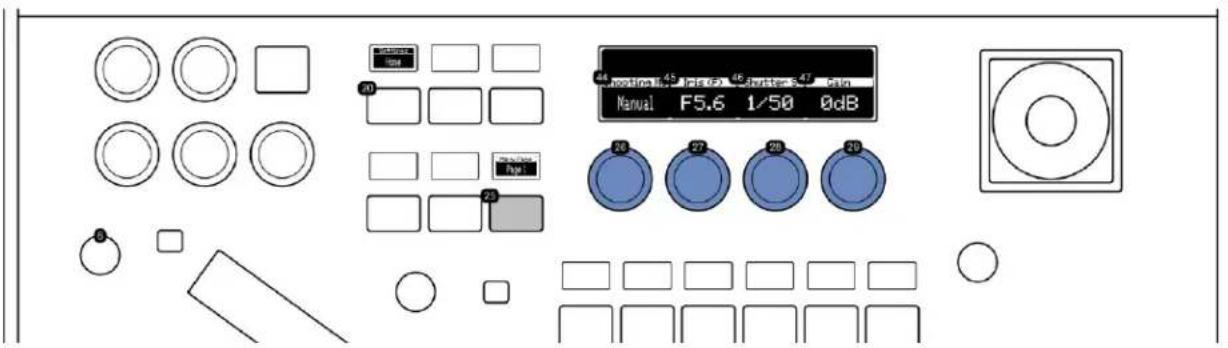
- 26,44: Auto/Manual Shooting Mode Selector: This setting toggles between automatic and manual shooting modes. The choice of mode significantly impacts the availability and adjustability of other camera settings, allowing for either automated convenience or customized control depending on the user's preference and the shooting scenario.
- 27,45: Iris Control: Mirrors the functionality of the Iris Dial (6). It allows for precise adjustment of the camera's iris, controlling the amount of light entering through the lens. This feature is crucial for managing the depth of field and exposure, especially in varying lighting conditions.
- 28,46: Shutter Speed Setting: Enables the adjustment of the camera's shutter speed. This setting is essential for controlling the exposure time and affecting motion blur in the captured video. Faster shutter speeds can freeze motion, while slower speeds create a motion blur effect, useful in various creative and practical applications.
- 29,47: Video Gain Setting: Adjusts the camera's video gain. This setting is crucial for enhancing the video signal in low-light conditions, improving visibility and clarity. However, increasing gain may introduce noise, so it should be balanced with other settings like iris and shutter speed for optimal results.
• 6: Dedicated Iris Dial.
• 20: Home Menu Select Button. Selects this menu.
• 25: Menu Selection paging button
Exposure 1 Menu
This menu focuses on exposure settings. The Auto/Manual Iris Toggle provides flexibility in aperture control, while the Iris Control enables precise adjustments. The Shutter Speed Mode offers a variety of options for different filming requirements, and the Shutter Speed Setting allows for detailed adjustments to achieve desired motion effects and exposure levels.
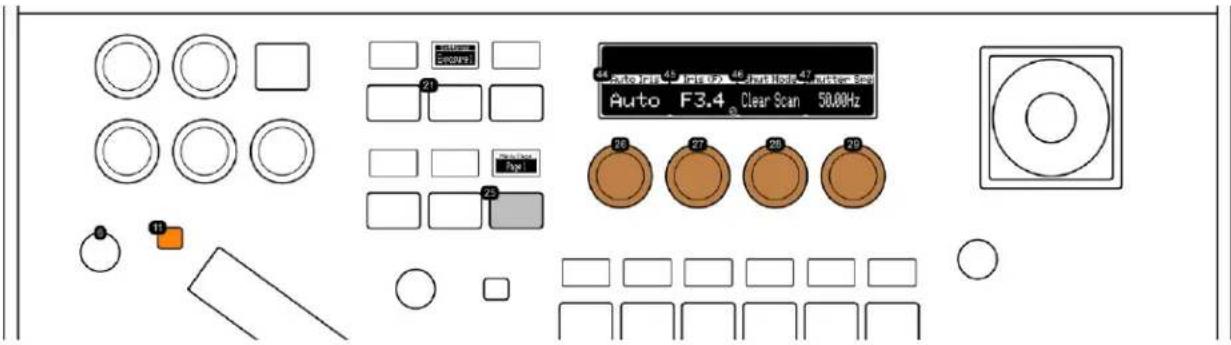
- 26,44: Auto/Manual Iris Toggle: This feature allows the user to switch between automatic and manual iris settings, providing flexibility in controlling the camera's aperture and light intake. Same function as (11)
- 27,45: Iris Control: Replicates the functionality of the Iris Dial (6) for precise aperture adjustments. A lock icon on the display signifies restricted control, typically due to the activation of Auto Iris, which automatically manages the iris setting based on lighting conditions.
- 28,46: Shutter Speed Mode: Offers a range of options such as Auto, Speed, Slow, Clear Scan, Angle, and Off. This setting is crucial for controlling motion blur and exposure time, adapting to different filming requirements.
- 29,47: Shutter Speed Setting: Enables detailed adjustment of the camera's shutter speed, crucial for achieving desired motion effects and exposure levels in various shooting environments.
• 6: Dedicated Iris Dial.
• 11: Auto/Manual Iris Toggle.
• 21: Exposure 1 Menu Select Button: Selects this menu.
• 25: Menu Selection paging button
Exposure 2 Menu
In this menu, users can manage light sensitivity and exposure. The Gain Mode Selection switches between manual and automatic modes for light sensitivity. Video Gain Setting is crucial for brightening images in low-light conditions. The Auto Exposure Gain Limit sets a maximum for auto exposure gain to prevent overly bright or noisy images. The ND Filter Selection allows users to choose the right Neutral Density filter to control light entry and manage exposure in bright environments.
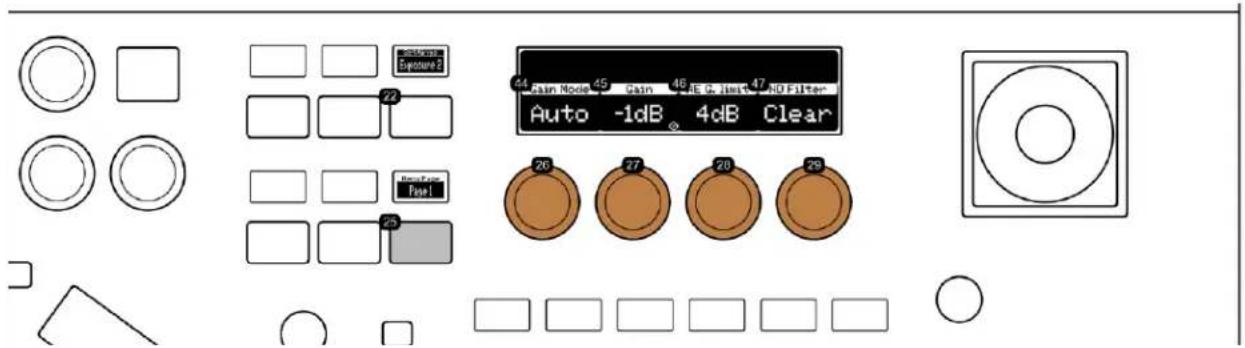
- 26,44: Gain Mode Selection: Enables switching between manual and automatic gain modes. This feature allows for precise control over the camera's sensitivity to light, adapting to various lighting conditions.
- 27,45: Video Gain Setting: Adjusts the level of gain in video capture. This setting is vital for enhancing image brightness and clarity in low-light conditions, but must be balanced to avoid excessive noise.
- 28,46: Auto Exposure Gain Limit: Sets the maximum limit for auto exposure gain. This control is essential for preventing overly bright or noisy images when the camera automatically adjusts gain in varying lighting situations.
- 29,47: ND Filter Selection: Allows the user to select the appropriate Neutral Density (ND) filter. ND filters reduce the amount of light entering the lens, enabling better control over exposure and depth of field in bright environments.
• 22: Exposure 2 Menu Select Button: Selects this menu.
• 25: Menu Selection paging button
White Balance Menu
This menu enables accurate color reproduction under different lighting conditions. The White Balance Mode Selection offers a range of settings for color temperature adjustment. Kelvin White Balance Adjustment/White Balance Reading Trigger allows for precise control in Kelvin mode or initiates a white balance reading in WB A or WB B mode. The Red and Blue Gain Settings are essential for color correction, adjusting red and blue color gains respectively.
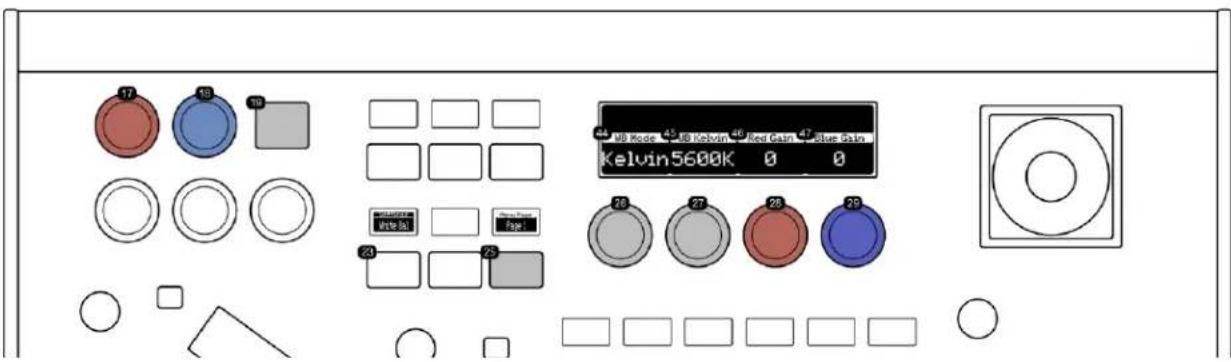
- 26,44: White Balance Mode Selection: Allows the user to choose between various white balance settings such as Auto, Manual, WB A, WB B, Daylight, Tungsten, and Kelvin. Each setting adjusts the camera's color temperature to match different lighting conditions, ensuring accurate color reproduction.
- 27,45: Kelvin White Balance Adjustment/White Balance Reading Trigger: When in Kelvin mode, this dial adjusts the color temperature in Kelvin degrees for precise control over white balance. In WB A or WB B mode, rotating this dial initiates a white balance reading, calibrating the camera to the current lighting conditions for accurate color representation.
- 28,46: Red Gain Setting: Adjusts the red color gain. This control mirrors the functionality of the dedicated red gain knob (17) located on the left side of the control panel. It's essential for color correction and balancing, especially in mixed lighting environments.
- 29,47: Blue Gain Setting: Alters the blue color gain, identical to the dedicated blue gain knob (18) on the left side of the control panel. This adjustment is crucial for fine-tuning the color balance, ensuring that the blues in the image are accurately represented.
• 17: Dedicated Red Gain adjustment knob.
• 18: Dedicated Blue Gain adjustment knob.
• 19: Sets the White Balance mode to Auto.
• 23: White Balance Menu Select Button: Selects this menu.
• 25: Menu Selection paging button
Black 1 Menu
This menu focuses on the adjustment of black and darker areas in the image. The Master Pedestal Setting controls the brightness of black areas, while the Red, Green, and Blue Pedestal Settings allow for fine-tuning of respective color tones in darker regions, ensuring balanced color representation and natural-looking shadows.
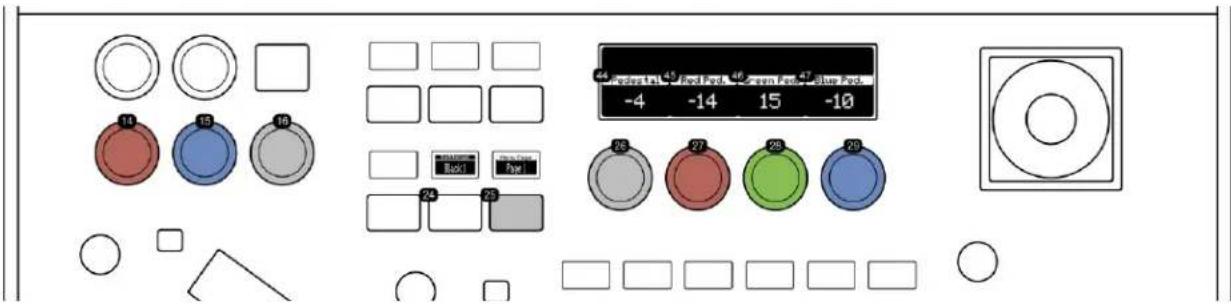
- 26,44: Master Pedestal Setting: Adjusts the overall brightness level of black areas in the image. This setting is a duplicate of the dedicated Master Pedestal control (16) located on the left side of the panel. It's essential for fine-tuning the shadow details and contrast in videos.
- 27,45: Red Pedestal Setting: Controls the brightness level of red tones in the black areas. This setting mirrors the dedicated Red Pedestal control (14) on the left side of the panel and is crucial for color balancing and correcting red hues in darker regions of the image.
- 28,46: Green Pedestal Setting: Allows adjustment of the green tones in the darker areas of the image. This control is vital for managing the balance of green hues, ensuring natural-looking shadows and dark regions.
- 29,47: Blue Pedestal Setting: Adjusts the blue tones in the black areas of the video. This setting replicates the functionality of the Blue Pedestal control (15) on the left side of the panel, playing a key role in color correction and balance, particularly for cooler tones in shadows.
• 14: Dedicated Red Pedestal knob.
• 15: Dedicated Blue Pedestal knob.
• 16: Dedicated Master Pedestal knob.
• 24: Black 1 Menu Select Button: Selects this menu.
• 25: Menu Selection paging button
Black 2 Menu
This menu focuses on image sharpness and shadow detail. The Sharpness Level adjusts edge enhancement for clarity and texture. Shadow Gamma Correction alters gamma values in shadow areas for nuanced shadow appearance. The Black Gamma Range knob modifies the width of black gamma range for targeted shadow detail enhancement. The Black Gamma Point knob pinpoints the level of gamma correction impact on darker areas.
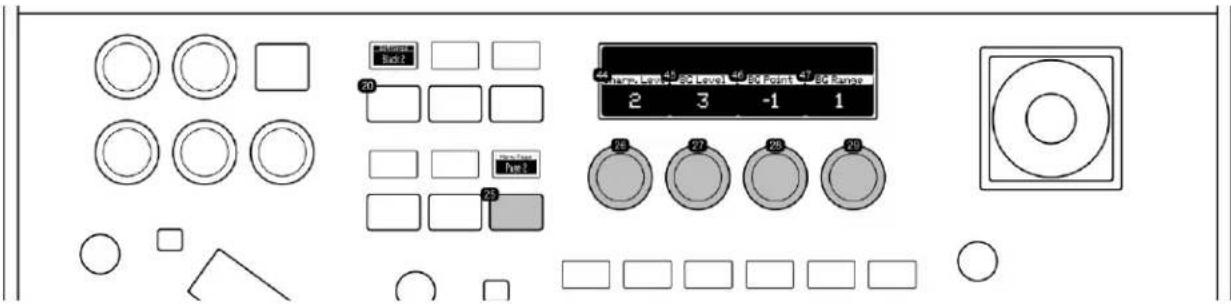
- 26,44: Sharpness Level: Allows for the adjustment of edge enhancement in the image. This setting is essential for defining the clarity and detail of edges, enhancing the overall sharpness and texture of the visual content.
- 27,45: Shadow Gamma Correction: Alters gamma values specifically in shadow areas. By adjusting this setting, the gamma curve on the darker side within a specified range is modified. This knob primarily changes the level, which is the height from the reference gamma, allowing for more nuanced control over the appearance of shadows in the image.
- 28,46: Black Gamma Point: Adjusts the vertex position of the black gamma curve. This setting is crucial for pinpointing the exact level at which the gamma correction impacts the image, offering targeted enhancement of darker areas without affecting overall contrast.
- 29,47: Black Gamma Range: This control modifies the width of the black gamma range from a specific point. It enables precise tuning of how the gamma correction affects the dark areas, allowing users to selectively enhance or suppress details in shadows.
• 20: Black 2 Menu Select Button: Selects this menu.
• 25: Menu Selection paging button.
Focus Menu
This menu offers focus control options. The Focus Mode Toggle allows switching between Auto and Manual Focus. Face Detection Mode configures the camera's face detection autofocus with options like 'Face Catch', 'Face Only', and 'Off'. Face Catch Tracking Toggle maintains focus on moving faces in 'Face Catch' mode. Autofocus Speed Selection adjusts the autofocus speed from fast to slow.
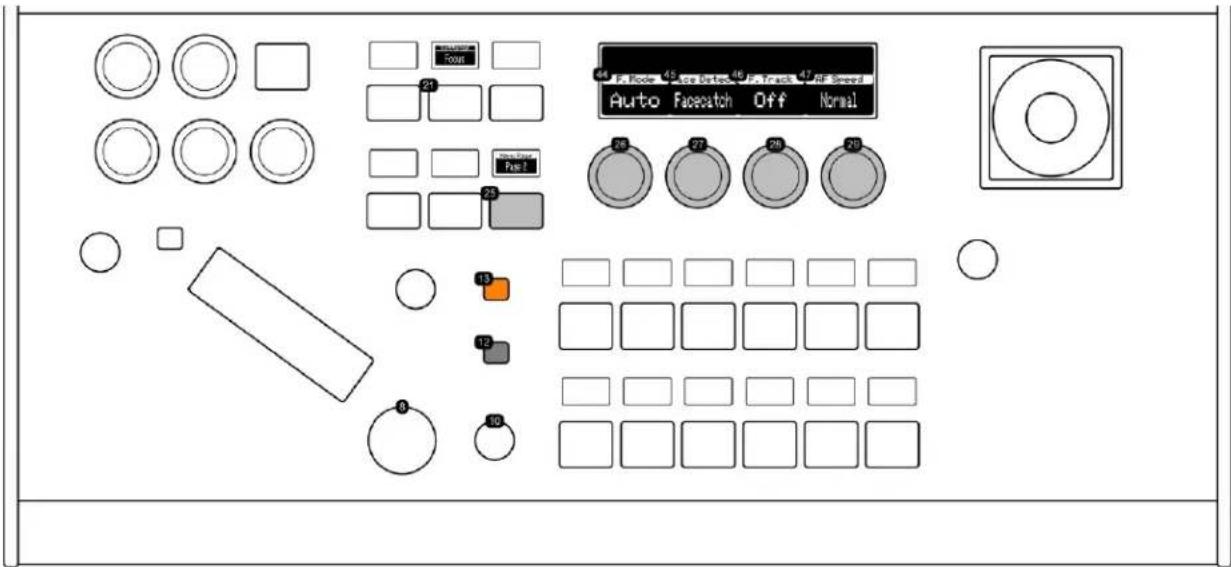
- 26,44: Focus Mode Toggle: Enables switching between Auto Focus and Manual Focus modes. Auto Focus offers convenience by automatically adjusting the focus, while Manual Focus provides more control over focusing, allowing precise adjustments for specific shooting requirements. Same as (13).
- 27,45: Face Detection Mode: Configures the operation of the camera's face detection autofocus. Options include 'Face Catch', which detects and focuses on any face; 'Face Only', focusing exclusively on faces and ignoring other subjects; and 'Off', which disables face detection.
- 28,46: Face Catch Tracking Toggle: When Face Detection is set to 'Face Catch' mode, this control activates or deactivates face tracking. Tracking maintains focus on a detected face as it moves, which is particularly useful in dynamic shooting scenarios involving people.
- 29,47: Autofocus Speed Selection: Adjusts the speed of autofocus adjustments. Available settings are 'High', 'Normal', and 'Low', determining how quickly the camera refocuses. 'High' is the fastest, suitable for quick-moving subjects, while 'Low' offers a slower, more gradual focus transition.
• 13: Dedicated Auto/Manual focus toggle.
• 12: One-Touch Auto Focus.
• 8: Manual Focus dial.
• 10: Manual focus speed dial.
• 21: Focus Menu Select Button: Selects this menu.
• 25: Menu Selection paging button.
Preset Menu
This menu handles settings for position preset movements. Preset Speed Mode includes 'Speed', 'Time', or 'Regular' for movement control. Preset Speed Value Setting determines camera movement speed to a preset position in 'Speed Mode'. Preset Time Setting sets the duration for movement in 'Time Mode'. Preset Content Selection specifies which settings are included in a preset, like 'All', 'PTZF', or 'Color'.
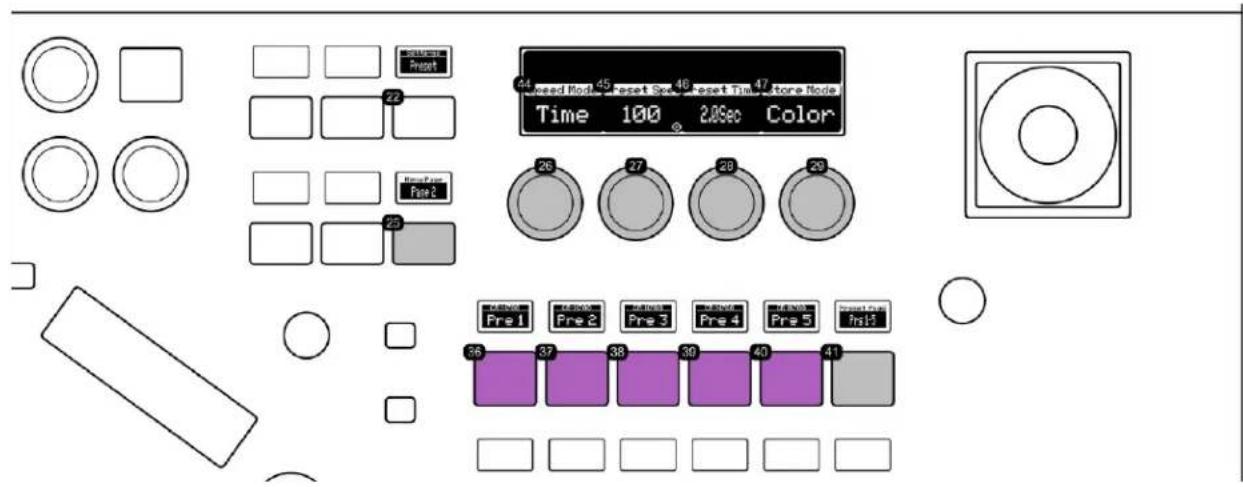
- 26,44: Preset Speed Mode: Offers selectable options such as 'Speed', 'Time', or 'Regular' for preset movements. 'Speed' allows for setting the speed of preset movements, 'Time' for the duration, and 'Regular' for a standard rate of movement.
- 27,45: Preset Speed Value Setting: Configures the speed at which the camera moves to a preset position when 'Speed Mode' is set to 'Speed'. This setting is essential for precise control over the rapidity of camera movement during preset transitions.
- 28,46: Preset Time Setting: Determines the time duration for the camera to move to a preset position when 'Speed Mode' is set to 'Time'. This option is useful for creating smooth, time-controlled movements to preset points.
- 29,47: Preset Content Selection: Specifies which aspects are included when storing a preset. Options include 'All', 'PTZF' (Pan, Tilt, Zoom, Focus), and 'Color'. 'All' stores all settings, 'PTZF' stores only pan, tilt, zoom, and focus settings, and 'Color' stores color-related settings.
- 36-40: Preset Recall and Store Buttons: Recall a preset by pressing a button. Hold for 1 second to store the current camera position as a preset. Preset status is indicated by a pink color, and storing confirmation by a brief green blink. With the RC-SK5 Pro License, you can customize the display labels for each camera individually.
- 41: Preset Paging Button: Accesses additional preset pages, with a total of 100 presets. Navigation similar to the camera selector paging button.
• 22: Preset Menu Select Button: Selects this menu.
• 25: Menu Selection paging button
Trace Menu
This menu is for recording and recalling movement patterns. Trace Number Selection identifies different recorded traces. Start Recording Button initiates recording of camera movements. Recall Preset Button provides quick access to saved presets. Trace Store Mode Selection defines how movement patterns are recorded and stored.
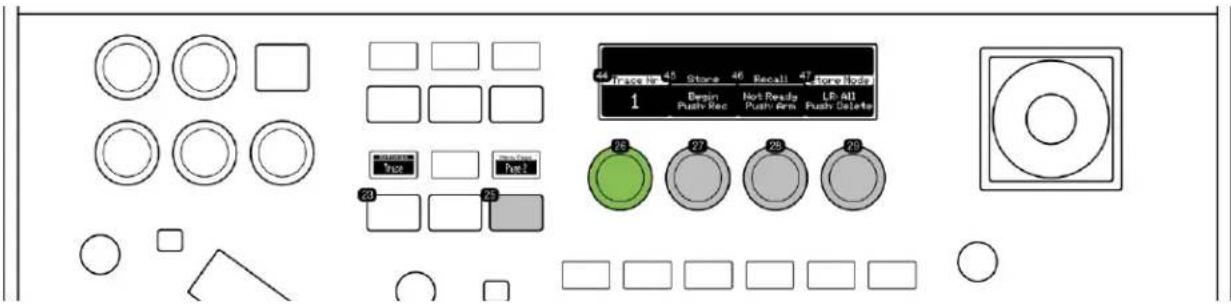
- 26,44: Trace Number Selection: Allows users to select a specific trace number. This feature is used to identify and differentiate between multiple recorded traces or movement patterns, facilitating easy organization and retrieval.
- 27,45: Start Recording Button: When pressed, initiates the recording of camera movements or traces. This function is essential for capturing complex movement sequences that can be replayed or analyzed later.
- 28,46: Recall Preset Button: Activates the function to recall a previously saved preset. This feature provides quick access to pre-defined camera positions and settings, streamlining camera operations during live productions or repeated shoots.
- 29,47: Trace Store Mode Selection: Allows the user to choose the mode for storing traces. This setting is crucial for defining how camera movement patterns are recorded and stored, enabling precise control over replay and execution of complex camera motions.
• 23: Trace Menu Select Button: Selects this menu.
• 25: Menu Selection paging button
Pan/Tilt Speed Menu
This menu adjusts the speed of camera movements. Maximum Speed of Pan/Tilt Joystick Movements sets the top speed for joystick-controlled movements. Maximum Speed of Zoom Movements configures zooming speed. Speed of Manual Focus Adjustments determines the speed of manual focus changes.
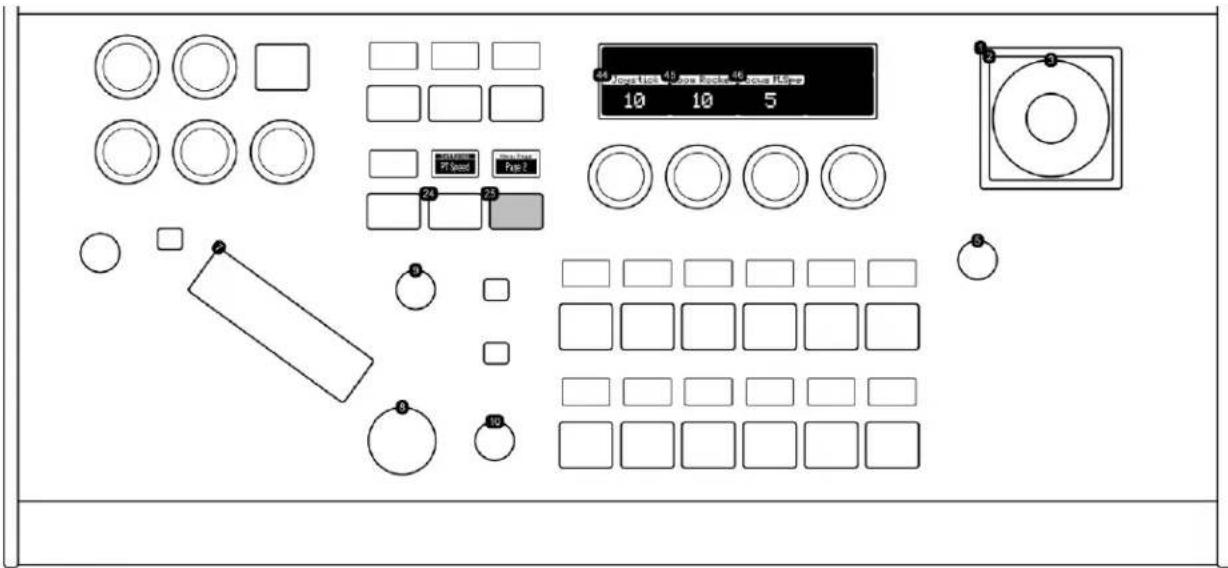
- 5,44: Maximum Speed of Pan/Tilt Joystick Movements: This setting adjusts the top speed for pan and tilt movements controlled by the joystick (1,2). Values range from 10 to 100, allowing for precise control over the speed of camera movements. The speed is adjusted using the dial located under the joystick, catering to different filming needs and preferences for smooth or rapid movements.
- 9,45: Maximum Speed of Zoom Movements: Configures the fastest speed for zooming, applicable to both the zoom rocker (7) and joystick twist (3). The adjustable range is between 10 and 100, offering versatility in zoom speed for dramatic or subtle zoom effects. The value is set by the speed dial for the zoom rocker, providing quick access for on-the-fly adjustments.
- 10,46: Speed of Manual Focus Adjustments: Determines how quickly manual focus adjustments are made. The value can be set between 1 and 8 (depending on camera), offering a range of speeds for precise focus control. Faster settings allow for quick focus changes, while slower settings provide finer, more detailed adjustments. This speed is adjusted using the dial next to the focus knob.
• 1-2: Pan/Tilt joystick.
• 3,7: Zoom rocker and joystick twist.
• 8: Manual focus.
• 24: Pan/Tilt Speed Select Button: Selects this menu.
• 25: Menu Selection paging button
Pan/Tilt Ramp and Zoom Menu
This menu controls the ramp (acceleration/deceleration) of camera movements. Adjustment Selector for Pan, Tilt, or Zoom allows selection of the movement type to adjust. Pan/Tilt Ramp Value sets the ramp for pan and tilt movements. Pan/Tilt Speed Mode chooses between 'Dynamic' and 'Constant' speed modes.
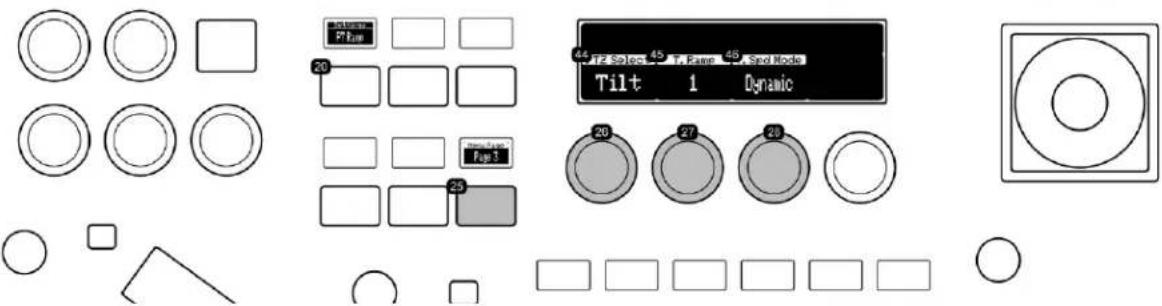
- 26,44: Adjustment Selector for Pan, Tilt, or Zoom: This setting allows the user to choose which camera movement to adjust Pan (horizontal), Tilt (vertical), or Zoom.
- 27,45: Pan/Tilt Ramp Value: Provides options 0, 1, and 2 for setting the ramp (acceleration/deceleration) of pan and tilt movements. A higher value indicates a smoother, more gradual start and stop of movement, which is key for creating professional, smooth camera motions.
- 28,46: Pan/Tilt Speed Mode: Offers 'Dynamic' or 'Constant' as selectable values. 'Dynamic' mode allows the speed to vary based on joystick input, while 'Constant' maintains a uniform speed regardless of joystick movement, ensuring consistent and steady camera movements.
• 20: Pan/Tilt Ramp Select Button: Selects this menu.
• 25: Menu Selection paging button
Zoom Menu
This menu offers zoom control options. Pan, Tilt, or Zoom Selection allows adjustment of each movement type. Zoom Mode Options include 'Off', 'Digital Zoom', 'Magnification', and 'Advanced'. Zoom Magnification Setting in Magnification Mode adjusts zoom levels.
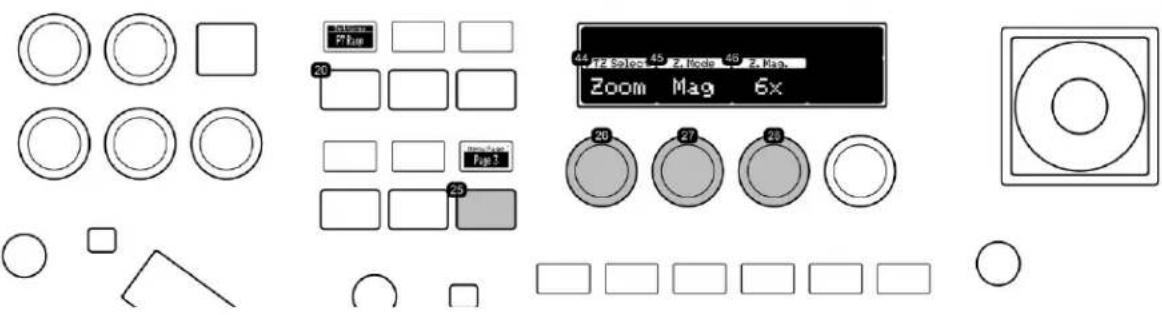
- 26,44: Pan, Tilt, or Zoom Selection: This control allows the user to choose whether to adjust the pan (horizontal movement), tilt (vertical movement), or zoom of the camera.
- 27,45: Zoom Mode Options: Provides various zoom options including 'Off', 'Digital Zoom', 'Magnification', and 'Advanced'. 'Off' disables zoom functions, 'Digital Zoom' allows for electronic enlargement of the image, 'Magnification' offers increased zoom levels with predefined magnifications, and 'Advanced' provides enhanced zoom features for detailed image capture.
- 28,46: Zoom Magnification Setting in Magnification Mode: Adjusts the level of zoom magnification when in 'Magnification' mode. The available range is from x1 to x6, allowing for a detailed zoom-in on subjects with varying degrees of closeness, ideal for capturing fine details or distant objects.
• 20: Pan/Tilt Ramp Select Button: Selects this menu. 'Zoom' settings are shown then 'Zoom' is selected on knob (26).
• 25: Menu Selection paging button
Various Menu
This menu includes diverse settings. Boot-Up State Save Function saves current settings as the default on boot-up. Image Stabilization Options provide stabilization settings. On-Screen Display Toggles for 12G SDI and HDMI/3G SDI Outputs enable or disable the OSD on respective outputs.
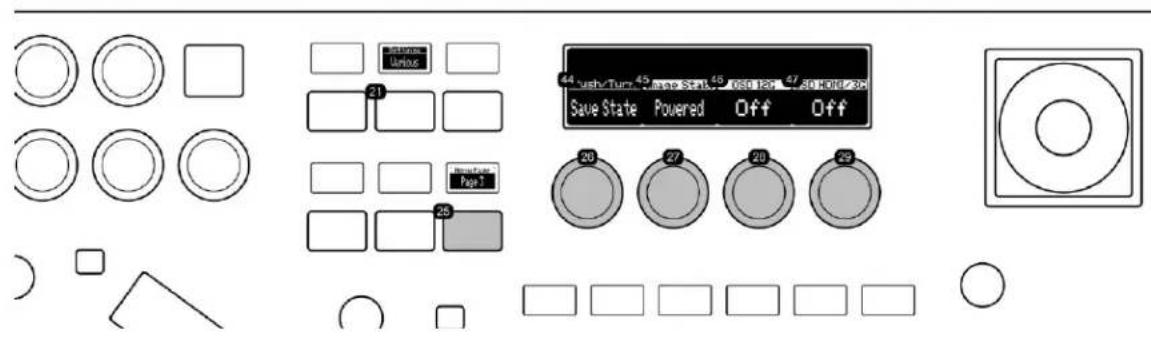
- 26,44: Boot-Up State Save Function: Allows the user to push or turn the control to save the camera's current settings as the default state upon boot-up. This feature ensures that preferred settings are automatically applied each time the camera is powered on, enhancing user convenience and operational efficiency.
- 27,45: Image Stabilization Options: Provides three settings for image stabilization - 'Off', 'Standard', and 'Powered'. 'Off' disables stabilization, 'Standard' offers basic stabilization suitable for general use, while 'Powered' provides an enhanced level of stabilization, ideal for situations requiring a high degree of steadiness, such as high-zoom or dynamic shooting conditions.
- 28,46: On-Screen Display Toggle for 12G SDI Output: Enables or disables the on-screen display on the 12G SDI output. The OSD feature is instrumental for displaying critical information such as camera settings and status indicators, aiding in the monitoring and adjustment of camera functions during live productions or recordings.
- 29,47: On-Screen Display Toggle for HDMI/3G SDI Output: This control activates or deactivates the OSD for the HDMI and 3G SDI outputs. The OSD is crucial for providing real-time visual feedback on camera settings and statuses, particularly useful when these outputs are used for live monitoring or external recording devices.
• 21: Various Menu Selection Button: Selects this menu.
• 25: Menu Selection paging button
Exposure D1 Menu
This menu focuses on low-light settings. Infra Red Mode Toggle enables infrared capture. High Sensitivity Toggle enhances image clarity in low light. Gain Boost Toggle expands dynamic range in Manual Exposure mode. Slow Shutter Toggle allows longer shutter speeds for low-light capture.
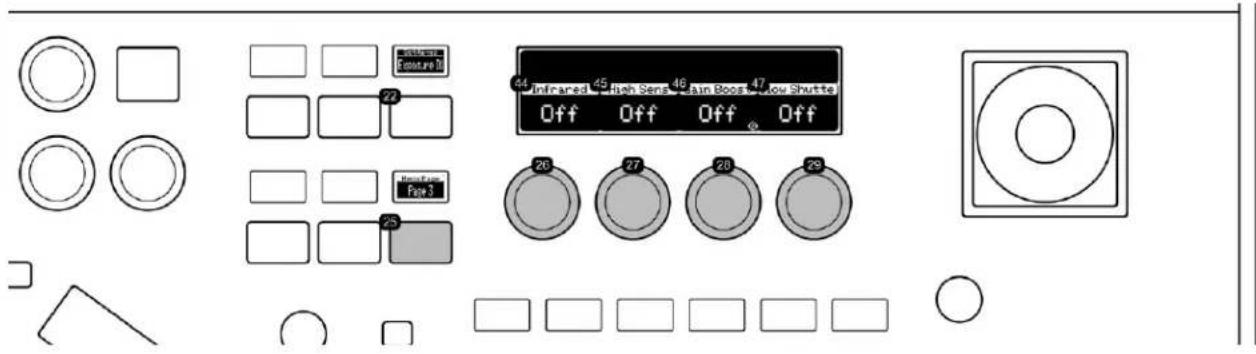
- 26,44: Infra Red Mode Toggle: This function enables or disables the infrared mode on the camera. When activated, it allows the camera to capture images in low-light or no-light conditions by using infrared light, making it ideal for night-time or surveillance applications.
- 27,45: High Sensitivity Toggle: Activates the camera's high sensitivity mode. This feature enhances the camera's ability to capture clearer images in low-light conditions by increasing the sensor's sensitivity to light, useful in scenarios where lighting is limited.
- 28,46: Gain Boost Toggle: Engages the Gain Boost feature, which provides an expanded dynamic range in Manual Exposure mode. This setting is essential for capturing more detail in both bright and dark areas of the image, particularly useful in high-contrast environments.
- 29,47: Slow Shutter Toggle: Enables the use of longer shutter speeds. This feature is beneficial for creating motion blur effects or for capturing more light in extremely low-light situations, enhancing image clarity and exposure.
• 22: Exposure D1 Menu Select Button: Selects this menu.
• 25: Menu Selection paging button
Exposure D2 Menu
This menu deals with exposure adjustments. Auto Exposure Shift Adjustment fine-tunes auto exposure levels. Metering Mode Selection offers different exposure metering options. Exposure Response configures the speed of automatic exposure adjustments. Shockless Gain Adjustment smooths gain transitions.
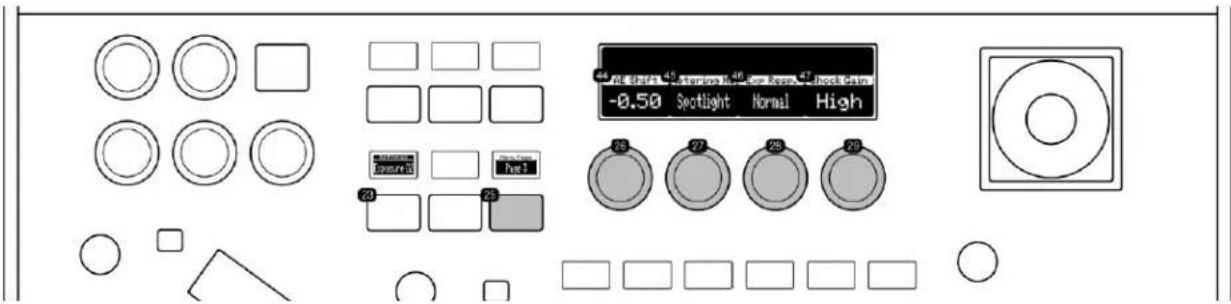
- 26,44: Auto Exposure Shift Adjustment: Allows fine-tuning of the auto exposure level. This setting helps in subtly shifting the overall exposure of the scene, useful for achieving the desired brightness level when using automatic exposure settings.
- 27,45: Metering Mode Selection: Offers options such as Standard, Spotlight, and Backlight for exposure metering. Standard mode provides a general exposure setting, Spotlight focuses on brightly lit subjects against a dark background, and Backlight adjusts for subjects lit from behind.
- 28,46: Exposure Response: Configures the responsiveness of automatic exposure (AE) adjustments when settings like Iris (Aperture Value), Shutter Mode, or Gain (dB) are set to Auto. Available settings are High, Normal, and Low, which dictate the speed at which the camera achieves the correct exposure level.
- 29,47: Shockless Gain Adjustment: Determines the smoothness of gain transitions. Options include Off, Low, Normal, and High. This feature is essential for ensuring a seamless change in gain levels, avoiding abrupt changes in image brightness during recording.
• 23: Exposure D2 Menu Select Button: Selects this menu.
• 25: Menu Selection paging button
Exposure D3 Menu
This menu includes exposure control features. Iris Limit Toggle restricts aperture size to prevent over or underexposure. Flicker Reduction Toggle minimizes flickering in video. Diffraction Toggle compensates for diffraction at smaller apertures.
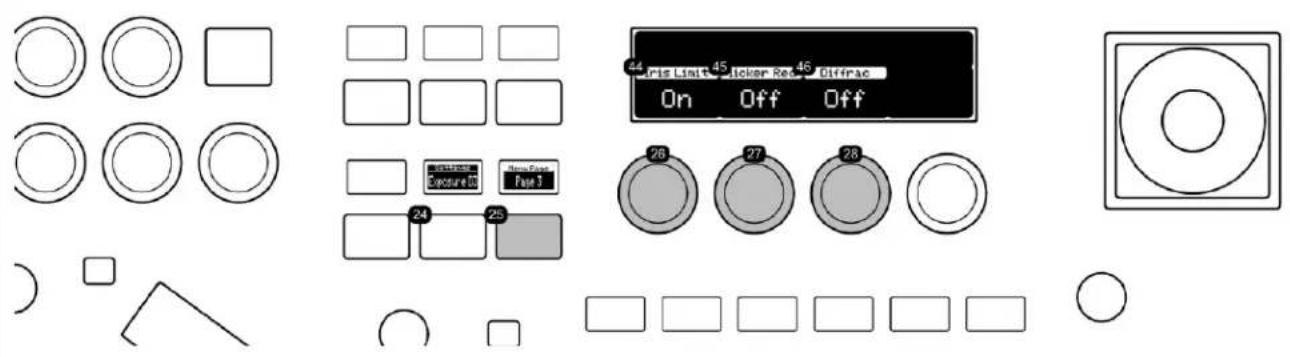
- 26,44: Iris Limit Toggle: This function enables or disables the iris limit. When activated, it restricts the maximum and minimum aperture size, preventing overexposure or underexposure due to extreme aperture adjustments. This feature is useful for maintaining consistent exposure levels in varying lighting conditions.
- 27,45: Flicker Reduction Toggle: Activates or deactivates the flicker reduction feature. This setting is crucial for minimizing or eliminating flickering effects in video footage, particularly when shooting under artificial lighting sources that may cause flickering, such as fluorescent or LED lights.
- 28,46: Diffraction Toggle: This option turns the diffraction control on or off. When enabled, it compensates for diffraction effects, which can occur at smaller apertures, leading to a reduction in image sharpness. This is particularly beneficial for maintaining image clarity when using narrow aperture settings.
• 24: Exposure D3 Menu Select Button: Selects this menu.
• 25: Menu Selection paging button
Color Matrix 1 Menu
This menu adjusts color settings. Color Matrix Gain fine-tunes color depth. Color Matrix Hue Adjustment manipulates color tones. Cyan-Green/Red-Magenta and Cyan-Blue/Red-Yellow Tone Adjustments balance specific color ranges.
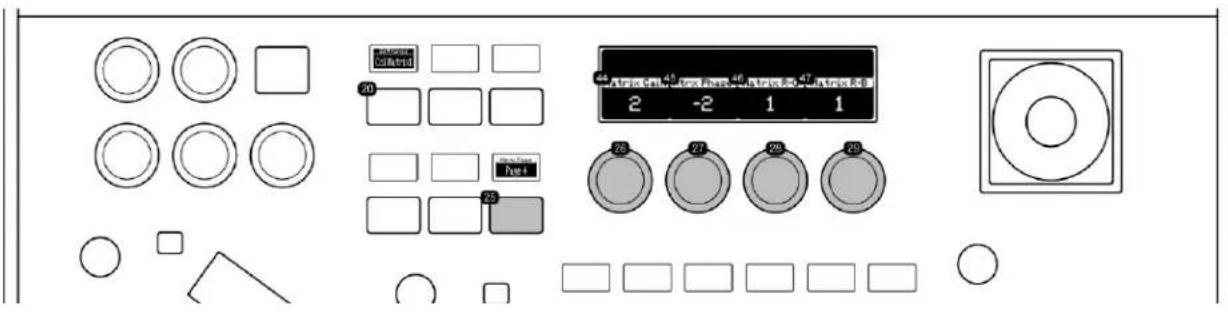
- 26,44: Color Matrix Gain: This feature enables fine-tuning of the video's color depth. The knob adjusts the gain of the color matrix, enhancing or reducing the intensity of colors in the video. It's crucial for achieving accurate color representation and adding artistic effects.
- 27,45: Color Matrix Hue Adjustment: This control adjusts the hue within the color matrix, allowing for precise manipulation of color tones. This adjustment is essential for color correction and achieving a specific look or mood in the video.
- 28,46: Cyan-Green/Red-Magenta Tone Adjustment: Modifies the balance between cyan and green tones as well as red and magenta tones. This control is particularly useful for correcting color casts or enhancing specific color ranges in the image.
- 29,47: Cyan-Blue/Red-Yellow Tone Adjustment: Alters the balance between cyan and blue tones as well as red and yellow tones. This adjustment is key for fine-tuning color temperatures and correcting or enhancing specific color hues.
• 20: Color Matrix 1 Select Button: Selects this menu.
• 25: Menu Selection paging button
Color Matrix 2 Menu
Similar to Color Matrix 1, this menu fine-tunes color balances. Magenta-Red/Green-Cyan and Magenta-Blue/Green-Yellow Tone Adjustments adjust specific color relationships. Yellow-Red/Blue-Cyan and Yellow-Green/Blue-Magenta Tone Adjustments further refine color temperatures and hues.
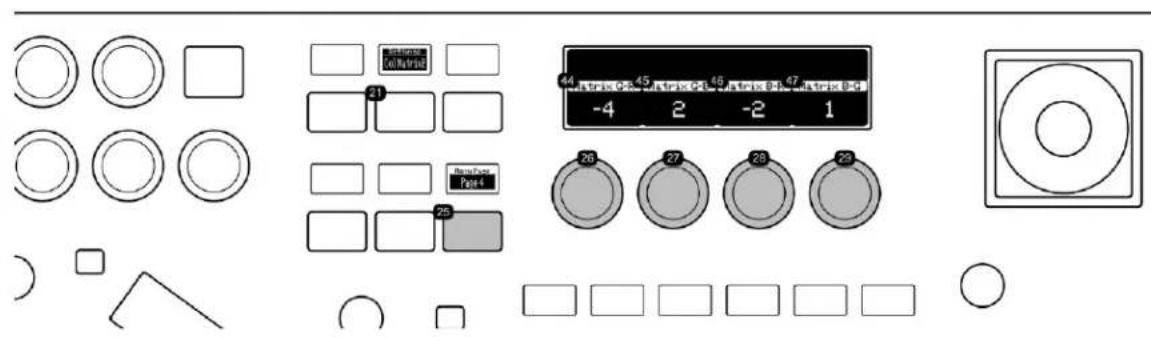
- 26,44: Magenta-Red/Green-Cyan Tone Adjustment: Alters the balance between magenta and red tones as well as green and cyan tones. This control is essential for fine-tuning color nuances, correcting color imbalances, and enhancing specific hues in the image.
- 27,45: Magenta-Blue/Green-Yellow Tone Adjustment: Adjusts the balance between magenta and blue tones as well as green and yellow tones. This setting is key for color correction, particularly in achieving natural skin tones and vibrant landscapes.
- 28,46: Yellow-Red/Blue-Cyan Tone Adjustment: This knob modifies the relationship between yellow and red tones as well as blue and cyan tones. It's useful for adjusting color temperature and enhancing specific elements within the video.
- 29,47: Yellow-Green/Blue-Magenta Tone Adjustment: Changes the balance between yellow and green tones as well as blue and magenta tones. This adjustment is crucial for achieving accurate color representation in various lighting conditions.
• 21: Color Matrix 2 Select button: Selects this menu.
• 25: Menu Selection paging button
Custom Picture Menu
This menu offers picture customization. CP.Selected - Color Profile Selection chooses color profiles like BT.709. Gamma Profile adjusts the gamma curve. HLG Color enhances dynamic range for HDR content. Matrix adjusts the color matrix for overall color tone.
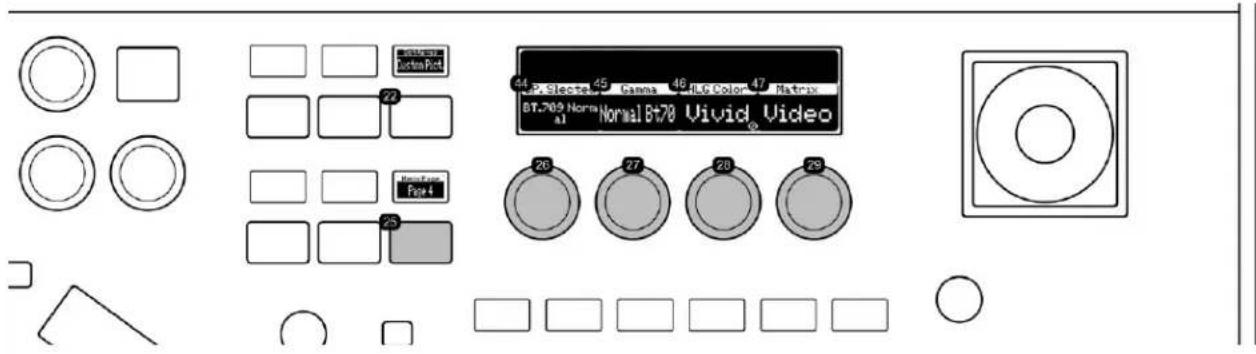
- 26,44: CP.Selected - Color Profile Selection: Similar to the BT.709 Normal color profile. This setting allows the user to choose a specific color profile, which dictates the overall color rendition of the video, ensuring accurate color representation according to industry standards like BT.709.
- 27,45: Gamma Profile: Example, Normal Bt70. This setting adjusts the gamma curve of the video output. Selecting a gamma profile like 'Normal Bt70' influences the contrast and brightness levels of the image, especially in mid-tone areas, for a balanced and natural look.
- 28,46: HLG Color: Stands for Hybrid Log-Gamma, a color setting that provides a wider color gamut and higher dynamic range. This setting is particularly beneficial for content intended for HDR (High Dynamic Range) displays, enhancing the overall visual quality with richer colors and improved contrast.
- 29,47: Matrix: This control adjusts the color matrix of the camera. The matrix setting is crucial for defining how colors are processed and mixed, affecting the overall color tone and accuracy in the video output.
• 22: Custom Picture Menu Select button: Selects this menu.
• 25: Menu Selection paging button
Image Quality Menu
This menu handles image quality adjustments. Noise Reduction Mode reduces visual noise. Skin Level Adjustment enhances skin tones. Knee Toggle manages highlights to prevent overexposure. Knee Saturation maintains color balance in bright areas.
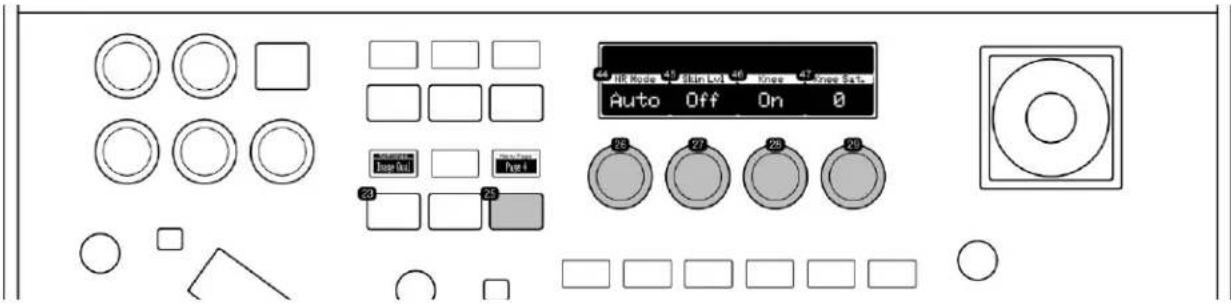
- 26,44: Noise Reduction Mode: This setting adjusts the camera's noise reduction levels. It helps in reducing visual noise in the footage, especially in low-light conditions or at higher ISO settings, resulting in cleaner, smoother images.
- 27,45: Skin Level Adjustment: This feature fine-tunes skin tone levels in the video. It's designed to enhance the natural appearance of skin tones, making it ideal for portraits or scenes where accurate skin tone representation is crucial.
- 28,46: Knee Toggle: Activates or deactivates the knee function. The knee function helps in managing the highlights in the image, preventing overexposure in bright areas by compressing the dynamic range in those regions.
- 29,47: Knee Saturation: Adjusts the color saturation in the knee point of the image. This setting is essential for maintaining color balance in high brightness areas, ensuring that the colors remain natural and are not washed out by the intensity of light.
• 23: Image Quality Select Button: Selects this menu.
• 25: Menu Selection paging button
System Menu
This menu configures system settings. System Video Size Setting selects video resolution. System Video Frequency Setting configures output frequency. 12G SDI Format Selection chooses the format for 12G SDI output. 3G-SDI/HDMI Format Setting adjusts
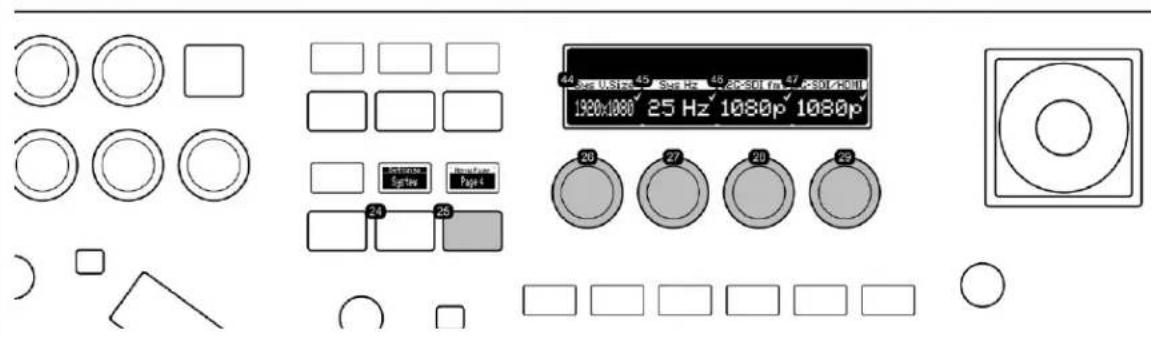
- 26,44: System Video Size Setting: Allows for the selection of the video resolution or size. Changing the system video size to match the requirements of the output format or recording device is crucial for optimal video quality. To confirm the selection, the user needs to press down on the knob after adjusting the value.
- 27,45: System Video Frequency Setting: Configures the video output frequency. This setting is key to ensuring compatibility with various displays and recording systems. Like the video size setting, a press-down confirmation on the knob is required to finalize the adjustment.
- 28,46: 12G SDI Format Selection: Chooses the format for 12G SDI output, a standard for high bandwidth digital video transmission. This setting is essential for high-definition video productions, ensuring seamless integration with professional-grade equipment. Pressing down the knob is necessary to confirm the selection.
- 29,47: 3G-SDI/HDMI Format Setting: Adjusts the output format for 3G-SDI and HDMI connections. This feature allows for flexibility in connecting to various types of displays and recording equipment. Users must press down on the knob to confirm their choice after making the selection.
• 24: System Menu Select Button: Selects this menu.
• 25: Menu Selection paging button
RC-SK5 & Frame Shot Pro
Frame Shot Pro is an innovative side panel designed to seamlessly integrate with the RC-SK5 as a host controller, enhancing the control of Canon PTZ cameras with visual presets. This system simplifies preset management by using color thumbnails as visual references, eliminating the need to memorize preset positions by their number. Users can store and recall up to 100 presets with ease for as many cameras as they want.
To purchase the Frame Shot Pro, please reach out to sales@skaarhoj.com or support@skaarhoj.com
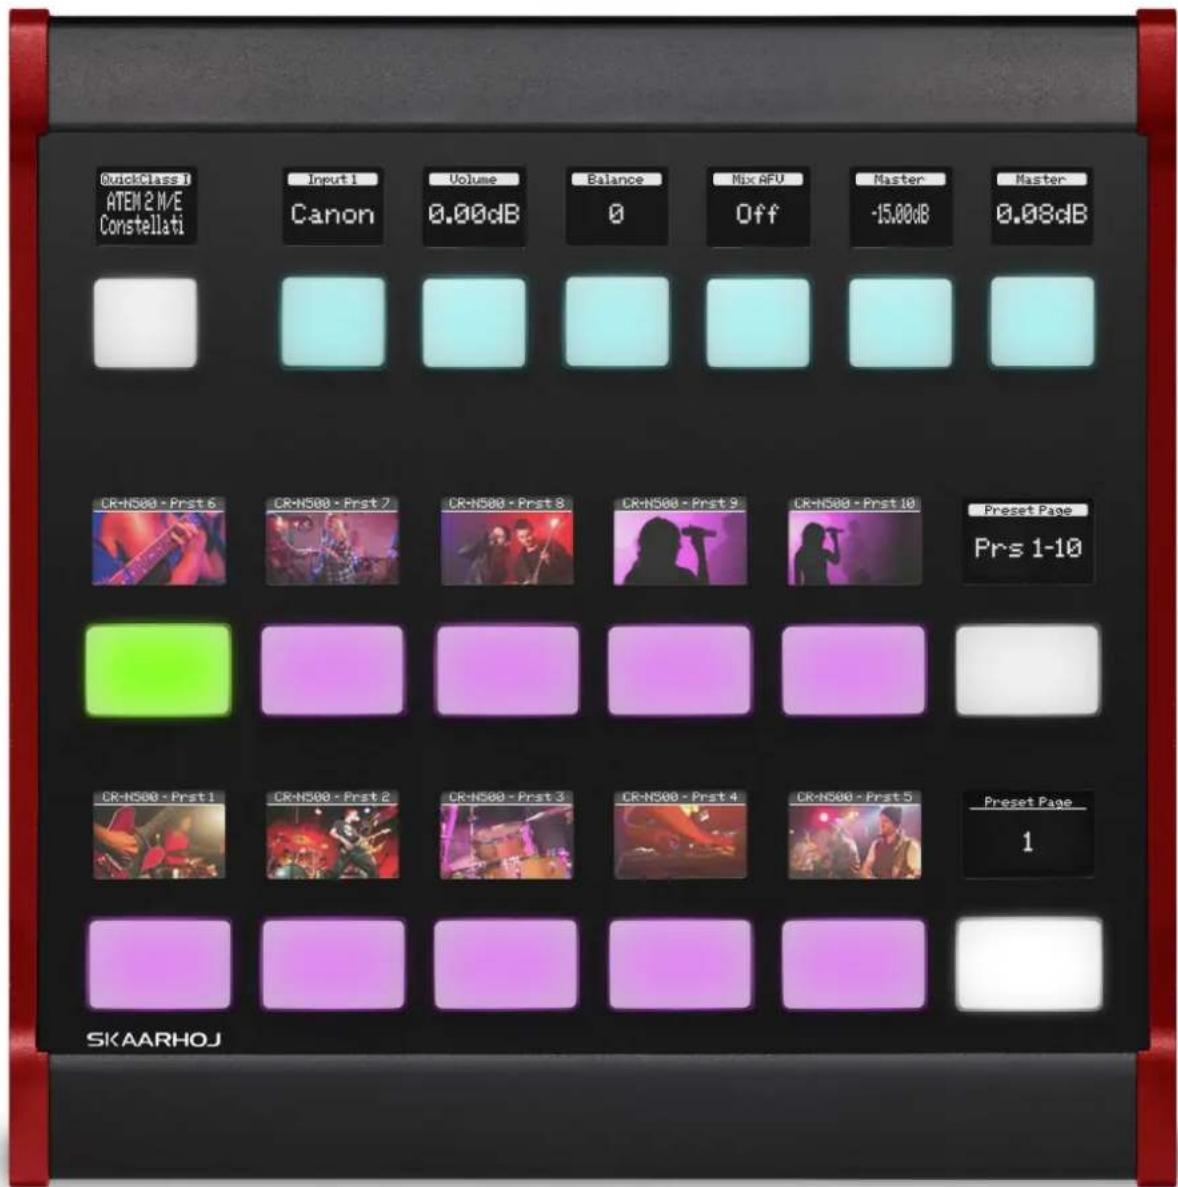
The Frame Shot Pro also features seven customizable four-way buttons that increase functionality and can be configured for various actions. When used with the RC-SK5 Pro License, these buttons gain even greater versatility through Quick Classes, which offer ready-to-use configurations for a wide array of devices, including video switchers, routers, and audio equipment.
Overview of Benefits
- Intuitive Presets: Visual thumbnails provide immediate, recognizable cues for preset selection.
• Effortless Preset Recording: Long-pressing a button store both the preset and its thumbnail. - Enhanced Camera Selector: Frees up six buttons on the RC-SK5, displaying more cameras for direct access and improved workflow.
- Third-Party Device Integration: The top seven buttons on Frame Shot Pro can control external devices, requiring an upgrade to the Reactor License for full functionality.
- Unified Design: Frame Shot Pro and RC-SK5 offer a robust, integrated experience, with changes on the RC-SK5 instantly reflected on Frame Shot Pro, ensuring a unified system response. Visually, they match perfectly with similar red styling on the sides.
Together, Frame Shot Pro and RC-SK5 deliver a powerful, user-friendly system that streamlines workflow for professionals in the field.
Network Connected
Frame Shot Pro and RC-SK5 are connected via network. They can sit side by side or as far away from each other as your network can reach.
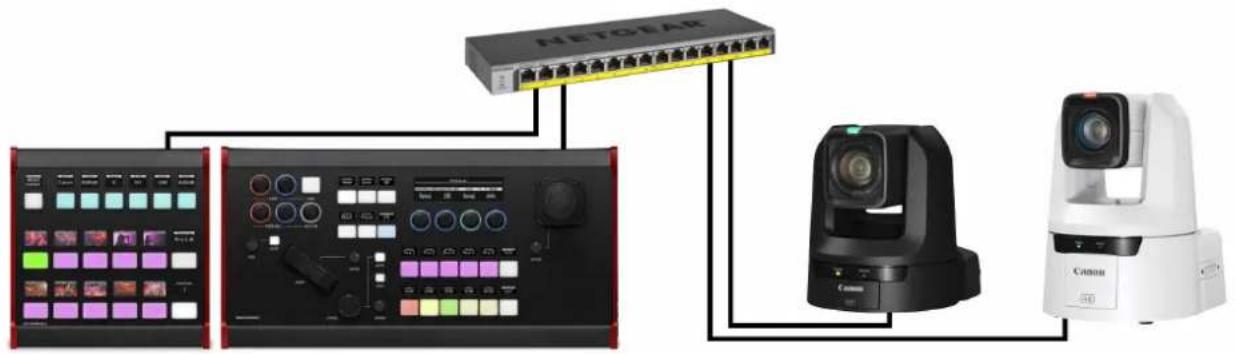
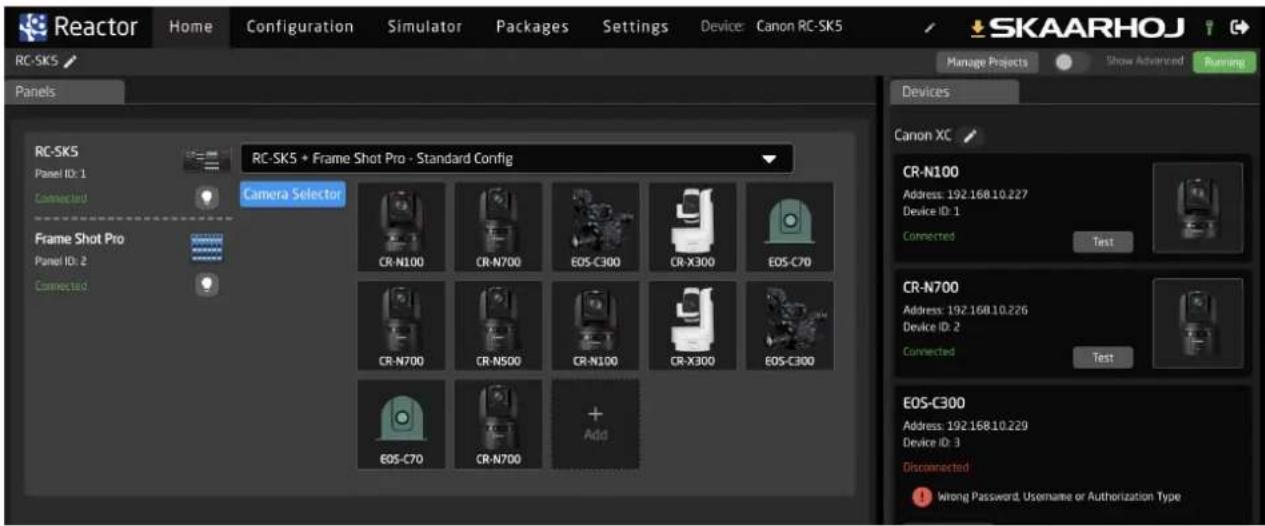
Adding a Frame Shot Pro is very simple to do. First, change the configuration over to "RC-SK5 + Frame Shot Pro - Standard Config".

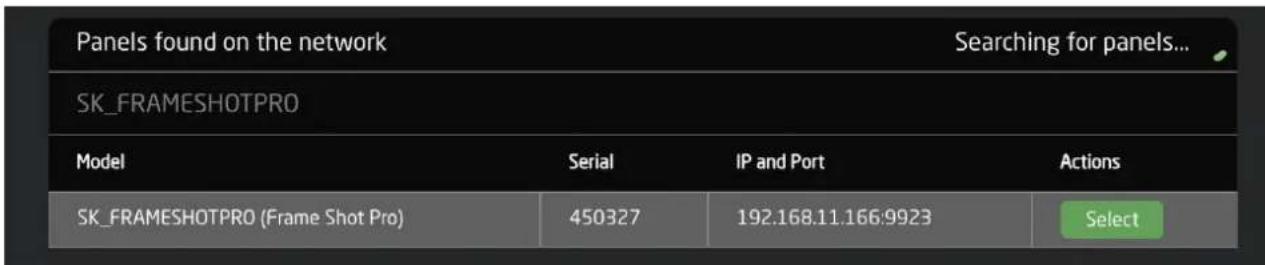
Then, Click on the drop down that says "Missing panel" and search for your Frame Shot Pro on the network
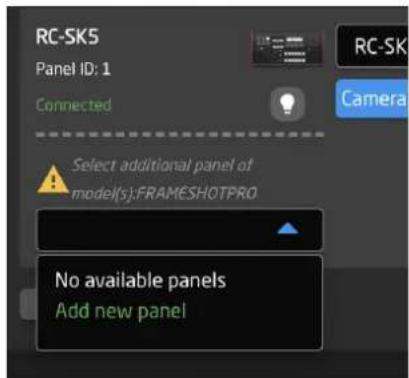
Select the Frame Shot Pro when found
Finally, add your cameras. You should end up with a result about like this example below:
Visual Presets
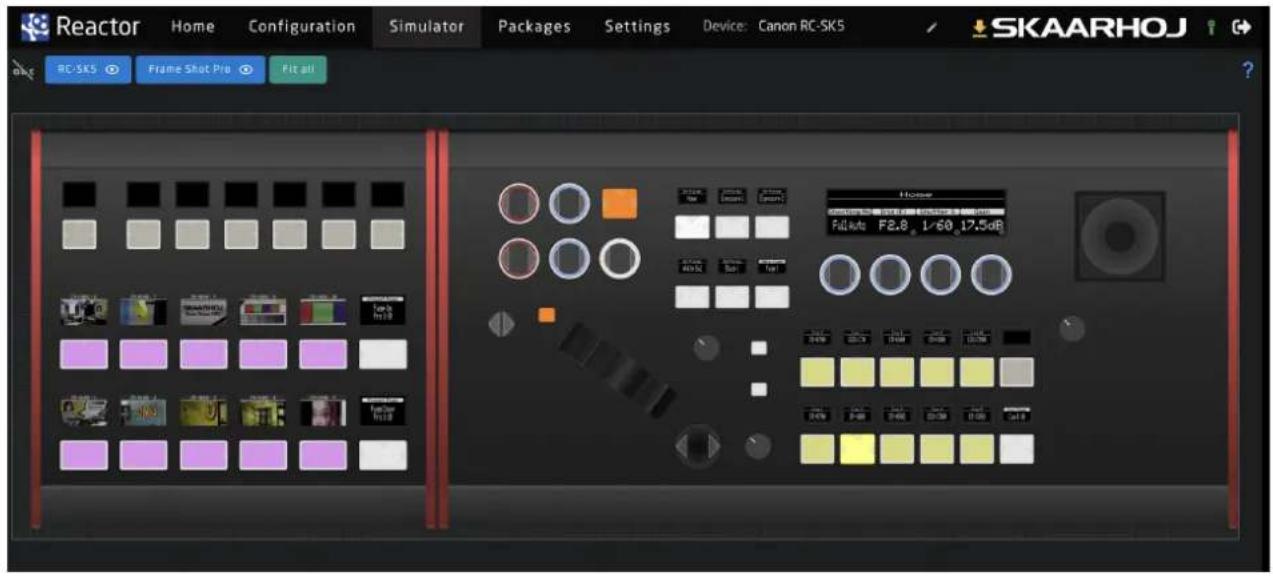
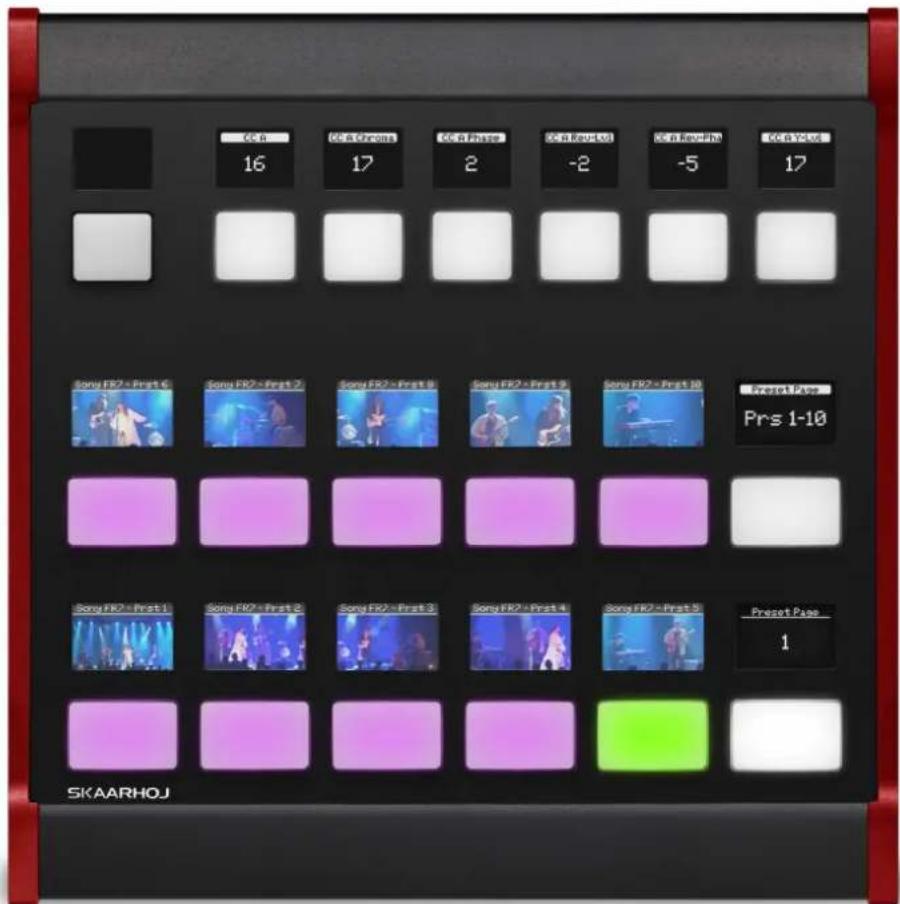
The process for recalling and storing presets on Frame Shot Pro mirrors that of the RC-SK5. A quick tap recalls a preset, while a longer press saves it, capturing and storing the corresponding thumbnail within the controller. As presets are saved, their thumbnails will display and update in accordance with the camera selections made on the RC-SK5. The two panels sync to function as a cohesive unit.
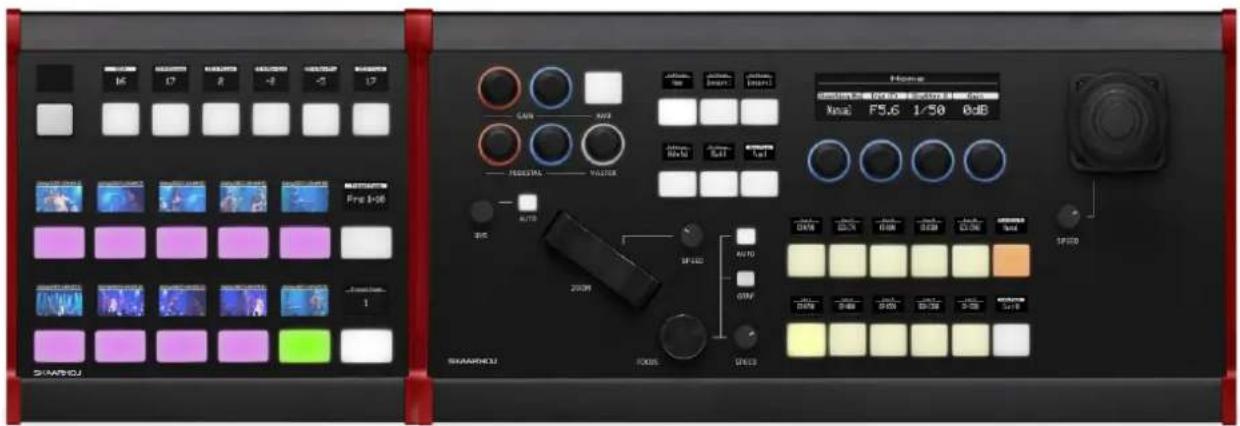
Frame Shot Pro paired with the RC-SK5 creates a harmonious and efficient workstation.
Functional Description
Detailed below are the functions of Frame Shot Pro's hardware components and their interaction with the RC-SK5, accommodating Canon cameras as well as models from other manufacturers.

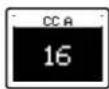
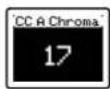
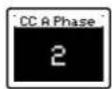
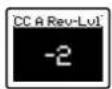
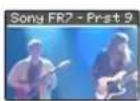
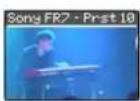
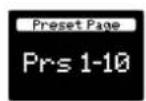
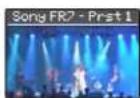
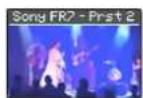
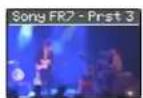
- 1-5, 7-11: These buttons are for preset recall and storage. A short press recalls the preset position, while a long press saves the current position as a preset and captures a thumbnail image. Upon storing a preset, the button briefly flashes green.
- 6, 12: Use these paging buttons to navigate through additional pages. With Canon cameras supporting up to 100 presets, there are 10 pages available for browsing.
- 13-19: Seven four-way buttons are provided for user-defined customization or for implementing Quick Class commands.
Persistent Thumbnail Storage
To retain thumbnails after a system restart, navigate to the "Canon XC" device core on the Home Screen and activate the "Persistent Storage" option.
![Canon XC Development Status: released Address local Simulate Description]^Type description here... Save Current State for Simulation Parameter List Autofix potential problems Core specific settings: Persistent Storage ✓ Save thumbnails and preset settings between reboots, if disabled it will clear all saved data! Delete Discard Save](/content/2026/05/905687/images/9bed64347057c36b09003f4ecde002b11055389d6230eed68e9cf0681110ec4d.jpg)
Side By Side
Frame Shot Pro can be positioned on either side of the RC-SK5, with each controller connecting independently to the PoE Ethernet switch. To facilitate integration, Frame Shot Pro must be set to Raw Panel Mode by activating the "Listen On Port" option in its Hardware Manager. This allows Frame Shot Pro to bypass its own Reactor version and connect to the RC-SK5. Both panels will then be visible in the RC-SK5's Simulation tab, and you can customize their placement side by side by editing the group on the Home Screen and adjusting their positions in the Graphical Editor, as detailed in the SKAARHOJ documentation.
Extended Camera Selector
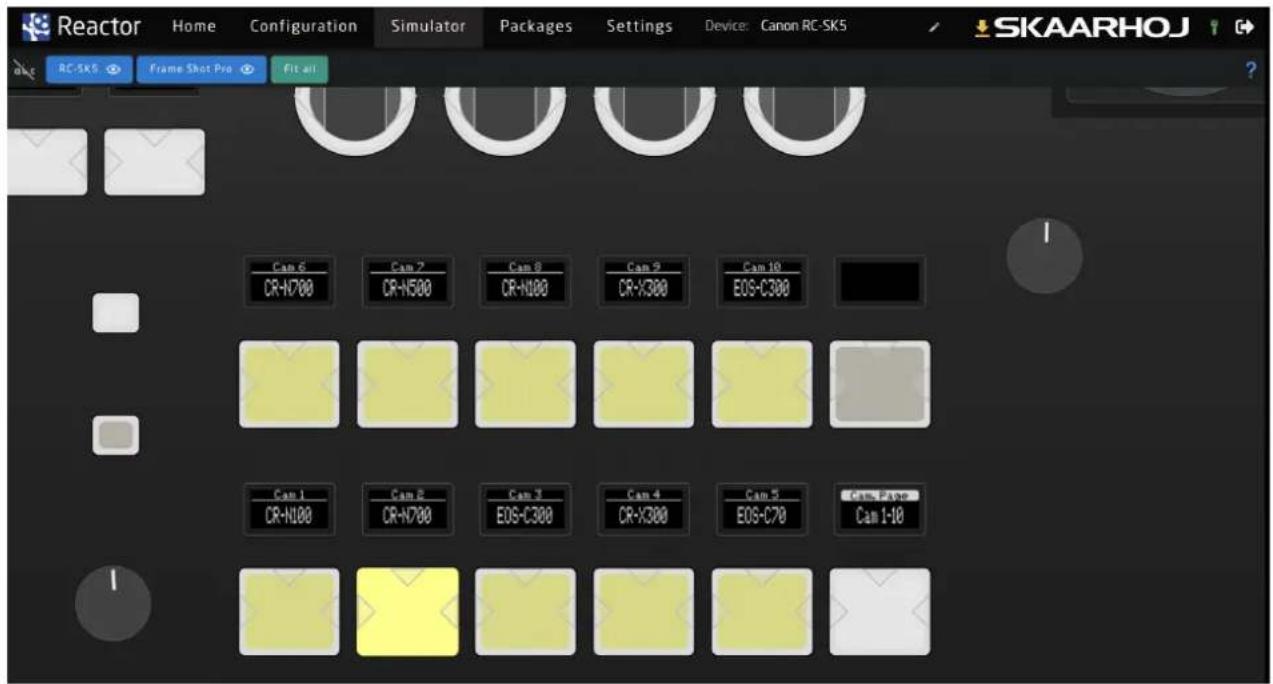
By expanding the Camera Selector to 10 buttons, the RC-SK5 doubles its display capacity, taking over buttons typically reserved for presets.
Customizing User Buttons
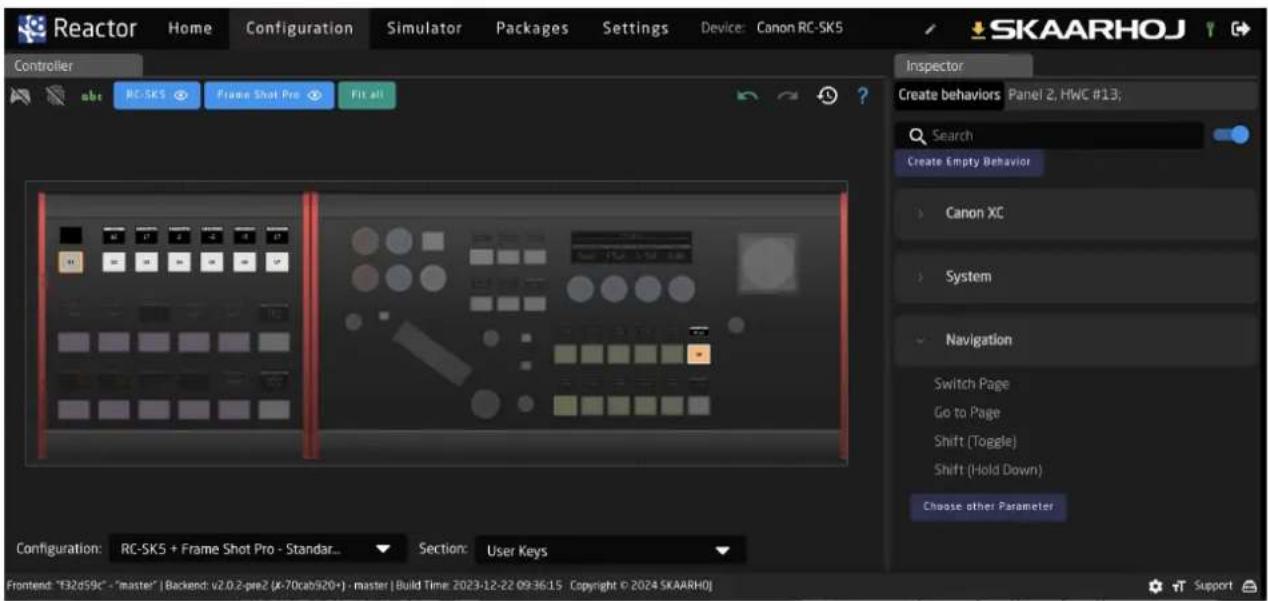
Frame Shot Pro features seven user buttons, and the RC-SK5 camera selector includes one additional customizable button. To configure these, access the "User Keys" section in the Configuration tab, where the eight buttons are displayed. Selecting an empty button, such as U1, will prompt the "Create Behavior" function in the Inspector pane, where you can assign any action linked to the cameras connected to the RC-SK5 with a single click.
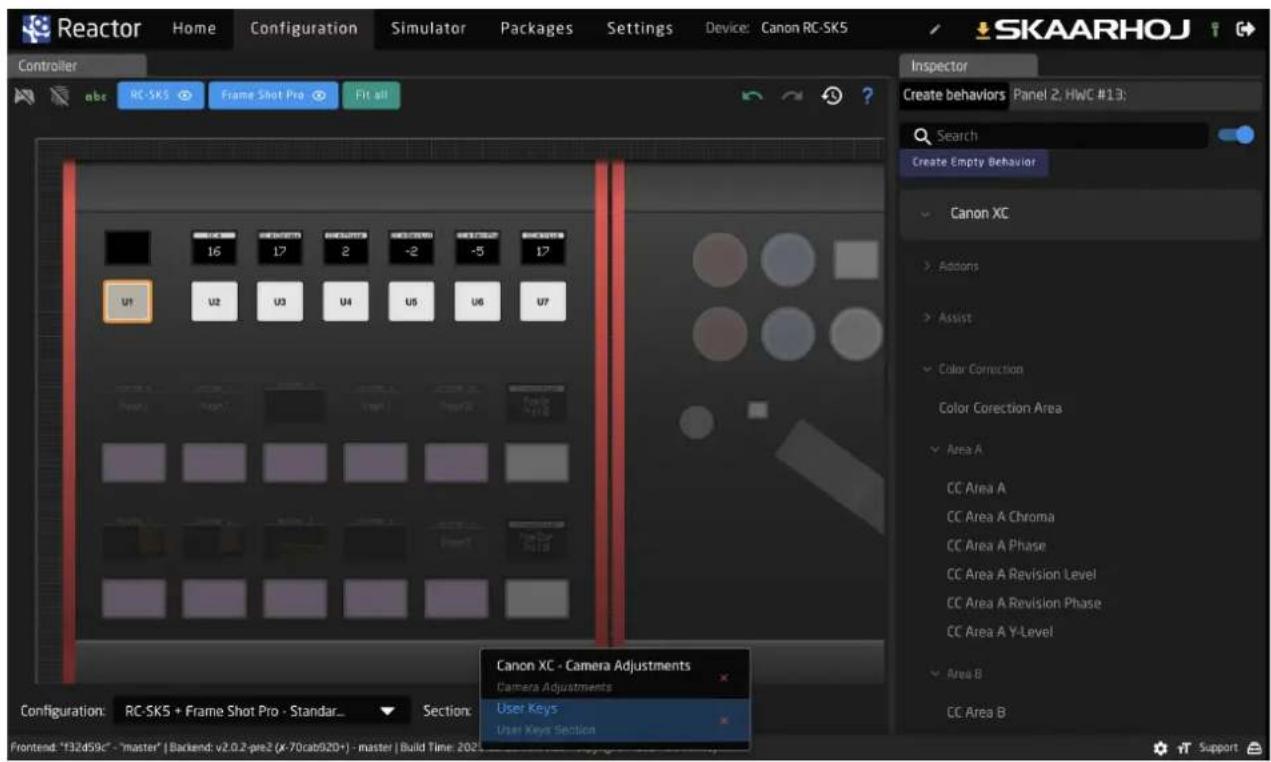
In the screenshot above, buttons U2-U7 are pre-configured for advanced color control on Canon cameras, with four-way functionality for incremental adjustments by pressing the sides of the buttons.
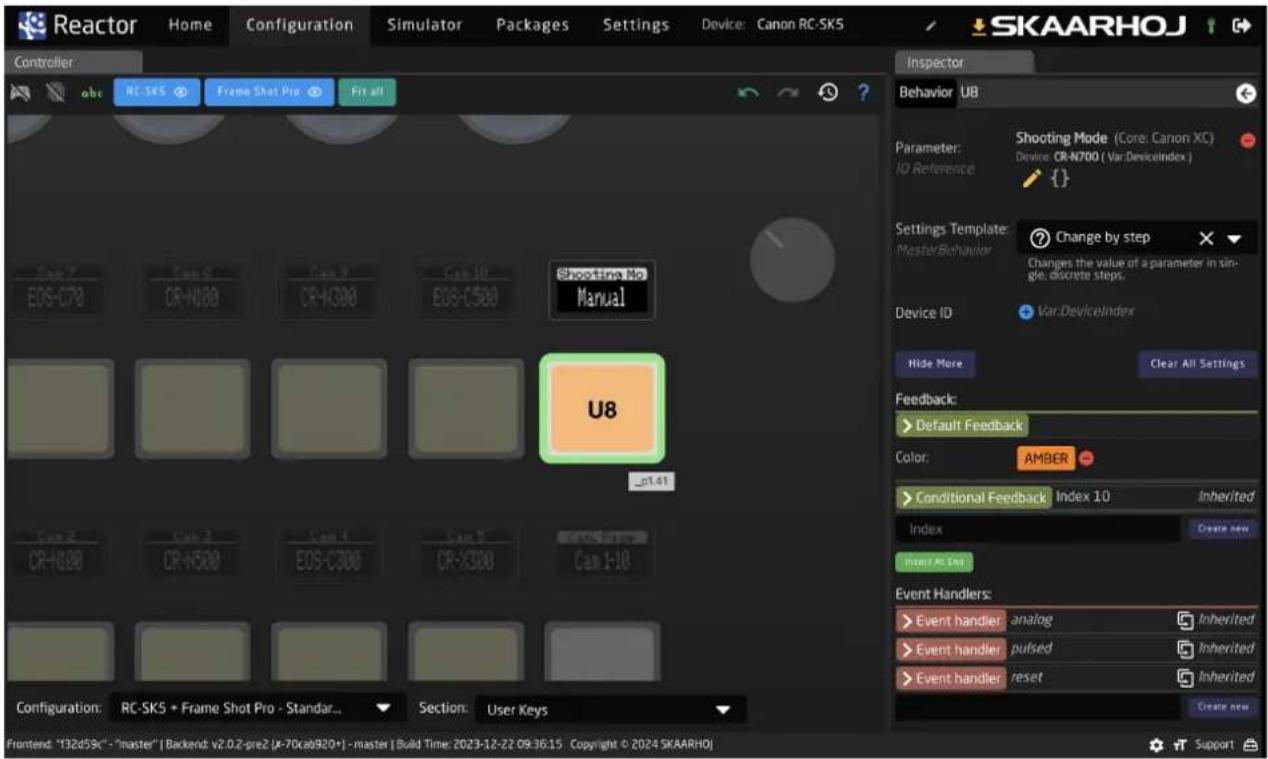
The camera selector's eighth button is part of the User Keys and is set for Shooting Mode, providing quick access to this function regardless of the menu selected. Its color is customized to amber, differing from the standard white.
Reactor offers a spectrum of configuration capabilities, from straightforward one-click behavior assignments to complex, multi-layered customization options. Sections within the configuration help organize these customizations into distinct zones, allowing them to coexist seamlessly with Reactor's default configurations.
RC-SK5 Pro License
The Pro License extends your RC-SK5 with universal camera compatibility across brands like Sony, BirdDog, Panasonic and many more, personalized preset labels for easier recall, and live tally indication from top switchers. It enables direct camera feed routing to screens, offers advanced customization through Reactor, supports unlimited camera additions, and integrates seamlessly with the SKAARHOJ ecosystem, transforming your RC-SK5 into a central control hub with the comprehensive capabilities of the Blue Pill platform.
The Pro License is provided as a natural first step beyond control of just Canon PTZ cameras and stepping into SKAARHOJs vast universe of device control beyond. SKAARHOJs solutions offer you a chance to integrate all your favourite hardware. It's fun, useful, space saving, extends the life time of your broadcast and AV devices and helps your users to get their job done without excessive training.
To purchase the Pro License, please reach out to sales@skaarhoj.com or support@skaarhoj.com
Overview of Benefits
- Universal Camera Support: Seamlessly mix in PTZ cameras from other top brands such as Sony, Panasonic, BirdDog, and many more, fully supported by SKAARHOJ.
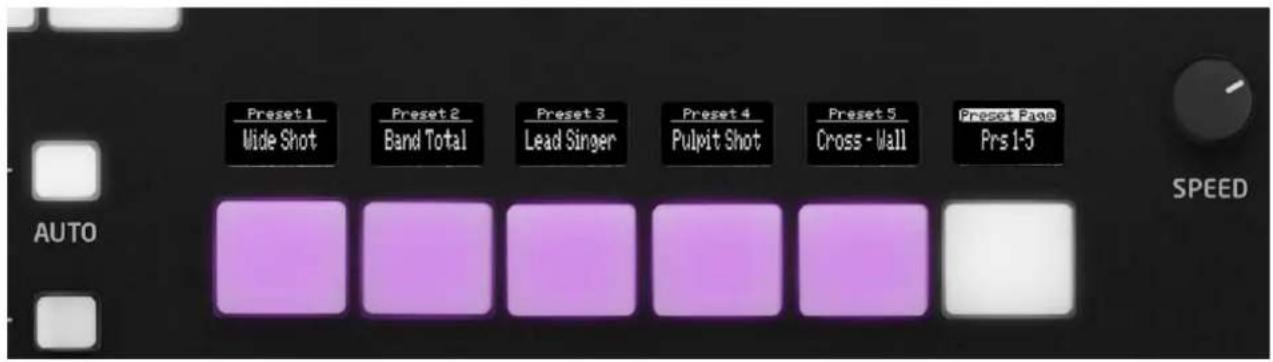
- Custom Preset Labels: Organize and recall your camera position presets with ease by labeling presets with names shown in the displays above buttons.
- Video Switcher Tally: Experience real-time red and green tally feedback from switchers like ATEM, vMix, TriCaster, and more, directly on your camera select buttons.
- Route Cameras to Screen: Connect the camera selector buttons to video routers or switchers over IP, instantly displaying the selected camera feed for operators.
- Advanced Customization: Take customization to the next level with Reactor, building and extending configurations for any supported SKAARHOJ device.
- Unlimited Cameras: With the Pro License, enhance your production by adding an unlimited number of cameras, limited only by system and network resources.
- SKAARHOJ Ecosystem Connectivity: Integrate RC-SK5 into SKAARHOJ's ecosystem, enabling connections with other devices via the Raw Panel Protocol.
- Control Hub: Make your RC-SK5 a control hub by incorporating other SKAARHOJ panels and devices, centrally managed within Reactor.
- Software Apps: Utilize the full range of SKAARHOJ software packages, connecting Stream Decks, X-keys, creating touch UIs and much more.
- The Full Blue Pill Power: Unlock the full potential of your RC-SK5 with the Pro License, aligning it with the elite features of SKAARHOJ's Blue Pill platform devices.
Control Any Camera and Device
The RC-SK5 Pro License significantly expands Reactor's connectivity, enabling control over a wide array of devices that SKAARHOJ controllers typically support. This enhancement goes beyond controlling various camera models from multiple manufacturers to include the integration of video switchers and routers.
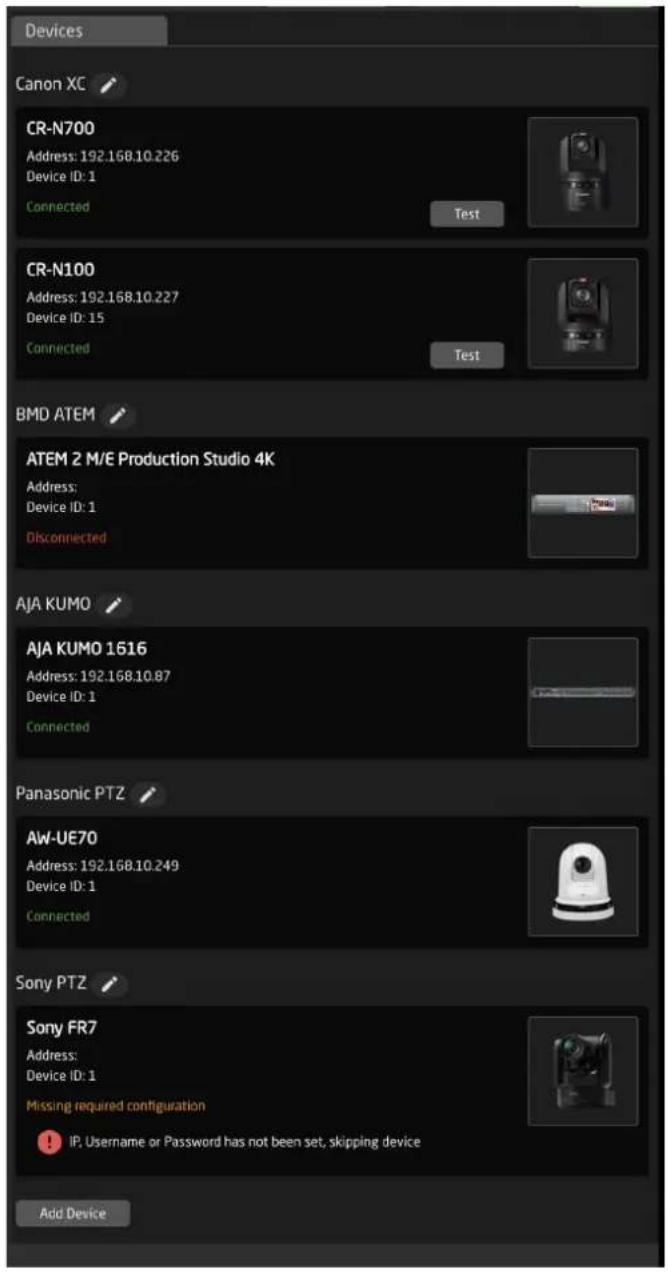
Adding new camera models to the system remains straightforward. The process mimics the simplicity of adding Canon cameras: simply search, select, and apply instantaneously.

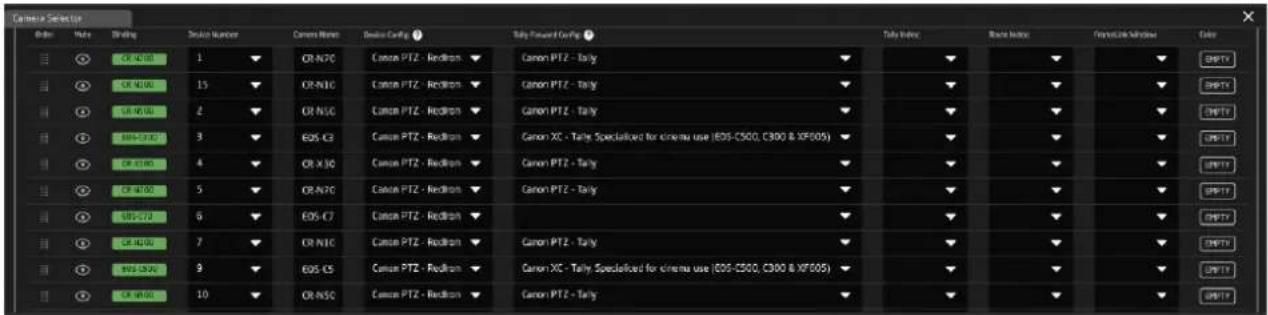
The camera selector interface now incorporates additional fields to accommodate the varied configurations required by different manufacturers' cameras. As a result, the Device Config list has expanded to provide specific sub-configurations essential for managing the unique settings displayed on the controllers' knobs and screens.
While configurations for non-Canon cameras may offer more basic support for RC-SK5's specialized features, such as dedicated knobs for iris, focus, pedestal, and gain, users can still customize mappings. Out-of-the-box configurations might not cover all features, but the central encoders, menu operations, preset recalls, and camera selection functionalities remain consistent across all supported camera models.
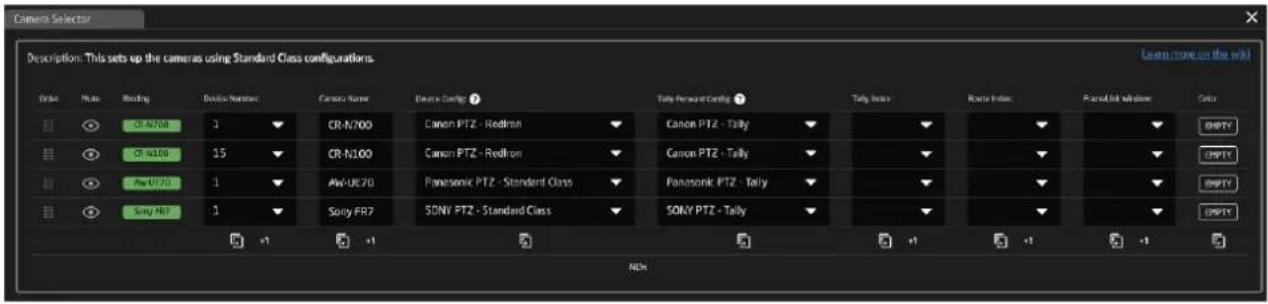
Additionally, the camera selector now contains settings to configure tally forwarding for any connected camera.
Preset Labels
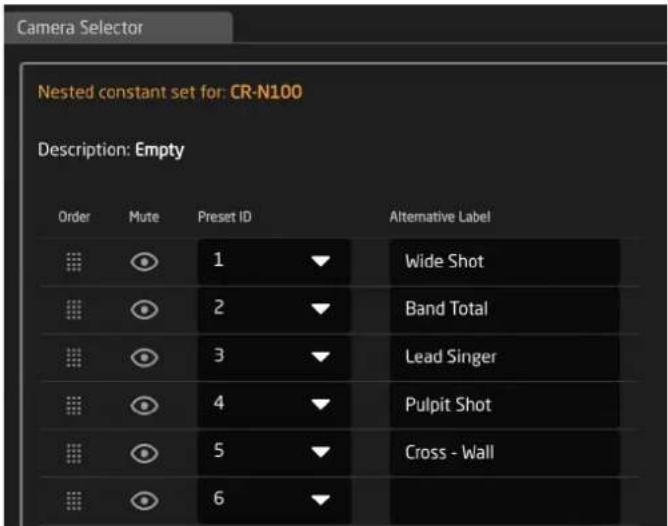
Adding preset labels is done by clicking the blue button "Camera Selector" and then for each camera clicking the button on the far right named "Presets":

This will bring up another editor with fields for each preset number. Don't change the Preset Ids, just add Alternative Labels:
The result is instantly available on the preset selector on RC-SK5:
More Configurations
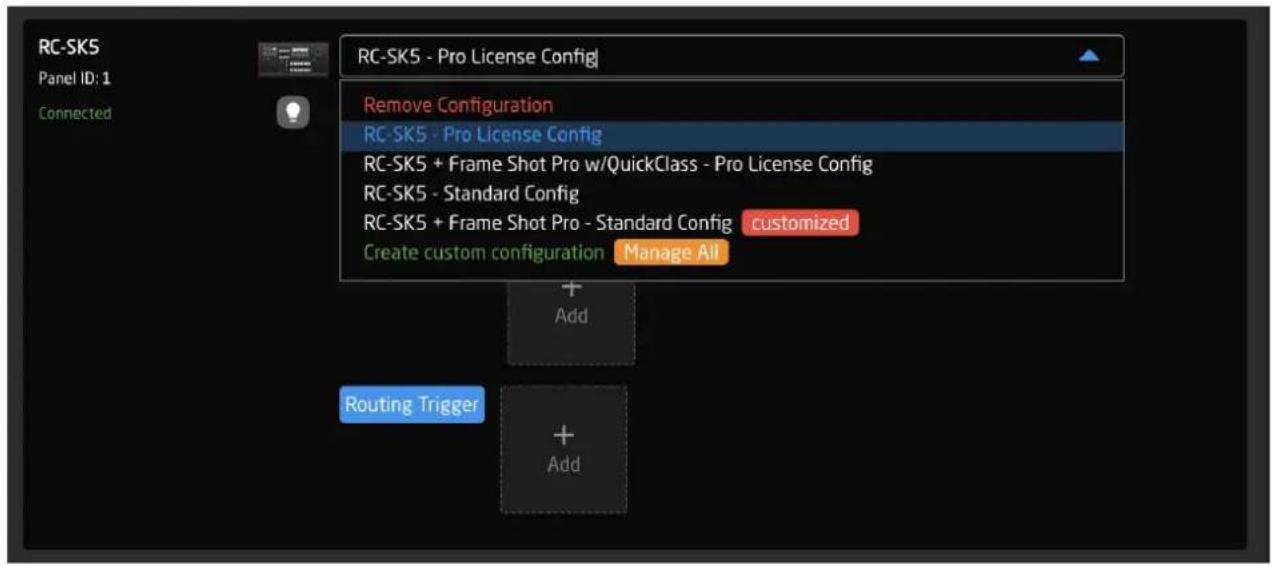
With the Pro License, the RC-SK5 and Frame Shot Pro offer expanded configuration options in addition to the standard configurations. Using the Pro License configurations will open up access to new features such as tally, routing, quick classes and provisions for using other camera brands and devices.
Tally and Routing Triggers
The Pro License enables the addition of video switchers and routers to your device list. This integration allows you to use them to control the red and green tally lights within the system. The tally status is displayed on the camera selector, helping operators easily see which camera is live or in preview.
Furthermore, this tally information can be relayed to the cameras themselves. Canon PTZ cameras and many other brands feature tally lamps, enhancing studio coordination.
Routing triggers allow the camera selector to manage video source routing to a monitor in front of the operator as they select a camera. This function requires a video switcher or router.
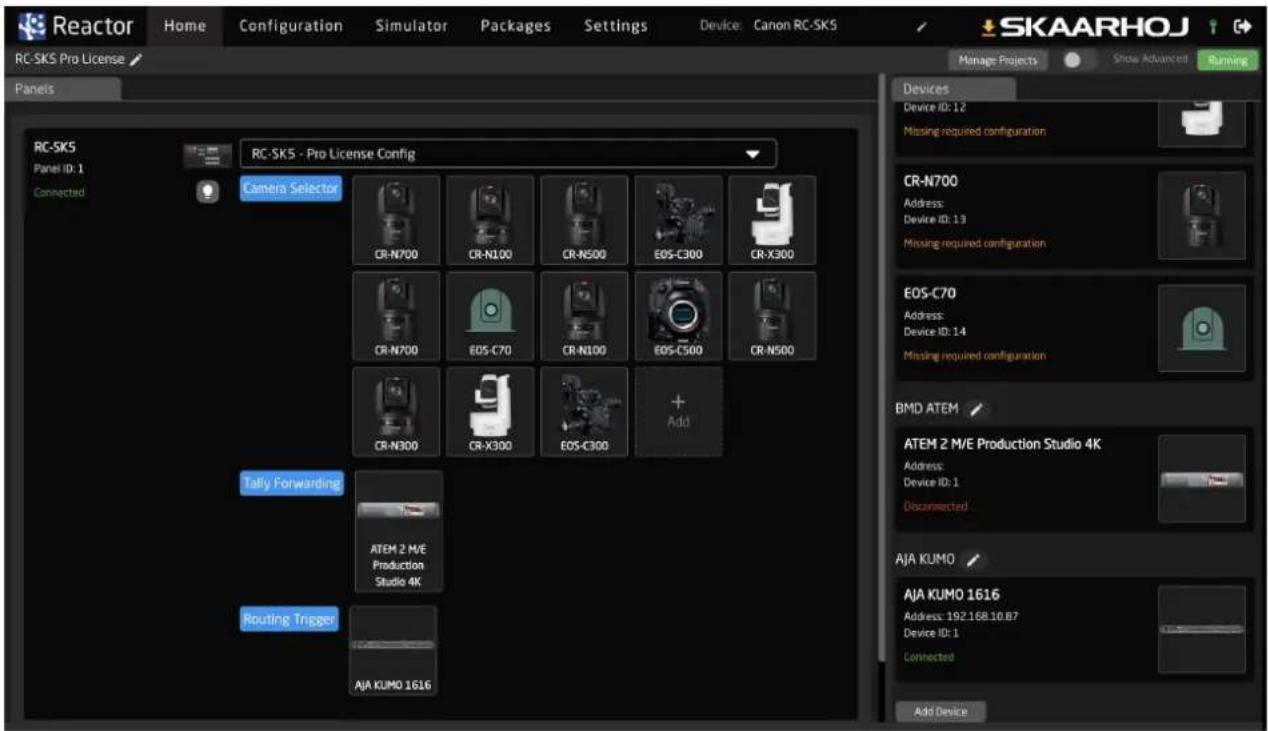
The system includes tally forwarding profiles for ATEM, vMix, TriCaster, and TSL systems.
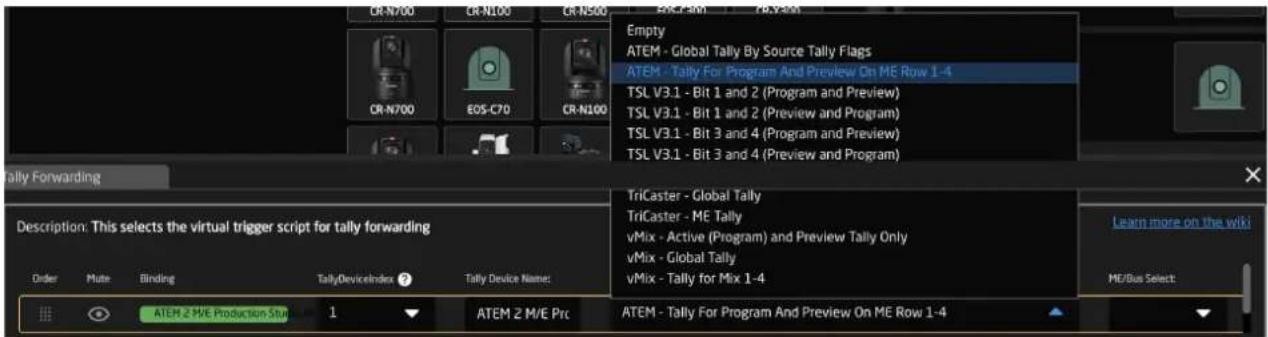
The Camera Selector interface is also enhanced with additional fields, enabling users to link cameras with specific inputs and outputs for tally and routing triggers.
Advanced Customization
With the Pro License, the RC-SK5 offers an extensive User Section that encompasses the entire controller interface. This enables users to go beyond camera-specific adjustment sections and overwrite any default preset functions.
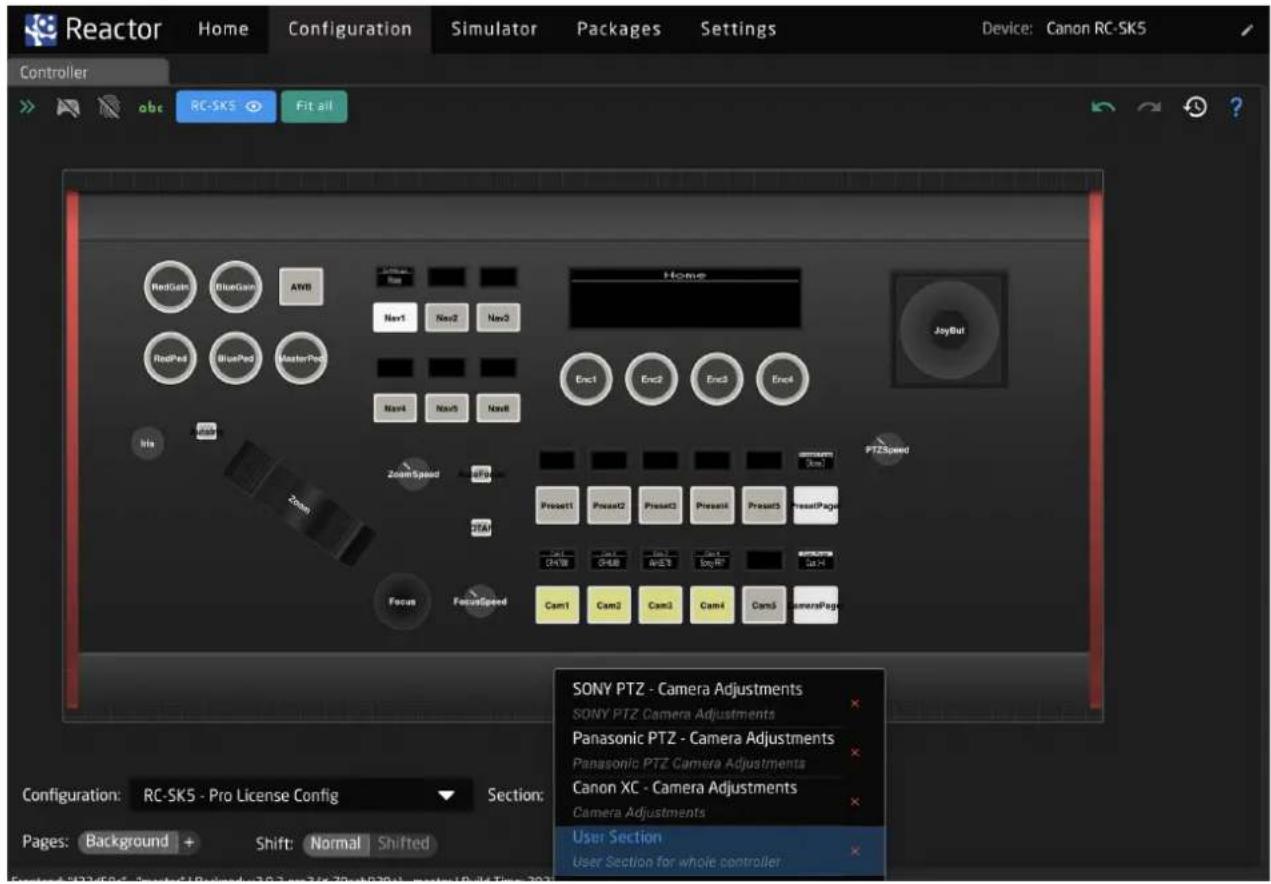
For instance, you can easily repurpose a button from the camera selector – perhaps one that's not in use – to perform an action on another device, like an ATEM switcher.
![Reactor Home Configuration Simulator Packages Settings Device: Canon RC-SKS SKAARHOJ Controller Preset1 Preset2 Preset3 Preset4 Preset5 PresetPager Cam 1 CR-N700 Cam 2 CR-N800 Cam 3 AM-UE70 Cam 4 Sony FR7 Cam Page Cam 1-4 Cam1 Cam2 Cam3 Cam4 Cam5 CameraPager Configuration: RC-SKS - Pro License Config Section: User Section Pages Background Shift Normal Started Features: "B2.65k" - "master" [Schend v2.6.2-pro2 (R-70ab029)] - master | Buto Tone 2023-12-22 09:36:15 Copyright © 2024SKAAH0J Inspector Create behaviors Planet1, HWC #74: Paper Background Shift Normal Search Create Empty Behavior CR-N700 ID: 1 CR-N100 ID: 15 ATEM 2 M/E Production Studio 4K ID: 1 Audio Aux Output Pax Select Choose a source for a specified Aux channel. ALL Cycles All Cam Control Desubscribed Keyer Aristight Audio Key Support](/content/2026/05/905687/images/5fc24d236b29407a60bd776d308fa099d7beb3b1089f86ad2865ae7a1037debf.jpg)
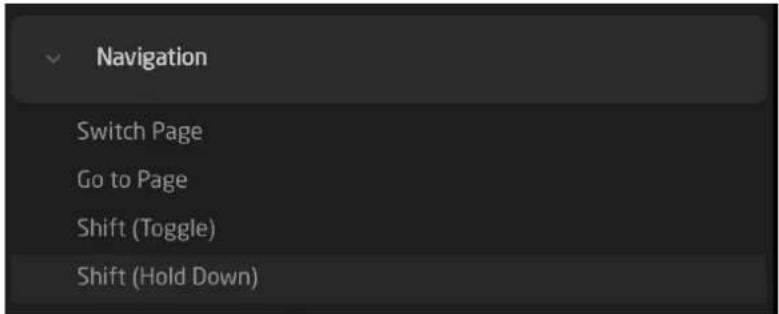
The User Section is versatile, allowing for the creation of multiple pages and shift levels within each.

The system also includes predefined actions that can be assigned to navigate through these pages and shift levels directly from the controller.
SKAARHOJ Ecosystem
Every other controller in the SKAARHOJ lineup supports the Raw Panel Protocol. With the RC-SK5 Pro License, this feature is also functional and allows the RC-SK5 to act as a remote panel for other SKAARHOJ devices or compatible third-party systems.

Control Hub
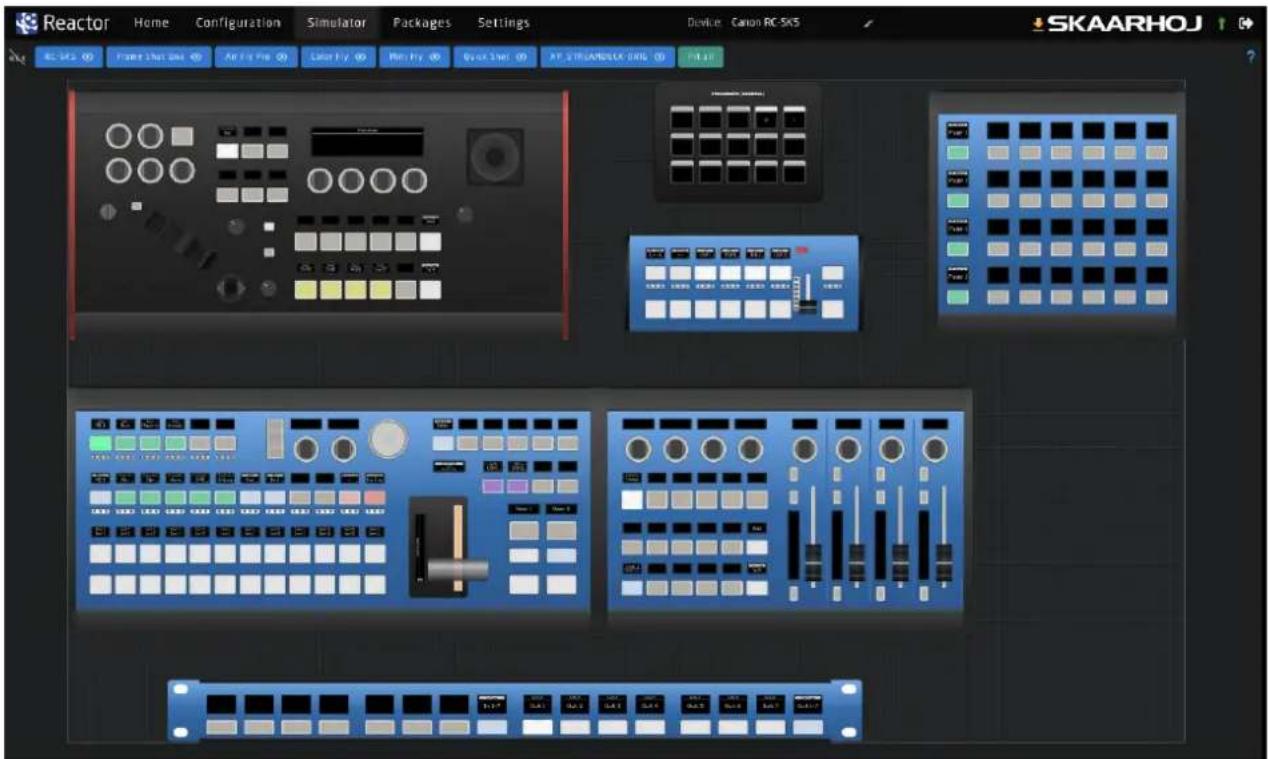
The RC-SK5 can serve as a central control hub, streamlining the management of multiple panels within a single user interface. For example, when integrating the Frame Shot Pro controller with the RC-SK5, it's essential to centralize the configuration in one device, with one acting as the host and the other as an auxiliary panel within the system. This centralized approach is also beneficial in other cases for convenience, keeping all controls within the same interface.
This example below illustrates the capability of the RC-SK5 to integrate multiple panels. Each panel typically operates with its own unique configuration, yet they all have access to the same set of devices.
Software Applications
Your RC-SK5 Pro Licensed controller can be enhanced with a variety of software packages, such as the xpanel series, which allows integration with Stream Decks, X-Keys, and touch UIs, transforming your RC-SK5 into a centralized host for these devices. USB devices can be connected to the USB-A port on the back, either directly or via a powered USB hub.
Please note that some software applications for the RC-SK5 may require separate licensing fees. For comprehensive information on this, consult the SKAARHOJ wiki or our support team.
| Available Packages | ||
| xpanel- | ||
| Package Name | Package Description | Versions |
| xpanel-hids | HID device Raw Panel server | 1.0.3 Install |
| xpanel-riedelsmartpanel | Riedel Smartpanel Raw Panel server | 1.0.2 Install |
| xpanel-streamdeck | Streamdeck Raw Panel server | 2.2.2 Install |
| xpanel-tallyma | Tally-MA Raw Panel server | 1.0.1 Install |
| xpanel-touch | Touch Raw Panel | 1.0.1 Install |
| xpanel-xkeys | X-keys Raw Panel server | 1.2.0 Install |
| Want to install a package manually? | Upload and install package | |
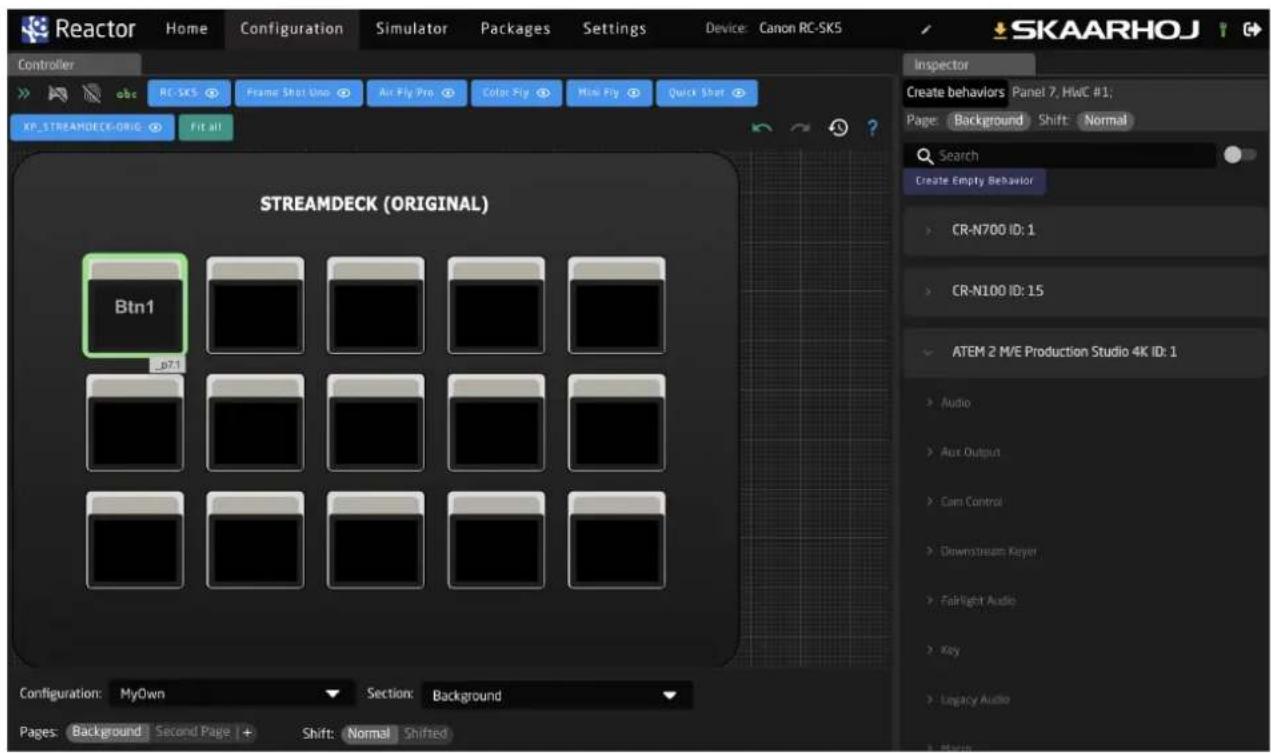
Incorporating a device like the Stream Deck panel, for instance, would result in it being displayed on the Home screen.

Within the Configuration tab, this custom setup adheres to the familiar page and shift-level paradigm, allowing for easy customization with just a single button click.
Important Information
Legal Notice
Attention:
The content and instructions of this document are subject to change without prior notice. Updates will be added to the manual.
Best effort have been conducted to verify the correctness of the content in this manual, but no statement, information, or recommendation in this manual shall constitute formal guarantee of any kind, expressed or implied. We shall not be held responsible for any technical or typographical error in this manual.
The product and graphic appearance demonstrated in this manual is for reference only, and may differ from the actual appearance of your device and associated software applications.
Use of this manual and the subsequent result shall be entirely on the user's own responsibility.
Reference to product names of other companies in this manual are the trademark or registered trademark of the respective companies.
Warnings
- If the product does not work properly, please contact your dealer. Never attempt to disassemble the controller yourself (we will not assume any responsibility for problems caused by unauthorized repair or maintenance)
- This installation should be made by a qualified service person and should conform to all the local codes
- When shipping, the controller should be packed in its original packaging
- Make sure the power supply voltage is correct before using the controller
- Do not drop the controller or subject it to physical shock
Maintenance Precautions
- If there is dust on the controller and the displays, remove the dust gently using a oil-free brush or dust blowing apparatus
- Do not use organic solvents, such as benzene or ethanol when cleaning the surface of the controller
Regulatory Compliance
For private households: Information on Disposal for Users of WEEE
This symbol on the product(s) and / or accompanying documents means that used electrical and electronic equipment (WEEE) should not be mixed with general household waste. For proper treatment, recovery and recycling, please take this product(s) to designated collection points where it will be accepted free of charge.
Alternatively, in some countries, you may be able to return your products to your local retailer upon purchase of an equivalent new product.

Disposing of this product correctly will help save valuable resources and prevent any potential negative effects on human health and the environment, which could otherwise arise from inappropriate waste handling.
Please contact your local authority for further details of your nearest designated collection point.
Penalties may be applicable for incorrect disposal of this waste, in accordance with you national legislation.
For professional users in the European Union
If you wish to discard electrical and electronic equipment (EEE), please contact your dealer or supplier for further information.
For disposal in countries outside of the European Union
This symbol is only valid in the European Union (EU). If you wish to discard this product please contact your local authorities or dealer and ask for the correct method of disposal.
- User Guide | January 2024
- Contents
- Introduction 4
- System Configuration 5
- Setup 5
- Customizing the Settings 15
- Simulator 18
- The Standard Config 19
- RC-SK5 & Frame Shot Pro 41
- RC-SK5 Pro License 49
- Important Information 58
- Introduction
- What's In the Box
- Overview
- System Configuration
- Setup
- Power
- Identifying the IP Address
- Logging into the RC-SK5 Web UI
- Update the Software
- Configurations
- Discovering Cameras
- Adding Cameras Manually
- Managing Cameras
- Manage Projects
- Customizing the Settings
- Undo
- More information
- Simulator
- The Standard Config
- Home Menu
- Exposure 1 Menu
- Exposure 2 Menu
- White Balance Menu
- Black 1 Menu
- Black 2 Menu
- Focus Menu
- Preset Menu
- Trace Menu
- Pan/Tilt Speed Menu
- Pan/Tilt Ramp and Zoom Menu
- Zoom Menu
- Various Menu
- Exposure D1 Menu
- Exposure D2 Menu
- Exposure D3 Menu
- Color Matrix 1 Menu
- Color Matrix 2 Menu
- Custom Picture Menu
- Image Quality Menu
- System Menu
- RC-SK5 & Frame Shot Pro
- Overview of Benefits
- Network Connected
- Visual Presets
- Functional Description
- Persistent Thumbnail Storage
- Side By Side
- Extended Camera Selector
- Customizing User Buttons
- RC-SK5 Pro License
- Control Any Camera and Device
- Preset Labels
- More Configurations
- Tally and Routing Triggers
- Advanced Customization
- SKAARHOJ Ecosystem
- Control Hub
- Software Applications
- Important Information
- Legal Notice
- Attention:
- Warnings
- Maintenance Precautions
- Regulatory Compliance
- For private households: Information on Disposal for Users of WEEE
- For professional users in the European Union
- For disposal in countries outside of the European Union
Brand : CANON
Model : SKAARHOJ RC-SK5
Category : Uncategorized