
BLSTKAG-WPB - Blender OSTER - Free user manual and instructions
Find the device manual for free BLSTKAG-WPB OSTER in PDF.


| Type of product | Blender |
| Brand | Oster |
| Model | BLSTKAG-WPB |
| Capacity | 48 oz (6 cups) |
| Jar material | Plastic (dison free) |
| Blade material | Stainless steel |
| Motor power | 700 watts |
| Voltage | 120 V |
| Frequency | 60 Hz |
| Speed settings | 2 speeds + pulse |
| Functions | Blend, ice crush, puree |
| Dishwasher safe parts | Jar and lid |
| Cord length | 2.5 ft (0.76 m) |
| Weight | 5.5 lbs (2.5 kg) |
| Dimensions (H x W x D) | 16 x 8 x 8 inches (40.6 x 20.3 x 20.3 cm) |
| Safety features | Safety lock lid |
| Warranty | 1 year limited |
| Included accessories | Recipe book |
| Color | Black and stainless steel |
| Cleaning instructions | Wipe base with damp cloth; jar and lid are dishwasher safe |
| Repairability | Replaceable jar assembly available |
Frequently Asked Questions - BLSTKAG-WPB OSTER
User questions about BLSTKAG-WPB OSTER
0 question about this device. Answer the ones you know or ask your own.
Ask a new question about this device
Download the instructions for your Blender in PDF format for free! Find your manual BLSTKAG-WPB - OSTER and take your electronic device back in hand. On this page are published all the documents necessary for the use of your device. BLSTKAG-WPB by OSTER.
USER MANUAL BLSTKAG-WPB OSTER
natural_image
Illustration of two Oster All-Metal Diving blisters with control knobs and buttons (no text or symbols on the devices themselves)MODELOS / MODELS
BLSTKAG-BPB, BLSTKAG-RPB,
BLSTKAG-WPB, BLSTKAP-BPB,
BLSTKAP-RPB, BLSTKAP-WPB,
BLSTKAG-BRD, BLSTKAG-RRD,
BLSTKAG-WRD, BLSTKAP-BRD,
BLSTKAP-RRD, BLSTKAP-WRD
READ ALL INSTRUCTIONS BEFORE USING THIS APPLIANCE
PRECAUCIONES IMPORTANTES
When using electrical appliances, basic safety precautions should always be followed to reduce the risk of fire, electric shock, and/or injury to persons including the following:
- Read all instructions before using this product.
- To protect against electric shock, do not place or immerse cord, plugs, or appliance in water or other liquid.
- This appliance is not intended for use by children or by persons with reduced physical, sensory, or mental capabilities, or lack of experience and knowledge. Close supervision is necessary when any appliance is used near children. Children should be supervised to ensure that they do not play with the appliance. Keep the appliance and its cord out of reach of children.
- Never leave appliance unattended when in use.
- Unplug from outlet when not in use, before putting on or taking off parts and before cleaning. Allow to cool before putting on or taking off parts, and before cleaning. To disconnect, turn any control to OFF, then unplug power cord from outlet. To unplug, grasp the plug and pull from the outlet. Never pull from the power cord.
- Avoid contacting moving parts.
- Do not operate any appliance with a damaged cord or plug or after the appliance malfunctions, or has been damaged in any manner. Do not attempt to replace or splice a damaged cord. Return appliance to the manufacturer (see warranty) for examination, repair or adjustment.
- For appliances with markings on plug blade: This appliance has important markings on the plug blade. The attachment plug or entire cordset (if plug is molded onto cord) is not suitable for replacement. If damaged, the appliance shall be replaced.
- The use of attachments, including canning jars, not recommended or sold by the manufacturer may cause fire, electric shock or injury.
- Do not use outdoors or for commercial purposes.
- Do not let cord hang over edge of table or counter, or touch hot surfaces, including the stove.
- Keep hands and utensils out of container while blending to reduce the risk of severe injury to persons or damage to the blender. A scraper may be used but must be used only when the blender is not running.
- Blades are sharp. Handle carefully, especially when removing the blades from the container, emptying the container and during cleaning.
- To reduce the risk of injury, never place cutter-assembly blades on base without jar properly attached.
- Always hold container while operating the appliance. If the container should turn when the motor is turned ON, switch appliance OFF immediately and tighten the container in the threaded bottom.
- Always operate blender with cover in place. Always wait until all moving parts have stopped before removing any lid or cover.
- When blending hot liquids, remove center piece of two-piece cover (if a two-piece cover is provided). Beware of steam. Do not blend boiling liquids.
- Do not use appliance for other than intended use. Misuse can cause injuries.
ENGLISH-1 ENGL
Always use appliance on a dry, stable, level surface. Never fill beyond the MAX fill line.
For containers with no lids or vents (when inserted in the blender), such as personal Blend and Go containers:
- Do not blend carbonated, hot or boiling liquids and ingredients, as this may create pressure buildup. Only blend non-carbonated liquids and ingredients that are at room temperature or cooler. If the container is warm to the touch, allow to cool before opening.
- Do not use the blender for longer than 1 minute at a time to avoid heat and pressure buildup. Allow to cool for 1 minute between cycles.
For appliances with food processor or food chopper attachments:
- Keep hands and utensils away from moving blades or discs while processing or chopping food to reduce the risk of severe injury to persons or damage to the food processor or chopper. A scraper may be used but must be used only when the food processor or chopper is not running.
- To reduce the risk of injury, never place cutting blade or discs on base without first putting container properly in place.
- Be certain cover is securely locked in place before operating appliance.
- For food processors: Never feed food by hand. Always use food pusher.
- Do not attempt to defeat the cover interlock mechanism.
SAVE THESE INSTRUCTIONS HOUSEHOLD USE ONLY
SPECIAL INSTRUCTIONS FOR POWER CORD
- A short power-supply cord is provided to reduce risk resulting from a person or pet becoming entangled in or tripping over a longer cord.
- An extension cord may be purchased and used if care is exercised in its use.
- If an extension cord is used, electrical rating of cord must be at least equal or greater than electrical rating of appliance. Extension cord should be arranged so that it will not drape over countertop or tabletop where it can be pulled on by children or tripped over unintentionally.
North American models with polarized plugs:
POLARIZED PLUG
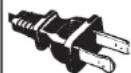
This appliance has a polarized plug, (one blade is wider than the other). As a safety feature to reduce the risk of electrical shock, this plug is intended to fit in a polarized outlet only one way. If the plug does not fit fully in the outlet, reverse the plug. If it still does not fit, contact a qualified electrician. Do not attempt to defeat
this safety feature or modify the plug in any way. If the plug fits loosely into the AC outlet or if the AC outlet feels warm do not use that outlet.

APPLIANCE DESCRIPTION ASSEN
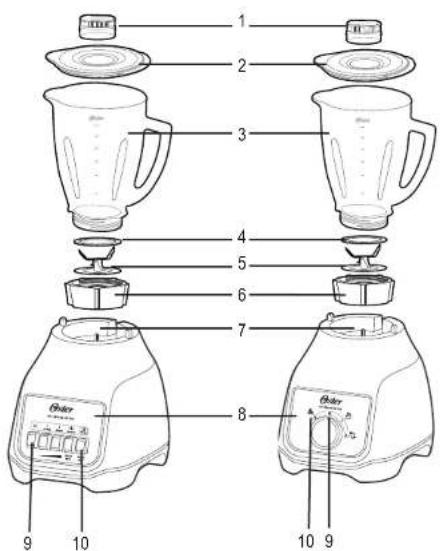
- Filler cap
- Spill-proof lid
- Jar – Your Oster ^® blender includes one of the following:
• Durable dishwasher-safe glass jar with 6-cup capacity - Shatter-resistant plastic jar with 5-cup capacity
- Leak-proof sealing ring
-
Ice-crushing blade pulverizes ice for smooth frozen drinks
-
Threaded bottom cap
- Powerful motor with exclusive All-Metal Drive® system for increased durability
- Control Panel – Your Oster ^® blender includes one of the following:
- Push Button Control Panel (2 speeds with high and low pulse)
• Rotary Dial Control Panel (2 speeds + pulse)
-
On/Off Button
-
Pulse Button
[NGGLISH] 3 [NGL
YOUR BLENDER
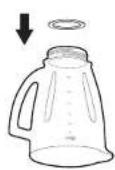
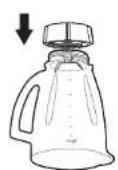
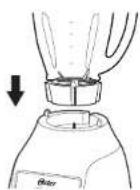
- Turn your jar upside down so smaller opening is facing up.
- Place sealing ring over small jar opening.
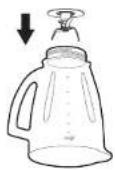
- Turn blade assembly upside down and place it over small jar opening.
- Tighten jar's threaded bottom cap.
ADJUSTING THE JAR
a. To adjust jar positioning, carefully place assembled jar into motor base, with handle and jar stopper in front of right break.
b. Using jar handle, turn jar to the left as much as possible. This will ensure bottom of jar is properly adjusted.
c. To operate blender, place assembled jar into motor base with jar stopper against flat side of motor base break. If jar stopper is not against flat side of the right break, lift jar and replace stopper against flat side of the left break. Put jar firmly in place and operate blender.
d. To remove jar, lift it straight up. (If jar cannot be removed easily, gently twist it from side to side and lift it up; do not turn.) If bottom of jar cannot be released by hand, place assembled jar into motor base, with jar handle in front of the left side break. Using handle, turn jar to the right until bottom of jar is released. Do not attempt to place or remove jar from motor base while motor is running.
ALWAYS HOLD JAR WITH ONE HAND WHILE POWERING ON YOUR BLENDER!

HOW DOES YOUR OSTER® BLENDER WORK
Your OSTER ^® blender is a multiple-speed electrical appliance that operates at a wide range of speeds—from lowest to highest. This speed range makes food preparation interesting, quick, and easy.
In addition, your OSTER ^® blender has two different operation modes:
-
CONTINUOUS to blend, mix, and finely chop.
-
BLEND CONTROL CYCLE, used to grind chopped food, such as chopped vegetables, nuts or cheese. There are different ways to operate the BLEND CONTROL CYCLE, but they are all related to activating blender motor at intervals, alternating between on and off. During "on" position of cycle, food is ground and moved away from blades. During "off" position of cycle, food is replaced over blades to smooth out processing.
NOTE: One cycle includes operating blender for about 2 seconds and then allowing blades to come to a complete stop.
SPEED SELECTION
PULSE FUNCTION (T)
- Press and hold PULSE ( ) button for desired length of time.
- Release PULSE button and allow blades to stop. Repeat cycle as needed. NOTE: One cycle includes operating blender for about 2 seconds and then allowing blades to come to a complete stop.
ICE-CRUSHING FUNCTION

-
Press and hold ice-crushing function ( ) for desired length of time.
-
Release button and allow blades to stop. Repeat cycle as needed.
NOTE: One cycle includes operating blender for about 2 seconds and then allowing blades to come to a complete stop.
SPEED CHART
In the chart below, you will find a typical application, which will serve as a guide to use your blender. (Follow chart matching model/number of speeds of your blender.)
FOR MODELS WITH CONTROL PANEL WITH BUTTONS:
| 2 SPEEDS + HIGH & LOW PULSE | ||||
| SPEED | 1 | 2 | ||
| FUNCTION | SOUPS | JUICES SAL | SAS / LOW PULSE | ICE-CRUSHING / HIGH PULSE |
ENGLISH-5 ENGL
FOR MODELS WITH CONTROL PANEL WITH ROTARY DIAL:
| 2 SPEEDS + PULSE | |||
| SPEED | 1 | 2 | mean— |
| FUNCTION | SOUPS JUCES | ICE-CRUSHING/PULSE | |
BLENDING TIPS
- Always place liquids in jar first, unless recipe indicates otherwise.
- To crush ice: Crush 6 ice cubes or about 2 cups of ice at a time.
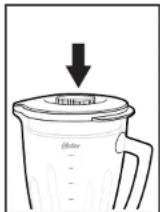
- Do not remove lid while appliance is running. Remove filler cap to add smaller ingredients.
- Cut all firm fruits and vegetables, cooked meats, fish and seafood into pieces of no more than 1/2 in. to 1 in. Cut all types of cheeses into pieces of no more than 1/2 in.
- This blender does not puree, does not whisk egg whites or egg substitutes for spreads, does not knead dough, and does not cut raw meats.
Be careful when pouring hot liquids into food processor or blender, as hot liquids may pop out of appliance due to a sudden burst of steam.
CARE AND MAINTENANCE
PLEASE NOTE: UNPLUG MOTOR BASE BEFORE CLEANING. NEVER IMMERSE BLENDER IN WATER OR ANY OTHER LIQUID. Wash blender's outside surface with a damp, soft sponge using mild soap. All parts, except motor base, may be washed in dishwasher. Pull apart sealing ring and threaded bottom cap to clean. Hold sealing ring with both hands and pull down over threaded bottom cap using both your thumbs. Sealing ring and threaded bottom cap may be washed in dishwasher top rack ONLY.
You may also wash all parts with warm soapy water.
STORING YOUR APPLIANCE
After cleaning, reassemble jar with blade, sealing ring and threaded bottom cap. Store blender leaving a gap between lid and jar to prevent container odors.
Oster®
The following information is for Mexico only.
LICUADORA OSTER®
MODELOS: BLSTKAG-BPB, BLSTKAG-BPB-013, BLSTKAG-RPB, BLSTKAG-RPB-013, BLSTKAG-WPB, BLSTKAG-WPB-013, BLSTKAP-BPB, BLSTKAP-BPB-013, BLSTKAP-RPB, BLSTKAP-RPB-013, BLSTKAP-WPB, BLSTKAP-WPB-013, BLSTKAG-BRD, BLSTKAG-BRD-013, BLSTKAG-RRD, BLSTKAG-RRD-013, BLSTKAG-WRD, BLSTKAG-WRD-013, BLSTKAP-BRD, BLSTKAP-BRD-013, BLSTKAP-RRD, BLSTKAP-RRD-013, BLSTKAP-WRD, BLSTKAP-WRD-013
© 2020 Sunbeam Products, Inc. All rights reserved. One year limited warranty. Please see details in the insert.
www.oster.com
OSTERLATINO

YouTube


P.N. 200441
GCDS-OST811225-LD
- PRECAUCIONES IMPORTANTES
- For containers with no lids or vents (when inserted in the blender), such as personal Blend and Go containers:
- For appliances with food processor or food chopper attachments:
- SAVE THESE INSTRUCTIONS HOUSEHOLD USE ONLY
- SPECIAL INSTRUCTIONS FOR POWER CORD
- North American models with polarized plugs:
- POLARIZED PLUG
- APPLIANCE DESCRIPTION ASSEN
- [NGGLISH] 3 [NGL
- YOUR BLENDER
- ADJUSTING THE JAR
- ALWAYS HOLD JAR WITH ONE HAND WHILE POWERING ON YOUR BLENDER!
- HOW DOES YOUR OSTER® BLENDER WORK
- SPEED SELECTION
- PULSE FUNCTION (T)
- ICE-CRUSHING FUNCTION
- SPEED CHART
- BLENDING TIPS
- CARE AND MAINTENANCE
- STORING YOUR APPLIANCE
- Oster®
Brand : OSTER
Model : BLSTKAG-WPB
Category : Blender