
SupraSafe 2HS - Safe KIDDE - Free user manual and instructions
Find the device manual for free SupraSafe 2HS KIDDE in PDF.


| Product Type | Fire Safe |
| Model | SupraSafe 2HS |
| Brand | Kidde |
| Exterior Dimensions (H x W x D) | 13.0 x 10.0 x 10.0 inches |
| Interior Dimensions (H x W x D) | 11.0 x 8.0 x 8.0 inches |
| Weight | 15.0 lbs (6.8 kg) |
| Capacity | 0.5 cubic feet |
| Construction Material | Heavy-gauge steel |
| Lock Type | Electronic keypad with backup key |
| Power Supply | 4 AA batteries (not included) for electronic lock |
| Fire Rating | 1 hour at 1700°F (927°C) |
| Water Resistance | Not rated |
| Color | Black textured finish |
| Mounting Options | Pre-drilled anchor holes (hardware included) |
| Interior Features | Removable shelf, carpeted floor |
| Door Construction | Tri-bolt locking system |
| Maintenance | Wipe with damp cloth; avoid harsh chemicals |
| Repair and Spare Parts | Contact Kidde customer service for replacement keys or electronic modules |
| Warranty | Limited lifetime warranty |
Frequently Asked Questions - SupraSafe 2HS KIDDE
User questions about SupraSafe 2HS KIDDE
0 question about this device. Answer the ones you know or ask your own.
Ask a new question about this device
Download the instructions for your Safe in PDF format for free! Find your manual SupraSafe 2HS - KIDDE and take your electronic device back in hand. On this page are published all the documents necessary for the use of your device. SupraSafe 2HS by KIDDE.
USER MANUAL SupraSafe 2HS KIDDE
Installation Instructions
Introduction
Your SupraSafe is the latest in Rapid Entry key control. To fully utilize it's built-in security features, we recommend that reasonable care be given to the location and method of mounting.
The vault is coated with a tough, baked polyurethane finish, which is resistant to the harshest environmental abuse; however, it is always best to locate the vault in an area which is sheltered from excessive moisture and possible mechanical damage.
Important! Contact your local fire department for specific mounting location and instructions.
Installation for Supra-Max, SupraSafe 1, SupraSafe 2HS/2HSR, and Supra-Safe 2HS/TS-Vault
- Mount the vault so that the moisture drain hole is on the bottom.
- Use a level to plumb the vault square.
- Four 5/16-inch lag bolts have been provided for surface mounting the vault.
Important! When installing the vault, do not over-tighten the four mounting bolts as this may distort the outside shell of the vault.
-
To secure the vault to a masonry/brick wall, it is necessary to use the anchors provided with the 5/16 lag bolts mounting kit. Drill a 1/2" hole approximately 1-3/4" deep into the masonry/brick wall. It is recommended to use a carbide/masonry bit to prevent cracking or shattering. Gently pound the anchor into the hole with a hammer so that it is flush with the wall. Secure vault to the wall.
-
Caulk between the vault and the wall for better waterproofing.
-
Please contact your fire department to install the lid once the vault has been installed.
- We strongly recommend the wiring of the tamper switch be performed by a qualified alarm installer or licensed electrician. The circuit shall conform to NEC class 2 or 3, or UL class 634 standards. In no case shall the wiring supply more than 30 volts at 50 ma. Consult local codes and ordinances prior to installations.
Figure 1. Side View of Mounted Vault
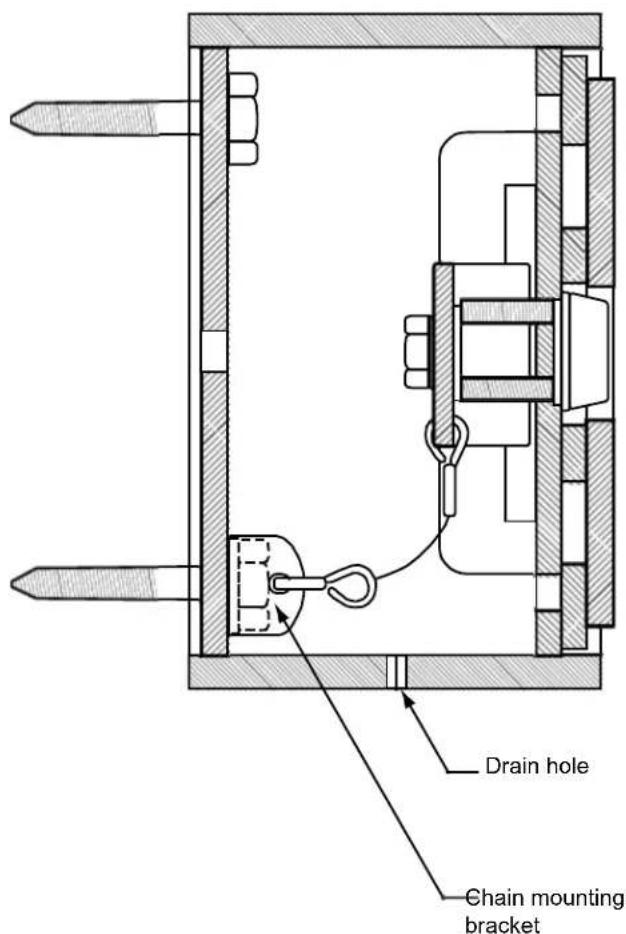
Instructions for SupraSafe 2HSR and SupraSafe 2HSR/TS Vaults
The SupraSafe 2HSR and SupraSafe 2HSR/TS vaults are designed to be recessed into a wall for attractive flush mounting. These units can be adapted to fit a variety of hollow wall situations or can be installed in a sold concrete wall which has been cored to a six inch diameter. For concrete or masonry walls in new construction, we recommend the use of our Cast-in-Place Mounting Kit described below.
With the SupraSafe 2HSR/TS, removal of the tamper switch is not necessary during installation. The alarm wiring to the tamper switch should be pulled tight so that any attempt to force the vault out of the wall will break the wire or pull terminals loose. Push-On type terminals are supplied for connection to tamper switch. Tamper switch can be connected for either open or closed circuits.
Cast-in-Place Mounting Kit (P/N: 454000)
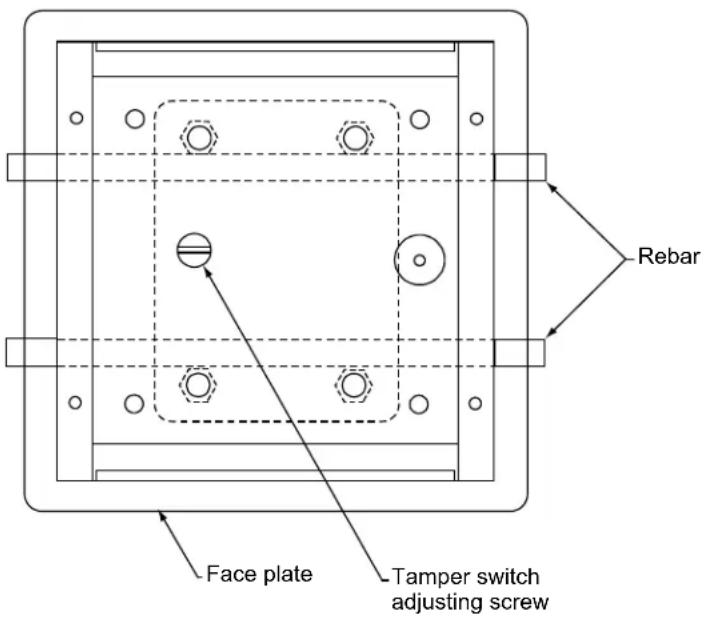
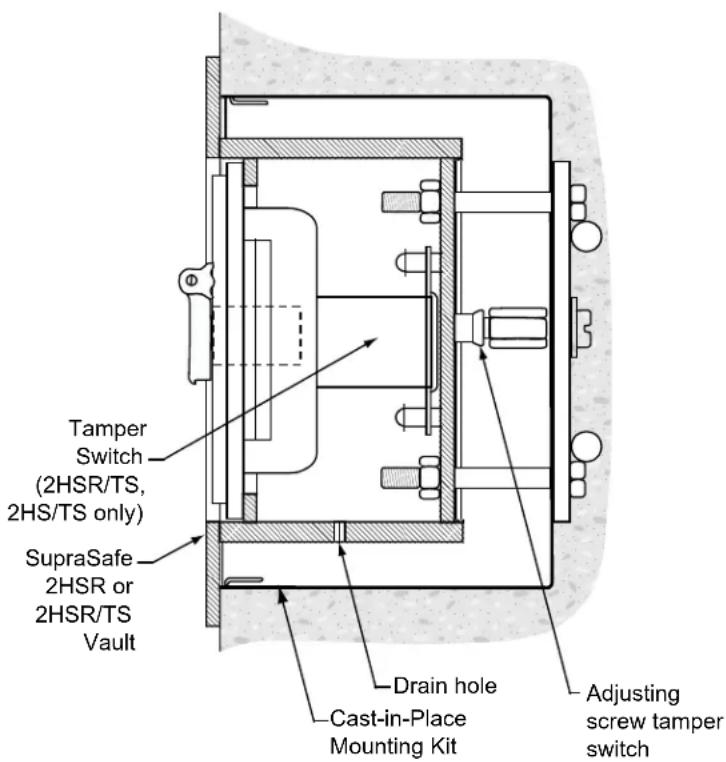
The Cast-in-Place Mounting kit is used only with the SupraSafe 2HSR and SupraSafe 2HSR/TS vaults. The kit contains a shell housing and mounting hardware to be cast in place in new masonry or concrete construction. After construction is completed, the vault mounts inside the recessed shell housing so that the small moisture drain hole is on the bottom.
Installation
The mounting kit may be fastened to the inside wall of a concrete form or set in place during construction of a masonry wall. Wiring conduit may be connected through one of several knockout holes in shell housing. The orientation of the mounting kit requires that the rebar on the backplate be horizontal. Mount the housing shell to the backplate so that the tamper switch adjustment screw is on the left side of the housing.
Important! Care should be taken to insure that the front of the shell housing, including the cover plate and screw heads, is flush with finish wall. Shell housing should be plumbed with a level. Leave cover and screws in place until vault is ready to be mounted inside.
Four mounting studs are provided for securing the vault and chain-lid assembly within the housing shell.
-
Place vault in housing shell of mounting kit so that the vault's small moisture drain hole is on the bottom. Align the tamper switch of the vault with the tamper switch adjustment screw of the housing shell. The tamper switch adjustment screw has a slotted head to adjust for proper switch operation.
-
Install washers and nuts onto the two top mounting
studs within the vault. Do not over-tighten mounting nuts as this may distort outside flange.
-
Slip the chain mounting bracket (attached to the chain-lid assembly) over the lower right-hand stud prior to installing the bottom washers and nuts in the vault. This will permanently attach the lid to the vault.
-
Please contact your fire department to install the lid once the vault has been installed.
Figure 2. Cast-in-Place Mounting Kit and Side View of Installation
- Installation Instructions
- Introduction
- Installation for Supra-Max, SupraSafe 1, SupraSafe 2HS/2HSR, and Supra-Safe 2HS/TS-Vault
- Important! When installing the vault, do not over-tighten the four mounting bolts as this may distort the outside shell of the vault.
- Instructions for SupraSafe 2HSR and SupraSafe 2HSR/TS Vaults
- Cast-in-Place Mounting Kit (P/N: 454000)
- Installation
Brand : KIDDE
Model : SupraSafe 2HS
Category : Safe