MAC007 - Oven MISTRAL - Free user manual and instructions
Find the device manual for free MAC007 MISTRAL in PDF.


| Product Type | Built-in electric oven |
| Brand | Mistral |
| Model | MAC007 |
| Installation | Built-in under counter or in column |
| Energy Source | Electric |
| Energy Efficiency Class | A (estimated) |
| Oven Capacity | 71 liters (estimated) |
| Dimensions (H x W x D) | 595 x 595 x 550 mm (estimated) |
| Weight | 30 kg (estimated) |
| Power Rating | 2.5 kW (estimated) |
| Voltage | 220-240 V ~ 50 Hz (estimated) |
| Cooking Functions | Conventional, fan-assisted, grill, defrost |
| Temperature Range | 50°C - 250°C (estimated) |
| Control Type | Electronic with digital display (estimated) |
| Timer | Minute minder and auto shut-off (estimated) |
| Interior Light | Yes (estimated) |
| Cleaning | Enamel interior, easy clean (estimated) |
| Safety Features | Child lock, cool touch door, automatic shut-off (estimated) |
| Spare Parts | Available through Mistral service centers (estimated) |
| Reparability | Repairable by qualified technicians; spare parts stocked (estimated) |
Frequently Asked Questions - MAC007 MISTRAL
User questions about MAC007 MISTRAL
0 question about this device. Answer the ones you know or ask your own.
Ask a new question about this device
Download the instructions for your Oven in PDF format for free! Find your manual MAC007 - MISTRAL and take your electronic device back in hand. On this page are published all the documents necessary for the use of your device. MAC007 by MISTRAL.
USER MANUAL MAC007 MISTRAL
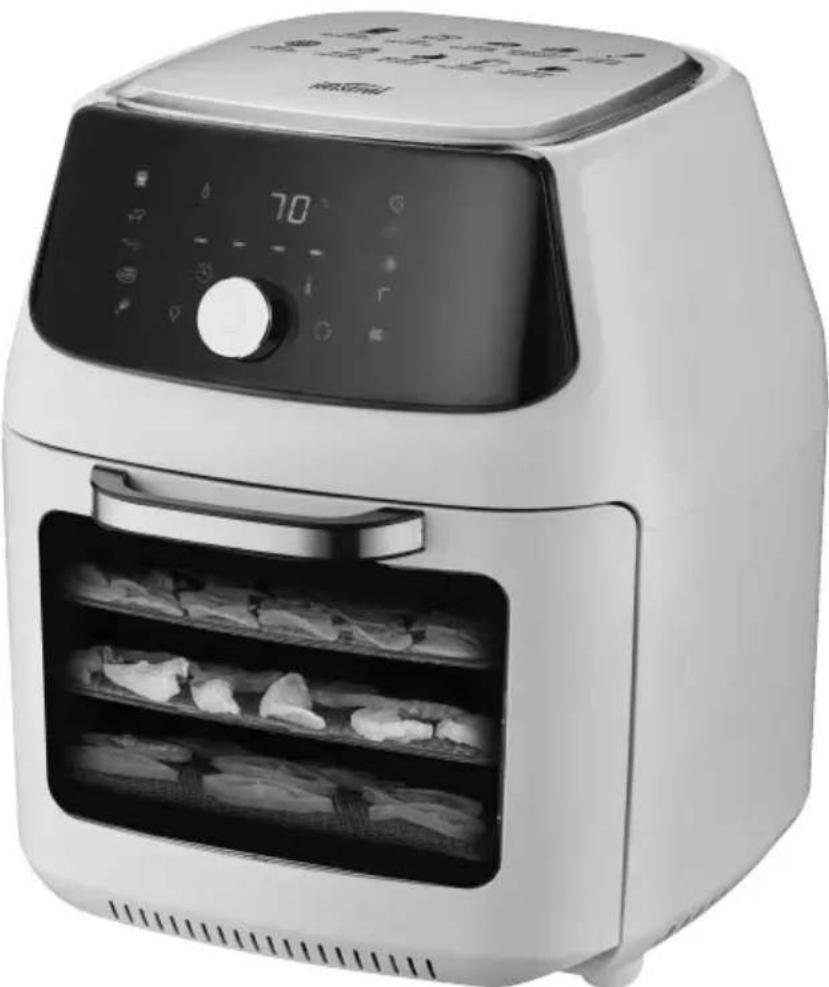
16 Litre Multi-function Digital Airfryer Oven
natural_image
White air fryer with digital display and open storage shelves (no visible text or symbols)Instruction Manual
Model: MAC007
Important Safeguards
When using this electrical appliance, the following basic safety precautions should always be followed:
For Your Safety
- Voltage: Make sure your outlet voltage and circuit frequency correspond to the voltage stated on the appliance rating label. If it does not match, contact our after sales support line and do not use the appliance.
- Connection: Insert the plug properly into an earthed mains socket. Make sure the socket is within easy reach so the plug can easily be removed if necessary.
- Electrical circuit: To avoid an electrical circuit overload do not use a high wattage appliance on the same circuit with the Airfryer Oven.
- Do not immerse: To protect against electric shock, do not immerse the cord, plug or the electric base in water or other liquid. If the base is accidentally immersed, immediately unplug the power plug, dry the appliance and have it checked by qualified service personnel.
- Protect from moisture: Do not expose the electrical connections to water. Do not use the appliance, or touch the plug, with wet or damp hands, on a damp floor or when the electric base is wet.
- Power cord: A short power supply cord is provided to reduce the hazards resulting from becoming entangled in or tripping over a longer cord. However, if an extension cord must be used, make sure its marked electrical rating is the same as the product. Arrange the extended cord so it will not drape over the table or benchtop where it can be pulled on or tripped over accidentally. Do not kink, bend, squash, strain or damage the power cord and protect it from sharp edges and heat. Do not let the cord hang over the edge of a table or benchtop, or touch hot surfaces.
- Damage: Check the power cord regularly for visible damage. If it is damaged, it must be replaced by the manufacturer, its authorised service centres or similarly qualified personnel in order to avoid any hazards. Do not pick up or operate an appliance with a damaged cord or plug, or after the appliance malfunctions or has been dropped or damaged in any manner.
In case of damage, call our after sales support line for advice on repair or return of the damaged product.
- Unattended: Do not leave the appliance unattended when plugged in.
- After use: Unplug the appliance after use. Wait until it has cooled completely before attempting to move or clean it.
- Disconnect: Always unplug the power cord when the appliance is not in use. When unplugging the appliance, grip by the plug, do not pull by the cord.
- RCD: Unless your home is already fitted with a residual current device (safety switch), we recommend installing an RCD with a rated residual operating current not exceeding 30mA to provide additional safety protection when using electrical appliances. See your electrician for professional advice.
Caution: Hot Surfaces!
- The Airfryer Oven and accessories will become very hot during use. Do not come into contact with heated parts while or after using the Airfryer Oven! Only touch the handles and control knobs while the Airfryer Oven is in operation or immediately after it has been switched off. The appliance needs approximately 30 minutes to cool down. Wait until the Airfryer Oven has cooled down fully before it is transported, cleaned or stored away. Use oven gloves and the rotisserie removal tool if necessary when handling the hot accessories.
- Open the door! Take care when opening the door! There is a danger of scalding from hot steam.
- Free space: Do not place the appliance against a wall or against other appliances. Hot air up to 160 Degrees expels through the rear vent of the appliance.
Leave at least 10cm clearance around the entire appliance, including directly above it. Additional care should be taking when placing appliances on bench top surfaces or near splash backs where such materials (Acrylics, timber etc.) do not have the high heat resistant properties, so advise to place them on top of a heat resistant material between bench and appliance and further away from wall surfaces / splash backs.
- Safe distance: During hot air frying, hot steam is released through the air outlet openings. Keep your hands and face at a safe distance from the steam and form the air outlet openings.
Usage Conditions and Restrictions
- Indoor domestic use only: This appliance is intended for indoor domestic use only. Do not use it outdoors.
- Intended purpose: This Airfryer Oven works with hot air and is not a conventional Cooker that is filled with oil or deep-frying fat. It is suitable for frying, baking, grilling, dehydrating, keeping warm or de-frosting food. It generally works like a convection fan oven. It is not intended for use with any non-food materials or products. Do not use the appliance for anything other than its intended purpose, and only use it as described in this manual.
Any other use may cause fire, electric shock or injury.
- Accessories: Do not use accessories not supplied with this product. Improper use or installation may result in the risk of fire, electric shock or injury.
- Usage restrictions: This appliance is not intended for use by persons (including children) with reduced physical, sensory or mental capabilities, or lack of experience and knowledge, unless they have been given supervision or instruction concerning the use of the appliance by a person responsible for their safety.
- Children: Supervise children to ensure they do not play with the appliance. Close supervision is necessary when any appliance is used by or near children.
- Location: To ensure efficient operation and avoid overturning, always place the appliance on a level and stable work surface.
- Protect from heat: Do not place the appliance on or near a hot gas or electric burner, or near a heated oven.
- Do not pour any liquids (e.g. oil or water) directly into the Airfryer Oven or the rotating mesh basket or place a liquid filled vessel into the Airfryer Oven. It works exclusively with hot air.
- CAUTION: Never use the open door as a deposit surface, e.g. for the rotating basket! Hot accessories could damage the door. In addition, the Airfryer Oven could tip over and present a risk of injury.
-
CAUTION: The Airfryer Oven must always be disconnected from the mains power when it is left unattended and before transporting, assembling, disassembling and cleaning the Airfryer Oven.
-
WARNING: Do not make any modifications to the Airfryer Oven. Also do not replace the connecting cable yourself. If the Airfryer Oven, the connecting cable or the accessories of the Airfryer Oven are damaged, they must be replaced by the manufacturer, customer service department or a specialist workshop in order to avoid any hazards.
- CAUTION: The Airfryer Oven is not designed to be operated with an external timer or a separate remote control system.
- CAUTION: Note the cleaning instructions in the "Care and Cleaning" chapter!
- Liability: We accept no liability for any damages or injury caused by improper use, incorrect handling or noncompliance with these instructions.
- Plastic bags and films: Keep children and animals away from plastic bags and films. There is a danger of suffocation.
- Thunderstorm: Remove the mains plug if a fault occurs during operation or before a thunderstorm.
- Check the Airfryer Oven: Always check the Airfryer Oven for damage before putting it into operation. The Airfryer Oven should only be used when it is fully assembled, undamaged, and in working order!
- Place the Airfryer Oven: Always place the Airfryer Oven on a dry, even, firm and heat resistant surface. Never place the Airfryer Oven on a soft surface. Do not cover the air inlet or the air outlet when the appliance is working. Otherwise it could overheat and be damaged. Do not place the Airfryer Oven on or next to heat sources such as hobs or ovens. Keep naked flames, e.g. burning candles, away from the Airfryer Oven and the connecting cable. Do not expose the Airfryer Oven to extreme temperatures, persistent moisture, direct sun-light or impacts. Keep the Airfryer Oven in a dry place at temperatures of between 0 and 40°C.
- Objects: Never place objects on the Airfryer Oven.
- Parts the manufacturer: Use only original spare parts from the manufacturer. If accessory parts which are not authorised by the manufacturer are used, all warranty and guarantee claims are void.
- WARNING: Do not use the Airfryer Oven if it has malfunctioned, fallen or been dropped in water. Have it checked in a specialist workshop before using it again.
- WARNING: Forks, Skewers and other metal parts with this unit are sharp and will get extremely hot during use. Great care should be taken to avoid personal injury. Wear protective oven mitts or gloves.
Warning ⚠
- Do not use the Airfryer Oven in rooms containing easily ignitable or explosive substances.
- Do not operate the Airfryer Oven in the vicinity of combustible material. Do not place any combustible materials (e.g. cardboard, paper or plastic) on or in the Airfryer Oven.
- Do not connect the Airfryer Oven along with other consumer appliances (with a high wattage) to a multiple outlet power board or adaptors in order to prevent overloading and a possible short circuit (fire).
- Do not insert anything into the ventilation openings of the Airfryer Oven and make sure that these do not become clogged.
- Make sure that foodstuffs containing oil and fats are not overheated. Do not place any vessels filled with oil or other liquids into the Airfryer Oven.
- Do not cover the Airfryer Oven during operation in order to prevent it from catching fire.
- In the event of a fire: Do not extinguish with water! Smother the flames with a fire blanket or a suitable fire extinguisher.
Save These Instructions
THIS APPLIANCE IS DESIGNED FOR HOUSEHOLD USE ONLY
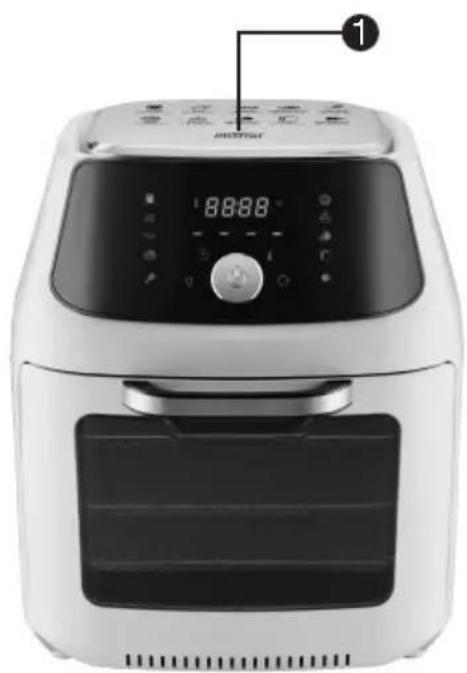
Features of Your Digital Airfryer Oven
natural_image
Front view of a white air fryer with digital display and control panel (no visible text or symbols)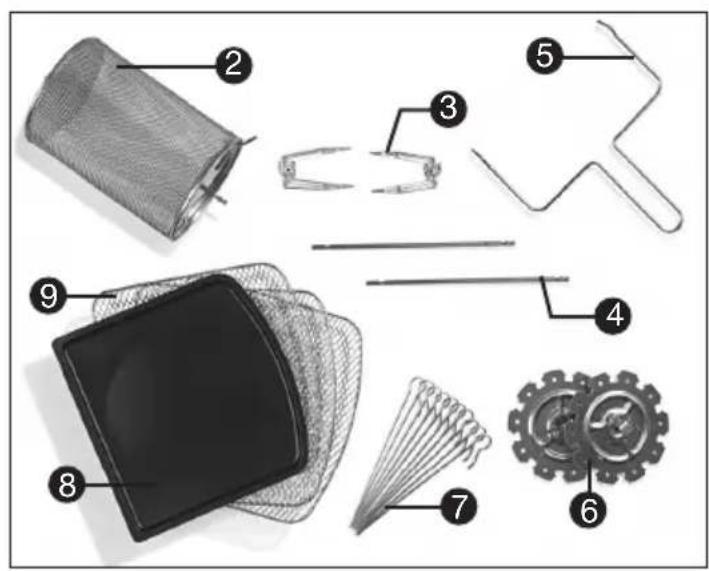
natural_image
Technical line drawing of a car intake manifold showing internal structure and mesh pattern (no text or symbols)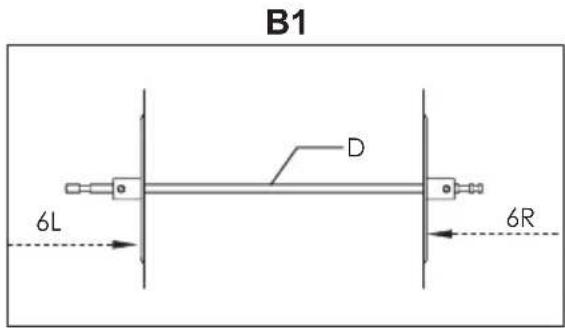
B2
natural_image
Technical line drawing of an electric motor assembly with two circular insets showing internal components (no text or labels)B3
natural_image
Technical line drawing of an air fryer with internal components, showing internal structure and a magnified inset (no text or symbols)B4
natural_image
Line drawing of an air fryer with internal components and a magnified inset showing the interior structure (no text or symbols)C1
C2
natural_image
Technical line drawing of a mechanical linkage or clamping mechanism (no text or symbols)E
natural_image
Hand pulling a cylindrical container with a connecting wire, showing internal components (no text or symbols visible)D
natural_image
Illustration of a cylindrical device with internal components and directional arrows indicating rotation (no text or symbols)Main Unit
(See page 5 for illustrations)
1 Main Unit (1x)
2 Rotating Mesh Basket (1x)
3 Rotating Rotisserie Fork with Locking Screws (2x)
4 Shafts (of the rotating rotisserie fork or rotating rotisserie skewers) (2x)
5 Rotisserie Removal Tool (1x)
6 Rack Wheels with Locking Screws (for Rotating Rotisserie Skewers) (2x)
7 Rotating Rotisserie Skewers (10x)
8 Oil Drip Tray (1x)
9 Air Flow Racks (3x)
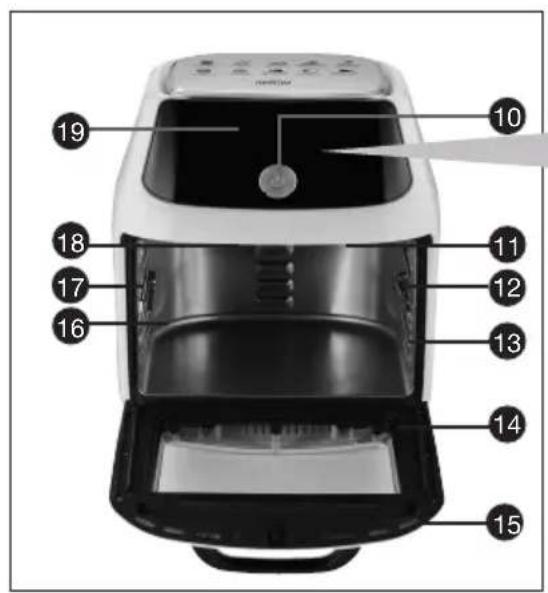
10 START/STOP Button (START/STOP Button for Setting the Temperature & Time)
11 Interior Light (not shown)
12 Support for the Shaft & Rotating Mesh Basket (right)
13 Rails
14 Removable inner glass assembly
15 Door
16 Cooking Space
17 Holder for the Shaft & Rotating Mesh Basket (left)
18 Heating Element (not shown)
19 Control Panel
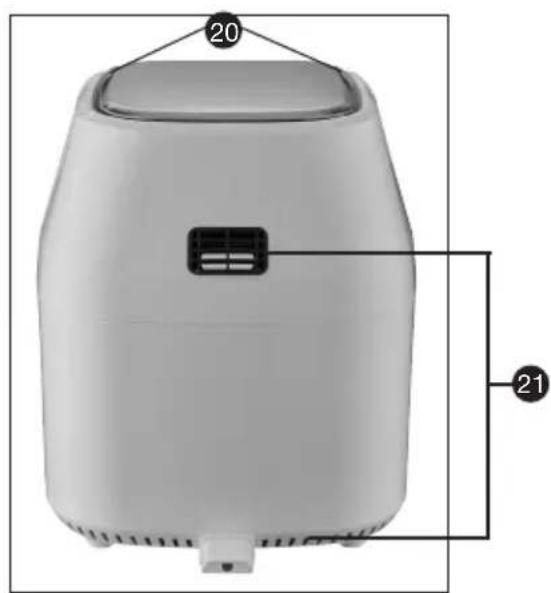
20 Air Inlet Slots
21 Air Outlet Openings
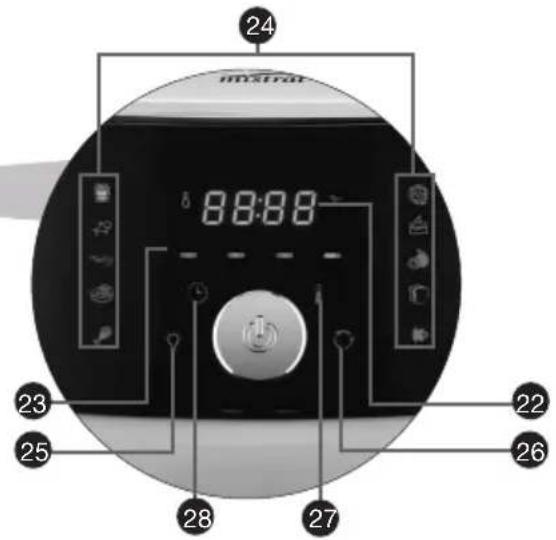
Control Panel
22 LED Display (alternating display of temperature & remaining cooking time during operation)
23 Operating Lamps (lighting up successively: Airfryer Oven is in operation; flashing: operation has been interrupted)
24 10 Programs
25 Switch the Light in the Airfryer Oven On/Off
26 Switch Rotating Function (for Rotating Mesh Basket, Rotating Rotisserie Spit) On/Off
27 Set the Cooking Temperature : press briefly and the temperature can be set with the START/STOP Button
28 Set the Cooking Time: press briefly, then set the cooking time with the START/STOP Button
Intended Use
- This Airfryer Oven works with hot air and is not a conventional Cooker that is filled with oil or deep-frying fat. It is suitable for frying, baking, grilling, dehydrating, keeping warm or defrosting food. It generally works like a convection fan oven.
- The Airfryer Oven is for personal domestic use only and is not intended for commercial applications.
- The Airfryer Oven should only be used as described in these instructions. Any other use is deemed to be improper. Incorrect operation and incorrect handling may cause faults with the Airfryer Oven and cause injury to the user.
- The following are excluded from the warranty: all defects caused by improper handling, damage or unauthorised attempts at repair. The same applies to normal wear and tear.
Before Initial Use
- Check the items supplied for completeness (See page 5-6) and possible transport damage. If you find any damage, do not use the Airfryer Oven (!), but rather contact the customer service department.
- Remove any possible films, stickers or transport protection from the Airfryer Oven. Never remove the rating plate and any possible warnings!
- The Airfryer Oven should be used for the first time without any food in it as it may produce some smoke or odours due to coating residues. Allow the Airfryer Oven to heat up on the highest temperature setting for approx. 15 minutes without any food in it (see the "Using the Airfryer Oven" chapter).
- Thoroughly rinse all accessories. Follow the instructions in the "Care and Cleaning" chapter to do this.
Using the Accessories
(See page 5-6 for illustrations)
Oil Drip Tray
The oil drip tray (8) should always be inserted so that any dripping fat, crumbs or other food residues can be collected in it. Slide the tray right into the bottom of the cooking space (16) or onto the bottom rails.
Air Flow Racks
The air flow racks (9) are intended for dehydrating. However, they can also be used for crisping, warming up etc.
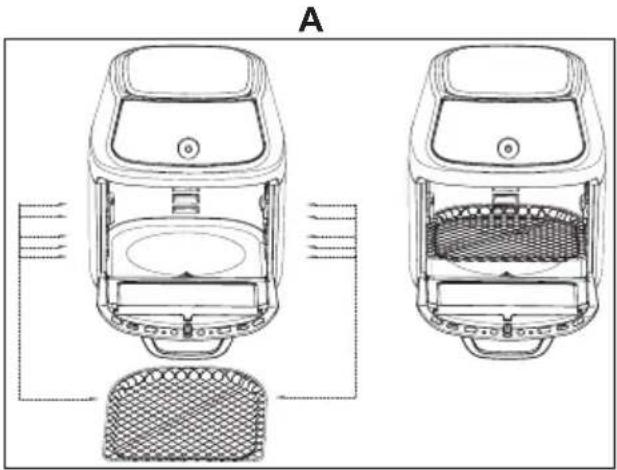
The air flow racks are slid onto the rails (13) in the cooking space (16) (see Illustration A).
The heating element (18) is located at the top of the cooking space, so the higher up a baking rack is placed, the more intense the heat is from above.
In the top section, the food is cooked faster and crispier. The middle position should be chosen to achieve even heating from all sides. The bottom rails are suitable for gentle cooking.
Rotating Rotisserie Skewers
Pieces of meat, fish, vegetables etc. are placed on the skewers (7) and grilled in the Airfryer Oven. The skewers can either be placed on the air flow racks (9) or inserted into the associated rack. In the rack, they are turned during grilling.
Assemble the rack for skewers and insert into the Airfryer Oven:
NOTE
The shaft (4) contains two small round notches. They mark the outermost position of the locking screws. These must not be attached any further than the outer ends of the shaft to ensure that smooth operation is possible.
Be careful when handling the skewers in order to prevent any injuries!
The rack and skewers will be hot and oven gloves must be used when handling.
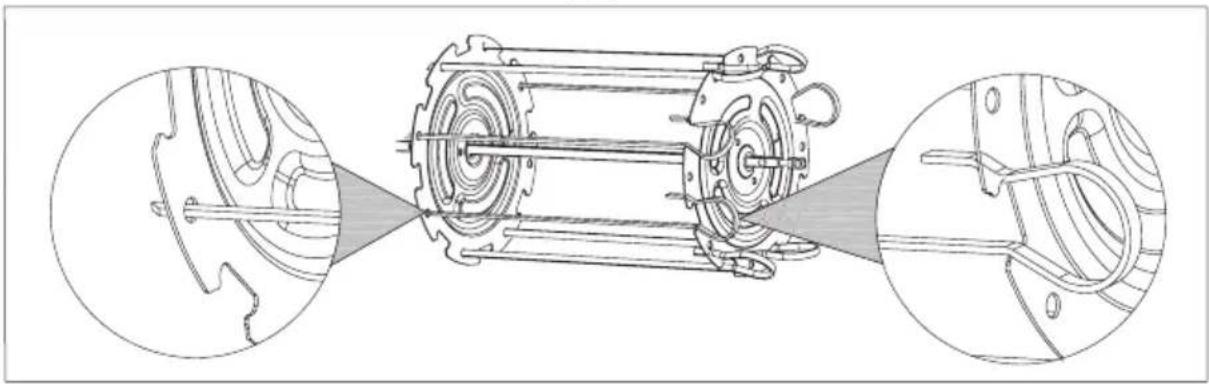
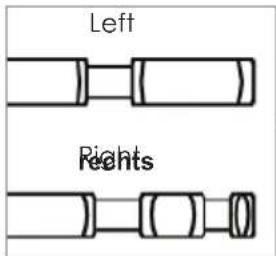
- Slide the rack wheel (6) with the L marking onto the left-hand end of the shaft with just one notch (see Illustration B1). The locking screw of the rack wheel is directed outwards.
- Fix the rack wheel gently with the locking screw. The shaft contains a small round notch for the tip of the locking screw. Do not tighten it too much so that the rack wheel can be moved if necessary after attaching the skewers.
- Mount the second rack wheel on the shaft in the same way (see Illustration B1).
- Place the tip of a skewer (with food on it) through the round hole in the lefthand rack wheel (see Illustration B2).
- Press together the other end (the clip) of the skewer slightly, slide it into the opposite notch in the right-hand rack wheel and allow it to engage (see Illustration B2).
- Fit the rest of the skewers in the same way so that they are distributed evenly in the rack (see Illustration B2).
- Tighten the locking screws of the rack wheels.
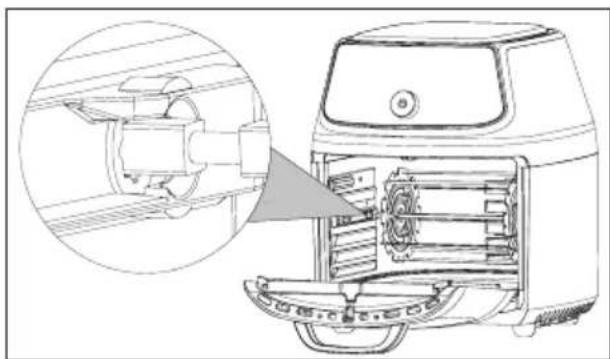
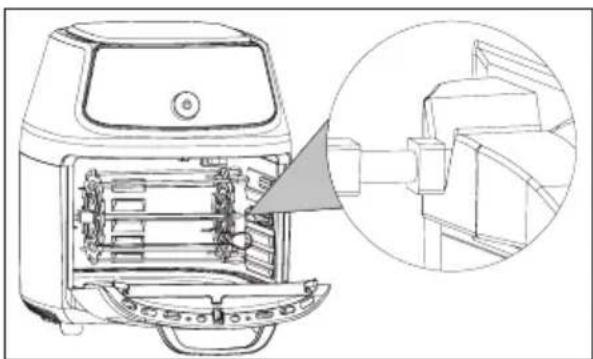
- Plug the left-hand end of the shaft as far as it will go into the round holder on the left-hand side of the cooking space (16) (see Illustration B3). Then hang the other end of the shaft into the support on the right-hand side of the cooking space (see Illustration B4).
- Check that it fits securely. The rack must not be able to rotate about its own axis while the Airfryer Oven is switched off. If this is not the case, plug the lefthand end of the shaft deeper into the holder.
After use, remove the rack from the cooking space using the rotisserie removal tool (5) (see the "Rotisserie Removal Tool" section).
To remove the skewers from the rack, press together the clips. It is essential that you use oven gloves to do this!
Rotating Rotisserie Fork
The rotating rotisserie fork consists of the shaft (4) and two rotating forks (3). It is suitable for grilling large pieces of meat, e.g. chicken, grilled or roast pork.
Assemble the rotating rotisserie fork and insert it into the Airfryer Oven:
NOTE
The shaft (4) contains two small round notches. They mark the outermost position of the locking screws. These must not be attached any further than the outer ends of the shaft to ensure that smooth operation is possible.
Be careful when handling the fork in order to prevent any injuries!
The fork will be hot and oven gloves must be used when handling.
- Slide one of the rotating forks onto the shaft and lock it with the locking screw. The shaft contains a small round notch for the tip of the locking screw. In the case of smaller pieces of food, the rotating forks can be secured more centrally on the shaft.
- Slide the items you want to grill onto the rotating fork.
- Slide the other rotating fork onto the shaft and lock it with the locking screw.
- Plug the left-hand end of the shaft with just one notch (see Illustration C1) as far as it will go into the round holder on the left-hand side of the cooking space (16). Then hang the other end of the shaft into the support on the right-hand side of the cooking space.
- Check that it fits securely. The rotating rotisserie fork must not be able to rotate about its own axis while the Airfryer Oven is switched off. If this is not the case, plug the left-hand end of the shaft deeper into the holder.
After use, remove the hot rotating rotisserie fork from the cooking space using the rotisserie removal tool (5) (see the "Rotisserie Removal Tool" section).
Always use oven gloves to remove the rotating forks and take off the grilled items.
Rotating Mesh Basket
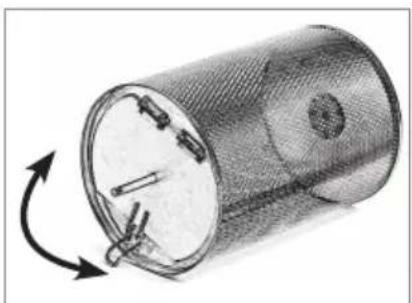
In the rotating mesh basket (2), the food is rotated during cooking so that it becomes crispy on all sides. The rotating mesh basket is particularly suitable for preparing chips or other potato products, small pieces of vegetables and meat as well as frozen products, e.g. chicken nuggets or squid rings.
Fill the rotating mesh basket and insert it into the Airfryer Oven:
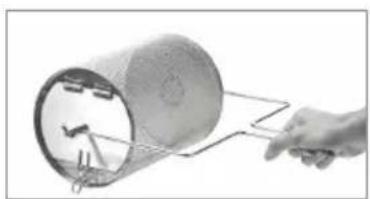
- Open the flap of the rotating mesh basket (see Illustration D).
- Fill the rotating mesh basket no more than 34 full with food. It should not be too full to ensure that the food is cooked evenly.
- Close the flap and ensure that it is shut correctly so that it does not open during use.
- First insert the left-hand side with the L marking of the rotating mesh basket into the cooking space (16) (see Illustration C1). To do this, plug the left end (with just one notch) of the shaft as far as it will go into the round holder on the left-hand side of the cooking space. Then hang the other end (with two notches) of the shaft into the support on the right-hand side of the cooking space.
- Check that it fits securely. The rotating mesh basket must not be able to rotate about its own axis when the Airfryer Oven is switched off. If this is not the case, plug the left-hand end of the shaft deeper into the holder.
After use, remove the hot rotating mesh basket from the cooking space using the rotisserie removal tool (see the "Rotisserie Removal Tool" section). Always use oven gloves to open and empty the rotating mesh basket.
Rotisserie Removal Tool
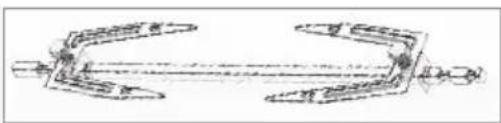
The rotating mesh basket, rotating rotisserie fork or the rack containing skewers is taken out of the cooking space using the removal tool (5).
- Place the ends of the rotisserie removal tool under the shaft (see Illustration E).
- First lift up the right-hand side of the shaft and move it forwards a little until the left end of the shaft is released from the holder.
- Carefully lift the rotating mesh basket, rotating rotisserie fork or the rack out of the cooking space (16) and place down on a heat-resistant surface.
Using the Airfryer Oven
NOTE
CAUTION – Danger of burns! All inserts will become extremely hot in the Airfryer Oven. It is essential to use oven gloves to remove them. Use the rotisserie removal tool for the rotating mesh basket, rotating spit and the rack for skewers.
Do not place food that is still packed in plastic wrap or plastic bags in the Airfryer Oven.
Only ever place down the hot accessories on a heat-resistant surface.
Make sure that the food that you would like to prepare does not come into contact with the heating element of the Airfryer Oven.
The door (15) of the Airfryer Oven must be closed for settings to be made and buttons to be pressed.
- Completely unwind the mains cable and plug the mains plug into a plug socket.
- Open the door (15). If the oil drip tray (8) is not to be used as a baking tray, slide it into the bottom of the cooking space (16).
- Select a suitable accessory for the food that is to be prepared (see the "Using the Accessories chapter).
- Process the food and place it on / in the accessory. Attach this accessory in the Airfryer Oven (see the "Using the Accessories" chapter).
- Close the door.
- Press the START/STOP button (10). The displays on the control panel (19) switch on.
- Either set the temperature and cooking time manually or select one of the 10 programmes.
Manual setting:
Touch the 8 button (27) briefly and then adjust the START / STOP button (10) to set the temperature to 65 °C To 200 °C (dehydration: 45-85 °C).
Touch the button (28) briefly and use the START / STOP button (10) to choose the cooking time from 1min to 60min (Dehydrate: 0.5-24h).
Choose a programme:
Touch the required programme symbol (24). When it flashes, the programme is activated. When the symbol is touched again, the selection is cancelled. The symbols represent the following presettings:
| Symbol | Programme | Temperature | Cooking time |
 | FRIES 200°C 20 min | ||
 | FISH 200°C 15 min | ||
 | SHRIMP 200°C 15 min | ||
 | STEAK / CUTLET 200°C 20 min | ||
 | CHICKEN 200°C 30 min | ||
 | PIZZA 170°C 20 min | ||
 | BAKING 160°C 25min | ||
 | DEHYDRATE 70°C 8 h (0.5 – 24 h) | ||
| To dry food is the best and effective way to store food.The dehydrate function ensures that it reduces the loss of food nutrients to maintain healthy foods. Dehydrate fruit and vegetables that are in season and store to enjoy throughout the year. | |||
 | TOAST 160°C 20 min | ||
 | ROTISSERIE(with automatic rotating function) | 200°C 35min | |
The temperatures and cooking times which are set for the programmes are merely averages and should be adjusted if necessary. As the ingredients differ due to their origin, size, shape, quality and brand, the actual cooking temperatures and times may vary.
To change the temperature or cooking time of a selected programme, touch the or button as you would for manual setting and use the START / STOP button (10) to set a value.
- Press the START/STOP button to switch on the Airfryer Oven. Successively illuminating operating lamps (23) indicate that the Airfryer Oven is operating. If operation is interrupted, they flash.
- If the rotating mesh basket, rotating spit or the rack for skewers is used, touch the button (26) to start the rotating function. Touching the button again will stop the rotating function.
Until you are properly familiar with the Airfryer Oven, the condition of the food should be checked in between times to ensure that it does not burn. To do this, switch on the light using the button (25) or open the door. When the door is opened, operation is interrupted automatically and the light switches on. Operation is resumed once the door is closed.
- Once the cooking time has elapsed, the Airfryer Oven switches off automatically and a beep is heard. If the Airfryer Oven is to be stopped prematurely, press the START/STOP button. To switch off the Airfryer Oven entirely, hold down the START/STOP button until the "OFF" displays on the control panel, the heating-up will stop immediately, and fan will automatically shut down after approximately 20 seconds.
- Carefully open the door and take the cooked items out of the Airfryer Oven. Only ever take out the rotating mesh basket, rotating spit or the rack for skewers using the rotisserie removal tool (5).
- Remove the mains plug from the plug socket after use.
- Allow the used accessories and Airfryer Oven to cool down and then clean them (see the "Care and Cleaning" chapter).
Automatic Switch-off
The appliance has a build in timer, it will automatically shut down the appliance when count down is completed and a beep is heard. If the Airfryer Oven is to be stopped prematurely, press the START/STOP button. To switch off the Airfryer Oven entirely, hold down the START/STOP button until the "OFF" displays on the control panel, the heating-up will stop immediately, and fan will automatically shut down after approximately 20 seconds.
Memory function
This Airfryer Oven has memory function, if you do not press the START/STOP button to stop the operation before opening the door or unplugging the plug, the machine will automatically continue the current cooking process once the door is closed again or the machine is turned on again.
NOTE You may open the Airfryer Oven door to view the rotisserie at any time during the process to check the progress. The appliance will stop working when the door is opened. It will resume cooking and the remaining time showing on the display after the door is closed.
Tips:
- Generally it is not necessary to preheat the Airfryer Oven. When preparing food which is to be ready "on the dot", it is advisable to extend the cooking time by 3 minutes.
- Cooking times are dependent on the size and quantity of the food and on the cooking temperature. However, in general the cooking times are shorter than in a conventional oven. Start with shorter cooking times and then adapt the cooking times to your personal taste.
- Generally no oil is required for preparing food. You can add oil to your food to enhance the taste by spraying your food with a little oil from the oil atomiser (not included).
- When preparing mass-produced frozen products, you should follow the times and temperatures specified by the manufacturer. Before the specified cooking time elapses, check whether the food is already cooked through because the cooking time can be slightly shorter than in a conventional oven.
Care and Cleaning
NOTE
Pull the mains plug out of the plug socket and allow the Airfryer Oven and accessories to cool down before doing any cleaning.
Surfaces could be damaged! Do not use any corrosive or abrasive cleaning agents or scouring sponges to clean the Airfryer Oven.
NOTE
The construction of the door assembly (15) allows for the removal of the internal Window pane (14) to facilitate cleaning to ensure a clear view of the cooking chamber.
The internal Window pane can be removed by opening the door, grasping the raised rim of the window pane and sliding it out of the recess.
After cleaning, the window pane must be slid back in the door recess, you will hear a click when it is locked into correct position.
DO NOT operate the appliance at anytime without this window pane in place.
WARNING
Do Not try to operate the unit without the inner glass assembly fixing back.
Clean the main unit (1) and the used accessories immediately after each use. Do not allow food residues to dry on.
- Do not immerse the main unit and door in water or other liquids! Do not place them in the dishwasher! Clean them with a damp cloth and, if necessary, a little detergent.
- Rinse all other used parts with detergent and warm water or in the dishwasher. In the case of stubborn dirt, we recommend soaking the accessories in warm water and detergent beforehand.
- Allow all parts to dry completely or dry them with a tea towel.
WARNING
Electric Shock Hazard!
Disconnect the power before cleaning the appliance.
Do not immerse the cord, plug or electric base in any liquid.
Failure to follow these instructions can result in death or electric shock.
Storage
- Before packing the Airfryer Oven away for storage, ensure it is unplugged from the power supply and has completely cooled down, is clean and dry.
• We recommend storing all parts of the appliance in the original carton, which will protect it from dust. - Store the Airfryer Oven in a clean and dry place, out of children's reach.
- Do not wrap the cord around the appliance during storage. Service and repair The unit has no user-serviceable parts contained within. Do not attempt to repair, disassemble or modify the appliance. If the appliance requires repair or service, contact our after sales support centre for advice.
IMPORTANT!
Trying to repair the appliance yourself, undertaking incorrect repairs or making modifications will expose you to considerable danger and will void the warranty.
Technical Specifications
Rated power input: 1800W
Voltage and frequency: 220-240V AC, 50Hz
Temperature settings: 65-200°C
(Dehydrate: 45-85°C)
Time settings: 1-60min (Dehydrate: 0.5-24h)
NOTE: As a result of continual improvements, the design and specifications of the product within may differ slightly to the unit illustrated on the packaging.
FAQs and Troubleshooting Guide
NOTE: Do not attempt to repair an electrical appliance yourself!
If the Airfryer Oven does not work properly, first check whether you are able to rectify the problem yourself. If the problem cannot be solved with the following steps, contact the customer service department.
| Problem | Possible Cause | Solution |
| The Airfryer Oven does not work. The displays on the control panel do not switch on. | The mains plug is not inserted correctly in the plug socket. | Push the mains plug into the plug socket as far as it will go. |
| The plug socket is defective. Try an | other plug socket. | |
| No mains voltage is present. Check | the fuse of the electrical distributor (fuse box). | |
| The overheating protection has been triggered. | Pull the mains plug out of the plug socket and allow the Airfryer Oven to cool down completely. Then try again. If the Airfryer Oven still cannot be switched on, contact the customer service department. | |
| The fuse in the electrical distributor (fuse box) is triggered. | Too many appliances connected to the same circuit. | Reduce the number of appliances in the circuit. |
| The food has not been cooked evenly. | Different items of food with different cooking times have been prepared at the same time. | Place food with a longer cooking time in the Airfryer Oven first, then add ingredients with a shorter cooking time later. |
| Items of food which require different cooking temperatures have been prepared at the same time. | Prepare items of food with different cooking temperatures one after the other. | |
| The food has not been cooked evenly. | The set cooking time was too short or the temperature too low. | Increase the cooking time or temperature. |
| The rotating mesh basket or baking | Reduce the amount of food. | |
| The items of food are piled on top of one another. | Spread the food and mix it | |
| The food is slightly burnt. | The selected temperature is too high or the cooking time too long. | Reduce the temperature or cooking time. |
| Chips made from fresh potatoes are not crispy. | The potatoes contain too much water. | Cut the potatoes into narrower pieces. Dab the potato pieces dry with some kitchen towel and then trickle a little cooking oil over them. |
| During use, an unpleasant smell is detected. | The Airfryer Oven is dirty. Follow the instructions in the “Care and Cleaning” chapter. | |
| The Airfryer Oven is being used for the first time. | A smell often develops when new appliances are first used. The smell should disappear once the appliance has been used several times. | |
Recipes
NOTE
Before you start preparing any food, it is essential to read the “Using the Accessories” and “Using the Airfryer Oven” chapters to familiarise yourself with the way that the Airfryer Oven works. This knowledge will then enable you to prepare lots of different dishes following any recipes you want.
The temperatures and cooking times specified in the following suggested recipes are guideline figures. As the ingredients differ due to their origin, size, shape and quality, the settings actually required may vary. It is important to check how the food is cooking from time to time and adjust the temperature or cooking time.
Apple Turnovers
Ingredients:
2 Apples
1 roll Puff pastry from the
50g Brown sugar
2 tbsp. Flour
2 tbsp. Lemon juice
To taste Cinnamon
Method:
- Peel the apples, remove the cores and cut them into small pieces.
- Mix together the pieces of apple, flour, sugar and lemon juice and add cinnamon to taste.
- Roll out the puff pastry and divide it into pastry squares with an edge approx. 10 cm long.
- Spread one tablespoon of the filling onto the pastry squares.
- Brush a little water onto the edge of the pastry and fold it up into triangles. Firmly press down the edge of the pastry.
- Spread the apple turnovers on the air flow racks.
- Insert the air flow racks into the Airfryer Oven in the middle position.
- Start the "Baking" programme.
- Before the cooking time elapses, check whether the apple turnovers are golden brown and take them out before the end of the cooking time if necessary. If the apple turnovers appear too light, extend the cooking time.
Banana Chips
Ingredients:
To taste Bananas
Method:
- Peel the bananas and cut them into slices 3 mm thick. The thinner they are, the faster they will dry.
- Spread the banana slices on the air flow racks.
- Insert the air flow racks into the Airfryer Oven.
- Start the "Dehydrate" programme and set the cooking time to 6 hours.
- Check from time to time whether the banana slices are dry. It has a toughened texture when dehydrated, but does not feel hard when they are done.

Crumbed Chicken Breast
Ingredients:
2 Chicken breast fillets
2 Egg white
12 cup Flour for breadcrumbs
12 cup Breadcrumbs
1 tsp. Salt
12 tsp. Pepper
Method:
- Separate off the egg white.
- Place the egg white, flour and breadcrumbs in three separate bowls.
- Chop each of the chicken breast fillets into strips of equal sizes.
- Season the chicken breast fillet strips with salt and pepper, roll in the flour, then dip them in egg white and roll in the breadcrumb coating.
- Place the chicken breast fillet strips on the air flow racks.
- Insert the air flow racks into the Airfryer Oven.
- Start the "Chicken" programme.
- Check in between times whether the chicken breast strips are cooked through and reduce or extend the cooking time if necessary.
Crumbed Prawns
Ingredients:
10 Large prawns (peeled and cleaned)
For the breadcrumb coating:
12 cup Flour
12 cup Breadcrumbs
2 Egg white
Method:
- Mix the ingredients together.
• Pour the flour into a separate bowl. - Separate off the egg white and pour it into another separate bowl.
- First roll the prawns in the flour, then dunk them in the egg white and then roll them in the breadcrumb coating.
- Spread the prawns on the air flow racks.
- Insert the air flow racks into the Airfryer Oven.
- Start the "Shrimp" programme.
- The prawns are ready for serving when they have developed a lovely golden brown colour. If the prawns are not yet cooked after the set time has elapsed, extend the cooking time.
Chips
Ingredients:
4 large Potatoes
1 - 2 tbsp. Cooking oil
To taste Salt
Method:
- Peel the potatoes and cut them into sticks of equal size.
- Thoroughly wash the potatoes and then dry them off.
- Add 1 – 2 tbsp. of oil to the potatoes and mix in. It is not essential to add oil. However, adding oil will make the chips crispier and give them a more intense flavour.
- Place the sliced potato chips into the rotating mesh basket.
- Insert the rotating mesh basket into the cooking space.
- Start the "Fies" programme.
- Press the button to activate the rotating function.
- The chips are cooked when they are golden brown. Reduce the temperature if necessary if the chips start to get too dark. If they are not cooked after the end of the programme, extend the cooking time and adjust the temperature if necessary.
Tips:
- Depending on how thick you cut your potatoes, you can vary between potato wedges and thick or thin chips. The thicker the potatoes are cut, the longer the cooking time.
- Use waxy potatoes. Young potatoes contain more water and therefore take longer to cook and it is possible that they may not go as crispy.
- Wash the chopped-up potatoes with cold, clear water to remove any excess starch in the potatoes. IMPORTANT: Then thoroughly dry the potatoes. The less moisture is present, the crispier the chips will become.
- Preboiled potatoes will cook more evenly! Cut the potatoes into small sticks and preboil them for around five minutes. This will prevent the chips from being crispy on the outside but not fully cooked on the inside.
- If you are going to prepare frozen chips or other frozen convenience products, follow the manufacturer's specifications on the packaging.
Flat Head Fillet with Garlic Herb Crust
Ingredients:
100g Flat head fillet
2 Egg white
2 Garlic clove
1 tbsp. Chopped basil
1 tsp. Paprika powder
To taste Sea salt, pepper
12 cup Breadcrumbs
Method:
- Peel the garlic and squeeze through a garlic press.
- Mix together the garlic, the rest of the herbs and breadcrumbs in a bowl.
- Separate off the egg white and pour it into a separate bowl.
- Dip the flat head fillet in egg white and then coat it in the garlic and herb breadcrumb coating.
- Place the flat head fillet on the air flow racks.
- Insert the air flow racks into the Airfryer Oven.
- Start the "Fish" programme.
- If the flat head fillet is not yet cooked, extend the cooking time if necessary.
Juicy Pork Cutlet
Ingredients:
4 Pork cutlet(s)
1 tbsp. Butter
2 Onion(s), cut into rings
3 tbsp. Sugar, brown
1 tsp. heaped Salt
1 tsp. level Pepper
2 tbsp. Vinegar
2 tbsp. Lemon juice
To taste Ground chilli flakes
1 pinch Cayenne pepper
2 tsp. Mustard
1 tsp. Paprika powder, smoked
1 1/2 cups Tomato sauce
1 tbsp. Worcester sauce
1 cup Water
Method:
- Place the cutlets on the air flow racks (oil drip tray).
- Mix together the lemon juice, vinegar, salt and pepper.
- Melt the butter in a small pan and fry off the onions in it.
- Add the sugar, allow it to caramelise a little and deglaze with the lemon juice mixture.
- Bring to the boil and pour over the cutlets.
- Stir together the tomato sauce with the water and the Worcester sauce. Mix together the rest of the spices thoroughly with the whisk.
• Pour this sauce over the cutlets.
- Slide the air flow racks onto the middle rail in the cooking space.
- Start the "Sleak/Cutlet" programme.
- If the cutlets are not covered by the sauce, pour the sauce over them from time to time.
- Check how cooked the food is shortly before the end of the programme.
Extend the cooking time if necessary.
Muffins Recipe to Make 10 Muffins
Ingredients:
70g Butter
170g Flour
1 pack Vanilla sugar
0.5 pack Baking powder
3 Eggs
120g Sugar
120ml Milk
10 Muffin moulds
Method:
- Beat the eggs to a froth in a bowl. Gradually add the sugar with the vanilla sugar. Add the butter cut into flakes. Whisk to a good froth until you can no longer see any butter flakes.
- Stir in the milk alternately with the flour and the baking powder.
- Pour the mixture into each of the muffin moulds up to half full.
- Spread the muffin moulds on the air flow racks.
- Insert the air flow racks into the Airfryer Oven in the middle / bottom position.
- Start the "Baking" programme.
- Before the cooking time elapses, check whether the muffins are cooked and take them out before the end of the cooking time if necessary.
Pepperoni Pizza
Ingredients:
1 Pizza dough, thin crust
3 tbsp. Pizza sauce
3/4 cup Mozzarella, shredded
12 slices Pepperoni
Method:
• Roll the pizza dough onto an air flow rack.
- Insert the air flow rack into the Airfryer Oven.
- Start the "Pizza" programme, set the cooking time to 10 minutes. Flip the dough after 5 minutes.
- Remove the crust from the Airfryer Oven.
- Top the crust with the sauce, cheese and pepperoni.
- Place the crust back into the Airfryer Oven. Continue the "Pizza" programme, set the cooking time to 5 minutes.
- Let the pizza cool for 5 minutes before cutting.
Skewered Chicken
Resting time: approx. 1 day
Ingredients:
1 large plump chicken breast
1 pinch Salt
1 pinch Pepper, white, ground
1 pinch Thyme, crushed
2 apples, tart
1 Medium onion, cut into quarters
1 clove Garlic
50ml Oil
10g Spice mixture (roast chicken spice)
Method:
- Mix the spices together and season the chicken with the mixture.
- Place the chopped apples, onions and garlic slices in the chicken.
- Seal up the chicken with string or cooking pins.
- Place the chicken in an appropriate vessel. Massage oil and roast chicken spice into the skin. Marinate in the fridge for roughly 12 to 24 hours.
- Slide the oil drip tray onto the bottom rail in the Airfryer Oven.
• Fix the chicken on the rotating rotisserie fork.
- Attach the rotating rotisserie fork in the Airfryer Oven.
- Start the

- If the chicken is not yet golden brown and crispy after the end of the programme, start the programme again.
The grilled chicken tastes delicious with chunks of bread.
Spiced Chicken Legs
Ingredients:
5 Chicken legs
3 tbsp. Olive oil
2 Garlic cloves
1 tsp. Sugar
1 tsp. Chilli powder or paprika powder
To taste Salt, pepper
Method:
- Peel the garlic and squeeze through the garlic press.
- Mix the clove of garlic with sugar, chilli/paprika powder, salt, pepper and oil.
- Rub the marinade into the chicken legs and allow it to infuse for at least 20 minutes.
- Place the chicken legs on the air flow racks in the middle position.

- Start the "Chicken" programme.
- Check how cooked the food is in between times. The cooking time may vary depending on the size of the chicken legs. Adjust the cooking temperature and cooking time accordingly if necessary.
Super Shaslicks
Resting time: approx. 1 day
Ingredients:
1kg lamb neck
1 Large onion
1 tsp. Sugar
1 tbsp. Vinegar
2 tbsp. Oil
2 tbsp. Strained tomato(es)
To taste Salt, black pepper, cayenne pepper
Method:
- Cut the meat into cubes roughly 2.5 x 2.5 cm in size.
- With the exception of the onion, mix together the rest of the ingredients to make a marinade and mix with the meat.
- Allow it to rest in the fridge for at least 4 hours, ideally overnight. Stir it around a few times.
- Chop the onion into rings.
- Slide the marinated meat and the onion rings onto the skewers.
- Fit the skewers in the rack and insert it into the cooking space.
- Start the

ak/Cutlet" programme.
- Press the function.

ton to activate the rotating
- Check how cooked the food is in between times. Adjust the cooking temperature and cooking time if necessary.
S'mores Pizza
Ingredients:
1/2 cup Heavy cream
1 & 1/4 cup Chocolate chips
1 Refrigerated thin crust pizza dough
9 Graham crackers, crumbled
1 cup Mini marshmallows
350g Chocolate candy bar, crumbled
Chocolate syrup, for serving
Marshmallow creme, for serving
Method:
- Bring the heavy cream to a simmer in a saucepan over medium heat to make the ganache.
- Pour the chocolate chips into the saucepan and stir.
- Let the mixture sit for 3 minutes on the heat.
• Whisk until smooth. - Remove from the heat.
• Shape the pizza dough onto an air flow rack. - Insert the air flow rack into the Airfryer Oven.

zza" programme.
- Start the
- Flip the dough after 10 minutes.
- Spread the ganache over the pizza crust.
- Scatter the graham crackers, marshmallows, and chocolate bar over the ganache.
- Place the dough back into the Airfryer Oven to continue the remaining cooking process until the cooking time elapses.
• Garnish with chocolate syrup and marshmallow creme.

Gerard Sourcing & Manufacturing
GSM RETAIL AUSTRALIA PTY LTD
Consumer Service Centre :
Aus: 1300 373 199
NZ: 0800 200 037
GSM Retail Australia Pty Ltd has a policy of continual improvement throughout the product range.
As such the unit contained within may differ slightly from the unit illustrated on the pack.
MADE IN CHINA for GSM Retail Australia Pty Ltd.
Cat. No. MAC007
March 2020

- Litre Multi-function Digital Airfryer Oven
- Instruction Manual
- Important Safeguards
- When using this electrical appliance, the following basic safety precautions should always be followed:
- For Your Safety
- Caution: Hot Surfaces!
- Usage Conditions and Restrictions
- Warning ⚠
- Save These Instructions
- Features of Your Digital Airfryer Oven
- Main Unit
- Control Panel
- Intended Use
- Before Initial Use
- Using the Accessories
- Oil Drip Tray
- Air Flow Racks
- Rotating Rotisserie Skewers
- NOTE
- Rotating Rotisserie Fork
- Rotating Mesh Basket
- Rotisserie Removal Tool
- Using the Airfryer Oven
- Choose a programme:
- Automatic Switch-off
- Memory function
- Tips:
- Care and Cleaning
- WARNING
- Storage
- IMPORTANT!
- Technical Specifications
- FAQs and Troubleshooting Guide
- NOTE: Do not attempt to repair an electrical appliance yourself!
- Recipes
- Apple Turnovers
- Ingredients:
- Method:
- Banana Chips
- Crumbed Chicken Breast
- Crumbed Prawns
- Chips
- Flat Head Fillet with Garlic Herb Crust
- Juicy Pork Cutlet
- Muffins Recipe to Make 10 Muffins
- Pepperoni Pizza
- Skewered Chicken
- Spiced Chicken Legs
- Super Shaslicks
- S'mores Pizza
- GSM RETAIL AUSTRALIA PTY LTD
Brand : MISTRAL
Model : MAC007
Category : Oven