
GVS12 - Vacuum Sealer GEMINI - Free user manual and instructions
Find the device manual for free GVS12 GEMINI in PDF.


| Brand | Gemini |
| Model | GVS12 |
| Product Type | Vacuum Sealer |
| Dimensions (W x D x H) | 16.5 x 8.5 x 5.5 inches |
| Weight | 3.2 lbs |
| Power Supply | 120V / 60Hz |
| Power Consumption | 120W |
| Sealing Bar Length | 12 inches |
| Vacuum Pressure | 0.8 bar |
| Pump Type | Single piston |
| Functions | Vacuum seal, seal only, pulse vacuum, accessory hose connection |
| Modes | Dry, Moist, Gentle settings |
| Bag Roll Compatibility | Width up to 12 inches |
| Automatic Bag Detection | Yes |
| Overheat Protection | Built-in thermal fuse |
| Cleaning | Wipe exterior with damp cloth; dry thoroughly |
| Maintenance | Check sealing gasket regularly; replace if worn |
| Safety | Auto shut-off after 2 minutes of inactivity |
| Spare Parts | Sealing gasket, vacuum pump parts, power cord |
| Repairability | Designed for simple part replacement; contact support |
| Warranty | 2 years limited |
Frequently Asked Questions - GVS12 GEMINI
User questions about GVS12 GEMINI
0 question about this device. Answer the ones you know or ask your own.
Ask a new question about this device
Download the instructions for your Vacuum Sealer in PDF format for free! Find your manual GVS12 - GEMINI and take your electronic device back in hand. On this page are published all the documents necessary for the use of your device. GVS12 by GEMINI.
USER MANUAL GVS12 GEMINI
When using this electrical appliance, safety precautions should always be observed, including the following:
READ ALL INSTRUCTIONS
- Carefully read all of the instructions before using this appliance and save for future reference.
- Before plugging cord into wall outlet, or disconnecting, make sure that the cover of the machine is in unlocked condition, and unplug from outlet when not in use or before cleaning.
- This appliance is not a toy, when used by or near children, close attention is necessary, and store this appliance to a safe place, out of the reach of children.
- Do not use any bags or attachments not recommended or appointed, and do not use this appliance for other purpose except its intended use.
- Stop using the machine immediately if the cord is damaged and have it replaced by a professional.
- Keep away from moving parts.
- Do not contact the hot sealing element located on edge of the top cover of this machine. It is hot and may get burn.
- Do not try to repair this appliance by yourself.
- Do not hit the machine or make it fall on the floor, do not use the appliance if it has fallen or appeared to be damaged.
- Avoid to do the following: pull or carry by the cord, use the cord as a handle, close a door on the cord, or pull the cord around sharp edges or corners. Do not operate appliance over the cord or when cord / plug is wet.
- Keep away from hot gas, heated oven, electric burner or any other hot surfaces. Do not use this appliance on wet or hot surface or near a heat source.
- It is better not to use an extension cord with this unit. However, if one is used, it must have a rating equal to or exceeding the rating of this appliance.
- When disconnect, to avoid any injury, please unplug by grabbing the plug, not the cord.
- Before plugging appliance in or operating, make sure your hands are dry and safe to do the actions.
- Always place the appliance on a stable surface, such as table or counter during operation.
- It is not necessary to use any lubricant, such as lubricating oils or water, on this appliance.
- Do not immerse any part of this appliance, power cord or plug in water or any other liquid.
- Do not use this appliance outdoors or on a wet surface, it is recommended for household and indoor use only.
SAVE THESE INSTRUCTIONS FOR HOUSEHOLD USE ONLY
OPERATION TIME: 1 MINUTE PER CYCLE
- This appliance is not intended for use by persons (including children) with reduced physical, sensory or mental capabilities, or lack of experience and knowledge, unless they have been given supervision or instruction concerning use of the appliance by a person responsible for their safety.
- Children should be supervised to ensure that they do not play with the appliance.
- Do not lock the cover after use to avoid long time sealing rings compression and cause damage.
FUNCTIONS
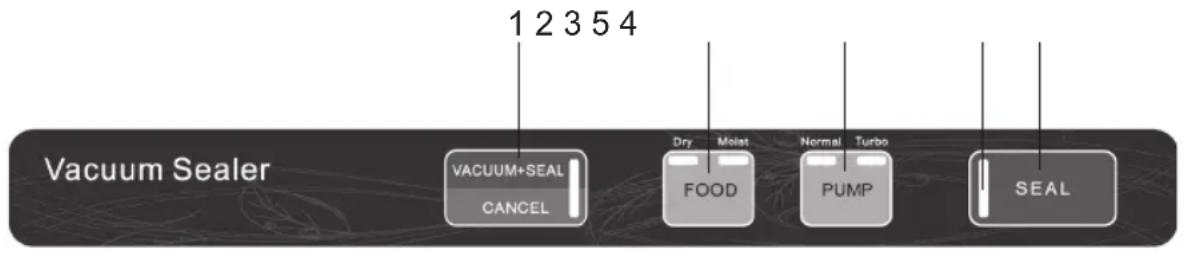
1. Vacuum + seal / Cancel button:
- This button has two functions depending on the machine status:
- At stand-by condition, it starts the automatic operation of vacuuming the bag and then seals the bag when vacuum process is completed.
- At operating condition (vacuuming or sealing), it stops the machine.
2. Food button: Used for choosing the best heat seal time
- Dry setting : for dry bags and items without moisture, requires a shorter heat sealing time;
- Moist setting: for wet bags or foods with moisture, requires an extended heat sealing time.
- Default setting is for dry bags and normal sealing time.
3. Pump button: For choice of different vacuum pressure
- Normal setting: for regular items storage in normal vacuum pressure;
- Turbo setting: for more vacuum with higher pressure.
- Default setting is "Normal" vacuum pressure.
4. Seal button: This button provides two functions:
- To manually seal the open end of a bag without vacuuming air suction, used to make a bag from a bag roll;
- When the automatic "VACUUM + SEAL" function is in operation, this button stops the motor pump and immediately starts to seal the bag so that less vacuum pressure inside the bag can be controlled by the user to avoid crushing of delicate items.
5. LED Indicators: Indicate the status of vacuum or seal process and the status of the machine setting.
- Vacuum+Seal / Cancel (ON: Red light ; Complete: Red light off)
- FOOD / PUMP (ON: Red light)
- SEAL (ON: Blue light ; Complete: Blue light off)
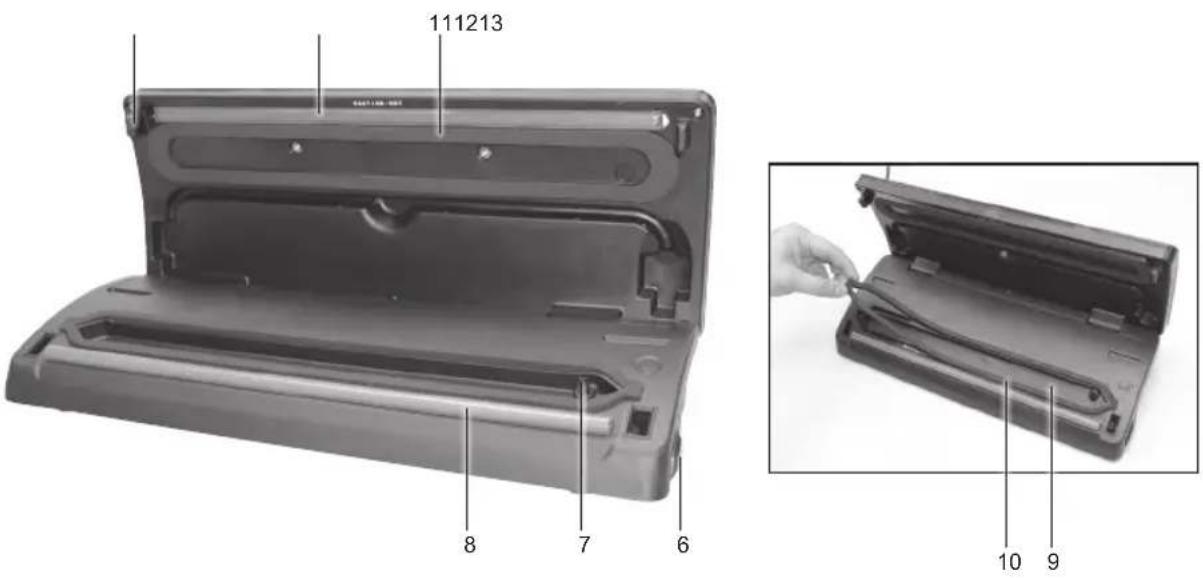
- Release Button (Left & right of the machine): Press the button on both sides to open the cover or release the vacuum pressure inside the machine.
- Air intake: To vacuum the air from vacuum bag.
- Sealing strip: Place the bag to be sealed over this strip.
- Vacuum chamber: Position the open end of the bag inside the chamber, draws air out of bag and catches any liquid overflow from the bag.
- Lower gasket: Keep air away by forming vacuum chamber with upper gasket in the vacuum chamber. Clean and dry or replace it when it is distorted or broken.
- Upper gasket: Keep air away by forming vacuum chamber with lower gasket. Clean and dry or replace it when distorted or broken.
- Sealing element: Heating element which generates heat and seals the bag.
- Lock: To lock the cover to the base.
OPERATING INSTRUCTIONS
Two sets (total 10 pieces) of vacuum bags are equipped in the package. One end of the bag is already sealed. Seal the other end after placing in the items for storage.
I. Making a bag from a bag roll (Need to purchase separately)
- Plug the unit into a power source;
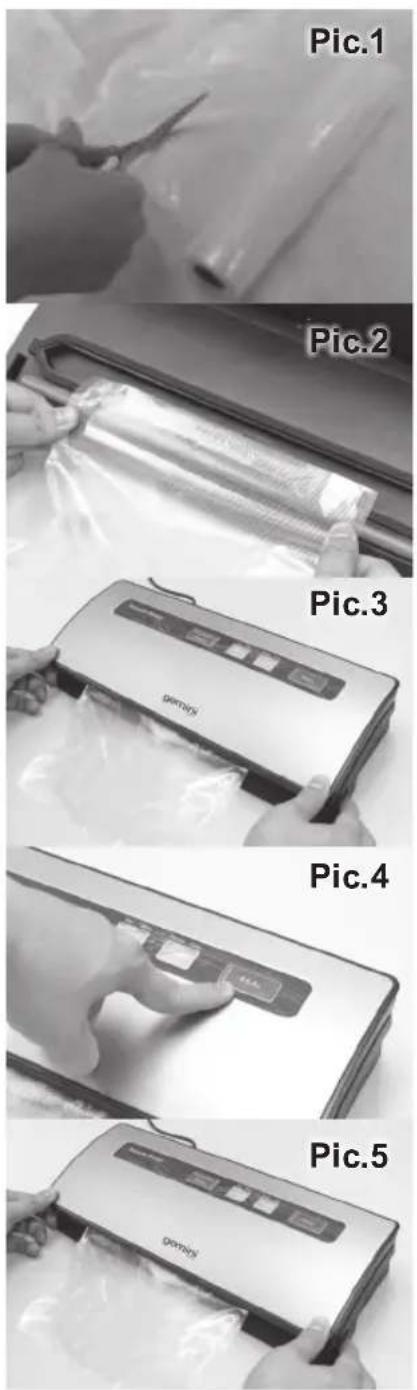
- Use scissors to cut a bag from the bag rolls to the desired length (Pic.1)
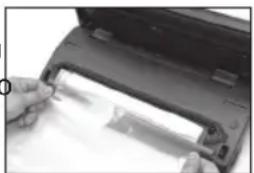
- Put one end of the bag on top of the sealing strip, but not enter the vacuum chamber (Pic.2)
- Close the upper lid and press tightly until it is clicked in place on both sides of release buttons (Pic.3)
- Press Seal button to start sealing the bag (Pic.4). After the process is completed, the blue light indicator will turn off.
- Press the release buttons to open the cover and take the bag out of the machine, one end of the bag is sealed (Pic.5)
II. Vacuum packaging with a bag
-
Put the foods/items inside the vacuum bag. Use only the food grade standard vacuum bags supplied by us with vacuum channel. Not to use other vacuum bags to avoid any risks and damage the machine.
-
Clean and straighten the open end of the bag, make sure there is no dust, wrinkle or ripples.
-
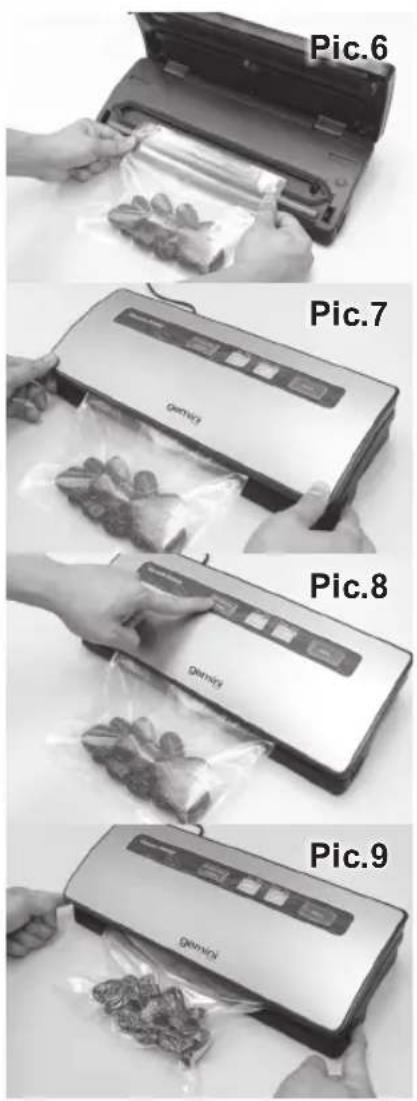
Place the open end of the bag within the vacuum chamber area (about 3-5mm edge over the vacuum chamber). Make sure the air intake is not covered by the bag. (Pic.6)
-
Press the cover down on both sides using both hands until click sound is heard from the release buttons. (Pic.7)
-
Choose the option from the "FOOD" button and the "PUMP" button. The vacuum and sealing time depends on the type of food packed (moist or dry) and desired vacuum pressure (Normal/Turbo) setting.
-
Then press "VACUUM + SEAL" button, the machine start to vacuum and will seal the bag automatically (Pic.8)
NOTE:
This machine provides very high vacuum pressure during vacuum packaging with a bag, in order to avoid crushing of the delicate item by the high vacuum pressure, observe the status of the vacuum pressure inside the bag and switch off the "VACUUM + SEAL" button immediately when the desired vacuum pressure is achieved. The machine will then stop the pump and start to heat-seal the bag. The red light of "VACUUM + SEAL" & blue light of "SEAL" will turn off when pressed the "CANCEL" button.
- The vacuum packaging is done. The red light of "VACUUM + SEAL" & blue light of "SEAL" will turn off. Press the release buttons on both sides of the machine simultaneously to open the cover and take out the packed bag (Pic.9)
NOTE:
- For the best sealing effect, it is better to let the machine cool down for 1 minute before using it again. Wipe out any excess liquid or food residue in the vacuum chamber after each bag packaged.
- Do not seal one bag after another continuously to avoid overheat of the sealing element. The machine will not function if this “seal” button is activated within 15 seconds of the last activation.
- Your appliance can only work on the food grade vacuum bags.
- Cut the bag straight across with scissors to open a sealed bag.
III. Cord storage box
After use, put the power cord into the storage box located at the back of the machine. Do not wrap the cord around the machine.
HINTS FOR BEST VACUUMING PERFORMANCE AND APPLICATIONS
-
Do not put too much stuff inside the bag: leave enough empty space in the open end of the bag so that the bag can be placed in the vacuum chamber area without creating wrinkles or ripples;
-
Do not wet the open end of the bag. Wet bags will cause difficulty to heat-seal tightly. If the food has moisture or the bag is wet, you can choose the 'Moist' function which is designed for a longer sealing time and seals better for wet bags.
-
Clean and straighten the open end of the bag before sealing. Make sure nothing is left on the open area of the bag, no wrinkle or creased lines should appear on the open panel, foreign objects or creased bag may cause difficult to seal tightly.
-
Do not leave too much air inside the bag. Press the bag to allow extra air to escape from the bag before vacuuming it. Too much air inside the bag increases the vacuum pump loading and may cause the motor insufficient power to draw away all the air inside the bag.
-
Do not vacuum packaging objects with sharp points like fish bones and hard shells! Sharp points may penetrate and tear the bag! You may use a thicker bag to cover the object before placing into the vacuum bag.
-
Suggest to vacuum seal one bag within 1 minute.
-
If vacuum is not performed properly, the vacuum system will shut automatically after 60 seconds. In this situation, please check if the bag is leaked or not placed properly or any other reasons.
-
Make sure there is no crack or deformation or small particles resting on the foam gaskets around the vacuum chamber. When this happens, take it out and wash and dry it thoroughly, or replace with a new one.
-
During vacuum packaging process, small amounts of liquids, crumbs or food particles can be inadvertently pull into the vacuum chamber, clogging the pump and damaging your appliance. To
avoid this, freeze moist and juicy foods first before sealing bags or place a folded paper towel near the inside top of the bag. For
natural_image
Close-up of hands using a printer to press or export a sheet of paper (no visible text or symbols)powdery or fine-grained foods, avoid overfilling bags. You may
-
For objects with sharp points and edges, such as bones or dried pasta, pad the edges with paper towels to keep them from puncturing the bag.
-
Pre-freeze fruits and blanch vegetables before vacuum packaging for best results.
-
Store perishable foods in the freezer or refrigerator. Vacuum packing extend the shelf life of foods.
-
Fill a bag about 2/3 full with water, seal the end (do not vacuum). Freeze the bag and use for ice in the cooler or ice packs for sports injuries.
-
Many foods are sold pre-packed in commercial vacuum bags such as cheese and deli meats. Now, you can maintain the taste and freshness of these foods, by re-packaging with the vacuum sealer bags after the commercially packed bags have been opened.
-
Items such as flour, rice, mixed for cakes and pancakes, all stay fresher longer when vacuum packed. Nuts and condiments maintain their flavor while rancidity is kept out.
-
There are many non-food uses for vacuum packing. Keep camping supplies such as matches, first aid kits and clothing clean and dry. Keep silver and collectibles untarnished.
NOTE:
After finished the vacuum work, please always keep the machine cover open, do not fasten the cover, it will deform the form gaskets and affect the machine function.
CLEANING AND MAINTENANCE
Vacuum sealer
- Always unplug the machine before cleaning.
- Do not immerse in water or any other liquid.
- Avoid using abrasive products or material to clean the machine as they will scratch the surface of the machine.
- Use mild dishwashing soap and a warm, damp cloth to wipe away food residue on the machine.
- Dry thoroughly before using again.
NOTE: The foam gaskets around the vacuum chamber should be dried thoroughly before re-assembling. When re-assembling, be careful to prevent any damage, and assemble back to the original position to ensure no vacuum leaking.
Vacuum bags
- Wash bags in warm water with a mild dishwashing soap.
- When wash bags in dishwasher, turn bags inside out and spread them over top rack of dishwasher, so entire surface is exposed to the washing water.
- Dry thoroughly before reusing.
IMPORTANT: To avoid possible illness, do not reuse bags after storing raw meats, raw fish or greasy foods. Do not reuse bags that have been microwaved or boiled.
Storing Your Vacuum Sealer:
- Keep the machine in a flat and safe place, out of reach from children.
- Please keep the cover lid UNLOCK when not in use and in storage to prevent distort of foam gasket that may cause air leakage.
TROUBLE SHOOTING
Nothing happens when I try to vacuum package
- Check power cord to see if it is firmly and correctly plugged into electrical outlet.
- Examine power cord for any damages.
- See if electrical outlet is operative by plugging in another appliance.
- Make sure it is set to the correct mode. Refer to the above operating instructions.
- Make sure the bag is placed correctly inside the vacuum chamber and beneath the air intake.
Air is not removed from the bag completely:
- To seal properly, open end of bag should be resting entirely inside vacuum chamber area.
- Check sealing strip and the foam gasket beneath the lid. Make sure no breaking or distortion of the foam seal gaskets on both the cover and on the base around the vacuum chamber. Wipe clean and smooth them back into place.
- Vacuum bag may have a leakage. To test, seal the bag with some air in it, submerge in water, and apply pressure. Bubbles indicate leakage. Reseal or use another new bag.
- Use only the specific vacuum bag with vacuum channels provided by the manufacturer.
- Leakage along the seal which can be caused by wrinkles, debris crumbs, grease or liquids. Reopen the bag, wipe the inner top of the bag and smooth it out along the sealing strip before resealing.
The machine does not turn to seal after vacuuming:
-
There is a vacuum pressure sensor built in this machine. The machine will not turn to seal automatically if the vacuum pressure inside the bag is not able to reach to the predetermined vacuum pressure. Check sealing strip and the foam gasket beneath the lid for debris and correct position. Wipe clean and smooth them back into place, and try again.
-
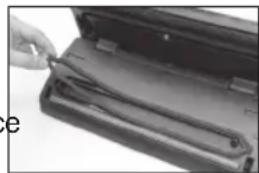
Make sure no breaking or distortion of the foam seal gaskets on both the cover and on the base around the vacuum chamber. Take it out from the groove (see image), wash and dry it thoroughly; or replace with a new foam gasket (contact our after sales service center).
natural_image
Close-up of a hand inserting a small electronic component into a device (no visible text or symbols)-
Vacuum bag may have leakage. To test, seal the bag with some air in it, submerge in water, and apply pressure. Bubbles indicate leakage. reseal or use another new bag.
-
Leakage along the seal which can be caused by wrinkles, debris crumbs, grease or liquids from the bag. Reopen the bag, wipe the inner top of the bag and smooth it out along the sealing strip before resealing.
Air has re-entered into the bag after being sealed.
- Leakage along the seal which can be caused by wrinkles, debris crumbs, grease or liquids. Reopen the bag, wipe the inner top of the bag and smooth it out along the sealing strip before resealing.
- It may be the release of natural gases or fermentation from foods (such as fresh fruits and vegetables). Open the bag, if you think food has begun to spoil, discard it immediately. Lack of refrigerator or fluctuating temperatures in the refrigerator can cause food to spoil. If food is not spoiled. Consume food immediately.
- Check the bag for a puncture or hole which may have released the vacuum. Do not vacuum packaging hard items with sharp points (like bones or cracks of nut shell). Cushion sharp edges in the contents of the bag with paper towels.
The bag melts:
Should sealing strip or sealing element be overheat and melt the bag, it may be necessary to lift the lid and allow sealing strip or heating element to cool for a few minutes. Please refer the clean instruction detail and try again after cleaning.
FOOD PRESERVATION GUIDELINES
| Classification | Food Items | Temperature | Normal Preservation | Vacuum Preservation |
| Refrigerated | Fresh Raw Meat | 5±3°C | 2~3 days 8~9 | days |
| Fresh Fish/ Sea Food | 5±3°C | 1~3 days 4~5 | days | |
| Cooked Meat | 5±3°C | 4~6 days 10~14 | days | |
| Vegetables | 5±3°C | 3~5 days 7~10 | days | |
| Fruit | 5±3°C | 5~7 days 14~20 | days | |
| Eggs | 5±3°C | 10~15 days 30~50 | days | |
| Frozen | Meat | -16 ~ -20°C | 3~5 months >1 | year |
| Fish | -16 ~ -20°C | 3~5 months >1 | year | |
| Sea Food | -16 ~ -20°C | 3~5 months >1 | year | |
| Room temperature | Bread | 25±2°C | 1~2 days 6~8 | days |
| Biscuit | 25±2°C | 4~6 months >1 | year | |
| Rice/ Flour | 25±2°C | 3~5 months >1 | year | |
| Peanut/Legume | 25±2°C | 3~6 months >1 | year | |
| Medical Material | 25±2°C | 3~6 months >1 | year | |
| Tea | 25±2°C | 5~6 months >1 | year |
SPECIFICATIONS
Model no.: GVS12
Voltage: 220-240V AC
Frequency: 50Hz
Output power: 120W
*Each package is equipped with 5 pcs (22W x 30L cm) + 5 pcs (28W x 40L cm) vacuum bags.
WARNING
This appliance is not intended for use by persons (including children) with reduced physical, sensory or mental capabilities, or lack of experience and knowledge, unless they have been given supervision or instruction concerning use of the appliance by a person responsible for their safety. Children should supervised to ensure that they do not play with the appliance.
重要的安全指引
natural_image
Close-up of a hand inserting a cable into a closed device case, with labeled parts 9 and 10 (no text or symbols on the device itself)6.釋放按鈕:(左及右邊的按鈕)
同時按兩邊的按鈕有兩個功能:
A. 開蓋
B. 釋放機內壓力。
- 抽氣孔:
natural_image
Close-up of hands inserting a card into a printer (no visible text or symbols)清潔和維護
真空封口機
natural_image
Close-up of a hand inserting a card into a folder (no visible text or symbols)Proudly Serviced by:

Gilman
since 1841

a Gilman Group Company
太平家庭電器
2/F, Shing Dao Industrial Building, 232 Aberdeen Main Road, Hong Kong 香港香港仔大道232號城都工業大廈2樓
- READ ALL INSTRUCTIONS
- FUNCTIONS
- Vacuum + seal / Cancel button:
- Food button: Used for choosing the best heat seal time
- Pump button: For choice of different vacuum pressure
- Seal button: This button provides two functions:
- LED Indicators: Indicate the status of vacuum or seal process and the status of the machine setting.
- OPERATING INSTRUCTIONS
- Making a bag from a bag roll (Need to purchase separately)
- Vacuum packaging with a bag
- NOTE:
- Cord storage box
- HINTS FOR BEST VACUUMING PERFORMANCE AND APPLICATIONS
- CLEANING AND MAINTENANCE
- Vacuum sealer
- Vacuum bags
- Storing Your Vacuum Sealer:
- TROUBLE SHOOTING
- Nothing happens when I try to vacuum package
- Air is not removed from the bag completely:
- The machine does not turn to seal after vacuuming:
- Air has re-entered into the bag after being sealed.
- The bag melts:
- FOOD PRESERVATION GUIDELINES
- SPECIFICATIONS
- WARNING
- 重要的安全指引
- 清潔和維護
- 真空封口機
- 太平家庭電器
Brand : GEMINI
Model : GVS12
Category : Vacuum Sealer