LE2710C - Network switch Black Box - Free user manual and instructions
Find the device manual for free LE2710C Black Box in PDF.


| Product Type | Network Switch |
| Brand | Black Box |
| Model | LE2710C |
| Ports | 10 x 10/100/1000 Mbps RJ45 |
| Switching Capacity | 20 Gbps |
| MAC Address Table Size | 8K entries |
| Jumbo Frame Support | Up to 9K bytes |
| Power Supply | External AC adapter (100-240V, 50-60Hz) |
| Power Consumption | Max 12W |
| Dimensions (W x D x H) | 280 x 180 x 44 mm |
| Weight | 1.5 kg |
| Operating Temperature | 0°C to 40°C |
| Operating Humidity | 10% to 90% non-condensing |
| LED Indicators | Power, Link/Activity per port |
| Mounting | Desktop or rackmount (brackets included) |
| Cooling | Fanless |
| Certifications | FCC, CE, RoHS |
| Warranty | Limited lifetime warranty |
| Safety | Use only included power adapter; keep away from liquids |
| Maintenance | Clean with soft dry cloth; no chemical cleaners |
| Repairability | No user-serviceable parts; contact Black Box support |
Frequently Asked Questions - LE2710C Black Box
User questions about LE2710C Black Box
0 question about this device. Answer the ones you know or ask your own.
Ask a new question about this device
Download the instructions for your Network switch in PDF format for free! Find your manual LE2710C - Black Box and take your electronic device back in hand. On this page are published all the documents necessary for the use of your device. LE2710C by Black Box.
USER MANUAL LE2710C Black Box
LE2700 Series Industrial Managed Ethernet Switches
User Manual
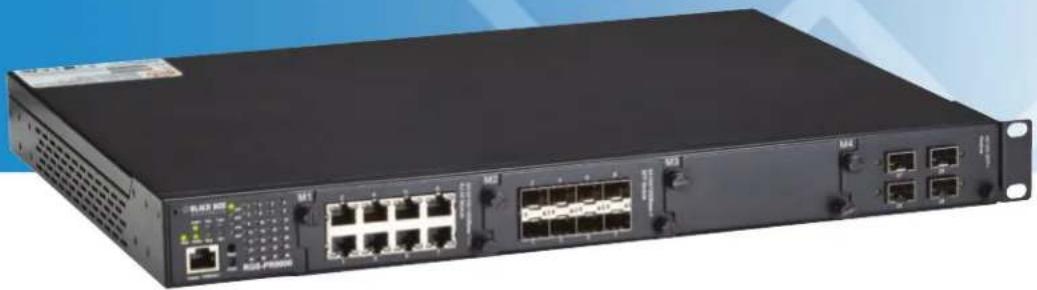
This Layer 2 modular rackmount managed Gigabit Ethernet switch has four module slots that accommodate 8-port 10/100/1000BASE-T RJ-45 and SFP modules, and 4-port 10GE SFP+ and 100-Mbps fiber ST and fiber SC modules.
natural_image
Front view of a black networking device with multiple Ethernet ports and network switches (no visible text or labels)Trademarks Used in this Manual
Black Box and the Double Diamond logo are registered trademarks of BB Technologies, Inc.
Any other trademarks mentioned in this manual are acknowledged to be the property of the trademark owners.
Disclaimer:
Black Box Network Services shall not be liable for damages of any kind, including, but not limited to, punitive, consequential or cost of cover damages, resulting from any errors in the product information or specifications set forth in this document and Black Box Network Services may revise this document at any time without notice.
We're here to help! If you have any questions about your application or our products, contact Black Box Tech Support at 724-746-5500 or go to blackbox.com and click on "Talk to Black Box."
You'll be live with one of our technical experts in less than 60 seconds.
Federal Communications Commission and Industry Canada Radio Frequency Interference Statements
This equipment generates, uses, and can radiate radio-frequency energy, and if not installed and used properly, that is, in strict accordance with the manufacturer's instructions, may cause interference to radio communication. It has been tested and found to comply with the limits for a Class A computing device in accordance with the specifications in Subpart B of Part 15 of FCC rules, which are designed to provide reasonable protection against such interference when the equipment is operated in a commercial environment. Operation of this equipment in a residential area is likely to cause interference, in which case the user at his own expense will be required to take whatever measures may be necessary to correct the interference.
Changes or modifications not expressly approved by the party responsible for compliance could void the user's authority to operate the equipment.
This digital apparatus does not exceed the Class A limits for radio noise emission from digital apparatus set out in the Radio Interference Regulation of Industry Canada.
2.1 Introduction....10
2.2 Features....10
2.3 What's Included 11
2.4 Hardware Description....12
- Hardware Installation....16
3.1 Rackmount Installation 16
3.2 Module Installation....16
3.2.1 RJ-45 Module (LE2720C) 16
3.2.2 SFP Module (LE2721C) 17
3.2.3 100/1000 Mbps SFP Module (LE2722C) or 10G SFP+ Module (LE2731C)....17
3.2.4 Power Module 18
3.3 Wiring 19
3.3.1 Grounding 19
3.3.2 Fault Relay 19
3.3.3 Redundant Power Inputs....19
3.4 Connection....20
3.4.1 Cables....20
3.4.2 SFP 22
3.4.3 B-Ring/B-Chain 22
- Redundancy....25
4.1 B-Ring 25
4.1.1 Introduction 25
4.1.2 Configurations 25
4.2 B-Chain 26
4.2.1 Introduction....26
4.2.2 Configurations....26
4.3 MRP....26
4.3.1 Introduction....26
4.3.2 Configurations....26
4.4 STP/RSTP/MSTP 27
4.4.1 STP/RSTP 27
4.4.2 MSTP....30
4.4.3 CIST 33
4.5 Fast Recovery 34
- Management....35
5.1 Basic Settings....36
5.1.1 System Information 36
5.1.2 Admin and Password....37
5.1.3 Authentication 37
5.1.4 IP Settings....38
5.1.5 IPv6 Settings 39
5.1.6 HTTPS....39
5.1.7 SSH 40
5.1.8 LLDP 40
5.1.9 Modbus TCP 43
5.1.10 Backup/Restore Configurations 43
5.1.11 Firmware Update....44
5.2 DHCP Server....44
5.2.1 Basic Settings....44
5.2.2 Dynamic Client List....44
5.2.3 Client List 44
5.2.4 Relay Agent....45
5.3 Port Setting 47
5.3.1 Port Control 47
5.3.2 Port Trunk 48
5.3.3 LACP 49
5.3.4 Loop Ground....52
5.4 VLAN....53
5.4.1 VLAN Membership....53
5.4.2 Port Configurations....54
5.4.3 Private VLAN 60
5.5 SNMP 62
5.5.1 SNMP System Configurations....64
5.5.2 SNMP Community Configurations 66
5.5.3 SNMP User Configurations....64
5.5.4 SNMP Group Configurations....66
5.5.5 SNMP View Configurations....66
5.5.6 SNMP Access Configurations....67
5.6 Traffic Prioritization....68
5.6.1 Storm Control....68
5.6.2 Port Classification....69
5.6.3 Port Tag Remaking....70
5.6.4 Port DSCP....71
5.6.5 Port Policing 72
5.6.6 Queue Policing 73
5.6.7 QoS Egress Port Scheduler and Shapers....74
5.6.8 Port Scheduled....76
5.6.9 Port Shaping....76
5.6.10 DSCP Based QoS....77
5.6.11 DSCP Translation....78
5.6.12 DSCP Classification 78
5.6.13 QoS Control List....79
5.6.14 QoS Counters 81
5.6.15 QCL Status....81
5.7 Multicast....82
5.7.1 IGMP Snooping....82
5.7.2 VLAN Configurations of IGMP Snooping....83
5.7.3 IGMP Snooping Status....84
5.7.4 Groups IGMP Snooping Information 85
5.8 Security....85
5.8.1 Remote Control Security Configurations....85
5.8.2 Device Binding 86
5.8.3 ACL Ports 90
5.8.4 AAA....99
5.8.5 RADIUS 100
5.8.6 NAS (802.1x) 105
5.9 Alerts....113
5.9.1 Fault Alarm 113
5.9.2 System Warning 113
5.10 Monitor and Diag 116
5.10.1 MAC Table 116
5.10.2 Port Statistics 119
5.10.3 Port Mirroring.... 121
5.10.4 System Log Information....122
5.10.5 Cable Diagnostics 123
5.10.6 SFP Monitor 124
5.10.7 Ping....124
5.11 Synchronization 126
5.12 Troubleshooting....129
5.12.1 Factory Defaults 129
5.12.2 System Reboot.... 129
5.13 Command Line Interface Management 129
- Specifications
| Ethernet Standards IEEE 802.3 10BASE-T, | IEEE 802.3u 100BASE-TX and 100BASE-FX,IEEE 802.3ab 1000BASE-T,IEEE 802.3z 100BASE-X,IEEE 802.3ae 10 Gigabit Ethernet,IEEE 802.3ad LACP (Link Aggregation Control Protocol),IEEE 802.1p COS (Class of Service),IEEE 802.1q VLAN tagging,IEEE 802.1w RSTP (Rapid Spanning Tree Protocol),IEEE 802.1s MSTP (Multiple Spanning Tree Protocol),IEEE 802.1x authentication,IEEE 801.1AB LLDP (Link Layer Discovery Protocol) |
| Jumbo Frames Up to 9.6 KB | |
| MAC Table 8 K | |
| Network Redundancy MRP, | MSTP (RSTP/STP compatible) |
| Priority Queues 8 | |
| Processing Store-and-forward | |
| Security Features Device binding, | Enable/disable ports, MAC based port security,Port-based network access control (802.1x),Single 802.1x and Multiple 802.1x,MAC-based authentication,QoS assignment,Guest VLAN,MAC address limit,TACACS+,VLAN (802.1Q) to segregate and secure network traffic,Radius centralized password management,SNMPv3 encrypted authentication and access security,Https/SSH enhance network security,Web and CLI authentication and authorization,Authorization (15 levels),IP source guard |
| Software Features IEEE 1588v2 clock synchronization, | IEEE 801.1D Bridge, auto MAC address learning/aging and MAC address (static),Multiple Registration Protocol (MRP),MSTP (RSTP/STP compatible),Redundant Ring with recovery time less than 30 ms over 250 units,Quality of Service (802.1p) for real-time traffic,VLAN (802.1Q) with VLAN tagging,IGMP v2/v3 Snooping,Port configuration, status, statistics, monitoring, security,DHCP Server/Client,DHCP Relay,Modbus TCP,DNS client proxy,SMTP Client |
| Connectors LE2700A, LE2700AE, LE2700UK:RS-232 Serial Console Port: (1) RJ-45 via console cable, 115200 bps, 8, N, 1;Fault contact: 24-VDC, 1-A relay;LE2710C: (4) 100FX SC, works in switch slot 1, 2, or 3;LE2711C: (4) 100FX ST, works in switch slot 1, 2, or 3;LE2720C: (8) 10/100/1000BASE-T RJ-45, works in switch slot 1, 2, or 3;LE2721C: (8) slots for 100/1000-Mbps SFP modules, works in switch slot 1, 2, or 3;LE2722C: (4) slots for 100/1000 Mbps SFP modules, works in switch slot 4 only;LE2731C: (4) slots for 10GE SFP+ modules, works in switch slot 4 only | |
| Indicators LE2700A, LE2700AE, LE2700UK, LE2600LV:(39) LEDs:(1) PWR, (1) PWR1, (1) PWR2, (1) RM, (1) Ring, (1) Fault, (1) Def, (1) Link, (1) SPD,(1) FDX, (1) RMT,(28) Port LEDs;LE2710C, LE2711C, LE2720C:(2) LEDs per port;LE2721C, LE2722C, LE2731C:(1) LED per port; | |
| Environmental Temperature Tolerance: | Operating: -40 to +185° F (-40 to +85°C);Storage: -40 to +185° F (-40 to +85°C);Humidity:Operating: 5 to 95%, noncondensing |
| Power LE2700A, LE2700AE, LE2700UK: | Input: Dual 88–264 VAC/100–370 VDC power inputs at terminal block;Consumption (Typ.): 43.5 watts max.;Overload Current Protection: Present;LE2700LV:Input: Dual 20–72 VDC terminal blocks, 3.9 A;LE2700LV-PS:Output: 12 VDC, 3.5 A:Consumption: 40 watts max.;Overload Current Protection: Present |
| Dimensions | 1.73"H x 17.32"W x 12.8"D (4.4 x 44 x 32.5 cm), 19" rackmountable |
| Weight 14.5 lb. (6.6 kg) | |
| Approvals EMI: | FCC Part 15,CISPR (EN55022) Class A,EN50155 (EN50121-3-2, EN55011, EN50121-4);EMS:EN61000-4-2 (ESD),EN61000-4-3 (RS),EN61000-4-4 (EFT),EN61000-4-5 (Surge),EN61000-4-6 (CS),EN61000-4-8,EN61000-4-11 |
2. Overview
2.1 Introduction
The LE2700 Series Industrial Managed Ethernet Switches are ideal for industrial Ethernet applications. Use them to control and monitor equipment at oil/gas wells transmission facilities, water/wastewater, IP security/surveillance cameras and alarms, utilities, or building HVAC systems.
The LE2700 Series Industrial Managed Ethernet Switches are scalable, flexible, cost-effective, and reliable. The 4-Slot Chassis is a Layer 2 modular rackmount managed Gigabit Ethernet switch with four module slots. 8-port 10/100/1000BASE-T RJ-45 and SFP modules, and 4-port 10GE SFP+ and 100-Mbps fiber ST and fiber SC modules are also available.
Figure 2-1. Available models.
| Part Number Description |
| LE2700A Industrial Managed Ethernet Switch, 4-Slot Chassis, US |
| LE2700AE Industrial Managed Ethernet Switch, 4-Slot Chassis, EU |
| LE2700UK Industrial Managed Ethernet Switch, 4-Slot Chassis, UK |
| LE2700LV Industrial Managed Ethernet Switch - 4-Slot, Low-Voltage |
| LE2710C 4-port 100FX multimode 2 km SC module, works in switch slot 1, 2, or 3 |
| LE2711C 4-port 100FX multimode 2 km ST module, works in switch slot 1, 2, or 3 |
| LE2720C 8-port 10/100/1000BASE-T RJ-45 module, works in switch slot 1, 2, or 3 |
| LE2721C 8-port 100/1000 Mbps SFP module, works in switch slot 1, 2, or 3 |
| LE2722C 4-port 100/1000 Mbps SFP module, works in switch slot 4 only |
| LE2731C 4-port 10 GE SFP+ module, works in switch slot 4 only |
| LE2700-LV Industrial Managed Ethernet Switch Power Supply - 4-Slot, Low-Voltage |
2.2 Features
- Modular design with dual power supplies enables flexible network planning by allowing users to add capacity as demand increases. Choose the right quantity, speed, and range of interfaces for the application. Purchase the capacity you need when you need it.
- Environmentally hardened case withstands operating temperatures of -40 to +185° F (-40 to +85° C).
- Managed switch enables you to configure and monitor installations remotely.
• Supports Web, SNMP, and console user interfaces. - Choose from copper, fiber, 10/100/1000-Mbps, and 10GE interfaces.
- Complies with IEEE 802.3az energy efficient standards.
- Manages traffic with 802.1p/q tagged frames.
- Handles jumbo frames.
• Supports IEEE 1588v2 synchronization. - Accommodates high availability protocols, including xSTP, link aggregation, and redundant ring protocols.
• Supports IP multicast snooping with IGMPv2/3. - Authenticates ACLs, TACACS+, and 802.1x users.
2.3 What's Included
Your package should include the following items. If anything is missing or damaged, contact Black Box Technical Support at 724-746-5500 or info@blackbox.com.
LE2700A:
• LE2700 Series Industrial Managed Ethernet Switch with power supply
• U.S. power cord
LE2700AE:
• LE2700 Series Industrial Managed Ethernet Switch with power supply
- EU. power cord
LE2700UK:
• LE2700 Series Industrial Managed Ethernet Switch with power supply
- UK power cord
LE2700LV:
• LE2700 Series Industrial Managed Ethernet Switch with low-voltage power supply
• U.S. power cord
LE2700LV-PS:
• LE2700 Series Industrial Managed Ethernet Switch Power Supply - Low-Voltage
LE2710C:
4-port 100FX multimode 2 km SC module, works in switch slot 1, 2, or 3
LE2711C
4-port 100FX multimode 2 km ST module, works in switch slot 1, 2, or 3
LE2720C:
8-port 10/100/1000BASE-T RJ-45 module, works in switch slot 1, 2, or 3
LE2721C:
8-port 100/1000 Mbps SFP module, works in switch slot 1, 2, or 3
LE2722C:
4-port 100/1000 Mbps SFP module, works in switch slot 4 only
LE2731C:
4-port 10 GE SFP+ module, works in switch slot 4 only
You can download this user manual from the Black Box Web site.
To download from the Web site:
- Go to www.blackbox.com
- Enter the part number (LE2700A) in the search box:
- Click on the "Resources" tab on the product page, and select the document you wish to download.
2.4 Hardware Description

flowchart
graph LR
    A["Image Icon"] --> B["Slot 1"]
    B --> C["Slot 2"]
    C --> D["Slot 3"]
    D --> E["Slot 4"]
LE2710C, LE2711C, LE2720C, or LE2721C
installs in slot 1, 2, or 3
10-Gigabit module (LE2731C) or
100/1000-Mbps Ethernet module
(LE2722C) installs in slot 4 only
Figure 2-1. Front panel.
flowchart
graph TD
    A["Power 1"] --> B["Power module slot 1"]
    C["Power 2"] --> D["Power module slot 2"]
    B --> E["Power module installed in slot 2"]
    D --> F["Power module installed in slot 1"]
Figure 2-2. Back panel.
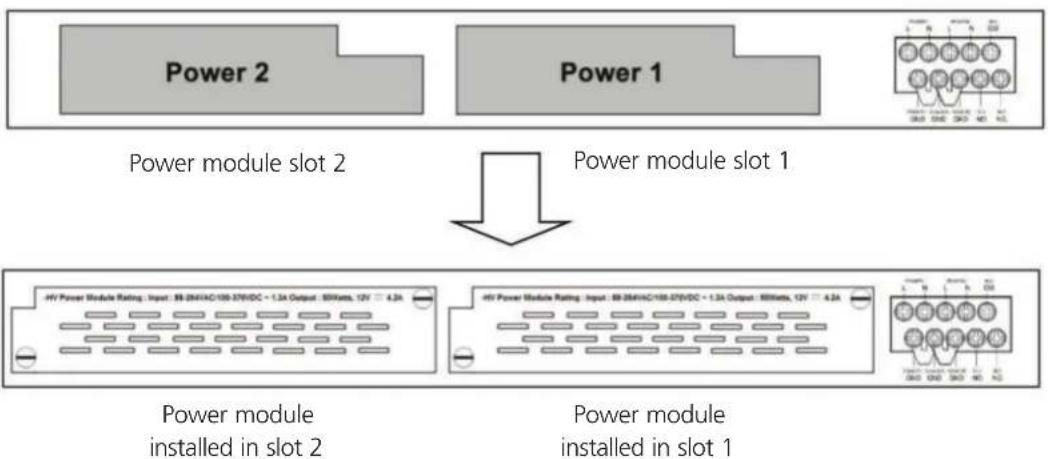
On the rear panel of the switch are two panel module slots and one terminal block. The terminal blocks include two power pairs for redundant power supply.
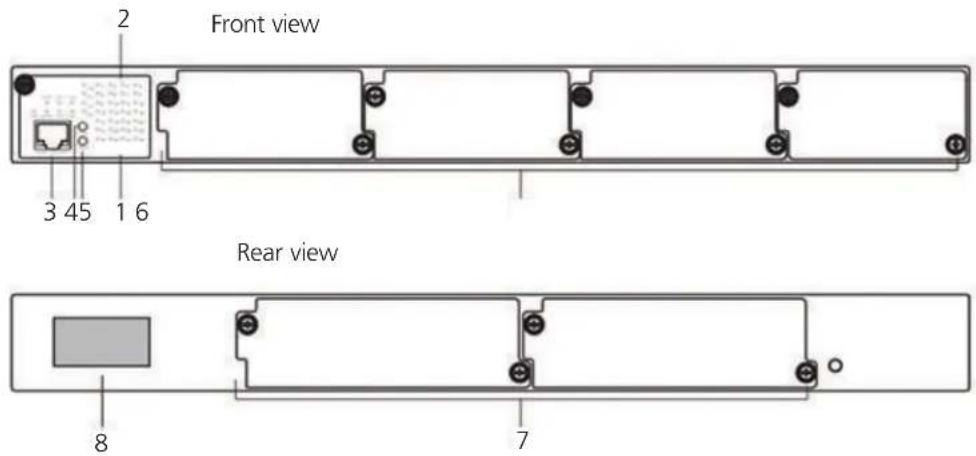
| Table 2-2. LE2700 Series Industrial Managed Ethernet Switches Components2 | ||
| Number | Component Description | |
| 1 | Model name | Name of product |
| 2 | System and Port status LEDs | System LEDs include PWR/PWR1/PWR2/R.M/Ring/Fault/DEF. Port LEDs include LINK/SPD/FDX/port number. |
| 3 | Serial console port | Links to console for management. |
| 4 | Reset button | Press Reset for 3 seconds to reset and 5 seconds to return to factory default. |
| 5 | LED mode button To change port LED mode, press the Mode button. | |
| 6 | Ethernet module slots | Enable different RJ-45/SFP modular combinations based on your needs. |
| 7 | Power input module slots Houses power input modules. | |
| 8 | Terminal block Links to DC connector. | |
B-Ring provides two 10 Gigabit modules and four Gigabit Ethernet modules to meet your demand for high speed. For applications requiring long-distance data transmission, B-Ring also provides several fiber modules to meet your needs. Please refer to the following table for available modules.
The modules are not hot-swappable. Be sure to turn off power before changing modules; otherwise, the system will not detect newly inserted modules.
Table 2-3. Switch Modules.
| Part Number Description | |
| LE2710C 4-port 1 | 100FX multimode 2 km SC module, installs in switch slot 1, 2, or 3 |
| LE2711C | 4-port 100FX multimode 2 km ST module, installs in switch slot 1, 2, or 3 |
| LE2720C 8-port | 10/100/1000BASE-T RJ-45 module, installs in switch slot 1, 2, or 3 |
| LE2721C 8-port 1 | 100/1000 Mbps SFP module, installs in switch slot 1, 2, or 3 |
| LE2722C 4-port | 100/1000 Mbps SFP module, installs in switch slot 4 only |
| LE2731C 4-port 1 | 10 GE SFP+ module, installs in switch slot 4 only |
| Figure 2-4. SFP Modules. | ||
| Part Number | Description Compatible Switch Modules | |
| LFP401 SFP, 155 | -Mbps Fiber with Extended Diagnostics, 850-nmMultimode, LC, 2 km | LE2721C, LE2722C |
| LFP402 SFP, 155 | -Mbps Fiber with Extended Diagnostics, 1310-nm Multimode, LC, 2 km | LE2721C, LE2722C |
| LFP403 SFP, 155 | -Mbps Fiber with Extended Diagnostics, 1310-nm, Single-Mode, LC, 30 km | LE2721C, LE2722C |
| LFP404 SFP, 155 | -Mbps Fiber with Extended Diagnostics, 1310-nmSingle-Mode, Plus, LC, 60 km | LE2721C, LE2722C |
| LFP411 SFP, 1.25 | -Gbps Fiber with Extended Diagnostics, 850-nmMultimode, LC, 300 m | LE2721C, LE2722C, LE2731C |
| LFP412 | SFP, 1.25-Gbps Fiber with Extended Diagnostics, 1310-nm Multimode, LC, 2 km | LE2721C, LE2722C, LE2731C |
| LFP413 | SFP, 1.25-Gbps Fiber with Extended Diagnostics, 1310-nmSingle-Mode, LC, 10 km | LE2721C, LE2722C, LE2731C |
| LFP414 | SFP, 1.25-Gbps Fiber with Extended Diagnostics, 1310-nmSingle-Mode, LC, 30 km | LE2721C, LE2722C, LE2731C |
| LFP415 | SFP with SerDes Interface, 1.25 Gbps, Copper, 1000BASE-T, Extended Diagnostics | LE2721C, LE2722C, LE2731C |
| LSP421 | 10GBASE-SR SFP+, 850-nm Multimode, 300 m, LC | LE2731C |
| LSP422 10GBASE-SR SFP+, 1310-nm Single-Mode, 10 km, LC | LE2731C | |
Available power supplies include:
- Spare Power Supply for the LE2700 Series Industrial Managed Ethernet Switch Chassis (LE2700-PS)
- Spare Power Supply for the LE2700 Series Industrial Managed Ethernet Switch Chassis (LE2700LV-PS)
| Table 2-5. LE2700 Series Industrial Managed Ethernet Switches LEDs. | ||||
| Number LED | Color Status Description | |||
| 1 | PWR Green On | DC power on | ||
| Green Blinking Upgrading firmware | ||||
| 2 | PW1 Green On | DC power module 1 activated | ||
| 3 | PW2 Green On | DC power module 2 activated | ||
| 4 | R.M. Green | On | Ring Master | |
| 5 | Ring Green On | Ring enabled | ||
| Green | Slowly blinking | Ring structure is broken (i.e. part of the ring is disconnected) | ||
| Green Fast blinking | Ring disabled | |||
| 6 | Fault | Amber | On | Errors (power failure or port malfunctioning) |
| 7 | DEF | Green | On | System reset to default |
| 8 | RMT Green On | Accessed remotely | ||
| 9 | LNK Green On | Port link up | ||
| 10 | SPD | Green | Blinking | Data transmitted |
| 11 | FDX | Amber | On | Port works under full duplex |
3. Hardware Installation
3.1 Rackmount Installation
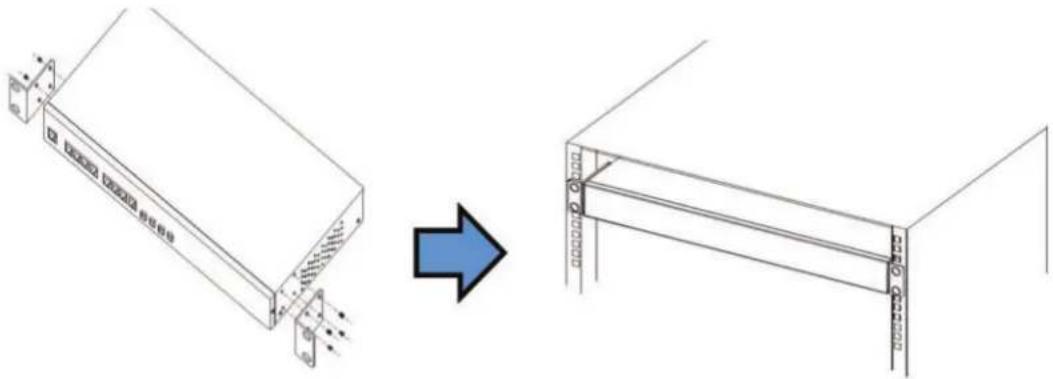
The switch comes with two rackmount kits to allow you to fasten the switch to a rack in any environment.
Follow the steps below to install the switch to a rack.
Step 1: Install left and right front mounting brackets to the switch using 4 M3 screws on each side provided with switch.
Step 2: With front brackets orientated in front of the rack, nest front and rear brackets together. Fasten together using remaining M4 screws into counter sunk holes.
Step 3: Fasten the front mounting bracket to the front of the rack.
natural_image
Technical line drawing showing a device with mounting bracket and a 3D view of its structural frame (no text or symbols)Figure 3-1. Installing the module.
3.2 Module Installation
3.2.1 RJ-45 Module (LE2720C)
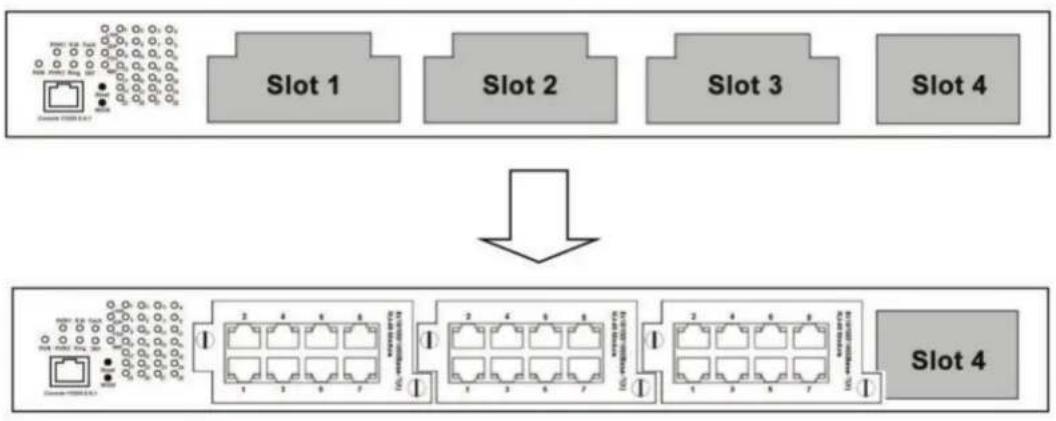
Each LE2700 Series Industrial Managed Ethernet Switches switch supports a maximum of three RJ-45 modules, giving you a total of 24 RJ-45 ports. Follow the steps bellow for installation.
Step 1: Switch off the power of the switch.
Step 2: Insert the modules in Slot 1, 2, and 3 respectively.
Step 3: Switch on the power of the switch.
flowchart
graph TD
    A["Slot 1"] --> B["Slot 2"]
    B --> C["Slot 3"]
    C --> D["Slot 4"]
    D --> E["Slot 4"]
    E --> F["Slot 4"]
    F --> G["Slot 4"]
    G --> H["Slot 4"]
    H --> I["Slot 4"]
    I --> J["Slot 4"]
    J --> K["Slot 4"]
    K --> L["Slot 4"]
    L --> M["Slot 4"]
    M --> N["Slot 4"]
    N --> O["Slot 4"]
    O --> P["Slot 4"]
    P --> Q["Slot 4"]
    Q --> R["Slot 4"]
    R --> S["Slot 4"]
    S --> T["Slot 4"]
    T --> U["Slot 4"]
    U --> V["Slot 4"]
    V --> W["Slot 4"]
    W --> X["Slot 4"]
    X --> Y["Slot 4"]
    Y --> Z["Slot 4"]
Figure 3-3. RJ-45 module.
3.2.2 SFP Module (LE2710C, LE2711C, LE2721C)
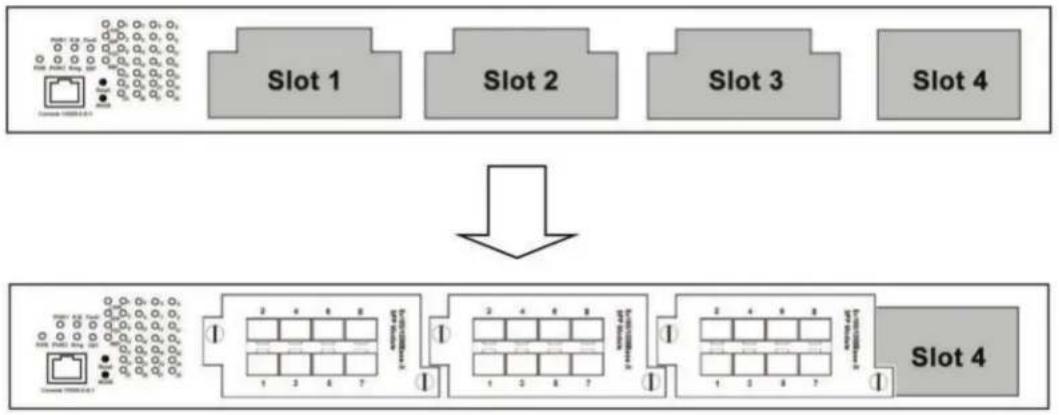
Each LE2700 Series Industrial Managed Ethernet Switches switch supports a maximum of three SFP modules, giving you a total of 24 SFP ports. Follow the steps bellow for installation.
Step 1: Switch off the power of the switch.
Step 2: Insert the modules in Slot 1, 2, and 3 respectively.
Step 3: Switch on the power of the switch.
flowchart
graph TD
    A["Slot 1"] --> B["Slot 2"]
    B --> C["Slot 3"]
    C --> D["Slot 4"]
    E["Slot 4"] --> F["Slot 4"]
    style A fill:#f9f,stroke:#333
    style B fill:#f9f,stroke:#333
    style C fill:#f9f,stroke:#333
    style D fill:#f9f,stroke:#333
    style E fill:#f9f,stroke:#333
    style F fill:#f9f,stroke:#333
Figure 3-4. SFP module.
3.2.3 100/1000 Mbps SFP Module (LE2722C) or 10G SFP+ Module (LE2731C)
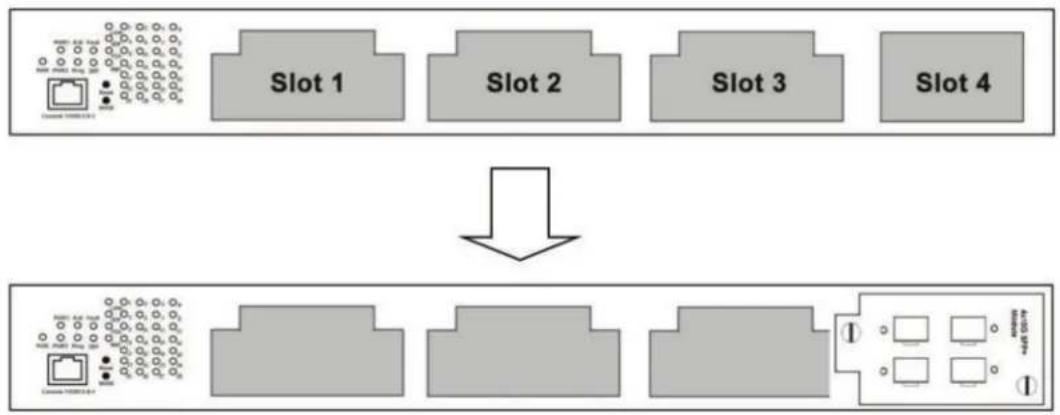
Each LE2700 Series Industrial Managed Ethernet Switches switch supports one 4-port GE SFP or 10G SFP+ module, giving you a total of four GE or 10G ports. Follow the steps bellow for installation. The module can be plugged into the 10-Gigabit Ethernet port of the switch and links the switch with a fiberoptic network.
Follow the steps bellow for installation.
Step 1: Switch off the power of the switch.
Step 2: Insert the module in Slot 4.
Step 3: Switch on the power of the switch.
flowchart
graph TD
    A["Slot 1"] --> B["Slot 2"]
    B --> C["Slot 3"]
    C --> D["Slot 4"]
    D --> E["Layout"]
    style A fill:#f9f,stroke:#333
    style B fill:#f9f,stroke:#333
    style C fill:#f9f,stroke:#333
    style D fill:#f9f,stroke:#333
    style E fill:#f9f,stroke:#333
    style_F["Layout"] --> G["Layout"]
    G --> H["Layout"]
    H --> I["Layout"]
Figure 3-5. 10G SFP+ module.
CAUTION:
- The 10G slot can accommodate a Gigabit or 10G module (LE2722C or LE2731C); therefore, do not insert the LE2722C or LE2731C module in other slots.
- Removing and installing an Ethernet module can shorten its useful life. Do not remove and insert the modules more often than is absolutely necessary.
3.2.4 Power Module
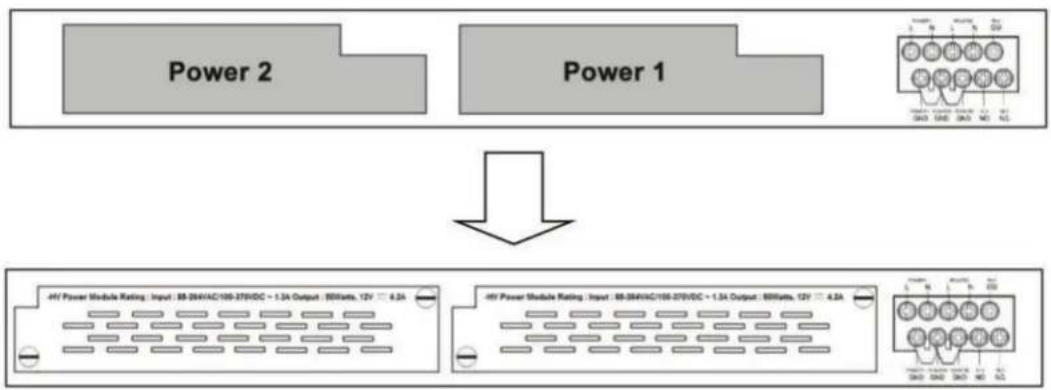
Each LE2700 Series Industrial Managed Ethernet Switches switch supports a maximum of two power modules. Follow the steps bellow for installation.
Step 1: Switch off the power of the switch.
Step 2: Insert the modules in Power 1 and 2 slots respectively.
Step 3: Switch on the power of the switch.
flowchart
graph TD
    A["Power 1"] --> C["Output: 80Watts, 12V"]
    B["Power 2"] --> C["Output: 80Watts, 12V"]
    C --> D["Output: 80Watts, 12V"]
Figure 3-6. Power module.
3.3 Wiring
WARNING:
Do not disconnect modules or wires unless power has been switched off or the area is known to be non-hazardous. The devices may only be connected to the supply voltage shown on the type plate.
ATTENTION:
- Be sure to disconnect the power cord before installing and/or wiring your switches.
- Calculate the maximum possible current in each power wire and common wire. Observe all electrical codes dictating the maximum current allowable for each wire size.
- If the current goes above the maximum ratings, the wiring could overheat, causing serious damage to your equipment.
- Use separate paths to route wiring for power and devices. If power wiring and device wiring paths must cross, make sure the wires are perpendicular at the intersection point.
- Do not run signal or communications wiring and power wiring through the same wire conduit. To avoid interference, wires with different signal characteristics should be routed separately.
-
You can use the type of signal transmitted through a wire to determine which wires should be kept separate. The rule of thumb is that wiring sharing similar electrical characteristics can be bundled together.
-
Separate input wiring from output wiring.
-
Label the wiring to all devices in the system.
3.3.1 Grounding
Grounding and wire routing help limit the effects of noise due to electromagnetic interference (EMI). Run the ground connection from the ground screws to the grounding surface prior to connecting devices.
3.3.2 Fault Relay
The relay contact of the 2-pin terminal block connector is used to detect user-configured events. The two wires attached to the fault contacts form an open circuit when a user-configured event is triggered. If a user-configured event does not occur, the fault circuit remains closed.
3.3.3 Redundant Power Inputs
The LE2700 Series Industrial Managed Ethernet Switches switches support dual redundant power supplies, Power Supply 1 (PWR1) and Power Supply 2 (PWR2). The connections for PWR1, PWR2 and the RELAY are located on the terminal block.
Step 1: Insert the negative/positive DC wires into the V-/V+ terminals, respectively.
Step 2: To keep the DC wires from pulling loose, use a small flat-blade screwdriver to tighten the wire-clamp screws on the front of the terminal block connector.
Step 3: Insert the plastic terminal block connector prongs into the terminal block receptor.
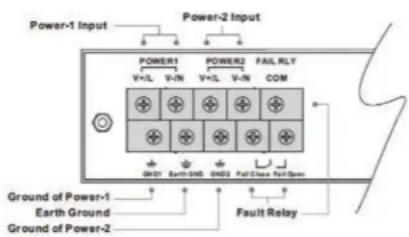
Figure 3-7. Redundant power inputs.
3.4 Connection
3.4.1 Cables
1000/100BASE-TX/10BASE-T Pin Assignments
The LE2700 Series Industrial Managed Ethernet Switches switches come with standard Ethernet ports. According to the link type, the switch uses CAT 3, 4, 5,5e UTP cables to connect to any other network devices (PCs, servers, switches, routers, or hubs). Refer to the following table for cable specifications.
| Table 3-1. Cable types and specifications. | |||
| Cable Type Max. | Length Connector | ||
| 10BASE-T CAT3, 4, 5 100-ohm UTP 328 ft. (100 m) RJ-45 | |||
| 100BASE-TX CAT5 | 100-ohm UTP UTP 328 ft. (100 m) RJ-45 | ||
| 1000BASE-TX | CAT5/CAT5e 100-ohm UTP | UTP 328 ft. (100 m) | RJ-45 |
With 1000/100BASE-TX/10BASE-T cables, pins 1 and 2 are used for transmitting data, and pins 3 and 6 are used for receiving data.
| Table 3-2. 10/100BASE-T RJ-45 pin assignments. | |
| Pin Number | Assignment |
| 1 | TD+ |
| 2 | TD- |
| 3 | RD+ |
| 4 | Not used |
| 5 | Not used |
| 6 | RD- |
| 7 | Not used |
| 8 | Not used |
| Table 3-3. 1000BASE-T RJ-45 pin assignments. | |
| Pin Number | Assignment |
| 1 | BI_DA+ |
| 2 | BI_DA- |
| 3 | BI_DB+ |
| 4 | BI_DC+ |
| 5 | BI_DC- |
| 6 | BI_DB- |
| 7 | BI_DD+ |
| 8 | BI_DD- |
The LE2700 series switches support auto MDI/MDI-X operation. You can use a cable to connect the switch to a PC. Table 3-4 shows the 10BASE-T/100BASE-TX MDI and MDI-X port pinouts.
| Table 3-4. 10/100BASE-T MDI/MDI-X Pin Assignments. | ||
| Pin Number | MDI port MDI-X port | |
| 1 | TD+(transmit) RD+(receive) | |
| 2 | TD-(transmit) RD-(receive) | |
| 3 | RD+(receive) TD+(transmit) | |
| 4 | Not used Not used | |
| 5 | Not used Not used | |
| 6 | RD-(receive) TD-(transmit) | |
| 7 | Not used Not used | |
| 8 | Not used Not used | |
| Table 3-5. 1000BASE-T MDI/MDI-X Pin Assignments. | ||
| Pin Number MDI port MDI-X port | ||
| 1 BI_DA+ BI_DB+ | ||
| 2 BI_DA- BI_DB- | ||
| 3 BI_DB+ BI_DA+ | ||
| 4 BI_DC+ BI_DD+ | ||
| 5 | BI_DC- | BI_DD- |
| 6 BI_DB- | BI_DA- | |
| 7 BI_DD+ | BI_DC+ | |
| 8 | BI_DD- | BI_DC- |
NOTE: "+" and "-" signs represent the polarity of the wires that make up each wire pair.
RS-232 port wiring
You can manage the LE2700 Series Switch via console ports using a RS-232 cable (included). Connect the port to a PC via the RS-232 cable with a DB9 female connector. The DB9 female connector of the RS-232 cable should be connected to the PC while the other end of the cable (RJ-45 connector) should be connected to the console port of the switch.
| Table 3-6. RS-232 port wiring. | ||
| PC Pinout (Male) Assignment | RS-232 with DB9 Female Connector | DB9 to RJ-45 |
| Pin #2 RD | Pin #2 TD | Pin #2 |
| Pin #3 TD | Pin #3 RD | Pin #3 |
| Pin #5 GD | Pin #5 GD | Pin #5 |
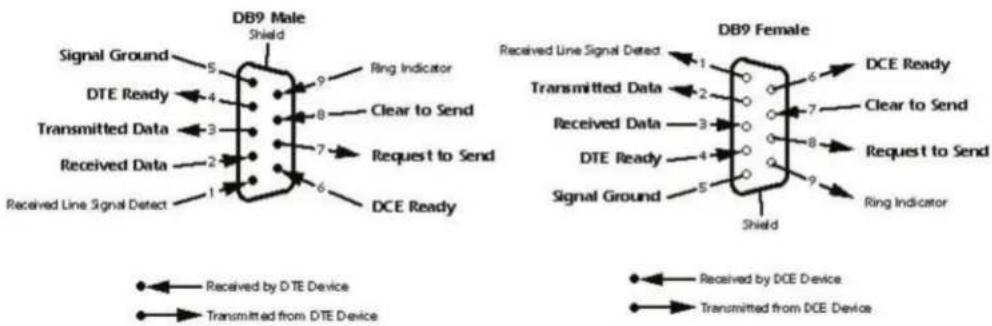
Figure 3-8. RS-232 port wiring diagram.
3.4.2 SFP
The switch comes with fiber optical ports that can connect to other devices using SFP modules. The fiber optical ports are in multimode (0 to 550 m, 850 nm with 50/125- m, 62.5/125- m fiber) and single-mode with LC connectors. Remember to connect the TX port of Switch A should be connected to the RX port of Switch B.
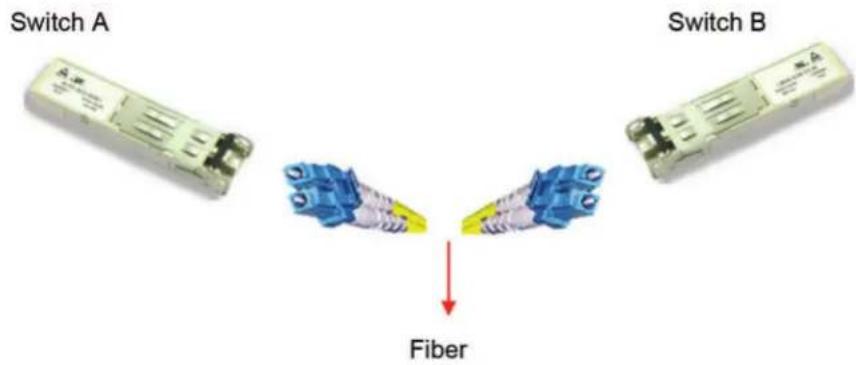
Figure 3-9. Fiber optic ports.
3.4.3 B-Ring/B-Chain
B-Ring
You can connect three or more switches to form a ring topology to gain network redundancy capabilities through the following steps.
- Connect each switch to form a daisychain using an Ethernet cable.
- Set one of the connected switches to be the master and make sure the port setting of each connected switch on the management page corresponds to the physical ports connected. For information about the port setting, please refer to Section 4.1.2, Configuration.
- Connect the last switch to the first switch to form a ring topology.
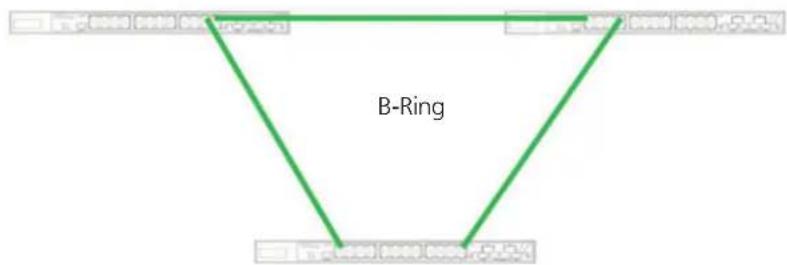
Figure 3-10. B-Ring.
Coupling Ring
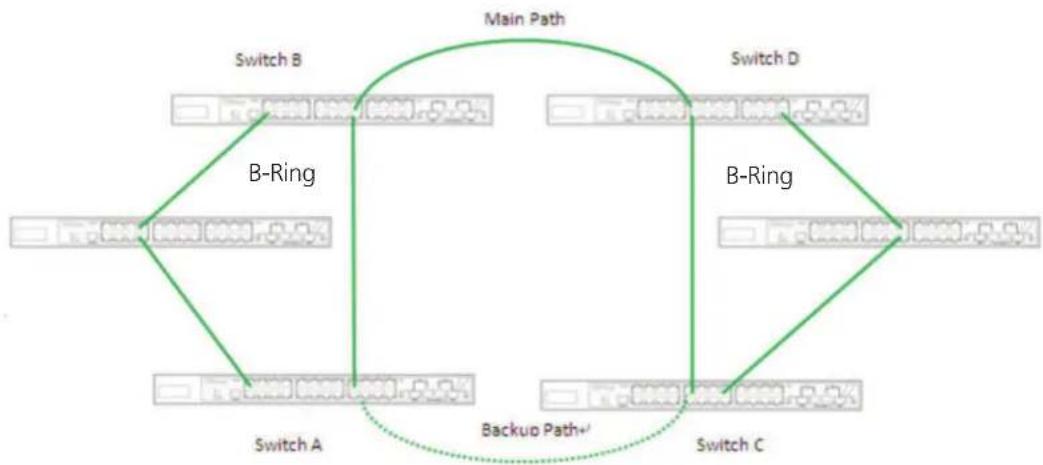
If you already have two B-Ring topologies and would like to connect the rings, you can form them into a coupling ring. All you need to do is select two switches from each ring to be connected, for example, switch A and B from Ring 1 and switch C and D from ring 2. Decide which port on each switch to be used as the coupling port and then link them together, for example, port 1 of switch A to port 2 of switch C and port 1 of switch B to port 2 of switch D. Then, enable Coupling Ring option by checking the checkbox on the management page and select the coupling ring in correspondence to the connected port. For more information on port setting, refer to Section 4.1.2, Configuration. Once the setting is completed, one of the connections will act as the main path while the other will act as the backup path.
flowchart
graph TD
    A["Switch A"] -->|B-Ring| B["Main Path"]
    B -->|B-Ring| C["Switch C"]
    C -->|B-Ring| D["Switch D"]
    D -->|B-Ring| E["Switch B"]
    E -->|Backup Path+| A
    style A fill:#f9f,stroke:#333
    style B fill:#ccf,stroke:#333
    style C fill:#cfc,stroke:#333
    style D fill:#fcc,stroke:#333
    style E fill:#cff,stroke:#333
Figure 3-11. Coupling ring.
Dual Homing
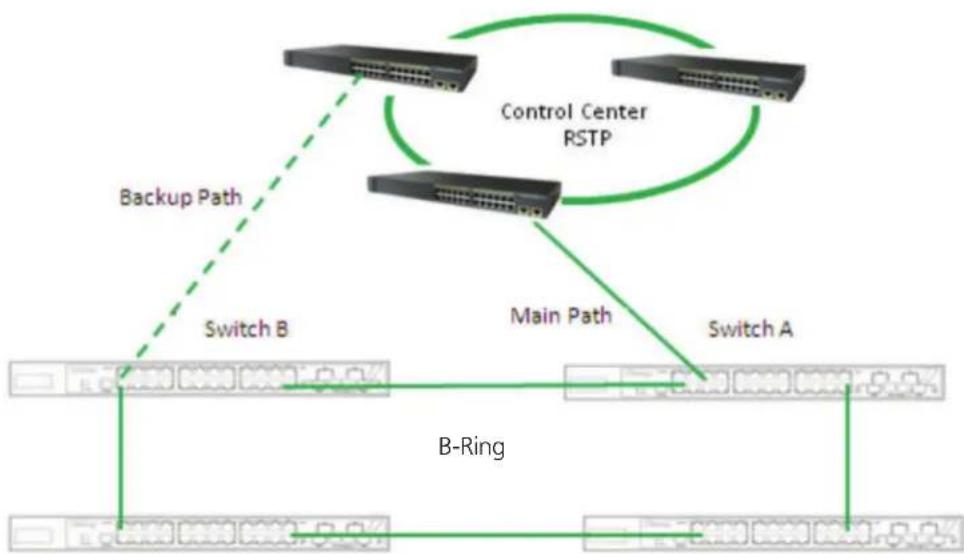
If you want to connect your ring topology to a RSTP network environment, you can use dual homing. Choose two switches (Switch A & B) from the ring for connecting to the switches in the RSTP network (Ciscos switches). The connection of one of the switches (Switch A or B) will act as the primary path, while the other will act as the backup path that is activated when the primary path connection fails.
flowchart
graph TD
    A["Control Center RSTP"] -->|Main Path| B["Switch A"]
    A -->|Main Path| C["Switch B"]
    C -->|Backup Path| A
    B --> D["B-Ring Interface"]
    D --> E["Output Interface"]
    style A fill:#f9f,stroke:#333
    style B fill:#ccf,stroke:#333
    style C fill:#cfc,stroke:#333
    style D fill:#fcc,stroke:#333
Figure 3-12. Dual homing.
B-Chain
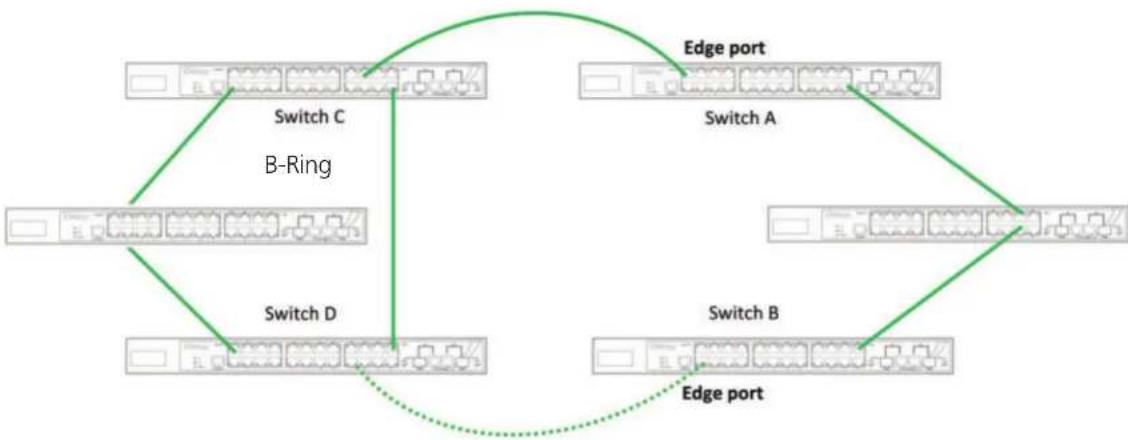
When connecting multiple B-Rings to meet your expansion demand, you can create an B-Chain topology through the following steps.
- Select two switches from the chain (Switch A & B) that you want to connect to the B-Ring and connect them to the switches in the ring (Switch C & D).
-
In correspondence to the port connected to the ring, configure an edge port for both of the connected switches in the chain by checking the box in the management page (see Section 4.1.2, Configuration).
-
Once the setting is completed, one of the connections will act as the main path, and the other as the backup path.
flowchart
graph TD
    A["Switch A"] -->|Edge port| B["Switch B"]
    B -->|Edge port| C["Switch C"]
    C -->|B-Ring| D["Switch D"]
    D -.-> B
    style A fill:#f9f,stroke:#333
    style B fill:#f9f,stroke:#333
    style C fill:#ccf,stroke:#333
    style D fill:#ccf,stroke:#333
Figure 3-13. B-Chain.
4. Redundancy
Redundancy for minimized system downtime is one of the most important concerns for industrial networking devices. Hence, B-Ring has developed proprietary redundancy technologies including B-Ring, O-RSTP, and Open-Ring featuring faster recovery time than existing redundancy technologies widely used in commercial applications, such as STP, RSTP, and MSTP. B-Ring's proprietary redundancy technologies not only support different networking topologies, but also assure the reliability of the network.
4.1 B-Ring
4.1.1 Introduction
B-Ring is a proprietary redundant ring technology, with recovery time of less than 10 milliseconds and up to 250 nodes. The ring protocols identify one switch as the master of the network, and then automatically block packets from traveling through any of the network's redundant loops. If one branch of the ring gets disconnected from the rest of the network, the protocol automatically readjusts the ring so that the part of the network that was disconnected can reestablish contact with the rest of the network. The B-Ring redundant ring technology can protect mission-critical applications from network interruptions or temporary malfunction with its fast recover technology.
4.1.2 Configurations
B-Ring supports three ring topologies: Ring Master, Coupling Ring, and Dual Homing. You can configure the settings in the interface below.
| Table 4-1. Configuration screen components. | |
| Label Description | |
| Redundant Ring Check to enable B-Ring topology. | |
| Ring Master | Only one ring master is allowed in a ring. However, if more than one switch are set to enable Ring Master, the switch with the lowest MAC address will be the active ring master and the others will be backup masters. |
| 1st Ring Port The primary port when the switch is ring master. | |
| 2nd Ring Port The backup port when the switch is ring master. | |
| Coupling Ring Check to enable Coupling Ring. Coupling Ring can divide a big ring into two smaller rings to avoid network topology changes affecting all switches. It is a good method for connecting two rings. | |
| Coupling Port | Ports for connecting multiple rings. A coupling ring needs four switches to build an active and a backup link.Links formed by the coupling ports will run in active/backup mode. |
| Dual Homing Check to enable Dual Homing. When Dual Homing is enabled, the ring will be connected to normal switches through two RSTP links (ex: backbone Switch). The two links work in active/backup mode, and connect each ring to the normal switches in RSTP mode. | |
| Apply Click to apply the configurations. | |
NOTE: Do not set one switch as ring master and coupling ring at the same time, because this could cause heavy loading.
4.2 B-Chain
4.2.1 Introduction
B-Chain is Black Box's revolutionary network redundancy technology which enhances network redundancy for any backbone networks, providing ease-of-use and maximum fault-recovery swiftness, flexibility, compatibility, and cost-effectiveness in a set of network redundancy topologies. The self-healing Ethernet technology designed for distributed and complex industrial networks enables the network to recover in less than 10 ms for up to 250 switches if at any time a segment of the chain fails.
B-Chain allows multiple redundant rings of different redundancy protocols to join and function together as a large and the most robust network topologies. It can create multiple redundant networks beyond the limitations of current redundant ring technologies.
4.2.2 Configurations
B-Chain is very easy to configure and manage. Only one edge port of the edge switch needs to be defined. Other switches beside them just need to have B-Chain enabled.
| Table 4-2. B-Chain screen options. | |
| Label Description | |
| Enable Check to enable B-Chain function | |
| 1st Ring Port The first port connecting to the ring. | |
| 2nd Ring Port The second port connecting to the ring. | |
| Edge Port A B-Chain topology must begin with edge ports. The ports with a smaller switch MAC address will serve as the backup link and RM LED will light up. | |
4.3 MRP
4.3.1 Introduction
MRP (Media Redundancy Protocol) is an industry standard for high-availability Ethernet networks. MRP allowing Ethernet switches in ring configuration to recover from failure rapidly to ensure seamless data transmission. A MRP ring (IEC 62439) can support up to 50 devices and will enable a back-up link in 80ms (adjustable to max. 200ms/500ms).
4.3.2 Configurations
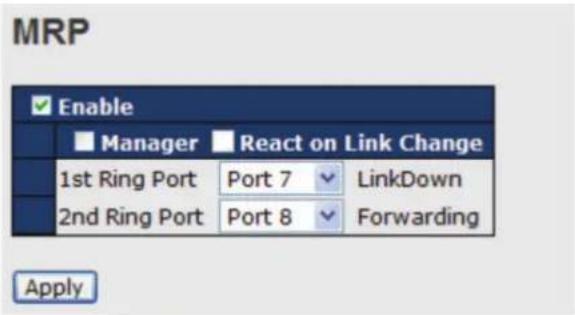
Figure 4-1. MRP screen.
| Table 4-3. MRP configuration screen options. | |
| Label Description | |
| Enable Enables the MRP function | |
| Manager Every MRP topology needs a MRP manager. One MRP topology can only have a Manager. If two or more switches are set to be Manager, the MRP topology will fail. | |
| React on Link Change (Advanced mode) | Faster mode. Enabling this function will cause MRP topology to converge more rapidly. This function only can be set in MRP manager switch. |
| 1st Ring Port Chooses the port which connects to the MRP ring | |
| 2nd Ring Port Chooses the port which connects to the MRP ring | |
4.4 STP/RSTP/MSTP
4.4.1 STP/RSTP
STP (Spanning Tree Protocol), and its advanced versions RSTP (Rapid Spanning Tree Protocol) and MSTP (Multiple Spanning Tree Protocol), are designed to prevent network loops and provide network redundancy. Network loops occur frequently in large networks as when two or more paths run to the same destination, broadcast packets may get in to an infinite loop and hence causing congestion in the network. STP can identify the best path to the destination, and block all other paths. The blocked links will stay connected but inactive. When the best path fails, the blocked links will be activated. Compared to STP which recovers a link in 30 to 50 seconds, RSTP can shorten the time to 5 to 6 seconds.
STP Bridge Status
This page shows the status for all STP bridge instances.

Figure 4-2. STP bridge screen.
| Table 4-4. STP bridge screen options. | |
| Label Description | |
| MSTI The bridge instance. You can also link to the STP detailed bridge status. | |
| Bridge ID The bridge ID of this bridge instance. | |
| Root ID The bridge ID of the currently selected root bridge. | |
| Root Port The switch port currently assigned the root port role. | |
| Root Cost | Root path cost. For a root bridge, this is zero. For other bridges, it is the sum of port path costs on the least cost path to the Root Bridge. |
| Topology Flag The current state of the Topology Change Flag for the bridge instance. | |
| Topology Change Last The time since last Topology Change occurred. | |
| Refresh | Click to refresh the page immediately. |
| Auto-refresh | Check this box to enable an automatic refresh of the page at regular intervals. |
STP Port Status
This page displays the STP port status for the currently selected switch.
| Port | CIST Role | CIST State | Uptime |
| 1 | Non-STP | Forwarding | - |
| 2 | Non-STP | Forwarding | - |
| 3 | Non-STP | Forwarding | - |
| 4 | Non-STP | Forwarding | - |
| 5 | Non-STP | Forwarding | - |
| 6 | Non-STP | Forwarding | - |
| 7 | Non-STP | Forwarding | - |
| 8 | Non-STP | Forwarding | - |
| 9 | Non-STP | Forwarding | - |
| 10 | Non-STP | Forwarding | - |
| 11 | Non-STP | Forwarding | - |
| 12 | Non-STP | Forwarding | - |
Figure 4-3. STP Port Status screen.
| Table 4-5. STP Port Status screen options. | |
| Label Description | |
| Port The switch port number to which the following settings will be applied. | |
| CIST Role | The current STP port role of the CIST port. The values include: AlternatePort, BackupPort, RootPort, and DesignatedPort. |
| State | The current STP port state of the CIST port. The values include: Blocking, Learning, and Forwarding. |
| Uptime The time since the bridge port is last initialized. | |
| Refresh Click to refresh the page immediately. | |
| Auto-refresh Check this box to enable an automatic refresh of the page at regular intervals. | |
STP Statistics
This page displays the STP port statistics for the currently selected switch.
| Port | Transmitted | Received | Discarded | |||||||
| MSTP | RSTP | STP | TCN | MSTP | RSTP | STP | TCN | Unknown | Illegal | |
| No ports enabled | ||||||||||
Figure 4-4. STP statistics screen.
| Table 4-6. STP statistics screen options. | |
| Label Description | |
| Port The switch port number to which the following settings will be applied. | |
| RSTP The number of RSTP configuration BPDUs received/transmitted on the port. | |
| STP The number of legacy STP configuration BPDUs received/transmitted on the port. | |
| TCN The number of (legacy) topology change notification BPDUs received/transmitted on the port. | |
| Discarded Unknown The number of unknown spanning tree BPDUs received (and discarded) on the port. | |
| Discarded Illegal | The number of illegal spanning tree BPDUs received (and discarded) on the port. |
| Refresh Click to refresh the page immediately. | |
| Auto-refresh Check to enable an automatic refresh of the page at regular intervals. | |
STP Bridge Configurations
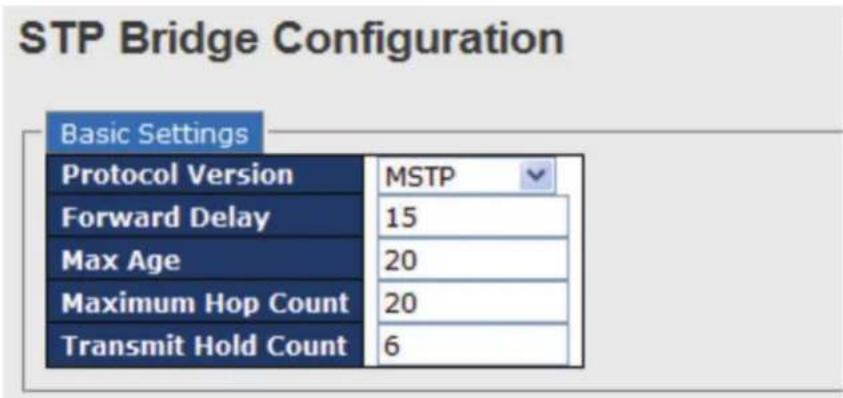
Figure 4-5. STP Bridge Configuration screen.
| Table 4-7. STP Bridge Configuration screen options. | |
| Label Description | |
| Protocol Version The version of the STP protocol. Valid values include STP, RSTP, and MSTP. | |
| Forward Delay | The delay used by STP bridges to transit root and designated ports to forwarding (used in STP compatible mode). The range of valid values is 4 to 30 seconds. |
| Max Age | The maximum time the information transmitted by the root bridge is considered valid. The range of valid values is 6 to 40 seconds, and Max Age must be <= (FwdDelay-1)*2. |
| Maximum Hop Count | This defines the initial value of remaining hops for MSTI information generated at the boundary of an MSTI region. It defines how many bridges a root bridge can distribute its BPDU information to. The range of valid values is 4 to 30 seconds, and MaxAge must be <= (FwdDelay-1)*2. |
| Transmit Hold Count | The number of BPDUs a bridge port can send per second. When exceeded, transmission of the next BPDU will be delayed. The range of valid values is 1 to 10 BPDUs per second. |
| Save | Click to save changes. |
| Reset | Click to undo any changes made locally and revert to previously saved values. |
4.4.2 MSTP
Since the recovery time of STP and RSTP takes seconds, which are unacceptable in some industrial applications, MSTP was developed. The technology supports multiple spanning trees within a network by grouping and mapping multiple VLANs into different spanning-tree instances, known as MSTIs, to form individual MST regions. Each switch is assigned to an MST region. Hence, each MST region consists of one or more MSTP switches with the same VLANs, at least one MST instance, and the same MST region name. Therefore, switches can use different paths in the network to effectively balance loads.
Port Settings
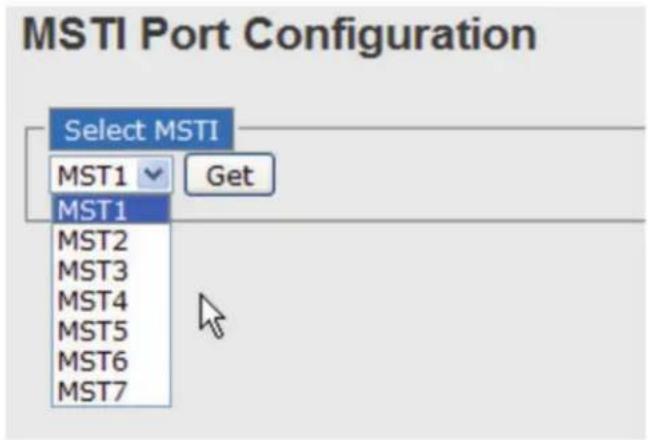
This page allows you to examine and change the configurations of current MSTI ports. A MSTI port is a virtual port, which is instantiated separately for each active CIST (physical) port for each MSTI instance configured and applicable for the port. The MSTI instance must be selected before MSTI port configuration options are displayed.
This page contains MSTI port settings for physical and aggregated ports. The aggregation settings are stack global.
| MSTI Normal Ports Configuration | ||
| Port | Path Cost | Priority |
| 1 | Auto | 128 |
| 2 | Auto | 128 |
| 3 | Auto | 128 |
| 4 | Auto | 128 |
| 5 | Auto | 128 |
| 6 | Auto | 128 |
Figure 4-6. MSTI Port Configuration screens.
| Table 4-8. MSTI Port Configuration screen options. | |
| Label Description | |
| Port The switch port number of the corresponding STP CIST (and MSTI) port. | |
| Path Cost | Configures the path cost incurred by the port. Auto will set the path cost according to the physical link speed by using the 802.1D-recommended values. Specific allows you to enter a user-defined value. The path cost is used when establishing an active topology for the network. Lower path cost ports are chosen as forwarding ports in favor of higher path cost ports. The range of valid values is 1 to 200000000. |
| Priority Configures the priority for ports having identical port costs. (See above). | |
| Save Click to save changes. | |
| Reset Click to undo any changes made locally and revert to previously saved values. | |
Mapping
This page allows you to examine and change the configurations of current STP MSTI bridge instance.
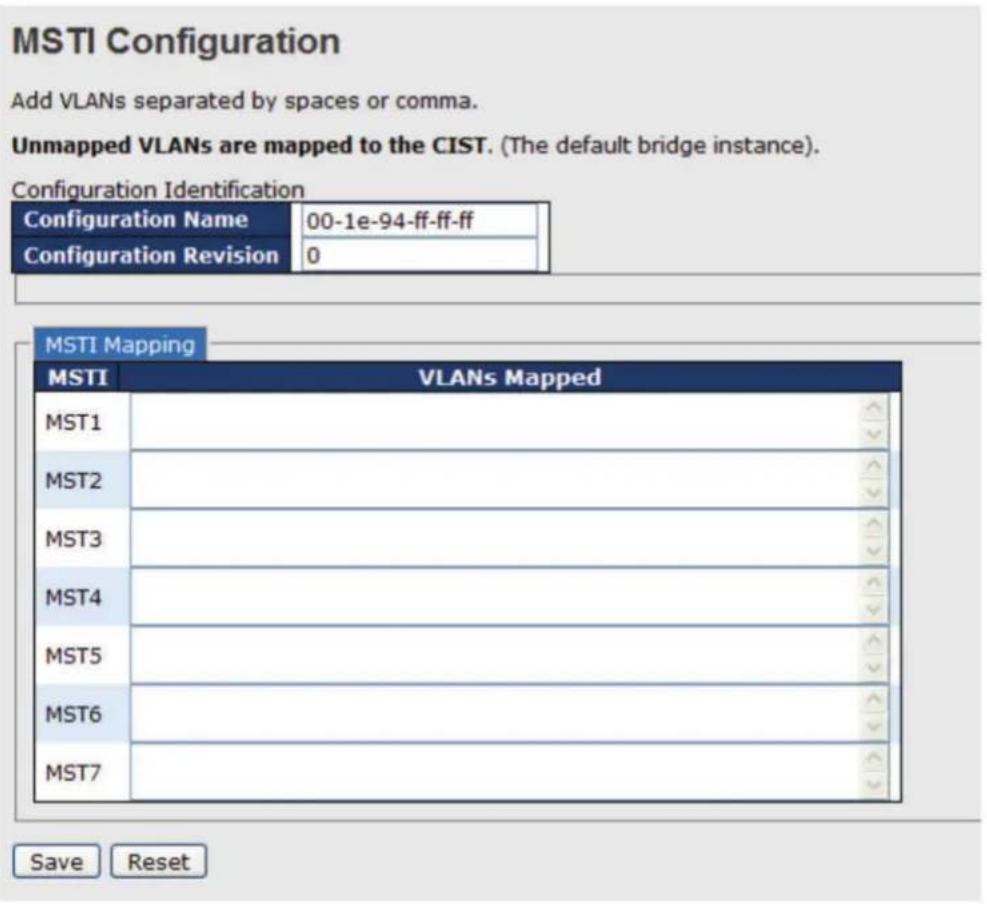
Figure 4-7. MSTI Configuration screen.
| Table 4-9. MSTI Configuration screen options. | |
| Label Description | |
| Configuration Name | The name which identifies the VLAN to MSTI mapping. Bridges must share the name and revision (see below), as well as the VLAN-to-MSTI mapping configurations in order to share spanning trees for MSTIs (intra-region). The name should not exceed 32 characters. |
| Configuration Revision | Revision of the MSTI configuration named above. This must be an integer between 0 and 65535. |
| MSTI The bridge instance. | The CIST is not available for explicit mapping, as it will receive the VLANs not explicitly mapped. |
| VLANS Mapped | The list of VLANs mapped to the MSTI. The VLANs must be separated with commas and/or space. A VLAN can only be mapped to one MSTI. An unused MSTI will be left empty (ex. without any mapped VLANs). |
| Save Click to save changes. | |
| Reset Click to undo any changes made locally and revert to previously saved values. | |
Priority
This page allows you to examine and change the configurations of current STP MSTI bridge instance priority.
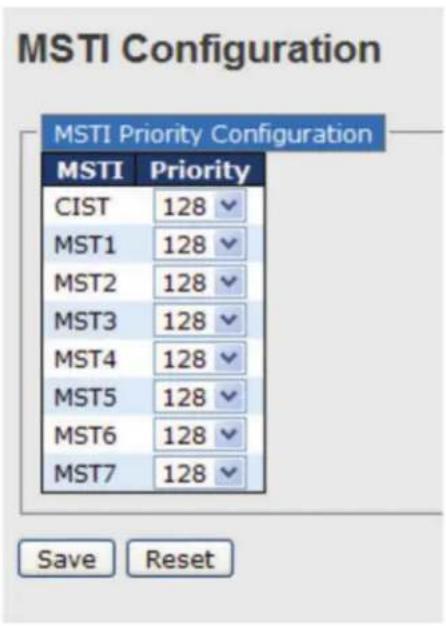
Figure 4-8. MSTI configuration screen.
| Table 4-10. MSTI configuration screen options. | |
| Label Description | |
| MSTI The bridge instance. CIST is the default instance, which is always active. | |
| Priority Indicates bridge priority. The lower the value, the higher the priority. The bridge priority, MSTI instance number, and the 6-byte MAC address of the switch forms a bridge identifier. | |
| Save Click to save changes. | |
| Reset Click to undo any changes made locally and revert to previously saved values. | |
4.4.3 CIST
With the ability to cross regional boundaries, CIST is used by MSTP to communicate with other MSTP regions and with any RSTP and STP single-instance spanning trees in the network. Any boundary port, that is, if it is connected to another region, will automatically belongs solely to CIST, even if it is assigned to an MSTI. All VLANs that are not members of particular MSTIs are members of the CIST.
Port Settings
| CIST Aggregated Ports Configuration | |||||||||
| Port | STP Enabled | Path Cost | Priority | Admin Edge | Auto Edge | Restricted Role | TCN | BPDU Guard | Point-to-point |
| - | □ | Auto | 128 | Edge | ✓ | □ | □ | □ | Forced True |
| CIST Normal Ports Configuration | |||||||||
| Port | STP Enabled | Path Cost | Priority | Admin Edge | Auto Edge | Restricted Role | TCN | BPDU Guard | Point-to-point |
| 1 | □ | Auto | 128 | Edge | ✓ | □ | □ | □ | Auto |
| 2 | □ | Auto | 128 | Edge | ✓ | □ | □ | □ | Auto |
| 3 | □ | Auto | 128 | Edge | ✓ | □ | □ | □ | Auto |
| 4 | □ | Auto | 128 | Edge | ✓ | □ | □ | □ | Auto |
| 5 | □ | Auto | 128 | Edge | ✓ | □ | □ | □ | Auto |
| 6 | □ | Auto | 128 | Edge | ✓ | □ | □ | □ | Auto |
Figure 4-9. Port settings screen.
| Table 4-11. Port Settings screen options. | |
| Label Description | |
| Port The switch port number to which the following settings will be applied. | |
| STP Enabled Check to enable STP for the port. | |
| Path Cost | Configures the path cost incurred by the port. Auto will set the path cost according to the physical link speed by using the 802.1D-recommended values. Specific allows you to enter a user-defined value. The path cost is used when establishing an active topology for the network. Lower path cost ports are chosen as forwarding ports in favor of higher path cost ports. The range of valid values is 1 to 200000000. |
| Priority Configures the priority for ports having identical port costs. (See above). | |
| OpenEdge (setate flag) | A flag indicating whether the port is connected directly to edge devices or not (no bridges attached). Transiting to the forwarding state is faster for edge ports (operEdge set to true) than other ports. |
| AdminEdge | Configures the operEdge flag to start as set or cleared.(the initial operEdge state when a port is initialized). |
| AutoEdge | Check to enable the bridge to detect edges at the bridge port automatically. This allows operEdge to be derived from whether BPDUs are received on the port or not. |
| Restricted Role | When enabled, the port will not be selected as root port for CIST or any MSTI, even if it has the best spanning tree priority vector. Such a port will be selected as an alternate port after the root port has been selected. If set, spanning trees will lose connectivity. It can be set by a network administrator to prevent bridges outside a core region of the network from influencing the active spanning tree topology because those bridges are not under the full control of the administrator. This feature is also known as Root Guard. |
| Table 4-11 (continued). Port Settings screen options. | |
| Label Description | |
| Restricted TCN | When enabled, the port will not propagate received topology change notifications and topology changes to other ports. If set, it will cause temporary disconnection after changes in an active spanning trees topology as a result of persistent incorrectly learned station location information. It is set by a network administrator to prevent bridges outside a core region of the network from causing address flushing in that region because those bridges are not under the full control of the administrator or is the physical link state for the attached LANs transitions frequently. |
| Point2Point | Configures whether the port connects to a point-to-point LAN rather than a shared medium. This can be configured automatically or set to true or false manually. Transiting to forwarding state is faster for point-to-point LANs than for shared media. |
| Save Click to save changes. | |
| Reset Click to undo any changes made locally and revert to previously saved values. | |
4.5 Fast Recovery
Fast recovery mode can be set to connect multiple ports to one or more switches. IGPS-9084GP with fast recovery mode will provide redundant links. Fast recovery mode supports 12 priorities. Only the first priority will be the active port, and the other ports with different priorities will be backup ports.
Fast Recovery Mode
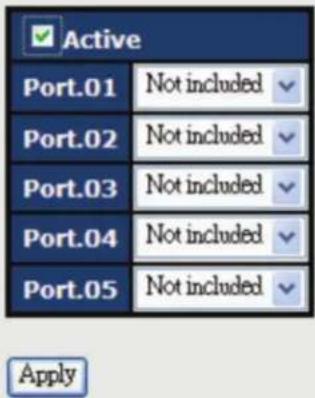
Figure 4-10. Fast Recovery screen.
| Table 4-12. Fast Recovery screen options. | |
| Label Description | |
| Active Activates fast recovery mode. | |
| port | Ports can be set to 12 priorities. Only the port with the highest priority will be the active port. 1st Priority is the highest. |
| Apply Click to activate the configurations. | |
5. Management
The switch can be controlled via a built-in Web server that supports Internet Explorer (Internet Explorer 5.0 or above versions) and other Web browsers such as Chrome. Therefore, you can manage and configure the switch easily and remotely. You can also upgrade firmware via a Web browser. The Web management function not only reduces network bandwidth consumption, but also enhances access speed and provides a user-friendly viewing screen.
NOTE: By default, IE5.0 or later version do not allow Java applets to open sockets. You need to modify the browser setting separately in order to enable Java applets for network ports.
Preparing for Web Management
You can access the management page of the switch via the following default values:
IP Address: 192.168.10.1
Subnet Mask: 255.255.255.0
Default Gateway: 192.168.10.254
User Name: admin
Password: admin
System Login
-
Launch Internet Explorer.
-
Type http:// and the IP address of the switch. Press Enter.

Figure 5-1. System login.
- A login screen appears.
- Type in the username and password. The default username and password is admin.
- Click Enter or OK button, the management Web page appears.
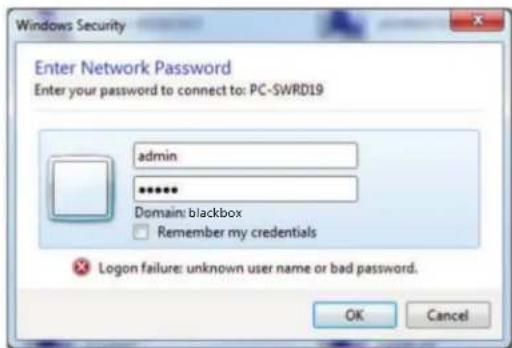
Figure 5-2. Login screen.
After logging in, you can see the information of the switch as shown in the next screen.
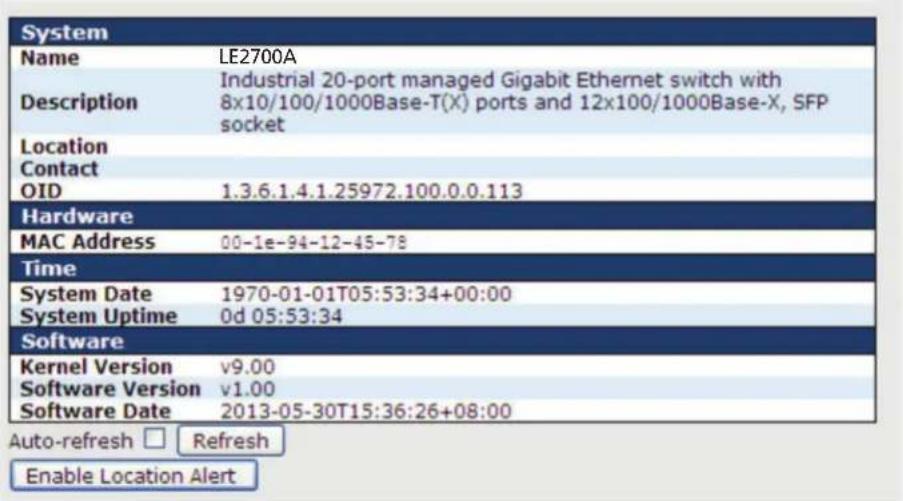
Figure 5-3. System information.
On the right-hand side of the management interface shows links to various settings. You can click on the links to access the configuration pages of different functions.
5.1 Basic Settings
Basic Settings allow you to configure the basic functions of the switch.
5.1.1 System Information
This page shows the general information of the switch.
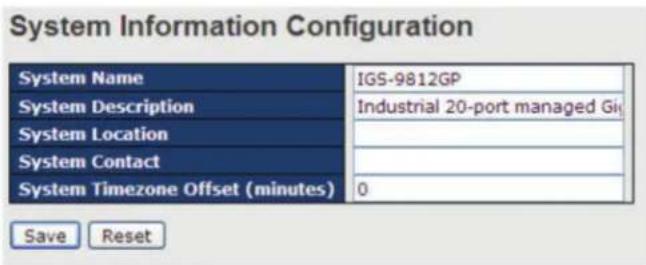
Figure 5-4. System information configuration.
| Table 5-1. System information configuration screen options. | |
| Label Description | |
| System Name | An administratively assigned name for the managed node. By convention, this is the node's fully-qualified domain name. A domain name is a text string consisting of alphabets (A-Z, a-z), digits (0-9), and minus sign (-). Space is not allowed to be part of the name. The first character must be an alpha character. And the first or last character must not be a minus sign. The allowed string length is 0 to 255. |
| System Description | Description of the device. |
| System Location | The physical location of the node (e.g., telephone closet, 3rd floor). The allowed string length is 0 to 255, and only ASCII characters from 32 to 126 are allowed. |
| Table 5-1 (continued). System information configuration screen options. | |
| Label Description | |
| System Contact | The textual identification of the contact person for this managed node, together with information on how to contact this person. The allowed string length is 0 to 255, and only ASCII characters from 32 to 126 are allowed. |
| System Timezone offset (minutes) | Provides the time-zone offset from UTC/GMT.The offset is given in minutes east of GMT. The valid range is from -720 to 720 minutes. |
| Save Click to save changes. | |
| Reset Click to undo | any changes made locally and revert to previously saved values. |
5.1.2 Admin & Password
This page allows you to configure the system password required to access the web pages or log in from CLI.
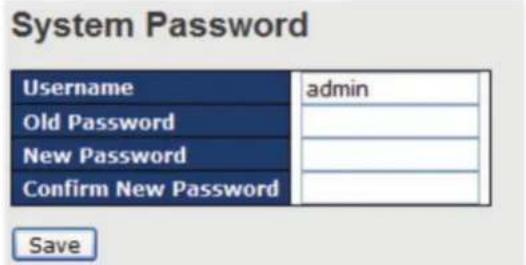
Figure 5-5. System Password screen.
| Table 5-2. System Password screen options. | |
| Label Description | |
| Old Password The existing password. If this is incorrect, you cannot set the new password. | |
| New Password | The new system password. The allowed string length is 0 to 31, and only ASCII characters from 32 to 126 are allowed. |
| Confirm New Password | Re-type the new password. |
| Save Click to save changes. | |
5.1.3 Authentication
This page allows you to configure how a user is authenticated when he/she logs into the switch via one of the management interfaces.
Authentication Method Configuration
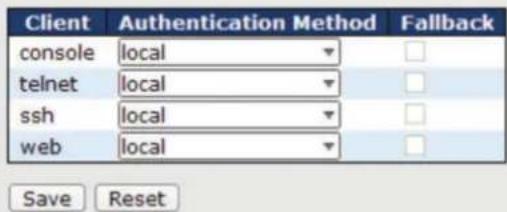
Figure 5-6. Authentication Method Configuration screen.
| Table 5-3. Authentication Method Configuration screen options. | |
| Label Description | |
| Client The management client for which the configuration below applies. | |
| Authentication Method | Authentication Method can be set to one of the following values: None: authentication is disabled and login is not possible. Local: local user database on the switch is used for authentication. Radius: a remote RADIUS server is used for authentication. |
| Fallback Check to enable fallback to local authentication. If none of the configured authentication servers are active, the local user database is used for authentication. This is only possible if Authentication Method is set to a value other than none or local. | |
| Save Click to save changes. | |
| Reset Click to undo any changes made locally and revert to previously saved values. | |
5.1.4 IP Settings
You can configure IP information of the switch in this page.
| Configured | Current | |
| DHCP Client | Renew | |
| IP Address | 192.168.10.1 | 192.168.10.1 |
| IP Mask | 255.255.255.0 | 255.255.255.0 |
| IP Router | 0.0.0.0 | 0.0.0.0 |
| VLAN ID | 1 | 1 |
| DNS Server | 0.0.0.0 | 0.0.0.0 |
Figure 5-7. IP Configuration screen.
| Table 5-4. IP Configuration screen options. | |
| Label Description | |
| DHCP Client | Enable the DHCP client by checking this box. If DHCP fails or the configured IP address is zero, DHCP will retry. If DHCP retry fails, DHCP will stop trying and the configured IP settings will be used. |
| IP Address | Assigns the IP address of the network in use. If DHCP client function is enabled, you do not need to assign the IP address. The network DHCP server will assign the IP address to the switch and it will be displayed in this column. The default IP is 192.168.10.1. |
| IP Mask Assigns the subnet mask of the IP address. If DHCP client function is enabled, you do not need to assign the subnet mask. | |
| IP Router | Assigns the network gateway for the switch. The default gateway is 192.168.10.254. |
| VLAN ID Provides the managed VLAN ID. The allowed range is 1 through 4095. | |
| DNS Server Provides the IP address of the DNS server in dotted decimal notation. | |
| Save Click to save changes. | |
| Reset Click to undo any changes made locally and revert to previously saved values. | |
5.1.5 IPv6 Settings
You can configure IPv6 information of the switch on the following page.
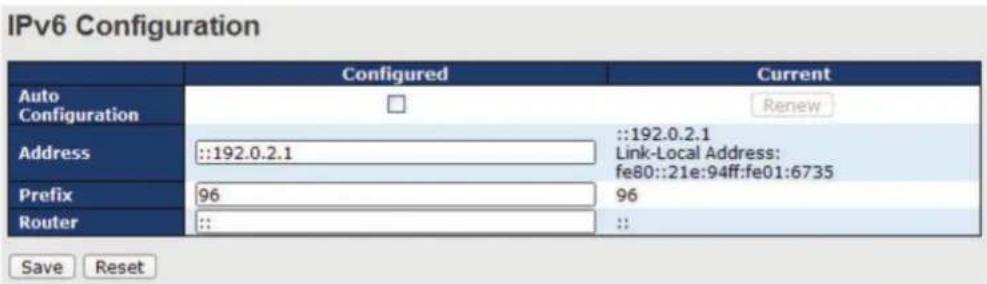
Figure 5-8. IPv6 Configuration screen.
| Table 5-5. IPv6 Configuration screen options. | |
| Label Description | |
| Auto Configuration | Check to enable IPv6 auto-configuration. If the system cannot obtain the stateless address in time, the configured IPv6 settings will be used. The router may delay responding to a router solicitation for a few seconds; therefore, the total time needed to complete auto-configuration may be much longer. |
| Address | Provides the IPv6 address of the switch. IPv6 address consists of 128 bits represented as eight groups of four hexadecimal digits with a colon separating each field (:). For example, in 'fe80::215:c5ff:fe03:4dc7', the symbol '::' is a special syntax that can be used as a shorthand way of representing multiple 16-bit groups of contiguous zeros; but it can appear only once. It can also represent a legally valid IPv4 address. For example, “::192.1.2.34”. |
| Prefix Provides the IPv6 prefix of the switch. The allowed range is 1 to 128. | |
| Router | Provides the IPv6 address of the switch. IPv6 address consists of 128 bits represented as eight groups of four hexadecimal digits with a colon separating each field (:). For example, in 'fe80::215:c5ff:fe03:4dc7', the symbol '::' is a special syntax that can be used as a shorthand way of representing multiple 16-bit groups of contiguous zeros; but it can appear only once. It canalso represent a legally valid IPv4 address. For example, “::192.1.2.34”. |
| Save Click to save changes. | |
| Reset Click to undo | any changes made locally and revert to previously saved values. |
5.1.6 HTTPS
You can configure the HTTPS mode in the following page.
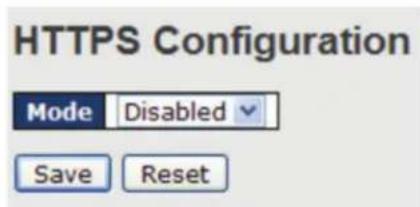
Figure 5-9. HTTPS Configuration screen.
| Table 5-6. HTTPS Configuration options. | |
| Label Description | |
| Mode | Indicates the selected HTTPS mode. When the current connection is HTTPS, disabling HTTPS will automatically redirect web browser to an HTTP connection. The modes include:Enabled: enable HTTPS.Disabled: disable HTTPS. |
| Save Click to save changes. | |
| Reset Click to undo any changes made locally and revert to previously saved values. | |
5.1.7 SSH
You can configure the SSH mode in the following page.
Figure 5-10. SSH Configuration screen.
| Table 5-7. SSH Configuration screen options. | |
| Label Description | |
| Mode Indicates the selected SSH mode. The modes include:Enabled: enable SSH.Disabled: disable SSH. | |
| Save Click to save changes. | |
| Reset Click to undo any changes made locally and revert to previously saved values. |
5.1.8 LLDP
LLDP Configurations
This page allows you to examine and configure current LLDP port settings.
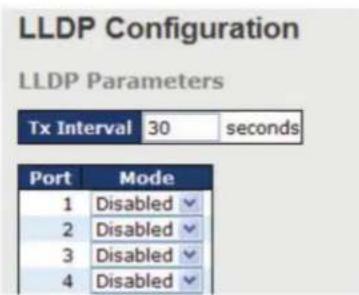
Figure 5-11. LLDP Configurations.
| Table 5-8. LLDP Configuration screen options. | |
| Label Description | |
| Port The switch port number to which the following settings will be applied. | |
| Mode Indicates the selected LLDP mode. | |
| Rx only: the switch will not send out LLDP information, but LLDP information from its neighbors will be analyzed.Tx only: the switch will drop LLDP information received from its neighbors, but will send out LLDP information.Disabled: the switch will not send out LLDP information, and will drop LLDP information received from its neighbors.Enabled: the switch will send out LLDP information, and will analyze LLDP information received from its neighbors. | |
LLDP Neighbor Information
This page provides a status overview for all LLDP neighbors. The following table contains information for each port on which an LLDP neighbor is detected. The columns include the following information:
| Local Port | Chassis ID | Remote Port ID | System Name | Port Description | System Capabilities | Management Address |
| Port 8 | 00-1E-94-12-45-78 | 7 | IGS-9812GP | Port #7 | Bridge(+) | 192.168.10.14 (IPv4) |
Figure 5-12. LLDP Neighbor Information screen.
| Table 5-9. LLDP Neighbor Information screen options. | |
| Label Description | |
| Local Port The port | that you use to transmits and receives LLDP frames. |
| Chassis ID The identification number of the neighbor sending out the LLDP frames. | |
| Remote Port ID The identification of the neighbor port. | |
| System Name The name advertised by the neighbor. | |
| Port Description The description of the port advertised by the neighbor. | |
| System Capabilities | Description of the neighbor's capabilities. The capabilities include:1. Other2. Repeater3. Bridge4. WLAN Access Point5. Router6. Telephone7. DOCSIS Cable Device8. Station Only9. ReservedWhen a capability is enabled, a (+) will be displayed. If the capability is disabled, a (-) will be displayed. |
| Management Address | The neighbor's address that can be used to help network management. This may contain the neighbor's IP address. |
| Refresh Click to refresh the page immediately. | |
| Auto-Refresh Check to enable an automatic refresh of the page at regular intervals. | |
Port Statistics
This page provides an overview of all LLDP traffic. Two types of counters are shown. Global counters will apply settings to the whole switch stack, while local counters will apply settings to specified switches.
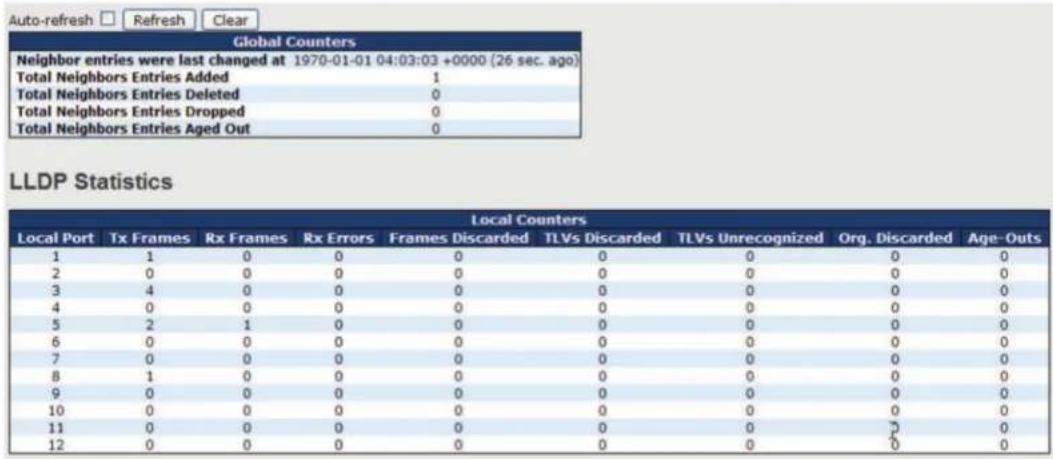
Figure 5-13. Port Statistics screen.
Global Counters
| Table 5-10. Global Counters options. | |
| Label Description | |
| Neighbor entries were last changed at Shows the time when the last entry was deleted or added. | |
| Total Neighbors Entries Added Shows the number of new entries added since switch reboot. | |
| Total Neighbors Entries Deleted Shows the number of new entries deleted since switch reboot. | |
| Total Neighbors Entries Dropped Shows the number of LLDP frames dropped due to full entry table. | |
| Total Neighbors Entries Aged Out Shows the number of entries deleted due to expired time-to-live. | |
| Table 5-11. Local Counters options. | |
| Label Description | |
| Local Port The port that receives or transmits LLDP frames. | |
| Tx Frames The number of LLDP frames transmitted on the port. | |
| Rx Frames The number of LLDP frames received on the port. | |
| Rx Errors The number of received LLDP frames containing errors. | |
| Frames Discarded | If a port receives an LLDP frame, and the switch's internal table is full, the LLDP frame will be counted and discarded. This situation is known as "too many neighbors" in the LLDP standard. LLDP frames require a new entry in the table if Chassis ID or Remote Port ID is not included in the table. Entries are removed from the table when a given port links down, an LLDP shutdown frame is received, or when the entry ages out. |
| TLVs Discarded | Each LLDP frame can contain multiple pieces of information, known as TLVs (Type Length Value). If a TLV is malformed, it will be counted and discarded. |
| TLVs Unrecognized | The number of well-formed TLVs, but with an unknown type value. |
| Org. Discarded | The number of organizationally TLVs received. |
| Table 5-11 (continued). Local Counters options. | |
| Label Description | |
| Age-Outs | Each LLDP frame contains information about how long the LLDP information is valid (age-out time). If no new LLDP frame is received during the age-out time, the LLDP information will be removed, and the value of the age-out counter will be incremented. |
| Refresh Click to refresh the page immediately. | |
| Clear Click to clear the local counters. All counters (including global counters) are cleared upon reboot. | |
| Auto-refresh Check to enable an automatic refresh of the page at regular intervals. | |
5.1.9 Modbus TCP
This page shows Modbus TCP support of the switch. (For more information regarding Modbus, please visit http://www.modbus.org/)
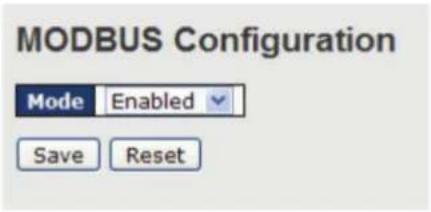
Figure 5-14. Modbus configuration screen.
| Table 5-12. Modbus TCP support. | |
| Label Description | |
| Mode Shows the existing status of the | Modbus TCP function. |
5.1.10 Backup/Restore Configurations
You can save/view or load switch configurations. The configuration file is in XML format.
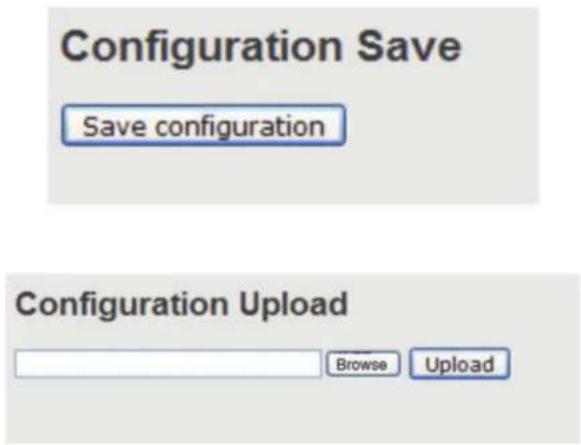
Figure 5-15.
5.1.11 Firmware Update
This page allows you to update the firmware of the switch.
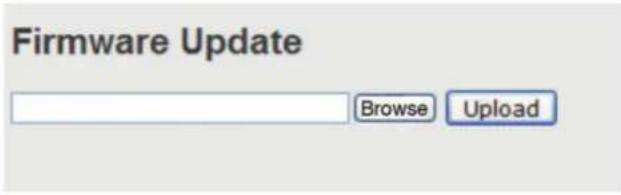
Figure 5-16. Firmware Update screen.
5.2 DHCP Server
The switch provides DHCP server functions. By enabling DHCP, the switch will become a DHCP server and dynamically assigns IP addresses and related IP information to network clients.
5.2.1 Basic Settings
This page allows you to set up DHCP settings for the switch. You can check the Enabled checkbox to activate the function. Once the box is checked, you will be able to input information in each column.
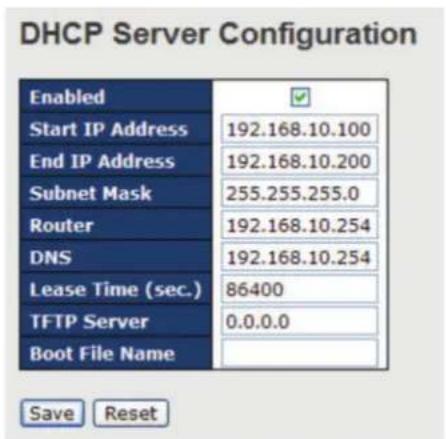
Figure 5-17. DHCP Server Configuration screen.
5.2.2 Dynamic Client List
When DHCP server functions are activated, the switch will collect DHCP client information and display in the following table.
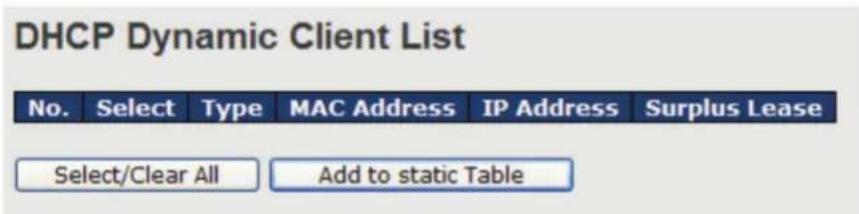
Figure 5-18. DHCP Dynamic Client List.
5.2.3 Client List
You can assign a specific IP address within the dynamic IP range to a specific port. When a device is connected to the port and requests for dynamic IP assigning, the switch will assign the IP address that has previously been assigned to the connected device.
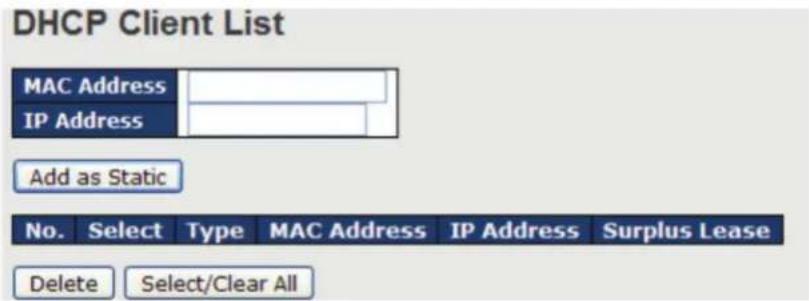
Figure 5-19. DHCP Client Lists screen.
5.2.4 Relay Agent
DHCP relay is used to forward and transfer DHCP messages between the clients and the server when they are not in the same subnet domain. You can configure the function in this page.
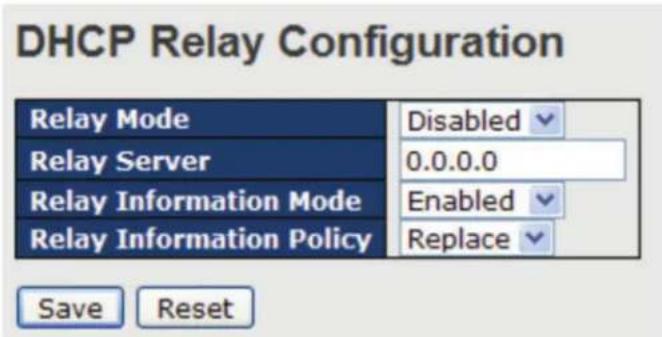
Figure 5-20. DHCP Relay Configuration screen.
| Table 5-13. DHCP Relay Configuration screen options. | |
| Label Description | |
| Relay Mode | Indicates the existing DHCP relay mode. The modes include:Enabled: activate DHCP relay. When DHCP relay is enabled, the agent forwards and transfers DHCP messages between the clients and the server when they are not in the same subnet domain to prevent the DHCP broadcast message from flooding for security considerations.Disabled: disable DHCP relay |
| Relay Server | Indicates the DHCP relay server IP address. A DHCP relay agent is used to forward and transfer DHCP messages between the clients and the server when they are not in the same subnet domain. |
| Relay Information Mode | Indicates the existing DHCP relay information mode. The format of DHCP option 82 circuit ID format is "[vlan_id][module_id][port_no}". The first four characters represent the VLAN ID, and the fifth and sixth characters are the module ID. In stand-alone devices, the module ID always equals to 0; in stacked devices, it means switch ID. The last two characters are the port number. For example, "00030108" means the DHCP message received form VLAN ID 3, switch ID 1, and port No. 8. The option 82 remote ID value equals to the switch MAC address.The modes include: Enabled: activate DHCP relay information. When DHCP relay information is enabled, the agent inserts specific information (option 82) into a DHCP message when forwarding to a DHCP server and removes it from a DHCP message when transferring to a DHCP client. It only works when DHCP relay mode is enabled.Disabled: disable DHCP relay information |
| Table 5-13 (continued). DHCP Relay Configuration screen options. | |
| Label Description | |
| Relay Information Policy | Indicates the policies to be enforced when receiving DHCP relay information. When DHCP relay information mode is enabled, if the agent receives a DHCP message that already contains relay agent information, it will enforce the policy. The Replace option is invalid when relay information mode is disabled. The policies includes:Replace: replace the original relay information when a DHCP message containing the information is received.Keep: keep the original relay information when a DHCP message containing the information is received.Drop: drop the package when a DHCP message containing the information is received. |
The relay statistics show the information of relayed packets of the switch.
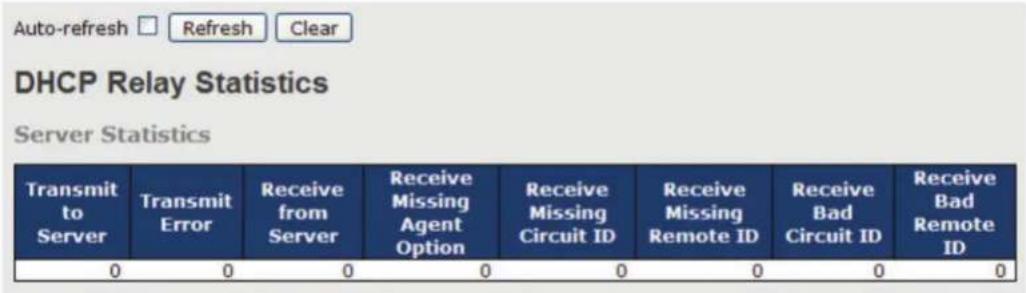
Figure 5-21. DHCP Relay Statistics.
| Table 5-14. DHCP Relay Statistics screen options. | |
| Label Description | |
| Transmit to Server The number of packets relayed from the client to the server. | |
| Transmit Error The number of packets with errors when being sent to clients. | |
| Receive from Server The number of packets received from the server. | |
| Receive Missing Agent Option The number of packets received without agent information. | |
| Receive Missing Circuit ID The number of packets received with Circuit ID. | |
| Receive Missing Remote ID The number of packets received with the Remote ID option missing. | |
| Receive Bad Circuit ID The number of packets whose Circuit ID do not match the known circuit ID. | |
| Receive Bad Remote ID The number of packets whose Remote ID do not match the known Remote ID. | |
| Transmit to Client | Transmit Error | Receive from Client | Receive Agent Option | Replace Agent Option | Keep Agent Option | Drop Agent Option |
| 0 | 0 | 0 | 0 | 0 | 0 | 0 |
Figure 5-22. Client Statistics screen.
| Table 5-15. Client Statistics screen options. | |
| Label Description | |
| Transmit to Client The number of packets relayed from the server to the client. | |
| Transmit Error The number of packets with errors when being sent to servers. | |
| Receive from Client The number of packets received from the server. | |
| Receive Agent Option The number of received packets containing relay agent information. | |
| Replace Agent Option | The number of packets replaced when received messages contain relay agent information. |
| Keep Agent Option The number of packets whose relay agent information is retained. | |
| Drop Agent Option | The number of packets dropped when received messages contain relay agent information. |
5.3 Port Setting
Port Setting allows you to manage individual ports of the switch, including traffic, power, and trunks.
5.3.1 Port Control
This page shows current port configurations. Ports can also be configured here.
| Port | Link | Speed | Flow Control | Maximum Frame Size | Power Control | |||
| Current | Configured | Current Rx | Current Tx | Configured | ||||
| <>✓ | 9600 | <>✓ | ||||||
| 1 | Down | Auto | ✓ | ✘ | ✘ | 9600 | Disabled✓ | |
| 2 | Down | Auto | ✓ | ✘ | ✘ | 9600 | Disabled✓ | |
| 3 | Down | Auto | ✓ | ✘ | ✘ | 9600 | Disabled✓ | |
| 4 | Down | Auto | ✓ | ✘ | ✘ | 9600 | Disabled✓ | |
| 5 | Down | Auto | ✓ | ✘ | ✘ | 9600 | Disabled✓ | |
| 6 | Down | Auto | ✓ | ✘ | ✘ | 9600 | Disabled✓ | |
| 7 | 1Gfdx | Auto | ✓ | ✘ | ✘ | 9600 | Disabled✓ | |
| 8 | Down | Auto | ✓ | ✘ | ✘ | 9600 | Disabled✓ | |
| 9 | Down | Auto | ✓ | ✘ | ✘ | 9600 | ||
| 10 | Down | Auto | ✓ | ✘ | ✘ | 9600 | ||
| 11 | Down | Auto | ✓ | ✘ | ✘ | 9600 | ||
| 12 | Down | Auto | ✓ | ✘ | ✘ | 9600 | ||
| 13 | Down | Auto | ✓ | ✘ | ✘ | 9600 | ||
Figure 5-23. Port Configuration screen.
| Table 5-16. Port Configuration screen options. | |
| Label Description | |
| Port The switch port number to which the following settings will be applied. | |
| Link | The current link state is shown by different colors. Green indicates the link is up and red means the link is down. |
| Current Link Speed Indicates the current link speed of the port. | |
| Configured Link Speed | The drop-down list provides available link speed options for a given switch port. Auto selects the highest speed supported by the link partner. Disabled disables switch port configuration. <> configures all ports. |
| Table 5-16 (continued). Port Configuration screen options. | |
| Label Description | |
| Flow Control | When Auto is selected for the speed, the flow control will be negotiated to the capacity advertised by the link partner.When a fixed-speed setting is selected, that is what is used. Current Rx indicates whether pause frames on the port are obeyed, and Current Tx indicates whether pause frames on the port are transmitted. The Rx and Tx settings are determined by the result of the last auto-negotiation.You can check the Configured column to use flow control. This setting is related to the setting of Configured Link Speed. |
| Maximum Frame You | can enter the maximum frame size allowed for the switch port in this column, including FCS. The allowed range is 1518 bytes to 9600 bytes. |
| Power Control | Shows the current power consumption of each port in percentage. The Configured column allows you to change power saving parameters for each port.Disabled: all power savings functions are disabled.ActiPHY: link down and power savings enabledPerfectReach: link up and power savings enabled.Enabled: both link up and link down power savings enabled. |
| Total Power Usage Total power consumption of the board, measured in percentage. | |
| Save Click to save changes. | |
| Reset Click to undo any changes made locally and revert to previously saved values. | |
| Refresh Click to refresh the page. Any changes made locally will be undone. | |
5.3.2 Port Trunk
This page allows you to configure the aggregation hash mode and the aggregation group.
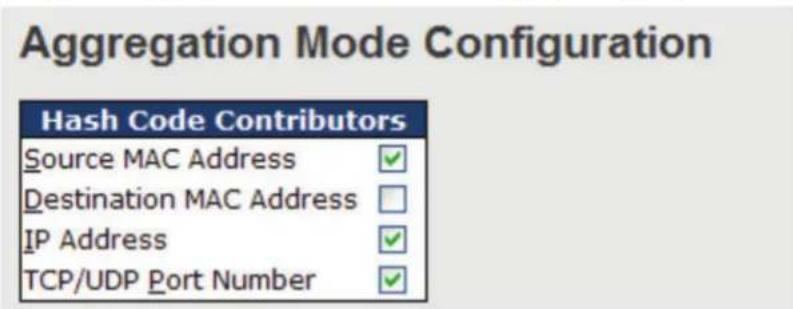
Figure 5-24. Aggregation Mode Configuration screen.
| Table 5-17. Aggregation Mode Configuration screen options. | |
| Label Description | |
| Source MAC Address | Calculates the destination port of the frame. You can check this box to enable the source MAC address, or uncheck to disable. By default, Source MAC Address is enabled. |
| Destination MAC Address Calculates the destination port of the frame. You can check this box to enable the destination MAC address, or uncheck to disable. By default, Destination MAC Address is disabled. | |
| IP Address | Calculates the destination port of the frame. You can check this box to enable the IP address, or uncheck to disable. By default, IP Address is enabled. |
| TCP/UDP Port Number | Calculates the destination port of the frame. You can check this box to enable the TCP/UDP port number, or uncheck to disable. By default, TCP/UDP Port Number is enabled. |
Aggregation Group Configuration
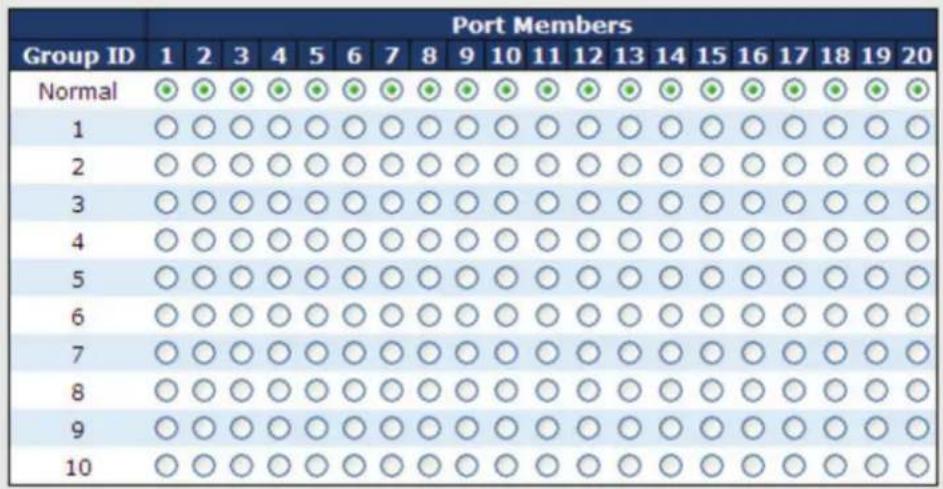
Figure 5-25. Aggregation Group Configuration screen.
| Table 5-18. Aggregation Group Configuration screen options. | |
| Label Description | |
| Group ID | Indicates the ID of each aggregation group. Normal means no aggregation. Only one group ID is valid per port. |
| Port Members | Lists each switch port for each group ID. Select a radio button to include a port in an aggregation, or clear the radio button to remove the port from the aggregation. By default, no ports belong to any aggregation group. Only full duplex ports can join an aggregation and the ports must be in the same speed in each group. |
5.3.3 LACP
This page allows you to enable LACP functions to group ports together to form single virtual links, thereby increasing the bandwidth between the switch and other LACP-compatible devices. LACP trunks are similar to static port trunks, but they are more flexible because LACP is compliant with the IEEE 802.3ad standard. Hence, it is interoperable with equipment from other vendors that also comply with the standard. You can change LACP port settings in this page.
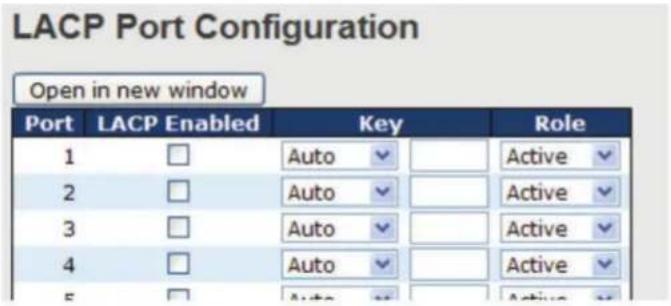
Figure 5-26. LACP Port Configuration screen.
| Table 5-19. LACP Port Configuration screen options. | |
| Label Description | |
| Port | Indicates the ID of each aggregation group. Normal indicates there is no aggregation. Only one group ID is valid per port. |
| LACP Enabled Lists | each switch port for each group ID. Check to include a port in an aggregation, or clear the box to remove the port from the aggregation. By default, no ports belong to any aggregation group. Only full duplex ports can join an aggregation and the ports must be in the same speed in each group. |
| Key | The Key value varies with the port, ranging from 1 to 65535. Auto will set the key according to the physical link speed (10Mb = 1, 100Mb = 2, 1Gb = 3). Specific allows you to enter a user-defined value. Ports with the same key value can join in the same aggregation group, while ports with different keys cannot. |
| Role | Indicates LACP activity status. Active will transmit LACP packets every second, while Passive will wait for a LACP packet from a partner (speak if spoken to). |
| Save Click to save changes. | |
| Reset Click to undo | any changes made locally and revert to previously saved values. |
LACP System Status
This page provides a status overview for all LACP instances.
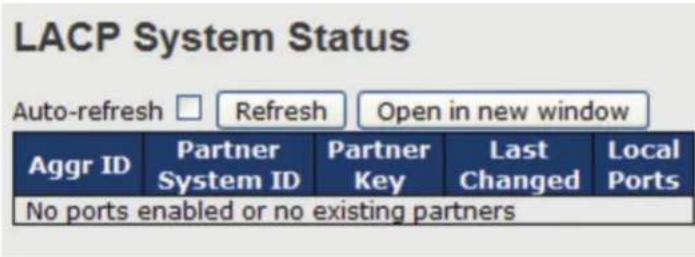
Figure 5-27. LACP System Status screen.
| Table 5-20. LACP System Status screen options. | |
| Label Description | |
| Aggr ID | The aggregation ID is associated with the aggregation instance. For LLAG, the ID is shown as 'isid:aggr-id' and for GLAGs as "aggr-id." |
| Partner System ID System ID (MAC address) of the aggregation partner | |
| Partner Key The key assigned by the partner to the aggregation ID | |
| Last Changed The time since this aggregation changed. | |
| Local Ports | Indicates which ports belong to the aggregation of the switch/stack. The format is: "Switch ID:Port." |
| Refresh | Click to refresh the page immediately |
| Auto-refresh | Check to enable an automatic refresh of the page at regular intervals |
LACP Status
This page provides an overview of the LACP status for all ports.
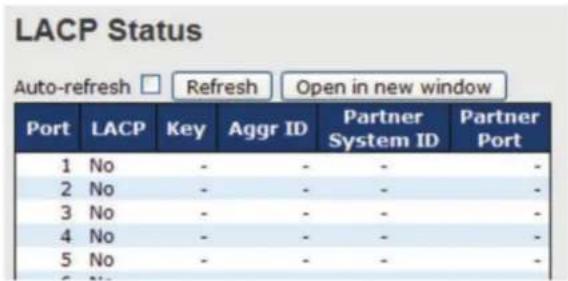
Figure 5-28. LACP Status screen.
| Table 5-21. LACP Status screen options. | |
| Label Description | |
| Port Switch port number | |
| LACP | Yes means LACP is enabled and the port link is up. No means LACP is not enabled or the port link is down. Backup means the port cannot join in the aggregation group unless other ports are removed. The LACP status is disabled. |
| Key The key assigned to the port. Only ports with the same key can be aggregated. | |
| Aggr ID The aggregation ID assigned to the aggregation group. | |
| Partner System ID The partner's system ID (MAC address). | |
| Partner Port The partner's port number associated with the port. | |
| Refresh Click to refresh the page immediately. | |
| Auto-refresh Check to enable an automatic refresh of the page at regular intervals. | |
LACP Statistics
This page provides an overview of the LACP statistics for all ports.
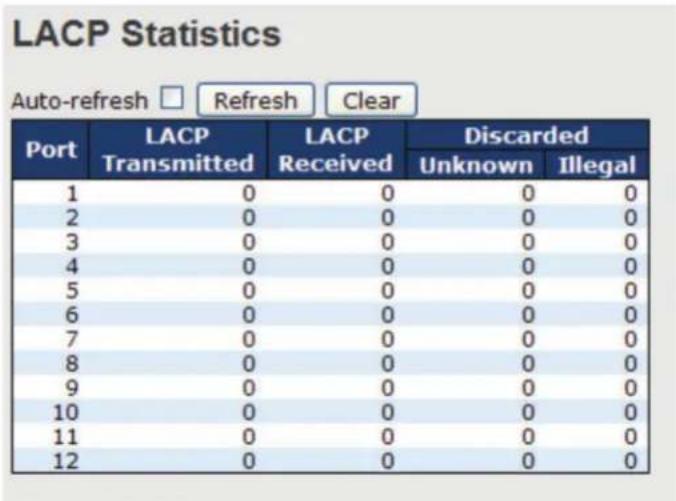
Figure 5-29. LACP Statistics screen.
| Table 5-22. LACP Statistics screen options. | |
| Label Description | |
| Port Switch port number | |
| LACP Transmitted The number of LACP frames sent from each port. | |
| LACP Received The number of LACP frames received at each port. | |
| Discarded The number of unknown or illegal LACP frames discarded at each port. | |
| Refresh Click to refresh the page immediately. | |
| Auto-refresh Check to enable an automatic refresh of the page at regular intervals. | |
| Clear Click to clear the counters for all ports. | |
5.3.4 Loop Gourd
This feature prevents loop attack. When receiving loop packets, the port will be disabled automatically, preventing the loop attack from affecting other network devices.
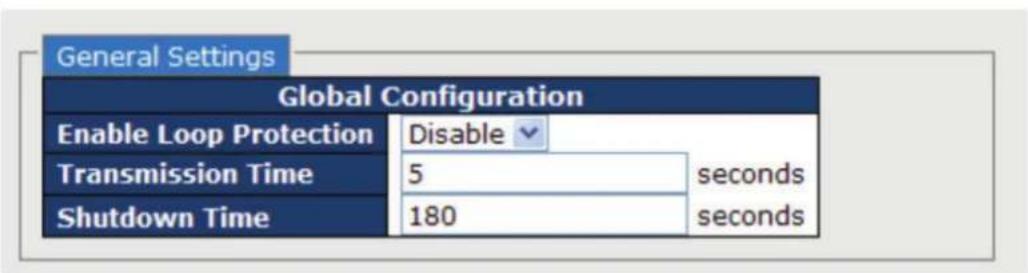
Figure 5-30. Loop Gourd screen.
| Table 5-23. Loop Gourd screen options. | |
| Label Description | |
| Enable Loop Protection | Activate loop protection functions (as a whole) |
| Transmission Time | The interval between each loop protection PDU sent on each port. The valid value is 1 to 10 seconds. |
| Shutdown Time | The period (in seconds) for which a port will be kept disabled when a loop is detected (shutting down the port). The valid value is 0 to 604800 seconds (7 days). A value of zero will keep a port disabled permanently (until the device is restarted). |
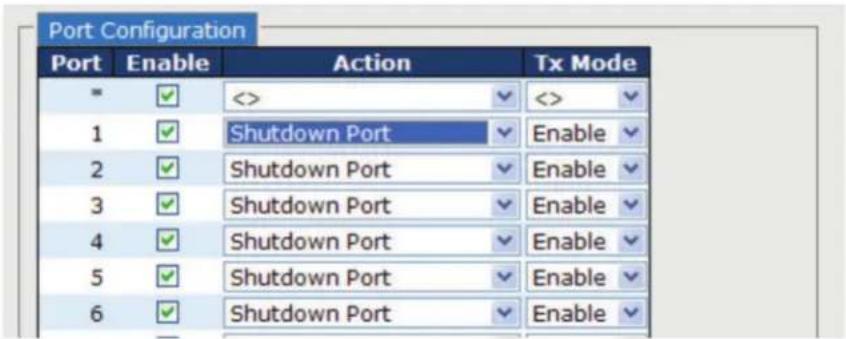
Figure 5-31. Port Configuration screen.
| Table 5-24. Port Configuration screen options. | |
| Label Description | |
| Port Switch port number | |
| Enable Activate | loop protection functions (as a whole) |
| Action | Configures the action to take when a loop is detected. Valid values include Shutdown Port, Shutdown Port, and Log or Log Only. |
| Tx Mode | Controls whether the port is actively generating loop protection PDUs or only passively look for looped PDUs. |
5.4 VLAN
5.4.1 VLAN Membership
You can view and change VLAN membership configurations for a selected switch stack in this page. Up to 64 VLANs are supported. This page allows for adding and deleting VLANs as well as adding and deleting port members of each VLAN.
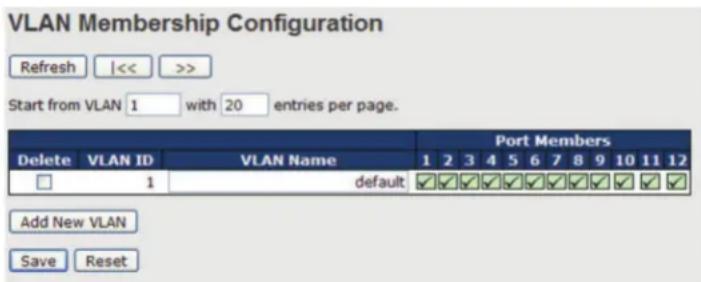
Figure 5-32. VLAN Membership Configuration screen.
| Table 5-25. VLAN Membership Configuration screen options. | |
| Label Description | |
| Delete Check to delete the entry. It will be deleted during the next save. | |
| VLAN ID The VLAN ID for the entry. | |
| MAC Address The MAC address for the entry. | |
| Port Members | Checkmarks indicate which ports are members of the entry. Check or uncheck as needed to modify the entry. |
| Add New VLAN | Click to add a new VLAN ID. An empty row is added to the table, and the VLAN can be configured as needed. Valid values for a VLAN ID are 1 through 4095.After clicking Save, the new VLAN will be enabled on the selected switch stack but contains no port members.A VLAN without any port members on any stack will be deleted when you click Save.Click Delete to undo the addition of new VLANs. |
5.4.2 Port Configurations
This page allows you to set up VLAN ports individually.
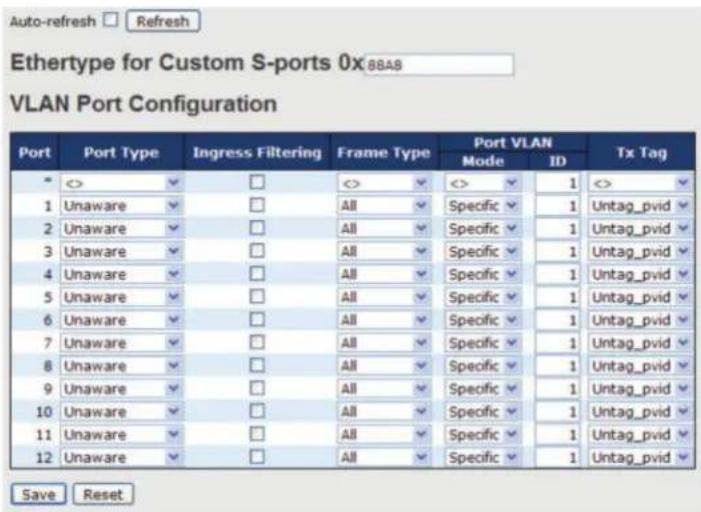
Figure 5-33. VLAN Port Configuration screen.
| Table 5-26. VLAN Port Configuration screen options. | |
| Label Description | |
| Ethertype for customer S-Ports | This field specifies the Ether type used for custom S-ports. This is a global setting for all custom S-ports. |
| Port The switch port number to which the following settings will be applied. | |
| Port type | Port can be one of the following types: Unaware, Customer (C-port), Service (S-port), Custom Service (S-custom-port). If port type is Unaware, all frames are classified to the port VLAN ID and tags are not removed. |
| Ingress Filtering | Enable ingress filtering on a port by checking the box. This parameter affects VLAN ingress processing. If ingress filtering is enabled and the ingress port is not a member of the classified VLAN of the frame, the frame will be discarded. By default, ingress filtering is disabled (no check mark). |
| Frame Type | Determines whether the port accepts all frames or only tagged/untagged frames. This parameter affects VLAN ingress processing. If the port only accepts tagged frames, untagged frames received on the port will be discarded. By default, the field is set to All. |
| Port VLAN Mode | The allowed values are None or Specific. This parameter affects VLAN ingress and egress processing. If None is selected, a VLAN tag with the classified VLAN ID is inserted in frames transmitted on the port. This mode is normally used for ports connected to VLAN-aware switches. Tx tag should be set to Untag_pvid when this mode is used.If Specific (the default value) is selected, a port VLAN ID can be configured (see below). Untagged frames received on the port are classified to the port VLAN ID. If VLAN awareness is disabled, all frames received on the port are classified to the port VLAN ID. If the classified VLAN ID of a frame transmitted on the port is different from the port VLAN ID, a VLAN tag with the classified VLAN ID will be inserted in the frame. |
| Port VLAN ID Configures | the VLAN identifier for the port. The allowed range of the values is 1 through 4095. The default value is 1. The port must be a member of the same VLAN as the port VLAN ID. |
| Tx Tag Determines egress tagging of a port. Untag_pvid: all VLANs except the configured PVID will be tagged. Tag_all: all VLANs are tagged. Untag_all: all VLANs are untagged. | |
Introduction of Port Types
Below is a detailed description of each port type, including Unaware, C-port, S-port, and S-custom-port.
| Table 5-27. Port types. | ||
| Ingress Action Egress Action | ||
| UnawareThe function of Unaware can be used for 802.1QinQ (double tag). | When the port receives untagged frames, an untagged frame obtains a tag (based on PVID) and is forwarded.When the port receives tagged frames:1. If the tagged frame contains a TPID of 0x8100, it will become a double-tag frame and will be forwarded.2. If the TPID of tagged frame is not 0x8100 (ex. 0x88A8), it will be discarded. | The TPID of a frame transmitted by Unaware port will be set to 0x8100.The final status of the frame after egressing will also be affected by the Egress Rule. |
| C-port | When the port receives untagged frames, an untagged frame obtains a tag (based on PVID) and is forwarded.When the port receives tagged frames:1. If the tagged frame contains a TPID of 0x8100, it will be forwarded.2. If the TPID of tagged frame is not 0x8100 (ex. 0x88A8), it will be discarded. | The TPID of a frame transmitted by C-port will be set to 0x8100. |
| S-port When the port receives untagged frames, an untagged frame obtains a tag (based on PVID) and is forwarded.When the port receives tagged frames:1. If the tagged frame contains a TPID of 0x8100, it will be forwarded.2. If the TPID of tagged frame is not 0x88A8 (ex. 0x8100), it will be discarded. | The TPID of a frame transmitted by S-port will be set to 0x88A8. | |
| S-custom-port When the | port receives untagged frames, an untagged frame obtains a tag (based on PVID) and is forwarded.When the port receives tagged frames:1. If the tagged frame contains a TPID of 0x8100, it will be forwarded.2. If the TPID of tagged frame is not 0x88A8 (ex. 0x8100), it will be discarded. | The TPID of a frame transmitted by S-custom-port will be set to a self-customized value, which can be set by the user via Ethertype for Custom S-ports. |
Examples of VLAN Settings
Switch A,
Port 7 is VLAN Access mode = Untagged 20
Port 8 is VLAN Access mode = Untagged 10
Below are the switch settings.
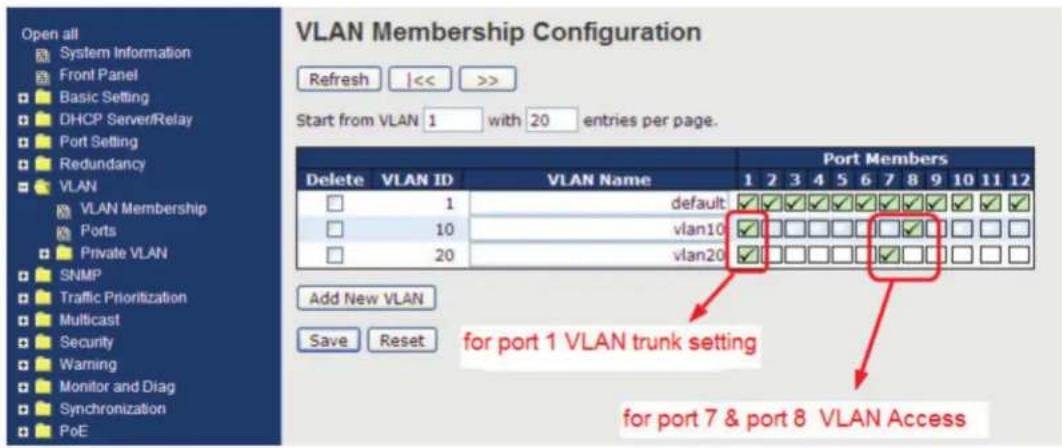
Figure 5-34.
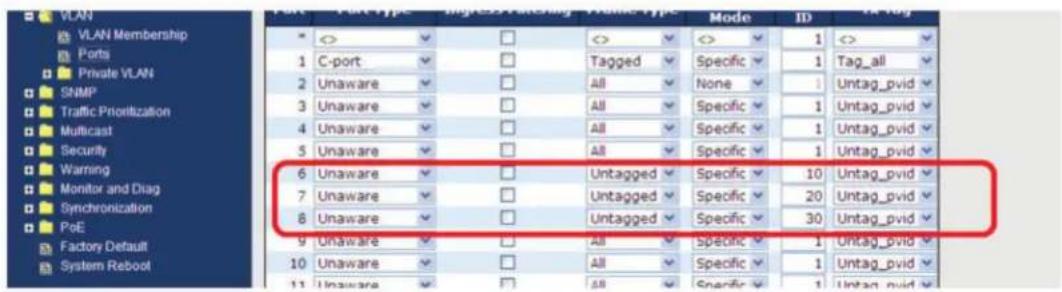
Figure 5-35.
VLAN 1Q Trunk Mode:
Switch B,
Port 1 = VLAN 1Qtrunk mode = tagged 10, 20
Port 2 = VLAN 1Qtrunk mode = tagged 10, 20
Below are the switch settings.
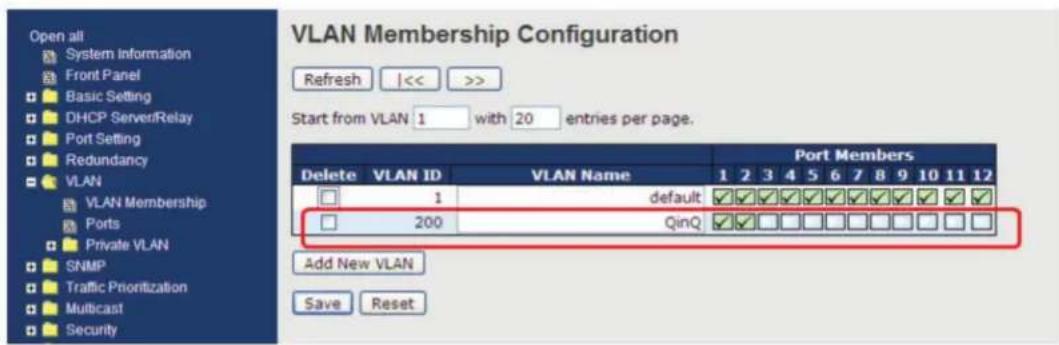
Figure 5-36.
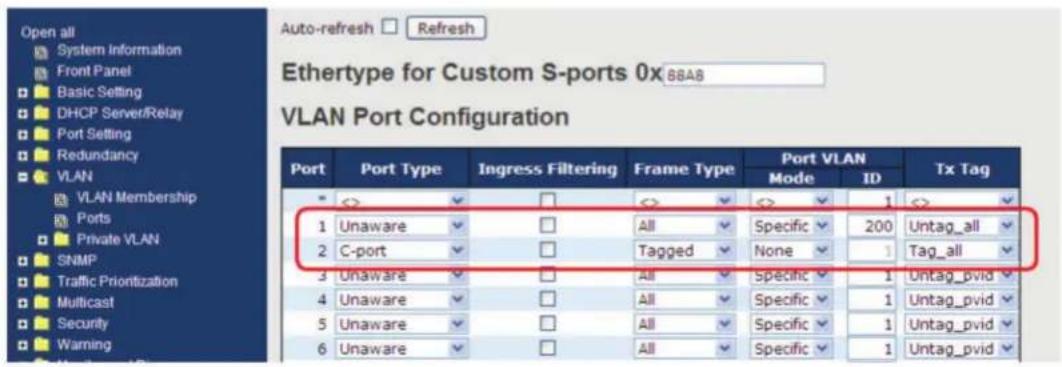
Figure 5-37.
VLAN Hybrid Mode:
Port 1 VLAN Hybrid mode = untagged 10
Tagged 10, 20
Below are the switch settings.
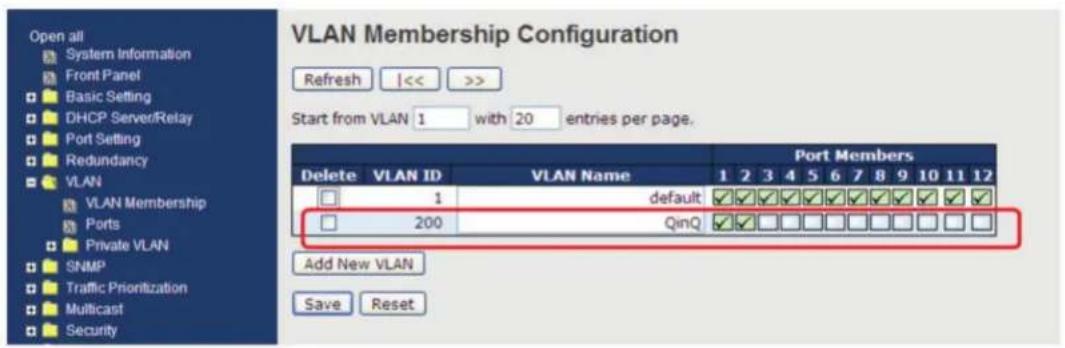
Figure 5-38.
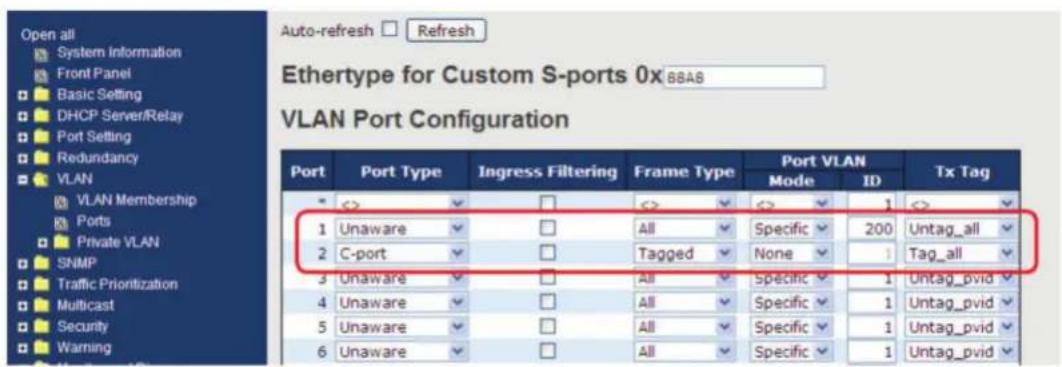
Figure 5-39.
VLAN QinQ Mode:
VLAN QinQ mode is usually adopted when there are unknown VLANs, as shown in the figure below.
VLAN "X" = Unknown VLAN
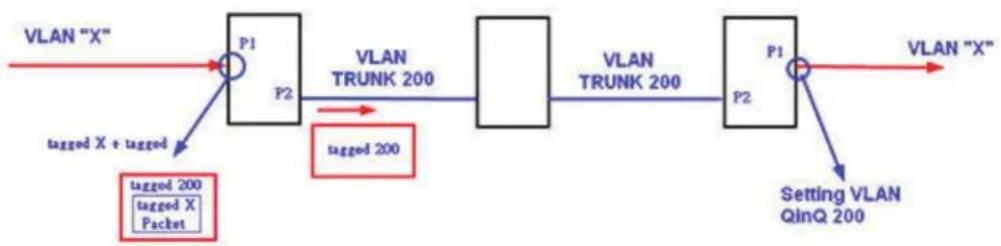
flowchart
graph LR
    A["VLAN "X""] --> B["P1"]
    B --> C["P2"]
    C --> D["VLAN TRUNK 200"]
    D --> E[" "]
    E --> F["VLAN TRUNK 200"]
    F --> G["P1"]
    G --> H["VLAN "X""]
    I["tagged X + tagged"] --> B
    J["tagged 200"] --> C
    K["tagged X Packet"] --> B
    L["Setting VLAN QinQ 200"] --> G
Figure 5-40. VLAN QinQ mode.
Port 1 VLAN Settings:
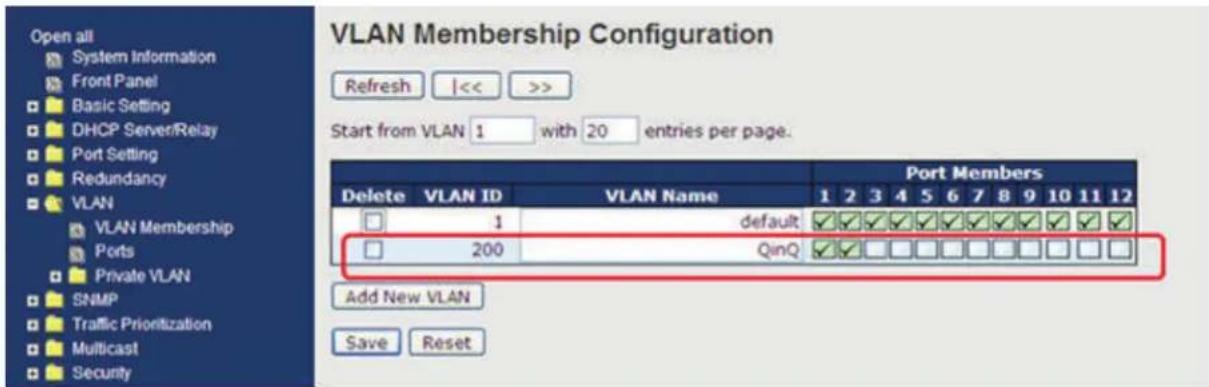
Figure 5-41. VLAN Settings screen.
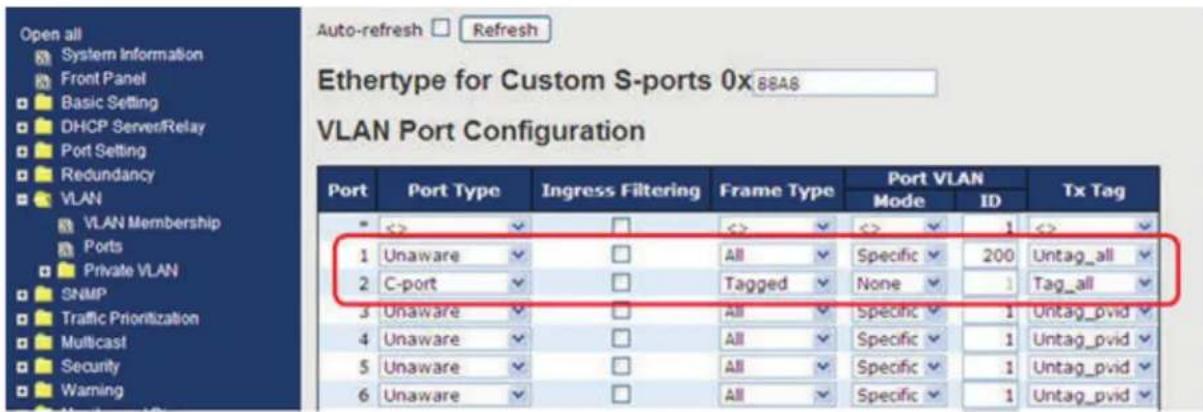
Figure 5-42. VLAN settings screen.
VLAN ID Settings
When setting the management VLAN, only the same VLAN ID port can be used to control the switch.
VLAN Settings:
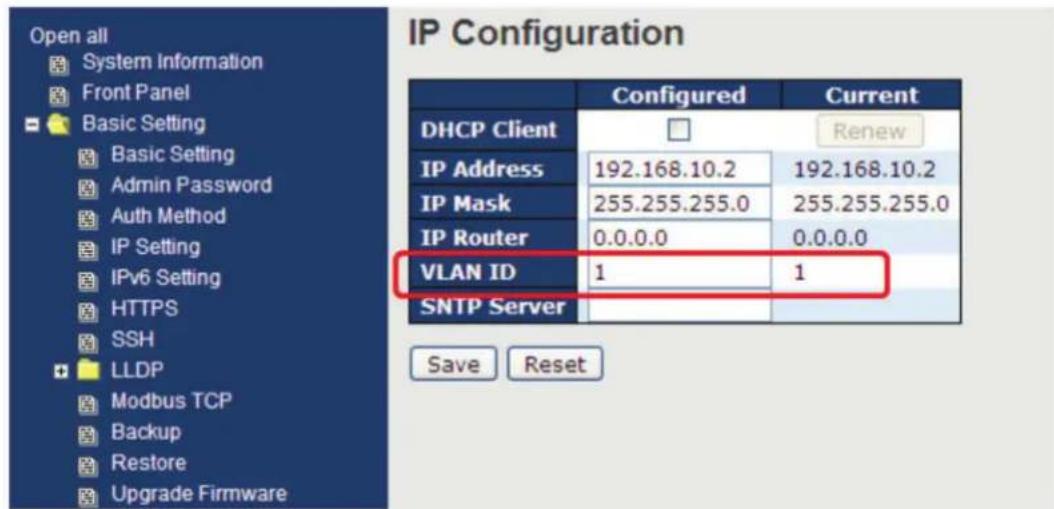
Figure 5-43.
5.4.3 Private VLAN
The private VLAN membership configuration for the switch can be monitored and modified here. Private VLANs can be added or deleted here. Port members of each private VLAN can be added or removed here. Private VLANs are based on the source port mask, and there are no connections to VLANs. This means that VLAN IDs and private VLAN IDs can be identical.
A port must be a member of both a VLAN and a private VLAN to be able to forward packets. By default, all ports are VLAN unaware and members of VLAN 1 and private VLAN 1.
A VLAN-unaware port can only be a member of one VLAN, but it can be a member of multiple private VLANs.
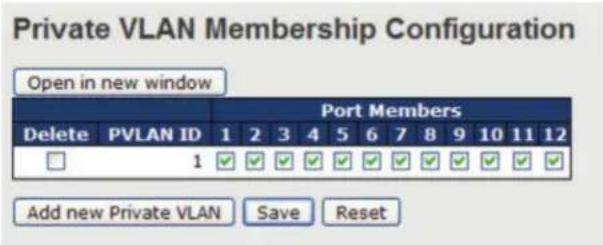
Figure 5-44. Private VLAN Membership Configuration screen.
| Table 5-28. Private VLAN Membership Configuration screen options. | |
| Label Description | |
| Delete Check to delete the entry. It will be deleted during | the next save. |
| Private VLAN ID Indicates the ID of this particular private | VLAN. |
| MAC Address The MAC address for the entry. | |
| Port Members A row of check boxes for each port is displayed for each private | VLAN ID. You can check the box to include a port in a private VLAN. To remove or exclude the port from the private VLAN, make sure the box is unchecked. By default, no ports are members, and all boxes are unchecked. |
| Adding a New Static Entry Click Add new Private LAN to add a new private VLAN ID. An empty row is added to the table, and the private VLAN can be configured as needed. The allowed range for a private VLAN ID is the same as the switch port number range. Any values outside this range are not accepted, and a warning message appears. Click OK to discard the incorrect entry, or click Cancel to return to the editing and make a correction.The private VLAN is enabled when you click Save.The Delete button can be used to undo the addition of new private VLANs. | |
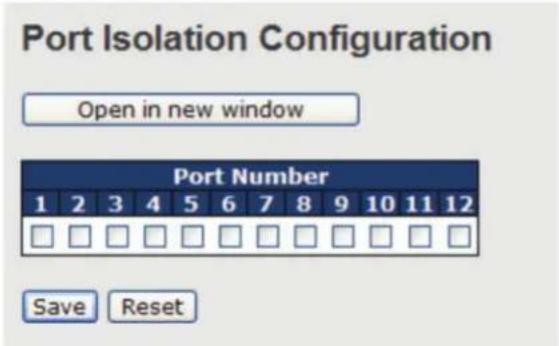
Figure 5-45. Port Isolation Configuration screen.
| Table 5-29. Port Isolation Configuration screen options. | |
| Label Description | |
| Port Members | A check box is provided for each port of a private VLAN.When checked, port isolation is enabled for that port.When unchecked, port isolation is disabled for that port.By default, port isolation is disabled for all ports. |
5.5 SNMP
5.5.1 SNMP System Configurations
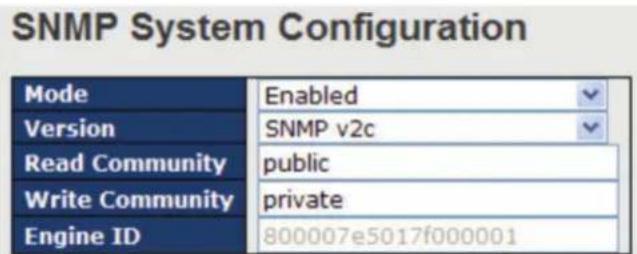
Figure 5-46. SNMP system configuration screen.
| Table 5-30. SNMP System Configuration screen options. | |
| Label Description | |
| Mode Indicates existing SNMP mode. Possible modes include:Enabled: enable SNMP modeDisabled: disable SNMP mode | |
| Version | Indicates the supported SNMP version. Possible versions include:SNMP v1: supports SNMP version 1.SNMP v2c: supports SNMP version 2c.SNMP v3: supports SNMP version 3. |
| Read Community | Indicates the read community string to permit access to SNMP agent. The allowed string length is 0 to 255, and only ASCII characters from 33 to 126 are allowed.The field only suits to SNMPv1 and SNMPv2c. SNMPv3 uses USM for authentication and privacy and the community string will be associated with SNMPv3 community table. |
| Write Community | Indicates the write community string to permit access to SNMP agent. The allowed string length is 0 to 255, and only ASCII characters from 33 to 126 are allowed.The field only suits to SNMPv1 and SNMPv2c. SNMPv3 uses USM for authentication and privacy and the community string will be associated with SNMPv3 community table. |
| Engine ID | Indicates the SNMPv3 engine ID. The string must contain an even number between 10 and 64 hexa-decimal digits, but all-zeros and all-'F's are not allowed. Change of the Engine ID will clear all original local users. |
SNMP Trap Configuration
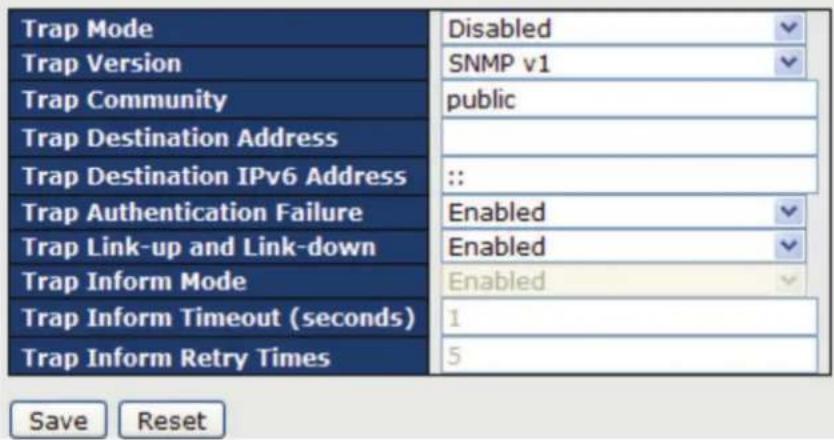
Figure 5-47. SNMP Trap Configuration screen.
| Table 5-31. SNMP Trap Configuration screen options. | |
| Label Description | |
| Trap Mode | Indicates existing SNMP trap mode. Possible modes include:Enabled: enable SNMP trap modeDisabled: disable SNMP trap mode |
| Trap Version | Indicates the supported SNMP trap version. Possible versions include:SNMP v1: supports SNMP trap version 1SNMP v2c: supports SNMP trap version 2cSNMP v3: supports SNMP trap version 3 |
| Trap Community Indicates the community access string when sending SNMP trap packets. The allowed string length is 0 to 255, and only ASCII characters from 33 to 126 are allowed. | |
| Trap Destination Address | Indicates the SNMP trap destination address. |
| Trap Destination IPv6 Address | Provides the trap destination IPv6 address of this switch. IPv6 address consists of 128 bits represented as eight groups of four hexadecimal digits with a colon separating each field (:.). For example, in 'fe80::215:c5ff:fe03:4dc7', the symbol '::' is a special syntax that can be used as a shorthand way of representing multiple 16-bit groups of contiguous zeros; but it can only appear once. It also uses a following legally IPv4 address. For example, "::192.1.2.34" |
| Trap Authentication Failure | Indicates the SNMP entity is permitted to generate authentication failure traps. Possible modes include:Enabled: enable SNMP trap authentication failureDisabled: disable SNMP trap authentication failure |
| Trap Link-up and Link-down | Indicates the SNMP trap link-up and link-down mode. Possible modes include:Enabled: enable SNMP trap link-up and link-down modeDisabled: disable SNMP trap link-up and link-down mode |
| Trap Inform Mode | Indicates the SNMP trap inform mode. Possible modes include:Enabled: enable SNMP trap inform modeDisabled: disable SNMP trap inform mode |
| Table 5-31 (continued). SNMP Trap Configuration screen options. | |
| Label Description | |
| Trap Inform Timeout(seconds) | Configures the SNMP trap inform timeout. The allowed range is 0 to 2147. |
| Trap Inform Retry Times | Configures the retry times for SNMP trap inform. The allowed range is 0 to 255. |
5.5.2 SNMP Community Configurations
This page allows you to configure SNMPv3 community table. The entry index key is Community.
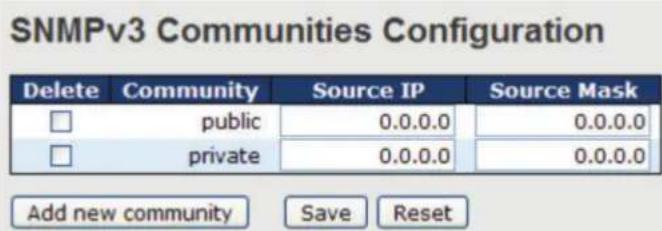
Figure 5-48. SNMPv3 Communities Configuration screen.
| Table 5-32. SNMPv3 Communities Configuration screen options. | |
| Label Description | |
| Delete Check to delete the entry. It will be deleted during the next save. | |
| Community | Indicates the community access string to permit access to SNMPv3 agent. The allowed string length is 1 to 32, and only ASCII characters from 33 to 126 are allowed. |
| Source IP Indicates the SNMP source address. | |
| Source Mask Indicates the SNMP source address mask. | |
5.5.3 SNMP User Configurations
This page allows you to configure SNMPv3 user table. The entry index keys are Engine ID and User Name.

Figure 5-49. SNMP Users Configuration screen.
| Table 5-33. SNMPv3 Users Configuration screen options. | |
| Label Description | |
| Delete Check to delete the entry. It will be deleted during the next save. | |
| Engine ID | An octet string identifying the engine ID that this entry should belong to. The string must contain an even number between 10 and 64 hexadecimal digits, but all-zeros and all-'F's are not allowed. The SNMPv3 architecture uses User-based Security Model (USM) for message security and View-based Access Control Model (VACM) for access control. For the USM entry, the usmUserEngineID and usmUserName are the entry keys. In a simple agent, usmUserEngineID is always that agent's own snmpEngineID value. The value can also take the value of the snmpEngineID of a remote SNMP engine with which this user can communicate. In other words, if user engine ID is the same as system engine ID, then it is local user; otherwise it's remote user. |
| User Name | A string identifying the user name that this entry should belong to. The allowed string length is 1 to 32, and only ASCII characters from 33 to 126 are allowed. |
| Security Level | Indicates the security model that this entry should belong to. Possible security models include: NoAuth, NoPriv: no authentication and none privacyAuth, NoPriv: Authentication and no privacyAuth, Priv: Authentication and privacyThe value of security level cannot be modified if the entry already exists, which means the value must be set correctly at the time of entry creation. |
| Authentication Protocol | Indicates the authentication protocol that this entry should belong to. Possible authentication protocols include: None: no authentication protocolMD5: an optional flag to indicate that this user is using MD5 authentication protocolSHA: an optional flag to indicate that this user is using SHA authentication protocolThe value of security level cannot be modified if the entry already exists, which means the value must be set correctly at the time of entry creation. |
| Authentication Password | A string identifying the authentication pass phrase. For MD5 authentication protocol, the allowed string length is 8 to 32. For SHA authentication protocol, the allowed string length is 8 to 40. Only ASCII characters from 33 to 126 are allowed. |
| Privacy Protocol | Indicates the privacy protocol that this entry should belong to. Possible privacy protocols include: None: no privacy protocolDES: an optional flag to indicate that this user is using DES authentication protocol |
| Privacy Password | A string identifying the privacy pass phrase. The allowed string length is 8 to 32, and only ASCII characters from 33 to 126 are allowed. |
5.5.4 SNMP Groups Configuration
This page allows you to configure SNMPv3 group table. The entry index keys are Security Model and Security Name.
SNMPv3 Groups Configuration
| Delete | Security Model | Security Name | Group Name |
| v1 | public | default_ro_group | |
| v1 | private | default_rw_group | |
| v2c | public | default_ro_group | |
| v2c | private | default_rw_group | |
| usm | default_user | default_rw_group |
Figure 5-50. SNMPv3 Groups Configuration screen.
| Table 5-34. SNMPv3 Groups Configuration screen options. | |
| Label Description | |
| Delete Check to delete the entry. It will be deleted during the next save. | |
| Security Model | Indicates the security model that this entry should belong to. Possible security models included:v1: Reserved for SNMPv1.v2c: Reserved for SNMPv2c.usm: User-based Security Model (USM). |
| Security Name | A string identifying the security name that this entry should belong to. The allowed string length is 1 to 32, and only ASCII characters from 33 to 126 are allowed. |
| Group Name | A string identifying the group name that this entry should belong to. The allowed string length is 1 to 32, and only ASCII characters from 33 to 126 are allowed. |
5.5.5 SNMP View Configurations
This page allows you to configure SNMPv3 view table. The entry index keys are View Name and OID Subtree.
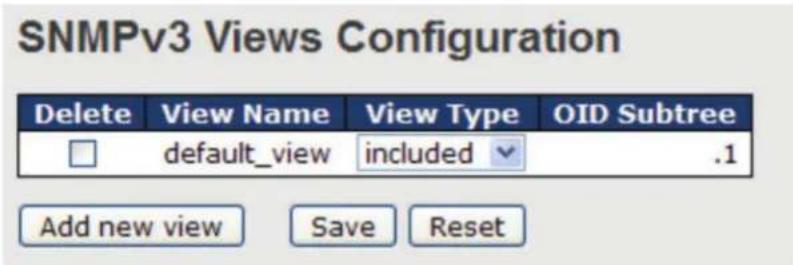
Figure 5-51. SNMPv3 Views Configuration screen.
| Table 5-35. SNMPv3 Views Configuration screen options. | |
| Label Description | |
| Delete Check to delete the entry. It will be deleted during the next save. | |
| View Name | A string identifying the view name that this entry should belong to. The allowed string length is 1 to 32, and only ASCII characters from 33 to 126 are allowed. |
| View Type | Indicates the view type that this entry should belong to. Possible view types include: Included: an optional flag to indicate that this view subtree should be included. Excluded: An optional flag to indicate that this view subtree should be excluded. Generally, if an entry's view type is Excluded, it should exist another entry whose view type is Included, and its OID subtree oversteps the Excluded entry. |
| OID Subtree | The OID defining the root of the subtree to add to the named view. The allowed OID length is 1 to 128. The allowed string content is digital number or asterisk (*). |
5.5.6 SNMP Access Configurations
This page allows you to configure SNMPv3 access table. The entry index keys are Group Name, Security Model, and Security Level.
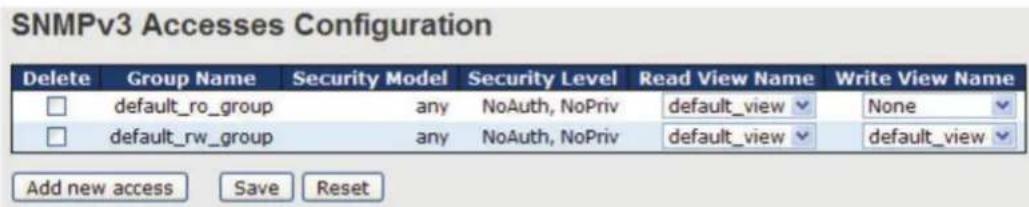
Figure 5-52. SNMPv3 Access Configuration screen.
| Table 5-36. SNMPv3 Access Configuration screen options. | |
| Label Description | |
| Delete Check to delete the entry. It will be deleted during the next save. | |
| Group Name | A string identifying the group name that this entry should belong to. The allowed string length is 1 to 32, and only ASCII characters from 33 to 126 are allowed. |
| Security Model | Indicates the security model that this entry should belong to. Possible security models include:any: Accepted any security model (v1|v2c|usm).v1: Reserved for SNMPv1.v2c: Reserved for SNMPv2c.usm: User-based Security Model (USM). |
| Security Level | Indicates the security model that this entry should belong to. Possible security models include:NoAuth, NoPriv: no authentication and no privacyAuth, NoPriv: Authentication and no privacyAuth, Priv: Authentication and privacy |
| Read View Name The name of the MIB view defining the MIB objects for which this request may request the current values. The allowed string length is 1 to 32, and only ASCII characters from 33 to 126 are allowed. | |
| Write View Name The name of the MIB view defining the MIB objects for which this request may potentially SET new values. The allowed string length is 1 to 32, and only ASCII characters from 33 to 126 are allowed. | |
5.6 Traffic Prioritization
5.6.1 Storm Control
There is a unicast storm rate control, multicast storm rate control, and a broadcast storm rate control. These only affect flooded frames, i.e. frames with a (VLAN ID, DMAC) pair not present on the MAC Address table.
The rate is 2^n, where n is equal to or less than 15, or "No Limit". The unit of the rate can be either pps (packets per second) or kpps (kilopackets per second). The configuration indicates the permitted packet rate for unicast, multicast, or broadcast traffic across the switch.
NOTE: Frames sent to the CPU of the switch are always limited to approximately 4 kpps. For example, broadcasts in the management VLAN are limited to this rate. The management VLAN is configured on the IP setup page.
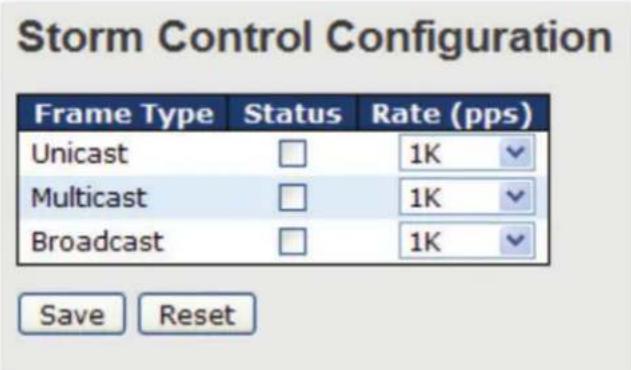
Figure 5-53. Storm Control Configuration screen.
| Table 5-37. Storm Control Configuration screen options. | |
| Label Description | |
| Frame Type | The settings in a particular row apply to the frame type listed here: unicast, multicast, or broadcast. |
| Status Enable or disable the storm control status for the given frame type. | |
| Rate | The rate unit is packet per second (pps), configure the rate as 1K, 2K, 4K, 8K, 16K, 32K, 64K, 128K, 256K, 512K, or 1024K. The 1 kpps is actually 1002.1 pps. |
5.6.2 Port Classification
QoS is an acronym for Quality of Service. It is a method to achieve efficient bandwidth utilization between individual applications or protocols.
| Port | QoS class | DP level | PCP | DEI | Tag Class. | DSCP Based |
| * | <>✓ | <>✓ | <>✓ | <>✓ | □ | |
| 1 | 0✓ | 0✓ | 0✓ | 0✓ | Disabled | □ |
| 2 | 0✓ | 0✓ | 0✓ | 0✓ | Disabled | □ |
| 3 | 0✓ | 0✓ | 0✓ | 0✓ | Disabled | □ |
| 4 | 0✓ | 0✓ | 0✓ | 0✓ | Disabled | □ |
| 5 | 0✓ | 0✓ | 0✓ | 0✓ | Disabled | □ |
| 6 | 0✓ | 0✓ | 0✓ | 0✓ | Disabled | □ |
| 7 | 0✓ | 0✓ | 0✓ | 0✓ | Disabled | □ |
| 8 | 0✓ | 0✓ | 0✓ | 0✓ | Disabled | □ |
| 9 | 0✓ | 0✓ | 0✓ | 0✓ | Disabled | □ |
| 10 | 0✓ | 0✓ | 0✓ | 0✓ | Disabled | □ |
| 11 | 0✓ | 0✓ | 0✓ | 0✓ | Disabled | □ |
| 12 | 0✓ | 0✓ | 0✓ | 0✓ | Disabled | □ |
| 13 | 0✓ | 0✓ | 0✓ | 0✓ | Disabled | □ |
Figure 5-54. QoS Ingres Port Classification screen.
| Table 5-38. QoS Ingres Port Classification screen options. | |
| Label Description | |
| Port The port number for which the configuration below applies. | |
| QoS Class Controls the default QoS class.All frames are classified to a QoS class. There is a one to one mapping between QoS class, queue, and priority. A QoS class of 0 (zero) has the lowest priority.If the port is VLAN aware and the frame is tagged, then the frame is classified to a QoS class that is based on the PCP value in the tag as shown below. Otherwise the frame is classified to the default QoS class.PCP value: 0 1 2 3 4 5 6 7QoS class: 1 0 2 3 4 5 6 7If the port is VLAN aware, the frame is tagged, and Tag Class is enabled, then the frame is classified to a QoS class that is mapped from the PCP and DEI value in the tag. Otherwise the frame is classified to the default QoS class.The classified QoS class can be overruled by a QCL entry.NOTE: If the default QoS class has been dynamically changed, then the actual default QoS class is shown in parentheses after the configured default QoS class. | |
| DP level Controls the default Drop Precedence Level.All frames are classified to a DP level.If the port is VLAN aware and the frame is tagged, then the frame is classified to a DP level that is equal to the DEI value in the tag. Otherwise the frame is classified to the default DP level.If the port is VLAN aware, the frame is tagged, and Tag Class is enabled, then the frame is classified to a DP level that is mapped from the PCP and DEI value in the tag. Otherwise the frame is classified to the default DP level.The classified DP level can be overruled by a QCL entry. | |
| Table 5-38 (continued). QoS Ingres Port Classification screen options. | |
| Label Description | |
| PCP Controls the default PCP value.All frames are classified to a PCP value.If the port is VLAN aware and the frame is tagged, then the frame is classified to the PCP value in the tag. Otherwise the frame is classified to the default PCP value. | |
| DEI Controls the default DEI value.All frames are classified to a DEI value.If the port is VLAN aware and the frame is tagged, then the frame is classified to the DEI value in the tag. Otherwise the frame is classified to the default DEI value. | |
| Tag Class | Shows the classification mode for tagged frames on this port.Disabled: Use default QoS class and DP level for tagged frames.Enabled: Use mapped versions of PCP and DEI for tagged frames.Click on the mode to configure the mode and/or mapping.NOTE: This setting has no effect if the port is VLAN unaware. Tagged frames received on VLAN-unaware ports are always classified to the default QoS class and DP level. |
| DSCP Based Click to enable DSCP Based QoS Ingress Port Classification. | |
5.6.3 Port Tag Remaking
This page provides an overview of QoS Egress Port Tag Remarking for all switch ports.
| Port | Mode |
| 1 | Classified |
| 2 | Classified |
| 3 | Classified |
| 4 | Classified |
| 5 | Classified |
| 6 | Classified |
| 7 | Classified |
| 8 | Classified |
| 9 | Classified |
| 10 | Classified |
| 11 | Classified |
| 12 | Classified |
| 13 | Classified |
| 14 | Classified |
| 15 | Classified |
| 16 | Classified |
| 17 | Classified |
| 18 | Classified |
| 19 | Classified |
| 20 | Classified |
Figure 5-55. QoS Egress Port Tag Remarking.
| Table 5-39. QoS Egress Port Tag Remarking screen options. | |
| Label Description | |
| Port | The switch port number to which the following settings will be applied. Click on the port number to configure tag remarking. |
| Mode | Enable or disable the storm control status for the given frame type.Shows the tag remarking mode for this port.Classified: use classified PCP/DEI valuesDefault: use default PCP/DEI valuesMapped: use mapped versions of QoS class and DP level |
| Rate | The rate unit is packet per second (pps), configure the rate as 1K, 2K, 4K, 8K, 16K, 32K, 64K, 128K, 256K, 512K, or 1024K. The 1 kpps is actually 1002.1 pps. |
5.6.4 Port DSCP
This page allows you to configure basic QoS Port DSCP settings for all switch ports.
QoS Port DSCP Configuration
| Port | Ingress | Egress | ||
| Translate | Classify | Rewrite | ||
| " | ☐ | <> | <> | ✓ |
| 1 | ☐ | Disable | Disable | ✓ |
| 2 | ☐ | Disable | Disable | ✓ |
| 3 | ☐ | Disable | Disable | ✓ |
| 4 | ☐ | Disable | Disable | ✓ |
| 5 | ☐ | Disable | Disable | ✓ |
| 6 | ☐ | Disable | Disable | ✓ |
| 7 | ☐ | Disable | Disable | ✓ |
| 8 | ☐ | Disable | Disable | ✓ |
| 9 | ☐ | Disable | Disable | ✓ |
| 10 | ☐ | Disable | Disable | ✓ |
| 11 | ☐ | Disable | Disable | ✓ |
| 12 | ☐ | Disable | Disable | ✓ |
| 13 | ☐ | Disable | Disable | ✓ |
| 14 | ☐ | Disable | Disable | ✓ |
| 15 | ☐ | Disable | Disable | ✓ |
Figure 5-56. QoS Egress Port DSCP Configuration screen.
| Table 5-40. QoS Egress Port DSCP Configuration screen options. | |
| Label Description | |
| Port Shows the list of ports for which you can configure DSCP Ingress and Egress settings. | |
| Ingress | In Ingress settings, you can change ingress translation and classification settings for individual ports.There are two configuration parameters available in Ingress:1. Translate2. Classify |
| 1. Translate Check to enable ingress translation. | |
| 2. Classify Classification has 4 different values.Disable: no Ingress DSCP classificationDSCP=0: classify if incoming (or translated if enabled) DSCP is 0.Selected: classify only selected DSCP whose classification is enabled as specified in DSCP Translation window for the specific DSCP.All: classify all DSCP | |
| Table 5-40 (continued). QoS Egress Port DSCP Configuration screen options. | |
| Label Description | |
| Egress Port egress rewriting can be one of the following options:Disable: no Egress rewriteEnable: rewrite enabled without remappingRemap DP Unaware: DSCP from the analyzer is remapped and the frame is remarked with a remapped DSCP value. The remapped DSCP value is always taken from the “DSCP Translation->Egress Remap DP0” table.Remap DP Aware: DSCP from the analyzer is remapped and the frame is remarked with a remapped DSCP value.Depending on the DP level of the frame, the remapped DSCP value is either taken from the 'DSCP Translation->Egress Remap DP0' table or from the “DSCP Translation->Egress Remap DP1” table. | |
5.6.5 Port Policing
This page allows you to configure Policer settings for all switch ports.
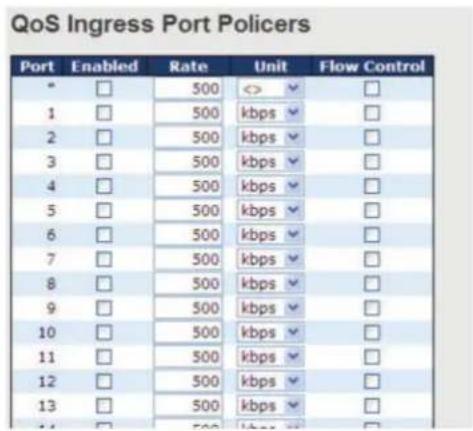
Figure 5-57. QoS Ingress Port Policers screen.
| Table 5-41. QoS Ingress Port Policers screen options. | |
| Label Description | |
| Port The port number for which the configuration below applies. | |
| Enable Check to enable the policer for individual switch ports. | |
| Rate | Configures the rate of each policer. The default value is 500. This value is restricted to 100 to 1000000 when the Unit is kbps or fps, and is restricted to 1 to 3300 when the Unit is Mbps or kfps. |
| Unit | Configures the unit of measurement for each policer rate as kbps, Mbps, fps, or kfps. The default value is kbps. |
| Flow Control | If Flow Control is enabled and the port is in Flow Control mode, then pause frames are sent instead of being discarded. |
5.6.6 Queue Policing
This page allows you to configure Queue Policer settings for all switch ports.
| Port | Queue 0 | Queue 1 Enable | Queue 2 Enable | Queue 3 Enable | Queue 4 Enable | Queue 5 Enable | Queue 6 Enable | Queue 7 Enable | ||
| E | Rate | Unit | ||||||||
| " | ✓ | 500 | <> ✓ | ☐ | ☐ | ☐ | ☐ | ☐ | ☐ | ☐ |
| 1 | ✓ | 500 | kbps ✓ | ☐ | ☐ | ☐ | ☐ | ☐ | ☐ | ☐ |
| 2 | ✓ | 500 | kbps ✓ | ☐ | ☐ | ☐ | ☐ | ☐ | ☐ | ☐ |
| 3 | ✓ | 500 | kbps ✓ | ☐ | ☐ | ☐ | ☐ | ☐ | ☐ | ☐ |
| 4 | ✓ | 500 | kbps ✓ | ☐ | ☐ | ☐ | ☐ | ☐ | ☐ | ☐ |
| 5 | ✓ | 500 | kbps ✓ | ☐ | ☐ | ☐ | ☐ | ☐ | ☐ | ☐ |
Figure 5-58. QoS Ingress Queue Policers screen.
| Table 5-42. QoS Ingress Queue Policers screen options. | |
| Label Description | |
| Port The port number for which the configuration below applies. | |
| Enable(E) Check to enable queue policer for individual switch ports. | |
| Rate | Configures the rate of each queue policer. The default value is 500. This value is restricted to 100 to 1000000 when the Unit is kbps, and is restricted to 1 to 3300 when the Unit is Mbps.This field is only shown if at least one of the queue policers is enabled. |
| Unit | Configures the unit of measurement for each queue policer rate as kbps or Mbps. The default value is kbps.This field is only shown if at least one of the queue policers is enabled. |
5.6.7 QoS Egress Port Scheduler and Shapers
This page allows you to configure Scheduler and Shapers for a specific port.
Strict Priority
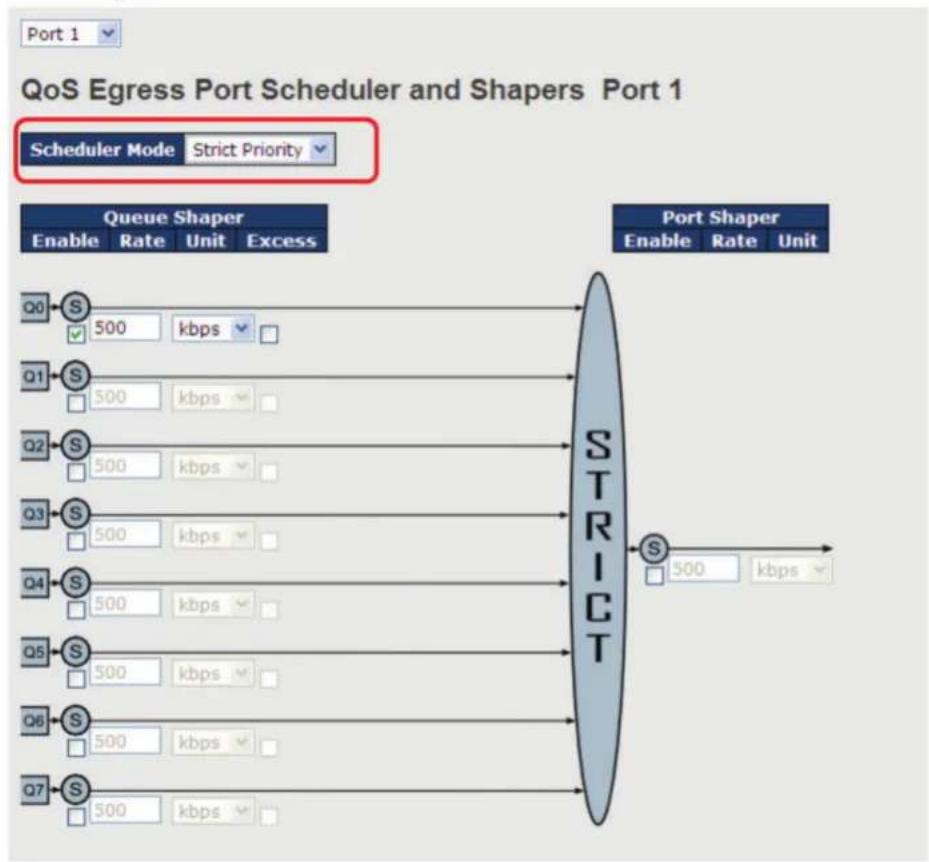
flowchart
graph TD
    A["Queue Shaper"] --> B["Enable Rate Unit Excess"]
    C["Port Shaper"] --> D["Enable Rate Unit"]
    B --> E["500 kbps"]
    D --> F["500 kbps"]
    E --> G["STRICT"]
    F --> G
    G --> H["500 kbps"]
Figure 5-59. Strict Priority screen.
| Table 5-43. Strict Priority screen options. | |
| Label Description | |
| Scheduler Mode | Controls whether the scheduler mode is Strict Priority or Weighted on this switch port. |
| Queue Shaper Enable Check to enable queue shaper for individual switch ports. | |
| Queue Shaper Rate | Configures the rate of each queue shaper. The default value is 500. This value is restricted to 100 to 1000000 when the Unit is kbps, and it is restricted to 1 to 3300 when the Unit is Mbps. |
| Queues Shaper Unit | Configures the rate for each queue shaper. The default value is 500. This value is restricted to 100 to 1000000 when the Unit is kbps, and it is restricted to 1 to 3300 when the Unit is Mbps. |
| Queue Shaper Excess Allows the queue to use excess bandwidth. | |
| Port Shaper Enable Check to enable port shaper for individual switch ports. | |
| Port Shaper Rate Configures the rate of each port shaper. The default value is 500 This value is restricted to 100 to 1000000 when the Unit is kbps, and it is restricted to 1 to 3300 when the Unit is Mbps. | |
| Port Shaper Unit Configures the unit of measurement for each port shaper rate as kbps or Mbps. The default value is kbps. | |
Weighted
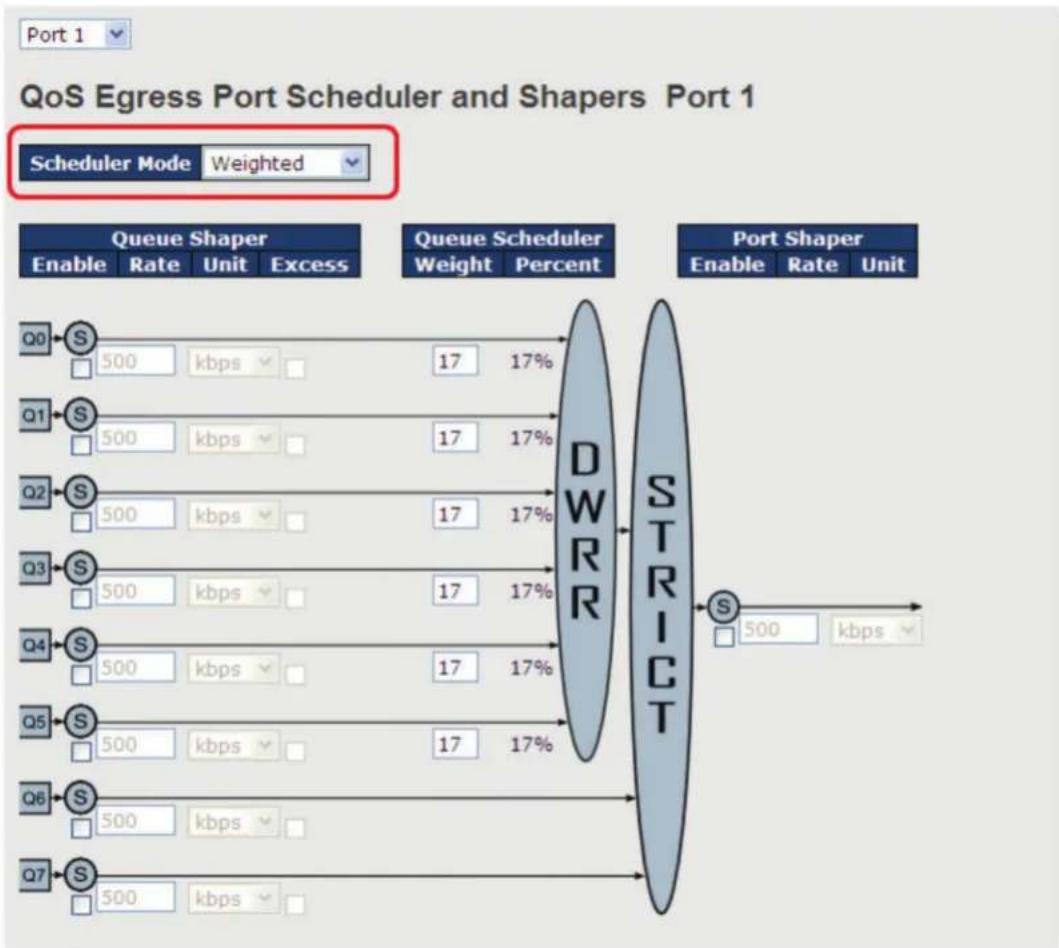
flowchart
graph TD
    A["Scheduler Mode Weighted"] --> B["Queue Shaper"]
    B --> C["Enable Rate Unit Excess"]
    B --> D["Queue Scheduler Weight Percent"]
    D --> E["DWRR"]
    E --> F["STRICT"]
    F --> G["S 500 kbps"]
Figure 5-60. QoS Egress Port Scheduler and Shapers Port 1.
| Table 5-44. QoS Egress Port Scheduler and Shapers Port 1 screen options. | |
| Label Description | |
| Scheduler Mode | Controls whether the scheduler mode is Strict Priority or Weighted on this switch port. |
| Queue Shaper Enable Check to enable queue shaper for individual switch ports. | |
| Queue Shaper Rate | Configures the rate of each queue shaper. The default value is 500. This value is restricted to 100 to 1000000 when the Unit is kbps, and it is restricted to 1 to 3300 when the Unit is Mbps. |
| Queues Shaper Unit | Configures the rate of each queue shaper. The default value is 500. This value is restricted to 100 to 1000000 when the Unit is kbps, and it is restricted to 1 to 3300 when the Unit is Mbps. |
| Queue Shaper Excess Allows the queue to use excess bandwidth. | |
| Queue Scheduler Weight | Configures the weight of each queue. The default value is 17. This value is restricted to 1 to 100. This parameter is only shown if Scheduler Mode is set to Weighted. |
| Queue Scheduler Percent | Shows the weight of the queue in percentage. This parameter is only shown if Scheduler Mode is set to Weighted. |
| Port Shaper Enable Check to enable port shaper for individual switch ports. | |
| Table 5-44 (continued). QoS Egress Port Scheduler and Shapers Port 1 screen options. | |
| Label Description | |
| Port Shaper Rate | Configures the rate of each port shaper. The default value is 500. This value is restricted to 100 to 1000000 when the Unit is kbps, and it is restricted to 1 to 3300 when the Unit is Mbps. |
| Port Shaper Unit | Configures the unit of measurement for each port shaper rate as kbps or Mbps. The default value is kbps. |
5.6.8 Port Scheduled
This page provides an overview of QoS Egress Port Schedulers for all switch ports.
QoS Egress Port Schedulers
| Port | Mode | Weight | |||||
| Q0 | Q1 | Q2 | Q3 | Q4 | Q5 | ||
| 1 | Strict Priority | - | - | - | - | - | - |
| 2 | Strict Priority | - | - | - | - | - | - |
| 3 | Strict Priority | - | - | - | - | - | - |
| 4 | Strict Priority | - | - | - | - | - | - |
| 5 | Strict Priority | - | - | - | - | - | - |
| 6 | Strict Priority | - | - | - | - | - | - |
Figure 5-61. QoS Egress Port Schedulers screen.
| Table 5-45. QoS Egress Port Schedulers screen options. | |
| Label Description | |
| Port | The switch port number to which the following settings will be applied.Click on the port number to configure the schedulers. |
| Mode Shows the scheduling mode for this port. | |
| Qn Shows the weight for this queue and port. | |
5.6.9 Port Shaping
This page provides an overview of QoS Egress Port Shapers for all switch ports.
QoS Egress Port Shapers
| Port | Shapers | ||||||||
| Q0 | Q1 | Q2 | Q3 | Q4 | Q5 | Q6 | Q7 | Port | |
| 1 | disabled | disabled | disabled | disabled | disabled | disabled | disabled | disabled | disabled |
| 2 | disabled | disabled | disabled | disabled | disabled | disabled | disabled | disabled | disabled |
| 3 | disabled | disabled | disabled | disabled | disabled | disabled | disabled | disabled | disabled |
| 4 | disabled | disabled | disabled | disabled | disabled | disabled | disabled | disabled | disabled |
| 5 | disabled | disabled | disabled | disabled | disabled | disabled | disabled | disabled | disabled |
| 6 | disabled | disabled | disabled | disabled | disabled | disabled | disabled | disabled | disabled |
Figure 5-62. QoS Egress Port Shapers screen.
| Table 5-46. QoS Egress Port Shapers screen options. | |
| Label Description | |
| Port | The switch port number to which the following settings will be applied. Click on the port number to configure the shapers. |
| Mode Shows disabled or actual queue shaper rate - e.g. “800 Mbps.” | |
| Qn Shows disabled or actual port shaper rate - e.g. “800 Mbps.” | |
5.6.10 DSCP Based QoS
This page allows you to configure basic QoS DSCP-based QoS Ingress Classification settings for all switches.
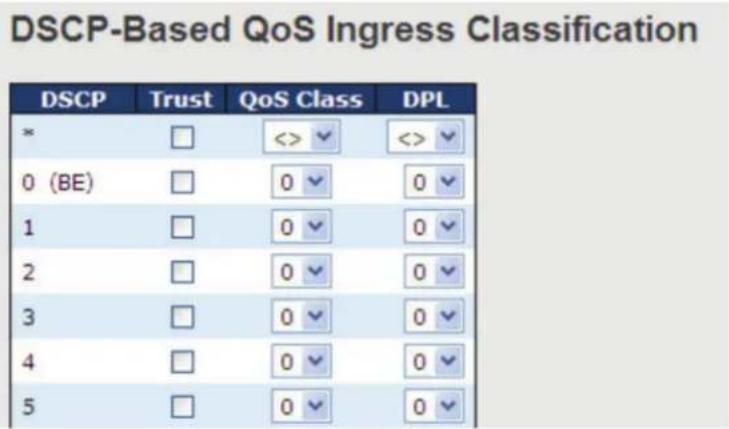
Figure 5-63. DSCP-Based QoS Ingress Classification screen.
| Table 5-47. DSCP-Based QoS Ingress Classification screen options. | |
| Label Description | |
| DSCP Maximum number of supported DSCP values is 64. | |
| Trust | Check to trust a specific DSCP value. Only frames with trusted DSCP values are mapped to a specific QoS class and drop precedence level. Frames with untrusted DSCP values are treated as a non-IP frame. |
| QoS Class QoS class value can be any number from 0–7. | |
| DPL Drop Precedence Level (0–1) | |
5.6.11 DSCP Translation
This page allows you to configure basic QoS DSCP translation settings for all switches. DSCP translation can be done in Ingress or Egress.
| DSCP | Ingress | Egress | ||
| Translate | Classify | Remap DP0 | Remap DP1 | |
| = | <> | □ | <> | <> |
| 0 (BE) | 0 (BE) | □ | 0 (BE) | 0 (BE) |
| 1 | 1 | □ | 1 | 1 |
| 2 | 2 | □ | 2 | 2 |
| 3 | 3 | □ | 3 | 3 |
| 4 | 4 | □ | 4 | 4 |
| 5 | 5 | □ | 5 | 5 |
| 6 | 6 | □ | 6 | 6 |
| 7 | 7 | □ | 7 | 7 |
| 8 (CS1) | 8 (CS1) | □ | 8 (CS1) | 8 (CS1) |
| 9 | 9 | □ | 9 | 9 |
Figure 5-64. DSCP Translation screen.
| Table 5-48. DSCP Translation screen options. | |
| Label Description | |
| DSCP Maximum number of supported DSCP values is 64 and valid DSCP value ranges from 0 to 63. | |
| Ingress | Ingress DSCP can be first translated to new DSCP before using the DSCP for QoS class and DPL map.There are two configuration parameters for DSCP Translation -1. Translate: DSCP can be translated to any of (0-63) DSCP values.2. Classify: check to enable ingress classification. |
| Egress Configurable egress parameters include;Remap DP0: controls the remapping for frames with DP level 0. You can select the DSCP value from a selected menu to which you want to remap. DSCP value ranges form 0 to 63.Remap DP1: controls the remapping for frames with DP level 1. You can select the DSCP value from a selected menu to which you want to remap. DSCP value ranges form 0 to 63. | |
5.6.12 DSCP Classification
This page allows you to configure the mapping of QoS class and Drop Precedence Level to DSCP value.
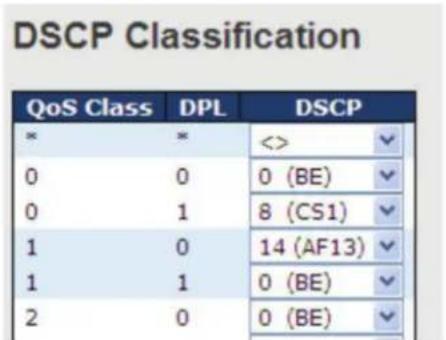
Figure 5-65. DSCP Classification screen.
| Table 5-49. DSCP Classification screen options. | |
| Label Description | |
| QoS Class Actual QoS class | |
| DPL Actual Drop Precedence Level | |
| DSCP Select the classified DSCP value (0–63) |
5.6.13 QoS Control List
This page allows you to edit or insert a single QoS control entry at a time. A QCE consists of several parameters. These parameters vary with the frame type you select.
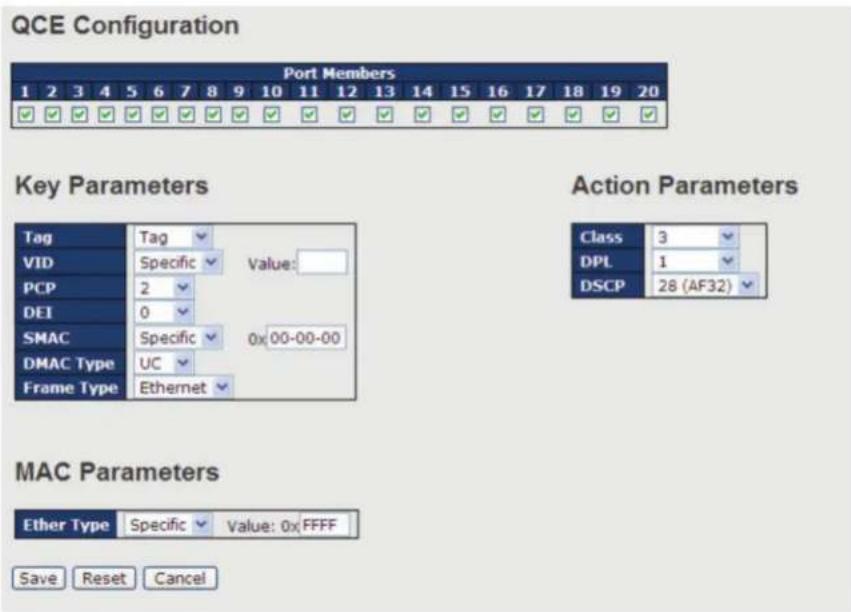
Figure 5-66. QCE Configuration screen.
| Table 5-50. QCE Configuration screen options. | |
| Label Description | |
| Port Members | Check to include the port in the QCL entry. By default, all ports are included. |
| Key Parameters | Key configurations include:Tag: value of tag, can be Any, Untag or Tag.VID: valid value of VLAN ID, can be any value from 1 to 4095 Any: user can enter either a specific value or a range of VIDs.PCP: Priority Code Point, can be specific numbers (0, 1, 2, 3, 4, 5, 6, 7), a range (0-1, 2-3, 4-5, 6-7, 0-3, 4-7) or AnyDEI: Drop Eligible Indicator, can be any of values between 0 and 1 or AnySMAC: Source MAC Address, can be 24 MS bits (OUI) or AnyDMAC Type: Destination MAC type, can be unicast (UC), multicast (MC), broadcast (BC) or AnyFrame Type can be the following values:AnyEthernetLLCSNAPIPv4IPv6NOTE: All frame types are explained below. |
| Any Allow all types of frames. | |
| Ethernet | Valid Ethernet values can range from 0x600 to 0xFFFF or Any' but excluding 0x800(IPv4) and 0x86DD(IPv6).The default value is Any. |
| LLC | SSAP Address: valid SSAP (Source Service Access Point) values can range from 0x00 to 0xFF or Any. The default value is Any.DSAP Address: valid DSAP (Destination Service Access Point) values can range from 0x00 to 0xFF or Any. The default value is Any.Control Valid Control: valid values can range from 0x00 to 0xFF or Any. The default value is Any. |
| SNAP | PID: valid PID (a.k.a ethernet type) values can range from 0x00 to 0xFFFF or Any. The default value is Any. |
| IPv4 Protocol IP | Protocol Number: (0-255, TCP or UDP) or Any.Source IP: specific Source IP address in value/mask format or Any. IP and mask are in the format of x.y.z.w where x, y, z, and w are decimal numbers between 0 and 255. When the mask is converted to a 32-bit binary string and read from left to right, all bits following the first zero must also be zero.DSCP (Differentiated Code Point): can be a specific value, a range, or Any. DSCP values are in the range 0-63 including BE, CS1-CS7, EF or AF11-AF43.IP Fragment: IPv4 frame fragmented options include 'yes', 'no', and 'any'.Sport Source TCP/UDP Port: (0-65535) or Any, specific value or port range applicable for IP protocol UDP/TCPDport Destination TCP/UDP Port: (0-65535) or Any, specific value or port range applicable for IP protocol UDP/TCP |
| IPv6 Protocol IP | protocol number: (0-255, TCP or UDP) or Any.Source IP IPv6 source address: (a.b.c.d) or Any, 32 LS bits.DSCP (Differentiated Code Point): can be a specific value, a range, or Any. DSCP values are in the range 0-63 including BE, CS1-CS7, EF or AF11-AF43.Sport Source TCP/UDP port: (0-65535) or Any, specific value or port range applicable for IP protocol UDP/TCPDport Destination TCP/UDP port: (0-65535) or Any, specific value or port range applicable for IP protocol UDP/TCP |
| Table 5-50 (continued). QCE Configuration screen options. | |
| Label Description | |
| Action Parameters Class QoS class: (0–7) or DefaultValid Drop Precedence Level value can be (0–1) or Default.Valid DSCP value can be (0–63, BE, CS1–CS7, EF or AF11–AF43) or Default.Default means that the default classified value is not modified by this QCE. | |
5.6.14 QoS Counters
This page provides the statistics of individual queues for all switch ports.
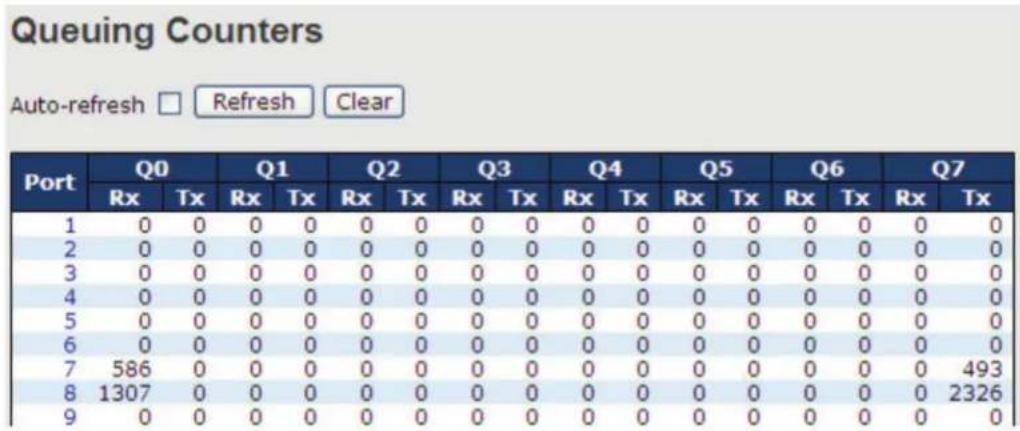
Figure 5-67. Queuing Counters screen.
| Table 5-51. Queuing Counters screen options. | |
| Label Description | |
| Port The switch port number to which the following settings will be applied. | |
| Qn There are 8 QoS queues per port. Q0 is the lowest priority. | |
| Rx/Tx The number of received and transmitted packets per queue. |
5.6.15 QCL Status
This page shows the QCL status by different QCL users. Each row describes the QCE that is defined. It is a conflict if a specific QCE is not applied to the hardware due to hardware limitations. The maximum number of QCEs is 256 on each switch.
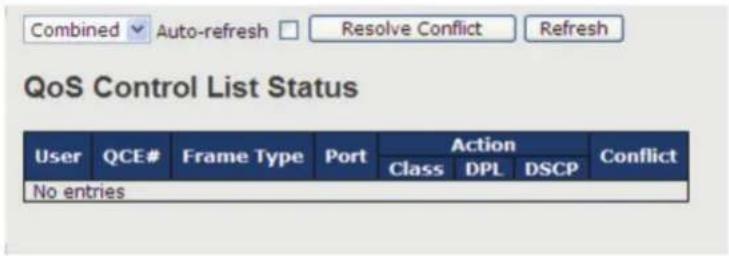
Figure 5-68. QoS Control List Status screen.
| Table 5-52. QoS Control List Status screen options. | |
| Label Description | |
| User Indicates the QCL user | |
| QCE# Indicates the index of QCE | |
| Frame Type | Indicates the type of frame to look for incoming frames. Possible frame types are:Any: the QCE will match all frame type.Ethernet: Only Ethernet frames (with Ether Type 0x600-0xFFFF) are allowed.LLC: Only (LLC) frames are allowed.SNAP: Only (SNAP) frames are allowed.IPv4: the QCE will match only IPV4 frames.IPv6: the QCE will match only IPV6 frames. |
| Port Indicates the list of ports configured with the QCE. | |
| Action | Indicates the classification action taken on ingress frame if parameters configured are matched with the frame's content.There are three action fields: Class, DPL, and DSCP.Class: Classified QoS; if a frame matches the QCE, it will be put in the queue.DPL: Drop Precedence Level; if a frame matches the QCE, then DP level will set to a value displayed under DPL column.DSCP: if a frame matches the QCE, then DSCP will be classified with the value displayed under DSCP column. |
| Conflict | Displays the conflict status of QCL entries. As hardware resources are shared by multiple applications, resources required to add a QCE may not be available. In that case, it shows conflict status as Yes, otherwise it is always No.NOTE: Conflict can be resolved by releasing the hardware resources required to add the QCL entry by pressing Resolve Conflict button. |
5.7 Multicast
5.7.1 IGMP Snooping
This page provides IGMP Snooping related configurations.
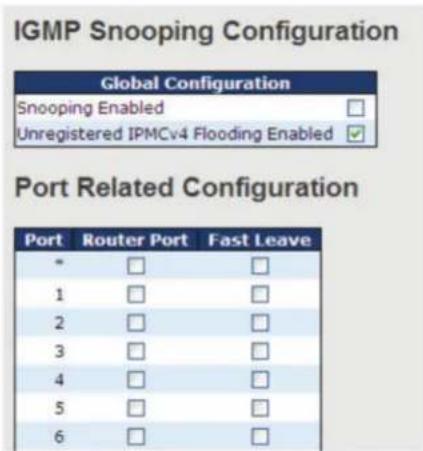
Figure 5-69. IGMP Snooping Configuration screen.
| Table 5-53. IGMP Snooping Configuration screen options. | |
| Label Description | |
| Snooping Enabled Check to enable global IGMP snooping. | |
| Unregistered IPMCv4Flooding enabled | Check to enable unregistered IPMC traffic flooding. |
| Router Port | Specifies which ports act as router ports. A router port is a port on the Ethernet switch that leads towards the Layer 3 multicast device or IGMP querier.If an aggregation member port is selected as a router port, the whole aggregation will act as a router port. |
| Fast Leave Check to enable fast leave on the port. | |
5.7.2 VLAN Configurations of IGMP Snooping
Each page shows up to 99 entries from the VLAN table, with a default value of 20, selected by the Entries Per Page input field. When first visited, the web page will show the first 20 entries from the beginning of the VLAN Table. The first displayed will be the one with the lowest VLAN ID found in the VLAN Table.
The VLAN input field allows the user to select the starting point in the VLAN Table. Clicking the Refresh button will update the displayed table starting from that or the next closest VLAN Table match.
The >> will use the last entry of the currently displayed entry as a basis for the next lookup. When the end is reached, the text No more entries is shown in the displayed table. Use the |<< button to start over.
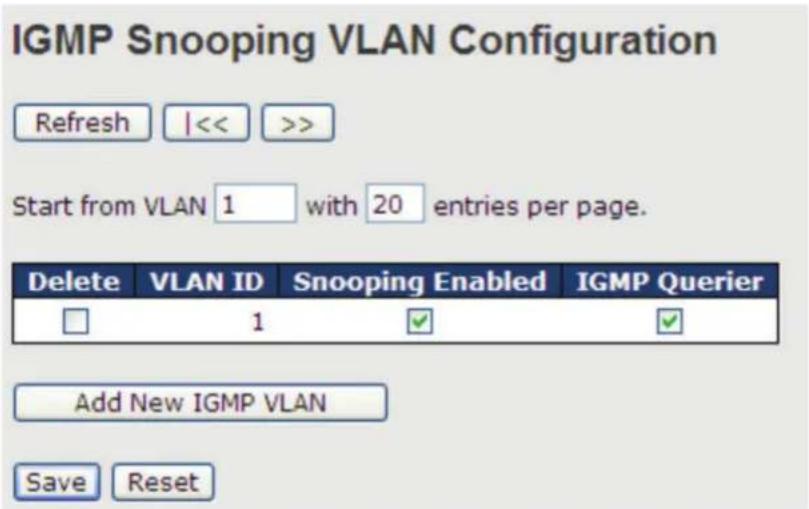
Figure 5-70. IGMP Snooping VLAN Configuration screen.
| Table 5-54. IGMP Snooping VLAN Configuration screen options. | |
| Label Description | |
| Delete Check to delete the entry. The designated entry will be deleted during the next save. | |
| VLAN ID The VLAN ID of the entry. | |
| IGMP Snooping Enable Check to enable IGMP snooping for individual VLAN. Up to 32 VLANs can be selected. | |
| IGMP Querier Check to enable the IGMP Querier in the VLAN. | |
5.7.3 IGMP Snooping Status
This page provides IGMP snooping status.
| VLAN ID | Querier Version | Host Version | Querier Status | Queries Transmitted | Queries Received | V1 Reports Received | V2 Reports Received | V3 Reports Received | V2 Leaves Received |
| 1 | v3 | v3 | DISABLE | 0 | 0 | 0 | 0 | 0 | 0 |
| Router Port | |||||||||
| Port | Status | ||||||||
| 1 | - | ||||||||
| 2 | - | ||||||||
| 3 | - | ||||||||
| 4 | - | ||||||||
| 5 | - | ||||||||
| 6 | - | ||||||||
Figure 5-71. IGMP Snooping Status screen.
| Table 5-55. IGMP Snooping Status screen options. | |
| Label Description | |
| VLAN ID The VLAN ID of the entry. | |
| Querier Version Active Querier version | |
| Host Version Active Host version | |
| Querier Status Shows the Querier status as ACTIVE or IDLE | |
| Querier Receive The number of transmitted Querier | |
| V1 Reports Receive The number of received V1 reports | |
| V2 Reports Receive The number of received V2 reports | |
| V3 Reports Receive The number of received V3 reports | |
| V2 Leave Receive The number of received V2 leave packets | |
| Refresh | Click to refresh the page immediately |
| Clear | Clear all statistics counters |
| Auto-refresh | Check to enable an automatic refresh of the page at regular intervals |
| Port | Switch port number |
| Status | Indicates whether a specific port is a router port or not |
5.7.4 Groups Information of IGMP Snooping
Entries in the IGMP Group Table are shown on this page. The IGMP Group Table is sorted first by VLAN ID, and then by group.
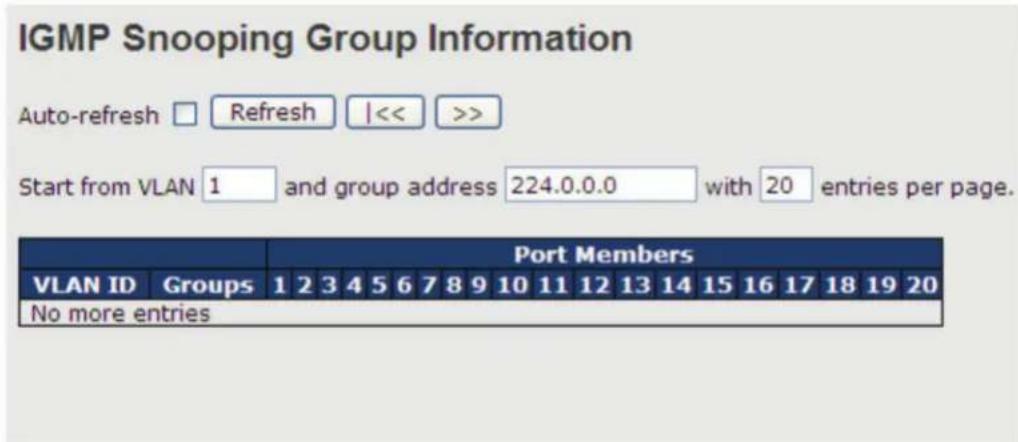
Figure 5-72. IGMP Snooping Group Information screen.
| Table 5-56. IGMP Snooping Group Information screen options. | |
| Label Description | |
| VLAN ID The VLAN ID of the group | |
| Groups The group address of the group displayed | |
| Port Members Ports under this group | |
5.8 Security
5.8.1 Remote Control Security Configurations
Remote Control Security allows you to limit the remote access to the management interface. When enabled, requests of the client which is not in the allow list will be rejected.
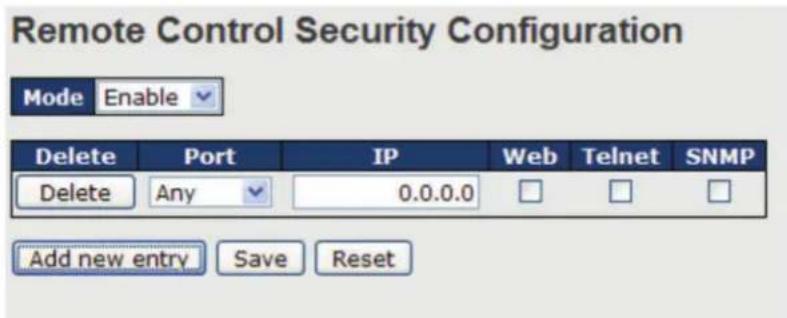
Figure 5-73. Remote Control Security Configuration screen.
| Table 5-57. Remote Control Security Configuration screen options. | |
| Label Description | |
| Port Port number of the remote client | |
| IP Address IP address of the remote client. 0.0.0.0 means “any IP.” | |
| Web Check to enable management via a Web interface | |
| Telnet Check to enable management via a Telnet interface | |
| SNMP Check to enable management via a SNMP interface | |
| Delete Check to delete entries | |
5.8.2 Device Binding
This page provides device binding configurations. Device binding is a powerful way to monitor devices and network security.
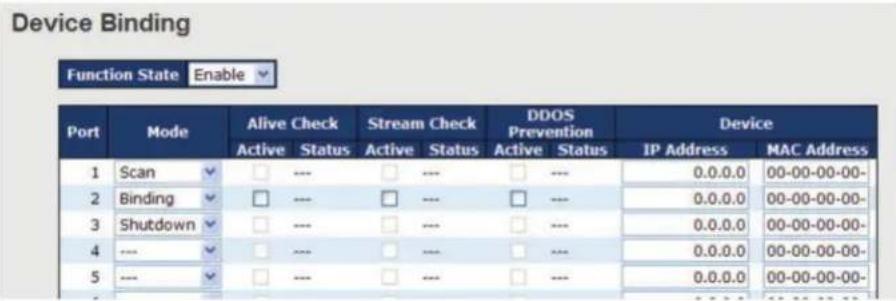
Figure 5-74. Device Binding screen.
| Table 5-58. Device Binding screen options. | |
| Label Description | |
| Mode | Indicates the device binding operation for each port. Possible modes are:---: disableScan: scans IP/MAC automatically, but no binding functionBinding: enables binding. Under this mode, any IP/MAC that does not match the entry will not be allowed to access the network.Shutdown: shuts down the port (No Link) |
| Alive Check Active Check to enable alive check. When enabled, switch will ping the device continually. | |
| Alive Check Status Indicates alive check status. Possible statuses are:---: disableGot Reply: receive ping reply from device, meaning the device is still aliveLost Reply: not receiving ping reply from device, meaning the device might have been dead. | |
| Stream Check Active Check to enable stream check. When enabled, the switch will detect the stream change (getting low) from the device. | |
| Stream Check Status Indicates stream check status. Possible statuses are:---: disableNormal: the stream is normal.Low: the stream is getting low. | |
| DDoS Prevention Action | Check to enable DDOS prevention. When enabled, the switch will monitor the device against DDOS attacks. |
| Table 5-58 (continued). Device Binding screen options. | |
| Label Description | |
| DDoS Prevention Status | Indicates DDOS prevention status. Possible statuses are:----: disableAnalyzing: analyzes packet throughput for initializationRunning: analysis completes and ready for next moveAttacked: DDOS attacks occur |
| Device IP Address Specifies | IP address of the device |
| Device MAC Address Specifies | MAC address of the device |
Advanced Configurations
Alias IP Address
This page provides Alias IP Address configuration. Some devices might have more than one IP addresses. You could specify the other IP address here.
Alias IP Address
| Port | Alias IP Address |
| 1 | 0.0.0.0 |
| 2 | 0.0.0.0 |
| 3 | 0.0.0.0 |
| 4 | 0.0.0.0 |
| 5 | 0.0.0.0 |
| 6 | 0.0.0.0 |
| 7 | 0.0.0.0 |
Figure 5-75. Alias IP Address screen.
| Table 5-59. Aiias IP Address screen options. | |
| Label Description | |
| Alias IP Address | Specifies alias IP address. Keep 0.0.0.0 if the device does not have an alias IP address. |
Alive Check
You can use ping commands to check port link status. If port link fails, you can set actions from the drop-down list.
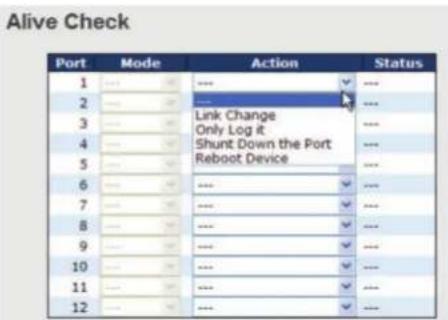
This page provides DDOS Prevention configurations. The switch can monitor ingress packets, and perform actions when DDOS attack occurred on this port. You can configure the setting to achieve maximum protection.
DDOS Prevention
| Port | Mode | Sensibility | Packet Type | Socket Number | Filter | Action | Status | |
| Low | High | |||||||
| 1 | Enabled | Normal | TCP | 80 | 80 | Destination | --- | Running... |
| 2 | --- | Normal | TCP | 80 | 80 | Destination | --- | --- |
| 3 | --- | Normal | TCP | 80 | 80 | Destination | Blocking 1 minuteBlocking 10 minuteBlockingShunt Down the Port | --- |
| 4 | --- | Normal | TCP | 80 | 80 | Destination | --- | |
| 5 | --- | Normal | TCP | 80 | 80 | Destination | Only Log #Reboot Device | --- |
| 6 | --- | Normal | TCP | 80 | 80 | Destination | --- | |
| 7 | --- | Normal | TCP | 80 | 80 | Destination | --- | --- |
| 8 | --- | Normal | TCP | 80 | 80 | Destination | --- | --- |
| 9 | --- | Normal | TCP | 80 | 80 | Destination | --- | --- |
| 10 | --- | Normal | TCP | 80 | 80 | Destination | --- | --- |
| 11 | --- | Normal | TCP | 80 | 80 | Destination | --- | --- |
Figure 5-77. DDOS Prevention screen.
| Table 5-61. DDOS Prevention screen options. | |
| Label Description | |
| Mode Enables or disables | DDOS prevention of the port |
| Sensibility | Indicates the level of DDOS detection. Possible levels are:Low: low sensibilityNormal: normal sensibilityMedium: medium sensibilityHigh: high sensibility |
| Packet Type Indicates the types of DDoS attack packets to be monitored. Possible types are:RX Total: all ingress packetsRX Unicast: unicast ingress packetsRX Multicast: multicast ingress packetsRX Broadcast: broadcast ingress packetsTCP: TCP ingress packetsUDP: UDP ingress packets | |
| Socket Number If packet type is UDP (or TCP), please specify the socket number here.The socket number can be a range, from low to high. If the socket number is only one, please fill the same number in the low and high fields. | |
| Table 5-61 (continued). DDOS Prevention screen options. | |
| Label Description | |
| Filter If packet type is UDP (or TCP), please choose the socket direction (Destination/Source). | |
| Action | Indicates the action to take when DDOS attacks occur. Possible actions are:---: no actionBlocking 1 minute: blocks the forwarding for 1 minute and log the eventBlocking 10 minute: blocks the forwarding for 10 minutes and log the eventBlocking: blocks and logs the eventShunt Down the Port: shuts down the port (No Link) and logs the eventOnly Log it: simply logs the eventReboot Device: if PoE is supported, the device can be rebooted. The event will be logged. |
| Status | Indicates the DDOS prevention status. Possible statuses are:---: disables DDOS preventionAnalyzing: analyzes packet throughput for initializationRunning: analysis completes and ready for next moveAttacked: DDOS attacks occur |
Device Description
This page allows you to configure device description settings.
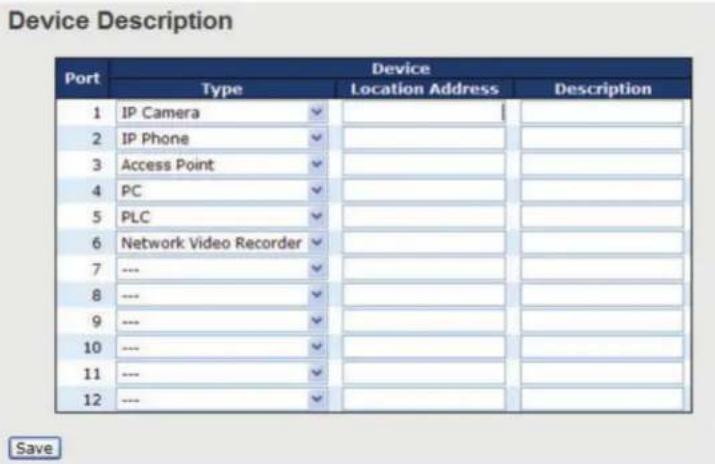
Figure 5-78. Device Description screen.
| Table 5-62. Device Description screen options. | |
| Label Description | |
| Device Type | Indicates device types. Possible types are: --- (no specification), IP Camera, IP Phone, Access Point, PC, PLC, and Network Video Recorder |
| Location Address | Indicates location information of the device. The information can be used for Google Mapping. |
| Description Device descriptions | |
Stream Check
This page allows you to configure stream check settings.
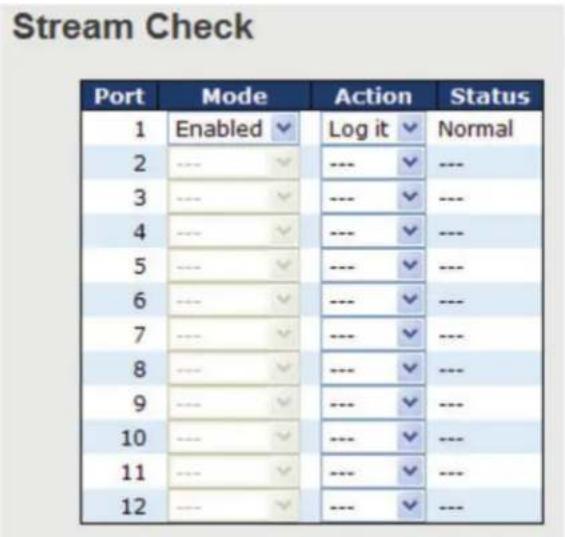
Figure 5-79. Stream Check screen.
| Table 5-63. Stream Check screen options. | |
| Label Description | |
| Mode Enables or disables | stream monitoring of the port. |
| Action | Indicates the action to take when the stream gets low. Possible actions are:---: no actionLog it: simply logs the event |
5.8.3 ACL Ports
This page allows you to configure the ACL parameters (ACE) of each switch port. These parameters will affect frames received on a port unless the frame matches a specific ACE.
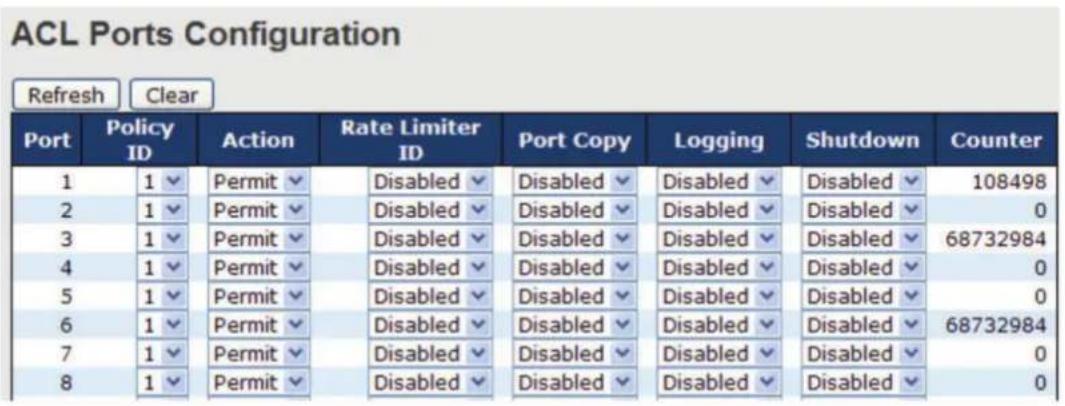
Figure 5-80. ACL Ports Configuration screen.
| Table 5-64. ACL Ports Configuration screen options. | |
| Label Description | |
| Port The switch port number to which the following settings will be applied. | |
| Policy ID | Select to apply a policy to the port. The allowed values are 1 to 8. The default value is 1. |
| Action Select to Permit to permit or Deny to deny forwarding. The default value is Permit. | |
| Rate Limiter ID | Select a rate limiter for the port. The allowed values are Disabled or numbers from 1 to 15. The default value is Disabled. |
| Port Copy | Select which port frames are copied to. The allowed values are Disabled or a specific port number. The default value is Disabled. |
| Logging | Specifies the logging operation of the port. The allowed values are: Enabled: frames received on the port are stored in the system log Disabled: frames received on the port are not logged The default value is Disabled. NOTE: System log memory capacity and logging rate is limited. |
| Shutdown | Specifies the shutdown operation of this port. The allowed values are: Enabled: if a frame is received on the port, the port will be disabled. Disabled: port shut down is disabled. The default value is Disabled. |
| Counter Counts the number of frames that match this ACE. | |
Rate Limiters
This page allows you to configure the rate limiter for the ACL of the switch.
| Rate Limiter ID | Rate (pps) |
| 1 | 1✓ |
| 2 | 1✓ |
| 3 | 1✓ |
| 4 | 1✓ |
| 5 | 1✓ |
| 6 | 1✓ |
| 7 | 1✓ |
| 8 | 1✓ |
| 9 | 1✓ |
| 10 | 1✓ |
| 11 | 1✓ |
| 12 | 1✓ |
Figure 5-81. ACL Rate Limiter Configuration screen.
| Table 5-65. ACL Rate Limiter Configuration screen options. | |
| Label Description | |
| Rate Limiter ID The rate limiter ID for the settings contained in the same row. | |
| Rate | The rate unit is packet per second (pps), which can be configured as 1, 2, 4, 8, 16, 32, 64, 128, 256, 512, 1K, 2K, 4K, 8K, 16K, 32K, 64K, 128K, 256K, 512K, or 1024K.The 1 kpps is actually 1002.1 pps. |
ACL Control List
This page allows you to configure ACE (Access Control Entry).
An ACE consists of several parameters. These parameters vary with the frame type you have selected. First select the ingress port for the ACE, and then the frame type. Different parameter options are displayed according to the frame type you have selected.
A frame matching the ACE can be configured here.
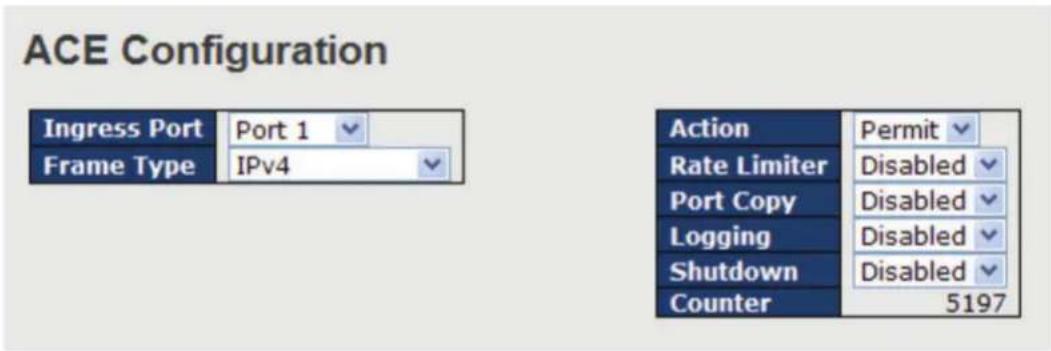
Figure 5-82. ACE Configuration screen.
| Table 5-66. ACE Configuration screen. | |
| Label Description | |
| Ingress Port | Indicates the ingress port to which the ACE will apply.Any: the ACE applies to any portPort n: the ACE applies to this port number, where n is the number of the switch port.Policy n: the ACE applies to this policy number, where n can range from 1 to 8. |
| Frame Type | Indicates the frame type of the ACE. These frame types are mutually exclusive.Any: any frame can match the ACE.Ethernet Type: only Ethernet type frames can match the ACE. The IEEE 802.3 descripts the value of length/types should be greater than or equal to 1536 decimal (equal to 0600 hexadecimal).ARP: only ARP frames can match the ACE. Notice the ARP frames will not match the ACE with Ethernet type.IPv4: only IPv4 frames can match the ACE. Notice the IPv4 frames will not match the ACE with Ethernet type. |
| Action | Specifies the action to take when a frame matches the ACE Permit: takes action when the frame matches the ACE.Deny: drops the frame matching the ACE. |
| Table 5-66 (continued). ACE Configuration screen. | |
| Label Description | |
| Rate Limiter | Specifies the rate limiter in number of base units. The allowed range is 1 to 15. Disabled means the rate limiter operation is disabled. |
| Port Copy | Frames matching the ACE are copied to the port number specified here. The allowed range is the same as the switch port number range. Disabled means the port copy operation is disabled. |
| Logging | Specifies the logging operation of the ACE. The allowed values are:Enabled: frames matching the ACE are stored in the system log.Disabled: frames matching the ACE are not logged.NOTE: System log memory capacity and logging rate is limited. |
| Shutdown | Specifies the shutdown operation of the ACE. The allowed values are:Enabled: if a frame matches the ACE, the ingress port will be disabled.Disabled: port shutdown is disabled for the ACE. |
| Counter Indicates the number of times the ACE matched by a frame. | |
MAC Parameters
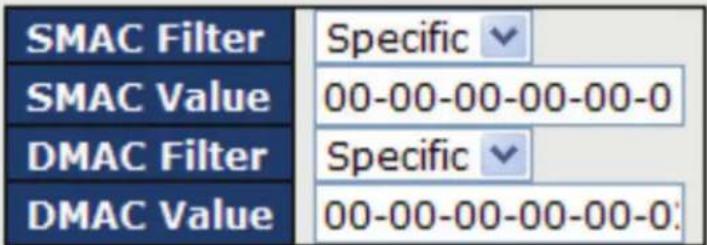
Figure 5-83. MAC Parameters screen.
| Table 5-67. MAC Parameters screen options. | |
| Label Description | |
| SMAC Filter | (Only displayed when the frame type is Ethernet Type or ARP.)Specifies the source MAC filter for the ACE.Any: no SMAC filter is specified (SMAC filter status is “don't-care”).Specific: if you want to filter a specific source MAC address with the ACE, choose this value. A field for entering an SMAC value appears. |
| SMAC Value | When Specific is selected for the SMAC filter, you can enter a specific source MAC address. The legal format is "xx-xx-xx-xx-xx-xx", Frames matching the ACE will use this SMAC value. |
| DMAC Filter | Specifies the destination MAC filter for this ACE.Any: no DMAC filter is specified (DMAC filter status is “don't-care”).MC: frame must be multicast.BC: frame must be broadcast.UC: frame must be unicast.Specific: If you want to filter a specific destination MAC address with the ACE, choose this value.A field for entering a DMAC value appears. |
| Table 5-67 (continued). MAC Parameters screen options. | |
| Label Description | |
| DMAC Value | When Specific is selected for the DMAC filter, you can enter a specific destination MAC address. The legal format is “xx-xx-xx-xx-xx-xx.” Frames matching the ACE will use this DMAC value. |
VLAN Parameters
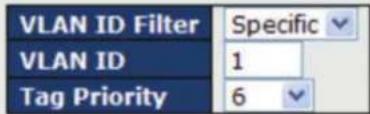
Figure 5-84. VLAN Parameters screen.
| Table 5-68. VLAN Parameters screen menu. | |
| Label Description | |
| VLAN ID Filter Specifies the VLAN ID filter for the ACEAny: no VLAN ID filter is specified (VLAN ID filter status is "don't-care").Specific: if you want to filter a specific VLAN ID with the ACE, choose this value. A field for entering a VLAN ID number appears. | |
| VLAN ID When Specific is selected for the VLAN ID filter, you can enter a specific VLAN ID number. The allowed range is 1 to 4095. Frames matching the ACE will use this VLAN ID value. | |
| Tag Priority Specifies the tag priority for the ACE. A frame matching the ACE will use this tag priority. The allowed number range is 0 to 7. Any means that no tag priority is specified (tag priority is "don't-care"). | |
IP Parameters
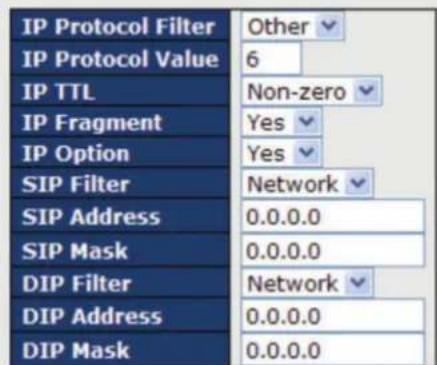
Figure 5-85. IP Parameters screen.
Chapter 5: Management
| Table 5-69. IP Parameters screen options. | |
| Label Description | |
| IP Protocol Filter | Specifies the IP protocol filter for the ACEAny: no IP protocol filter is specified ("don't-care").Specific: if you want to filter a specific IP protocol filter with the ACE, choose this value. A field for entering an IP protocol filter appears.ICMP: selects ICMP to filter IPv4 ICMP protocol frames. Extra fields for defining ICMP parameters will appear. For more details of these fields, please refer to the help file.UDP: selects UDP to filter IPv4 UDP protocol frames. Extra fields for defining UDP parameters will appear. For more details of these fields, please refer to the help file.TCP: selects TCP to filter IPv4 TCP protocol frames. Extra fields for defining TCP parameters will appear. For more details of these fields, please refer to the help file. |
| IP Protocol Value | Specific allows you to enter a specific value. The allowed range is 0 to 255. Frames matching the ACE will use this IP protocol value. |
| IP TTL Specifies the | time-to-live settings for the ACEZero: IPv4 frames with a time-to-live value greater than zero must not be able to match this entry.Non-zero: IPv4 frames with a time-to-live field greater than zero must be able to match this entry.Any: any value is allowed ("don't-care"). |
| IP Fragment | Specifies the fragment offset settings for the ACE. This includes settings of More Fragments (MF) bit and Fragment Offset (FRAG OFFSET) for an IPv4 frame.No: IPv4 frames whose MF bit is set or the FRAG OFFSET field is greater than zero must not be able to match this entry.Yes: IPv4 frames whose MF bit is set or the FRAG OFFSET field is greater than zero must be able to match this entry.Any: any value is allowed ("don't-care"). |
| IP Option Specifies | the options flag settings for the ACENo: IPv4 frames whose options flag is set must not be able to match this entry.Yes: IPv4 frames whose options flag is set must be able to match this entry.Any: any value is allowed ("don't-care"). |
| SIP Filter Specifies | the source IP filter for this ACEAny: no source IP filter is specified (Source IP filter is "don't-care").Host: source IP filter is set to Host. Specify the source IP address in the SIP Address field that appears.Network: source IP filter is set to Network. Specify the source IP address and source IP mask in the SIP Address and SIP Mask fields that appear. |
| SIP Address | When Host or Network is selected for the source IP filter, you can enter a specific SIP address in dotted decimal notation. |
| SIP Mask | When Network is selected for the source IP filter, you can enter a specific SIP mask in dotted decimal notation. |
| DIP Filter Specifies | the destination IP filter for the ACEAny: no destination IP filter is specified (destination IP filter is "don't-care").Host: destination IP filter is set to Host. Specify the destination IP address in the DIP Address field that appears.Network: destination IP filter is set to Network. Specify the destination IP address and destination IP mask in the DIP Address and DIP Mask fields that appear. |
| DIP Address | When Host or Network is selected for the destination IP filter, you can enter a specific DIP address in dotted decimal notation. |
| DIP Mask | When Network is selected for the destination IP filter, you can enter a specific DIP mask in dotted decimal notation. |
ARP Parameters
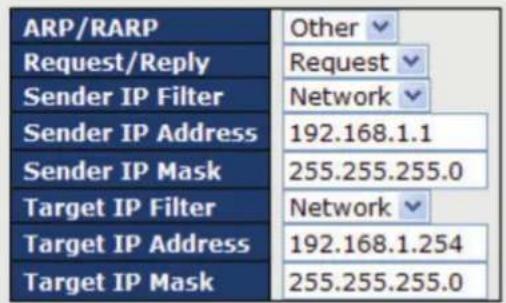
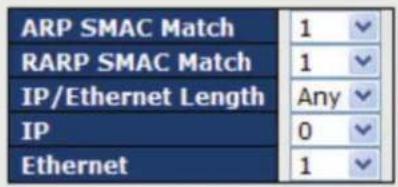
Figure 5-86. ARP Parameters screen.
| Table 5-70. ARP Parameters screen options. | |
| Label Description | |
| ARP/RARP | Specifies the available ARP/RARP opcode (OP) flag for the ACEAny: no ARP/RARP OP flag is specified (OP is "don't-care").ARP: frame must have ARP/RARP opcode set to ARPRARP: frame must have ARP/RARP opcode set to RARP.Other: frame has unknown ARP/RARP Opcode flag. |
| Request/Reply | Specifies the available ARP/RARP opcode (OP) flag for the ACEAny: no ARP/RARP OP flag is specified (OP is "don't-care").Request: frame must have ARP Request or RARP Request OP flag set.Reply: frame must have ARP Reply or RARP Reply OP flag. |
| Sender IP Filter Specifies the sender IP filter for the ACEAny: no sender IP filter is specified (sender IP filter is "don't-care").Host: sender IP filter is set to Host. Specify the sender IP address in the SIP Address field that appears.Network: sender IP filter is set to Network. Specify the sender IP address and sender IP mask in the SIP Address and SIP Mask fields that appear. | |
| Sender IP Address | When Host or Network is selected for the sender IP filter, you can enter a specific sender IP address in dotted decimal notation. |
| Sender IP Mask | When Network is selected for the sender IP filter, you can enter a specific sender IP mask in dotted decimal notation. |
| Target IP Filter | Specifies the target IP filter for the specific ACEAny: no target IP filter is specified (target IP filter is "don't-care").Host: target IP filter is set to Host. Specify the target IP address in the Target IP Address field that appears.Network: target IP filter is set to Network. Specify the target IP address and target IP mask in the Target IP Address and Target IP Mask fields that appear. |
| Target IP Address | When Host or Network is selected for the target IP filter, you can enter a specific target IP address in dotted decimal notation. |
| Target IP Mask | When Network is selected for the target IP filter, you can enter a specific target IP mask in dotted decimal notation. |
| Table 5-70 (continued). ARP Parameters screen options. | |
| Label Description | |
| ARP SMAC Match | Specifies whether frames will meet the action according to their sender hardware address field (SHA) settings.0: ARP frames where SHA is not equal to the SMAC address1: ARP frames where SHA is equal to the SMAC addressAny: any value is allowed ("don't-care"). |
| RARP SMAC Match | Specifies whether frames will meet the action according to their target hardware address field (THA) settings.0: RARP frames where THA is not equal to the SMAC address1: RARP frames where THA is equal to the SMAC addressAny: any value is allowed ("don't-care") |
| IP/Ethernet Length | Specifies whether frames will meet the action according to their ARP/RARP hardware address length (HLN) and protocol address length (PLN) settings.0: ARP/RARP frames where the HLN is equal to Ethernet (0x06) and the (PLN) is equal to IPv4 (0x04) must not match this entry.1: ARP/RARP frames where the HLN is equal to Ethernet (0x06) and the (PLN) is equal to IPv4 (0x04) must match this entry.Any: any value is allowed ("don't-care"). |
| IP | Specifies whether frames will meet the action according to their ARP/RARP hardware address space (HRD) settings.0: ARP/RARP frames where the HLD is equal to Ethernet (1) must not match this entry.1: ARP/RARP frames where the HLD is equal to Ethernet (1) must match this entry.Any: any value is allowed ("don't-care"). |
| Ethernet | Specifies whether frames will meet the action according to their ARP/RARP protocol address space (PRO) settings.0: ARP/RARP frames where the PRO is equal to IP (0x800) must not match this entry.1: ARP/RARP frames where the PRO is equal to IP (0x800) must match this entry.Any: any value is allowed ("don't-care"). |
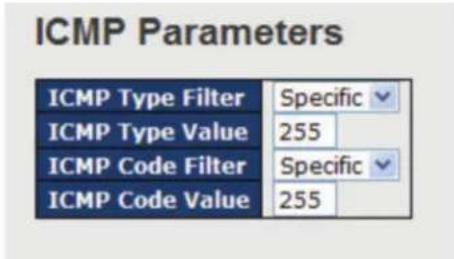
Figure 5-87. ICMP Parameters screen.
| Table 5-71. ICMP Parameters screen options. | |
| Label Description | |
| ICMP Type Filter S | Specifies the ICMP filter for the ACEAny: no ICMP filter is specified (ICMP filter status is "don't-care").Specific: if you want to filter a specific ICMP filter with the ACE, you can enter a specific ICMP value. A field for entering an ICMP value appears. |
| ICMP Type Value | When Specific is selected for the ICMP filter, you can enter a specific ICMP value. The allowed range is 0 to 255. A frame matching the ACE will use this ICMP value. |
| ICMP Code Filter S | Specifies the ICMP code filter for the ACEAny: no ICMP code filter is specified (ICMP code filter status is "don't-care").Specific: if you want to filter a specific ICMP code filter with the ACE, you can enter a specific ICMP code value. A field for entering an ICMP code value appears. |
| ICMP Code Value | When Specific is selected for the ICMP code filter, you can enter a specific ICMP code value. The allowed range is 0 to 255. A frame matching the ACE will use this ICMP code value. |
TCP Parameters
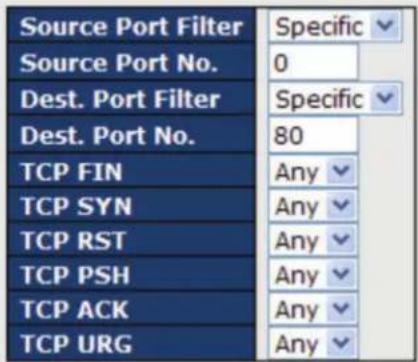
UDP Parameters
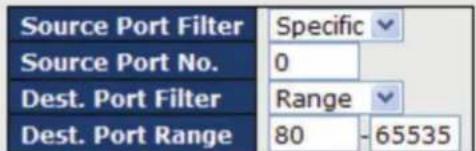
Figure 5-88. TCP Parameters and UDP Parameters screens.
| Table 5-72. TCP Parameters and UDP Parameters screens options. | |
| Label Description | |
| TCP/UDP Source Filter | Specifies the TCP/UDP source filter for the ACEAny: no TCP/UDP source filter is specified (TCP/UDP source filter status is "don't-care").Specific: if you want to filter a specific TCP/UDP source filter with the ACE, you can enter a specific TCP/UDP source value. A field for entering a TCP/UDP source value appears.Range: if you want to filter a specific TCP/UDP source range filter with the ACE, you can enter a specific TCP/UDP source range. A field for entering a TCP/UDP source value appears. |
| TCP/UDP Source No. | When Specific is selected for the TCP/UDP source filter, you can enter a specific TCP/UDP source value. The allowed range is 0 to 65535. A frame matching the ACE will use this TCP/UDP source value. |
| TCP/UDP Source Range | When Range is selected for the TCP/UDP source filter, you can enter a specific TCP/UDP source range value.The allowed range is 0 to 65535. A frame matching the ACE will use this TCP/UDP source value. |
| Table 5-72 (continued). TCP Parameters and UDP Parameters screens options. | |
| Label Description | |
| TCP/UDP Destination Filter | Specifies the TCP/UDP destination filter for the ACEAny: no TCP/UDP destination filter is specified (TCP/UDP destination filter status is "don't-care").Specific: if you want to filter a specific TCP/UDP destination filter with the ACE, you can enter a specific TCP/UDP destination value. A field for entering a TCP/UDP destination value appears.Range: if you want to filter a specific range TCP/UDP destination filter with the ACE, you can enter a specific TCP/UDP destination range. A field for entering a TCP/UDP destination value appears. |
| TCP/UDP Destination Number | When Specific is selected for the TCP/UDP destination filter, you can enter a specific TCP/UDP destination value. The allowed range is 0 to 65535. A frame matching the ACE will use this TCP/UDP destination value. |
| TCP/UDP Destination Range | When Range is selected for the TCP/UDP destination filter, you can enter a specific TCP/UDP destination range value. The allowed range is 0 to 65535. A frame matching the ACE will use this TCP/UDP destination value. |
| TCP FIN | Specifies the TCP FIN ("no more data from sender") value for the ACE.0: TCP frames where the FIN field is set must not be able to match this entry.1: TCP frames where the FIN field is set must be able to match this entry.Any: any value is allowed ("don't-care"). |
| TCP SYN | Specifies the TCP SYN ("synchronize sequence numbers") value for the ACE0: TCP frames where the SYN field is set must not be able to match this entry.1: TCP frames where the SYN field is set must be able to match this entry.Any: any value is allowed ("don't-care"). |
| TCP PSH | Specifies the TCP PSH ("push function") value for the ACE0: TCP frames where the PSH field is set must not be able to match this entry.1: TCP frames where the PSH field is set must be able to match this entry.Any: any value is allowed ("don't-care"). |
| TCP ACK | Specifies the TCP ACK ("acknowledgment field significant") value for the ACE0: TCP frames where the ACK field is set must not be able to match this entry.1: TCP frames where the ACK field is set must be able to match this entry.Any: any value is allowed ("don't-care"). |
| TCP URG | Specifies the TCP URG ("urgent pointer field significant") value for the ACE0: TCP frames where the URG field is set must not be able to match this entry.1: TCP frames where the URG field is set must be able to match this entry.Any: any value is allowed ("don't-care"). |
5.8.4 AAA
Common Server Configurations
This page allows you to configure authentication servers.
Authentication Server Configuration
Common Server Configuration
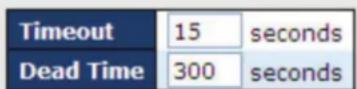
Figure 5-89. Authentication Server Configuration screen.
| Table 5-73. Authentication Server Configuration screen options. | |
| Label Description | |
| Timeout | The timeout, which can be set to a number between 3 and 3600 seconds, is the maximum time to wait for a reply from a server.If the server does not reply within this time frame, we will consider it to be dead and continue with the next enabled server (if any).RADIUS servers are using the UDP protocol, which is unreliable by design. In order to cope with lost frames, the timeout interval is divided into 3 subintervals of equal length. If a reply is not received within the subinterval, the request is transmitted again. This algorithm causes the RADIUS server to be queried up to 3 times before it is considered to be dead. |
| Dead Time | The dead time, which can be set to a number between 0 and 3600 seconds, is the period during which the switch will not send new requests to a server that has failed to respond to a previous request. This will stop the switch from continually trying to contact a server that it has already determined as dead.Setting the dead time to a value greater than 0 (zero) will enable this feature, but only if more than one server has been configured. |
5.8.5 RADIUS
Authentication and Accounting Server Configurations
The table has one row for each RADIUS authentication server and a number of columns, which are:
RADIUS Authentication Server Configuration
| # | Enabled | IP Address | Port | Secret |
| 1 | 1812 | |||
| 2 | 1812 | |||
| 3 | 1812 | |||
| 4 | 1812 | |||
| 5 | 1812 |
Figure 5-90. RADIUS Authentication and Accounting Server Configurations screen.
| Table 5-74. RADIUS Authentication and Accounting Server Configurations screen options. | |
| Label Description | |
| # The RADIUS authentication server number for which the configuration below applies. | |
| Enabled Check to enable the RADIUS authentication server. | |
| IP Address | The IP address or hostname of the RADIUS authentication server. IP address is expressed in dotted decimal notation. |
| Port | The UDP port to use on the RADIUS authentication server. If the port is set to 0 (zero), the default port (1812) is used on the RADIUS authentication server. |
| Secret | The secret—up to 29 characters long—shared between the RADIUS authentication server and the switch stack. |
RADIUS Accounting Server Configuration
| #Enabled | IP Address | Port | Secret |
| 1 | 1813 | ||
| 2 | 1813 | ||
| 3 | 1813 | ||
| 4 | 1813 | ||
| 5 | 1813 | ||
| Save Reset | |||
Figure 5-91. RADIUS Accounting Server Configuration screen.
| Figure 5-75. RADIUS Accounting Server Configuration screen options. | |
| Label Description | |
| # The RADIUS accounting server number for which the configuration below applies. | |
| Enabled Check to enable the RADIUS accounting server. | |
| IP Address | The IP address or hostname of the RADIUS accounting server. IP address is expressed in dotted decimal notation. |
| Port | The UDP port to use on the RADIUS accounting server. If the port is set to 0 (zero), the default port (1813) is used on the RADIUS accounting server. |
| Secret | The secret—up to 29 characters long—shared between the RADIUS accounting server and the switch stack. |
Authentication and Accounting Server Status Overview
This page provides an overview of the status of the RADIUS servers configurable on the authentication configuration page.
RADIUS Authentication Server Status Overview
| # | IP Address | Status |
| 1 | 0.0.0.0:1812 | Disabled |
| 2 | 0.0.0.0:1812 | Disabled |
| 3 | 0.0.0.0:1812 | Disabled |
| 4 | 0.0.0.0:1812 | Disabled |
| 5 | 0.0.0.0:1812 | Disabled |
Figure 5-92. RADIUS Authentication Server Status Overview screen.
| Table 5-76. RADIUS Authentication Server Status Overview screen options. | |
| Label Description | |
| # The RADIUS server number. Click to navigate to detailed statistics of the server. | |
| IP Address | The IP address and UDP port number (in: notation) of the server. |
| Table 5-76 (continued). RADIUS Authentication Server Status Overview screen options. | |
| Label Description | |
| Status | The current status of the server. This field has one of the following values:Disabled: the server is disabled.Not Ready: the server is enabled, but IP communication is not yet up and running.Ready: the server is enabled, IP communications are built, and the RADIUS module is ready to accept access attempts.Dead (X seconds left): access attempts are made to this server, but it does not reply within the configured timeout. The server has temporarily been disabled, but will be re-enabled when the dead-time expires. The number of seconds left before this occurs is displayed in parentheses. This state is only reachable when more than one server is enabled. |
RADIUS Accounting Server Status Overview
| # | IP Address | Status |
| 1 | 0.0.0.0:1813 | Disabled |
| 2 | 0.0.0.0:1813 | Disabled |
| 3 | 0.0.0.0:1813 | Disabled |
| 4 | 0.0.0.0:1813 | Disabled |
| 5 | 0.0.0.0:1813 | Disabled |
Figure 5-93. RADIUS Accounting Server Status Overview screen.
| Table 5-77. RADIUS Accounting Server Status Overview screen options. | |
| Label Description | |
| # The RADIUS server number. Click to navigate to detailed statistics of the server. | |
| IP Address | The IP address and UDP port number (in: notation) of the server. |
| Status | The current status of the server. This field has one of the following values:Disabled: the server is disabled.Not Ready: the server is enabled, but IP communication is not yet up and running.Ready: the server is enabled, IP communication is up and running, and the RADIUS module is ready to accept accounting attempts.Dead (X seconds left): accounting attempts are made to this server, but it does not reply within the configured timeout. The server has temporarily been disabled, but will be re-enabled when the dead-time expires. The number of seconds left before this occurs is displayed in parentheses. This state is only reachable when more than one server is enabled. |
Authentication and Accounting Server Statistics
The statistics map closely to those specified in RFC4668 - RADIUS Authentication Client MIB.
Use the server drop-down list to switch between the backend servers to show related details.
RADIUS Authentication Statistics for Server #1
| Server #1 Auto-refresh Refresh Clear | |||
| Receive Packets | Transmit Packets | ||
| Access Accepts | 0 | Access Requests | 0 |
| Access Rejects | 0 | Access Retransmissions | 0 |
| Access Challenges | 0 | Pending Requests | 0 |
| Malformed Access Responses | 0 | Timeouts | 0 |
| Bad Authenticators | 0 | ||
| Unknown Types | 0 | ||
| Packets Dropped | 0 | ||
| Other Info | |||
| IP Address 0.0.0.0:1812State DisabledRound-Trip Time 0 ms | |||
Figure 5-94. RADIUS Authentication Statistics for Server #1 screen.
| Table 5-78. RADIUS Authentication Statistics for Server #1 screen options. | |
| Label Description | |
| Packet Counters | RADIUS authentication server packet counters. There are seven “receive” and “transmit” counters. |
| Direction | Name | RFC4668 Name | Description |
| Rx | Access Accepts | radiusAuthClientExtAccessAccepts | The number of RADIUS Access-Accept packets (valid or invalid) received from the server. |
| Rx | Access Rejects | radiusAuthClientExtAccessRejects | The number of RADIUS Access-Reject packets (valid or invalid) received from the server. |
| Rx | Access Challenges | radiusAuthClientExtAccessChallenges | The number of RADIUS Access-Challenge packets (valid or invalid) received from the server. |
| Rx | Malformed Access Responses | radiusAuthClientExtMalformedAccessResponses | The number of malformed RADIUS Access-Response packets received from the server. Malformed packets include packets with an invalid length. Bad authenticators or Message Authenticator attributes or unknown types are not included as malformed access responses. |
| Rx | Bad Authenticators | radiusAuthClientExtBadAuthenticators | The number of RADIUS Access-Response packets containing invalid authenticators or Message Authenticator attributes received from the server. |
| Rx | Unknown Types | radiusAuthClientExtUnknownTypes | The number of RADIUS packets that were received from the server on the authentication port and dropped for some other reason. |
| Rx | Packets Dropped | radiusAuthClientExtPacketsDropped | The number of RADIUS packets that were received from the server on the authentication port and dropped for some other reason. |
| Tx | Access Requests | radiusAuthClientExtAccessRequests | The number of RADIUS Access-Request packets sent to the server. This does not include retransmissions. |
| Tx | Access Retransmissions | radiusAuthClientExtAccessRetransmissions | The number of RADIUS Access-Request packets retransmitted to the RADIUS authentication server. |
| Tx | Pending Requests | radiusAuthClientExtPendingRequests | The number of RADIUS Access-Request packets destined for the server that have not yet timed out or received a response. This variable is incremented when an Access-Request is sent and decremented due to receipt of an Access-Accept, Access-Reject, Access-Challenge, timeout, or retransmission. |
| Tx | Timeouts | radiusAuthClientExtTimeouts | The number of authentication timeouts to the server. After a timeout, the client may retry to the same server, send to a different server, or give up. A retry to the same server is counted as a retransmit as well as a timeout. A send to a different server is counted as a Request as well as a timeout. |
Table 5-78 (continued). RADIUS Authentication Statistics for Server #1 screen options.
Label Description
Other Info This section contains information about the state of the server and the latest round-trip time.
| Name | RFC4668 Name | Description |
| State | - | Shows the state of the server. It takes one of the following values:Disabled: The selected server is disabled.Not Ready: The server is enabled, but IP communication is not yet up and running.Ready: The server is enabled, IP communication is up and running, and the RADIUS module is ready to accept access attempts.Dead (X seconds left): Access attempts were made to this server, but it did not reply within the configured timeout. The server has temporarily been disabled, but will get re-enabled when the dead-time expires. The number of seconds left before this occurs is displayed in parentheses. This state is only reachable when more than one server is enabled. |
| Round-Trip Time | radiusAuthClientExtRoundTripTime | The time interval (measured in milliseconds) between the most recent Access-Reply/Access-Challenge and the Access-Request that matched it from the RADIUS authentication server. The granularity of this measurement is 100 ms. A value of 0 ms indicates that there hasn't been round-trip communication with the server yet. |
RADIUS Accounting Statistics for Server #1
| Receive Packets | Transmit Packets | ||
| Responses | 0 | Requests | 0 |
| Malformed Responses | 0 | Retransmissions | 0 |
| Bad Authenticators | 0 | Pending Requests | 0 |
| Unknown Types | 0 | Timeouts | 0 |
| Packets Dropped | 0 | ||
| Other Info | |||
| IP Address | 0.0.0.0:1813 | ||
| State | Disabled | ||
| Round-Trip Time | 0 ms | ||
Figure 5-95. RADIUS Accounting Statistics for Server #1 screen.
| Table 5-79. RADIUS Accounting Statistics for Server #1 screen options. | |||
| Label Description | |||
| Packet Counters | RADIUS authentication server packet counters. There are five “receive” and four “transmit” counters. | ||
| Direction Name RFC4670 Name DescriptionRx Responses radiusAccClientExtResponses The number of RADIUS packets (valid or invalid) received from the server.Rx Malformed radiusAccClientExtMalformedResponses with an invalid length. Bad authenticators or or | |||
| Direction | Name | RFC4670 Name | Description |
| Rx | Responses | radiusAccClientExtResponses | The number of RADIUS packets (valid or invalid) received from the server. |
| Rx | Malformed Responses | radiusAccClientExtMalformedResponses | The number of malformed RADIUS packets received from the server. Malformed packets include packets with an invalid length. Bad authenticators or or unknown types are not included as malformed access responses. |
| Rx | Bad Authenticators | radiusAccClientExtBadAuthenticators | The number of RADIUS packets containing invalid authenticators received from the server. |
| Rx | Unknown Types | radiusAccClientExtUnknownTypes | The number of RADIUS packets of unknown types that were received from the server on the accounting port. |
| Rx | Packets Dropped | radiusAccClientExtPacketsDropped | The number of RADIUS packets that were received from the server on the accounting port and dropped for some other reason. |
| Tx | Requests | radiusAccClientExtRequests | The number of RADIUS packets sent to the server. This does not include retransmissions. |
| Tx | Retransmissions | radiusAccClientExtRetransmissions | The number of RADIUS packets retransmitted to the RADIUS accounting server. |
| Tx | Pending Requests | radiusAccClientExtPendingRequests | The number of RADIUS packets destined for the server that have not yet timed out or received a response. This variable is incremented when a Request is sent and decremented due to receipt of a Response, timeout, or retransmission. |
| Tx | Timeouts | radiusAccClientExtTimeouts | The number of accounting timeouts to the server. After a timeout, the client may retry to the same server, send to a different server, or give up. A retry to the same server is counted as a retransmit as well as a timeout. A send to a different server is counted as a Request as well as a timeout. |
Table 5-79 (continued). RADIUS Accounting Statistics for Server #1 screen options.
| Label Description | |
| Other info This section contains information about the state of the server and the latest round-trip time. | |
| Name | RFC4570 Name |
| State | Shows the state of the server. It takes one of the following values:Disabled: The selected server is disabled.Not. Ready: The server is enabled, but IP communication is not yet up and running.Ready: The server is enabled, IP communication is up and running, and the RADIUS module is ready to accept accounting attempts. |
| Name | RFC4670 Name | Description |
| State | - | Shows the state of the server. It takes one of the following values: Disabled : The selected server is disabled. Hot Ready : The server is enabled, but IP communication is not yet up and running. Ready : The server is enabled, IP communication is up and running, and the RADIUS module is ready to accept accounting attempts. Dead (X seconds left): Accounting attempts were made to this server, but it did not reply within the configured timeout. The server has temporarily been disabled, but will get re-enabled when the dead-time expires. The number of seconds left before this occurs is displayed in parentheses. This state is only reachable when more than one server is enabled. |
| Round- Trip Time | radiusAccClientExtRoundTripTime | The time interval (measured in milliseconds) between the most recent Response and the Request that matched it from the RADIUS accounting server. The granularity of this measurement is 100 ms. A value of 0 ms indicates that there hasn't been round-trip communication with the server yet. |
5.8.6 NAS (802.1x)
This page allows you to configure the IEEE 802.1X and MAC-based authentication system and port settings.
The IEEE 802.1X standard defines a port-based access control procedure that prevents unauthorized access to a network by requiring users to first submit credentials for authentication. One or more central servers (the backend servers) determine whether the user is allowed access to the network. These backend (RADIUS) servers are configured on the authentication configuration page.
MAC-based authentication allows for authentication of more than one user on the same port, and does not require the users to have special 802.1X software installed on their system. The switch uses the users' MAC addresses to authenticate against the backend server. As intruders can create counterfeit MAC addresses, MAC-based authentication is less secure than 802.1X authentication.
Overview of 802.1X (Port-Based) Authentication
In an 802.1X network environment, the user is called the supplicant, the switch is the authenticator, and the RADIUS server is the authentication server. The switch acts as the man-in-the-middle, forwarding requests and responses between the supplicant and the authentication server. Frames sent between the supplicant and the switch are special 802.1X frames, known as EAPOL (EAP Over LANs) frames which encapsulate EAP PDUs (RFC3748). Frames sent between the switch and the RADIUS server are RADIUS packets. RADIUS packets also encapsulate EAP PDUs together with other attributes like the switch's IP address, name, and the supplicant's port number on the switch. EAP is very flexible as it allows for different authentication methods, like MD5-Challenge, PEAP, and TLS. The important thing is that the authenticator (the switch) does not need to know which authentication method the supplicant and the authentication server are using, or how many information exchange frames are needed for a particular method. The switch simply encapsulates the EAP part of the frame into the relevant type (EAPOL or RADIUS) and forwards it.
When authentication is complete, the RADIUS server sends a special packet containing a success or failure indication. Besides forwarding the result to the supplicant, the switch uses it to open up or block traffic on the switch port connected to the supplicant.
NOTE: In an environment where two backend servers are enabled, the server timeout is configured to X seconds (using the authentication configuration page), and the first server in the list is currently down (but not considered dead), if the supplicant retransmits EAPOL Start frames at a rate faster than X seconds, it will never be authenticated because the switch will cancel on-going backend authentication server requests whenever it receives a new EAPOL Start frame from the supplicant. Since the server has not failed (because the X seconds have not expired), the same server will be contacted when the next backend authentication server requests from the switch. This scenario will loop forever. Therefore, the server timeout should be smaller than the supplicant's EAPOL Start frame retransmission rate.
Overview of MAC-Based Authentication
Unlike 802.1X, MAC-based authentication is not a standard, but merely a best-practices method adopted by the industry. In MAC-based authentication, users are called clients, and the switch acts as the supplicant on behalf of clients. The initial frame (any kind of frame) sent by a client is snooped by the switch, which in turn uses the client's MAC address as both username and password in the subsequent EAP exchange with the RADIUS server. The 6-byte MAC address is converted to a string in the following form "xx-xx-xx-xx-xx-xx", that is, a dash (-) is used as separator between the lower-cased hexadecimal digits. The switch only supports the MD5-Challenge authentication method, so the RADIUS server must be configured accordingly.
When authentication is complete, the RADIUS server sends a success or failure indication, which in turn causes the switch to open up or block traffic for that particular client, using static entries into the MAC Table. Only then will frames from the client be forwarded on the switch. There are no EAPOL frames involved in this authentication, and therefore, MAC-based authentication has nothing to do with the 802.1X standard.
The advantage of MAC-based authentication over 802.1X is that several clients can be connected to the same port (e.g. through a 3rd party switch or a hub) and still require individual authentication, and that the clients do not need special supplicant software to authenticate. The disadvantage is that MAC addresses can be spoofed by malicious users, equipment whose MAC address is a valid RADIUS user can be used by anyone, and only the MD5-Challenge method is supported.
802.1X and MAC-Based authentication configurations consist of two sections: system- and port-wide.
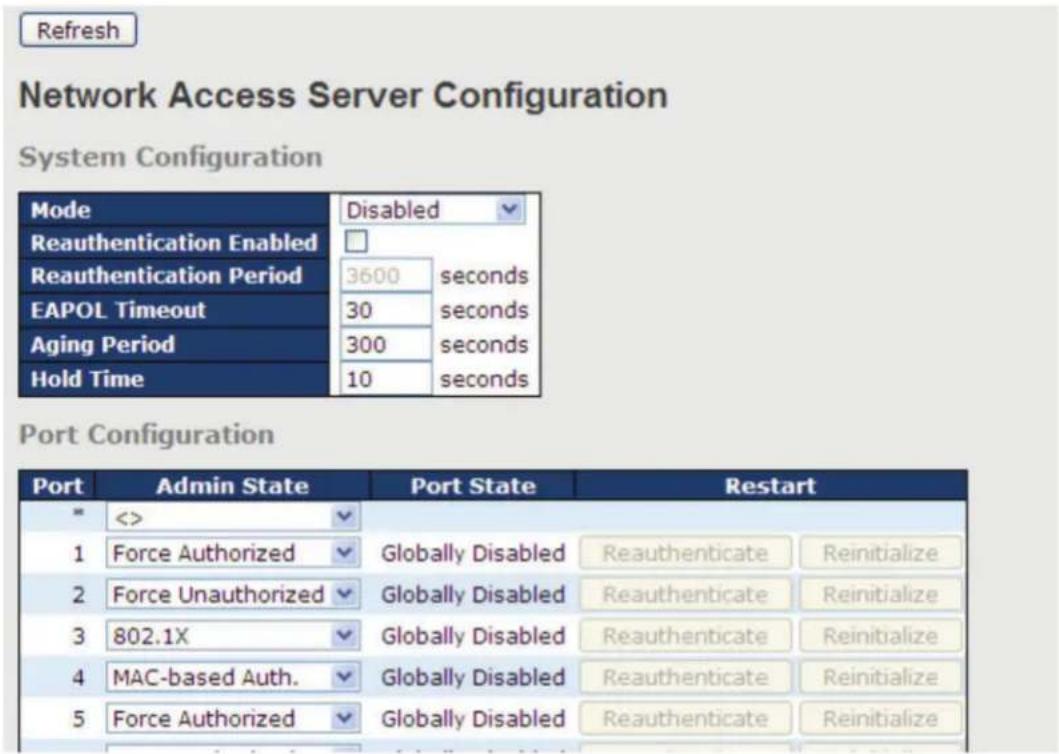
Figure 5-96. Network Access Server Configuration screen.
| Table 5-80. Network Access Server Configuration screen options. | |
| Label Description | |
| Mode | Indicates if 802.1X and MAC-based authentication is globally enabled or disabled on the switch. If globally disabled, all ports are allowed to forward frames. |
| Reauthentication Enabled | If checked, clients are reauthenticated after the interval specified by the Reauthentication Period.Reauthentication for 802.1X-enabled ports can be used to detect if a new device is plugged into a switch port.For MAC-based ports, reauthentication is only useful if the RADIUS server configuration has changed. It does not involve communication between the switch and the client, and therefore does not imply that a client is still present on a port (see Age Period below). |
| Reauthentication Period | Determines the period, in seconds, after which a connected client must be re-authenticated. This is only active if the Reauthentication Enabled checkbox is checked. Valid range of the value is 1 to 3600 seconds. |
| EAPOL Timeout | Determines the time for retransmission of Request Identity EAPOL frames.Valid range of the value is 1 to 65535 seconds. This has no effect for MAC-based ports. |
| Age Period This setting applies to the following modes, i.e. modes using the Port Security functionality to secure MAC addresses:MAC-Based Auth.:When the NAS module uses the Port Security module to secure MAC addresses, the Port Security module needs to check for activity on the MAC address in question at regular intervals and free resources if no activity is seen within a given period of time. This parameter controls exactly this period and can be set to a number between 10 and 1000000 seconds.For ports in MAC-based Auth. mode, reauthentication does not cause direct communications between the switch and the client, so this will not detect whether the client is still attached or not, and the only way to free any resources is to age the entry. | |
| Hold Time | This setting applies to the following modes, i.e. modes using the Port Security functionality to secure MAC addresses:MAC-Based Auth.:If a client is denied access - either because the RADIUS server denies the client access or because the RADIUS server request times out (according to the timeout specified on the "Configuration Security AAA" page) - the client is put on hold in Unauthorized state. The hold timer does not count during an on-going authentication.The switch will ignore new frames coming from the client during the hold time.The hold time can be set to a number between 10 and 1000000 seconds. |
| Port The port number for which the configuration below applies. | |
| Admin State | If NAS is globally enabled, this selection controls the port's authentication mode. The following modes are available:Force AuthorizedIn this mode, the switch will send one EAPOL Success frame when the port link is up, and any client on the port will be allowed network access without authentication.Force UnauthorizedIn this mode, the switch will send one EAPOL Failure frame when the port link is up, and any client on the port will be disallowed network access. |
| Table 5-80 (continued). Network Access Server Configuration screen options. | |
| Label Description | |
| Admin State (continued) | Port-based 802.1XIn an 802.1X network environment, the user is called the supplicant, the switch is the authenticator, and the RADIUS server is the authentication server. The authenticator acts as the man-in-the-middle, forwarding requests and responses between the supplicant and the authentication server. Frames sent between the supplicant and the switch are special 802.1X frames, known as EAPOL (EAP Over LANs) frames which encapsulate EAP PDUs (RFC3748). Frames sent between the switch and the RADIUS server is RADIUS packets. RADIUS packets also encapsulate EAP PDUs together with other attributes like the switch's IP address, name, and the supplicant's port number on the switch. EAP is very flexible as it allows for different authentication methods, like MD5-Challenge, PEAP, and TLS. The important thing is that the authenticator (the switch) does not need to know which authentication method the supplicant and the authentication server are using, or how many information exchange frames are needed for a particular method. The switch simply encapsulates the EAP part of the frame into the relevant type (EAPOL or RADIUS) and forwards it.When authentication is complete, the RADIUS server sends a special packet containing a success or failure indication. Besides forwarding the result to the supplicant, the switch uses it to open up or block traffic on the switch port connected to the supplicant.NOTE: In an environment where two backend servers are enabled, the server timeout is configured to X seconds (using the authentication configuration page), and the first server in the list is currently down (but not considered dead), if the supplicant retransmits EAPOL Start frames at a rate faster than X seconds, it will never be authenticated because the switch will cancel on-going backend authentication server requests whenever it receives a new EAPOL Start frame from the supplicant. Since the server has not failed (because the X seconds have not expired), the same server will be contacted when the next backend authentication server request from the switch This scenario will loop forever. Therefore, the server timeout should be smaller than the supplicant's EAPOL Start frame retransmission rate.a. Single 802.1XIn port-based 802.1X authentication, once a supplicant is successfully authenticated on a port, the whole port is opened for network traffic. This allows other clients connected to the port (for instance through a hub) to piggy-back on the successfully authenticated client and get network access even though they are not authenticated individually. To overcome this security breach, use the Single 802.1X variant.Single 802.1X is not yet an IEEE standard, but features many of the same characteristics as port-based 802.1X. In Single 802.1X, at most one supplicant can get authenticated on the port at a time. Normal EAPOL frames are used in the communications between the supplicant and the switch. If more than one supplicant are connected to a port, the one that comes first when the port's link is connected will be the first one considered. If that supplicant does not provide valid credentials within a certain amount of time, the chance will be given to another supplicant. Once a supplicant is successfully authenticated, only that supplicant will be allowed access. This is the most secure of all the supported modes. In this mode, the Port Security module is used to secure a supplicant's MAC address once successfully authenticated.b. Multi 802.1XIn port-based 802.1X authentication, once a supplicant is successfully authenticated on a port, the whole port is opened for network traffic. This allows other clients connected to the port (for instance through a hub) to piggy-back on the successfully authenticated client and get network access even though they are not authenticated individually. To overcome this security breach, use the Multi 802.1X variant. |
| Admin State(continued) | In Multi 802.1X, it is not possible to use the multicast BPDU MAC address as the destination MAC address for EAPOL frames sent from the switch to the supplicant, since that would cause all supplicants attached to the port to reply to requests sent from the switch. Instead, the switch uses the supplicant's MAC address, which is obtained from the first EAPOL Start or EAPOL Response Identity frame sent by the supplicant. An exception to this is when no supplicants are attached. In this case, the switch sends EAPOL Request Identity frames using the BPDU multicast MAC address as destination—to wake up any supplicants that might be on the port.The maximum number of supplicants that can be attached to a port can be limited using the Port Security Limit Control functionality.The maximum number of supplicants that can be attached to a port can be limited using the Port Security Limit Control functionality.MAC-based Auth.Unlike port-based 802.1X, MAC-based authentication is not a standard, but merely a best-practices method adopted by the industry. In MAC-based authentication, users are called clients, and the switch acts as the supplicant on behalf of clients. The initial frame (any kind of frame) sent by a client is snooped by the switch, which in turn uses the client's MAC address as both username and password in the subsequent EAP exchange with the RADIUS server. The 6-byte MAC address is converted to a string in the following form "xx-xx-xx-xx-xx-xx", that is, a dash (-) is used as separator between the lower-cased hexadecimal digits. The switch only supports the MD5-Challenge authentication method, so the RADIUS server must be configured accordingly.When authentication is complete, the RADIUS server sends a success or failure indication, which in turn causes the switch to open up or block traffic for that particular client, using the Port Security module. Only then will frames from the client be forwarded on the switch. There are no EAPOL frames involved in this authentication, and therefore, MAC-based authentication has nothing to do with the 802.1X standard.The advantage of MAC-based authentication over port-based 802.1X is that several clients can be connected to the same port (e.g. through a 3rd party switch or a hub) and still require individual authentication, and that the clients don't need special supplicant software to authenticate. The advantage of MAC-based authentication over 802.1X-based authentication is that the clients do not need special supplicant software to authenticate. The disadvantage is that MAC addresses can be spoofed by malicious users - equipment whose MAC address is a valid RADIUS user can be used by anyone. Also, only the MD5-Challenge method is supported. The maximum number of clients that can be attached to a port can be limited using the Port Security Limit Control functionality. |
| Port State | The current state of the port. It can undertake one of the following values: Globally Disabled: NAS is globally disabled.Link Down: NAS is globally enabled, but there is no link on the port.Authorized: the port is in Force Authorized or a single-supplicant mode and the supplicant is authorized.Unauthorized: the port is in Force Unauthorized or a single-supplicant mode and the supplicant is not successfully authorized by the RADIUS server.X Auth/Y Unauth: the port is in a multi-supplicant mode. Currently X clients are authorized and Y are unauthorized. |
| Restart | Two buttons are available for each row. The buttons are only enabled when authentication is globally enabled and the port's Admin State is in an EAPOL-based or MAC-based mode.Clicking these buttons will not cause settings changed on the page to take effect.Reauthenticate: schedules a reauthentication whenever the quiet-period of the port runs out (EAPOL-based authentication). For MAC-based authentication, reauthentication will be attempted immediately.The button only has effect on successfully authenticated clients on the port and will not cause the clients to be temporarily unauthorized.Reinitialize: forces a reinitialization of the clients on the port and hence a reauthentication immediately. The clients will transfer to the unauthorized state while the reauthentication is in progress. |
NAS Status
This page provides an overview of the current NAS port states.
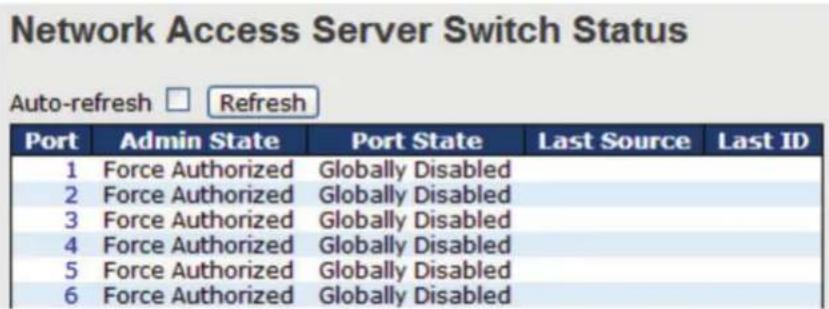
Figure 5-97. Network Access Server Switch Status screen.
| Table 5-81. Network Access Server Switch Status screen options. | |
| Label Description | |
| Port The switch port number. Click to navigate to detailed 802.1X statistics of each port. | |
| Admin State | The port's current administrative state. Refer to NAS Admin State for more details regarding each value. |
| Port State | The current state of the port. Refer to NAS Port State for more details regarding each value. |
| Last Source | The source MAC address carried in the most recently received EAPOL frame for EAPOL-based authentication, and the most recently received frame from a new client for MAC-based authentication. |
| Last ID | The user name (supplicant identity) carried in the most recently received Response Identity EAPOL frame for EAPOL-based authentication, and the source MAC address from the most recently received frame from a new client for MAC-based authentication. |
This page provides detailed IEEE 802.1X statistics for a specific switch port using port-based authentication. For MAC-based ports, only selected backend server (RADIUS Authentication Server) statistics is showed. Use the port drop-down list to select which port details to be displayed.
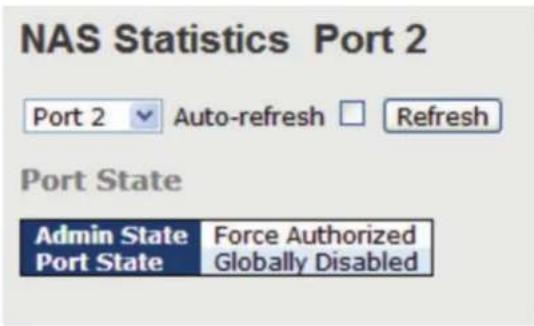
Figure 5-98. NAS Statistics Port 2 screen.
| Table 5-82. NAS Statistics Port 2 screen options. | |
| Label Description | |
| Admin State | The port's current administrative state. Refer to NAS Admin State for more details regarding each value. |
| Port State | The current state of the port. Refer to NAS Port State for more details regarding each value. |
| EAPOL Counters | These supplicant frame counters are available for the following administrative states:Force AuthorizedForce Unauthorized802.1X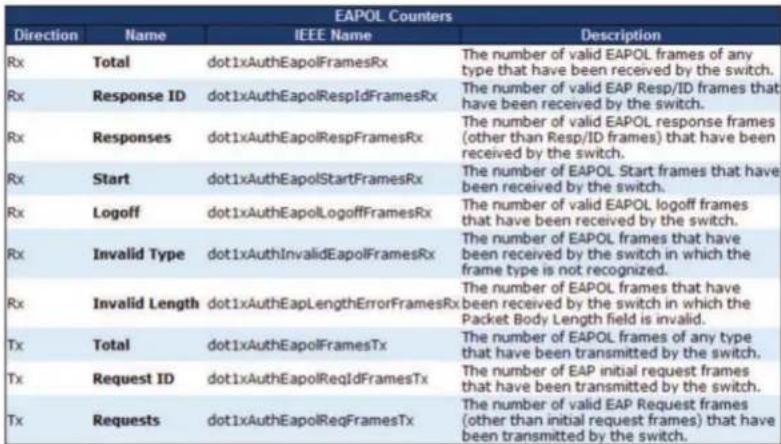 |
| Table 5-82 (continued). NAS Statistics Port 2 screen options. | |
| Label Description | |
| Backend Server Counters | These backend (RADIUS) frame counters are available for the following administrative states:802.1XMAC-based Auth.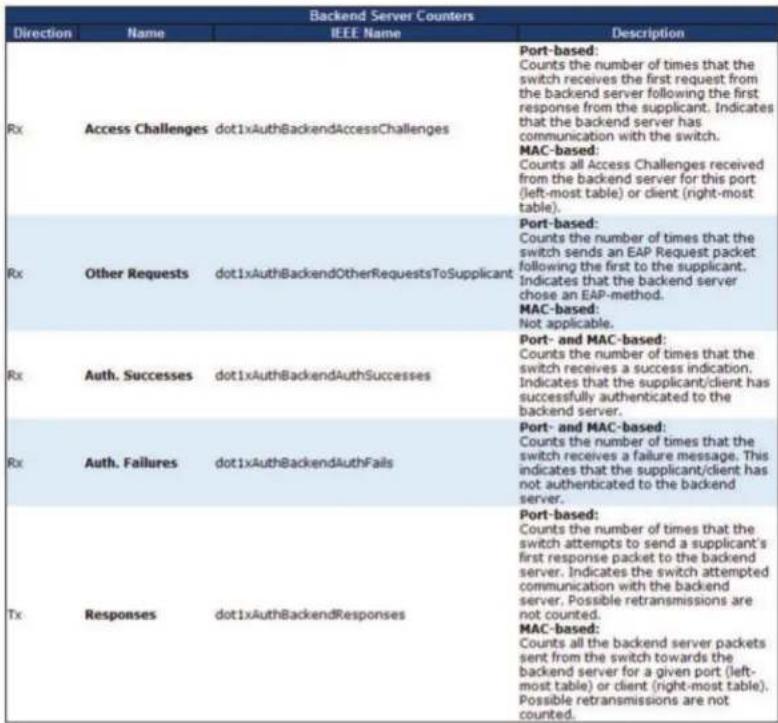 |
| Last Supplicant/Client Info | Information about the last supplicant/client that attempts to authenticate. This information is available for the following administrative states:802.1XMAC-based Auth.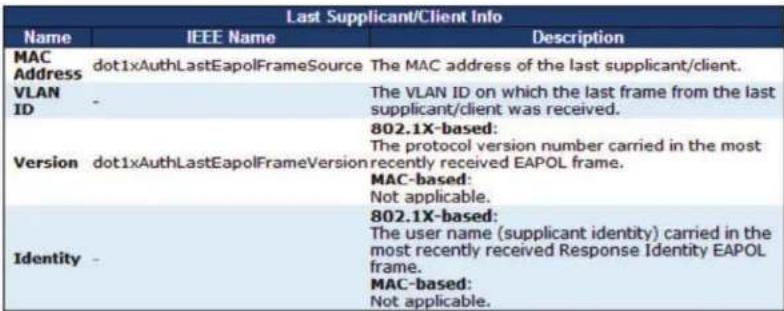 |
5.9 Alerts
5.9.1 Fault Alarm
When any selected fault event happens, the Fault LED on the switch panel will light up and the electric relay will signal at the same time.
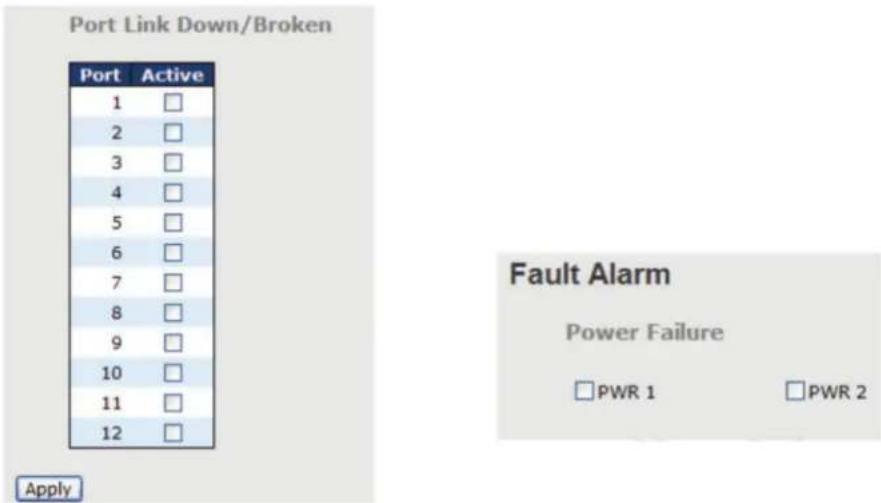
Figure 5-99. Port Link Down/Broken and Fault Alarm screens.
5.9.2 System Warning
SYSLOG Setting
The SYSLOG is a protocol that transmits event notifications across networks. For more details, please refer to RFC 3164 - The BSD SYSLOG Protocol.
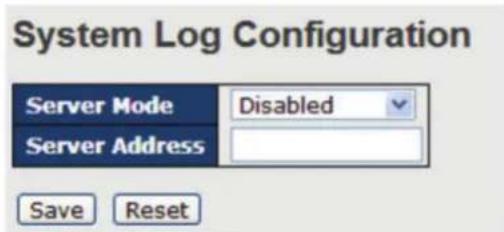
Figure 5-100. System Log Configuration screen.
| Table 5-83. System Log Configuration screen options. | |
| Label Description | |
| Server Mode | Indicates existing server mode. When the mode operation is enabled, the syslog message will be sent to syslog server. The syslog protocol is based on UDP communications and received on UDP port 514 and the syslog server will not send acknowledgments back to the sender since UDP is a connectionless protocol and it does not provide acknowledgments. The syslog packet will always be sent even if the syslog server does not exist. Possible modes are:Enabled: enable server modeDisabled: disable server mode |
| SYSLOG Server IP Address | Indicates the IPv4 host address of syslog server. If the switch provides DNS functions, it also can be a host name. |
SMTP Setting
SMTP (Simple Mail Transfer Protocol) is a protocol for transmitting e-mails across the Internet. For more information, refer to RFC 821—Simple Mail Transfer Protocol.
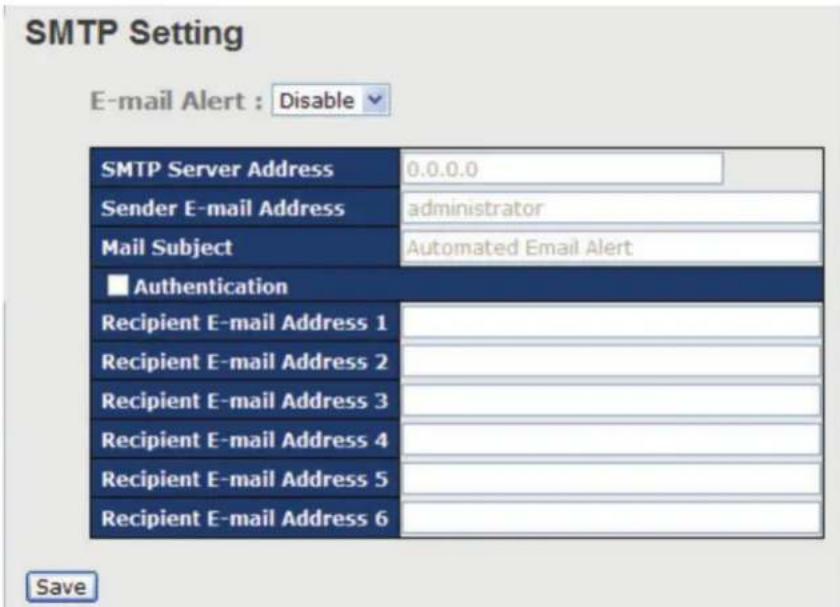
Figure 5-101. SMTP Setting screen.
| Table 5-84. SMTP Setting screen options. | |
| Label Description | |
| E-mail Alarm Enables or disables transmission of system warnings by e-mail. | |
| Sender E-mail Address | SMTP server IP address |
| Mail Subject Subject of the mail | |
| Authentication • Username: the authentication username• Password: the authentication password• Confirm Password: re-enter password | |
| Recipient E-mail Address | The recipient's e-mail address. A mail allows for 6 recipients. |
| Apply Click to activate the configurations | |
| Help Shows help file | |
Event Selection
SYSLOG and SMTP are two warning methods supported by the system. Check the corresponding box to enable the system event warning method you want. Please note that the checkbox cannot be checked when SYSLOG or SMTP is disabled.
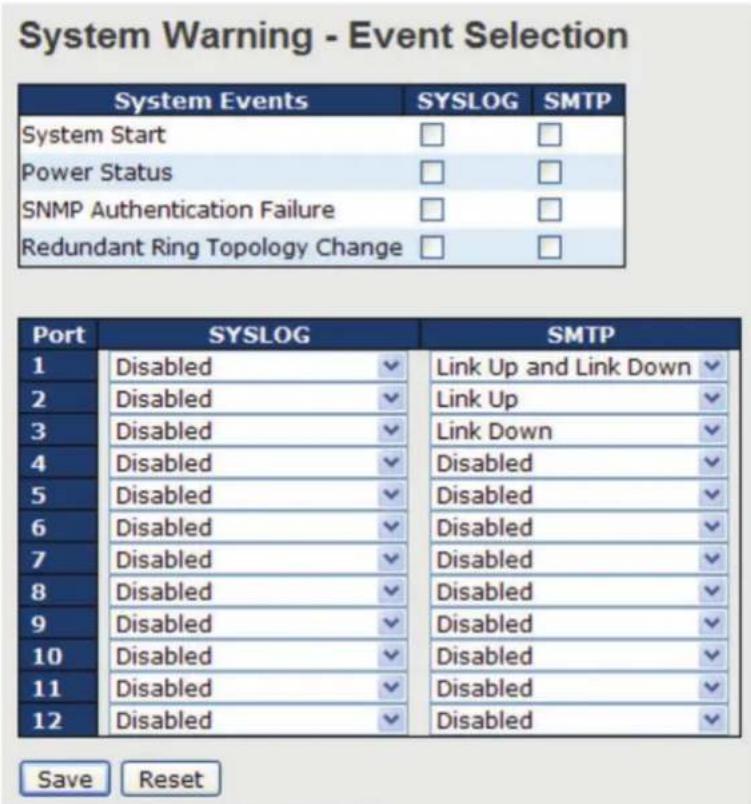
Figure 5-102. System Warning—Event Selection screen.
| Table 5-85. System Warning—Event Selection screen options. | |
| Label Description | |
| System Cold Start Sends out alerts when the system is restarted. | |
| Power Status Sends out alerts when power is up or down. | |
| SNMP Authentication Failure Sends out alert when SNMP authentication fails. | |
| B-Ring Topology Change Sends out alerts when B-Ring topology changes. | |
| Port EventSYSLOG/SMTP event | DisableLink UpLink DownLink Up & Link Down |
| Apply Click to activate the configurations. | |
| Help Shows help file | |
5.10 Monitor and Diag
5.10.1 MAC Table
The MAC address table can be configured on this page. You can set timeouts for entries in the dynamic MAC table and configure the static MAC table here.
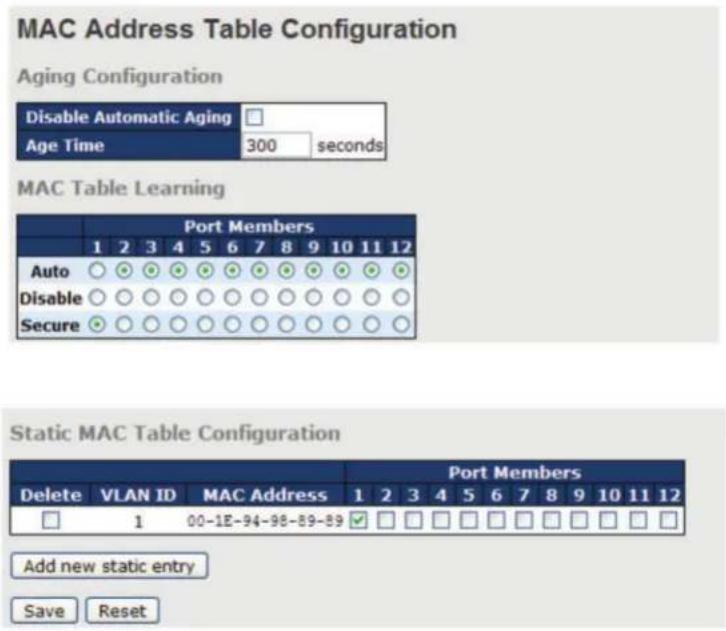
Figure 5-103. MAC Address Table Configuration and Static Mac Table Configuration screens.
Aging Configuration
By default, dynamic entries are removed from the MAC after 300 seconds. This removal is called aging. You can configure aging time by entering a value in the box of Age Time. The allowed range is 10 to 1000000 seconds. You can also disable the automatic aging of dynamic entries by checking Disable Automatic Aging.
MAC Table Learning
If the learning mode for a given port is grayed out, it means another module is in control of the mode, and thus the user cannot change the configurations. An example of such a module is MAC-Based authentication under 802.1X.
You can configure the port to dynamically learn the MAC address based upon the following settings:
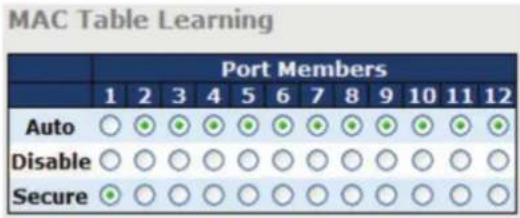
Figure 5-104. MAC Table Learning screen.
| Table 5-86. MAC Table Learning screen options. | |
| Label Description | |
| Auto Learning is done automatically as soon as a frame with unknown SMAC is received. | |
| Disable No learning is done. | |
| Secure Only static MAC entries are learned, all other frames are dropped.NOTE: Make sure the link used for managing the switch is added to the static Mac table before changing to secure learning mode; otherwise, the management link will be lost and can only be restored by using another non-secure port or by connecting to the switch via the serial interface. | |
Static MAC Table Configurations
The static entries in the MAC table are shown in this table. The static MAC table can contain up to 64 entries. The entries are for the whole stack, not for individual switches. The MAC table is sorted first by VLAN ID and then by MAC address.
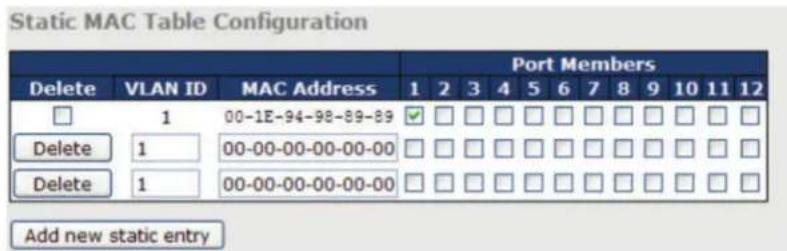
Figure 5-105. Static MAC Table Configuration screen.
| Table 5-87. Static MAC Table Configuration screen options. | |
| Label Description | |
| Delete Check to delete an entry. It will be deleted during the next save. | |
| VLAN ID The VLAN ID for the entry. | |
| MAC Address The MAC address for the entry. | |
| Port Members | Checkmarks indicate which ports are members of the entry. Check or uncheck to modify the entry. |
| Adding New Static Entry | Click to add a new entry to the static MAC table. You can specify the VLAN ID, MAC address, and port members for the new entry. Click Save to save the changes. |
MAC Table
Each page shows up to 999 entries from the MAC table, with a default value of 20, selected by the Entries Per Page input field. When first visited, the web page will show the first 20 entries from the beginning of the MAC Table. The first displayed will be the one with the lowest VLAN ID and the lowest MAC address found in the MAC Table.
Each page shows up to 999 entries from the MAC table, with a default value of 20, selected by the Entries Per Page input field. When first visited, the web page will show the first 20 entries from the beginning of the MAC Table. The first displayed will be the one with the lowest VLAN ID and the lowest MAC address found in the MAC Table.
The Start from MAC address and VLAN fields allow the user to select the starting point in the MAC table. Clicking the Refresh button will update the displayed table starting from that or the closest next MAC table match. In addition, the two input fields will—upon clicking Refresh—assume the value of the first displayed entry, allows for continuous refresh with the same start address.
The >> will use the last entry of the currently displayed VLAN/MAC address pairs as a basis for the next lookup. When it reaches the end, the text "no more entries" is shown in the displayed table. Use the |<< button to start over.
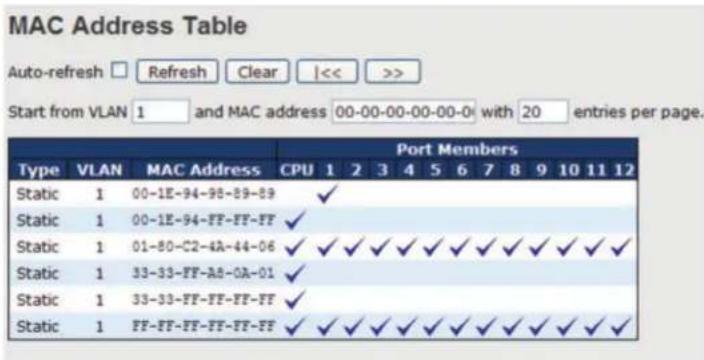
Figure 5-106. MAC Address Table screen.
| Table 5-88. MAC Address Table screen options. | |
| Label Description | |
| Type Indicates whether the entry is a static or dynamic entry. | |
| MAC address The MAC address of the entry. | |
| VLAN The VLAN ID of the entry. | |
| Port members The ports that are members of the entry. | |
5.10.2 Port Statistics
Traffic Overview
This page provides an overview of general traffic statistics for all switch ports.
| Port | Packets | Bytes | Errors | Drops | Filtered | ||||
| Receive | Transmit | Receive | Transmit | Receive | Transmit | Receive | Transmit | Receive | |
| 117980 | 86946125 | 9117790 | 6259918088 | 3 | 0 | 0 | 0 | 0 | |
| 0 | 0 | 0 | 0 | 0 | 0 | 0 | 0 | 0 | |
| 68732984 | 68732987 | 4957477714 | 4957477932 | 0 | 0 | 0 | 0 | 24710409 | |
| 0 | 0 | 0 | 0 | 0 | 0 | 0 | 0 | 0 | |
| 0 | 0 | 0 | 0 | 0 | 0 | 0 | 0 | 0 | |
| 68732985 | 68732987 | 4957477883 | 4957477932 | 1 | 0 | 0 | 0 | 25204638 | |
| 0 | 0 | 0 | 0 | 0 | 0 | 0 | 0 | 0 | |
| 0 | 0 | 0 | 0 | 0 | 0 | 0 | 0 | 0 | |
| 0 | 0 | 0 | 0 | 0 | 0 | 0 | 0 | 0 | |
| 0 | 0 | 0 | 0 | 0 | 0 | 0 | 0 | 0 | |
| 0 | 0 | 0 | 0 | 0 | 0 | 0 | 0 | 0 | |
| 0 | 0 | 0 | 0 | 0 | 0 | 0 | 0 | ||
Figure 5-107. Port Statistics Overview screen.
| Table 5-89. Port Statistics Overview screen options. | |
| Label Description | |
| Port The switch port number to which the following settings will be applied. | |
| Packets The number of received and transmitted packets per port. | |
| Bytes The number of received and transmitted bytes per port. | |
| Errors | The number of frames received in error and the number of incomplete transmissions per port. |
| Drops The number of frames discarded due to ingress or egress congestion. | |
| Filtered The number of received frames filtered by the forwarding process. | |
| Auto-refresh Check to enable an automatic refresh of the page at regular intervals. | |
| Refresh Updates the counter entries, starting from the current entry ID. | |
| Clear Flushes all counters entries | |
Detailed Statistics
This page provides detailed traffic statistics for a specific switch port. Use the port drop-down list to decide the details of which switch port to be displayed.
The displayed counters include the total number for receive and transmit, the size for receive and transmit, and the errors for receive and transmit.
Detailed Statistics—Total Receive & Transmit
| Receive Total | Transmit Total | |
| Rx Packets | 0 | Tx Packets 0 |
| Rx Octets | 0 | Tx Octets 0 |
| Rx Unicast | 0 | Tx Unicast 0 |
| Rx Multicast | 0 | Tx Multicast 0 |
| Rx Broadcast | 0 | Tx Broadcast 0 |
| Rx Pause | 0 | Tx Pause 0 |
| Receive Size Counters | Transmit Size Counters | |
| Rx 64 Bytes | 0 | Tx 64 Bytes 0 |
| Rx 65-127 Bytes | 0 | Tx 65-127 Bytes 0 |
| Rx 128-255 Bytes | 0 | Tx 128-255 Bytes 0 |
| Rx 256-511 Bytes | 0 | Tx 256-511 Bytes 0 |
| Rx 512-1023 Bytes | 0 | Tx 512-1023 Bytes 0 |
| Rx 1024-1526 Bytes | 0 | Tx 1024-1526 Bytes 0 |
| Rx 1527- Bytes | 0 | Tx 1527- Bytes 0 |
| Receive Queue Counters | Transmit Queue Counters | |
| Rx Q0 | 0 | Tx Q0 0 |
| Rx Q1 | 0 | Tx Q1 0 |
| Rx Q2 | 0 | Tx Q2 0 |
| Rx Q3 | 0 | Tx Q3 0 |
| Rx Q4 | 0 | Tx Q4 0 |
| Rx Q5 | 0 | Tx Q5 0 |
| Rx Q6 | 0 | Tx Q6 0 |
| Rx Q7 | 0 | Tx Q7 0 |
| Receive Error Counters | Transmit Error Counters | |
| Rx Drops | 0 | Tx Drops 0 |
| Rx CRC/Alignment | 0 | Tx Late/Exc. Coll. 0 |
| Rx Undersize | 0 | |
| Rx Oversize | 0 | |
| Rx Fragments | 0 | |
| Rx Jabber | 0 | |
| Rx Filtered | 0 | |
Figure 5-108. Detailed Port Statistics Port 1 screen.
| Table 5-90. Detailed Port Statistics Port 1 screen options. | |
| Label Description | |
| Rx and Tx Packets The number of received and transmitted (good and bad) packets. | |
| Rx and Tx Octets The number of received and transmitted (good and bad) bytes, including FCS, except framing bits. | |
| Rx and Tx Unicast The number of received and transmitted (good and bad) unicast packets. | |
| Rx and Tx Multicast | The number of received and transmitted (good and bad) multicast packets. |
| Rx and Tx Broadcast The number of received and transmitted (good and bad) broadcast packets. | |
| Rx and Tx Pause | The number of MAC Control frames received or transmitted on this port that have an opcode indicating a PAUSE operation. |
| Rx Drops | The number of frames dropped due to insufficient receive buffer or egress congestion. |
| Rx CRC/Alignment The number of frames received with CRC or alignment errors. | |
| Rx Undersize The number of short1 frames received with a valid CRC. | |
| Rx Oversize The number of long2 frames received with a valid CRC. | |
| Rx Fragments The number of short1 frames received with an invalid CRC. | |
| Rx Jabber | The number of long2 frames received with an invalid CRC. |
| Rx Filtered | The number of received frames filtered by the forwarding process. |
| Tx Drops | The number of frames dropped due to output buffer congestion. |
| Tx Late/Exc.Coll. | The number of frames dropped due to excessive or late collisions. |
- Short frames are frames smaller than 64 bytes.
- Long frames are frames longer than the maximum frame length configured for this port.
5.10.3 Port Mirroring
You can configure port mirroring on this page.
To solve network problems, selected traffic can be copied, or mirrored, to a mirror port where a frame analyzer can be attached to analyze the frame flow.
The traffic to be copied to the mirror port is selected as follows:
All frames received on a given port (also known as ingress or source mirroring).
All frames transmitted on a given port (also known as egress or destination mirroring).
Port to mirror is also known as the mirror port. Frames from ports that have either source (rx) or destination (tx) mirroring enabled are mirrored to this port. Disabled option disables mirroring.
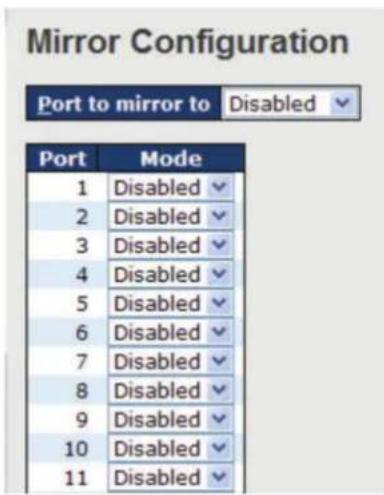
Figure 5-109. Mlrror Configuration screen.
| Table 5-91. Mlrror Configuration screen options. | |
| Label Description | |
| Port The switch port number to which the following settings will be applied. | |
| Mode Drop-down list for selecting a mirror mode.Rx only: only frames received on this port are mirrored to the mirror port. Frames transmitted are not mirrored.Tx only: only frames transmitted from this port are mirrored to the mirror port. Frames received are not mirrored.Disabled: neither transmitted nor received frames are mirrored.Enabled: both received and transmitted frames are mirrored to the mirror port.NOTE: For a given port, a frame is only transmitted once. Therefore, you cannot mirror Tx frames to the mirror port. In this case, mode for the selected mirror port is limited to Disabled or Rx only. | |
5.10.4 System Log Information
This page provides switch system log information.
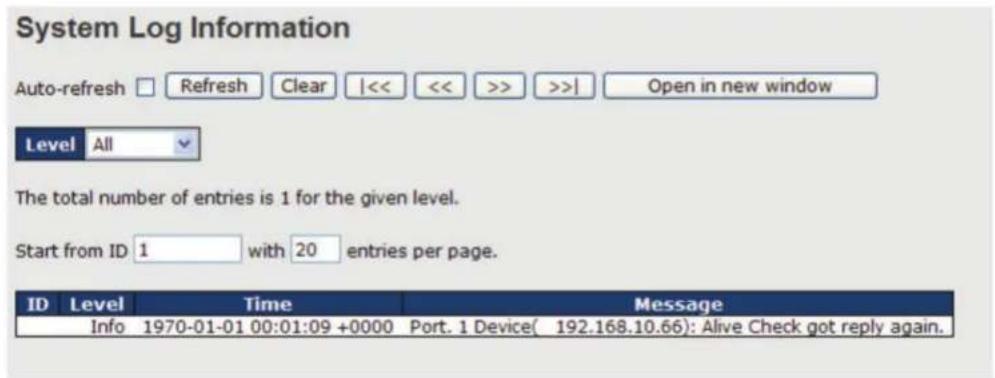
Figure 5-110. System Log Information screen.
| Table 5-92. System Log Information screen options. | |
| Label Description | |
| ID The ID (>= 1) of the system log entry. | |
| Level The level of the system log entry. The following level types are supported:Info: provides general informationWarning: provides warning for abnormal operationError: provides error messageAll: enables all levels | |
| Time The time of the system log entry. | |
| Message The MAC address of the switch. | |
| Auto-refresh Check this box to enable an automatic refresh of the page at regular intervals. | |
| Refresh Updates system log entries, starting from the current entry ID. | |
| Clear Flushes all system log entries. | |
| |<< Updates system log entries, starting from the first available entry ID | |
| << Updates system log entries, ending at the last entry currently displayed | |
| >> Updates system log entries, starting from the last entry currently displayed. | |
| >>| Updates system log entries, ending at the last available entry ID. | |
5.10.5 Cable Diagnostics
This page allows you to perform VeriPHY cable diagnostics.
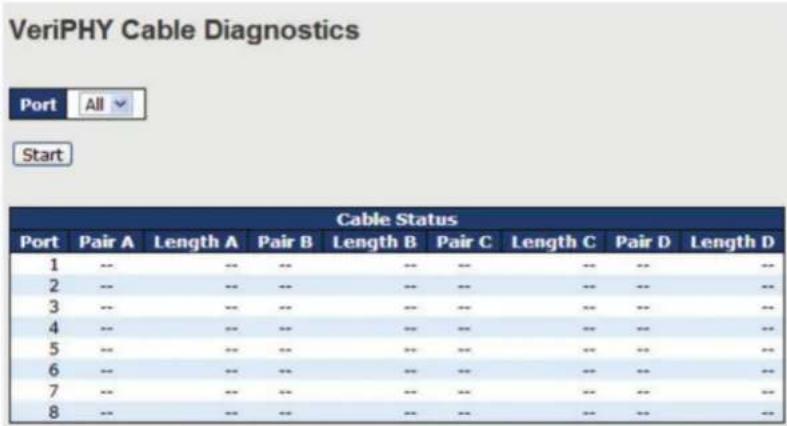
Figure 5-111. VeriPHY Cable Diagnostics screen.
Press Start to run the diagnostics. This will take approximately 5 seconds. If all ports are selected, this can take approximately 15 seconds. When completed, the page refreshes automatically, and you can view the cable diagnostics results in the cable status table. Note that VeriPHY diagnostics is only accurate for cables 7–140 meters long.
10 and 100 Mbps ports will be disconnected while running VeriPHY diagnostics. Therefore, running VeriPHY on a 10 or 100 Mbps management port will cause the switch to stop responding until VeriPHY is complete.
| Table 5-93. SVeriPHY Cable Diagnostics screen options. | |
| Label Description | |
| Port The port for which VeriPHY Cable Diagnostics is requested. | |
| Cable Status Port: port number | Pair: the status of the cable pairLength: the length (in meters) of the cable pair |
5.10.6 SFP Monitor
SFP modules with DDM (Digital Diagnostic Monitoring) function can measure the temperature of the apparatus, helping you monitor the status of connection and detect errors immediately. You can manage and set up event alarms through DDM Web interface.
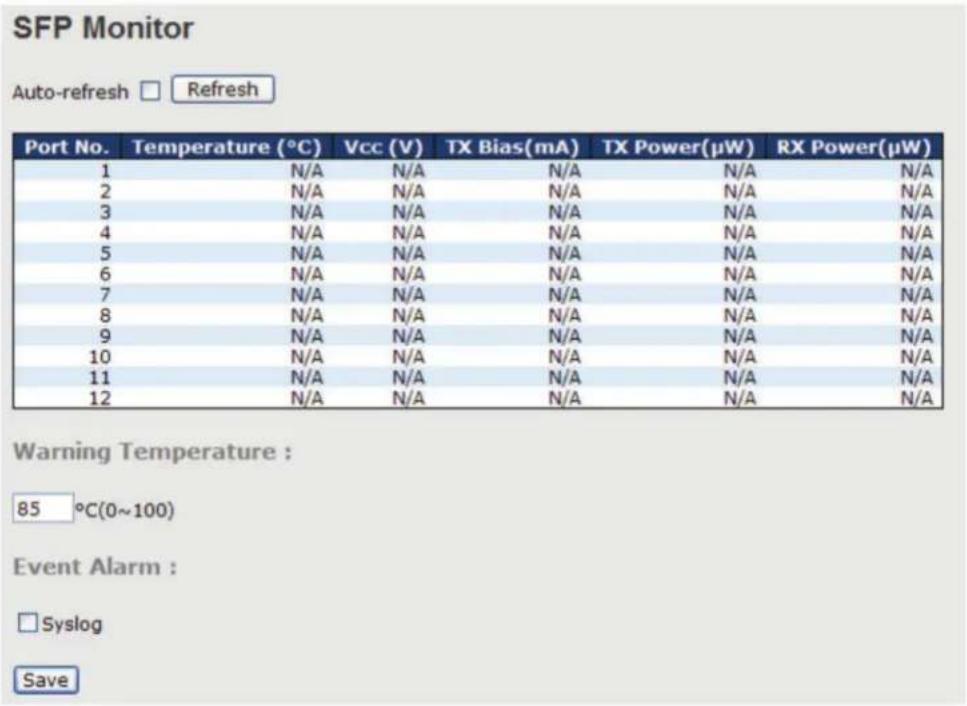
Figure 5-112. SFP Monitor screen.
5.10.7 Ping
This page allows you to issue ICMP PING packets to troubleshoot IP connectivity issues.
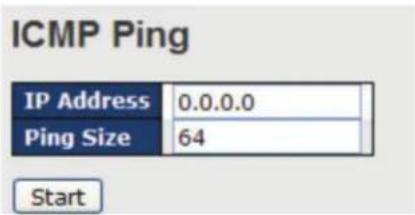
Figure 5-113. ICMP Ping screen.
After you press Start, five ICMP packets will be transmitted, and the sequence number and roundtrip time will be displayed upon reception of a reply. The page refreshes automatically until responses to all packets are received, or until a timeout occurs.
PING6 ser ver ::10.10.132.20
64 bytes from ::10.10.132.20: icmp_seq=0, time=0ms
64 bytes from ::10.10.132.20: icmp_seq=1, time=0ms
64 bytes from ::10.10.132.20: icmp_seq=2, time=0ms
64 bytes from ::10.10.132.20: icmp_seq=3, time=0ms
64 bytes from ::10.10.132.20: icmp_seq=4, time=0ms
Sent 5 packets, received 5 OK, 0 bad
You can configure the following properties of the issued ICMP packets:
| Table 5-94. ICMP Ping screen options. | |
| Label Description | |
| IP Address The destination | IP Address |
| Ping Size The payload size | of the ICMP packet. Values range from 8 to 1400 bytes. |
IPv6 Ping
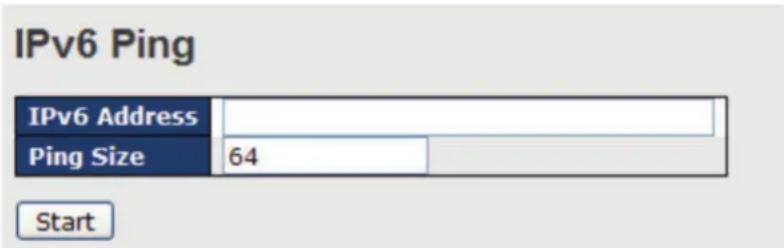
Figure 5-114. IPv6 Ping screen.
PING6 ser ver ::192.168.10.1
sendto
sendto
sendto
sendto
sendto
Sent 5 packets, received 0 OK, 0 bad
5.11 Synchronization
MAC-based Authentication
This page allows you to configure and examine current PTP clock settings.
PTP External Clock Mode
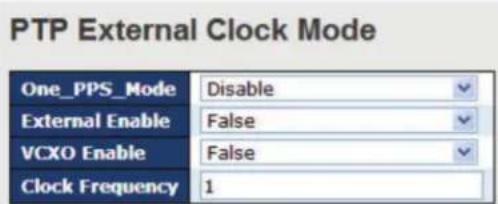
Figure 5-115. PTP External Clock Mode screen.
| Table 5-95. PTP External Clock Mode screen options. | |
| Label Description | |
| One_pps_mode | The box allows you to select One_pps_mode configurations.The following values are possible:Output: enable the 1 pps clock outputInput: enable the 1 pps clock inputDisable: disable the 1 pps clock in/out-put |
| External Enable | The box allows you to configure external clock output.The following values are possible:True: enable external clock outputFalse: disable external clock output |
| VCXO_Enable | The box allows you to configure the external VCXO rate adjustment.The following values are possible:True: enable external VCXO rate adjustmentFalse: disable external VCXO rate adjustment |
| Clock Frequency The box | allows you to set clock frequency.The range of values is 1–25000000 (1–25 MHz). |
PTP Clock Configurations
PTP Clock Configuration
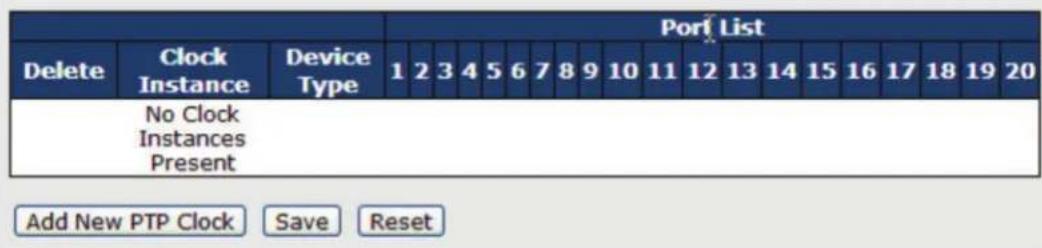
Figure 5-116. PTP Clock Configuration screen.
| Table 5-96. PTP Clock Configuration screen options. | |
| Label Description | |
| Delete Check this box and click Save to delete the clock instance. | |
| Clock Instance | Indicates the instance of a particular clock instance [0..3]Click on the clock instance number to edit the clock details |
| Device Type | Indicates the type of the clock instance. There are five device types.Ord-Bound: ordinary/boundary clockP2p Transp: peer-to-peer transparent clockE2e Transp: end-to-end transparent clockMaster Only: master onlySlave Only: slave only |
| Port List Set check mark for each port configured for this Clock Instance. | |
| 2 Step Flag Static member defined by the system; true if two-step Sync events and Pdelay_Resp events are used. | |
| Clock Identity Shows a unique clock identifier. | |
| One Way | If true, one-way measurements are used. This parameter applies only to a slave. In one-way mode no delay measurements are performed, i.e. this is applicable only if frequency synchronization is needed. The master always responds to delay requests. |
| Protocol Transport protocol used by the PTP protocol engineEthernet PTP over Ethernet multicastip4multi PTP over IPv4 multicastip4uni PTP over IPv4 unicastNOTE: IPv4 unicast protocol only works in Master Only and Slave Only clocks.For more information, please refer to Device Type.In a unicast Slave Only clock, you also need to configure which master clocks to request Announce and Sync messages from.For more information, please refer to Unicast Slave Configuration. | |
| VLAN Tag Enable Enables VLAN tagging for PTP frames.NOTE: Packets are only tagged if the port is configured for vlan tagging. i.e:Port Type != Unaware and PortVLAN mode == None, and the port is member of the VLAN. | |
| VID VLAN identifiers used for tagging the PTP frames | |
| PCP | Priority code point values used for PTP frames |
| Table 5-97. Power Over Ethernet Status screen options. | |
| Label Description | |
| Local Port The switch port | number to which the following settings will be applied. |
| PD Class | Each power device is classified according to the class that defines the maximum power consumed by the PD.This setting includes five classes:Class 0: Max. power 15.4 WClass 1: Max. power 4.0 WClass 2: Max. power 7.0 WClass 3: Max. power 15.4 WClass 4: Max. power 30.0 W |
| Power Requested Shows | the amount of power requested by the powered device. |
| Power Allocated Shows | the amount of power the switch has allocated for the powered device. |
| Power Used Shows how | much power the powered device currently is using. |
| Current Used Shows how | much current the PD currently is using. |
| Priority Shows the port's priority configured by the user. | |
| Port Status | Shows the port's status. The status can be one of the following values:PoE not available: no PoE chip foundPoE turned OFF: PoE is disabled by user.PoE turned OFF: power budget exceeded. The total requested or used power by the powered devices exceeds the maximum power the power supply can deliver, and port(s) with the lowest priority will be powered down.No PD detected: no powered devices detected on the port.PoE turned OFF: powered devices overload. The powered devices have requested or used more power than the port can deliver, and the port is powered down.PoE turned OFF: the powered device is turned off.Invalid PD: the power device is detected, but is not working correctly. |
5.12 Troubleshooting
5.12.1 Factory Defaults
You can reset the configuration of the stack switch on this page. Only the IP configuration is retained.
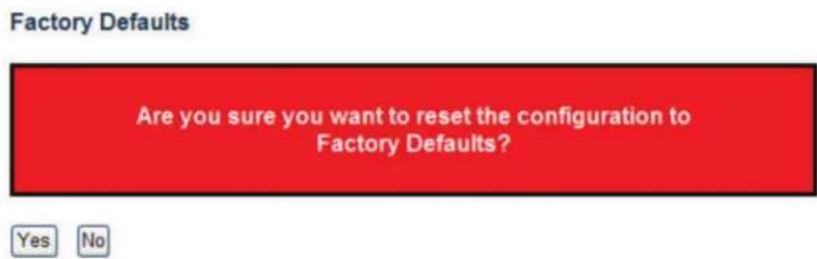
Figure 5-117. Factory default prompt screen.
| Table 5-98. Factory default prompt screen options. | |
| Label Description | |
| Yes Click to reset the configuration to factory defaults. | |
| No Click to return to the Port State page without resetting. | |
5.12.2 System Reboot
You can reset the stack switch on this page. After reset, the system will boot normally as if you have powered on the devices.
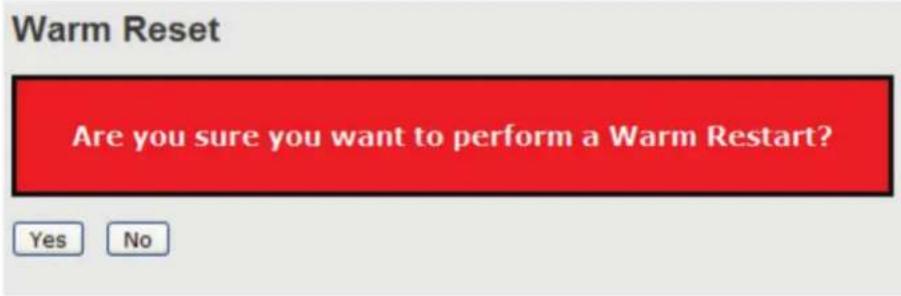
Figure 5-118. Warm Reset screen.
| Table 5-99. Factory default prompt screen options. | |
| Label Description | |
| Yes Click to reboot device | |
| No Click to return to the | Port State page without rebooting. |
5.13 Command Line Interface Management
Besides Web-based management, the switch also supports CLI management. You can use console or telnet to manage the switch by CLI.
CLI Management by RS-232 Serial Console (115200, 8, none, 1, none)
Before configuring RS-232 serial console, connect the RS-232 port of the switch to your PC Com port using a RJ45 to DB9-F cable.
Follow the steps below to access the console via RS-232 serial cable.
Step 1: On Windows desktop, click on Start -> Programs -> Accessories -> Communications -> HyperTerminal.
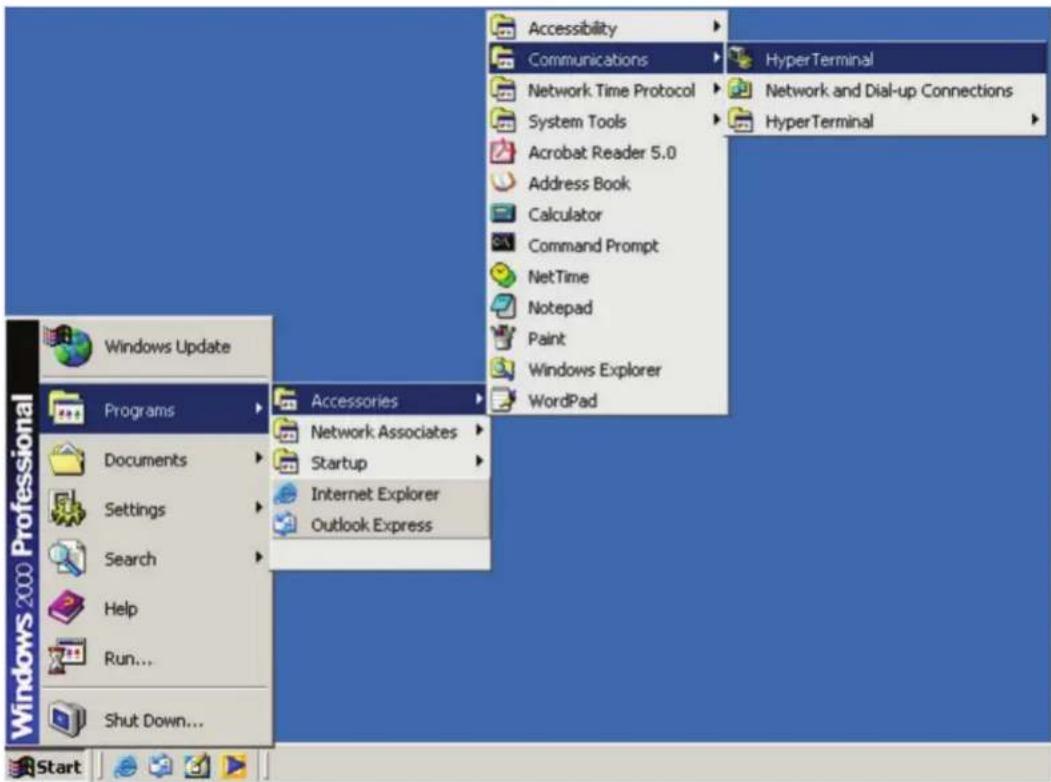
Figure 5-119. HyperTerminal screen.
Step 2: Input a name for the new connection.
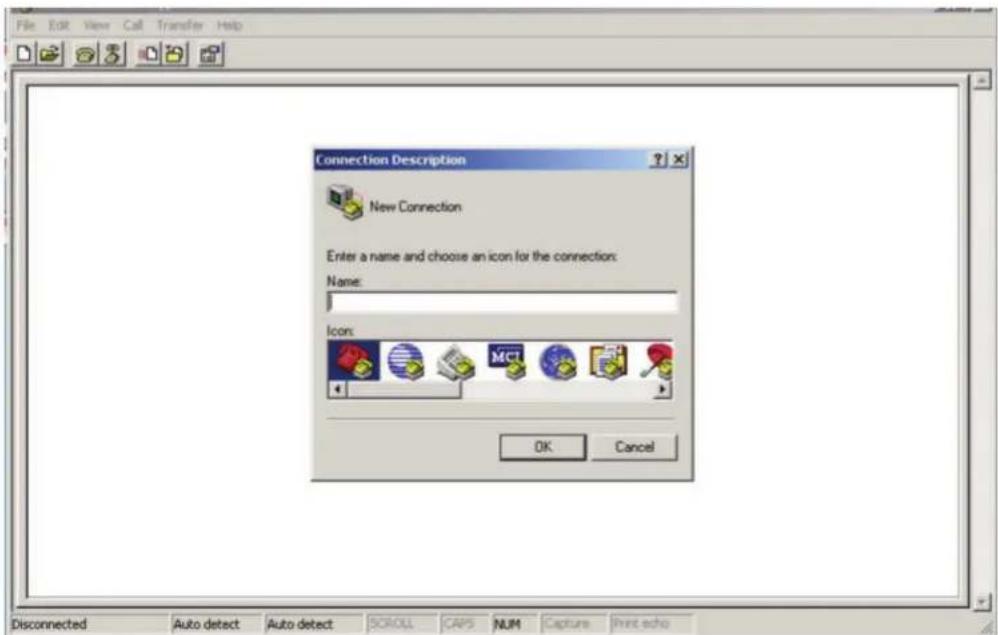
Figure 5-120. Connection Description screen.
Step 3: Select a COM port in the drop-down list.
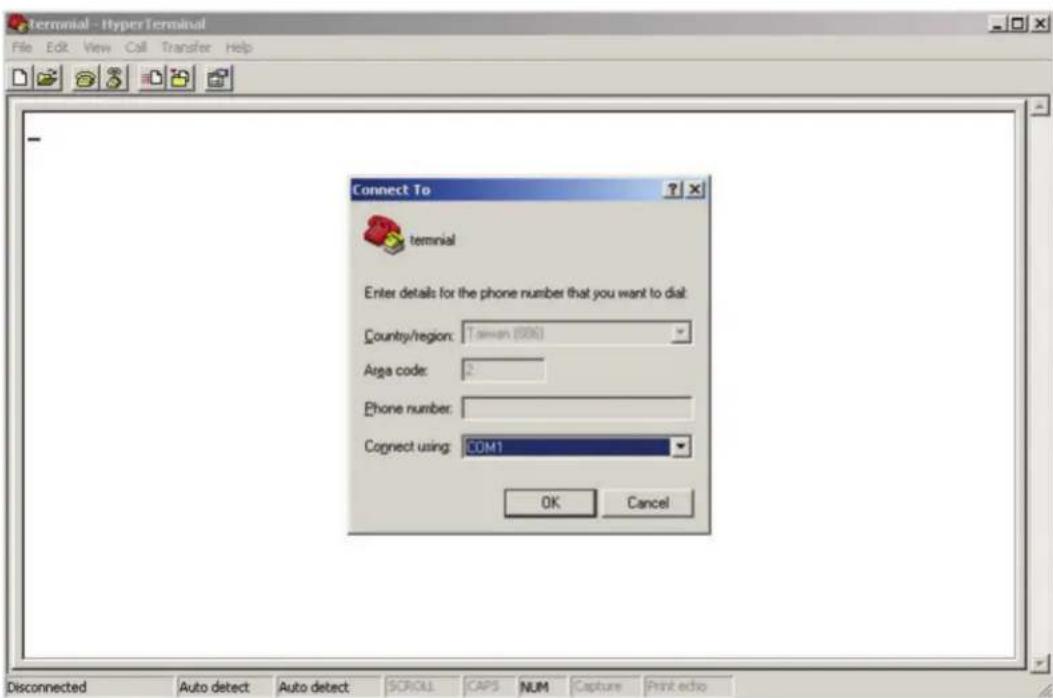
Figure 5-121. COM port screen.
Step 4: A pop-up window that indicates COM port properties appears, including bits per second, data bits, parity, stop bits, and flow control.
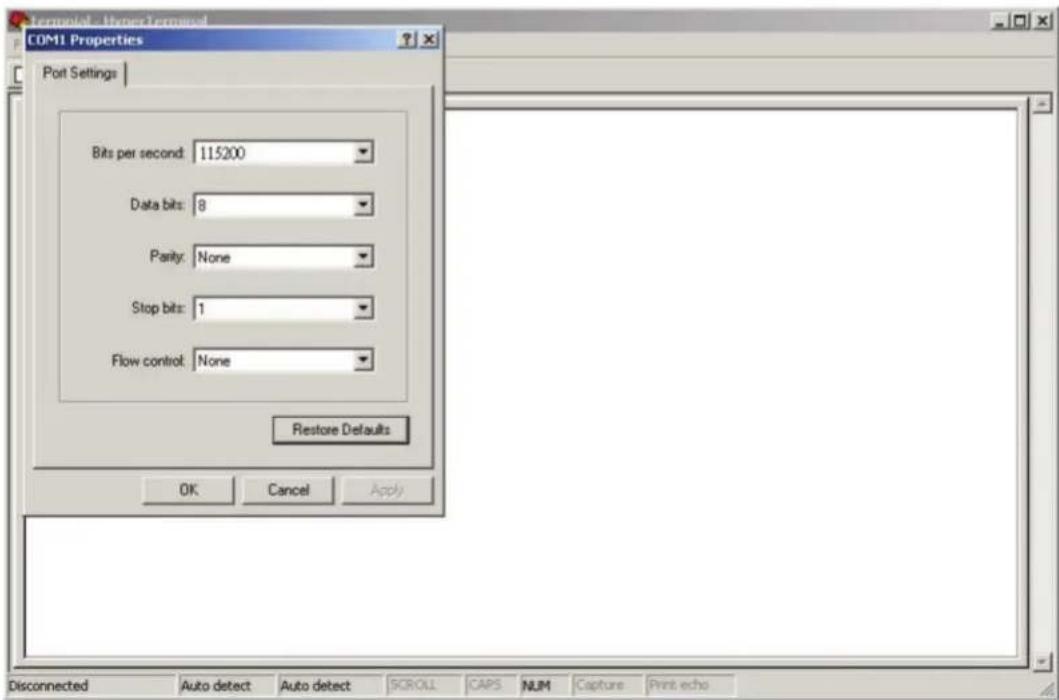
Figure 5-122. COM Properties screen.
Step 5: The console login screen will appear. Use the keyboard to enter the Username and Password (same as the password for Web browsers), then press Enter.
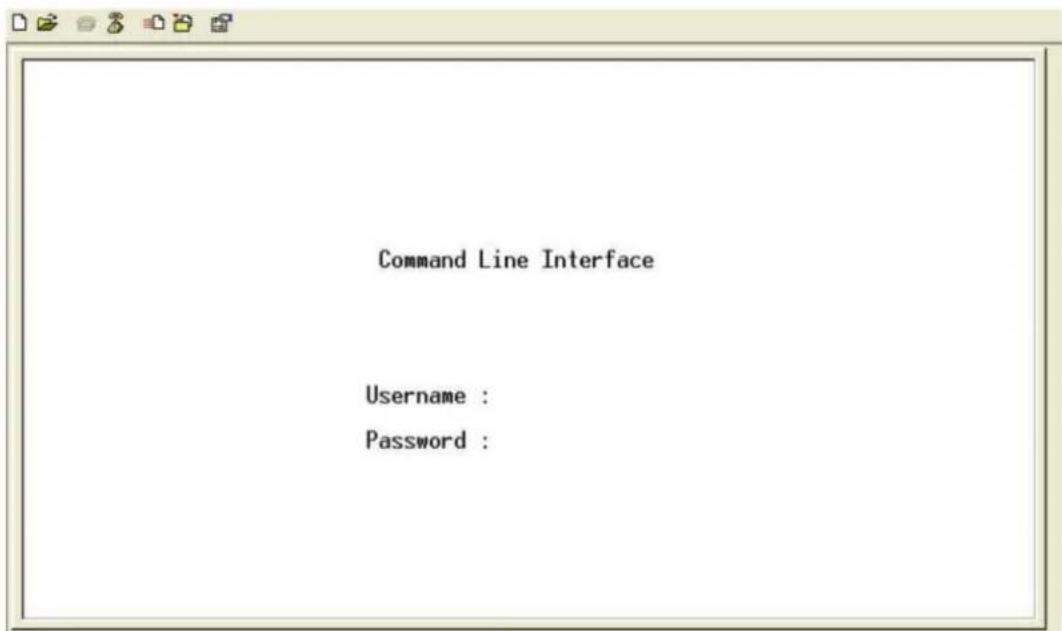
Figure 5-123. CLI screen.
CLI Management by Telnet
You can can use TELNETto configure the switch. The default values are:
IP Address: 192.168.10.1
Subnet Mask: 255.255.255.0
Default Gateway: 192.168.10.254
User Name: admin
Password: admin
Follow the steps below to access the console via Telnet.
Step 1: Telnet to the IP address of the switch from the Run window by inputting commands (or from the MS-DOS prompt) as below.
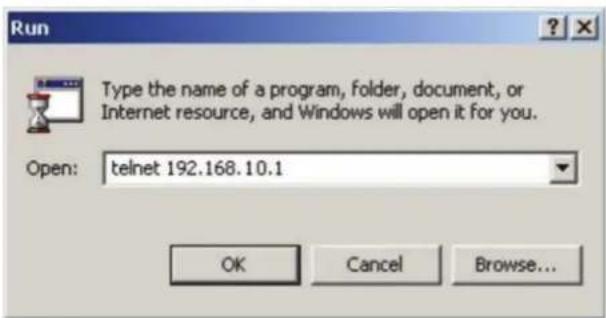
Figure 5-124. Run screen.
Step 2: The Login screen will appear. Use the keyboard to enter the Username and Password (same as the password for Web browser), and then press Enter.
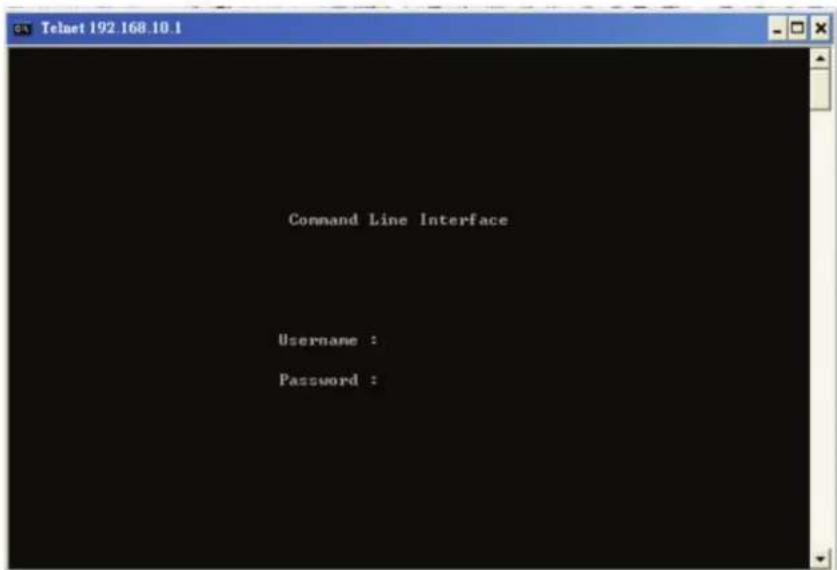
Figure 5-125. Telnet screen.
Commander Groups
Command Groups:
System : System settings and reset options
IP : IP configuration and Ping
Port : Port management
MAC : MAC address table
VLAN : Virtual LAN
PULAN : Private VLAN
Security : Security management
STP : Spanning Tree Protocol
Aggr : Link Aggregation
LACP : Link Aggregation Control Protocol
LLDP : Link Layer Discovery Protocol
PoE : Power Over Ethernet
QoS : Quality of Service
Mirror : Port mirroring
Config : Load/Save of configuration via IFTP
Firmware : Download of firmware via IFTP
PTP : IEEE1588 Precision Time Protocol
Loop Protect : Loop Protection
IPMC : MLD/IGMP Snooping
Fault : Fault Alarm Configuration
Event : Event Selection
DHCPServer : DHCP Server Configuration
Ring : Ring Configuration
Chain : Chain Configuration
RCS : Remote Control Security
Fastrecovery : Fast-Recovery Configuration
SFP : SFP Monitor Configuration
DeviceBinding: Device Binding Configuration
MRP : MRP Configuration
Modbus : Modebus TCP Configuration
Figure 5-126. Command Groups screen.
System
System>
Configuration [all] [<port_list>]
Reboot
Restore Default [keep_ip]
Contact [<contact>]
Name [<name>]
Location [<location>]
Description [<description>]
Password <password>
Username [<username>]
Timezone [<offset>]
Log [<log_id>] [all|info|warning|error] [clear]
IP
IP> Configuration
DHCP [enable|disable]
Setup [<ip_addr>] [<ip_mask>] [<ip_router>] [<vid>]
Ping <ip_addr_string> [<ping_length>]
SNTP [<ip_addr_string>]
Port
port> Configuration [<port_list>] [up|down]
Mode [<port_list>] [auto|10hdx|10fdx|100hdx|100fdx|1000fdx|sfp_auto_ams]
Flow Control [<port_list>] [enable|disable]
State [<port_list>] [enable|disable]
MaxFrame [<port_list>] [<max_frame>]
Power [<port_list>] [enable|disable|actiphy|dynamic]
Excessive [<port_list>] [discard|restart]
Statistics [<port_list>] [<command>] [up|down]
VeriPHY [<port_list>]
SFP [<port_list>]
MAC
MAC> Configuration [<port_list>]
Add <mac_addr> <port_list> [<vid>]
Delete <mac_addr> [<vid>]
Lookup <mac_addr> [<vid>]
Agetime [<age_time>]
Learning [<port_list>] [auto|disable|secure]
Dump [<mac_max>] [<mac_addr>] [<vid>]
Statistics [<port_list>]
Flush
VLAN
VLAN> Configuration [<port_list>]

PVID [<port_list>] [<vid>|none]

FrameType [<port_list>] [all|tagged|untagged]

IngressFilter [<port_list>] [enable|disable]

tx_tag [<port_list>] [untag_pvid|untag_all|tag_all]

PortType [<port_list>] [unaware|c-port|s-port|s-custom-port]

EtypeCustomSport [<etype>]
Add <vid>|<name> [<ports_list>]
Forbidden Add <vid>|<name> [<port_list>]
Delete <vid>|<name>
Forbidden Delete <vid>|<name>
Forbidden Lookup [<vid>] [(name <name>)]
Lookup [<vid>] [(name <name>)] [combined|static|nas|all]
Name Add <name> <vid>
Name Delete <name>
Name Lookup [<name>]
Status [<port_list>] [combined|static|nas|mstp|all|conflicts]
Private VLAN
PVLAN> Configuration [<port_list>]
Add <pvlan_id> [<port_list>]
Delete <pvlan_id>
Lookup [<pvlan_id>]
Isolate [<port_list>] [enable|disable]
Security
Security > Switch    Switch security setting
Network    Network security setting
AAA    Authentication, Authorization and Accounting setting
Security Switch
Security/switch> Password <password>
Auth Authentication
SSH Secure Shell
HTTPS Hypertext Transfer Protocol over RMON Remote Network Monitoring
Security Switch Authentication
Security/switch/auth> Configuration
Method [console|telnet|ssh|web] [none|local|radius] [enable|disable]
Security Switch SSH
Security/switch/ssh> Configuration
Mode [enable|disable]
Security Switch HTTPS
Security/switch/ssh> Configuration
Mode [enable|disable]
Security Switch RMON
Security/switch/rmon> Statistics Add <stats_id> <data_source>

Statistics Delete <stats_id>

Statistics Lookup [<stats_id>]

History Add <history_id> <data_source> [<interval>] [<buckets>]

History Delete <history_id>

History Lookup [<history_id>]

Alarm Add <alarm_id> <interval> <alarm_variable> [absolute|delta]<rising_threshold> <rising_event_index> <falling_threshold> <falling_event_index> [rising|falling|both]

Alarm Delete <alarm_id>

Alarm Lookup [<alarm_id>]
Security Network
Security/Network> Psec Port Security Status
NAS Network Access Server (IEEE 802.1X)
ACL Access Control List
DHCP Dynamic Host Configuration Protocol
Security Network Psec
Security/Network/Psec> Switch [<port_list>]
Port [<port_list>]
Security Network NAS
Security/Network/NAS> Configuration [<port_list>]
Mode [enable|disable]
State [<port_list>] [auto|authorized|unauthorized|macbased]
Reauthentication [enable|disable]
ReauthPeriod [<reauth_period>]
EapolTimeout [<eapol_timeout>]
Agetime [<age_time>]
Holdtime [<hold_time>]
Authenticate [
Statistics
[
[clear|eapol|radius]
Security Network ACL
Security/Network/ACL> Configuration [<port_list>]

Action [<port_list>] [permit|deny] [<rate_limiter>][<port_redirect>] [<mirror>] [<logging>] [<shutdown>]

Policy [<port_list>] [<policy>]

Rate [<rate_limiter_list>] [<rate_unit>] [<rate>]

Add [<ace_id>] [<ace_id_next>][(port <port_list>)] [(policy <policy> <policy_bitmask>)] [<tagged>]
[<vid>] [<tag_prio>] [<dmac_type>][(etype <etype>] [<smac>] [<dmac>]) | (arp [<sip>] [<dip>] [<smac>] [<arp_opcode>] [<arp_flags>]) | (ip [<sip>] [<dip>] [<protocol>] [<ip_flags>]) | (icmp [<sip>] [<dip>] [<icmp_type>] [<icmp_code>] [<ip_flags>]) | (udp [<sip>] [<dip>] [<sport>] [<dport>] [<ip_flags>]) | (tcp [<sip>] [<dip>] [<sport>] [<dport>] [<ip_flags>] [<tcp_flags>]) | [permit|deny] [<rate_limiter>] [<port_redirect>] [<mirror>] [<logging>]
[<shutdown>]

Delete <ace_id>

Lookup [<ace_id>]

Clear

Status [combined|static|loop_protect|dhcp|ptp|ipmc|conflicts]

Port State [<port_list>] [enable|disable]
Security Network DHCP
Security/Network/DHCP> Configuration
Mode [enable|disable]
Server [<ip_addr>]
Information Mode [enable|disable]
Information Policy [replace|keep|drop]
Statistics [clear]
Security Network AAA
Security/Network/AAA> Configuration
Timeout [<timeout>]
Deadtime [<dead_time>]
    RADIUS [<server_index>] [enable|disable] [<ip_addr_string>] [<secret>] [<server_port>]
    ACCT_RADIUS [<server_index>] [enable|disable] [<ip_addr_string>] [<secret>] [<server_port>]
Statistics [<server_index>]
STP
STP> Configuration
Version [<stp_version>]
Non-certified release, v
Txhold [<holdcount>]lt 15:15:15, Dec 6 2007
MaxAge [<max_age>]
FwdDelay [<delay>]
bpduFilter [enable|disable]
bpduGuard [enable|disable]
recovery [<timeout>]
CName [<config-name>] [<integer>]
Status [<msti>] [<port_list>]
Msti Priority [<msti>] [<priority>]
Msti Map [<msti>] [clear]
Msti Add <msti> <vid>
Port Configuration [<port_list>]
Port Mode [<port_list>] [enable|disable]
Port Edge [<port_list>] [enable|disable]
Port AutoEdge [<port_list>] [enable|disable]
Port P2P [<port_list>] [enable|disable|auto]
Port RestrictedRole [<port_list>] [enable|disable]
Port RestrictedTcn [<port_list>] [enable|disable]
Port bpduGuard [<port_list>] [enable|disable]
Port Statistics [<port_list>]
Port Mcheck [<port_list>]
Msti Port Configuration [<msti>] [<port_list>]
Msti Port Cost [<msti>] [<port_list>] [<path_cost>]
Msti Port Priority [<msti>] [<port_list>] [<priority>]
Aggr
Aggr> Configuration
Add <port_list> [<aggr_id>]
Delete <aggr_id>
Lookup [<aggr_id>]
Mode [smac|dmac|ip|port] [enable|disable]
LACP
LACP> Configuration [<port_list>]
Mode [<port_list>] [enable|disable]
Key [<port_list>] [<key>]
Role [<port_list>] [active|passive]
Status [<port_list>]
Statistics [<port_list>] [clear]
LLDP
LLDP> Configuration [<port_list>]
Mode [<port_list>] [enable|disable]
Statistics [<port_list>] [clear]
Info [<port_list>]
PoE
PoE> Configuration [<port_list>]

Mode [<port_list>] [disabled|poe|poe+]

Priority [<port_list>] [low|high|critical]

Mgmt_mode [class_con|class_res|al_con|al_res|lldp_res|lldp_con]

Maximum_Power [<port_list>] [<port_power>]

Status

Primary_Supply [<supply_power>]
QoS
QoS> DSCP Map [<dscp_list>] [<class>] [<dpl>]

DSCP Translation [<dscp_list>] [<trans_dscp>]

DSCP Trust [<dscp_list>] [enable|disable]

DSCP Classification Mode [<dscp_list>] [enable|disable]

DSCP Classification Map [<class_list>] [<dpl_list>] [<dscp>]

DSCP EgressRemap [<dscp_list>] [<dpl_list>] [<dscp>]

Storm Unicast [enable|disable] [<packet_rate>]

Storm Multicast [enable|disable] [<packet_rate>]

Storm Broadcast [enable|disable] [<packet_rate>]

QCL Add [<qce_id>] [<qce_id_next>]

[<port_list>]

[<tag>] [<vid>] [<pcp>] [<dei>] [<smac>]

[<dmac_type>]

[(etype    [<etype>]) | (LLC [<DSAP>] [<SSAP>] [<control>]) | (SNAP    [<PID>]) | (ipv4 [<protocol>] [<sip>] [<dscp>] [<fragment>] [<sport>] [<dport>]) | (ipv6 [<protocol>] [<sip_v6>] [<dscp>] [<sport>]
[<dport>])]

[<class>]    [<dp>]    [<classified_dscp>]

QCL Delete <qce_id>

QCL Lookup [<qce_id>]

QCL Status [combined|static|conflicts]

QCL Refresh

Mirror

Mirror> Configuration [<port_list>]

Port [<port>|disable]

Mode [<port_list>] [enable|disable|rx|tx]
Dot1x
Dot1x> Configuration [<port_list>]

Mode [enable|disable]

State [<port_list>] [macbased|auto|authorized|unauthorized]

Authenticate [<port_list>] [now]

Reauthentication [enable|disable]

Period [<reauth_period>]

Timeout [<eapol_timeout>]

Statistics [<port_list>] [clear|eapol|radius]

Clients [<port_list>] [all|<client_cnt>]

Agetime [<age_time>]

Holdtime [<hold_time>]
IGMP
IGMP> Configuration [<port_list>]
Mode [enable|disable]
State [<vid>] [enable|disable]
Querier [<vid>] [enable|disable]
Fastleave [<port_list>] [enable|disable]
Router [<port_list>] [enable|disable]
Flooding [enable|disable]
Groups [<vid>]
Status [<vid>]
ACL
ACL> Configuration [<port_list>]

Action [<port_list>] [permit[deny] [<rate_limiter>] [<port_copy>]

    [<logging>]    [<shutdown>]

Policy [<port_list>] [<policy>]

Rate [<rate_limiter_list>] [<packet_rate>]

Add [<ace_id>] [<ace_id_next>] [switch | (port <port>) | (policy <policy>)]
    [<vid>] [<tag_prio>] [<dmac_type>]

    [(etype [<etype>] [<smac>] [<dmac>]) | (arp [<sip>] [<dip>] [<smac>] [<arp_opcode>] [<arp_flags>]) | (ip [<sip>] [<dip>] [<protocol>] [<ip_flags>]) | (icmp [<sip>] [<dip>] [<icmp_type>] [<icmp_code>] [<ip_flags>]) | (udp [<sip>] [<dip>] [<sport>] [<dport>] [<ip_flags>]) | (tcp [<sip>] [<dip>] [<sport>] [<dport>] [<ip_flags>] [<tcp_flags>]) | [permit[deny] [<rate_limiter>] [<port_copy>] [<logging>] [<shutdown>]

Delete <ace_id>

Lookup [<ace_id>]

Clear
Mirror
Mirror> Configuration [<port_list>]
Port [<port>|disable]
Mode [<port_list>] [enable|disable|rx|tx]
Config
Config> Save <ip_server> <file_name>
Load <ip_server> <file_name> [check]
Firmware
Firmware> Load <ip_addr_string> <file_name>
SNMP
SNMP> Trap Inform Retry Times [<retries>]

Trap Probe Security Engine ID [enable|disable]

Trap Security Engine ID [<engineid>]

Trap Security Name [<security_name>]

Engine ID [<engineid>]

Community Add <community> [<ip_addr>] [<ip_mask>]

Community Delete <index>

Community Lookup [<index>]

User Add <engineid> <user_name> [MD5|SHA] [<auth_password>] [DES] [<priv_password>]

User Delete <index>

User Changekey <engineid> <user_name> <auth_password> [<priv_password>]

User Lookup [<index>]

Group Add <security_model> <security_name> <group_name>

Group Delete <index>

Group Lookup [<index>]

View Add <view_name> [included|excluded] <oid_subtree>

View Delete <index>

View Lookup [<index>]

Access Add <group_name> <security_model> <security_level> [<read_view_name>] [<write_view_name>]

Access Delete <index>

Access Lookup [<index>]
Firmware
Firmware> Load <ip_addr_string> <file_name>
PTP
PTP> Configuration [<clockinst]

PortState <clockinst> [<port_list>] [enable|disable|internal]
ClockCreate <clockinst> [<devtype>] [<twostep>] [<protocol>] [<oneway>] [<clockid>] [<tag_enable>] [<vid>] [<prio>]
ClockDelete <clockinst> [<devtype>]
DefaultDS <clockinst> [<priority1>] [<priority2>] [<domain>]
CurrentDS <clockinst>
ParentDS <clockinst>
Timingproperties <clockinst> [<utcoffset>] [<valid>] [<leap59>] [<leap61>] [<teaptrac>] [<freqtrac>] [<ptptimescale>]
[<timesource>]
PTP PortDataSet <clockinst> [<port_list>] [<announceintv>] [<announceto>] [<syncintv>] [<delaymech>] [<minpd layreqintv>] [<delayasymmetry>] [<ingressLatency>]
LocalClock <clockinst> [update|show|ratio] [<clockratio>]
Filter <clockinst> [<def_delay_filt>] [<period>] [<dist>]
Servo <clockinst> [<displaystates>] [<ap_enable>] [<ai_enable>] [<ad_enable>] [<ap>] [<ai>] [<ad>]
SlaveTableUnicast <clockinst>
UniConfig <clockinst> [<index>] [<duration>] [<ip_addr>]
ForeignMasters <clockinst> [<port_list>]
EgressLatency [show|clear]
MasterTableUnicast <clockinst>
ExtClockMode [<one_pps_mode>] [<ext_enable>] [<clockfreq>] [<vcxo_enable>]
OnePpsAction [<one_pps_clear>]
DebugMode <clockinst> [<debug_mode>]
Wireless mode <clockinst> [<port_list>] [enable|disable]
Wireless pre notification <clockinst> <port_list>
Wireless delay <clockinst> [<port_list>] [<base_delay>] [<incr_delay>]
Loop Protect
Loop Protect> Configuration
Mode [enable|disable]
Transmit [<transmit-time>]
Shutdown [<shutdown-time>]
Port Configuration [<port_list>]
Port Mode [<port_list>] [enable|disable]
Port Action [<port_list>] [shutdown|\shut_log|log]
Port Transmit [<port_list>] [enable|disable]
Status [<port_list>]
IPMC
IPMC> Configuration [igmp]
Mode [igmp] [enable|disable]
Flooding [igmp] [enable|disable]
VLAN Add [igmp] <vid>
VLAN Delete [igmp] <vid>
State [igmp] [<vid>] [enable|disable]
Querier [igmp] [<vid>] [enable|disable]
Fastleave [igmp] [<port_list>] [enable|disable]
Router [igmp] [<port_list>] [enable|disable]
Status [igmp] [<vid>]
Groups [igmp] [<vid>]
Version [igmp] [<vid>]
Fault
Fault> Alarm PortLinkDown [<port_list>] [enable|disable]
Alarm PowerFailure [pwr1|pwr2|pwr3] [enable|disable]
Event
Event> Configuration
Syslog SystemStart [enable|disable]
Syslog PowerStatus [enable|disable]
Syslog SnmpAuthenticationFailure [enable|disable]
Syslog RingTopologyChange [enable|disable]
Syslog Port [<port_list>] [disable|linkup|linkdown|both]
SMTP SystemStart [enable|disable]
SMTP PowerStatus [enable|disable]
SMTP SnmpAuthenticationFailure [enable|disable]
SMTP RingTopologyChange [enable|disable]
SMTP Port [<port_list>] [disable|linkup|linkdown|both]
DHCPServer
DHCPServer> Mode [enable|disable]
Setup [<ip_start>] [<ip_end>] [<ip_mask>] [<ip_router>] [<ip_dns>] [<ip_tftp>] [<lease>] [<bootfile>]
Ring
Ring> Mode [enable|disable]
Master [enable|disable]
1stRingPort [<port>]
2ndRingPort [<port>]
Couple Mode [enable|disable]
Couple Port [<port>]
Dualhoming Mode [enable|disable]
Dualhoming Port [<port>]
Chain
Chain> Configuration
Mode [enable|disable]
1stUplinkPort [<port>]
2ndUplinkPort [<port>]
EdgePort [1st|2nd|none]
RCS
RCS> Mode [enable|disable]
Add [<ip_addr>] [<port_list>] [web_on|web_off] [telnet_on|telnet_off] [snmp_on|snmp_off]
Del <index>
Configuration
FastRecovery
FastRecovery> Mode [enable|disable]
Port [<port_list>] [<fr_priority>]
SFP
SFP> syslog [enable|disable]
temp [<temperature>]
Info
DeviceBinding
Devicebinding> Mode [enable|disable]
Port Mode [<port_list>] [disable|scan|binding|shutdown]
Port DDOS Mode [<port_list>] [enable|disable]
Port DDOS Sensibility [<port_list>] [low|normal|medium|high]
Port DDOS Packet [<port_list>] [rx_total|rx_unicast|rx_multicast|rx_broadcast|tcp|udp]
Port DDOS Low [<port_list>] [<socket_number>]
Port DDOS High [<port_list>] [<socket_number>]
Port DDOS Filter [<port_list>] [source|destination]
    Port DDOS Action [<port_list>] [do_nothing|block_1_min|block_10_mins|block|shutdown|only_log|reboot_device]
Port DDOS Status [<port_list>]
Port Alive Mode [<port_list>] [enable|disable]
    Port Alive Action [<port_list>] [do_nothing|link_change|shutdown|only_log|reboot_device]
Port Alive Status [<port_list>]
Port Stream Mode [<port_list>] [enable|disable]
Port Stream Action [<port_list>] [do_nothing|only_log]
Port Stream Status [<port_list>]
Port Addr [<port_list>] [<ip_addr>] [<mac_addr>]
Port Alias [<port_list>] [<ip_addr>]
Port DeviceType [<port_list>] [unknown|ip_cam|ip_phone|ap|pc|plc|nvr]
Port Location [<port_list>] [<device_location>]
Port Description [<port_list>] [<device_description>]
MRP
MRP> Configuration
Mode [enable|disable]
Manager [enable|disable]
React [enable|disable]
1stRingPort [<mrp_port>]
2ndRingPort [<mrp_port>]
Parameter MRP_TOPchgT [<value>]
Parameter MRP_TOPNRmax [<value>]
Parameter MRP_TSTshortT [<value>]
Parameter MRP_TSTdefaultT [<value>]
Parameter MRP_TSTNRmax [<value>]
Parameter MRP_LNKdownT [<value>]
Parameter MRP_LNKupT [<value>]
Parameter MRP_LNKNRmax [<value>]
Modbus
Modbus> Status
Mode [enable|disable]
Black Box Tech Support: FREE! Live. 24/7.
Tech support the way it should be.

natural_image
Close-up portrait of a smiling man wearing a headset, against a blue background (no text or symbols visible)Great tech support is just 60 seconds away at 724-746-5500 or blackbox.com.

BLACK BOX®
About Black Box
Black Box provides an extensive range of networking and infrastructure products. You'll find everything from cabinets and racks and power and surge protection products to media converters and Ethernet switches all supported by free, live 24/7 Tech support available in 60 seconds or less.
© Copyright 2016. Black Box Corporation. All rights reserved. Black Box ^® and the Double Diamond logo are registered trademarks of BB Technologies, Inc. Any third-party trademarks appearing in this manual are acknowledged to be the property of their respective owners.
LE2700A user manual, version 5
- LE2700 Series Industrial Managed Ethernet Switches
- User Manual
- Trademarks Used in this Manual
- Disclaimer:
- Federal Communications Commission and Industry Canada Radio Frequency Interference Statements
- Overview
- Introduction
- Features
- What's Included
- LE2700A:
- LE2700AE:
- LE2700UK:
- LE2700LV:
- LE2700LV-PS:
- LE2710C:
- LE2711C
- LE2720C:
- LE2721C:
- LE2722C:
- LE2731C:
- To download from the Web site:
- Hardware Description
- Hardware Installation
- Rackmount Installation
- Module Installation
- RJ-45 Module (LE2720C)
- SFP Module (LE2710C, LE2711C, LE2721C)
- 100/1000 Mbps SFP Module (LE2722C) or 10G SFP+ Module (LE2731C)
- CAUTION:
- Power Module
- Wiring
- ATTENTION:
- Grounding
- Fault Relay
- Redundant Power Inputs
- Connection
- Cables
- RS-232 port wiring
- SFP
- B-Ring/B-Chain
- B-Ring
- Coupling Ring
- Dual Homing
- B-Chain
- Redundancy
- B-Ring
- Introduction
- Configurations
- B-Chain
- Introduction
- Configurations
- MRP
- Introduction
- Configurations
- STP/RSTP/MSTP
- STP/RSTP
- STP Bridge Status
- STP Port Status
- STP Statistics
- STP Bridge Configurations
- MSTP
- Port Settings
- Mapping
- Priority
- CIST
- Fast Recovery
- Management
- Preparing for Web Management
- System Login
- Basic Settings
- System Information
- Admin & Password
- Authentication
- IP Settings
- IPv6 Settings
- HTTPS
- SSH
- LLDP
- LLDP Neighbor Information
- Port Statistics
- Modbus TCP
- Backup/Restore Configurations
- Firmware Update
- DHCP Server
- Basic Settings
- Dynamic Client List
- Client List
- Relay Agent
- Port Setting
- Port Control
- Port Trunk
- LACP
- LACP System Status
- LACP Status
- LACP Statistics
- Loop Gourd
- VLAN
- VLAN Membership
- Port Configurations
- Introduction of Port Types
- VLAN QinQ Mode:
- Port 1 VLAN Settings:
- VLAN ID Settings
- Private VLAN
- SNMP
- SNMP System Configurations
- SNMP Community Configurations
- SNMP User Configurations
- SNMP Groups Configuration
- SNMP View Configurations
- SNMP Access Configurations
- Traffic Prioritization
- Storm Control
- Port Classification
- Port Tag Remaking
- Port DSCP
- Port Policing
- Queue Policing
- QoS Egress Port Scheduler and Shapers
- Weighted
- Port Scheduled
- Port Shaping
- DSCP Based QoS
- DSCP Translation
- DSCP Classification
- QoS Control List
- QoS Counters
- QCL Status
- Multicast
- IGMP Snooping
- VLAN Configurations of IGMP Snooping
- IGMP Snooping Status
- Groups Information of IGMP Snooping
- Security
- Remote Control Security Configurations
- Device Binding
- Alive Check
- Device Description
- Stream Check
- ACL Ports
- Rate Limiters
- ACL Control List
- MAC Parameters
- VLAN Parameters
- IP Parameters
- TCP Parameters
- UDP Parameters
- AAA
- Authentication Server Configuration
- RADIUS
- Authentication and Accounting Server Status Overview
- NAS (802.1x)
- Overview of 802.1X (Port-Based) Authentication
- Overview of MAC-Based Authentication
- NAS Status
- Alerts
- Fault Alarm
- System Warning
- SYSLOG Setting
- SMTP Setting
- Event Selection
- Monitor and Diag
- MAC Table
- Aging Configuration
- MAC Table Learning
- Static MAC Table Configurations
- MAC Table
- Port Statistics
- Traffic Overview
- Detailed Statistics
- Port Mirroring
- System Log Information
- Cable Diagnostics
- SFP Monitor
- Ping
- IPv6 Ping
- Synchronization
- Troubleshooting
- Factory Defaults
- System Reboot
- Command Line Interface Management
- CLI Management by Telnet
- Black Box Tech Support: FREE! Live. 24/7.
- BLACK BOX®
- About Black Box
Brand : Black Box
Model : LE2710C
Category : Network switch