IZ-9007 - Household Fan Izzy - Free user manual and instructions
Find the device manual for free IZ-9007 Izzy in PDF.


| Product Type | Domestic Fan |
| Model | IZ-9007 |
| Brand | Izzy |
| Dimensions (Height x Width x Depth) | 45 cm x 35 cm x 25 cm |
| Weight | 2.5 kg |
| Power Supply | 220-240 V, 50/60 Hz |
| Power Consumption | 50 W |
| Number of Speed Settings | 3 |
| Oscillation | Yes, 90° |
| Tilt Adjustment | Yes |
| Blade Diameter | 35 cm |
| Material | ABS plastic with metal stand |
| Remote Control | Not included |
| Noise Level | ≤ 55 dB |
| Safety Features | Overheat protection, safety grill |
| Cleaning and Maintenance | Wipe with a damp cloth; do not immerse in water |
| Spare Parts Availability | Blades, grill, motor available from manufacturer |
| Repairability | Repairable by qualified technician; spare parts sold separately |
| Warranty | 2 years |
Frequently Asked Questions - IZ-9007 Izzy
User questions about IZ-9007 Izzy
0 question about this device. Answer the ones you know or ask your own.
Ask a new question about this device
Download the instructions for your Household Fan in PDF format for free! Find your manual IZ-9007 - Izzy and take your electronic device back in hand. On this page are published all the documents necessary for the use of your device. IZ-9007 by Izzy.
USER MANUAL IZ-9007 Izzy
natural_image
Three white outdoor fan units with 'izy' branding, arranged in a row (no text or symbols on the fan bodies)We thank you for having chosen an appliance from the IZZY range.
Safety Interlocks

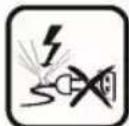
Please read these instructions carefully before using the appliance and save them for future reference. Please keep the sales receipt for guarantee purposes (please see below “Guarantee and Customer Service”). IZZY is not responsible for non-compliance of the instructions.
When using electrical appliances, basic safety precautions should always be followed:
- Make sure your electricity supply is the same as the one shown on the underside of the appliance.
- Never leave the appliance unattended when operating.
- Close supervision is necessary when your appliance is being us near children or infirm persons. Ensure that they do not play with the appliance.
- This appliance is not intended for use by persons with reduced physical, sensory or mental capabilities, children or those with lack of experience and knowledge, unless they have been given supervision or instruction concerning use of the appliance by a person responsible for their safety.
WARNING: Do not expose babies and the elderly many hours in front of the fan's air.
- Switch off and unplug:
- When not in use.
- When you move it.
- Before cleaning.
- Never use the appliance for any other use than indicated.
• The device is intended for indoor use. Do not use the device outdoors. -
The device is intended only for domestic use. Any other use will cancel the warranty.
• Always use the mixer on a secure, dry level surface. -
Do not operate or place the device or parts in places of high humidity or where it may get wet.
- Do not use this appliance in the immediate surroundings of a bath, a shower or a swimming pool or in places where it may get wet.
- Never let the power unit, cord or plug get wet. If the appliance does get wet, immediately remove the power cord from the wall outlet and do not put your hands in the water. Never run the wet appliance and contact one of the authorized BENRUBI service centers.
CAUTION: To prevent injury, do not place foreign objects, pencils, etc. through the grills when the appliance is plugged in or when it is in operation.
CAUTION: To avoid injury, do not put your fingers through the grilles when the appliance is plugged in or when it is in operation.
- Leave plenty of free space around the appliance so that you do not block the grilles and the fan movement.
- Do not let the power cord of the appliance hang over the edge of a table or bench edge or where a child can grab it. Do not allow the power cord to touch any warm surface.
- Ensure that the power cord is not clamped from any object, e.g. furniture. Do not press the power cord and never place it under carpets or mats where there is a risk of stepping on it. Keep the power cord in a place where there is no danger of stumbling.
- Do not place the appliance next to fabrics, e.g. hanging curtains, etc. Do not place clothes on the appliance to dry or for any other reason.
- Before inserting or removing the socket, make sure the appliance is turned OFF.
- Never use the cord to pull the plug out of the socket. Disconnect alway by pulling on the plug.
- Ensure that the power cord does not come into contact with moving parts of the appliance.
- Do not use the appliance if it has been dropped or damaged in any way and contact an authorized BENRUBI Service Center.
- In case that you notice some strange noise, smell, smoke or anything unusual, do not use the appliance. Disconnect it from electricity and contact an authorized BENRUBI Service Center.
- Failure to use properly may cause injury.
- Never leave the power cable wrapped during use. Unwind it completely.
-
Never use highly corrosive or abstractive cleaning agents. Never use metal scouring pads for cleaning.
-
Do not move the appliance when it is in operation.
- Do not touch the appliance with wet or damp hands.
- Do not use an extension power cord.
- This appliance is not intended to be operated by means of an external timer or separate remote control system.
- Check the power cord periodically for possible damages.
- If the power cord or the plug of the appliance has been damaged, do not use the appliance and contact an authorized BENRUBI Service Center.
- In case of a possible damage, do not attempt to repair the appliance by yourself. Please contact one of the authorized BENRUBI servic centers.
- Any repair made by an unauthorized BENRUBI Service Center CANCELS THE GUARANTEE.
- Any misuse of the device cancels the warranty.
- Only use original spare parts
- The appliance conforms to EU directive 2014/30/EU on Electromagnetic Compatibility, the 2014/35/ EU Low Voltage Directive, the2011/65/EU RoHS Directive and the directive 2009/125/EC for eco-design.
SAVE THESE INSTRUCTIONS
Parts of the Appliance
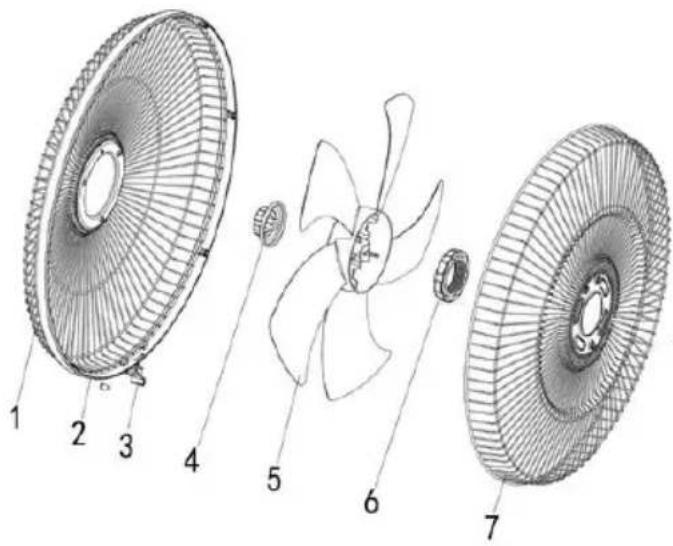
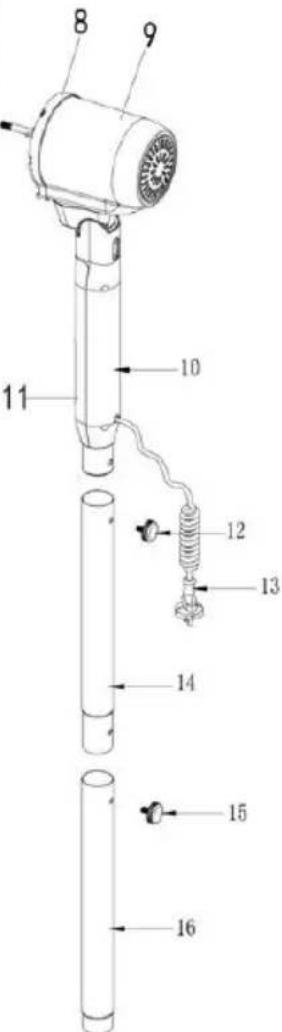
- Front fan grill
- Clip screw
- Clip
- Blades support nut
- Blades
- Rear grille support nut
- Rear fan grille
- Motor shaft
- Motor
-
Support tube
-
Control panel
- Tube mounting screw
- Power cord
- Extension tube
- Tube mounting screw
- Extension tube
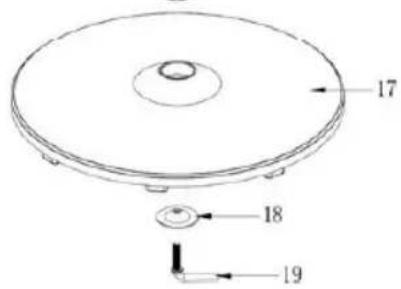
- Base
- Base gasket
- Base screw "L"
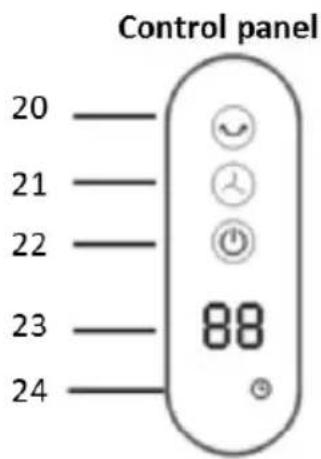
Control panel
- Oscillating button
- Speed control button
- Power button
- Display screen
- Timer indication
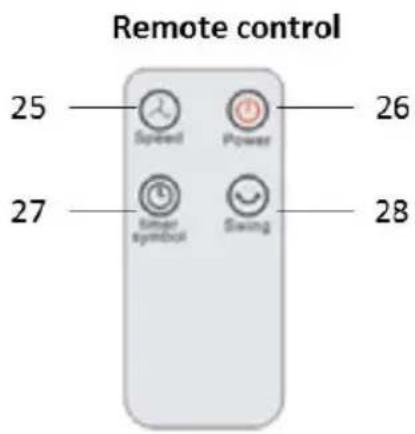
Remote control
- Speed control button
- Power button
- Timer button
- Oscillation button
Fan Assembly
Remove the packaging.
Motor assembly
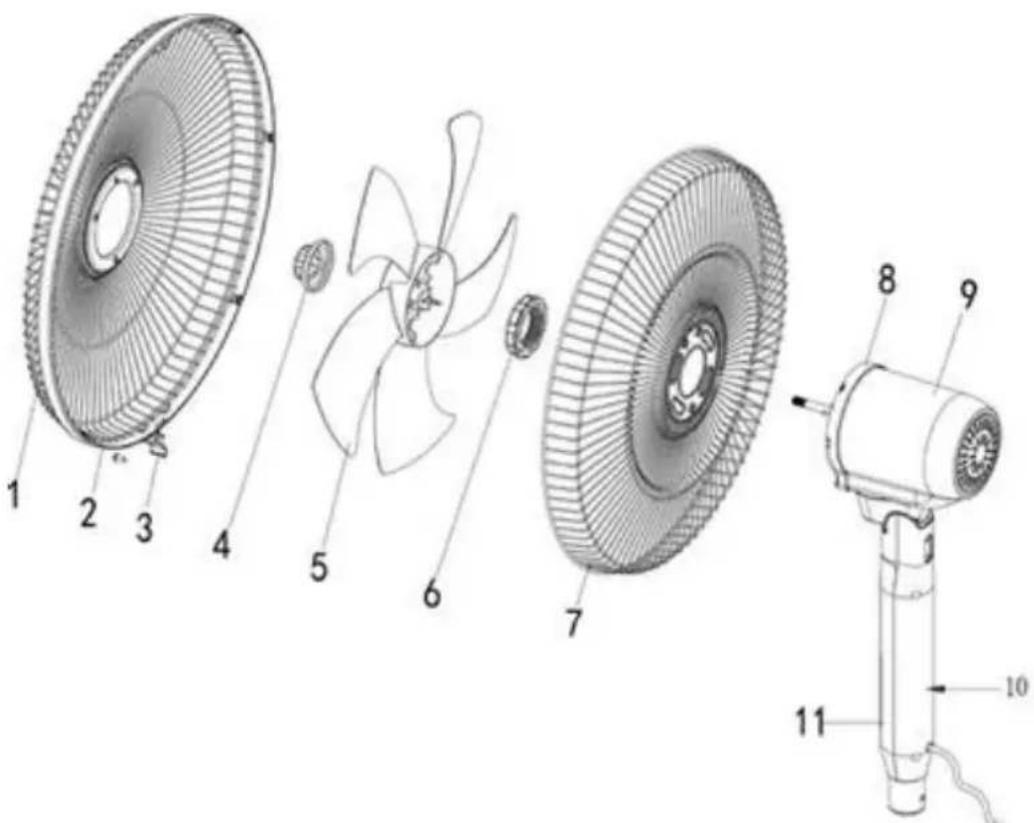
- Install the rear fan grille (7) on the motor shaft (8) and securely fasten the rear grille support nut (6).
- Fit the blades (5) and fasten the blades support nut (4).
CAUTION: The blade support nut bolts counterclockwise. - Install the front fan grille (1) and close the clips (3). Secure fasten the clip screw (2).
Standing fan assembly (single extension tube)
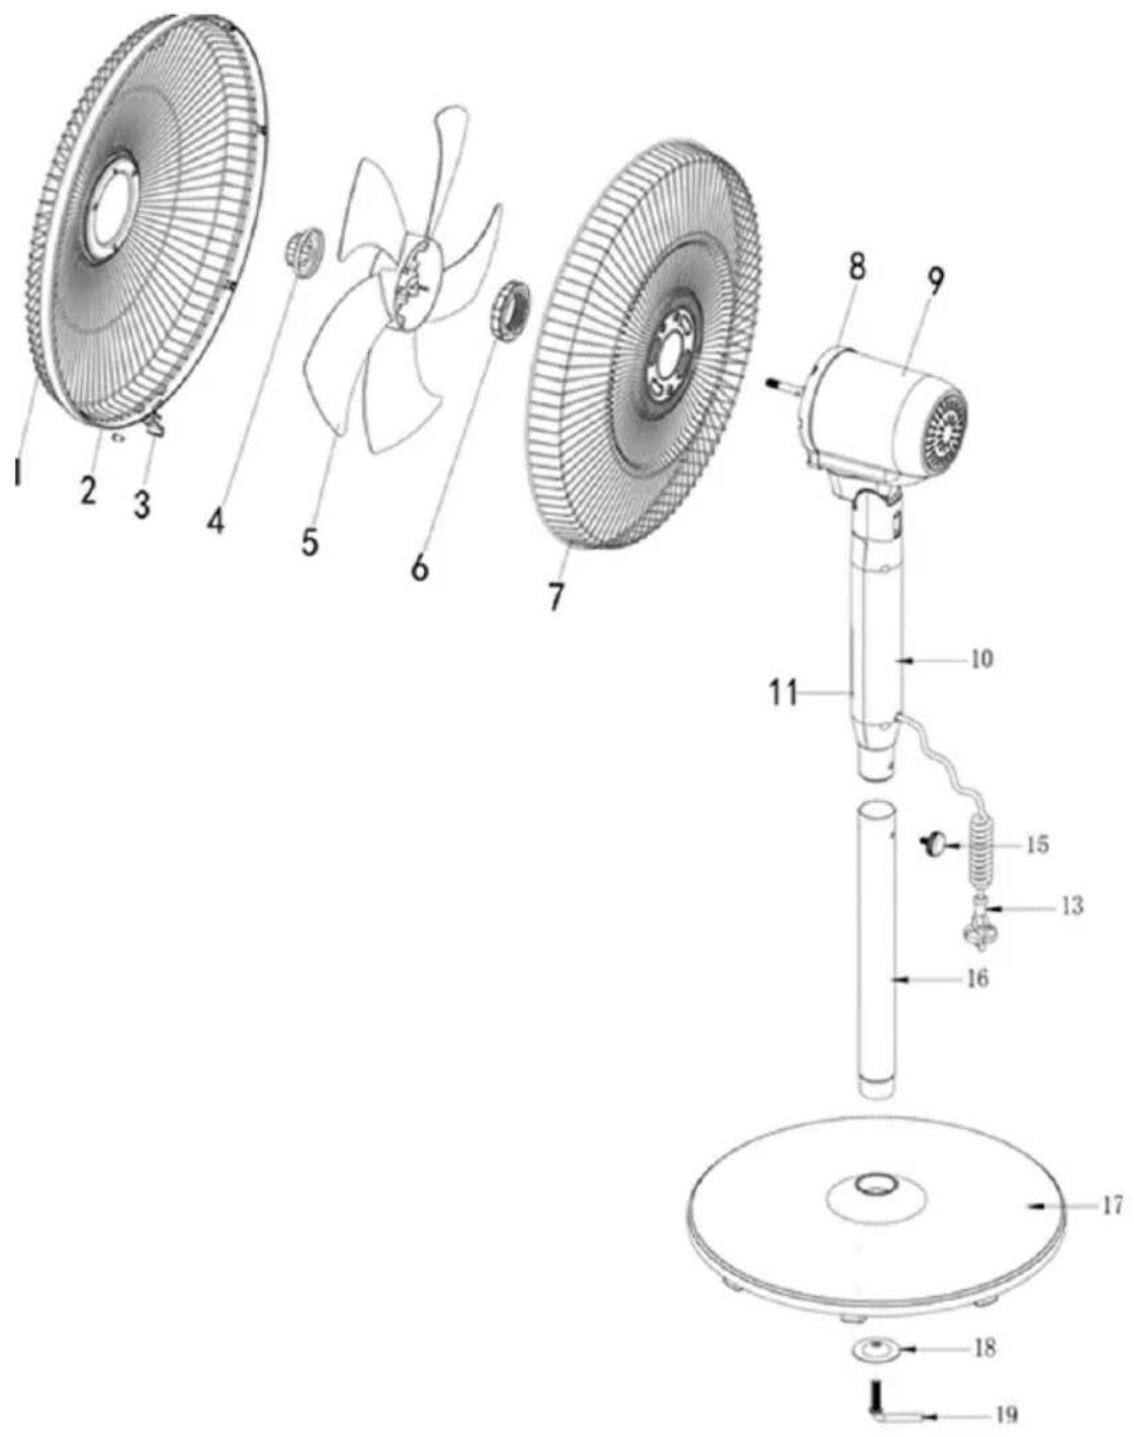
- Insert the extension tube (16) into the reception on the base (17).
- Insert the base gasket (18) and tighten the base screw "L" (19).
- Insert the support tube (10) into the extension tube socket (16).
- Screw in the tube mounting screw (15).
Standing fan assembly (double extension tube)
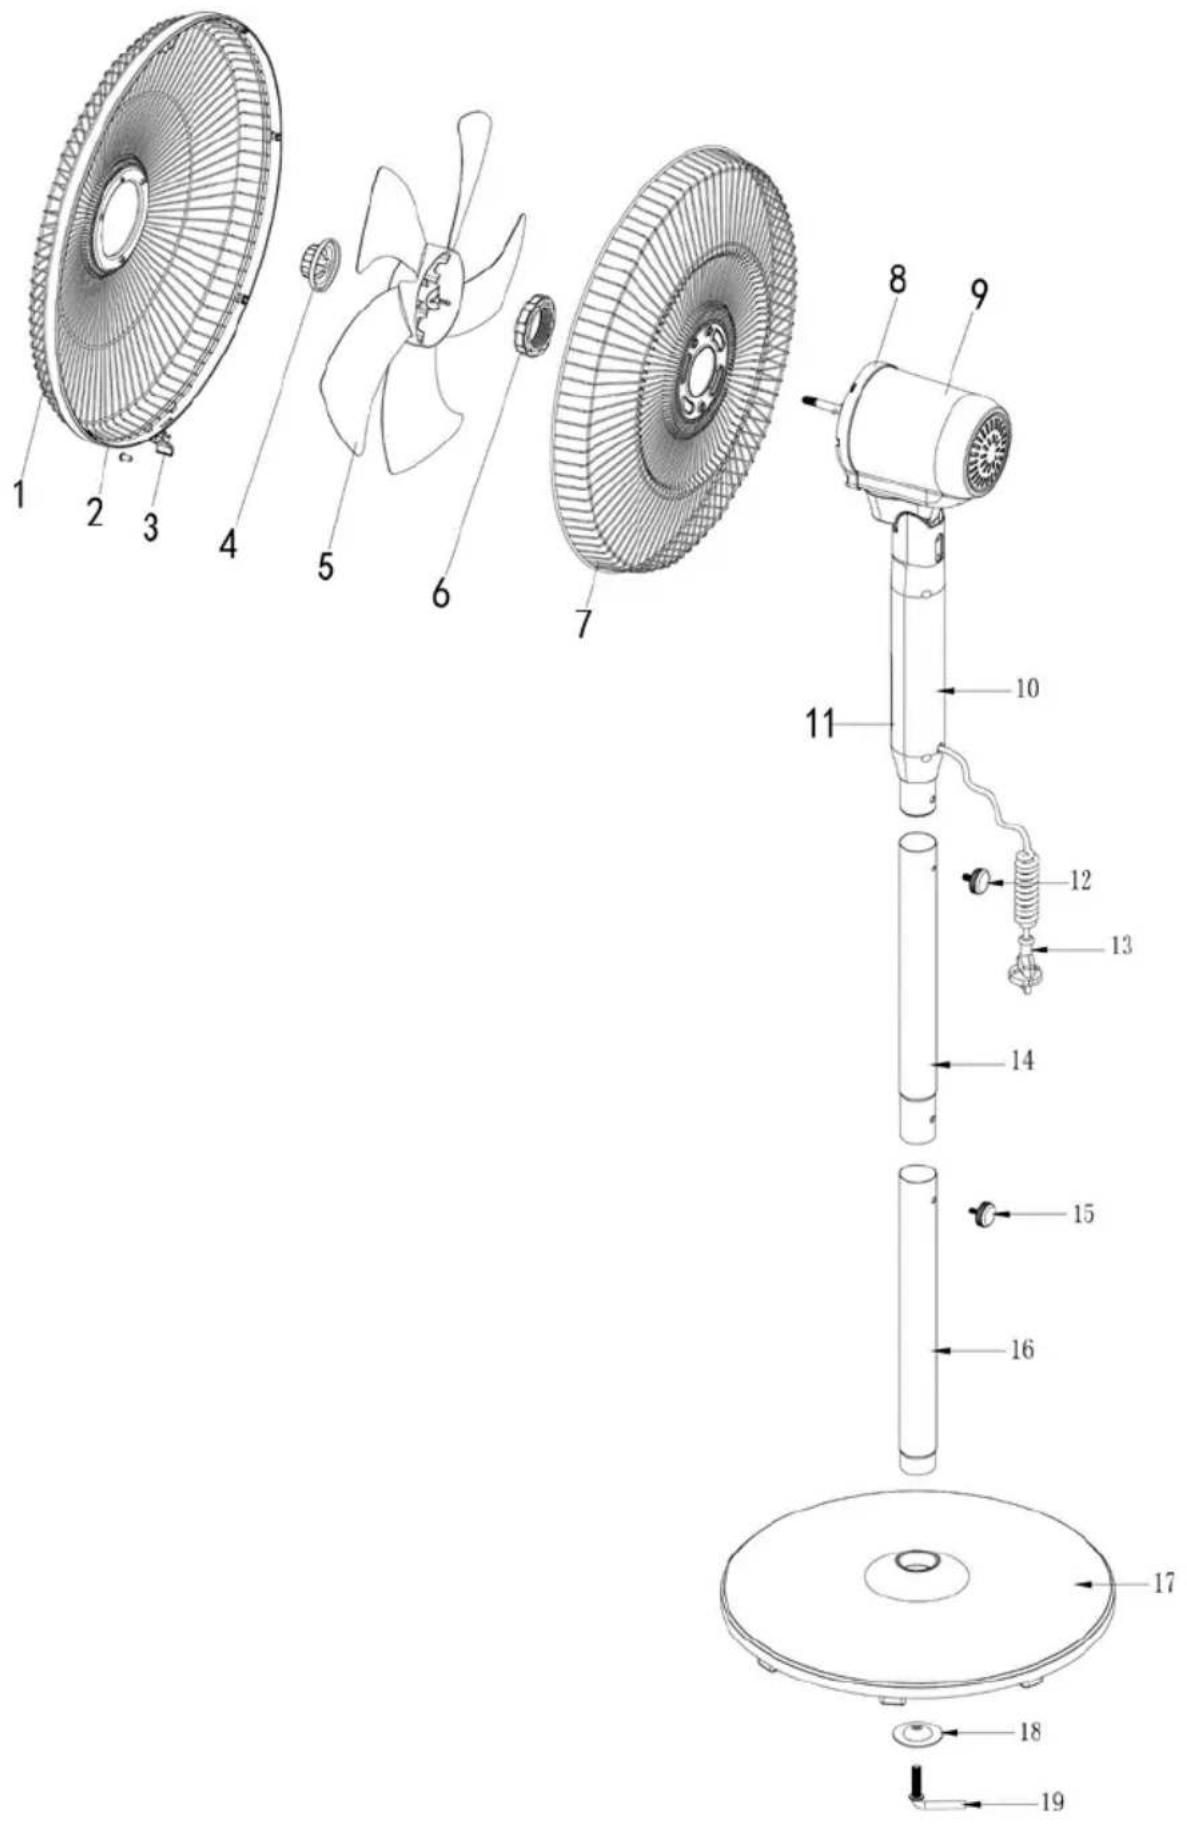
- Insert the extension tube (16) into the reception on the base (17).
- Insert the base gasket (18) and tighten the base screw "L" (19).
- Insert the extension tube (14) into the reception of the extension tube (16).
- Screw in the tube mounting screw (15).
- Insert the support tube (10) into the reception of the extension tube (14).
- Screw in the tube mounting screw (12).
Table fan assembly
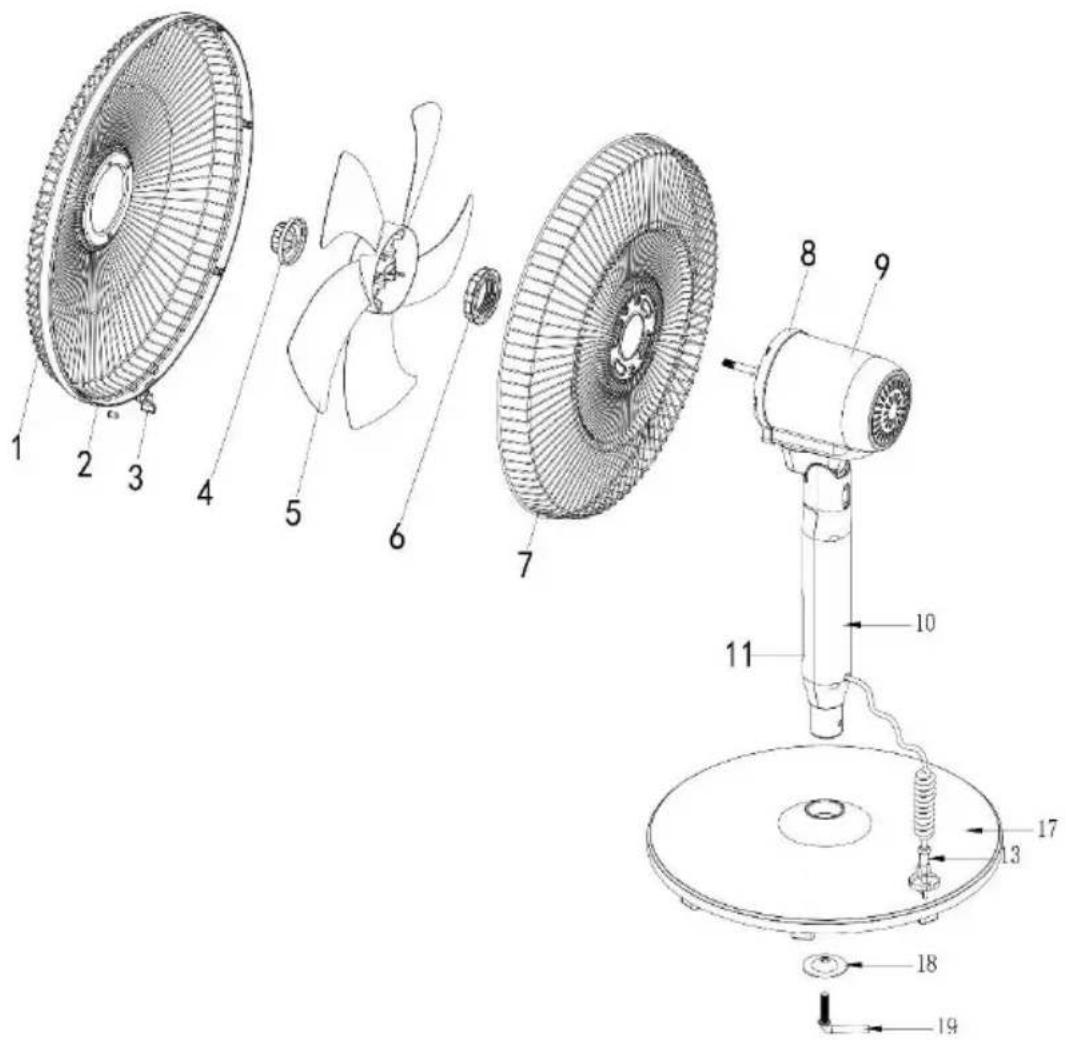
- Insert the support tube (10) into the reception on the fan base (17).
- Insert the base gasket (18) and tighten the base screw "L" (19).
Using the Fan
CAUTION:
- Before using, make sure that all parts of the device are properly assembled and that there are no parts that have been damaged.
-
Always place the device on a flat, dry and stable surface. There is a risk of damage if it is not installed on a flat and level surface.
-
Plug in the appliance.
- Press the power button (22) on the control panel or the power button (26) on the remote control.
- Press consecutively the speed control button (21) on the control panel or the speed control button (25) on the remote control. The display will show the speeds:
F1 - Low speed
F2 - Middle speed
F3 – High speed
-
Press the oscillation button (20) on the control panel or the oscillation button (28) on remote control. Press again to stop oscillation.
-
Adjust the desired angle by moving the head up or down respectively.
-
Press the power button (22) on the control panel or the power button (26) on the rer control to turn off the appliance.
-
Disconnect from the power outlet when not in use.
Timer Setting
Setting (through control panel)
- While the fan is on, press the oscillation button (20) for 3 consecutive seconds until the timer indicator (24) illuminates at the bottom of the control panel and the display (23) flashes.
- Press consecutively the oscillation button (20) until the desired time (1-18 hours) of the fan is displayed on the display screen (23). The display will stop flashing and the fan will operate for the hours you have set.
- When the time you set is complete, the fan will automatically stop working.
- Disconnect from the power outlet when not in use.
Setting (through remote control)
- Press the timer button (27) while the fan is on. The timer indicator (24) will illuminate at the bottom of the control panel and the display (23) will flash.
- Press repeatedly until the desired time (1-18 hours) of the fan is displayed on the display screen (23). The display will stop flashing and the fan will operate for the hours you have set.
- When the time you set is complete, the fan will automatically stop working.
- Disconnect from the power outlet when not in use.
Care and Cleaning
- Switch off and unplug the appliance before cleaning.
-
Do not disassemble the fan to clean it.
-
At regular intervals, clean the main body of the appliance with a soft cloth and dry thoroughly.
- Never use highly corrosive or abstractive cleaning agents. Never use metal brushes or sponges for cleaning and do not immerse the appliance in water.
• To ensure that the air circulates properly on the motor, keep the air outlets at the rear of the motor clean.
Storage
- Switch off and unplug the appliance before storing it.
- Store the appliance in a dry place without humidity.
- Before using the appliance for a long time, make sure it is clean and dry.
- Store the appliance where it is not reachable by children.
Technical Specifications
Model: Fan 3 in 1 IZ9007
Voltage: AC 220\~240V
Frequency: 50/60Hz
Rated input: 70W
Safe Appliance Disposal
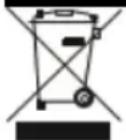
At the end of its working life, the product must not be disposed of as urban waste. It must be taken to a special local authority differentiated waste collection centre or to a dealer providing this service. Disposing of a household appliance separately avoids possible negative consequences for the environment and health deriving from inappropriate disposal and enables the constituent materials to be recovered to obtain significant savings in energy and resources.
As a reminder of the need to dispose of household appliances separately, the product is marked with a crossed-out wheeled dustbin.
Guarantee & Customer Service
- BENRUBI Company guarantees its products for any manufacturing defect or defective materials for a period of two (2) years from the date of purchase or delivery by present purchase receipt. If your product malfunctions or you find any defects, please revert to the retail location you have purchased it from or contact an authorized BENRUBI Service Centre. To find the nearest authorized BENRUBI Service Centre, visit our website www.benrubi.gr. It is in the discretion of BENRUBI Company to replace or repair the defective product.
- The warranty does not cover damages resulting from normal wear, breakage, scaling, improve installation or maintenance of the product, mishandling, abnormal working conditions, failure to implement the instructions, conversion or repair of the product by an unauthorized technician who does not belong to the BENRUBI Service Centers.
Also, the warranty does not cover the following indicative factors:
• Stains, discoloration or scratches.
- Burns due to exposure to heat or flame.
- Damage from thermal shock (sudden temperature change or change of voltage).
FOR MORE INFORMATION CONTACT:
(NEW) H. BENRUBI & FILS SA
27 Aghiou Thoma str, GR15124, Maroussi – Athens
Tel.: 210 6156400, Fax: 210 6199316, e-mail: benrubi-sda@benrubi.gr


- Safety Interlocks
- When using electrical appliances, basic safety precautions should always be followed:
- SAVE THESE INSTRUCTIONS
- Parts of the Appliance
- Control panel
- Remote control
- Fan Assembly
- Standing fan assembly (single extension tube)
- Using the Fan
- CAUTION:
- Timer Setting
- Setting (through control panel)
- Setting (through remote control)
- Care and Cleaning
- Storage
- Technical Specifications
- Safe Appliance Disposal
- Guarantee & Customer Service
Brand : Izzy
Model : IZ-9007
Category : Household Fan