
KH-6I38CS00-EU - Cooker SHARP - Free user manual and instructions
Find the device manual for free KH-6I38CS00-EU SHARP in PDF.


| Product Type | Freestanding Electric Cooker |
| Brand | Sharp |
| Model | KH-6I38CS00-EU |
| Overall Dimensions (H x W x D) | 850 mm x 600 mm x 600 mm |
| Oven Capacity | 65 L |
| Oven Type | Multifunction Electric |
| Hob Type | Ceramic Glass Induction |
| Number of Cooking Zones | 4 |
| Power Supply | 230 V / 50 Hz |
| Rated Power | 10.5 kW |
| Energy Efficiency Class (Oven) | A |
| Oven Functions | Convection, Grill, Fan Grill, Defrost, Top Heat, Bottom Heat |
| Cleaning Type | Enamel Interior, Easy-Clean Glass Door |
| Safety Features | Child Lock, Automatic Shut-off, Residual Heat Indicator, Cool Touch Door |
| Weight | 45 kg |
| Color | Stainless Steel / Black |
| Spare Parts Availability | Heating Elements, Control Board, Glass Top, Door Hinges |
| Repairability Index | 7.5 / 10 |
Frequently Asked Questions - KH-6I38CS00-EU SHARP
User questions about KH-6I38CS00-EU SHARP
0 question about this device. Answer the ones you know or ask your own.
Ask a new question about this device
Download the instructions for your Cooker in PDF format for free! Find your manual KH-6I38CS00-EU - SHARP and take your electronic device back in hand. On this page are published all the documents necessary for the use of your device. KH-6I38CS00-EU by SHARP.
USER MANUAL KH-6I38CS00-EU SHARP
GB-Declaration of conformity
We declare that our products meet the applicable European Directives, Decisions and Regulations and the requirements listed in the standards referenced.
natural_image
Symbol of a trash bin crossed with no text or labels, representing waste sorting or disposal (no text present)GB: The symbol on the product or on its packaging indicates that this product may not be treated as household waste. Instead it shall be handed over the applicable collection point for recycling of electrical and electronic equipment. By ensuring this product is disposed of correctly, you will help prevent potential negative consequences for the environment and human health, which could otherwise be caused by inappropriate waste handling of this product. For more detailed information about recycling this product, please contact your local city offices, your household waste disposal service or the shop where you purchased the product.
natural_image
Simple line drawing of a cooking pot on a surface (no text or symbols)KORREKTE
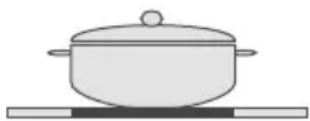
E GABUAR
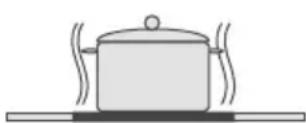
KORREKTE E GABUAR

Kursim Energjie


natural_image
Two technical line drawings of a square plate with a spiral pattern, shown from different angles (no text or symbols)

natural_image
Two isometric line drawings of a square frame with a spiral base, no text or symbols present.Монтажна конзола
natural_image
Simple line drawing of a cooking pot with a lid and a handle, placed on a flat surface (no text or symbols)TNĚ
Energeticky úsporné


natural_image
Pure electrical circuit lines without any symbols

natural_image
Two isometric line drawings of a square frame with a spiral base, no text or symbols present.Installationsadvarsler
BESKRIVELSE AF KOGEPLADEN
Kære kunde,
natural_image
Pure electrical circuit lines without any symbolsKontrolpanel
Induktionsvarmelegeme
INSTALLATION AF APPARATET
ADVARSEL:

natural_image
Two technical line drawings of a square panel with different top and bottom views, no text or symbols present.Monteringsbeslag til bordplade
Appliance description.
Cooking surface and control panel of heaters
Operation of the appliance
Switching the appliance on and off
Switching the cooking-zones on and off
Smart Pause
Residual heat indicator.
Safety switch off function
Child Lock
Timer function
Buzzer
Boost Function
Switching the bridge zone on
Special cooking function
Hints and tips
Installation of the appliance
Installation safety
Fitting the hob into a worktop
Making an electrical connection
Electrical connection diagram
SAFETY WARNINGS
READ THESE INSTRUCTIONS CAREFULLY AND COMPLETELY BEFORE USING YOUR APPLIANCE, AND KEEP THEM IN A CONVENIENT PLACE FOR REFERENCE WHEN NECESSARY.
THIS MANUAL IS PREPARED FOR MORE THAN ONE MODEL. YOUR APPLIANCE MAY NOT HAVE SOME OF THE FEATURES THAT ARE EXP-LAINED IN THIS MANUAL. WHILE YOU ARE READING THE OPERATING MANUAL, PAY A SPECIAL ATTEN-TION TO THE EXPRESSIONS THAT HAVE IMAGES.
General Safety Warnings
- This appliance can be used by children aged from 8 years and above and persons with reduced physical, sensory or mental capabilities or lack of experience and knowledge if they have been given supervision or instruction concerning use of the appliance in a safe way and understand the hazards involved. Children should not play with the appliance. Cleaning and user
maintenance shall not be done by children without supervision.
- WARNING: The appliance and its accessible parts become hot during use. Care should be taken to avoid touching the heating elements. Children under the age of 8 should stand away from the appliance unless continuously supervised.
- WARNING: Unattended cooking on a hob with fat or oil can be dangerous and may result in fire. NEVER try to extinguish a fire with water. Switch off the appliance and cover the flame e.g. with a lid or a fire blanket.
- WARNING: Danger of fire: do not store items on the cooking surfaces.
- WARNING: If the sur-
face is cracked, switch the appliance off to avoid the possibility of electric shock.
- For induction hobs, metallic objects such as knives, forks, spo-ons and lids should not be placed on the hob surface since they can become hot.
- For induction hobs, after use, switch off the hob element by using its control and do not rely on the pan detector.
- For hobs incorporating a lid, any spillage should be removed from the lid before opening. Additionally, the hob surface should be allowed to cool before closing the lid.
- The appliance is not intended to be operated by means of an external timer or separate remote-control
system.
- Do not use harsh abrasive cleaners or sharp metal scrapers to clean the oven door glass and other surface since they can scratch the surface, which can cause the glass to shatter or cause damage to the surface.
- Do not use steam cleaners to clean the appliance.
- Your appliance is produced in accordance with all applicable local and international standards and regulations.
- Maintenance and repair work must be carried out only by authorized service technicians. Installation and repair work that is carried out by unauthorized technicians may endanger you. Altering or modifying the specifications of the appliance in any way is hazardous.
- Prior to installation, ensure that the local distribution conditions (nature of the gas and gas pressure or electricity voltage and frequency) and the requirements of the appliance are compatible. The requirements for this appliance are stated on the label.
- CAUTION: This appliance is de-
signed only for cooking food and is intended for indoor domestic household use only and should not be used for any other purpose or in any other application, such as for non-domestic use or in a commercial environment or room heating.
- All possible security measures have been taken to ensure your safety. Since the glass may break, you should be careful while cleaning it to avoid scratching. Avoid hitting or knocking on the glass with accessories.
- Ensure that the supply cord is not wedged during the installation. If the supply cord is damaged, it must be replaced by the manufacturer, its service agent or similarly qualified persons in order to prevent a hazard.
Installation Warnings
- Do not operate the appliance before it is fully installed.
- The appliance must be installed by an authorized technician and put into use. The manufacturer is not responsible for any damage that might be caused by defective placement and installation by unauthorized persons.
- When you unpack the appliance, make sure that it was not damaged during transportation. In the event of any defect; do not use the appliance and contact a qualified service agent immediately. As the materials used for packaging (nylon, staplers, styrofoam... etc.) may cause harmful effects to children, they should be collected
and disposed of immediately.
- Protect your appliance against atmospheric effects. Do not expose it to effects such as sun, rain, snow etc.
- The surrounding materials of the appliance (cabinet) must be able to withstand a temperature of a min. of 100°C. The temperature of the bottom surface of the hob may increase during operation. Therefore, a board must be installed underneath the product.
- During use
- Do not put flammable or combustible materials, in or near the appliance when it is in operation.
- Do not leave the cooker while co-oking with solid or liquid oils. They may catch fire as a result of extreme heating. Never pour water on to flames that are caused oil. Cover the saucepan or frying pan with its cover to choke the flame that has arisen in this case and turn the cooker off.
• Always position pans over the centre of the cooking zone, and turn the handles to a safe position so they cannot be knocked or grabbed. - If you are not going to use the appliance for a long time, remove the plug from the socket. Keep the main control switched off. Additionally, when not using the appliance, shut the gas valve off.
- Make sure the appliance control knobs are always in the "0" (stop)
position when it is not being used.
•
During cleaning and maintenance
- Always turn the appliance off before operations such as cleaning or maintenance. You can do it after removing the plug for the appliance off or turning the main switches off.
- Do not remove the control knobs to clean the control panel.
• TO MAINTAIN THE EFFICIENCY AND SAFETY OF YOUR APPLIANCE, WE RECOMMEND YOU ALWAYS USE ORIGINAL SPARE PARTS AND ONLY CALL OUR AUTHORIZED SERVICE AGENTS SHOULD SUCH A NEED ARISE.
DESCRIPTION OF THE HOB
Dear Customer,
Please read the instructions in this user guide before using the hob and keep them for future reference.
Cooking Surface for 4 heaters:

Note: The appearance of your hob may be different than the model shown above due to its configuration.
Control Panel for 4 heaters:

1- Heater display
2- Upper left heater selection
3- Timer display
4- Timer
5- Key lock indicator
6- Smart Pause
7- Lower left heater selection
8- Sliding Buttons
9- Lower right heater selection
10- Boost
11- On/Off
Use the induction cooking zones with suitable cookware.
After the power supply is turned on, all of displays light up for a moment. When this time is over, the hob goes into stand-by mode and is ready for operation.
The hob is controlled with electronic sensors which are operated by touching the related sensors. Each sensor activation is followed by a sound signal (buzzer).
Switching the appliance on:
Switch the hob on by pressing the ON/OFF key 📋 All heater displays show a static "0" and the bottom right dots blink. (If no cooking-zone is selected within 20 seconds, the hob will automatically turn off.)
Switching the appliance off:
Switch the hob off at any time by pressing 🔊.
The ON/OFF key 📋 always has priority in the switch off function.
Switching the cooking-zones on:
Press the heater selection key ☐ you wish to cook on. There is a static dot indication on the selected heater display and the blinking dot on all other displays switch off.
For the selected heater, you can set the heat level by touching the Sliding Buttons. The element is now ready to cook on. For quickest boil times, select the desired cooking level and then press the P key to activate the Boost function.
Switching the cooking-zones off:
If the cooking zone is hot, "H" will be displayed instead of "0".
Switching all the cooking-zones off:
To turn all the cooking zones off at once, press the 🔒 key.
In stand-by mode, an "H" appears on all cooking zones which are hot.
Residual heat indicator:
Residual heat indicator indicates that the ceramic glass has a dangerous touch temperature in the circumference of the cooking zone.
After switching off the cooking zone, the respective display displays an "H" until the assigned cooking zone temperature is in an uncritical level.
Safety switch off function:
Every cooking zone will be switched off after a defined maximum operation time if the heat setting is not modified. Every change in the cooking zone puts the maximum operation time back to the initial value of the operating time limitation. The maximum operation time depends on the selected temperature level.
Wait until the 'F' disappears for all zones, turn the hob on by touching and continue to use.

| Heat setting Safety switch off after | |
| 1 - 2 6 Hours | |
| 3 - 4 5 Hours | |
| 5 4 Hours | |
| 6 - 9 1,5 Hours | |
Child Lock:
The child lock function can be activated after switching the control on. To activate the child lock, simultaneously press the right and the left side of the slider button and then operate the right side of the slider button again. "L" meaning LOCKED will appear in all heater displays and the control can not be changed. (If a cooking zone is in the hot condition, "L" and "H" will be displayed in alternation.)
The hob will remain in a locked condition until it gets unlocked, even if the control has been switched on and off.
To deactivate the child lock, first switch the hob on. Simultaneously press the right and the left of the slider button and then press left of slider button again. The "L" will disappear in the display and the hob will be switched off.
Key Lock
The key lock functionality is for blocking and setting the appliance into safe mode during operation.. Touch modifications as, for example, increasing heat settings and others should not be possible. Only switching the appliance off is possible.
The lock function becomes active if the Key Lock button 🔒 is pressed for at least 2 seconds. This operation is acknowledged by a buzzer. After a successful operation of more than 2 seconds, the Key Lock Indicator flashes and the heater becomes locked.
Timer function :
The timer function is carried out in two versions:
Minute minder timer (1 to 99 minutes):
The minute minder timer can be operated if the cooking zones are switched off. The timer display displays "00" with a blinking dot.
Use the Timer Sliding Buttons to increase/decrease the time. Adjustment range is between 0 and 99 minutes. If there
is no operation in 10 seconds, the minute minder timer will be set and the blinking dot will disappear. After the timer is set, the time runs down according to the adjustment.
When the time is over, a signal sounds and the timer display blinks. The sound signal will be stopped automatically after 30 seconds and/or by operating any key.
The minute minder timer can be changed or switched off any time by using the Timer Sliding Buttons 📁 Switching off the hob by touching at any time will also switch off the minute minder timer.
Cooking zone timer (1 to 99 minutes):
When the hob is switched on, an independent timer can be programmed for every cooking zone.
Select a cooking zone, then select the temperature setting and finally activate the timer setting
key 📁, the timer can be programmed as a switch off function for a cooking zone. Four LEDs are arranged around the timer. These indicate for which cooking zone the timer has been activated.
10 seconds after the last operation, the timer display changes to the timer that will run out next (in the event of programming more than 1 cooking zone).
When the timer has run down, a signal sounds and the timer display shows "00" statically, the assigned cooking zone timer LED blinks.
The programmed cooking zone will be switched off and the "H" will be displayed if the cooking zone is hot.
The sound signal and the blinking of the LED timer will be stopped automatically after 30 seconds and/or by operating any key.
Buzzer :
While the hob is in operation, the following activities will be signalled by means of a buzzer:
Normal key activation with a short sound signal
Continuous operation of keys over a longer period of time (10 seconds) with a longer, intermittent sound signal.
Boost Function:
A cooking zone has to be selected, cooking level set to the "desired cooking level" and the P (Boost) key has to be pressed again.
The Boost-Function can be activated if the induction module accepts the setting on this cooking zone. If the Boost Function is active, a "P" is displayed on the corresponding display.
Activating the booster can exceed the maximum power and the integrated power management will be activated.
The necessary power reduction is shown by the blinking of the
corresponding cooking zone display. Blinking is active for 3 seconds and allows further adaptations of the settings before power reduction.
Switching the bridge zone on
Touch the front left and rear left heater selection key simultaneously. There is a static dot indication on the left heaters displays and displays Show the 'b' and 'r'. Also, Touch the front right and rear right heater selection key simultaneously. There is a static dot indication on the right heaters displays and displays Show the 'b' and 'r'. And the blinking dot on the all other displays turned off.. Select the temperature setting by using the increase heat setting with right side of the sliding button or decrease heat setting with left side of the sliding button. The bridge element is ready to cook. For quickest boil time, select desired cooking level and then touch the P key to activate Boost function.
Switching the bridge zone off
Bridge left element shall be selected by pressing the rear left or front left heater selection key with using left side of the sliding button key, turn the level down to "0". If the bridge cooking zone is hot, "H" will be displayed. Also right bridge element shall be selected by pressing the rear right or front right heater selection key with using left side of the sliding button key, turn the level down to "0". If the bridge cooking zone is hot, "H" will be displayed.
Smart Pause
The Smart Pause, when activated, reduces the power of all burners that have been switched on.
If you then deactivate the Smart Pause, the heaters will automatically return to the previous level.
If the Smart Pause is not de-activated, the cooktop will turn off after 30 minutes.
Press (☐) to activate Smart Pause. The power for the activated heater(s) will reduce to level 1 and "II" will appear on all the displays.
Press ( ) again to deactivate Smart Pause. "II" will disappear and the heaters will now run at the level previously set.
HINTS AND TIPS
Cookware
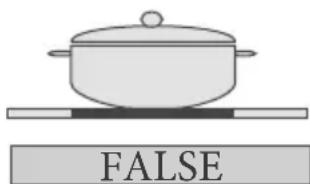
- Use thick, flat, smooth bottomed cookware, that has the same diameter as the element. This will help reduce cooking times.
- Cookware made of steel, enamelled steel, cast iron and stainless steel (if appropriately labelled by the manufacturer) will give you the best results.
- Cookware made of enamelled steel or aluminium or copper bottoms can cause a metallic residue to remain on the hob. If left, this becomes difficult to remove. Clean the hob after every use.
- Cookware is suitable for induction if a magnet sticks to the bottom of the cookware.
- The cookware must be placed centrally on the cooking zone. If it is not placed correctly, is displayed.
- When using certain pans, you may get various noises from the pans, this is due to the design of the pans and does not effect the performance or safety of the hob.



natural_image
Simple line drawing of a cooking pot with a tail and label 'SE' below (no text or symbols on the diagram itself)Energy saving
- Induction cooking zones adapt automatically to the size of the cookware bottom up to a certain limit. However, the magnetic part of the cookware bottom must have a minimum diameter depending upon the size of the cooking zone.
- Place the cookware on the cooking zone before it is switched on. If it is switched on before putting any cookware on it, the cooking zone will not operate and the control display shows.
- Use a lid to reduce cooking time.
- When liquid comes to the boil, reduce the temperature setting.
- Minimize the amount of liquid or fat to reduce cooking times.
- Select the proper temperature setting for the cooking applications.
Examples of cooking applications
The information given in the following table is for guidance only.
| Settings Use for | |
| 0 | Element off |
| 1-3 | Delicate warning |
| 4 - 5 | Gentle simmering, slow warning |
| 6 - 7 | Reheating and rapid simmering |
| 8 | Boiling, sauté and searing |
| 9 | Maximum heat |
| P | Boost function |
Cleaning tips
- Do not use abrasive pads, corrosive cleaners, aerosol cleaners or sharp objects to clean the surfaces of the hob.
- To remove burnt food, soak it off with a damp cloth and washing-up liquid.
- You may use a scraper for cleaning food or residues. Sticky foods must be cleaned immediately when they spill, before the glass has cooled down.
- Be careful not to scratch the silicon adhesive placed on the edges of the glass whilst using a scraper.
- The scraper has a razor, therefore, it must be kept away from children.
- Use a special ceramic hob cleaner on the hob while it is warm to touch. Rinse and wipe dry with a clean cloth or paper towel.
INSTALLATION OF THE APPLIANCE
WARNING:
The electrical connection of this hob should be carried out by a qualified electrician, according to the instructions in this guide and in compliance with the current regulations. In the event of any damage that occurs as a result of improper connection or installation, the warranty will not be valid. This appliance must be grounded.
Installation safety
- Any overhanging surface should be at least 65cm above the hob.
- Extractor fans must be fitted in accordance with the manufacturer's instructions.
- The wall in contact with the rear of the hob must be made of flameproof material.
- The power cable length should not exceed 2 metres.
Fitting the hob into a work surface
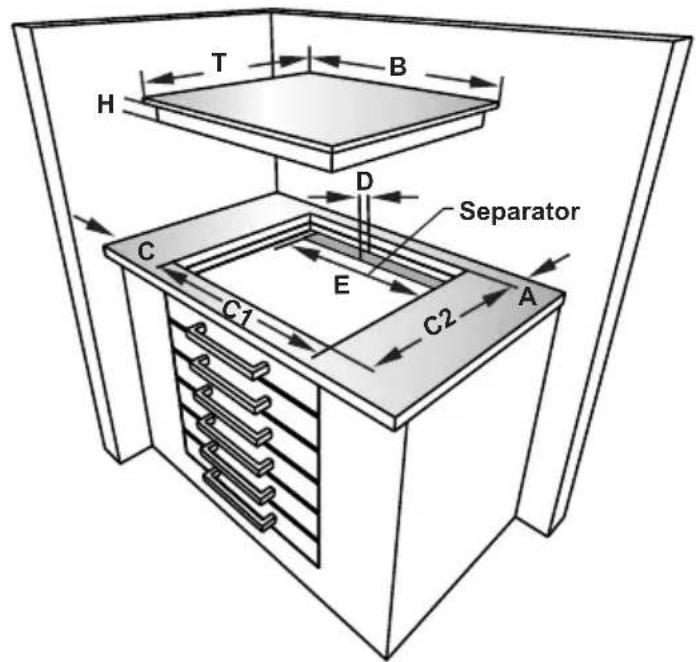
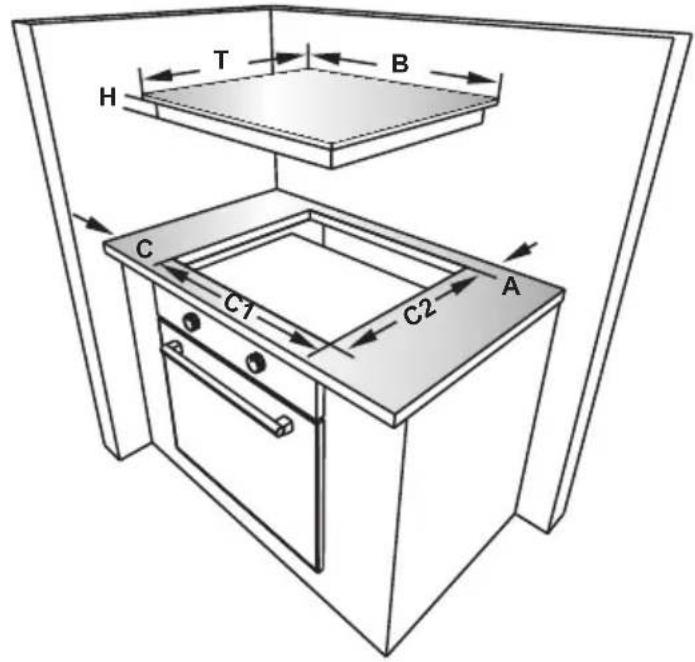
- The hob can be inserted into any worktop provided it is heat resistant up to at least 90°C.
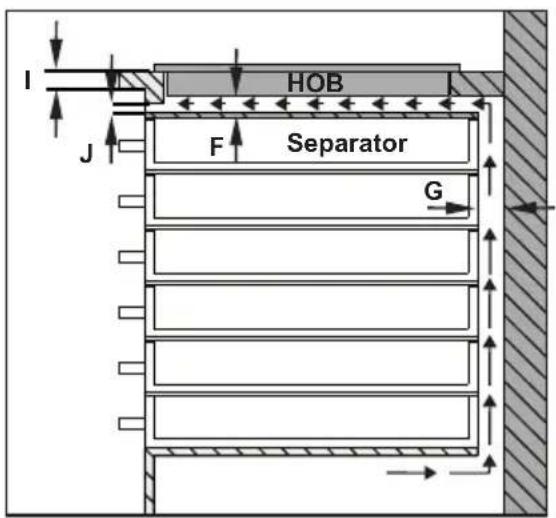
- Create an opening with the dimensions shown in the picture below and on the next page.
- The induction hob may be built in 25 to 40mm thick worktops.
| B (mm) 59 | 0 min. A (mm) 50 | |
| T (mm) 52 | 0 min. C (mm) 50 | |
| H (mm) 56 | min. E (mm) 500 | |
| C1 (mm) 5 | 60 min. F (mm) 10 | |
| C2 (mm) 4 | 90 G (mm) 20 | |
| D (mm) | 50 | I (mm) |
| J (mm) | 5 |


· Apply one-sided self-adhesive sealing tape supplied all the way round the lower glass edge of the cooking surface along the outer edge of the glass ceramic panel. Do not stretch it.
- Screw the 4 worktop mounting brackets on the side walls of the product.
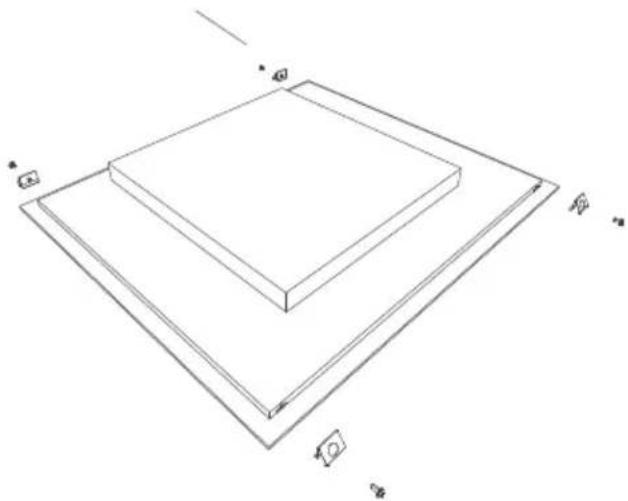
natural_image
Isometric line drawing of a square with two horizontal layers, no text or symbols present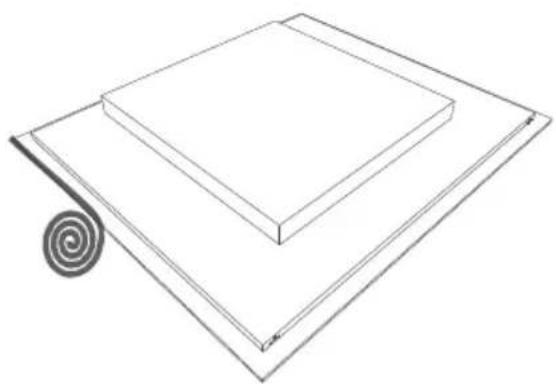
natural_image
Simple line drawing of a square block placed on two planes with a spiral pattern on the left (no text or symbols)Making an electrical connection
Before making a connection, check that:
The voltage power supply is the same as that quoted on the rating plate which is situated at the back of your hob.
The circuit can support the appliance load (see the rating plate).
The power supply has a grounded connection connection, which complies with the provisions of current regulations and is in good working order.
The fused switch is easily accessible once the hob has been installed.
If there is no dedicated hob circuit and fused switch, they must be installed by a qualified electrician before the hob is connected.
An approved suitable cable must be connected from the Consumer Unit (main fuse box) and be protected by its own 50amp fuse or Micro Circuit Breaker (MCB). The electrician must provide a fused all pole switch, which disconnects both the line (live) and neutral conductors with a contact separation of at least 3.0 mm.
The fused switch should be fitted to the kitchen wall, above the work surface and to the side of the hob, not above it, in accordance with IEE regulations. Connect the fused switch to a junction box which should be fitted on the wall about 61cm (24 inches) above floor level and behind the hob. The hob's power supply cable can then be connected. Connect one end to the junction box and connect the other end to the hob's power connection box which is
located at the back of the hob. Remove the cover of the power connection box and install the cable, in accordance with the connection diagram.
The power supply cable must be positioned away from direct heat sources. It should not be to a temperature rise of more than 50^ C above room temperature.

flowchart
graph TD
    subgraph Left_Circuit
        N1["+"] --> L3["+"]
        N2["+"] --> L2["+"]
        PE1["+"] --> L1["+"]
        PE2["+"] --> L1["+"]
        PE3["+"] --> L1["+"]
        PE4["+"] --> L1["+"]
    end
    subgraph Right_Circuit
        N5["+"] --> L5["+"]
        PE5["+"] --> L5["+"]
        PE6["+"] --> L5["+"]
        PE7["+"] --> L5["+"]
        PE8["+"] --> L5["+"]
        PE9["+"] --> L5["+"]
    end
    style Left_Circuit fill:#f9f,stroke:#333
    style Right_Circuit fill:#bbf,stroke:#333
For the induction hob, the cable must be H05VV-F 3X2,5 mm² 60227 IEC 53 ••. You will find the connection diagram shown on the bottom of your appliance.
ERROR CODES
If there is an error, error code will be showed at heater displays.
E1: The cooling Fan is disabled, call an authorized service agent.
E3: The power supply voltage is over the rated values, turn the hob off by touching 📋, wait until “H” disappears for all zones, turn the hob on by pressing 📋 and continue
to use. If same error appears, call an authorized service agent.
E4 : Supply frequency is different from the rated values, turn the hob off by touching 📋, wait until “H” disappears for all zones, turn the hob on by pressing 📋 and continue to use. If same error appeals, plug off/on turn the hob on by pressing 📋 continue to use it. f same error appears, call an authorized service agent.
E5: The hob inside temperature is too high, turn the hob off by pressing let the heaters cool down.
E6 : Communication error between touch control and heater, call an authorized service agent.
E7 : The coil temperature sensor is disabled, call an authorized service agent.
E8: The cooler temperature sensor is disabled, call an authorized service agent.
E9 : Calibration error, call an authorized service agent.

Service & Support
Visit Our Website
sharphomeappliances.com
52288042


- GB-Declaration of conformity
- Kursim Energjie
- Energeticky úsporné
- Installationsadvarsler
- BESKRIVELSE AF KOGEPLADEN
- INSTALLATION AF APPARATET
- ADVARSEL:
- SAFETY WARNINGS
- General Safety Warnings
- Installation Warnings
- - During use
- During cleaning and maintenance
- DESCRIPTION OF THE HOB
- Switching the appliance on:
- Switching the appliance off:
- Switching the cooking-zones on:
- Switching the cooking-zones off:
- Switching all the cooking-zones off:
- Residual heat indicator:
- Safety switch off function:
- Child Lock:
- Key Lock
- Timer function :
- Minute minder timer (1 to 99 minutes):
- Cooking zone timer (1 to 99 minutes):
- Buzzer :
- Boost Function:
- Switching the bridge zone on
- Switching the bridge zone off
- Smart Pause
- HINTS AND TIPS
- Cookware
- Energy saving
- Examples of cooking applications
- Cleaning tips
- INSTALLATION OF THE APPLIANCE
- WARNING:
- Installation safety
- Fitting the hob into a work surface
- Making an electrical connection
- ERROR CODES
- Service & Support
Brand : SHARP
Model : KH-6I38CS00-EU
Category : Cooker