
WRC2 - Network switch Mercury - Free user manual and instructions
Find the device manual for free WRC2 Mercury in PDF.


| Product Type | Network Switch |
| Brand | Mercury |
| Model | WRC2 |
| Number of Ports | 8 |
| Port Speed | 10/100/1000 Mbps (Gigabit) |
| Switching Capacity | 16 Gbps |
| MAC Address Table Size | 8K |
| Network Standards | IEEE 802.3, 802.3u, 802.3ab, 802.3x |
| Dimensions (W x D x H) | 170 x 100 x 30 mm |
| Weight | 0.3 kg |
| Power Supply | External AC/DC adapter, 5V/1A |
| Power Consumption | ≤ 5W |
| LED Indicators | Power, Link/Act per port |
| Data Transfer Mode | Store-and-forward |
| Auto MDI/MDIX | Yes, on all ports |
| Operating Temperature | 0°C to 40°C |
| Storage Temperature | -10°C to 70°C |
| Operating Humidity | 10% to 90% non-condensing |
| Certifications | CE, FCC, RoHS |
| Package Contents | Switch, Power Adapter, User Manual |
| Maintenance | Clean with a soft, dry cloth |
| Safety | Keep away from water and moisture; use only supplied adapter |
| Spare Parts & Repairability | Power adapter available; device is not user-serviceable |
Frequently Asked Questions - WRC2 Mercury
User questions about WRC2 Mercury
0 question about this device. Answer the ones you know or ask your own.
Ask a new question about this device
Download the instructions for your Network switch in PDF format for free! Find your manual WRC2 - Mercury and take your electronic device back in hand. On this page are published all the documents necessary for the use of your device. WRC2 by Mercury.
USER MANUAL WRC2 Mercury
natural_image
Line drawing of two identical electrical outlets with three square outlets and a remote control unit (no text or symbols)Wireless Remote Control Mains Sockets - Set of 2
Order ref: 350.117UK
User Manual
Leaving an appliance in standby can still consume up to 70% of full power and can shorten the life of the appliance by 15%. These adaptors can be controlled individually by the remote supplied. Ideal for a wide variety of electrical appliances and a great solution for controlling appliances in inaccessible places, or for people with limited mobility.
Specification:
| Quantity in set | 2 sockets, 1 remote |
| Voltage | 240Vac, 50Hz |
| Max. load | 3120W per socket |
| Max. current | 13A per socket |
| Standby power | 0.6W |
| Transmission frequency | 433.92MHz |
| Remote: range | Up to 30m (clear line of sight) |
| Remote: battery | 12V, 23A |
| Socket: dimensions | 83 x 58 x 56mm |
| Remote: dimensions | 84 x 39 x 18.8mm |
| Weight | 225g (set) |
Features:
- Reduces fire risk and protects your appliances
- Remote control operates up to 30m away from socket
- Sockets are pre-programmed with remote control supplied for instant use
• Additional sockets and remotes can be added using self-learning function - Reduces your household energy costs and carbon footprint
Operation:
All socket receivers have been pre-programmed to the supplied remote and can be used immediately. To re-program the remote control with any receiver socket, please follow the instructions below:
1) Plug the socket in, then press and hold the program/on/off button on the side of the unit until the LED indicator begins blinking.
2) Press the On or Off button of the desired number on the remote.
3) The socket should now be programmed with the desired number on your remote and the indicator light will stop blinking. Note: It is also possible to program multiple sockets to the same remote or to program up to 3 remotes to a single socket by using the same procedure above.
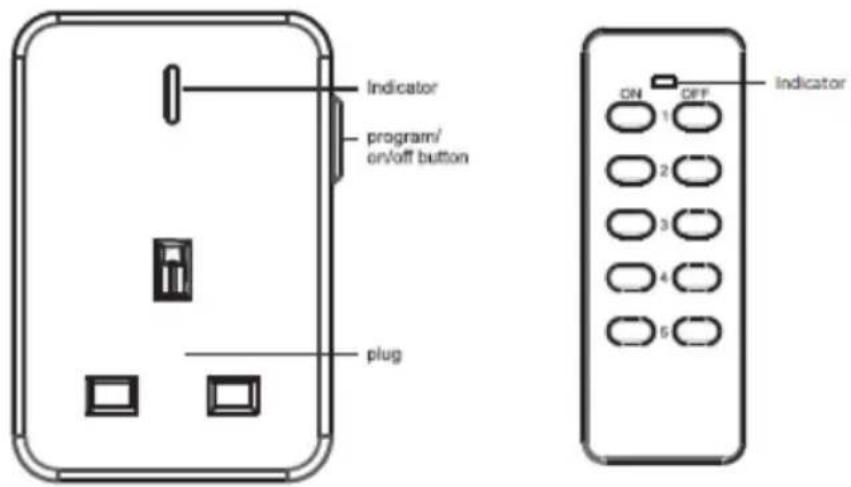
Un-programming a socket from a remote is also possible by unplugging the socket from the mains. Press and hold the program/on/off button on the side of the socket while plugging it back in, keep the button pressed for around 5 seconds until the LED indicator begins to flash. Finally release the button to finish the reset and the LED indicator should stop flashing.
Troubleshooting:
- If the socket is unresponsive to the remote control, please refer to the Un-programming a socket and Re-programming operation sections in the manual above.
- If sockets are not responding correctly or the LED indicator on the remote control becomes dim, then the battery should be changed at the earliest possible opportunity. Install the 12V (23A) battery in the battery compartment; making sure the polarity is the correct way around. Always dispose of old batteries with consideration for the environment.
• Make sure the socket and device are properly connected and powered on.
• Make sure that the socket is placed in an area with proper air circulation without overheating.
Warning:
- For reasons of electrical safety, this socket must never be immersed in water, exposed to damp conditions or excessive force.
• Do not use this product if you find that it is damaged in any way. - Never exceed the maximum load current.
- Do not attempt to repair this product or take it apart under any circumstances, as this will invalidate your warranty.

This product is classed as Electrical or Electronic equipment and should not be disposed with other household or commercial waste at the end of its useful life. The goods must be disposed of according to your local council guidelines.
Errors and omissions excepted.
Copyright© 2021 AVSL Group Ltd, Unit 2 Bridgewater Park,
Taylor Road, Trafford Park, Manchester. M41 7JQ.
AVSL (Europe) Ltd, Unit 3D North Point House, North Point Bus. Park, New Mallow Road, Cork, Ireland.
Brand : Mercury
Model : WRC2
Category : Network switch