
ML2TSTie7 - Uncategorized DIMPLEX - Free user manual and instructions
Find the device manual for free ML2TSTie7 DIMPLEX in PDF.


| Product Type | Electric Heater |
| Brand | Dimplex |
| Model | ML2TSTie7 |
| Dimensions (H x W x D) | 30 cm x 20 cm x 15 cm |
| Weight | 2.5 kg |
| Power Supply | 220-240 V ~ 50 Hz |
| Power Consumption | 1500 W |
| Heating Type | Fan-forced convection |
| Thermostat Control | Adjustable thermostat with frost protection |
| Fan Settings | 2 speed settings (Low/High) |
| Safety Features | Overheat protection, tip-over switch |
| Installation | Freestanding or wall-mounted (bracket included) |
| Operation | Manual controls on unit |
| Maintenance | Clean with soft dry cloth; do not use abrasive cleaners |
| Spare Parts Availability | Contact Dimplex customer service for replacement parts |
| Certifications | CE marked, compliant with EU safety standards |
| Warranty | 2 years (subject to terms) |
Frequently Asked Questions - ML2TSTie7 DIMPLEX
User questions about ML2TSTie7 DIMPLEX
0 question about this device. Answer the ones you know or ask your own.
Ask a new question about this device
Download the instructions for your Uncategorized in PDF format for free! Find your manual ML2TSTie7 - DIMPLEX and take your electronic device back in hand. On this page are published all the documents necessary for the use of your device. ML2TSTie7 by DIMPLEX.
USER MANUAL ML2TSTie7 DIMPLEX
Designed to provide gentle background heating, to take the chill off a room. Ideally to be used with a principal source of heating.
As with all portable heating appliances: This product is suitable only for well insulated spaces or occasional use.
Installation and Operating Instructions
IMPORTANT: THESE INSTRUCTIONS SHOULD BE READ CAREFULLY BEFORE USE AND RETAINED FOR FUTURE REFERENCE
IMPORTANT SAFETY ADVICE
WARNING: To avoid danger of suffocation please remove all packaging materials particularly plastic and EPS and keep these away from vulnerable people, children and babies.
WARNING: To avoid the risk of accidental strangulation from the supply cord all children and vulnerable people must be supervised when in the vicinity of the product whether it is working or not.
DO NOT pull, carry or move the appliance using the power cable.
DO NOT use the heater in the immediate surroundings of a bath, a shower or a swimming pool.
DO NOT place the heater directly below a fixed socket outlet.
The socket-outlet must be accessible at all times to enable the mains plug to be disconnected as quickly as possible.
WARNING: In order to avoid overheating, do not cover the heater.

This heater carries the warning symbol indicating that it must not be covered.
DO NOT cover or obstruct the air inlet and outlet openings in any way.
DO NOT use this heater in small rooms when they are occupied by persons not capable of leaving the room on their own, unless constant supervision is provided.
IMPORTANT: If the mains lead of this appliance is damaged, it must be replaced by the manufacturer or its service agent or a similarly qualified person in order to avoid a hazard.
CAUTION: In order to avoid a hazard due to inadvertent resetting of the thermal cut-out, this appliance must not be supplied through an external switching device, such as a timer, or connected to a circuit that is regularly switched on and off by the utility.
This appliance can be used by children aged from 8 years and above and persons with reduced physical, sensory or mental capabilities or lack of experience or knowledge if they have been given supervision or instruction concerning the use of the appliance in a safe way and understand the hazards involved. Children shall not play with the appliance. Cleaning and user maintenance shall not be made by children without supervision.
Children of less than 3 years should be kept away unless continuously supervised.
Children aged from 3 years and less than 8 years shall only switch on/off the appliance provided that it has been placed or installed in its intended normal operating position and they have been given supervision or instruction concerning the use of the appliance in a safe way and understand the hazards involved. Children aged from 3 years and less than 8 years shall not plug in, regulate and clean the appliance or perform user maintenance.
CAUTION: Some parts of this product can become very hot and cause burns. Particular attention has to be given where children and vulnerable people are present.
DO NOT use this heater if it has been dropped. DO NOT use if there are visible signs of damage to the heater.
Use this heater on a horizontal and stable surface with the feet securely fitted or fix to the wall as applicable.
WARNING: To reduce risk of fire, keep textiles, curtains, or any other flammable material a minimum distance of 1m from the appliance.
WARNING: Risk of fire - Do not use this appliance connected through an extension lead or any external switching device such as a plug in timer or remote control plug in adaptor. All heating appliances draw high current through the mains supply and any weakness in the design, connections or components in these devices can easily result in overheating of the connection points resulting in melting, distortion and even the risk of fire!
DO NOT use the heater on deep pile carpets or the long hair type of rugs, or less than 750mm (30") away from any overhanging surface. Keep combustible materials such as drapes and other furnishings clear from the front, sides and rear of the heater. Do not use heater to dry your laundry.
DO NOT operate the heater with the mains lead overhanging the outlet grill.
DO ENSURE that the mains lead cannot be tripped over.
If the radiator is tipped over, unplug it and allow it to cool before standing it back up.
IMPORTANT: The feet supplied with the appliance must be used.
This instruction leaflet belongs to the appliance and must be kept in a safe place. If changing owners, the leaflet must be surrendered to the new owner.
All Dimensions in millimetres
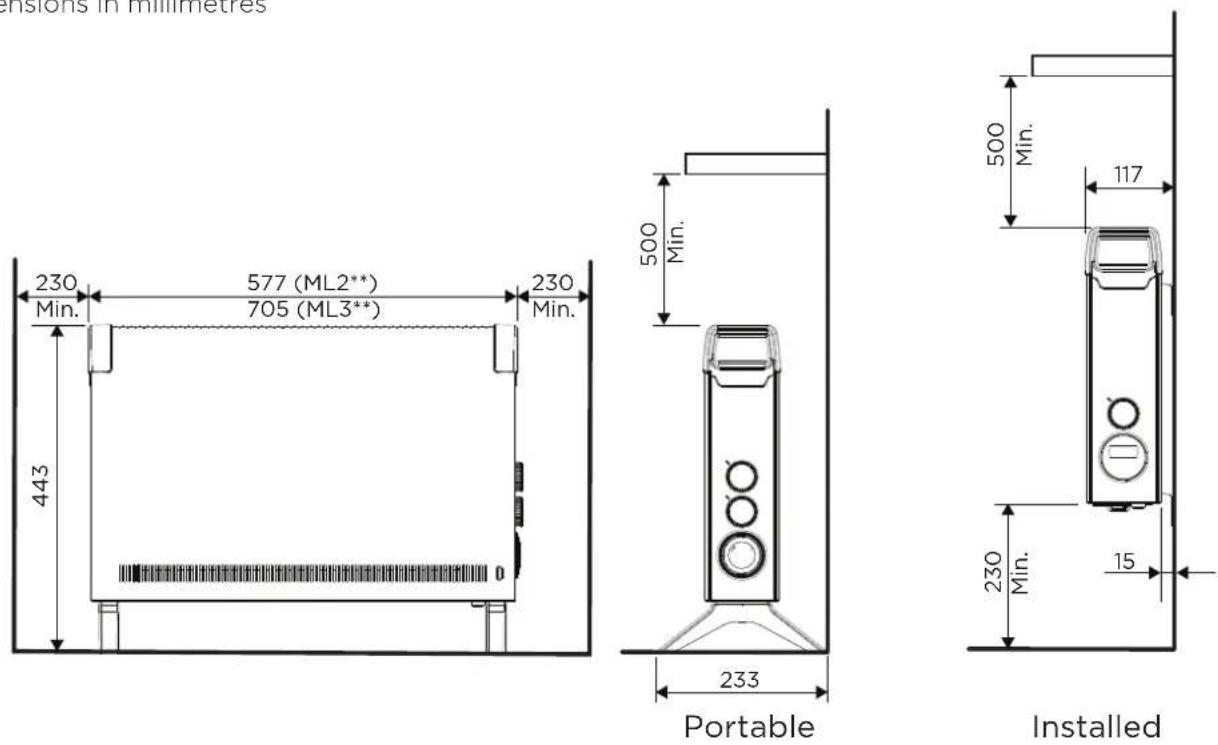
Fig. 1
Technical Data
| Model Identifier(s): ML2TSTie7 ML2TSFTie7 ML3TSTie7 ML3TSFTie7 | ||||||
| Specification | ||||||
| Electronic Time & temperature control Yes Yes Yes Yes | ||||||
| Turbo Fan No Yes No Yes | ||||||
| Heat Selection Yes Yes Yes Yes | ||||||
| Feet for portable use Yes Yes Yes Yes | ||||||
| Wall mountable Yes Yes Yes Yes | ||||||
| Heat output | ||||||
| Nominal heat output | Pnom | 2.0 | 2.0 | 3.0 | 3.0 | kW |
| Minimum heat output (indicative) | Pmin | 1.2 | 1.2 | 2.0 | 2.0 | kW |
| Maximum continuous heat output | Pmax,c | 2.0 | 2.0 | 3.0 | 3.0 | kW |
| Auxiliary electricity Consumption | ||||||
| At nominal heat output | elmax | 0.0 | 0.0 | 0.0 | 0.0 | kW |
| At minimum heat output | elmin | 0.0 | 0.0 | 0.0 | 0.0 | kW |
| In standby mode | eISB | 0.0 | 0.0 | 0.0 | 0.0 | kW |
| Type of heat output/ room temperature control | ||||||
| With electronic room temperature control plus day timer | Yes | Yes | Yes | Yes | ||
| Contact details | UK: Glen Dimplex UK Ltd., Millbrook House, Grange Drive, Hedge End, Southampton SO30 2DFROI: Glen Dimplex Europe Limited, Airport Road, Cloghran, County Dublin, K67 VE08 | |||||
Electrical Connection
WARNING: THIS APPLIANCE MUST BE EARTHED
DO NOT use an extension lead or multi-plug adaptor when connecting this product to the mains. Connection through these devices could lead to risk of overloading, overheating and even fire at the extension lead or adaptor due to inadequate connection quality.
This heater must be used on an AC (-) supply only and the voltage marked on the heater must correspond to the supply voltage. This heater is fitted with a rewirable plug incorporating a 10/13 amp fuse. In the event of replacing the fuse in the plug supplied, an equivalent 10/13 amp fuse approved by ASTA to BS 1362 must be used. If any other type of plug is used, a 15 amp fuse must be fitted in the plug, the adaptor, or at the distribution board.
IMPORTANT: If the plug is not suitable for your socket, the 13 amp plug should be removed. Before wiring the appropriate plug, please note that the wires in this mains lead are coloured in accordance with the following code:
GREEN AND YELLOW: EARTH
BLUE:
NEUTRAL
BROWN:
LIVE
Connect the GREEN AND YELLOW wire to the terminal marked 'E' or by the earth symbol ⏻, or coloured GREEN or GREEN AND YELLOW. Connect the BROWN wire to the terminal marked 'L' or coloured RED. Connect the BLUE wire to the terminal marked 'N' or coloured BLACK.
General
The heater is designed for operation on an AC electricity supply, and is suitable for use in domestic dwellings and similar indoor locations.
The heater is supplied with feet and wall brackets to provide the customer with the flexibility to choose between portable or installed use. A rotary selector switch provides the ability to select between Lo and High heat output, each model contains a seven day electronic timer with an integrated room sensing thermostat. It is supplied with a cord and plug and is ready for use once the feet have been fitted or the heater is mounted correctly.
Assembly and Positioning
The ML Convector can be used as a portable heater or can be installed.
For portable use, always ensure that the heater is stood on a firm, level base near to, but not directly underneath a suitable mains supply socket.
Ensure that curtains and furniture are not positioned close to the chosen position.
We recommend that the heater should be wall-mounted in rooms where children may be left unattended, see 'Important Safety Advice'.
If young children, the aged or infirm are likely to be left in the vicinity of the heater, we advise that the adequate precautions should be taken. We recommend that a guard be fitted to ensure contact with the heater is avoided and objects cannot be inserted into the product.
WARNING: PLEASE ENSURE THE MINIMUM CLEARANCE DIMENSIONS INDICATED IN Fig.1 ARE MAINTAINED
WALL MOUNTING
The brackets for wall mounting the heater are supplied fitted to the base of the heater. To wall mount the appliance, first remove the brackets as follows:
Lay the heater on its back and remove the screw holding the brackets in place. The brackets can then be removed from the heater.
Select a suitable position on a wall, close to a suitable power socket, making sure that the minimum clearances outlined in Fig.1 are maintained.
The position of the top two wall mounting brackets can be marked using the dimensions included in Fig.2 for reference. Drill and fix the top two brackets to the wall using suitable screw fixings.
Locate the heater on the top brackets and allow it to hang in place. Fit the bottom bracket into the slot in the heater and then mark and fix it to the wall.
Note: The heater should be hanging on the top brackets with the bottom bracket in position before the bottom bracket is fixed to the wall.
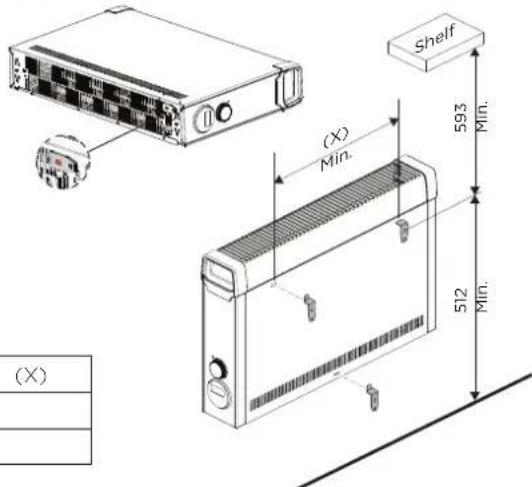
Fig. 2
| (X) | |
| ML2*** 358 | |
| ML3*** 478 |
PORTABLE USE
WARNING The heater must only be operated with the feet securely fitted and in the upright position.
Never use the heater as a portable appliance without the feet securely fitted using the screws provided.
To assemble the feet, lay the heater on its back and remove the wall mounting brackets - see Fig.3, these can be discarded or stored for future use.
Remove the two foot fixing screws, highlighted in Fig.3. Assemble the feet by pressing them firmly into the convector body as indicated in Fig.3, the foot should clip into position.
Secure using the foot fixing screw,
Return the convector to the upright position,
The appliance is now ready for use.
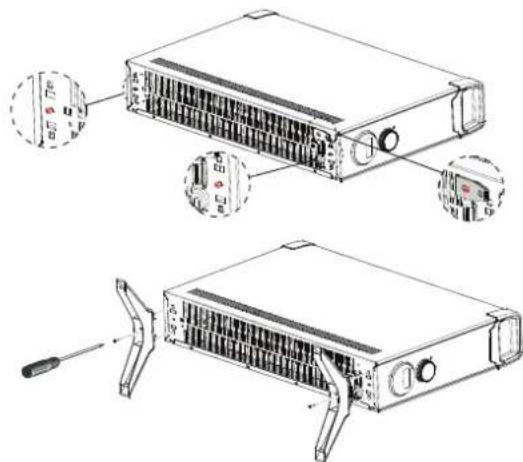
Fig. 3
Operation
IMPORTANT - OBJECTS OR CLOTHING MUST NOT BE PLACED ON THIS HEATER.
Before using the heater ensure that all warnings and instructions have been carefully read.
To activate the heater, after installation or assembly, simply plug it in.
Note: The element has been coated with a protective film which will burn off during the first few minutes of use, this may cause a small amount of fuming. This is quite normal - the fumes are non-toxic and will quickly disappear.
We recommend that you open a window to ventilate the room when using the heater for the first time.
CONTROL KNOB (SWITCH)
All models are fitted with a rotary control knob and an electronic timer/thermostat control unit, see Fig 4. The heat output along with the turbo fan (selected models) are controlled via the control knob. The electronic control unit offers a programmable automatic seven day time and temperature operation mode or a manual mode for room temperature control.
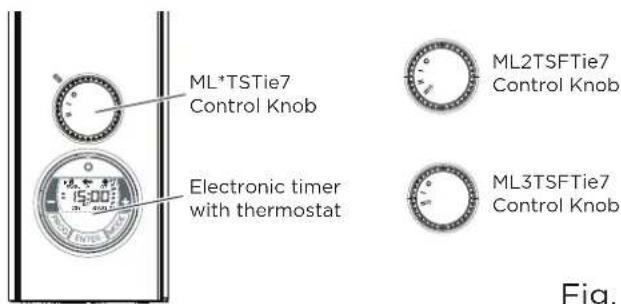
Fig. 4
Depending on the model the options available on the control knob may vary, see Fig.4. The following table explains the operation of each knob position.
| Mode Operation | |
| ○ | Off |
| I | Low heat |
| II | High heat |
| II※ | High heat with turbo fan |
ELECTRONIC CONTROL (TIMER)
The product is equipped with an electronic control unit, consisting of a display, a heat indicating LED and five keys. The unit has two principle operating modes, AUTO and MANUAL, to offer flexibility to the user. AUTO mode will operate a user programmed time and temperature profile. MANUAL mode is a continuous operating mode that will allow the user to set and maintain a constant room temperature.
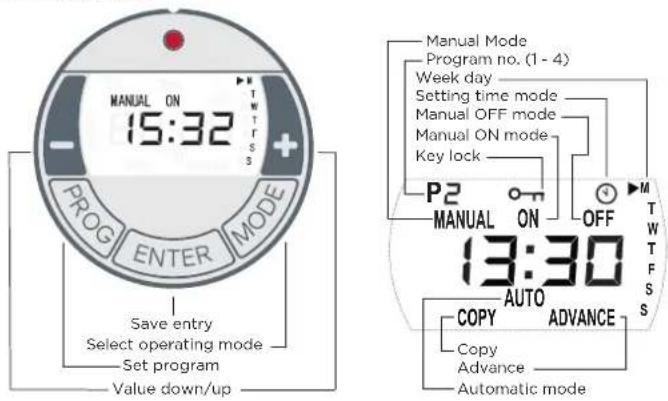
Fig.5
Setting time and weekday
To set the time and day complete the following steps:
- Press and hold the PROG key for three seconds. The clock symbol appears on screen with the hours display flashing.
- Use the + / - keys to set the hours and press the ENTER key. to confirm selection, The minutes display will begin flashing.
- Use the + / - keys to set the minutes. Press the ENTER key to conform selection, the week day will begin flashing.
- Use the + / - keys to set the day and confirm selection using the ENTER key.
• The CLOCK symbol disappears. Setting is complete.
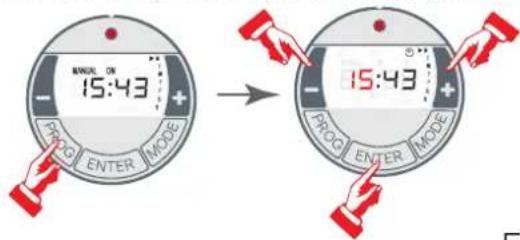
Fig. 6
OPERATING MODES
To select or toggle through the operating modes press the MODE key, see Fig.7. The available operating modes are a follows:
Auto/timer operation
The heater will control the room temperature in accordance with the user determined time and temperature schedule. Up to four heating programs can be set for each day. The required On/Off time along with the room temperature can be specified for each heating program.
When this mode has been activated AUTO is visible on the display.
Manual Mode/Changing the Temperature Select MANUAL ON or MANUAL OFF mode as desired using the MODE key (see Fig.7).
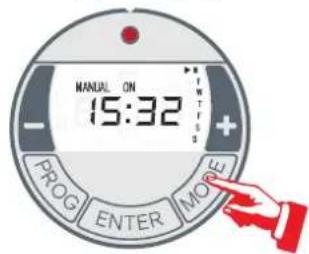
Fig. 7
MANUAL ON is a continuous 'On' operating mode and allows the user to specify the room temperature manually.
- Note: The heat output will switch on and off automatically to achieve and maintain the desired room temperature.
- Note: The desired room temperature can be changed at any stage by using the "+" or "-" keys (see Fig.8) but the product must be in MANUAL ON mode (not available in MANUAL OFF mode).
- Note: When in MANUAL ON mode the screen will toggle between the current time and the temperature setting
MANUAL OFF is a standby mode, the product remains energised and available to be activated.
Depending on the mode which is activated MANUAL ON or MANUAL OFF will be visible on the display.
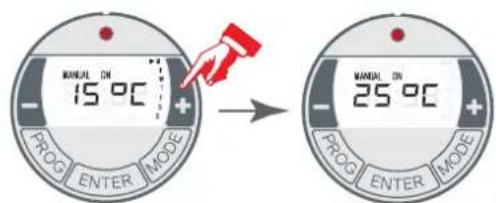
Fig. 8
Auto/timer mode
Select AUTO mode as desired using the MODE key.
Note: by default, no time and temperature profile have been specified. Prior to using AUTO mode a suitable time profile must be programmed.
Note: For extended operation, it is advisable to use the AUTO operating mode to reduce the operating costs.
Four time blocks for ON/OFF times and temperature set point are available for each of the seven days of the week.
These can be individual programmed for each week day.
For each block the user must specify an ON time, an OFF time and a desired room temperature.
Note: it is possible to programme overlapping time periods, the heater will always give priority to the period with the highest temperature setting.
During AUTO mode operation the user can alter the room temperature by pressing the -/+ key, this will only have a temporary effect and will not alter the program.
Programming Auto/timer profiles
To set up a time and temperature profile complete the following steps:
- Press the PROG key, the week day will begin to flash on screen. M represents Monday, T represents Tuesday, etc.
- Use the +/- keys to set the weekday for which the profile is being set and confirm using the ENTER key.
- The P1 'ON' time, hour will begin flashing on the screen, use the +/- and ENTER key to set the Hour and minutes time.
- The P1 'OFF' time must then be set using the same process as above.
- Once this is complete the room temperature must be set. Use the +/- keys to set the desired temperature and confirm using the ENTER key.
- The setup menu then enters P2 'ON' time, the process above can be repeated to set up the four programme blocks.
Note: To save the setup and exit, press the PROG key. It is not necessary to set up all the program blocks.
Copying Day programs
It is possible to copy day (P1-P4) programmes to alternative days.
To copy a day programme to another days, proceed as follows.
- From the Temperature Setting screen, for any of the Programme blocks (P1-P4), press and hold the ENTER key until COPY appears.
- Select the days you wish to paste the profile using the -/+ keys. To confirm days you wish to paste the profile to press the + key, if you do not wish to copy to a particular day, skip this day by pressing the - key.
- Both the - and the + keys will move the day forward to the next week day.
- Days selected to copy the profile to will be indicated by a solid triangle, see Wednesday, Thursday and Saturday in Fig. 9.
- Press the ENTER key to confirm the copy, COPY will flash three times to indicate the copy was successful.
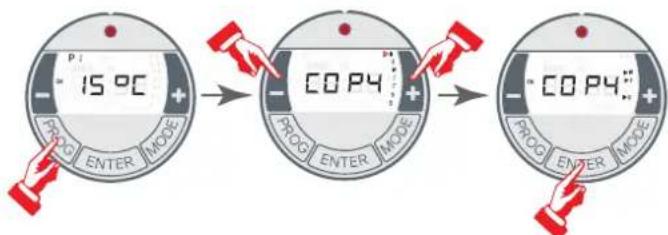
Fig. 9
Frost protection
In MANUAL OFF operating mode and AUTO operating mode (time block OFF), frost protection mode will activate if the room temperature is below 5°C, the heater will power up automatically to try and maintain a room ambient of approximately 5°C.
Adaptive start
The adaptive start function is applicable only to AUTO mode.
This function guarantees that the set room temperature is achieved exactly at the start of the switch-on time.
Example:
In the timer menu, a set room temperature of 22^ C is specified. The current room temperature is 17^ C. The heating device switches on early so that the specified room temperature of 22^ C is reached by 07:00.
The Product will automatically calculate the advance time required to achieve the temperature set in the schedule.
If adaptive start has not been activated the appliance will only turn on at the programmed ON time.
To Activate or Deactivate this mode, complete the following:
- From AUTO mode press and hold the - and the + keys for three seconds.
- ECO appears, use the + / - keys to activate and deactivate the function. The status is indicated by ON or OFF on the screen.
- Confirm setting using the ENTER key.
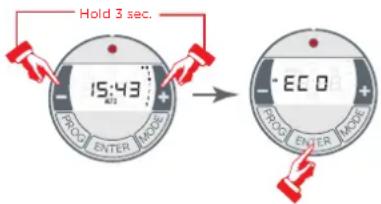
Fig. 10
Key lock
This function can be used to lock the controller keys. To activate the key lock press the ENTER and MODE keys simultaneously. The key lock symbol b- will illuminate on the screen.
To deactivate key lock press ENTER and MODE again.
Advance function
The advanced function can be used in AUTO mode to activate the next scheduled programme block (P1 - P4) early. To activate this mode, while in AUTO mode, press and hold the + key for three seconds. ADVANCE will illuminate on the screen.
To deactivate the ADVANCED function press and hold the + or - key again for three seconds.
Master reset function
If you hold PROG and ENTER and MODE buttons on power up, then release them when the LED comes on, the GP timer will reset all ON/OFF times to 00:00.
The reset should take approximately 3 seconds and the KEY LOCK function will be on when it is finished.
Use ENTER and MODE buttons together to turn off KEY LOCK function.
Safety Features
This appliance incorporates a number of safety devices. In addition to the 'Important Safety Advice' section your attention is drawn to the following:
SAFETY OVERHEAT PROTECTION
The heater is fitted with a thermal cutout which will switch off the heater should it overheat for any reason. If the thermal cutout operates, unplug the unit immediately. Allow the heater to cool down completely and remove the cause of the over heating.
TILT SWITCH
The product is fitted with a safety tilt switch which will prevent the heater from working if the heater is accidentally tipped over in any direction. If the heater is tipped over while it is hot, disconnect the power and allow it to cool, then stand the heater back upright. Reconnect the power - normal operation should be resumed.
Note: The tilt switch mechanism makes a muted rattling noise when the product is moved or tilted, this is not a fault, this noise is normal.
Additional
IMPORTANT NOTES
Although this heater is manufactured to comply with the relevant safety standards, certain types of carpets could become discoloured by the temperatures under a portable heater. If you are concerned about this, we recommend that you contact the carpet manufacturer for guidance. Alternatively, stand the heater on a suitable base to shield the carpet – call our Helpline for further advice.
You may notice some parts of the element appearing to be hotter from time to time because of the variable airflow through the heater. This does not cause a safety hazard.
The heat outlet grille may become discoloured with use - this is caused by airborne pollution and is not a fault.
TURBO FAN (SELECTED MODELS)
The turbo fan is used to boost the airflow around the room. This circulates the heat better and results in a reduced heat up time and a more even heat distribution.
The turbo fan is controlled by the Control knob.
STORAGE
If the heater is not required for long periods, for example during the summer, it should be stored in a dry place and preferably covered to prevent the accumulation of dirt and dust.
If left unplugged for a long duration, resetting the time and the programmed settings will be necessary.
CLEANING
WARNING - ALWAYS DISCONNECT THE POWER SUPPLY BEFORE CLEANING THE HEATER.
Do not use detergents, abrasive cleaning powder or polish of any kind on the body of the heater.
Allow the heater to cool, then wipe with a dry cloth to remove dust and a damp cloth (not wet) to clean off stains. Be careful not to allow moisture in to the heater.
RECYCLING
For electrical products sold within the European Community.
At the end of the electrical products useful life it should not be disposed of with household waste. Please recycle where facilities exist. Check with your
Local Authority or retailer for recycling advice in your country. If you don't intend to keep the packaging of this product for later use or storage, please dispose of it in an eco-friendly way, please dispose of it in your recycling bin or nearest recycling facility, thank you.
Guarantee
What does a Dimplex Guarantee cover?
Dimplex products deliver reliable service for normal, household use in domestic settings. All Dimplex products are individually tested before leaving the factory.
If you are a consumer and you experience a problem with your Dimplex product, which is found to be defective due to faulty materials or workmanship within the Guarantee Period, this Dimplex Guarantee will cover repair or - at the discretion of Dimplex - replacement with a functionally equivalent Dimplex product.
Your product is under Guarantee for 1 year from the date of purchase or the date of delivery of the product, if later. The 1 year Guarantee is extended for an additional 2 years when you register the product with Dimplex, within 28 days of purchase. If you do not register the product with Dimplex within 28 days, your product will remain warranted for 1 year only. To validate your extended Guarantee register with us online at: http://register.dimplex.co.uk. N.B. Each qualifying product needs to be registered with Dimplex individually. Please note that the extended Guarantee is only available in the UK and Ireland.
The Dimplex Guarantee is conditional upon you providing the original purchase receipt as proof of purchase. Please therefore retain your receipt as proof of purchase.
If you do experience a problem with your Dimplex product please call the Helpline on +44 [0]344 879 3588 or visit https://www.dimplex.co.uk/support. For ROI please email serviceireland@glendimplex.com or call +353(0)1 842 4833. We will need details of your Dimplex product and a description of the fault which has occurred. Once we receive your information and proof of purchase we will contact you to make the necessary arrangements. If your Dimplex product is not covered by this Dimplex Guarantee there may be a charge to repair your product. However, we will contact you for agreement to any charges before any chargeable service is carried out.
What is not covered by a Dimplex Guarantee?
The Dimplex Guarantee does not cover any of the following:
Any fault or damage to your Dimplex product due to faulty materials or workmanship occurring outside the Guarantee Period. Normal wear and tear including parts that might wear out over time or consumables, such as filters.
Any fault or damage occurring to any pre-owned Dimplex product or to any other equipment or property.
Accidental damage to your Dimplex product or damage to your Dimplex product from external sources (for example, transit, weather, electrical outages or power surges).
Fault or damage to your Dimplex product which is:
- Not due to faulty materials or workmanship or which is due to circumstances outside
Dimplex's control.
- Caused by use of your Dimplex product for anything other than normal domestic household purposes in the country where it was purchased.
- Caused by any misuse, abuse or negligent use of the Dimplex product, including but not limited to any failure to use it in accordance with the Operating Instructions supplied with the product.
- Caused by any failure to assemble, install clean and maintain your Dimplex product in accordance with the Operating Instructions supplied with the product unless this was carried out by Dimplex or its authorised dealers.
- Caused by repairs or alterations to your Dimplex product not carried out by Dimplex service personnel or its authorised dealer(s).
- Caused by use of any consumables or spare parts for your Dimplex product which are not Dimplex - specified.
Terms and Conditions
The Dimplex Guarantee is valid for 1 calendar year, plus 2 if registered, from the date of purchase of your Dimplex product from a recognised retailer in the country of purchase and use, or the date of delivery of the product if later, always provided the original receipt has been retained and is produced as proof of purchase.
You must provide to Dimplex or its authorised agents on request the original receipt as proof of purchase and - if required by Dimplex - proof of delivery. If you are unable to provide this documentation, you will be required to pay for any repair work required. Any repair work under the Dimplex Guarantee will be carried out by Dimplex or its authorised dealer(s) and any parts that are replaced will become the property of Dimplex. Any repairs performed under the Dimplex Guarantee will not extend the Guarantee Period.
The Dimplex Guarantee does not entitle you to recovery of any indirect or consequential loss or damage including but not limited to loss or damage to any other property.
The Dimplex Guarantee is in addition to your statutory rights as a consumer and your statutory rights are not affected by this Dimplex Guarantee.
Contact Dimplex A brand of the Glen Dimplex UK Limited, trading as Glen Dimplex Heating & Ventilation
If you have any questions about what the Dimplex Guarantee covers and does not cover or how to claim under the Dimplex Guarantee, please contact us: Glen Dimplex Heating & Ventilation, Grange Drive, Hedge End, Southampton SO30 2DF
Telephone: 0344 879 3588
Visit: www.dimplex.co.uk
- Installation and Operating Instructions
- IMPORTANT SAFETY ADVICE
- Electrical Connection
- WARNING: THIS APPLIANCE MUST BE EARTHED
- GREEN AND YELLOW: EARTH
- General
- Assembly and Positioning
- WALL MOUNTING
- PORTABLE USE
- Operation
- CONTROL KNOB (SWITCH)
- ELECTRONIC CONTROL (TIMER)
- OPERATING MODES
- Auto/timer operation
- Auto/timer mode
- Programming Auto/timer profiles
- Copying Day programs
- Frost protection
- Adaptive start
- Example:
- Safety Features
- SAFETY OVERHEAT PROTECTION
- TILT SWITCH
- Additional
- IMPORTANT NOTES
- TURBO FAN (SELECTED MODELS)
- STORAGE
- CLEANING
- RECYCLING
- Guarantee
- What does a Dimplex Guarantee cover?
- What is not covered by a Dimplex Guarantee?
- Terms and Conditions
Brand : DIMPLEX
Model : ML2TSTie7
Category : Uncategorized