
DSX 1000 - Network audio player Chord - Free user manual and instructions
Find the device manual for free DSX 1000 Chord in PDF.


| Product Type | Network Audio Player |
| Brand | Chord |
| Model | DSX 1000 |
| Dimensions (W x H x D) | 420 mm x 88 mm x 355 mm |
| Weight | 12 kg |
| Power Consumption | 30 W |
| Operating Voltage | 85-270 V AC, 50-60 Hz (auto-switching) |
| Harmonic Distortion | < -103 dB (1 kHz, 24-bit @ 44.1 kHz) |
| Signal-to-Noise Ratio | > 120 dB |
| Channel Separation | > 125 dB @ 1 kHz |
| Dynamic Range | 120 dB |
| Network Input | 1 x RJ45 100Base-T Ethernet |
| Digital Input | 1 x 75 Ω BNC (automatic switching) |
| Supported File Formats | WMA-9, MP3, AAC, Ogg Vorbis, ALAC, AIFF (up to 96 kHz), FLAC, WAV (up to 192 kHz) |
| Supported Sample Frequencies | 44.1, 48, 88.2, 96, 176.4, 192 kHz |
| Analogue Outputs (Line Level) | Stereo RCA Phono and balanced XLR (6 V rms balanced, 3 V rms unbalanced) |
| Analogue Outputs (Variable) | Stereo RCA Phono and balanced XLR with volume control |
| Output Impedance | 75 Ω |
| Headphone Output | 1/4" jack on front panel |
| Media Server Protocol | uPNP/DLNA |
| DAC Technology | FPGA-based, 5th generation Pulse Array DAC |
| Included Accessories | Remote control, power cord, RJ45 network cable, guarantee card |
| Web Configuration | Yes (via IP address in browser) |
| Standby Mode | Low power standby via remote control |
| Warranty | Manufacturer warranty (see registration card) |
Frequently Asked Questions - DSX 1000 Chord
User questions about DSX 1000 Chord
0 question about this device. Answer the ones you know or ask your own.
Ask a new question about this device
Download the instructions for your Network audio player in PDF format for free! Find your manual DSX 1000 - Chord and take your electronic device back in hand. On this page are published all the documents necessary for the use of your device. DSX 1000 by Chord.
USER MANUAL DSX 1000 Chord
natural_image
Exterior view of a silver audio workstation with a digital display and circular button (no visible text or symbols)CONTENTS
PRODUCT DESCRIPTION....3
INVENTORY....3
WHEN SETTING UP ....4
SAFETY WARNINGS....5
AC POWER CONNECTION....6
CONNECTING YOUR EQUIPMENT ....7
FRONT PANEL 8
REAR PANEL CONNECTIONS....8
NETWORK CONNECTION 9
OUTPUT CONNECTIONS....11
HEADPHONES....12
EVERYDAY USE OF YOUR DSX1000....12
USER MENUS....13
SETTINGS MENU....19
FAVOURITES MENU....21
USING THE FRONT PANEL CONTROL 22
USING THE REMOTE CONTROL....23
PLAYING MUSIC FROM AN PORTABLE DEVICE APP OR DESKTOP PROGRAM......25
MAINTENANCE 26
FREQUENTLY ASKED QUESTIONS ......27
PRODUCT SPECIFICATION....28
DSX1000 Network Music Player
Thank you for buying a Chord Electronics product.
Before you start to enjoy your DSX1000, please take a couple of minutes to read how to connect your audio equipment and how to maximise your listening experience.
Product Description
The DSX1000 is a fully featured digital network player using our state of the art DAC technology. It features uPNP/DLNA access and control and HD audio support for the very latest high quality audio playback. It is compatible with smart phone applications allowing easy remote browsing and playing of networked stored audio.
The digital heart of the DSX1000 uses the latest generation field programmable gate array device (FPGA) as found in the QBD76. The FPGA handles all the digital data decoding, clocking, WTA filtering, and the 5^th generation Pulse Array DAC. The improvements to the Pulse Array DAC have been further complimented with improved power supply design and layout giving the very best digital to analogue conversion.
Inventory
As well as your DSX1000 and this user manual, you should also have received the following items.
- Remote Control
- Power cord
- Chord guarantee registration card
- RJ45 Network cable
When setting up
To ensure that your DSX1000 works efficiently and safely, please pay particular attention to the following issues.
ventilation
Your DSX1000 should have at least 5cm of clear space all around it to ensure a free flow of air at all times. We do not recommend that you place DSX1000 directly on a carpet. If you have the integra leg system fitted it is recommended that the power amplifiers sit above the DSX1000.
AC lead and plug
All Chord equipment comes supplied with the correct power lead and plug. This should be used at all times.
if you need to fit a plug for UK/Europe
Connect the blue wire to the neutral terminal
Connect the brown wire to the live terminal
Connect the yellow/green wire to the earth terminal
if you need to fit a plug for US/Canada
Connect the white wire to the neutral terminal
Connect the black wire to the live terminal
Connect the green to the earth terminal
Earthing issues
In some countries a hum may occur if your DSX1000 is connected to mains sockets that do not have an earth. If this is the case please ensure that:
- Your product is connected via a multi-way mains block, which contains an earth point at each socket outlet. This is to ensure that the chassis metalwork of each item is connected together.
- We recommend that an earthing method for your building be implemented.
Safety Warnings
It is important that your DSX1000 is earthed at all times via its own mains lead. Failure to do this may be hazardous. The power supply components within the DSX1000 are designed to operate at lethal voltages and energy levels. Circuit designs that embody these components conform to applicable safety requirements. Precautions must be taken to prevent accidental contact with power-line potentials. Do not connect grounded test equipment.
There are no user serviceable parts within the DSX1000 Reference Preamplifier. Unauthorised tampering or dismantling of this product will invalidate the warranty and could cause injury.
AC Power connection
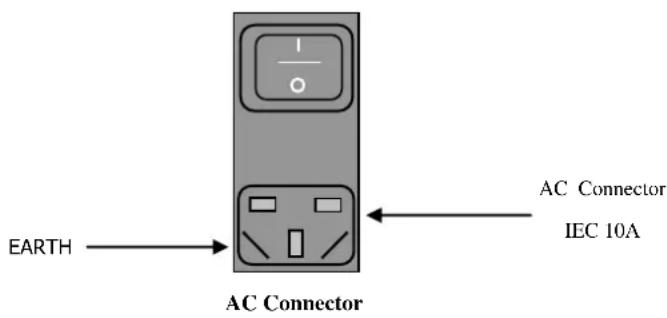
The AC power connector on the DSX1000 is at the back of the unit. Plug the female end (socket) of the power cord into the power connector of the preamplifier, and the male end(plug) of the power cord into AC wall socket or AC extension socket. The DSX1000 features a universal voltage high frequency power supplied and will operate automatically from 65V to 260V AC, 50 or 60Hz.
For optimum operation it is recommended that the DSX1000 is connected directly to the wall socket via the power cord provided.
Powering up
Press the rear panel power switch to the on position. The internal illumination will light up followed by the front panel display 10 seconds later. The DSX1000 will run through a boot sequence where the display will show the Chord logo and after about 30 seconds the main menu will be displayed and the unit is ready for use.
Standby mode
Press the standby button on the remote control to enter low power standby mode. Press the standby button again to switch the DSX1000 back on.
Full Power down
Press the rear panel switch to the off position. The DSX1000 utilises soft start circuitry so the power can switched on and off as often as required. There is no need to leave the DSX1000 permanently switched on.
Connecting your equipment
Chord amplifiers are supplied with and designed to be connected using balanced inputs. The interconnecting cables you use will depend on the available input and output sockets on your other equipment. We have installed unbalanced inputs on all Chord equipment, thus enabling you to mix Chord Electronics and other manufacturer's equipment.

Balanced inputs carry twice the strength of signal of unbalanced inputs and are able to be fed down long lengths of cable with less deterioration of signal. They are also less prone to interference than unbalanced inputs. Balanced inputs have three pins and use XLR style connectors. Pin 1 is earth, pin 2 is positive and pin 3 is negative.

Unbalanced inputs use RCA phono connectors, which are gold plated with teflon high performance dielectric insulators for optimum performance.

flowchart
graph TD
    A["CD Player"] -->|Red Reference CD Player| B["QBD76"]
    B --> C["CD Transport"]
    B --> D["Network Router"]
    B --> E["outputs inputs"]
    B --> F["outputs inputs"]
    B --> G["outputs inputs"]
    B --> H["outputs inputs"]
    B --> I["outputs inputs"]
    B --> J["outputs inputs"]
    B --> K["outputs inputs"]
    B --> L["outputs inputs"]
    B --> M["outputs inputs"]
    B --> N["outputs inputs"]
    B --> O["outputs inputs"]
    B --> P["outputs inputs"]
    B --> Q["outputs inputs"]
    B --> R["outputs inputs"]
    B --> S["outputs inputs"]
    B --> T["outputs inputs"]
    B --> U["outputs inputs"]
    B --> V["outputs inputs"]
    B --> W["outputs inputs"]
    B --> X["outputs inputs"]
    B --> Y["outputs inputs"]
    B --> Z["outputs inputs"]
    B --> AA["outputs inputs"]
    B --> AB["outputs inputs"]
    B --> AC["outputs inputs"]
    B --> AD["outputs inputs"]
    B --> AE["outputs inputs"]
    B --> AF["outputs inputs"]
    B --> AG["outputs inputs"]
    B --> AH["outputs inputs"]
    B --> AI["outputs inputs"]
    B --> AJ["outputs inputs"]
    B --> AK["outputs inputs"]
    B --> AL["outputs inputs"]
    B --> AM["outputs inputs"]
    B --> AN["outputs inputs"]
    B --> AO["outputs inputs"]
    B --> AP["outputs inputs"]
    B --> AQ["outputs inputs"]
    B --> AR["outputs inputs"]
    B --> AS["outputs inputs"]
    B --> AT["outputs inputs"]
    B --> AU["outputs inputs"]
    B --> AV["outputs inputs"]
    B --> AW["outputs inputs"]
    B --> AX["outputs inputs"]
    B --> AY["outputs inputs"]
    B --> AZ["outputs inputs"]
    B --> BA["outputs inputs"]
    B --> BB["outputs inputs"]
    B --> BC["outputs inputs"]
    B --> BD["outputs inputs"]
    B --> BE["outputs inputs"]
    B --> BF["outputs inputs"]
    B --> BG["outputs inputs"]
    B --> BH["outputs inputs"]
    B --> BI["outputs inputs"]
    B --> BJ["outputs inputs"]
    B --> BK["outputs inputs"]
    B --> BL["outputs inputs"]
    B --> BM["outputs inputs"]
    B --> BN["outputs inputs"]
    B --> BO["outputs inputs"]
    B --> BP["outputs inputs"]
    B --> BQ["outputs inputs"]
    B --> BR["outputs inputs"]
    B --> BS["outputs inputs"]
    B --> BT["outputs inputs"]
    B --> BU["outputs inputs"]
    B --> BV["outputs inputs"]
    B --> BW["outputs inputs"]
    B --> BX["outputs inputs"]
    B --> BY["outputs inputs"]
    B --> BZ["outputs inputs"]
    B --> CA["outputs inputs"]
    B --> CB["outputs inputs"]
    B --> CC["outputs inputs"]
    B --> CD["outputs inputs"]
    B --> CE["outputs inputs"]
    B --> CF["outputs inputs"]
    B --> CG["outputs inputs"]
    B --> CH["outputs inputs"]
    B --> CI["outputs inputs"]
    B --> CJ["outputs inputs"]
    B --> CK["outputs inputs"]
Basic system diagram
Front Panel

flowchart
graph TD
    A["Headphone Jack Socket"] -->|1/4 "Headphone Jack Socket"| B["Favourites"]
    A -->|Display| C["IR Remote Control Receiver"]
    A --> D["Menu Selection Buttons Up, Down, Left, Right functions Press any button hard for select function"]
    E["CHORD"] --> F["● CHORD ●"]
Rear Panel Connections

flowchart
graph TD
    A["LINE LEVEL OUTPUT"] --> B["PRE AMPLIFIER"]
    C["VARIABLE OUTPUT"] --> D["POWER AMPLIFIER"]
    E["CD TRANSPORT"] --> F["INTERNET ROUTER"]
    G["AC WALL SOCKET"] --> H["AC IN"]
    I["DIGITAL INPUT"] --> J["NETWORK"]
    K["RIGHT"] --> L["LINE LEVEL OUTPUT"]
    M["LEFT"] --> N["VARIABLE OUTPUT"]
Network Connection
The DSX1000 has an RJ45 (Cat 5) Ethernet network cable connection. This should be plugged into your network router so that the DSX1000 has access to the internet and also the other computers or network storage for music streaming.
When the connection has successfully been made the DSX1000 will show an active network symbol on the display.

NO NETWORK CONNECTION

NETWORK CONNECTED
If your network connection or router is not located near your HiFi equipment then we recommend the use of power line network adapters. You simply plug one device into an available AC wall socket near your HiFi equipment and then another device into an AC wall socket near your network router. The network signal is carried over the AC power line wiring rather than having to run any additional cables. This system is very convenient but not suitable for every situation so you should check compatibility first.
Network example using power line adapters

flowchart
graph TD
    A["Home Office"] --> B["85 Mbps Powerline Ethernet Adapter"]
    B --> C["Router"]
    C --> D["Broadband modem"]
    D --> E["Living Room"]
    F["Set-top box"] --> G["85 Mbps Powerline Ethernet Adapter"]
    G --> H["Laptop"]
    G --> I["Gaming console"]
    J["Digital Entertainer"] --> G
Network Settings
The DSX1000 is setup with the most commonly found network settings. However if you want to manually change these then go to settings, network, network setting and click the wired icon. You can then change from automatic mode to manually selecting an IP address and associated settings.
Media Server
Once the DSX1000 is has a network connection then it will automatically search for any available media servers available on your network. The media server is the software that will provide the music for the DSX1000 to play. Examples of this are Windows Media player, Twonky Media, Asset UPnP but many more are available for both Windows and Apple Mac computer systems and also tablet computers and mobile phones. Once the media server software is installed on the computer it will search and catalogue all the music on your hard drive and make that available to the DSX1000. If you don't wish to use your computer or have it switched on all the time then you may also decide to use a network attached storage drive more commonly called a NAS drive instead. These devices connect to the same network as the DSX1000 and have built in media server software that the DSX1000 can connect to. You simply copy all your music to the NAS drive and then leave it running all the time so that the DSX1000 can play music from it.
Web Browser Configuration
Network settings and the friendly network name of the DSX1000 can also be changed using the web browser menu. In the search bar of your web browser type the IP address of the DSX1000 to bring up the configuration menu. If you don't know the IP address use the settings menu on the DSX1000 to navigate to the network settings and then network info. This will show the connection settings and the IP address.
Output Connections
The DSX1000 has two sets of output connectors. You can connect directly to a power amplifier using the variable output connections or you can connect to a preamplifier with built in volume control using the line level outputs.
Variable Output
The DSX1000 has a built in analogue volume control meaning that it can be directly connected to a power amplifier or amplified loudspeakers. Please use either the balanced XLR or RCA phono outputs marked as Variable Output.
VARIABLE OUTPUT

Line Level Output
The line level output is a full volume signal designed to be connected to a preamplifier or integrated amplifier with volume control. Please use either the balanced XLR or RCA phono outputs marked as Line Level Output.
Never connect the line level outputs directly to a power amplifier as this output will be extremely loud and cause damage to your loudspeakers or amplifier.

Note: For optimum performance it is recommended that the balanced outputs are used where possible.
Digital Input
The DSX1000 has a 75 ohm bnc digital input on the rear of the unit. You can use this to connect an additional digital source such as a CD transport and use the internal DAC inside the DSX1000 to play music. The digital input automatically switches on when the DSX1000 is not playing music. The volume control can still be used with the digital input.
Headphones
The DSX1000 features a 3/4 inch headphone socket on the front panel. Once the headphones are inserted the variable output on the rear of the unit will automatically mute. You can listen to you music discretely using headphones and adjust the volume to suit.
Everyday use of your DSX1000
Turning on your DSX1000
Press the power button on the rear of the DSX1000. Press again to switch off.
Turning on your DSX1000 from standby
Press the standby button on the remote control. Press again to switch into standby mode.
Boot Sequence
The DSX1000 will take about 30 seconds to load software so it is ready for use. During this time the Chord logo will be shown on the screen.
Select the media server
Using the front panel controls or the remote control select the media server menu and then select the media server you wish to use. Browse through the available albums and music tracks stored on the media server then select items to play.
adjusting the volume
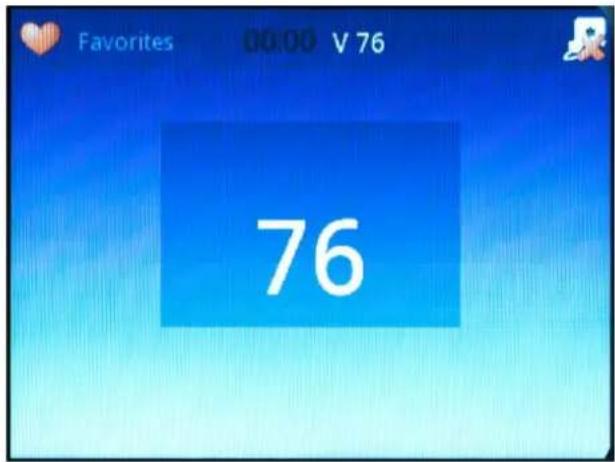
Use the remote control buttons to adjust the volume. The volume range runs from 0 to 100 and is displayed on the DSX1000 display as you change the volume. The volume level is also always shown next to the clock on the display as the word Vol and a two digit level as shown in the example below.
Volume display
User menus
Information Bar
The information bar appears at the top of nearly all screens on the DSX1000. This gives important information regarding the current state of the DSX1000.

The following information will always appear:
- Clock
- Mute (if applicable)
- Random / Repeat 1 / Repeat All (when applicable)
- Play states (Play/Pause/Search) (will only appear during playback)
• Volume
• Network Status
Icons
Throughout the menus a number of icons have been specified. These are displayed in the information bar at the top of the screen.
 | PLAY |
 | PAUSE |
 | FAST FORWARD |
 | FAST BACKWARDS |
 | MUTE |
 | REPEAT TRACK |
 | RANDOM |
 | REPEAT ALBUM |
 | FAVORITE |
 | MEDIA SERVER |
 | FOLDER |
 | SETTINGS |
 | NETWORK CONNECTED |
 | NETWORK DISCONNECTED |
Menu pages
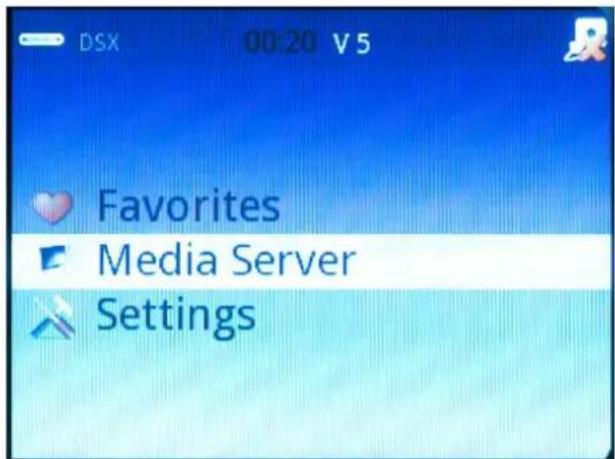
The DSX1000 is navigated via a menu system. All menus consist of a vertically scrolling list of menu items. A static highlight bar indicates which item is currently selected.
Home Menu
The Home Menu is the starting screen and will show menus for stored favourites, allow you to select your Media server, or make changes to the setup. Using the front panel control or remote control you can scroll up or down then press enter to select a menu.
Sub Menus
Sub menus of the DSX1000 contain icons for items which are playable (music, pictures) and for items which are folders or for setup information.
On the right side a scroll bar indicates the position in the complete list. The scroll bar fades out after a few idle seconds.
Mute
If the mute key is pressed the mute icon will appear in the info bar and the audio output will be muted. Press the mute key again to cancel the Mute.
When using a network music player or app to control the DSX1000 the mute icon may not be displayed but the audio output will still mute.
If power is lost or the device is powered down, the mute setting will not be remembered.
Playback
When a File is selected for playback the DSX1000 will launch either the Audio or Photo player. These will have a now playing display, which will give information on the current file playing.
Playback will continue if the user navigates away from the Now Playing screen.
Pressing Home on the remote whilst on the home menu will also take you to the Now Playing screen.
To start playback firstly navigate to the media server where you music or photos are stored.

The available media servers will be listed. Select which one you want to stream your media from or choose recently played if you have played the track previously.
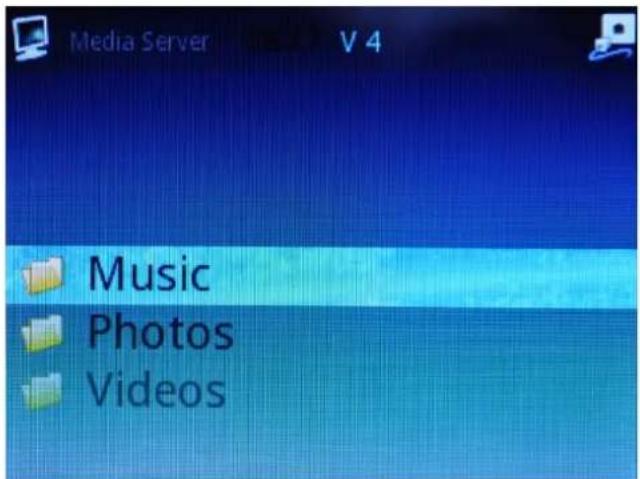
Choose to play either music or photos. Video is not supported.
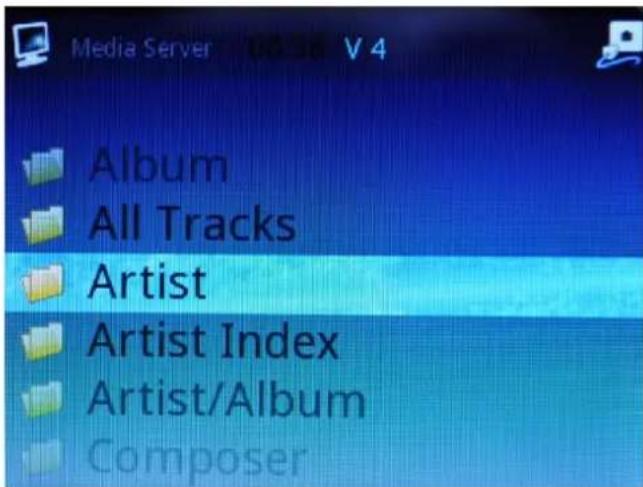
Depending on the media server settings you will be able to choose to sort and show your media with different options. Below we have chosen to search for music by Album.

Select an album to play.
Audio Player
The audio Player ‘Now playing’ screen gives information regarding the current track being played.
This includes:
- Info bar
- Track
- Artist
- Album
- Album art
- Play / Pause / Search Icon
- Track time - x:xx of x:xx
- Track time bar
If there is no album art available the metadata will be drawn over the whole screen.

Photo viewer
The photo player plays back picture files full screen. There is normally no other information on the display. There are two playback modes.
- Slideshow mode
- Manual mode
When playback starts the photo viewer always defaults to slideshow mode. It will automatically scroll through the images every x seconds. This time is definable in the settings menu under slideshow options. The default is 10 seconds. If the end of the list is reached, the photo viewer will continue from the beginning of the same list. The user can enter manual mode by pressing Play/Pause/Skip Forward/Skip Backward. If they press Play/Pause again the photo viewer will return to slide show mode.
If the user presses Skip Forward or Skip Back the Photo viewer will enter Manual mode and Skip Forward/Back to the next photo. The user can then manually skip through the photos as desired. When using manual skip forward/back, a status icon will appear at the bottom of the display to feedback loading progress. The Skip Icon will only appear when using manual skip, not during automatic skip in slideshow mode.
Text Input
Text input is required for the some network settings and search functions.
- The characters will be selected using a barrel roll text entry system.
• The Right key will move to the next character - The Left or back key will move to the previous character
• The OK button will confirm the entered value - Up/Down will scroll through the characters
Settings Menu
From the main menu you can enter the settings menu to make changes to the DSX1000 configuration.
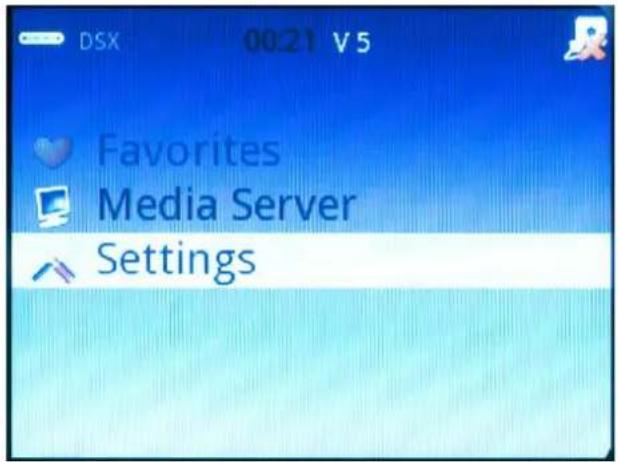
There are several options to make changes to the network, time, user interface, playback or general configuration.

Network
The network settings menu gives you options to change your type of connection from automatic mode to manual if you want to use your own static IP address or use a proxy server. In nearly all cases automatic mode will be the best option.
You can also see the current network information including the IP address allocated to the DSX1000 – this is useful if you want to use the web configuration or if you need to use control software that requires the IP address to be known.
If you have a media server that you want to set as the default so your media is always chosen from the same server then you can use the Default UPnP server menu. Select a default server from a list of all the media servers available on your network.
You can change the friendly network name. By default this is set to DSX1000. ( This can only be changed when nothing is playing )
Time
The time menu allows you to make changes to the time zone and switch daylight savings mode on or off.

User Interface
The user interface has 4 themes to choose from and also the option to switch the display off after a period of time so nothing is displayed.

Playback
The playback menu allows you to select repeat mode, shuffle mode or the image slideshow transition time between images. (You can also select repeat and shuffle modes using the remote control button)

General Menu
This menu will allow you to reset the DSX1000 back to factory defaults, update the software and show information about the product and legal information.

Favourites Menu
When playing a particular media file you can add this to your favourites menu to make it easier to locate for future playback. Whilst playing press the favourite key on the remote control to add an entry to the menu.

From the home page select the Favourite menu to find and play your stored media files. To delete an entry just press the Mem key on the remote control.
Using the front panel control

natural_image
Circular metallic object with four evenly spaced white holes, enclosed in a blue border (no text or symbols)The front panel control disc allows you to navigate through the menus and select items. As well as the normal up, down, left and right functions you can also select each item by pressing down hard on any button. Each function is represented by a different colour blue, yellow, red, green or white.
Using the remote control
The DSX1000 is supplied with a remote control that can be used to fully control it. The main functions are listed below:-

Standby. Press to switch the unit into standby mode. Press again to switch back on.

Home key. This will show the home menu. Press again to show the current playing track.

Favourite key. Press to add a media file to the favourite menu.

Repeat all, repeat one and shuffle key.
Delete memory key. This removes entries in the favourite menu.

Number keys. Not used.

Mute and volume keys.
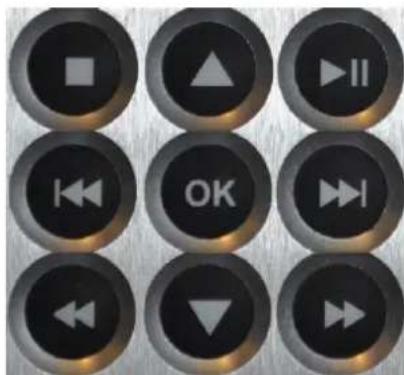
Navigation keys allow you to use the menus. These keys also play, pause and also fast forward or fast back any track.

The back key will take you back through the menus or text entry.
Playing music from an portable device app or desktop program
Refer to the manual supplied with the app or program to search for connected network media renderers or players. The DSX1000 will be shown as a network player and can be selected for use. Browse through the library of connected music sources from your computer or connected network drive and choose music to play. If you are using the variable outputs directly into a power amplifier then you can use the volume control button in the app or program to directly increase or decrease the level.
The DSX1000 has been tested with Songbook, 8Player, PlugPlayer, BubbleUpnp apps or desktop computer programs such as J.River Media Centre. You can also use any other software that offers Upnp support.
Maintenance
cleaning
To clean finger marks and other blemishes from your amplifier spray clear glass cleaner onto a soft lint free cloth and then use the cloth to gently clean your amplifier.
changing the batteries in the remote control
Simply push the button on the bottom of your remote control to release the battery cover. Replace with one new CR2025 button cell battery.
servicing
There are no user serviceable parts in your Chord amplifier, and it should only be serviced by Chord Electronics Limited or their expressly approved Service Agents.
Frequently asked questions
why aren't any of the remote control buttons working?
Check and replace the battery. The battery compartment can be opened from the bottom of the unit and requires a CR2025 battery.
I've connected all the wires up but I can't hear any sound?
Ensure that the mute is not selected and the volume is turned up.
why is there humming coming from the loudspeakers?
Check that you've earthed the unit. The interconnects need to be properly screened and placed away from mains cables. Interference can be reduced by using balanced inputs and outputs instead of RCA phono types.
the sound coming from the loudspeakers is distorted
Check that the speakers are connected properly. It may be that the volume is turned up too loud for your speakers.
Product Specification
| HARMONIC DISTORTION | <-103 dB (1kHz, 24-Bit @ 44.1KHz Sample Frequency)< -110dB (100Hz, 24-Bit @ 44.1KHz Sample Frequency) |
| SIGNAL TO NOISE RATIO | >120dB |
| CHANNEL SEPARATION | >125dB @ 1KHz |
| DYNAMIC RANGE | 120dB |
| NETWORK INPUT | 1 x RJ45 100 base T Ethernet |
| DIGITAL INPUT | 1 x 75 ohm BNC automatic switching |
| SUPPORTED FILE FORMATS | wma-9, mp3, AAC, Ogg VorbisALAC, AIFF (96KHz)FLAC, WAV (including 176.4 and 192KHz support) |
| ANALOGUE OUTPUTS | Stereo RCA Phono and balanced XLR Line Level Direct OutputsStereo RCA Phono and balanced XLR Volume Control Outputs |
| SUPPORTED SAMPLE FREQUENCIES | 44.1, 48, 88.2, 96, 176.4 and 192KHz (format dependant) |
| LINE LEVEL OUTPUT | 6V rms. Balanced. 3V rms. unbalanced |
| OUTPUT IMPEDANCE | 75Ω (short circuit protected) |
| DIMENSIONS IN MM | 420mm x 355mm x 88mm (Width x Height x Depth) |
| POWER CONSUMPTION | 30W |
| OPERATING VOLTAGE | 85 – 270V AC (50-60Hz) auto switching |
| WEIGHT | 12 Kg |

natural_image
Exterior view of a silver electronic device with a digital display and control panel, set against a blue abstract background (no visible text or symbols)Chord Electronics limited
The Pumphouse
Farleigh Bridge
Farleigh Lane
East Farleigh
Kent ME16 9NB
Tel: +44 (0)1622 721444
Fax: +44 (0)1622 721555
Email: sales@chordelectronics.co.uk
http://www.chordelectronics.co.uk
- CONTENTS
- DSX1000 Network Music Player
- Product Description
- Inventory
- When setting up
- ventilation
- AC lead and plug
- if you need to fit a plug for UK/Europe
- if you need to fit a plug for US/Canada
- Earthing issues
- Safety Warnings
- AC Power connection
- Powering up
- Standby mode
- Full Power down
- Connecting your equipment
- Network Connection
- Network Settings
- Media Server
- Web Browser Configuration
- Output Connections
- Variable Output
- Line Level Output
- Digital Input
- Headphones
- Everyday use of your DSX1000
- adjusting the volume
- User menus
- Information Bar
- Icons
- Menu pages
- Home Menu
- Sub Menus
- Mute
- Playback
- Audio Player
- Photo viewer
- Text Input
- Settings Menu
- Network
- Time
- User Interface
- General Menu
- Favourites Menu
- Using the front panel control
- Using the remote control
- Playing music from an portable device app or desktop program
- Maintenance
- cleaning
- changing the batteries in the remote control
- servicing
- Frequently asked questions
- Product Specification
Brand : Chord
Model : DSX 1000
Category : Network audio player