
GMF2120BCL - Microwaves GRUNDIG - Free user manual and instructions
Find the device manual for free GMF2120BCL GRUNDIG in PDF.


| Product Type | Solo Microwave Oven |
| Brand | Grundig |
| Model | GMF2120BCL |
| Capacity | 20 Liters |
| Power Consumption | 1200 W (230-240 V ~ 50 Hz) |
| Microwave Output Power | 800 W |
| Operating Frequency | 2450 MHz |
| External Dimensions (H x W x D) | 262 mm x 452 mm x 365 mm |
| Internal Dimensions (H x W x D) | 210 mm x 315 mm x 329 mm |
| Net Weight | 11.4 kg |
| Control Type | Rotary knob and push buttons |
| Display | Digital LED display |
| Power Levels | 6 (100%, 80%, 60%, 40%, 20%, 0%) |
| Defrost Function | By weight (100 g - 1800 g) |
| Auto Cook Menus | 9 (Milk/Coffee, Meat, Spaghetti, Potatoes, Reheat, Fish, Pizza, Vegetables, Popcorn) |
| Quick Start | Up to 10 minutes at full power |
| Preset / Delay Start | Yes (24-hour clock) |
| Child Lock | Yes (hold Stop/Cancel 3 sec) |
| Turntable | Glass tray (removable) |
| Interior Light | Yes (replaceable by service) |
| Safety Features | Door safety interlock system, overheating protection |
| Cleaning | Wipe with damp cloth; mild detergent; turntable dishwasher safe |
| Warranty | 24 months (UK/ROI) |
Frequently Asked Questions - GMF2120BCL GRUNDIG
User questions about GMF2120BCL GRUNDIG
0 question about this device. Answer the ones you know or ask your own.
Ask a new question about this device
Download the instructions for your Microwaves in PDF format for free! Find your manual GMF2120BCL - GRUNDIG and take your electronic device back in hand. On this page are published all the documents necessary for the use of your device. GMF2120BCL by GRUNDIG.
USER MANUAL GMF2120BCL GRUNDIG
natural_image
Grundig microwave oven with digital display and control buttons (no visible text or symbols on main body)Thank you for choosing a Grundig appliance.
Please take some time to read this user manual before using your appliance, to ensure you know how to safely operate the controls and functions.
Carefully follow all unpacking and installation instructions to ensure the appliance is correctly connected and fitted prior to use.
Please write your product model and serial number on the last page of this user manual, and store in a safe location close to the appliance for easy future reference.
This user manual may also be applicable for several other models. Differences between models will be listed.
If you have any questions or concerns, please call our contact centre or find help and information online at www.grundig.co.uk
Contents
ENGLISH
05-21
Important safety and environmental instructions
This section contains safety instructions that will help protect from risk of personal injury or property damage. Failure to follow these instructions invalidates the granted warranty.
General safety
- Do not use the appliance outdoors or in the bathroom.
- No responsibility or warranty claim shall be assumed for damages arising from misuse or improper handling of the appliance.
- Never dismantle the device. No warranty claims are accepted for damage caused by improper handling.
- Only use the original parts or parts recommended by the manufacturer.
-
Do not leave this appliance unattended while it is in use.
• Always use the appliance on a stable, flat, clean dry, and non-slip surface. -
The appliance should not be operated with an external clock timer or separate remote control system.
- Before using the appliance for the first time, clean all its parts. Please see the details given in the "Cleaning and Maintenance" section.
-
Operate the appliance for its intended purpose only as described in this manual. Do not use abrasive chemicals or steam on this appliance. This oven is intended for heating and cooking the food especially. It is not intended for industrial or laboratory use.
-
Do not use the appliance to dry your clothing or kitchen towels.
- Your oven is not designed to dry any living being.
- Do not operate the oven empty.
Important safety and environmental instructions
- Cooking dish may get due to the heat transferred from the heated food to the dish. You may require oven gloves to hold the dish.
- Dishes shall be checke ensure that they are suitable to be used in microwave ovens.
- Do not place the oven stoves or other heat generating appliances. Otherwise, it may be damaged and the warranty is void.
- Microwave oven shall be placed inside a cupboard.
- Steam may come out w opening the covers or the foil after cooking the food.
- Use gloves while take any kind of heated food out.
h Electrical safety
- Grundig Microwave Oven comply with the applicable safety standards; therefore, in case of any damage on the appliance or power cable, it should be repaired or replaced by the dealer, service center or a specialist and authorized service alike to avoid any danger. Faulty or unqualified repair work may be dangerous and cause risk to the user.
• Make sure that your supply power source complies with the information supplied on the rating plate. The only way to disconnect the appliance from the power supply is to pull the power plug out of the power outlet.
- Use the appliance with a grounded outlet only.
- Never use the appliance if the power cable or the appliance itself is damaged.
- Do not use this appliance with an extension cord.
Important safety and environmental instructions
- Never touch the appliance or its plug with damp or wet hands.
- Place the appliance in way so that the plug is always accessible.
- Prevent damage to the power cord by not squeezing, bending, or rubbing it on sharp edges. Keep the power cable away from hot surfaces and naked flame.
- Make sure that there no danger that the power cord could be accidentally pulled or that someone could trip over it when the appliance is in use.
- Unplug the appliance before each cleaning and when the device is not in use.
e• Do not immerse the appliance, power cord or power plug in water or in other liquid. Do not hold it under running water. - When heating food in plastic or paper containers, check the oven frequently due to the possibility of ignition.
- Remove the wire strings of paper or plastic bags before placing bags suitable for use in microwave oven to the oven.
- Turn off the appliance or unplug it and hold its door closed to prevent ignition if you observe smoke.
- Do not use inside of the oven to store something. Do not leave paper items, cooking material or food inside the oven when it is not being used.
- Do not pull the power cab of the appliance to disconnect it from its power supply and never wrap its power cable around the appliance.
Important safety and environmental instructions
- The contents of feeding bottles and baby food jars shall be stirred or shaken and the temperature checked before consumption, in order to avoid burns.
- This product is a Group Class B ISM equipment. Group 2 equipment contains all ISM (Industrial, Scientific and Medical) equipment in which radio-frequency energy is intentionally generated and/or used in the form of electromagnetic radiation for the treatment of material, and spark erosion equipment. Class B equipment is suitable for use in domestic establishments and establishments directly connected to a low voltage power supply network.
- Door or outer surface of the appliance may be heated when it is being operated.
- Turn off the appliance or unplug it and hold its door closed to extinguish the fire if you observe smoke.
Product safety
- Liquids or other food shall not be heated in closed 2 container as there is a risk of exploding.
- Heating the beverages with microwave may cause them to boil by splashing around after they have been taken out of the oven, so be careful when you are holding the containers.
- Do not roast anything in the oven. Hot oil may damage the components and materials of the oven, and it may even cause skin burns.
- Pierce food with thick crust such as potatoes, zucchini, apples and chestnuts.
e• Appliance shall be placed so that the rear side is facing the wall.
Important safety and environmental instructions
• Do not use the appliance for anything other than its intended use.
- Do not use the appliance as a heat source.
- Microwave oven is intended to thaw, cook and stew food only.
- Place your oven at least 8 cm inside the counter to prevent it from tipping down. For sufficient ventilation, allow a space of 30 cm at least on the upper side of the oven, and 10 cm at least on the rear. Sides of the oven shall be kept clean to provide air circulation. Prevention of air entry or exit may cause damage to the oven or bad cooking results. Make sure that microwave oven is placed to ensure steady air flow.
Children's safety
- Extreme caution is advised when being used near children and persons who are restricted in their physical, sensory or mental abilities.
• This appliance can be used
- If the door or door se are damaged, the oven shall not be operated until it has been repaired by a competent person.
- Before handling the pliance, please secure the turntable to prevent damage to it.
Intended use
- Microwave oven shall be used as solo only.
by the children who are at the age of 8 or over and by the people who have limited physical, sensory or mental capacity or who do not have knowledge and experience, as long as they are supervised with regard to safe use of the product or they are instructed accordingly or understand the risks of using the product. Children should not play with the appliance.
Important safety and environmental instructions
Cleaning and maintenance works should not be performed by children unless they are supervised by an adult.
- Risk of choking! Keep the packaging materials away from children.
- Only allow children to the oven without supervision when adequate instructions have been given so that the child is able to use the microwave oven in a safe way and understands the hazards of improper use.
Compliance with the WEEE Directive and disposal of waste products
This product does not include harmful and prohibited materials specified in the “Regulation for Supervision of the Waste Electric and Electronic Appliances” issued by the Ministry of Environment and Urban Planning. Complies with the WEEE Directive.
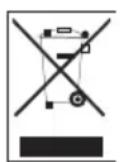
This symbol indicates that this product shall not be disposed with other household wastes at the end of its service life.
Used device must be returned to official collection point for recycling of electrical and electronic devices. To find these collection systems please contact to your local authorities or retailer where the product was purchased. Each household performs important role in recovering and recycling of old appliance. Appropriate disposal of used appliance helps prevent potential negative consequences for the environment and human health.
Package information

Package of the product is made of recyclable materials in accordance with our National Legislation. Do not dispose of the packaging materials together with the domestic or other wastes. Take them to the packaging material collection points designated by the local authorities.
Plug Wiring
The moulded plug on this appliance incorporates a 13 A fuse. Should the fuse need to be replaced an ASTA approved BS1362 fuse of the same rating must be used. Do not forget to refit the fuse cover. In the event of losing the fuse cover, the plug must not be used until a replacement fuse cover has been fitted. Colour of the replacement fuse cover must be the same colour as that visible on the pin face of the plug Fuse covers are available from any good electrical store.
Important safety and environmental instructions
• Fiting a different plug
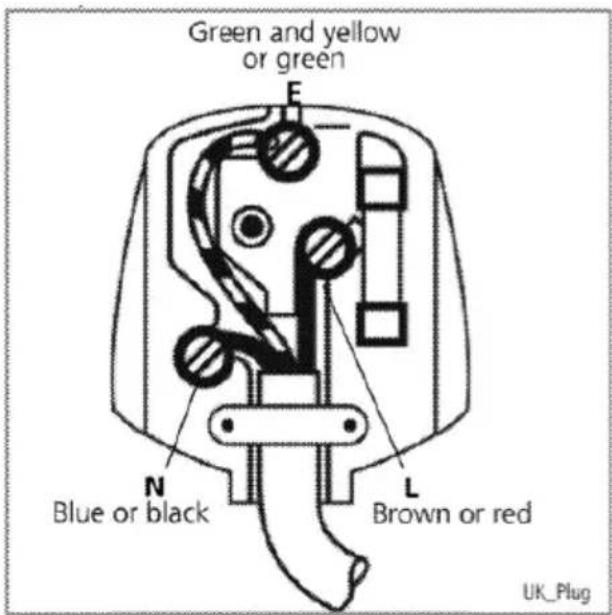
- As the colours of the wires in the mains lead of this appliance may not correspond with the coloured markings identifying the terminals on your plug, proceed as follows:
- Brown cable = L (Live)
• Blue cable = N (Neutral)
- Green/yellow cable must be connected to ground (E) line
- With the alternative plugs a 13 A fuse must be fitted either in the plug or adaptore or in the main fuse box. If in doubt contact a qualified electrician.
Technical specifications
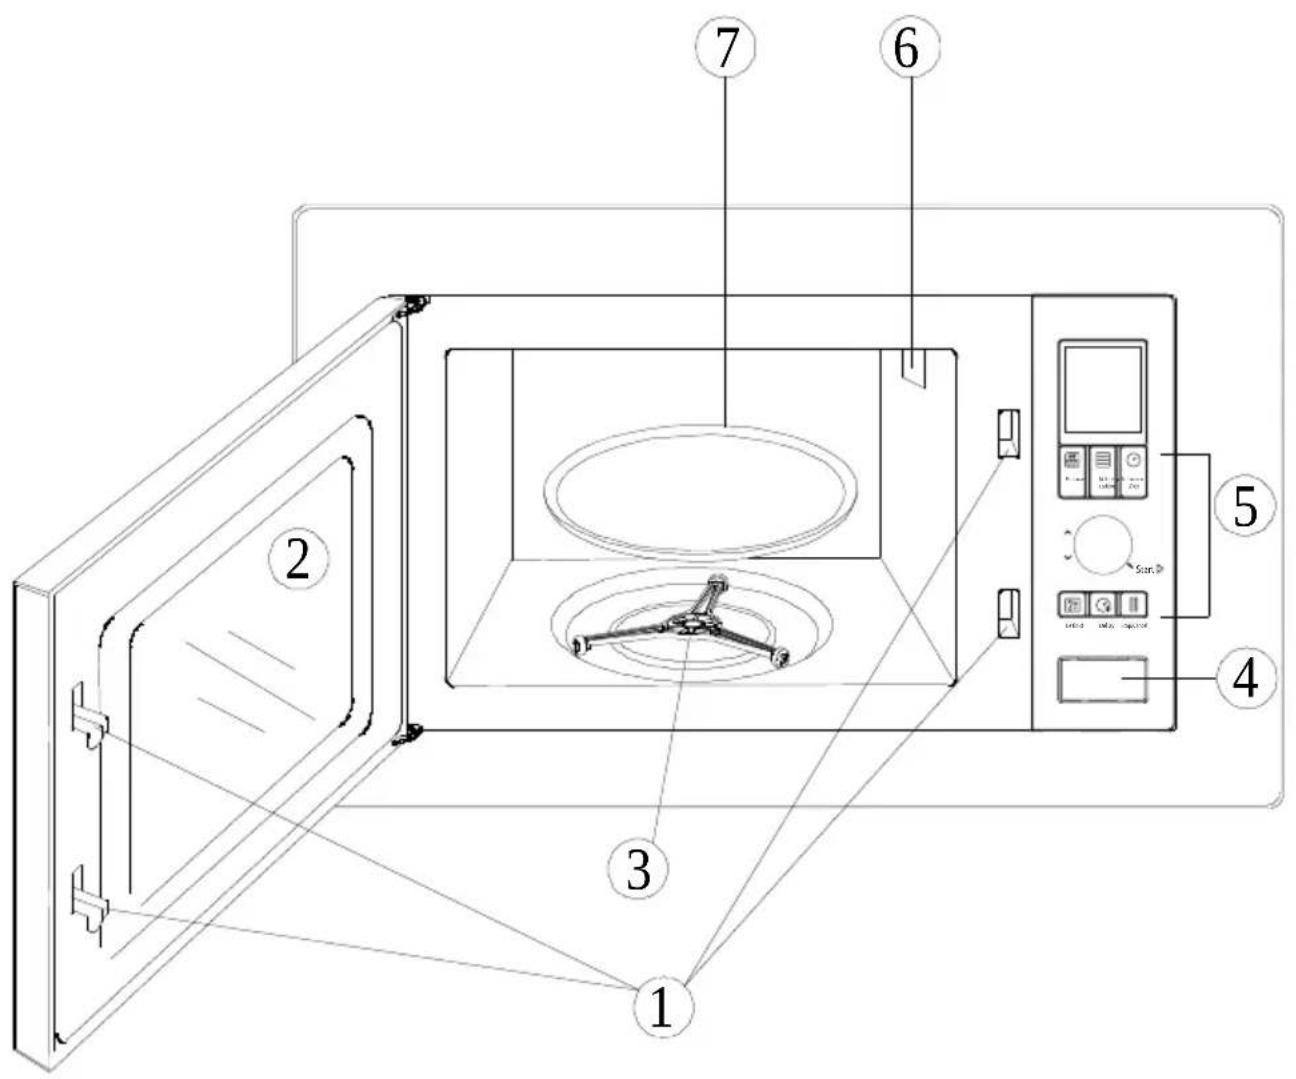
Control and parts
- Door Safety Interlock System
- Oven Window
- Turntable support
- Door opening button
- Control panel
- Wave Guide (please do not remove the plexiglass cover the wave guide)
- Glass Tray
Technical data
CE
| Power Consumption 230- | 240 V~50 Hz, 1200 W |
| Output 800 W | |
| Operating frequency 2450 MHz | |
| External dimensions 262 | mm (H) X 452 mm (W) X 365 mm (D) |
| Internal dimensions of the oven | 210 mm (H) X 315 mm (W) X 329 mm (D) |
| Oven Capacity 20 Liters | |
| Net Weight 11.4 kg | |
Markings on the product or the values stated in other documents supplied with the product are values obtained under laboratory conditions as per relevant standards. These values may vary according to the usage of the appliance and ambient conditions. Power values are tested at 240V.
Installation
Installation
- Make sure that all packing materials inside the door are removed.
- This microwave oven shall be placed on a level surface that could bear the weight of the oven and the heaviest food that may be cooked inside the oven.
- Do not place the oven in places with moisture or high humidity or near inflammable materials.
- Do not operate the oven without placing the turntable support to the correct position.
- Make sure that power cord is not damaged and it does not run under the oven or over any hot or sharp surface.
- Power outlet shall be at a easily accessible position, so you can unplug the appliance easily in case of a emergency.
- Do not use the oven outdoors.
Radio interference
Operation of the microwave oven may cause interference on radios, TVs and similar appliances.
In case of interference, it may be reduced or eliminated by taking the precautions given below:
- Clean the door and sealing surface of the oven.
- Set the antenna direction of th radio or TV again.
- Reposition the oven against the receiver.
- Place microwave oven way from the receiver.
- Plug the microwave oven to another outlet, thus microwave oven and receiver shall on different lines.
Microwave cooking principles
• Prepare the food carefully. Place the remaining parts to the outside of the dish.
- Pay attention to the cooking time. Cook in the shortest time specified and add some more time if required. Overcooked food may cause smoke or may be burnt.
- Cover the food while cooking. Covering the food prevents any splashing and helps to ensure that food is cooked evenly.
- Turn over food such as poultry and hamburgers while cooking them in a microwave oven in order to accelerate cooking of these kind of food. Larger food such as roast shall be turned over at east once.
- Turn food such as meatballs upside down in the middle of the cooking and replace them with each other from the center of the dish to the outside.
Grounding instructions
This appliance must be grounded. This oven has a ground cable with plug. Appliance shall be plugged to a wall outlet installed and grounded correctly. Grounding system allows a leak wire for the electrical current in case of a short circuit and reduces the risk of electric shock. We recommend to use an electrical circuit dedicated to the oven.
Installation
Operating with high voltage is dangerous and may cause fire or other accidents that would cause damage to the oven.
Warning:
Misuse of grounding plug may cause electric shock.
Notes:
- If you have any questions on grounding and electrical instructions, please consult a competent electric technician or service personnel.
• Manufacturer and/or dealer would not accept any responsibility for injuries or damages on the oven that may occur when electrical connection procedures are not followed.
Cables inside the power cord are color-coded as follows:
Green and Yellow = GROUND
Blue= NEUTRAL
Brown = LIVE
Oven wares
- Ideal material for microwave ove wares are materials that conduct microwave, these materials allows that energy can get through the oven ware and allows heating of the food.
- Microwave cannot penetrate through metals; therefore, metal or metal ornamented oven ware shall not be used.
- Do not use recycled paper products for microwave cooking as they may include small metallic parts that may cause sparks and/or fire.
- We recommend using round/oval dishes instead of square/rectangular dishes where food on the edges would be overheated.
- You may use narrow aluminum foil straps. However, be careful, do not use it excessively and allow a distance of 2.5 cm (1 inch) between the foil and inner surface of
Following list is a general guide that would help you in selecting the right oven ware.
| Cookware Microwave | |
| Heat-resistant glass Yes | |
| Non-heat-resistant glass No | |
| Heat-resistant ceramics Yes | |
| Plastic dish suitable for microwave oven | Yes |
| Paper kitchenware Yes | |
| Metal tray No | |
| nMetal rack No | |
| Aluminum foil and foil covers | No |
Operation
Control panel
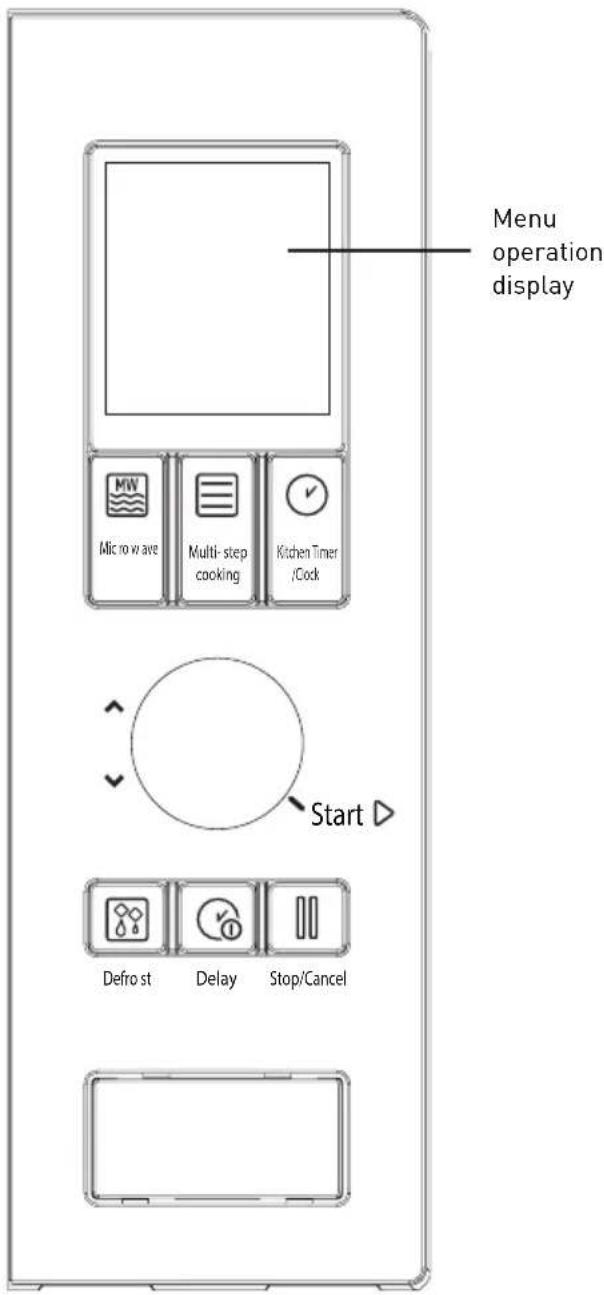
Microwave Button
Press this button a few times to set the level of microwave cooking.
Queued Cooking
You can program 3 automatic cooking queues in your oven.
Date / Time √
Press this button to set the time.
Defrosting
Press this button to defrost the food as per its weight.
Cooking Delay
Press this button to set a pre-set cooking program.
Stop/Cancel
Press this button to cancel a setting or to reset the oven before setting a cooking program.
Press the button once to stop cooking temporarily or twice to cancel it completely.
It is also used to set the child lock.
Start Button
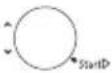
Turn the button to set current time, cooking duration, menu or weight.
Press the button to start a cooking programme.
If this button is pressed a couple of times to set a cooking duration, the oven will operate in full power.
Automatic cooking function selection is made with turning the button in counter-clockwise direction.
Setting of oven controls
A signal sound is given while setting the oven.
1 BEEP: Oven accepts the input.
2 BEEPS: Oven rejects the input. Check and try again.
Operation
Setting of the digital clock
If you want to set the current time to 08:30.
- While in standby mode, press the DURATION/TIME button and set the time in 24H format.
- Turn the START button and set the hour to 8.
- Press "DURATION/TIME" button for once.
- Turn the START button and set the minute to 8:30.
- Press "DURATION/TIME" button for once to approve.
Note:
- You may check the time setting during cooking by pressing the TIME/CLOCK button once.
Microwave cooking
The longest cooking duration for microwave is 95 minutes. You can set the power level pressing the MICROWAVE button repeatedly.
- For example, if you want to cool for 5 minutes with 60% microwave power.
- Press STOP/CANCEL button.
- Press the POWER LEVEL button repeatedly to select the power level.
| Display Cooking Power | |
| P100 100% | |
| P80 80% | |
| eP60 60% | |
| P40 40% | |
| P20 20% | |
| eP00 00% | |
- Turn the START button until 5:00 is displayed.
- Press the START button.
Notes:
- You may check the cooking power while cooking by pressing the MI-CROWAVE button.
- Oven gives a signal sound when cooking/defrosting time is completed and "End" message is displayed on the display; clear the display by pressing STOP/CANCEL button or opening the door before setting another function. (It may be used for the following cooking functions.)
Quick start
This feature is used for operating the oven quickly. The longest cooking duration is 10 minutes.
To set the cooking duration while in standby mode, press the START button repeatedly in a quick manner; the oven immediately starts operating in full power.
Operation
Defrosting by weight
The oven can defrosts food depending on the weight you enter. After the oven is set, duration and defrosting power are automatically set. Food weight varies between 100 g and 1.800 g.
If you want to defrost 600 g of shrimps:
- Place the shrimps in the oven and close the door.
- Press STOP/CANCEL button.
- Press "DEFROST" button for once.
- Turn the START button until 600 g is displayed.
- Press the START button.
Note:
• During the defrosting procedure,
system pauses and gives an audible signal to remind you to turn over the food, press the START button then in order to continue with the procedure.
Cooking Delay
Cooking delay function enables the oven to be operated at a later time. For example current time is 9:00 and you want the oven to start cooking at 11:30.
- Set a cooking programme.
- Press the MICROWAVE button repeatedly to select the power level.
- Turn the START button until the desired time is displayed.
-
Press the COOKING DELAY button.
-
Turn the START button and set the hour to 11.
- Press the COOKING DELAY button.
- Turn the START button and set the minute to 30.
- Press the START button to approve.
Notes:
- You may check the presetting time by pressing the COOKING DELAY button when you have set the function. To cancel this feature, press COOKING DELAY button, and then STOP/CANCEL button.
- When the cooking delay time is reached, signals which indicate that preset cooking program is about to start.
- Presetting is not possible in Defrosting and Quick Start functions
Queued Cooking (Multi-functional cooking)
You can program 3 automatic cooking queues in your oven.
If you want set the following cooking programme:
1 minute in 60% power level, 2 minutes in 100% power level.
- Press STOP/CANCEL button.
- Press the MICROWAVE button repeatedly until P60 is displayed.
- Turn the START button until 1 minute is displayed.
- Press the MICROWAVE button repeatedly until P100 is displayed.
Operation
- Turn the START button until minutes is displayed.
- Press the START button.
Note:
- Start, Menu and Defrosting Weight cannot be set in multi-step cooking mode. The related lamps are turned on to indicate the operation stage of the oven.
Automatic cooking
For foods and following cooking mode, setting the duration and cooking power is not necessary. You may just enter the type of the food and the weight of that food.
You may have to turn over the food in the middle of cooking period in order to achieve an even cooking.
Example : Cooking 400 g. of fish
- Press STOP/CANCEL button.
- Rotate the START button counter clockwise to select the food code. Selected symbol shall be illuminated on the display.
- Press the START button.
- Enter 400 g. by rotating the STAR button.
- Press the START button.
Automatic Cooking Menu
| Code Food/cooking mode | For milk/coffee, potato, serving amount is entered instead of weight. There is only one option for popcornThe result of automatic cooking depends on factors such as voltage fluctuation, shape and size of the food, your personal choice on the cooking level of specific food, and even how well you have placed the food in the oven. If you have not found the result satisfactory, please set the cooking time more appropriately for your choice. |
| A-1 Milk/Coffee (200 ml/cup) | |
| A-2 Meat | |
| A-3 Spaghetti | |
| A-4 Potatoes (230 g/piece) | |
| A-5 Automatic Re-Heating (g) | |
| A-6 Fish (g) | |
| A-7 Pizza | |
| A-8 Vegetables | |
| A-9 Popcorn |
Child lock
Use this feature to prevent operation of the oven by unattended little children. Child lock symbol is displayed and oven cannot be operated while the Child Lock is set.
To set: When the oven is in standby or presetting mode, press and hold the STOP/CANCEL button for 3 seconds, a beep is heard and lock symbol is illuminated. All buttons are deactivated in the lock mode.
To cancel: Press and hold STOP/CANCEL button for 3 seconds until the lock symbol on the display is turned off.
Cleaning and maintenance
Cleaning
Warning:
- Never use gasoline, solvent, abrasive cleaning agents, metal objects or hard brushes to clean the appliance.
- Never immerse the appliance or its power cable in water or in any other liquid.
- Turn the appliance off and disconnect it from wall socket.
- Let the appliance cool down completely.
- Keep the inside of the oven clean. Wipe over with a damp cloth when splashed food or spilled liquids stick on the walls of the oven. A mild detergent may be used if the oven gets very dirty. Avoid using sprays and other harsh cleaning agents as they may cause stains, marks, and opaqueness on the door surface.
- Outer surfaces of the oven shall be cleaned with a damp cloth. Do not allow water ingress from ventilation holes to prevent damage to the operating parts in the oven.
-
Wipe both sides of the door and the glass, door gaskets and parts near the gaskets frequently with a damp cloth in order to remove the overflowing and spilling stains. Do not use abrasive cleaning agents.
-
Do not allow control panel to become wet. Clean with a soft damp cloth. Leave the door of the oven open to prevent operation of inadvertently while cleaning the control panel.
- If steam accumulates inside or around the oven door, wipe with a soft cloth. This may occur when the microwave oven is operated under high humidity conditions. This is normal.
- Sometimes you may need to the remove the glass tray for cleaning. Wash the tray in warm soapy water or in a dishwasher.
- The roller ring and oven floor should be cleaned regularly to avoid excessive noise. It would be adequate to wipe the lower surface of the oven with a mild detergent. Roller ring may be washed in warm soapy water or in a dishwasher. When you remove the roller ring from oven internal floor for cleaning, ensure that you install it in the correct position while replacing it.
- In order to remove bad odors in your oven, put a glass of water and juice and peel of a lemon to a deep bowl suitable for use in microwave and operate the oven for 5 minutes in microwave mode. Wipe thoroughly and dry with a soft cloth.
- Please contact the authorized service when the oven lamp shall be replaced.
Cleaning and maintenance
- The oven should be cleaned regularly and any food deposits removed. If the oven is not kept clean, this may cause surface defects that would affect the lifecycle of the appliance negatively and that would possibly cause risks.
- Please do not dispose this appliance with household waste; old ovens shall be disposed to special waste centers provided by the municipalities.
Storage
- If you do not intend to use the appliance for a long time, please store it carefully.
-
Please make sure that the appliance is unplugged, cooled down and totally dry.
-
Keep the appliance in a cool, dry place.
- Keep the appliance out of the reach of children.
24 months breakdown and repair guarantee
Guarantor: Beko plc, 1 Greenhill Crescent, Watford, Hertfordshire. WD18 8UF
The guarantee does not in any way diminish your statutory or legal rights.
Your appliance has the benefit of our manufacturer's guarantee which covers the product for 24 months from the date of original purchase.
This gives you reassurance that if within that time, your appliance is proven to be defective because of either workmanship or materials, we will at our discretion either repair or replace your appliance.
The appliance must be correctly installed, located and operated in accordance with the instructions contained in the user manual. The guarantor disclaims any liability for accidental or consequential damage.
The Guarantee is subject to the following conditions:
• Documentary proof of the original purchase date is provided.
- The appliance has been installed and operated correctly in accordance with our operating and maintenance instructions.
• The appliance is used only on the electricity supply shown on the rating plate.
• The appliance has only been used for normal domestic purposes.
• The appliance has not been altered, serviced, dismantled or otherwise interfered with by any person.
• The appliance is used in the United Kingdom or the Republic of Ireland.
• Any parts removed during repair work or any product that has been replaced becomes our property.
• The guarantee is not transferrable if the product is resold.
The Guarantee does not cover:
• Transit, installation or delivery damage.
- Accidental damage.
- Misuse or abuse.
- Replacement of any consumable item or accessories. These include but are not limited to: plugs, cables, light bulbs, knobs, filters and flaps.
- Repairs or replacements required as a result of unauthorised repairs or inexpert installation that fails to meet the requirements contained in the user guide or instruction book.
• Repairs to products used in commercial or non-residential household premises.
How to obtain after sales service, help or general advice
Please keep your purchase receipt or other proof of purchase in a safe place as you will need to show us this document if your product requires attention within the guarantee period.
Please also record your product details below, which will allow you to access our services more quickly and help us identify your product. The model number is printed on the front of the user guide and the serial and model number is shown on your products rating plate.
| Model number | Serial number | Purchased from | Date of purchase |
Please call our UK based Customer Service department if you need urgent help or advice from us:
United Kingdom and Northern Ireland: 0333 207 9920
Republic of Ireland: 01 691 0203
You can also contact us through our website: www.grundig.co.uk
GRUNDIG
- Contents
- Important safety and environmental instructions
- General safety
- h Electrical safety
- Product safety
- Children's safety
- Intended use
- Compliance with the WEEE Directive and disposal of waste products
- Package information
- Plug Wiring
- Technical specifications
- Control and parts
- Technical data
- CE
- Installation
- Radio interference
- Microwave cooking principles
- Grounding instructions
- Warning:
- Notes:
- Oven wares
- Operation
- Control panel
- Microwave Button
- Queued Cooking
- Date / Time √
- Defrosting
- Cooking Delay
- Stop/Cancel
- Start Button
- Setting of oven controls
- Setting of the digital clock
- Note:
- Microwave cooking
- Quick start
- Defrosting by weight
- Queued Cooking (Multi-functional cooking)
- Automatic cooking
- Child lock
- Cleaning and maintenance
- Cleaning
- Storage
- months breakdown and repair guarantee
- Your appliance has the benefit of our manufacturer's guarantee which covers the product for 24 months from the date of original purchase.
- The Guarantee is subject to the following conditions:
- The Guarantee does not cover:
- How to obtain after sales service, help or general advice
- GRUNDIG
Brand : GRUNDIG
Model : GMF2120BCL
Category : Microwaves