
GMI2120B - Microwaves GRUNDIG - Free user manual and instructions
Find the device manual for free GMI2120B GRUNDIG in PDF.


| Product Type | Solo Microwave |
| Brand | Grundig |
| Model | GMI2120B |
| Capacity | 20 Liters |
| Microwave Power | 700 Watts |
| Power Supply | 230 V / 50 Hz |
| Dimensions (HxWxD) | 26 cm x 45 cm x 36 cm |
| Weight | 11 kg |
| Display Type | Digital LED |
| Control Type | Touch + Dial |
| Defrost Function | Yes, by weight or time |
| Auto Cook Programs | 8 preset menus |
| Timer | Up to 95 minutes |
| Child Lock | Yes |
| Interior Light | Yes |
| Turntable | Glass turntable, 24.5 cm diameter |
| Cleaning | Wipe with damp cloth; mild detergent |
| Safety Features | Door interlock, overheat protection |
| Warranty | 2 years |
| Spare Parts Availability | Turntable, fuse, door parts |
Frequently Asked Questions - GMI2120B GRUNDIG
User questions about GMI2120B GRUNDIG
0 question about this device. Answer the ones you know or ask your own.
Ask a new question about this device
Download the instructions for your Microwaves in PDF format for free! Find your manual GMI2120B - GRUNDIG and take your electronic device back in hand. On this page are published all the documents necessary for the use of your device. GMI2120B by GRUNDIG.
USER MANUAL GMI2120B GRUNDIG
natural_image
Simple icon of a microwave oven with a steaming bowl (no text or symbols)GMI 2120 B
EN
Thank you for choosing a Grundig appliance.
Please take some time to read this user manual before using your appliance, to ensure you know how to safely operate the controls and functions.
Carefully follow all unpacking and installation instructions to ensure the appliance is correctly connected and fitted prior to use.
Please write your product model and serial number on the last page of this user manual, and store in a safe location close to the appliance for easy future reference.
This user manual may also be applicable for several other models. Differences between models will be listed.
If you have any questions or concerns, please call our contact centre or find help and information online at www.grundig.co.uk
Meanings of the symbols
Following symbols are used in the various section of this user manual:
 | Important information and useful hints about usage. |
 | Warnings for dangerous situations concerning the safety of life and property. |
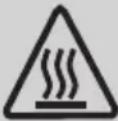 | Warning for hot surfaces. |
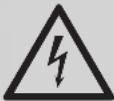 | Warning for electric shock. |
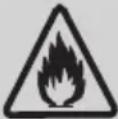 | Warning for danger of fire. |
ENGLISH 15 - 24
Important safety and environmental instructions
Important Safety Instructions Read Carefully And Keep For Future Reference
Safety warnings
This section contains safety instructions that will help protect from risk of fire, electric shock, exposure to leak microwave energy, personal injury or property damage. Failure to follow these instructions shall void any warranty.
■Grundig Microwave Ovens comply with the applicable safety standards; therefore, in case of any damage on the appliance or power cable, it should be repaired or replaced by the dealer, service center or a specialist and authorized service alike to avoid any danger. Faulty or unqualified repair work may be dangerous and cause risk to the user.
■This appliance is intended to be used in household and similar applications such as:
- Staff kitchen areas in shops, offices and other working environments;
- Farm houses
— By clients in hotels, and other residential type environments; - Bed and Breakfast type environments.
■It is not intended for industrial or laboratory use.
- Do not attempt to start the oven when its door is open; otherwise you may be exposed to harmful microwave energy. Safety locks should not be disabled or tampered with.
■The microwave oven is intended for heating food and beverages. Drying of food or clothing and heating of warming pads, slippers, sponges, damp cloth and similar may lead to risk of injury, ignition or fire.
Important safety and environmental instructions
- Do not place any object between the front side and the door of the oven. Do not allow dirt or cleaning agent remnants to build up on the closure surfaces.
■Any service works involving removal of the cover that provides protection against exposure to microwave energy must be performed by authorized persons/service. Any other approach is dangerous. - Your product is intended for cooking, heating and defrost food at home. It must not be used for commercial purposes.
■Your oven is not designed to dry any living being.
■Do not use your appliance to dry clothes or kitchen towels. - Do not use this appliance outdoors, bathrooms, humid environments or in places where the it can get wet.
■No responsibility or warranty claim shall be assumed for damages arising from misuse or improper handling of the appliance.
■Never attempt to dismantle the appliance. No warranty claims are accepted for damage caused by improper handling.
■Only use the original parts or parts recommended by the manufacturer.
■Do not leave this appliance un-attended while it is in use.
■Always use the appliance on a stable, flat, clean dry, and non-slip surface.
■The appliance should not be operated with an external clock timer or separate remote control system.
■Before using the appliance for the first time, clean all parts. Please see the details given in the “Cleaning and Maintenance” section.
■Operate the appliance for its intended purpose only as described in this manual.
■Appliance becomes very hot while it is in use. Pay attention not to touch the hot parts inside the oven.
Important safety and environmental instructions
■Do not operate the oven empty.
■Cooking utensil may get hot due to the heat transferred from the heated food to the utensil. You may need oven gloves to hold the utensil.
■Utensils shall be checked to ensure that they are suitable for use in microwave ovens.
■Do not place the oven on stoves or other heat generating appliances. Otherwise, it may be damaged and the warranty becomes void.
■Steam may come out while opening the covers or the foil after cooking the food.
■The appliance and its accessible surfaces may be very hot when the appliance is in use.
■Door and outer glass may be very hot when the appliance is in use.
■Make sure that your mains power supply complies with the information supplied on the rating plate of the appliance.
■The only way to disconnect the appliance from the power supply is to remove the power plug from the power outlet.
■Use the appliance with a grounded outlet only.
■Never use the appliance if the power cable or the appliance itself is damaged.
■Do not use this appliance with an extension cord.
■Never touch the appliance or its plug with damp or wet hands.
■Place the appliance in a way so that the plug is always accessible.
■Prevent damage to the power cable by not squeezing, bending, or rubbing it on sharp edges. Keep the power cable away from hot surfaces and naked flame.
■Make sure that there is no danger that the power cable could be accidentally pulled or that someone could trip over it when the appliance is in use.
Important safety and environmental instructions
■Unplug the appliance before each cleaning and when the appliance is not in use.
- Do not pull the power cable of the appliance to disconnect it from its power supply and never wrap its power cable around the appliance.
■Do not immerse the appliance, power cable, or power plug in water or any other liquids. Do not hold it under running water.
- When heating food in plastic or paper containers, keep an eye on the oven due to the possibility of ignition.
■Remove the wire strings and/or metal handles of paper or plastic bags before placing bags to the oven.
■If smoke is observed, switch off or unplug the appliance if safe to do so and keep the door closed in order to stifle any flames.
- Do not use microwave oven for storage. Do not leave paper items, cooking material or food inside the oven when it is not being used.
■The contents of feeding bottles and baby food jars should be stirred or shaken and the temperature checked before consumption, in order to avoid burns.
■This appliance is a Group 2 Class B ISM equipment. Group 2 contains all ISM (Industrial, Scientific and Medical) equipment in which radio-frequency energy is intentionally generated and/or used in the form of electromagnetic radiation for the treatment of material, and spark erosion equipment.
■Class B equipment is suitable for use in domestic establishments and establishments directly connected to a low voltage power supply network.
■Do not use cooking oil in the oven. Hot oil may damage the components and materials of the oven, and it may even cause skin burns.
■Pierce food with thick crust such as potatoes, courgettes, apples and chestnuts.
Important safety and environmental instructions
■Appliance must be placed so that the rear side is facing the wall.
■Before moving the appliance, please secure the turntable to prevent damage.
■Eggs in their shell and whole hard-boiled eggs must not be heated in microwave ovens since they may explode, even after microwave heating has ended.
WARNING: If the door or door seals are damaged, the oven must not be operated until it has been repaired by a competent person.
WARNING: It is hazardous for anyone other than a competent person to carry out any service or repair operation which involves the removal of a cover which gives protection against exposure to microwave energy.
WARNING: Liquids and other foods must not be heated in sealed containers since they are liable to explode.
■The oven should be cleaned regularly and any food deposits removed.
■There should be min 20 cm free space above the top surface of the oven.
■Do not over-cook foods; otherwise, you may cause a fire.
■Do not use chemicals and steam assisted cleaners to clean the appliance.
■Extreme caution is advised when being used near children and persons who are restricted in their physical, sensory or mental abilities.
■This appliance can be used by the children who are at the age of 8 or over and by the people who have limited physical, sensory or mental capacity or who do not have knowledge and experience, as long as they are supervised with regard to safe use of the product or they are instructed accordingly or understand the risks of using the product. Children should not play with the appliance.
Important safety and environmental instructions
Cleaning and user maintenance procedures should not be performed by children unless they are controlled by their elders.
■Danger of choking! Keep all the packaging materials away from children.
■Due to excessive heat that arises in grill and combination modes, children should only be allowed to use these modes under supervision of an adult.
- Keep the product and its power cable so that they are inaccessible by children under 8 years old.
■Do not cook food directly on the glass tray. Put the food in / on appropriate kitchen utensils before placing them in the oven.
■Metallic containers for food and beverages are not allowed during microwave cooking. Otherwise, sparking may occur.
■Microwave oven must not be placed in a cabinet that is not in compliance with the installation instructions.
■Microwave oven is intended for built-in use only.
If built-in appliances being used equal or higher than 900 mm above the floor, care should be taken not to displace the turntable when removing containers from the appliance.
■If the built-in product is in a cabinet with a door, the product must be operated with the cabinet door open.
Compliance with WEEE Directive and Disposing of the Waste Product
This product complies with EU WEEE Directive (2012/19/EU). This product bears a classification symbol for waste electrical and electronic equipment (WEEE).
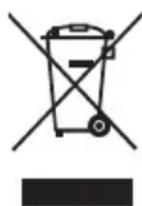
This symbol indicates that this product shall not be disposed with other household wastes at the end of its service life. Used device must be returned to official collection point for recycling of electrical and electronic devices. To find these collection systems please contact to your local authorities or retailer where the product was purchased. Each household performs important role in recovering and recycling of old appliance. Appropriate disposal of used appliance helps prevent potential negative consequences for the environment and human health.
Important safety and environmental instructions
Compliance with RoHS Directive
The product you have purchased complies with EU RoHS Directive (2011/65/EU). It does not contain harmful and prohibited materials specified in the Directive.
Package Information

Packaging materials of the product are manufactured from recyclable materials in accordance with our National Environment Regulations. Do not dispose of the packaging materials together with the domestic or other wastes. Take them to the packaging material collection points designated by the local authorities.
Plug Wiring
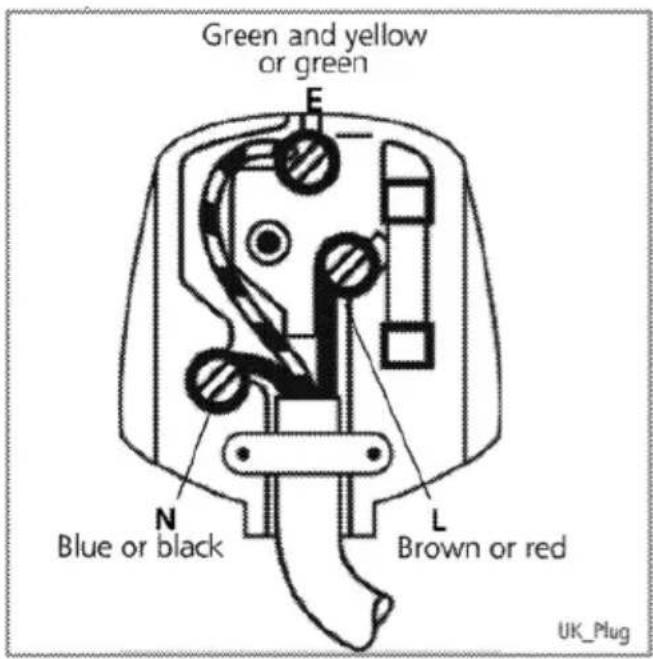
The moulded plug on this appliance incorporates a 13 A fuse. Should the fuse need to be replaced an ASTA approved BS1362 fuse of the same rating must be used. Do not forget to refit the fuse cover. In the event of losing the fuse cover, the plug must not be used until a replacement fuse cover has been fitted. Colour of the replacement fuse cover must be the same colour as that visible on the pin face of the plug Fuse covers are available from any good electrical store.
■Fiting a different plug
■As the colours of the wires in the mains lead of this appliance may not correspond with the coloured markings identifying the terminals on your plug, proceed as follows:
■Brown cable = L (Live)
■Blue cable = N (Neutral)
■Green/yellow cable must be connected to ground (E)
■With the alternative plugs a 13 A fuse must be fitted either in the plug or adaptore or in the main fuse box. If in doubt contact a qualified electrician.
Technical specifications
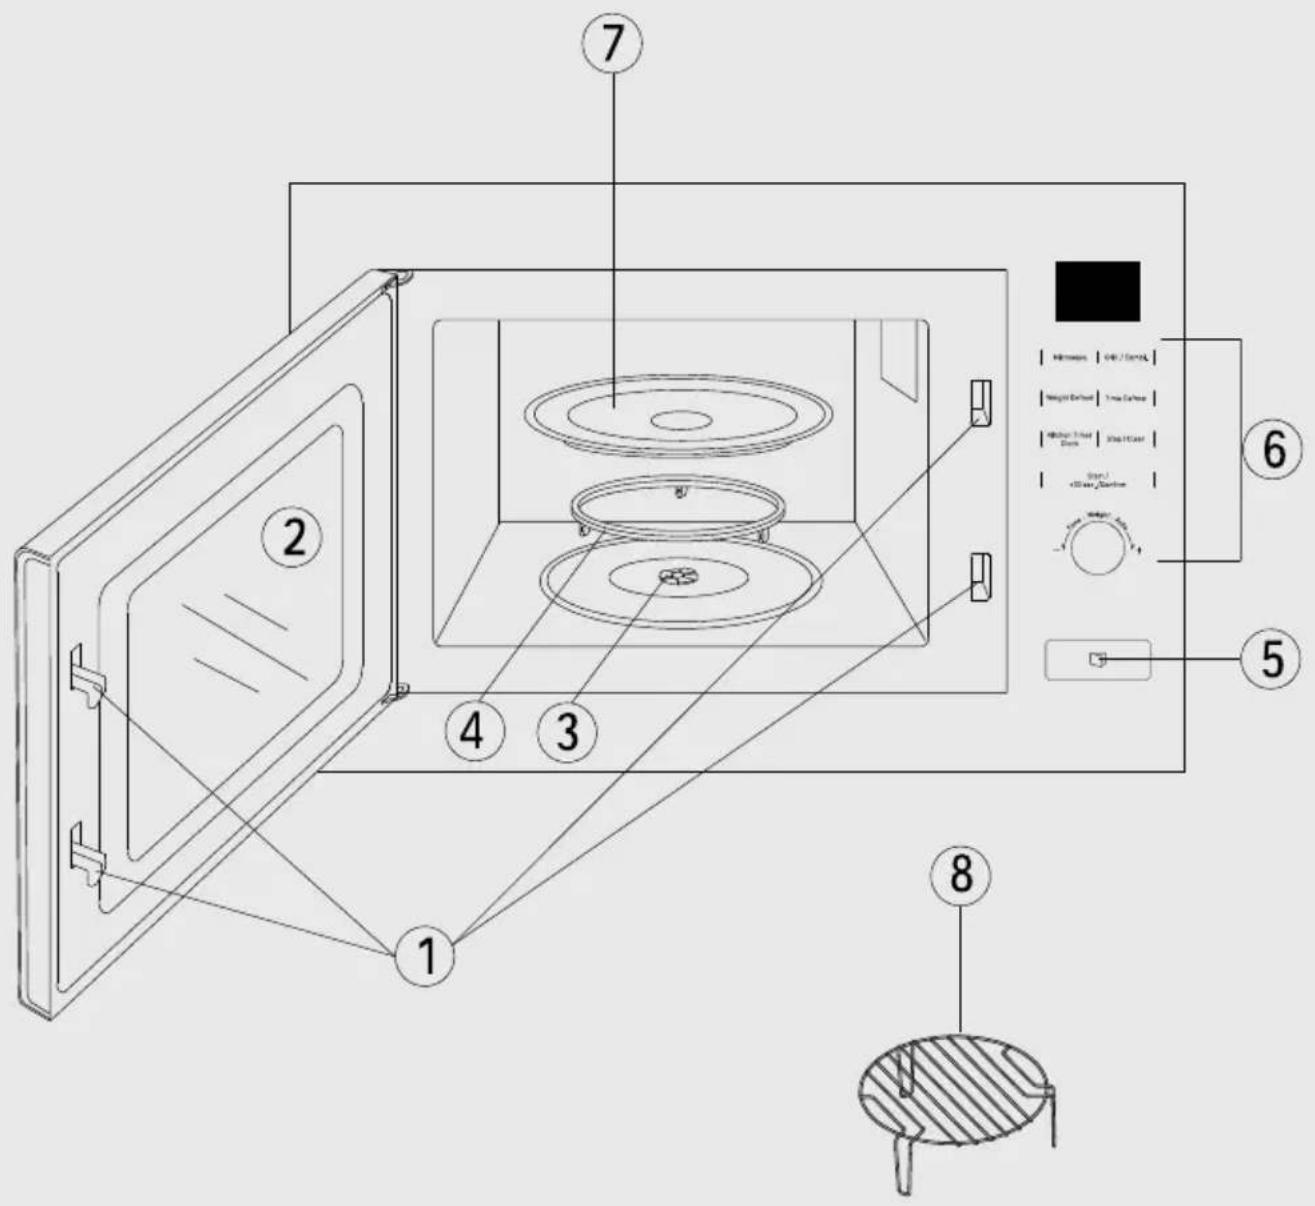
Control and parts
- Door Safety Interlock System
- Oven Window
- Turntable shaft
- Turntable support
- Door opening button
-
Control Panel
-
Microwave
- Grill / Combi.
- Weight Defrost
– Time Defrost - Kitchen Timer Clock
- Stop / Clear
-
Start/+30Sec./Confirm
– Time / Weight / Auto (Push-out button) -
Glass Tray
-
Grill Rack ( Can not be used in microwave function and must be placed on the glass tray )
Technical data
| Power consumption | 230 V~50 Hz, 1270 W (Microwave) 1000 W (Grill) |
| Output 800 W | |
| Operating frequency | 2450 MHz |
| External dimensions (Hx Wx D) mm | 382x594x333 |
| Oven Capacity 20 Litres | |
| Net Weight 16.5 kg | |
| Color Black | |
Technical and design modification rights are reserved.
Markings on the appliance or the values stated in other documents supplied with the product are values obtained under laboratory conditions as per relevant standards. These values may vary according to the usage of the appliance and ambient conditions. Power values are tested at 230 V.
Installation Instruction
■Please observe the special installation instructions.
■The appliance can be installed in a 60cm wide wallmounted cupboard.
■The appliance is fitted with a plug and must only be connected to a properly installed earthed socket.
■The mains voltage must correspond to the voltage specified on the rating plate.
■The socket must be installed and connecting cable must only be replaced by a qualified electrician. If the plug is no longer to accessible following installation, an all-pole disconnecting device must be present on the installation side with a contact gap of at least 3mm.
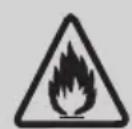
WARNING: Adapters, multi-way strips and extension leads must not be used. Overloading can result in a risk of fire.
Electrical connection
■The appliance is fitted with a plug and must only be connected to a properly installed earthed socket.
■Only a qualified electrician who takes the appropriate regulations into account may install the socket or replace the connecting cable.
If the plug is no longer accessible following installation, an all-pole isolating switch must be present on the installation side with a contact gap of at least 3 mm.
■Contact protection must be ensured by the installation.
Installation and connection
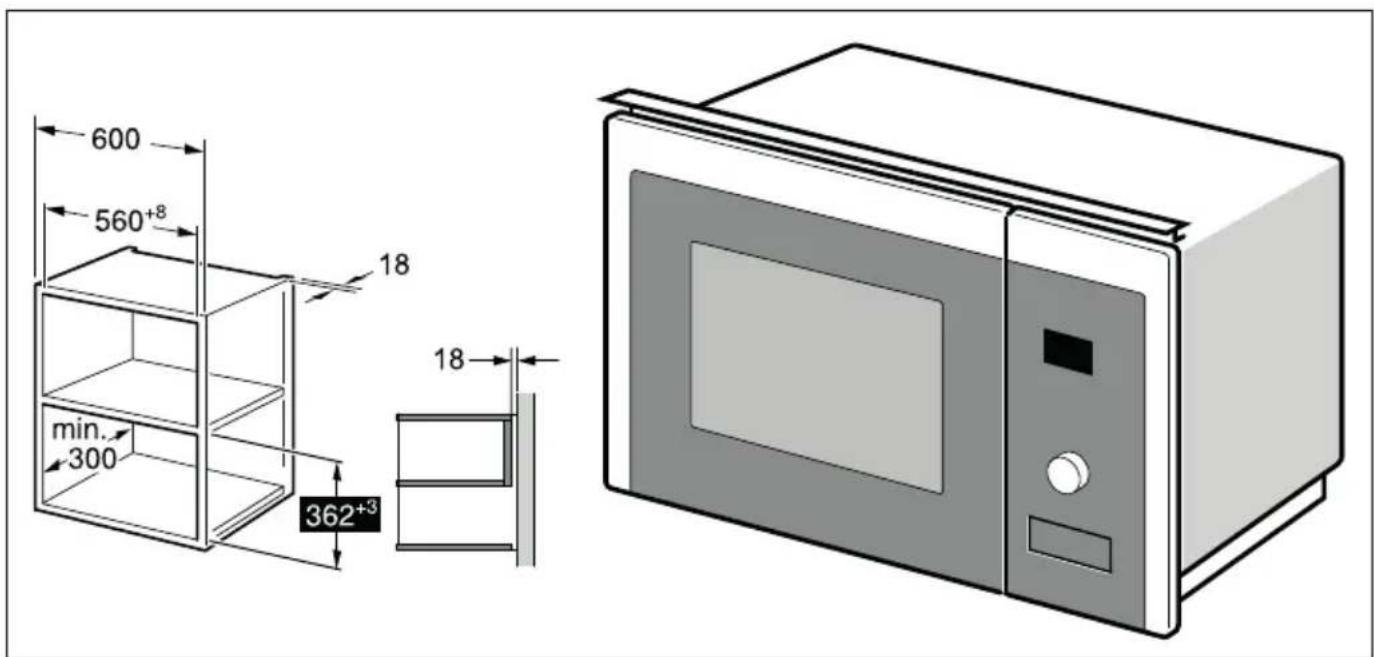
Appliance in a wall-hanging unit
The installation cabinet must not have a back panel behind the appliance.
Minimum installation height: 850 mm. Ventilation slots and intakes must not be covered.
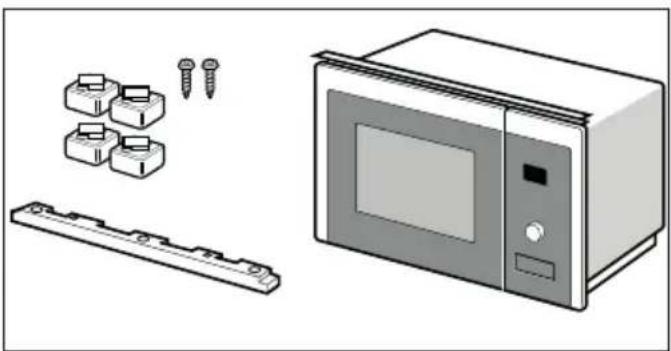
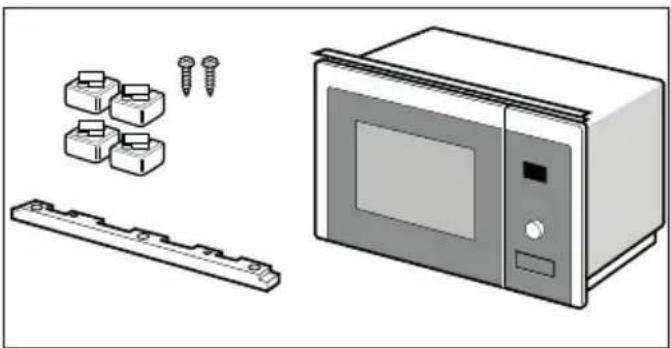
Parts;
natural_image
Illustration of a microwave oven, screw holder, and plastic tray (no text or symbols)Appliance in a wall-hanging unit
Installation and connection
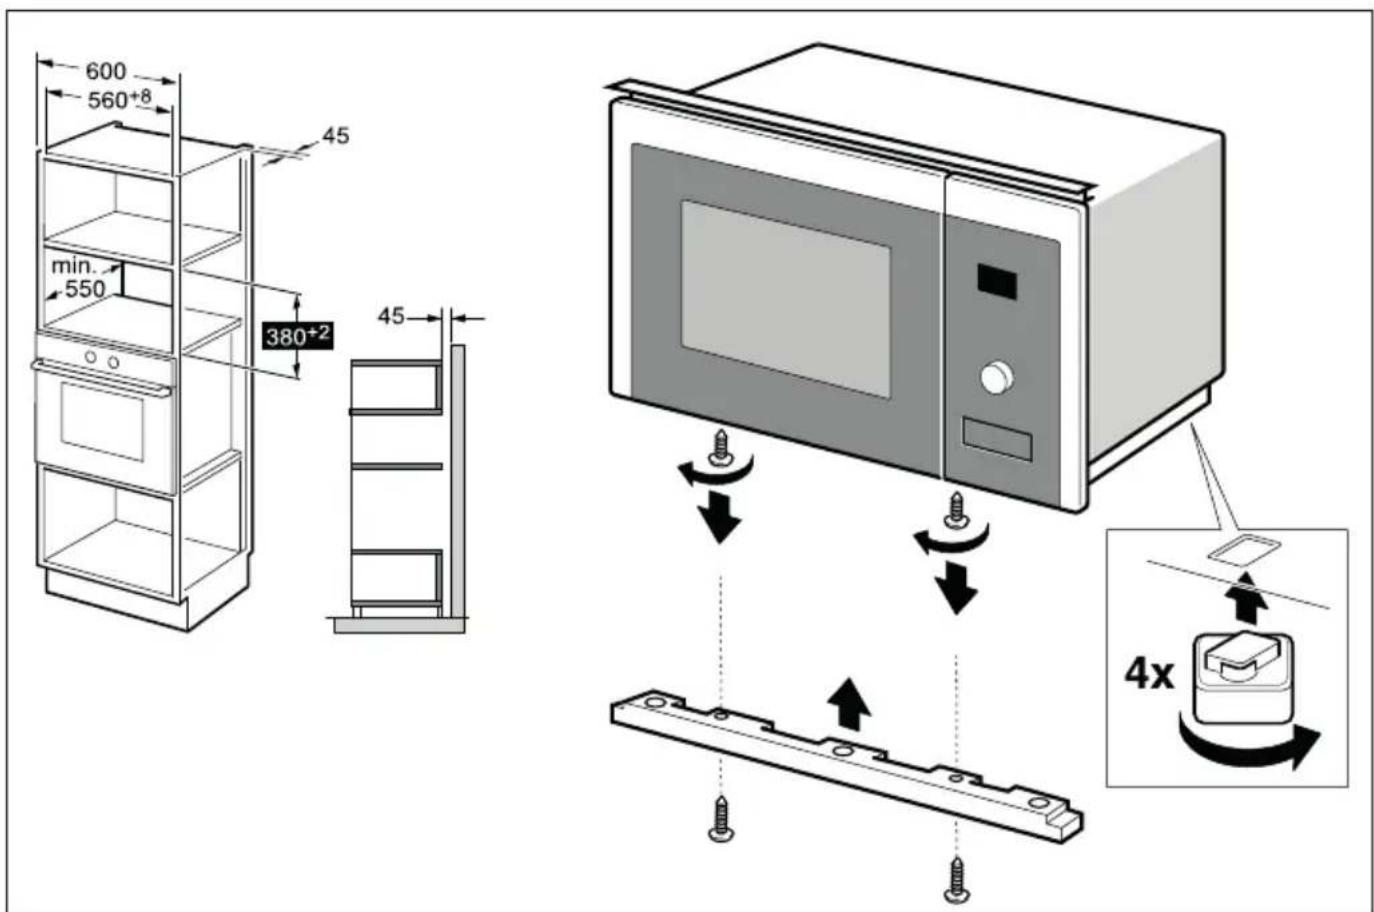
Appliance in a tall unit
The installation cabinet must not have a back panel behind the appliance.
Minimum installation height: 850 mm. Ventilation slots and intakes must not be covered.
Parts;
natural_image
Illustration of a microwave oven, screw holder, and plastic tray (no text or symbols)Appliance in a tall unit
Installation and connection
Installing the oven
WARNING: Do not trap or kink the mains lead.
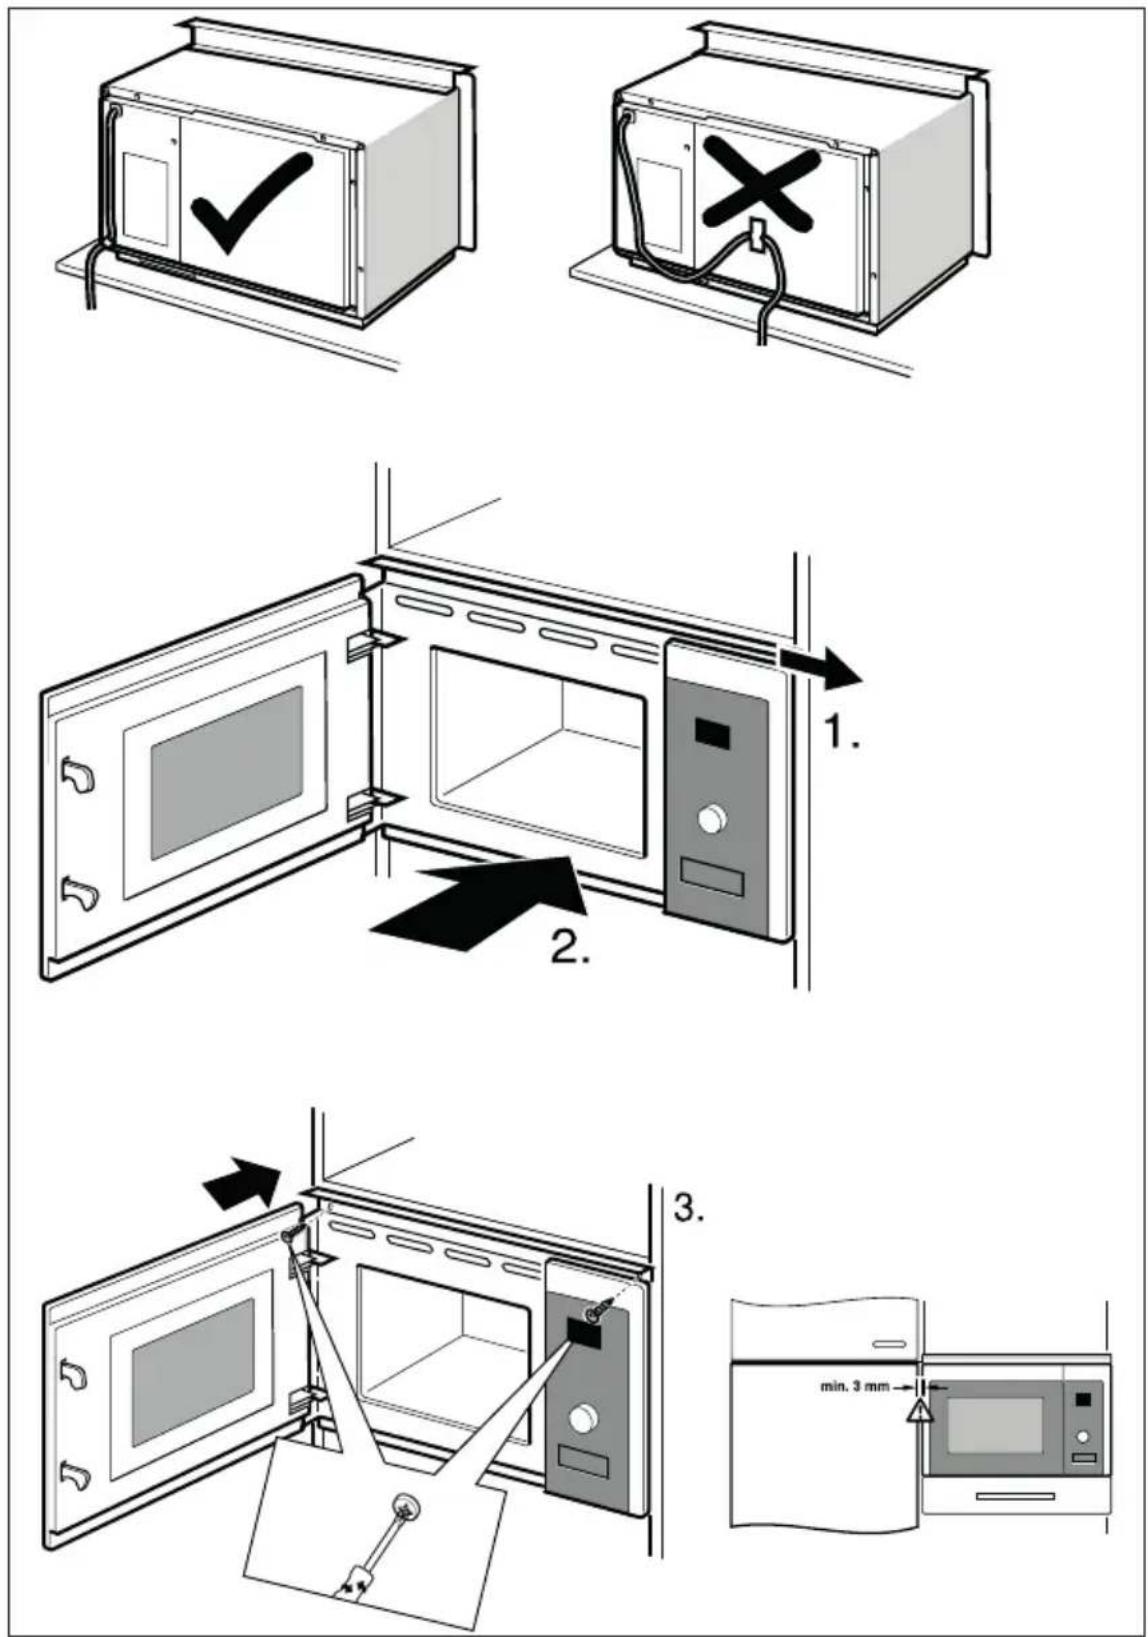
Installation and connection
Installing the turntable
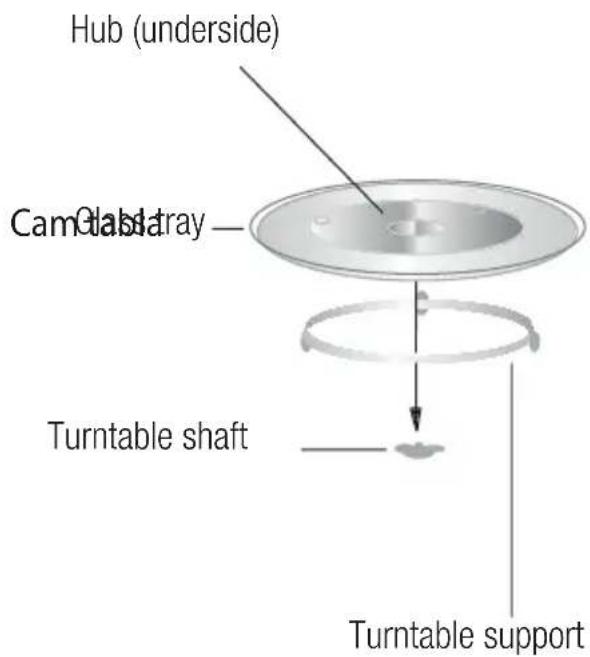
■ Never place the glass tray upside down. The glass tray should never be restricted.
■ Both glass tray and turntable support must always be used during cooking.
■All food and containers of food must always place on the glass tray for cooking.
■If glass tray or turntable support crack or break, contact your nearest authorized service center.
Control panel Clock setting
natural_image
Solid dark gray rectangle with no visible text, symbols, or features.Microwave
Grill / Combi.
Weight Defrost
Time Defrost
Kitchen Timer Clock
Stop / Clear
Start /
+30 sec./Confirm
flowchart
graph TD
    A["Time"] --> B["Weight"]
    B --> C["Auto"]
    C --> A
    A --> D["-"]

natural_image
Simple 3D rectangular block diagram with no text or symbolsWhen the microwave oven is electrified, the oven will display "0:00", buzzer will ring once. The oven will enter to waiting state.
1 Press "Kitchen Timer/Clock" twice and the figures for hours will start flashing.
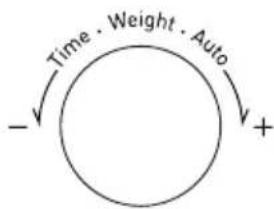
2 Turn "Time / Weight / Auto" to adjust the hour; the input value should be between 0 and 23.
3 Press "Kitchen Timer/Clock" and the figures for minutes will start flashing.
4 Turn "Time / Weight / Auto" to adjust the minutes; the input value should be between 0 and 59.
5 Press "Kitchen Timer/Clock" to finish time setting. ":" symbol will flash, and the time will light.

If the clock is not set, it would not function when powered.
Microwave cooking
1 Press the "Microwave" key once, and "P100" will display.
2 Press "Microwave" again or turn "Time / Weight / Auto" to select the desired power. Each time you press the key, "P100", "P80", "P50", "P30" or "P10" will be displayed respectively.
3 Press "Start/+30 Sec./Confirm" to confirm the desired power.
4 Turn "Time / Weight / Auto" to set the cooking time to a value between 0:05 and 95:00.
5 Press "Start/+30 Sec./Confirm" again to start cooking.
6 The time on the screen starts to count down.
7 The "beep" sound can be heard after process finished.
The steps for adjusting the time in coding button are as below:
| Setting the duration | Increment amount |
| 0-1 minute 5 seconds | |
| 1-5 minutes 10 seconds | |
| 5-10 minutes 30 seconds | |
| 10-30 minutes 1 minute | |
| 30-95 minutes 5 minutes |
Microwave Power Chart
| Microwave Power | High | Med. High | Med. | Med. Low | Low |
| Display P1 | 00 P80 | P50 P30 | P10 |
Grill or combi. cooking
1 Press "Grill/Combi." once, the screen will display "G".
2 Press repeatedly or turn "Time / Weight / Auto" to choose the power you want, and "G", "C-1" or "C-2" will display.
3 Press "Start/+30Sec./Confirm" to confirm the power.
4 Turn "Time / Weight / Auto" to set cooking time. (The maximum cooking time is 95 minutes)
5 Press "Start/+30Sec./Confirm" again to start cooking.
6 The time on the screen starts to count down.
7 The "beep" sound can be heard after process finished.
Combination Power instructions
| Program Display Mic- | rowave power | Grill power | |
| Grill G | 0% | 100% | |
| Combi.1 C-1 | 55% | 45% | |
| Combi.2 C-2 | 36% | 64% | |

If half the grill time passes, the oven sounds twice, and this is normal. In order to have a better effect of grilling food, you should turn the food over, close the door, and then press "Start/+30Sec./Confirm" to continue cooking. If no operation, the oven will continue working.
Defrost by weight
1 Press "Weight Defrost" once, the screen will display "dEF1".
2 Turn "Time / Weight / Auto" to select the food weight. The range of weight is 100-2000g.
3 Press "Start/+30Sec./Confirm" key to start defrosting.
4 The time on the screen starts to count down.
5 The "beep" sound can be heard after process finished.

If half the defrost time passes, the oven sounds twice, and this is normal. In order to have a better effect of defrosting, you should turn the food over, close the door, and then press “Start/+30Sec./Confirm” to continue cooking. If no operation, the oven will continue working.
Defrost by time
1 Press "Time Defrost" once, the screen will display "dEF2".
2 Turn "Time / Weight / Auto" to select the cooking time. The maximum time is 95 minutes.
3 Press "Start/+30Sec./Confirm" key to start defrosting.
4 The time on the screen starts to count down.
5 The “beep” sound can be heard after process finished.

If half the defrost time passes, the oven sounds twice, and this is normal. In order to have a better effect of defrosting, you should turn the food over, close the door, and then press “Start/+30Sec./Confirm” to continue cooking. If no operation, the oven will continue working.
Multi-stage cooking
2 stages can be maximally set. If one stages is defrosting, it should be put in the first stage automatically. The buzzer will ring once after each stage and the next stage will begin.

Auto menu and speedy cooking cannot be set as one of the multi-stage.
Example: If you want to defrost the food for 5 minutes, then to cook with 80% microwave power for 7 minutes.
The steps are as following:
1 Press "Time Defrost" once, the screen will display "dEF2".
2 Turn "Time / Weight / Auto" to adjust the defrost time of 5 minutes;
3 Press "Microwave" once, the screen will display "P100".
4 Press "Microwave" repeatedly to choose microwave power till "P80" displays;
5 Press "Start/+30Sec./Confirm" to confirm.
6 Turn "Time / Weight / Auto" to adjust the cooking time of 7 minutes;
7 Press "Start/+30Sec./Confirm" to start cooking.
8 The “beep” sound can be heard after process finished.
Kitchen timer
1 Press "Kitchen Timer/Clock" once, the screen will display "00:00".
2 Turn "Time / Weight / Auto" to enter the correct timer. (The maximum cooking time is 95 minutes)
3 Press "Start/+30Sec./Confirm" to confirm.
4 The time on the screen starts to count down.
5 The “beep” sound can be heard after process finished.
Auto menu
1 In waiting state, turn "Time / Weight / Auto" right to choose the menu. The screen will display "A-1".
2 Turn "Time / Weight / Auto" to choose the menu you want, "A-1" to "A-8" will display.
3 Press "Start/+30Sec./Confirm" to confirm the menu.
4 Turn "Time / Weight / Auto" to choose the the weight of food.
5 Press "Start/+30Sec./Confirm" again to start cooking.
6 The time on the screen starts to count down.
7 The "beep" sound can be heard after process finished.
The menu chart:
| Menu Weight Power | ||
| A-1 Pizza | 200 g | 100%(Mic.) |
| 400 g | ||
| A-2 Meat | 250 g | 100%(Mic.)350 |
| 450 g | ||
| A-3 Vegetable | 200 g | 100%(Mic.)300 |
| 400 g | ||
| A-4 Pasta | 50g (with 450g cold water) | 80%(Mic.) |
| 100g (with 800g cold water) | ||
| A-5 Potato | 200 g | 100%(Mic.)400 |
| 600 g | ||
| A-6 Fish | 250 g | 80%(Mic.)350 g |
| 450 g | ||
| A-7 Beverage | 1cup (about 120ml) | 100%(Mic.) |
| 2cups (about) | ||
| 3cups (about) | ||
| A-8 Popcorn | 50 g | 100%(Mic.) |
| 100 g | ||
Speedy cooking
1 In waiting state, press "Start/+30Sec./Confirm" key to cook with 100% power level for 30 seconds. Each press on the same key can increase 30 seconds. The maximum cooking time is 95 minutes.
2 During the microwave, grill, combination cooking and the defrost by time process, press "Start/+30Sec./Confirm" to increase the cooking time.
3 Under the states of auto menu and defrost by weight, cooking time cannot be increased by pressing "Start/+30Sec./Confirm".
In waiting state, turn "Time / Weight / Auto" left to choose the cooking time. After adjusting the cooking time, press "Start/+30Sec./Confirm" to start microwave cooking with 100 % power g lever.
Lock Function for children
Lock: In waiting state, press "STOP/Clear" for 3 seconds to enter the children-lock state and the current time will display if the time has been set, otherwise, the screen will display "→b
Lock quitting: In locked state, press "STOP/ Clear" for 3 seconds, the lock is released.
Inquiring Function
1 In cooking states of microwave or grill and combination. Press “Microwave” or “Grill/Combi.”, the current power will be displayed for 3 seconds.
2 If the clock has been set, during cooking state, press "Kitchen Timer/Clock" to check the current time. It will be displayed for 3 seconds.
Specification
1 If the door is opened in the process of cooking, close the door and then press "Start/+30Sec./Confirm" to continue cooking.
2 Once the cooking programme has been set, "Start/+30Sec./Confirm" is not pressed in 1 minutes. The current time will be displayed. The setting will be cancelled.
3 The buzzer sounds once by efficient press, inefficient press will be no response.
The following factors may affect the cooking result:
Food arrangement
Place thicker areas towards outside of dish, the thinner part towards the centre and spread it evenly. Do not overlap if possible.
Cooking time length
Start cooking with a short time setting, evaluate it after it times out and extend it according to the actual need. Over cooking may result in smoke and burns.
Cooking food evenly
Food such as chicken, hamburger or steak should be turned once during cooking.
Depending on the type of food, if applicable, stir it from outside to centre of dish once or twice during cooking
Allow standing time
After cooking times out, leave the food in the oven for an adequate length of time, this allows it to complete its cooking cycle and cooling it down in a gradual manner
Whether the food is done
Color and hardness of food help to determine if it is done, these include:
■Steam coming out from all parts of food, not just the edge
■Joints of poultry can be moved easily
■Pork or poultry shows no signs of blood
■Fish is opaque and can be sliced easily with a fork
Browning dish
When using a browning dish or self-heating container, always place a heat-resistant insulator such as a porcelain plate under it to prevent damage to the turntable and rotating ring.
Microwave safe plastic wrap
When cooking food with high fat content, do not allow the plastic wrap come into contact with food as it may melt
Microwave safe plastic cookware
Some microwave safe plastic cookware might not be suitable for cooking foods with high fat and sugar content. Also, the preheating time specified in the dish instruction manual must not be exceeded.
Materials you can use in microwave oven or to be avoided in microwave oven

Personal Injury Hazard It is hazardous for anyone other than a competent person to carry out any service or repair operation that involves the removal of a cover which gives protection against exposure to microwave energy.
See the instructions on “Materials you can use in microwave oven or to be avoided in microwave oven.” There may be certain non-metallic utensils that are not safe to use for microwaving. If in doubt, you can test the utensil in question following the procedure below.
Utensil Test:
1 Fill a microwave-safe container with 1 cup of cold water (250ml) along with the utensil in question.
2 Cook on maximum power for 1 minute.
3 Carefully feel the utensil. If the empty utensil is warm, do not use it for microwave cooking.
4 Do not exceed 1 minute cooking time.
| Materials you can use in microwave oven | |
| Utensils Remarks | |
| Browning dish Follow m | manufacturer's instructions. The bottom of browning dish must be at least 3/16 inch (5mm) above the turntable. Incorrect usage may cause the turntable to break. |
| Dinnerware Microwave- | safe only. Follow manufacturer's instructions. Do not use cracked or chipped dishes. |
| Glass jars Always remove | lid. Use only to heat food until just warm. Most glass jars are not heat resistant and may break. |
Utensils guideline
| Glassware Heat-resistant oven glassware only. Make sure there is no metallic trim. Do not use cracked or chipped dishes. | |
| Oven cooking bags | Follow manufacturer's instructions. Do not close with metal tie. Make slits to allow steam to escape. |
| Paper plates and cups Use for short-term cooking/warming only. Do not leave oven unattended while cooking. | |
| Paper towels Use to cover food for reheating and absorbing fat. Use with supervision for a short-term cooking only. | |
| Parchment paper Use as a cover to prevent splattering or a wrap for steaming. | |
| Plastic | Microwave-safe only. Follow the manufacturer's instructions. Should be la-beled "Microwave Safe". Some plastic containers soften, as the food inside gets hot. "Boiling bags" and tightly closed plastic bags should be slit, pierced or vented as directed by package. |
| Plastic wrap Microwave-safe only. Use to cover food during cooking to retain moisture. Do not allow plastic wrap to touch food. | |
| Thermometers Microwave-safe only (meat and candy thermometers). | |
| Wax paper Use as a cover to prevent splattering and retain moisture. | |
| Materials to be avoided in microwave oven | |
| Aluminum tray May cause arcing. Transfer food into microwave-safe dish. | |
| Food carton with metal handle | May cause arcing. Transfer food into microwave-safe dish. |
| Metal or metaltrimmed utensils | Metal shields the food from microwave energy. Metal trim may cause arcing. |
| Metal twist ties May cause arcing and could cause a fire in the oven. | |
| Paper bags May cause a fire in the oven. | |
| Plastic foam Plastic foam may melt or contaminate the liquid inside when exposed to high temperature. | |
| Wood Wood will dry out when used in the microwave oven and may split or crack. | |
Cleaning and maintenance
Cleaning

WARNING: Never use gasoline, solvent, abrasive cleaning agents, metal objects or hard brushes to clean the appliance.

WARNING: Never immerse the appliance or its power cable in water or in any other liquid.
1 Switch off and unplug the appliance.
2 Wait for the appliance to cool completely.
3 Keep the inside of the oven clean. Wipe with a damp cloth when splashed food or spilled liquids stick on the walls of the appliance. A mild detergent may be used if the appliance gets very dirty. Avoid using sprays and other harsh cleaning agents as they may cause stains, marks, and opaqueness on the door surface.
4 Outer surfaces of the appliance must be cleaned with a damp cloth. Do not allow water ingress from ventilation openings to prevent damage to the operating parts in the appliance.
5 Wipe both sides of the door and the glass, door gaskets and parts near the gaskets frequently with a damp cloth in order to remove the overflowing and splashing stains. Do not use abrasive cleaning agents.
6 Do not allow control panel to get wet. Clean with a soft damp cloth. Leave the door of the appliance open to prevent inadvertent operation while cleaning the control panel.
7 If mist accumulates inside or around the appliance door, wipe with a soft cloth. This may occur when the microwave oven is operated under high humidity conditions. This is normal.
8 In some cases, you may need to remove the glass tray for cleaning. Wash the tray in warm soapy water or in a dishwasher.
-
The roller ring and appliance floor should be cleaned regularly to avoid excessive noise. It would be sufficient to wipe the lower surface of the appliance with a mild detergent. Roller ring may be washed in warm soapy water or in a dishwasher. When you remove the roller ring from the appliance internal floor for cleaning, ensure that you install it in the correct position while replacing it.
-
In order to remove the bad odours in your appliance, put a glass of water and juice and rind of a lemon into a deep bowl suitable for use in microwave and operate the appliance for 5 minutes in the microwave mode. Wipe thoroughly and dry with a soft cloth.
-
Please contact the authorized service when the appliance lamp needs to be replaced.
-
The appliance should be cleaned regularly and any food deposits should be removed. If the appliance is not kept clean, this may cause surface defects that would affect the life-cycle of the appliance negatively and that would possibly cause risks.
-
Please do not dispose this appliance with household waste; old ovens shall be disposed to special waste centres provided by the municipalities.
-
When the appliance is used in grill function, a small amount of smoke and odour may occur which will disappear after a certain time of usage.
Storage
■If you do not intend to use the appliance for a long time, please store it carefully.
■Please make sure that the appliance is unplugged, cooled and totally dry.
■Store the appliance in a cool and dry place.
- Keep the appliance out of the reach of children.
Cleaning and maintenance
Handling and transportation
■During handling and transportation, carry the appliance in its original packaging.
■The packaging of the appliance protects it against physical damages.
- Do not place heavy loads on the appliance or on the packaging. The appliance may get damaged.
Trouble shooting
| Normal | |
| Microwave oven interferes with TV reception Radio | and TV reception may be interfered when microwave oven is operating. It is similar to the interference caused by small electrical appliances, like mixer, vacuum cleaner, and electric fan. It is normal. |
| Oven light is dimmed In low power microwave cooking, oven light may be dimmed. It is normal. | |
| Steam accumulating on door, hot air coming out of vents | During cooking, steam may arise from the food. Most of this steam will get out from vents. But some may accumulate on a cool place like oven door. It is normal. |
| Oven started accidentally with no food in it. | It is not allowed to run the appliance without any food inside. It is very dangerous. |
| Problem Possible Reason Solution | ||
| Oven can not be started. 1) Power cable is not plugged in properly. | Unplug. Then plug again after 10 seconds. | |
| 2) Fuse is blown or circu#reter breaker is activated. Replace fuse or reset circuit breaker (repaired by professional personnel of our company). | ||
| 3) Trouble with outlet. Test the outlet with other electri-cal appliances. | ||
| Oven does not heat. 4) Door is not closed properly. Close the door | properly. | |
24 months breakdown and repair guarantee
Guarantor: Beko plc, 1 Greenhill Crescent, Watford, Hertfordshire. WD18 8UF
The guarantee does not in any way diminish your statutory or legal rights.
Your appliance has the benefit of our manufacturer's guarantee which covers the product for 24 months from the date of original purchase.
This gives you reassurance that if within that time, your appliance is proven to be defective because of either workmanship or materials, we will at our discretion either repair or replace your appliance.
The appliance must be correctly installed, located and operated in accordance with the instructions contained in the user manual. The guarantor disclaims any liability for accidental or consequential damage.
The Guarantee is subject to the following conditions:
- Documentary proof of the original purchase date is provided.
- The appliance has been installed and operated correctly in accordance with our operating and maintenance instructions.
• The appliance is used only on the electricity supply shown on the rating plate.
• The appliance has only been used for normal domestic purposes.
• The appliance has not been altered, serviced, dismantled or otherwise interfered with by any person.
• The appliance is used in the United Kingdom or the Republic of Ireland.
• Any parts removed during repair work or any product that has been replaced becomes our property.
• The guarantee is not transferrable if the product is resold.
The Guarantee does not cover:
• Transit, installation or delivery damage.
• Accidental damage.
- Misuse or abuse.
- Replacement of any consumable item or accessories. These include but are not limited to: plugs, cables, light bulbs, knobs, filters and flaps.
- Repairs or replacements required as a result of unauthorised repairs or inexpert installation that fails to meet the requirements contained in the user guide or instruction book.
• Repairs to products used in commercial or non-residential household premises.
How to obtain after sales service, help or general advice
Please keep your purchase receipt or other proof of purchase in a safe place as you will need to show us this document if your product requires attention within the guarantee period.
Please also record your product details below, which will allow you to access our services more quickly and help us identify your product. The model number is printed on the front of the user guide and the serial and model number is shown on your products rating plate.
| Model number | Serial number | Purchased from | Date of purchase |
Please call our UK based Customer Service department if you need urgent help or advice from us:
United Kingdom and Northern Ireland: 0333 207 9920
Republic of Ireland: 01 691 0203
You can also contact us through our website: www.grundig.co.uk
- Meanings of the symbols
- Important safety and environmental instructions
- Important Safety Instructions Read Carefully And Keep For Future Reference
- Safety warnings
- Compliance with WEEE Directive and Disposing of the Waste Product
- Compliance with RoHS Directive
- Package Information
- Plug Wiring
- ■Fiting a different plug
- Technical specifications
- Control and parts
- Installation Instruction
- Electrical connection
- Installation and connection
- Appliance in a wall-hanging unit
- Appliance in a tall unit
- Installing the oven
- Installing the turntable
- Control panel Clock setting
- Microwave cooking
- Grill or combi. cooking
- Defrost by weight
- Defrost by time
- Multi-stage cooking
- The steps are as following:
- Kitchen timer
- Auto menu
- Speedy cooking
- Lock Function for children
- Inquiring Function
- Specification
- Food arrangement
- Cooking time length
- Cooking food evenly
- Allow standing time
- Whether the food is done
- Browning dish
- Microwave safe plastic wrap
- Microwave safe plastic cookware
- Materials you can use in microwave oven or to be avoided in microwave oven
- Utensil Test:
- Utensils guideline
- Cleaning and maintenance
- Cleaning
- Storage
- Handling and transportation
- months breakdown and repair guarantee
- Your appliance has the benefit of our manufacturer's guarantee which covers the product for 24 months from the date of original purchase.
- The Guarantee is subject to the following conditions:
- The Guarantee does not cover:
- How to obtain after sales service, help or general advice
Brand : GRUNDIG
Model : GMI2120B
Category : Microwaves