
O62C - Temperature Controller Fantini Cosmi - Free user manual and instructions
Find the device manual for free O62C Fantini Cosmi in PDF.


| Product Type | Programmable Thermostat for Radiator Valves |
| Brand / Model | Fantini Cosmi O62C |
| Power Supply | 2 x AA 1.5V alkaline batteries (non-rechargeable) |
| Valve Connection | M30 x 1.5 thread (for H series valves) |
| Dimensions (L x H x W) | 52 x 83 x 65 mm |
| Protection Degree | IP30 |
| Operating Temperature | 0 °C to 50 °C |
| Storage Temperature | -20 °C to +70 °C |
| Control Type | PID controller with response time within 3 minutes |
| Display | LCD with 4 alphanumeric figures, profile indicators, icons |
| Programming Capability | Up to 8 daily switchovers (4 comfort, 4 economy) per day or grouped days |
| Operating Modes | Auto (weekly program), Manual (constant temperature), Jolly (temporary override) |
| Special Functions | Holiday mode, Window detection, Child lock, Anti-freeze (6 °C), Anti-calcification, Standby display, Offset adjustment |
| Quick Programming | Via optional programmer 063P (Mini-USB key) and PC software |
| Installation | Snap-on mounting onto ring nut (included); must be in INST mode |
| Cleaning | Wipe with a soft, dry cloth. Do not use solvents or harsh detergents. |
| Safety | Child lock deactivates buttons and wheel; anti-freeze prevents pipe freezing |
| Spare Parts | Batteries (AA 1.5V) and optional ring nut are user-replaceable; valve adaptation resets errors. |
| Included Accessories | Ring nut for valve connection (B) |
| Warranty & Compliance | Complies with Directive 2004/108/EC (EMC) |
Frequently Asked Questions - O62C Fantini Cosmi
User questions about O62C Fantini Cosmi
0 question about this device. Answer the ones you know or ask your own.
Ask a new question about this device
Download the instructions for your Temperature Controller in PDF format for free! Find your manual O62C - Fantini Cosmi and take your electronic device back in hand. On this page are published all the documents necessary for the use of your device. O62C by Fantini Cosmi.
USER MANUAL O62C Fantini Cosmi
CRONOTERMOSTATO SETTIMANALE PER RADIATORE
062

italiano pag. 2
english pag. 11
natural_image
Diagram showing two views of a table with arrows indicating direction (no text or symbols)062C
natural_image
Mechanical assembly diagram showing three stages (A, B, C) of a gear and shaft assembly with no visible text or symbolsMODALITÀ MANU (MANUALE)
natural_image
Hand inserting a small electronic device into a grid-patterned heater (no text or symbols visible)Read these instructions carefully before installing the device, and keep them for future consultation.
Remember that, to speed up the installation phase, you can programme 062C via the programmer 063P (Mini-USB key).
1 DESCRIPTION OF THE PRODUCT
- Battery compartment
- Temperature sensor
- Wheel selector
- Function keys: MENU - OK - JOLLY
- Mini-USB connector for connecting O63P
- LCD display

- Area with the 4 alphanumerical figures
- Profile indicators: day and time bands for comfort/economy mode
- "Child protection" function indicator
- Battery replacement indicator
- Indicator of active "anti-freeze / window open" function
- Indicator of active ECONOMY
- Indicator of active COMFORT
- Indicator of active "holidays"
- Indicator of AUTO or MANUAL mode

2 INSERTING OR REPLACING THE BATTERIES
To access the battery compartment, use your finger to prise off the cover, as shown in the figure. Insert two AA 1,5V alkaline long-life batteries, respecting the polarity indicated.
Warning: use alkaline batteries only. Do not use any type of rechargeable battery.

natural_image
Diagram showing two views of a table with arrows indicating movement or rotation (no text or symbols)3 PROGRAMMING MENU
Use the MENU key to access the programming menu. Navigate through the eleven options with the aid of the wheel selector. The options are described below:
MODE Select AUTO (automatic) or MANU (manual) mode
PROG Set and programme the ambient profiles
TEMP Set the COMFORT (Tmax) or ECONOMY (Tmin) temperature
TIME Set the current date and time
WINW Set the "open window" function parameters
RES Reset the initial factory programming
ADAP Launch the valve adaptation cycle
HOLI Set the "holiday" function
INST Programmable thermostat installation/removal function
OFFS Set the temperature "offset"
STBY Set the "standby" function
VERS Information on product SW version
DST Set Daylight Saving Time
4 SETTING THE CLOCK/CALENDAR
When the batteries are first inserted, O62C automatically calls up the predefined clock/calendar settings menu (2010 factory programming).
1 Use the wheel to select the current year, then confirm with OK

2 Select the current month, then confirm with OK
3 Select the current day, then confirm with OK
4 Select the current hour, then confirm with OK
5 Select the minutes, then confirm with OK
For subsequent modifications, press MENU and use the selector to choose the item TIME. 062C automatically assumes INST mode, and is ready to be installed on the valve.
When the batteries are replaced, the date/time settings are not lost.
062C
5 INSTALLATION
The programmable thermostat is installed on all the valves with thermostatic option of the H series, with connection M30x1,5 as shown below:
1 Tighten the ring nut B (supplied) on the radiator valve A;
2 Insert the programmable thermostat C on the ring nut B you will hear a "click" when the two elements are correctly coupled.
The programmable thermostat must be in "INST" or "ON" mode in order to fix it to the ring nut without too much effort. If the programmable thermostat is installed at a later time, select the "INST" menu

natural_image
Mechanical assembly diagram showing gear and housing components (no text or labels)before fixing it to the ring nut. To ensure better temperature adjustment, you are advised to install the programmable thermostat with the display facing upwards. IMPORTANT: if you hold onto the programmable thermostat when screwing the ring nut onto - or unscrewing it from - the valve, this will cause irreversible damage to the mechanism and the coupling teeth of the ring nut itself.
6 REMOVING THE PROGRAMMABLE THERMOSTAT
1 Set the maximum temperature via the wheel selector (the display will show "ON") and wait at least one minute.
2 Press in the point indicated by the arrow (A) to release the programmable thermostat from the ring nut.

7 VALVE ADAPTATION PROCEDURE
At the initial start-up, press the OK key several times (skipping the clock/calendar setting operation) until the word ADAP appears on the display.
062C performs a self-calibration, checking the valve limit switches. This procedure may take a few minutes, after which 062C resumes normal operation.
An additional adaptation procedure may be needed if the radiator does not fully cool down when the programmable thermostat is OFF. If the procedure concludes with error E2, check the correct coupling with the valve and take the batteries out for a few minutes, then replace them and perform a new valve adaptation procedure.
8 PROGRAMS
MANU (MANUAL) MODE
062C adjusts the temperature set by the user via the wheel selector.
AUTO MODE (AUTOMATIC PROGRAM)
062C adjusts the temperature on the basis of the COMFORT (Tmax) or ECONOMY (Tmin) function defined in the relative time bands. You can select up to 8 daily switchovers for the seven days of the week: 4 COMFORT and 4 ECONOMY.
You can manually set the required room temperature at any time.
9 SETTING A PROGRAM
Up to 4 COMFORT (Tmax) switchovers and 4 ECONOMY (TMIN) switchovers can be defined for each of the seven days of the week, or for 3 groups of several days.
DAY1 (Monday) - DAY2 (Tuesday) - DAY3 (Wednesday) - DAY4 (Thursday) - DAY5 (Friday) - DAY6 (Saturday) DAY7 (Sunday) refer to the days of the week shown beneath the times bar:
Mo-Tu-We-Th-Fr-Sa-Su.
D1-5 = from Monday to Friday - D1-6 = from Monday to Saturday - D1-7 = from Monday to Sunday. 062C is factory-set with the following switchovers: COMFORT at 6:00 and ECONOMY at 22:00.

3 Use the selector to choose the required day or group (top part of the display)
Confirm with OK.
The time of the first switchover in COMFORT mode will flash on the display. Use the selector to set the time - e.g. 6:00, then confirm with OK.
4 The time of the first switchover in ECONOMY mode will fash on the display.
Use the selector to set the time - e.g. 22:00.
Confirm with OK, then set the times of any other mode switchovers.
5 The inactivated COMFORT and ECONOMY switchovers are shown with the time field --:-- If you do not want to activate them, carry on confirming the other possible settings with OK until the programming of the next day begins. If you do not want to programme another day, and want to quit the programming function, press MENU.
10 SETTING THE COMFORT/ECONOMY TEMPERATURE
O62Cis factory-set as follows: COMFORT 21 °C and ECONOMY 16 °C.
1 Press the MENU key and use the selector to choose the item TEMP. Confirm with OK.

2 The set COMFORT temperature (e.g. 21.0°) will flash on the display.
Use the selector to set the required temperature, then confirm with OK.
3 The set ECONOMY temperature (e.g. 16.0°) will flash on the display.
Use the selector to set the required temperature, then confirm with OK.
The upper and lower temperature setting limits are:
OFF = anti-freeze function active (8 °C) and ON = valve fully open.
If O62C is in AUTO mode, the manual temperature setting will be maintained until the next mode switchover, when the programmable thermostat will begin operating on the basis of the defined profile.
062C
11 ADVANCED FUNCTIONS AND OPERATIONS
JOLLY FUNCTION
With 062C, you can exclude the automatic programme at any moment, and for a set time.

2 Use the selector to set the required timing (minimum 1H, maximum 24H), then confirm with OK.
3 The set temperature will % ash on the display. Use the selector to set the required temperature value, then confirm with OK.
During operation in JOLLY mode, the wheel selector and OK/JOLLY keys are inactive. To annul JOLLY mode, press the MENU key.
SETTING THE OFFSET
Elements like shelves and curtains near a radiator can impede good heat diffusion, affecting the room temperature detected by the programmable thermostat and its subsequent adjustment. If the room temperature is very different from the temperature set on the programmable thermostat, you can insert an OFFSET correction factor:
1 Press the MENU key and use the selector to choose the item OFFS. Press OK.
2 The set Offset temperature will flash on the display.

3 Use the selector to set the required correction factor, then confirm with OK.
Before implementing an OFFSET value, it is necessary to measure the room temperature with the aid of a precision thermometer.
Example: if the COMFORT temperature set on the programmable thermostat is 21 °C but the real temperature
in the room is only 19 °C, enter a correction factor of +2,0 °C.
WINDOW FUNCTION
When the window is opened and the temperature therefore drops suddenly, 062C temporarily closes the valve (for a set time) to save energy. During this time, the ANTI-FREEZE symbol will be shown on the display.
1 Press the MENU key and use the selector to choose the item WINW.

2 The set MID sensitivity will flash on the display. Use the selector to set the required sensitivity measurement: HIGH, MID or LOW. Confirm with OK.
3 The set 10M (10 minutes) closure time will % ash on the display. Use the selector to set the required time, then confirm with OK.
At the end of the timed period, the programmable thermostat returns to normal operating mode.
HOLIDAY FUNCTION
In the event of a prolonged absence, you can set the temperature for that period (or even the closure of the valve), along with the date and time of your return:
1 Press the MENU key and use the selector to choose the item HOLI, then confirm with OK.

2 The current date will flash on the display - for example 06.01 (DD.MM).
Use the selector to set the restart date (i.e. your return after an absence), then confirm with OK.
3 The hour subsequent to the current one will flash on the display. Use the selector to set the required restart hour, then confirm with OK.
4 The word OFF will flash on the display (valve closed, i.e. the factory programming). You can use the selector to set the required temperature instead of the closed valve.
Confirm your choice with OK.
The set temperature or the chosen valve status (OFF-closed, ON-open) will appear on the display, together with the holiday symbol 📋. Regardless of the operating mode defined by the current profile, the programmable thermostat adopts the new mode setting.
CHILDREN SAFETY FUNCTION
This function deactivates the keys and wheel selector to prevent unauthorised persons from accessing the menu.

1 Press the OK and JOLLY keys simultaneously for 2 seconds until the padlock symbol appears
To release the lockout, perform the same operation until the padlock symbol disappears
HEATING SHUT-OFF (VALVE CLOSURE)
If necessary, you can close the valve to deactivate the heating in a room:
1 Press the MENU key and use the selector to choose the item MODE, then confirm with OK.

2 The word MANU will flash on the display. Confirm with OK.
3 Use the selector to lower the temperature until the word OFF appears, then confirm with OK.
When the valve is closed, the anti-calcification function still remains active. To deactivate the function, go to AUTO mode.
062C
1 Press the MENU key and use the selector to choose the item RES, then confirm with OK.

2 The word OK will flash on the display. Confirm with the OK key or press the MENU key to quit the function without deleting the programmings..
ANTI-FREEZE FUNCTION
If the room temperature falls below 6 °C , the programmable thermostat opens the valve until the temperature rises to 8 °C . This prevents the water in the pipes from freezing.
ANTI-CALCIFICATION FUNCTION
Once a week (on Friday), O62C performs a valve opening/closing cycle to prevent the valve from calcifying.
DISPLAY SWITCH-OFF
1 Press the MENU key and use the selector to choose the item STBY, then confirm with OK.

2 The word OFF will flash on the display. Select ON, then confirm with OK.
After 30 sec. the display switches off. You can switch it back on by pressing a key or using the wheel selector, then it will switch off again after 30 seconds. To deactivate the function, follow the above instructions but choose the OFF option.
GMT-DAYLIGHT SAVING TIME SWITCHCHOVER
1 Press the MENU key then use the selector to choose DST. The word OFF will flash on the display (GMT is set).
2 Select ON (DST mode set), then confirm with OK. Follow the same procedure to change from DST to GMT.
12 TROUBLESHOOTING
PROBLEM POSSIBLE CAUSES SOLUTION
The symbol is lit up The batteries  | don't have enough charge | Replace the batteries |
| The heating element does not heat up | Is the boiler water temperature correct?Maybe the valve doesn't open because it has calcified following the summer break? | Adjust the boiler water temperatureRemove 062C and move the valve stem backwards and forwards manually or with the aid of a tool |
| The heating element does not cool down | The valve doesn't close completely.Maybe the closure point of the valve seat has moved. | Perform a new valve adaptation cycleManually adjust the valve pin several times; it may be impossible to implement the adaptation due to calcification or because the closure pin is no longer doing its job |
The "valve-pusher" pin has come loose from its seat (this may lead to error E1)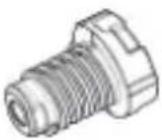 | The "valve-pusher" pin has an endless thread and may come loose from its seat if the programmable thermostat is not installed on the valve | Replace the pin in its seat and perform a new adaptation procedure, or remove the batteries and then re-insert them.The endless screw will rotate and reconnect with the valve-pusher pin.Install 062C on the valve and launch a new valve adaptation cycle. |
| E1, E2, E3 | Press any key to delete the error message on the display and launch a new adaptation cycle. | |
| E1 | The valve adaptation cycle cannot be performedThe programmable thermostat is not installed on the valve | Was the installation made correctly?Install 062C on the radiator |
| E2 | The valve excursion is too short Manually open and close the valve a few times, or replace the batteries | |
| E3 | Motor rotation is blocked Make sure the valve pin can move freely | |
13 PROGRAMMING VIA KEY 063P
062C can be directly programmed via the programmer 063P, ensuring quick and easy programmable thermostat configuration thanks to the exchange of data via the Mini-USB connector.
Using the key O63P and viewing the graphic interface on the PC, you can easily programme the daily time bands for the COMFORT (Tmax) and ECONOMY (Tmin) temperatures of the programmable thermostat.
Once the temperature profiles of the various rooms have been stored on the key 063P, they can be uploaded onto the programmable thermostat 062C which thus automatically acquires the current time and date.
This means that any pre-setting by the user is super%uous.
For the programming, refer to the instructions enclosed with the programmer 063P.

natural_image
Hand inserting a small electronic device into a grid-patterned rack (no text or symbols visible)The device's "Mini-USB" connector is only compatible with the cable of the programmer 063P; do not connect any other devices fitted with a Mini-USB port, as this could irreversibly damage the programmable thermostat.
14 TECHNICAL DATA
Compliance with Directive 2004/108/EC.
Power supply: 2 AA batteries 1,5 V.
Control: PID controller with response time within 3 minutes.
Serial port to 063P: proprietary interface and protocol.
No. of programmable time bands: 4 daily time bands.
Protection degree: IP30.
Working temperature: 0 ÷ 50 °C.
Storage temperature: -20 ÷ +70^ .
Type of casing: white ABS.
Casing dimensions (LxHxW): 52x65x83 mm.
Valve connection: M30x1,5.

FANTINI COSMI S.p.A.
Via dell'Osio, 6
- CRONOTERMOSTATO SETTIMANALE PER RADIATORE
- 062
- 062C
- DESCRIPTION OF THE PRODUCT
- INSERTING OR REPLACING THE BATTERIES
- PROGRAMMING MENU
- SETTING THE CLOCK/CALENDAR
- INSTALLATION
- REMOVING THE PROGRAMMABLE THERMOSTAT
- VALVE ADAPTATION PROCEDURE
- PROGRAMS
- SETTING A PROGRAM
- SETTING THE COMFORT/ECONOMY TEMPERATURE
- ADVANCED FUNCTIONS AND OPERATIONS
- JOLLY FUNCTION
- SETTING THE OFFSET
- WINDOW FUNCTION
- HOLIDAY FUNCTION
- CHILDREN SAFETY FUNCTION
- HEATING SHUT-OFF (VALVE CLOSURE)
- ANTI-FREEZE FUNCTION
- ANTI-CALCIFICATION FUNCTION
- DISPLAY SWITCH-OFF
- GMT-DAYLIGHT SAVING TIME SWITCHCHOVER
- TROUBLESHOOTING
- PROGRAMMING VIA KEY 063P
- TECHNICAL DATA
Brand : Fantini Cosmi
Model : O62C
Category : Temperature Controller