
X-Session UC-17 - Audio Equipment M-AUDIO - Free user manual and instructions
Find the device manual for free X-Session UC-17 M-AUDIO in PDF.


| Product Type | USB MIDI Controller |
| Brand | M-Audio |
| Model | X-Session UC-17 |
| Number of Faders | 3 (crossfader and two channel faders) |
| Number of Knobs | 9 rotary knobs |
| Number of Buttons | 34 buttons (including transport controls) |
| Interface | USB 1.1 (class-compliant) |
| Power Source | USB bus-powered (no external power required) |
| Dimensions (W x D x H) | 320 x 220 x 40 mm |
| Weight | 1.2 kg |
| Compatibility | Windows XP/Vista/7/8/10, Mac OS X (10.4 or later) |
| Main Functions | DJ-style mixing, volume control, effects adjustment, transport control for DAWs |
| Included Accessories | USB cable, user manual, software CD (Ableton Live Lite, etc.) |
| Cleaning and Maintenance | Wipe with a dry, soft cloth. Do not use solvents or abrasive cleaners. |
| Safety Precautions | Keep away from liquids and extreme temperatures. Avoid dropping. |
| Spare Parts and Repairability | Replacement faders and knobs available from M-Audio support. Repair service by authorized centers. |
| General Information | Designed for DJs and producers; plug-and-play with most music software. |
Frequently Asked Questions - X-Session UC-17 M-AUDIO
User questions about X-Session UC-17 M-AUDIO
0 question about this device. Answer the ones you know or ask your own.
Ask a new question about this device
Download the instructions for your Audio Equipment in PDF format for free! Find your manual X-Session UC-17 - M-AUDIO and take your electronic device back in hand. On this page are published all the documents necessary for the use of your device. X-Session UC-17 by M-AUDIO.
USER MANUAL X-Session UC-17 M-AUDIO
Evolution X-Session Advanced User Guide
Appendix H - X-Session Preset Chart
Factory Preset
01 MIDI CC's 16-31 *
02 MIDI CC's 32-47 *
03 MIDI CC's 48-63 *
04 MIDI CC's 102-117 *
05 GM Preset
06 Reason native Preset
07 Pro-53 Preset
08 Rebirth Preset
09 Sampletank Preset
10 Sound Blaster Synth Preset
Presets 1 to 4 are designed for software that does not have default MIDI CC's to control it's parameters, and instead uses a MIDI 'learn' mode.
*The Cross Fader will send out CC10 for all presets 1-4. F18 is set to 'OFF', so that only cc10 is sent out when the cross fader is moved. The buttons are assigned MIDI CC's such that their values will not clash with any of the CC's assigned to the controllers in all four of these presets.
EVOLUTION
Advanced User Guide

X-Session

www
evolution.co.uk

About The Advanced Guide
In the X-Session Advanced Guide we have made the assumption that you have been through the X-Session Getting Started Guide which should have been supplied in printed form with your X-Session. If you do not have this guide, please contact your local distributor or download it from our website www.evolution.co.uk
The Getting Started Guide should insure that you are now familiar with the basic operation of the X-Session so that we now can focus on more in-depth features.
First however, we need to explain some terminology we use throughout the guide.
Terminology
Edit Mode:
Edit Mode describes the short period after a function button has been pressed during which the parameters of that function can be altered. The numeric keypad can be used to alter a parameter during this time. No data is sent out of the X-Session when it is in Edit mode except for program and bank changes. LCD symbols shown in Edit mode will flash to show you that a particular parameter can be edited. If a number is part entered, and a new controller turned, that number will become the relevant parameter number for the new controller and the 3 second editing period will re-trigger.
Default mode :
Default Mode describes the state of the X-Session, when no function buttons have been pressed within the last 3 seconds. In Default mode, the LCD will show the controller symbol, and the 2 digit display will show the last selected controller. The 3 digits display the currently assigned MIDI CC number.
Appendix F - Roland GS and Yamaha XG NRPN Support to Roland JV/XP
| NRFH | NRFN | Data | Data | ||
| MSB | LSB | MSB | LSB | ||
| CC99 | CC98 | CC96 | CC98 | ||
| 01 | 08 | 08-0-F | n/a | (-64 - 0 - +63) | Vibrotto Rate (relative change) |
| 01 | 09 | 09-0-F | n/a | (-64 - 0 - +63) | Vibrotto Depth (relative change) |
| 01 | 08 | 08-0-F | n/a | (-64 - 0 - +63) | Vibrotto Delay (relative change) |
| 01 | 20 | 06-7-F | n/a | (-64 - 0 - +63) | Viller Cutoff (Freq. relative change) |
| 01 | 21 | 06-7-F | n/a | (-64 - 0 - +63) | Filler Resonance (relative change) |
| 04 | 63 | 06-7-F | n/a | (-64 - 0 - +63) | DG (LVW@VA) Attack Time (relative change) |
| 04 | 64 | 06-7-F | n/a | (-64 - 0 - +63) | DG (LVW@VA) Decay Time (relative change) |
| 04 | 66 | 06-7-F | n/a | (-64 - 0 - +63) | DG (LVW@VA) Release Time (relative change) |
| *14 | 06-7F | 06-7-F | n/a | (-64 - 0 - +63) | Drum Viller Cutoff (Freq. (relative change) |
| *15 | 06-7F | 06-7-F | n/a | (-64 - 0 - +63) | Drum Filler Resonance (relative change) |
| *16 | 06-7F | 06-7-F | n/a | (-64 - 0 - +63) | Drum BG Attack Rate (relative change) |
| *17 | 06-7F | 06-7-F | n/a | (-64 - 0 - +63) | Drum BG Decay Rate (relative change) |
| *18 | 06-7F | 06-7-F | n/a | (-64 - 0 - +63) | Drum Instrument Pitch Operate (relative change) |
| *19 | 06-7F | 06-7-F | n/a | (-64 - 0 - +63) | Drum Instrument Pitch Rate (relative change) |
| 1A | 06-7F | 06-7-F | n/a | (0 to Max) Drum instrument. Level (absolute change) | |
| 1D | 06-7F | 06-7-F | n/a | (Ranocm, I<>B#) Drum Instrument Perpot (absolute change) | |
| 1D | 06-7F | 06-7-F | n/a | (0 to Max) Drum instrument Reverb Send level (absolute change) | |
| 1F | 06-7F | 06-7-F | n/a | (0 to Max) Drum Instrument Chorus Sand Seal (absolute change) | |
| *1F | 06-7F | 06-7-F | n/a | (0 to Max) Drum Instrument Variation Sound Level (absolute change) | |
* - added by Yamaha XC, % changed from Delay to Variation by Yamaha XC
Appendix G - General MIDI Reverb and Chorus Types
Reverb Types
0: Small Room
1: Medium Room
2: Large Room
3: Medium Hall
4: Large Hall
8: Plate
Chorus Types
0: Chorus 1
1: Chorus 2
2: Chorus 3
3: Chorus 4
4: FB Chorus
5: Flanger
Evolution X-Session Advanced User Guide
Appendix E - Standard MIDI Controller numbers (MIDI CC's)
| 00 | Bank | Select | 46 | Controller | 46 | 92 | Tremelo | Depth | |
| 01 | Modulation | 47 | Controller | 47 | 93 | Chorus | Depth | ||
| 02 | Breath | Control | 48 | Gen Purpose 1 LSB | 94 | Celeste (De-tune) | |||
| 03 | Controller | 3 | 49 | Gen Purpose 2 LSB | 95 | Phaser | Depth | ||
| 04 | Foot | Control | 50 | Gen Purpose 3 LSB | 96 | Data | Increment | ||
| 05 | Porta | Time | 51 | Gen Purpose 4 LSB | 97 | Data | Decrement | ||
| 06 | Data Entry | 52 | Controller | 52 | 98 | Non-Reg | Param | LSB | |
| 07 | Channel | Volume | 53 | Controller | 53 | 99 | Non-Reg | Param | MSB |
| 08 | Balance | 54 | Controller | 54 | 100 | Reg | Param | LSB | |
| 09 | Controller 9 | 55 | Controller | 55 | 101 | Reg | Param | MSB | |
| 10 | Pan | 56 | Controller | 56 | 102 | Controller | 102 | ||
| 11 | Expression | 57 | Controller | 57 | 103 | Controller | 103 | ||
| 12 | Effects Controller 1 | 58 | Controller | 58 | 104 | Controller | 104 | ||
| 13 | Effects Controller 2 | 59 | Controller | 59 | 105 | Controller | 105 | ||
| 14 | Controller | 14 | 60 | Controller | 60 | 106 | Controller | 106 | |
| 15 | Controller | 15 | 61 | Controller | 61 | 107 | Controller | 107 | |
| 16 | Gen Purpose 1 | 62 | Controller | 62 | 108 | Controller | 108 | ||
| 17 | Gen Purpose 2 | 63 | Controller | 63 | 109 | Controller | 109 | ||
| 18 | Gen Purpose 3 | 64 | Sustain | Pedal | 110 | Controller | 110 | ||
| 19 | Gen Purpose 4 | 65 | Portamento | 111 | Controller | 111 | |||
| 20 | Controller | 20 | 66 | Sostenuto | 112 | Controller | 112 | ||
| 21 | Controller | 21 | 67 | Soft Pedal | 113 | Controller | 113 | ||
| 22 | Controller | 22 | 68 | Legato | Pedal | 114 | Controller | 114 | |
| 23 | Controller | 23 | 69 | Hold | 2 | 115 | Controller | 115 | |
| 24 | Controller | 24 | 70 | Sound | Variation | 116 | Controller | 116 | |
| 25 | Controller | 25 | 71 | Resonance | 117 | Controller | 117 | ||
| 26 | Controller | 26 | 72 | Release | Time | 118 | Controller | 118 | |
| 27 | Controller | 27 | 73 | Attack Time | 119 | Controller | 119 | ||
| 28 | Controller | 28 | 74 | Cut-off | Frequency | ||||
| 29 | Controller | 29 | 75 | Controller | 75 | Channel Mode Messages | |||
| 30 | Controller | 30 | 76 | Controller | 76 | ||||
| 31 | Controller | 31 | 77 | Controller | 77 | 120 | All Sound off | ||
| 32 | Bank Select LSB | 78 | Controller | 78 | 121 | Reset all Controllers | |||
| 33 | Modulation LSB | 79 | Controller | 79 | 122 | Local Control | |||
| 34 | Breath | Control | LSB80 | Gen Purpose 5 | 123 | All Notes Off | |||
| 35 | Controller | 35 | 81 | Gen Purpose 6 | 124 | Omni Off | |||
| 36 | Foot | Control | LSB | 82 Gen Purpose 7 | 125 | Omni On | |||
| 37 | Porta Time LSB | 83 | Gen Purpose 8 | 126 | Mono On (Poly Off) | ||||
| 38 | Data Entry LSB | 84 | Portamento | Control | 127 | Poly On (Mono Off) | |||
| 39 | Channel Volume LSB | 85 | Controller | 85 | Extra RPN Messages | ||||
| 40 | Balance | LSB | 86 | Controller | 86 | ||||
| 41 | Controller | 41 | 87 | Controller | 87 | 128 | Pitch Band sensitivity | ||
| 42 | Pan | LSB | 88 | Controller | 88 | 129 | Fine Tune | ||
| 43 | Expression | LSB | 89 | Controller | 89 | 130 | Coarse Tune | ||
| 44 | Controller | 44 | 90 | Controller | 90 | 131 | Channel Pressure | ||
| 45 | Controller | 45 | 91 | Reverb | Depth | ||||
"On The Fly" Operations

Evolution X-Session Advanced User Guide
Sending Program Changes On The Fly
You can at any one time send out a program change message to you sound card, sound module, instrument or whatever other device will receive this standard MIDI message. The program change will be sent on the global MIDI channel.
1. Press the PROGRAM button.
- Type in the program number you wish to send, using the numerical keypad or the +/- keys.

Example: The LCD display the PROG symbol in the right hand corner Indicating that the PROGRAM button has been pressed. The program value sent is 00 and its sent on the global MIDI channel 01.
You can also program the assignable buttons to send out fixed program messages to individual MIDI channels. For further information regarding this method, please go to pages 5 to 9.
Global MIDI channel: For more information, please go to page 10.
Sending Bank Changes On The Fly
If your receiving device has more than 128 presets, you may be able to access the additional banks by sending out bank change LSB and MSB messages.
1. Press the DATA LSB or DATA MSB button.
- Type in the bank number you wish to send, using the numerical keypad or the +/- keys.
Please check the documentation for your receiving device to ensure that it will respond to these messages. For more information about LSB and MSB, please see the chapter "Program and Bank Changes Explained" on page 17 in this manual.
Sending Snap Shot
Press the +/- buttons together to send a SNAP SHOT of the current X-Session controller assignments and their values.

When you send a snapshot, the LCD will display the SNAPSHOT symbol. The data for an individual controller will be sent on which ever channel that controller has been assigned to.
Snap Shot is one way of synchronizing the receiving device with the X-Session and can be used as a creative tool, with interesting and surprising results.
The data sent when SNAP SHOT is pressed, can be viewed in your sequencers list editor. Set your sequencer to record and press SNAP SHOT. Then open the list editor and ensure its set to display controller data.
Evolution X-Session Advanced User Guide
MIDI Note Numbers
| Octave (n) | Note Numbers | ||||||||||||||
| Cn | C#n | Dn | D#n | En | Fn | F#n | Gn | G#n | An | A#n | Bn | ||||
| -1 | 0 | 1 | 2 | 3 | 4 | 5 | 6 | 7 | 8 | 9 | 10 | 11 | |||
| 0 | 12 | 13 | 14 | 15 | 16 | 17 | 18 | 19 | 20 | 21 | 22 | ||||
| 1 | 24 | 25 | 26 | 27 | 28 | 29 | 30 | 31 | 32 | 33 | 34 | ||||
| 2 | 36 | 37 | 38 | 39 | 40 | 41 | 42 | 43 | 44 | 45 | 46 | ||||
| 3 | 48 | 49 | 50 | 51 | 52 | 53 | 54 | 55 | 56 | 57 | 58 | ||||
| 4 | 60 | 61 | 62 | 63 | 64 | 65 | 66 | 67 | 68 | 69 | 70 | ||||
| 5 | 72 | 73 | 74 | 75 | 76 | 77 | 78 | 79 | 80 | 81 | 82 | ||||
| 6 | 84 | 85 | 86 | 87 | 88 | 89 | 90 | 91 | 92 | 93 | 94 | ||||
| 7 | 96 | 97 | 98 | 99 | 100 | 101 | 102 | 103 | 104 | 105 | 106 | ||||
| 8 | 108 | 109 | 110 | 111 | 112 | 113 | 114 | 115 | 116 | 117 | 118 | ||||
| 9 | 120 | 121 | 122 | 123 | 124 | 125 | 126 | 127 | |||||||
Appendix D - Useful MIDI data
General MIDI Instruments
| Piano Bass Reed Synth Effects | |||
| 0 Acoustic Grand Piano | 32 Acoustic Bass | 64 Soprano Sax | 96 SFX Rain |
| 1 Bright Acoustic Piano | 33 Electric Fingered | 65 Alto Sax | 97 SFX Soundtrack |
| 2 Electric grand Piano | Bass | 66 Tenor Sax | 98 SFX Crystal |
| 3 Honky Tonk Piano | 34 Electric Picked Bass | 67 Baritone Sax | 99 SFX Atmosphere |
| 4 Electric Piano 1 | 35 Fretless Bass | 68 Oboe | 100 SFX Brightness |
| 5 Electric Piano 2 | 36 Slap Bass 1 | 69 English Horn | 101 SFX Goblins |
| 6 Harpsichord | 37 Slap Bass 2 | 70 Bassoon | 102 SFX Echoes |
| 7 Clavlnet | 38 Syn Bass 1 | 71 Clarinet | 103 SFX Sci-FI |
| 39 Syn Bass 2 | |||
| Chromatic Percussion Strings/Orchestra | Pipe | Ethnic | |
| 8 Celesta | 40 Violin | 72 Piccolo | 104 Sitar |
| 9 Glockenspiel | 41 Viola | 73 Flute | 105 Banjo |
| 10 Music Box | 42 Cello | 74 Recorder | 106 Shamisen |
| 11 Vibraphone | 43 Contrabass | 75 Pan Flute | 107 Koto |
| 12 Marimba | 44 Tremolo Strings | 76 Bottle Blow | 108 Kalimba |
| 13 Xylophone | 45 Pizzicato Strings | 77 Shakuhachi | 109 Bag Pipe |
| 14 Tubular bells | 46 Orchestral Harp | 78 Whistle | 110 Fiddle |
| 15 Dulcimer | 47 Timpani | 79 Ocarina | 111 Shanai |
| Organ Ensemble | Synth Lead | Percussive | |
| 16 Drawbar Organ | 48 String Ensemble 1 | 80 Syn Square Wave | 112 Tinkle Bell |
| 17 Percussive Organ | 49 String Ensemble 2 | 81 Syn Sawtooth Wave | 113 Agogo |
| 18 Rock Organ | (Slow) | 82 Syn Calliope | 114 Steel Drums |
| 19 Church Organ | 50 Syn Strings 1 | 83 Syn Chiff | 115 Woodblock |
| 20 Reed Organ | 51 Syn Strings 2 | 84 Syn Charang | 116 Talko Drum |
| 21 Accordion | 52 Choir Aahs | 85 Syn Voice | 117 Melodic Tom |
| 22 Harmonica | 53 Voice Oohs | 86 Syn Fifths Sawtooth | 118 Syn Drum |
| 23 Tango Accordion | 54 Syn Choir | Wave | 119 Reverse Cymbal |
| 55 Orchestral Hit | 87 Syn Brass & Lead | ||
| Guitar Brass Synth Pad Sound Effects | |||
| 24 Nylon Acoustic | 56 Trumpet | 88 New Age Syn Pad | 120 Guitar Fret Noise |
| 25 Steel Acoustic | 57 Trombone | 89 Warm Syn Pad | 121 Breath Noise |
| 26 Jazz Electric | 58 Tuba | 90 Polysynth Syn Pad | 122 Seashore |
| 27 Clean Electric | 59 Muted Trumpet | 91 Choir Syn Pad | 123 Bird Tweet |
| 28 Muted Electric | 60 French Horn | 92 Bowed Syn Pad | 124 Telephone Ring |
| 29 Overdrive | 61 Brass Section | 93 Metal Syn Pad | 125 Helicopter |
| 30 Distorted | 61 Syn Brass 1 | 94 Halo Syn Pad | 126 Applause |
| 31 Harmonics | 62 Syn Brass 2 | 95 Sweep Syn Pad | 127 Gun Shot |
Muting All Controllers
To Mute all controllers and the cross fader, press the CTRL MUTE buttons.
This allows you to alter the position of the controller without affecting the settings of your software. CTRL MUTE does not affect buttons, and as soon as an assignable button or a function key is pressed, the controllers are turned back on. Alternatively, you can press the CTRL MUTE buttons again to turn the controllers back on.
When you first press the CTR MUTE buttons, you will see the LCD display 'OFF'. Changing the position of a controller with controller mute engaged, the LCD will always display OFF to indicate no data is being sent out by the X-Session. To cancel the controller mute function, simply press a function key (or keys) or one of the assignable buttons.
This is a very useful feature if you are switching between presets on the X-Session with the controllers out of position. You will be able to move the controller to a position relative to the software's controller value, rather than causing the software's controller value to jump.
You can also use this feature for creative mixing and interesting DJ type control. If for instance you use the X-Session as a conventional volume mixer, try engaging the controller mute function, change the volume up or down of various channels and press the SNAP SHOT buttons. This form of mixing is very dynamic and can not be done using a conventional mixer.
About the Cross Fader
The cross Fader can be assigned to two MIDI CC values, by editing F17 and F18. When it is moved, both F17 and F18 will be sent out. F17 will increment from left to right, while F18 will increment from right to left. So, F17 and F18 work against each other.
As an example, this has been put to practice in the Rebirth preset:
F17 controls the volume of the top drum module, while F18 controls the volume of the bottom drum module. This means you can flick between the two modules by flicking the fader far left or right, since when F17 is 0, F18 is 127, and when F18 is 0 F17 is 127.
To select F18 for programming, you need to use the CONTROL SELECT Buttons. F17 can be selected for editing by moving the cross fader.
Appendix C - Hexadecimal Conversion Chart
Hexadecimal to Decimal Conversion Chart
| Hexadeci-mal value | Decimal Value | Hexadeci-mal value | Decimal Value | Hexadeci-mal value | Decimal Value |
| 0 0 2B | 43 56 86 | ||||
| 1 1 2C | 44 57 87 | ||||
| 2 2 2D | 45 58 88 | ||||
| 3 3 2E | 46 59 89 | ||||
| 4 4 2F | 47 5A 90 | ||||
| 5 5 30 | 48 5B 91 | ||||
| 6 6 31 | 49 5C 92 | ||||
| 7 7 32 | 50 5D 93 | ||||
| 8 8 33 | 51 5E 94 | ||||
| 9 9 34 | 52 5F 95 | ||||
| 0A 10 35 | 53 60 96 | ||||
| 0B 11 36 | 54 61 97 | ||||
| 0C 12 37 | 55 62 98 | ||||
| 0D 13 38 | 56 63 99 | ||||
| 0E 14 39 | 57 64 100 | ||||
| 0F 15 3A | 58 65 101 | ||||
| 10 16 3B | 59 66 102 | ||||
| 11 17 3C | 60 67 103 | ||||
| 12 18 3D | 61 68 104 | ||||
| 13 19 3E | 62 69 105 | ||||
| 14 20 3F | 63 6A 106 | ||||
| 15 21 40 | 64 6B 107 | ||||
| 16 22 41 | 65 6C 108 | ||||
| 17 23 42 | 66 6D 109 | ||||
| 18 24 43 | 67 6E 110 | ||||
| 19 25 44 | 68 6F 111 | ||||
| 1A 26 45 | 69 70 112 | ||||
| 1B 27 46 | 70 71 113 | ||||
| 1C 28 47 | 71 72 114 | ||||
| 1D 29 48 | 72 73 115 | ||||
| 1E 30 49 | 73 74 116 | ||||
| 1F 31 4A | 74 75 117 | ||||
| 20 32 4B | 75 76 118 | ||||
| 21 33 4C | 76 77 119 | ||||
| 22 34 4D | 77 78 120 | ||||
| 23 35 4E | 78 79 121 | ||||
| 24 36 4F | 79 7A 122 | ||||
| 25 37 50 | 80 7B 123 | ||||
| 26 38 51 | 81 7C 124 | ||||
| 27 39 52 | 82 7D 125 | ||||
| 28 40 53 | 83 7E 126 | ||||
| 29 41 54 | 84 7F 127 | ||||
| 2A 42 55 | 85 |
B2-The Buttons:
| MIDI CC | Description | Program | Data Lsb | Data Msb |
| (Press Twice) | (Press Twice) | (Press Twice) | ||
| 0-119 | Standard MIDI CC's | - Toggle Value 2 | Toggle Value 1 | |
| 120-127 | Channel Mode Messages | - Toggle Value 2 | Toggle Value 1 | |
| 128 | Pitch Bend Range | - Sensitivity value - | ||
| 129 | Channel Fine Tune | - Tuning amount - | ||
| 130 | Channel Coarse Tune- | Tuning amount | - | |
| 131 | Channel Pressure | - | Pressure amount | - |
| 132 | RPN Coarse | Value | RPN LSB | RPN MSB |
| 133 | RPN Fine | Value | RPN LSB | RPN MSB |
| 134 | NRPN Coarse | Value | NRPN LSB | NRPN MSB |
| 135 | NRPN Fine | Value | NRPN LSB | NRPN MSB |
| 136 | Master Volume GM* | - | Volume LSB | Volume MSB |
| 137 | Master Pan GM* | - | Pan LSB | Pan MSB |
| 138 | Master Coarse Tune GM* | - Tuning LSB | Tuning MSB | |
| 139 | Master Fine Tune GM* | - Tuning LSB | Tuning MSB | |
| 140 | Chorus Mod rate GM2* | - Mod rate | - | |
| 141 | Chorus Mod Depth GM2* | - Mod depth | - | |
| 142 | Feedback GM2* | - | Feedback level | - |
| 143 | Send to Reverb GM2*- | Reverb send level | - | |
| 144 | Pitch Bend | - | Pitch shift LSB | Pitch shift MSB |
| 145 | Program/Bank Preset Program | Bank LSB | Bank MSB | |
| 146 | MIDI CC (on/off) | MIDI CC | Button press value | Button release value |
| 147 | Note (on/off) | Note | Velocity off | Velocity on |
| 148 | Note (on/off toggle) | Note | Velocity off | Velocity on |
| 149 | MMC Command** | - | Command select. | - |
| 150 | Reverb type GM2^ | - | Type | - |
| 151 | Reverb time GM2* | - | Time | - |
| 152 | Chorus type GM2* | - | Type | - |
| 255 | Controller Off*** | - - | - |
* Sysex messages - for details please see pages 8 & 18.
** MMC Sysex messages, for details please see page 11.
*** This value cannot be typed in using the numerical keypad. Type in 144 and then press the '+' button to set this value, or 0 and press the '-' button.

Introduction To X-Session Programming Options
Each of the X-Session's 28 controllers can send MIDI CC, RPN/NRPN, GM 1&2 SysEx and even be assigned to individual MIDI channels.
MIDI CC (continuous controller) numbers are part of the standard MIDI specifications and are typically used to control the real-time changing of parameters in musical equipment. For a complete list of standard MIDI controller numbers from 0 to 131, please see Appendix E on page 29.
Any of the 28 real-time controllers on the X-Session can be assigned to a MIDI CC number however the 10 assignable buttons have slightly different options from the cross fader or 16 rotary controllers.
The following 2 charts show all the transmit messages you can program for each of the 18 fader/controllers and 10 assignable MIDI buttons respectively. We show you this already at this stage, so you can follow the principle of programming the X-Session controllers in the following instructions and examples.
Please pay extra attention to the differences between how you program the cross fader or controllers and how you program the buttons.
| Cross Fader & Rotary Dials | |||
| ASSIGN | Description Data Lsb | (Press Twice) | Data Msb(Press Twice) |
| 0-119 | Standard MIDI CC's -- | ||
| 120-127 | Channel Mode Messages -- | ||
| 128 | Pitch Bend Sensitivity -- | ||
| 129 | Channel Fine Tune -- | ||
| 130 | Channel Coarse Tune -- | ||
| 131 | Channel Pressure -- | ||
| 132 | RPN coarse RPN LSB RPN MSB | ||
| 133 | RPN fine RPN LSB RPN MSB | ||
| 134 | NRPN coarse | NRPN LSB | NRPN MSB |
| 135 | NRPN fine | NRPN LSB | NRPN MSB |
| 136 | Master Volume GM* | - | - |
| 137 | Master Pan^ | - | - |
| 138 | Master Coarse Tune* | - | - |
| 139 | Master Fine Tune^ | - | - |
| 140 | Chorus Mod rate** | - | - |
| 141 | Chorus Mod Depth** | -- | |
| 142 | Feedback** | - | - |
| 143 | Send to Reverb** | -- | |
| 144 | Pitch Bend | - | - |
| 255 | Controller Off**** | -- | |
* General MIDI SysEx messages - for details please see pages 8 & 18. ** General MIDI 2 SysEx messages
*** MMC Sysex messages, for details please see page 11.
**** This value cannot be typed in using the numerical keypad. Use '+' or '-'
Appendix B - Assignable MIDI CC's
on the X-Session
B1 - The Cross Fader and rotary Controllers:
| MIDI CC | Description | Data Lsb (Press Twice) | Data Msb (Press Twice) |
| 0-119 | Standard MIDI CC's | - | - |
| 120-127 | Channel Mode Messages | - | - |
| 128 | Pitch Bend Sensitivity | - | - |
| 129 | Channel Fine Tune - | - | |
| 130 | Channel Coarse Tune | - | - |
| 131 | Channel Pressure | - | - |
| 132 | RPN coarse | RPN LSB | RPN MSB |
| 133 | RPN fine | RPN LSB | RPN MSB |
| 134 | NRPN coarse | NRPN LSB | NRPN MSB |
| 135 | NRPN fine | NRPN LSB | NRPN MSB |
| 136 | Master Volume GM* | - | - |
| 137 | Master Pan GM* | - | - |
| 138 | Master Coarse Tune GM* | - | - |
| 139 | Master Fine Tune GM* | - | - |
| 140 | Chorus Mod rate GM2* | - | - |
| 141 | Chorus Mod Depth GM2* | - | - |
| 142 | Feedback GM2^ | - | - |
| 143 | Send to Reverb GM2* | - | - |
| 144 | Pitch Bend | - | - |
| 255 | Controller Off*** | - | - |
* Sysex messages - for details please see pages 8 & 18.
** MMC Sysex messages, for details please see page 11.
*** This value cannot be typed in using the numerical keypad. Type in 144 and then press the '+' button to set this value, or 0 and press the '-' button.
Appendix A - MIDI IMPLEMENTATION CHART
| Function Transmitted Received Remarks | |||
| Basic :Default Channel:Changed | 1-16 1-16 | X | |
| :Default Mode :Messages :Altered | X ***** | X | |
| Note Number:True Voice | 0-127 ***** | X | |
| Velocity: Note ON : Note OFF | 0 0 | X | |
| After :Keys Touch :Ch's | 0 0 | X | |
| Pitch Bend 0 X | |||
| Control Change 0-119 120-127 0 X | 0 X | ||
| Program Change:True Number | 0-127 ***** | X | |
| System Exclusive GM, GM2, MMC | Memory Dump | ||
| Song Position Common:Song Select | X X | X | |
| System :Clock Exclusive:Commands | X 0 | X | |
| Aux Messages :Local ON/OFF :All Notes OFF :Active Sense :Reset | 0 0 0 0 | X | |
| Notes: 0 = YES X=NO | |||
| ASSIGN | Description Program | (Press Twice) | Bank LSB (Press Twice) | Data Msb (Press Twice) |
| 0-119 | Standard MIDI CC's | - | Toggle Value 2 | Toggle Value 1 |
| 120-127 | Channel Mode Messages- | Toggle Value 2 | Toggle Value 1 | |
| 128 | Pitch Bend Sensitivity | - | Sensitivity value | - |
| 129 | Channel Fine Tune | - | Tuning amount | - |
| 130 | Channel Coarse Tune | - | Tuning amount | - |
| 131 | Channel Pressure | - | Pressure amount | - |
| 132 | RPN Coarse | Value | RPN LSB | RPN MSB |
| 133 | RPN Fine | Value | RPN LSB | RPN MSB |
| 134 | NRPN Coarse | Value | NRPN LSB | NRPN MSB |
| 135 | NRPN Fine | Value | NRPN LSB | NRPN MSB |
| 136 | Master Volume* | - | Volume LSB | Volume MSB |
| 137 | Master Pan* | - | Pan LSB | Pan MSB |
| 138 | Master Coarse Tune* | - | Tuning LSB | Tuning MSB |
| 139 | Master Fine Tune* | - | Tuning LSB | Tuning MSB |
| 140 | Chorus Mod rate** | - | Mod rate | - |
| 141 | Chorus Mod Depth** | - | Mod depth | - |
| 142 | Feedback** | - | Feedback level | - |
| 143 | Send to Reverb** | - | Reverb send level | - |
| 144 | Pitch Bend | - | Pitch shift LSB | Pitch shift MSB |
| 145 | Program/Bank Preset | Program | Bank LSB | Bank MSB |
| 146 | MIDI CC (on/off) | MIDI CC | Button release value | Button press value |
| 147 | Note (on/off) | Note | Velocity off | Velocity on |
| 148 | Note (on/off toggle) | Note | Velocity off | Velocity on |
| 149 | MMC Command*** | - | Command select. | - |
| 150 | Reverb type ** | - | Type | - |
| 151 | Reverb time ** | - | Time | - |
| 152 | Chorus type ** | - | Type | - |
| 255 | Controller Off**** | - | - | - |
Selecting A Controller For Editing
Before you can assign a MIDI CC to one of the X-Session's controllers, you will need to select it for editing. There are 2 methods for doing this:
-
Press CONTROL SELECT. The LCD will display the CONTROLLER symbol. The symbol will be flashing to indicate the controller settings can be altered. The 3-digit display will show the number of the currently selected controller, proceeded by a 'C', or an 'F' if the cross fader is selected.
-
Type in the number of the controller using the numeric keypad, or the +/- buttons.
or Move the cross fader/rotary controller. Simply moving a fader/rotary controller will make it the currently selected controller, ready for editing.
To select the second cross fader controller value (F18) please use method 1. It is also not possible to select any of the 10 numerical buttons by pressing them, since during edit mode, they are used to enter numerical values. To program these buttons, please use the first method.
Evolution X-Session Advanced User Guide
Assigning MIDI CC's
Once the controller you want to edit has been selected, you can change the assigned MIDI CC number in the following way:
- Press ASSIGN. The LCD will flash the CC symbol.
The 3 digit display will indicate the currently assigned MIDI CC number.
- Type in a new MIDI CC value using the numeric keypad or '+' and '-' buttons. The MIDI controller number you select will be assigned to the currently selected controller, shown by the number on the small, 2-digit display.

Example: After pressing ASSIGN, the display shows the cc symbol and in this case displays that currently the MIDI CC 07 is assigned to controller number 13.
Assigning An Individual MIDI Channel
- Select the controller you want to edit as described earlier.
- Press CHANNEL.
The LCD will display the CHAN symbol and the 3-digit display will show the current channel assignment of the selected controller, preceded by a 'c'. The small 2-digit display will show the currently selected controller for assignment
- Type the MIDI channel number (01-16) you want the controller to send to, using the numeric keypad or the +/- keys.
If the controller is assigned to channel 00, it will transmit on the global channel.
Changing The Global MIDI Channel
The X-Session's global MIDI channel affects only the controllers that have the individual MIDI channel assigned to value 00, as described in the previous section.
Here is how you change the global MIDI channel:
- Press GLOBAL CHANNEL (ASSIGN and CHANNEL together).
The LCD will display the KEYBOARD and CHAN symbol. The 3-digit display will show the currently selected global channel, preceded by a 'c'. - Type in the MIDI channel number (01-16) using the numeric keypad or the +/- keys.
Example: MIDI channel 01 is assigned as global MIDI channel.

Using a combination of global MIDI channel and individually assigned MIDI channels can be a great way of navigating through your system. With multitimbral instruments such as Reason, it can be easier to just change the global MIDI channel on the X-Session in order to jump to the next device, rather than operating the software.


Evolution X-Session Advanced User Guide
Evolution X-Session Advanced User Guide
Viewing The Contents Of A Memory
Right-click on a memory to view the contents. Please note that it is not possible to edit the contents of a memory. The Sys Ex librarian will simply allow you to rearrange the order of memories, or copy memories between one memory dump and another.
Saving A Setup
Once you have named all your presets, and organised them in the desired order, click 'save' to save the content.
Alternatively you can click on the File menu and select save to save the file with the previously assigned file name, or save as to assign the memory dump a new file name. The shortcut key to save Bank 1 is CTRL+S.
Make sure you give the file a name which allows you to quickly identify your collection of setups.
Loading A Setup
To load a memory setup file back in to the librarian, click on the 'Load' button and select the required file. The loaded preset setups will appear in the Bank Window. You can then either send it directly to the Evolution device by clicking send, or edit it.
Alternatively, select Open from the File menu.
The shortcut key for loading is CTRL+O
Future Development Of The Librarian
We strongly recommend you register your ownership of the Evolution Librarian if you would like to be kept informed about future development. As you can see from the version number, the software is at an early version 1.1 stage and we will continue to work on enhancements for the software.
To register your copy, please visit www.evolution.co.uk/register
Setting Toggle Values For The Buttons
The 10 assignable buttons can each be assigned to toggle between two values. You may for instance want to send out value 15 when you first press the button followed by value 74 when you press the button for a second time. This is how you do it:
- Press the Function button labelled DATA MSB 2 times.
- Type in 15 using the numerical keypad or the +/- keys.
- Press the Function button labelled DATA LSB 2 times.
- Type in 74 using the numerical keypad or the +/- keys.
If you want the button to send the same value every time you press it, simply type in the same value both times.
RPN/NRPN, GM 1+2 SysEx & Other Messages
As already described, the standard MIDI controller numbers range from 0 to 131. We have extended the list of MIDI CC's that can be assigned to the controllers of the X-Session to include RPN/NRPN, MMC and General MIDI 1&2 SysEx messages.
These advanced messages are as easy to program as a regular MIDI CC instruction by entering values 132 to 152 when programming MIDI CC's. The charts on page 8 and 9 (or Appendix B) show you what number correspond to each message
To program the values required for these advanced messages, the X-Session requires you to press the PROGRAM, DATA LSB and DATA MSB buttons twice respectively. Pressing only once will send the program and bank change instructions "on the fly" as described earlier.
Lets look at a couple of examples to see how this works. Please refer to the chart in Appendix B so you get to grips with the principle:
Assigning MMC Control To A Button
- Select the button you want to control the MMC message.
- Press "ASSIGN" on the X-Session.
- Type in "149" using the numerical keypad.
This is the number that corresponds to the MMC instruction, as per the chart on page 8 and 9. - Press "Channel" once.
- Type in "127", using the numerical keypad.
This ensures that the message is set to all device ID numbers. For more information about this, please read "About SysEx Messages & Device ID" on page 13. - Press the "DATA LSB" button twice.
- Enter a number from the chart on the next page to select the MMC message you want:
Evolution X-Session Advanced User Guide
| Number MMC Command | |
| 01 STOP | |
| 02 PLAY | |
| 03 DEFERRED PLAY | |
| 04 FAST FORWARD | |
| 05 REWIND | |
| 06 RECORD STROBE | |
| 07 RECORD EXIT | |
| 08 RECORD PAUSE | |
| 09 PAUSE | |
| 10 EJECT | |
| 11 CHASE | |
| 12 COMMAND ERROR RESET | |
| 13 MMC RESET |
Assigning RPN/NRPN To A Controller
Note: For a detailed description of RPN/NRPN data see section RPN/NRPN's Explained on page 17.
- Press Control select, and move the desired controller.
- Press control assign twice and while the display is flashing, enter controller 132 for RPN coarse, 133 for RPN fine, 134 for NRPN coarse or 135 for NRPN fine.
- Press DATA MSB twice to assign the number for the RPN/NRPN MSB.
- Press DATA LSB twice to assign the number for RPN/NRPN LSB.
- Press CHANNEL ASSIGN to assign the MIDI channel the message should be sent on.
You will find most data sheets for synths that make use of NRPN's will give the MSB and LSB values that you should enter into DATA MSB and DATA LSB banks (also see Appendix F). However, some manuals may only give the hex values. The X-Session requires you to enter the decimal value. You can easily convert hexadecimal values to decimal using the windows calculator. Simply select Scientific mode, select hex and enter the hexadecimal value you need to convert. Press the Dec button to convert it to a decimal value. Enter the decimal value into the X-Session.
Alternatively, use the look up table in Appendix C.
The following shows how to set a button to transmit a note on when pressed, and a note off when released.
Evolution X-Session Advanced User Guide
Setting Up The Librarian Software
Before you start using the Librarian, check that the X-Session has been selected as input and output device.
- Select MIDI Setup from the Options menu.
- Ensure the USB driver for your Evolution X-Session - is selected in the "Inputs" Column.
If you are using native drivers this may be named "USB Audio Device".
- In the "Outputs" column, select the USB driver for your Evolution X-Session. If you are using native drivers this may be named "USB Audio Device".
You should now be ready to use the Librarian software with you Evolution X-Session.
Librarian Overview
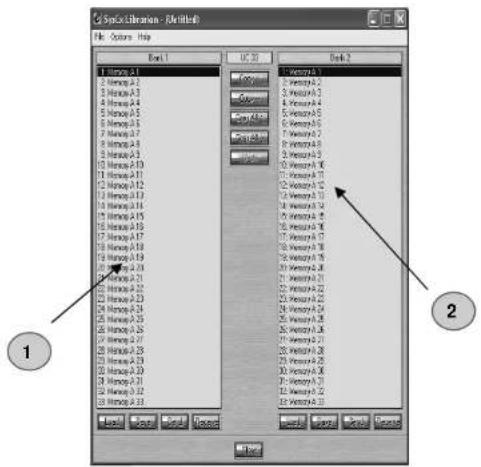
As you can see from the screenshot of the Librarian on page 20, you can save, load, receive or send the complete content to and from either Bank columns.
To transmit the complete content of your Evolution X-Session to the librarian, simply press the "Receive" button on the Librarian software.
This process can only be completed successfully if the USB drivers for your X-Session have been selected correctly, as described in the "Setting Up The Librarian Software" section.
Once you have Received data from the X-Session, the memories are displayed in the column.
Organising Presets Received From A Device
You can name the memories as you like. To re-name a memory, double-click on the memory. You can then move memories around by dragging them to a new position, or using the copy buttons between the two windows.
These buttons are defined below:
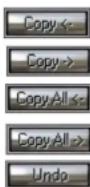
Will copy the selected memory in Bank 2 to Bank 1.
Will copy the selected memory in Bank 1 to Bank 2.
Will copy all memories in Bank 2 to Bank 1.
Will copy all the memories in Bank 1 to Bank 2.
Will undo the last copy you made. Only the last copy is remembered.
It's a good idea to decide which column is your master column, to avoid confusion and maybe loosing hours of work.
Evolution X-Session Advanced User Guide
Evolution X-Session Advanced User Guide
About The Evolution Librarian Software
The Evolution Librarian Software is a Windows PC librarian program developed for Evolution products. The program not only works with the MK-425C/449C/461C keyboards but is also compatible with the Evolution X-Session and the Evolution UC-33e USB controllers.
And even better, you can swap patches between Evolution products that are supported by the Librarian so you never have to create the same patch twice.
The librarian itself, allows you to send and receive the 10 patches to and from the X-Session, load and save memory banks, view how individual patches have been programmed and drag and drop patches in order to create new combinations in the 10 memory locations.
Installing The Evolution Librarian Software
- Insert the X-Session Installer CD-ROM in to your CD-ROM drive.
- Click on "Librarian Installer"
- Follow the on-screen instructions to complete the installation process
Once the installation has been completed, launch the program. The following is a screenshot of what you should be seeing on your monitor.
20
Assigning A Note To A Button
- Press SELECT and press the "0" button. The display will show that you have selected controller 19.
- Press ASSIGN and enter '147' this is the MIDI CC number that corresponds to Note on/off mode, as shown in Appendix B.
- Press DATA MSB twice and enter a value of '100'. This means when you press the button, a Note on message will be sent out with a velocity of 100.
- Press DATA LSB twice, and enter a value of '000'. This means when you release the button, a Note off message will be sent out.
- Press the PROGRAM button twice and enter '064'. This will mean you are sending out MIDI note 64 or E4, each time you press the button. The MIDI note numbers are given in Appendix D.
This button mode has many uses. You can use this mode to trigger samples, control lighting equipment, play keyboard notes and much more.

Note: When you press the button in note mode, the LCD display will briefly show the note velocity.
About Sys Ex Messages & Device ID
When transmitting Sys Ex messages, the individual control channel number does not define a transmit channel, but a device ID. This is made clear since when you press the CHANNEL button, the CC symbol will not be shown and there is no 'c' in the 3 digit display.
Device ID's range between 00 - 127. In most cases, you should set the device ID as 127. 127 means the SysEx message will be received by all devices.
Please note that the device ID for a Sys Ex message assigned to a controller can not be changed using the Device ID buttons. These buttons are used for varying the device ID of the X-Session it self, not just a separate controller.
Evolution X-Session Advanced User Guide
Non-Volatile Memory
The X-Session uses non-volatile memory so that you can continue where you left off even after powering down and restarting. The current X-Session controller and channel assignments are stored whether you have stored your setup to a memory locations or not. Also stored is MIDI Out from USB on/off, Program, DATA LSB and DATA MSB data, global channel setting and last used memory preset.
Memory Dump
Pressing the MEMORY DUMP buttons will send out a number of Sys Ex data packets that represent the 10 memories you have set up in your X-Session. This is a useful way of storing or backing up the contents of your memory presets externally.
You can record the complete memory dump in to a standard sequencer. To recall the memory dump back to the X-Session, play the MIDI track containing the recorded memory dump to the X-Session, making sure that the X-Session drivers are selected as output for that particular track.
The current controller assignments are not affected by a memory dump, or a memory send to the X-Session. Once a memory dump has been sent to the X-Session, you will need to recall a preset to access the new memory settings.
Assigning A Device ID To The X-Session
Pressing the "DEV. ID" buttons will allow you to assign a Device ID to the X-Session. The default Device ID is 127, which means when a memory dump is performed, that dump can be received by any X-Session, regardless of the Device ID setting.
If a device ID is assigned to any number other than 127, the memory dump performed will be specific to X-Session's with the same device ID. If the device ID of a X-Session differs from the one recorded with the memory dump, the data will be ignored.
The device ID is a handy way of differentiating between multiple X-Session's. Otherwise, we recommend you keep the device ID setting as 127.
When you press the Device ID buttons, you will see the small 2-digit display on LCD display 'id'. The 3-digit display represents the assigned Device ID. You can enter a new device ID using the numeric keypad, or the '+' and '-' buttons.
For more information on Sys Ex messages and device ID, please go to page 18.
Resetting To The Factory Default Setting
The X-Session comes with 10 useful presets stored in it's memory (for complete list, see Appendix H). You can reset the X-Session back to the factory defaults on power-up by holding down the +/- buttons.
Note: Restoring the Factory presets will erase all X-Session setups stored to memory.
![SysEx Librarian - (Untitled) File Options Help Bank 1 UC-33 Bank 2 1: Memory A 1 2: Memory A 2 3: Memory A 3 4: Memory A 4 5: Memory A 5 6: Memory A 6 7: Memory A 7 8: Memory A 8 9: Memory A 9 10: Memory A 10 11: Memory A 11 12: Memory A 12 13: Memory A 13 14: Memory A 14 15: Memory A 15 16: Memory A 16 17: Memory A 17 18: Memory A 18 19: Memory A 19 20: Memory A 20 21: Memory A 21 22: Memory A 22 23: Memory A 23 24: Memory A 24 25: Memory A 25 26: Memory A 26 27: Memory A 27 28: Memory A 28 29: Memory A 29 30: Memory A 30 31: Memory A 31 32: Memory A 32 33: Memory A 33 Copy ← Copy → Copy All Undo 1: Memory A 1 2: Memory A 2 3: Memory A 3 4: Memory A 4 5: Memory A 5 6: Memory A 6 7: Memory A 7 8: Memory A 8 9: Memory A 9 10: Memory A 10 11: Memory A 11 12: Memory A 12 13: Memory A 13. 14: Memory A 14 15: Memory A 15 16: Memory A 16 17: Memory A 17 18: Memory A 18 19: Memory A 19 20: Memory A 20 21: Memory A 21 22: Memory A 22 23: Memory A 23 24: Memory A 24 [Memory A 25] [Memory A 26] [Memory A 27] [Memory A 28] [Memory A 29] [Memory A 30] [Memory A 31] [Memory A 32] [Memory A 33] Load Save Send Close Load Save Send EVOLUTION](/content/2026/05/977287/images/e00541f88c0709d197962097735671f19fa958ff0a4b2c5ad4ffab1ff77b9207.jpg)
Evolution X-Session Advanced User Guide
A list of NRPN's will always be given in the User Manual of a device that receives NRPN messages. It is always necessary that the NRPN MSB and LSB are sent together. Both will be specified in the device's manual. You may find the manufacturer's have only specified the numbers in Hexadecimal format. In this case, use Appendix C to translate the value to Decimal.
The X-Session makes the process of transmitting NRPN's easy. All you need is to enter the appropriate NRPN LSB by pressing the LSB/DATA button twice, enter the NRPN MSB by pressing the MSB/DATA button twice, and as you move the X-Session controller, an appropriate NRPN message will be sent out. Assign NRPN coarse to make big sweeps, or NRPN fine to make slight adjustments.
Sys Ex Explained
System Exclusive (Sys Ex) messages were defined in the MIDI specification to allow individual devices to have individual control via MIDI. The format of Sys Ex messages allows for virtually any function to be performed via MIDI – so long as the receiving device is able to translate the message, and act accordingly. This allows devices to send audio sample memory data, memory dumps, controller settings, and much more. It also allows the controllers of one device to be controlled by another.
It is not possible to program your own specified Sys Ex message into the X-Session. However, there are some useful Sys Ex messages pre-programmed, that can be accessed by assigning the appropriate MIDI cc to a controller (see Appendix B)
It should be noted that a Sys Ex message is not transmitted on any specified channel. All Sys Ex messages contain a device ID, that is used to single out devices to respond to the Sys Ex message. All other devices are ignored. If you are using a Sys Ex message on the X-Session the global channel is ignored. When you press CHANNEL, instead of entering a channel for the controller, you will be enter a device ID instead. This is indicated by the fact that the CC symbol will not be showing.
Device ID's run from 00 to 127. 127 is the default device number setting on the X-Session. This setting transmits the Sys Ex message to all devices.
Although it is not possible to program the controllers of the X-Session with your own Sys Ex messages, there are software applications that can receive a MIDI input signal and transmit a different, user specified message. You can program your Sys Ex messages into the translator software, then translate the incoming data from the X-Session to your Sys Ex, depending on the controller you are using.


Evolution X-Session Advanced User Guide
Evolution X-Session Advanced User Guide
MIDI In & MIDI Out Signal Flow Diagram
The MIDI IN & MIDI OUT ports have different uses depending on how you intend to connect and power the X-Session. The diagram below shows the different routing options.

flowchart
graph TD
    A["USB MIDI IN"] --> B["MIDI OUT From USB Switch"]
    C["Controllers"] --> B
    D["MIDI IN"] --> B
    B --> E["USB MIDI OUT 1"]
    B --> F["USB MIDI OUT 2"]
    B --> G["MIDI OUT"]
About The MIDI In Port
The MIDI in plug can be used to interface another MIDI device to your PC, via the USB port. Data received from this device will be transmitted via the X-Session to the PC. This is achieved using a second USB MIDI out. So, when you select the MIDI devices section of your sequencer you will see two X-Session USB MIDI Ins. The first of these is used to receive the X-Session controller data, the second is used to receive data from the other device connected to the X-Session's MIDI IN plug. So, the X-Session is acting as a MIDI-to-USB interface for the other MIDI device.
About The MIDI Out Port
The X-Session can of course also interface with other MIDI devices. By default (i.e. when you switch the unit on), all controller data is sent out via the MIDI output as well as the USB out.
If you want the MIDI output to act like a traditional USB-to-MIDI interface, just press the two buttons (SELECT and ASSIGN) that activate the MIDI OUT from USB mode.
If you are using a host application which can pick up multiple input drivers, you will be able to use the X-Session's MIDI input and the X-Session surface to record MIDI data and send the whole lot out of the X-Session's MIDI output.
Important note: The X-Session is not a MIDI THRU device and as such, MIDI data received at the X-Session's MIDI IN plug can never be sent directly to the X-Session's MIDI OUT plug. However, if the X-Session is connected via USB to a computer, data received at the MIDI IN can be transmitted to the MIDI OUT plug, since the data is sent to the computer, and received back from the computer. MIDI OUT FROM USB mode must be engaged for this to occur.
Program & Bank Changes Explained
The original GM MIDI specification catered for only 128 voices, numbered from 0-127. It is possible to access a different voice by sending a program change.
In order to expand on the GM set of voices, Bank changes were devised. Each bank contains 128 patches, that can be accessed using a program change. There are 16,384 banks available, accessible by sending a 14-bit Bank change message. The first 7 bits of this message are sent in a single byte known as the Bank LSB. The last 7 bits are specified by another byte known as the Bank MSB. The BANK LSB is the most commonly used. This allows for 128 bank changes, and often there is no need to send a Bank MSB.
You will find almost all MIDI devices respond to the program change, but some that do not conform to the GM set of voices use the program change message for other purposes. Many VST instruments have adopted this approach, allowing you to use a program change to change the instrument patch. The FM7 by Native Instruments is a good example of this.
Bank changes are more rarely used, although they do exist. Bank changes are useful in manufacturer's extensions to the MIDI specification, such as Roland's GS specification and Yamaha's XG specification. Both of these require you to specify a Bank change, in order to access the extra voices and effects that these specifications provide.
Sending Program, Bank LSB and Bank MSB data is made simple using the X-Session. Simply press the PROGRAM, DATA LSB or DATA MSB button and enter the program or bank change you wish to send.
RPN/NRPN's Explained
Non-registered parameter numbers (NRPN's) are device specific messages that enable the control of synths via MIDI. The MIDI specification defines parameter numbers to allow scope for manufacturers to specify their own controllers. The more common of these have been registered by the MIDI Manufacturer's Association and are part of the MIDI specification (hence the term Registered Parameter Numbers – RPN's). (See Appendix F.)
MIDI controllers 98 and 99 represent the NRPN LSB and MSB respectively, while 100 and 101 represent the RPN LSB and MSB. This can be seen from the MIDI controllers list in Appendix D. To transmit an NRPN/RPN, these two controller messages are sent along with their user-specified values. A further controller message and value needs to be sent to specify the (coarse or fine) value adjustment.
This is specified by controller number 6 (Data entry) for coarse adjustments or number 38 for fine adjustments.

- Appendix H - X-Session Preset Chart
- Factory Preset
- EVOLUTION
- Advanced User Guide
- About The Advanced Guide
- Terminology
- Edit Mode:
- Default mode :
- Appendix F - Roland GS and Yamaha XG NRPN Support to Roland JV/XP
- Appendix G - General MIDI Reverb and Chorus Types
- Reverb Types
- Chorus Types
- Sending Program Changes On The Fly
- Press the PROGRAM button.
- Sending Bank Changes On The Fly
- Press the DATA LSB or DATA MSB button.
- Sending Snap Shot
- Appendix D - Useful MIDI data
- Muting All Controllers
- About the Cross Fader
- Appendix C - Hexadecimal Conversion Chart
- Introduction To X-Session Programming Options
- Appendix B - Assignable MIDI CC's
- on the X-Session
- Selecting A Controller For Editing
- Assigning MIDI CC's
- Assigning An Individual MIDI Channel
- Changing The Global MIDI Channel
- Viewing The Contents Of A Memory
- Saving A Setup
- Loading A Setup
- Future Development Of The Librarian
- Setting Toggle Values For The Buttons
- RPN/NRPN, GM 1+2 SysEx & Other Messages
- Assigning MMC Control To A Button
- Assigning RPN/NRPN To A Controller
- Setting Up The Librarian Software
- Librarian Overview
- Organising Presets Received From A Device
- About The Evolution Librarian Software
- Installing The Evolution Librarian Software
- Assigning A Note To A Button
- About Sys Ex Messages & Device ID
- Non-Volatile Memory
- Memory Dump
- Assigning A Device ID To The X-Session
- Resetting To The Factory Default Setting
- Sys Ex Explained
- MIDI In & MIDI Out Signal Flow Diagram
- About The MIDI In Port
- About The MIDI Out Port
- Program & Bank Changes Explained
- RPN/NRPN's Explained
Brand : M-AUDIO
Model : X-Session UC-17
Category : Audio Equipment