DCP-200 - Audio Equipment M-AUDIO - Free user manual and instructions
Find the device manual for free DCP-200 M-AUDIO in PDF.


| Product Type | Digital Console Piano |
| Keyboard | 88 weighted keys with Graded Hammer action |
| Polyphony | 64 notes (maximum) |
| Sounds | 8 built-in voices: Grand Piano, Bright Piano, Vintage Electric Piano, FM Electric Piano, Harpsichord, Church Organ, Strings, Upright Bass |
| Effects | Built-in digital Reverb (on/off, depth 0-127, per voice) |
| Metronome | Yes, tempo 20-280 bpm, time signatures: 2/2, 2/4, 3/4, 4/4, 5/4, 6/8, 7/8, 9/8, 12/8 |
| Recorder | 2-track song recorder, up to 14,000 notes, 1 song memory |
| Modes | Split, Layer, Octave shift (+/-3), Transpose (+/-12 semitones) |
| Touch Sensitivity | 4 modes: Low, Normal, High, Fixed |
| Pedals | 3 pedals (Soft, Sostenuto, Sustain) via included pedal board |
| Connectivity | USB (1.1), MIDI Out (5-pin), Aux Line In (RCA), Line Out (RCA), 2 Headphone outputs (1/4") |
| Speakers | Built-in 20W stereo system with two 4" full-range speakers |
| Power Supply | AC 100-240V, 50/60Hz (IEC power cable included) |
| Dimensions (approximate) | Width: 1360 mm, Depth: 450 mm, Height: 950 mm (estimated) |
| Weight (approximate) | 40 kg (estimated) |
| Included Accessories | Pedal board, 1/8" TRS to 2x RCA cable, USB cable, IEC power cable, piano bench, music stand, Sibelius First CD-ROM, A4 laminated function sheet |
| Maintenance | Clean with soft dry cloth; avoid chemical cleaners; keep away from moisture |
| Safety | Follow all safety instructions in manual; do not expose to rain or moisture; unplug during storms |
| Spare Parts / Repairability | Contact M-Audio technical support for service; no user-serviceable parts inside |
| Warranty | Standard M-Audio warranty; register online at www.m-audio.com/register |
Frequently Asked Questions - DCP-200 M-AUDIO
User questions about DCP-200 M-AUDIO
0 question about this device. Answer the ones you know or ask your own.
Ask a new question about this device
Download the instructions for your Audio Equipment in PDF format for free! Find your manual DCP-200 - M-AUDIO and take your electronic device back in hand. On this page are published all the documents necessary for the use of your device. DCP-200 by M-AUDIO.
USER MANUAL DCP-200 M-AUDIO
Thank you for purchasing this digital instrument. For perfect operation and security, please read the manual carefully and keep it for future reference.
Safety Precautions
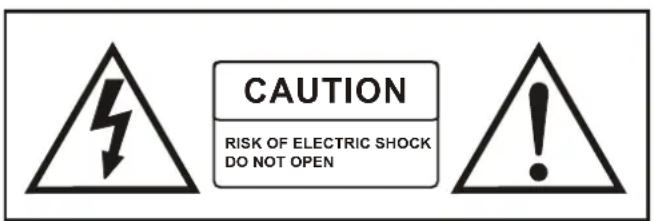


The lightning flash with arrowhead symbol within an equilateral triangle is intended to alert the user to the presence of uninsulated “dangerous voltage” within the product s enclosure that may be of sufficient magnitude to constitute a risk of electric shock to persons.

The exclamation point within an equilateral triangle is intended to alert the user to the presence of important operating and maintenance(servicing) instructions in the literature accompanying the product.
Important Safety Instructions
1) Read these instructions.
2) Keep these instructions.
3) Heed all warnings.
4) Follow all instructions.
5) Do not use this apparatus near water.
6) Please use the production near the electric socket to unplug easily;
7) Clean only with dry cloth.
8) Do not block any ventilation openings, install in accordance with the manufacturer's instructions.
9) Do not install near any heat sources such as radiators, heat registers, stoves, or other apparatus (including amplifiers) that produce heat.
10) Do not defeat the safety purpose of the polarized or grounding-type plug. A polarized plug has two blades with one wider than the other. A grounding type plug has two blades and a third grounding prong. The wide blade or the third prong are provided for your safety, if the provided plug does not fit into your outlet. Consult an electrician for replacement of the obsolete outlet.
11) Protect the power cord from being walked on or pinched particularly at plugs.convenience receptacles,and the point where they exit from the apparatus.
12) Only use attachments/accessories specified by the manufacturer.
13) Use only with the cart, stand, tripod, bracket, or table specified by the manufacturer, or sold with the apparatus. When a cart is used, use caution when moving the cart/apparatus combination to avoid injury from tip-over (Figure 1).
14) Unplug this apparatus during lightning storms or when unused for a long periods fo time.
15) Refer all servicing to qualified service personnel. Servicing is required when the apparatus has been damaged in any way, such as power-supply cord or plug is damaged, liquid has been spilled or objects have fallen into the apparatus, the apparatus has been exposed to rain or moisture, does not operate normally, or has been dropped.
WARNING: To reduce the risk of fire or electric shock, do not expose this apparatus to rain or moisture.
CAUTION: Apparatus shall not be exposed to dripping or splashing and no objects filled with liquids, such as vases, shall be placed on the apparatus.

natural_image
Symbolic icon of a person pushing a large object through a wheel, enclosed in a circle (no text or symbols)(Figure 1)
Table of Contents
1 Introduction 5
2 What's in the Kit. 5
3 Features 5
4 Controls and Connectors....6
Right Panel. 6
Left Panel 7
Connections Panel. 8
Rear Panel 8
5 Using DCP-200 for the First Time....9
Connect the Pedal Board 9
Connect the Power Cable. 9
Turn the Power On. 10
Set a Comfortable Volume Level 10
Select a Sound 11
Connect Headphones....12
Using the Pedals. 12
6 Additional Features....13
Resetting DCP-200 13
Method 1: Piano Reset. 13
Method 2: Factory Reset. 14
Using the Built-in Reverb 15
Playing the Demo Songs 16
Using the Metronome 18
To Activate the Metronome. 18
Metronome Volume 18
Tempo....19
Time Signature. 19
Using the Song Recorder....21
To record a track. 21
To manually select a track to record to 22
To cancel recording while in Record Wait Mode 23
To change metronome tempo while in Record Wait Mode. 23
To turn off the metronome while recording 23
To Clear all Data in the Song Recorder. 24
To Erase a Single Track in the Song Recorder 25
To Play Back Your Song Recorder Tracks. 26
To stop playback and exit Song Play Mode . . . . . . . . . . . . . . . . . . . . . . . . . . . . . . . . . . . . . . . . . . . . . . . . . . . . . . . 27
7 Edit Mode 28
Resetting the Data Control Knob to Voice Select 28
To enter Edit Mode, press the Voice/Function button. 29
Using the Voice Select Keys 29
Split Mode. 30
Layer Mode 35
Octave, Transpose, and Master Tuning . . . . . . . . . . . . . . . . . . . . . . . . . . . . . . . . . . . . . . . . . . . . . . . . . . . . . . . . 39
Octave (C#0) 39
Transpose (Eb0)....40
Master Tuning (F#2) 41
Adjusting Keyboard Sensitivity: 'Touch' Select Keys (F3, F#3, Ab3, Bb3) .....42
To set the keyboard sensitivity . . . . . . . . . . . . . . . . . . . . . . . . . . . . . . . . . . . . . . . . . . . . . . . . . . . . . . . . . 42
8 Using Your Digital Console Piano with a Computer .....43
Computer System Requirements 43
Connecting DCP-200 to your Computer 44
Connecting the USB cable. 44
Connecting the DCP-200 Auxiliary Input . . . . . . . . . . . . . . . . . . . . . . . . . . . . . . . . . . . . . . . . . . . . . . . . . . . . 45
Installing Sibelius First Software 47
Running the Sibelius First Software. 48
9 MIDI Functions....51
Local On/Off (C#3) 51
To turn Local On/Off to Off. 51
Main MIDI Transmit Channel (C#2). 52
To change the Main MIDI Transmit Channel. 52
Numeric Data Entry Keys (G5, A5, B5, C6, D6, E6, F6, G6, A6, B6)....53
Enter Key (C7) 53
Cancel Key (Bb6) 54
Data Control Assign Key (C#6)....54
Program Change, Bank LSB, and Bank MSB 57
Sending MIDI Program Changes. 57
Sending Bank LSB Changes. 60
Sending Bank MSB Changes 63
Panic Key (F#6) 66
Default Key (F5) 67
10 Care and Maintenance....68
11 Troubleshooting....68
12 Technical Info....69
13 Appendices 70
Appendix A – Defaults. 70
Default Settings 70
Piano Reset 71
Additional Default Information 71
Appendix B - MIDI Implementation. 72
Appendix C – Data Control Assignments and MIDI CC List .....73
14 Warranty 75
1 Introduction
Congratulations on your purchase of the DCP-200 Digital Console Piano from M-Audio. DCP-200 combines state-of-the-art electronics with graded hammer keyboard action and elegant design, giving you a versatile musical instrument that is a joy to play, while adding beauty and sophistication to your home.
Professional musicians and recording studios around the world rely on M-Audio's market-leading USB MIDI controller keyboards. M-Audio digital pianos build on this legacy of quality and dependability, fusing industry leading expertise in digital keyboard technology with world-class sounds. DCP-200 is a beautifully designed, highly playable instrument equally suited for today's homes and houses of worship. And a single USB cable unlocks an entire world of additional functionality, allowing DCP-200 to interface with a vast variety of music software including everything from fun-oriented education programs to professional recording and notation applications such as the included Sibelius First software. ^1
Whether you're new to musical instruments in general, or an experienced musician, please take some time to read through this user guide. It will help to familiarize you with the many features of DCP-200, so that you can get the most from your new piano.
^1 Computer and software setup instructions can be found in the section titled “Using Your Digital Console Piano with a Computer”.
2 What's in the Kit
Your DCP-200 console piano kit includes the following items:
■ DCP-200 Piano (assembly required)
■ 1/8" TRS to 2x RCA adaptor cable
This User Guide
■ Assembly Instructions
■ Sibelius First CD-ROM - Contents:
• Sibelius First Installer PC and Mac
• Documentation for Sibelius First
• Extra content - piano scores suitable for loading into Sibelius First
USB Cable
IEC Power Cable
■ A4 Laminated Sheet showing additional keybed functions
Piano Bench
3 Features
■ Graded Hammer action
■ 64-Note Polyphony (maximum)
■ Master Volume Control
Built-in Reverb Effect
■ 4 Keyboard Touch Sensitivity Modes (Low, Normal, Hi, Fixed)
■ Metronome with variable Tempo (20 to 280bpm) and time signatures (2/2, 2/4, 3/4, 4/4, 5/4, 6/8, 7/8, 9/8, 12/8)
■ Transpose function (+/-12 semitones)
■ Octave Shift function (+/-3 Octaves)
■ Layer Mode
Split Mode
■ Built-in 1-song/2-track recording capability with 14,000 note song memory
■ 8 Sounds in internal ROM: Grand Piano, Bright Piano, Vintage Electric Piano, FM Electric Piano, Harpsichord, Church Organ, Strings, Upright Bass
■ 8 Demo Songs
USB 1.1 connectivity
■ Pedal Board with 3 pedals (Soft, Sostenuto and Sustain)
Aux Line In
■ Stereo Line out connectors
■ Two Headphone Outputs
■ Sliding Key cover
■ Hinged Music Stand
Headphone Hook
Built-in 20W Stereo Speaker system with two 4" High Quality Full Range Speakers
4 Controls and Connectors

Right Panel

- Power On/Off Switch – Pressing this button turns DCP-200 on or off.
Left Panel
![MASTER VOLUME LED PIANO RESET Reverb Voice / Function Song Metronome RECORD Data Control [Assignable]](/content/2026/05/953362/images/20360ba5174d43a1a3f74fefc20b9b9c5daf9c766f1d189bb4d879723c1ce0d3.jpg)
-
Master Volume – Controls the overall volume of the piano, including the built-in speakers and headphone output. Turn this knob to the right to increase the volume, and to the left to decrease the volume. Please note that the Master Volume does not affect the volume of the Line Outputs (13)
-
LED Display - The three-digit LED display indicates Voice selection, Reverb depth and other parameters.
-
Reverb Button - This button is used to turn the Reverb on or off.
Pressing and holding the Reverb button while turning the Data Control knob allows you to adjust the Reverb Depth.
For more information, see "Using the Built-in Reverb" in the Additional Features section.
-
Voice / Function Button – Pressing this button puts DCP-200 in Edit Mode, allowing you to change various functions and parameters. In Edit Mode, the keys no longer send notes, but instead are used to select functions and edit their parameters. See the Edit Mode section for more information on using the Voice / Function button for Edit Mode functions.
-
Metronome Button – Pressing this button will start or stop the Metronome. The LED in the button will blink in time with the tempo setting.
Pressing and holding the Metronome button while turning the Data Control knob allows you to adjust the Tempo.
Form more information, see "Using the Metronome" in the Additional Features section.
-
Song Button – This button is used to enter Song Play Mode. Pressing it and using the Data control knob will scroll through the demo songs, as well as any songs you may have recorded in the built-in Song Recorder.
-
Data Control Knob – The Data Control knob is a multi-purpose control for entering or altering the settings of various functions. In its default setting it is assigned to change voices (that is, to select any of the eight built-in sounds of DCP-200).
Connections Panel
-
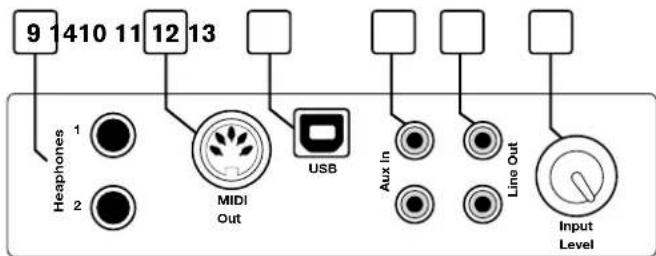
Headphone Outputs – Plugging a set of headphones into Headphone Output number 1 will disable the output from the internal speakers, allowing you to play without disturbing others. Plugging headphones only into the second (bottom) headphone output will not affect the speakers.
-
MIDI Output - This standard 5-pin MIDI connector sends MIDI output signal, for connecting to a computer or external MIDI device.
-
USB Connector - This is a standard USB 1.1 connector, for connecting to a computer's USB port.
-
Aux Line In – These RCA connectors allow you to mix an external sound source (such as a CD player or computer output) with the piano's internal sounds, for playback through the piano's built-in speakers or headphone outputs.
-
Line Out – These RCA connectors can be used to connect the output of the piano to another device such as a stereo sound system, keyboard amplifier, mixing console or audio recorder. The level of the Line Output is not affected by the Master Volume knob.
-
Aux Input Level - This adjusts the input level of the signal connected to the Aux Line Inputs.
Rear Panel

-
Power Socket - Connect the included 3-pin AC cable here, and plug the other end into an active AC outlet.
-
Pedal Connector – Connect the pedal board here.
5 Using DCP-200 for the First Time
Everything you need to know to start making music with DCP-200 is right here in this short section.
Connect the Pedal Board

Connect the Power Cable
1
Make sure that the Power On/Off Switch is in the "Off" (up) position.
2
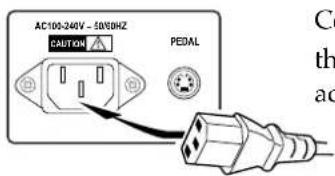
Connect the included AC cable to the Power Socket on the rear panel of the piano, and plug the other end into an active AC outlet.

natural_image
Simple line drawing of a plug connected to an electrical outlet with two socket switches (no text or symbols)Turn the Power On
1
![Turn the Master Vol (all the way to MASTER VOLUME PNO PIANO [ RESET ] Reverb Voice 7- Function 5 Song Metronome RECORD Data Control [ Assignable ] Less Volume MASTER VOLUME](/content/2026/05/953362/images/127c90e922597b37ca0e95ea7565a890be4375e8ec9b49edd9059f564166b8c5.jpg)
Turn the Master Volume knob all the way down (all the way to the left).
2

Press the Power On/Off switch to turn DCP-200 on.
The LED display will light up and show the characters P n o, to represent Grand Piano. Grand Piano is the sound (or Voice) that is automatically selected each time you turn on DCP-200.
Set a Comfortable Volume Level
![Master VOLUME Pno PIANO [RESET] Reverb Voice / - Function Song Melanome [RECORD] Data Control [Assignable] While playing the keyboard with your left hand to adjust the M comfortable level. Turn the h level, and right to increase th Less Volume More Volume MASTER VOLUME](/content/2026/05/953362/images/19beda4e0a4d869087190578dbb2f282bc5b0ba7e41fd244dd809b2d81c3807b.jpg)
While playing the keyboard with your right hand, use your left hand to adjust the Master Volume control to a comfortable level. Turn the knob left to decrease the volume level, and right to increase the volume level.
Select a Sound
![The display shows that Bright Piano is selected MASTER VOLUME 8-rt PIANO [RESET] Reverb Voice / - Function Song Metronome RECORD Turn the Data Control knob to select a voice Data Control [Assignable]](/content/2026/05/953362/images/f79f76f2fb12a6c741a0d890c1603634ea3a4ec6f3403aa3691a5bc0791e69e9.jpg)
To select a new sound, turn the Data Control knob until the desired sound is shown in the LED display.
Turn the Data Control knob to select a voice.
Below is a list showing the eight sounds built into the DCP-200 piano, as well as the way the voice names are abbreviated for the LED display.
| Voice Name LED Display | Turning the Data |
| Grand Piano | Pno |
| Bright Piano | Brt |
| Vintage Electric Piano | EP1 |
| FM Electric Piano | EP2 |
| Church Organ | Or9 |
| Harpsichord | HAr |
| Strings | Sbr |
| Upright Bass | BAS |
clockwise scrolls down the list (ultimately stopping at Upright Bass), while turning the Data Control knob counter-clockwise scrolls up the list (ultimately stopping at Grand Piano). Note that the sound selections do not repeat in an endless loop if you keep turning the Data Control knob in one direction.
Connect Headphones

If you wish to use headphones while playing by
yourself, plug your headphones into the top headphone output (Headphone Output 1). This will automatically turn off the speakers, so that you only hear sound through the headphones. Volume is still controlled by the Master Volume knob. Be sure the Master Volume is turned down before you put on your headphones, and then gradually turn it up to a comfortable level.
! Warning: Using headphones at high volumes can permanently damage your hearing.
Note that plugging headphones into the bottom
headphone output (Headphone Output 2) does not automatically turn off the speakers. Headphone Output 2 is designed for use at times when you wish to practice quietly together with another person (such as a student), with both people wearing headphones. In this case, the speakers will still remain off, since headphones are also plugged into Headphone Output 1.
Using the Pedals
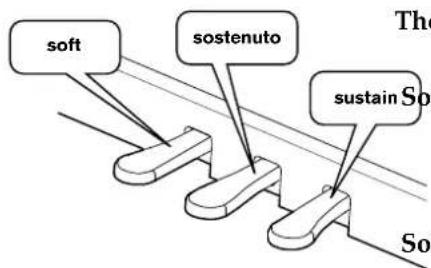
The pedal board has three pedals:
Pedal (Left Pedal): When this pedal is pressed, notes will sound slightly softer than they normally would if played with the same force without pressing the pedal.
Sostenuto Pedal (Middle Pedal): The Sostenuto pedal acts as a selective damper pedal by sustaining specifically chosen notes. To use it, play and hold down a note or chord. Then depress the sostenuto pedal. After releasing the keys, only those notes will continue to sustain until the sostenuto pedal is released.
Sustain Pedal (Right Pedal): When this pedal is pressed, notes will continue to sustain even after the keys are released.
Congratulations, you've learned all you need to know to be able to start enjoying your new digital piano. You can put this manual away and start playing music. If you want to learn about all the additional functionality DCP-200 has to offer (including how to play the built-in demo songs, use the metronome, and record your own songs using the built-in Song Recorder), please continue on to the "Additional Features" section.
6 Additional Features
Resetting DCP-200:
What to do if you need to start over
If you come to a point while using some of the advanced features built into DCP-200 where you are feeling a little lost and just want to start over, there are two ways to do this.
Method 1: Piano Reset
The Piano Reset Function resets selected aspects of DCP-200 back to their default factory state. These elements are carefully selected to give you a quick and easy way to restore DCP-200 back to being a simple Grand Piano once more, with the Data Control knob assigned for selecting voices.
Press the Reverb button and the Voice/Function button at the same time.
When both buttons are pressed the display will immediately change to show:

The LED display will show this for 1 second and then return to the default display.
Now the piano is back in Performance Mode, with the Grand Piano voice selected, and the Data Control knob ready to choose other voices if you wish.
In most cases, this is all you will need to do. Any songs you have recorded in the Song Recorder will be preserved.
For detailed information regarding which MIDI commands are sent during a Piano Reset, as well as a list of which settings are saved or returned to default after a Piano Reset (or after powering DCP-200 off), please see Appendix A: Defaults.
Method 2: Factory Reset
Performing a Factory Reset will clear all battery backed memory and restore all functions to their factory defaults, just like they were when you used DCP-200 for the first time. Please note that anything you have recorded in the Song Recorder will be erased by this procedure!
Hold down the Reverb and Voice/Function buttons while powering on DCP-200.

The LED Display will light ALL segments, and all LEDs on the device will light while these buttons are held down. Once this has happened, you can release the Reverb and Voice/Function buttons.
When the Reverb and Voice/Function buttons are released, DCP-200 will return to Performance Mode (ready-to-play). All button LEDs will return to their default states. The LED Display will show the version number of the firmware (the piano's internal operating software) for 2 seconds and then return to showing the Voice Name (Grand Piano - Pno).
DCP-200 will then function normally and as if powered on for the first time.
Using the Built-in Reverb
Your DCP-200 piano includes a built-in digital Reverb that can be used for adding a natural-sounding room ambience to any of the piano's eight voices.
![MASTER VOLUME Piano RESET Reverb Voice / - Function Song Metronome RECORD Data Control [Assignable]](/content/2026/05/953362/images/2e5f72ac26eac5ae6312ac6af7e8a8fed67d7fcf4abc7595fb7f7a87f3cc27cf.jpg)
To apply Reverb to a voice:
Press the Reverb button. The button will illuminate, and you will hear the Reverb effect when you play the currently selected voice.
To turn Reverb off, press the Reverb button again. The button LED will turn off to indicate that Reverb is no longer active.
![MASTER VOLUME 64 PIANO [RESET] Reverb Voice / - Function Song Metronome [RECORD] Data Control [Assignable]](/content/2026/05/953362/images/4439322806b4bfcf2fb29a563c9a3df3518fc3706ed37c282fdfe8fae56d86d0.jpg)
To adjust the Reverb depth (Reverb amount):
-
Press and hold the Reverb button; the LED display will change to show the current Reverb depth.
-
While holding the Reverb button, turn the Data Controller knob (7) to adjust the reverb depth setting. The minimum setting is 0, and the maximum setting is 127.
Once you have the desired amount of Reverb, let go of the Reverb button, and resume playing DCP-200.
Each of the eight built-in voices will remember its individual Reverb on/off status and depth setting, even after turning the Power switch off and on.
Playing the Demo Songs
DCP-200 comes pre-programmed with a selection of eight demo songs. Each of the Demo Songs is designed to demonstrate one of the piano's built-in voices.
▶ To play the first demo song:
1
![579 PIANO RESET Reverb Voice / Function Song Metronome RECORD Data Control [Assignable]](/content/2026/05/953362/images/0ad5523919cddd8bde31d245258f5bdca1bd39ddacbf68b38792e140bd6c1c33.jpg)
Press the Song button to enter Song Play Mode.
2
![PIANO RESET Reverb Voice / - Function Song Metrolome RECORD Data Control [Assignable]](/content/2026/05/953362/images/59adb78900a682d243a09e2718aac2cc14547749beded2b95dc3b69e608fa0fa.jpg)
Turn the Data Control knob to the right until you see the number 1 appear on the LED display.
3
![dEN PIANO RESET Reverb Voice / - Function Song Motronome RECORD Data Control [Assignable]](/content/2026/05/953362/images/9d2ea4ff2fdfe208810ca42f9b5574a01c7efdedba9ddd6fb68b56701566f5b2.jpg)
Press the Song button to hear Demo Song 1, which is the Grand Piano demo.
While the demo is playing, the Song button will flash quickly, and the LED display will show:
dEN
If you allow playback to continue past the end of Demo Song 1, Demo Song 2 (Bright Piano) will begin to play, and after that, each of the remaining demos will continue to play in sequence until you press the Song button. If the Song button is not pressed to stop demo playback, after the end of the eighth demo, demo playback will continue from the beginning of Demo Song 1 until the Song button is pressed.
To Stop Playback of a Demo Song:
To stop playback of a Demo Song, press the Song button. The Song Button's LED will turn off, and DCP-200 will be back in Performance Mode, ready for you to play on the keyboard again.
To choose a specific Demo Song:
1
![579 PIANO RESET Reverb Voice / Function Song Matronome RECORD Data Control [Assignable]](/content/2026/05/953362/images/620b0269214e96a823279f45a49cbc844b59f7287a938e2469664c5e0e76eba0.jpg)
Press the Song button to enter Song Play Mode.
2
![Piano RESET Reverb Voice / - Function Song Metronome RECORD Data Control [Assignable]](/content/2026/05/953362/images/e5ce4be81a20dad95e6c3c59ec93e4d3049d88c0320adf81bcd377afca732327.jpg)
Turn the Data Control knob to the right until you see the desired Demo Song number appear in the LED display window.
3
![dEN PIANO RESET Rerverb Voice / - Function Song Matronome RECORD Data Control [Assignable]](/content/2026/05/953362/images/85713e93d0cee957e8498bb24d5bbdceb2a5507e9013f054dd38471fb832874b.jpg)
Press the Song button to begin playback of the selected Demo song.
The following table shows the Demo Song numbers along with which voice is used for each Demo Song:
| Demo Song Number Voice Used | |
| 1 Grand Piano | |
| 2 Bright Piano | |
| 3 Vintage Electric Piano | |
| 4 FM | Electric Piano |
| 5 Church Organ | |
| 6 Harpsichord | |
| 7 Strings | |
| 8 Upright Bass | |
Using the Metronome
DCP-200 features a built-in metronome which can be used for practicing to a set tempo, and is also helpful when recording tracks in the Song Recorder.
To Activate the Metronome:

Press the Metronome button.
The metronome will sound a high tone on the first beat of a bar, and a lower tone on the remaining beats of the bar. The Metronome button's LED will also flash in time.
Metronome Volume
The metronome volume can be raised or lowered to a level that is comfortable for you.
To change the metronome's volume:
1
![Pno PIANO RESET Reverb Voice / - Function Song Metronome [RECORD]](/content/2026/05/953362/images/3da2eb3a311693e8daefb86dd9a48c0685aa4773077df01fd6e882a776dfdd64.jpg)
Press the Voice/Function button on the left hand panel.
Did you know...
...that many of the keys on your keyboard allow you to access additional features on DCP-200? Push the Voice/Function button to activate this mode (called Edit Mode), and then use the included A4 laminate sheet to locate the keyboard key that gives access to the feature you are looking for. Instructions on how to use specific features while in Edit Mode can be found throughout this manual. A comprehensive explanation of the features in Edit Mode can be found in the Edit Mode section later in this User Guide.
2
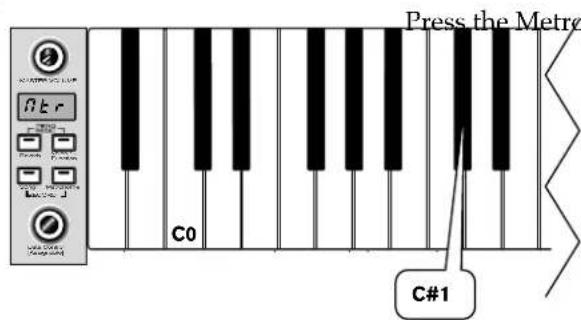
the Volume key (C#1) on the keyboard.
The LED display will momentarily show Nt r
3
![115 PIANO RESET Reverb Voice 7- Function Song Melonome RECORD Data Control [Assignable]](/content/2026/05/953362/images/a5b65db6a95d7c988378c81a5ed7f7f9beb991e23a83e8dc6e0264d6dae98128.jpg)
Turn the Data Control knob clockwise to increase the metronome volume, or counter-clockwise to decrease the metronome volume.
The metronome volume level will be indicated as a value from 0-127 in the LED display window.
NOTE: Now the Data Control knob is assigned to controlling metronome volume instead of Voice Selection. To reassign the Data Control knob for Voice Selection, press the Voice / Function button and then press the Eb2 key. (This procedure is illustrated at the beginning of the "Edit Mode" section.)
Tempo
The metronome can be programmed for any tempo between 20 beats per minute (bpm) and 280 bpm.
To change the metronome's tempo:
![120 PIANO RESET Reverb Voice / Function Song Metronom RECORD 1 2 Data Control [Assignable]](/content/2026/05/953362/images/15c34bff96ac249541888a27db505e7c31b450fed11eaa38e35e8988528b7854.jpg)
-
Press and hold the Metronome button (5). The LED display will show the current tempo.
-
Turn the Data Control knob clockwise to increase tempo, or counter-clockwise to decrease tempo.
Time Signature
The metronome can support the following time signatures: 2/2, 2/4, 3/4, 4/4, 5/4, 6/8, 7/8, 9/8, 12/8
To change the metronome's time signature:
1
![Pno PIANO RESET Reverb Voice / - Function Song Metronome RECORD Data Control [Aspligable]](/content/2026/05/953362/images/de847747ae55cb2b35eaeb332d8a45f9d7ad86202ae1377f99464251dae53695.jpg)
Press the Voice/Function button on the left hand panel.
2
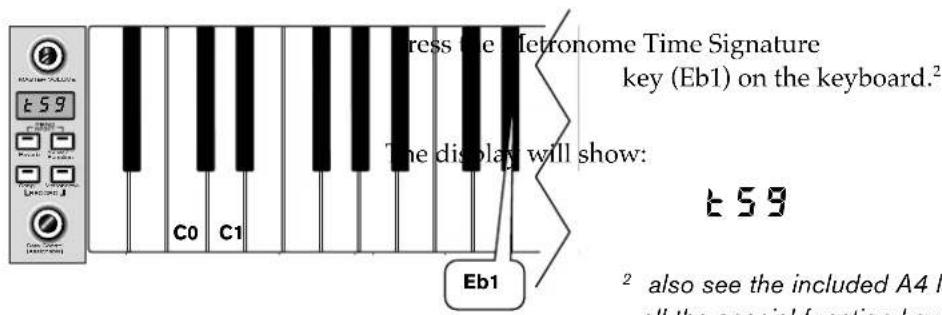
^2 also see the included A4 laminate for all the special function key locations, including this one.
3
![4.4 PIANO [RESET] Roverb Voice / - Function Song Metronome RECORD Data Control [Assignable]](/content/2026/05/953362/images/2401e19054e9fb83eb2193fbfa2d6eb465d5c7bf370d579f467a1be0bbc0eaae.jpg)
Turn the Data Control knob to step through the available time signatures.
The available time signatures will be shown on the LED display as they appear below:
| 2.2 | 2.4 | 3.4 | 4.4 | |
| 5.4 | 6.8 | 7.8 | 9.8 |
Please note that time signature and Tempo cannot be changed while recording a song in Song Record Mode.
NOTE: Now the Data Control knob is assigned to control time signature instead of Voice Selection. To reassign the Data Control knob for Voice Selection, press the Voice / Function button and then press the Eb2 key. (This procedure is illustrated at the beginning of the "Edit Mode" section.) Also, keep in mind that no matter how the Data Controller knob is assigned, you can always select sounds (in Performance Mode) by holding down the Voice /Function button while turning the Data Control knob.
Performance Mode? Edit Mode?
As you read this User Guide, you will notice mention of Performance Mode and Edit Mode.
Performance Mode is the mode DCP-200 is in when first powered on. It is the mode in which you can play (or "perform" on) the keyboard.
Edit Mode is what happens any time you press the Voice/Function button. In Edit Mode, the keys do not make sound. Instead, several of the keys have a special function (as you will find referenced on the included A4 laminate sheet). When you are done editing the desired function, DCP-200 will be in Performance Mode again so you can play the keyboard.
Using the Song Recorder
The Song Recorder built into DCP-200 can record two individual tracks, allowing you to record one part and then record a second complementary part while the first part is played back.
To record a track:
1
![REC PIANO RESET Reverb Voice / - Function Song Metronom RECORD Data Control [Assignable]](/content/2026/05/953362/images/aad7300bb274d1fc4110a99eeadd952d3da3f375c9cd18d27efe7cf752ac2198.jpg)
Press the Song button and the Metronome button simultaneously to enter Record Wait Mode. The Song button's LED will light, and the Metronome will begin playing at the currently selected tempo.
The LED display will show: r E for one second, after which it will show: t r 1
2
200 is now in Record Wait Mode. To start recording, begin playing the keyboard. Recording starts automatically as soon as you start playing.
NOTE: When Record Wait Mode is active, you can also start recording by pressing the Song button. In that case, the Song Recorder will record silence until you start playing the keyboard.
3
![REC PIANO RESET Reverb Voice / Function Song Metronome RECORD Data Control [Assignable]](/content/2026/05/953362/images/7a54a20b9f5b2146f6e28f5a1cf1e436c95892e1d8e66728dc63dea854582faf.jpg)
To end recording, press the Song button.
As mentioned at the beginning of this section, you can record to two independent tracks within each song you record. This means that you can make a recording, and after you're done, play back what you recorded while recording a complementary part on a second track. DCP-200 automates some of the track selections to make work with the Song Recorder more intuitive:
When you start recording, if data has already been recorded on track 1, the display will show b c , and the Song Recorder will record on track 2.
During recording, any notes already recorded on the other track will be played back. If you are recording on track 2, anything previously recorded on track 1 will be played back for you to play along to.
If tracks 1 and 2 both contain data, DCP-200 will automatically choose to record to the track that was NOT last recorded to. (If your last recording was on track 1, track 2 will be selected; if your last recording was on track 2, track 1 will be selected.)
To manually select a track to record to:
1
![Press th enter Ro RE PIANO RESET Reverb Voice / Function Song Metronom RECORD Data Control [Assignable]](/content/2026/05/953362/images/4e03251595ac84390fbd71dbf04b35a6718608dbb15fa25619590155236daf4c.jpg)
Press the Song button and the Metronome button simultaneously to enter Record Wait Mode.
2
![tr1 PIANO RESET Reverb Voice / - Function Song Metronome RECORD Data Control [Assignable]](/content/2026/05/953362/images/c23967aae4d297fdf8f6364e9db55ab39636e52f26682373296b12fc09aadbd4.jpg)
Turn the Data Control knob to select between Track 1 and Track 2.
If either of the tracks contains recorded data, the display will show a dot “.” in the bottom right hand corner:
b r 1. b r 2.
You will also see options for "Clear" (abbreviated "clr") and "Cancel" (abbreviated "cAn"), which you can ignore for the moment. These will be discussed later in this section.
3
natural_image
Illustration of two hands typing on a piano keyboard (no text or symbols)When the LED display shows the track you wish to record to, you may begin playing whenever you are ready, and recording will automatically begin as soon as you play the first note.
To cancel recording while in Record Wait Mode:
1
![cA_n PIANO RESET Reverb Voice / - Function Song Metronome RECORD Data Control [Assignable]](/content/2026/05/953362/images/89c89b98391e7295e12f499ab1f5727cca9c7fc948c1c6323bf7898ae2b0b8ac.jpg)
Turn the Data Control knob until the LED display shows: c A n
2

Press the Song button.
Record Wait Mode will exit, and the keyboard will be back in Performance Mode, with no changes to the contents of either Track 1 or Track 2.
To change metronome tempo while in Record Wait Mode:

The metronome tempo can be adjusted while in Record Wait Mode by pressing and holding the Metronome button and using the Data Control knob to select the desired value. However, the metronome tempo can not be adjusted during recording.
To turn off the metronome while recording:
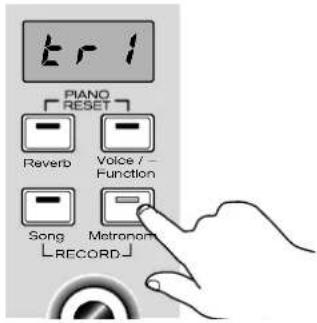
Press the Metronome button, and the metronome will stop while recording continues.
Pressing the Metronome button again will turn the metronome on again.
Note that the metronome can also be turned on and off in the same way while in Record Wait Mode, before recording commences.
To Clear all Data in the Song Recorder:
Use the following procedure to clear all data from Tracks 1 and 2 in the Song Recorder:
1
![Piano RESET -Reverb Voice / - -Function Song Matronom -RECORD Data Control [Assignable]](/content/2026/05/953362/images/8baff9de61f37e0a95ffcfe57834d9cde43bba047b87a6c1bc2afdf1f6f7a94f.jpg)
Press the Song button and the Metronome button at the same time to enter Song Recording Mode. This will start the Metronome and place the Song Recorder in Record Wait.
2
![Turn th PIANO RESET Reverb Voice / - Function Song Matronoma RECORD Data Control [Assignable]](/content/2026/05/953362/images/c97a5bdcc1b2eeae2bafb0b25a4e8e978eaca1d7320bec324be77ebf16057d08.jpg)
Turn the Data Control knob until the LED displays: r.
3a

natural_image
Illustration of two hands typing on a piano keyboard (no text or symbols)gin playing the keyboard. All previously
recorded data on Tracks 1 and 2 will be cleared, and the notes you are now playing will be recorded on Track 1.
or...
3b
![press twice Piano RESET Reverb Voice / - Function Song Metronome RECORD Data Control [Assignable]](/content/2026/05/953362/images/bfebf5d16ade1f3ffe49b54dcf0536d9945b45ccbfd020af1be8d130864d9baa.jpg)
To clear all data on Tracks 1 and 2 without recording anything new, after step 2, press the Song button twice.
You will then be back in Performance Mode, with all data cleared from the Song Recorder.
Note that the "Clear" function always erases recorded notes from both tracks. For instructions on how to erase data from only one of the two tracks, please read the following section, "To Erase a Single Track in the Song Recorder."
To Erase a Single Track in the Song Recorder:
1
![Piano RESET Reverb Voice / Function Song Metronom RECORD Data Control [Assignable] Press time](/content/2026/05/953362/images/2b1cd8ee9f3814f7523216ecb6fbff81e6d8f6f48b8bc55da1213b2eb2d0b83d.jpg)
Press the Song button and the Metronome button at the same time to enter Song Recording Mode.
2
![Use the Piano RESET Reverb Voice / - Function Song Metronome RECORD Data Control [Assignable]](/content/2026/05/953362/images/8f7103909118bd6b2dfbe907165afc09ccc1e0421e4dd03495889dfc78b1e192.jpg)
Use the Data Control knob to select the track you wish to erase.
3
![press twice Piano [RESET] Reverb Voice / Function Song Matronome [RECORD] Data Control [Assignable]](/content/2026/05/953362/images/f56f34a9a22c9254545b740b19c4588450a5ae9b0b77b8def472313811e5e7fb.jpg)
Press the Song button twice.
The track will be erased, and DCP-200 will be back in Performance Mode.
To Play Back Your Song Recorder Tracks:
1
![519 PIANO [RESET] Reverb Voice / - Function Song Melanome RECORD Data Control [Assignable]](/content/2026/05/953362/images/6340171f01b1b42a4338bb8857a9052884a69865693e553cc4e01df384df7cce.jpg)
From Performance Mode, press the Song button to enter Song Play Mode.
2
![tr1 PIANO RESET Reverb Voice 7- Function Song Metronome RECORD Data Control [Assignable]](/content/2026/05/953362/images/e41311fbce06ed9fb0f42b6be439b4b070862106e4a175cbe5f939f8b0194cc9.jpg)
Use the Data Control knob to select one of the following:
519
Playback of both of the Song Recorder tracks simultaneously.
tr 1
Playback of Song Recorder Track 1.
t r 2
Playback of Song Recorder Track 2.
3
![PLY PIANO RESET Reverb Voice / Function Song Metronome RECORD Data Control [Assignable]](/content/2026/05/953362/images/423cb7bcc72f081b5218a9acbfe11e177217085086ed1332d4bd189976656d5a.jpg)
Press the Song button to start playback.
While the Song is playing the LED display will show:
PLY
NOTE: If there is nothing recorded on either of the tracks (1 or 2), then the Song will not play. Rather, the Song LED will flash 3 times quickly, and DCP-200 will exit Song Play Mode and resume Performance Mode, with the LED display showing the currently selected voice.
To stop playback and exit Song Play Mode:
![PLY PIANO RESET Reverb Voice / Function Song Metronome RECORD Data Control [Assignable]](/content/2026/05/953362/images/4fd2e69c96e8a8a66b36c4f99ee705847b7e08f46142625dbc754bd138f3ab07.jpg)
Press the Song button. Song playback will stop, and DCP-200 will exit Song Play Mode and resume Performance Mode with the LED display showing the currently selected voice.
7 Edit Mode
In Edit Mode, the keys on the DCP-200 piano keyboard do not make any sound. Instead, the keys are used for selecting functions for editing. In most cases, an edit function is selected using the keyboard, and the Data Control knob is used to increase or decrease the value of the selected editing parameter. To enter Edit Mode, press the Voice/Function button.
Included with your piano is an A4 laminate sheet which shows the locations of all the special function keys. Please keep it at hand for reference. The chart below is a smaller version containing the same information.

Resetting the Data Control Knob to Voice Select
Whenever you power up DCP-200, the Data Control knob is assigned to instantly select sounds (Voice Select) at a turn of the knob. However, when using other DCP-200 features, you will often have occasion to assign the Data Control knob for other uses. Although the Data Control knob can easily be returned to its Voice Select function as part of a Piano Reset, here is another way to change the Data Control knob back so that it can be used for selecting sounds:
1
![MASTER VOLUME Pno PIANO [RESET] Reverb Voice / - Function Song Metronome [RECORD]](/content/2026/05/953362/images/69f15b2a0fa624300e4b86e3dd48f2d07afa6c7c59692f4541d34a7122dc2235.jpg)
Press the Voice/Function button. It will light up.
2

Press the key Eb2. The LED will momentarily display SEL, and will then display the currently selected sound. Now you can use the Data Control knob to select sounds as before.
NOTE: No matter how the Data Controller knob is assigned, you can always select sounds (in Performance Mode) by holding down the Voice /Function button while turning the Data Control knob.
To enter Edit Mode, press the Voice/Function button.
Using the Voice Select Keys
The Voice Select keys offer an alternative method of selecting voices.
▶ To select different voices using Voice Select keys:
1
![Pno PIANO RESET Reverb Voice / Function Song Metronome RECORD Data Control [Assignable]](/content/2026/05/953362/images/0131ac31360824efd8804927a3649ca23486e4601e77fbda0fdf3ec67f9eb1ab.jpg)
Press the Voice/Function button to enter Edit Mode. The LED in the Voice/Function button will light.
2

| PGM Key Sound Name LED Display | |||
| 0 A-1 Grand Piano | Pno | ||
| 1 B-1 Bright Piano | 8rt | ||
| 2 C0 Vintage | EP | EP1 | |
| 3 D0 FM | FP | EP2 | |
| 4 E0 | Church Organ | 0-9 | |
| 5 F0 Harpsichord | HRc | ||
| 6 G0 Strings | 5tr | ||
| 7 A0 Upright Bass | 8RS | ||
Split Mode
In Split Mode, the keyboard is divided into two parts, with each part playing a different sound. This allows you to play two different instruments, for example, bass with your left hand and piano with your right hand.
The different voices, split point and other settings are selected in Edit Mode.
▶ To Use Split Mode:
Before you begin, select a sound as you normally would. This sound will be used for your right hand once you activate Split Mode.
1
![PNO PIANO [RESET] Reverb Voice / - Function Song Record Metronome](/content/2026/05/953362/images/56b2eaa22e8979bbbcdf61286c475de08ff053d3c4e811d1d53fc68bb498a615.jpg)
Press the Voice/Function button to enter Edit Mode.
2
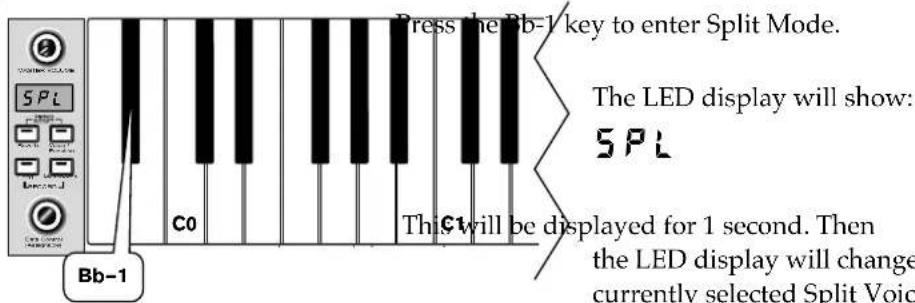
The selected Split Voice (Left Hand Voice) is
played in the section of the keyboard from the lowest (left-most) key up to and including the selected Split Point key. (Selecting the Split Point will be explained in the next section.) The originally selected Voice (Right Hand Voice) is played in the section of the keyboard to the right of the selected Split Point key up to and including the highest key on the keyboard. (The LED display will show the name of the Left Hand Voice.)
Note for MIDI Users
The Right Hand Voice (Main Voice) will remain on the previously selected Main MIDI Transmit Channel. The Left Hand Split Voice will be played on the next highest Main MIDI Transmit Channel (Main MIDI Transmit Channel +1). For information on setting the MIDI Transmit Channel, please read the section entitled MIDI Transmit Channel in the MIDI Functions portion of this User Guide.
IMPORTANT:
If Voice Select is now used, it will only affect the Left Hand Split Voice. The Right Hand Voice will stay the same until Split Mode is turned off again.
▶ To change the Split Point:
1
![Pno PIANO RESET Reverb Voice / - Function Song Metronome RECORD Data Control [Assignable]](/content/2026/05/953362/images/4543b6db0ee7d8d93ccb7f223abd04fa66efcaa88878d9dcf1f14ee499ad240c.jpg)
Press the Voice/Function Button to enter Edit Mode.
2

the Split Mode (Bb-1) key.
The LED display will show 'SPL' for 1 second. After 1 second the display will begin flashing 'SPL.'
3

keyboard between C0 and C7 to select the Split Point. (The split point cannot be set lower than C0.)
The default values for Split Mode are:
| Default Split Point: Eb3 | |
| Default Voices: 7. Upright | Bass (L Hand),0 Grand Piano (R Hand) |
| MIDI Transmit Channel: | Left Hand Voice on MIDITransmit Channel +1 |
| Default Volume Level: 127 |
To Independently Control Volume Levels of Left Hand and Right Hand Voices:
• Left Hand Voice Volume:
1
Press the Voice/Function button to enter Edit Mode.
![Pno PIANO RESET Reverb Voice / - Function Song Metronome LRECORD Data Control [Assignable]](/content/2026/05/953362/images/2d9a6da9c9272f5c5dc3821109367847c47312ac4b1d716d23059e8b98b7a55e.jpg)
2
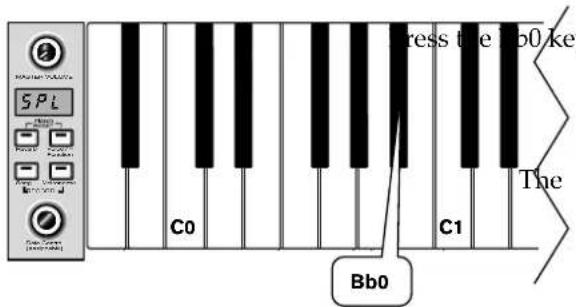
to assign the Data Control knob to control the Split Voice (Left Hand Voice) volume.
LED display will show: SPL
3
![100 PIANO RESET Reverb Voice / Function Song Metronome RECORD Data Control [Assignable]](/content/2026/05/953362/images/8dd554108e20d0edd3cf244c82c835fa07a5c9bd165fa85fc87d95940a11aaec.jpg)
Use the Data Control knob to select a Split Voice volume level between 1 (minimum) and 127 (maximum). You can play as you do this to hear the volume change.
• Right Hand Voice Volume:
1
![120 PIANO RESET Reverb Voice / Function Song Metronome RECORD Data Control [Assignable]](/content/2026/05/953362/images/2502d4a498c65468e5c5e692707adb061ed19b63e475db45ca3360f1fb70a9de.jpg)
Press the Voice/Function button to enter Edit Mode.
2

3
![80 PIANO RESET Reverb Voice / Function Song Metronome RECORD Data Control [Assignable]](/content/2026/05/953362/images/5a3066cf166cf24874e7f80fd80006765a43501e5bfba433ee9d9a528c6390b8.jpg)
Use the Data Control knob to select a Right Hand Voice volume level between 1 (minimum) and 127 (maximum). You can play as you do this to hear the volume change.
▶ To turn off Split Mode:
1
Press the Voice/Function button.
![80 PIANO RESET Reverb Voice / - Function Song Matronome LRECORD Data Control [Assignable]](/content/2026/05/953362/images/88d621d70593da8a2597f8ce471f54ae04b30455814c7597d033b56431d22715.jpg)
2
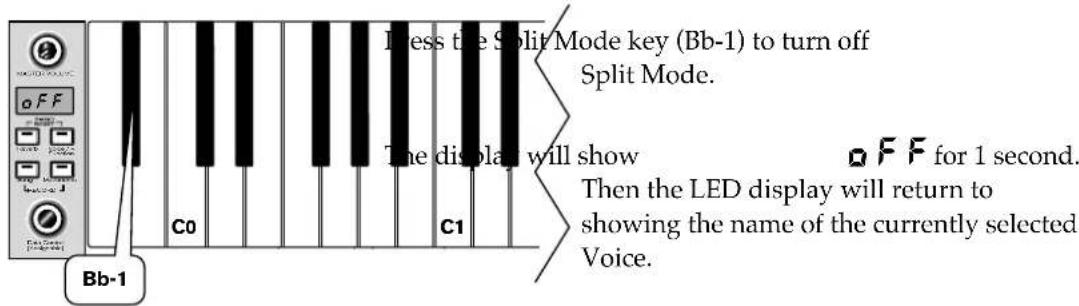
Layer Mode
In Layer Mode, DCP-200 will play two voices simultaneously on each key.
▶ To use Layer Mode:
1
![Pno PIANO RESET Reverb Voice / - Function Song Metronome LRECORD Data Control [Assignable]](/content/2026/05/953362/images/7e266e3966bc2d5f05a1e697a3e9479b8ed0726c92328d8caea2eea1ea7da6ec.jpg)
Press the Voice/Function button to enter Edit Mode.
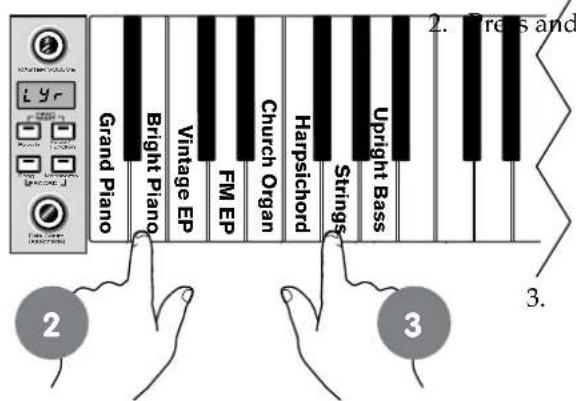
hold down a Voice Select key
(any white key in the lowest octave of the piano). This will select the Main Voice. (See the section on Using the Voice Select Keys at the beginning of the Edit Mode Functions section for more information on selecting voices in this manner.)
While continuing to hold the first Voice Select key, press a second Voice Select key. This will select the Layer Voice.
While both keys are held down the display will show:
LYr
■ DCP-200 is now in Layer Mode. Both the Main and Layer Voices will sound when keys are pressed. (In the example illustration, Bright Piano is the Main Voice (because it is selected first), and Strings is the Layer Voice (because it is selected second).
If the Data Control knob is used to change voices while in Layer Mode, it will affect the Layer Voice only. The Main Voice (original voice) will stay the same until Layer Mode is turned off again.
■ Please note that polyphony may be reduced while Layer Mode is in use.
To adjust the volume of the Layer Voice:
1
Press the Voice/Function button to enter Edit Mode.
![5tr PIANO [RESET] Reverb Voice / - Function Song Melanome RECORD Data Control [Assignable]](/content/2026/05/953362/images/3f32cfdc6d7ea7a322e83b924bbc6a96e8b41e9ac5bd7758e9b4ba92f59397dc.jpg)
2

3
![100 PIANO RESET Reverb Voice 7- Function Song Metronome RECORD Data Control [Assignable] Use bet this](/content/2026/05/953362/images/8f868a9ecba1c888bdee1062c36e9638eb6543e37a724c5c5557475fe029a4d8.jpg)
Use the Data Control knob to select a Layer Voice volume level between 1 (minimum) and 127 (maximum). You can play as you do this to hear the volume change.
To adjust the volume of the Main Voice:
1
Press the Voice/Function button to enter Edit Mode.
![Str PIANO RESET Reverb Voice / Function Song Metronome RECORD Data Control [Assignable]](/content/2026/05/953362/images/ab055416cede7986503c0012895115793699ac5e047c1ab982cf55f07b9a3740.jpg)
2

3
Use the Data Control knob to adjust the Voice volume.
![127 PIANO RESET Reverb Voice / Function Song Metronome RECORD Data Control [Assignable]](/content/2026/05/953362/images/d0723685e305ecc8ed57a0db0daef988f8dbc66a3cb0e868c0f3067e9b121f69.jpg)
Note to MIDI Users:
The Main Voice will be transmitted on the selected Main MIDI Transmit Channel. The Layer Voice will be played on the selected MIDI Transmit Channel +2. So if the Main Voice is transmitting on MIDI channel 1, the Layer Voice will be transmitted on MIDI channel 3. For information on setting the Main MIDI Transmit Channel, please read the section entitled Main MIDI Transmit Channel in the MIDI Functions portion of this User Guide.
NOTE: If Split Mode is engaged and Layer Mode is selected, the Layer Voice will only be applied to the keys to the right of the split point. The Left Hand Voice will remain the same as was specified for Split Mode.
▶ To turn off Layer Mode:
1
![Str PIANO RESET Reverb Voice / Function Song Melronome RECORD Data Control [Assignable]](/content/2026/05/953362/images/1c3c950b8f2efc1f6a8f12f00502865ac85d9b6b8632a9725a2c1c23ad651763.jpg)
Press the Voice/Function button to enter Edit Mode.
2

(See "Using the Voice Select Keys" at the beginning of the Edit Mode section for more information on selecting voices in this manner.)
Octave, Transpose, and Master Tuning
To access the Octave, Transpose, and Master Tuning editing functions, press the Voice/Function button to enter Edit Mode. Then press the designated key to access the desired function.
Octave (C#0)
Pressing this key will set the Data Control knob to increase or decrease the keyboard's octave setting.
1
![Pno PIANO RESET Reverb Voice / - Function Song Melanome RECORD Data Control [Assignable]](/content/2026/05/953362/images/ce9fba43f9921cf0264e5f67ad0d307b36daf8d8dabade4fe82d5c6c9f4a3fef.jpg)
Press the Voice/Function button to enter Edit Mode.
2

3
![2 PIANO RESET Reverb Volco / - Function Song Metronomo RECORD Data Control [Assignable] Us Tu pit low ne, ►](/content/2026/05/953362/images/2da25867c982129812ad642536701f81d55a75fba12e2f3d684df2407def4451.jpg)
Use the Data Control knob to select the desired Octave.
Turning the Data Control knob clockwise will raise the keyboard's pitch in octave increments, and turning it counter-clockwise will lower it in octave increments. The display will show a positive, negative, or zero value.
NOTE: To reassign the Data Control knob for Voice Selection, press the Voice / Function button and then press the Eb2 key. (This procedure is illustrated at the beginning of the "Edit Mode" section.)
Transpose (Eb0)
Pressing this key will set the Data Control knob to increase or decrease the keyboard's transpose value.
1
Press the Voice/Function button to enter Edit Mode.
![Pno PIANO [RESET] Reverb Voice / Function Song Metronome RECORD Data Control [Assignable]](/content/2026/05/953362/images/3085531bd9a61741b66ed17477d3d5886c7c5ee2a57e03e6999d85082e4f64bb.jpg)
2
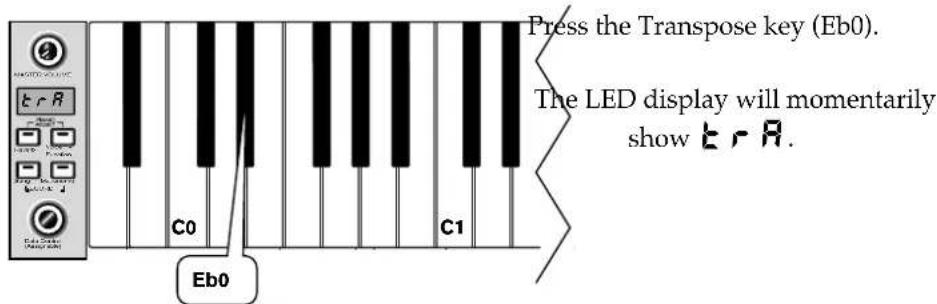
3
![Piano RESET Reverb Voice / - Function Song Metronome RECORD Data Control [Assignable]](/content/2026/05/953362/images/acf5b2a596aad39ec87c4a1708b1b8a8330d4c7207d504cdb8c378330f2b09b3.jpg)
Use the Data Control knob to select the desired Transpose Value.
Turning the Data Control knob clockwise will raise the keyboard's pitch in semitone increments, and turning it counter-clockwise will lower it in semitone increments. The display will show a positive, negative, or zero value.
NOTE: To reassign the Data Control knob for Voice Selection, press the Voice / Function button and then press the Eb2 key. (This procedure is illustrated at the beginning of the "Edit Mode" section.)
Master Tuning (F#2)
Pressing this key will set the Data Control knob to raise or lower ("fine-tune") the Master Tune setting of DCP-200.
1
![Pno PIANO RESET Reverb Voice / Function Song Metronome RECORD Data Control [Assignable]](/content/2026/05/953362/images/3173e1c835eb852d98cb3176c753000a9eeb81c80a04751a69ec4e9a596e5558.jpg)
Press the Voice/Function button to enter Edit Mode.
2

Press the Master Tuning key (F#2).
The LED display will momentarily show
3
![- 10 PIANO RESET Reverb Voice / Function Song Metronome RECORD Data Control [Assignable]](/content/2026/05/953362/images/d6e7907b86bc4d30f45247413609950fe52901430958414f8da357ccfe944ac8.jpg)
Use the Data Control knob to set the Master Tuning.
The LED display will show a positive, negative, or zero value between -64 and 64.
Of course, DCP-200 never actually "goes out of tune," but the Master Tuning feature can be useful when you are playing along with another instrument or recording that may be slightly above or below standard pitch.
Remember: No matter how the Data Control knob is assigned, you can always select sounds (in Performance Mode) by holding down the Voice / Function button while turning the Data Control knob.
Adjusting Keyboard Sensitivity: 'Touch' Select Keys (F3, F#3, Ab3, Bb3)
The Touch Select control, sometimes referred to as Velocity Curve, lets you decide how the pressure with which you hit the keys determines the volume at which the notes play. DCP-200 provides you with four different keyboard sensitivity options:
- Normal (Ab3 key) is the default setting, and is designed to be useful for most players with an "average" touch (i.e.: people who play with an average amount of force). When selecting this option (explained further below), the LED display shows n or r
- Low (F#3 key) is a sensitivity setting that generates lower velocity values for the same force. This setting is useful for playing more quietly, even if you have a "heavy" touch. When selecting this option (explained further below), the LED display shows
- High (Bb3 key) is a sensitivity setting that generates higher velocity values for the same force. This setting is useful for playing more loudly, even if you have a naturally "light" touch. When selecting this option (explained further below), the LED display shows h1
- Fixed (F3 key) is a setting that effectively disables sensitivity, meaning the keyboard will generate a fixed velocity value of 100 (on a scale of 0-127) regardless of how hard or soft you play. When selecting this option (explained further below), the LED display shows Fd
To set the keyboard sensitivity:
1
![Pno PIANO [RESET] Reverb Voice / - Function Song Metronome [RECORD] Data Control [Assignable]](/content/2026/05/953362/images/01ca04dfe6f4cc84be59687b8b0c5f93b75b75e0fc6166d1b45038af3bfc24cd.jpg)
Press the Voice/Function button to enter Edit Mode.
2
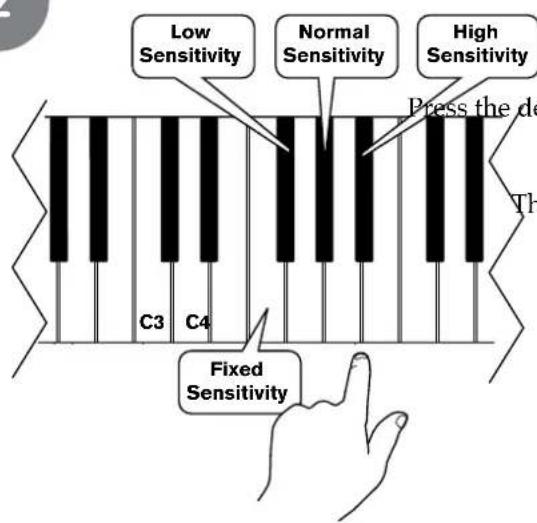
desired Touch Select key (F3, F#3, Ab3, Bb3).
LED display will show the selected Touch setting. Please note that these keys are in the middle of the keyboard. If you need help locating them, please refer to the included laminated Special Function Key chart.
8 Using Your Digital Console Piano with a Computer
The following section explains how to connect DCP-200 to your home computer, and how to install the included Sibelius First software.
Computer System Requirements
Most recently-manufactured home computers should meet the following requirements for use with DCP-200 and the included Sibelius First software:
| Windows: |
| XP SP2/Vista |
| 512 MB RAM, |
| 600 MB hard disk space |
| CD-ROM drive |
| Available USB port |
| Mac: |
| OS X 10.4 or later |
| 512 MB RAM |
| 600 MB hard disk space |
| CD-ROM drive |
| Available USB port |
▶ Note: It is not necessary to install Sibelius First software in order to use DCP-200 with your computer. Other music software may also be used. Note that other music software may have higher system requirements than those listed above for Sibelius First.
Connecting DCP-200 to your Computer
Your DCP-200 is class-compliant. This means you may simply connect your DCP-200 to your Windows XP, Windows Vista or Mac OS X computer using the provided USB cable and switch the piano on. No additional installation or drivers are required.
Connecting the USB cable:
1

With your computer on and all
programs/applications closed, connect one end of the included USB cable to an open USB port on your computer.
2

the other end of the included USB cable to the USB jack on the front of the DCP-200 Connections Panel.
3

Make sure DCP-200 is powered on.
That's it! Now MIDI (Musical Instrument Digital Interface) data can be sent between DCP-200 and your computer.
Connecting the DCP-200 Auxiliary Input
The Auxiliary Input of the DCP-200 allows you to connect the audio output of a computer, MP3 player, or other audio device to DCP-200, and hear that audio device play through the stereo speakers built in to DCP-200. This feature can be very useful when you want to play along with pre-recorded music, or when you are working with music software.
To connect your computer's audio output to the DCP-200 Auxiliary Input:
1
![Set a comfortable volume level to the "Set a Comfortal in the "Using DCP-200 beginning of this User" MASTER VOLUME Pno PIANO [RESET] Reverb Voice 7 Function Song Metronome RECORD Data Control [Assignable] Less Volume More Volume MASTER VOLUME](/content/2026/05/953362/images/a17179660ea2cf4b76d706e8e2153f4233bcec9fcec6b1dde5faeb7c71a961e9.jpg)
Set a comfortable volume level for DCP-200 according
to the "Set a Comfortable Volume Level" instructions
in the "Using DCP-200 for the First Time" section at the beginning of this User Guide.
2
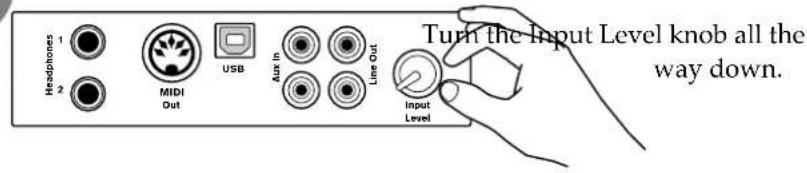
3

Connect the 1/8" end of the included
1/8" TRS to stereo RCA audio cable to the audio output (headphone or line output) of your computer.
(This will most likely silence your computer speakers.)
4

the RCA plugs of the included 1/8" TRS to stereo RCA audio cable into the Aux In jacks on the DCP-200 Connections Panel.
5
natural_image
Illustration of a computer monitor displaying a video player interface, next to a desktop tower (no text or symbols visible)Begin playing an audio file or audio CD on your computer, at the volume level you usually use.
6

Slowly turn up the Input Level
knob, until you hear the audio file playing through the DCP-200 speakers at a comfortable listening level.
You may wish to play the piano
along with the music, as this can help you set a more balanced mix between the piano's built-in sounds and the external audio source.
Note: Of course, if you prefer to listen to your computer through its own speakers instead of the DCP-200 speakers, that's fi ne. You can still use DCP-200 with your computer either way.
Installing Sibelius First Software
1
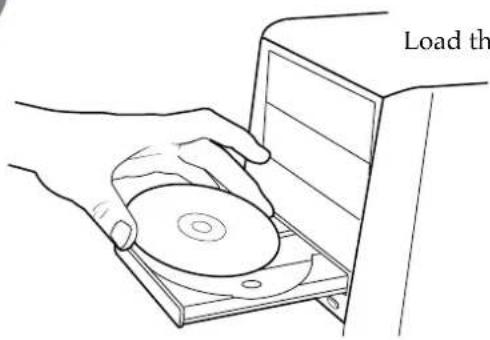
Load the Sibelius First CD-ROM into your computer's CD-ROM drive.

Sibelius
Install Sibelius First
The fast, easy and fun way to create

Install Scorch »
internet browser plug-in to view and play Sibelius files
Install PhotoScore Lite »
Scan music into Sibelius First
Browse this disc »
Exit »
Sibelius
First
- On Windows computers, click "Install Sibelius First" on the screen that will automatically launch.

Sibelius First
■ On Mac,
double-click on the Sibelius
First CD-ROM icon on the
desktop

Sibelius
then double-click on the


Install Scorch

Example Scores

install PhotoScore Lite
Sibelius
First
Install Sibelius First icon in the window that opens.
2
Follow the on-screen prompts to install the software.
3
Once the installation has finished, proceed to the next section: Running the Sibelius First Software.
Note: You can also find more detailed installation instructions in the Sibelius First Installation Guide booklet included in the Sibelius First product box.
Running the Sibelius First Software
1
Make sure DCP-200 is connected to your computer's USB input, and DCP-200 is powered on.
2

Launch Sibelius First:
■ On Windows computers,
double-click the Sibelius 5 First icon on your desktop.
On Mac,
double-click your hard disk icon, navigate to the Applications folder, then double-click the Sibelius 5 First program icon.
3

Try Sibelius
First window, click the Enter Serial Number button.
4
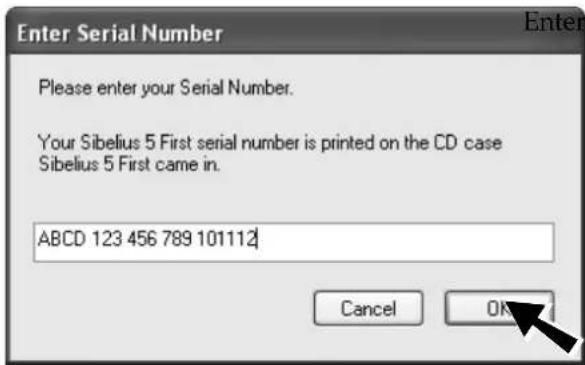
the serial number found inside the front cover of the included Sibelius First Installation Guide booklet, and then click OK.
5

Follow the on-screen instructions to register the software.
6
When registration is complete, Sibelius 5 First will launch. When you see the Quick Start window:
■ On Windows computers:
"Open recent file" and "Quick tour.sib" should already be selected. All you have to do is click OK.
On Mac:
Choose "Open another file" and click OK.
- In the Open dialog that appears, navigate to the Example Scores folder on the installation CD-ROM.
- Double-click the Example Scores folder, then open the folder named "Other," select the score called Quick tour, and then click Open.
A single-page excerpt from a composition by Scott Joplin called "Something Doing" will open.
7
Click the Play button.

You will hear the score played back using a piano sound that is built into Sibelius-- either through your computer speakers, or through the DCP-200 speakers (if you have connected the Aux In as discussed in the "Connecting the DCP-200 Auxiliary Input" section).
Help
Sibelius 5 First User Guide F1
Help Center
Check For Updates
Sibelius.com
SibeliusMusic.com
PhotoScore Ultimate
Try Full Sibelius
Upgrade to Full Sibelius
To continue learning about Sibelius First, please refer to the Sibelius First User Guide. It contains everything you need to know about using the software. The Sibelius First User Guide can be accessed from the Help menu in Sibelius First.
9 MIDI Functions
If you are an advanced MIDI user, this section will help you to access the MIDI controller capabilities of DCP-200. If you already know that you need this specialized functionality, then this section is for you. However, this information is not necessary in order to enjoy playing the piano. A good rule to keep in mind is: If you don't know what a function described in this section is, then you probably don't need it.
MIDI, or Musical Instrument Digital Interface, is the way most electronic keyboards communicate with computers and with each other. Through a series of MIDI messages a computer or keyboard can tell an instrument what note to play, how loud to play it, when to stop playing it, and a host of other information.
DCP-200 can send MIDI information to a computer or another MIDI-capable instrument, via its MIDI or USB output. This enables DCP-200 to act as a controller keyboard for another instrument, MIDI sequencer or MIDI-enabled Digital Audio Workstation program. You can even use DCP-200 to directly input notes onto a musical score using the included Sibelius First notation software.
Local On/Off (C#3)
Turning the Local On/Off function to Off will disconnect the keyboard from the internal sound engine of DCP-200. This means you can use DCP-200 as a MIDI controller to control other MIDI devices (or virtual instrument software running on your computer) without playing the internal sounds of DCP-200. You may also find other occasions (such as when you are using MIDI sequencing software on your computer) where it is useful to turn Local off.
For example: If you decided that instead of using the sounds built into the included Sibelius First music notation software, you would rather use the sounds built into DCP-200, you would choose DCP-200 as the Playback Device in Sibelius (note that DCP-200 will show up as “USB Audio Device” on Windows XP computers). You would then want to switch Local On/Off to “off” on the DCP-200 to avoid note “doubling” (where notes you play on DCP-200 actually play twice at almost the same time, diminishing the available polyphony).
To turn Local On/Off to Off:
1

Press the Voice/Function button to enter Edit Mode.
2

Press the Local On/Off key (C#3)
The LED display will show: OFF
To turn Local On/Off back on, follow the above procedure again.
The LED display will show: ☐ ☑
Main MIDI Transmit Channel (C#2)
Pressing the MIDI Transmit Channel key will set the Data Control knob to increase or decrease the Main MIDI Transmit channel number.
To change the Main MIDI Transmit Channel:
1
Press the Voice/Function button to enter Edit Mode.
![Pno PIANO RESET Reverb Voice / - Function Song Metronome RECORD Data Control [Assignable]](/content/2026/05/953362/images/5583fc7c12c618f7668a29d652ecbb8262250fe639354e7c5996cc1dc6b4cc84.jpg)
2

Press the MIDI Transmit Channel Key (C#2)
The LED Display will momentarily show:
c h A
3
![6 PIANO RESET Reverb Voice / - Function Song Metronome RECORD Data Control [Assignable]](/content/2026/05/953362/images/6c774d3ce038c8c6d31d68e592a44a738dab56b6a3f7238cd620732baf138ca2.jpg)
Use the Data Control knob to select the desired Main MIDI Transmit Channel.
Note that the MIDI channels used for the Split and Layer voices are relative to the Main MIDI Transmit Channel, in the following way:
Split Voice Transmit Channel = Main MIDI Transmit Channel +1 Layer Voice Transmit Channel = Main MIDI Transmit Channel +2
Numeric Data Entry Keys (G5, A5, B5, C6, D6, E6, F6, G6, A6, B6)
Some of the advanced MIDI editing functions of DCP-200 require that a numeric value be entered. This can be accomplished using the Numeric Data Entry Keys.

These features are discussed in detail later in the MIDI Functions section.
Note: If preferred, the Data Control knob may also be used to scroll to the desired numeric value, instead of using the Numeric Data Entry Keys.
Enter Key (C7)

flowchart
graph TD
    A["Program"] --> B["Default"]
    B --> C["0"]
    B --> D["1"]
    B --> E["2"]
    B --> F["3"]
    B --> G["4"]
    B --> H["5"]
    B --> I["6"]
    B --> J["7"]
    B --> K["8"]
    B --> L["9"]
    M["Data Control Assign"] --> N["Bank MSB"]
    N --> O["Program"]
    P["Panic"] --> Q["Program"]
    R["Cancel"] --> S["Program"]
    T["ON/OFF"] --> U["Enter"]
When entering data in Edit
Mode, pressing the Enter key will send the selected data to DCP-200 as a MIDI command. After pressing the Enter key, DCP-200 will return to Performance Mode.
Cancel Key (Bb6)

flowchart
graph TD
    A["Program"] --> B["Default 0"]
    B --> C["Bank MSB 1"]
    C --> D["Data Control Assign 2"]
    D --> E["3"]
    E --> F["4"]
    F --> G["5"]
    G --> H["6"]
    H --> I["7"]
    I --> J["8"]
    J --> K["9"]
    K --> L["ENTER ON/OFF"]
    L --> M["Bb6"]
    N["Pressing the Cancel key at any time"] --> O["Data Control Assign"]
    P["while in Edit Mode will exit Edit Mode and return DCP-200 to Performance Mode. Settings will remain unchanged."] --> Q["Cancel"]
Data Control Assign Key (C#6)
Pressing the Data Control Assign key while in Edit Mode will allow you to send MIDI Continuous Controller command values using the Data Control knob.
To assign the Data Control knob to send MIDI Continuous Controller command values:


3

flowchart
graph TD
    A["Program"] --> B["Default 0"]
    B --> C["Bank LSB 1"]
    C --> D["Bank MSB 2"]
    D --> E["Data Control Assign 3"]
    E --> F["4"]
    F --> G["Panic 5"]
    G --> H["7"]
    H --> I["8"]
    I --> J["Cancel 9"]
    J --> K["ENTER"]
    style A fill:#f9f,stroke:#333
    style K fill:#ccf,stroke:#333
    note right of A: C5 C7
    note right of K: ON/OFF
Using the Numeric Data Entry
keys, select the Continuous Controller number you wish to assign to the Data Control knob.
4

flowchart
graph TD
    A["C5"] --> B["Program"]
    B --> C["Default 0"]
    C --> D["Bank LSB"]
    D --> E["Bank MSB"]
    E --> F["Data Control Assign"]
    F --> G["3"]
    G --> H["4"]
    H --> I["5"]
    I --> J["6"]
    J --> K["7"]
    K --> L["8"]
    L --> M["9"]
    M --> N["Cancel"]
    N --> O["ON/OFF"]
    style A fill:#f9f,stroke:#333
    style O fill:#ccf,stroke:#333
Press the ENTER key (C7).
5
![64 PIANO RESET Reverb Voice / - Function Song Metronome RECORD Data Control [Assignable] Now Con spec For e Con](/content/2026/05/953362/images/e72f7d0c0ae4e7e1c5c748750f2fe9519b802fde46bf1d6fb4fd82132fb4f4b9.jpg)
Now you are back in Performance Mode, and you can use the Data Control knob to send values for the Continuous Controller (CC) you specified in Step 3.
For example, if you entered 01 (modulation) in Step 3, the Data Control knob will now behave like a modulation wheel.
The Data Control knob can be assigned to send standard MIDI Continuous Controller commands up to 127 (in addition to other types of control information specific to DCP-200). Please see Appendix C - Data Control Assignments and MIDI CC List for more information.
NOTE: To reassign the Data Control knob for Voice Selection, press the Voice / Function button and then press the Eb2 key. (This procedure is illustrated at the beginning of the "Edit Mode" section.)
Program Change, Bank LSB, and Bank MSB
The following section demonstrates how to send MIDI Program Changes, Bank LSB (Least Signifi cant Byte) and Bank MSB (Most Signifi cant Byte) values from DCP-200 to an external MIDI device or virtual instrument software program.
Sending MIDI Program Changes
There are two ways to send MIDI Program Number changes. You can either enter a single specific Program Number (Data Control knob assignment remains unchanged), or you can assign the Data Control knob to send MIDI Program Changes.
To send a single specific Program Number (Data Control knob assignment remains unchanged):
1
![Pno PIANO RESET Reverb Voice / Function Song Metronome RECORD Data Control [Assignable]](/content/2026/05/953362/images/c69269dd8f3e864f5c2d275e4a7f49135d27320df7ed14145ddf6e866bf34662.jpg)
Press the Voice/Function button to enter Edit Mode.
2
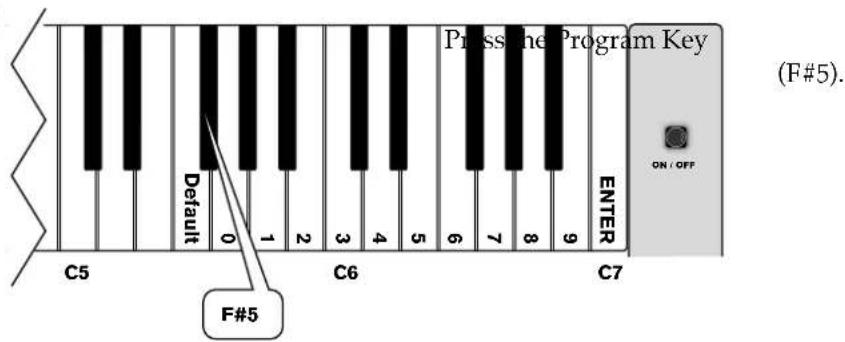
3

Using the Numeric Data Entry
keys, enter the MIDI Program
Number you want to send.
Note: As an alternative to using the Numeric Data Entry Keys, you could instead use the Data Control knob to choose the MIDI Program Number in this step.
4
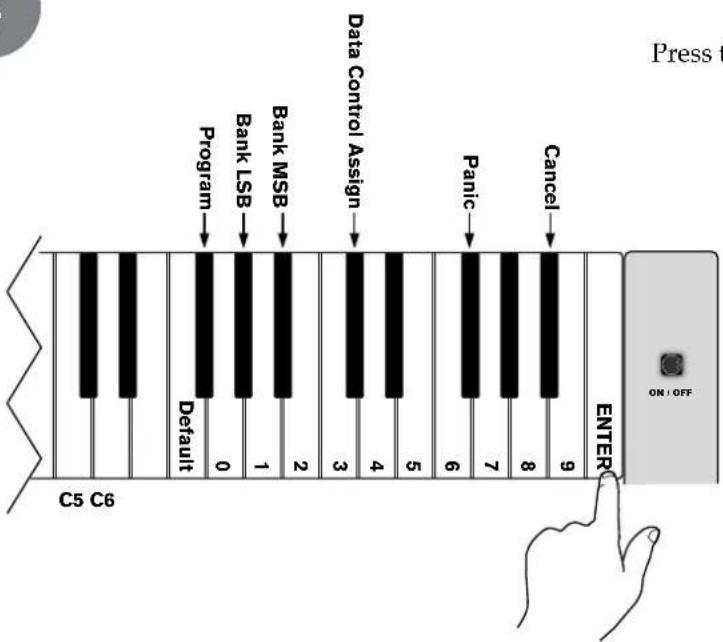
flowchart
graph TD
    A["Program"] --> B["Default 0"]
    B --> C["Bank LSB"]
    C --> D["Bank MSB"]
    D --> E["Data Control Assign"]
    E --> F["3"]
    F --> G["4"]
    G --> H["5"]
    H --> I["6"]
    I --> J["7"]
    J --> K["8"]
    K --> L["9"]
    L --> M["ENTER"]
    style A fill:#f9f,stroke:#333
    style M fill:#ccf,stroke:#333
    note right of A Press t
    note right of L ENTER ON/OFF
Press the Enter Key (C7) to
send the MIDI command.
To assign the Data Control knob to send MIDI Program Changes:
1
![Pno PIANO RESET Reverb Voice / Function Song Metronome RECORD Data Control [Assignable]](/content/2026/05/953362/images/cf952bc0b9f478423bc9becc18658018e331cf653e13719d98c60945071ec5d5.jpg)
Press the Voice/Function button to enter Edit Mode.
2

^3 Note that this is different than the Program Key (F#5) that you used to input a single MIDI Program Number value.
3
![22 PIANO RESET Reverb Voice / - Function Song Melanome RECORD Data Control [Assignable]](/content/2026/05/953362/images/62c7ce73134526189d9b8ea83f49f8270e62ea5844d209eb225cb5c04cf024cf.jpg)
Now you are back in Performance Mode, and the Data Control knob has been assigned so that a MIDI Program Change will be sent out each time the control is turned. The LED display will show the currently selected MIDI Program Number (between 0 and 127).
Sending Bank LSB Changes
There are two ways to send Bank LSB changes. You can either enter a specific LSB (Least Signifi cant Byte) value using (Data Control knob assignment remains unchanged), or you can assign the Data Control knob to send Bank LSB changes. (Please note that after any kind of bank message, it is usually necessary to follow up with a MIDI Program Change message in order to affect a sound change on the receiving device.)
To send a specific Bank LSB value (Data Control knob assignment remains unchanged):
1
Press the Voice/Function button to enter Edit Mode.
![Pno PIANO RESET Reverb Voice / Function Song Metronome RECORD Data Control [Assignable]](/content/2026/05/953362/images/ac606de13c1bc8e3d0d862a9415fb2a3128bd1c6c830b2cbe5de469fc88af195.jpg)
2

3
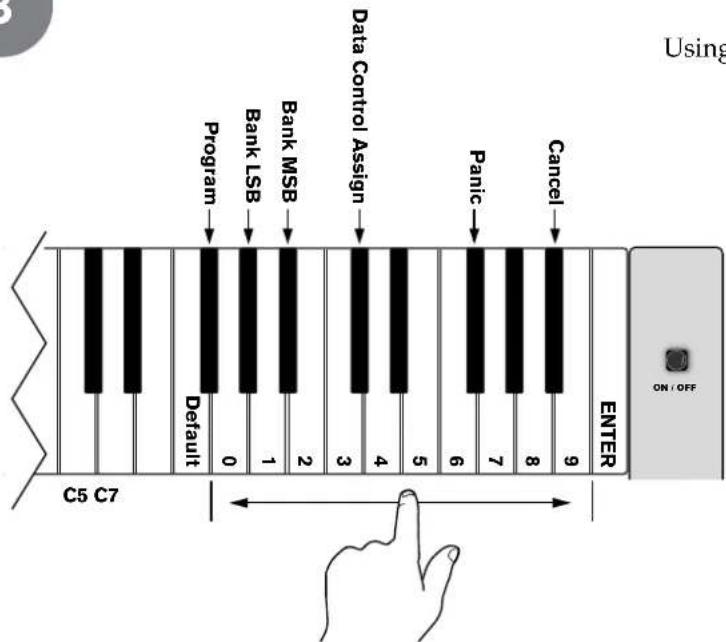
Using the Numeric Data Entry keys, enter the Bank LSB value you want to send.
Note: As an alternative to using the Numeric Data Entry Keys, you could instead use the Data Control knob to choose the Bank LSB value in this step.
4

flowchart
graph TD
    A["C5"] --> B["Program"]
    B --> C["Default 0"]
    C --> D["Bank LSB"]
    D --> E["Bank MSB"]
    E --> F["Data Control Assign"]
    F --> G["3"]
    G --> H["4"]
    H --> I["5"]
    I --> J["6"]
    J --> K["7"]
    K --> L["8"]
    L --> M["9"]
    M --> N["Cancel"]
    N --> O["ON/OFF"]
Press the Enter Key (C7) to send the MIDI command.
To assign the Data Control knob to send Bank LSB changes:
1
![Pno PIANO RESET Reverb Voice / Function Song Metronome RECORD Data Control [Assignable]](/content/2026/05/953362/images/fbc1250d011eef456c786bc799838b92d74f8befd4df061c9dd3c0c7e4ad9ff0.jpg)
Press the Voice/Function button to enter Edit Mode.
2
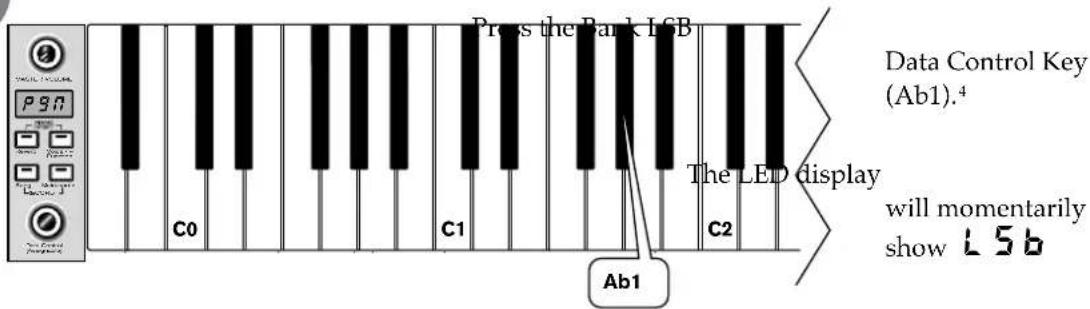
^4 Note that this is different than the Bank LSB Key (Ab5) that you used to input a single Bank LSB value.
3
![50 PIANO RESET Reverb Voice / - Function Song Metronome RECORD Data Control [Assignable] Now has A M Con valu](/content/2026/05/953362/images/5cf7b21eaaa2e047e7d8b5c49996075e657fd2838c571b0969d26150357cd35b.jpg)
Now you are back in Performance Mode, and the Data Control knob has been assigned to send Bank LSB values.
A MIDI Bank LSB change will be sent out each time the Data Control knob is turned. The LED display will show the Bank LSB value (between 0 and 127) as you turn the knob.
Sending Bank MSB Changes
There are two ways to send Bank MSB changes. You can either enter a specific MSB (Most Signifi cant Byte) value using the Numeric Data Entry Keys, or you can assign the Data Control knob to send Bank MSB changes. (Please note that after any kind of bank message, it is usually necessary to follow up with a MIDI Program Change message in order to affect a sound change on the receiving device.)
To send a specific Bank MSB value using the Numeric Data Entry Keys:
1
![PNO PIANO RESET Reverb Voice / Function Song Metronome RECORD Data Control [Assignable]](/content/2026/05/953362/images/7c63f2e440bac6d6f1e67556a831445bbe98830314f08ea1a1f8dafab225ee5b.jpg)
Press the Voice/Function button to enter Edit Mode.
2
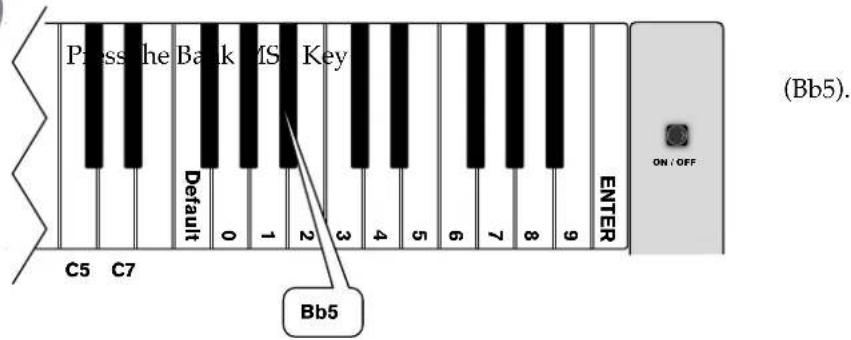
3

Using the Numeric Data Entry keys, enter the Bank MSB value you want to send.
Note: As an alternative to using the Numeric Data Entry Keys, you could instead use the Data Control knob to choose the Bank MSB value in this step.
4
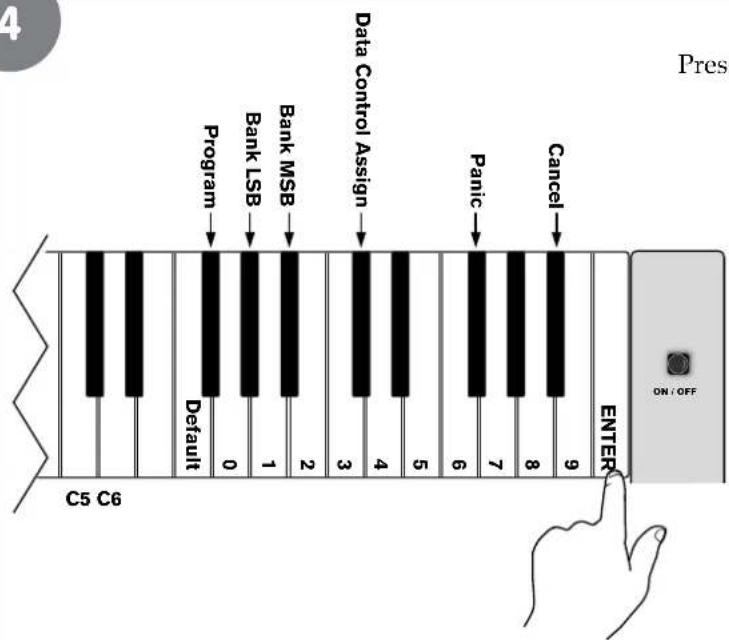
flowchart
graph TD
    A["C5"] --> B["Program"]
    B --> C["Default 0"]
    C --> D["Bank MSB 1"]
    D --> E["Data Control Assign 2"]
    E --> F["3"]
    F --> G["4"]
    G --> H["5"]
    H --> I["6"]
    I --> J["7"]
    J --> K["8"]
    K --> L["9"]
    L --> M["Enter"]
    style A fill:#f9f,stroke:#333
    style M fill:#ccf,stroke:#333
    note right of M
        Press
        ON/OFF
    end
Press the Enter Key (C7) to send the MIDI command.
To assign the Data Control knob to send Bank MSB changes:
1
![Pno PIANO RESET Reverb Voice / Function Song Melanome RECORD Data Control [Assignable]](/content/2026/05/953362/images/d1ecc93a69626084a814b22f0533a6f99633dff88513cdb44212bbb99f319999.jpg)
Press the Voice/Function button to enter Edit Mode.
2
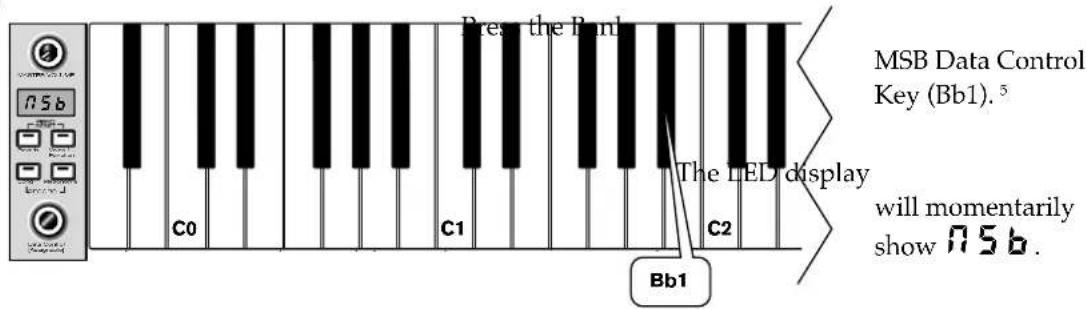
^5 Note that this is different than the Bank MSB Key (Bb5) that you used to input a single Bank MSB value.
3
![44 PIANO RESET Reverb Voice / - Function Song Metronome RECORD Data Control [Assignable]](/content/2026/05/953362/images/fb5568482ca1a6e9772338035f0851b89f85f29645f2c0b551a898803327296a.jpg)
Now you are back in Performance Mode, and the Data Control knob has been assigned to send Bank MSB values.
A MIDI Bank MSB change will be sent out each time the Data Control knob is turned. (See the section on MIDI Functions for more information.) The LED display will show the Bank MSB value (between 0 and 127) as you turn the knob.
Panic Key (F#6)
Pressing the Panic key will send out a 'Reset All Controllers' and 'All Notes Off' MIDI Message on ALL MIDI Channels 1 - 16. This can be especially useful for clearing "stuck notes" when controlling external MIDI devices or software with DCP-200.
To use the Panic key to send out a 'Reset All Controllers' and 'All Notes Off' MIDI Message on ALL MIDI Channels 1 - 16:
1
![Pno PIANO RESET Reverb Voice / Function Song Metronome RECORD Data Control [Assignable]](/content/2026/05/953362/images/1229cfbb7565422bfdf2e8633454ee0baff14cdd44ec4d0e9631ada0a2b00180.jpg)
Press the Voice/Function button to enter Edit Mode.
2

NOTE: The Piano Reset procedure described at the beginning of the Additional Features section also sends out a "Reset All Controllers" and "All Notes Off" MIDI Message, but on MIDI Channel 1 only.
To do a Piano Reset, press the Reverb and Voice/Function buttons at the same time.
For a complete list of MIDI commands sent during a Piano Reset, see Appendix A: Defaults.
Default Key (F5)
The Default Key can be used to reset any one of the following Edit Mode parameters to its default value:
- Program (F#5)
- Bank LSB (Ab5)
- Bank MSB (Bb5)
• Data Ctrl Assign (C#6)
When applying the Default Key to Program, Bank LSB, or Bank MSB, those parameters will be returned to their default value of zero. When the Default Key is applied to the Data Ctrl Assign parameter, the Data Control knob will be returned to its default Voice Select functionality.
▶ To use the Default Key:
1
Press the Voice/Function button to enter Edit Mode.

2

flowchart
graph TD
    A["Program"] --> B["Bank LSB"]
    B --> C["Bank MSB"]
    C --> D["Assign"]
    D --> E["Data Control"]
    E --> F["Control"]
    F --> G["Panic"]
    G --> H["Cancel"]
    H --> I["Press the special font"]
    I --> J["ENTER"]
    K["C5 C7"] --> L["Default"]
    L --> M["F#5"]
    M --> N["1"]
    N --> O["2"]
    O --> P["3"]
    P --> Q["4"]
    Q --> R["5"]
    R --> S["6"]
    S --> T["7"]
    T --> U["8"]
    U --> V["9"]
Edit Mode parameter you would like to return to its default value. (The Program parameter was chosen for this example picture.)
3

Press the Default Key (F5).
Once you have pressed the Default Key, DCP-200 will automatically be back in Performance Mode, with the selected Edit Mode parameter returned to its default value.
Default Notes:
- While in Edit Mode, if you happen to press the Default Key without first choosing an Edit Mode parameter, DCP-200 will be returned to Performance Mode, with no other changes.
- To clear all battery backed memory and restore all functions to their factory defaults, follow the Factory Reset procedure described near the beginning of the "Additional Features" section.
- For information regarding the default values of all the various functions of DCP-200, please see Appendix A: Defaults.
10 Care and Maintenance
As with all furniture, avoid placing items directly on the piano (such as drink glasses, potted plants, etc.) that may cause moisture damage to the piano's finish.
Cleaning should be done with a soft, dry cloth (or if necessary, a slightly damp cloth). Chemical cleaning products should not be used, as they may harm the piano's finish.
11 Troubleshooting
Your DCP-200 digital piano has been tested under a wide variety of conditions to ensure trouble-free performance. In the event that you do experience any difficulty, this section provides tips to help resolve some basic issues you may encounter.
Problem: My piano keyboard is working correctly, but the pedals do not seem to be working.
Solution: Make sure the Pedal Board cable is firmly connected to the Pedal Connector on the piano's rear panel.
Problem: My piano is on with the volume turned up, but I do not hear any sound when I play the keyboard.
Solution 1: Local On/Off may be set to Off, or the currently selected voice's volume may be turned down. In either case, a Piano Reset will fix the problem. To do a Piano reset, press the Reverb button and the Voice/Function button at the same time.
Solution 2: If the Master Volume knob is turned up, but you do not hear sound from the piano's built-in speakers, make sure nothing is plugged into Headphone Output 1.
Problem: When I turn on the piano, the LED display does not light up, and I do not hear any sound.
Solution: Make sure one end of the AC cable is connected to the jack on the piano's rear panel, and that the other end is plugged into an electrical outlet. If the AC cable is plugged into a power strip, make sure the power strip is switched on.
Problem: My piano is not recognized by my music software.
Solution: The USB cable between the computer and the DCP-200 piano must be connected (and the piano powered on) before the music software is launched.
With the USB cable connected and DCP-200 powered on, try quitting the software and then launching it again.
Refer to the documentation which came with your software to learn how to make sure DCP-200 is properly selected within the software.
Note that on Windows XP computers, DCP-200 will show up as "USB Audio Device."
12 Technical Info
Caution: Electro Static Discharge, Electrical Fast Transient and Conducted RF interference may cause the unit to malfunction. In such case, unplug the unit and plug it in again to restore normal operation.
Note: Your M-Audio product has been tested to comply with FCC Standards FOR HOME OR OFFICE USE. Modifications not authorized by the manufacturer may void users authority to operate this device.
Note: This equipment has been tested and found to comply with the limits for a Class B digital device, pursuant to Part 15 of the FCC Rules. These limits are designed to provide reasonable protection against harmful interference in a residential installation. This equipment generates, uses and can radiate radio frequency energy and, if not installed and used in accordance with the instructions, may cause harmful interference to radio communications. However, there is no guarantee that interference will not occur in a particular installation. If this equipment does cause harmful interference to radio or television reception, which can be determined by turning the equipment off and on, the user is encouraged to try to correct the interference by one or more of the following measures:
■ Re-orient or relocate the receiving antenna.
■ Increase the separation between the equipment and receiver.
■ Connect the equipment to an outlet on a circuit different from that to which the receiver is connected.
- Consult the dealer or an experienced radio/ TV technician for help.
13 Appendices
Appendix A – Defaults
At power up, the DCP-200 piano is in Performance Mode, with the Data Control knob set to Voice Select.
Default Settings
The table below shows the DCP-200 factory default settings and whether or not user changes to these settings are retained after a power-cycle (turning the device off and on):
| Parameter Factory Default Retained on Power-Down | ||
| Program Number & Voice Selected 000 - Grand Piano No | ||
| Bank MSB Number 000 No | ||
| Bank LSB Number 000 No | ||
| Main MIDI Transmit Channel Channel 1 No | ||
| Octave shift | 0 | No |
| Transpose | 0 | No |
| Local | On | No |
| Data Control Assignment | Data = Voice Select No | |
| Reverb On/Off | Reverb On | Yes - store for each sound |
| Reverb Depth | Defaults for each sound | Yes - store for each sound |
| Velocity Curve Selected | 'NORMAL' | Yes |
| Split Point Eb3 | Yes | |
| Voice Volume | 127 No | |
| Layer Volume | 100 Yes | |
| Split Volume | 127 Yes | |
| Metronome Volume | 127 Yes | |
| Master Tune | 0 | Yes |
| Tempo | 120 Yes | |
| Layer Mode Voice | n/a | n/a |
| Split Mode Voice | 8 - Upright Bass Yes | |
| Layer Mode On/Off | Off | No |
| Split Mode On/Off | Off | No |
At power-on, the following MIDI data will be sent to the sound engine, the USB MIDI and the MIDI Out:
- Bank Change MSB=0, LSB=0, PGM=0 - Set sound engine to piano voice
- Reverb default value
Piano Reset
As soon as the Piano Reset function is activated (by pressing the Reverb and Voice/Function buttons simultaneously), the device will perform the following functions:
-
Turn Local On
-
Send 'All Notes Off' Command on MIDI Channel 1 - external and to the internal sound engine
-
Send 'Reset All Controllers' Command on MIDI Channel 1 - external and to the internal sound engine
-
Assign Data Control to Voice Select
- Set Volume levels for Main Voice, Split Voice and Layer Voice to defaults
- Set Pan to 64 for Main Voice, Split Voice and Layer Voice
- Turn off Layer Mode and Split Mode
- Set Main MIDI Transmit Channel to 1
- Set Transpose and Octave Shift both back to zero
- Send a Program Change = 0 on Channel 1
- Send a Bank Change MSB = 0 and Bank Change LSB = 0 on Channel 1
- Set the Reverb Depth back to the default value for the Default Voice
- Send Chorus Depth = 0 on Channel 1
- Send the current status of the Sustain Pedal on Channel 1
Additional Default Information
▶ Reverb Defaults
| PGM Sound Name Reverb On/Off Reverb Depth | |||
| 0 Grand Piano On | 40 | ||
| 1 Bright Piano | On | 40 | |
| 2 | Vintage EP | On | 40 |
| 3 FM | EP | On | 48 |
| 4 Church Organ | On | 96 | |
| 5 Harpsichord On | 40 | ||
| 6 Strings | On | 64 | |
| 7 Upright Bass | On | 32 | |
| MIDI Channel 10 | (Metronome) Off | n/a | 0 |
▶ Other Defaults
| Parameter | Default Value | Range |
| Octave Shift | 0 | -3 to +3 |
| Transpose | 0 | -12 to +12 |
| Voice Vol | 127 | 0 to 127 |
| Layer Vol | 90 | 0 to 127 |
| Split Vol | 127 | 0 to 127 |
| Metronome Vol | 127 | 0 to 127 |
| Tempo | 120 | 20 to 280 bpm |
| Program | 0 | 0 to 127 |
| Bank LSB | 0 | 0 to 127 |
| Bank MSB | 0 | 0 to 127 |
| Channel | 1 | 1 to 16 |
| Voice Select 1 (Grand Piano) | 1 to 8 (display shows Voice names) | |
| Tuning | 440 Hz (display shows '0') | -64 (-50 cents) to 63 (+50 cents) in 128 MIDI steps ^6 |
^6 1 tone = 100 cents, therefore -50 to +50 cents = -1 to +1 semi-tone.
Note this is shown in MIDI steps -64 to 63.
Appendix B - MIDI Implementation
| Function... Transmitted Recognized Remarks | |||
| Basic Default Channel Changed | 1-16 1-16 | 1-16 1-16 | |
| Mode Default Messages Altered | Mode 3 0 ***** | Mode 3 X X | |
| Note True Voice Number | 0-127 ***** | 0-127 | |
| Velocity ON Note OFF | 0 0 | 0 0 | |
| After Key's Touch Touch Channel | X X | X X | |
| Pitch Bend X X | |||
| Control Change | 0-127 | 0, 1, 5, 6, 7, 10, 11, 32, 64, 65, 66, 67, 80, 81, 91, 93, 100, 101, 121 | |
| Program Change True # | 0-127 ***** | 0-7 | *8 sounds only PGM=0-7 |
| System Exclusive | 0* | 0* | * The controller will recognize and respond to GM Device inquiries. Master Tune supported. Master Volume supported. |
| System Song Position Pointer Common Song Sel Tune Request | X X X | X X X | |
| System Clock Real Time Commands | X X | X X | |
| Aux All Sounds Off* Messages Reset All Controllers Local ON/OFF* All Notes OFF Active Sensing System Reset | 0 0 0 0 X X | 0 0 0 0 0 0 | |
| Notes |
Mode 1: OMNI ON, POLY
Mode 2: OMNI ON, MONO
0: Yes
Mode 3: OMNI OFF, POLY
Mode 4: OMNI OFF, MONO
X: No
Appendix C – Data Control Assignments and MIDI CC List
Below is a list of MIDI controllers that can be assigned to the Data Control:
| CC no. | Controller Name Display Name Default Value | ||
| Octave | oct | ||
| Transpose | t r A | ||
| Voice Volume (same as CTRL 7 below) | voi | ||
| Layer Volume | Lyr | ||
| Split Volume | SPL | ||
| Metronome Volume | ntr | ||
| Time Signature | t s g | ||
| Program Change | PGN | ||
| Bank Change LSB | LSb | ||
| Bank Change MSB | NSb | ||
| MIDI Transmit Channel | chA | ||
| Voice Select | SEL | ||
| Master Tune | tUN | ||
| 0 0 Bank Select (coarse) 000 0 | |||
| 1 1 Modulation Wheel (coarse) 001 0 | |||
| 2 2 Breath controller (coarse) 002 0 | |||
| 3 003 0 | |||
| 4 4 Foot Pedal (coarse) 004 0 | |||
| 5 5 Portamento Time (coarse) 005 0 | |||
| 6 6 | Data Entry (coarse) | 006 0 | |
| 7 7 Volume (coarse) | 007 127 | ||
| 8 8 Balance (coarse) | 008 0 | ||
| 9 009 0 | |||
| 10 | 10 Pan position (coarse) | 010 64 | |
| 11 | 11 Expression (coarse) | 011 | 127 |
| 12 | 12 Effect Control 1 (coarse) | 012 | 0 |
| 13 | 13 Effect Control 2 (coarse) | 013 0 | |
| 14 | 014 0 | ||
| 15 | 015 0 | ||
| 16 | 16 General Purpose Slider 1 | 016 0 | |
| 17 | 17 General Purpose Slider 2 | 017 0 | |
| 18 | 18 General Purpose Slider 3 | 018 0 | |
| 19 | 19 General Purpose Slider 4 | 019 0 | |
| 20-31 | 020, 021, 022 ... 031 | 0 | |
| 32 | 32 Bank Select (fine) | 032 0 | |
| 33 | 33 Modulation Wheel (fine) 033 0 | ||
| 34 | 34 Breath controller (fine) | 034 | 0 |
| 35 | 035 0 | ||
| 36 | 36 Foot Pedal (fine) | 036 0 | |
| 37 | 37 Portamento Time (fine) | 037 | 0 |
| 38 | 38 Data Entry (fine) | 038 0 | |
| 39 | 39 Volume (fine) | 039 | 127 |
| 40 | 40 Balance (fine) | 040 0 | |
| 41 | 041 0 | ||
| 42 42 Pan | position (fine) 042 0 | ||
| 43 43 Expression (fine) | 043 127 | ||
| 44 44 | Effect Control 1 (fine) 044 0 | ||
| 45 45 Effect Control 2 (fine) | 045 0 | ||
| 46-63 046, | 047, 048 ... 063 0 | ||
| 64 64 Hold | Pedal (on/off) 064 0 | ||
| 65 65 Portamento (on/off) | 065 0 | ||
| 66 66 Sostenuto | Pedal (on/off) 066 0 | ||
| 67 67 Soft | Pedal (on/off) 067 0 | ||
| 68 68 Legato | Pedal (on/off) 068 0 | ||
| 69 69 Hold | 2 Pedal (on/off) 069 0 | ||
| 70 70 Sound Variation | 070 64 | ||
| 71 71 Sound | Timbre 071 64 | ||
| 72 72 Sound | Release Time 072 64 | ||
| 73 73 Sound | Attack Time 073 64 | ||
| 74 74 Sound | Brightness 074 64 | ||
| 75 75 Sound | Control 6 075 0 | ||
| 76 76 Sound | Control 7 076 0 | ||
| 77 77 Sound | Control 8 077 0 | ||
| 78 78 Sound | Control 9 078 0 | ||
| 79 79 Sound | Control 10 079 0 | ||
| 80 80 General | Purpose Button 1 (on/off) 080 4 | ||
| 81 81 General | Purpose Button 2 (on/off) 081 2 | ||
| 82 82 General | Purpose Button 3 (on/off) 082 0 | ||
| 83 83 General | Purpose Button 4 (on/off) 083 0 | ||
| 84-90 084, | 085, 086 ... 090 0 | ||
| 91 91 | Effects Level | 091 40 | |
| 92 92 Tremolo | Level 092 0 | ||
| 93 93 Chorus | Level 093 0 | ||
| 94 94 Celeste | Level 094 0 | ||
| 95 95 Phaser | Level 095 0 | ||
| 96 96 Data | Button increment 096 0 | ||
| 97 97 Data | Button decrement 097 0 | ||
| 98 98 | Non-registered Parameter (fine) | 098 127 | |
| 99 99 Non-registered Parameter (coarse) | 099 127 | ||
| 100 | 100 Registered Parameter (fine) | 100 | 127 |
| 101 | 101 Registered Parameter (coarse) | 101 127 | |
| 102-119 | 102, 103, 104 ... 119 | 0 | |
| 120 | All Sound Off | 120 0 | |
| 121 | All Controllers Off | 121 0 | |
| 122 | Local Keyboard (on/off) | 122 0 | |
| 123 | All Notes Off | 123 0 | |
| 124 | Omni Mode Off | 124 0 | |
| 125 | Omni Mode On | 125 0 | |
| 126 | Mono Operation | 126 0 | |
| 127 | Poly Operation | 127 0 | |
14 Warranty
Warranty Terms
M-Audio warrants products to be free from defects in materials and workmanship, under normal use and provided that the product is owned by the original, registered user.
Visit www.m-audio.com/warranty for terms and limitations applying to your specific product.
Warranty Registration
Immediately registering your new M-Audio product entitles you to full warranty coverage and helps M-Audio develop and manufacture the finest quality products available. Register online at www.m-audio.com/register to receive FREE product updates and for the chance to win M-Audio giveaways.
© 2009 Avid Technology, Inc. All rights reserved. Product features, specifications, system requirements and availability are subject to change without notice. Avid, M-Audio and DCP-200 are either trademarks or registered trademarks of Avid Technology, Inc. All other trademarks contained herein are the property of their respective owners.


WARNING: This product contains chemicals, including lead, known to the State of California to cause cancer, and birth defects or other reproductive harm. Wash hands after handling.
M-Audio USA
5795 Martin Rd., Irwindale, CA 91706
Technical Support
web. . . . . . . . . . . . . . . . www.m-audio.com/tech
tel (pro products) ..... (626) 633-9055
tel (consumer products) ..... (626) 633-9066
fax (shipping) ..... (626) 633-9032
Sales
e-mail.....sales@m-audio.com
tel. 1(866) 657-6434
fax (626) 633-9070
Web . . . . . . . . . . . . . . . . . . . . . . . . . . . . . . . . . . . . . . . . . . . . . . . . . . . . . . . . . . . . . . . . . . . . . . . . . . . . . . . . . www.m-audio.com
M-Audio U.K.
Avid Technology | M-Audio
Pinewood Studios, Pinewood Road
Iver Heath, Bucks, SLO 0NH, United Kingdom
Technical Support
e-mail.....support@maudio.co.uk
tel (Mac and PC support) . . . +44 (0)1753 658630
Sales
tel....+44 (0) 1753 659590
Web . . . . . . . . . . . . . . . . . . . . . . . . . . . . . . . . . . . . . . . . . . . . . . . . . . . . . . . . . . www.maudio.co.uk
Benelux
Technical Support
Belgium tel....+32 22 54 88 93
Holland tel ..... +31 35 625 0097
M-Audio France
Avid Technology | M-Audio
Pinewood Studios, Pinewood Road
Iver Heath, Bucks, SLO 0NH, United Kingdom
email .....info@m-audio.fr
Assistance Technique
PC 0 820 000 731
Mac. 0 820 391 191
e-mail (PC) ..... support@m-audio.fr
email (Mac)....mac@m-audio.fr
fax .....+33 (0)1 72 72 90 52
Web . . . . . . . . . . . . . . . . . . . . . . . . . . . . . . . . . . . . . . . . . . . . . . . . . . . . . . . . . . . . . . . . . . . . . . . . . . . . . . . . . . . . www.m-audio.com
M-Audio Germany
Kuhallmand 34, D-74613 Ohringen, Germany
Technical Support
email . . . . . . . . . . . . . . . . . . . support@m-audio.de
tel. +49 (0)7941 - 9870030
tel. . . . . . . . . . . . . . +49 (0)7941 - 98 70070
Sales
e-mail....info@m-audio.de
tel. .....+49 (0)7941 98 7000
fax ..... +49 (0)7941 98 70070
Web . . . . . . . . . . . . . . . . . . . . . . . . . . . . . . . . . . . . . . . . . . . . . . . . . . . . . . . . . . . . . . . . . . . . . . . . . . . . . . . . . . . www.m-audio.de
M-Audio Canada
1400 St-Jean Baptiste Ave. #150, Quebec City,
Quebec G2E 5B7, Canada
Technical Support
e-mail.....techcanada@m-audio.com
tel. ..... (418) 872-0444
fax (418) 872-0034
Sales
e-mail....infocanada@m-audio.com
tel. (866) 872-0444
fax (418) 872-0034
Web . . . . . . . . . . . . . . . . . . . . . . . . . . . . . . . . . . . . . . . . . . . . . . . . . . . . . . . . . . . . . . . . . . . . . . . . . . . . . . . . . . . . www.m-audio.ca
M-Audio Japan

- Safety Precautions
- Important Safety Instructions
- Table of Contents
- Using Your Digital Console Piano with a Computer .....43
- MIDI Functions....51
- Care and Maintenance....68
- Troubleshooting....68
- Technical Info....69
- Appendices 70
- Warranty 75
- Introduction
- What's in the Kit
- Features
- Controls and Connectors
- Right Panel
- Left Panel
- Connections Panel
- Rear Panel
- Using DCP-200 for the First Time
- Connect the Pedal Board
- Connect the Power Cable
- Turn the Power On
- 1
- 2
- Set a Comfortable Volume Level
- Select a Sound
- Turn the Data Control knob to select a voice.
- Connect Headphones
- Using the Pedals
- The pedal board has three pedals:
- Additional Features
- Resetting DCP-200:
- Method 1: Piano Reset
- Method 2: Factory Reset
- Using the Built-in Reverb
- To apply Reverb to a voice:
- To adjust the Reverb depth (Reverb amount):
- Playing the Demo Songs
- ▶ To play the first demo song:
- To Stop Playback of a Demo Song:
- To choose a specific Demo Song:
- Using the Metronome
- To Activate the Metronome:
- Press the Metronome button.
- Metronome Volume
- To change the metronome's volume:
- 3
- Tempo
- To change the metronome's tempo:
- Time Signature
- To change the metronome's time signature:
- Performance Mode? Edit Mode?
- Using the Song Recorder
- To record a track:
- To manually select a track to record to:
- To cancel recording while in Record Wait Mode:
- Press the Song button.
- To change metronome tempo while in Record Wait Mode:
- To turn off the metronome while recording:
- To Clear all Data in the Song Recorder:
- 3a
- or...
- 3b
- To Erase a Single Track in the Song Recorder:
- To Play Back Your Song Recorder Tracks:
- PLY
- To stop playback and exit Song Play Mode:
- Edit Mode
- Resetting the Data Control Knob to Voice Select
- To enter Edit Mode, press the Voice/Function button.
- Using the Voice Select Keys
- Split Mode
- ▶ To Use Split Mode:
- Note for MIDI Users
- IMPORTANT:
- ▶ To change the Split Point:
- • Right Hand Voice Volume:
- ▶ To turn off Split Mode:
- Layer Mode
- To adjust the volume of the Main Voice:
- Note to MIDI Users:
- ▶ To turn off Layer Mode:
- Octave, Transpose, and Master Tuning
- Octave (C#0)
- Transpose (Eb0)
- Master Tuning (F#2)
- Adjusting Keyboard Sensitivity: 'Touch' Select Keys (F3, F#3, Ab3, Bb3)
- To set the keyboard sensitivity:
- Using Your Digital Console Piano with a Computer
- Computer System Requirements
- Connecting DCP-200 to your Computer
- Connecting the USB cable:
- Connecting the DCP-200 Auxiliary Input
- To connect your computer's audio output to the DCP-200 Auxiliary Input:
- 4
- 5
- 6
- Installing Sibelius First Software
- Running the Sibelius First Software
- Launch Sibelius First:
- Try Sibelius
- On Mac:
- 7
- Help
- Sibelius 5 First User Guide F1
- MIDI Functions
- Local On/Off (C#3)
- To turn Local On/Off to Off:
- Main MIDI Transmit Channel (C#2)
- To change the Main MIDI Transmit Channel:
- Numeric Data Entry Keys (G5, A5, B5, C6, D6, E6, F6, G6, A6, B6)
- Enter Key (C7)
- Cancel Key (Bb6)
- Data Control Assign Key (C#6)
- Program Change, Bank LSB, and Bank MSB
- Sending MIDI Program Changes
- Sending Bank LSB Changes
- Sending Bank MSB Changes
- Panic Key (F#6)
- Default Key (F5)
- Default Notes:
- Care and Maintenance
- Troubleshooting
- Technical Info
- Appendices
- Appendix A – Defaults
- Default Settings
- Piano Reset
- Additional Default Information
- Appendix C – Data Control Assignments and MIDI CC List
- Warranty
- Warranty Terms
- Warranty Registration
- M-Audio USA
- Technical Support
- Sales
- M-Audio U.K.
- Benelux
- M-Audio France
- Assistance Technique
- M-Audio Germany
- M-Audio Canada
- M-Audio Japan
Brand : M-AUDIO
Model : DCP-200
Category : Audio Equipment