
MX-0606-PP-POH - Hi-Fi System WyreStorm - Free user manual and instructions
Find the device manual for free MX-0606-PP-POH WyreStorm in PDF.


| Product Type | 6x6 HDMI/HDBaseT Matrix Switcher with PoH |
| Brand | WyreStorm |
| Model | MX-0606-PP-POH |
| Dimensions (with brackets/feet/handles) | 481 x 95.5 x 373.8 mm |
| Weight | 6.7 kg |
| Power Supply | 100~240V AC 50/60Hz, 125W max |
| Video Inputs | 6x HDMI Type A |
| Video Outputs | 6x HDMI Type A (mirror HDBaseT) + 6x HDBaseT RJ-45 |
| Max Resolution (HDMI) | 1920x1080p @60Hz 36bit (15m/50ft) |
| Max Resolution (Cat6/6a/7) | 1920x1080p @60Hz 36bit (70m/230ft) |
| Audio Formats | 2ch PCM, DTS-HD Master Audio, Dolby TrueHD |
| Control Methods | Front panel, IR remote, RS-232, Ethernet (Web UI/IP) |
| IR Features | 1 Ext (stereo), 6 TX (mono), 6 RX (stereo), bidirectional over HDBaseT |
| HDBaseT Power | PoH 48V 15.4W per output |
| EDID Management | Smart EDID, EDID Copy, dipswitch settings |
| Compliance | CE, FCC |
| Warranty | 3 years limited parts and labor |
| Operating Temperature | 0°C ~ 45°C (32°F ~ 113°F) |
| Storage Temperature | -20°C ~ 70°C (-4°F ~ 158°F) |
| Maintenance | Clean with dry cloth; avoid liquids; do not hot plug HDMI/HDBaseT cables while powered on |
| Spare Parts & Repairability | Contact manufacturer for replacement parts; warranty covers defects |
Frequently Asked Questions - MX-0606-PP-POH WyreStorm
User questions about MX-0606-PP-POH WyreStorm
0 question about this device. Answer the ones you know or ask your own.
Ask a new question about this device
Download the instructions for your Hi-Fi System in PDF format for free! Find your manual MX-0606-PP-POH - WyreStorm and take your electronic device back in hand. On this page are published all the documents necessary for the use of your device. MX-0606-PP-POH by WyreStorm.
USER MANUAL MX-0606-PP-POH WyreStorm
Note: The following information applies to version 1 of this product as identified by v1 after the model number on the product label.
WyreStorm recommends reading through this document in its entirety to become familiar with the product's features prior to starting the installation process.
CHDBT HDMI POH
In the Box
1x MX-0606-PP-POH Matrix Switcher
1x IR Remote Handset
1x IR Receiver (38khz)
6x Wide-band IR Receivers (30-50kHz)
6x IR Emitters
1x 100\~240V AC 50/60Hz Power Cord with US Plug
1x 100\~240V AC 50/60Hz Power Cord with UK Plug
1x 100\~240V AC 50/60Hz Power Cord with EU Plug
2x Mounting Brackets
1x Quickstart Guide (this document)
Basic Wiring Diagram

IMPORTANT!
Disconnecting and connecting (hot plugging) HDMI or HDBaseT while devices are powered on may cause damage. WyreStorm recommends powering off devices before disconnecting these connections.
Recommended Products
To take full advantage of the features of this matrix, WyreStorm recommends the following products be used within the system.
- RX-70-POH – This receiver supports the functions of this matrix. While others can be used, they may contain features that are not available on this matrix.
- CAB-IR-LINK – Use this cable when using an IR control system for matrix control of HDBaseT pass-through.
Additional Information
This Quickstart Guide provides the basic steps for the common uses of this product. Detailed installation and configuration information may be found in the download tab located on the product page.
- WebUI Reference Guide – Setup for advanced Matrix features such as IP and testing of connections
- Drivers and API – Preconfigured drivers for popular control systems and API document.
Before Beginning
- WyreStorm recommends visiting the product page before installing this product for updates to this Quickstart Guide as well as other information about the product.
- Verify that all items are included in the packaging per the In the Box list.
Pre Wire
- Run a Cat5e/6/6a cable from the matrix location to the receiver location. See for resolution distance restrictions. Terminate the cable per the HDMI/HDBaseT Wiring section.
- (Optional) If using IR emitters or connecting blocks, run the wire and terminate per the IR TX (Emitter) Wiring section.
- (Optional) If using IR receivers, run the wire and terminate per the IR RX (Receiver) Wiring section.
- (Optional) If using RS-232 pass-through, run the wire and terminate per the RS-232 Wiring section.
Installation
- Connect the output of an HDMI source to an HDMI In on the matrix using a cable from a high quality brand such as WyreStorm Express. Repeat for additional sources:
- Using the cable created in Pre Wire step 1, connect the 8-pin RJ-45 female plug to the HDBT Out jack on the matrix. Repeat for additional HDBaseT receivers.
- (Optional) Using the included IR emitter or the cable created in Pre Wire step 2, place an IR emitter onto a source device near the device's IR sensor. Connect the 3.5mm (1/8in) Mono Plug to an IR TX port. Repeat for additional sources.
- (Optional) Using the included IR receiver, connect the 3.5mm (1/8in) Stereo Plug to an IR RX (IR to Zone) port. If using a control system, use the WyreStorm CAB-IR-LINK or the cable created in Pre Wire step 3. Repeat for additional zones.
- (Optional) Using an included IR receiver, connect the 3.5mm (1/8in) Stereo Plug to an IR Ext port. If using a control system, use the WyreStorm CAB-IR-LINK or the cable created in Pre Wire step 3.
- (Optional) Using the cable created in Pre Wire step 4, connect the 9-pin DB9 male jack to the RS-232 port on the matrix and the opposite end to an RS-232 control system.
- Install HDBaseT receivers (RX-70-POH recommended) following the instructions provided with the model being installed.
Front Panel

| A | Output ChannelIndicator | 1-6 (6x6) or 1-8 (8x8)Displays the source input number currently selected for the corresponding output number. |
| B | IR Sensor | Receives IR signals from included handheld IR remote or attached emitter from IR control system for switcher control. |
| C | Source/OutputNavigation | Left/Right: Output SelectionUp/Down: Input SelectionEnter: Confirm Selection |
Rear Panel

| A | Power Input | 8-pin RJ-45 femaleConnect to the HDBT In of an HDBaseT receiver. See HDMI/HDBaseT Wiring for important wiring guidelines.HDBT Out LED OperationGreen Solid: HDBaseT link has been established with the receiver.Green Flashing or Off: HDBaseT link has NOT been established with the receiver.Amber Flashing: HDBaseT functioning normally and can establish a link with the receiver.Amber Off: HDBaseT has discovered a fault and cannot establish a link with the receiver. |
| B | HDMI IN/Out | 19-pin type A HDMI female:Supports HDMI and DVI/D (requires adapter-not included). See HDMI/HDBaseT Wiring for important wiring guidelines. |
| C | IR RX/Ext/TX | IR RX/Ext - 3.5mm (1/8in) Stereo Jack:Connect to an IR receiver for matrix control (Ext) or IR pass-through (RX) via HDBaseT.IR TX - 3.5mm (1/8in) Mono Jack:Connect to an IR emitter to control a local device from the remote display location via HDBaseT. See IR Wiring. |
| D | Power | Power Switch: 0 –Power Off / I – Power OnFuse HolderIEC Power Cord Port |
| E | LAN | 8-pin RJ-45 female | 10/100 Mbps auto-negotiatingConnect to a network router or switch for accessing the Web UI or matrix control via IP. |
| E | RS-232 | 9-pin DB9 FemaleUsed to control the matrix functions and firmware updates. See RS-232 Wiring. |
| E | EDID | 4 Position Dipswitch:Used to set EDIDs to correct resolution conflicts between the source and the display. See EDID Settings. |
HDMI/HDBaseT Wiring

IMPORTANT! Wiring Guidelines
- The use of patch panels, wall plates, cable extenders, kinks in cables, and electrical or environmental interference can have an adverse effect on HDMI or HDBaseT transmission limiting performance. Steps should be taken to minimize these factors (or remove completely) during installation for best results.
- While similar in nature, the HDBaseT protocol is different than Ethernet and voltages provided for PoH can be higher than those provided by PoE. For this reason, never connect an HDBaseT link to an Ethernet router or switch to avoid damaging the connected devices.
Wiring for HDBaseT follows the EIA T568B standard.


Wire colors shown follow EIA/TIA-568B standard.
Resolutions Distances
The type of category cable used and the distance between the matrix and receiver can restrict the available video resolution.
Refer to Video Resolutions in the Specifications table for the max distance based on resolution.
IR Wiring
IR TX (Emitter) Wiring
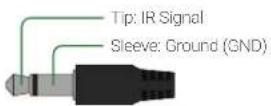
Connection for IR TX (transmit) uses a 3.5mm (1/8in) mono plug.
IR RX (Receiver) Wiring
Connection for IR RX (receive) uses a 3.5mm (1/8in) stereo jack that outputs +5V DC to power the included IR receiver.

IMPORTANT! IR TX Connection Guidelines
3rd party IR receivers may require a different voltage, refer to the documentation provided with the IR receiver before making any connections to avoid damaging the device.

RS-232 Wiring
RS-232 Connection Guidelines
The following wiring diagram shows the pinouts for the extender set. While not shown, connect the TX (transmit) to RX (receive) pins at the control system or PC side of the cable.
Most control systems and computers are DTE where pin 2 is RX, this can vary from device to device. Refer to the documentation for the connected device for pin functionally to ensure that the correct connections can be made.


EDID Settings
EDIDs can be configured to resolve issues with video output on displays that may not accept the maximum resolution available from the source.
- When set to Smart EDID (default) the matrix will scan all selected displays for the lowest resolution.
- When EDID Copy or a direct EDID is being used, SmartEDID is turned Off.
- Ensure that a display is connected and powered On to the selected output before copying EDIDs or the copy will fail. When this occurs, EDID will be set to 1080p @60Hz 2ch.
- Power to the matrix must be cycled (Off/On) after changing dip switches in order for the setting to take effect.
- Grayed out switches in the diagrams below can be in any position for the identified EDID.

| EDID Copy |  | ||
| 1080p @60Hz 3D 2ch |  | 1080p @60Hz 2ch |  |
| 1080p @60Hz 5.1ch |  | 1080p @60Hz 7.1ch |  |
| 1080i @60Hz 2ch |  | ||
| Normal Output Check hot plug voltage |  | Force Output Outputs regardless of hot plug voltage |  |
Copying EDIDs
- Set the EDID dipswitch to EDID Copy (all switches down).
- Reboot the matrix.
- Using the front navigation buttons, select the input port for the output. Example: Input 2 for Output 2
- Once the output port indicator blinks, press and hold Enter for 5 seconds. An OK message on the display indicates that the copy was successful, an FL-2 indicates that the copy failed.
- Reboot the matrix.
Specifications
| Audio and Video | ||
| Inputs 6x HDMI 19-pin type A | ||
| Outputs 6x HDMI 19-pin type A (Mirrors HDBaseT) 6x HDBaseT 8-pin RJ-45 female | ||
| Audio Formats 2ch PCM | Up to DTS-HD Master Audio and Dolby TrueHD | ||
| Video Resolutions (Max) | Using HDMI1920x1080p @60Hz 36bit (15m/50ft) | Using Cat6/6a/71920x1080p @60Hz 36bit (70m/230ft) |
| Color Depth 36bit | ||
| Maximum Pixel Clock 225MHz | ||
| Communication and Control | ||
| HDMI EDID | DVI/D supported with adapter (not included) | ||
| HDBaseT EDID | PoH (1way) | Bidirectional IR | ||
| Ethernet | 1x 8-pin RJ-45 female | Web UI | IP Control | |
| IR | 1x IR Ext - 3.5mm (1/8in) Stereo | Matrix Control6x IR TX - 3.5mm (1/8in) Mono | Bidirectional over HDBaseT | 6x IR RX - 3.5mm (1/8in) Stereo | Bidirectional over HDBaseT | |
| RS-232 | Matrix Control | Firmware Updates | |
| Power | Dimensions and Weight | |
| Power Supply Input: 100~240V AC 50/60Hz | Rack Units/Wall Box 2U | |
| PoH 48V 15.4W (each HDBT output) | Height With | Without Feet 95.5mm/3.76in | 87.7mm/3.46in | |
| Max Power Consumption 125 W | Width With | Without Brackets 481mm/18.94in | 438mm/17.25in | |
| Environmental | ||
| Operating Temperature | 32°F ~ 113°F (0°C ~ 45°C)10% ~ 90%, non-condensing | Depth With | Without Handles 373.8mm/14.72in | 347.8mm/13.7in |
| Storage Temperature | -4°F ~ 158°F (-20°C ~ 70°C)10% ~ 90%, non-condensing | Weight 6.7kg/14.74lbs |
| Maximum BTU 426.5 BTU/hr | RegulatorySafety and Emission CE | FCC | |
Troubleshooting
No or Poor Quality Picture (snow or noisy image)
- Verify that power is being supplied to the matrix and receiving device and that both devices are powered on.
Note:
When using PoH, to power the receivers, verify that the HDBaseT cable is properly terminated per the HDMI/HDBaseT Wiring section.
Verify that the transmitter, matrix/receiver, and display support the output resolution of the source. Refer to Video Resolutions in the Specifications table for the max distance based on resolution.
- Configure EDID Settings to a lower resolution.
- If transmitting 3D or 4K, verify that the HDMI cables used are 3D and/or 4K rated.
- Verify that the HDBaseT cable is properly terminated per the HDMI/HDBaseT Wiring section.
- Verify that all source and HDBaseT connections are not loose and are functioning properly.
No or Intermittent 3 ^rd party Device Control
- Verify that IR and RS-232 cable(s) are properly terminated per the appropriate wiring section.
IR: IR Wiring.
RS-232: RS-232 Wiring. - Verify that the IR emitter is located over or near the IR sensor on the device. Move the emitter closer or further from the sensor as the IR signal can be too strong in some cases.
- Verify that the IR receiver is in line of sight of the handheld remote.

Troubleshooting Tips:
- WyreStorm recommends using a cable tester or connecting the cable to other devices to verify functionality.
- Use a flashlight to locate the IR receiver behind any tinted panels on the device being control.
Warranty Information
This product is covered by a 3 year limited parts and labor warranty. During this period there will be no charge for unit repair, component replacement or complete product replacement in the event of malfunction. The decision to repair or replace will be made by the manufacturer. This limited warranty only covers defects in materials or workmanship and excludes normal wear and tear or cosmetic damage.
Visit the product page located at wyrestorm.com for additional information on this product including important technical information not provided in this document and warranty terms & conditions.


- CHDBT HDMI POH
- In the Box
- IMPORTANT!
- Recommended Products
- Additional Information
- Before Beginning
- Pre Wire
- Installation
- HDMI/HDBaseT Wiring
- IMPORTANT! Wiring Guidelines
- Resolutions Distances
- IR Wiring
- IR TX (Emitter) Wiring
- IR RX (Receiver) Wiring
- IMPORTANT! IR TX Connection Guidelines
- RS-232 Wiring
- RS-232 Connection Guidelines
- EDID Settings
- Copying EDIDs
- Troubleshooting
- No or Poor Quality Picture (snow or noisy image)
- Note:
- No or Intermittent 3 rd party Device Control
- Troubleshooting Tips:
- Warranty Information
Brand : WyreStorm
Model : MX-0606-PP-POH
Category : Hi-Fi System