Secure 860 - Baby monitor Oricom - Free user manual and instructions
Find the device manual for free Secure 860 Oricom in PDF.


| Product type | Baby monitor |
| Brand | Oricom |
| Model | Secure 860 |
| Technology | DECT |
| Range (indoor) | Up to 50 meters |
| Range (outdoor) | Up to 300 meters |
| Frequency | 1.8 GHz or 2.4 GHz (typical) |
| Parent unit display | 2.8-inch color LCD |
| Camera resolution | VGA (640x480) |
| Night vision | Yes, infrared LEDs |
| Audio | Two-way talk |
| Temperature sensor | Yes |
| Lullabies | Built-in |
| Power supply parent unit | Rechargeable battery (Li-ion) and AC adapter |
| Power supply baby unit | AC adapter |
| Battery life (parent unit) | Up to 10 hours |
| Dimensions (parent unit) | Approx. 120 x 70 x 30 mm |
| Dimensions (baby unit) | Approx. 100 x 60 x 40 mm |
| Weight (parent unit) | Approx. 150 g |
| Weight (baby unit) | Approx. 120 g |
| Cleaning instructions | Wipe with a dry cloth; do not use liquids |
| Safety features | Out-of-range alarm, low battery alert, encrypted transmission |
| Spare parts availability | Contact Oricom support or authorized retailers |
| Repairability | User-replaceable battery (parent unit) |
Frequently Asked Questions - Secure 860 Oricom
User questions about Secure 860 Oricom
0 question about this device. Answer the ones you know or ask your own.
Ask a new question about this device
Download the instructions for your Baby monitor in PDF format for free! Find your manual Secure 860 - Oricom and take your electronic device back in hand. On this page are published all the documents necessary for the use of your device. Secure 860 by Oricom.
USER MANUAL Secure 860 Oricom
natural_image
Digital medical device displaying a baby photo with a neon face, showing app icons and status bar (no readable text or symbols on device body)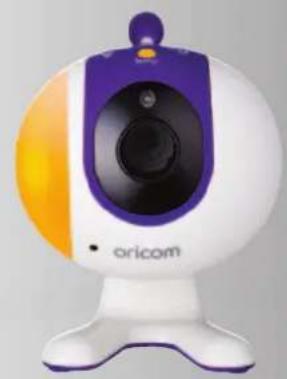
natural_image
White and purple remote camera with orange and yellow accent, no visible text or symbols on bodyUser Guide
KEEP THIS USER GUIDE FOR FUTURE REFERENCE
Always retain your proof of purchase in case of warranty service and register your product on line at: AUSTRALIA: www.oricom.com.au NEW ZEALAND: www.oricom.co.nz
Contents
Getting set up....3
Learn about your menu 8
Learn about your Parent unit....10
Learn about your Baby unit ....11
Baby unit (camera)....12
Using the Night Light....16
Using Lullabies ....18
Feed Timer....20
Temperature....22
Cry Alerts....25
Night vision....28
Settings....29
Oricom Help....31
Help and troubleshooting....33
Guarantee and returns 35
Customer Support 36
Express Warranty (Australia)....37
Important safety notices
- Your baby monitor is designed as just an aid. It isn't a substitute for responsible and proper adult supervision.
- Make sure all cables and units are out of your baby's reach – at least one metre away.
- Never cover either unit, put them in moist places or inside the cot, bed or playpen.
- If you travel abroad, check the voltage on your unit's plugs match the local power output.
- Only use the battery supplied for the Parent unit. If you need to replace it, contact our Sales or Support Team.
- Do not take the product apart. If you need repairs, get in touch with our Support Team.
- The Baby unit might get warm after it's been on for a while. Don't worry – this is normal, and it's perfectly safe.
Getting set up
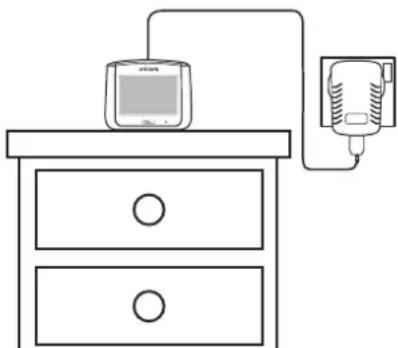
Place the Parent unit near a power socket in the room where you're going to be monitoring your baby most of the time. (Most people have their Parent unit on a bedside table).
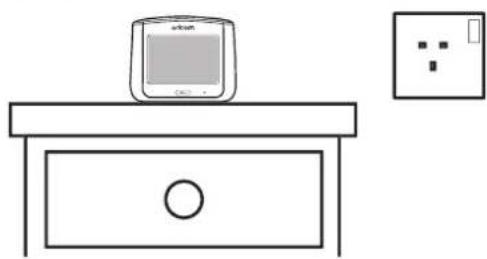
natural_image
Simple line drawing of a desk with a monitor and a wall-mounted socket (no text or symbols)② Plug the USB end into the Parent unit, then plug the power plug into the power socket and switch the power on.
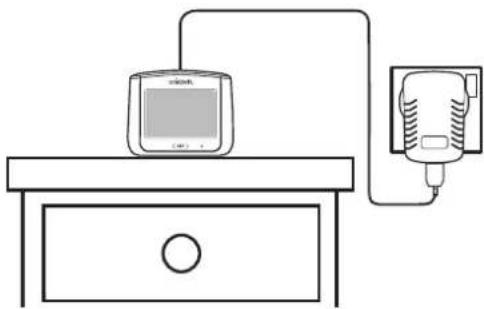
natural_image
Simple line drawing of a device setup with a monitor and connected tubing (no text or symbols)When does near become too far?
The maximum range between your Parent and Baby units is up to 300 metres outdoors, in optimum conditions, and up to 50 metres indoors, in optimum conditions. Thick walls and doors reduce the units' range and affect how they link to each other.
Tip
You can also plug the power cable directly into your Parent unit without needing to use the charging dock.
You can also charge your Parent unit using other micro USB cables. This can be handy when you're away from home with your baby.
Note: these cables are not included but are available as optional accessories.
Tip
When your Parent unit charges while switched off, it turns itself off when fully charged. This means the battery icon goes off, too.
Important note about batteries
A fully charged Parent unit will last about 6.5 hours with normal use. To speed up charging, charge the Parent unit when it's switched off. You can also charge the Parent unit and use it at the same time, but it'll charge more slowly and take longer to fully charge. If the Parent unit battery is low with only about 30 minutes' charge left, you'll hear an alert tone. If this happens, put the Parent unit back on charge if you want to keep monitoring your baby.
③ Pull the battery tab out of the Parent unit.
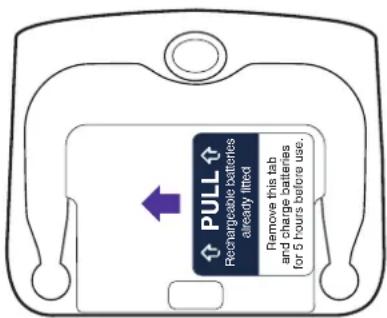
4 Leave the Parent unit to charge for at least five hours.
You can tell it's fully charged when the green.
battery icon on the screen is solid
natural_image
Simple line drawing of a washing machine connected to a wall-mounted device (no text or symbols)Need some help? Call 1300 889 785 or go to www.oricom.com.au
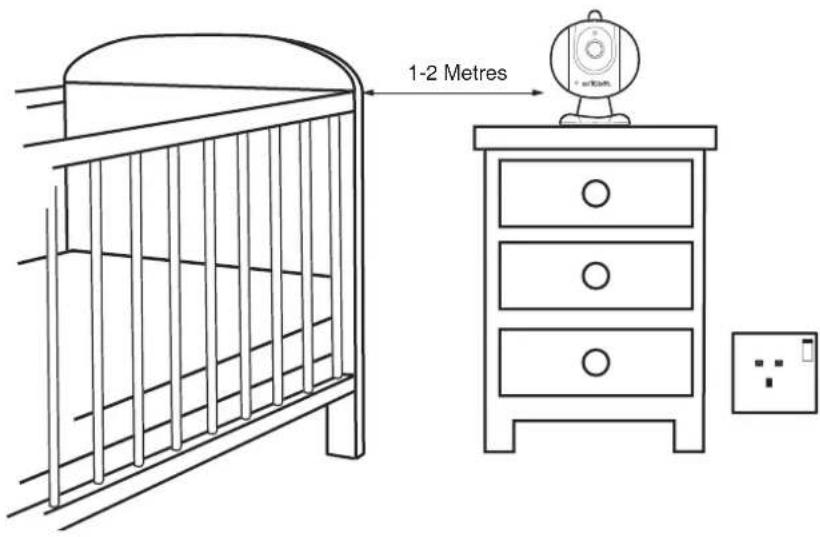
⑤ After the Parent unit has charged for five hours you're ready to set up your Baby unit (camera). To get the best performance, place your Baby unit between one and two metres away from your baby. If you like, you can also attach the unit to a wall. See page 33 for how to do this.
Tip
Point the Baby unit's camera to the centre of the mattress or playpen. You can always adjust this later.
Important note
The Baby unit might get warm after it's been on for a while. Don't worry – this is normal, and it's perfectly safe.
Important note about connections
If the Parent and Baby unit lose the link or connection between them, the link light will flash and the screen will say the link is lost, and is trying to reconnect. If after 30 seconds there's still no link, you'll hear an alert tone from the Parent unit. First, check on your baby and then follow the steps from step 7 again to set up the link again.
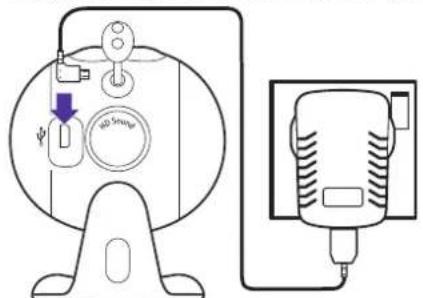
⑥ Using your power adaptor cable, plug one end into the power plug on the Baby unit (Camera) and the other end into the Baby unit. Plug the power plug into the power socket and switch the power on.
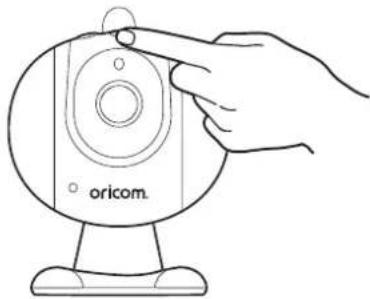
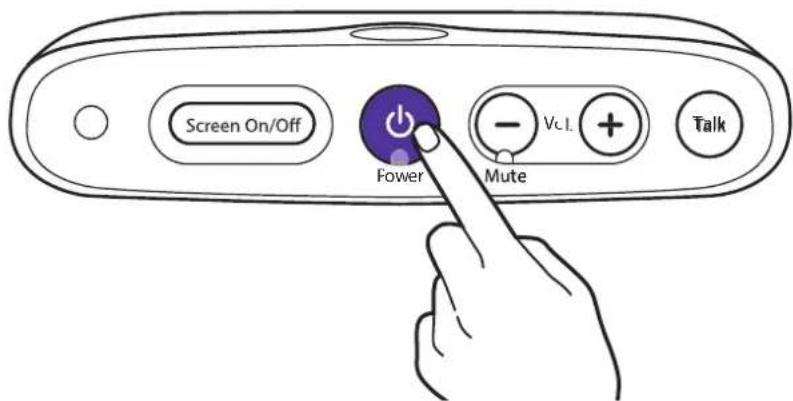
7 Press and hold the power button for two to three seconds. The link light will flash green and the night light will light on and off.
natural_image
Line drawing of a hand holding a camera lens with 'oricom' label, no other text or symbols presentNeed some help? Call 1300 889 785 or go to www.oricom.com.au
⑧ Press the power button to switch on your Parent unit. The Parent and Baby unit will link automatically and the Baby unit's link light will turn solid green.
The first time you switch on your Parent unit, a set-up wizard asks you to set the time and then shows you all your baby monitor's features.
If you want, you can skip through the set-up wizard by tapping the screen or tapping Exit, when shown.
When you exit the set-up wizard, the Parent unit will show you the live view from the Baby unit and you're all set up!
Tip
If you ever want to watch the set-up wizard again, tap Menu and then Oricom Help, then Introduction.
Learn about your menu
Using your baby monitor
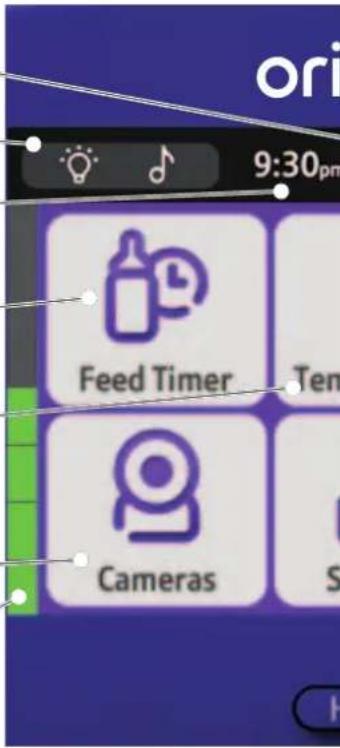
Signal strength This will show the strength of your connection between the Parent and Baby unit.
Quick access menu for Night Light and Lullabies More on page 18-19.
Time
You can set this in Settings.
More on page 29.
How do I leave the menu?
Press
Home
Feed Timer
Set reminders for feeding time.
More on page 20.
Temperature
The temperature of the room the Baby unit is in.
Get alerts on changes of temperature.
More on page 22.
Baby unit (camera)
Name your camera or pair additional cameras.
More on page 12.
Sound level indicator
This is on the left of the screen and shows you the level of noise in your baby's room.
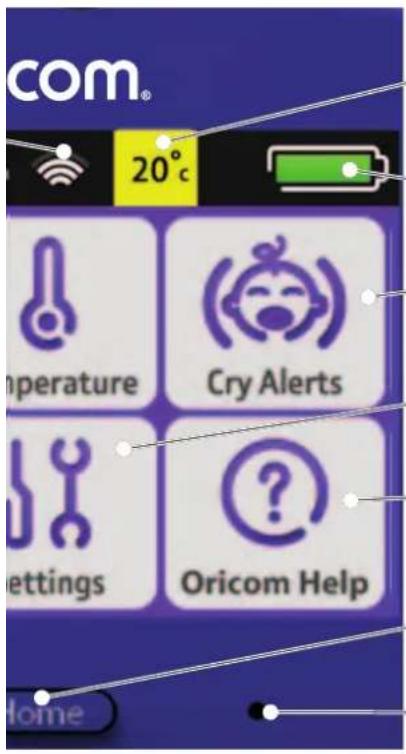
Temperature at Baby unit
This changes colour as the temperature changes – light orange is the optimum temperature, blue too cold, dark orange too warm and red too hot.
More on page 22.
Battery level
More on page 3.
Cry Alerts
Hear when your baby's crying.
More on page 25.
Settings
Set tones, backlight and time.
More on page 29.
Oricom Help
See the set-up wizard, reset settings and how to get more help.
More on page 31.
Home
Returns to the live video from your Baby unit. Tap the screen anywhere to go to the menu.
Mic
Microphone – speak into this when you want to talk to your baby using the Baby unit.
More on page 10.
Need some help? Call 1300 889 785 or go to www.oricom.com.au
Learn about your Parent unit
Tips about talking
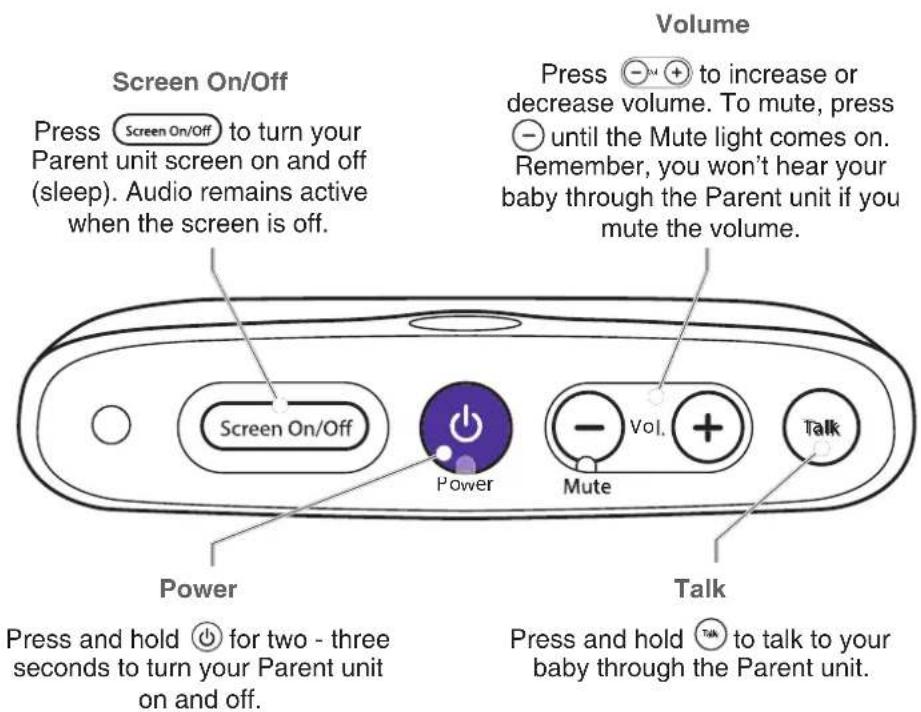
You can talk to your baby using the Parent unit. Hold or have the Parent unit about an arm's length away when using it to talk to your baby – and take care not to put your thumb over the microphone. And remember, while you're talking, you won't be able to hear your baby.
Learn about your Baby unit
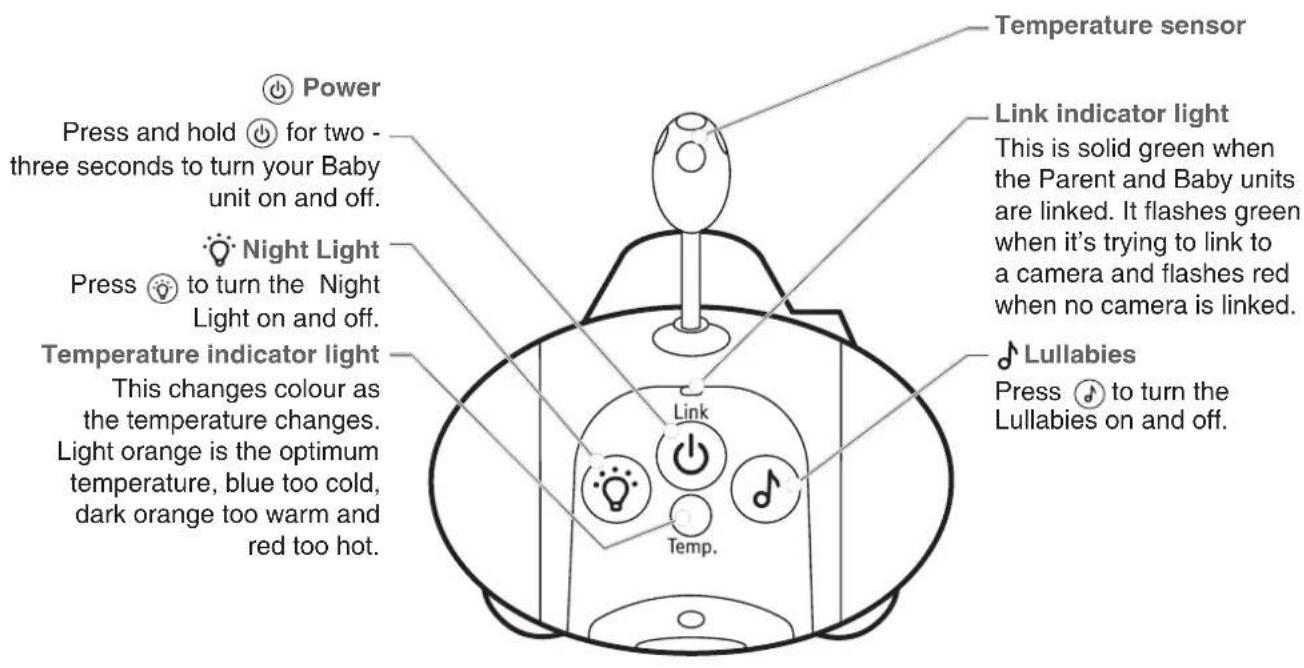
Need some help? Call 1300 889 785 or go to www.oricom.com.au
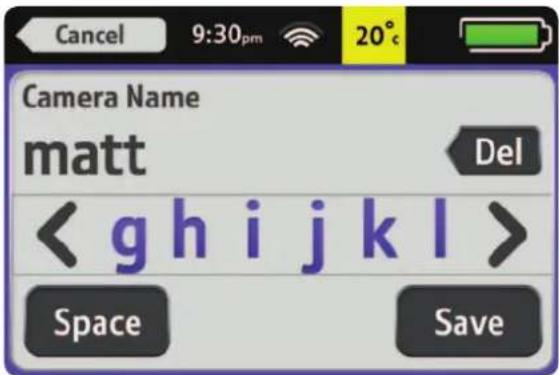
How to name your camera
To change your camera name, tap Cameras and then Rename?
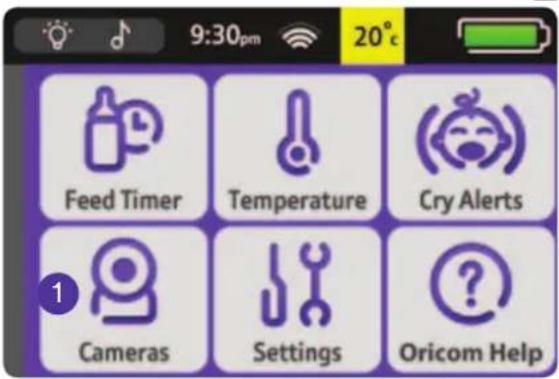
② Enter your baby's name (up to eight characters) and tap Save.
How to zoom your camera
To zoom a camera, tap the screen and the ⏻ and ⏻ will appear.
Tap these to zoom in and out.
When zoomed in, the will appear.
Tap these to move the view up, down, left or right.

natural_image
Close-up photo of a sleeping baby with medical UI icons and a 'Menu' button (no readable text or symbols on the image itself)Need some help? Call 1300 889 785 or go to www.oricom.com.au
How to register additional cameras
① Go to camera menu on the parent unit and then select the camera you want to pair.
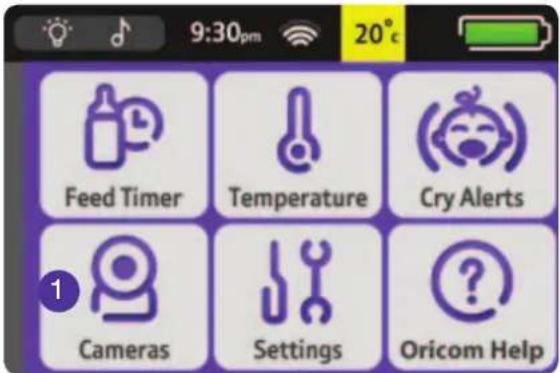
② Follow the on-screen instruction to turn on the baby unit and then press and hold the night light button on baby unit for 10 seconds.
Using the Night Light
A gentle night light in your baby's room can give your baby comfort.
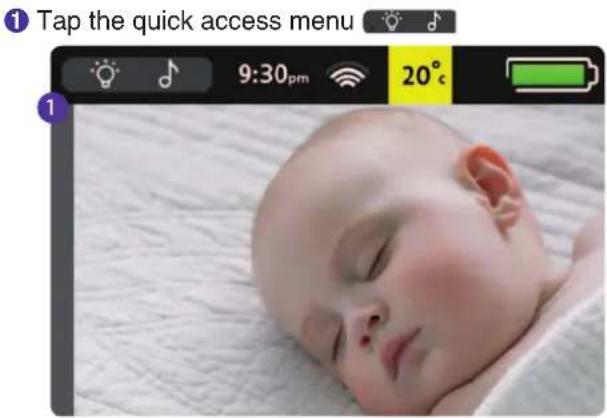
① Tap the quick access menu

natural_image
Close-up photo of a sleeping baby on a white textured surface, captured in a mobile app interface (no text or symbols on the image itself)Need some help? Call 1300 889 785 or go to www.oricom.com.au
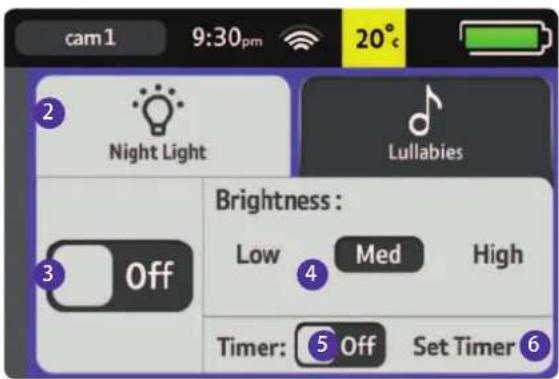
② Choose the Night Light tab.
③ Tap to turn your Night Light on/off. (The will glow yellow on the quick access menu when you return to the home screen.)
④ There are three brightness settings for the Night Light. Tap how bright you want your Night Light.
⑤ Tap to turn the timer on/off.
⑥ Tap to set your timer. To choose how long the light stays on, press Set Timer and then tap + or -.
⑦ If you want to go back and adjust your Night Light's brightness, tap Hide Timer.
Tips
You can also turn the Night Light on/off on the Baby unit – just press the 📍 button.
If you turn off your Baby unit, any Night Light settings will be saved on your Parent and Baby unit.
Using Lullabies
Music can entertain your baby or help them drift off to sleep. You can choose from Lullabies, Classical, Nature Sounds and White Noise.
Need some help? Call 1300 889 785 or go to www.oricom.com.au
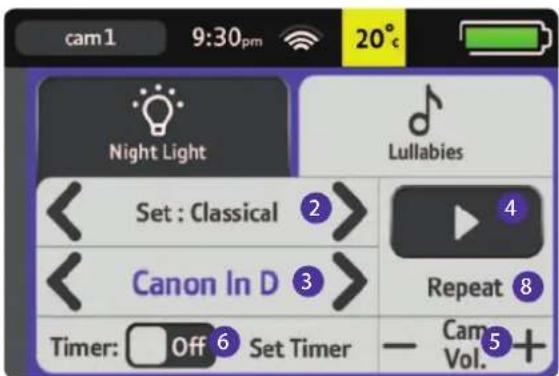
② Tap either arrow to scroll and choose the type of music you want from lullaby, classical, nature or white noise.
③ Tap either arrow to choose the track to play.
④ Tap to play the track.
⑤ Tap to adjust the Baby unit (camera) volume.
⑥ Tap to turn the timer on/off. When on, you'll see a timer icon on the Lullabies tab and quick access menu.
⑦ Tap to set your timer. Then tap the + or - to set how long the music plays. You can change timer settings whilst a track is playing.
8 Tap to set the track to keep repeating. If the track isn't set to repeat, the other tracks within that type of music will play.
Tips
If you turn off your Baby unit, any lullaby settings will be saved on your Parent and Baby unit.
You can also turn Lullabies on and off on the Baby unit – just press the ⏻ button.
Feed Timer
Tip
If you just start your feed timer without changing any settings, its default setting is to alert you in two hours. The maximum alert time you can set is for an alert in nine hours and 59 minutes.
How to set reminders for feeding time
Babies like regular feeding times and a bit of routine. Your handy baby monitor can remind you of feeding times.
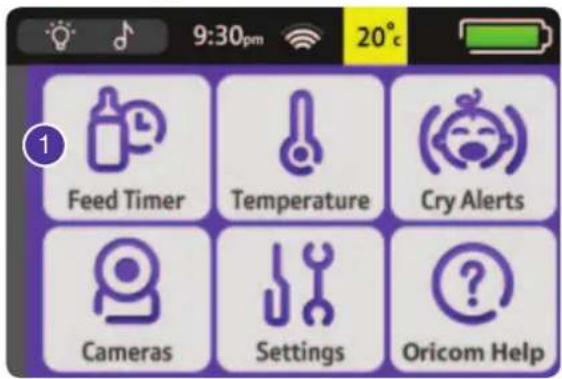
① In Menu, tap 📋 Feed Timer.
Need some help? Call 1300 889 785 or go to www.oricom.com.au
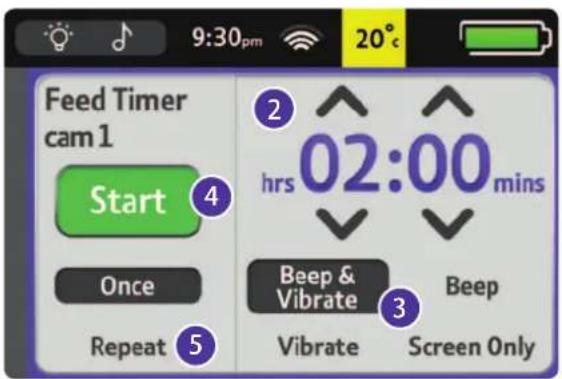
② Tap when you want feed timer alerts.
③ Choose and tap the kind of alert you want.
4 Tap Start . When your feed timer is on, the numbers showing the time glow green. You can also see a countdown to the next alert on the home screen.
⑤ Tap to set the timer to keep repeating and reminding you of the next feeding time.
You'll hear two beeps when the feed timer finishes. Tap the feed timer numbers on the home screen to dismiss this alert and take you to the feed timer menu. If you've set the timer to repeat, it'll restart timing automatically from the moment you dismiss the alert.
Important
If you turn off your Parent unit, you'll need to restart your feed timer when you turn it on again. Length and frequency settings for alerts aren't affected by turning off the Parent unit.
More than one alert?
You'll always see the latest alert on the screen. If you dismiss the latest alert, you'll then see any previous alert.
Temperature
Important
The Baby unit's thermometer is accurate to +/- 2°C.
Default settings
The Baby unit's default setting for temperature alerts is 15°C (and below) and 30°C.
What happens if I reset the Parent unit?
All temperature displays and indicators will go back to default settings.
How to change the temperature alert settings
Make sure your baby's room is at a comfortable temperature. Your handy baby monitor will let you know if it's getting too hot or too cold.
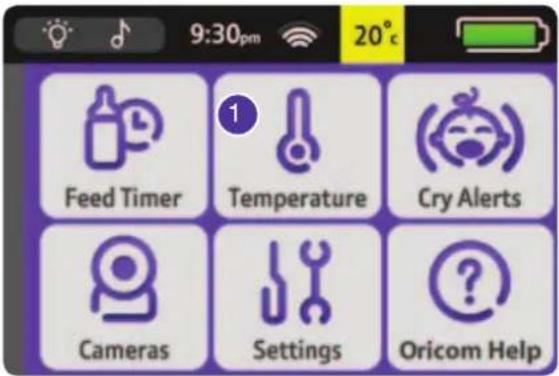
① In Menu, tap 🔒 Temperature.
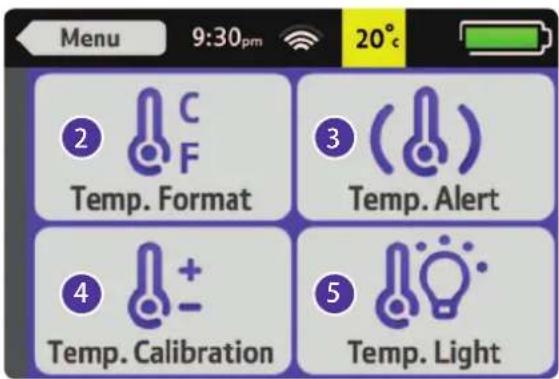
② Tap if you want to change how you want your baby's room temperature displayed (i.e. in Celsius or Fahrenheit). Its default is Celsius.
③ Tap (to) turn off alerts or set the kind of alert you want.
④ Tap if you want to adjust the temperature displayed. For example, you might want to do this if there's a slight difference in temperature between what's showing on the Parent unit and your central heating thermostat or other device.
⑤ Tap You want to turn the Baby unit's temperature indicator light on or off.
What happens if there's more than one alert?
You'll always see the latest alert on the screen. If you dismiss the latest alert, you'll then see any previous alert.
Note
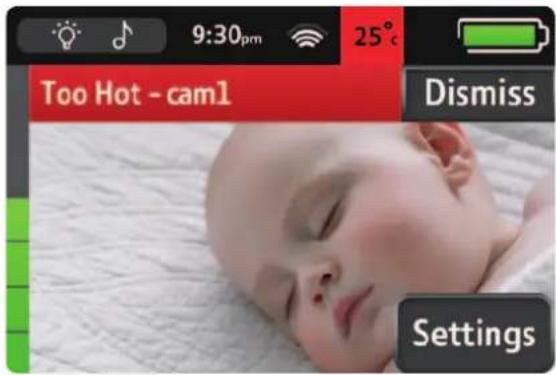
If the alert is set to screen only, the screen will come on if the Parent unit is in sleep mode.
Note
A Too Warm alert will stop automatically after 30 seconds.
During an alert, tap Dismiss to stop it or Settings to change it.
Need some help? Call 1300 889 785 or go to www.oricom.com.au
Cry Alerts
How to know when your child is making a sound
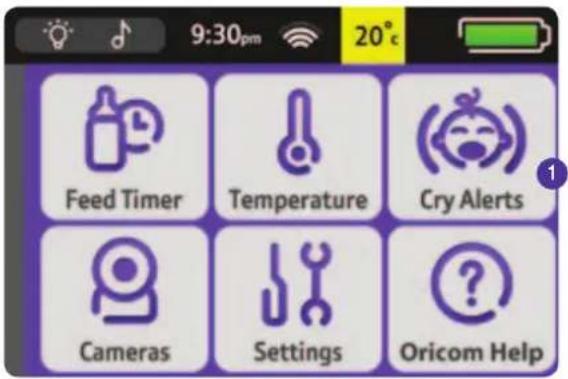
Babies make all sorts of sounds, from gurgling and snuffling to chatting and crying. Cry alerts do exactly as they say. They won't alert you to every little snuffle, but only when your child is making a loud noise. A cry alert only sounds when the Parent unit is on mute.
① In Menu, tap (😊) Cry Alerts.
Important
If the screen's off or in sleep mode, it'll come on when there's a cry alert. If your baby settles, a cry alert will stop automatically after 30 seconds.
What happens if there's more than one alert?
You'll always see the latest one on the screen. If you dismiss the latest alert you'll see the previous one.
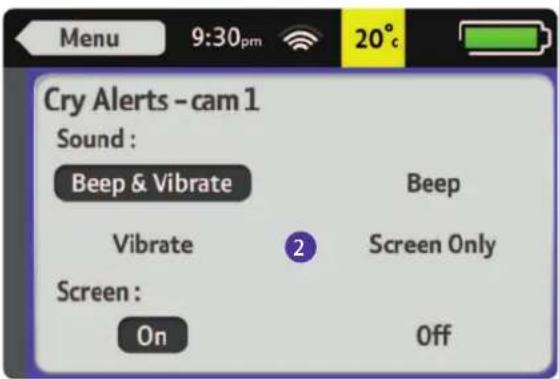
② Tap the kind of alert you want.
During an alert, tap Dismiss to stop it or Settings to change it.
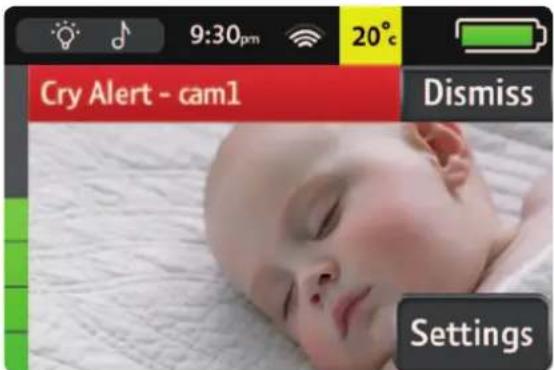
If the screen alert is set to off, press any button on the Parent unit to dismiss the alert.
Night vision
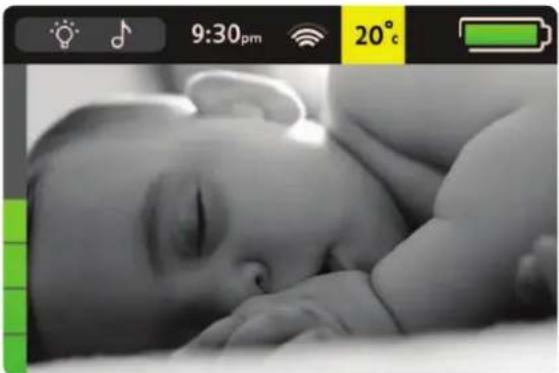
The Baby unit has a night vision mode that allows you to monitor your baby in dark rooms. The Baby unit has infrared LEDs that are invisible to your baby so they don't disturb or distract them.
The night vision mode will automatically turn on when the ambient light drops and the room becomes dark. The picture will turn to a black and white image.
natural_image
Black-and-white photo of a sleeping baby with hands on back, showing no visible text or symbols.The night vision works best when the Baby unit is placed between 1 and 2 metres from your baby (or ideally <3.5m from your baby). Any further away and the image will not be as clear.
Settings
How to set key tones, backlight and time, and calibrate screen
All your main baby monitor settings are in one handy place on your Parent unit.
① In Menu, tap Settings.
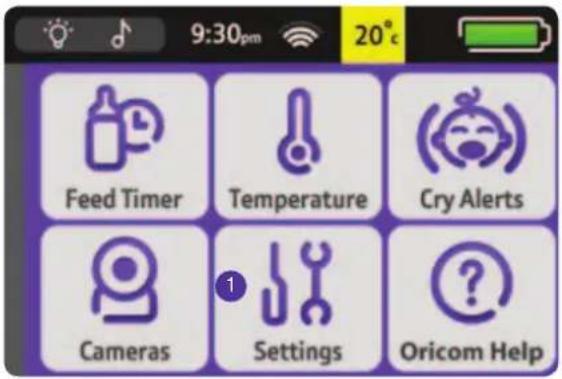
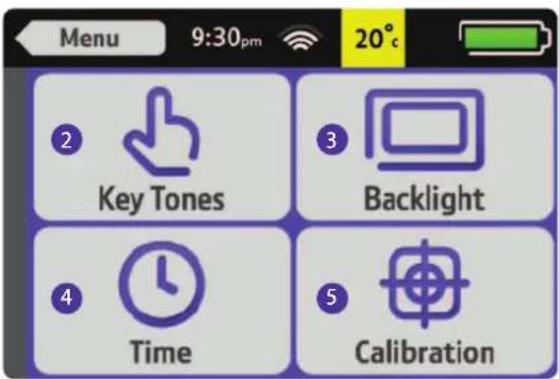
② Tap to set the sound or vibration you'd like when you tap your screen.
③ Tap to set how bright you'd like your screen. The default setting is for the Parent unit to automatically adjust brightness depending on the ambient light. There are five different levels of brightness, if you want to set this manually.
④ Tap to set the time.
⑤ Tap calibrate your screen. (You'll see arrows around the screen when it needs calibrating, otherwise you shouldn't need to calibrate it.)
Oricom Help
How to see the set-up wizard, reset settings and get help There's lots of help, if you need it.
① In Menu, tap Ⓕ? Oricom Help.
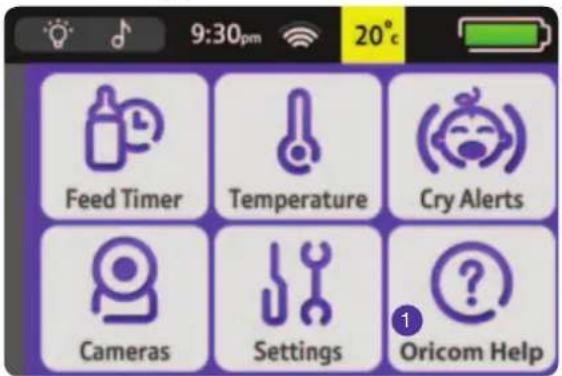
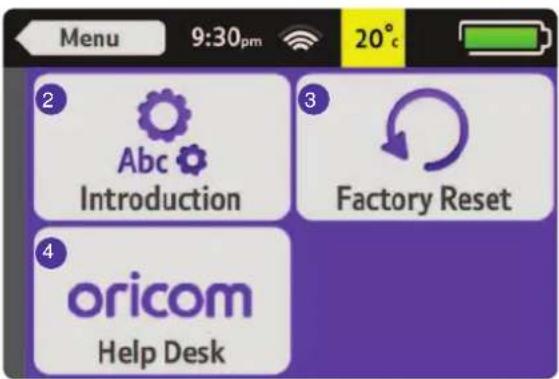
② Tap to see the set-up wizard.
③ Tap to reset your Parent unit to its factory settings. Factory Reset
4 Tap for the Oricom Help Desk contact information.
Help and troubleshooting
If you have any problems setting up or using your baby monitor, see if these common questions can help.
How long does the Parent unit battery last?
A fully charged Parent unit will last about 6.5 hours with normal use. To speed up charging, charge the Parent unit when it's switched off. You can also charge the Parent unit and use it at the same time, but it'll charge slower and take longer to fully charge.
How do I replace the battery?
You should only use a Lithium 3.7V 2500mAh 9.25Wh battery from our Customer Support. Call us on 1300 889 785 when you need to replace it. When you get it, take off the battery compartment cover and pull the tab inside to get the old battery out. Then insert your new battery and put the cover back on.
How do I attach my Baby unit to a wall?
You get some screws and plugs with your baby monitor.
Here's what to do.
- Make sure the wall can support the Baby unit.
- Make sure the power plug can reach the power socket.
- Check that you aren't drilling into any hidden wiring or plumbing. Oricom isn't responsible for any damage or injury caused while trying to wall mount your Baby unit.
- Use a pencil to mark where you want your Baby unit.
- Check the reception strength of the Baby unit and its camera angle before drilling two 5mm holes, 37mm apart.
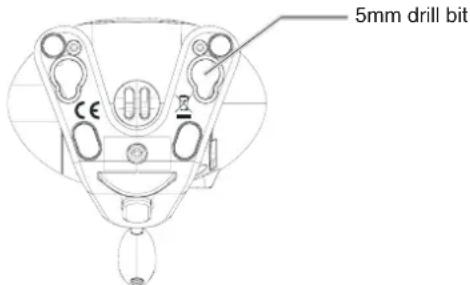
Need some help? Call 1300 889 785 or go to www.oricom.com.au
My Parent/Baby unit isn't working. What should I do?
Check that:
- power cables are plugged in and switched on at the wall socket
- batteries are installed correctly and fully charged
- the units are turned on
- the Parent unit isn't too far from the Baby unit(s) (large obstructions or other electrical devices might affect the signal between the Parent and Baby unit).
Sometimes unplugging the power cables, waiting about 20 seconds, and then plugging them back in can help. If you do this, you'll need to allow about a minute for Parent and Baby unit(s) to link.
My Parent/Baby unit is making a high-pitched noise.
What should I do?
They might be too close together. Make sure they're at least 2-3 metres apart.
How do I reset my Parent unit?
In Menu, tap Oricom Help then tap Factory Reset.
How do I reset my Baby unit?
Within three seconds of the Baby unit starting, press and hold down the ⏻ and ⏻ buttons for about five seconds.
Why is my Parent unit beeping?
The Parent unit beeps when:
- your units aren't linking – see page 3.
- there's a problem with mains or battery power
- a crying alert is switched on – see page 25.
How do I pair the Parent unit to a camera?
- select the camera menu
- select which camera you need to pair
- the on-screen instruction will ask you to turn on the camera and press and hold down the night light button.
Guarantee and returns
Cleaning
The Oricom SC860 has a durable plastic casing that should keep their colour and finish for many years. To clean, use only a soft cloth slightly dampened with water or a mild soap. Do not use too much water or cleaning solvents.
Storage:
- Keep in cool dry place, in original packaging or box for best protection.
- Do not wind cords around devices, loop together and bundle with elastic band or suitable cable tie.
- Remove battery for prolonged storage. Test and charge on annual basis.
Customer Support
Customer Support
If you have any problems setting up or using this product you will find useful tips and information in the Troubleshooting section of this user guide as well as “Frequently Asked Questions” on our website www.oricom.com.au.
If you have further questions about using the product after reviewing the resources above or would like to purchase replacement parts or accessories please call our Customer Support Team on 02 4574 8888 or 1300 889 785 AUS/ 0800 674 266 NZ Mon to Fri 8am to 6pm AEST. Our dedicated local support team are more likely to be able to help you than the retailer where you made your purchase.
Important
Please retain your purchase receipt and attach to the back page of this user guide as you will need to produce this if warranty service is required. Take a few moments to register your product online: www.oricom.com.au.
Express Warranty (Australia)
Express Warranty (Australia)
This Express Warranty is provided by Oricom International Pty Ltd ABN 46 086 116 369, Unit 1, 4 Sovereign Place, South Windsor NSW 2756, herein after referred to as "Oricom".
Oricom products come with guarantees that cannot be excluded under the Australian Consumer Law. You are entitled to a replacement or refund for a major failure and compensation for any other reasonably foreseeable loss or damage. You are also entitled to have the goods repaired or replaced if the goods fail to be of acceptable quality and the failure does not amount to a major failure. Oricom warrants that the product is free from defects in materials or workmanship during the Express Warranty Period. This Express Warranty does not extend to any product from which the serial number has been removed or was purchased outside of Australia.
Nothing in this Express Warranty excludes, restricts or modifies any condition, warranty, guarantee, implied term, right or remedy pursuant to the Australian Consumer Law and which may not be so excluded, restricted or modified. For such conditions, terms, guarantees and warranties that cannot be excluded, restricted or modified, Oricom limits the remedies available to extent permitted in the relevant legislation.
The Express Warranty Period will be 3 years from the date of purchase of the product evidenced by your dated sales receipt. You are required to provide proof of purchase as a condition of receiving Express Warranty services.
You are entitled to a replacement product or repair of the product at our discretion according to the terms and conditions of this document if your product is found to be faulty within the Express Warranty Period.
This Express Warranty extends to the original purchaser only and is not transferable.
Products distributed by Oricom are manufactured using new materials or new and used materials equivalent to new in performance and reliability. Spare parts may be new or equivalent to new. Spare parts are warranted to be free from defects in material or workmanship for thirty (30) days or for the remainder of the Express Warranty Period of the Oricom branded product in which they are installed, whichever is longer.
During the Express Warranty Period, Oricom will where possible repair and if not replace the faulty product or part thereof. All component parts removed under this Express Warranty become the property of Oricom. In the unlikely event that your Oricom product has a recurring failure, Oricom may always, subject to the Competition and Consumer Act 2010, at its discretion, elect to provide you with a replacement product of its choosing that is at least equivalent to your product in performance.
No change to the conditions of this Express Warranty is valid unless it is made in writing and signed by an authorised representative of Oricom.
Oricom will not be liable under this Express Warranty, and to the extent permitted by law will not be liable for any defect, loss, damage or injury arising out of or in connection with a:
- Failure by you to adhere to the warnings and follow the instructions set out in this user guide for the proper installation and use of the product;
- Wilful misconduct or deliberate misuse by you of the product;
- Any external cause beyond our control, including but not limited to power failure, lightning or over voltage; or
- Modification to the product or services carried out on the product by anyone other than Oricom or Oricom's authorised service provider.
How to make a claim under your Express Warranty in Australia
Oricom has a simple warranty process for you to follow:
- Please call or email our Customer Support Team, 1300 889 785 or support@oricom.com.au.
- A Customer Support Team member will verify after troubleshooting with you if your product qualifies under warranty. If so, they will give you a Product Return Authorisation number.
- We will then email or fax a Return Authorisation form and a Repair Notice (if necessary), together with instructions on how to return the goods for warranty service.
Please note that if a Customer Support Team member advises that your product does not qualify for return, this warranty does not apply to your product. Products that are authorised to be returned to Oricom in Australia must include all of the following:
• A completed Return Authorisation form
- A copy of your Proof of Purchase (please keep your original copy)
- The faulty product, including all accessories.
Send the approved returns to:
Oricom International Pty Ltd
Locked Bag 658
South Windsor NSW 2756 Australia
Please note that this Express Warranty excludes expenses incurred by you in returning any faulty product to us. You must arrange and pay any expenses incurred (including postage, delivery, freight, transportation or insurance of the product) to return the faulty product to us, however, we will arrange delivery of the repaired or replaced faulty product to you.
Contact Details for Oricom Support and Express Warranty Claims in Australia
Oricom International Pty Ltd
Locked Bag 658
South Windsor, NSW 2756
Australia
Email: support@oricom.com.au
Phone: 1300 889 785 or (02) 4574 8888
(Monday to Friday 8am to 6pm AEST)
Web: www.oricom.com.au
Fax: (02) 4574 8898
Contact Details for Oricom Support and Express Warranty Claims in New Zealand
Email: support@oricom.co.nz
Phone: 0800 674 266
(Monday to Friday 10am to 8pm NZST)
Web: www.oricom.co.nz

Ref: 07092015
- Contents
- Important safety notices
- Getting set up
- When does near become too far?
- Tip
- Important note about batteries
- ③ Pull the battery tab out of the Parent unit.
- Leave the Parent unit to charge for at least five hours.
- Important note
- Important note about connections
- Learn about your menu
- Temperature at Baby unit
- Battery level
- Cry Alerts
- Settings
- Oricom Help
- Home
- Mic
- Learn about your Parent unit
- Tips about talking
- Learn about your Baby unit
- Using the Night Light
- Tips
- Using Lullabies
- Feed Timer
- Important
- More than one alert?
- Temperature
- Default settings
- What happens if I reset the Parent unit?
- What happens if there's more than one alert?
- Note
- Night vision
- Help and troubleshooting
- Guarantee and returns
- Cleaning
- Storage:
- Customer Support
- Express Warranty (Australia)
- How to make a claim under your Express Warranty in Australia
- Contact Details for Oricom Support and Express Warranty Claims in Australia
- Contact Details for Oricom Support and Express Warranty Claims in New Zealand
Brand : Oricom
Model : Secure 860
Category : Baby monitor