Secure 715 - Baby monitor Oricom - Free user manual and instructions
Find the device manual for free Secure 715 Oricom in PDF.


| Product Type | Audio Baby Monitor |
| Brand | Oricom |
| Model | Secure 715 |
| Technology | DECT 1.9 GHz |
| Range (outdoor) | Up to 300 meters |
| Range (indoor) | Up to 50 meters |
| Power Supply | AC adapter 100-240V, output 6V DC |
| Battery Type (parent unit) | Rechargeable Ni-MH 2.4V |
| Number of Channels | 120 |
| Two-Way Talk | Yes |
| Lullabies | Yes (5 preloaded) |
| Temperature Sensor | Yes (baby unit) |
| Night Light | Yes (baby unit) |
| Low Battery Alert | Yes (parent unit) |
| Out of Range Alert | Yes |
| Cleaning Instructions | Wipe with a soft, dry cloth |
| Replaceable Battery | Yes |
| Manual Included | Yes (PDF download) |
| Weight (parent unit) | Approx. 150 g |
| Dimensions (parent unit) | 120 x 60 x 30 mm |
Frequently Asked Questions - Secure 715 Oricom
User questions about Secure 715 Oricom
0 question about this device. Answer the ones you know or ask your own.
Ask a new question about this device
Download the instructions for your Baby monitor in PDF format for free! Find your manual Secure 715 - Oricom and take your electronic device back in hand. On this page are published all the documents necessary for the use of your device. Secure 715 by Oricom.
USER MANUAL Secure 715 Oricom
natural_image
Two white remote control devices with camera modules and a photo of a newborn baby on the screen (no visible text or symbols)User Guide
KEEP THIS USER GUIDE FOR FUTURE REFERENCE
Always retain your proof of purchase in case of warranty service. AUSTRALIA: www.oricom.com.au NEW ZEALAND: www.oricom.co.nz
TABLE OF CONTENTS
SAFETY INFORMATION 1
OVERVIEW OF FUNCTIONAL COMPONENT POSITIONS 3
GETTING STARTED 5
USING THE BABY MONITOR 7
TROUBLESHOOTING
12
EXPRESS WARRANTY 13
Need Help?
If you need assistance setting up or using your Oricom product now or in the future, call Oricom Support.
Australia 1300 889 785 or 02 4574 8888
www.oricom.com.au
Mon-Fri 8am – 6pm AEST
New Zealand 0800 67 42 66
www.oricom.co.nz
Mon-Fri 10am – 8pm NZST
1 Important Safety Information
- It is very important that you read the User Guide carefully as it contains detailed information you will need to get the most from your Oricom baby monitor. If you have any issues setting up or using your Oricom baby monitor, please call our Customer Support team.
- Your Oricom baby monitor is designed to be an aid and should not be used as a substitute for responsible and proper adult supervision of a child.
- The baby monitor has been designed to provide some added reassurance in the form of sound transmission for those times when you are not in the same room as your baby provided you always stay within hearing range of the baby monitor during use. Your baby monitor is not a medical device, nor a device to prevent cases of Sudden Infant Death Syndrome (SIDS) or "cot death", and you should not rely on it for your baby's wellbeing. It is important that you regularly check on your baby personally.
-
Make sure the baby unit, parent unit and mains adaptor cables are kept out of reach of your baby and other young children at all times, at least one metre away.
-
Never place the baby unit or parent unit inside your baby's cot, bed or playpen.
- Never cover the parent or baby units with clothes, towels or blankets or any other item. Never use or place your parent or baby unit in or near moisture or water (e.g. near bath or pool). Immersing in water could cause electric shock and even death.
- The installation location plays an important role in ensuring proper operation. Therefore, maintain a distance of at least one metre from other electronic equipment, such as microwave ovens or hi-fi devices, otherwise they could cause interference. During continual use the baby unit power adaptors may become warm to the touch. This is normal and should not be a concern.

Warning
Risk of suffocation! Keep all packaging materials and protective foils out of reach of children.
2
SAFETY INFORMATION

Warning
Do not place the AC Adaptor cable in a high "wear and tear" location. Never use a frayed or compromised cord.
Battery safety
- Batteries represent a hazard to health and the environment!
- They contain toxic, ecologically hazardous heavy metals. Do not dispose of batteries in a fire as they may explode. Dispose of batteries according to local regulations, never in your household rubbish.
- Do not dismantle, cut, open, crush, bend, puncture, or shred cells or batteries. If a battery leaks, do not let the battery liquid touch skin or eyes. If this happens, immediately flush the affected areas with water, and seek medical assistance.
- Do not modify, remanufacture, attempt to insert foreign objects into the battery, or immerse or expose it to water or other liquids. Batteries may explode if damaged.
- Use only the batteries supplied with the product. Improper use, or use of unapproved batteries, may present a risk of fire, explosion, or other hazard, and may invalidate any approval or warranty.
- If you believe the battery is damaged, remove product from the charger and stop using the product. Contact Oricom for assistance. Never use a damaged battery.
Disposal
Always dispose of your products at the end of their life in accordance with your local waste disposal requirements.
Packaging materials all cardboard and paper packaging should be recycled in accordance with your local council waste regulations.
OVERVIEW OF FUNCTIONAL COMPONENT POSITIONS
2 Your Baby Monitor
Parent Unit
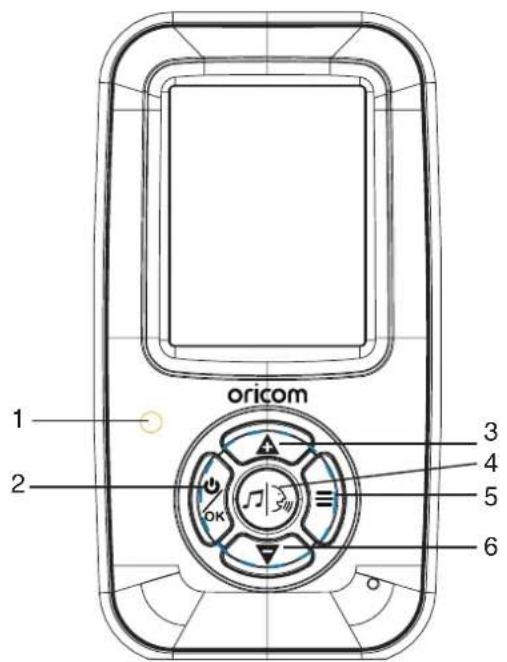
1 Power
2 Power / OK Button
3 Up Button
4 PTT / Lullaby Button
5 Menu Button
6 Down Button
OVERVIEW OF FUNCTIONAL COMPONENT POSITIONS
Camera unit (Baby Unit)
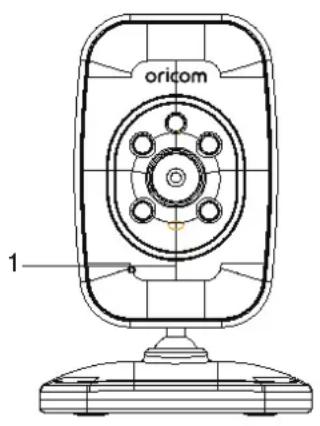
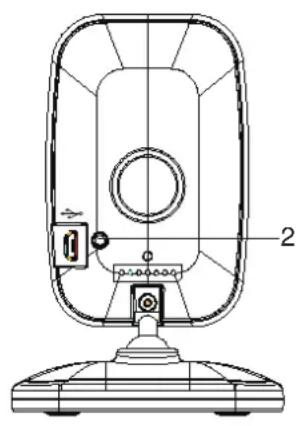
natural_image
Technical line drawing of a mechanical device with labeled components (no text or symbols present)1 Baby Unit Power Indicator
2 Pairing Button
Check pack contents
| SC715 |
| 1 Baby unit (camera) |
| 1 AC adaptor for the baby unit |
| 1 Parent unit2 x AA 800mAh NiMH batteries1 AC adaptor for the parent unit |
If any items are missing, contact Oricom customer support on 1300 889 785 or support@oricom.com.au.
3 Getting Started
NOTE:
YOU MUST INITIALLY CHARGE THE BATTERIES FOR 12-14 HOURS BEFORE USE. THIS IS IMPORTANT TO MAINTAIN ADEQUATE BATTERY PERFORMANCE.
3.1 Baby unit power supply
(1) Connect the power adaptor with microUSB to the baby unit.

Warning
Only use the AC power adaptor supplied with the product as other power adaptors could damage the product. This product is designed for indoor use only.
3.2 Turn on/off the Parent unit
(1) Insert batteries into the battery compartment.
(2) Close the battery compartment.
(3) Press and hold
(4) Press and hold
NOTE:
When the battery level is low, the LCD will show the battery empty icon, which will flash.
3.3 Charge the Battery on the Parent unit
(1) Connect the Micro USB power adaptor to the parent unit and other end to the mains power.
(2) Battery icon with lightning symbol is shown on the LCD.
Battery Life
The rechargeable batteries (supplied) can be charged and discharged hundreds of times, however they will eventually wear out and lose their ability to hold a full charge. When the in-use time becomes noticeably shorter than normal, it is time to purchase new batteries.
How to purchase spare parts
You can purchase batteries (Part number: 2B0109), and extra camera units from Oricom www.oricom.com.au

Warning
Only use Rechargeable Nickel Metal Hydride batteries in this product, as any other type may cause damage.
6 GETTING STARTED
4 Using The Baby Monitor
Once the baby and parent units are powered on and registered, the display on the parent unit will show the video captured by the baby unit.
Switching on the Parent Unit
Press and hold the
Press and hold the
NOTE:
If you place the parent and baby units too close together, you will hear a high pitched noise called "feedback" this is normal. The units are designed to be located in separate rooms.
To prevent feedback, avoid having the parent unit and baby unit turned on in the same room.
Feedback will be generated if the talk button is pressed when the baby unit and parent unit are too close to each other.
4.1 Video mode
The baby and parent units are pre-registered. Once the baby and parent units are switched on the parent unit will show the video captured by the baby unit.
4.1.1 Sound level adjustment
During video mode, you can press the
Press the menu key to save and exit.
4.1.2 Brightness adjustment
During video mode, you can press the
Press the menu key to save and exit.
4.1.3 Lullaby selection
During video mode, press the
4.1.4 Push to talk
During video mode, press and hold
NOTE:
Lullabies will continue to play on the baby unit when the parent unit is turned OFF. To turn off the lullabies on the baby unit: turn the parent unit back ON, then turn the lullabies off in the menu.

4.2 MENU mode
(1) Press the
- Please call or email our Customer Support Team, 1300 889 785 or support@oricom.com.au.
- A Customer Support Team member will verify after troubleshooting with you if your product qualifies under warranty. If so, they will give you a Product Return Authorisation number.
- We will then email or fax a Return Authorisation form and a Repair Notice (if necessary), together with instructions on how to return the goods for warranty service.
Please note that if a Customer Support Team member advises that your product does not qualify for return, this warranty does not apply to your product. Products that are authorised to be returned to Oricom in Australia must include all of the following:
• A completed Return Authorisation form
- A copy of your Proof of Purchase (please keep your original copy)
- The faulty product, including all accessories.
EXPRESS WARRANTY
Send the approved returns to:
Oricom International Pty Ltd
Locked Bag 658
South Windsor NSW 2756 Australia
Please note that this Express Warranty excludes expenses incurred by you in returning any faulty product to us. You must arrange and pay any expenses incurred (including postage, delivery, freight, transportation or insurance of the product) to return the faulty product to us, however, we will arrange delivery of the repaired or replaced faulty product to you.
Important Information
Repair Notice
Please be aware that the repair of your goods may result in the loss of any user-generated data (such as stored telephone numbers, text messages and contact information). Please ensure that you have made a copy of any data saved on your goods before sending for repair. Please also be aware that goods presented for repair may be replaced by refurbished goods or parts of the same type rather than being repaired.
ORICOM CUSTOMER SUPPORT
Oricom have a trained and dedicated team of Customer Support Representatives, each with the knowledge and resources to assist in answering your questions quickly and efficiently.
Oricom Support - Australia
For all product enquiries, troubleshooting or to discuss the range of Oricom products, feel free to contact Oricom or visit our website for answers to frequently asked questions.
1300 889 785
Monday - Friday 8am – 6pm AEST
Email: support@oricom.com.au
www.oricom.com.au
Oricom Support - New Zealand
0800 674 266
Monday - Friday 10am - 8pm NZST
Email: support@oricom.co.nz
www.oricom.co.nz

Ref: 18102018
- TABLE OF CONTENTS
- Need Help?
- Important Safety Information
- Warning
- 2
- SAFETY INFORMATION
- Battery safety
- Disposal
- OVERVIEW OF FUNCTIONAL COMPONENT POSITIONS
- Your Baby Monitor
- Getting Started
- NOTE:
- Baby unit power supply
- Turn on/off the Parent unit
- Charge the Battery on the Parent unit
- Battery Life
- How to purchase spare parts
- GETTING STARTED
- Using The Baby Monitor
- Switching on the Parent Unit
- Video mode
- Sound level adjustment
- Brightness adjustment
- Lullaby selection
- Push to talk
- MENU mode
- CAMERA SELECTION
- VOX SELECTION
- USING THE BABY MONITOR
- VOX timer
- ZOOM
- SETUP mode
- Camera registration / de-registration
- Lullaby volume setting
- Lost link indication
- Cleaning
- USING THE BABY MONITOR
- Customer Support
- TROUBLESHOOTING
- EXPRESS WARRANTY
- Express Warranty (Australia)
- EXPRESS WARRANTY
- How to make a claim under your Express Warranty in Australia
- Important Information
- Repair Notice
- ORICOM CUSTOMER SUPPORT
- Oricom Support - Australia
- 889 785
- 674 266
Brand : Oricom
Model : Secure 715
Category : Baby monitor