
StoreOnce G2 - NAS HP - Free user manual and instructions
Find the device manual for free StoreOnce G2 HP in PDF.


User questions about StoreOnce G2 HP
0 question about this device. Answer the ones you know or ask your own.
Ask a new question about this device
Download the instructions for your NAS in PDF format for free! Find your manual StoreOnce G2 - HP and take your electronic device back in hand. On this page are published all the documents necessary for the use of your device. StoreOnce G2 by HP.
USER MANUAL StoreOnce G2 HP
G2 Backup System user guide
Abstract
This is the user guide for the following G2 and G2-E HP StoreOnce Backup Systems:
• HP D2D4300 Series: HP D2D4324 and HP D2D4312
• HP D2D4100 Series: HP D2D4112 and HP D2D4106
•HP D2D2500 Series: HP D2D2504 and HP D2D2502
Some features described in this guide may not be activated on your product. Refer to the Quick Specs on http://www.hp.com for supported features for your model and the current status. See the PDF version of the product's Installation and Configuration guide (available from the HP web site) for all installation and hardware cabling instructions.
NOTE: Much of the information is also relevant for the older G1 products. Although these products are now discontinued, they are still supported and Appendix A includes any information that is specific to the older G1 products.
© Copyright 2011–2013 Hewlett-Packard Development Company, L.P.
Confidential computer software. Valid license from HP required for possession, use or copying. Consistent with FAR 12.211 and 12.212, Commercial Computer Software, Computer Software Documentation, and Technical Data for Commercial Items are licensed to the U.S. Government under vendor's standard commercial license.
The information contained herein is subject to change without notice. The only warranties for HP products and services are set forth in the express warranty statements accompanying such products and services. Nothing herein should be construed as constituting an additional warranty. HP shall not be liable for technical or editorial errors or omissions contained herein.
WARRANTY STATEMENT: To obtain a copy of the warranty for this product, see the warranty information website:
http://www.hp.com/go/storagewarranty
Linear Tape-Open, LTO, LTO Logo, Ultrium and Ultrium Logo are trademarks of Quantum Corp, HP and IBM in the US, other countries or both.
Microsoft, Windows, Windows NT, and Windows XP are U.S. registered trademarks of Microsoft Corporation.
Intel and Itanium are trademarks or registered trademarks of Intel Corporation or its subsidiaries in the United States and other countries.
AMD is a registered trademark of Advanced Micro Devices, Inc.
The StoreOnce Backup System product firmware includes software developed by the OpenSSL Project for use in the OpenSSL Toolkit.
(http://www.openssl.org/. See separate copyright statement included on the CD.
Contents
1 Getting started....6
Introduction......6
What is the Web Management interface?......6
To run the Web Management Interface....6
Initial logon and Welcome message....7
2 Home, Summary......8
Summary (Home)....8
3 Virtual Tape Devices....10
Devices (Virtual Tape Devices)....10
Making Replication Target libraries visible to the host....16
Cartridges (Virtual Tape Devices)....18
4 NAS....21
Shares (NAS)......21
Configuring NAS targets for CIFS....22
Configuring users on AD (CIFS shares only)....24
Configuring NAS shares for NFS....30
5 Appliance Configuration....33
Network (Configuration)....33
Fibre Channel (Configuration)....36
iSCSI (Configuration)....36
SNMP (Configuration)....37
HP Systems Insight Manager....39
Email Alerts (Configuration)....43
To configure Microsoft Exchange Server....44
6 Status....46
System Activity (Status)....46
Storage (Status)....46
Storage pool tab....47
Disks tab....49
RAID....50
Shelves....51
Disk (Status)....52
RAID (Status)....54
Network (Status)....54
iSCSI (Status)....55
Fibre Channel (Status)....55
Storage Reporting (Status)....56
Log (Status)....57
7 Replication....58
Status (Replication)....58
Virtual Tape Mappings (Replication)....59
Running the replication wizard (virtual tape devices)......61
NAS Mappings (Replication)......66
Running the replication wizard (NAS)....69
Partner Appliances (Replication)....73
Source Appliance Permissions tab....76
Local Appliance (Replication)....77
Event History (Replication)....81
8 Administration....82
User Account (Administration)....82
Security (Administration)......83
Date & Time (Administration)....85
Housekeeping (Administration)......87
Shutdown (Administration)......88
Software (Administration)......88
Support (Administration)....91
Backup & Restore (Administration)....93
License (Administration)....94
9 Restore processes with replication....96
Recovering a Source Appliance (Virtual Tape devices)....96
Reverse replication using the wizard....96
Promoting a Target Library over the WAN using iSCSI....100
Promoting a target library using colocation....101
Recovering a Source Appliance (NAS shares)....104
Reverse replication using the wizard....104
Promoting a Target Share over the WAN using NAS....107
Promoting a Target Share using colocation....108
10 Restore processes without replication....111
Restore scenarios....111
Restoring single files....111
Restore and deduplication....111
Reconnecting to the to iSCSI VTL devices after host failure....112
11 Understanding LEDs....115
HP D2D4324/4312 Backup System....115
HP D2D4112/4106 Backup System....116
HP D2D2502/2504 Backup System....117
Hot-plug drive LEDs....118
Fibre Channel card LEDs....119
Capacity upgrade kit LEDs....119
12 Hardware monitoring....121
Resolving problems....122
13 Troubleshooting....125
Connecting to the StoreOnce Backup System from the backup application....125
Connecting to the network....125
Using the 10Gb ports (HP D2D4300 Series only)....126
Performance....126
Web Management Interface errors and warnings....127
Power On/Off Problems....128
Cannot connect to Web Management Interface....129
NFS State handle error....129
Cannot authenticate an iSCSI session....130
Diagnostic Fibre Channel device....130
If the HP StoreOnce Backup System runs out of disk space....130
Cannot access a storage shelf (HP D2D4100 and 4300 Series Backup Systems)....131
If backup or replication fails....131
Recovering Devices that have 'failed to start' or have become read-only....132
StoreOnce Backup System configuration problems....134
Upgrade licenses....134
Replacement of hardware....134
Upgrades to component parts....135
14 Hard disk replacement....136
RAID....136
How do I know a disk has failed?....137
Replacing a hot-plug hard disk 142
After replacing the failed disk....144
If several disks fail....146
Replacing the disks (HP D2D2500 Series)....146
Replacing the disks (HP D2D4300/4100 Series)....148
Creating cartridges (Virtual Tape Devices only)....152
A Extra information for G1 products....153
Overview....153
Major differences....153
VTL devices....153
NAS devices....153
Tape Attach....154
Seeding Virtual Tape Devices using Tape Attach....154
Configuration (Tape Attach)....154
Manual jobs (Tape Attach)....157
Scheduled jobs (Tape Attach)....160
Active Jobs (Tape Attach)....164
Job History (Tape Attach)....165
Glossary....167
About this guide....171
Index....174
1 Getting started
In this chapter:
- Introduction (page 6)
•What is the web management interface (page 6)
•To run the Web Management Interface (page 6) - Initial logon and Welcome message (page 7)
Introduction
This guide contains detailed information on using the HP StoreOnce Backup System Web Management Interface. It also contains troubleshooting information. The following documents are also available:
- HP StoreOnce Backup System Concepts Guide: If you are new to the HP StoreOnce Backup System, it is a good idea to read this guide before you configure your system. It describes the StoreOnce technology.
- HP StoreOnce Backup System Installation and Configuration Guide: This guide describes how to install and carry out the initial configuration of your HP StoreOnce Backup System.
D2D Best Practices for VTL, NAS and Replication implementations: This white paper advises how to plan the workload being placed on the HP StoreOnce Backup System in order to optimize performance and minimize the impact of deduplication, replication and housekeeping operations competing for resources. It is regularly updated.
NOTE: This guide describes mainly how to monitor and configure the HP StoreOnce Backup System using the Web Management Interface. There are other ways of connecting to the appliance using either a system console or the iLO2 management port. See the HP StoreOnce Backup System Installation and Configuration Guide for more information about these options.
What is the Web Management interface?
The Web Management Interface is the main interface for:
• Monitoring the status and health of the HP StoreOnce Backup System and all configured backup devices
- Creating and modifying VTL and NAS StoreOnce backup targets
• Managing replication relationships
- Configuring appliance settings
To run the Web Management Interface
There are two ways of logging on:
• From the host server or PC: Use the desktop shortcut created by the Installation wizard.
- From any machine connected to the network: The HP StoreOnce Backup System uses a secure network connection. Enter https:// followed by the IP address or fully qualified domain name (for example, myhpd2d.mydomain.com) of the HP StoreOnce Backup System into the web browser.
NOTE: If you use http: in the URL, you are automatically forwarded to the https: secure network connection.
The Web Management Interface displays the Login prompt:
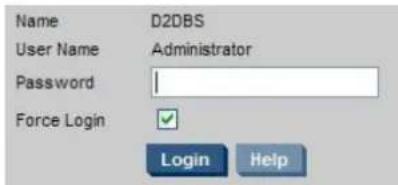
The Login is Administrator with an initial password of Admin.
Both names are case sensitive. The password can subsequently be changed from the User Acc (Administration) (page 82) menu option.
Only one active session is supported. You cannot connect to an HP StoreOnce Backup System somebody else is logged into the Web Management Interface. However, Force Login is enabled by default and this will disconnect an active session.
After a period of 20 minutes of user inactivity the session will time out and return to the Logi screen. It is possible to change this Inactive Logout Time from the User Accounts (Administration page.
NOTE: The web browser used to communicate with the StoreOnce Backup System must have Active Scripting or JavaScript enabled. If it does not, some of the browser buttons may not be displayed.
Initial logon and Welcome message
Initial logon
The first time that you log on after installation you will notice an information message advising that "RAID Parity Initialization" is occurring. This is normal and does not require you to take action. The status will become "OK" as soon initialization completes, but it may take some time
Welcome message
Whenever you upgrade software, there will be a pop-up in the Web Management Interface th summarizes all the changes in this upgrade.
Click Close to close the pop-up. It will be displayed the next time you log onto the Web Management Interface.
Click Don't show again to prevent the pop-up from being displayed again. If you want to view the pop-up again, use the option on the User Account page to re-instate it.
2 Home, Summary
Summary (Home)
Whenever you log in, the Summary page is displayed. It is also accessed from Home in the navigation bar.
Use this page:
• To display information about your HP StoreOnce Backup System and its network connection.
- To find out whether you have a G1 or G2 product (in the Type field). This is important when upgrading software.
• To monitor system health and status.
The following example shows the Summary page for an HP D2D4312 Backup System.
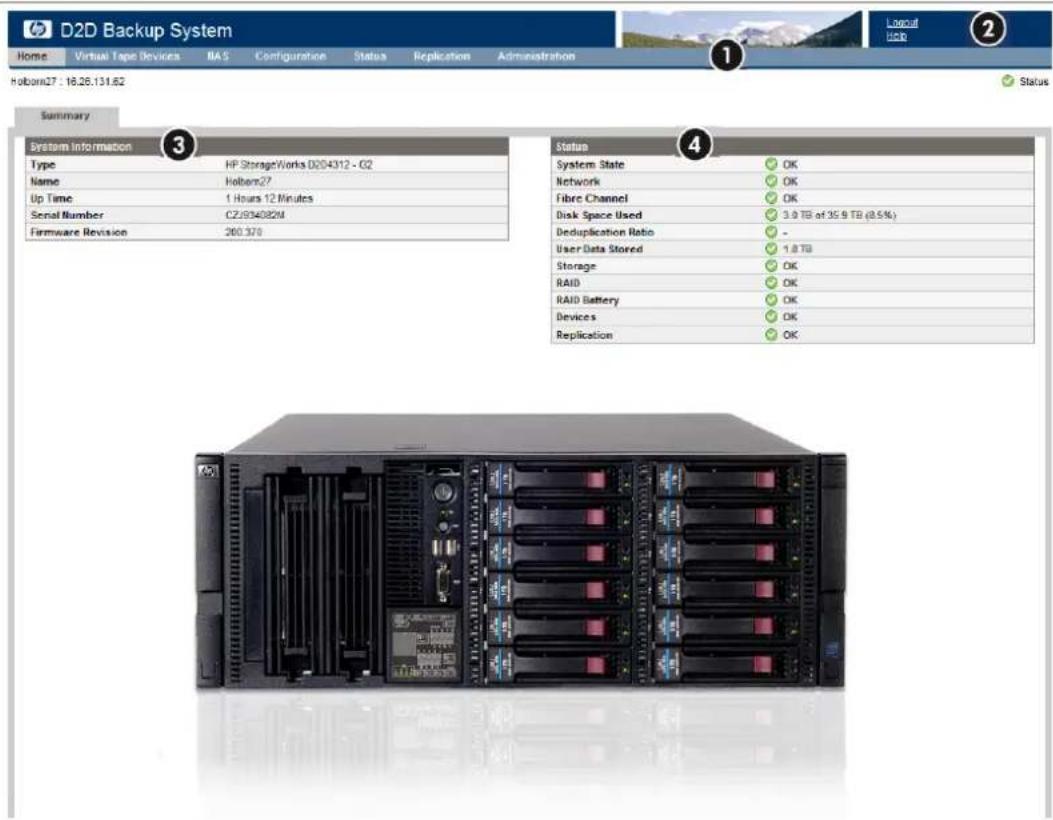
NOTE: If a capacity upgrade kit has been installed, the shelves are also shown on the Summary page. (HP D2D2500 Series products do not support connection of a Capacity Upgrade Kit.)
Table 1 Summary page layout
| Select the appropriate option from the top bar.Navigation bar1 | ||
| 2 | Help and logout | The Help option opens the help pages. This is a context sensitive link that displays help that is appropriate to the currently selected page. Logout closes your session on the HP StoreOnce Backup System. If somebody else logs in, you will be automatically logged out. |
| 3 | StoreOnce Backup System information | This section provides the information that identifies your HP StoreOnce Backup System. It shows the Type (Product Generation), Name, Serial Number and Software Revision of the HP StoreOnce Backup System. .The Up Time records how long the HP StoreOnce Backup System has been running.System State is the overall status of the system and relates to the Status icon four in the top right-hand corner of all pages.Appliance State: shows whether the StoreOnce Backup System is Initialising/Running/Shutting down/Stopping. It also includes any hardware failure indications. |
| Status details4 | This section provides details about overall system status and the status of the network (HP D2D4300 Series) or network ports (all other models), RAID, disk usage, user data stored, deduplication ratio, and any licensed features, such as replication.Additional information is provided if the status is not OK. See also (page 9).Disk Space Used is the amount of disk space that has been used. Deduplication is updated whenever data is written to storage. User Data Stored shows how mu user data has been backed up to unit.Storage is the first place to look to identify any problems with the storage pool (shelves and disks) on HP D2D4100/4300 Series). A failed disk should be replaced as soon as possible. See Hard disk replacement (page 136).RAID and RAID battery are the first place to look to identify any problems with the RAID status and RAID battery. A failed battery should be replaced as soon as possible. See the HP StoreOnce Backup System Maintenance and Service Guide.Devices informs the user of the status of the libraries and NAS shares within the StoreOnce Backup System. After a power up or reset, each device is checked and brought on line. This can take a long time, especially after an unscheduled power fail, where the message will show 'Starting'.Disk Licensing for models that support a Capacity Upgrade Kit will show a warning message if you have not yet provided the licensing information. See License (Administration) (page 94).Replication status is shown if you have licensed and enabled this feature. If you have enabled the Network Time Protocol (from the Date & Time (Status) page), the status of the NTP process is also shown. |
Status icons
Indicates a healthy system or system component. Everything is OK and the system is working correctly.
i Indicates standard information.
Indicates a warning state. Something needs attention but it is not critical to the successful operation of the device. For example, a disk may have failed or disks may be installed in an expansion shelf but not lic
Indicates a critical state. Something needs attention. Investigate immediately.
3 Virtual Tape Devices
The Virtual Tape Devices menu allows you to monitor and configure VTL devices and cartridges. The following options are available.
• Devices (Virtual Tape Devices)
• Backup applications and Replication Target libraries
• Cartridges (Virtual Tape Devices)
These pages allow you to monitor and configure VTL devices. If you are a new user, we strongly recommend that you read the following documents, which are available from the HP web site. They provide a detailed discussion about replication deployment strategies and terminology and include worked examples.
- HP StoreOnce Backup System Concepts Guide: This describes the StoreOnce technology and advises how to plan the workload being placed on the HP StoreOnce Backup System in order to optimize performance and minimize the impact of deduplication, replication and housekeeping operations competing for resources.
D2D Best Practices for VTL, NAS and Replication implementations: This guide describes best practices and also includes examples using different backup applications.
Devices (Virtual Tape Devices)
If using iSCSI to connect your hosts to virtual tape devices, a default library is created automatically when a new host connects to the HP StoreOnce Backup System. Use this page to view and confirm the default library and to create additional devices, if required, for the host.
NOTE: If the HP StoreOnce Backup System is connected to a Fibre Channel network, it is not possible to create a default library for the host automatically during installation. You must use this page to create and configure devices that can be accessed by the host.
The top half of the page shows a list of devices available on the HP StoreOnce Backup System. There is also a Show/Hide Details Box that provides information about the maximum number of libraries/shares and drives available for the emulation type selected, and the actual number of libraries/shares and drives remaining. This is useful because the Summary details for a selected device only show the Maximum values.
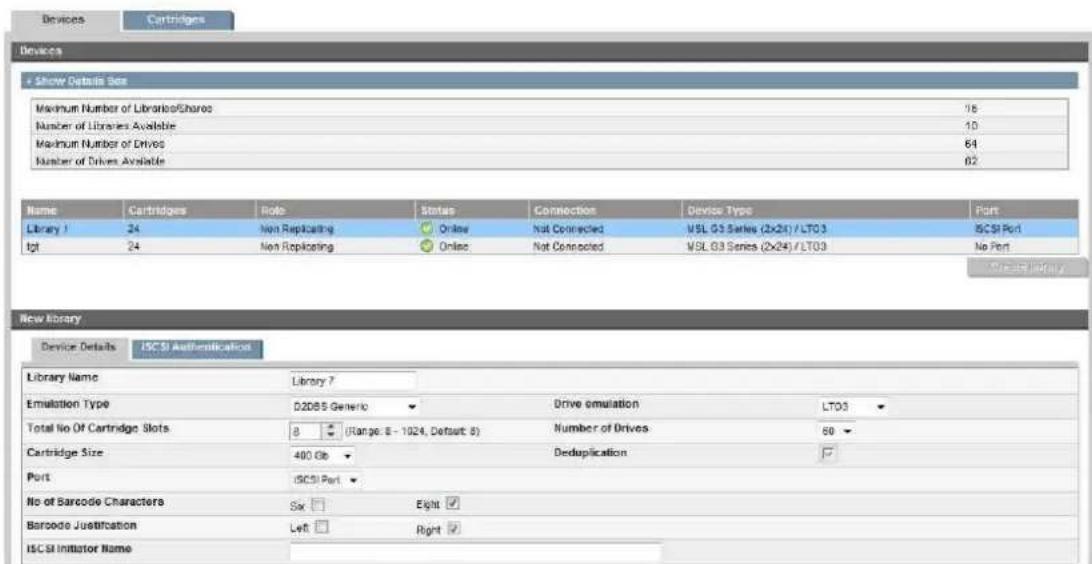
Summary information is provided for each device, as follows:
Table 2 Device parameters (top half of the page)
| Name | This is the name that is used to identify that device (library or autoloader). You may like t enter a name that identifies the host or backup job with which it is associated. |
| Cartridges | This is the number of cartridges available on the device, which is determined by the Emulat Type selected when the device was created. You can reduce the number of slots on this page, but this will only remove the highest blank slots. Once it reaches a slot number that contains data, it will not allow you to reduce the number further on this page, even if ear slots are blank. You must first use the Cartridges tab to make the slot blank. |
| Role | This is the role of the library, which may be non-replicating, replication source or replicatio target. |
| This is the status of the library, which may be online, offline or failed to start.Status | |
| Connection | If a device is shown as not connected, this indicates that the iSCSI Initiator on the host he not logged on.With a FC device, this field shows the connection status of the FC link and its speed: dov 1G, 2G or 4G for HP D2D4100 Series; 2G, 4G or 8G for HP D2D4300 Series). |
| Device Type | This is the emulation type used by the backup software. It is selected during installation or when you create a device. |
| Port | This identifies the port to which the host is connected for backup and restore. The number of ports available in the drop-down menu depends upon your network configuration.There is always an iSCSI port. With the HP D2D4300 Series both the 1–Gb and 10–Gb ports may be used for the iSCSI data connection, but the 10–Gb ports are recommended for data transfer. This is configured on the Network (Configuration) page.FC products have two FC ports on the pre-installed FC card and these are also listed in the Port drop-down menu. |
NOTE: If the StoreOnce D2D Backup system detects a possibly issue with data integrity for a virtual tape library it will immediately set the status of that device to 'failed-to-start' or 'read-on this is to minimize the possibility of any further potential corruption being introduced on the device. If a device enters one of these states it is reported on the GUI. Selecting that device will give some options to attempt to restore the device to a working state. For more details see Recovering devices that have failed to start or have become read-only (page 132).
Emulation types for tape devices
HP StoreOnce Backup Systems emulate a range of physical tape devices, which are listed below
NOTE: Not all products support all emulation types. If the emulation type is not in the dropdown list, it is not supported on your model. For example, HP D2D2500 Series do not support the and EML-e Library emulation types.
D2DBS Generic Library: This is a tape library device which allows you to configure many drives per library and many cartridges per library
° HP D2D2502/2504: up to 16 (HP D2D2502) and 32 (HP D2D2504) drives per libra and up to 96 cartridges per library
° HP D2D4106/4112: up to 64 (HP D2D4106) and 96 (HP D2D4112) drives per library and up to 1024 cartridges per library
- HP D2D4312/4324: up to 200 drives per library and up to 4096 cartridges per library
If it is supported by your backup application, this is the preferred emulation type to be used because it does not emulate any physical library types in existence and is, therefore, clean identifiable as a StoreOnce device. It is the most flexible emulation type available; however, backup application support varies by software vendor.
If you have selected D2DBS Generic for the Library Emulation Type, you will be able to select Ultrium VT for the drive emulation. This is a generic Ultrium device which is clearly identifiable as virtual. Backup application support for Ultrium VT is reasonable, but not quite as complete as the D2DBS library type, so its not possible to use it with all backup software.
NOTE: Symantec prefer their customers to use this emulation type with BackupExec and Netbackup.
- HP 1x8 G2 Autoloader: This is a single Ultrium tape drive autoloader with a maximum of 24 cartridge slots. It should be used for simple rotation schemes where a single backup job is to run at a time. This emulation type is widely supported by backup applications, but mainly of use with the HP D2D2500 Series.
- MSL G3 series (2x24) Library: This is a tape library device with a maximum of two embedded Ultrium tape drives and 24 cartridge slots. It should be used when implementing rotation schemes which involve simultaneous backup jobs to two devices. This emulation type is widely supported by backup applications.
- MSL G3 series (4x48) Library: This is a tape library device with a maximum of four embedded Ultrium tape drives and 48 cartridge slots. It should be used when implementing rotation schemes which involve simultaneous backup jobs to more than two devices or those that use a large number of cartridges devices. This emulation type is widely supported by backup applications.
- MSL G3 series (8x96) Library: This is a tape library device with a maximum of four embedded Ultrium tape drives and 96 cartridge slots.
- ESL-E series Library: This is an enterprise tape solution which allows you to configure many drives per library and many cartridges per library (see values for D2DBS emulation above). Use the Show Details Box at the top of the screen to view maximum details and actual numbers used.
- EML-E series Library: This is an enterprise tape library solution which allows you to configure many drives per library and many cartridges per library (see values for D2DBS emulation above). Use the Show Details Box at the top of the screen to view maximum details for d and libraries and actual numbers used.
Flexible emulation (G2 products only)
If supported, the ESL, EML and D2DBS emulations are particularly flexible because they allow you to configure a large number of drives per library. This has two main benefits:
- It allows for more concurrent streams on backups which are throttled due to host application throughput, such as multi-streamed backups from a database.
- It allows for a single library (and therefore dedupe store) to contain similar data from backups that must run in parallel to increase deduplication ratio.
If using these flexible emulation types, the following factors should also be considered:
Although there are no hard limits on the number of drives that can be configured per library, there are limits on the total number of devices and shares that can be configured on an appliance. If you configure 1 library with 200 drives on an HP D2D4312 Backup System, you will still have 49 libraries available in theory, but you will have no more drives.
- The total value also applies to NAS shares. If you configure the full 250 value as VTL devices, you will not be able to configure any NAS shares for that appliance.
- Please refer to the D2D Best Practices for VTL, NAS and Replication implementations for maximum and recommended values.
NOTE: G1 products do not support flexible emulation; they have fixed values for the above emulation types (some products do not support all emulation types).
Libraries, slots and storage capacity
It is recommended to:
• Only configure the libraries that you need
- Only configure the number of cartridges that you are likely to need
You can add cartridges at a later date to expand the system and remove individual blank car from a library without deleting the whole library, but cannot remove cartridges that have been written to.
Source and target libraries
Target libraries are created if you have a replication license when you create a replication ma Source libraries are always visible to the host; Target libraries are not normally visible to the but you can configure devices to make them visible to backup applications. This feature should used with care because some backup applications will fail if they are able to see duplicate ca barcodes in two libraries simultaneously.
Target libraries for replication may be created with 0 drives.
To view device details
Click on a device in the top half of the page to view its details in the bottom half of the page where you can also edit and delete details. There are three tabs with device information. See Device tabs (page 13).
To create a new device
- To create a new device for the host, click on Create library.
- Enter the appropriate details in the Libraries tab and click Create. There is also a tab to enable and configure iSCSI Authentication, if this is required. Any information you enter on this to must match the information that you have configured in the iSCSI Initiator itself. (See the StoreOnce Backup System Installation and Configuration Guide for more information c configuring the iSCSI initiator.)
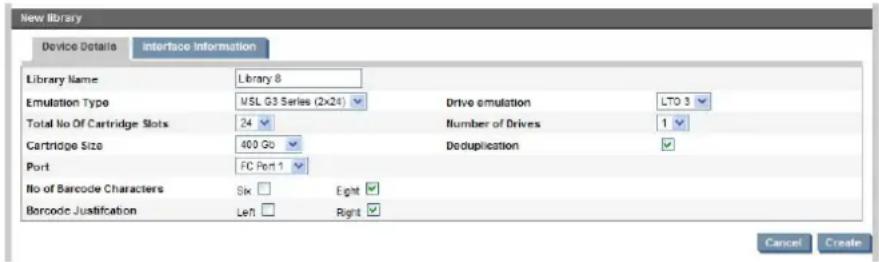
Table 3 Device tabs (lower half of the page)
| Libraries tab | |
| Library Name | This is the name that is used to identify that device. You may like to enter a name that identifies the host or backup job with which it is associated. |
| Emulation Type | This is the emulation type used by the backup software. The HP StoreOnce Backup System supports a number of emulation types, see (page 11). The emulation type determines how many embedded drives and cartridge slots are available. For example, if you select HP MS G3 Series (2x24), the device will emulate an MSL 2024 Library with two embedded tape drives and a possible total of 24 cartridge slots. Consult your backup application technical support information for further details. |
| Drive Emulation | By selecting a drive emulation type, HP LTO-2, 3, 4 or 5, you set only the default capacity of the cartridges within the library device. (LTO-2 = 200 GB, LTO-3 = 400 GB, LTO-4 = 800 GB, LTO-5 = 1.6 GB.) It does not affect the ability of the backup application to writeto the device and tape cartridge capacities can be increased at any time (but not decreased), as long as the cartridge is blank, regardless of the drive generation number.If you have selected D2DBS Generic for the Library Emulation Type, you will be able to select Ultrium VT for the drive emulation. This is a generic Ultrium device which is clearly identifiable as virtual. Backup application support for Ultrium VT is reasonable, but not quite as complete as the D2DBS library type, so its not possible to use it with all backup software. |
| Total No of Cartridgeslots: | This is where you define the number of slots that you require for your tape rotation strategy.The number of slots available depends upon the Emulation Type that you have selected.Each slot will be automatically populated with a new cartridge upon creation whose capacity is appropriate to the Drive Emulation type.You can change the maximum size of the cartridge as long as it is blank. This means that you can only change the value immediately after the device is created and before it has been accessed by the backup application. |
| Number of drives: | The default number of drives is determined by the Emulation Type that you have selected. If you increase the number of drives be careful not to exceed the maximum number of libraries and drives that a host can physically access. (64 for iSCSI interfaces and 128 for FC interfaces.) |
| Deduplication: | Data deduplication is enabled by default for the library device. It is not possible to disable deduplication on any HP StoreOnce G2 Backup System. |
| Port: | This identifies the network port on the HP StoreOnce Backup System to which the device is connected. This will be the port used for the Library device as well as the default port for embedded tape drives. The choices in the drop-down menu depend upon your network configuration. There are up to two iSCSI ports (this depends upon your network mode), and two FC ports if you have the FC model. FC users may choose to connect the device to an iSCSI or a FC port. It is possible to change the tape device ports after creation. |
| No of BarcodeCharacters: | The HP StoreOnce Backup System generates barcodes automatically for cartridges. This option allows you to select whether the barcodes should have six or eight characters. When the user selects 6-character barcodes this is not reflected on the Web Management Interface, which will still show 8-character barcodes. However, when a backup application runs an inventory command it will only see 6-character barcodes. |
| Barcode Justification: | This option allows you to specify which six characters are reported to the backup application when using 6-character barcodes. The six characters that are reported to the backup application are determined by whether the justify option is set to left or right. Setting it to left justify will mean that the first 6 characters of the barcode will be reported to the backup application, right justify will report the last 6 characters. Note that using left justify may result in the backup application seeing barcodes that appear to be duplicates. |
| iSCSI Initiator Name:(iSCSI devices only) | This is the Initiator Node Name of the host that will back up to this device. It is provided automatically for the default library that is created when you run the Installation wizard on a host for a first time. But you must enter it manually if you are creating a new device on this page. If you are using the Microsoft iSCSI Initiator, you can find the name by running the iSCSI Initiator on the host and copying the Initiator Node Name from the General tab. |
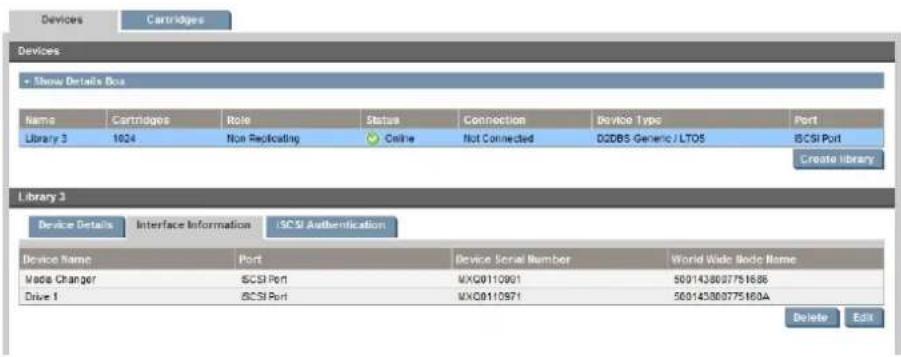
Table 4 Device tabs continued (lower half of the page)
| Interface Information tab | |
| Device Name | This is the device name, such as Medium Changer or Drive 1. There will be an entry for each drive that is appropriate for the selected emulation type. |
| Device Serial Number | This is a unique serial number for the device. It is generated automatically by the HPStoreOn Backup System and cannot be edited. |
| World Wide Node Name | This is provided during manufacturing for all possible devices. You can change this, if necessary, but not to any names that are in use by libraries or drives on the local appliance. |
| World Wide Port Name | This is generated automatically by the HP StoreOnce Backup System for FC devices. You can change this, if necessary, but not to any names that are in use by libraries or drives the local appliance. |
| Port | If the library is FC attached, you can choose which port each drive is on using this selection. |
| iSCSI Authentication tab (iSCSI devices only) | |
| Require initiator to logcheck this box if you require the initiator to logon. You must also provide the Initiator CH, user name and secret. | |
| Initiator CHAP User Name | This should be the same CHAP user name that you configure for the target on the iSCSI Initiator. (On the Microsoft iSCSI Initiator, this is the User Name as it is configured on the Targets tab in the Log On to Target Advanced Settings.) |
| Initiator CHAP Secret | This should be the same CHAP secret that you configure for the target on the iSCSI Initiatc (On the Microsoft iSCSI Initiator, this is the Target Secret as it is configured on the Targets tab in the Log On to Target Advanced Settings.) |
| Target required to logcheck this box if you require mutual CHAP authentication, which means that the target must also log on to the initiator. You must also provide the target CHAP user name and secret. On the iSCSI Initiator you must also make sure that mutual authentication is enabled. (On the Microsoft iSCSI Initiator, make sure Perform mutual authentication is checked on the Targets tab in the Log On to Target Advanced Settings.) | |
| Target CHAP User Name | This may be any meaningful CHAP user name. It does not need to match any information on the iSCSI Initiator. |
| Target CHAP Secret | This should be the same CHAP Secret that you configure for the target on the iSCSI Initiatc (On the Microsoft iSCSI Initiator, this is the Secret as it is configured from the General tab |
NOTE: For more information about configuring the Microsoft iSCSI Initiator see the HP StoreOnce Backup System Installation and Configuration Guide.
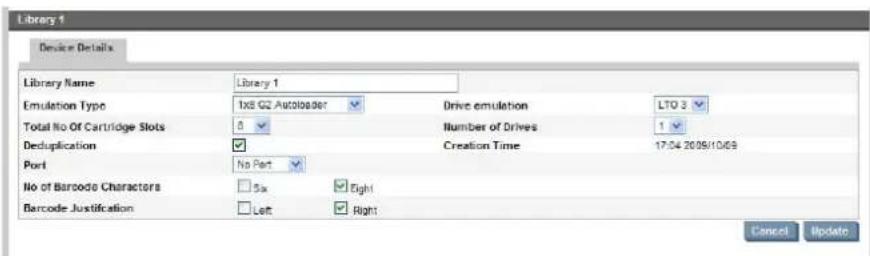
To edit device details
It is possible to edit some, but not all, device details after creating a device. In particular, yo should be aware of the following:
- You can delete cartridges by reducing the number of slots on the Devices page, but this will only remove the highest—numbered blank slots. Once the Delete operation reaches a slot number that contains data, it will not allow you to reduce the number further on the Deta page, even if earlier slots are blank. You must first use the Cartridges tab to make the sl blank.
- If you change the cartridge size on this page, this will only change newly-added cartridges; it does not change the size of cartridges that have already been created.
- You can reduce the number of drives but, if you go to 0, the port setting will go to "No Port".
-
You cannot change the library type to a type that has a smaller set of maximum values (e.g. number of cartridges) than is currently set.
-
Select the device in the list to display its details and then click on Edit.
-
Amend details as appropriate and click Update to apply them. The information for the Interface Information tab is generated automatically and cannot be changed.
To delete a device
Select the required device and then click on Delete in the Details section to delete it. You will be prompted to confirm that this is what you wish to do.
!
WARNING! All data on the device will be deleted. The library's deduplication store is also deleted. It may take up to 15 minutes to delete all the files and free space on the HP StoreOnce Backup System.
Making Replication Target libraries visible to the host
NOTE: See Replication (page 58) for more details on replication configuration.
Replication Target libraries are not normally visible to the host, but you can configure devices to make them visible to backup applications. This allows the backup application to:
- Move cartridges from storage slots to drives in the library
•Perform SCSI commands on the library device - Perform read and verify operations on the cartridge (but not write)
•Perform load/unload operations on the tape device
!
WARNING! This facility should be used with care. If the backup application can see both source and target libraries, it will not be able to distinguish between the source library and the target library because the barcodes are duplicated in the two locations.
Why make target libraries visible?
There are two occasions when it may be useful to make a target library visible to the backup application on the host.
- To confirm that replication is working correctly and check the integrity of the replicated backup by doing a test restore
•To perform manual tape copy jobs to any tape device on the network using the backup application
!
IMPORTANT: You cannot change data on a Target library cartridge; you may only load it temporarily into a physical tape device to read it.
Best practices for using this feature
△
WARNING! If you do not follow these best practices, unstable and possibly damaging results may occur. Cartridges may be marked as unusable or the backup application may attempt to target cartridges.
- Ensure that no replication jobs to the selected target cartridge are in progress
- Ideally check that no backup jobs to the mapped source cartridges are scheduled
- Ensure that the backup application media server instance to be used is not within the same cell/domain that can access the source cartridge
- Import the data on the target cartridge into the backup application (this operation must be repeated after each replicate operation to the cartridge)
- Perform the desired operation on the cartridge, which may be:
- Verify the cartridge using the backup application either using a verify command or by performing a restore
- Copy the cartridge to a physical tape device connected to the media server
How is a target library made visible?
-
Create the replication mapping, as normal. See Running the replication wizard (NAS) (page 69) or Running the replication wizard (virtual tape devices) (page 61), as appropriate.
-
From the host that has access to the target library, on the Virtual Tape Devices-Devices page select the target library in the Devices list.
-
Click Edit.
-
The Port defaults to None. Select an iSCSI or FC port, as appropriate.
-
If you have selected an iSCSI port, enter the iSCSI Initiator Name.
-
Click Update.
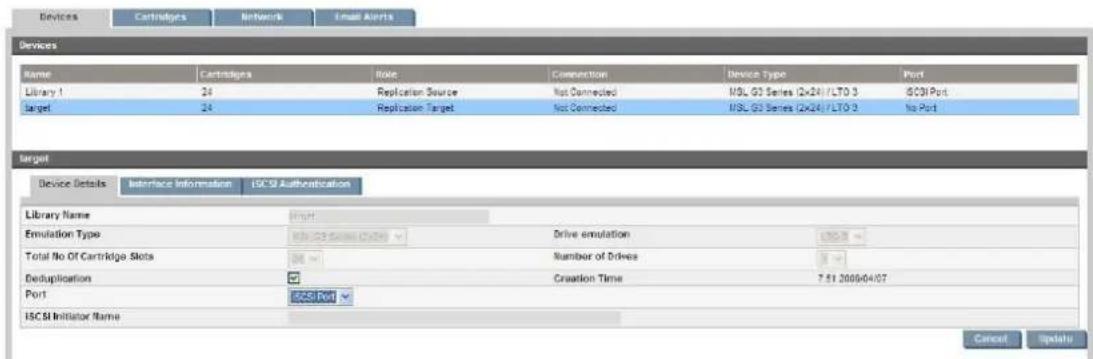
- Now you can make the target library visible from other hosts. For iSCSI devices, log on to target library using the ISCSI Initiator. For FC devices, configure the FC fabric to make the host visible. Target visibility persists even if the power fails or if the replication mapping is removed.
NOTE: To remove target visibility, simply reset the Port to None. You will lose the iSCSI Initiator Node Name and must reenter it to reinstate target visibility.
Cartridges (Virtual Tape Devices)
Use this page to view and configure cartridge settings. The number of slots configured on the Devices page for a library determines the number of cartridge rows that are available to edit on this page.
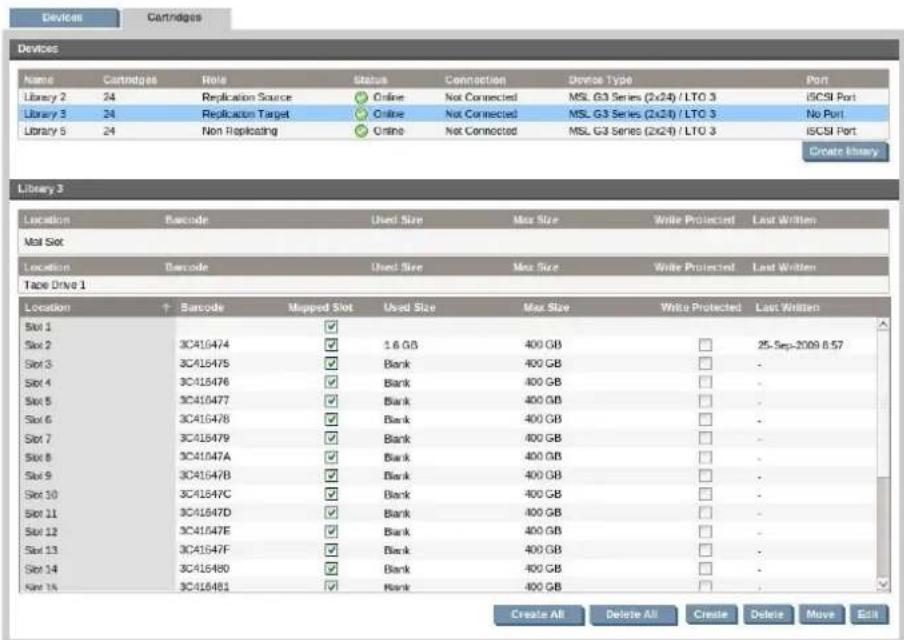
Table 5 Cartridge parameters
| Location: | The Location column identifies each element of the library that is available to hold a cartridge. There are three types of element:Mail slot: which is a dedicated slot that is used to hold a cartridge that is ready for exporting to or importing from physical tape. Cartridges are moved into the mail slot by the backup application on the host machine, but there is also a Move Cartridge drop-down menu in Edit mode.Tape drive: which is populated when there is activity on a cartridge. You can also move a cartridge into a tape drive by using the Move Cartridge drop-down menu in Edit mode.Slot n: which is one of the standard library slots |
| Barcode: | A barcode is an 8- or 6-digit, alphanumeric, unique identifier for a cartridge within the HP StoreOnce Backup System. Barcodes are shared with the backup application, if requested. The backup application may also choose to assign its own internal identifier to the cartridge but, if it does so, it cannot assign this identifier to the Cartridge ba code.Barcodes are generated automatically but may be edited by the user. If you choose to edit the barcode:It must be unique and must not start with the letters "CLN" or "DG" because these are reserved designations for cleaning and diagnostic cartridges.It should be a minimum of 4 characters. Valid ASCII characters are A-Z, a-z, 0-9, space and hyphen. Anything less than 8 characters will be appended with space characters. |
| Mapped Slot: | This checkbox indicates whether the slot is included in a replication mapping configuration. It cannot be edited from this page. |
| Used Size: | This shows the actual used capacity in MB or GB. If this is Blank, the cartridge may be deleted using the delete icon, see below. Non-blank cartridges cannot be removed so the Remove button will not be shown. Only Blank cartridges can be removed from the mail slot. |
| Max Size: | This defaults to the appropriate capacity for the drive emulation type selected on the Devices tab. This value may be changed if the Used Size is Blank, see below. The maximum value allowed is 3200 GB. |
| Write Protected: | This is a check box that allows you to enable (checked) and disable (unchecked) write protection, see below. |
| Move Cartridge: | This drop-down list is displayed in Edit mode and allows you to move the cartridge to an empty (blank) slot, mail slot or tape drive. |
| Last Written: | This tells you when the cartridge was last written to and is useful when identifying data for copying or exporting. |
Empty slots
Empty slots are slots that contain no cartridges; all the fields are empty.
- Tape drive row: A library consists of two devices; a tape drive and changer device. This location refers to the tape drive element of the library. It is normally only populated when backup application on the host is writing to or reading from the library.
- Mail slot row: This location refers to the slot that is used for importing and exporting data to a physically attached tape drive. It is not used with G2 products.
- Numbered slot row: This slot is empty after a Delete operation or after the backup application has moved data to the mail slot for export.
Once a numbered slot is empty, the Create button may be used to create a new, blank cart. See (page 20).
To delete a cartridge
If the Used Size of a cartridge is Blank, you will be able to remove it.
Click on the Delete button. There is a new right-hand column, Delete Cartridge.
You can select individual slots by clicking in the appropriate checkboxes. When you have sele the slots where cartridges should be deleted, click Delete. If the Used Size is not Blank, you can still remove it but only space that is occupied by unique data will be freed up.
Alternatively, click Delete All to delete all the cartridges in the library.
NOTE: You can also delete cartridges by reducing the number of slots on the Devices page, but this will only remove the highest blank slots. Once the Delete operation reaches a slot number contains data, it will not allow you to reduce the number further on the Details page, even if slots are blank. You must first use the Cartridges tab to make the slot blank.
To write protect a cartridge
Click Edit for the appropriate cartridge. Check the Write Protected check box for the cartridge. Your backup application will not be able to write any more data to it.

To edit maximum cartridge size
The only times you can resize cartridges are when you first create a library or when you add cartridges and they are blank. Once the cartridges are made available to the backup applicat it formats them ready for use and they are no longer blank, even if you have not yet written to them. Similarly, the erase function on most backup applications does not return the cartridge a completely blank state.
The Max Size defaults to the appropriate capacity for the drive emulation type selected on the Devices tab, but if the Used Size is Blank, you can edit this value. The maximum value allowed is 3200 GB.
Click Edit for the appropriate slot. Select a value from the drop-down menu and click Update.
NOTE: The maximum size indicates the maximum amount of user data that can be written to that cartridge, assuming uncompressed data; it will only be committed when data is written to it. Changing the maximum space does not affect actual disk usage or save disk space, but may be useful if you know you will be moving data to a physical tape with a smaller cartridge capacity.
To create a cartridge
Click on the Create button. There is a new right-hand column, Add Cartridge. Slots that are empty have a checkbox in this column.
You can select individual slots by clicking in the appropriate checkboxes. When you have selected the slots where cartridges should be added, click Create.
Alternatively, click Create all to create a blank cartridge of the size/emulation type selected when the library was first configured in all empty slots.
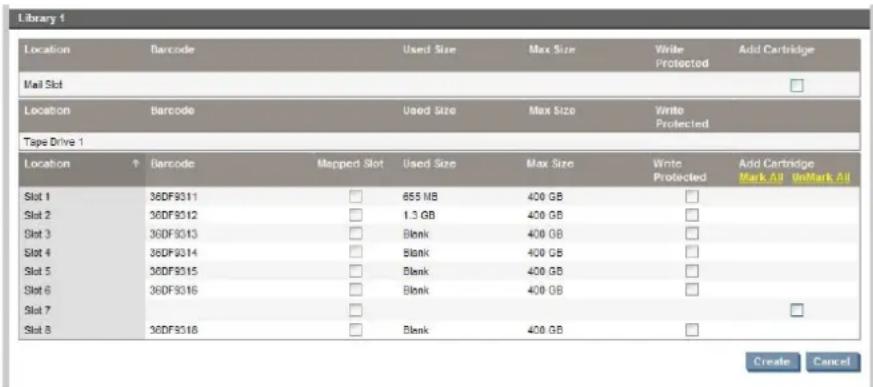
- If you create a cartridge in an empty slot, the backup application needs to inventory it (add it to its database or catalog) before it can access it.
- If you create a cartridge in an empty mail slot, you can use the backup application to move the blank, new cartridge to an empty cartridge slot, without having to run an inventory. This saves some processing time.
You may need to restart your backup application services to see the new cartridges.
To move or unload cartridges
The ability to move cartridges is provided, but only to an empty Location (tape drive or numbered slot).
Click on the Move button. There is a right-hand column, Move Cartridge. The Move Cartridge drop-down menu lists available empty slots. (Empty numbered slots are created if you delete a cartridge.)
Use the Unload all Cartridges button to return all cartridges to their slots.
The move and unload options are unlikely to be required very often, but may be useful if the use needs to re-align their library configuration against their backup application should they become out of sync, perhaps because the backup application has crashed, or if the backup application does not support the Move Medium command.
4 NAS
The NAS menu allows you to monitor and configure NAS shares. The following options are available.
•Shares (NAS)
•CIFS Server (NAS)
- Configuring users on AD (CIFS shares only)
•NFS Server (NAS)
These pages allow you to monitor and configure NAS shares. If you are a new user, we stro recommend that you read the following documents, which are available from the HP web site. They provide a detailed discussion about replication deployment strategies and terminology and include worked examples.
- HP StoreOnce Backup System Concepts Guide: This describes the StoreOnce technology and advises how to plan the workload being placed on the HP StoreOnce Backup System in order to optimize performance and minimize the impact of deduplication, replication and housekeeping operations competing for resources.
D2D Best Practices for VTL, NAS and Replication implementations: This guide describes best practices and also includes examples using different backup applications.
Shares (NAS)
This tab is used to manage all NAS target devices (referred to as shares) for both CIFS and servers.
NOTE: It is important to understand that the HP StoreOnce network share is intended to be used ONLY by backup applications that "back up to disk". Do not use the NAS target device as drag-and-drop general file store. The one exception to this rule is if you are using the NAS sl to seed an appliance for replication.
Creating NAS shares
The process varies slightly depending upon whether you are creating a CIFS or NFS share, se
- Creating a CIFS share (page 23)
•(page 31)
Editing share details
An existing NAS share may be edited to alter any of its parameters.
- Select the share on the Shares tab and click Edit.
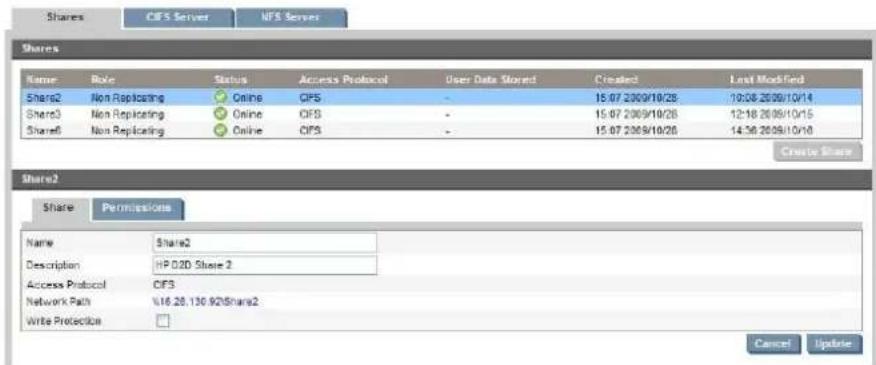
- Make the required changes and click Update. When the changes are applied they will take effect immediately. If the NAS server (service) needs to restart, there will be a warning provid to the user, which they can accept to allow all shares to temporarily go offline. Note that yc cannot change the share name once it has been created.
If a share is converted from Read/Write to Read Only, any open items will be force closed which may result in inconsistencies if they are being written to by a backup application. The user will be warned that this could occur before the change is made.
Configuring NAS targets for CIFS
HP StoreOnce Backup Systems provide a CIFS interface in order to provide shares that are accessible to Windows servers.
There are two configuration stages when creating a file share that Windows users can access; both stages are implemented from the Web Management Interface:
- Configure authentication for the StoreOnce Backup System CIFS server, these settings then apply to all CIFS shares.
- Create NAS CIFS shares on the HP StoreOnce Backup System
Configuring the CIFS server
- Log on to the Web Management Interface for the appliance.
- Select NAS.
- Select the CIFS Server tab. The CIFS server name is the same as the name of the HP StoreC Backup System device.
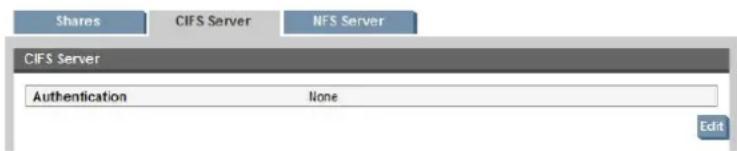
- Click Edit to modify the authentication settings.
There are three authentication options that provide different levels of security for CIFS NAS shares. Before configuring the settings, make sure you know which is appropriate for your network and any extra information that may be needed during configuration. None (default), User, and Windows Active Directory. See the next section for examples and more information about CIFS authentication.
- Make changes, as required and click Update. Refer to the next section for worked examples for the various Authentication types.
NOTE: When switching authentication modes the user must log out and back into the Windows client before the new authentication settings will work.
Table 6 Authentication settings
| No authentication | Setting authentication to None provides a simple CIFS server configuration that allows for the creation of shares with no protection. All users can access the shares created on the HP StoreOnce Backup System with this authentication setting. |
| User authentication | Setting authentication to user provides a method of securing the CIFS shares so that they can be accessed only by specified “local” users. Once the server has been set to User mode, it is possible to create new local users by selecting Create User and providing a username and password. These users can then be individually allowed to access any of the shares that are created.NOTE: When creating a new share in User Authentication mode, the user must log out into Windows before they can access the newly created share. |
| Active Directory (AD) authentication | Setting authentication to AD allows the CIFS server to join a Windows Active Directory of Access to individual CIFS shares is then managed from the Windows domain controller se can provide the names of domain users that will have access. See Configuring users on AD (CIFS shares only) (page 24) for detailed instructions. |
Creating a CIFS share
Procedure 1
- Log on to the Web Management Interface for the appliance.
- Select NAS and display the Shares tab. This tab is used to manage all shares for both CIFS and NFS servers.
- Click Create Share.
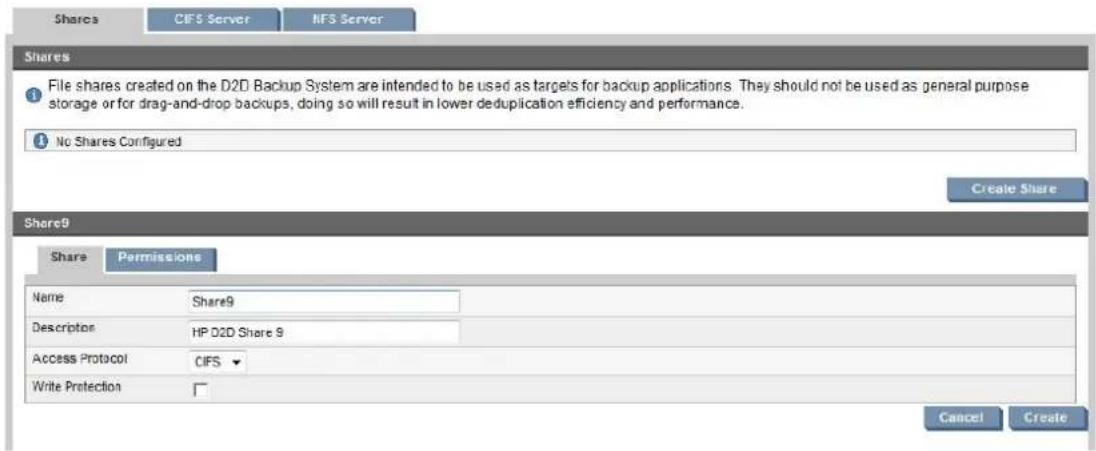
- Provide the following information:
• Name: the name that will be used to identify the share in Windows
•Description: a text description of the share (optional)
•Access Protocol: Select CIFS
The Network Path is
There is also an option to enable Write Protection. This should only be used if you want to prevent further backup to the share. If you enable it, any backup jobs currently using that share will fail.
- If using User Authentication, select the Permissions tab, this will show the list of users available on the server who can be assigned access to NAS target devices. You may amend permission for individual NAS target devices.
If required, click Edit to amend the permissions for the NAS target device. Check the appropriate Access box and click Update.
NOTE: If using AD Authentication, please refer to Configuring users on AD (CIFS shares only) (page 24).
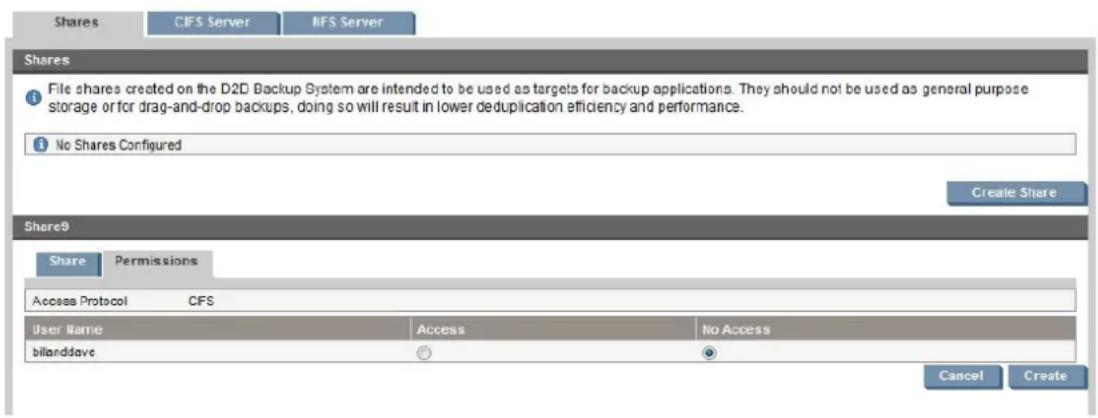
NOTE: You will need to log out and back into Windows before you can access the newly created share because you have changed the default Permissions.
- The NAS target device is now available as a network drive and you can target it from the backup application. It can also be mapped as a network drive in Windows.
NOTE: The NAS target device is not optimized for general purpose file storage. The HP StoreOnce Backup System is a NAS deduplicating appliance that is optimized for backup.
Connecting to the NAS target device on Windows
To access the NAS target device from a Windows server on the network, enter the
NOTE: If the StoreOnce D2D Backup system detects a possibly issue with data integrity for a Share it will immediately set the status of that device to 'failed-to-start' or 'read-only', this is to minimize the possibility of any further potential corruption being introduced on the device. If a device enters one of these states it is reported on the GUI and selecting that device will give you some options to attempt to restore the device to a working state. For more details see Recovering devices that have failed to start or have become read-only (page 132).
Configuring users on AD (CIFS shares only)
Prerequisites
•Domain Controller running:
Windows server 2003°
- Windows server 2003 R2
- Windows server 2008
-
Windows server 2008 R2
-
User account on Domain Controller with authority to add computers to AD
-
User account on server running DNS to add entries
-
The StoreOnce Backup System hostname MUST contain 15 characters or less. If this is not the case, it must be changed before attempting to join the domain.
- The system time on the StoreOnce Backup System must be correct and in sync with that of the domain controller. Using the NTP mode on the StoreOnce Backup System to synchronize with a time server is a good way to ensure accurate time keeping. See Date and Time (Administration) (page 85).
!
IMPORTANT: AD Domain Support: StoreOnce products support configuration in a multi-domain tree forest but does not support multi forest domain topologies.
Adding the StoreOnce device to an AD Domain
In order to join a domain:
Procedure 2
- Connect to the StoreOnce Web Management Interface and navigate to the NAS - CIFS \$ page
- Select the Edit button and choose AD from the drop-down menu.
NOTE: In some configurations the Active Directory Domain Controller requires that an entry for the server name is created before the device can be added to the domain.
- Provide the name of the domain that you wish to join e.g "mydomain.local"
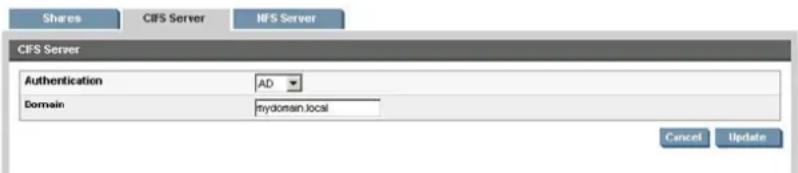
- Select Update. If the domain controller is found, a popup box will request credentials of a user with permission to join the domain. (Note that joining or leaving the domain will result in failure of any backup or restore operations that are currently running.)
- Provide credentials (username and password) of a domain user who has permission to add computers to the domain and select Register.
- After a short delay the computer will become a member of the domain.
- After joining the domain, the DNS server should be automatically updated (if a DHCP server is used) with Forward and Reverse Lookup zone entries, however, some DNS configurations do not allow this. In this case, or if a DHCP is not used on the network, the user must configure the domain's DNS server to be able to correctly manage the D2D shares, as described below.
To configure entries manually if the DNS server does not update automatically
From a Windows client server that has domain and DNS management tools installed launch the DNS Management Tool. (From the command line type dnsmgmt.msc or launch DNS from the Administrative Tools menu).
Create a new Host(A) record in the forward lookup zone for the domain to which the D2D B System belongs with the hostname and IP address of the D2D Backup System.
![disngmt - [DNS:\EDGWARE\Forward Lookup Zones\mydomain.local] File Action View Window Help DNS EDGWARE Forward Lookup Zones _mds.dns.mydomain.local mydomain.local _mds.dns _sites _tcp _udp _DomainDnsZones _ForestDnsZones Reverse Lookup Zones Event Viewer mydomain.local 12 record(s) Name Type Data msdcs _sites _tcp _udp _DomainD ForestrDr (same as (same as (same as edgware heathroa New Host Name (uses parent domain name if blank): d2d-mvq011096w Fully quolified domain name (FQDN): d2d-mvq011096w.mydomain.local. address: 132 .160 0 .110 Create associated pointer (PTR) record Allow any authenticated user to update DNS records with the same owner name Add Host Cancel](/content/2026/05/975286/images/fd7641b1ecdbb6cfebb3db279838f2aee41d862c9a12f596d35a84c09b9a5684.jpg)
Also create a Pointer(PTR) in the reverse lookup zone for the domain for the D2D Backup System by providing the hostname and IP address.
![dramgmt - [DNS:EDGWARE\Reverse Lookup Zones\192.160.0.x Subnet] File Action View Window Help DNS EDGWARE Forward Lookup Zones _nscds.mydomain.local mydomain.local _nscds _stos _tcp _udp DomainDnsZones ForestDnsZones Reverse Lookup Zones 192.160.0.x Subnet Event Viewer 192.160.0.x Subnet ( record(s) Name Type Data (same as parent folder) Start of Authority (SOA) [7], edgware.mydomain.loc... (same as parent folder) None Server (NS) edgware.mydomain.local. 192.168.0.: Pointer (PTR) edgware.mydomain.local. New Resource Record Pointer (PTR) Host IP number: 192.168.0 110 Fully qualified domain name (FQDN): 113.0.150.192.in-sddk.orpa Host name: d2d-mxcg011096w.mydomain.local Browse... Allow any authenticated user to update all DNS records with the same name. This setting applies only to DNS records for a new name. OK Cancel](/content/2026/05/975286/images/bb1d5b8fb465c8f6c60e37492f11b8c12217338c17103d5c640acb07739e7c19.jpg)
Creating shares and granting access permission
Now that the HP StoreOnce Backup System is part of a domain and can be managed, it is positive to create shares and grant access permission to them for domain account users or groups.
- Firstly create a share on the Backup System that is going to be used as a backup target, by selecting NAS — Shares from the Web Management Interface and clicking Create.
- Provide a share name and description, then select the CIFS protocol and click Create.
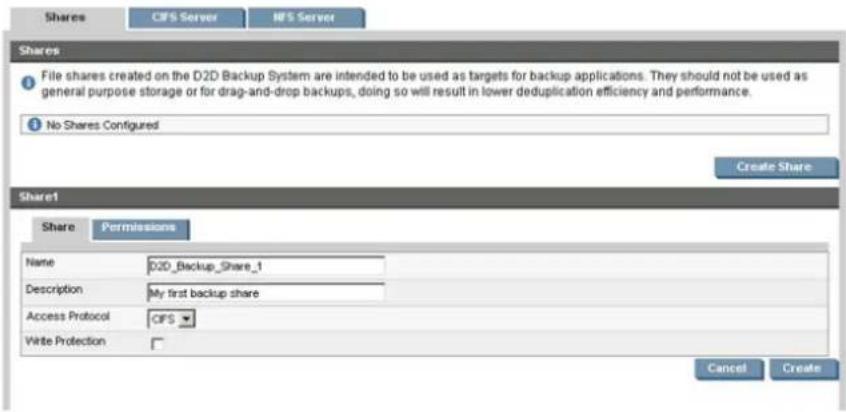
- Now that the D2D Backup System is a member of the domain its shares can be managed from any computer on the domain by configuring a customized Microsoft Management Con (MMC) with the Shared Folders snap-in. To do this first open a new MMC window by type mmc at the command prompt or from the Start Search box. This will launch a new empty window.
![Console1 - [Console Root] File Action View Favorites Window Help Console Root Name There are no items to show in this view. Actions Console Root More Actions](/content/2026/05/975286/images/14336876ff6c1b40c66350d8f639ccee0702ec219a27c4ca02de1e1d9c65fa13.jpg)
- To this empty MMC window add the Shared Folders snap-in. Select File — Add/Remove Snap-in ..., then select Shared Folders from the left-hand pane.
![Console1 - [Console Root] File Action View Favorites Window Help Add or Remove Snap-ins You can select snap-ins for this console from those available on your computer and configure the selected set of snap-ins. For extensible snap-ins, you can configure which extensions are enabled. Available snap-ins: Snap-in Vendor Security Configurati... Microsoft Cor... Security Templates Microsoft Cor... Server Manager Microsoft Cor... Services Microsoft Cor... Share and Storage ... Microsoft Cor... Shared Folders Microsoft Cor... Storage Explorer Microsoft Cor... Task Scheduler Microsoft Cor... Telephony Microsoft Cor... TPM Management Microsoft Cor... Windows Firewall wit... Microsoft Cor... Windows Server Bac... Microsoft Cor... WMI Control Microsoft Cor... Add > Selected snap-ins: Console Root Edit Extensions... Remove Move Up Move Down Advanced... Description: Displays shared folders, current sessions, and open files. OK Cancel](/content/2026/05/975286/images/3784f652e11656208e902e6c3ecfe37c35071d2b08681e05f81dd2150dd6227a.jpg)
- Click Add > and in the dialog box choose the computer to be managed and select Shares from the View options.
![Console1 - [Console Root] File Action View Favorites Window Help Add or Remove Snap-ins Shared Folders Select the computer you want this snap-in to manage. This snap-in will always manage: Local computer: (the computer this console is running on) Another computer: hp-czj020039q.mycompany.local Browse... Allow the selected computer to be changed when launching from the command line. This only applies if you save the console. View All Sessions Shares Open Files < Back Finish Cancel of snap-ins. For Edit Extensions... Remove Move Up Move Down Advanced... Displays shared folders, current sessions, and open files. OK Cancel](/content/2026/05/975286/images/4372cbe5111819fdd2aa6c5c428fa6dac14a583fd55a99cb58aeb2dee915bc79.jpg)
- Click Finish and OK to complete the snap-in set up.
![Console1 - [Console Root\Shares (\\hp-czj020039q.mycompany.local)] File Action View Favorites Window Help Console Root Shares (\\hp-czj020039q.mycompany Share Name Folder Path Type # Client Conn... Description BackupShare1 C:\tmp\nas\mountp... Windows 0 File Server 1 Backup C$ C:\wcfs Windows 0 Default Share DPBackupShare1 C:\tmp\nas\mountp... Windows 0 HP D2D Share 3 IPC$ C:\ Windows 0 Remote IPC NEWBackupShare1 C:\tmp\nas\mountp... Windows 0 Migrated Data Share Actions Shares (...) More ... >](/content/2026/05/975286/images/e81f3716d4eb24e460163915a0648f7da93de330e315027996bda2eaba86c512.jpg)
Note that the Folder Path field contains an internal path on the D2D Backup System.
- Save this customized snap-in for future use.
- Select the Share Permissions tab and Add a user or group of users from the domain. Specify the level of permission that the users will receive and click Apply.
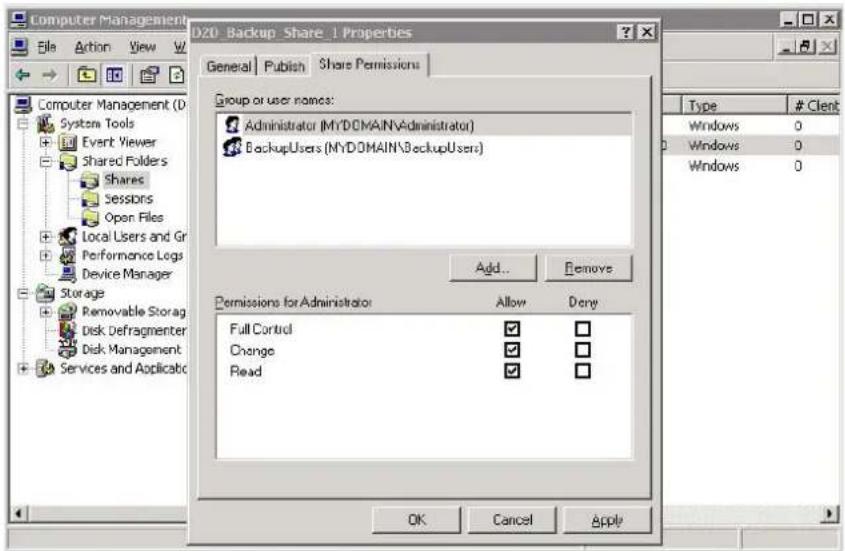
- Now from any Windows server on the domain it is possible to access the newly created s using the credentials of anyone who had been given permission to access the share. If a permitted user is logged into Windows, access to the share will be granted automatically those permissions.
NOTE: In some cases, when switching the StoreOnce Backup System from No Authentication or User Authentication mode to AD mode, it may be necessary to log out and back into Windows client before it is possible to access the shares.
Leaving an AD Domain
The user may wish to Leave and AD domain in order to:
•Temporarily Leave then Rejoin the same domain
- Join a different AD Domain
- Put the StoreOnce Backup System into either No Authentication or Local User Authentication modes.
If you need to leave then rejoin the domain, use the Leave AD option on the NAS—CIFS Server
Web Management Interface; you can then rejoin the same domain. If joining a different AD domo or changing mode, select the Edit button on the page and select the new domain or mode.
In either case you will first be prompted to provide credentials of a user with authority to leave the domain. If incorrect credentials are supplied the StoreOnce Backup System will reconfigure its own authentication mode, but will not correctly inform the domain controller that the computer has left the domain.
Configuring NAS shares for NFS
HP StoreOnce Backup Systems provide an NFS interface that allows you to configure the HP StoreOnce Backup System with NFS file shares as target for backups from UNIX and Linux servers. There are two configuration stages when creating a file share that UNIX and Linux users can acc both are stages implemented from the Web Management Interface:
•Create a list of NFS hosts that can mount the NFS shares
- Create NFS NAS shares on the StoreOnce Backup System and specify access permissions for list of hosts
Specifying NFS hosts
- Log on to the Web Management Interface for the appliance.
- Select NAS.
- Select the NFS Server tab.
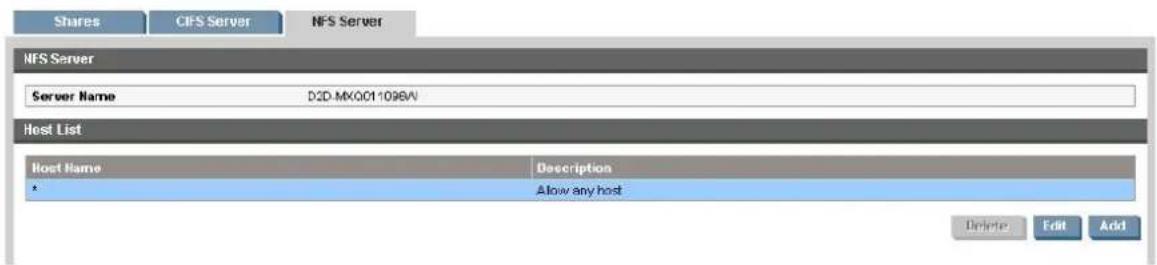
- Click Add and provide a Host Name and Description. Click Update.
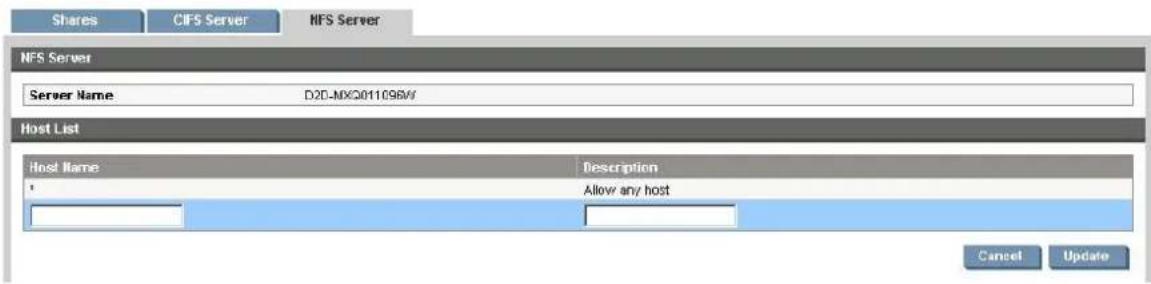
NOTE: A host with the '*' wildcard is added by default, which will allow any host to access a share.
Creating an NFS share
- Log on to the Web Management Interface for the appliance.
- Select NAS and display the Shares tab. This tab is used to manage all shares: for both CIFS and NFS servers.
- Click Create Share.
- Provide the following information:
• Name: the name that will be used to identify the share in Windows
•Description: a text description of the share (optional)
•Access Protocol: Select NFS
The Network Path is either
There is also an option to enable Write Protection. This should only be used if you want to prevent further backup to the share. If you enable it, any backup jobs currently using that share will fail.
- Now select the Permissions tab and set the access permissions for that share for each host in the list. Check the appropriate box: Read/Write Access, Read-Only Access or No Access.
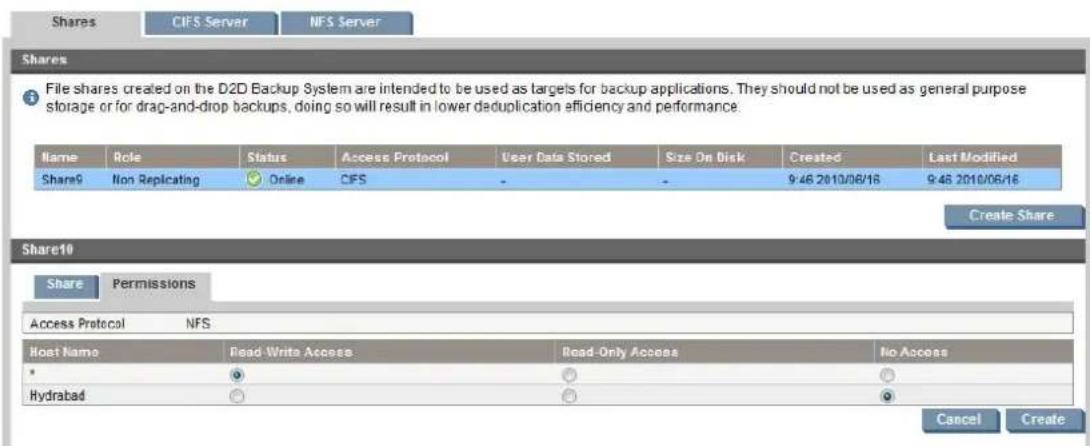
- Click Update.
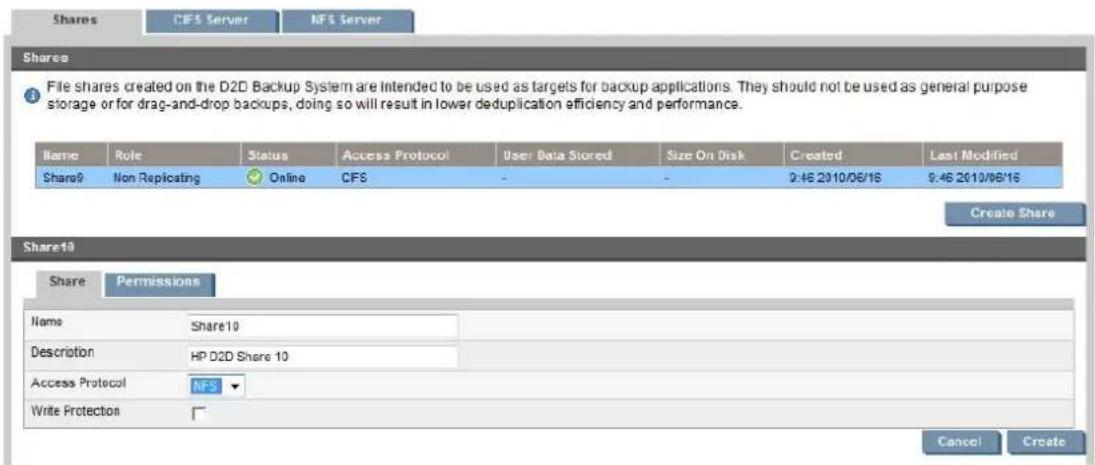
- The share is now available as a network drive to be mounted from a UNIX or Linux server so that it may be a target for the backup application.
NOTE: The share is not optimized for general purpose file storage. The HP StoreOnce Backup System is a NAS deduplicating appliance that is optimized for backup.
Connecting to the NAS share on UNIX or Linux
To access the NAS share from a UNIX or Linux server on the network, use the mount command. The actual syntax of the command depends upon which operating system you are using.
NOTE: See the Linux and UNIX Configuration Guide for more detailed information.
Problems connecting
The following sequence will cause problems when connecting to a NFS share.
- Create an NFS share and mount it on a Linux box.
- Delete the share on the StoreOnce Backup System without unmounting it from the Linux box.
- Recreate the share again with the same name.
In this scenario, the Linux client will assign a new set of inodes to the new share, but when trying to access the old mount point it will use the previous set of inodes and will therefore not manage to connect.
Reboot the host Linux system and the connection will work again.
NOTE: If the StoreOnce D2D Backup system detects a possibly issue with data integrity for a Share it will immediately set the status of that device to 'failed-to-start' or 'read-only', this is to minimize the possibility of any further potential corruption being introduced on the device. If a device enters one of these states it is reported on the GUI and selecting that device will give you some options to attempt to restore the device to a working state. For more details see Recovering devices that have failed to start or have become read-only (page 132).
5 Appliance Configuration
The Configuration menu allows you to configure the appliance's network and interface settings and set up email alerts. The following options are available.
•Network (Configuration)
•Fibre Channel (Configuration)
- iSCSI (Configuration)
•SNMP (Configuration)
- Email Alerts (Configuration)
Network (Configuration)
This page is used to view and edit network settings. It is also used to turn Beacon Mode on off.
NOTE: HP D2D4300 Series only: It is possible to turn off the 1Gb port without switching on the 10Gb port. For this reason a warning is always displayed when you change the network setti The following screen shot is taken from an HP D2D4300 Series model.
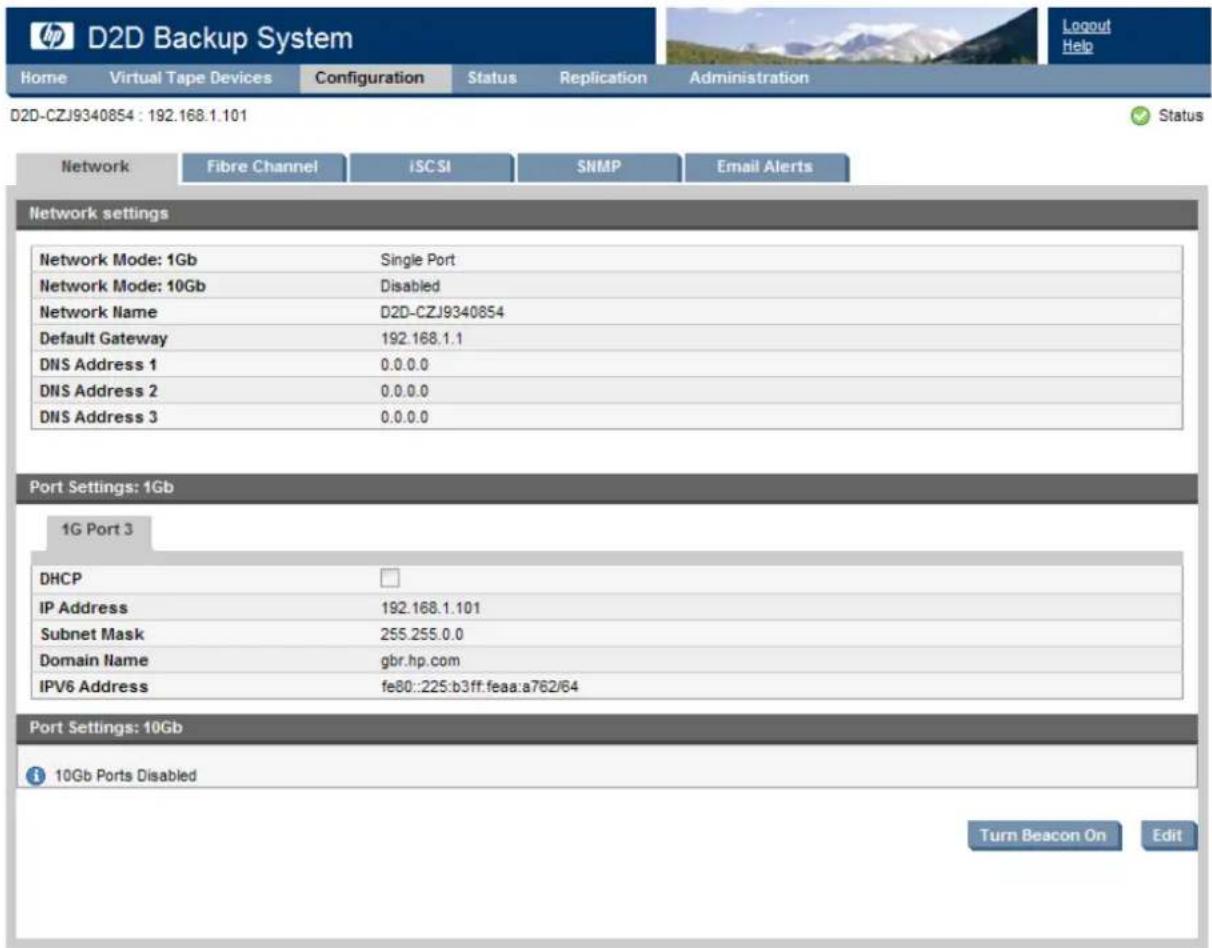
Network configuration
The details in this section reflect the IP settings that were specified during installation. The HP StoreOnce Backup System supports DHCP for IPv4 networks and this is turned on by default.
NOTE: NetBIOS name resolution is not supported on CIFS shares.
You may need to edit the details if there is a conflict in the IP address, or you move the host to different network node. Be aware that any changes you make to the network settings could affect how you connect again to the HP StoreOnce Backup System. For example, if you change the IP address, you must use the new address to log in from a web browser.
1Gb and 10Gb ports (HP D2D4300 Series only)
The HP D2D4300 Series has two 1Gb ports and two 10Gb ports. You must connect to the 1Gb port (labeled LAN port 3) to run the Installation Wizard and discover the HP StoreOnce Backup System on your network. This is also the recommended port for running the Web Management Interface.
The 10Gb ports are available for backup and replication traffic. Take care if configuring with DHCP because the HP StoreOnce Backup System supports only one gateway address. If 1Gb and 10Gb networks are configured on the same domain and backup and replication traffic seems to be slow, make sure that the hosts are configured appropriately to select the 10Gb network for data transfer.
To edit network settings
Procedure 3
- Click Edit to make the details editable.
- Make the required changes and click Update.
- You must now reconnect to the HP StoreOnce Backup System using the new settings.
- If you have changed the IP address, you must use the new address to log in from a web browser.
- You may also need to edit the iSCSI Initiator on all hosts that are connected to the HP StoreOnce Backup System, if you change the IP address. See also the HP StoreOnce Backup System Installation and Configuration Guide.
Table 7 Network parameters
| Network Mode: | This is where you define the 1Gb network mode, which may be single port, dual port, high availability (port failover) or high availability (link aggregation). The selection you make determines the number of network port tabs in the lower half of this page and the ports available on the Devices page. See the HP StoreOnce Backup System Installation and Configuration Guide for more information about configuring network modes.HP D2D4300 Series: The 10Gb network mode is disabled by default. If you are using the 10Gb port(s) to transfer data, you must first enable the port in the Port Settings 10Gb section of this page. |
| Network Name: | This is the name of the HP StoreOnce Backup System. You can use the network name, instead of the IP address, to log on to the Web Management Interface. |
| Use DHCP Gateway: | This option is available if any port is configured for DHCP. Check this box to select the DHCP allocated Gateway IP address rather than the Default Gateway. |
| Default Gateway: | This is the node that connects the HP StoreOnce Backup System to the network that is servicing the web pages. (Static IP addressing only.) A default gateway is required if all ports are configured as static, or Use DHCP Gateway is not enabled. The gateway must reside in one of the subnets. |
| DNS Server Name 1/2/3: | These are the DNS IP addresses. When using DHCP these may be obtained automatically.Ask your network administrator to advise what you should enter. |
More about the default gateway
If any network port (1Gb or 10Gb) is set to DHCP the Use DHCP Gateway checkbox is displayed.
If you do not want to enable this setting, you must enter the specific settings for the Default (
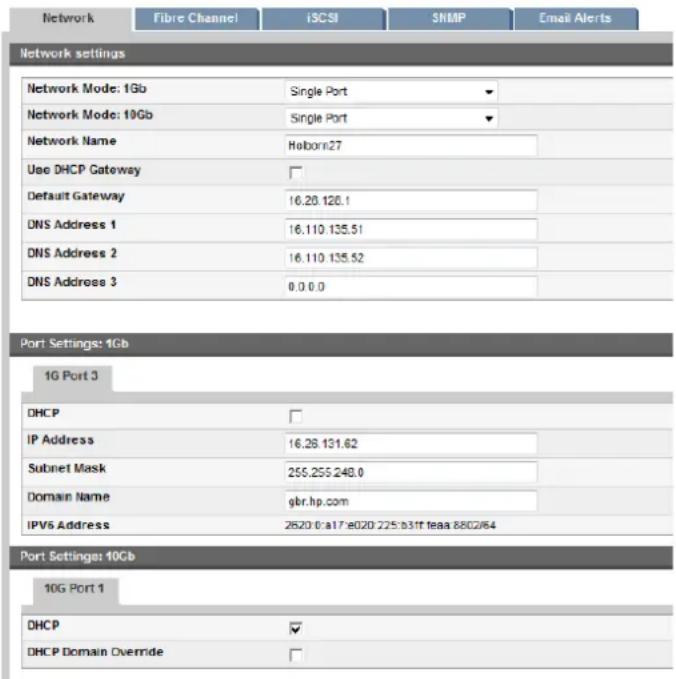
Table 8 Port Settings 1GB
| DHCP: | Check or uncheck the box to enable or disable this feature. If DHCP is turned off, you must manually specify all the network settings for the HP StoreOnce Backup System. If DHCP is turned on, the majority of the network settings are obtained automatically. However, even when DHCP is on, the Network Name must be specified. Other parameters, such as Doma Name and DNS Server Address, become optional. You can override the automatic settings and enter your own values, if required, but this is not usually necessary. |
| IP Address: | This is the IP address for the device. The HP StoreOnce Backup System supports both dyna (DHCP) and static IP addressing. The IP Address must be unique on the network. If you are using static IP addressing, you must also provide the subnet mask, default gateway and, optionally, domain name. |
| Subnet Mask: | This determines the subnet to which the IP address belongs. (Static IP addressing only.) |
| Domain Name: | This is the group of devices on the network to which the HP StoreOnce Backup System belongs. (Static IP addressing only.) |
Table 9 Port Settings 10Gb (HP D2D4300 Series only)
| 10Gb Ports Disabled: | This is the default setting. When you enable it, the settings are the same as those displayed for the 1Gb ports. |
| Other settings: | Once you enable 10Gb ports you can edit the same fields as you would for the see previous table. |
Resetting network settings and Web Management Interface password
There are some conditions in which a previously configured device may fail to be discovered a network and, therefore, may be unreachable if the network parameters are invalid for the net to which the device is attached. In this case, it may be necessary to reset the networking parameters and device name to factory defaults.
-
Ensure that there are no backup or restore jobs in progress to the device.
-
Press the Power On button on the front of the HP StoreOnce Backup System three times in quick succession to reset it.
After approximately 5 seconds, the HP StoreOnce Backup System will begin its reboot sequence.
NOTE: The HP StoreOnce Backup System will be reset to factory networking settings and the Administrator password will be reset to Admin. No user data will be lost. Network configuration defaults to Single Port configuration, so you may need to edit the settings on this page.
- After the reboot, the device will be in DHCP mode and also available for discovery using the Installation wizard provided on the StoreOnce CD.
Beacon mode
Beacon mode flashes the LEDs on the HP StoreOnce Backup System. It is useful if you have several HP StoreOnce Backup Systems on your network and want to confirm which unit is being configured
- Click Turn Beacon On to activate beacon mode.
• If you do not switch off Beacon Mode from the Network page, it will continue for 5 minutes.
Fibre Channel (Configuration)
This page allows you to view and edit Fibre Channel SAN settings, if necessary. It shows FC settings for each port on the FC card.

To edit the FC configuration
Click Edit to make the fields editable for each port. Make the required changes and click Update.
- Speed: The default is Auto, which is the recommended option. For users who wish to fix the speed, other available values are:
- HP D2D4300 Series: 8Gbs (preferred), 4Gbs or 2Gbs (not recommended)
° HP D2D4100 Series: 4Gbs (preferred), 2Gbs or1Gbs (not recommended)
- Topology: The default is Auto, which is the recommended option. Loop, where the HP StoreOnce Backup System simulates a large number of FC devices, and N_Port, when a single target device creates many virtual devices on a fabric attach port, are also supported. N_Port requires the switch port to support NPIV (N_Port ID Virtualisation).
iSCSI (Configuration)
By default, a new library is automatically created whenever a new server first connects to the HP StoreOnce Backup System using the iSCSI initiator. Use this page, if you want to disable this feature.

SNMP (Configuration)
This feature provides an HP StoreOnce Backup System with the ability to act as a Network EI in an SNMP network so that it can communicate effectively with Network Management Stations using SNMP (Simple Network Management Protocol). You use the SNMP tab to enable this feed and configure various settings, as described below.
The StoreOnce implementation of SNMP is compatible with and has been tested with HP System Insight Manager (HP-SIM).
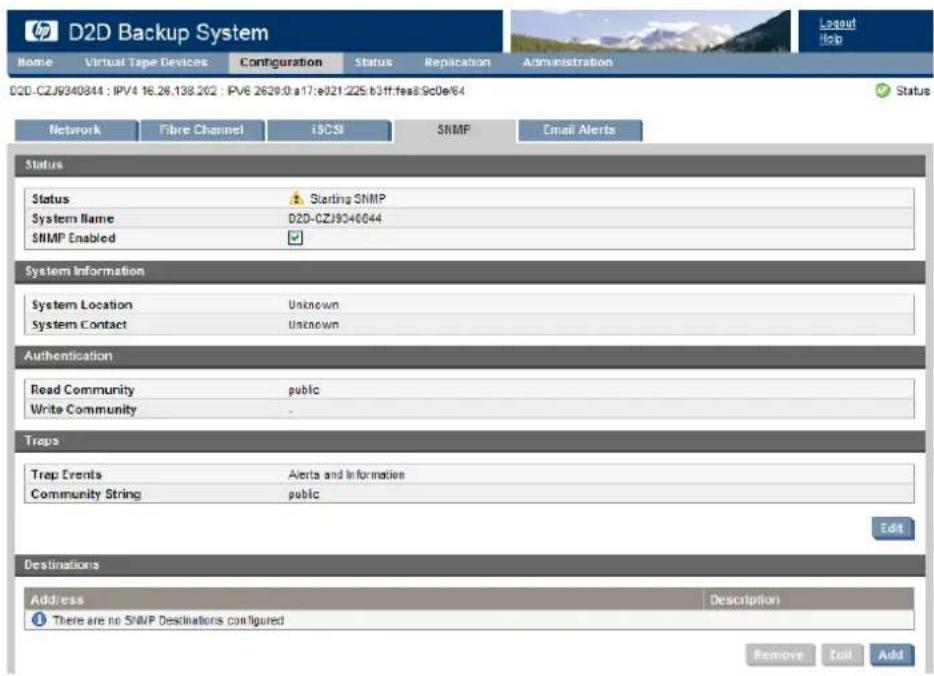
Procedure 4
- To enable SNMP, click on Edit and check the SNMP Enabled box.
- Make any changes to the default parameters, as appropriate. See also SNMP parameters (page 38).
- Click Add in the Destinations section to specify the IP Address(es) of the SNMP management host(s) that will be monitoring the HP StoreOnce Backup System. If you do not specify any destinations, events will be reported to everybody on the network. (To remove an SNMP h simply select its IP address and click Remove.)
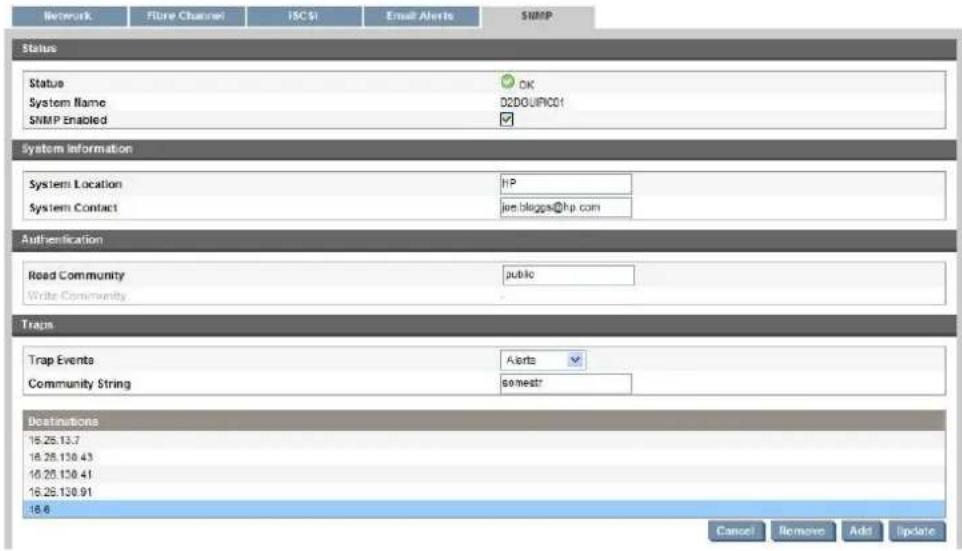
4. Click Update to apply the parameters.
Table 10 SNMP parameters
| Status | |
| Status: | When the SNMP feature is enabled, it reports the overall system status as reflected on the Summary page of the Web Management interface, as follows:OK - System status is good.Warning - Something on the system needs attention, but is not critical.Critical - Something on the system needs immediate attention.It also reports any software status messages or hardware status messages, as reported in the event log and email alerts or the Web Management Interface. |
| This is the network name of the StoreOnce Backup System.System Name: | |
| Check this box to enable SNMP. The default state is disabled.SNMP enabled: | |
| System Information | |
| System Location: | This is the physical location of the HP StoreOnce Backup System. A maximum of 20 characters is allowed. |
| System Contact: | This is contact information for the system administrator, which may be a name, email address or phone number. A maximum of 20 characters is allowed. |
| Authorization | |
| Read Community: | This defines the SNMP Read Community string. The default is 'public'. If you want to restrict read access, enter a string of up to 20 characters. This string acts as a password for Read access and must be manually configured in the management application so that it can access events (see HP Systems Insight Manager (page 39)). |
| Write Community: | This is not currently supported. Network Management Stations are not able to write any data to the HP StoreOnce Backup System. |
| Traps | |
| Trap Events: | This defines which events are reported. The default is none, but this may be reset to:Alerts (reports only alert events)Information (reports only information events)Both (reports both alerts and information events) |
| Community String: | This should be the same as the Read Community and defaults to 'Public'. Only change it, if you change the Read Community string. |
| Destinations: It is advised that these are set to point the appropriate HP SIM management server with to ensure the notification of alerts and information events. | |
| Address: | This is the IP Address of the SNMP management host(s) that will be monitoring the HP StoreOnce Backup System. For example, an address entered would be that of the HP-SIM management server. Up to 16 destination addresses may be configured. |
| This is a description of the destination management host.Description: | |
HP Systems Insight Manager
The MIBs, Management Information Bases, used to represent the information handled by the HF StoreOnce Backup System are called SEMI-MIB.mib and TRAP-DESTINATIONS-MIB.mib and are included on the CD supplied with your product (they can also be downloaded from http://www.hp.com/support). These databases must be compiled and registered with HP Systems Insig Manager, so that information from the StoreOnce Backup System can be transmitted to and interpreted by the management host.
There are three stages to setting up HP Systems Insight Manager for use with the HP StoreOn Backup System:
- Register SEMI-MIB.mib and TRAP-DESTINATION-MIB within the base of MIBs supported by HP Systems Insight Manager.
- Update the existing system type database with the new system type for the HP StoreOnce Backup System, based on the unique system object identifier.
- Discover the HP StoreOnce Backup System under HP Systems Insight Manager
NOTE: For detailed instructions on working with HP-SIM, refer to the "HP Systems Insight Manager Technical Reference Guide".
Register the MIB for the HP StoreOnce Backup System
- Log on to the HP Systems Insight Manager.
-
Compile SEMI-MIB.
Open a Command window and go to Program Files\HP\Systemins Insight Manager\ mibs. Enter the command mcompile SEMI-MIB.mib. -
Register SEMI-MIB.
Still in the Command window, enter the command mxmib -a SEMI-MIB.cfg.
- Compile TRAP-DESTINATIONS-MIB.
Open a Command window and go to Program Files\HP\Systemins Insight Manager\ mibs. Enter the command mcompile TRAP-DESTINATIONS-MIB.mib.
- Register TRAP-DESTINATIONS-MIB.
Still in the Command window, enter the command mxmib -a TRAP-DESTINATIONS-MIB.cfg.
-
Log out from the HP System Insight Manager and then log back in again.
-
You can check that SEMI-MIB and TRAP-DESTINATIONS-MIB have been registered with HP System Insight Manager by selecting Options — Events — SNMP Trap Settings... on the HP-SIM Home page.
-
Scroll down the list of available MIBs to locate SEMI-MIB and TRAP-DESTINATIONS-MIB.
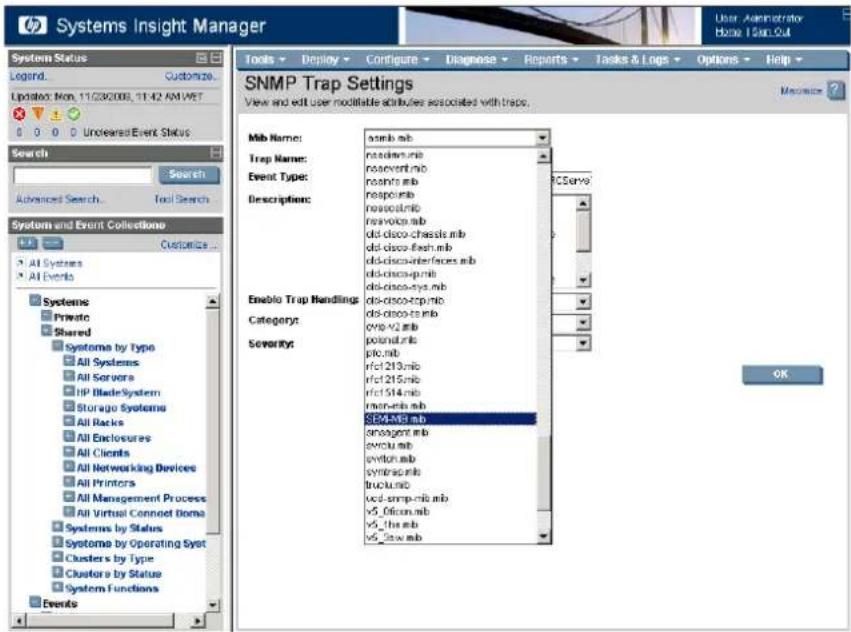
Update the system type database
- Log on to HP System Insight Manager, if not already logged on.
- Select Options — Manage System Types... on the Home page to display a list of all managed system types.
- Click on New... to add a new system type.
- Define a new rule filling only required fields. as follows:
•System object identifier: 1.3.6.1.4.1.11.10.3.1.3.27
• Compare rule: match
•Priority: 1 (highest)
•System type: Storage Device
•Product Model: HP StorageWorks D2D
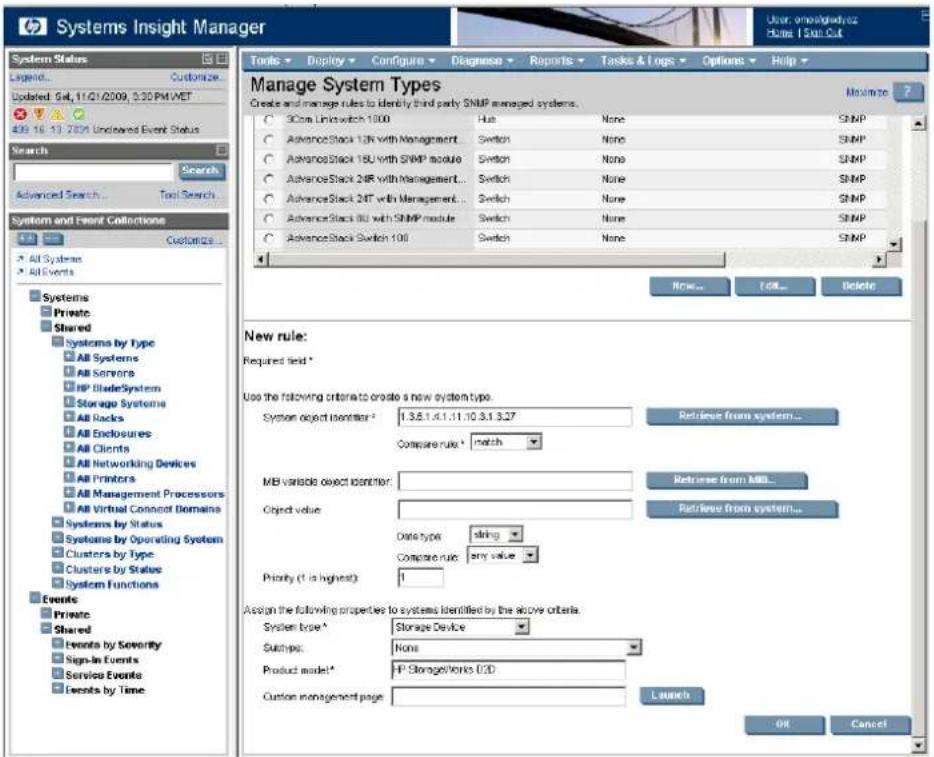
- Click OK. The HP StoreOnce Backup System will now be included as a product within the pool of managed system types. (Select Storage Device from the System Type drop-down menu to check this.)
Discover the HP StoreOnce Backup System
NOTE: Always set up the SNMP page on the Web Management Interface before discovering the HP StoreOnce Backup System on HP-SIM.
- Log on to HP System Insight Manager, if not already logged on.
- Select Options — Discovery... on the Home page to display a list of systems that have already been discovered.
- Click Edit... to configure the discovery rule for the HP StoreOnce Backup System
- Place a single IP or a range of IP addresses to discover the new machine(s) in Ping inclusion ranges...
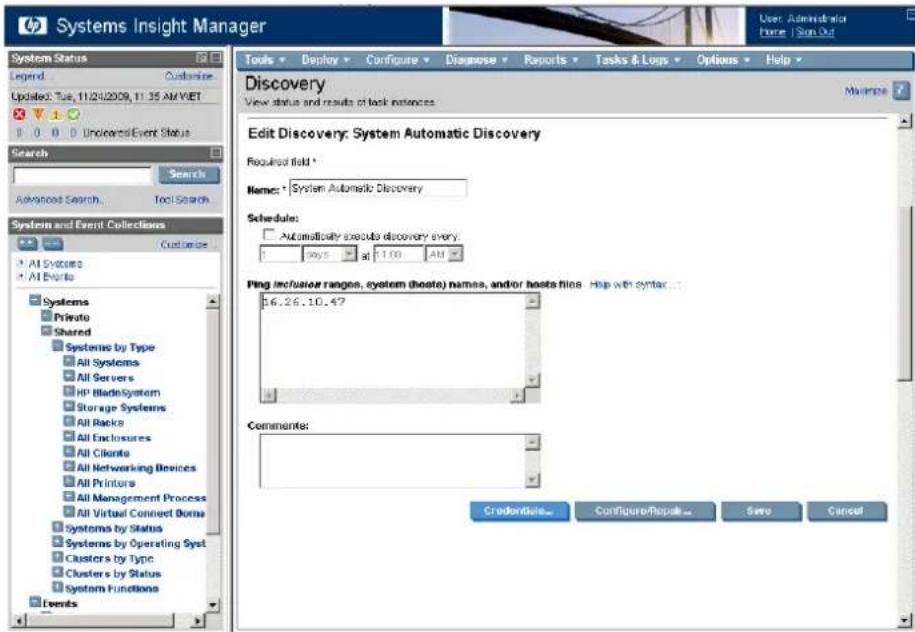
- Click Credentials..., select the SNMP tab and type in the Read community string. This should be the same as the Read Community string on the SNMP page of the Web Management Interface. If you are using the default setting that allows everyone on the network to read the reported alerts, enter "public". Click OK to confirm.
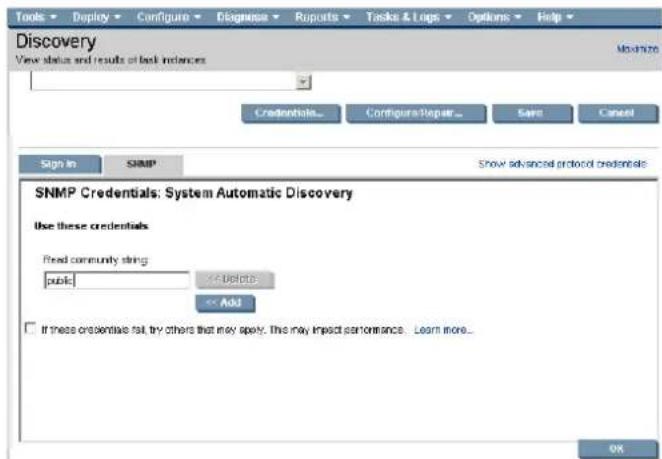
-
Click Save to save the discovery rule.
-
To start the discovery process click Run Now.
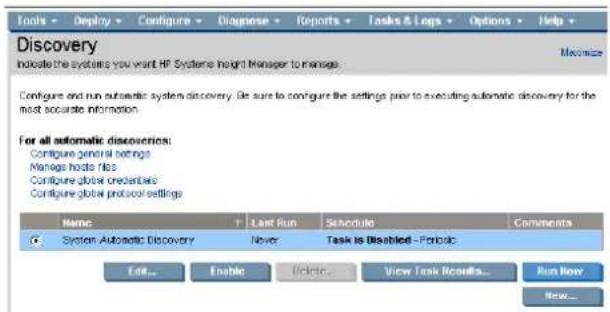
NOTE: If a firewall is in operation on the machine running HP Systems Insight Manager, make sure the HP StoreOnce Backup System(s) are within the firewall.
- The discovery process adds new machine(s) to the collection of managed systems. To locate the HP StoreOnce Backup System, enter its IP address in the Search box in the left-hand and click Search.
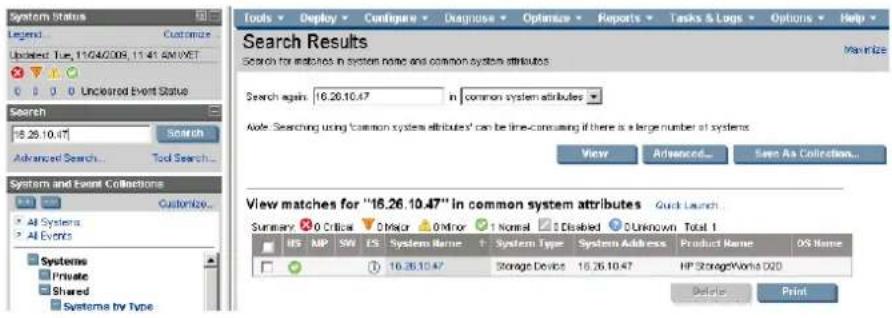
NOTE: If the discovery process fails, check that the network is working correctly and that the HP StoreOnce Backup System is online.
Email Alerts (Configuration)
This page is used to set up details of the email servers that will be used to route messages of the HP StoreOnce Backup System and to specify up to eight email recipients. Messages are generated if a disk fails or reaches its threshold capacity, if the system reboots, if there are no problems or if there is a critical hardware failure.
The HP StoreOnce Backup System uses Simple Mail Transfer Protocol (SMTP), which is the established standard for transferring mail over the internet. Microsoft Exchange has a virtual SN server available which can be used to receive these emails and forward onward if necessary. UNIX and Linux operating systems have a Sendmail program included. Sendmail uses the SMTP protocol to receive and, if necessary, forward e-mail messages.
To configure email settings, the HP StoreOnce Backup System must be on the same network as SMTP server that it can use.
- Click Edit to make the fields editable. Make changes, as appropriate and click Update.
- Once you have created a recipient's email address, use the Test button to make sure emails can be sent successfully.
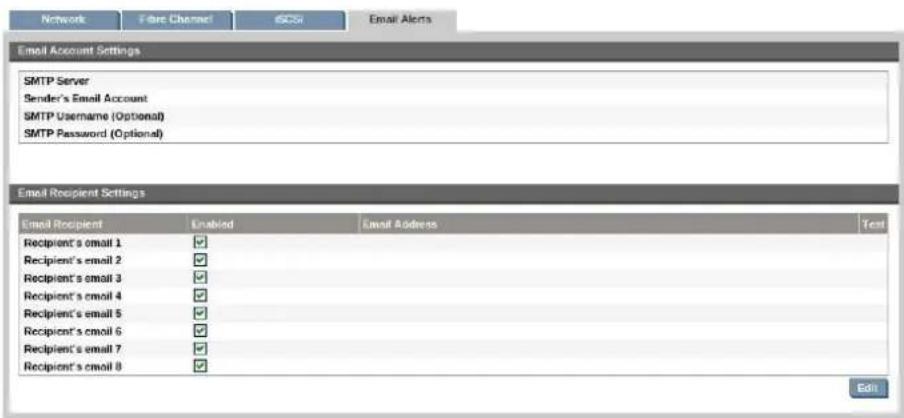
Table 11 Email parameters
| This is the IP address of the email server.SMTP Server: | |
| Username and Password: | Some email servers require authentication to send email alerts. If required, enter a Usernam and a Password here that are valid on the SMTP server entered in the previous box. |
| Sender's Email Account | This is the email account to which the email will be attributed in the recipient's inbox. The account must exist on the email server. For example, you may like to create an account called "MyD2D@MyServer.com". |
| Recipient's Email Address 1/2/3../8: | This is the email address of the person who should receive the message. Up to eight email addresses may be specified. You may only enter one address per line. Once you have configured an email recipient, there is a Test button that you can use to send a test email to the specified address. |
To configure Microsoft Exchange Server
NOTE: Please refer to the Linux and UNIX Configuration Guide on the CD-ROM for information about configuring SMTP with UNIX and Linux.
It is important to check the SMTP server's security configuration parameters to ensure that the Sender's Email Account can be recognized. Security configuration parameters are found within the SMTP virtual server's property pages. To view or modify them:
- Open the Exchange Management console.
- Click on Servers and then the server you wish to configure.
- Click on Protocols and then SMTP.
- You will see the default virtual SMTP server. Right click on this and select Properties.
- Select the Access Control tab and then select Authentication.
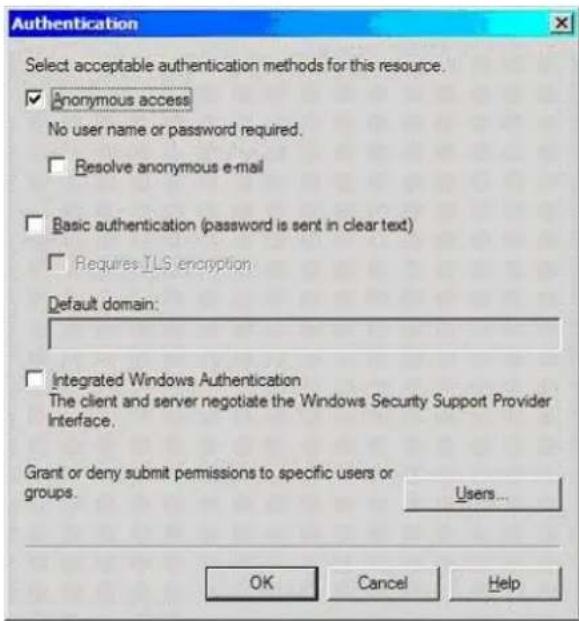
-
The HP StoreOnce Backup System may be used with one of the following settings:
-
Anonymous Authentication (anyone can log on, you do not need to provide a Username and Password when you configure email alerts)
- Basic Authentication, where a user name and password are required and should be provided when you configure email alerts
NOTE: Integrated Windows Authentication is not supported with the HP StoreOnce Backup System. If your SMTP Server requires this form of authentication and you have a spare net port, we recommend that you create a new virtual SMTP server, allowing connection only the HP StoreOnce Backup System. In this instance, you may lock the SMTP server to use the HP StoreOnce Backup System's IP address and authentication may safely be set to anonymous for the dedicated SMTP server.
6 Status
The Status menu allows you to monitor system activity and the health of storage elements and network connections/interfaces. The following options are available.
•System Activity (Status)
•Storage (Status), HP D2D4100 and 4300 Series only
•Disk (Status), HP D2D2500 Series only
•RAID (Status), HP D2D2500 Series only
• Network (Status)
•iSCSI (Status)
•Fibre Channel (Status)
•Storage Reporting (Status)
- Log (Status)
System Activity (Status)
This tab displays two graphs that illustrate system activity. These graphs show Virtual Tape and NAS throughput, which illustrates current backup activity, and current replication throughput.
These graphs are updated every 5 seconds and provide useful feedback about the activity on the HP StoreOnce Backup System.
See the D2D Best Practices for VTL, NAS and Replication implementations for more information about using these graphs in conjunction with other information to decide whether it may be necessary to take action to improve performance and what action may be appropriate.
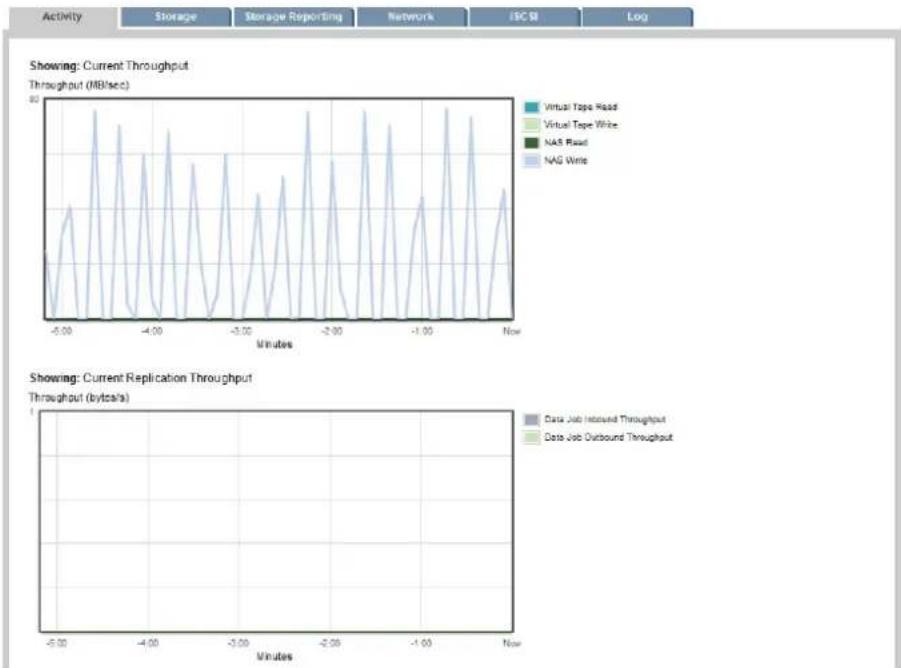
line
| Time (Minutes) | Throughput (MB/sec) - Virtual Tape Read | Throughput (MB/sec) - Virtual Tape Write | Throughput (MB/sec) - NAS Read | Throughput (MB/sec) - NAG Write | Data Job Inbound Throughput | Data Job Outbound Throughput | | -------------- | ---------------------------------------- | ----------------------------------------- | ------------------------------ | ------------------------------- | ---------------------------- | ----------------------------- | | -6.00 | ~0.5 | ~0.3 | ~0.1 | ~0.2 | ~0.8 | ~0.6 | | -4.00 | ~1.2 | ~0.9 | ~0.4 | ~0.7 | ~1.5 | ~1.2 | | -2.00 | ~0.8 | ~0.6 | ~0.2 | ~0.5 | ~1.2 | ~1.0 | | -1.00 | ~1.5 | ~1.1 | ~0.6 | ~0.9 | ~1.8 | ~1.5 | | 0 | ~0.3 | ~0.2 | ~0.1 | ~0.3 | ~0.9 | ~0.8 | | 1 | ~1.8 | ~1.4 | ~0.5 | ~0.8 | ~1.6 | ~1.4 | | 2 | ~0.7 | ~0.5 | ~0.2 | ~0.4 | ~1.1 | ~1.0 | | 3 | ~1.4 | ~1.1 | ~0.6 | ~0.9 | ~1.7 | ~1.5 | | 4 | ~0.9 | ~0.7 | ~0.3 | ~0.5 | ~1.3 | ~1.2 | | 5 | ~1.6 | ~1.3 | ~0.7 | ~0.8 | ~1.9 | ~1.7 | | 6 | ~0.6 | ~0.5 | ~0.2 | ~0.4 | ~1.0 | ~0.9 | | 7 | ~1.3 | ~1.1 | ~0.5 | ~0.7 | ~1.5 | ~1.3 | | 8 | ~0.8 | ~0.6 | ~0.3 | ~0.5 | ~1.2 | ~1.1 | | 9 | ~1.7 | ~1.4 | ~0.7 | ~0.9 | ~1.8 | ~1.6 | | 10 | ~0.7 | ~0.5 | ~0.2 | ~0.4 | ~1.1 | ~1.0 | | 11 | ~1.4 | ~1.1 | ~0.6 | ~0.8 | ~1.6 | ~1.4 | | 12 | ~0.9 | ~0.7 | ~0.3 | ~0.5 | ~1.3 | ~1.2 | | 13 | ~1.5 | ~1.2 | ~0.7 | ~0.9 | ~1.9 | ~1.7 | | 14 | ~0.8 | ~0.6 | ~0.2 | ~0.4 | ~1.0 | ~0.9 | | 15 | ~1.3 | ~1.1 | ~0.5 | ~0.8 | ~1.5 | ~1.3 | | 16 | ~0.7 | ~0.5 | ~0.3 | ~0.5 | ~1.2 | ~1.1 | | 17 | ~1.6 | ~1.3 | ~0.7 | ~0.9 | ~1.8 | ~1.6 | | 18 | ~0.9 | ~0.7 | ~0.2 | ~0.4 | ~1.1 | ~1.0 | | 19 | ~1.4 | ~1.1 | ~0.6 | ~0.8 | ~1.6 | ~1.4 | | 20 | ~0.8 | ~0.5 | ~0.3 | ~0.5 | ~1.3 | ~1.2 | | 21 | ~1.3 | ~1.2 | ~0.7 | ~0.9 | ~1.9 | ~1.7 | | 22 | ~0.7 | ~0.6 | ~0.2 | ~0.4 | ~1.0 | ~0.9 | | 23 | ~1.5 | ~1.3 | ~0.6 | ~0.8 | ~1.5 | ~1.3 | | 24 | ~0.9 | ~0.7 | ~0.3 | ~0.5 | ~1.2 | ~1.1 | | 25 | ~1.2 | ~1.4 | ~0.7 | ~0.9 | ~1.7 | ~1.5 | | 26 | ~0.8 | ~0.6 | ~0.2 | ~0.4 | ~1.3 | ~1.2 | | 27 | ~1.4 | ~1.1 | ~0.6 | ~0.8 | ~1.9 | ~1.7 | | 28 | ~0.7 | ~0.5 | ~0.3 | ~0.5 | ~1.0 | ~0.9 | | 29 | ~1.3 | ~1.2 | ~0.7 | ~0.9 | ~1.5 | ~1.3 | | 30 | ~0.9 | ~0.7 | ~0.2 | ~0.4 | ~1.2 | ~1.1 | | 31 | ~1.5 | ~1.3 | ~0.6 | ~0.8 | ~1.8 | ~1.6 | | 32 | ~0.8 | ~0.6 | ~0.3 | ~0.5 | ~1.3 | ~1.2 | | 33 | ~1.2 | ~1.4 | ~0.7 | ~0.9 | ~1.9 | ~1.7 | | 34 | ~0.7 | ~0.5 | ~0.2 | ~0.4 | ~1.0 | ~0.9 | | 35 | (~-5) | (~-4) | (~-3) | (~-2) | (~-3) | (~-2) | | 36 | (~-4) | (~-3) | (~-2) | (~-1) | (~-2) | (~-1) | | 37 | (~-3) | (~-2) | (~-1) | (~-2) | (~-3) | (~-2) | | 38 | (~-2) | (~-1) | (~-2) | (~-3) | (~-2) | (~-3) | | 39 | (~-3) | (~-2) | (~-3) | (~-4) | (~-3) | (~-4) | | 40 | (~-4) | (~-3) | (~-4) | (~-5) | (~-4) | (~-5) | | 41 | (~-5) | (~-4) | (~-5) | (~-6) | (~-5) | (~-6) | | 42 | (~-6) | (~-5) | (~-6) | (~-7) | (~-6) | (~-7) | | 43 | (~-7) | (~-6) | (~-7) | (~-8) | (~-7) | (~-8) | | 44 | (~-8) | (~-7) | (~-8) | (~-9) | (~-8) | (~-9) | | 45 | (~-9) | (~-8) | (~-9) | (~-10) | (~-9) | (~-10) | | 46 | (~-8) | (~-9) | (~-8) | (~-9) | (~-8) | (~-9) | | 47 | (~-7) | (~-8) | (~-7) | (~-8) | (~-7) | (~-8) | | 48 | (~-6) | (~-7) | (~-6) | (~-7) | (~-6) | (~-7) | | 49 | (~-5) | (~-6) | (~-5) | (~-6) | (~-5) | (~-6) | | 50 | (~-4) | (~-5) | (~-4) | (~-5) | (~-4) | (~-5) | | 51 | (~-3) | (~-4) | (~-3) | (~-4) | (~-3) | (~-4) | | 52 | (~-2) | (~-3) | (~-2) | (~-3) | (~-2) | (~-3) | | 53Storage (Status)
This page contains four tabs that provides information about the Storage Pool, Disks, RAID and Shelves for HPD2D4100 and HP D2D4300 Series Backup Systems.
NOTE: This page is not displayed with HP D2D2500 Series Backup Systems.
Shelf is used as a term within the Web Management Interface to identify the physical storage space provided by the HP StoreOnce Backup System (Internal shelf for HP D2D4300 Series and Shelf for HP D2D4100 Series) and the optional Capacity Upgrade Kit (Shelf 1 for HP D2D4100 Se for HP D2D4300 Series these shelves are identified by the card slot and port on the RAID cc which the shelf is attached). Each shelf contains 12 physical disks, but one of the disks is an spare disk. If one of the other disks on that shelf fails, the online spare disk will be immediat used to replace it. The RAID rebuild process occurs automatically. The failed disk should be rep a soon as possible.
The Storage Pool refers to the overall storage space available on the HP StoreOnce Backup System to hosts for storing data. It consists of shelves and disks. Two fields are displayed at the top each of the three tabs.
• Storage Pool Status: This is a summary of the overall health of the storage and RAID
• Storage Manager Status: This is the most recent message reported by the Storage Management System
Storage pool tab
This tab shows the overall status of the Storage Pool, the number of shelves in the storage po and their configuration status. It is the tab that you use to add a shelf to the storage pool or Capacity Upgrade Kit has been physically installed. The following example shows the Storage Pool tab for an HP D2D4300 Series product.
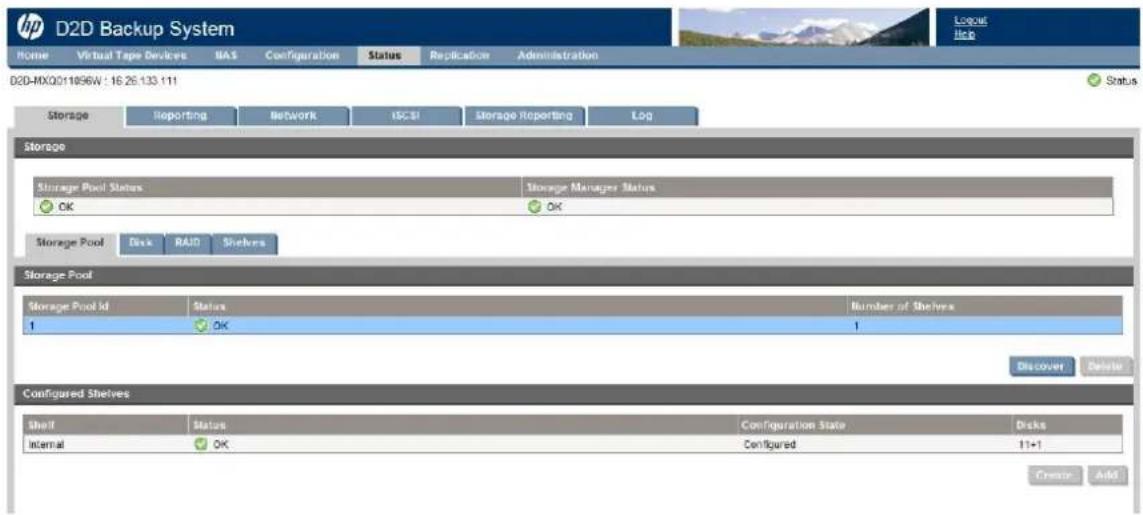
Storage Pool
This section shows the overall status of the Storage Pool and the number of configured shelves in the storage pool. Storage pool information cannot be displayed if Storage Manager is busy, for example adding a shelf.
- Click Discover to search for shelves and refresh the information on this page. This process will normally occur automatically.
- Click Delete to return the Storage Pool to factory settings. This function is used only if the storage pool has failed. It should only be used, if advised to do so by HP Customer Support
| Storage Pool ID: | This is a unique ID. Currently, there is only one storage pool per HP StoreOnce Backup System. |
| Status: | This shows the overall status of the storage pool. A warning message is displayed if a disk has failed and RAID is being rebuilt. You can tell which shelf the disk is on from the Configured Shelves section, but will need to check the Shelves page to find the exact location of the disk that has failed. |
| This shows the number of configured shelves in the storage pool.Number of Shelves: |
Configured shelves
This section shows the status of the configured shelves and the number of disks. Shelf information cannot be displayed if Storage Manager is busy, for example adding a shelf.
Internal shelf identifies the disks within the HP D2D4312 Backup System. External shelves are identified by the card slot and port on the RAID card to which the shelf is attached.
0 shelf identifies the disks within the HP D2D4100 Series Backup System. External shelves are identified as 1.
- Click Add to add additional shelves to the storage pool RAID and expand the capacity of the HP StoreOnce Backup System. Refer to the Capacity Upgrade Kit Guide supplied with the expansion shelf for more information. This guide can also be downloaded from the HP web site.
IMPORTANT: HP StoreOnce systems that do not contain any data will complete the expansion process in around 5 minutes. Systems that already have data stored will take considerably longer and the time required to complete the expansion process will depend on the number of capacity upgrade shelves and the amount of data stored on the unit.
For example, an HP StoreOnce 4100 Series system running at close to full capacity will take up to 12 hours in most cases but an HP StoreOnce 4300 Series system running at close to full capacity (without any existing capacity upgrade) could take up to 48 hours, and potential take over 96 hours to complete with an existing capacity upgrade.
Please note that all devices remain offline during the expansion process. No backup, replication or tape attach scheduled jobs can occur and the process cannot be cancelled once started.
- Click Create to create a storage pool. This would only be necessary if you had deleted the storage pool and needed to recreate the environment.
| Shelf: | This is the shelf number. HP D2D4100Series: Shelf 0 is the HP StoreOnce Backup System; Shelf 1 is the Capacity Upgrade Kit, if installed.HP D2D4300 Series: This is the shelf name. Internal is the HP StoreOnce Backup System; external shelves are identified by the card slot and port on the RAID card to which the sh is attached. HP D2D4312 Backup systems may have up to 3 shelves. |
| Status: | This is the status of the shelf. A warning message is displayed if a disk has failed and RA is being rebuilt. You will need to check the Shelves page to find the exact location of the disk that has failed. |
| Configuration State: | This is the configuration status of the shelf. It is shown as not configured if it is not yet po of the storage pool. |
| Disks: | This shows the number of disks per shelf. The first number refers to the number of disks in the RAID; the second number is the online spare, It is normally 11+1 but can change to show the number of active disks in use. |
Disks tab
The tab provides information about total storage usage and the devices (libraries and NAS share making use of the StoreOnce Backup System. Use it to check how individual devices are using total storage space and when the total storage space is reaching capacity.
It also shows the deduplication ratio per library or share. This information is shown in the last column and is updated whenever data is written to disk.
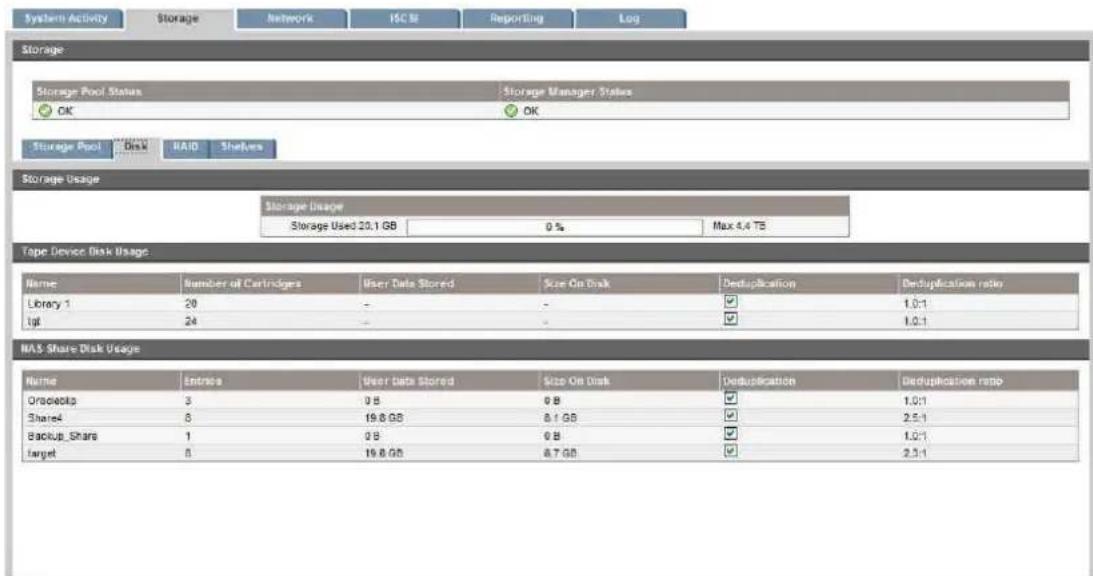
Storage usage
This section provides information about total disk usage. Use it to check the total disk space c when the total disk space is reaching capacity. The Storage Usage bar indicates how much of the disk has been used to store backup data from the host(s). The maximum storage capacity is s to the right of the bar. The system will send warning messages to email recipients (if configure when the storage is reaching capacity. The Storage icon on the Summary page will also indi that space is running out.
Tape device disk usage
This section shows a list of available libraries with their number of cartridges, amount of user stored and whether deduplication is enabled. The list will be empty if the StoreOnce Backup S is offline or if no virtual tape libraries have been created.
NAS shares disk usage
This section shows a list of available NAS shares, amount of user data stored and size on disk, and whether deduplication is enabled. The list will be empty if the StoreOnce Backup System is offline or if no NAS shares have been created.
RAID
The RAID tab shows the status of the RAID controller and the logical units.
The following screen shot is from an HP D2D4300 Series model. HP D2D4100 Series models only have one RAID controller.
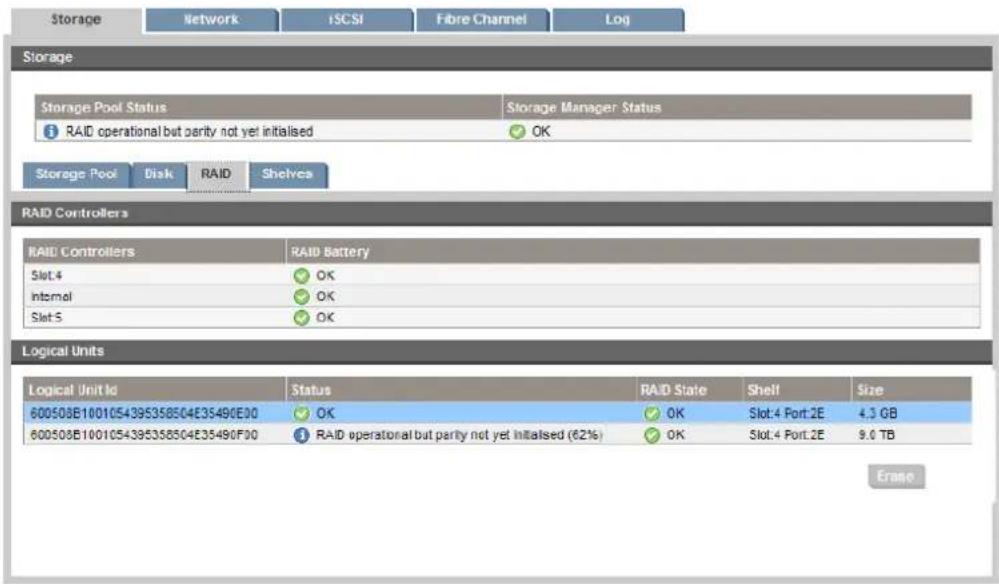
RAID controllers
| RAID Controllers: | This is the ID of the RAID controller. HP D2D4300 Series: There is an entry for the internal shelf and each expansion shelf that has been installed. Expansion shelves are identified by the slot number. Select a shelf to display information about its logical units. HP D2D4100 Series: There is only one in the current system. |
| RAID Battery: | In normal operation, this shows green, OK. If a battery fails, please replace it as soon as possible. The status of the RAID and the RAID battery are also shown on theSummarypage. See the HP StoreOnce Backup System Maintenance and Service Guide for more information about replacing the RAID battery. |
Logical units
Each shelf consists of two logical units. The smaller unit contains configuration information; the larger unit contains the data. These units always act as pairs.
The Erase button is only active if any RAID has failed and is not recoverable. The logical units must be erased from the bottom up (start with the highest Logical Unit number and work backwards). Use with care and only when advised to do so by HP Customer Support.
| This is a unique ID for the logical unit.Logical Unit ID: | |
| This is the status of the logical unit.Status: | |
| RAID State: | This is the RAID state of the logical unit. The only time the RAID state may be diff pairs of logical units is when the RAID is rebuilding or initializing/optimizing. |
| Shelf: | This identifies the RAID card and port to which the shelf is connected, if you have an external shelf in the RAID controller list. |
| This is the size of the logical unit.Size: |
Shelves
This page shows the status of the shelves and the physical disks. You can also use it to be a disk within the StoreOnce Backup System. The Beacon LED on the front of the individual disk Blue.
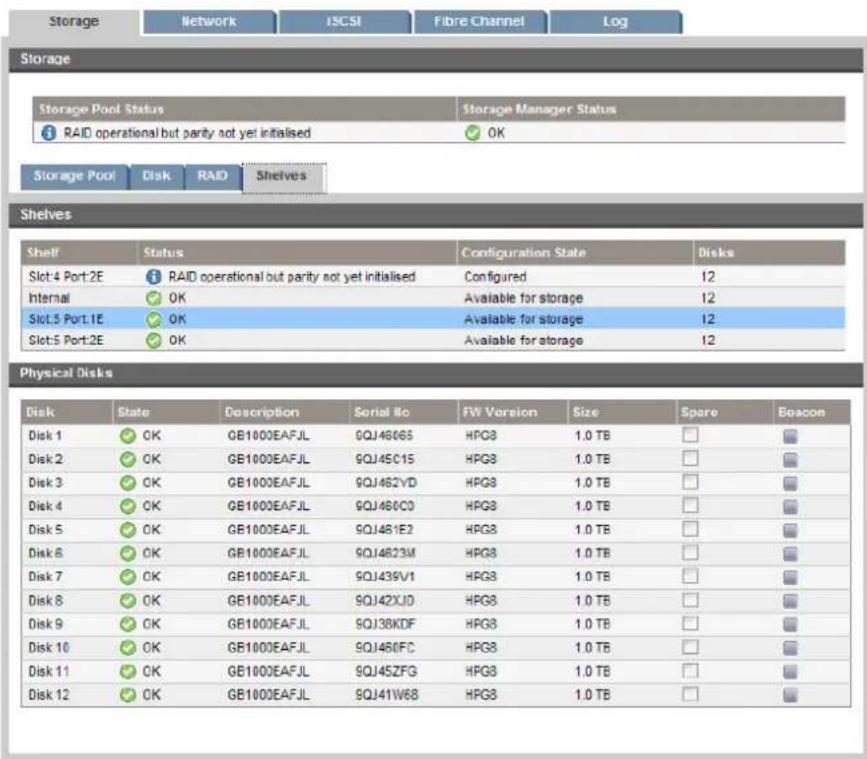
Shelves
Click on a shelf (it is highlighted in blue) to display the disks located in that shelf in the Phy. Disks section.
| Shelf: | This is the shelf number. HP D2D4100 Series: Shelf 0 is the HP StoreOnce Backup System; Shelf 1 is the Capacity Upgrade Kit, if installed. HP D2D4300 Series: Internal refers to the HP StoreOnce Backup System. Additional shelves show the card slot and port number to which they are attached. These Backup Systems may have up to 3 additional shelves. |
| Status: | In normal operation, this shows green, OK. If one or more disks fail, it shows a failed icc and a message. The disk should be replaced as soon as possible. See Hard disk replacement (page 136) for more information about replacing the disk. |
| Configuration State: | This indicates whether the shelf has been configured. It is shown as not configured if it is not yet part of the storage pool. |
| The number of available physical disks in the shelf including the online spare disk.Disks: |
Physical disks
When you select a shelf, the disks within it are displayed in the Physical Disks section. Use the information in this section to identify disks that may be failing or disks that are approaching capacity.
!
IMPORTANT: If you need to replace a disk, it is very important to obtain the serial number and the physical location of the failed disk from this page before you replace it. We strongly recommend that you use this page to beacon a disk within the StoreOnce Backup System. The Beacon LED c the front of the individual disk will show solid blue.
| Disk: | This indicates the physical location of the disk and is useful if you need to replace a disk. Always double check against the serial number after removing a disk. |
| State: | This is the status of the physical disk. Possible states are - OK, Failed, Missing, Too Small, Rebuilding, Predictive Failure. |
| This is the product number of the disk.Description: | |
| Serial No: | This is the serial number of the disk. Always make a note of this before replacing a failed disk. |
| FW Version: | This is the software version of the disk. It may be useful for troubleshooting and when replacing a disk. |
| Size: | This is 2 TB (HP D2D4324), 1 TB (HP D2D4112/4312) or 500 GB (HP D2D4106). This shows the size of each disk in your StoreOnce Backup System. The sum of the disks gives the total raw capacity available. However, the usable capacity is always less due to the RAID configuration used across the disks. See the Storage glossary entry for more information. |
| This indicates the location of the online spare disk. It is normally:Spare:HP D2D4300 Series: Disk 1 for the internal shelf and Disk 12 for an expansion shelfHP D2D4100 Series: Disk 12The box will be unchecked if a disk fails and the online spare takes over from the failed disk. Once you replace the disk and the RAID rebuilds, the box against Disk 1 or Disk 12 is checked again as it resumes its function of online spare disk | |
| Beacon: | Check this box to beacon the LED on the front of the disk. This helps you identify the disk that needs attention and the shelf that contains it. |
Disk (Status)
This page provides information about total disk usage and disk usage for each library and NAS share configured on the HP D2D2500 Series Backup System. It also shows deduplication ratios. Use it to check when the total disk space is reaching capacity.
NOTE: This page is not displayed with HP D2D4100 and HP D2D4300 Series Backup Systems.
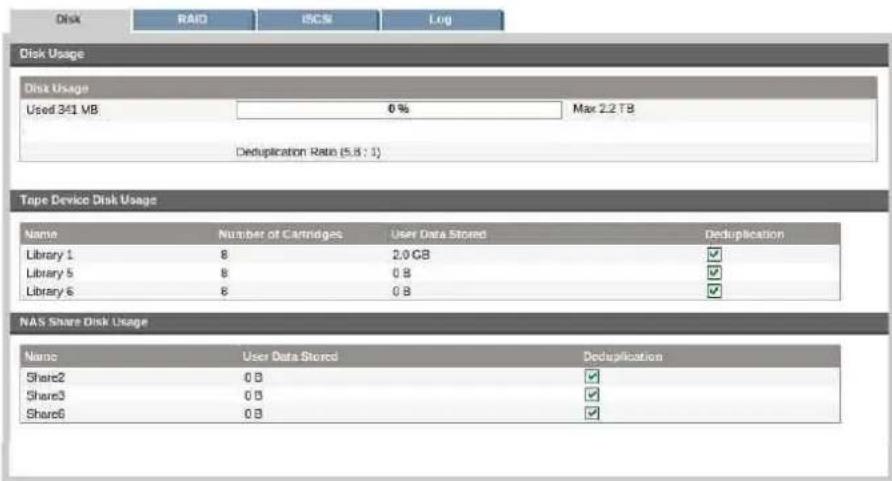
Disk usage
This section shows you how much disk space has been used.
Table 12 Disk usage parameters
| Used GB: | The red area indicates how much of the disk has been used to store backup data from the host(s). The maximum disk capacity is shown to the right of the chart. The system will send warning messages to email recipients that the disks are reaching capacity. The Disk Usage icon on the Summary page will also indicate that disk space is running out. |
| The deduplication ratio is updated whenever data is written to disk.Deduplication ratio: |
Options for creating space, if the disks start to get full, include:
- Review your backup jobs to see if you can reduce the size of backup or retention time.
- Use the backup application job settings to overwrite or erase data.
Tape device disk usage
This section shows you how the individual libraries are using disk space.
Table 13 Device disk usage parameters
| This is the name of the library.Name: | |
| Number of cartridges: | This is the number of cartridges configured for that library on the Devices page. |
| This is the amount of user data stored on that library.User data stored: | |
| Deduplication: | This indicates that deduplication is enabled for that library on the Devices page. |
NAS share disk usage
This page shows information about disk usage of the NAS backup targets.
Table 14 NAS share disk usage parameters
| Name: | This is the name of the NAS share. |
| User data stored: | This is the amount of user data stored on that NAS share. That is the amount of data that the backup application has backed up to the share. This figure is undeduplicated data. |
| Deduplication: | This indicates that deduplication is enabled for that NAS share. |
RAID (Status)
This page provides information about the RAID status, and the status of the physical disks on the HP D2D2500 Series Backup System.
NOTE: This page is not displayed with HP D2D4100 or HP D2D4300 Series Backup Systems.
Use it to identify disks that may be failing or disks that are approaching capacity. You can also use it to beacon a disk within the StoreOnce Backup System. The Beacon LED on the front of the individual disk is solid blue.
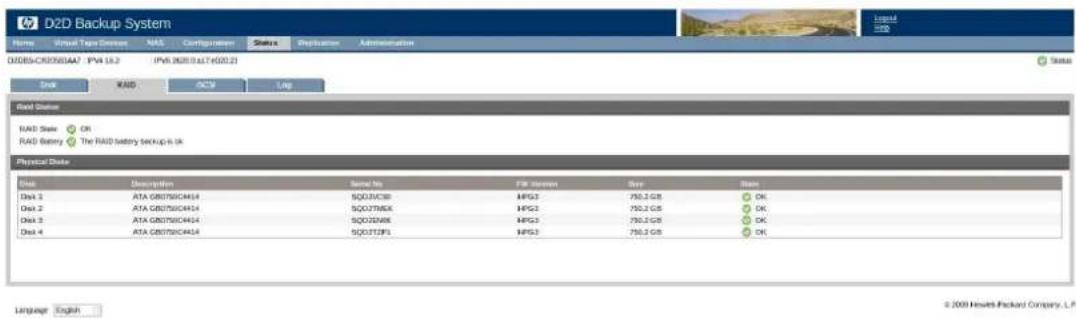
RAID status
In normal operation, this shows green, OK.
If one or more disks fail, it shows a failed icon.
Physical disks
This section provides information about the physical disks. If you need to replace a disk, it is very important to obtain the serial number and the physical location of the failed disk from this page before you replace it.
Table 15 Physical disk parameters
| Disk: | This indicates the physical location of the disk and is useful if you need to replace a disk. Always double check against the serial number after removing a disk. |
| This is the product number of the disk.Description: | |
| Serial No: | This is the serial number of the disk. Always make a note of this before replacing a failed disk. |
| SW Version: | This is the software version of the disk. It may be useful for troubleshooting and when replacing a disk. |
| This is 500 GB for the HP D2D2502i; 1 TB for the HP D2D2504i.Size: | |
| This indicates the state of the disk. Green indicates OK, red indicates a failed disk.State: | |
| Beacon: | Check this box to beacon the LED on the front of the disk. This helps you identify the disk that needs attention. |
Network (Status)
This page shows the network status of the HP D2D4300 Series Backup System and the status of the port(s). The Summary page shows only the overall network status. If there is a problem on or of the ports, it will display a warning but not identify which port has failed. (The failed icon is t Red square with white X.)
Use this page to get more information about the status of individual ports.
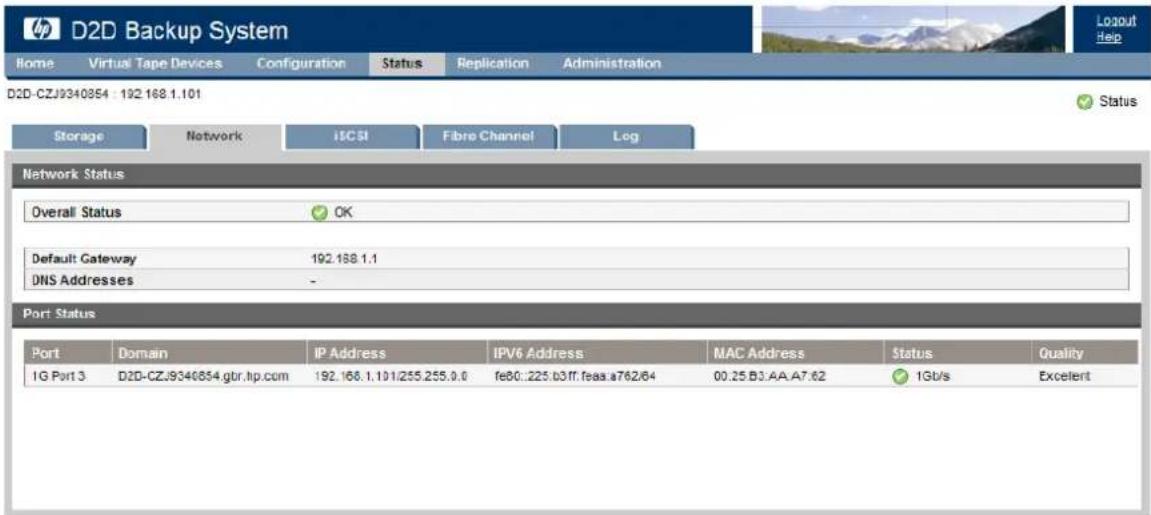
iSCSI (Status)
This page shows the iSCSI details for all the devices that are configured on the HP StoreOnce Backup System. There are two tabs: Media Changer iSCSI details and Drive iSCSI Details. Click on a device to select it and display the associated iSCSI information.
NOTE: There is also an Active Connections tab which displays information about open iSCSI sessions. If all sessions are inactive (not connected), this tab is not displayed.
This page is mainly for information and is useful in troubleshooting. It cannot be edited. If a device is showing as not connected, this indicates that the iSCSI Initiator on the host has logged on. Log on using the iSCSI Initiator and set the device as a Persistent Target for that This ensures that it will automatically log on again whenever the host is rebooted.
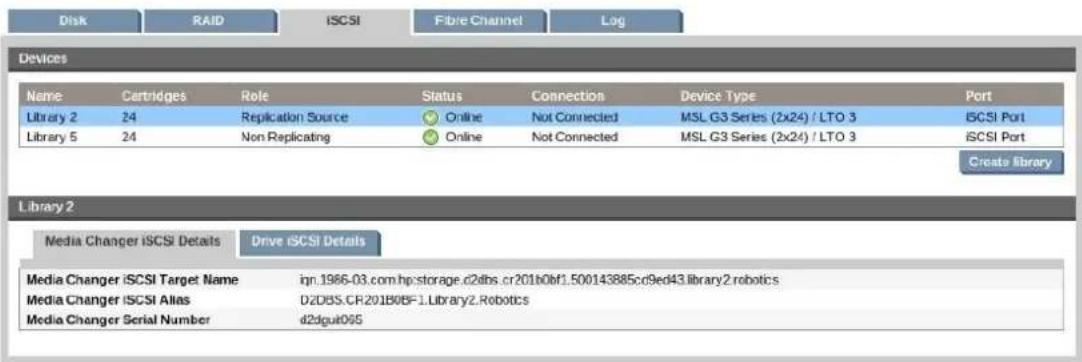
Fibre Channel (Status)
This page shows the details for all the FC devices that are configured on the HP StoreOnce E System. Select a library in the Devices list to view the connection details for the library's medi changer and drive(s).
This page is mainly for information and is useful in troubleshooting. It cannot be edited.
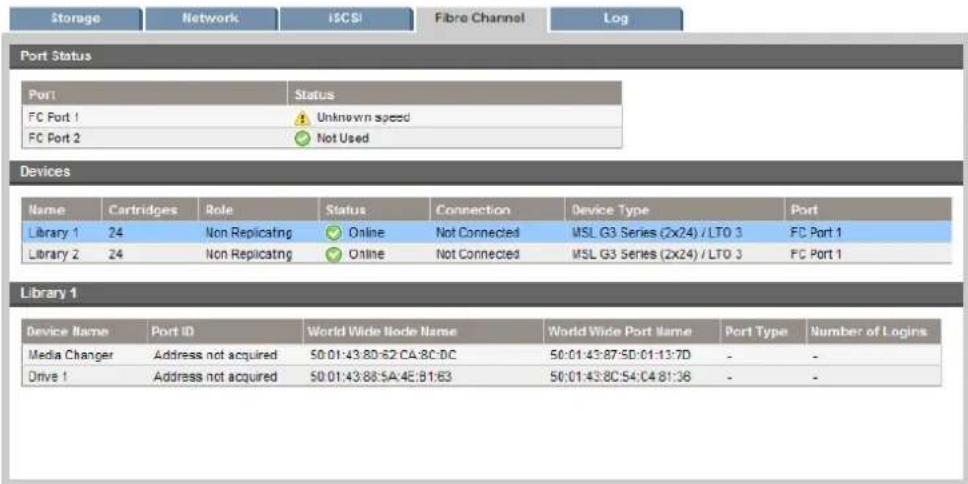
Devices section
The details in this section reflect settings that were configured for this library when it was created on the Devices page or when the Fibre Channel was configured. These settings can only be edited on the appropriate Configuration page. If the Connection field for all devices on the same port is showing Not Connected, check the physical FC connection. Examine the FC switch for visibility of the devices. Some configuration changes may be necessary or the configuration may not be supported.
Library section
There is a row for each device associated with the library. The Device Type determines the numb of drives.
- The Port ID is three hexadecimal numbers and is known as the FC address by some manufacturers. If the device is not connected, this field will be blank.
• The Port Type describes the nature of the connection and should match the Topology details. - The Number of logins is the number of hosts currently with an active logical connection to this device. To be used at least one active connection is required. Too large a number indicates that the device has been zoned inappropriately and could cause issues.
Storage Reporting (Status)
This page has three tabs that allow you to select Overall, Libraries or Shares storage reporting. Each tab allows you select Data and/or the Period from drop-down boxes to specify the axes for the graph.
There are three Data types:
• Dedupe ratio
- Disk storage
- Data storage
The Period may be weekly or monthly.
See the D2D Best Practices for VTL, NAS and Replication implementations for more information about using these graphs in conjunction with other information to decide whether it may be necessary to take action to improve performance and what action may be appropriate.
In the following example Dedupe Ratio has been selected as the Data type.
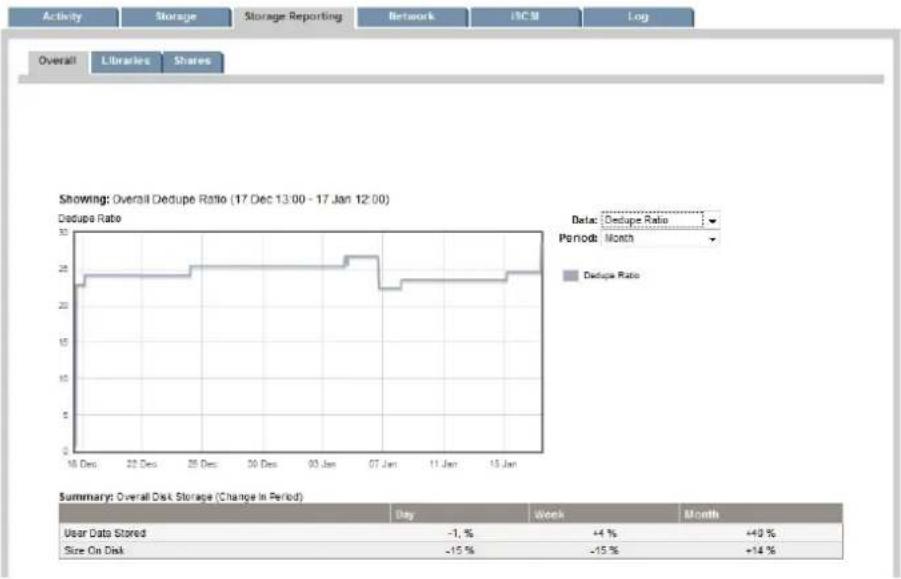
line
| Date | Dedupe Ratio | | ---------- | ------------ | | 18 Dec | 25 | | 22 Dec | 25 | | 25 Dec | 25 | | 30 Dec | 25 | | 03 Jan | 25 | | 07 Jan | 25 | | 11 Jan | 25 | | 15 Jan | 25 |Log (Status)
This page presents a time and date-stamped list of significant system events. The most recent information is shown at the top of the list. The icons identify whether the messages are inform error or warning messages.
The Log is maintained even if the HP StoreOnce Backup System is power cycled. Use the Cled Log button to clear the log.
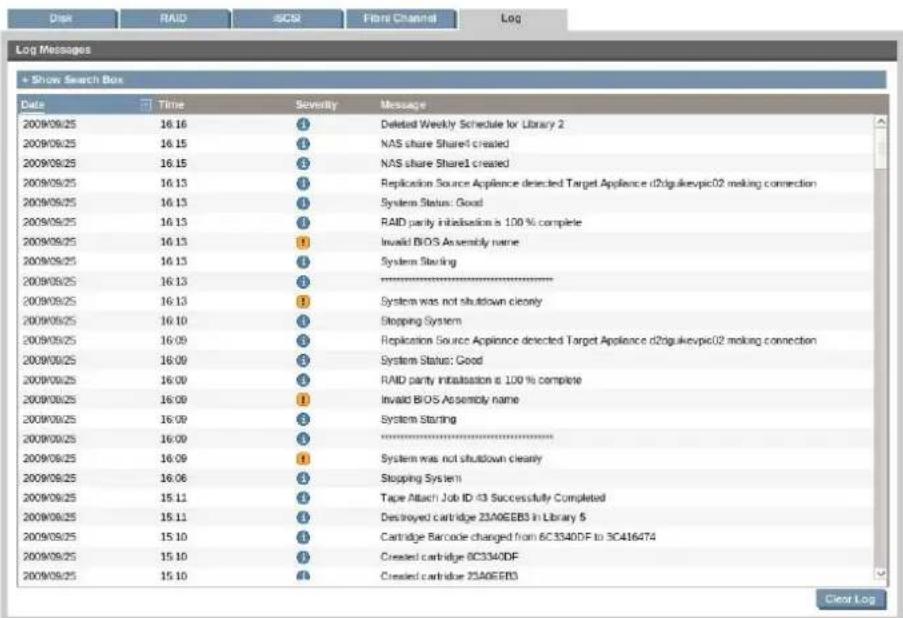
Sorting and searching the log
Click on any column heading to sort messages according to that criterion. For example, click Date to sort the messages according to date.
Click on Show Search Box to display a Filter field and two drop-down menus.
- Use the right-hand drop-down menu to filter on severity, for example to display all Error messages.
- Use the middle drop-down menu to select a column (or All) and the type a search string into the Filter box.
7 Replication
The Replication menu allows you to monitor and configure all aspects of replication. The following options are available.
- Status (Replication)
•Virtual Tape Mappings (Replication)
•NAS Mappings (Replication)
•Partner Appliances (Replication) - Local Appliance (Replication)
•Event History (Replication)
These pages allow you to monitor and configure replication. If you are new to replication we strongly recommend that you read the following documents, which are available from the HP web site. They provide a detailed discussion about replication deployment strategies and terminology and include examples using the Replication and Recovery wizards.
- HP StoreOnce Backup System Concepts Guide: If you are new to the HP StoreOnce Backup System, it is a good idea to read this guide before you configure your system. It describes tl StoreOnce technology and advises how to plan the workload being placed on the HP StoreOnce Backup System in order to optimize performance and minimize the impact of deduplication, replication and housekeeping operations competing for resources.
D2D Best Practices for VTL, NAS and Replication implementations: This guide describes best practices and aslo includes examples using different backup applications.
Status (Replication)
The top part of this page shows the replication status summary of the appliance which may be:
•OK
• A target appliance is offline
- A mapped share (NAS) or slot pair (VTL) is not synchronized, or out of sync for a certain number of days (hours), depending upon the settings for warning/critical out of sync hours
There is also a second line that indicates whether the appliance is licensed as a replication target or not.
The central section of this page contains information about replication throughput and active sessions. These tables show an average throughput over a period time so will not produce accurate data straight away
The bottom half of the page contains three tabs, that show status details for:
- Current Issues such as: a target appliance is offline or a mapped share (NAS) or slot pair (VTL) is not synchronized, or out of sync for a certain number of days (hours), depending up the settings for warning/critical out of sync hours
- Source Active Jobs
•Target Active Jobs
Click and highlight any of the status details to display more information about the issue.
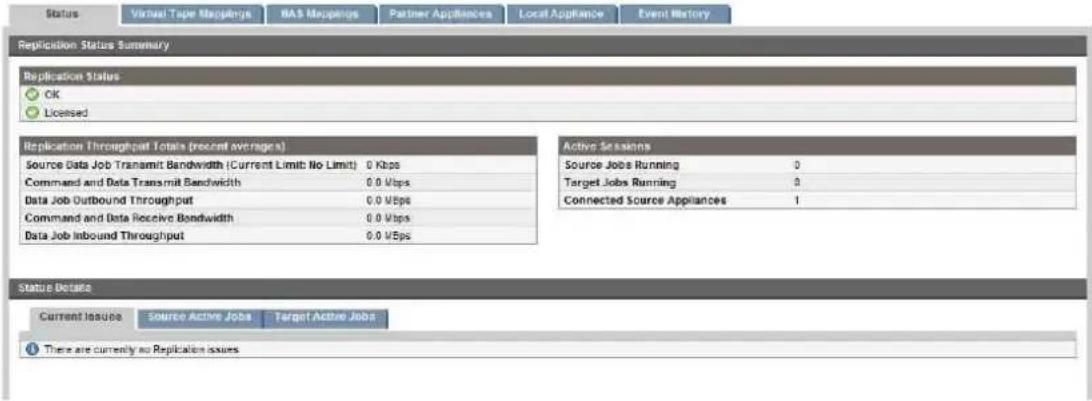
Virtual Tape Mappings (Replication)
This page allows you to configure and view how cartridges are mapped between source and target libraries. (NAS share mappings are managed on a separate tab.)
NOTE: You can only map and replicate deduplicating libraries and you can only map libraries of the same version.
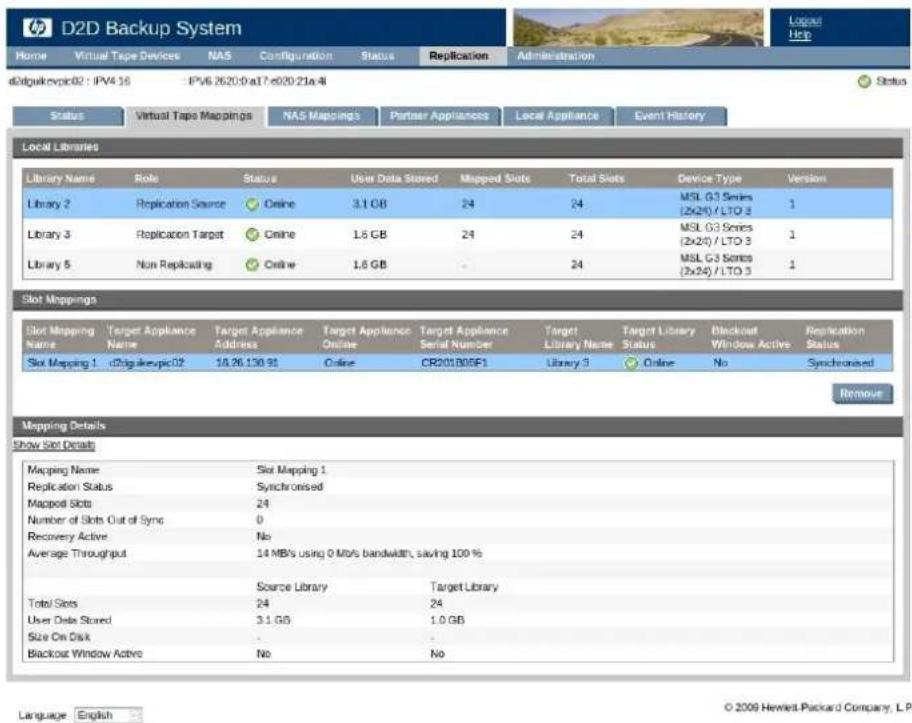
Local library
This section contains a list of all available local libraries. Local Libraries are the libraries that been configured on this HP StoreOnce Backup System.
- Non-replicating library: a library on this HP StoreOnce Backup System whose slots have not yet been mapped for replication. Replication and Recovery Wizards are available only with non-replicating libraries.
- Replication-Source library: a library on this HP StoreOnce Backup System with cartridges that have been mapped for replication. You do not have to map all cartridges in a
Replication-Source Library and the Replication-Target Library does not have to contain the same number of cartridges as the Replication-Source Library.
- Replication-Target library: a library on this HP StoreOnce Backup System with slots that hold cartridges replicated from a Replication-Source library. The option is available to recover individual cartridges from Replication-Target libraries.
Table 16 Local library parameters
| The name of the library, defined when the library device was created.Library Name | |
| The status of the local library (such as online)Library Status | |
| Role | The role, which may be non-replicating, replication-source or replication-target. All library devices are initially non-replicating, until slots have been configured using this page. |
| The amount in GB of user data stored.User Data Stored | |
| The amount of space used on the disk.Size on disk | |
| The number of slots that have been mapped.Mapped Slots | |
| The total number of slots configured on the library device.Total Slots | |
| Device Type | The emulation type configured for that library. |
| Library Version | The version number of the library. |
| Replication status | Replication status, which may be Synchronised, Synchronising or Pending Synchronisation. |
Slot mappings
Select a local library to display slot mappings for that library.
You can also remove a slot mapping by clicking on the Remove button.
Table 17 Slot mapping parameters
| Replication-Source or Replication-Target library selected | |
| Slot Mapping Name | This is the slot mapping name. Is it created when you run the wizard to define the grouping of slots that you select. |
| Source/Target Appliance Name | The name of the Target Appliance to which cartridges will be replicated. |
| Source/Target Appliance Address | The IP address of the Target Appliance to which cartridges will be replicated. |
| Source/Target Appliance Online | This indicates whether a replication link is established with the partner appliance. |
| Source/Target Appliance Serial Number | The serial number of the Target Appliance to which cartridges will be replicated. |
| Source/Target Library Name | The name of the library to which cartridges will be replicated on the Target Appliance . |
| Source/Target Library Status | The status of the partner library (such as online). |
| Blackout Window Active | This relates to the local appliance in its role as a source or target appliance. No replication jobs will be started if the source or target appliance for a mapping are in blackout, and any running jobs for the mapping will be paused. |
| Replication Status | This shows whether the mapping is synchronized. |
Slot mapping details
The two tabs at the bottom of this page show more detailed mapping information for the sele library and slot mapping.
Library Details tab
This tab details mapping details between source and target libraries. If a source library has been selected, it will tell you whether Recovery is in process; if a target library has been selected, tell you whether the target library is visible to the host. All other information is identical for b-source and target libraries. For example, use this tab to find out:
•The number of mapped slots and replication status
•The average throughput of data
You can only edit the Mapping Name on this tab.
Slot Details tab
This tab displays details for each mapped slot in the selected slot mapping. It includes average throughput data for each slot. If you have selected a source library, you will be able to:
- Edit the Target Slot to which a Source Slot is mapped.
- Enable the Recover First checkbox, which enables a user to request that a mapped slot be recovered from Target to Source, if required.
The replication wizards
When you select a Non-Replicating library, you will be able to run the Replication or Recover wizard.
- Use the Replication wizard to create slot mappings for the non-replicating library; it becomes a Source library. See Running the replication wizard (virtual tape devices) for more information.
- Use the Recovery wizard to recover cartridges from a Target Library. See Recovering a source appliance, VTL devices for more information.
Running the replication wizard (virtual tape devices)
The Replication Wizard is used to create new mappings between Non-Replicating Libraries (wh become Replication Source Libraries) and either existing or new Target Libraries.
- Create a Non-Replicating Library on the Source Appliance.
- Create a backup rotation scheme and allow the first full backup to run.
- Decide how you will seed the first full backup on the Target Appliance. Are you seeding of the WAN or have you been able to colocate the Target Appliance on the same LAN as Source Appliance? See the HP StoreOnce Backup System Concepts Guide for a more detailed discussion about seeding.
- Go to the Replication-Virtual Tape Mappings page and select a Non-Replicating Library to be converted to a Replication Source Library.
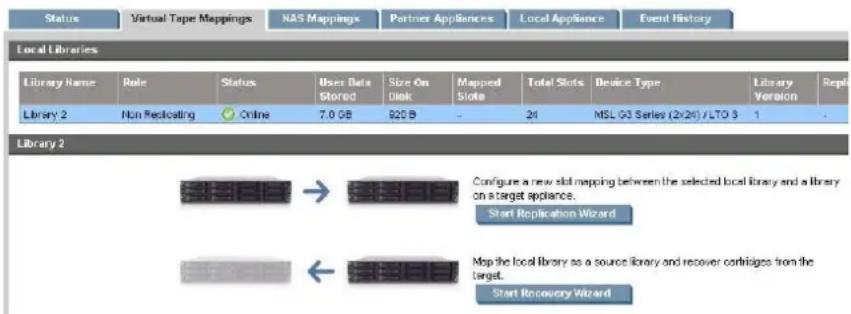
- Click Start Replication Wizard and proceed to the Select Target Appliance step.

TIP: Click on the show/hide details link to check how many target appliances are permitted and the number of target appliances that are currently configured.
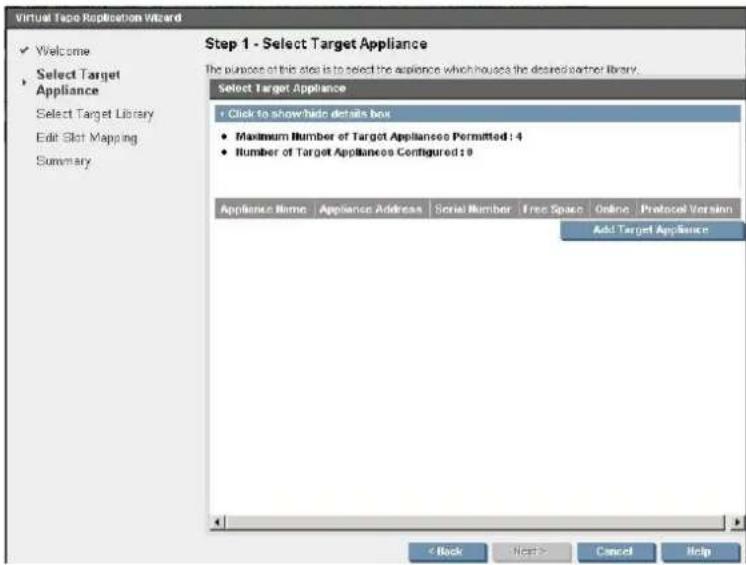
- Select a Target Appliance from the list and click Next.
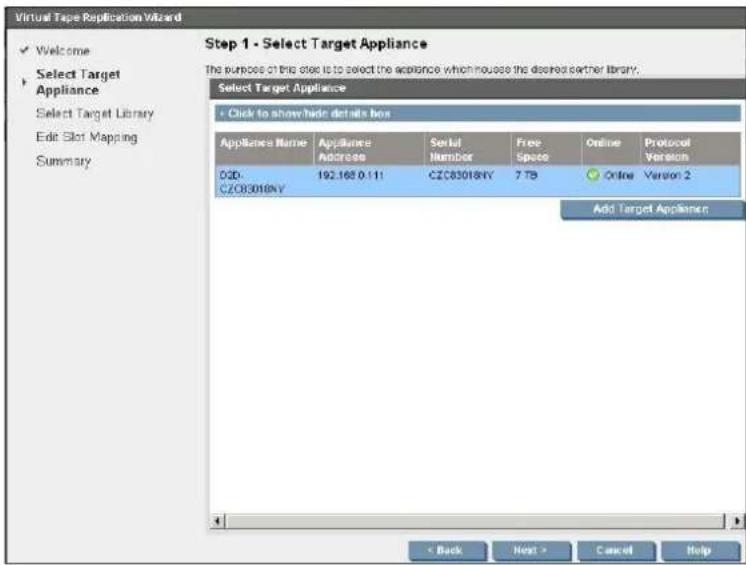
NOTE: If you want to select an appliance that is not yet on the list, click Add Target Appliance. Enter the Target Appliance IP Address or fully qualified domain name. The default values for the Command and Data Protocol Port Numbers are usually acceptable, but may be edited if there is a conflict. (If replication needs to take place through a firewall, the network administrator will need to open (TCP) ports 9387 (Command protocol) and 9388 (Data protocol) to allow the replication traffic to pass to and from the HP StoreOnce Backup System Click Add Target Appliance.
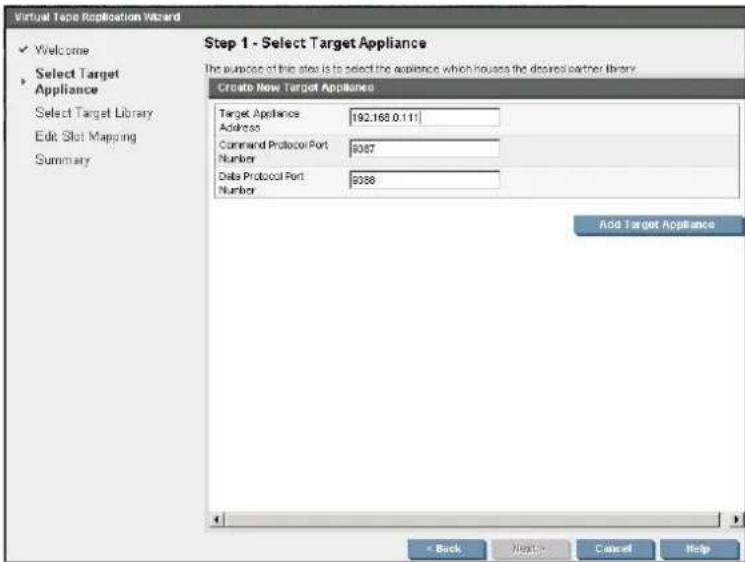
- The wizard then moves to the Select Target Library step. Select a library on the target app and click Next.
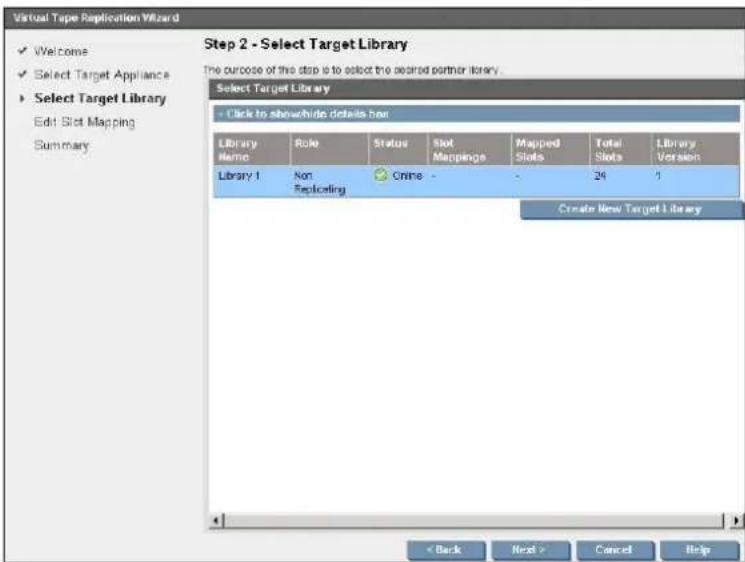
NOTE: If you need to create a new library on the target appliance, click Create New Target Library. Set up the details as you would normally do when creating a new library device. When creating libraries on a target device it is possible to create libraries with 0 (zero) Attempting to create a library with more drives than those available on the target will fail a suggestion that there may be too many drives already in use on the target. You cannot create a new target library if Source Appliance Permissions is enabled on the selected target appliance. Instead the library must be first created on the target before map from the source.
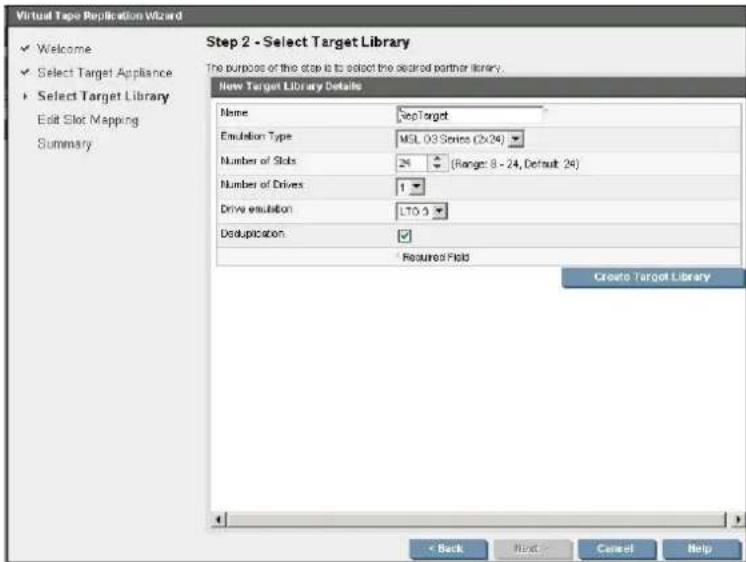
- This takes you to the Edit Slot Mapping step. Enter a Slot Mapping Name. The slot number and barcodes of all source cartridges are displayed. A new barcode is generated for them on the target library (these barcodes will be overwritten with those of the source when replication starts). By default, all slots on the Source are selected for mapping and mapped to available slots on the Target library. If you want to deselect cartridges from this slot mapp configuration, select Unmapped from the Target Slot Name drop-down menu.
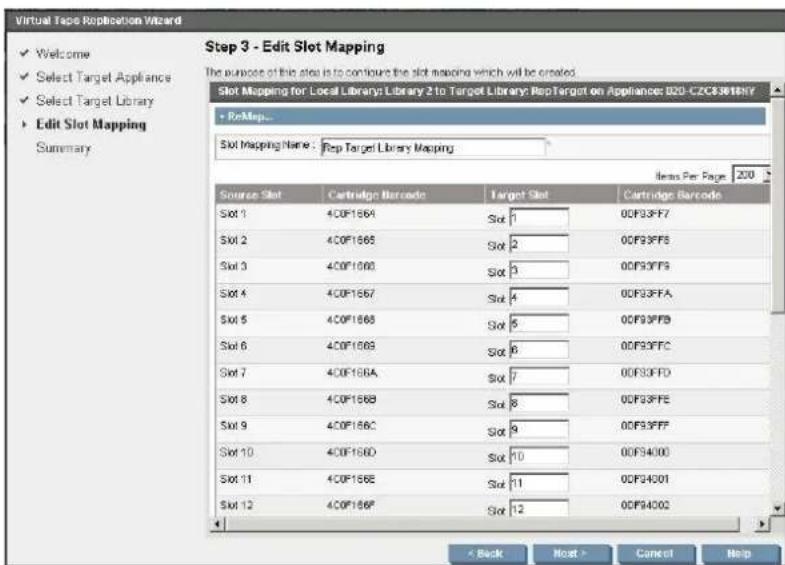
- Click Next to display a summary of the replication configuration that you have created.
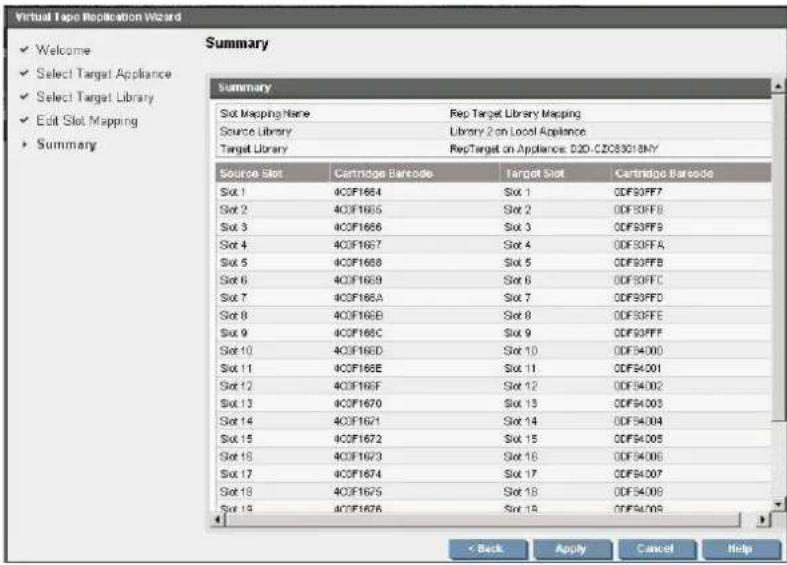
- Click Apply to create the slot mapping configuration. Replication of cartridges will start as soon as the libraries have been synchronised. Look at the Replication Status field on the Library Details tab of the Virtual Tape Mappings page. It changes from "Pending Synchronisation" to "Synchronising" to "Synchronized".
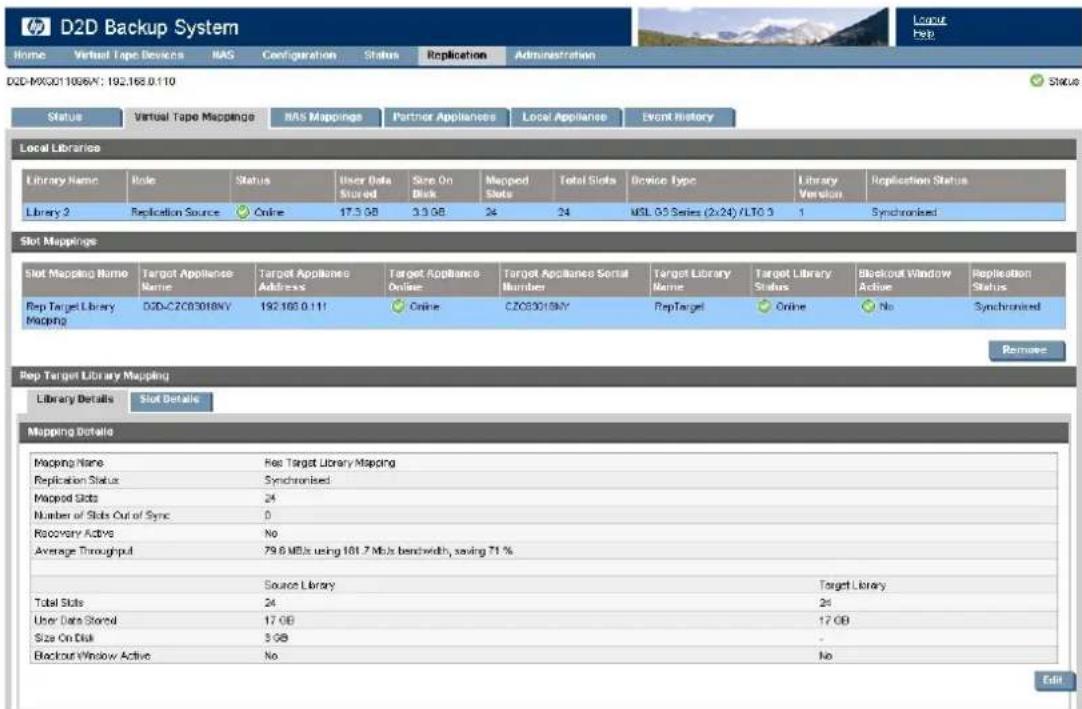
NOTE: If you were able to colocate the Target Appliance on the same LAN as the Source Appliance to improve replication performance, remember to relocate the Target Appliance to the target site as soon as the cartridges are synchronized.
Figure 1 Replication creation process
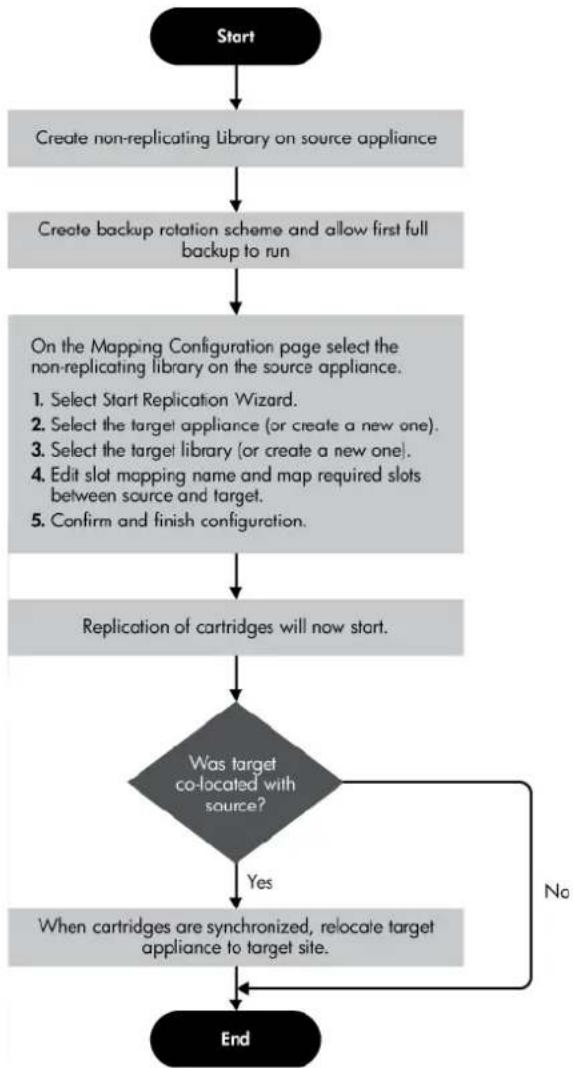
flowchart
graph TD
    A["Start"] --> B["Create non-replicating library on source appliance"]
    B --> C["Create backup rotation scheme and allow first full backup to run"]
    C --> D["On the Mapping Configuration page select the non-replicating library on the source appliance."]
    D --> E["Select Start Replication Wizard."]
    D --> F["Select the target appliance (or create a new one)."]
    D --> G["Select the target library (or create a new one)."]
    D --> H["Edit slot mapping name and map required slots between source and target."]
    D --> I["Confirm and finish configuration."]
    E --> J["Replication of cartridges will now start."]
    F --> J
    G --> J
    H --> J
    I --> J
    J --> K{Was target co-located with source?}
    K -->|Yes| L["When cartridges are synchronized, relocate target appliance to target site."]
    L --> M["End"]
    N["No"] --> K
NAS Mappings (Replication)
This page allows you to configure and view how NAS shares are mapped between source and target appliances. (Virtual tape library mappings are managed on a separate tab.)
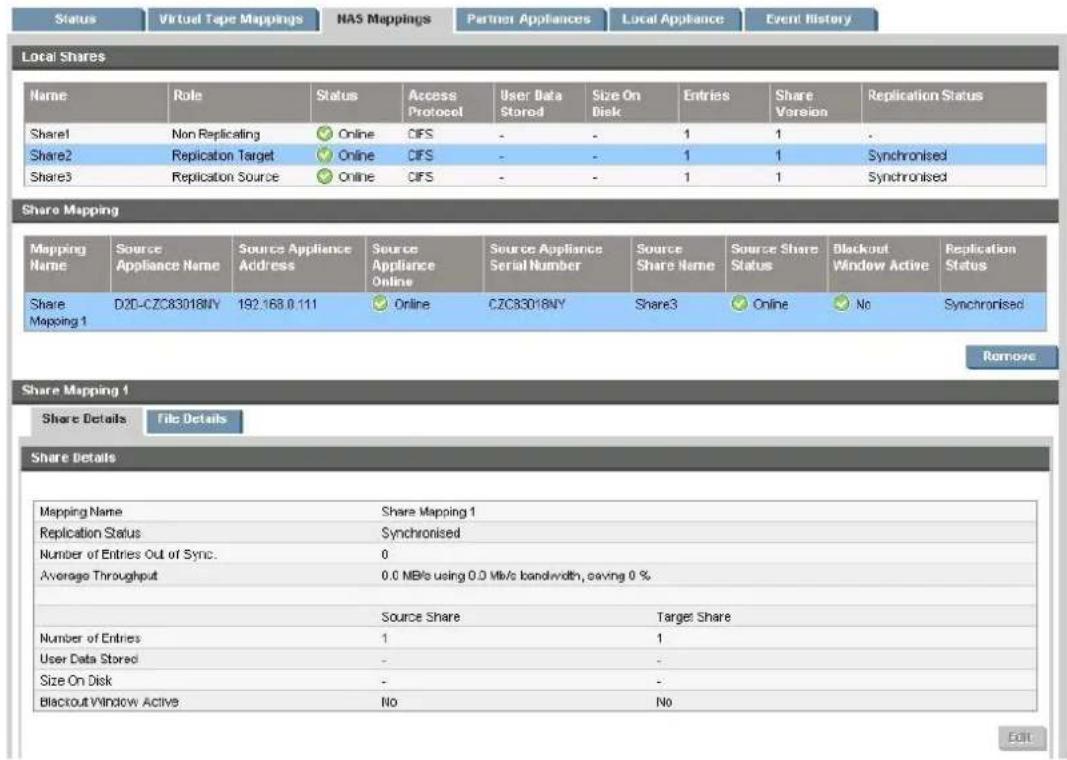
Local shares
This section contains a list of all available NAS shares that have been configured on this HP StoreOnce Backup System.
- Non-replicating: a share on this HP StoreOnce Backup System that has not yet been mapped for replication. Replication and Recovering Wizards are available only with non-replicating shares.
- Replication-Source: a share on this HP StoreOnce Backup System that has been mapped for replication.
- Replication-Target: a share on this HP StoreOnce Backup System that has been replicated from a Replication-Source share.
Table 18 Local share parameters
| The name of the share, defined when the share was created.Share Name | |
| The status of the local share, such as online.Share Status | |
| Role | The role, which may be non-replicating, replication-source or replication-target. All shares are initially non-replicating, until mappings have been configured using this page. |
| The amount in GB of user data stored.User Data Stored | |
| The amount of space used on the disk.Size on disk | |
| Entries | The number of files and directories existing on the local share (every existing file and directory will be replicated if the share is mapped). |
| Access protocol | The access protocol that was configured when the NAS share was created: CIFS or NFS. |
| The version number of the share.Share Version | |
| Replication status | Replication status, which may be Synchronisd, Synchronising |
Share mappings
Select a local share to display its mapping.
You can also remove a share mapping by clicking on the Remove button.
IMPORTANT: Do not delete a replication mapping whilst a backup or restore operation is in progress, because the source device will temporarily be taken offline and any backup or restore jobs will fail.
Table 19 Share mapping parameters
| Replication-Source or Replication-Target share selected | |
| Share Mapping Name | This is the share mapping name. Is it created when you run the wizard to create the share mapping. |
| Source/Target Appliance Name | The name of the Target Appliance to which entries will be replicated. |
| Source/Target Appliance Address | The IP address of the Target Appliance to which entries will be replicated. |
| Source/Target Appliance Online | This indicates whether a replication link is established with the partner appliance. |
| Source/Target Appliance Serial Number | The serial number of the Target Appliance to which entries will be replicated. |
| Source/Target Share Name | The name of the share to which entries will be replicated on the Target Appliance. |
| The status of the partner share, such as online.Source/Target Share Status | |
| Blackout Window Active | This relates to the local appliance in its role as a source or target appliance. No replication jobs will be started if the source or target appliance for a mapping are in blackout, and any running jobs for the mapping will be paused. |
| Replication Status | This shows whether the mapping is synchronized. |
Share mapping details
The two tabs at the bottom of this page show more detailed mapping information for the selected share and share mapping.
Share details tab
This tab details mapping details between source and target shares. If a source share has been selected, it will tell you whether Recovery is in process. All other information is identical for both source and target shares. For example, use this tab to find out:
• The status of mappings
• The average throughput of data
You can only edit the Mapping Name on this tab.
File details tab
This tab displays mapping details for each directory and files within it. It includes average through data for each file. You cannot edit any details on this tab, but you can click on any of the colu headings to sort the file details according to that column.
The replication wizards
When you select a Non-Replicating share, you will be able to run the Replication or Recoverir wizard.
- Use the Replication wizard to create slot mappings for the non-replicating share; it becomes a Source share. See next section for more information.
- Use the Recovery wizard to recover files from a Target share. See Recovering a source appliance, NAS shares (page 104) for more information.
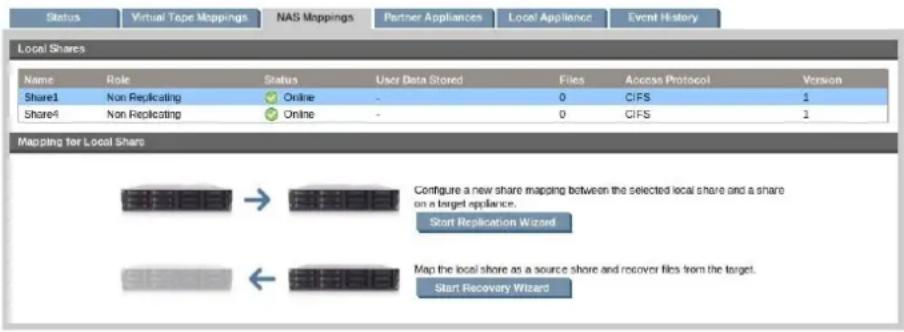
Running the replication wizard (NAS)
The Replication Wizard is used to create new mappings between Non-Replicating NAS shares (which become Replication Source shares) and either existing or new Target shares. (See Recovering a source appliance, NAS shares (page 104) for information about the Recovery wizard.)
- Create a Non-Replicating Share on the Source Appliance.
- Allow the first full backup to run.
-
Decide how you will seed the first full backup on the Target Appliance. (See also the HP StoreOnce Backup System Concept Guide.)
-
If you are seeding across the WAN or have been able to colocate the Target Appliance on the same LAN as the Source Appliance, go to step 4.
• If you are seeding using physical media: -
Create the first full backup on the Remote Site share.
- Map to the NAS share on the Source Appliance and copy the files from the NAS share to a USB disk.
- Transport the USB disk to the replication target site.
- Insert the USB disk into a host server on the same sub-net as the Target Appliance Map to the NAS Share on the Target Appliance and copy the files across from 1 USB disk.
Figure 2 Seeding initial data using a USB disk
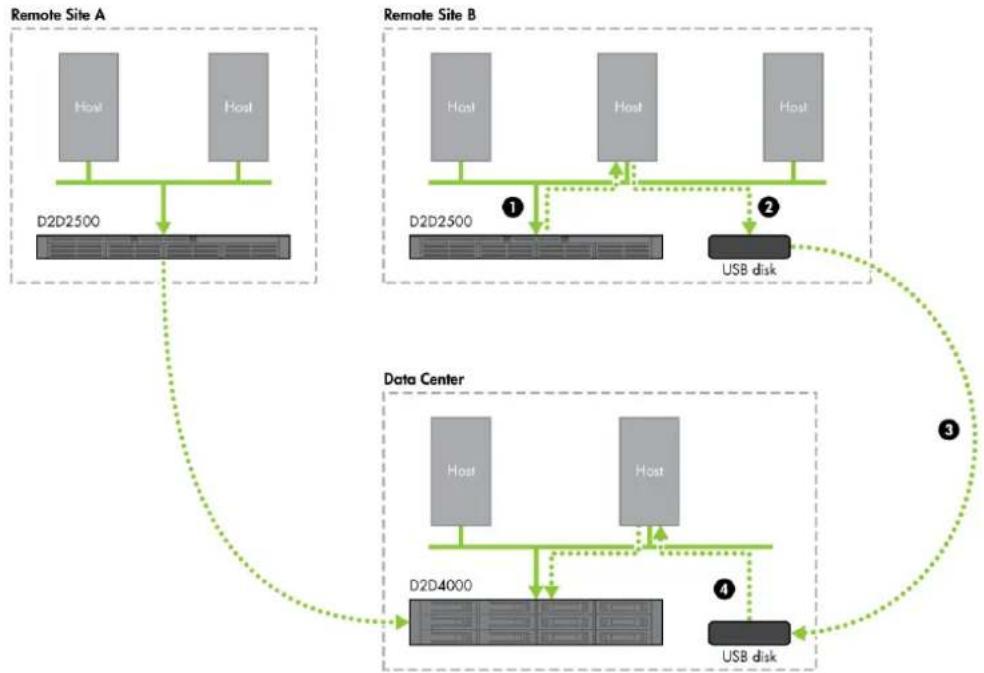
flowchart
graph TD
    subgraph Remote Site A
        A1["Host"] --> D2D2500["D2D2500"]
        B1["Host"] --> D2D2500
        D2D2500 --> D2D4000["D2D4000"]
    end
    subgraph Remote Site B
        B1["Host"] --> D2D2500["D2D2500"]
        B2["Host"] --> D2D2500
        D2D2500 --> D2D4000
        D2D4000 --> D2D4000
        D2D4000 --> USB_disk["USB disk"]
    end
    subgraph Data Center
        D2D4000 --> USB_disk["USB disk"]
    end
    D2D4000 --> USB_disk
    style Remote Site A fill:#f9f,stroke:#333
    style Remote Site B fill:#f9f,stroke:#333
    style Data Center fill:#ccf,stroke:#333
- Go to the NAS Mappings page.
- Select a Non-Replicating Share to be converted to a Replication Source Share and click Start Replication Wizard.
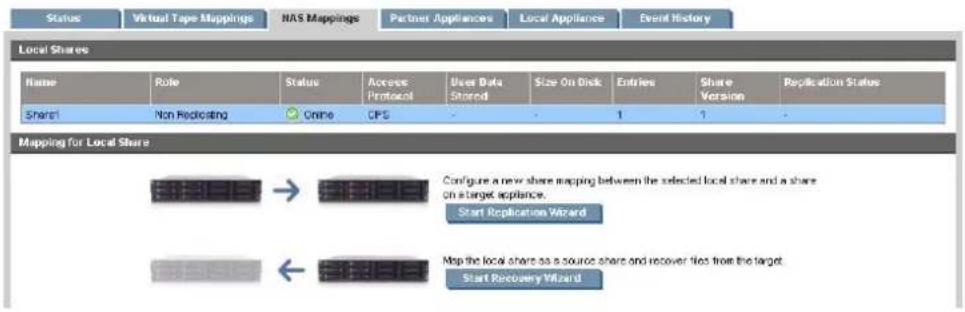
- Proceed to the Select Target Appliance step.

TIP: Click on the show/hide details link to check how many target appliances are permitted and the number of target appliances that are currently configured.
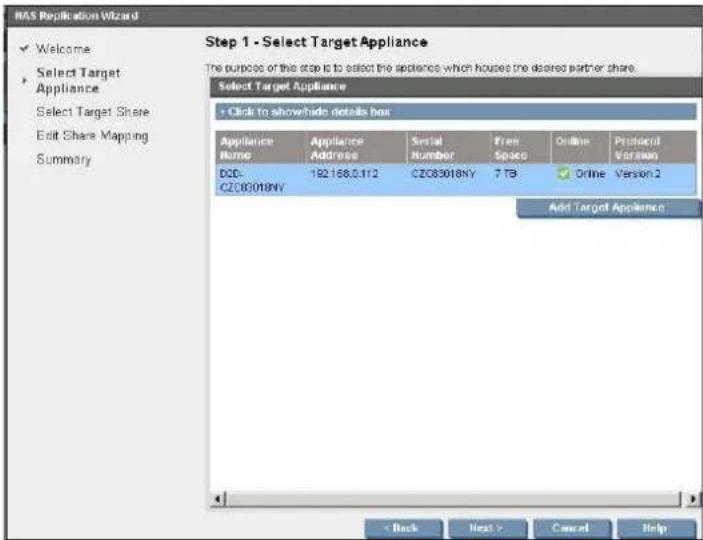
- Select a Target Appliance from the list and click Next.
NOTE: If you want to select an appliance that is not yet on the list, click Add Target Appliance. Enter the Target Appliance IP Address or fully qualified domain name. The default values include the Command and Data Protocol Port Numbers are usually acceptable, but may be edited there is a conflict. (If replication needs to take place through a firewall, the network administrator will need to open (TCP) ports 9387 (Command protocol) and 9388 (Data protocol) to allow the replication traffic to pass to and from the HP StoreOnce Backup System Click Add Target Appliance.
- The wizard then moves to the Select Target Share step. Select a share on the target applic and click Next.
NOTE: If you need to create a new share on the target appliance, click Create New Target Share. Set up the details as you would normally do when creating a new share. You can create a new target share if the appliance to be used as the target has Replication Sour Permissions enabled.
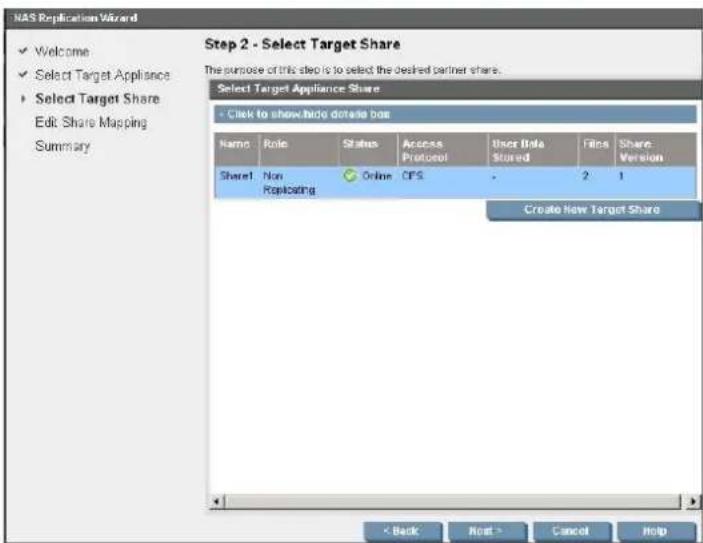
- Give the Share Mapping a name and click Next.
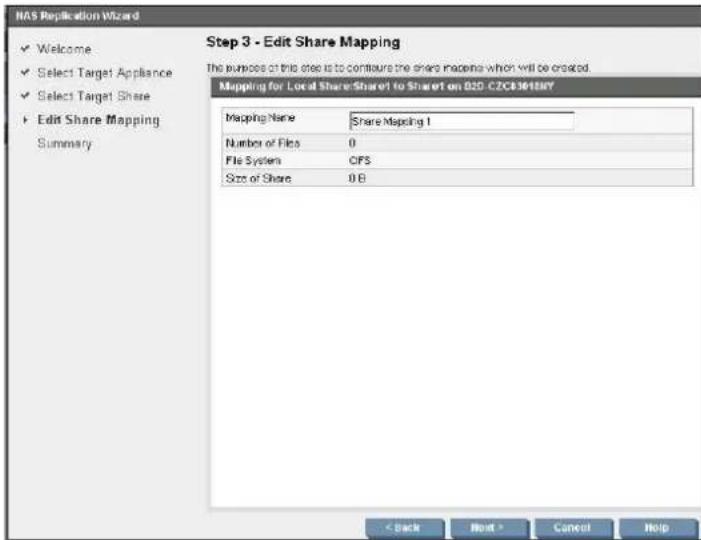
- The Summary screen is displayed. Click Apply to create the share mapping configuration. Replication of files will start immediately.
NOTE: If you were able to colocate the Target Appliance on the same LAN as the Source Appliance to improve replication performance, remember to relocate the Target Appliance to the target site as soon as the files are synchronized.
Figure 3 Replication creation process
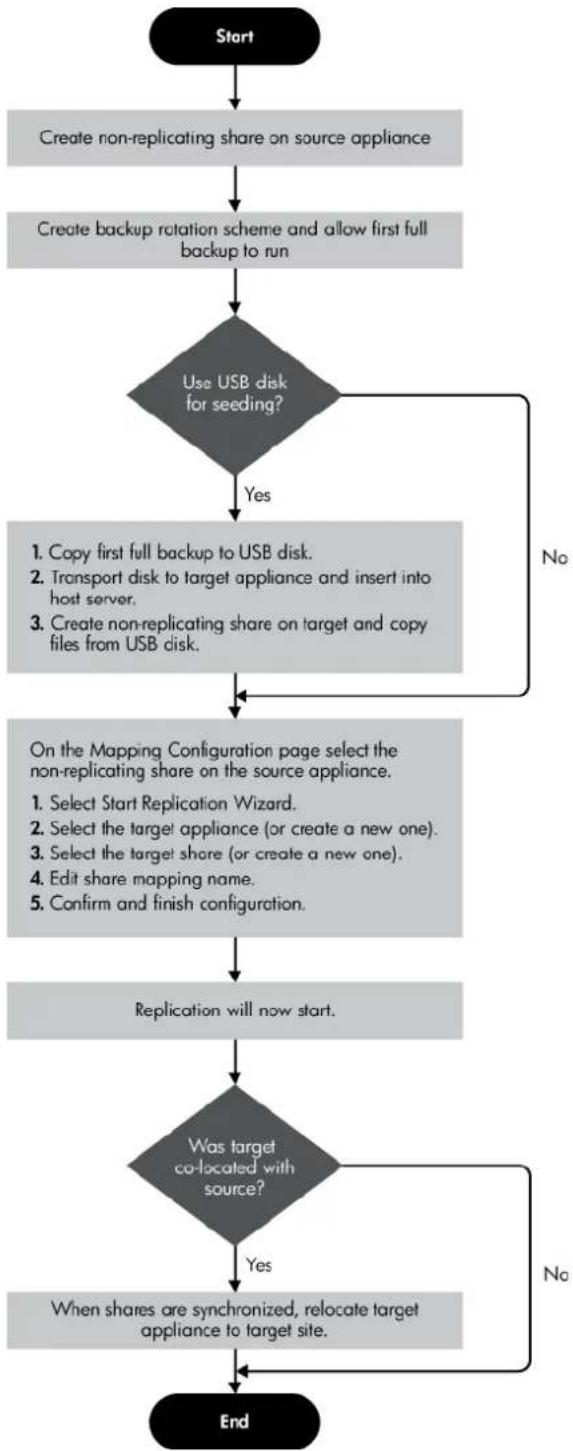
flowchart
graph TD
    A["Start"] --> B["Create non-replicating share on source appliance"]
    B --> C["Create backup rotation scheme and allow first full backup to run"]
    C --> D{Use USB disk for seeding?}
    D -->|Yes| E["1. Copy first full backup to USB disk.<br>2. Transport disk to target appliance and insert into host server.<br>3. Create non-replicating share on target and copy files from USB disk."]
    D -->|No| F["On the Mapping Configuration page select the non-replicating share on the source appliance.<br>1. Select Start Replication Wizard.<br>2. Select the target appliance (or create a new one).<br>3. Select the target share (or create a new one).<br>4. Edit share mapping name.<br>5. Confirm and finish configuration."]
    F --> G["Replication will now start."]
    G --> H{Was target co-located with source?}
    H -->|Yes| I["When shares are synchronized, relocate target appliance to target site."]
    H -->|No| J["End"]
Partner Appliances (Replication)
This page shows you the replication status of all Target and Source HP StoreOnce Backup Sys that have been configured for use with this HP StoreOnce Backup System. You can also add HP StoreOnce Backup Systems on this page, however, it is not necessary to do so before ma configurations because this option is also available when running the Replication wizard. Look the bottom of the page to find information about any blackout windows that apply to the sele appliance.
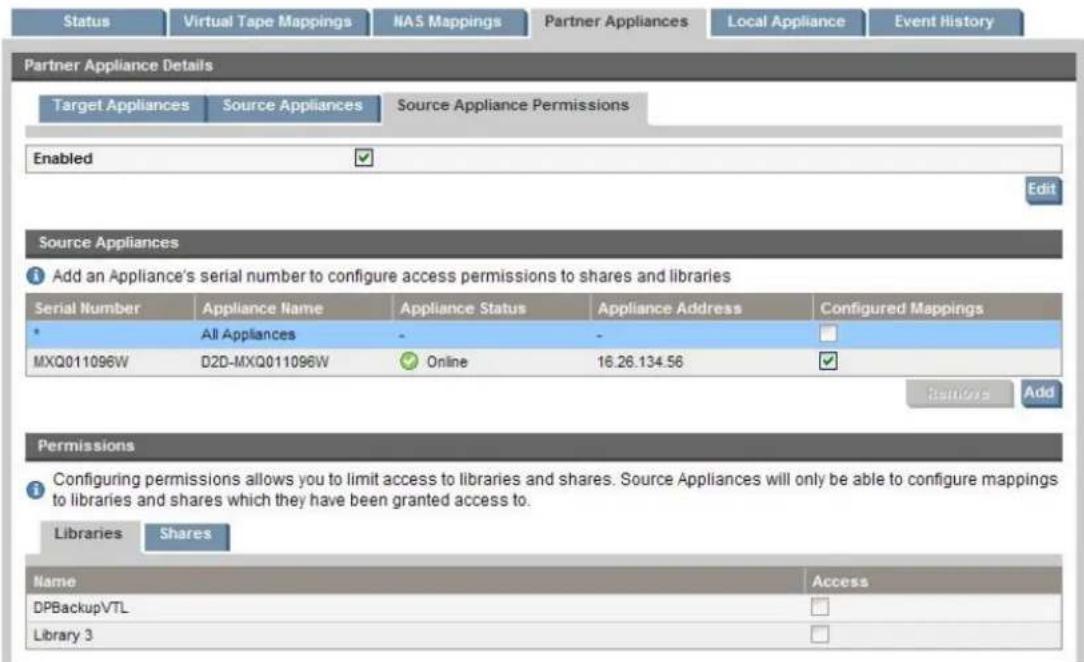
There are three tabs; one for Target Appliances and one for Source Appliances, and a separate tab for setting Source Appliance permissions.
- The Source Appliances tab is not editable. If the HP StoreOnce Backup System also has Replication-Target libraries, there may be multiple Source Appliances.
NOTE: Source Appliances are appliances that have added the local appliance as a Target Appliance. Only Source Appliances that are currently connected to the Target Appliance are listed.
•The Target Appliances tab allows you to add, edit and remove Target Appliance details.
- The Source Appliance Permissions tab allows you to lock down the ability to create share and library mappings so that, when the wizard is run and mappings are configured, the Target only has access to a list of sources that are allowed to replicate to it.
Summary Appliance details
Click on a tab to display a list of available appliances of that type. The following status details shown for the appliance.
Table 20 Summary Appliance details
| The name of the appliance.Appliance Name | |
| The health of the appliance; this shows you whether the appliance is running.Applioc | |
| The address of the appliance.Appliance Address | |
| The serial number of the appliance.Serial number | |
| The amount of free space on the appliance.Free space | |
| Online | Whether the appliance is online. |
| Protocol version | The protocol of the appliance software. |
Click on an appliance to view more detailed status information in the bottom half of the screen, as described in (page 75).
To add a target appliance
Procedure 5
1. Click Add Target Appliance.
Figure 4 Create new target appliance
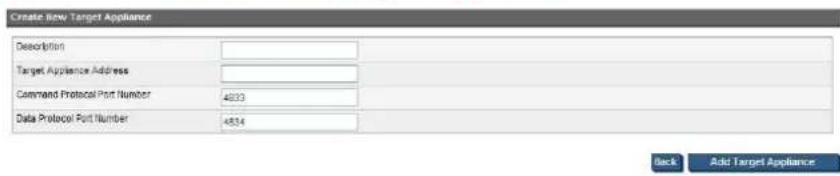
-
Enter the Target Appliance Address.
-
The default values for the Command and Data Protocol Port Numbers are usually acceptable, but may be edited if there is a conflict. (If replication needs to take place through a fire, the network administrator will need to open (TCP) ports 9387 (Command protocol) and 93 (Data protocol).)
-
Click Add Target Appliance.
To edit or remove a Target Appliance
- Select the appliance and click Edit to edit the Appliance Name, IP address and protocol port details of the target appliance.
- Select the appliance and click Delete to remove an appliance from the list of Target Appliances available to that source.
Run Traceroute
Click Run Traceroute to check that the local appliance can communicate with the target appliance and identify the number of hops and latency in the routing.
Target Appliance tab
Table 21 Target appliance parameters
| Target Appliance tab Some fields are editable. | |
| Appliance Name | This is the name that is used to identify the Target Appliance. You specify it on the Local Appliance tab of the partner appliance. |
| Product Class | The product class of the appliance, such as HP D2D4100. |
| Appliance Address | This is the IP address of the Target Appliance. You specify it when you add the Target Appliance and may edit it later. |
| Serial Number | This is the serial number of the Target Appliance; it cannot be edited. |
| Command Protocol Port Number | This is the port number that will be used for command protocol. |
| Data Protocol Port Number | This is the port number that will be used for data protocol. |
| Available | This field indicates whether the Target Appliance is available. |
| Replication protocol | This identifies the replication protocol in use. |
| Capacity | This shows the capacity of the Target Appliance. |
| Free Space | This shows the amount of free space on the Target Appliance. |
| Software version | This shows the software version of the Target Appliance.This shows the current system time.System Time |
| Blackout window active | This shows whether a blackout window is currently active. This means no replication will occur. |
| Blackout windows | Any blackout windows that have been specified will be reflected in this weekly calendar. During these times, the selected Target Appliance is not available for replication. |
Summary Appliance tab
Table 22 Source appliance parameters
| Source Appliance tab No fields are editable. | |
| This is the name of the Source Appliance.Appliance Name | |
| The product class of the appliance, such as HP D2D4000.Product Class | |
| This is the IP address of the Source Appliance.Appliance Address | |
| This is the serial number of the Source Appliance.Serial Number | |
| This field indicates whether the Source Appliance is available.Available | |
| This shows the capacity of the Source Appliance.Capacity | |
| This shows the amount of free space on the Source Appliance.Free Space | |
| This shows the software version of the Source Appliance.software version | |
| Blackout windows | Any blackout windows that have been specified will be reflected in this weekly callDuring these times, the selected Source Appliance is not available for replication. |
Source Appliance Permissions tab
Source Appliance Permissions are disabled by default. In this state, there is no control over mapp between share and library devices on the Target and the Source Appliances.
However, if you want to lock down the ability to create share and library mappings so that, when the wizard is run and mappings are configured, the Target only has access to a list of sources that are allowed to replicate to it, click Edit and check the Enabled box.
You will then need to create the list of source appliances and enable share and library permission accordingly.

To add a Source Appliance
When you click Edit and check the Enabled box a list of source appliances is displayed.
There is a wildcard entry in the Source Appliances list that allows you to set permissions across all source appliances. However, you are more likely to want to set permissions for individual appliances.
Click Add. A wizard guides you through the necessary steps to add a new source appliance to the list. You will need to provide the serial number of the appliance and can also specify initial access permissions for all libraries and all shares on that appliance.
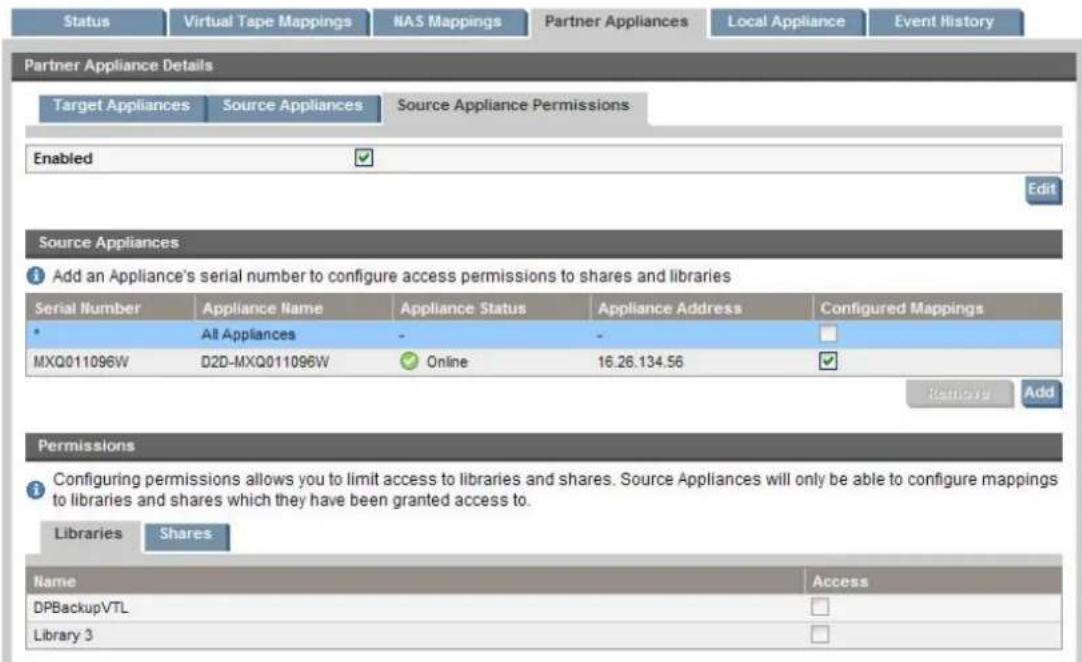
Table 23 Source Appliances parameters
| Serial Number | This is the serial number of the source appliance. This information can be found by runn the Web Management Interface on the required appliance and looking at the Summary page. |
| Appliance Name | This is the name of the appliance for which you have specified the serial number and cannot be altered. |
| Appliance Status | This is the status of the appliance for which you have specified the serial number and cannot be altered. |
| Appliance Address | This is the address of the appliance for which you have specified the serial number and cannot be altered. |
| Configured Mappings | This checkbox indicates whether any mappings have been configured on the source appliance. This is important to know, because any mappings that already exist will be retained regardless of any access permissions you subsequently set up for libraries and shares on that appliance. |
To enable permissions
- Select the source appliance in the list. There are two tabs; one for Libraries and one for S
-
Click Edit. You can now check the Access box for those shares and libraries to which acc should be granted. These are the shares and libraries that will be displayed when the ma configuration step is run in the Replication wizard. It will not be possible to create a new or library from the wizard.
-
Click Update to apply the permissions.
Local Appliance (Replication)
This page contains three tabs that show general settings for the HP StoreOnce Backup System, settings for blackout windows and bandwidth limiting settings. These are the tabs that allow you to view and modify information about the appliance whose Web Management Interface you have logged into.
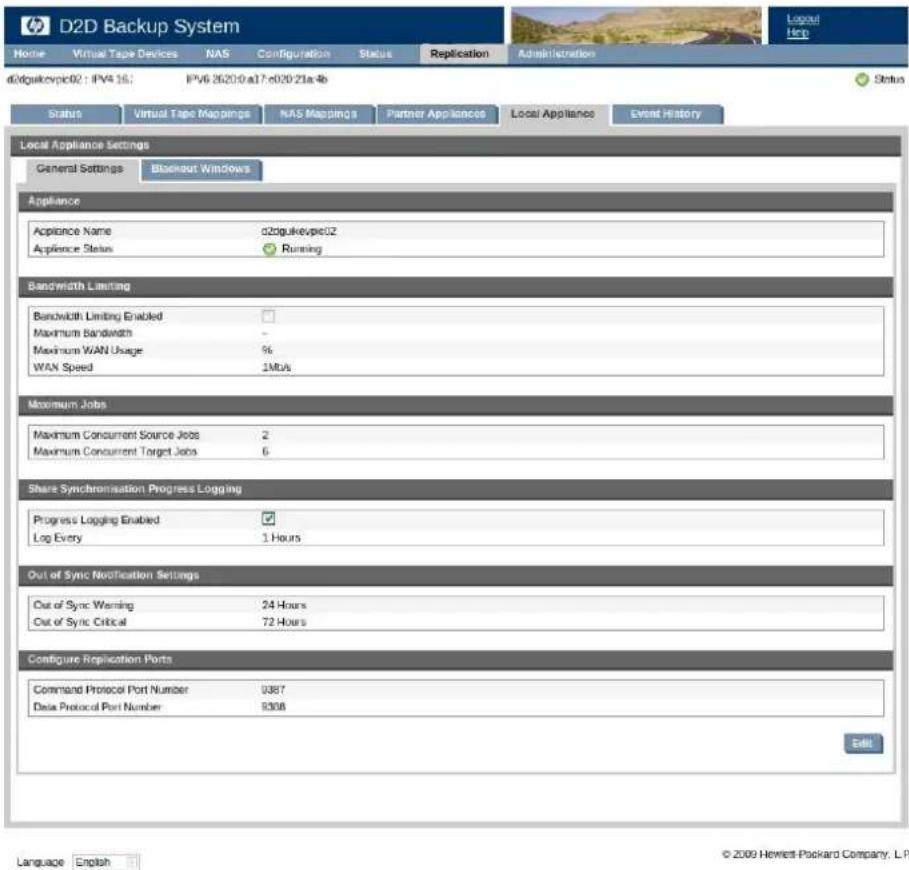
General settings
- Select the General Settings tab.
- Click Edit to make the fields editable, see table below.
- Click Apply to apply the settings.
Table 24 General Settings (Replication)
| Appliance | This shows the name of the appliance and its current status. It also tells you the product class: HP D2D2500, HP D2D4000, HP D2D4106/4112 or HP D2D4312/4324. You can only edit the appliance name. The default name is the network host name of the appliance (as configured in network settings). You may change this to something that is more user friendly and will make it easier to identify the appliance on the replication Web Management Interface of the local and partner appliances. It may be anything that is meaningful to the user, such as the geographical location of the appliance. |
| Maximum Jobs | This is the maximum number of source and target jobs that can run concurrently. If necessary, you can reduce the default value on this page. You may want to decrease the maximum source jobs to avoid using too much WAN bandwidth. You may want to reduce the maximum number of target jobs to avoid overloading the target appliance and reserve appliance performance, if you are running backups or tape offloads at the same time as replication. |
| Synchronization progress logging | An event is always generated each time a mapping goes out of sync and goes back into sync. This field applies to periodic sync progress updates whilst the mapping remains out of sync, which results in emails (if emails are configured), but not SNMP traps. Use these fields to enable progress logging for Library and Share synchronization and to specify the logging interval. While the library or share is out of sync emails are sent periodically indicating how many slots or entries are still out of sync. This information is also logged to the user Event Log. One email is sent for each log entry made for each library or share that is out of sync. |
| Out of Sync Notification Settings | These fields to specify the amount of time a mapping needs to be out of sync before a sync issue is shown in the Issue tab, and an event is generated, resulting in an entry in the user Event Log, and also an email and/or an SNMP trap if the appliance is configured tosend these. These notifications are in addition to a standard notification email sent whenever a mapping first becomes unsynchronized and another when synchronization is achieved. |
| Configure ReplicationPorts | Replication ports should only be changed if replication is blocked by a router on the WAN They must be the same on both source and target appliances. If in doubt, do NOT chang them. |
!
IMPORTANT: If replication needs to take place through a firewall, the network administrator will need to open (TCP) ports 9387 (Command protocol) and 9388 (Data protocol) to allow the replication traffic to pass to and from the HP StoreOnce Backup Systems. If necessary and the StoreOnce Backup Systems conflict with another device on the network, these ports can be checked from the defaults in the General Settings.
Bandwidth limiting
This tab allows you to apply a general bandwidth setting and to configure bandwidth limiting windows.
Bandwidth limiting can be used to avoid saturating the WAN with low bandwidth replication, freeing up bandwidth for other processes and applications that you may have running. A mini of 2Mbps per concurrent job is recommended. At least 512kbps per concurrent job is required for reliable operation. A bandwidth usage calculator is provided to generate a recommended bandwidth limit from WAN speed information and percentage usage information, which is provi in the Maximum WAN Usage and WAN Speed fields. These limits apply to all outbound replication jobs from this local appliance.
- Display the Bandwidth Limiting tab.
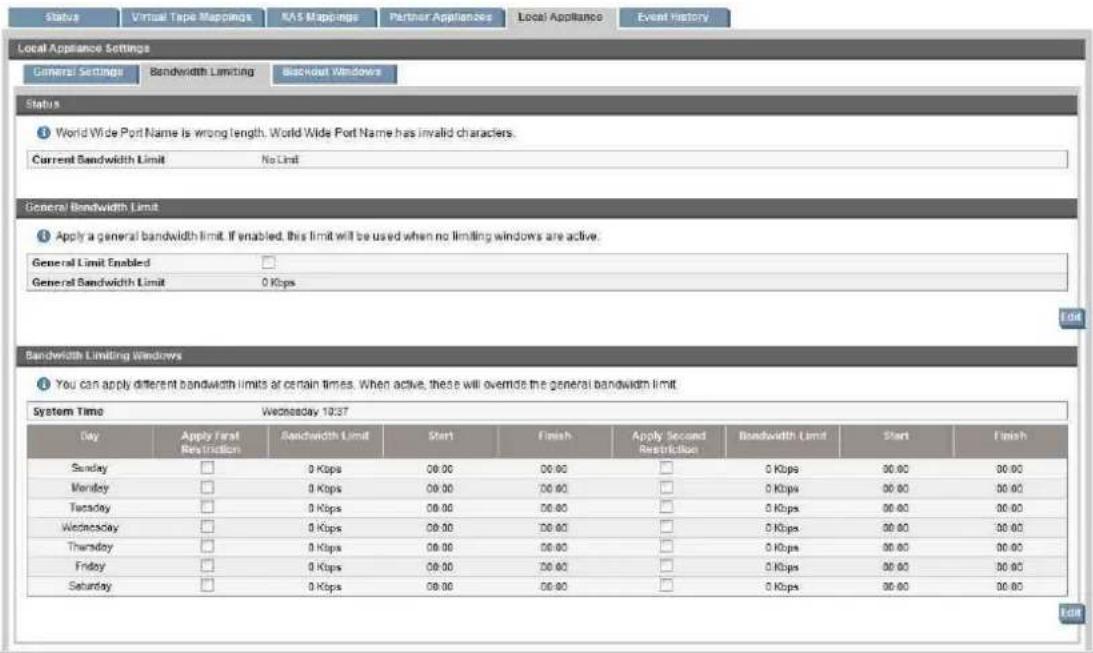
-
Check the General Limiting Enabled box. You can now work out the recommended general bandwidth limit, which is a simple calculation of WAN Speed x Maximum % WAN Usage A bandwidth limit calculator is provided on this page to work out limit values, if required.
-
Click Edit to edit the Bandwidth Limiting Windows.
You can configure two windows for each day. Be sure to check the appropriate Apply First/Second Restriction checkbox(es). This ensures the times that have been specified are
enabled. If it is not checked, the times are ignored. Then enter the general value you have just calculated for the Recommended Limit in each required window manually.
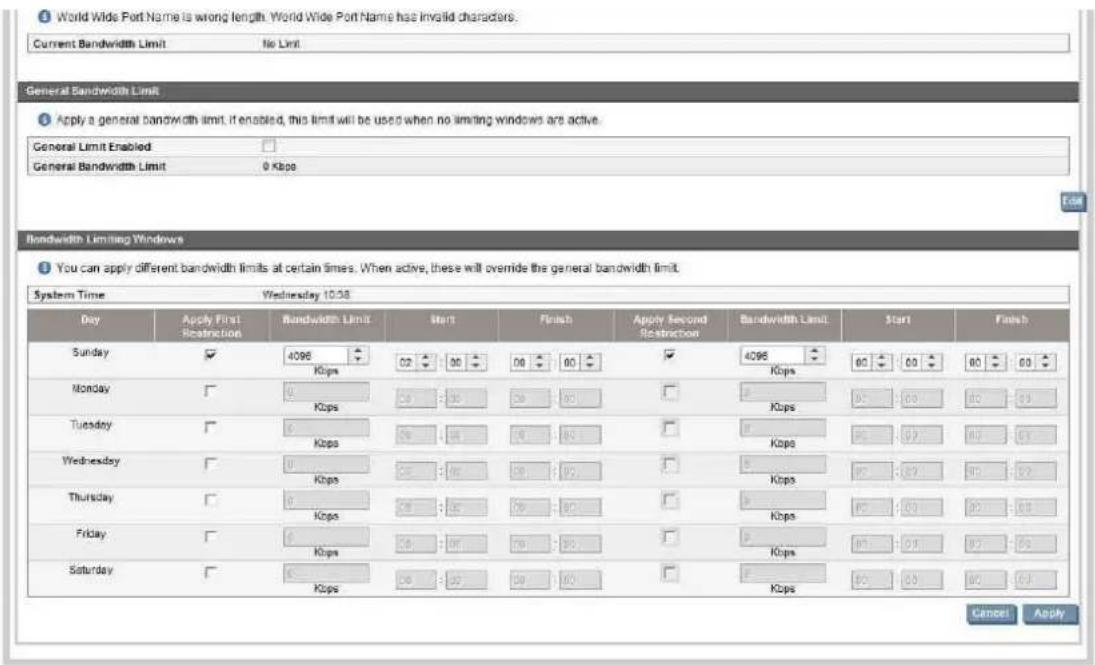
NOTE: All settings are applied to the HP StoreOnce Backup System — you cannot configure settings for individual jobs. The Bandwidth Limit windows override the General Limit when the time specified for the window is active. Outside of Bandwidth Limit windows the General Limit applies.
4. Click Apply.
Blackout windows
This option allows you to specify times when replication should not occur, for example during planned maintenance or heavy network traffic. You may configure multiple blackout windows.
NOTE: This setting relates to the local appliance in its role as a source or target device. No replication jobs will be started if the Source or Target Appliance for a mapping is in blackout, a any running jobs for the mapping will be paused.
- Select the Blackout Windows tab.
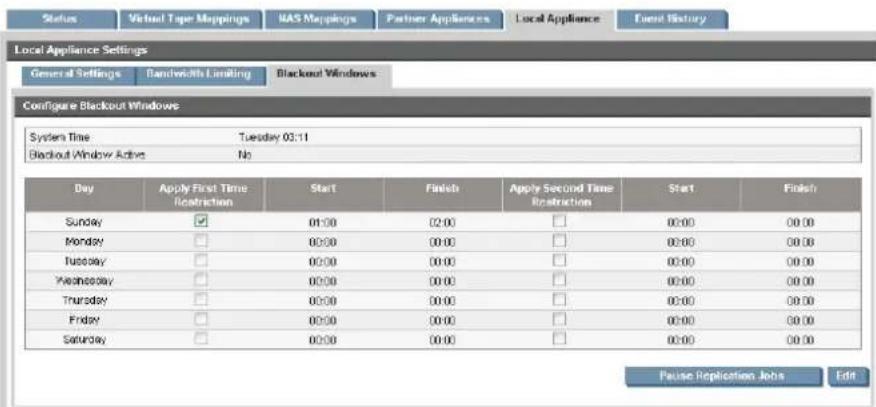
-
Click Edit.
-
Check the box next to the required day of the week.
-
The time boxes become editable. Use the drop-down menus to select the appropriate hours.
-
Set up as many blackout windows, as required.
-
Make sure the Apply First Time Restriction box is checked. This ensures the times that have been specified are enabled. If it is not checked, the times are ignored.
-
If you want to enable a second blackout window, make sure the Apply Second Time Res box is checked. The second blackout window for each day must occur after the first black window for that day.
-
Click Apply. If you now look at the Appliance tab, you will notice that the calendar for the Source and Target Appliances reflects the changes you have made.
Pause replication jobs
The Pause Replication Jobs button on the Blackout Windows tab provides an easy way of putting all replication jobs on hold immediately. Click a second time to resume replication jobs.
Event History (Replication)
This page shows the log of all completed replication events on the appliance. Select an event the list to view its details below.
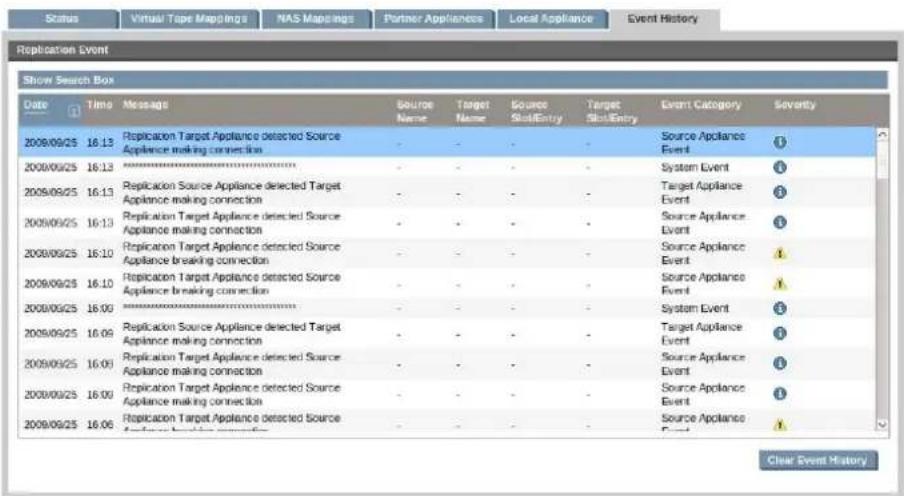
This page presents a time and date stamped list of significant replication events with severity s and associated messages. The most recent information is shown at the top of the list.
- Select an event in the list to view its details below.
•The Clear Event History button may be used to clear the list.
•The History will be maintained if the HP StoreOnce Backup System is power cycled.
Sorting and searching the event history
Click on any column heading to sort messages according to that criterion. For example, click Date to sort the messages according to date.
Click on Show Search Box to display a Filter field and two drop-down menus. Use the right-hand drop-down menu to filter on Severity, for example to display all Error messages. Use the middle drop-down menu to select a column (or All) and the type a search string into the Filter box.
8 Administration
The Administration menu allows you to configure basic appliance settings, such as date and time and licenses. The following options are available.
-User Account (Administration)
•Security (Administration)
•Date and Time (Administration)
•Housekeeping (Administration)
- Shutdown (Administration)
•Software (Administration)
•Support (Administration)
• Backup and Restore (Administration)
•License (Administration)
User Account (Administration)
This page allows you to manage the Administrator's password. It also includes sections for configuring the amount of idle time before a user is automatically logged off and for disabling/enabling the welcome message pop-up screen.
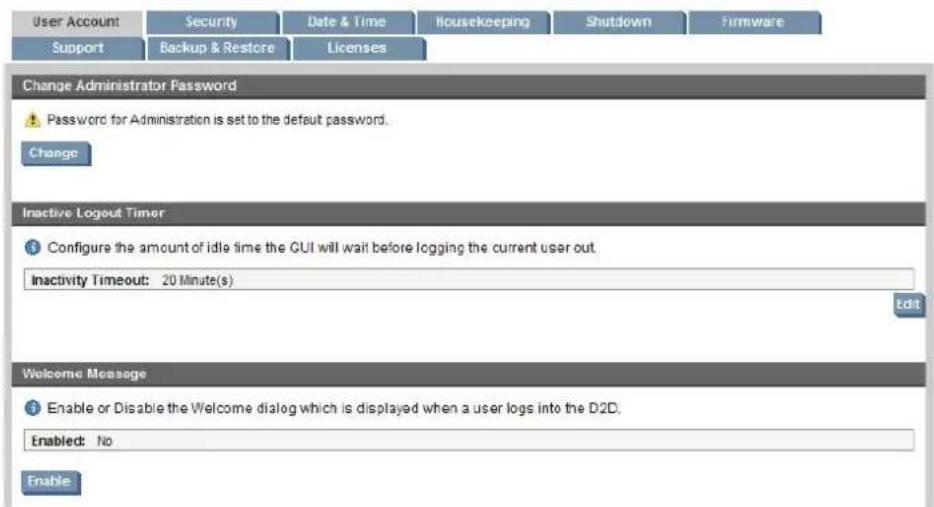
Password
When you first log on the Administrator user has a password of Admin. For security reasons, you may wish to change this.
- Click Edit to make the fields editable.
• Make the required changes and click Update to apply the changes (or Cancel to discard them). The new password must have at least 8 characters.
NOTE: The password that you configure on this page is also the password that is required when accessing the HP StoreOnce Backup System configuration from the system console.
Resetting the password
If you forget your password, you can reset the HP StoreOnce Backup System as follows:
NOTE: Resetting the password will reset the networking settings to the factory defaults and reset the Administrator password to Admin. No user data will be lost.
Procedure 6
- Make sure nobody is using the HP StoreOnce Backup System before you attempt the reset.
- Press the Power button on the front of the HP StoreOnce Backup System three times in quick succession.
Approximately 5 seconds later the HP StoreOnce Backup System will reboot.
- Use the device Discovery tool on the HP StoreOnce Backup System CD-ROM to re-configure the network settings of the HP StoreOnce Backup System. You can also use the console so
Inactive Logout Time
It is possible to set an amount of idle time, in minutes, before a user is automatically logged Click Edit and amend, as required.
Welcome Message
The Welcome Message is automatically displayed whenever the software is upgraded; it is a way of drawing the user's attention to changes and new features. Click Disable to disable the Welcome Message. Alternatively, you can click Don't show again on the Welcome Message itself. Once disabled, you must use the Enable button on the User Account page to reinstate it.
Security (Administration)
By default, the HP StoreOnce Backup System generates a generic SSL certificate, which means that it is not unique to the HP StoreOnce Backup System. So, when you log onto the HP Stor Backup System for the first time from a host, certificate errors are displayed. It is safe to cont but you will have a Certificate Error reported in the navigation bar.
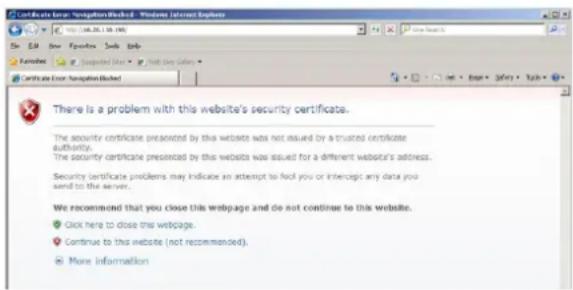
This page allows you to create a self-signed SSL certificate, after you have logged on. This will prevent the certificate errors being displayed in future because the certificate has not been signed by a trusted certificate authority, but any attempts to spoof the HP StoreOnce web site using a different certificate will fail. (The SSL certificate info in the Web Management Interface will always show the values of the default SSL certificate, not the content of the generated SSL.)
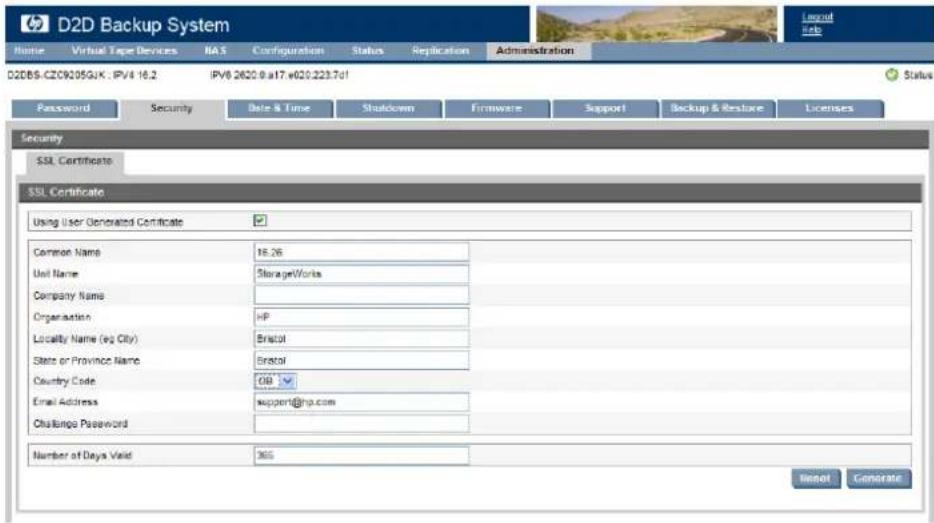
-
The Using User Generated Certificate check box is blank when this feature is not yet enabled..
-
Provide the relevant information, as described below.
Table 25 Security parameters
| The host name or IP address of the HP StoreOnce Backup System.Common Name | |
| Your section name within your company.Unit Name | |
| Your company name.Organisation | |
| Your city.Locality | |
| Your state or province name.State or Province Name | |
| Select the appropriate two-character identifier from the drop-down box.Country Code | |
| Email Address | Your email address. |
| Number of days valid | The certificate will expire after this number of days and an error will be displayed in the web browser. |
-
Click on Generate.
-
Once generated, the HP StoreOnce Backup System will restart its web server and re-display the login page. Certificate errors will still be present, but this time the certificate contains valid and unique data.
-
You can now install this certificate into the web browser on the host system. The web brow will no longer issue the initial error web page when you log in, but the "Certificate Error message will still be present on the navigation bar.
Figure 5 Generic certificate information
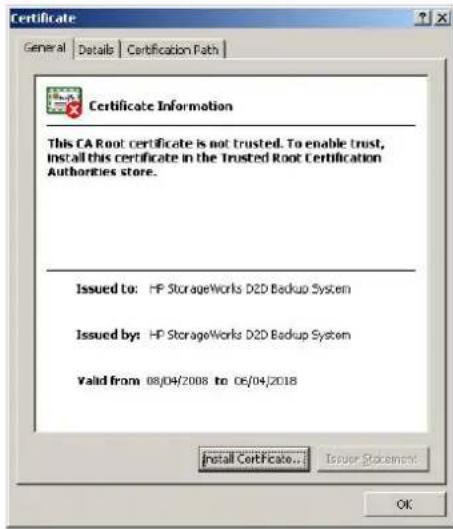
Figure 6 User generated certificate information
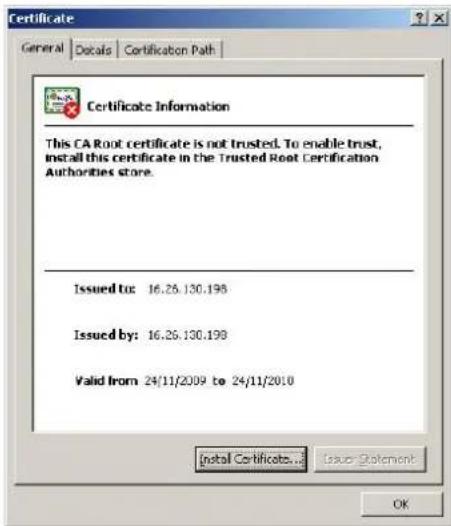
Date & Time (Administration)
This page allows you to view and manage the following settings:
• Date and time settings
- Date display format
• Network Time Protocol (NTP) settings
•Daylight saving settings
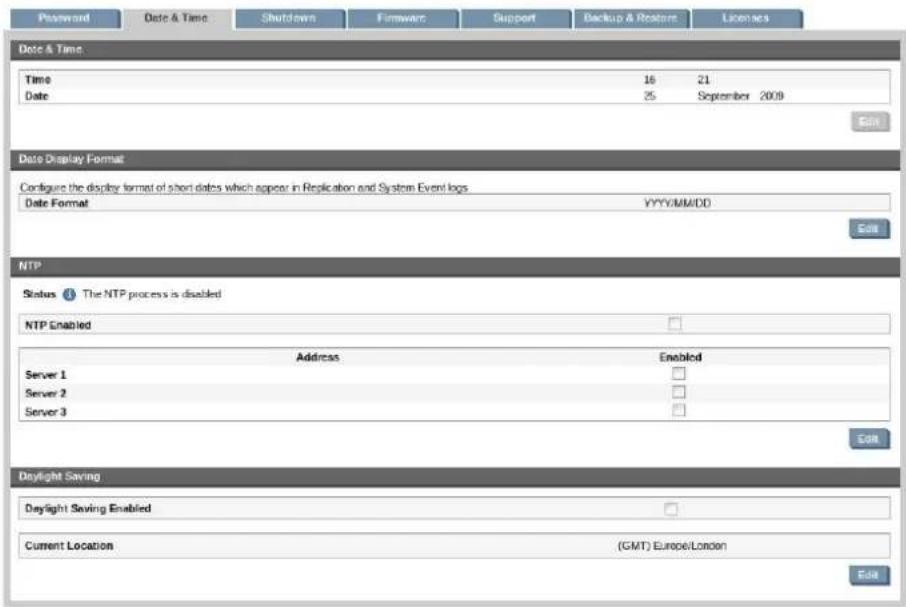
Date & Time settings
These fields provide the ability to manually set the date and time. They can only be edited if the NTP process is disabled.
Date Display format
Click Edit to change the way the date format is displayed in Replication and System Event logs. Select the desired format from the drop-down menu and click Update.
Network Time Protocol (NTP) settings
Network Time Protocol (NTP) provides support for automatic time synchronization. If you are using an Active Directory Service domain controller, it is important to synchronize the StoreOnce appliance's real-time clock with the same time source as that of the Active Directory Server.
NOTE: If you enable NTP, you cannot configure date and time manually and you must set the Current Location correctly to ensure that local time is correct
- Check the NTP Enabled box and provide the IP address or fully qualified domain name of an NTP server on the local network.
It is possible to synchronize the HP StoreOnce Backup System with up to three NTP servers. If you are using Windows Active Directory, one of these should be either the domain control server or an NTP server that the domain controller is also using to synchronize its time. Provid multiple NTP servers ensures that a single server failing or getting out of sync will not affect the time on the HP StoreOnce system. - Be sure to check the box next to each of the servers to enable.
IMPORTANT: If the NTP server (for automatic date and time update) fails to connect to the server for any reason, it will fail and stop the NTP server. If this happens an email alert will be sent at the user must manually restart NTP from the Web Management Interface.
Daylight Saving
By default, the HP StoreOnce Backup System does not make any automatic adjustments for daylight saving time. Use this section to enable daylight saving and also view the current time zone/locatic
Time zones that have half-hour increments (rather than full-hour increments) are fully supported. The 0.5 hour time zone increment is not shown in the Current Location drop-down list (for exc Australia/Darwin and Australia/Adelaide are shown as GMT+9, rather than GMT+9.5), but the correct adjustments are made.
Users in locations that are on 0.5 hour time zone increments and that do not participate in E Savings Adjustments, such as Australia/Darwin and Asia/Calcutta, must enable Daylight Savings for the correct local time to be shown.
Housekeeping (Administration)
IMPORTANT: Housekeeping is an important process in order to maximize the deduplication efficiency of the appliance and, as such, it is important to ensure that it has enough time to run. Running backup, restore, tape offload and replication operations with no break (i.e. 24 hours day) will result in housekeeping never being able to complete. This is a complex subject. We strongly recommend that you read HP StoreOnce Backup Systems best practices for VTL, Replication implementations that is available on http://www.hp.com/support/manuals for more detailed guidance.
This page shows current housekeeping activity, as a graph, and allows you to configure black windows for housekeeping. The graph can be toggled from a Day to a Week view; the exam shows the Day view.
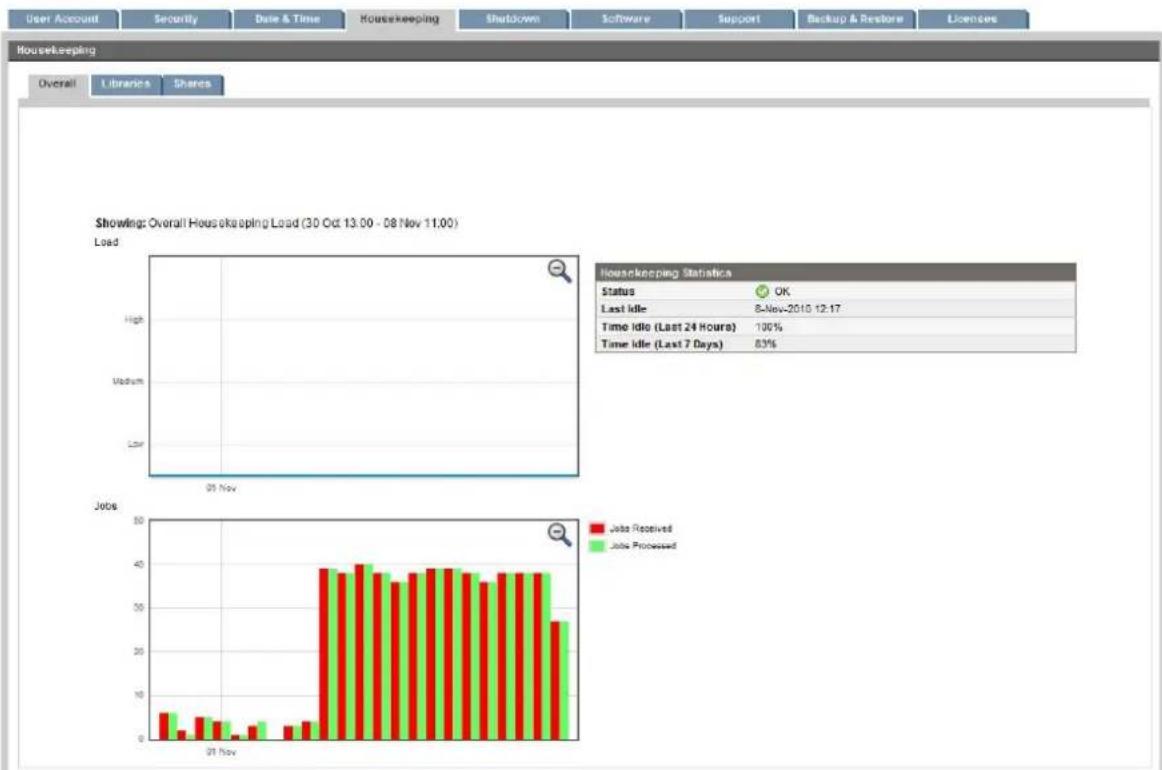
bar
Showing: Overall Housekeeping Load (30 Oct 13.00 - 08 Nov 11.00) | Metric | Jobs Received | Jobs Processed | | :--- | :--- | :--- | | 01 Nov | 5 | 6 | | 02 Nov | 4 | 3 | | 03 Nov | 3 | 2 | | 04 Nov | 2 | 1 | | 05 Nov | 3 | 2 | | 06 Nov | 4 | 3 | | 07 Nov | 5 | 4 | | 08 Nov | 6 | 5 | | High | 12 | 1 | Housekeeping Statistics Status OK Last Idle 8-Nov-2010 12:17 Time Idle (Last 24 Hours) 100% Time Idle (Last 7 Days) 83%Using the graph
The graph is displayed when the Overall tab is selected; it shows the overall activity for the HP StoreOnce Backup Appliance. Two additional tabs allow you to view activity for libraries and shares.
Use the Housekeeping Statistics to check the status.
- OK means that housekeeping has been idle and, therefore, not likely to have been impacting on backup or replication performance.
- Warning means that housekeeping has not been idle in the last 24 hours.
- Caution means that housekeeping has not been idle in the last 7 days
A status of either Warning or Caution requires further investigation because it will be affecting backup and replication performance.
Configuring blackout windows
Scheduling housekeeping blackout windows to cover the period during which backups are occurring can significantly improve backup performance.
Click Edit and enter the appropriate times for each window. Make sure the Apply First Time Restriction box is checked. This ensures the times that have been specified are enabled. If it is not checked, the times are ignored.
You may configure a maximum of two windows for each day. Settings apply to all devices on the HP StoreOnce Backup System.
#
TIP: Ideally, housekeeping blackout windows should be set for those times when the HP StoreOnce Backup System is running backup or replication. See the D2D Best Practices for VTL, Replication implementations for recommendations.
NAS ai
Pausing housekeeping
Click Pause Housekeeping to pause housekeeping altogether (perhaps while you decide how best to configure blackout windows). This setting applies to all devices, libraries and shares on the HP StoreOnce Backup System. It is not retained if there is a power failure or the HP StoreOnce Back System is powered down.
Housekeeping should not be left in the paused state for significant amounts of time; use it only a test tool.
Shutdown (Administration)
This option allows you to shut down the HP StoreOnce Backup System cleanly. It is the only recommended way of powering off the device. If you remove the power in any other way and a host is carrying out a backup or restore, you may lose or corrupt data.
Click Power Off and Yes to confirm.

!
WARNING! Before shutting down always ensure that there are no backup or restore jobs in progress and that no future jobs are scheduled to start whilst the system is shut down. If hosts do not automatically reconnect to the HP StoreOnce Backup System when it restarts, you must reconn manually from the iSCSI Initiator on each host, see the HP StoreOnce Backup System Installation and Configuration Guide.
Software (Administration)
This page provides information about the software version of your HP StoreOnce Backup System and its build date. It also allows you to upgrade the software and the language pack. Whenever
you upgrade software, there will be a welcome message in the Web Management Interface th summarizes all the changes in this upgrade.
!
IMPORTANT: Once you have upgraded your software, you will not be able to revert to the earlier version. Always read the Release Notes accompanying the software upgrade carefully to check that the upgrade is compatible with your configuration.
IMPORTANT: Software can only be upgraded from a maximum of two previous revisions; attempting to upgrade from a version any older will fail with an error message and the software will not be upgraded. If you wish to upgrade from an older version, you must first upgrade to appropriate newer reversion, reboot and then upgrade again.
Software updates for all versions can be downloaded from http://www.hp.com/support/downloads.
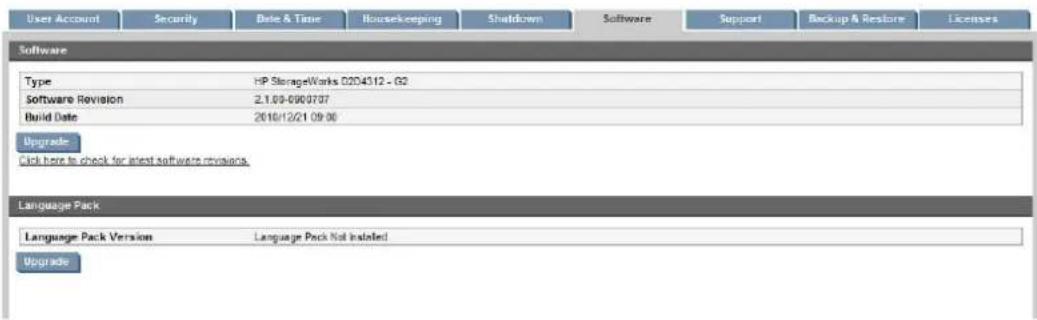
NOTE: You may also receive notification of upgrades to system components, such as hard drives and BIOS, from time to time, independently of upgrades to the HP StoreOnce Backup Software. Use the Support page to check the current status of these components and determine whether an upgrade is required.
Language Pack
The Language Pack contains all the translations for the Web Management Interface and message that are displayed when using it. This includes the online help.
Whenever new software is released, there may also be changes to the screens and messages. is, therefore, very important to make sure that these are downloaded at the same time as the software is updated. The software upgrade removes all language packs, so a new language p is always required to get localized languages and ensure that everything is up to date.
Identifying the correct software for your product
It is important to select the correct software for your product. There are two generations of HF StoreOnce Backup Systems. Sometimes it is easy to identify the generation from the model nun sometimes it is less easy.
• HP D2D2503i, HP D2D4004/4009i/fc are only available as G1 products
• HP D2D4106i/fc and HP D2D4312 are only available as G2 products
- HP D2D2502i, HP D2D2504i and HP D2D4112 are available as both G1 and G2 products. The generation can be identified from the Summary page and the Software page of the Web Management Interface. Look at the Type field, which will state G1 or G2 or look at the Software Revision field. If it shows 1.x.xx software, it is a G1 product; if it shows 2.x.xx software, it is a G2 product.
Upgrading the software
- Check http://www.hp.com/support for the latest software (you can do this by selecting the link on the Software page) and download it to your hard disk.
- Read the Release Notes accompanying the software upgrade and confirm that it is compatible with your StoreOnce configuration. You will not be able to revert to earlier software after running the upgrade.
- Select Software from the Web Management Interface and click Upgrade in the Software section of the page.
- Make sure that there are no backup or restore jobs in progress and that no future jobs are scheduled to start whilst the software is upgrading. Click Yes.
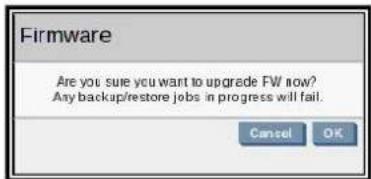
- Click Browse... and locate the upload file that you have just downloaded.
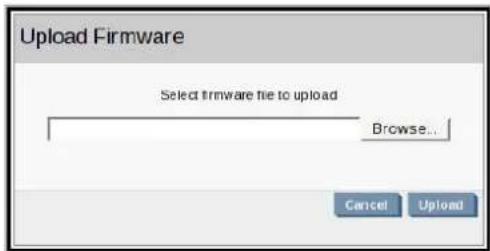
- Click Upload to upgrade the software. A progress meter is displayed while the upgrade takes place. The system will reboot once it has been updated. Configuration information and data are unaffected by this process.

WARNING! Once you have started to upgrade the software, it is important that you allow it to complete. Do not attempt to cancel the upgrade process, or power off the machine.
!
IMPORTANT: We strongly recommend that you upgrade the language pack immediately after upgrading the software. The software upgrade removes all language packs, so a new language pack is always required to get localized languages and ensure that everything is up to date. If y do not download the language pack, all message strings, online help and screen prompts will be in English only.
Upgrading the language pack
NOTE: The supported languages are English, French, German, Spanish, Portuguese, Russian, Japanese and Simplified Chinese.
- Check http://www.hp.com/support for the latest language pack (you can do this by selecting the link on the Software page) and download it to your hard disk.
- Select software from the Web Management Interface and click Upgrade in the Language Pack section of this page.
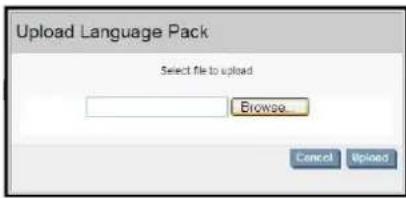
NOTE: Online help is also included in this pack.
- Click Browse... and locate the upload file that you have just downloaded.
- Click Upload to upgrade the language pack. On successful completion the following messa is displayed.
- Click OK. All screen fields and messages will now be correct for all languages.
Support (Administration)
Use this page to view system information and to generate and download a support ticket.
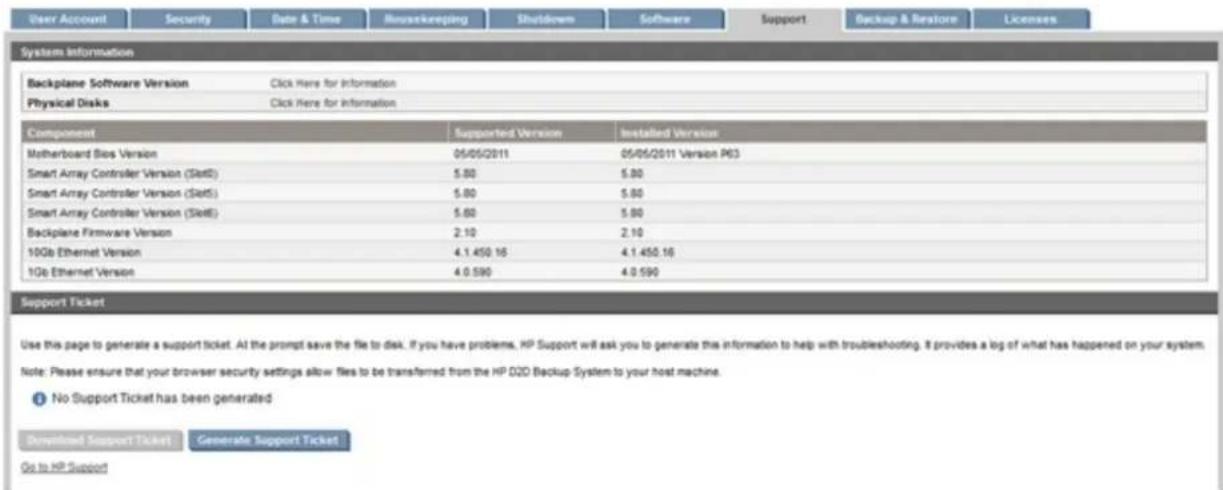
System information
This section provides information about the following components within the HP StoreOnce Back System:
- Motherboard BIOS
•Smart array controller(s) version
• Ethernet card(s) versions
• Expansion shelf/shelves versions
• Backplane software version (and a link for further information on the Status-Shelves page)
•Physical disk versions (this is a link to the Status-RAID page)
For each component, the current installed version is listed as well as the current supported version so that you can determine whether an upgrade is required. If the installed version is out-of-date, this will be flagged for your attention. All component firmware versions can be updated at once
with the D2D Component Firmware ISO image. The latest version of the ISO image is available from http://www.hp.com.
IMPORTANT: It is essential that when you upgrade your software to the latest version, you also update all component firmware.
Support ticket
If you have problems, HP Support will ask you to generate a support ticket to help with troubleshooting. It provides a log of everything that has happened on your system.
NOTE: Please ensure that your browser security settings allow files to be transferred from the HP StoreOnce Backup System to your host machine.
- Click Generate Support Ticket to create a support ticket.
- The ticket generation will start and display a progress meter.
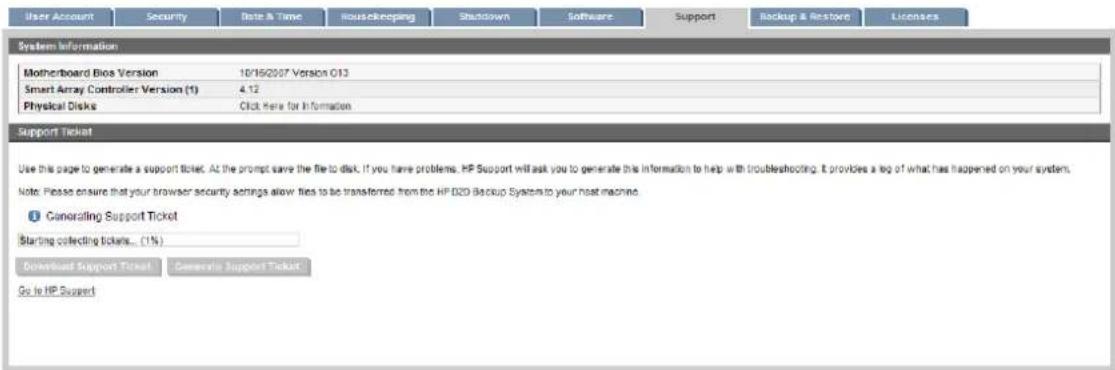
NOTE: If a support ticket had already been created and not downloaded before you created the new support ticket, a warning is issued. Either click Continue to overwrite the existing support ticket or click Cancel and download the existing support ticket first.
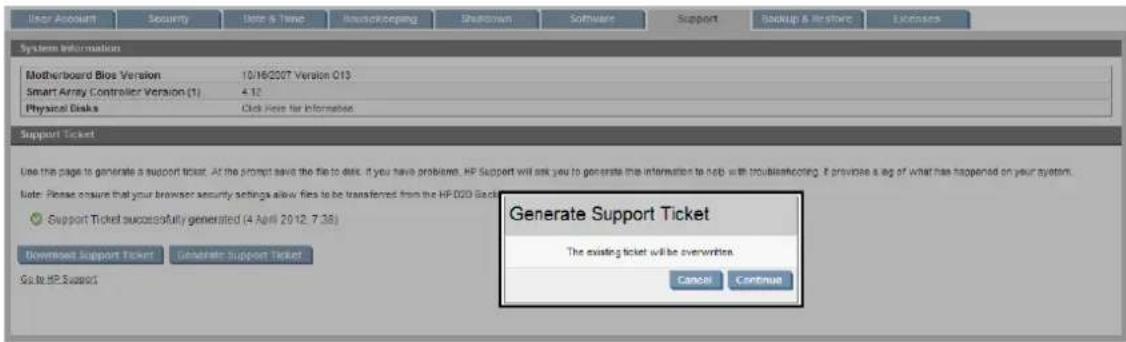
- Once completed, a status is provided along with a Date and Time when the ticket was generated, and the Download Support Ticket button is enabled.
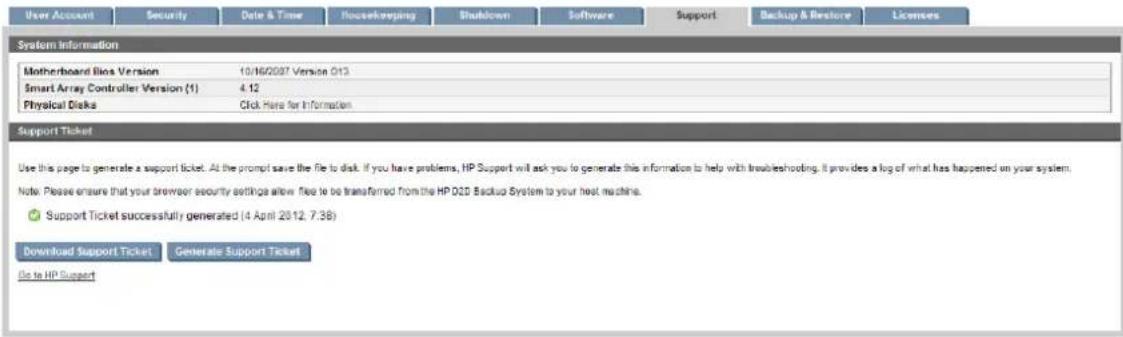
NOTE: If there is an issue with the ticket being generated, a partial ticket may be created.
- Click Download Support Ticket to save the file to disk.
Backup & Restore (Administration)
This tab allows you to save the HP StoreOnce Backup System's configuration settings by downloading them to the host system. If the HP StoreOnce Backup System or the host is repair or replaced, the configuration settings can be restored. It is also possible to restore an HP Store Backup System to factory settings, if a critical failure cannot be resolved by any other means. should normally only be done, if advised to do so by HP Customer Support.
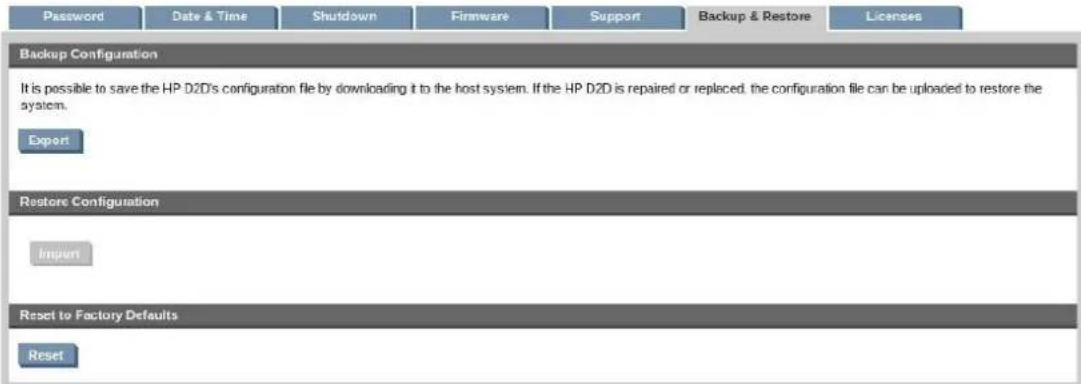
Recommendations
Certain combinations of hardware failure will result in the need to recover configuration setting. It is strongly recommended that you export the configuration file:
- Once you have initially configured the HP StoreOnce Backup System and the configuration is stable
• Whenever you change the configuration
• Before you upgrade the software - Immediately after upgrading software
• Before you change any hardware component
NOTE: Configuratin files generated on old software will not be compatible after software upgrade, so a new configuration file must be taken after software update.
Backing up the configuration file
- Click on Export to create the configuration file.
- At the prompt, select Save to disk.
Restoring the configuration file
It is only possible to restore configuration files when there is no other configuration present; resetti to factory defaults can be used to achieve this.
- Click on Import to upload the configuration file.
- You will be warned that this will override at current settings. Click OK to continue.
- At the prompt, locate the configuration file and click Upload to complete the process. This restores the following configuration parameters:
•network settings
• virtual tape device configuration
- email alert settings
- fibre channel settings, if your model supports FC
- date and time settings
Resetting factory defaults
Only use this feature, if advised to do by Support and there is no other way of restoring the system to a known-good state. It erases all user data and deletes all configuration details and license information. It resets the system and puts it in a state ready to create storage.
License (Administration)
Licensing is used to enable optional product functionality, such as capacity upgrades and replication. The Licenses page shows you a list of the features that are available for your product and wheth they have been enabled and licensed. Most features are only enabled when they are licensed. If you have purchased a feature that requires a license, you will receive a license entitlement certificate with your product. This is a paper document that contains all the information you need to obtain your unique License to Use (LTU) key. If you have Internet access, you can obtain the key from the HP Webware site by connecting to the web address specified on the certificate and following the instructions on the web. (Users without Internet access may use the contact numbers provided with the entitlement certificate.)
You will be required to enter the product's serial number when you request a License to Use key.
More about replication licensing
Replication is a licensed feature. Each HP StoreOnce Backup System that will be used as a Target Appliance must have a Replication license activated.
More about capacity upgrade licensing
The capacity of the HP D2D2500 Series Backup System cannot be upgraded.
The HP StoreOnce Backup System is supplied with eleven hot-plug RAID disks and an online spare disk (in bay 12 (HP D2D4100 Series) or in bay 1 (HP D2D4300 Series). The Capacity Upgrade Kit provides an additional eleven hot-plug +1 online spare disks. The HP 4100 Series allows connection of one Capacity Upgrade Kit; the HP D2D4300 Series allows connection of up to three capacity upgrade kits. You cannot use the disks in the Capacity Upgrade Kit until they are licensed
IMPORTANT: When you add the Capacity Upgrade Kit, the HP StoreOnce Backup System goes offline while the RAID is expanded.
The capacity of the HP D2D2500 Series Backup System cannot be upgraded.
To apply the license key
- Obtain the unique License to Use key, as instructed on the License Entitlement Certificate. This is normally from the HP Licensing website at http://www.webware.hp.com. We recommend that you select the option to save the license to a .DAT file. The file can also be emailed the registered license owner's email address or you can use Cut and Paste to copy it to temporary file.
- Select the License page From the Web Management Interface to display a list of licensable features.
- Select the feature that you wish to license and click in the checkbox to enable it. If you have saved the LTU as a .DAT file, click Upload license file and use the Browse option to file. If you used email or a temporary file, cut and paste the string exactly as you obtain from the HP Licensing website and click Enter LTU string. It is not advised to try and key in the LTU manually. The key is specific to the HP StoreOnce Backup System and cannot be transferred.
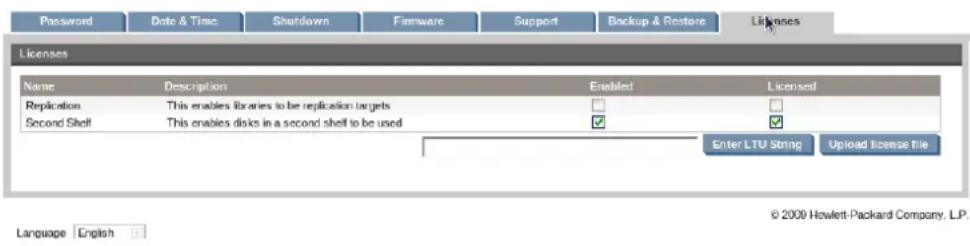
NOTE: If you are expanding the RAID disk capacity in an HP D2D4000 Series product, you be prompted to reboot your system.
9 Restore processes with replication
In this chapter:
•Recovering a source appliance, VTL devices
•Recovering a source appliance, NAS shares
Recovering a Source Appliance (Virtual Tape devices)
! :
If you replace the disks in the source StoreOnce Backup System and keep the original appliance, the source to target mapping will still exist on the repaired StoreOnce Backup System. You MUST break this mapping BEFORE carrying out recovery. If you do not, the now blank Source Library (on the replacement disks) will overwrite the data on the Target Library. You will effectively lose backup data on both Source and Target Libraries.
Reverse replication using the wizard
The remote site has lost both the host servers and the StoreOnce system. New hardware has been purchased and installed and the administrator now wants to recover data to the StoreOnce Backup System and then restore to the host server. Before the failure a mapping existed between a Source Library on the remote site StoreOnce Backup System and a Target Library on the Data Center StoreOnce Backup System. After the failure the Source Library is missing; the mapping may or may not still exist.
Figure 7 Recovery using reverse replication
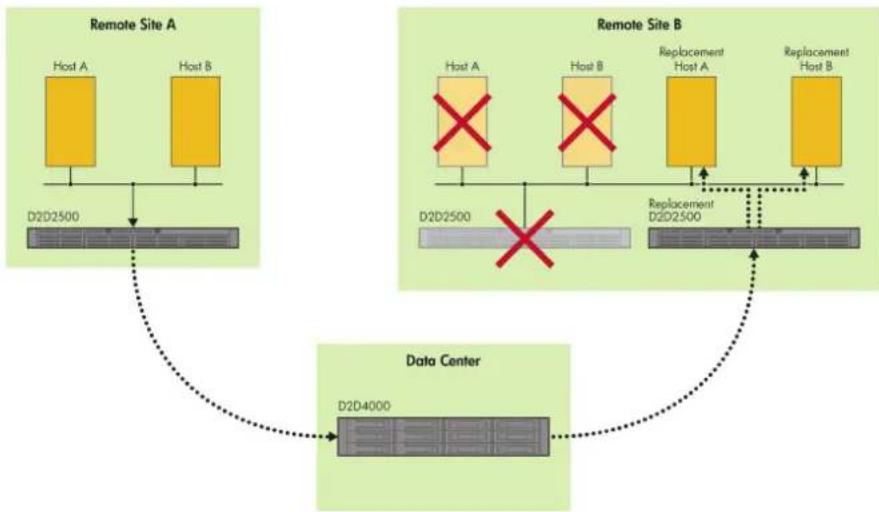
flowchart
graph TD
    subgraph Remote Site A
        A1["Host A"] --> D2D2500
        A2["Host B"] --> D2D2500
        D2D2500 --> DataCenter
    end
    subgraph Remote Site B
        B1["Host A"] --> D2D2500
        B2["Host B"] --> D2D2500
        B3["Replacement Host A"] --> D2D2500
        B4["Replacement Host B"] --> D2D2500
        D2D2500 --> DataCenter
    end
    D2D2500 --> DataCenter
    D2D2500 --> DataCenter
    DataCenter --> DataCenter
    style Remote Site A fill:#f9f,stroke:#333
    style Remote Site B fill:#f9f,stroke:#333
    style DataCenter fill:#ccf,stroke:#333
- Create a new Non-Replicating Library on the Source Appliance (either by running the Installation wizard or by using the Devices page).
- Go to the Replication - Virtual Tape Mappings page and select the new non-replicating library.
- Click Start Recovery Wizard.
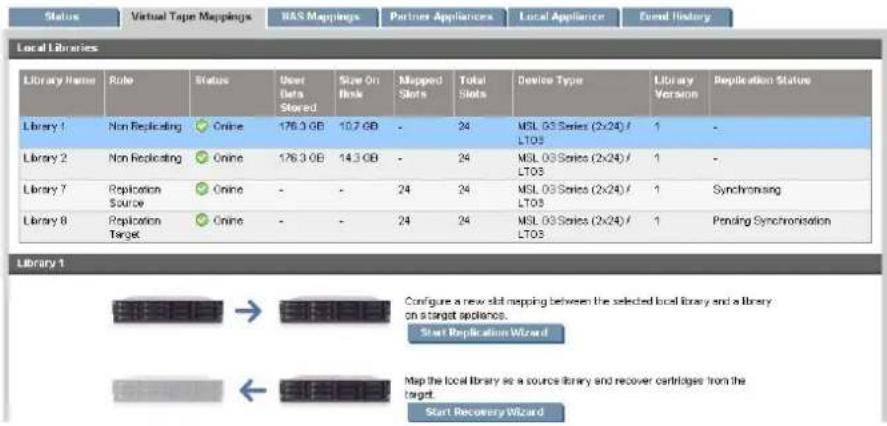
- At the Select Target Appliance Step, select Add the Target Appliance and provide the IP address of the previous replication target device..
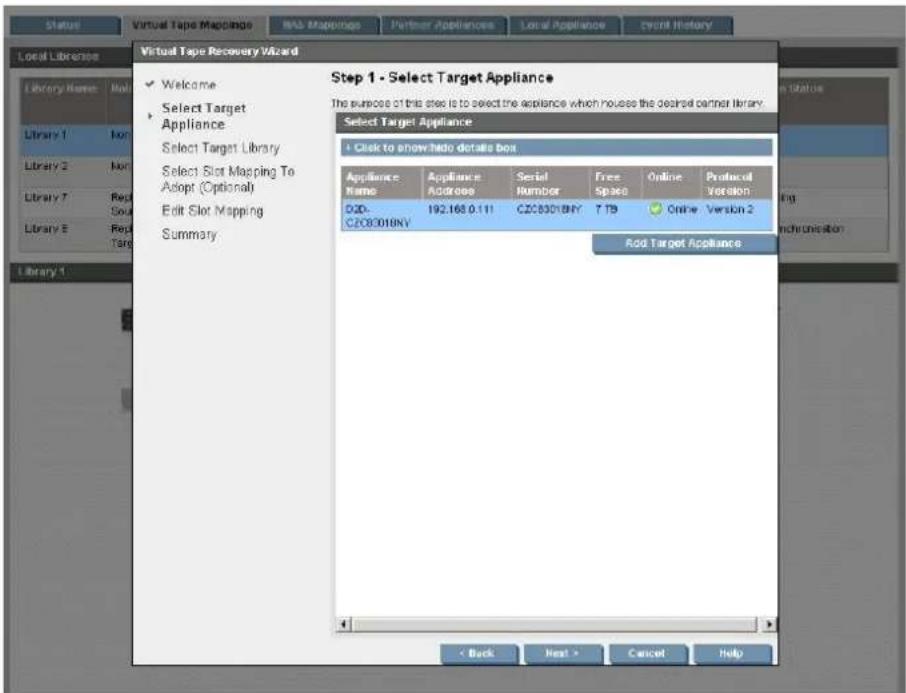
- Select the existing Target Library, or the Non-Replicating Library that was the Target Library before mapping was broken, from which slots should be recovered.
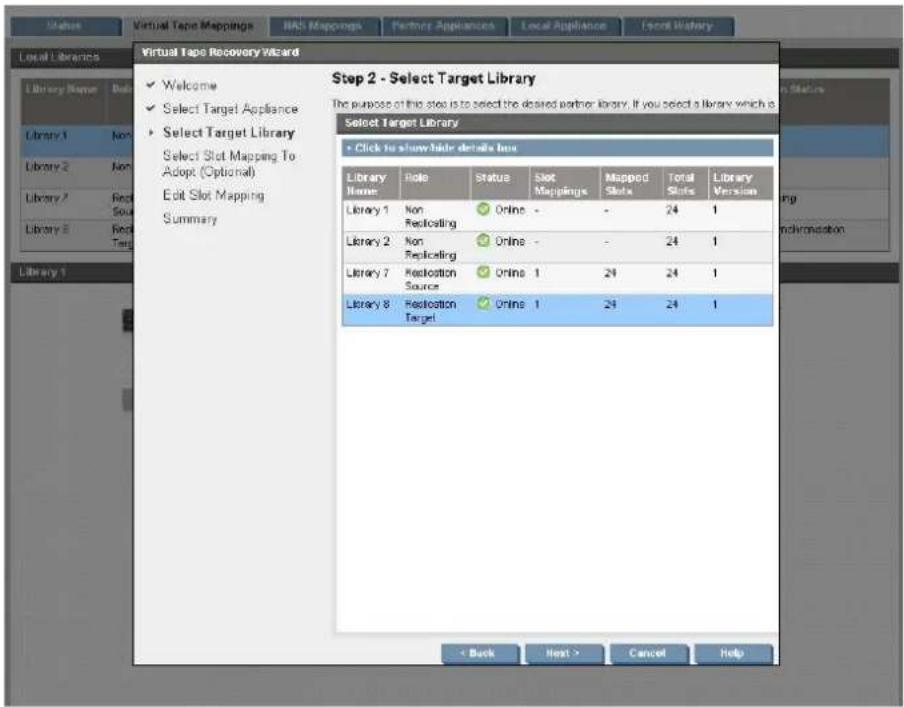
- If it is an existing Target Library, adopt the Slot Mapping that had been configured. If the mapping had been broken and the library has reverted to Non-Replicating, create a new slot mapping. All slots in the Target Library will be selected by default, but you may deselect any cartridges that you do not wish to recover to the Source Library.
Click Adopt to run reverse replication.
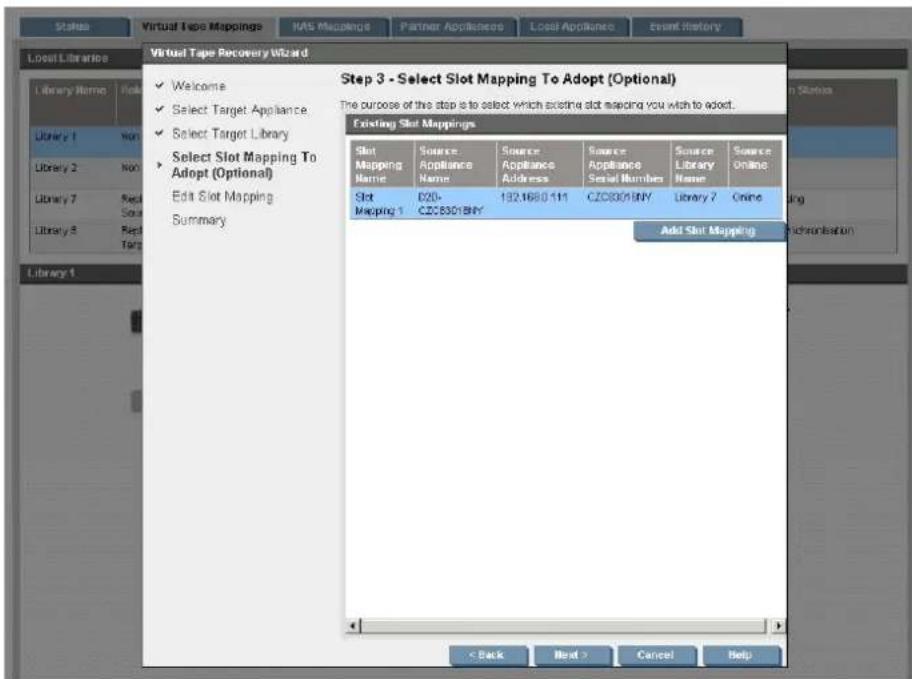
If the Target Library supports multiple library Fan In, the library may still be a Replication Target if other mappings exist. You can now recover by adding the mapping back to map the unmapped slots to the new Source Library.
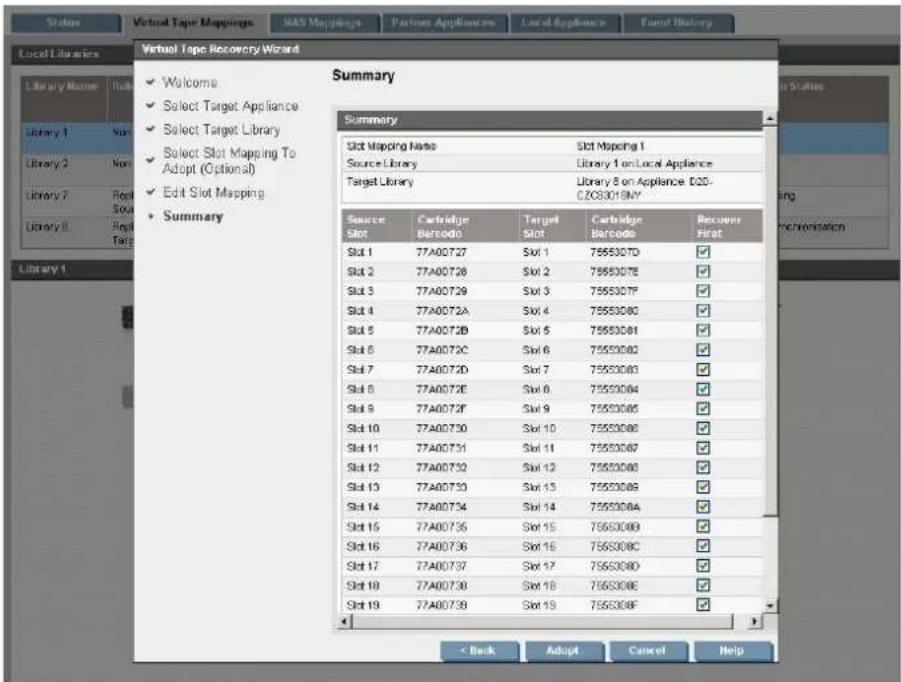
- As soon as reverse replication has completed for each slot, the data may be recovered to host using the original backup application.
- New backups can now run to the Source Appliance and replication will run normally with further configuration.
Figure 8 Reverse replication process: source lost
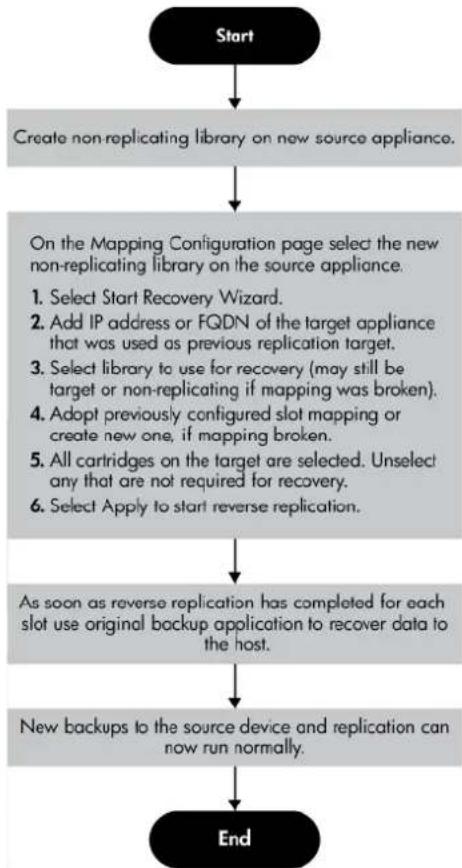
flowchart
graph TD
    A["Start"] --> B["Create non-replicating library on new source appliance."]
    B --> C["On the Mapping Configuration page select the new non-replicating library on the source appliance."]
    C --> D["Select Start Recovery Wizard."]
    C --> E["Add IP address or FQDN of the target appliance that was used as previous replication target."]
    C --> F["Select library to use for recovery (may still be target or non-replicating if mapping was broken)."]
    C --> G["Adopt previously configured slot mapping or create new one, if mapping broken."]
    C --> H["All cartridges on the target are selected. Unselect any that are not required for recovery."]
    C --> I["Select Apply to start reverse replication."]
    C --> J["As soon as reverse replication has completed for each slot use original backup application to recover data to the host."]
    J --> K["New backups to the source device and replication can now run normally."]
    K --> L["End"]
Promoting a Target Library over the WAN using iSCSI
The remote site has lost both the host servers and the StoreOnce system. New server hardware has been purchased and installed and the admin now wants to recover data to the server. The admin has not installed a new StoreOnce Backup System and is going to recover data directly to the server from the Data Center StoreOnce Backup System over the WAN (which will take a long time).
NOTE: The procedure described below retains the ability to back up to the Target Library. If this is not required, a simpler solution may be to make the Target Library visible (but read-only), see Backup applications and Replication Target libraries (page 16).
Figure 9 Recovery by promoting a Target Library
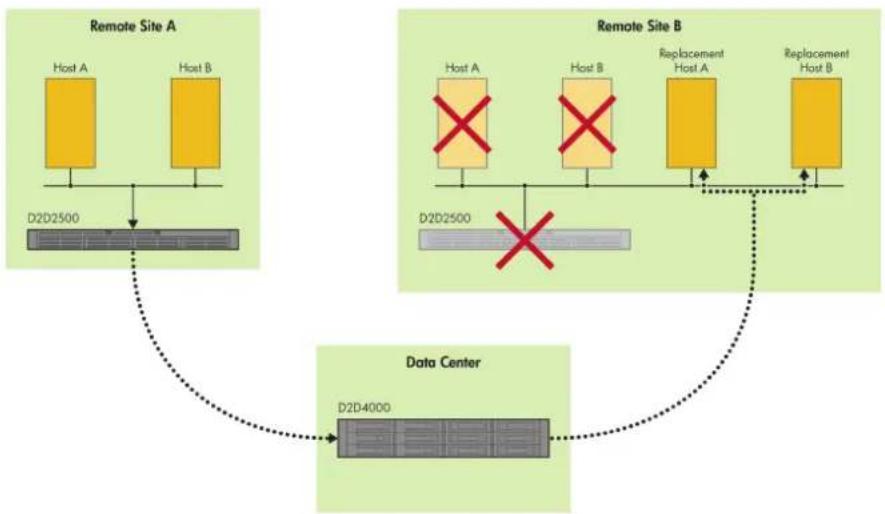
flowchart
graph TD
    subgraph Remote Site A
        A1["Host A"] --> D2D2500
        A2["Host B"] --> D2D2500
        D2D2500 --> DataCenter
    end
    subgraph Remote Site B
        B1["Host A"] --> D2D2500
        B2["Host B"] --> D2D2500
        B3["Replacement Host A"] --> DataCenter
        B4["Replacement Host B"] --> DataCenter
    end
    D2D2500 -.-> DataCenter
    D2D4000 -.-> DataCenter
    D2D4000 -.-> DataCenter
Before the failure a mapping existed between a Source Library on the remote site StoreOnce Backup System and a Target Library on the Data Center StoreOnce Backup System. After the failure the mapping still exists but the Source Library is missing. The Target Library on the Data Center StoreOnce Backup System is still in Target Library mode, it has not had its mappings removed.
IMPORTANT: This recovery method is not suitable if the Target Library also has slot mappings from Source Libraries on other remote sites.
-
On the Target Appliance in the Data Center, go to the Replication - Mapping Configuration page, select the Target Library and remove the slot mapping between it and the lost Source Library.
-
As long as there is only one slot mapping to the Target Library, it will become a Non-Replicating Library.
NOTE: If there are other mappings, do not remove them if it will break other library replication. Do not proceed, this method is not suitable.
-
Edit the port configuration of the newly promoted Non-Replicating Library to make it iSCSI.
-
Install the iSCSI initiator on the host machine at the remote site where recovery is to occur an install the backup application.
-
Configure the iSCSI Initiator Name for the newly promoted Non-Replicating Library to be that of the host system.
-
Connect to the Data Center appliance and library via iSCSI from the host at the remote site.
-
Import the cartridges into the backup application and recover the data over the WAN.
-
At this point there is no HP StoreOnce Source Appliance at the remote site. If one is installed at a later date, you can reverse recover the data and configure replication, as described Reverse replication using the wizard (page 96).
Figure 10 Recovery process: promoting a target library over the WAN
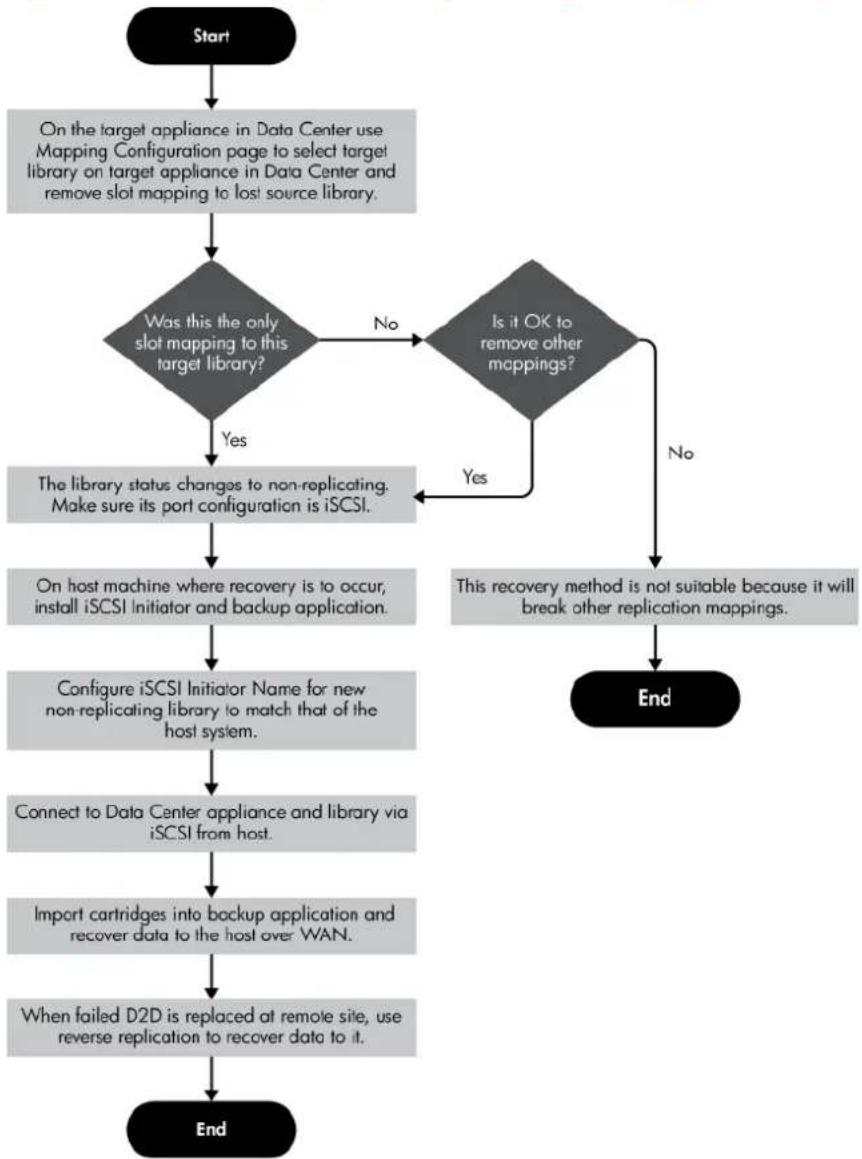
flowchart
graph TD
    A["Start"] --> B["On the target appliance in Data Center use Mapping Configuration page to select target library on target appliance in Data Center and remove slot mapping to lost source library."]
    B --> C{Was this the only slot mapping to this target library?}
    C -->|No| D{Is it OK to remove other mappings?}
    C -->|Yes| E["The library status changes to non-replicating. Make sure its port configuration is iSCSI."]
    D -->|No| F["This recovery method is not suitable because it will break other replication mappings."]
    D -->|Yes| G["End"]
    E --> H["On host machine where recovery is to occur, install iSCSI Initiator and backup application."]
    H --> I["Configure iSCSI Initiator Name for new non-replicating library to match that of the host system."]
    I --> J["Connect to Data Center appliance and library via iSCSI from host."]
    J --> K["Import cartridges into backup application and recover data to the host over WAN."]
    K --> L["When failed D2D is replaced at remote site, use reverse replication to recover data to it."]
    L --> M["End"]
Promoting a target library using colocation
New server hardware has been purchased and installed and the admin now wants to recover data to the server. The administrator decides to move the StoreOnce Backup System appliance that was in the Data Center to the remote office (maybe only temporarily) in order to recover server data.
Figure 11 Recovery by relocating the Target Appliance
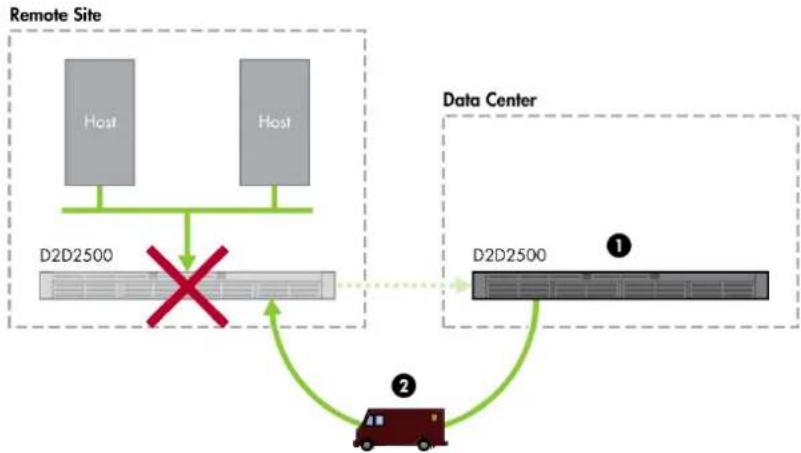
flowchart
graph TD
    A["Host"] --> B["D2D2500"]
    C["Host"] --> B
    B --> D["Data Center"]
    D --> E["D2D2500"]
    E --> F["Truck"]
    style A fill:#ccc
    style C fill:#ccc
    style B fill:#fff
    style D fill:#fff
    style E fill:#ccc
    style F fill:#ccc
    classDef red_X stroke:#000,stroke-width:2px;
    classDef green_Y stroke:#000,stroke-width:2px;
    classDef green_O stroke:#000,stroke-width:2px;
    classDef red_Low stroke:#000,stroke-dasharray: 5 5;
    class D,E,F red
Before the failure a mapping existed between a Source Library on the remote site StoreOnce Backup System and a Target Library on the Data Center StoreOnce Backup System. After the failure, the mapping still exists but the Source Library is missing. The Target Library on the Data Center StoreOnce Backup System is still in target library mode, it has not had its mappings removed.
!
IMPORTANT: This configuration is possible in only limited situations because it will break any other backups or replications to the Data Center appliance. In a simple Active-Passive scenario, however, this may be a very good model.
-
Transport the appliance from the Data Center to the remote site and reconfigure networking, etc.
-
On the Target Appliance (now in the remote site), go to the Replication - Virtual Tape Mappings page, select the Target Library and remove the slot mapping between it and the lost Source Library.
-
As long as there is only one slot mapping to the Target Library, it will become a Non-Replicating Library.
NOTE: If there are other mappings, do not remove them if it will break other library replication. Do not proceed, this method is not suitable.
- Decide which interface, iSCSI or FC, you will use to connect the library to the host and edit the port configuration of the newly promoted Non-Replicating Library to make it iSCSI or FC, as appropriate.
- For an iSCSI connection, install the iSCSI initiator on the host machine at the remote site where recovery is to occur and install the backup application. Configure the iSCSI Initiator Name for the newly promoted Non-Replicating Library to be that of the host system.
- For a FC connection, connect to the SAN. (If necessary, install a FC card in the server.)
-
Connect to the colocated appliance and library from the host.
-
Import the cartridges into the backup application and recover the data over the WAN.
-
At this point there is no HP StoreOnce Source Appliance at the remote site. If one is installed at a later date, you can reverse recover the data and configure replication, as described in Reverse replication using the wizard (page 96).
Figure 12 Recovery process: promoting a target library using colocation
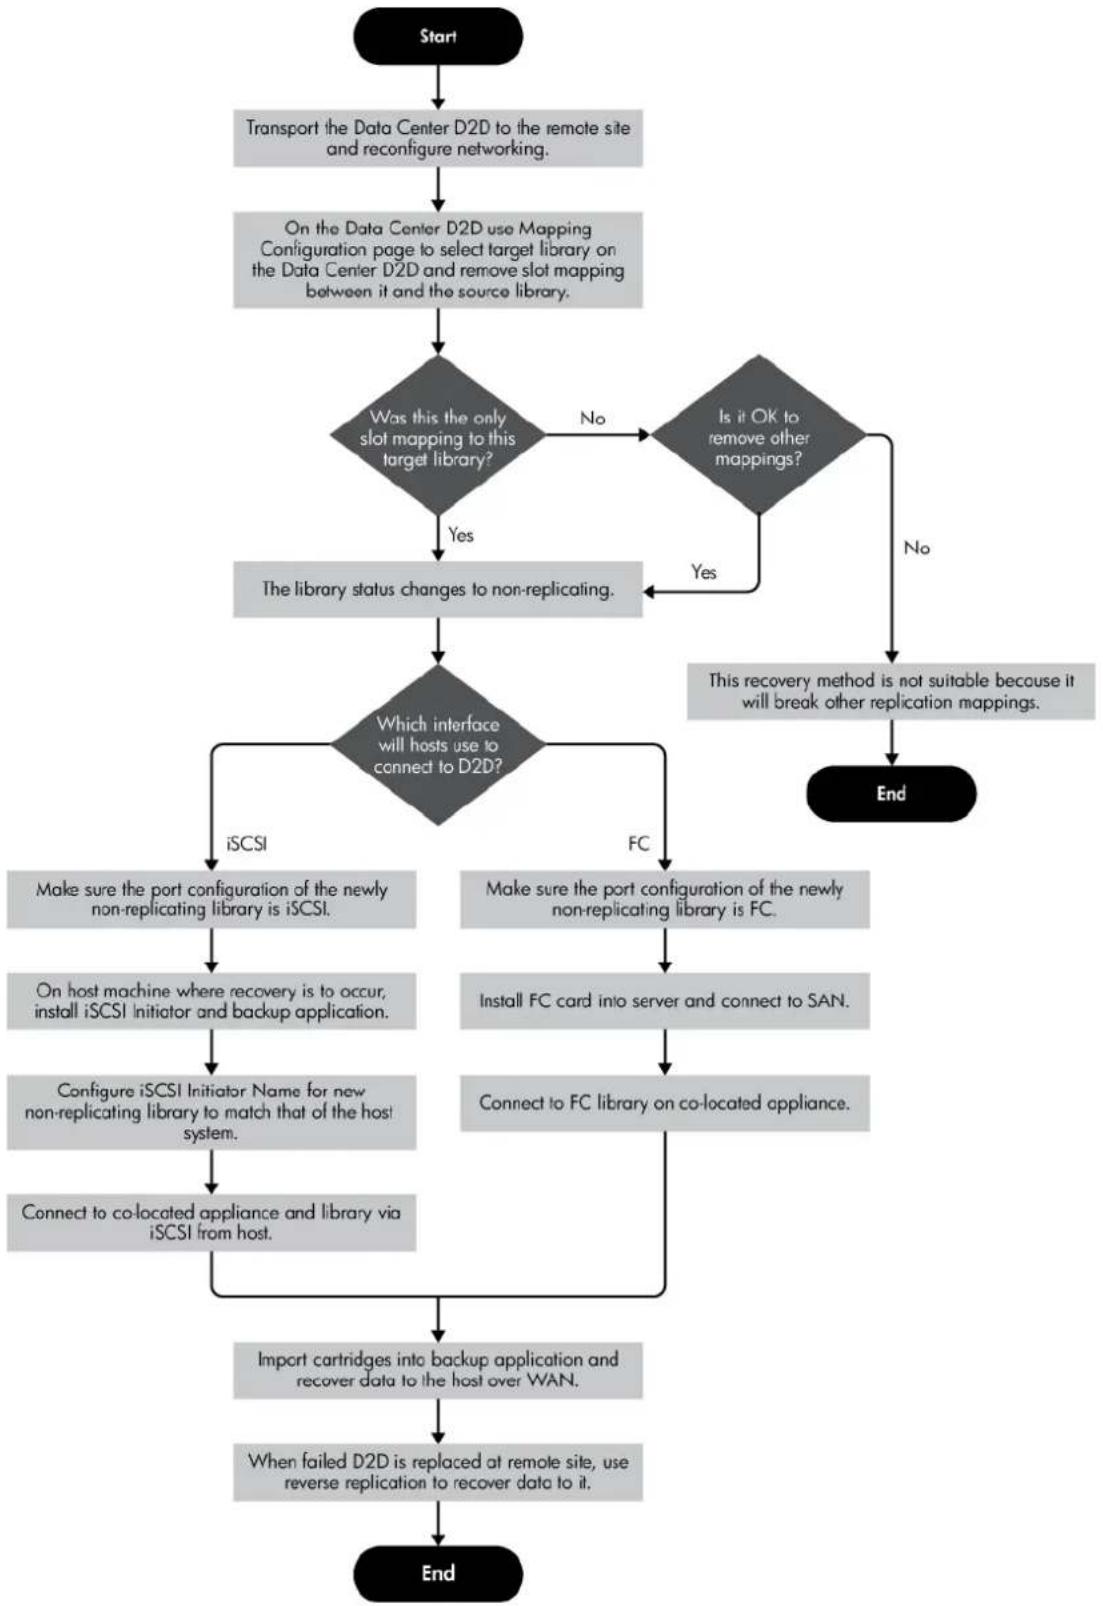
flowchart
graph TD
    A["Start"] --> B["Transport the Data Center D2D to the remote site and reconfigure networking."]
    B --> C["On the Data Center D2D use Mapping Configuration page to select target library on the Data Center D2D and remove slot mapping between it and the source library."]
    C --> D{Was this the only slot mapping to this target library?}
    D -->|No| E{Is it OK to remove other mappings?}
    D -->|Yes| F["The library status changes to non-replicating."]
    E -->|No| G["This recovery method is not suitable because it will break other replication mappings."]
    E -->|Yes| H["End"]
    F --> I{Which interface will hosts use to connect to D2D?}
    I -->|Yes| J["iSCSI"]
    I -->|No| K["FC"]
    J --> L["Make sure the port configuration of the newly non-replicating library is iSCSI."]
    K --> M["Make sure the port configuration of the newly non-replicating library is FC."]
    L --> N["On host machine where recovery is to occur, install iSCSI initiator and backup application."]
    M --> O["Install FC card into server and connect to SAN."]
    N --> P["Configure iSCSI Initiator Name for new non-replicating library to match that of the host system."]
    O --> Q["Connect to FC library on co-located appliance."]
    P --> R["Connect to co-located appliance and library via iSCSI from host."]
    Q --> S["Import cartridges into backup application and recover data to the host over WAN."]
    R --> S
    S --> T["When failed D2D is replaced at remote site, use reverse replication to recover data to it."]
    T --> U["End"]
Recovering a Source Appliance (NAS shares)
IMPORTANT: If you replace the disks in the source StoreOnce Backup System and keep the original appliance, the source to target mapping will still exist on the repaired StoreOnce Backup System. You MUST break this mapping BEFORE carrying out recovery. If you do not, The now blank Source Share (on the replacement disks) will overwrite the data on the Target Share. You will, effectively, lose backup data on both Source and Target Shares.
Reverse replication using the wizard
In this example, the remote site has lost both the host servers and the StoreOnce system. New hardware has been purchased and installed and the administrator now wants to recover data to the StoreOnce Backup System and then restore to the host server. Before the failure a mapping existed between a Source Library on the remote site StoreOnce Backup System and a Target Librc on the Data Center StoreOnce Backup System. After the failure the Source Library is missing; the mapping may or may not still exist.
Seeding
It is possible to reverse seed the first full restore using a USB disk, as follows:
- Map from the host at the target site to the NAS share on the HP StoreOnce Backup System and copy the share to a USB disk attached to the host.
- Transport the media to the Replication Source site and attach it to a host.
- Map from a host at the source site to the new share on the Replication Source and copy across the data from the USB disk before running the Recovery wizard.
Figure 13 Recovery by reverse seeding NAS shares on a replacement source appliance
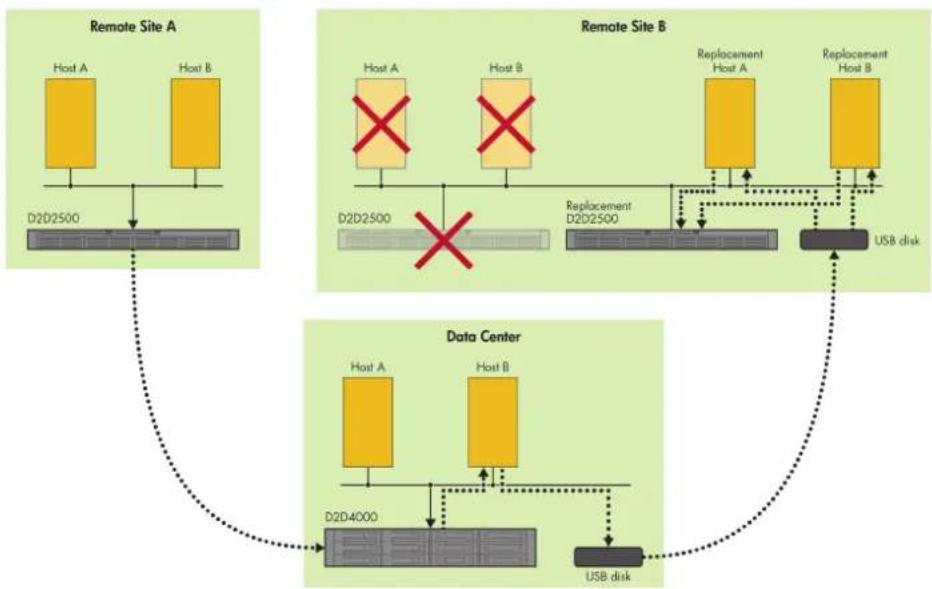
flowchart
graph TD
    subgraph Remote Site A
        A1["Host A"] --> D2D2500
        A2["Host B"] --> D2D2500
        D2D2500 --> D2D4000
    end
    subgraph Remote Site B
        B1["Host A"] --> D2D2500
        B2["Host B"] --> D2D2500
        D2D2500 --> D2D4000
        D2D4000 --> D2D4000
        D2D4000 --> USB Disk
    end
    subgraph Data Center
        A3["Host A"] --> D2D4000
        A4["Host B"] --> D2D4000
        D2D4000 --> USB Disk
    end
    D2D4000 -.-> D2D2500
    D2D4000 -.-> USB Disk
    D2D4000 -.-> D2D2500
    D2D4000 -.-> USB Disk
    D2D2500 -.-> D2D2500
    D2D2500 -.-> D2D4000
    D2D4000 -.-> USB Disk
    D2D4000 -.-> USB Disk
    D2D2500 -.-> USB Disk
    D2D2500 -.-> USB Disk
    D2D4000 -.-> USB Disk
    D2D4000 -.-> USB Disk
    D2D2500 -.-> USB Disk
    D2D2500 -.-> USB Disk
    D2D4000 -.-> USB Disk
    D2D4000 -.-> USB Disk
    D2D4000 -.-> USB Disk
    D2D4000 -.-> USB Disk
    D2D4000 -.-> USB Disk
    D2D4000 -.-> USB Disk
    D2D4000 -.-> USB Disk
    D2D4000 -.-> USB Disk
    style Remote Site A fill:#f9f,stroke:#333
    style Remote Site B fill:#f9f,stroke:#333
    style Data Center fill:#ccf,stroke:#333
- Create a new Non-Replicating Share on the Source Appliance (by using the NAS Shares page).
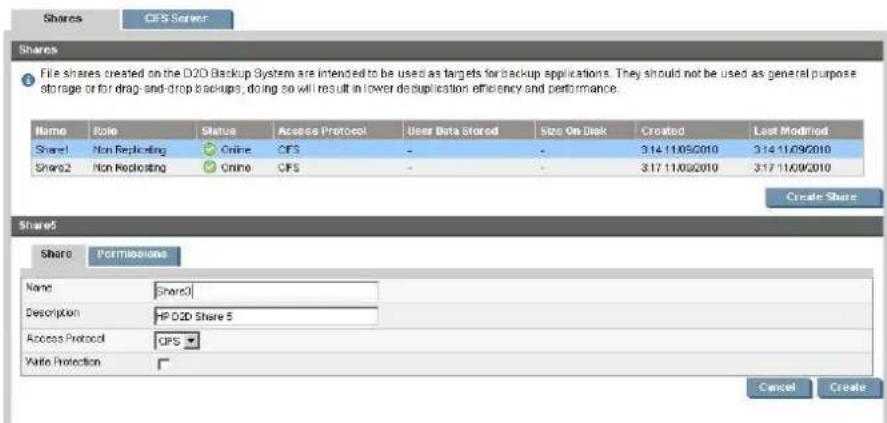
- Reverse seed the first full restore. The simplest way to do this is to use a USB disk, as de at the beginning of this section. It is also possible to recover across the WAN, but this m place an unacceptable load on bandwidth or time availability.
- Go to the Replication - NAS Mappings: page and select the new non-replicating share.
- Click Start Recovery Wizard.
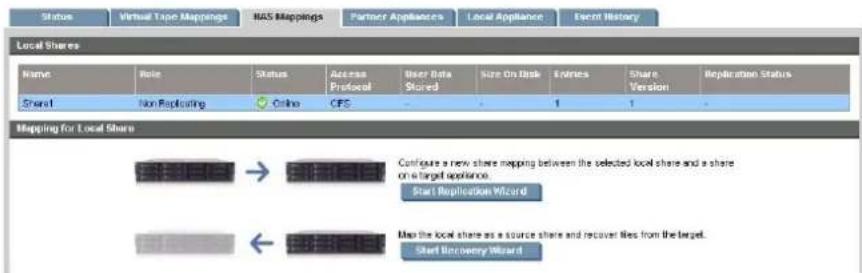
- At the Select Target Appliance step, select Add Target Appliance and provide the IP address of the previous replication target device.
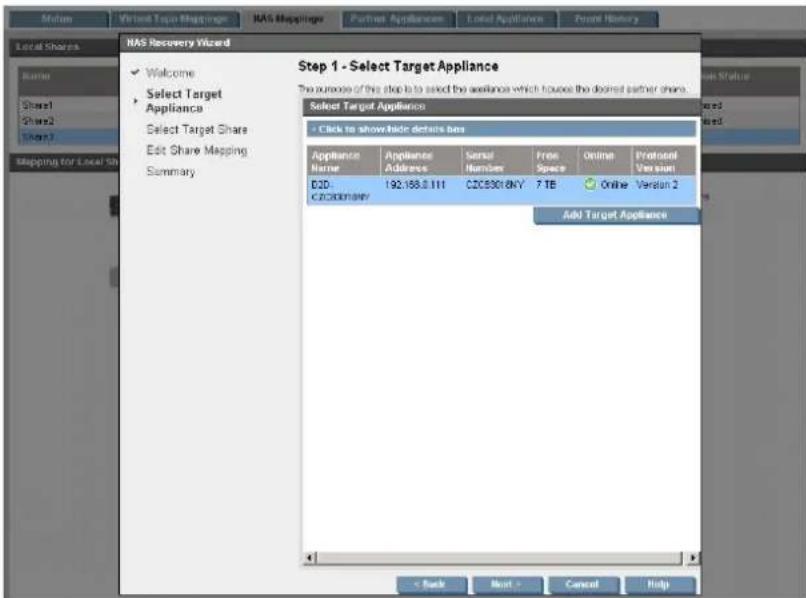
- Select the existing Target. This is the Target NAS share from which files should be recovered. Click Next.
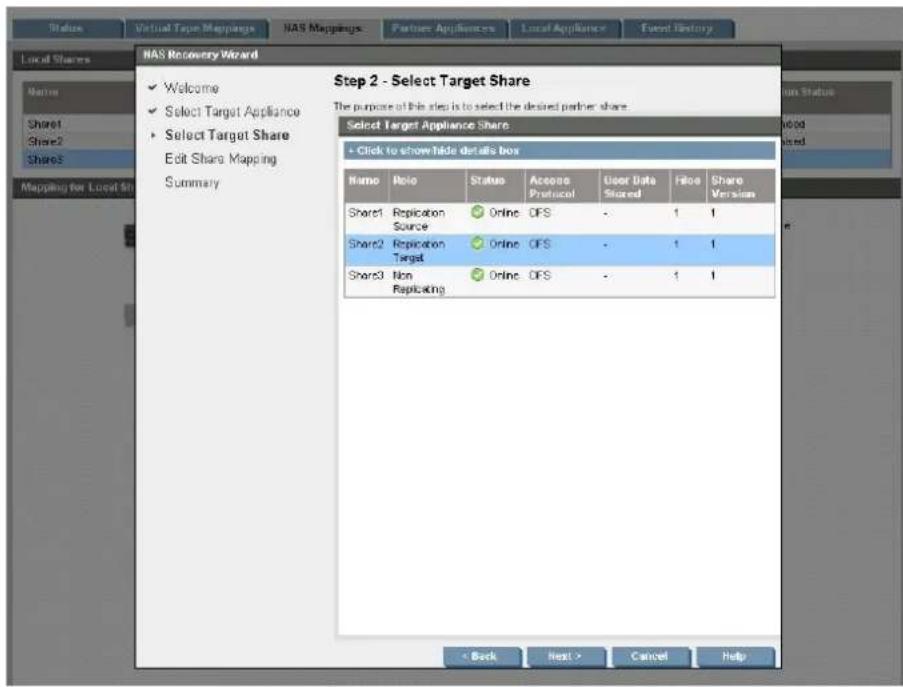
NOTE: If the mapping has been broken there will be an entry that says Non-replicating library (instead of Replication Target).
-
At the Edit Share Mapping step, either adopt the mapping that had been configured or create a new mapping and click Next.
-
Click Adopt to run reverse replication.
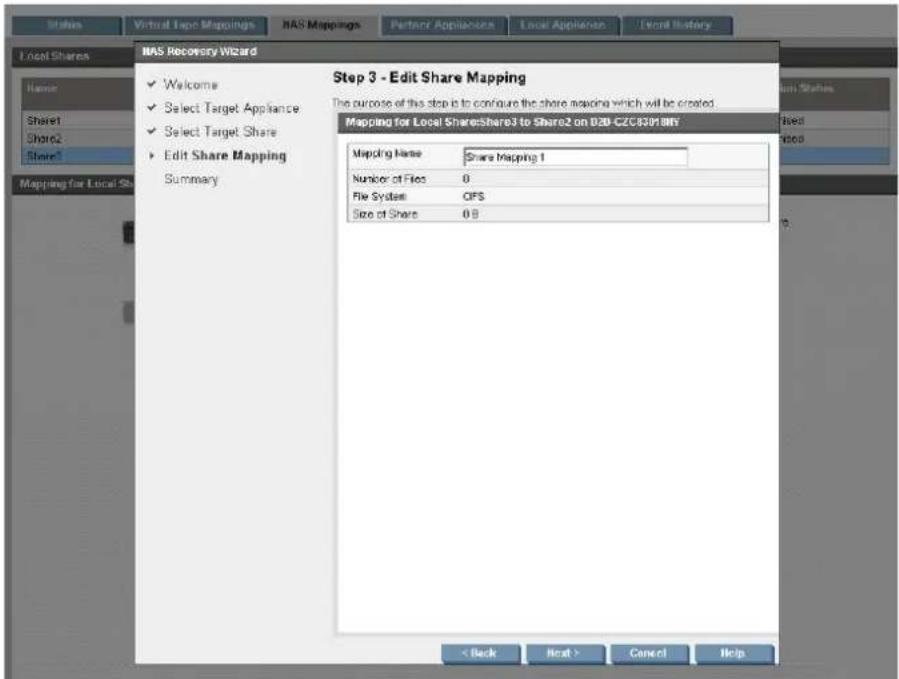
-
As soon as reverse replication has completed, the data may be recovered to the host using the original backup application.
-
New backups can now run to the Source Appliance and replication will run normally with further configuration.
Figure 14 Reverse replication process: source lost
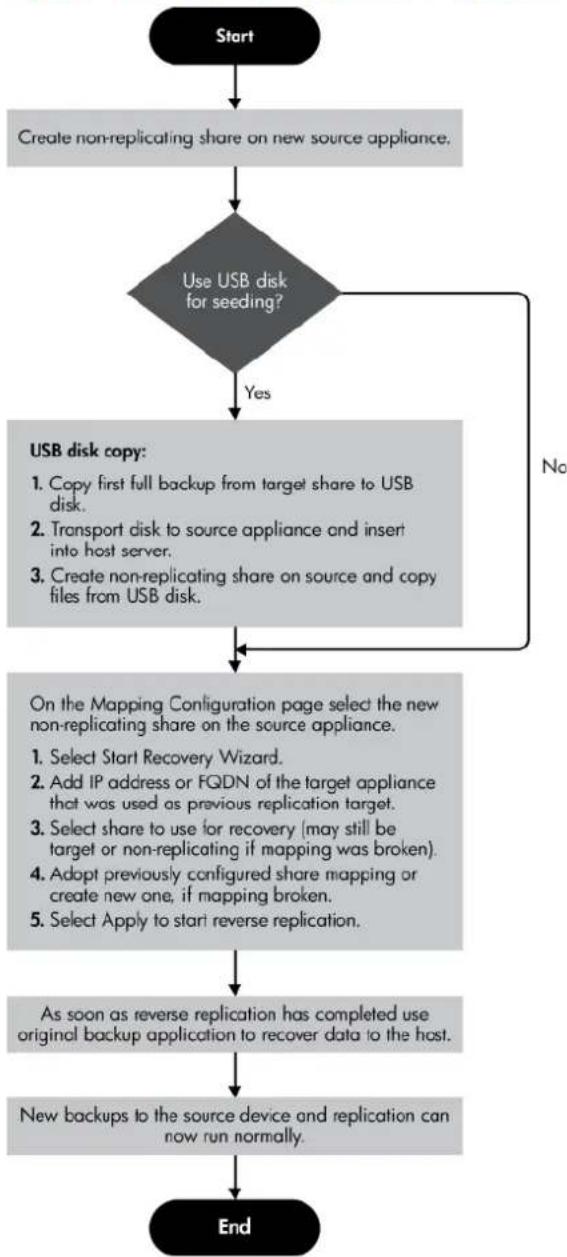
flowchart
graph TD
    A["Start"] --> B["Create non-replicating share on new source appliance."]
    B --> C{Use USB disk for seeding?}
    C -->|Yes| D["USB disk copy: <br>1. Copy first full backup from target share to USB disk.<br>2. Transport disk to source appliance and insert into host server.<br>3. Create non-replicating share on source and copy files from USB disk."]
    D --> E["On the Mapping Configuration page select the new non-replicating share on the source appliance. <br>1. Select Start Recovery Wizard.<br>2. Add IP address or FQDN of the target appliance that was used as previous replication target.<br>3. Select share to use for recovery (may still be target or non-replicating if mapping was broken).<br>4. Adopt previously configured share mapping or create new one, if mapping broken.<br>5. Select Apply to start reverse replication."]
    E --> F["As soon as reverse replication has completed use original backup application to recover data to the host."]
    F --> G["New backups to the source device and replication can now run normally."]
    G --> H["End"]
    C -->|No| D
Promoting a Target Share over the WAN using NAS
The remote site has lost both the host servers and the StoreOnce system. New server hardware has been purchased and installed and the admin now wants to recover data to the server. The admin has not installed a new StoreOnce Backup System and is going to recover data directly the server from the Data Center StoreOnce appliance over the WAN (which will take a long
NOTE: The procedure described below retains the ability to back up to the Target Share. If this is not required, a simpler solution may be to recover data from the Target Share, which is re
Figure 15 Recovery by promoting a Target Share over NAS
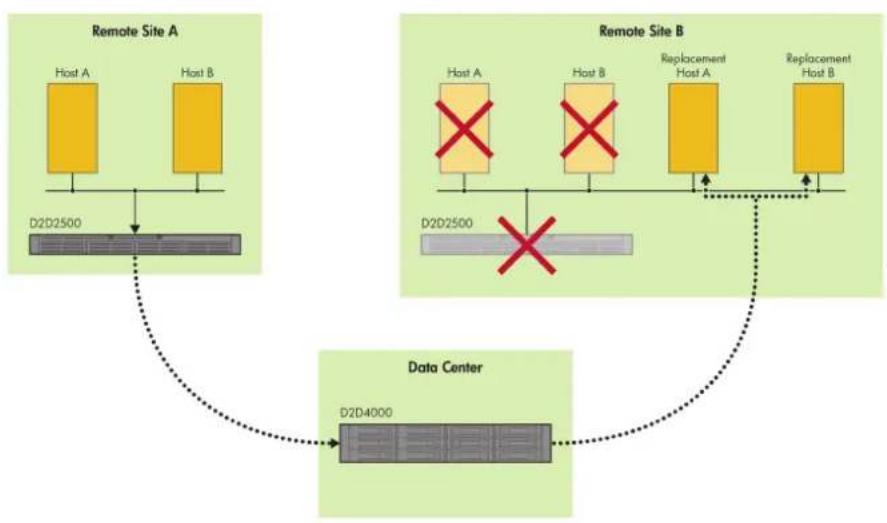
flowchart
graph TD
    subgraph Remote Site A
        A1["Host A"] --> D2D2500
        A2["Host B"] --> D2D2500
        D2D2500 --> DataCenter
    end
    subgraph Remote Site B
        B1["Host A"] --> D2D2500
        B2["Host B"] --> D2D2500
        B3["Replacement Host A"] --> D2D2500
        B4["Replacement Host B"] --> D2D2500
        D2D2500 --> DataCenter
    end
    D2D4000 --> DataCenter
    D2D4000 -.->|dotted arrow| DataCenter
Before the failure a mapping existed between a Source Share on the remote site StoreOnce Backi System and a Target Share on the Data Center StoreOnce Backup System. After the failure the mapping still exists but the Source Share is missing. The Target Share on the Data Center StoreO Backup System is still in Target Share mode, it has not had its mappings removed.
- On the Target Appliance in the Data Center, go to the Replication - NAS Mappings page, select the Target Share and remove the mapping between it and the lost Source Share.
- The Target Share becomes a Non-Replicating Share.
- Make sure the backup application is targeting the newly non-replicating share and recover the data.
- At this point there is no HP StoreOnce Source Appliance at the remote site. If one is installed at a later date, you can reverse recover the data and configure replication, as described in (page 104).
Figure 16 Recovery process: promoting a target share over the WAN
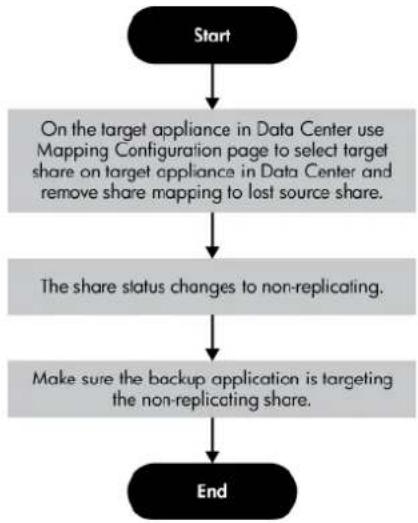
flowchart
graph TD
    A["Start"] --> B["On the target appliance in Data Center use Mapping Configuration page to select target share on target appliance in Data Center and remove share mapping to lost source share."]
    B --> C["The share status changes to non-replicating."]
    C --> D["Make sure the backup application is targeting the non-replicating share."]
    D --> E["End"]
Promoting a Target Share using colocation
New server hardware has been purchased and installed and the admin now wants to recover data to the server. The administrator decides to move the StoreOnce appliance that was in the Data Center to the remote office (maybe only temporarily) in order to recover the server data.
Figure 17 Recovery by relocating the Target Appliance
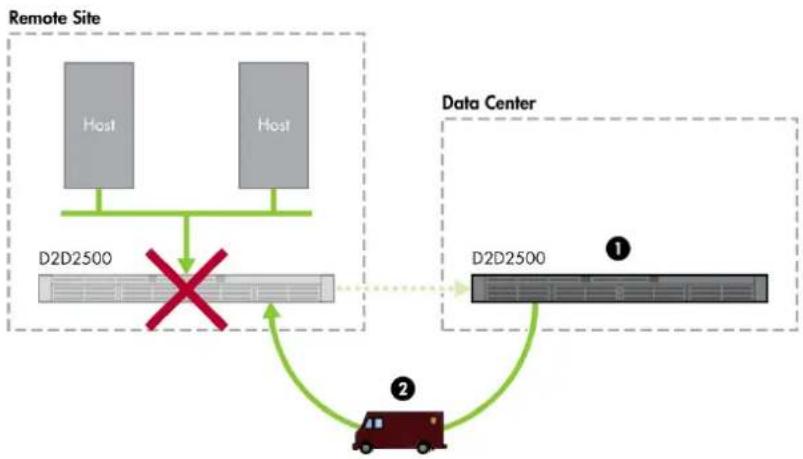
flowchart
graph TD
    A["Remote Site"] --> B["Host"]
    A --> C["Host"]
    B --> D["D2D2500"]
    C --> D
    D --> E["Data Center"]
    E --> F["D2D2500"]
    F --> G["①"]
    F --> H["②"]
    G --> I["Truck"]
    H --> I
    style D stroke:#ff0000,stroke-width:2px
    style E stroke:#0000ff,stroke-width:2px
Before the failure a mapping existed between a Source Share on the remote site StoreOnce B System and a Target Share on the Data Center StoreOnce Backup System. After the failure the mapping still exists but the Source Share is missing. The Target Share on the Data Center Sto Backup System is still in target share mode, it has not had its mappings removed.
!
IMPORTANT: This configuration is possible in only limited situations because it will break any other backups or replications to the Data Center appliance. In a simple Active-Passive scenario, however, this may be a very good model.
- Transport the appliance from the Data Center to the remote site and reconfigure networking etc.
- On the Target Appliance (now in the remote site), go to the Replication - NAS Mappings page, select the Target Share and remove the slot mapping between it and the lost Source Shar
- The Target Share becomes a Non-Replicating Share.
NOTE: If there are other share mappings, do not proceed, this method is not suitable.
- Check that the newly non-replicating NAS share has been configured correctly to allow the required hosts to access it.
- Recover data from the NAS share to the host over WAN.
- At this point there is no HP StoreOnce Source Appliance at the remote site. If one is installed at a later date, you can reverse recover the data and configure replication, as described (page 104).
Figure 18 Recovery process: promoting a target share using colocation
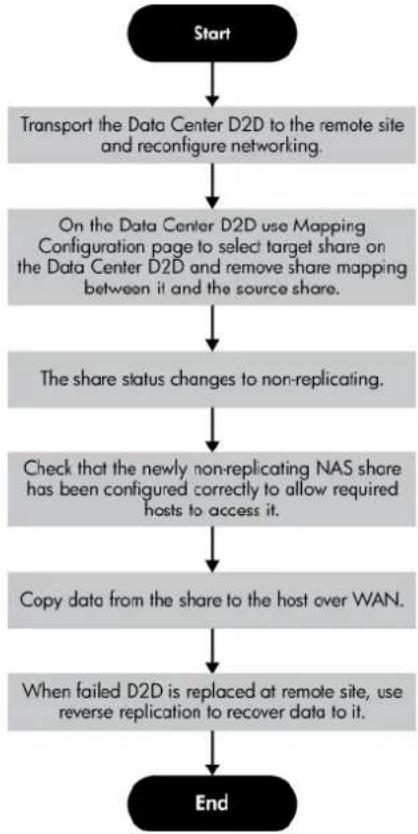
flowchart
graph TD
    A["Start"] --> B["Transport the Data Center D2D to the remote site and reconfigure networking."]
    B --> C["On the Data Center D2D use Mapping Configuration page to select target share on the Data Center D2D and remove share mapping between it and the source share."]
    C --> D["The share status changes to non-replicating."]
    D --> E["Check that the newly non-replicating NAS share has been configured correctly to allow required hosts to access it."]
    E --> F["Copy data from the share to the host over WAN."]
    F --> G["When failed D2D is replaced at remote site, use reverse replication to recover data to it."]
    G --> H["End"]
10 Restore processes without replication
In this chapter:
- Restore scenarios
- Restoring single files
- Restore and deduplication
- Reconnecting toto iSCSI VTL devices after host failure
NOTE: If you are using replication, there are other options for restoring data.
Restore scenarios
There are three main restore scenarios.
Basic file restore
This is carried out from the HP StoreOnce Backup System. Use the backup application to restore files from the HP StoreOnce Backup System to the host, as required.
Restore after host failure
This is carried out from the HP StoreOnce Backup System.
- Rebuild the host operating systems and install applications then reconnect to the HP StoreOnce Backup System.
- Use the backup application to restore data files from the HP StoreOnce Backup System to the host.
Bare Metal Disaster Recovery (NAS Shares)
NOTE: Bare Metal Disaster Recovery may be possible in some cases with Fibre Channel VTL, the backup application supports Fibre Channel connectivity through the recovery process. iSCSI VTL recovery in this way is not possible with current backup applications.
If your backup application supports Bare Metal Disaster Recovery, you can use it create a box recovery CD.
- Use the boot recovery CD to boot the host system into your backup application's recovery console and reconnect to the HP StoreOnce Backup System.
- When the backup application prompts for access to the NAS share, provide the IP address of the StoreOnce Backup System.
Restoring single files
This is very easy and fast. Run your backup software and select the files to be restored. Even restoring from virtual tape devices, where the software application is tape-based, the restore performance on your HP StoreOnce Backup System is much faster than restoring from physical tape.
Restore and deduplication
With data deduplication the actual restore time from disk is longer because the data chunks m be reconstructed. However, because more data can be stored on the disk, restore is still fast b there is no need to retrieve data from archived physical media.
Reconnecting to the to iSCSI VTL devices after host failure
Each configured library or tape drive on the HP StoreOnce Backup System is uniquely mapped to a host. It cannot be seen by any other host on the network. If the host system fails, you must re it and reconfigure the mapping of the host to the configured backup device on the HP StoreOnce Backup System.
- Install the operating system on the host. If possible, give the host the same Computer Name as the host that failed.
- Install the backup application on the host.
- Run the iSCSI Initiator on the restored host. (See also the HP StoreOnce Backup System Installation and Configuration Guide.)
- Make a note of the Initiator Node Name (this can be found on the General tab on the Microsoft iSCSI initiator).
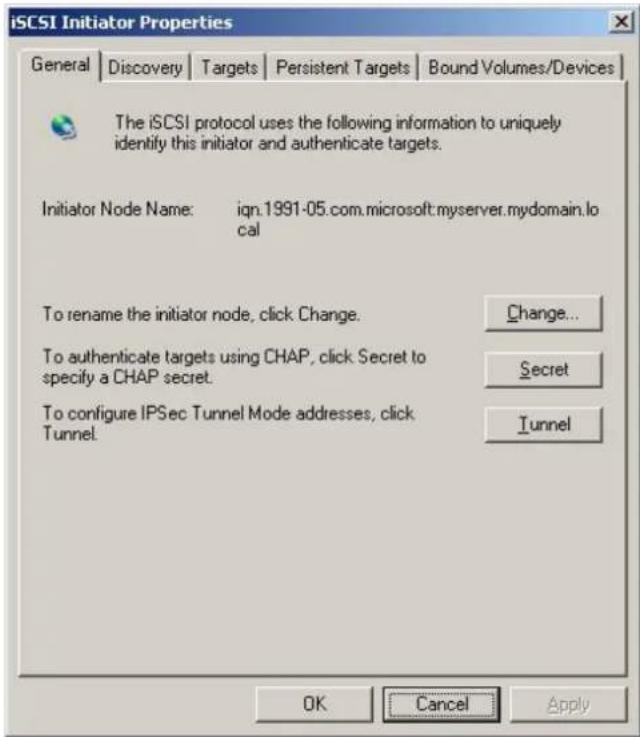
- Modify the target library to see the new machine name of the restored host. Select the Device page on the Web Management Interface, and put the target library into Edit mode. Copy the host's Initiator Node Name (found on the General tab in step 4) into iSCSI Initiator Name.
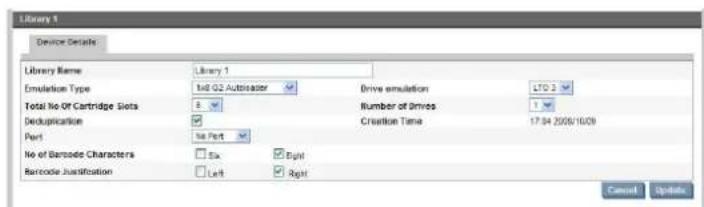
NOTE: If you have used the Secret option on the iSCSI Initiator to enter an authentication string, you must enter the same information on the Web Management Interface. See iSCSI (Status) (page 55).
- On the Discovery tab, enter the IP address of the HP StoreOnce Backup System to add it as a target portal for the host. Do not change the Port; it should be 3260.
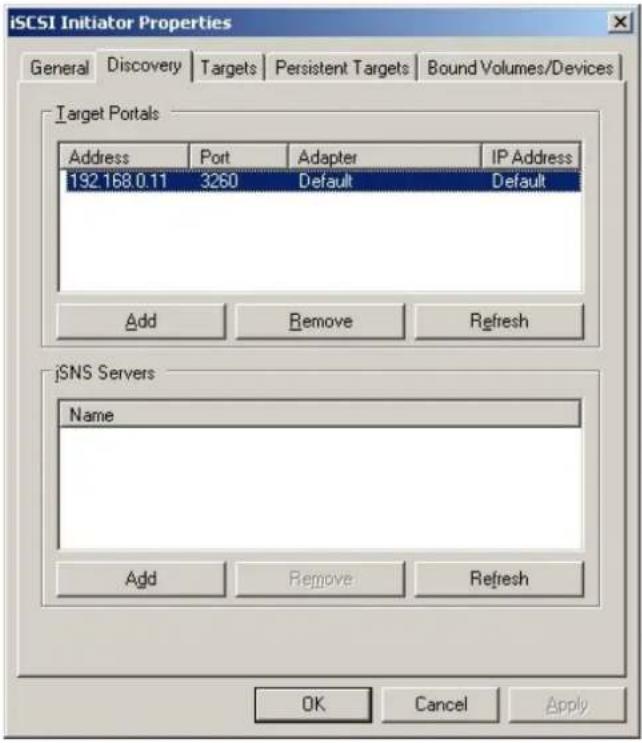
- Target devices have already been configured on the HP StoreOnce Backup System for the host that failed, so they will appear in the list on the Targets tab with a status of Inactive, if you are using the same hostname and iSCSI initiator node name as the host that failed. Otherwise new devices will be configured for this host. You must log on to the appropriate targets for your host. Remember that each library has two devices and you must log onto one separately. We recommend that you also select the automatic restore on boot option the Log On... dialog.
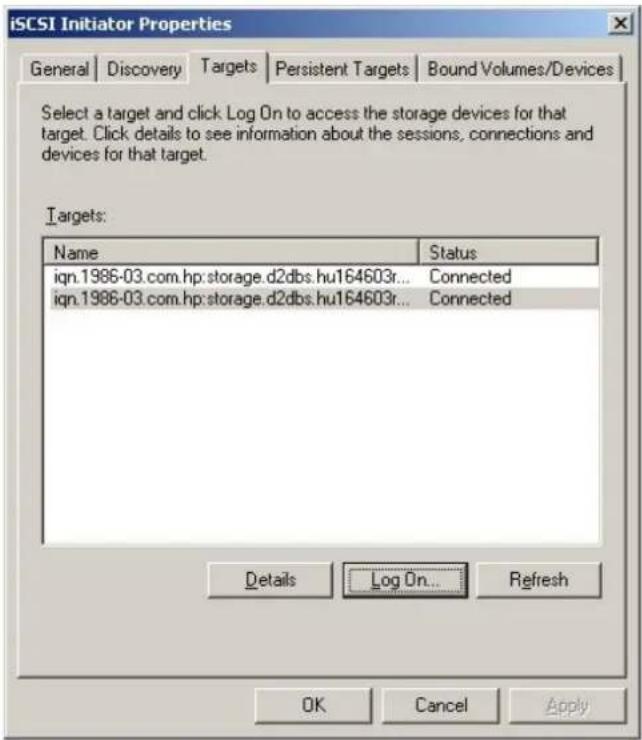
- Run your backup application. It should see the library device on the HP StoreOnce Backup System. Import the media into your backup application's database and restore the latest full backup from the HP StoreOnce Backup System.
11 Understanding LEDs
In this chapter:
•HP D2D4324/4312 Backup System
•HP D2D4112/4106 Backup System
•HP D2D2502/2504 Backup System
HP D2D4324/4312 Backup System
Front LEDs
Figure 19 Front LEDs on the HP D2D4324/4312 Backup System
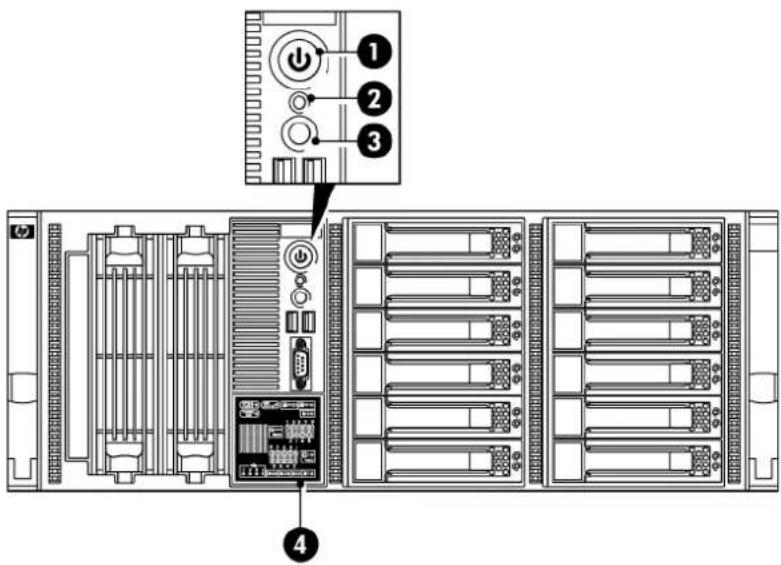
-
Power On button/LED
-
System Health LED
-
HP D2D Beacon LED
-
System Insight Display
Steady green: Power connected, device ready to use
Steady amber: Device switched off or in hibernation with power connected
Off: No power connected
Steady green: Hardware is performing correctly
Flashing amber: degraded condition
Flashing red: critical condition, such as power supply or fan failure
Steady blue: identifies the unit
Amber: Power off or system hardware fault
The HP Systems Insight Display LEDs represent the system board layout and may be useful for troubleshooting. See the "Maintenance and Service Guide" for more details.
Rear LEDs
Figure 20 HP D2D4324/4312 rear panel LAN LEDs
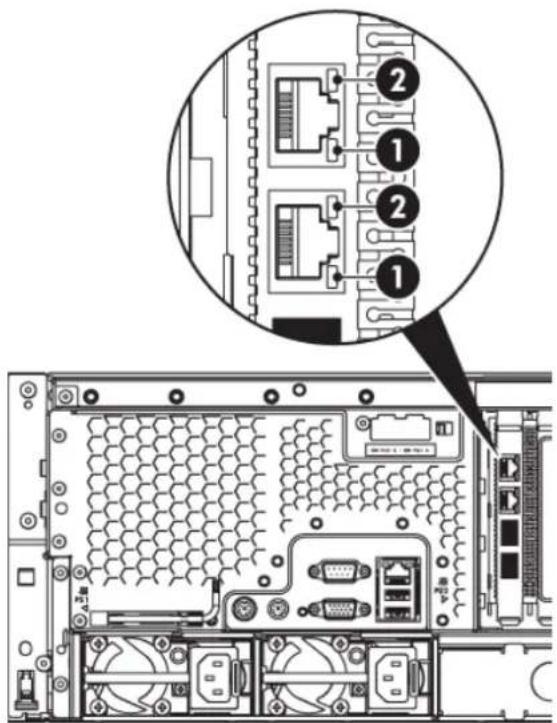
- LAN network speed LED indicator
Steady green: The LAN connection is using 10 Mbps/100 Mbps link.
Steady amber: The LAN connection is using a GbE link. Off: No connection.
Flashing green: Ongoing network data activity.2. LAN activity stat Off: No network data activity or no connection.
HP D2D4112/4106 Backup System
Front LEDs on the HP D2D4106/4112
Figure 21 Front LEDs on the HP D2D4112 and 4106 Backup System
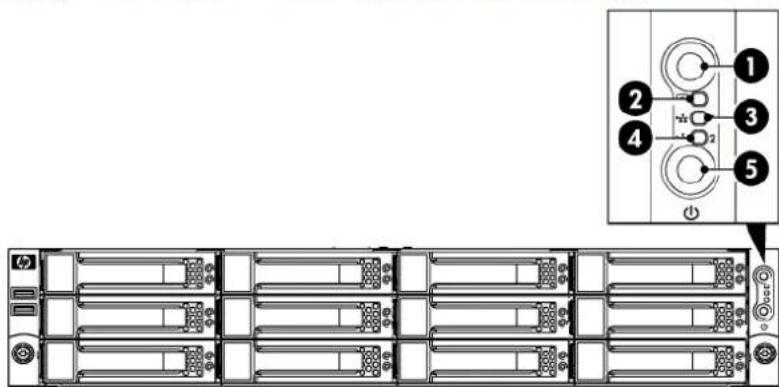
-
HP D2D Beacon LED
Steady blue: identifies the unit -
System Health LED
-
and 4. LAN port LEDS
-
Power On button/LED
Amber: Power off or system hardware fault
Steady green: Hardware is performing correctly
Flashing amber: degraded condition
Flashing red: critical condition, such as power supply or fan failure
Flashing green: network connection
Off: no network connection or network not configured
Steady green: Power connected, device ready to use
Steady amber: Device switched off or in hibernation with power connected
Off: No power connected
Rear LEDs on the HP D2D4106/4112
Figure 22 HP D2D4112/4106 LAN LEDs
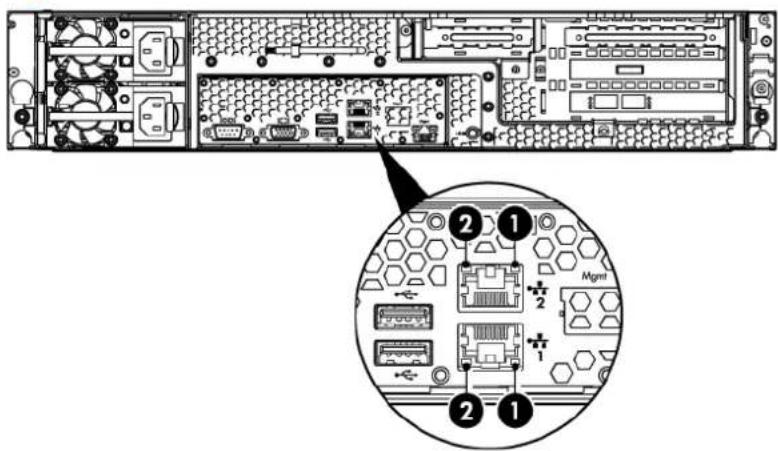
- LAN network speed LED indicator
Steady green: The LAN connection is using 10 Mbps/100 Mbps link.
Steady amber: The LAN connection is using a GbE link. Off: No connection.
- LAN activity status LED indicator
Flashing green: Ongoing network data activity.
Off: No network data activity or no connection.
HP D2D2502/2504 Backup System
Front view of the HP D2D2502/2504
Figure 23 Front view of the HP D2D2502/2504 Backup System
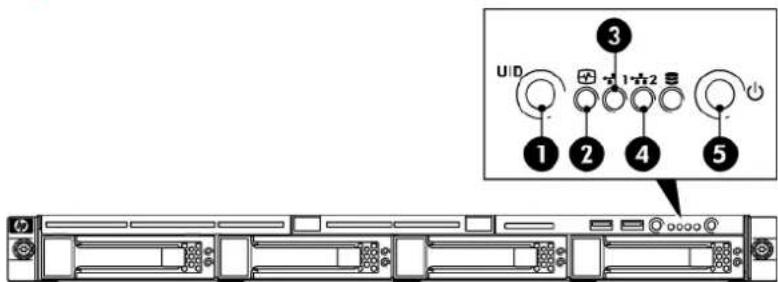
Steady blue: identifies the unit1. HP D2D Beacon LED
Steady green: Hardware is performing correctly2. System Hea
Flashing amber: degraded condition
Flashing red: critical condition, such as power supply or fan failure
Flashing green: network connection3. and 4. LAN port LEDS
Off: no network connection or network not configured
Steady green: Power connected, device ready to use5. Power On
Steady amber: Device switched off or in hibernation with power connected
Off: No power connected
Rear view of the HP D2D2502/2504 G2
Figure 24 HP D2D2502/2504 rear panel LEDs
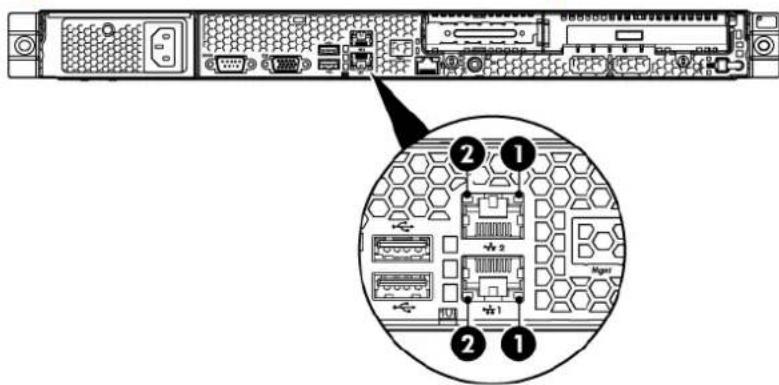
- LAN network speed LED indicator
Steady green: The LAN connection is using 10 Mbps/100 Mbps link.
Steady amber: The LAN connection is using a GbE link.
Off: No connection.
Flashing green: Ongoing network data activity.2. LAN activity stat
Off: No network data activity or no connection.
Hot-plug drive LEDs
The status of hot-plug hard drives installed in the server is indicated by the drive activity LED indicated on the front panel of the server.
Figure 25 Drive LEDs
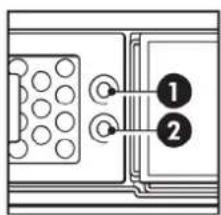
natural_image
Pure electrical circuit lines without any symbolsSteady green: Online, no activity1. Disk Online LED
Flashing green: Ongoing disk activity
Steady amber: Disk has failed
Flashing amber: Predictive disk failure
Off: The disk is not a part of RAID
Steady blue: identifies a specific disk within the unit2. Disk beacc
Beacon mode
The HP StoreOnce Backup System supports a Beacon LED sequence, which helps a user identify which unit is being configured, if several are connected to the network. AL HP D2D4000 Serial Backup System also have a Beacon LED on the individual disks so that you can identify a sp disk within the HP D2D.
Use the Network page of the Web Management Interface to turn Beacon Mode on and off for HP StoreOnce Backup System. This turns the Beacon LED on the front and the rear of the HP solid blue. If you do not switch off Beacon Mode, it will continue for 5 minutes. See also Network
(Configuration) (page 33). You can also switch Beacon mode on and off by pressing the LED the front panel.
Fibre Channel card LEDs
If you have the Fibre Channel version of the HP D2D, there are three LEDs adjacent to each port.
Table 26 FC card LEDs
| ActivityAmber LEDGreen LEDYellow LED | |||
| Power Off (OK)OffOffOff | |||
| On | OnOn | Power on before or after software initialization.Awaiting HBA software initialization. | |
| Flashing | Flashing | Flashing | Power on after software initialization. Link not initialized. |
| Alternately flashing | Alternately flashing | Alternately flashing | software fault (OK) |
| OnOffOff | Connected at 2 (HP D2D4300 Series only) or 1 (all other FC systems) Gb/s | ||
| OffOff | Flashing | Activity at 2 (HP D2D4300 Series only) or 1 (all other FC systems) Gb/s (OK) | |
| OffOnOff | Connected at 4 (HP D2D4300 Series only) or 2 (all other FC systems Gb/s | ||
| Off | OffFlashing | Activity at 4 (HP D2D4300 Series only) or 2 (all other FC systems)Gb/s (OK) | |
| OffOffOn | Connected at 8 (HP D2D4300 Series only) or 4 (all other FC systems) Gb/s | ||
| OffOffFlashing | Activity at 8 (HP D2D4300 Series only) or 4 (all other FC systems) Gb/s (OK) |
Capacity upgrade kit LEDs
There are three LEDs on the front of the Capacity Upgrade Kit.
Figure 26 Capacity Upgrade LEDs
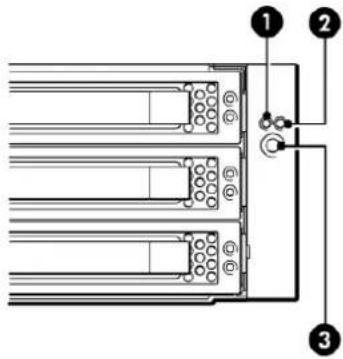
Green: System activity1. Heartbeat LED
Off: No system activity
Amber: Fault condition2. Fault LED
Off: No fault condition
Blue: Identified3. UID button/LED
Flashing blue: Active remote management
Off: No remote management
12 Hardware monitoring
This feature enables the HP StoreOnce Backup System to report any changes in the status or condition of its power supply, fan or thermal sensors. This feature is only available on G2 sys
NOTE: This feature is only available on G2 systems.
Changes may be notified in a number of ways:
- Any failures of fans or power supply or any overheating events are reported via email alerts and SNMP, if configured correctly.
- The HP StoreOnce Backup System reflects its overall status on the Summary and Event Log pages.
- Any change to hardware status or condition generates an entry in the Event Log Messages page (see also Log (Status) (page 57)). Each entry displays a severity icon to reflect Information, Warning or Critical.
i Indicates standard information.
Indicates a warning state. Something needs attention but it is not critical to the successful operation of the device. For example, a disk may have failed or disks may be installed in an expansion shelf but not licensed.
Indicates a critical state. Something needs attention. Investigate immediately.
NOTE: Email alerts and SNMP traps will only be generated, if the HP StoreOnce Backup System has been configured correctly to support emails and traps being sent to the HP SIM Server. R to SNMP (Configuration) (page 37) and Email Alerts (Configuration) (page 43).
An example email alert
The following example shows an email alert that has been sent from an HP StoreOnce Backup System.
This is a system generated message from your
HP StoreOnce D2D Backup System
Email Notification From HP-CR206F1F2E
04-Feb-2012 11:41:55 +0000 : An optional fan is not operating normally.
04-Feb-2012 11:41:55 +0000 : The Fans are now redundant on Chassis 1
04-Feb-2012 11:42:25 +0000 : System fan has returned to normal operation.
For further information please browse to
https://HP-CR206F1F2E.com (https://XXX.XXX.XXX.XXX)
Please do not reply to this email.
******************************************************************************************
An example Event log page
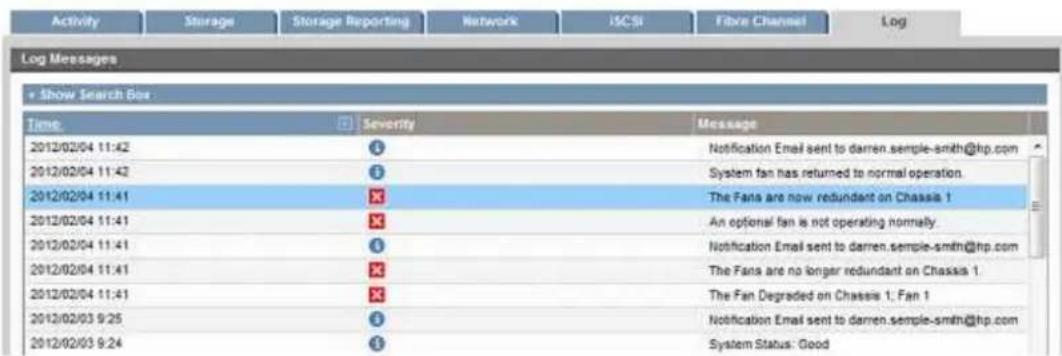
An example SNMP trap
The following screenshot illustrates an example of a trap captured in the HP SIM Server, when SNMP is configured.
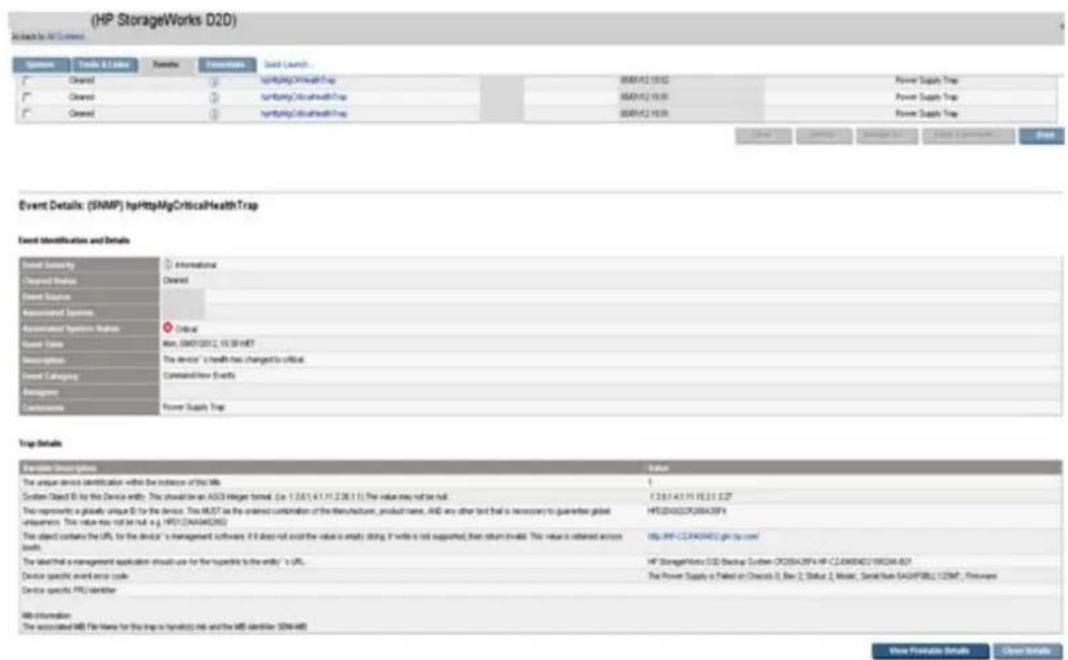
Resolving problems
The tables in the following sections explain what events are reported and how to interpret the location and ID values in event messages. Please refer to the HP StoreOnce Backup System Maintenance and Service Guide for information about replacing parts.
What events are reported for head units?
NOTE: Power supply failures are only reported if the HP StoreOnce Backup System has redundant power supplies. This is not relevant for HP D2D2500 Series Backup Systems.
Table 27 Power Supply and Fan events for HP D2D2500 Series, HP D2D4100 Series D2D4300 Series Backup Systems
| Event LogAlert | Email Alert | SNMP SentenceProblemComj | ||||
| (see also note above) | FailedPOWER SUPPLY power cable is disconnected | YesYesYesCautionS | ||||
| YesYesYesCautionS | ||||||
| Inserted | System Power Supplyinserted | Information | Yes | Yes | Yes | |
| Not Redundant | System Power Supplies not redundant | Caution | Yes | Yes | Yes | |
| Repaired | (Message as above)...repaired | YesYesYesInformati | ||||
| YesYesYesCautionF | ||||||
| Removed | YesYesYesCautionS | |||||
| Inserted | System Fan insertedYesYesYesInformati | |||||
| YesYesRedCautionS | ||||||
| Repaired | (Message as above)...repaired | YesYesYesInformati | ||||
Table 28 Temperature Sensor events for HP D2D2500 Series, HP D2D4100 Series and Series Backup Systems
| Event LogAt | Email SharedM | SNMP SentenceProblem | ||||
| TEMPERATURE SENSOR | Approaching Dangerous Temperature | Temperature, theis reporting overheating conditions | Approaching DangerousYesYesYesCritical | |||
| System Overheating | YesYesYesCautionS | |||||
| Repaired | (Message as above) ...repairs YesInformati | |||||
Location and ID values
Table 29 Location and Thermal Sensor ID values for HP D2D2500 Series and HP D Backup Systems
| Location | LocationID | LocationID | ID | ||
| Ambient | 1 | Memory_BD | 11 | I/O_Zone | 21 |
| CPU#1 | 2 | Memory_BD | 12 | I/O_Zone | 22 |
| CPU#2 | 3 | Memory_BD | 13 | I/O_Zone | 23 |
| Memory_BD | 4 | System_BD | 14 | I/O_Zone | 24 |
| Memory_BD | 5 | System_BD | 15 | SCSI_BACKPLANE_ZONE | 25 |
| System_BD | 6 | System_BD | 16 | SCSI_BACKPLANE_ZONE | 26 |
| System_BD | 7 | System_BD | 17 | SCSI_BACKPLANE_ZONE | 27 |
| Memory_BD | 8 | System_BD | 18 | SCSI_BACKPLANE_ZONE | 28 |
Table 29 Location and Thermal Sensor ID values for HP D2D2500 Series and HP D2D4 Backup Systems (continued)
| IDLocationIDLocationIDL | |||||
| 29SCSI_BACKPLANE_Z | |||||
| 30SCSI_BACKPLANE_Z |
Table 30 Location and Thermal Sensor ID values for HP D2D4300 Series Backup System
| IDLocationIDLocationIDL | |||||
| 1Ambient/O_Zone | 21Processor_Zone11 | ||||
| 2CPU#121/O2ZBve.Supply_Zone | |||||
| 3CPU#231/O2Zb/o_Zone | |||||
| 4Mem04/BDZb/o_Zone | |||||
| 5Mem05/BDZsystem_board | |||||
| 6SystemB/D_Zone | |||||
| 7SystemB/D_Zone | |||||
| 8Mem08/BD_Zone | |||||
| 9Mem09/BD_Zone | |||||
| 10I/O2D/DEZone | |||||
What events are reported for expansion shelves?
Table 31 Power Supply and Fan events for all expansion shelves (HP D2D2500 Series, HP D2D4100 Series and HP D2D4300 Series Backup Systems)
| Component | Problem | Message | Alert level | Event Log | Email Alerts | SNMP Trap |
| Failed POWER SUP | External StoragePower Supplyhas failed or power cable is disconnected | Caution | Yes | Yes | Yes | |
| Removed | External StoragePower Supplyremoved | Caution | Yes | Yes | Yes | |
| Inserted | External StoragePower Supplyinserted | Information | Yes | Yes | Yes | |
| Not Redundant | External StoragePower Supplies not redundant | Caution | Yes | Yes | Yes | |
| Repaired | (Message as above)...repaired | Information | Yes | Yes | Yes | |
| FAN | Failed | Fan Failure | Caution | Yes | Yes | Yes |
| Removed | System Fan Removed | Caution | Yes | Yes | Yes | |
| Inserted | System Fan inserted | Information | Yes | Yes | Yes | |
| Not Redundant | System Fans not redundant | Caution | Yes | Yes | Yes | |
| Repaired | (Message as above)...repaired | Information | Yes | Yes | Yes |
13 Troubleshooting
Use the information in this chapter to troubleshoot problems. More detailed troubleshooting information can be found at http://www.hp.com/support.
This chapter provides troubleshooting information on:
- Connecting to the StoreOnce Backup System from the backup application
•Connecting to the network
• Using the 10-Gb ports
•Performance
•Web Management Interface errors and warnings
•Power On/Off problems - Cannot connect to Web Management Interface
•NFS State handle error - Cannot authenticate an iSCSI session
•Diagnostic Fibre Channel device (page 130)
• If the HP D2D runs out of space - Cannot access a storage shelf
- Backup or replication fails
•Recovering devices that have failed to start or have become read-only - StoreOnce Backup System configuration problems
- Upgrade licenses
•Replacement of hardware
•Upgrades to component parts
Connecting to the StoreOnce Backup System from the backup application
Make sure you have the latest version or software patches for the backup application. Please http://www.hp.com/go/connect or http://www.hp.com/go/ebs for supported applications.
Stop and restart the backup application services after the backup device has been discovered. you still cannot access the device, check Device Manager to make sure it is accessible from the host.
- Make sure that the iSCSI initiator is connected to the devices and log on to them, if they are not, configure them on the Targets tab of the iSCSI Initiator.
- If it is not accessible, rerun Discovery.
NOTE: There are practical limitations on the number of devices that each host and FC switch or HBA can access. It is possible to configure more drive and library devices than a host can at The limit for Windows or Linux hosts using the iSCSI interface is 64. Using the Fibre Channel connection there is a theoretical limit of 255 devices per FC port on a host or switch, but the limit is usually lower due to switch or host port imposed limits. It is recommended that no more than 64 devices are configured for use by a single host.
Connecting to the network
NOTE: If you have selected the Link aggregation mode, ensure that switch is configured correctly.
If you cannot access your device on the network, please check the following:
-
Regardless of the network configuration mode and interface type, please ensure that there is a CAT-5E (or above) Ethernet cable connected to network port 1 (or 3 for HP D2D4300 Serial Backup Systems). This is the primary port for communication to the Web Management Interface and on iSCSI models, the primary port for data communications (apart from HP D2D4300 Series products, which normally use the 10Gb ports for data communications).
-
Check that the LEDs are flashing on the LAN port and the LAN front panel LED.
- If no LEDs are flashing, you do not have a network connection – check your Ethernet cable or consult your network administrator.
- If LEDs are flashing, check that you have the correct IP address for your HP D2D. Are you using DHCP or Static IP addressing for your HP D2D? If you are unsure of your settings, please use the System Console to confirm the settings that have been configured on your HP D2D (see the HP StoreOnce Backup System Installation and Configuration Guide).
- Is your network running IPv4 or IPv6 mode?
- Your HP D2D will operate and automatically detect both modes of operation.
- Ensure that you have selected the correct IP Address for the network you are using.
- At this time, the HP D2D does not support DHCPv6, but you can use Static addressing in IPv6 mode.
-
Try to PING / PINGv6 the IP address of the HP StoreOnce Backup System. If PING is successful, there is network communication between the host and the HP D2D.
-
If you still cannot access the HP StoreOnce Backup System, use the standalone Discovery tool. Discovery is run as part of the Installation wizard; it is also installed as a standalone utility of your desktop. Run the Discovery tool and check that the HP StoreOnce Backup System appears in the list of devices for selection.
- Use the Beacon option to identify a particular HP StoreOnce Backup System on the network.
- If Discovery cannot find the device, check whether there is a Firewall. You may need to temporarily disable it. It can be re-enabled as soon as the device is configured. Or, the HP StoreOnce Backup System may be on a different subnet.
Using the 10Gb ports (HP D2D4300 Series only)
Although a warning will be displayed, it is possible to disable network ports. You can recover this only from the console screen by directly attaching a monitor and keyboard to the HP StoreOnce Backup System.
- If you cannot use the Web Management Interface, check that the 1Gb ports are enabled on the Network (Configuration) page.
- If data transfer seems slow, check that the 10Gb ports are enabled on the Network (Configuration) page. Also, make sure that the hosts are configured correctly to select the 10Gb network for data transfer. The LEDs on the 10Gb card (at the rear of the HP StoreOn Backup System) also help identify network activity. Or use iLO2 to monitor the network ports.
Performance
Your HP StoreOnce Backup System is designed for high performance backup and restore operation according to the specification documented. However, it requires careful configuration. Please refer to the D2D Best Practices for VTL, NAS and Replication implementations document on the HP Manuals page for detailed guidance.
There are many reasons why you may not see the performance you expected from your HP C
- Your own network speed or disk access is not fast enough to allow streaming of data.
- Your backup application is not optimized.
- Your HP D2D is not optimized for your network and application.
Network
For iSCSI devices the HP D2D is designed to be run on a 1Gb or 10Gb (HP D2D4300 Seri network. Performance will be reduced if a 10/100BaseT network is used. The LEDs on the fro panel (1–Gb ports only) and on the network ports and also warnings on the Web Manageme Interface will indicate the network speeds at which the device is operating.
Web Management Interface errors and warnings
The Web Management Interface will highlight errors and warnings associated with the operation of the HP D2D.
- You can configure email alerts, which will automatically send a message to your mail system when a problem occurs (see Email Alerts (Configuration) (page 43)).
- The Summary page of the Web Management Interface can indicate an error or warning message, highlighted by an information, a warning or an error icon against major sub sys See (page 9).
- The System Event Log in the Web Management Interface can also highlight warnings or errors. See Log (Status) (page 57).
#
TIP: If you have selected a language other than English and find that some of the messages are in English, you have upgraded the software without upgrading the language pack. This is easier remedied by following the instructions in (page 90). Best practice, however, is to always upgrade the language pack at the same time as the software.
Disk RAID errors and warnings
See Hard disk replacement (page 136) for details of hard disk drive failure and rebuild.
Network warnings
See Connecting to the network (page 125).
NTP server fails
If the NTP server (for automatic date and time update) fails to connect to the server for any item, it will fail and stop the NTP server. If this happens an email alert will be sent and the user is manually restart NTP from the Web Management Interface.
System state
This describes the overall state of the HP D2D.
RAM Failure Warning
Your HP D2D is designed to operate with a certain amount of RAM. If it is outside this limit, warning will appear. The device will still operate, but with very limited performance.
- Check that the memory modules are correctly mounted in the slots
- Check that you have the correct memory capacity inserted
- Check that they are in the correct slots
CPU Faulty Warning
You HP D2D is designed to operate with a certain processor and speed. If it is outside this limit, a warning will appear. The device will still operate, but with very limited performance.
Check that the processor is the correct version
Storage Pool messages
If you have installed the Capacity Upgrade Kit (not supported on the HP D2D2500 Series) and it is powered off for any reason, you should also power down the HP StoreOnce Backup System. Then restart the Capacity Upgrade Kit before you restart the HP StoreOnce Backup System. If the two units are not powered on in the correct sequence, you will get a message that "a storage p is not available."
Power On/Off Problems
The normal boot sequence takes approximately 2 (or 5 for HP D2D4300 Series) minutes. On power up the HP StoreOnce Backup System runs its fans at high speed for approximately 10 seconds before returning to normal speed. When powering off the HP StoreOnce Backup System make sure no backup or restore jobs are running or scheduled to run while the HP StoreOnce Backup System is out of action.
HP D2D shuts down automatically
The HP D2D has found a problem with the internal hardware which requires the device to shut to avoid further hardware problems. The System Health LED on the front panel will probably be flashing RED.
- Plug in a monitor and keyboard directly to the back of the HP D2D (see the HP StoreOnce Backup System Installation and Configuration Guide) and watch for errors on boot up or the Console screen.
- If iLO-2 is available on your system, check for errors in the event and IML logs.
HP D2D does not boot up correctly
Check the Power LED on the front panel.
If the Power LED is OFF:
- Check power is connected to the HP D2D and is on.
•The PSU may be faulty.
If the Power LED is AMBER:
•Power on the HP D2D using the Power button.
- If it shuts down again, see (page 128).
If the Power LED is GREEN:
- Plug in a monitor and keyboard directly to the back of the HP D2D (see the HP StoreOnce Backup System Installation and Configuration Guide) and watch for errors on boot up or the System Console screen.
- If all the LEDs turn on except for the hard disk drive LEDs, the SmartArray RAID controller in one of the PCIe slots may be at fault. On the System Console screen, the Smart Array status
normally shown at boot time will not display. No hard disk drive LEDs will turn on. Pleas refer to SmartArray RAID information on http://www.hp.com/support.
- If the System Console screen is not seen:
The HP D2D operating system may not be seen or recognized. Check the flash memo module inside the HP D2D for correct seating. (To locate the flash memory module, re to the schematic on the hood label.)
- Check for hardware errors as the HP D2D device boots up.
HP D2D System Health LED is flashing RED (HP D2D4100 and D2D4300 Series)
One of the two power supplies is faulty or not connected to power at power on time, causing warning condition. Check the LED on the PSU to ensure it is not faulty (it should be green). E both power supplies are connected and reboot to clear this LED. The HP D2D will work satisfied with one power supply, but without any redundancy. It is recommended to power on the second power supply or replace the power supply as soon as possible.
HP D2D boots up correctly, but cannot be seen on the network
See Connecting to the network (page 125).
Cannot connect to Web Management Interface
HP D2D is not visible on the network
See Connecting to the network (page 125).
Cannot log in to the Web Management Interface
The password is case-sensitive, please make sure you know whether CAPS LOCK is on or off. If you cannot find the password to the Web Management Interface login screen, it can be res factory value.
- Ensure that there are no backup or restore jobs in progress to the device.
- Press the Power On button on the front of the HP StoreOnce Backup System three times in quick succession to reset it.
- After approximately 5 seconds, the HP StoreOnce Backup System will begin its reboot sequence.
- The HP StoreOnce Backup System will be reset to factory networking settings and the Administrator password will be reset to Admin. No user data will be lost but you will need re-configure your network settings, because they may be reset by this action.
NFS State handle error
NOTE: NetBIOS name resolution is not supported on CIFS shares.
The following sequence will cause problems when connecting to a NAS share.
- Create an NFS share and mount it on a Linux box.
- Delete the share on the D2D without unmounting it from the Linux box.
- Recreate the share again with the same name.
In this scenario, the Linux client will assign a new set of inodes to the new share, but when to access the old mount point it will use the previous set of inodes and will therefore not mail to connect.
Reboot the host Linux system and the connection will work again.
Cannot authenticate an iSCSI session
CHAP authentication is used within HP D2D. For details of the settings on the Microsoft iSCSI initiator and the HP D2D Web Management Interface, see also the HP StoreOnce Backup System Installation and Configuration Guide.
Diagnostic Fibre Channel device
For each FC port there will be a Diagnostic Fibre Channel Device presented to the Fabric. There will be one per active FC physical port; this means there are wo ports for an HP D2D4112, 43 or 4324 appliance.
The Diagnostic Fibre Channel device can be identified by the following example text:
Symbolic Port Name "HP D2D S/N-CZJ1440JBS HP D2DBS Diagnostic Fibre Channel S/N-MY5040204H Port-1"
Symbolic Node Name "HP D2D S/N-CZJ1440JBS HP D2DBS Diagnostic Fibre Channel S/N-MY5040204H"
A virtual driver or loader would be identified by the following example text:
Symbolic Port Name "HP D2D S/N-CZJ1440JBS HP Ultrium 4-SCSI Fibre Channel S/N-CZJ1440JC5 Port-0"
Symbolic Node Name "HP D2D S/N-CZJ1440JBS HP Ultrium 4-SCSI Fibre Channel S/N-CZJ1440JC5"
In the above the S/N-CZJ1440JBS for all devices should be identical. If this is Node Port 1, the Node Name string will be as above but, if Port 2, the Node Name string will end with "Port-2". Often the diagnostic device will be listed above the other virtual devices as it logs in first, ahead of the virtual devices. The S/N-MY5040204H string is an indication of the QLC HBA's SN not any SN of an appliance/node.
At this time these devices are part of the StoreOnce VTL implementation and are not an error or fault condition. It is recommended that these devices be removed from the switch zone that is also used for virtual drives and loaders.
If the HP StoreOnce Backup System runs out of disk space
A warning message is generated when the HP StoreOnce Backup System reaches 80% capacity. Further warnings are generated at 85% and 90% capacity, and then at 1% intervals from 91% to 99%. If capacity reaches 100%, further error messages are generated.
| Log Messages | ||
| + Show Search Box | ||
| Time | Severity | Message |
| 2012/11/05 17:28 | ✘ | Stop all jobs on appliance. Remove HK blackout window in order to delete data and recover space, or consider a capacity upgrade if supported by your appliance |
| 2012/11/05 17:28 | ✘ | Appliance now at full capacity. Any jobs in progress will fail |
| 2012/11/05 17:24 | ✘ | Disk full |
| 2012/11/05 17:24 | t | Appliance capacity greater than 99 % |
| 2012/11/05 17:20 | t | Appliance capacity greater than 98 % |
| 2012/11/05 17:16 | t | Appliance capacity greater than 97 % |
| 2012/11/05 17:11 | t | Appliance capacity greater than 96 % |
| 2012/11/05 17:06 | t | Appliance capacity greater than 95 % |
| 2012/11/05 17:04 | t | Appliance capacity greater than 94 % |
| 2012/11/05 17:01 | t | Appliance capacity greater than 93 % |
| 2012/11/05 16:58 | t | Appliance capacity greater than 92 % |
| 2012/11/05 16:56 | t | Appliance capacity greater than 91 % |
| 2012/11/05 16:52 | t | Disk greater than 90% full |
| 2012/11/05 16:52 | t | Appliance nearing full capacity |
Note that if email and SNMP alerting is configured on the device, the above warnings and error will be delivered by these methods, too.
To reduce the risk of system unavailability, HP recommends that you monitor your disk storage capacity to ensure that storage utilization stays below 80%. Keeping available disk storage capacity above 20% offers the best backup and deduplication performance. Prior to reaching 80% utilization
consider adding additional disk storage and review best practices and implementation guides to ensure the solution remains optimized.
If you have the 12-disk base unit, you can purchase and install the Capacity Upgrade Kit to your capacity (note that the HP D2D2500 Series does not support connection of a Capacity Upgrade Kit).
Further options for creating space include:
- Stop all backups and replication until disk space is reclaimed.
- Remove any housekeeping blackout window so housekeeping can process new tasks create by space to be reclamation tasks.
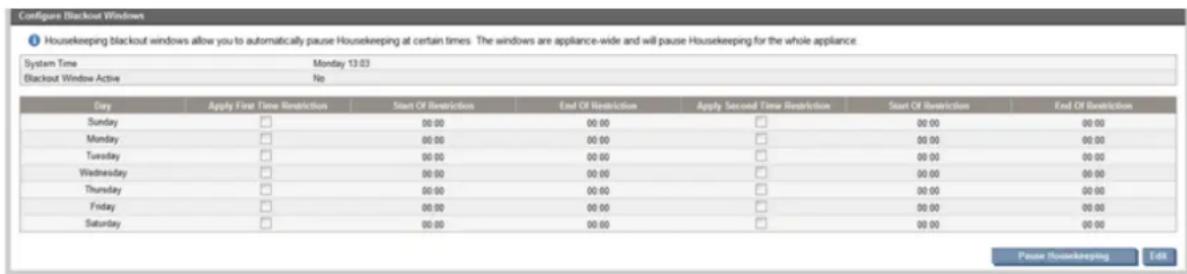
- Delete unused virtual tape libraries (VTLs) or NAS shares where data has expired.
NOTE: HP does not recommend the deletion of large numbers of individual cartridges to regain space because this can create a large amount of Housekeeping work on the StoreBackup System which will have a significant negative impact on its performance. It is preferred to delete entire virtual tape libraries, where possible, or to limit the number of cartridges I deleted to less than five per day. For the same reason, it is preferable to delete entire N shares rather than large amounts of data from a share.
- Delete synchronized replication targets, if they exist.
- Use backup software to perform a tape copy or object copy to a physical tape (Gen 1 only).
- Expire media and overwrite cartridges with new data.
Cannot access a storage shelf (HP D2D4100 and 4300 Series Backup Systems)
If you disconnect a storage shelf, you must reconnect it to the same port to which it was orig connected. Do not daisy chain storage shelves.
If backup or replication fails
Backup fails
It is strongly recommended that users check backup application error logs. There are a couple things that may result in errors:
• Exceeding the maximum concurrent jobs
• Exceeding the maximum number of concurrent open files for NAS
• Exceeding the total number of files in a NAS share
• Reconfiguring devices whilst backups are in progress
• Deleting replication mappings
Refer to the D2D Best Practices for VTL, NAS and Replication implementations for recommended and maximum values.
Replication fails
If replication needs to take place through a firewall, the network administrator will need to open (TCP) ports 9387 (Command protocol) and 9388 (Data protocol) to allow the replication traffic to pass to and from the HP StoreOnce Backup Systems. If necessary and the D2Ds conflict with another device on the network, these ports can be changed from the defaults when you create the replication pairing or from the Local Appliance's General Settings page.
If the replication Source Appliance fails and goes offline whilst it was performing a NAS replication job, the replication target share appliance may be left in an inconsistent state. This state may result in failure to recover from some files in the share or perform a list of files in the share because relationships between files and folders have been lost. This will automatically be repaired by the target appliance as soon as it detects the loss of the source appliance, however it may take up 10 minutes to complete this repair during which time the share will not be available for access.
If some files are failing to replicate and remain out of sync for long periods of time, check that backup application is not holding open those files. This can be done by checking that there are no queued or paused jobs in the backup application, or restarting backup application services. If neither action resolves the problem, reboot the backup application server.
Recovering Devices that have 'failed to start' or have become read-only
If the D2D detects a potential issue with data integrity for a Virtual Tape Library or Share it will immediately set the status of that device to 'failed-to-start' or 'read-only', this is to minimize the possibility of any further potential corruption being introduced on the device.
If a device enters one of these states it is reported on the GUI and selecting that device will give you some options to attempt to restore the device to a working state.
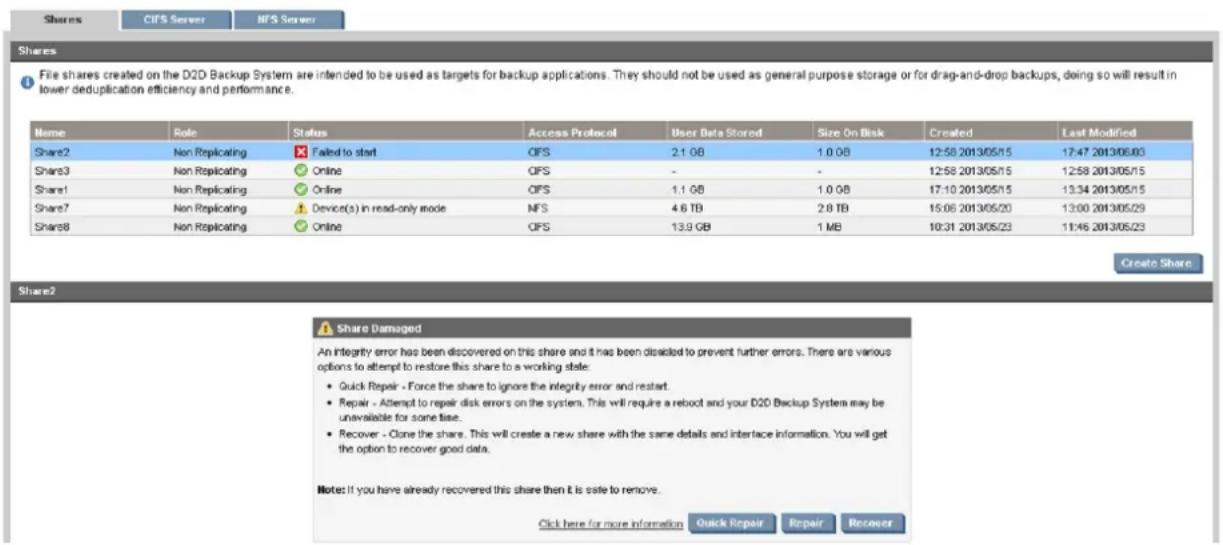
Three options are available:
- Quick Repair: This forces the device to ignore the error condition and the device is restarted. However, if following a quick repair the D2D continues to detect a possible integrity error then the status may once again return to 'failed to start' or 'read-only'. If this is the case, it recommended that you try the Repair or Recover option. Running the quick repair option on a failed device more than once is not recommended as this can lead to further corruption.
- Repair: This reboots the D2D Backup System and during the boot-up process the disks are checked for errors. Once the D2D has finished rebooting, if the device can now be safely returned to an online state, it will be returned to that state automatically. If the device remain
in a 'failed to start' or 'read-only' state following the reboot it is recommended that you either the Quick Repair or Recover Option.
- Recover: The Recover process will clone the device, creating an identical device with identical configuration, including any replication mappings. You will also have the option to clone the data to the new device. Click the Recover button to display the following dialog box.
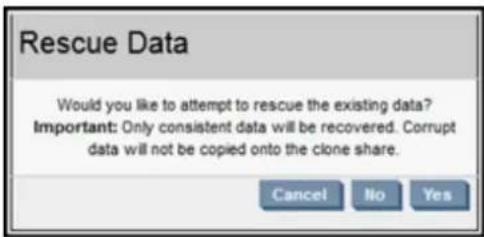
Select No to create a clone of the device, but no data will be copied. Select Yes to create a clone and also attempt to copy all data from the existing device.
Further information about the Recover process:
- Following successful recovery of a NAS device (CIFS or NFS) you may need to remount the device on your NAS client in order to regain access to it.
- Please note that if you choose to clone all the data the process can potentially take several days if a large amount of data is stored on that device.
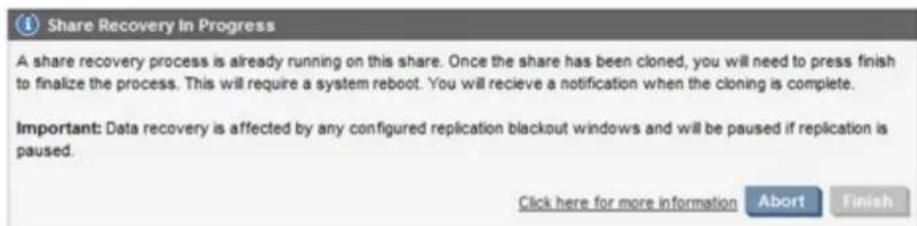
If you wish to end the recovery process before it completes, click the Abort button in order to stop the process and undo all changes
It is also only possible to clone all the data if sufficient free space is available on the device.
For example, if the device displays a "size on disk" (see screenshot above) of 500GB, then you will require at least 500GB of free space on the D2D to be available in order for r to succeed.
- After recovery has completed successfully, both the failed device and the replacement device remain on your system and both of these will be using up disk space on your D2D. Who you are happy that you have recovered your data successfully you can manually delete the failed device to free space.
- In some circumstances, the recovery process may be unable to complete due to corruption on the device being recovered. In such circumstances, as much data as possible is cloned to replacement store and the process is paused. You will then be prompted to contact HP Su for further assistance.
IMPORTANT: During the recovery process, a new device is created with the name MYSTORE_RESCUED (where MYSTORE is the name of the failed device). Once the recovery process has completed successfully and the server is rebooted the names of the two devices are swapped so that the failed store is now called MYSTORE_RESCUED and the new replacement device is called MYSTORE.
StoreOnce Backup System configuration problems
I cannot see a newly created VTL device
When you create a new device on the HP StoreOnce Backup System, the host will not be able to see the device until you connect manually to it using the iSCSI Initiator or it has been zoned corr on the Fibre Channel SAN. See the HP StoreOnce Backup System Installation and Configurat Guide for more information. If you still cannot see the device, check Device Manager to make sure it is visible from the host.
I cannot see additional slots from the backup application
When you create additional slots for an autoloader/library on the HP StoreOnce Backup System, you may need to restart services on the backup application so that it can see the new slots.
I cannot recover the configuration file
You can only recover a configuration file to an HP StoreOnce Backup System if no devices (NAS shares or Virtual Tape Libraries) have been created on that appliance. This option should only be used in emergencies, when the HP StoreOnce Backup System has lost both disks and the disk configuration on the USB stick.
Upgrade licenses
Can I transfer the License To Use to a different HP D2D?
No. The LTU is tied uniquely to the serial number of your HP D2D hardware. If your hardware serial number changes (by swapping out the unit motherboard), the LTU must be transferred to the new hardware via the HP Licensing website. A new LTU is generated, which must then be applied and activated via the Web Management Interface on the repaired/replaced system.
More disks present than are licensed
If the Disk Licensing status on the Summary page states that more disks are present than are licensed, you need to obtain and apply a License To Use key. See License (Administration) (page 94).
Replacement of hardware
In the unlikely event that replacement hardware is required to be installed, please consult the Maintenance and Service Guide on http://www.hp.com/support. This User Guide also contains information about replacing a failed disk.
Event log displays 'Invalid BIOS Assembly name'
This event log entry and email alert will occur if a motherboard has been replaced on your HP D2D. This is a warning message, designed for future expansion of the system. Your HP D2D will operate fully without impacting anything. This message will occur each time you restart your HP D2D system.
If the RAID battery fails
The RAID battery normally has a status of OK, which means that is fully charged or in the process of recharging. (It is normal for the battery to recharge, if the HP D2D has been powered off for more than 24 hours.) If the RAID battery status shows as failed, it must be replaced. (HP D2D4100/4300 Series on the Summary or Storage—RAID pages; HP D2D2500 Series on the Summary or RAID page)
Upgrades to component parts
You may receive notification of upgrades to system components, such as hard disk drives and BIOS, from time to time, independently of upgrades to the HP StoreOnce Backup System softw Use the Support page to check the current status of these components and determine whether upgrade is required, see Support (Administration) (page 91).
You will find comprehensive instructions for applying these upgrades with the release notes that accompany the download.
- Go to http://www.hp.com/support/downloads.
- Under storage, click Disk Storage Systems.
- Under Disk-to-disk Backup, click HP StorageWorks D2D Backup Systems.
- Choose your HP StoreOnce Backup System and then click Cross operating system (BIOS, Firmware, Diagnostics, etc).
- In the Description column of the table, click the title that corresponds to software upgrade to you require. Read the release notes and follow the instructions to carry out the upgrade.
14 Hard disk replacement
In this chapter:
•RAID
•How do I know a disk has failed?
•Replacing a hot-plug hard disk
•After replacing the failed disk
RAID
RAID 6
RAID 6 provides protection against double disk failures and failures while a single disk is rebuildin. The following HP StoreOnce Backup Systems are RAID 6 devices.
• HP D2D4312 and HPD2D4324 Backup Systems
•HP D2D4106 and HP D2D4112 Backup Systems
The HP StoreOnce Backup System head unit is protected by a RAID 6 volume, and each Capacit Upgrade Kit is protected by a separate RAID 6 volume. Therefore the head and each Capacity Upgrade Kit can experience a double disk failure without incurring a data loss.
These HP StoreOnce Backup Systems also have an online spare disk on each shelf, which will automatically be incorporated into the RAID if a disk fails. This means that actual storage capacity is approximately 75% of the physical storage capacity for the main unit and each Capacity Upgra Kit connected to it.
- 18 TB for the HP D2D4324 Backup System and 18 TB for each of up to three Capacity Upgrade Kits
- 9 TB for the HP D2D4312 Backup System and 9 TB for each of up to three Capacity Upgrade Kits
- 9 TB for the HP D2D4112 Backup System and 9 TB for an attached Capacity Upgrade Kit
- 4.5 TB for the HP D2D4106 Backup System and 4.5 TB for an attached Capacity Upgrade Kit
RAID 5
The following HP StoreOnce Backup Systems are RAID 5 devices.
•HP D2D2504 Backup Systems
•HP D2D2502 Backup Systems
RAID 5 stores parity data across all the physical drives in the array. If a drive fails, the controller uses the parity data and the data on the remaining drives to reconstruct data from the failed drive. The system continues operating with a slightly reduced performance until you replace the failed drive. RAID 5 requires an array with a minimum of three physical drives. For the HP StoreOnce Backup System, which has four disks, 25% of the total logical drive storage capacity is used for parity data.
This means that actual storage capacity is approximately:
•1.5 TB for the HP D2D2502i Backup System
•3.0 TB for the HP D2D2504i Backup System
How do I know a disk has failed?
The Disk online LED (1) on the failed disk shows amber.
Figure 27 Drive LEDs
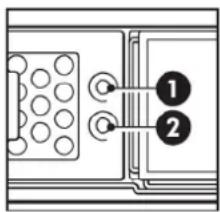
NOTE: For more information about these LEDs refer to Drive LEDs (page 118).
Identifying a failed disk on the Web Management Interface
The Web Management Interface identifies failed or predictive failed disks.
- HP D2D4300 and HP D2D4100 Series Backup Systems operate correctly with up to two failed disks on the HP D2D and up to two failed disks in any Capacity Upgrade Kit that installed.
- HP D2D2500 Series Backup Systems operate correctly with one failed disk.
It is important to replace a failed or predictive failed disks as soon as possible. Any subsequent disk failure will result in complete data loss.
NOTE: The first disk (HP D2D4300 Series) or the 12th disk (HP D2D4100 Series) on the internal shelf and the 12th disk on any expansion shelves are the online spare disks. If a disk fails, it online spare disk will immediately be used to replace it. The RAID rebuild process occurs automatically. The failed disk should always be replaced as soon as possible.
Summary page information
Look at the Summary page. For example:
- HP D2D4100/4300 Series: If it shows see that RAID is building, but is fully operational and that Storage needs attention, this probably means that a disk has failed and the online sp is being used. The Storage (Status) tabs will provide more information.
- HP D2D2500 Series: If you can see that RAID status has failed, but it is recoverable, this means that one disk has failed.
Figure 28 Summary page with RAID status warning (example shows HP D2D4112)
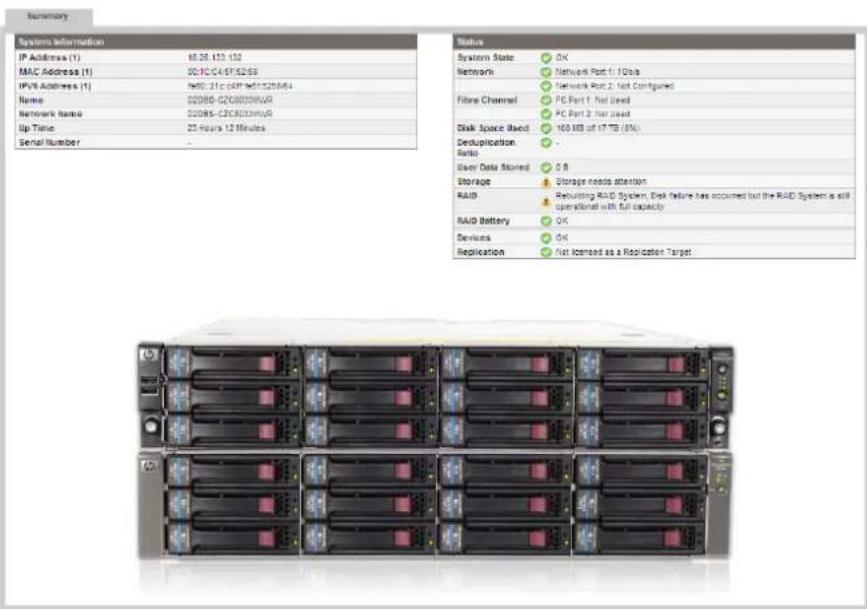
Figure 29 Summary page with RAID status warning (example shows HP D2D2500 Series
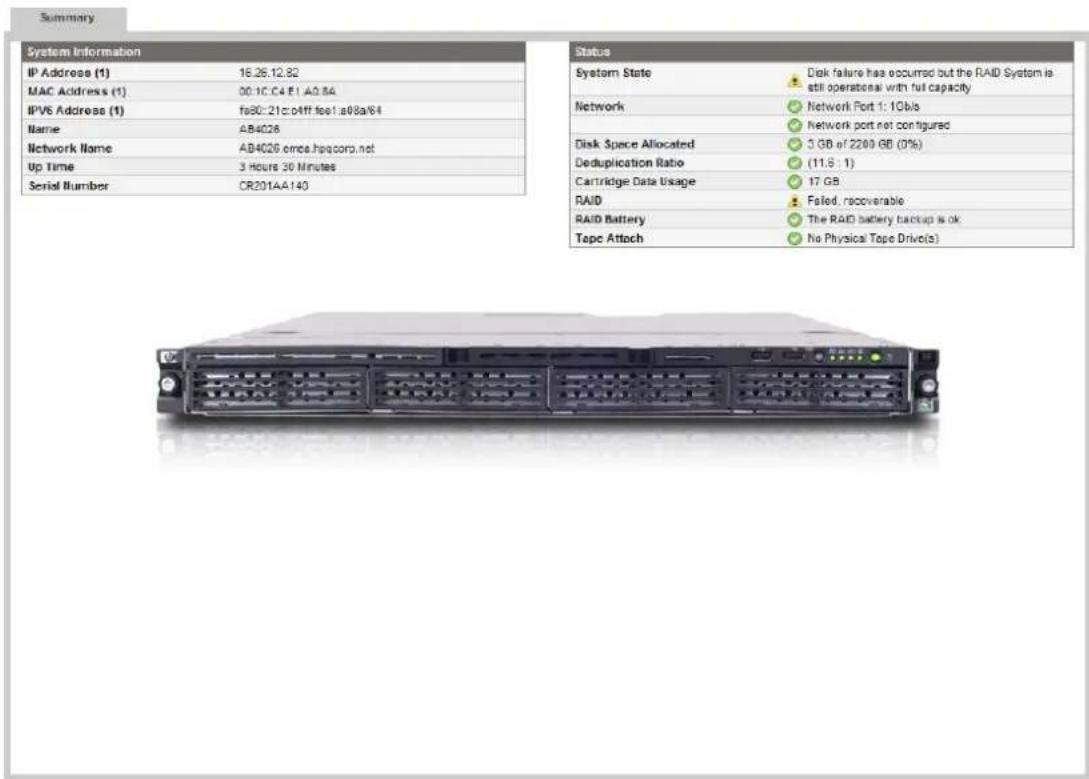
Status page information (HP D2D2500 Series)
Look at the RAID (Status) page for more information. The RAID Status section shows that a disk has failed but it is recoverable. No data has been lost. The information in the Physical Disks section identifies the disk that has failed. This is the disk that you must replace.
Figure 30 Identifying the failed disk (HP D2D2500 Series)
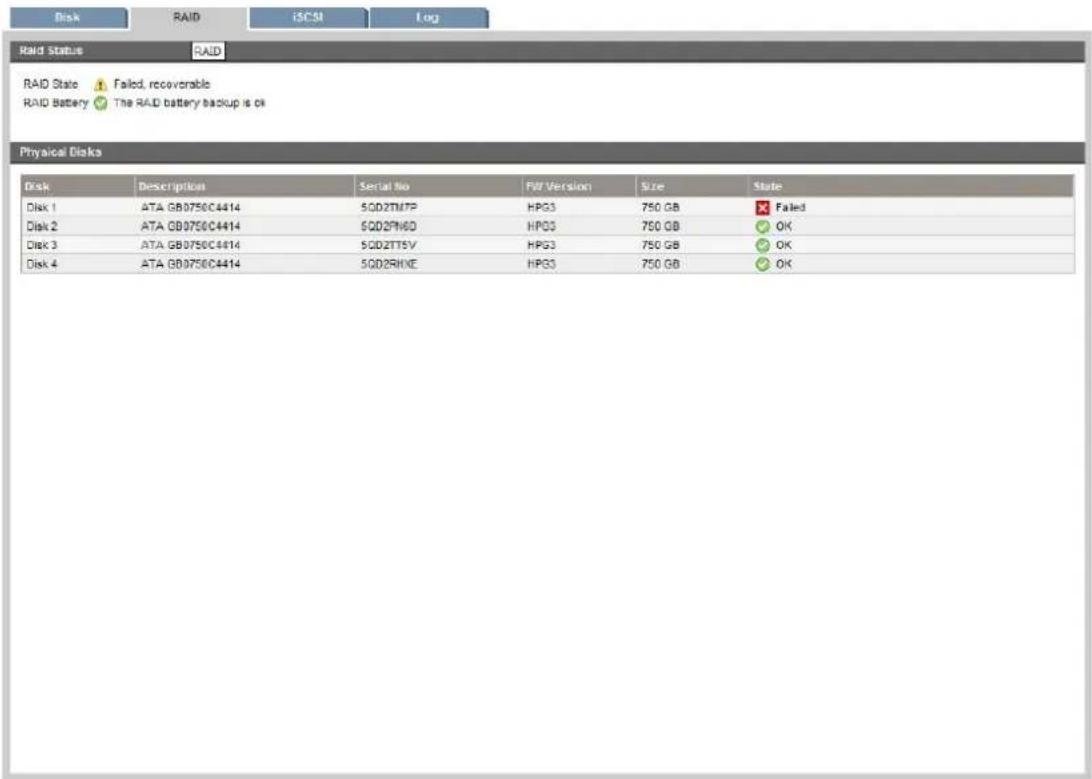
Status page information (HP D2D4300/4100 Series)
Both the Storage Pool and RAID tabs report that there is a problem with disks, but do not id the failed disk.
Figure 31 Storage Pool tab with RAID status warning (HP D2D4300/4100 Series)
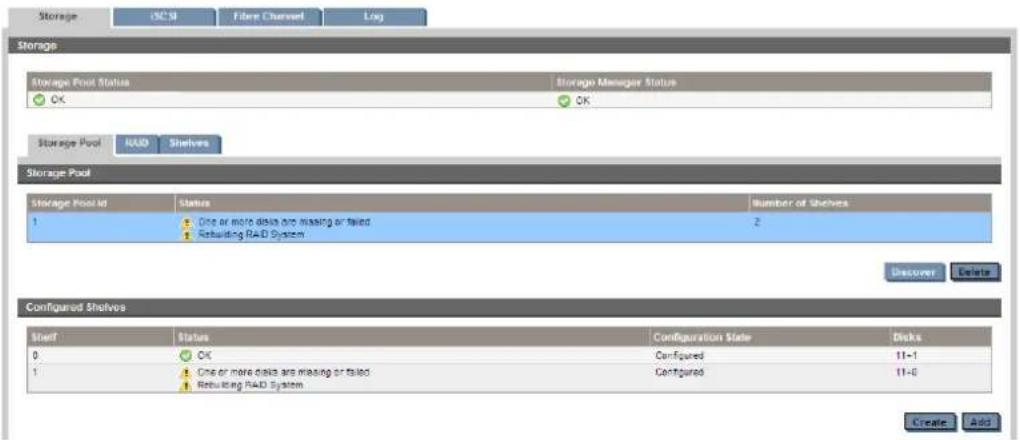
Figure 32 RAID tab with RAID status warning (HP D2D4300/4100 Series)
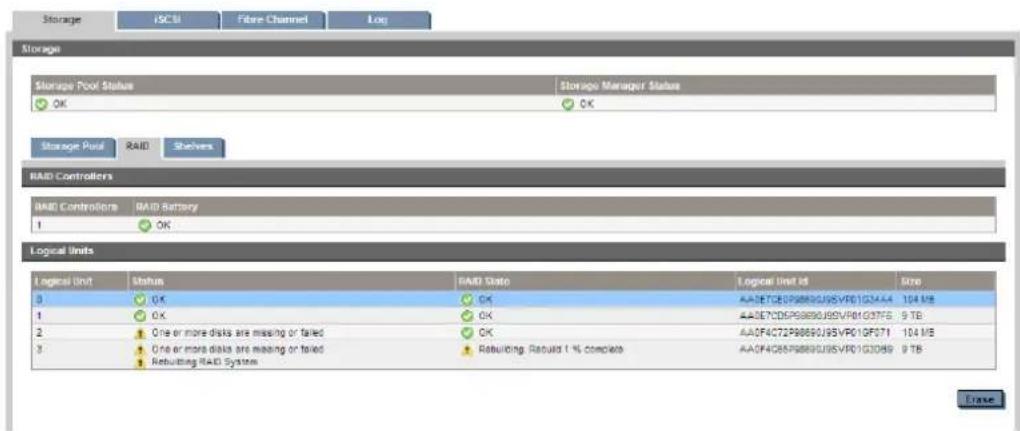
To find out which physical disk has failed and its location, look at the Shelves tab. Use the Beacon function on the Storage-Shelves page to locate the physical disk in the shelf.
Figure 33 Identifying the failed disk(s) (HP D2D4300/4100 Series)
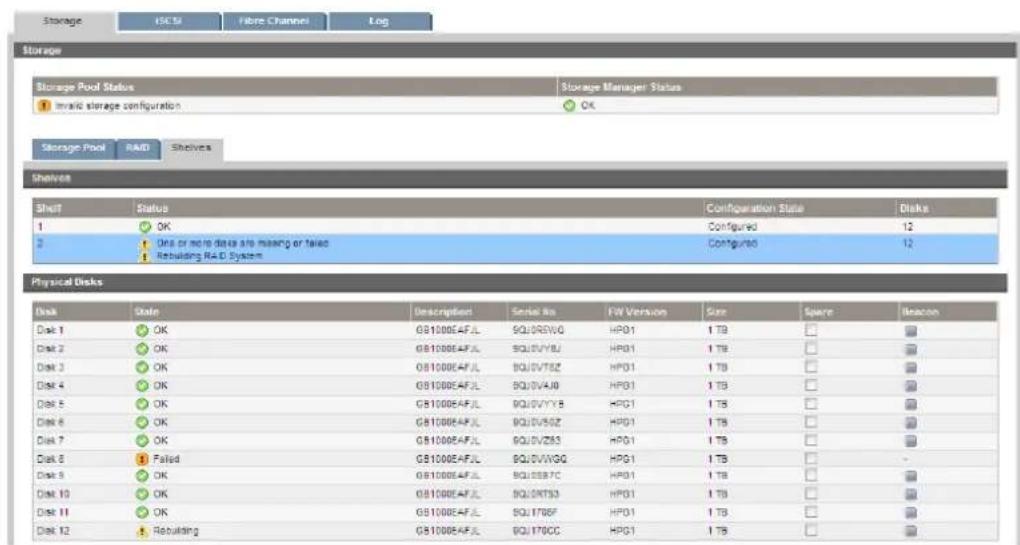
If you have a system console
The optional system console is a useful tool for monitoring disk status. If you have connected a system console, as described in the Installation and Configuration Guide, an Attention message is displayed against the RAID Status Level if a disk fails and the failed disk can easily be identified in the RAID section.
NOTE: The system console is password protected. It uses the same password as the Web Management Interface.
Figure 34 System console showing failed disks (HP D2D2500 Series)
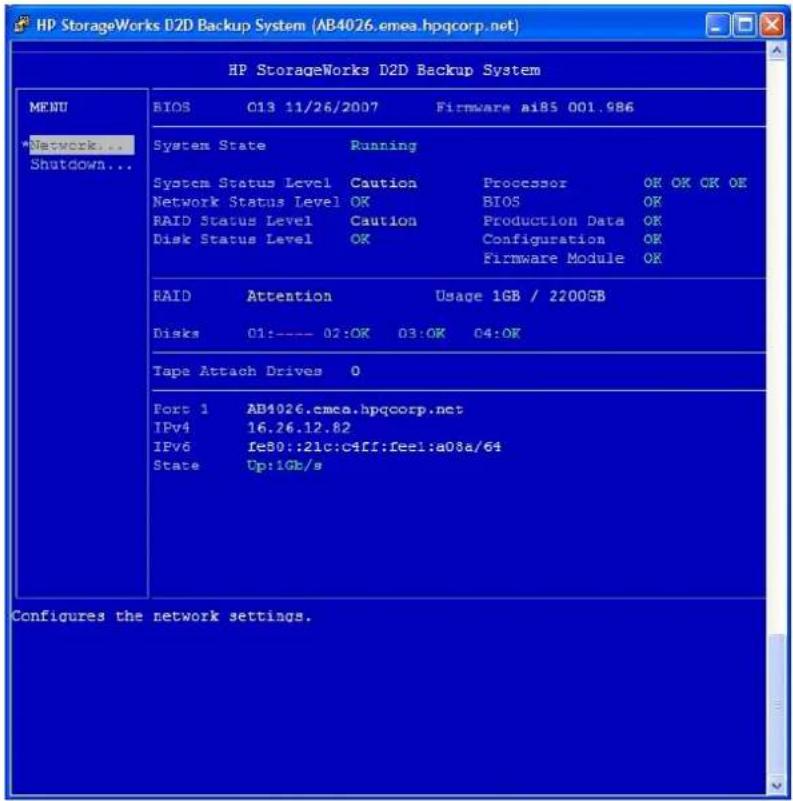
If you are using iLO2
The Remote Console option under iLO2 also allows you to monitor disk status. It provides similar information to the system console, described in the previous section, and is also password protected. It uses the same password as the Web Management Interface.
If you have email alerts
If you have configured recipients for email alerts on the Web Management Interface, they will be notified of a disk failure with a message similar to the following.
Example email from an HP D2D4100/4300 Series Backup System
**************************
This is a system generated message from your HP StoreOnce D2D Backup System
Email Notification From D2D-CZC8033MWR

31-Mar-2009 8:32:57 : Storage RAID Logical Drive AA587361P98690J9SVP01GCD82
Catastrophically Failed

31-Mar-2009 8:32:57 : Storage RAID Logical Drive AA58736DP98690J9SVP01G5251
Catastrophically Failed

31-Mar-2009 8:32:57 : Physical disk 5QK0AQKG failed

31-Mar-2009 8:32:57 : Physical disk 5QK0AN7T failed

31-Mar-2009 8:32:57 : Physical disk 5QK0ANMP failed

For further information please browse to
https://D2D-CZC8033MWR.emea.hpqcorp.net (https://16.26.133.71)
Please do not reply to this email.
**************************
Example email from an HP D2D2500 Series Backup System
This is a system generated message from your HP StoreOnce D2D Backup System
Email Notification From AB4027
20-May-2008 16:20:54 : Disk failure has occurred but the RAID System is still operational with full capacity
20-May-2008 16:20:54 : RAID Disk 1 Failed
For further information please browse to
https://AB4027.emea.hpqcorp.net (https://16.26.11.104)
Please do not reply to this email.
The Event Log
The Log also contains warning messages if a disk fails.
Figure 35 Log showing disk failure (HP D2D4300/4100 Series)
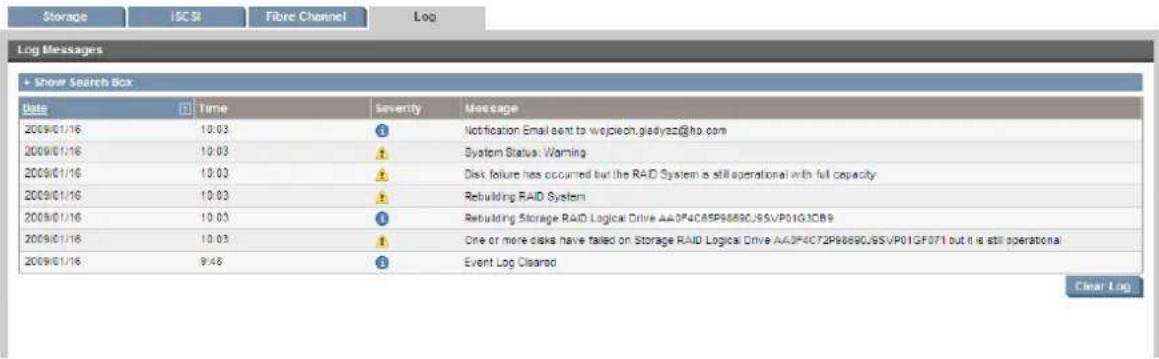
Replacing a hot-plug hard disk
- Identify the disk that has failed as described in How do I know a disk has failed? (page 137).
NOTE: Remember you can use the Beacon LED to identify the physical disk in the unit.
- HP D2D4100 Series: The hard drives installed in the server are labeled from device 1 to device 12, from left to right, top to bottom, when viewed from the front of the server.
HP D2D4300 Series: The hard drives in the internal shelf are installed in two columns in the server and each column is physically labeled from device 1 to device 6, bottom to top. When viewed from the front of the server, the disks 1 to 6 in the far-right column relate to disks 1 to 6 on the Web Management Interface. The disks 1 to 6 in the inner column relate to disks 7 to 12 on the Web Management Interface. In the expansion shelves, they are installed in four columns and are labeled from top to bottom, left to right.
HP D2D2500 Series: The drive bays are labeled from device 1 to device 4, from left to ri when viewed from the front of the server.
Figure 36 Disk numbering (HP D2D4100 Series)
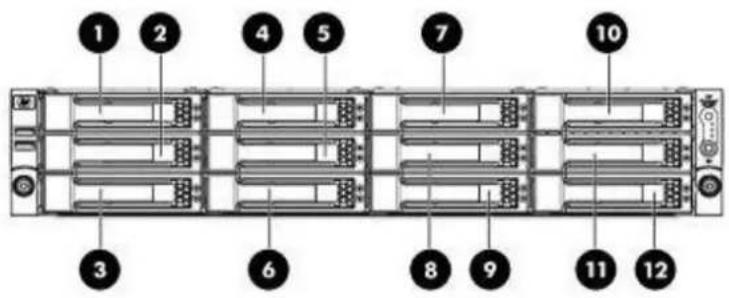
Figure 37 Disk numbering (HP D2D2500 Series)
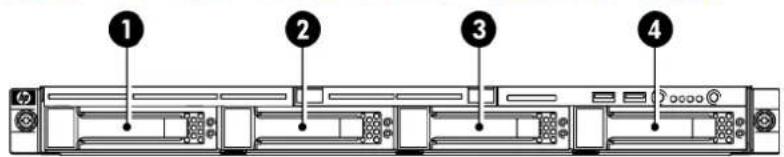
Figure 38 Disk numbering of the internal shelf (HP D2D4300 Series)
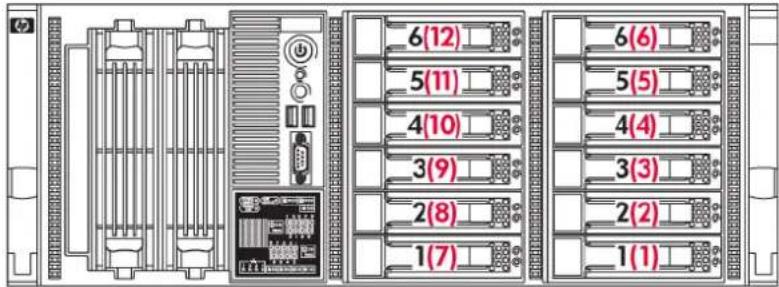
NOTE: The red lettering indicates the disk number on the Web Management Interface.
Figure 39 Disk numbering of expansion shelves (HP D2D4300/4100 Series)
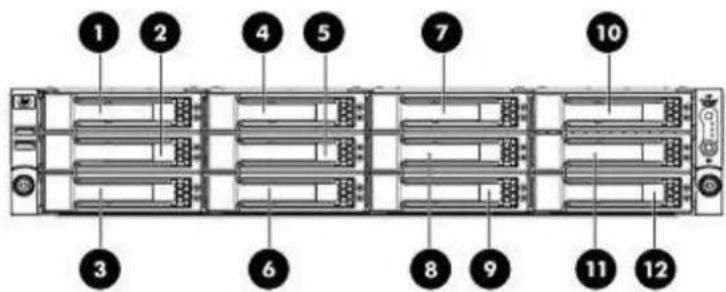
-
Remove the disk.
-
Press the hard disk carrier button (1) to release the ejector lever.
- Pull out the disk carrier handle (2) and slide the hard drive assembly (3) out of the drive bay. Be sure to support the drive when pulling it out of the cage.
Figure 40 Removing the hard drive (example shows D2D4100 Series)
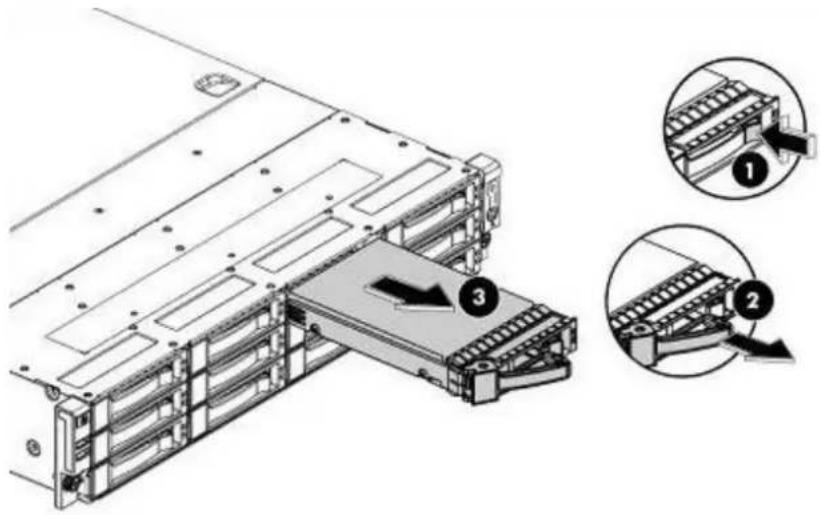
- Replace the failed disk with the new disk.
Push the hard drive assembly (1) into the drive bay until it stops and press the HDD carr latch (2) inward until it clicks.
Figure 41 Installing a replacement hard disk
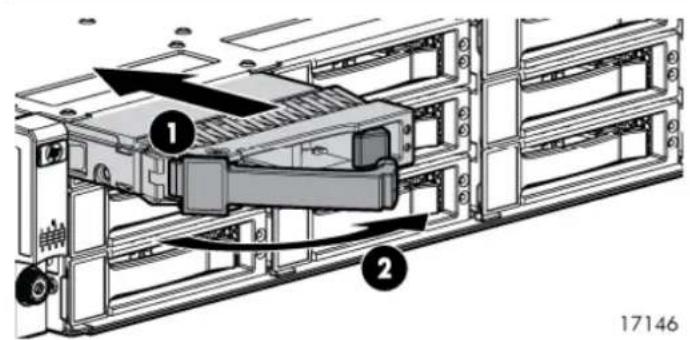
- Log in to the Web Management Interface and look at the appropriate Status pages.
HP D2D4100/4300 Series: Select Storage-Shelves. The status of the failed disk should now be OK. The RAID will rebuild automatically but can take up to 5 hours. The RAID State field on the Storage-RAID tab displays the Percentage Complete.
HP D2D2500 Series: Select RAID. The status of the failed disk should now be OK. The RAID will rebuild automatically but can take up to 5 hours. The RAID Status section displays the Percentage Complete.
Figure 42 RAID rebuilding (HP D2D2500 Series)
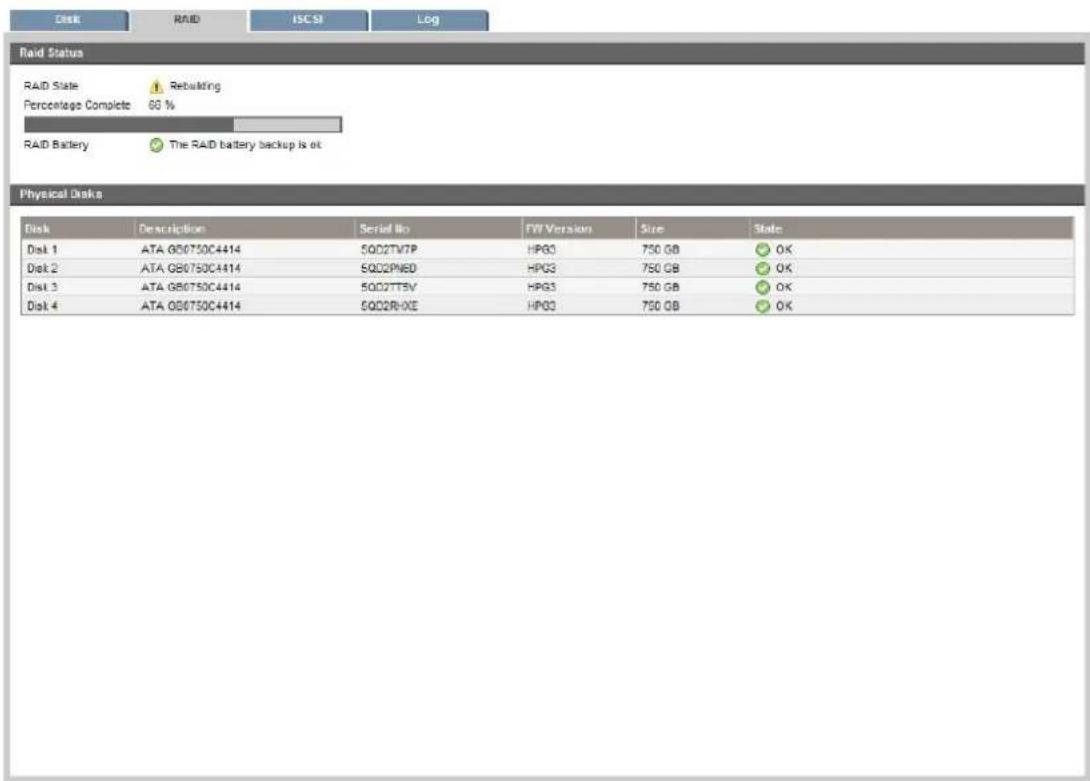
After replacing the failed disk
When you replace a disk, the RAID initialization process starts. The D2D is fully functional during this time, however may have reduced performance until the process completes and initialization progress is 100%.
NOTE: This can take a very long time to complete, even when the appliance is idle.
Email alerts and Log
If you have configured recipients for email alerts on the Web Management Interface, they will notified that physical disk(s) added, RAID is being rebuilt and when the rebuild has completed. The Log also contains an entry when the RAID rebuild completes.
If you have a system console or are using the iLO2 Remote Console
The disks are shown as OK, but a message is displayed against the RAID Status Level while RAID is rebuilding.
Figure 43 System console during RAID rebuild (HP D2D4300 Series)
| HP StorageWorks D2D Backup System | ||
| MENU Network... *Shutdown... Reset... Logout... | BIOS P63 03/30/2010 | Firmware 200. |
| System State Running | ||
| System Status Level OK | Processors OK | |
| Network Status Level OK | BIOS OK | |
| RAID Status Level Caution | Production Data OK | |
| Disk Status Level OK | Configuration OK | |
| FCP Status Level OK | Firmware Module OK | |
| System Memory OK | ||
| Storage Configured : 1 Shelf : Online Shelves 1:10+1 Rebld:5% | ||
| 1G Port 3 D2D-CZJ9340846. IPv4 IPv6 2620:0:a17:e020:225:b3ff:feaa:d862/64 State Up | ||
| Session: Logged Out | ||
Figure 44 System console during RAID rebuild (HP D2D2500 Series)
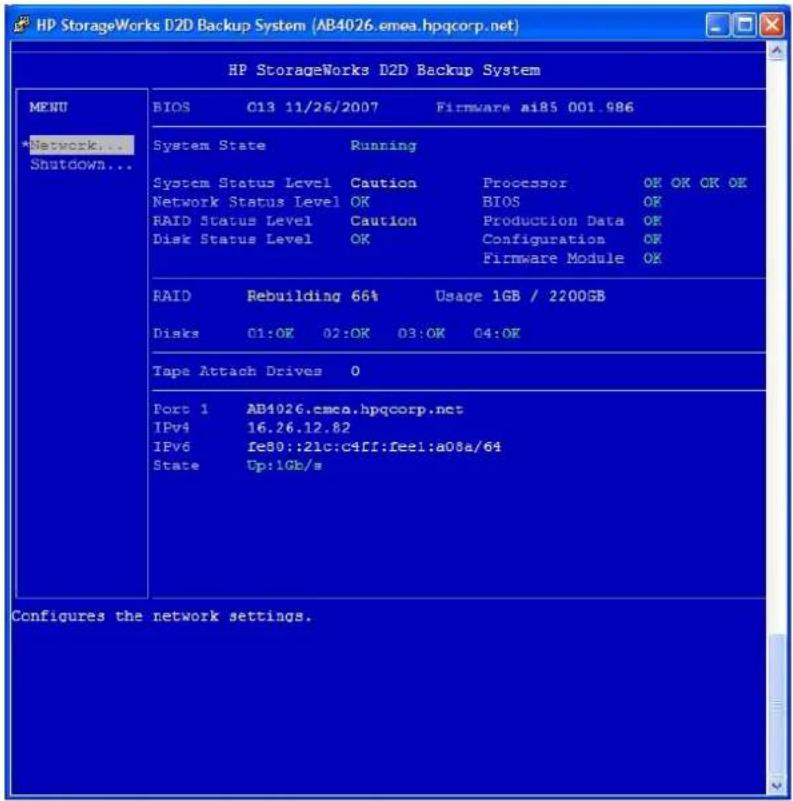
If several disks fail
If several disk failures are reported at once, it is possible that the disks are fine while some other component has failed. In these situations care should be taken to rule out the possibilities of loose/broken cables, faulty RAID controllers or powered-down Capacity Upgrade Kits before replacing the disks. If the problem lies with components other than the disks, then there is a very good chance that no actual data loss has occurred.
NOTE: If the System State shows that RAID has failed catastrophically and no RAID devices are available, the HP Smart Array RAID controller has failed and needs replacing. See the HP D2D Backup System Maintenance and Service Guide for more information.
Replacing the disks (HP D2D2500 Series)
If more than one disk fails on the HP D2D2500 Series, you will lose all data on the HP StoreOf Backup System and the message on the Summary page warns that the RAID system has failed catastrophically. The RAID is not recoverable.
Figure 45 Status showing multiple disk failure (HP D2D2500 Series)
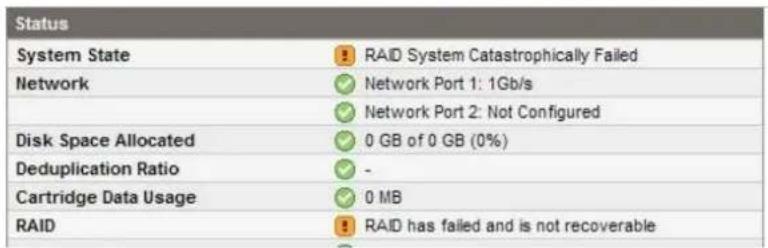
The device operating system is not stored on any of the disks, so the HP StoreOnce Backup S is still usable after replacing the failed disks. Use the RAID (Status) page of the Web Management Interface or the System Console to help you identify the disks that have failed.
Figure 46 RAID showing two disk failures (HP D2D2500 Series)
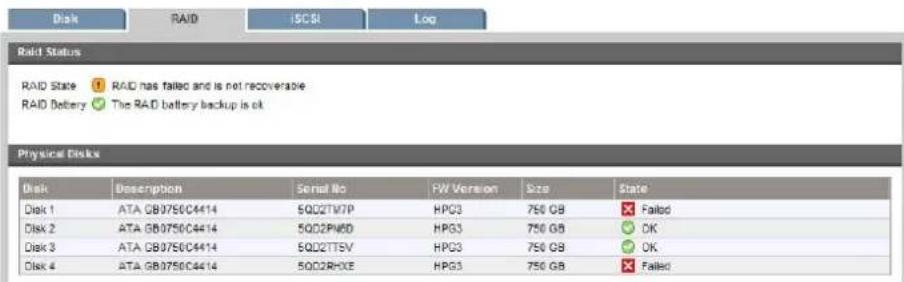
Replace the disks, as described earlier in this chapter. When you power on again, the RAID not rebuild automatically. The Summary page continues to show the RAID System as catastrophic failed. If you look at the Devices or Cartridges page, no information is available other than the library is awaiting RAID initialization.
Figure 47 Devices page awaiting RAID initialization (HP D2D2500 Series)
| Name | Cartridges | Connection | Device Type | Port |
| Library 1 | 24 | Analog RMS information | VSL 03 Series (2x24) / LTD. 5 | FCD Port |
| Creative library |
If you have the System Console connected you will see Fault conditions for System Status and Status and that the RAID is not mounted, even though the disks are shown as OK.
Figure 48 System console after two disks are replaced (HP D2D2500 Series)
| System State | Running | |||
| System Status Level | Fault | Processor | OK OK OK OK | |
| Network Status Level | OK | BIOS | OK | |
| RAID Status Level | Fault | Production Data | OK | |
| Disk Status Level | OK | Configuration | OK | |
| Firmware Module | OK | |||
| RAID | Not Mounted | Usage 5GB / 2200GB | ||
| Disks | 01:OK 02:OK 03:OK 04:OK | |||
Initialising RAID
You must initiate the RAID rebuild manually on the RAID page in the Web Management Interface. Click on the Initialise button. This will make the HP StoreOnce Backup System usable again, I you will have lost your data. After initialization, the Disk page will show 0% used because all has been lost.
The initialization process may take several hours or a day depending on the process. Once the RAID status parity reaches 100%, the RAID is fully configured (it is still useable whilst initialisir parity with some slight damage to performance).
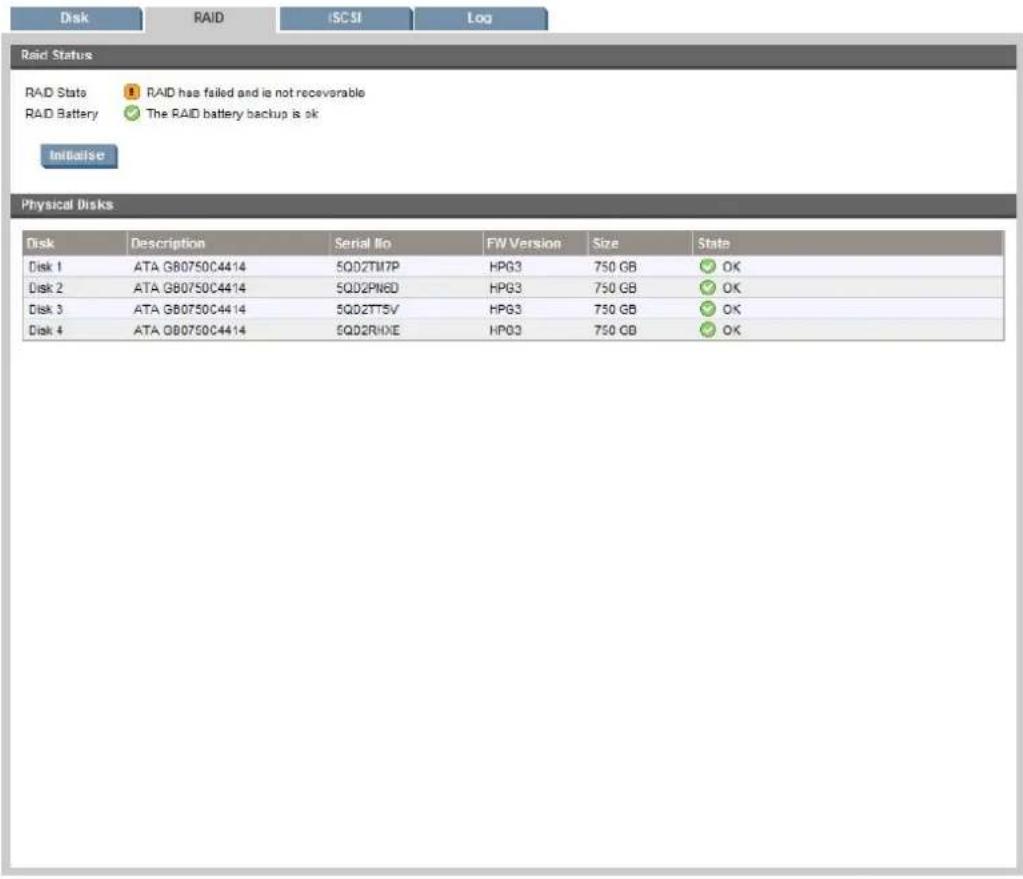
Replacing the disks (HP D2D4300/4100 Series)
If more than two disks fail and the online spare disk has been used on the HP D2D4300/4100 Series, you will lose all data on the HP StoreOnce Backup System and the message on the Sumr page warns that the RAID system has failed catastrophically. The RAID is not recoverable.
Figure 49 Status showing multiple disk failure on one shelf (HP D2D4300/4100 Series)
| Storage | Storage is faulty |
| RAID | RAID System Catastrophically Failed, Storage system is available but operating at reduced performance due to RAID Optimisation |
The device operating system is not stored on any of the disks, so the HP D2D Backup System is still usable after replacing the failed disks. Use the Beacon function on the Storage-Shelves page of the Web Management Interface or the System Console to help you identify the disks that have failed.
Figure 50 Storage—Shelves showing three disk failures (HP D2D4300/4100 Series)
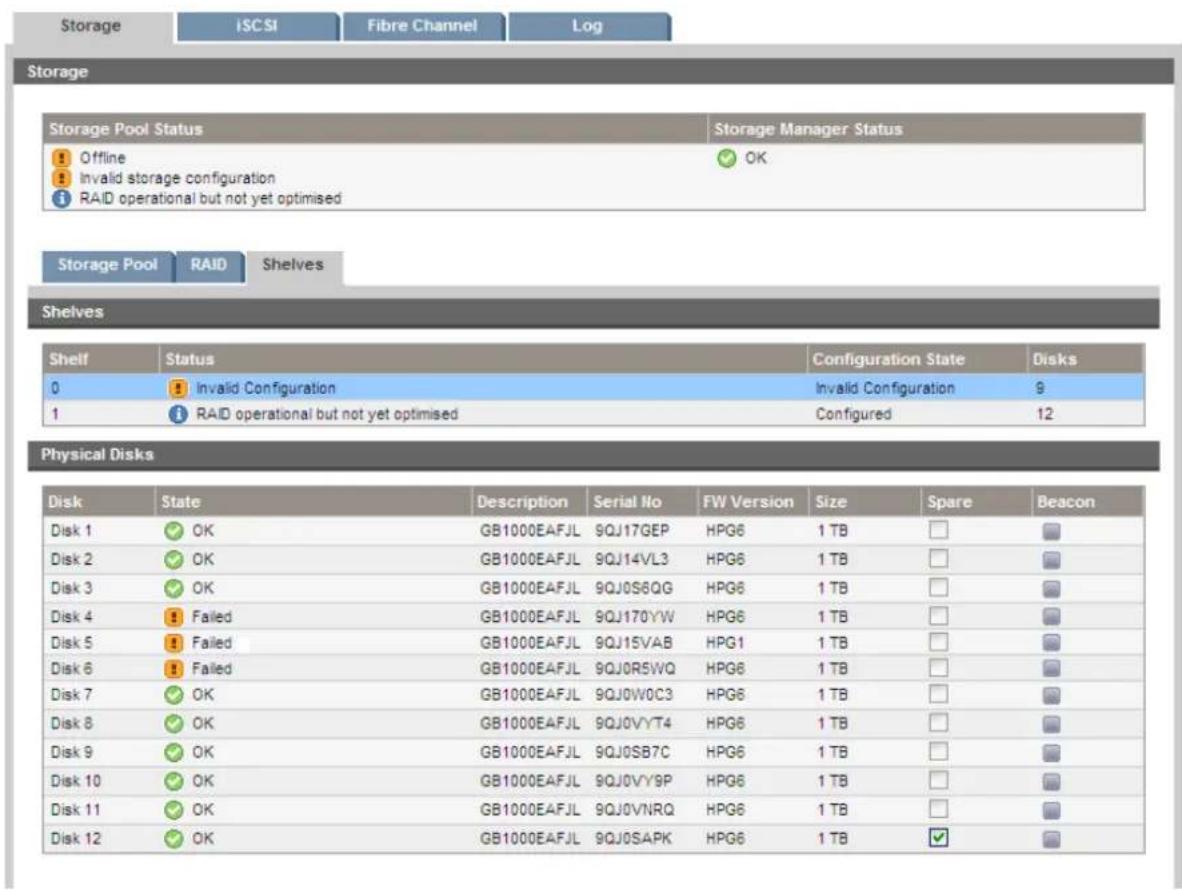
IMPORTANT: When you have two (or more) shelves, the disk failures may be on one shelf or and the RAID status of the other shelf is shown as operational. However, you will lose all data the HP StoreOnce Backup System.
Power off and replace the disks, as described earlier in this chapter. When you power on ag the disks are show as OK in the Storage-Shelves page, but the Shelf and Storage Pool both I an invalid configuration.
Figure 51 Storage—Shelves page after replacing disks (HP D2D4300/4100 Series)
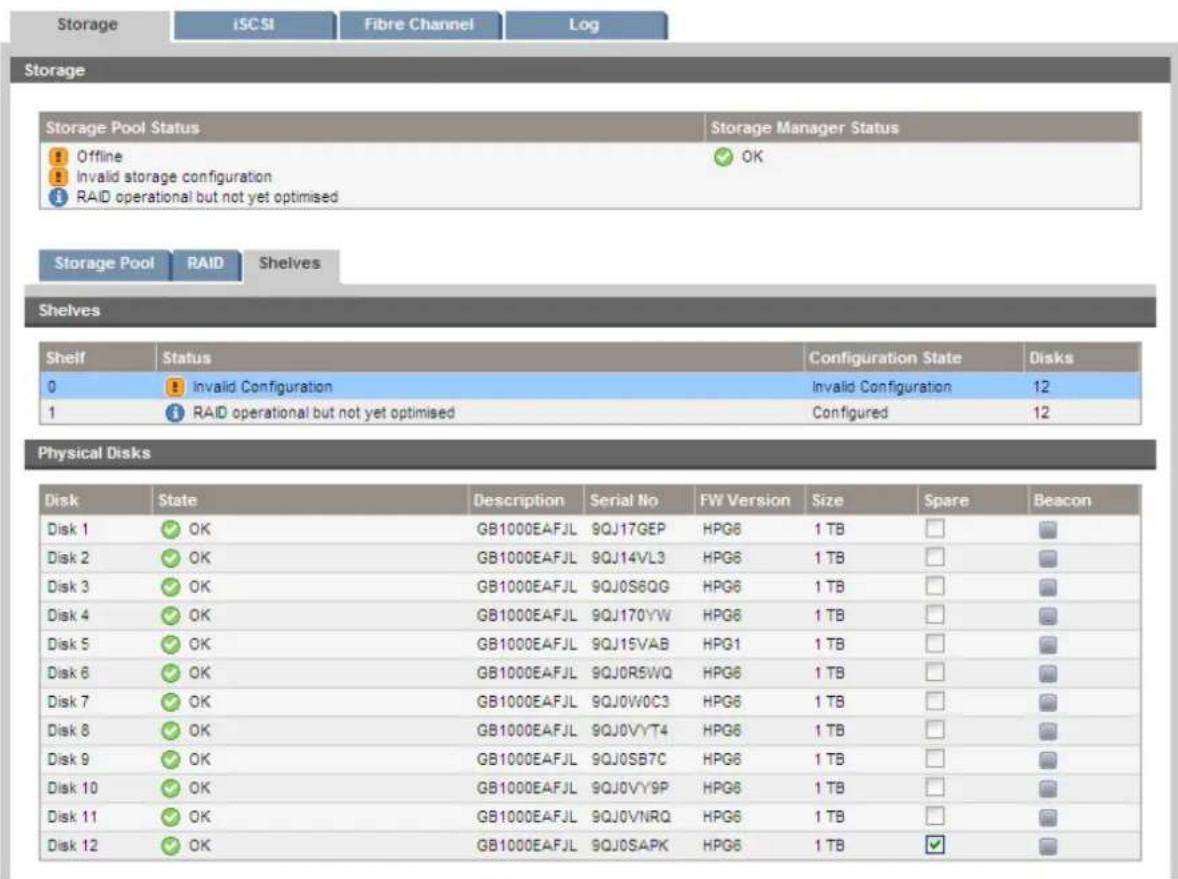
Restoring the Storage Pool
You must delete the whole storage pool and rebuild it.
- Go to the Storage-Storage Pool tab and click Delete.
Figure 52 Storage-Storage Pool tab, deleting the storage pool
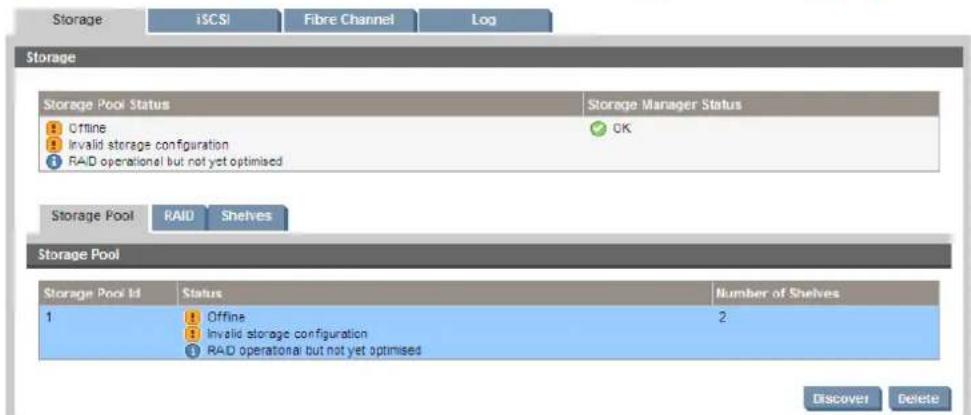
- Look at the Summary page to monitor progress. (If you look at the Status—Storage page w storage is being deleted, the system cannot display meaningful storage pool information an it tells you that the storage manager is busy.)
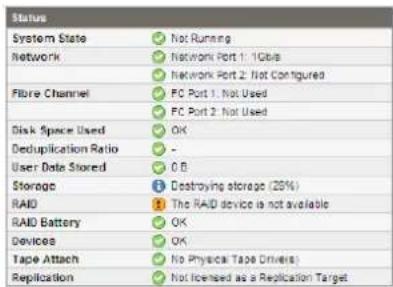
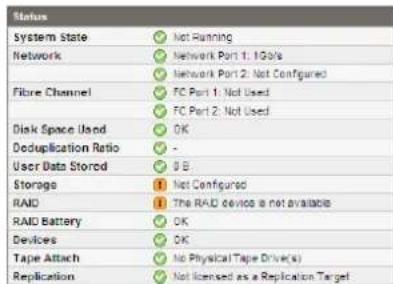
Summary page after storage is deleted Summary page
- Go back to the Status-Storage page and click Create in the Configured Shelves section of Storage Pool tab.
Figure 53 Storage-Storage Pool tab, creating the storage pool
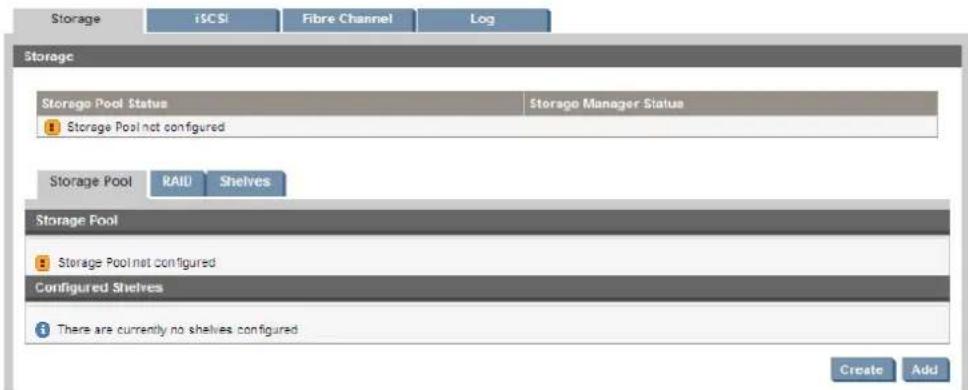
- The system will start creating new storage using all available and licensed shelves. Look at the Summary page to monitor progress.
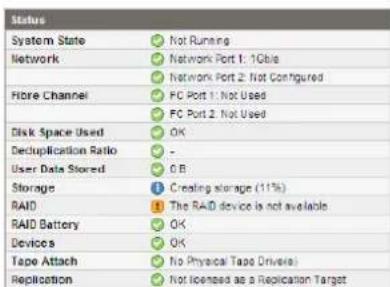
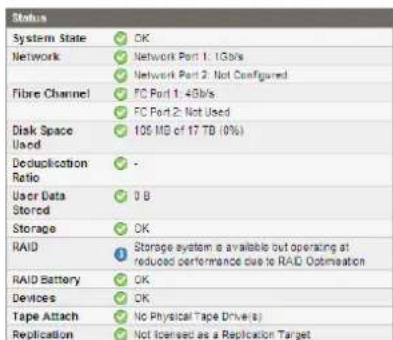
Summary page after storage is created Summary page
- The information message advising you that the HP StoreOnce Backup System is optimizing is normal and does not require you to take any action. The status will become OK as soon optimization completes, but it may take some time. If you look at the Status—Storage page, the same message is displayed but all relevant storage pool information is available.
Figure 54 Status—Storage page after storage is created
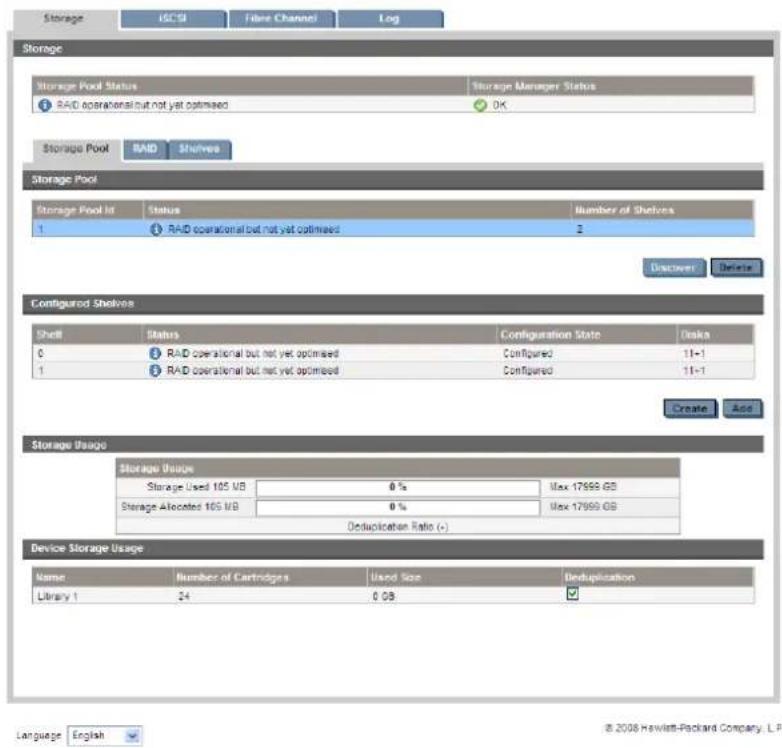
Creating cartridges (Virtual Tape Devices only)
All cartridges and data were lost when the disks failed. Before you can use the HP StoreOnce Backup System you must create new cartridges. Use the Create all button to create a blank cartridge of the size/emulation type selected when the library was first configured in all empty slots.
| Location | Bar Code | Used Size | Max Size | Write Protected | Last Written | |
| Mail Slot | #2 | |||||
| Location | Bar Code | Used Size | Max Size | Write Protected | Last Written | |
| Tape Drive 1 | ||||||
| Location | + Bar Code | Used Size | Max Size | Write Protected | Last Written | |
| Slot 1 | #2 | |||||
| Slot 2 | #2 | |||||
| Slot 3 | #2 | |||||
| Slot 4 | #2 | |||||
| Slot 5 | #2 | |||||
| Slot 6 | #2 | |||||
| Slot 7 | #2 | |||||
| Slot 8 | #2 | |||||
A Extra information for G1 products
Overview
The information in this section is for users who have one of the older G1 products:
•HP D2D2502/2503/2504 G1 Backup Systems
•HP D2D4004/4009 G1 Backup Systems
•HP D2D4112 G1 Backup Systems
How do I know whether I have a G1 or G2 Backup System?
The generation can be identified from the Summary page and the Software page of the Web Management Interface. Look at the Type field, which will state G1 or G2 or look at the Software Revision field. If it shows 1.x.xx software, it is a G1 product; if it shows 2.x.xx software, it is a G2 product.
Major differences
This section highlights areas where the information provided in the main body of this user guide is different for G1 products. It does not provide a definitive list of technical differences. Please to the product specs for detailed information.
VTL devices
G1 products do not support ESL-e or EML-e library emulation and never support more than four drives per library. There may be other restrictions on emulation types that are available dependent upon product type. Unsupported emulation types are not available for selection on the Devices page. The maximum number of libraries and drives that are supported per G1 appliance is given in the following table.
Table 32 Maximum number of libraries and drives per G1 appliance
| HP D2D2502i | HP D2D2503i | HP D2D2504i | HP D2D4004 /4009 | HP D2D4112 | |
| Max libraries | 4 | 6 | 8 | 16 | 24 |
| Max drives per library | 4 | 1 | 4 | 4 | 4 |
| Max slots per library (D2DBS) | 48 | 48 | 48 | 96 | 144 |
NOTE: It is only possible to exceed the maximum physical limitation of 64 devices when configuring the HP D2D4112 Backup System.
Creating cartridges
The procedure is as described in the main guide, apart from the following note that applies if are using Tape Attach.
NOTE: When you import a cartridge, you need an empty mail slot and an empty cartridge to which the backup application can move the imported data. Therefore, you may wish to leave slot whose cartridge has been exported empty, rather than creating a new cartridge. Or to create a slot, edit the Total No Of Cartridge Slots on the Devices page.
NAS devices
G1 products do not support NFS NAS shares; they only support CIFS NAS shares.
Tape Attach
An external or rackmount Ultrium library or tape device may be attached directly to the HP D2D Backup System, allowing the user to store backups offsite. Always refer to http://www.hp.com/go/connect or http://www.hp.com/go/ebs to find out which tape library and tape drive models are supported.
Both SAS and SCSI library and tape devices are supported and require installation of a host bus adapter (HBA); External devices may be half-height or full-height. Rackmount devices are installed in a rackmount enclosure, such as a 1U Rack, 3U Rack or a TapeArray.
With a SCSI interface, up to two tape drives may be connected (including tape drives in libraries and up to two tape operations (import, export or copy) from separate libraries may take place at any one time. With a SAS interface, up to four tape drives may be connected (including tape drives in libraries), and up to four tape operations (import, export or copy) from separate libraries may take place at any one time.
NOTE: Tape Attach is only appropriate if you wish to back up Virtual Tape Devices to a physical tape device connected to the HP D2D Backup System. You cannot back up NAS shares in this way.
The Tape Attach web pages allow you to configure attached tape storage device, run jobs manual create and run job schedules, view status and job history.
NOTE: Physical tape storage devices attached to the HP D2D Backup System can only be accessed by the HP D2D Backup System using the Tape Attach pages. They do not appear as attached network devices to the host system.
Seeding Virtual Tape Devices using Tape Attach
Use the Library or Tape Attach Copy functionality to create a physical cartridge that can be shipped to the site of the Target Appliance and imported. You only need to seed with one full backup.
- Host backs up to a Non Replicating library on the Source Appliance.
- The first full backup is copied to a cartridge on a Tape Library.
- The physical cartridge is shipped to the Data Center.
- The first full backup is imported from Tape Library into a Non-Replicating Library on the Target Appliance. It is also possible to import the cartridge into an unmapped slot of an existing Replication-Target library.
- Once imported create the replication linkage between Source and Target Appliances and configure slot mappings.
- Normal replication across the WAN can now take place with only new or changed data needing to be replicated.
NOTE: When recovering data after a disaster has occurred in the remote site resulting in the loss of both the host servers and the D2D system, you can speed up data recovery to the D2D I using the last full backup cartridge to reverse seed the Virtual Tape Library.
Configuration (Tape Attach)
This page allows you to view physical tape storage devices that are attached to the HP D2D Bad System. The top half of the page shows a list of configured physical tape devices.
NOTE: With a SCSI interface, up to two tape drives may be connected (including tape drives in libraries), and up to two tape operations (import, export or copy) from separate libraries may take place at any one time. With a SAS interface, up to four tape drives may be connected (including tape drives in libraries), and up to four tape operations (import, export or copy) from separate libraries may take place at any one time.
NOTE: Standard HP Ultrium barcodes should be applied to all cartridges in libraries to ensure correct media type identification.
Select a device to display its details in the lower half of the page. There are four tabs in the section: Devices, Cartridges, Support and Software.
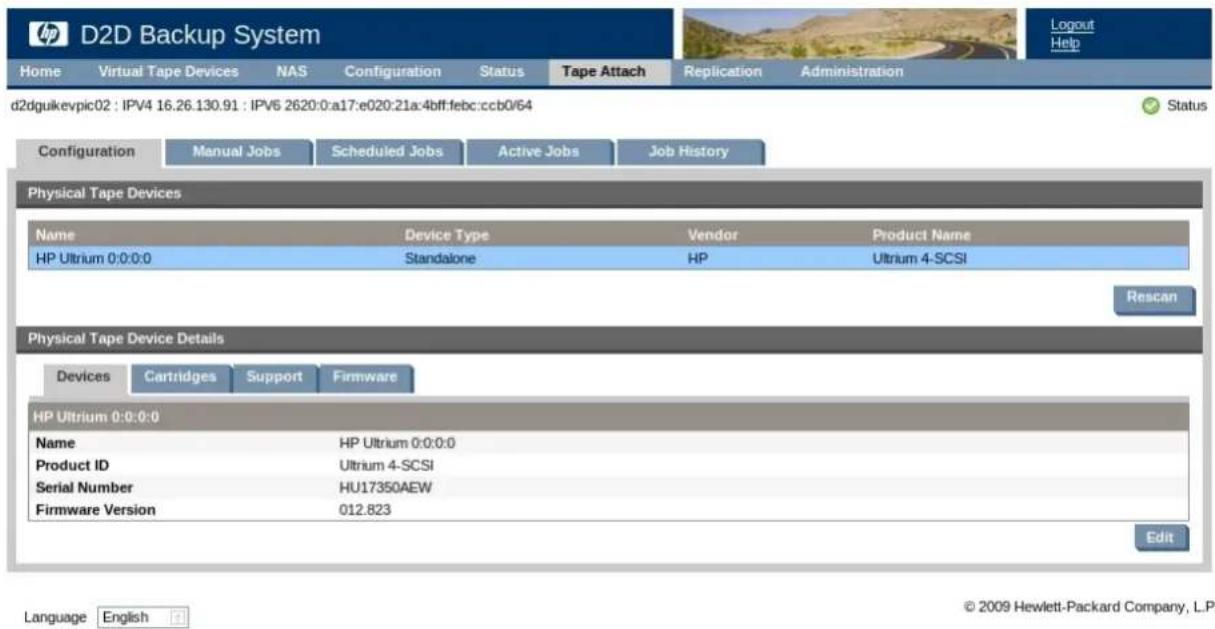
Adding tape storage devices to the list
Devices appear in the list as long as they are connected at power on. If you subsequently attach an external or rack-mounted tape storage device after power on, click Rescan to add it to the list of devices.
IMPORTANT:
When using a physical tape library or autoloader connected to the D2D device, always ensure that when first connected or prior to a rescan, all cartridges within the device have been returned to their slots. In order to do this it may be necessary to move cartridges from the tape drive(s) of their slots manually via the library front panel. Failure to do this will result in tape offload job failing to start and remaining in queued state."
Viewing and editing tape device details
Select a specific tape device and click the Devices tab to display additional information about it and any embedded tape drives. This information tells you the device's serial number and softw version.
For tape libraries, it also tells you the total number of slots, mail slots and embedded tape drive. Details for any embedded tape drives are included below the tape device details. You can use this to find out the Ultrium generation of the embedded tape drive, its serial number and software version and the barcode of any cartridge that is loaded.
Click Edit. You can only change the Name of the tape device. This is the name that is used to identify the tape device on the HP D2D Web Management Interface. None of the other details may be edited.
Viewing cartridge details
Click the Cartridges tab to display a list of slots with details of bar codes and the maximum size of any cartridges in those slots. The maximum size is the raw capacity with no data compress. You cannot edit these details.
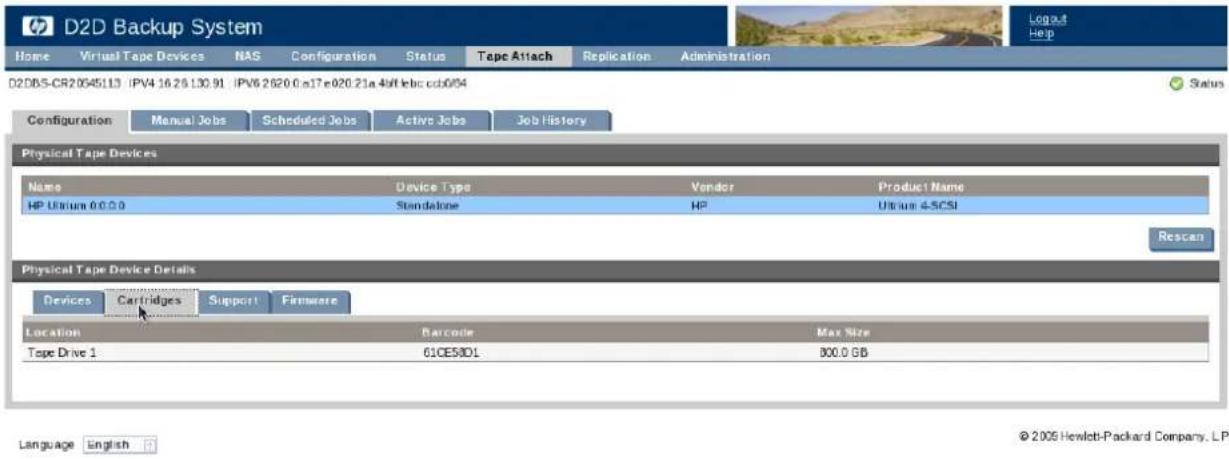
Obtaining support
Click on the Support tab.
•The general support enquiries link takes you to HP Support web pages.
- With tape libraries a link is provided so that you can generate a support ticket from the library GUI. This link takes you to the Command View MSL login.
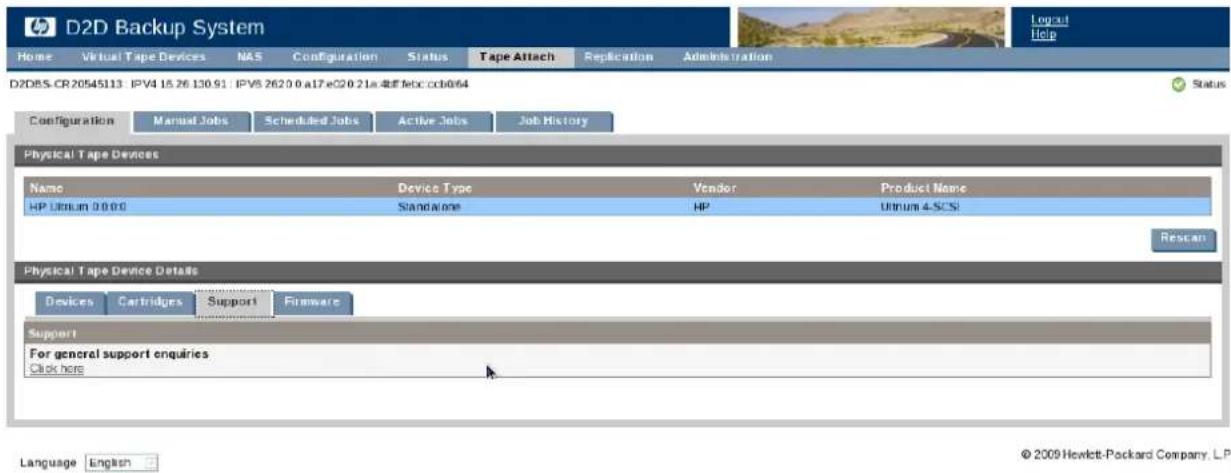
Upgrading tape storage device firmware
As long as the tape device is supported, you can also upgrade the firmware from this screen. CI on the Firmware tab.
- For tape drives you can upload firmware that you have downloaded from the HP web site. Please refer to http://www.hp.com/support for details of the latest firmware for your HP Ultrium Tape Library or Tape Drive and download required files to a location on your host machine before you use this page.
- For tape libraries a link is provided so that you can use the library GUI. This link takes you to the Command View MSL login.
NOTE: If you update firmware on an attached physical tape device that has a cartridge loaded at the time, the cartridge will be unloaded by the firmware update.
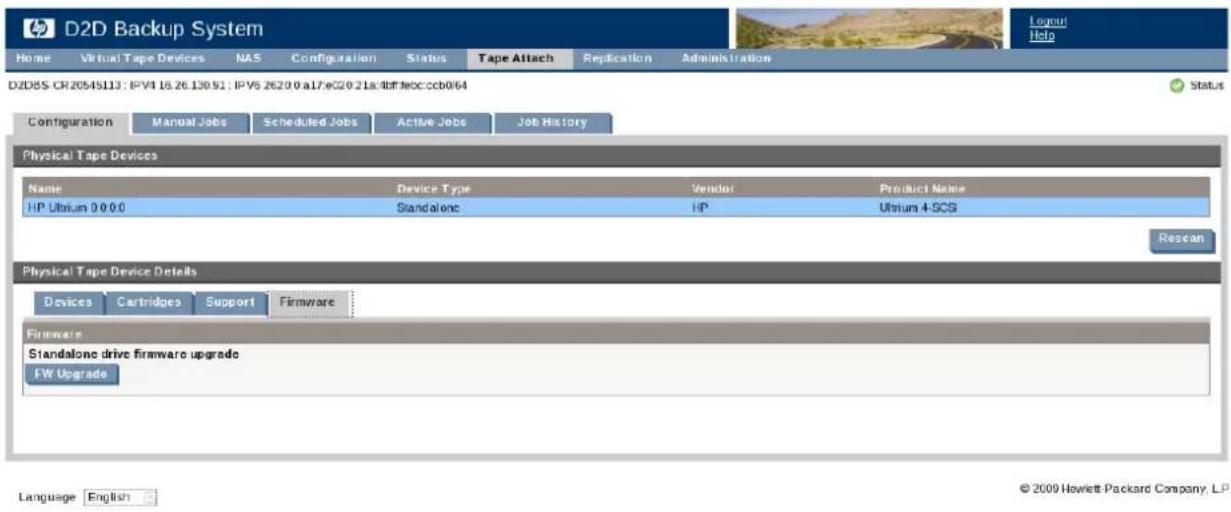
Manual jobs (Tape Attach)
This page provides a wizard that allows you to initiate an immediate import, export or copy operation.
- A copy operation may be performed upon any non blank cartridge in any numbered slot in a library device on the HP D2D Backup System. The cartridge data is copied from the H D2D Backup System to the physical tape storage device.
- An export operation may be performed upon any non blank cartridge in the mail slot in a library device on the HP D2D Backup System. The cartridge data is first copied from the D2D Backup System to the physical tape storage device and then subsequently deleted from the HP D2D Backup System.
- An import operation may be performed on a physical cartridge in the attached tape drive. The data is copied to the target device on the HP D2D Backup System. The operation will automatically create a new cartridge in the mail slot of a library device.
NOTE: With SAS devices, up to four tape operations (import, export or copy) from separate libraries may take place at any one time. If four jobs are already running concurrently, a wait message will be displayed when you try to set up the new job. You must wait for one of the jobs to complete. With SCSI devices, the number of concurrent operations is limited to two.
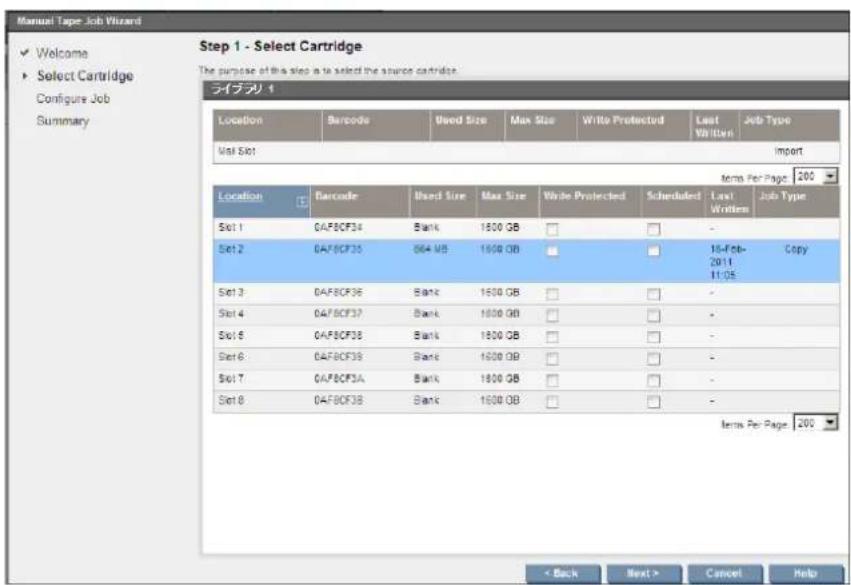
There are two steps in this wizard:
- Select the slot on the HP D2D library that should be used for the copy, export or import job.
- Select the slot on the physical tape storage device.
To select cartridges on the HP D2D library
Select the Library in the Virtual Devices list at the top of the page to display a list of the cartridge in that library.
- There is a Copy label in the far column next to any numbered slot that does not have a blank cartridge.
- There is an Export label in the far column next to the mail slot if it contains a non blank cartridge.
• There is an Import label in the far column next to the mail slot if it contains no cartridge.
To copy to attached tape storage device
- Locate the cartridge that you wish to copy in the Cartridge list and click on the slot to select it. If it is a valid slot, the Next button is active. Blank slots or slots that have already been assigned to scheduled jobs are not valid selections for manual jobs.
- Click on Next to display the second page of the wizard. (Or report an error if no tape storage devices are currently attached to the HP D2D Backup System.)
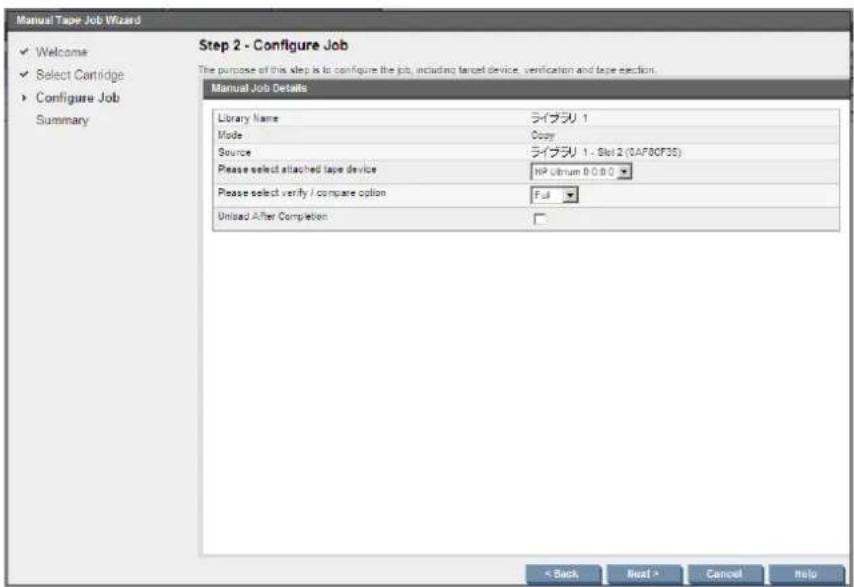
- Select the attached tape storage device from the pull-down list, the required physical slot if it is a tape library, the required verify/compare option and whether the physical cartridge should be unloaded after the operation completes.
NOTE: A Full Verify reads the data back after copy and compares it byte-by-byte with the original. A Quick Verify also reads back the data, but only ensures that it can be read. It may save some time if another tape device on the HP D2D Backup System is being accessed at the same time as the copy operation. No Verify is the fastest option.
NOTE: On physical tape libraries the unload after completion option moves the cartridge to the mail slot if the mail slot is enabled and empty.
-
Click Create.
-
The process checks that media is loaded in the attached tape storage device and that it is blank. If it is not blank, you are given the option of overwriting it or canceling the job. (It is not possible to append data.) It also checks that there is cartridge data to be copied (it may have been subsequently moved by the backup application).
NOTE: In the case of libraries some of these checks can only be made after loading the cartridge in a tape drive, which takes approximately one minute.
- The Job Status page is displayed and you can view progress in the final column.
To export to attached tape storage device
Data can only be exported from the mail slot. Once data has been exported it is removed from the HP D2D Backup System. However, if an error occurs during the process, the data is not allowed. It remains on the cartridge located in the mail slot. Export is not recommended with deduplicating libraries as it does very little to free up disk space, which is the prime reason for export. (Sp. is only freed up, if a chunk of data is no longer referenced by any cartridges.)
The preferred option is to use the backup application on the host to move the cartridge into email slot. This action removes the cartridge from the numbered slot and leaves the slot empty also ensures that the backup application is in sync with the status of cartridges on the HP D2 Backup applications have a number of terms to describe this action, such as remove or eject. to the documentation supplied with your backup application for further details. You can also m cartridges manually from the Web Management Interface, see Cartridges (Virtual Tape Devices) (page 18).
Δ
CAUTION: Do not export cartridges that the backup application uses on a frequent basis as part of a rotation strategy.
- Click on the mail slot in the Cartridge list and press the Next button.
NOTE: The Export function is only active if the mail slot contains a cartridge with data on it (there is an Export label in the right column of the mail slot).
-
This displays the second page of the wizard. (Or reports an error if no tape storage device are currently attached to the HP D2D Backup System.)
-
Select the attached tape drive from the pull-down list, the required physical slot if it is a tape library, the required verify/compare option and whether the physical cartridge should be unloaded after the operation completes.
NOTE: A Full Verify reads the data back after copy and compares it byte-by-byte with the original. A Quick Verify also reads back the data, but only ensures that it can be read. It may save some time if another tape device on the HP D2D Backup System is being accessed the same time as the copy operation. No Verify is the fastest option.
NOTE: On physical tape libraries the unload after completion option moves the cartridge to the mail slot, if the mail slot is enabled and empty.
- Click Create.
NOTE: You cannot select a cartridge from a Replicating Target Library for export. The Roll column in the Devices section tells you what sort of library you have selected.
- The process warns you that the cartridge data on the HP D2D Backup System will be removed once it has been exported. You must click OK to continue. It also checks that media is locked in the attached tape storage device and that it is blank. If it is not blank, you are given option of overwriting it or canceling the job. Finally, it checks that there is cartridge data on the slot to be exported (it may have been subsequently moved by the backup application.)
NOTE: In the case of libraries some of these checks can only be made after loading the cartridge in a tape drive, which takes approximately one minute.
-
The Job Status page is displayed and you can view progress in the final column.
-
Once the export completes successfully, the cartridge is removed from the mail slot.
NOTE: If you cancel the process, remember to use the backup application (or the Web Management Interface) to move the cartridge back from the mail slot to the cartridge slot.
To import from attached tape storage device
An import operation may be performed on a physical cartridge in the attached tape drive. The cartridge is copied to the target device on the HP D2D Backup System. The operation will either automatically create a new cartridge in the mail slot of a library device or replace the data on a cartridge in a standalone tape drive device. The mail slot or cartridge must be empty.
- Locate the mail slot in the Cartridge list and click on the Next button. (There is an Import label in the right column of the mail slot.)
- This displays the second page of the wizard. (Or reports an error if no tape storage devices are currently attached to the HP D2D Backup System.)
- Select the attached tape drive from the pull-down list, the required physical slot if it is a tape library, the required verify/compare option and whether the physical cartridge should be unloaded after the operation completes.
NOTE: In the case of libraries some of these checks can only be made after loading the cartridge in a tape drive, which takes approximately one minute.
4. Click Create.
- Once the import has completed successfully, the cartridge is in the mail slot. Use the backup application (or Web Management Interface) to move the data back into the library slots. Backup applications have a number of terms to describe this action, such as insert. Refer to the documentation supplied with your backup application for further details.
When you import a cartridge:
• If it is less than 200 GB, the cartridge Max Size is set to 200 GB.
- If it is over 200 GB, the cartridge Max Size is set to 400 GB.
- If it is over 400 GB, the cartridge Max Size is set to 800 GB.
• If it is over 800 GB, the cartridge Max Size is set to 1.6 TB.
• Cartridges over 1.6 TB are not writable.
•The Used Size is always reported correctly.
Scheduled jobs (Tape Attach)
This page provides a 3-step wizard that allows you to create, edit and delete schedules for export and copy operations. You can also run a job immediately, rather than wait until its next schedule time.
Five types of schedule are allowed: daily, weekly, day of month, weekday of month and after write. The After Write option runs the job immediately after the cartridge has been written. Up to 50 schedules may be created.
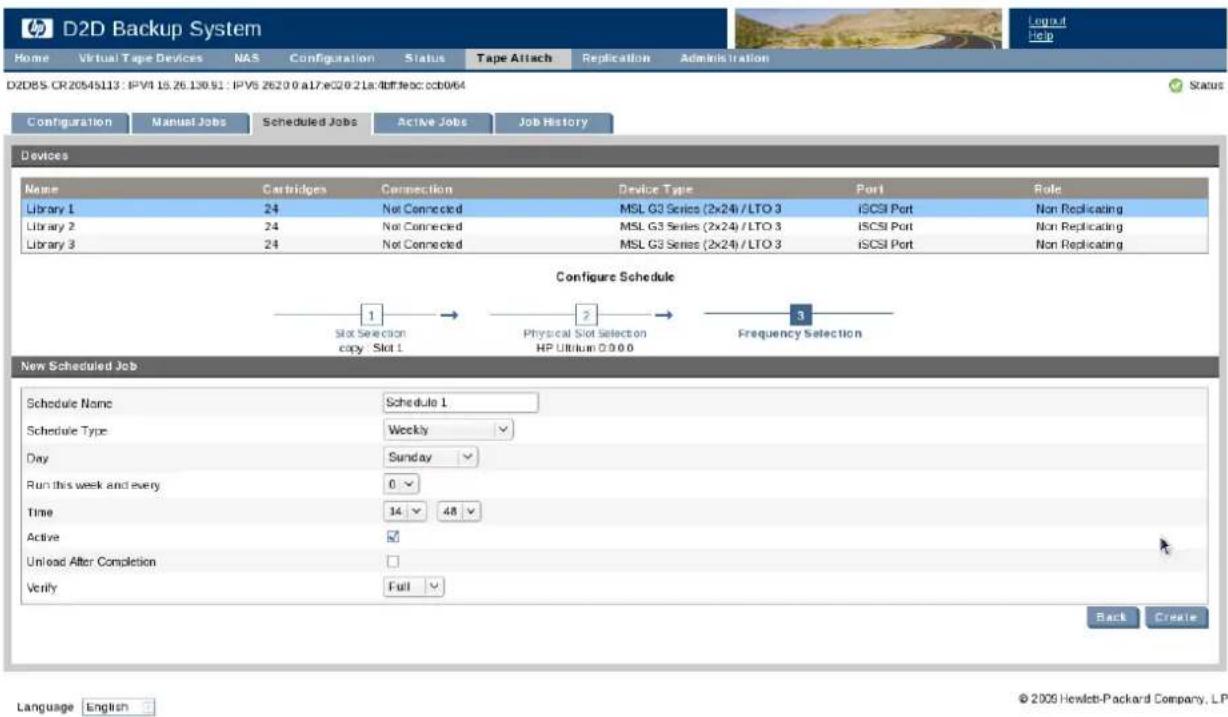
When an export or copy scheduled job is run, it automatically overwrites the cartridge in the drive. If the cartridge is not blank, there is no warning and no record in the job log.
NOTE: The backup application is not automatically updated with any schedules created on the HP D2D Backup System. The two are independent of each other. If you want the backup app schedules to work in conjunction with a schedule on the HP D2D Backup System, you must coordinate them manually.
To create a scheduled job
- Select Scheduled jobs from the Tape Attach section of the navigation bar. A scrollable list of existing schedules is displayed together with details of the next scheduled tape job.
- Click Create.
NOTE: The Create button is not present if you have already created 50 schedules. You need edit or delete existing schedules if you want to create new ones.
- Select the Library in the Virtual Devices list at the top of the page to display a list of the slots in that library. The last column shows you what action is available for a slot.
• Copy is available for numbered slots.
• Export or Import is available for the mail slot.
- Note the icon in the last column heading for the numbered slots. Click on this icon to copy the last written cartridge to physical tape; there is no need to specify the slot n
- If a slot has already been selected for a schedule, the Scheduled box is checked. Slots may be used on only one schedule.
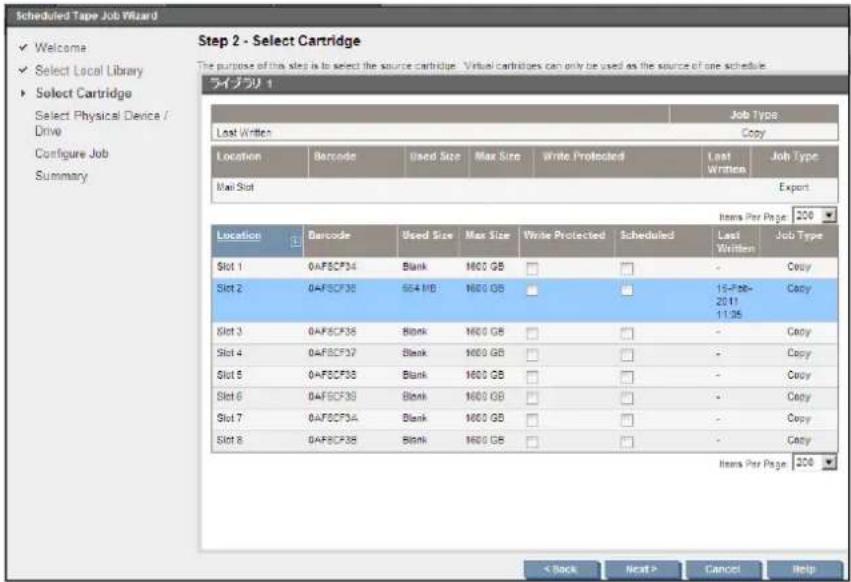
- Select the required slot. If a valid slot is selected, the Next button is active.
- Click Next. This displays the second page of the wizard. (Or reports an error if no tape storage devices are currently attached to the HP D2D Backup System.)
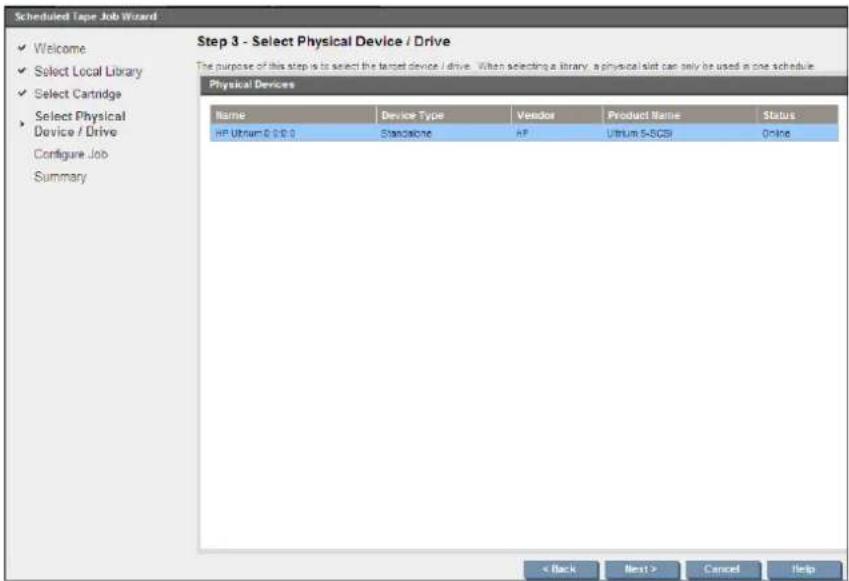
- Select the appropriate Physical Device to display a list of the slots in that device.
NOTE: If a slot has already been selected for a schedule, the Scheduled box is checked. Slots may be used on only one schedule.
- Click on the appropriate physical slot. If a valid slot is selected, the Next button is active.
- Click Next to display the final page of the wizard.
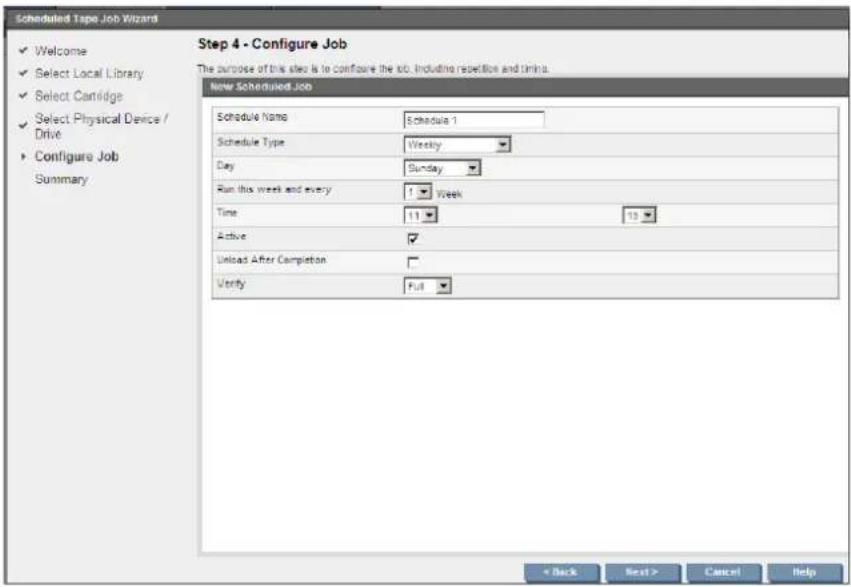
- Enter a name for the Schedule and select the appropriate Scheduling parameters. Click Create.
Table 33 Job schedule parameters
| This field allows you to provide a meaningful name for the scheduled job.Schedule Nam | |
| Schedule Type: | For daily jobs, selectDaily.For weekly jobs, selectWeekly.For jobs that you wish to run on a specific date in the month, selectDay of the Month.For jobs that you wish to run on a specific day and week in the month, selectWeekday of Month.For jobs that you wish to run as soon as the cartridge has been written, selectAfter Write. |
| Day: | This field is not relevant forDailyjobs andAfter Writejobs. ForWeeklyjobs, select the day of the week. ForMonthly by day, select a day between 1 and 31. For months w less than 31 days, the job is always run on the last day of the month. ForWeekdayMonth, select First/Second/Third/Fourth/Last week and then the day of the week. |
| Time: | This field is not relevant forAfter Writejobs. It is the time at which the job is to run: hour (24-hour clock) and minute. |
| Active: | Use this check box to control whether a schedule is active. The default is active (box is checked). |
| Unload After Completion: | Use this check box you to control whether the cartridge is unloaded once the scheduled job completes. The default is to remain loaded (the box is not checked). If the attached device is a library the tape will be moved to the mail slot if there is an empty mail slc |
| Verify: | This determines how the data that has been created on the physical cartridge is to be verified with the original data on the HP D2D Backup system. There are three options: None, Quick and Full. The default is Full. |
Sorting and searching scheduled jobs
Click on any column heading to sort jobs according to that criterion. For example, click on Next Expiry Time to sort the jobs according to the time they next run.
Click on Show search-box to display a Filter field and one drop-down menu.
• Use the right-hand drop-down menu to filter on All, Name, Schedule or Mode/Slot.
•Type a search string into the Filter box.
To view, edit or delete existing schedules
- Locate the schedule in the scrollable list and click to display the schedule details.
- Click Edit to make schedule details editable. Make the required changes and click Update. (You cannot edit the schedule Type.)
- Click Delete to delete the schedule completely. You will be prompted to confirm the delete action. (Remember that you can also disable the job temporarily by de-selecting the Active checkbox.)
• Click Run now to run the schedule immediately.
Table 34 Scheduled job details
| This field allows you to provide a meaningful name for the scheduled job.Name: | |
| Schedule Type: | For daily jobs, this isDaily.For weekly jobs, this isWeekly.For jobs that you wish to run on a specific date in the month, this isDay of the Month.For jobs that you wish to run on a specific day and week in the month, this isWeekday of Month.For jobs that you wish to run as soon as the cartridge has been written, this isAfter Write. |
| Virtual Library Name: | This is the name of the library on the HP D2D that you selected for the export or copy job. |
| Virtual Slot: | This is the slot number that you selected on the library on the HP D2D. For a copy job, select the slot number. For an export job, select the mail slot. You can also select theLast Written cartridge to copy or export data from the last backup rather than having to specify a specific slot. |
| Physical Device: | This is the physical tape library or tape drive connected to the HP D2D, to which the cartridge will be exported or copied. |
| Physical Slot: | This is the slot on the physical storage device to which the cartridge will be exported or copied. |
| Day: | This field is not relevant forDailyjobs andAfter Writejobs. ForWeeklyjobs, select the day of the week. ForMonthly by day, select a day between 1 and 31. For months with less than 31 days, the job is always run on the last day of the month. ForWeekday of Month, select First/Second/Third/Fourth/Last week and then the day of the week. |
| Time: | This field is not relevant forAfter Writejobs. It is the time at which the job is to run: hour (24-hour clock) and minute. |
| Active: | Use this check box to control whether a schedule is active. The default is active (box is checked). |
| Eject Physical Cartridge: | This checkbox allows you to control whether the cartridge is unloaded from the physical tape device once the scheduled job completes. The default is not to eject the physical cartridge. If the attached device is a library the tape will be moved to the mail slot if there is an empty mail slot. |
| Verify: | This determines how the data that has been created on the physical cartridge is to be verified with the original data on the HP D2D Backup system. There are three options: None, Quick and Full. The default is Full. |
Active Jobs (Tape Attach)
This page displays the status of any current tape import, export or copy operations.
- If no such operations are currently in progress, a link will be provided to the Tape Attach Job History page.
If a job is in progress, it shows job mode (copy, export or import), HP D2D library device, cartridge barcode, start time, duration, verify and data size. The final column shows the Job Status. If the job is running, this will include a progress bar for all relevant activities in the
operation, such as copy and verify (if requested). This column also shows any error or information messages.
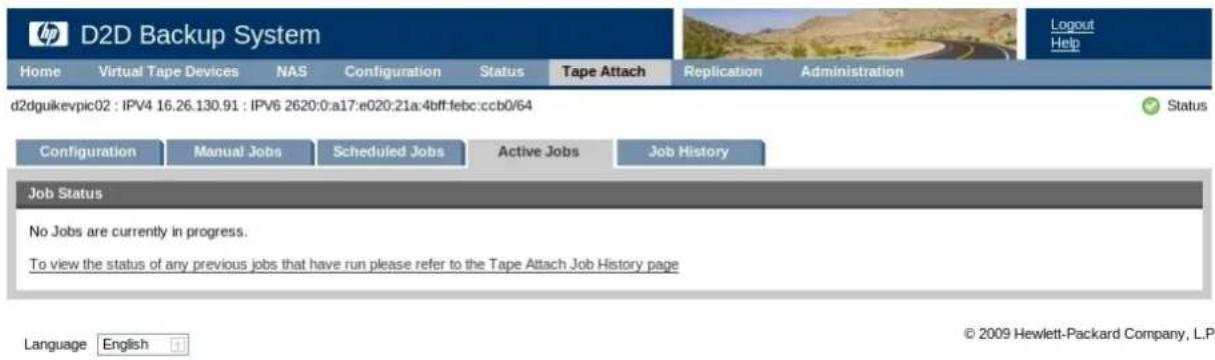
To cancel a job
To cancel a job in progress, click Cancel job. You are asked to confirm that you wish to cancel the job.
If a job is canceled during the copy, export or import phase, this cancels the transfer of data
NOTE: There are three phases to an export job: copy, an optional verify and subsequent removal of cartridge data from the HP D2D Backup System. If the job is cancelled during the copy pr an error will be reported and the data will remain on the HP D2D Backup System. If it is cc during the verify process, the data will be left intact on the physical tape and the data will s removed from the HP D2D Backup System.
If an error occurs
Errors may occur if there is a tape read/write media problem, if there is not enough capacity the physical cartridge or if there is a verify error. Errors may also occur if the backup applica accesses the cartridge that is being exported/imported or copied.
Errors are reported in the Job Status column on this page.
IMPORTANT: If an error occurs during export or copy, you do not lose any data. The original data remains unaltered in its original location on the HP D2D Backup System.
Job History (Tape Attach)
This page provides details of the last 1000 tape export, import and copy jobs. The job mode (copy, export or import), HP D2D library device, slot and cartridge barcode, physical device n slot and barcode, start time and job status are displayed. The most recent job is shown at the of a scrollable list. The final column shows the Job Status.
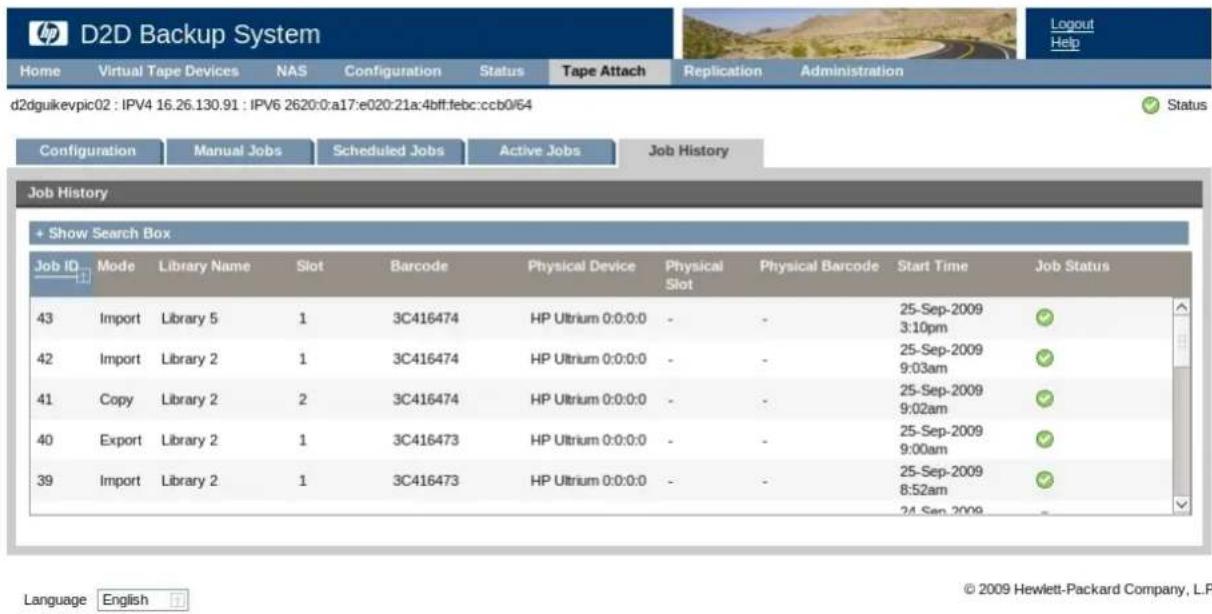
Sorting and searching the job history
Click on any column heading to sort messages according to that criterion. For example, click on Start Time to sort the messages according to time and date.
Click on Show Search Box to display a Filter field and two drop-down menus.
- Use the right-hand drop-down menu to filter on job status, for example to display all jobs with Error messages.
- Use the middle drop-down menu to select a column (or All) and then type a search string into the Filter box.
Glossary
A
Autoloaders
An autoloader is a Virtual Tape Device that has a single tape drive and multiple storage slots.
(A library has multiple tape drives.) Each storage slot contains a cartridge that can be allocated to a specific backup task; for example, one cartridge can hold Monday's data, another can be Tuesday's data, and so on. In this way, backup applications are able to implement tape rotation strategies that accommodate differing backup requirements for daily, weekly, monthly, yearly backups.
B
Backup devices and slots
See Virtual Tape Devices.
C
CIFS
Common Internet File System (CIFS) is a protocol for interfacing to hosts on a Windows network.
The HP StoreOnce Backup System supports this interface for connecting to NAS targets from c Windows network.
D
Deduplication
Data deduplication compares blocks of data being written to the backup device with data blocks
previously stored on the device. If duplicate data is found, a pointer is established to the original data, rather than storing the duplicate data sets. This removes, or "deduplicates," the redundant blocks. See also the HP StoreOnce Backup System Concepts Guide.
The main benefit of deduplication is that it is possible to store more data and retain data for longer on each device. The host using the device has access to a greater depth of historical that would otherwise have been archived offline.
Figure 55 Data stored after deduplication
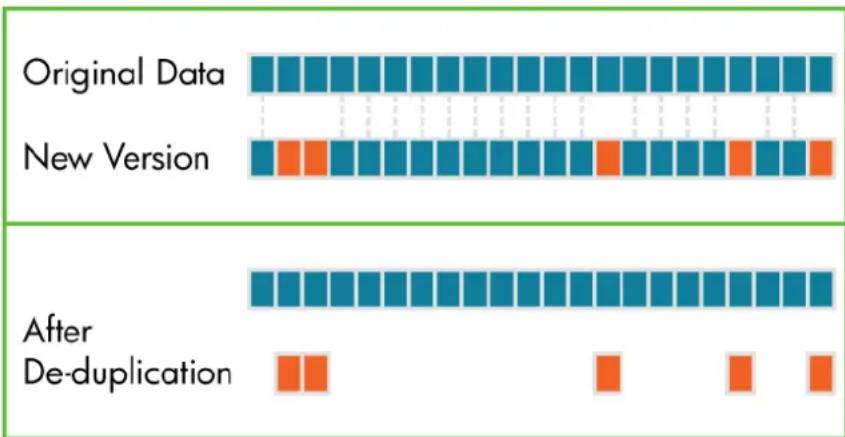
E
Emulation types
HP StoreOnce products emulate a range of physical Tape Autoloaders or Tape Libraries. Supported emulation types are listed below:
•HP 1x8 G2 Autoloader (HP D2D2500)
•HP MSL2024 Library
•HP MSL4048 Library
•HP D2DBS Library
•HP MSL8096 Library (HP D2D4300/D2D4100)
•HP ESL-E Library (HP D2D4300/D2D4100)
•HP EML-E Library (HP D2D4300/D2D4100)
•HP D2DBS Generic Library
If it is supported by your backup application, HP D2DBS Generic Library is the preferred emulation type because it does not emulate any physical library types in existence and is clearly identifiable as a StoreOnce device. It is the most flexible emulation type available; however, backup application support varies by software vendor.
F
Fibre Channel (FC)
Fibre Channel (FC) supports network connectivity over fibre optic cabling or copper wiring. FC has a different set of standards and network connection protocol to Ethernet and different configuration requirements. FC HP StoreOnce Backup Systems may be connected to both a Fibre Channel SAN and an Ethernet (as an iSCSI device) network. The FC connection is used only to transfer backup data from the host to the HP StoreOnce Backup System. Access to the Web Management Interface is always across an Ethernet connection.
H
Hosts
A server that is being used to back up to the StoreOnce system via iSCSI or Fibre Channel, this may also be a backup application media server which can back up other servers on the network that do not have a direct iSCSI or Fibre Channel connection to the StoreOnce Backup System.
Housekeeping
If data is deleted from the StoreOnce system (e.g a virtual cartridge is overwritten or erased), any unique chunks will be marked for removal, any non-unique chunks are de-referenced and their reference count decremented. The process of removing chunks of data is not an inline operation because this would significantly impact performance. This process, termed "housekeeping", runs on the appliance as a background operation, it runs on a per cartridge and NAS file basis and will run as soon as the cartridge is unloaded and returned to its storage slot or a NAS file has completed writing and has been closed by the appliance. See also the StoreOnce Backup System Concepts Guide.
|
iSCSI
On an Ethernet network the HP StoreOnce Backup System is configured as an iSCSI device. This means that the HP StoreOnce Backup System plugs directly into the network, but it presents device as directly-attached SCSI autoloaders to host machines. In order to function, it requires an iSCSI initiator. For more information about iSCSI, see the HP StoreOnce Backup System Installation and Configuration Guide. Linux and UNIX users should also refer to the Linux and UNIX Configuration Guide on the HP StoreOnce Backup System CD-ROM for more information.
L
Library
library is a Virtual Tape Device that appears to the backup application on the host as a physical tape library. A tape library is a backup device that has multiple drives and multiple storage slots. Each storage slot contains a cartridge. This provides considerable storage capacity and full support for tape rotation strategies. The difference between an autoloader and a library is that a library can support multiple tape drives whereas an autoloader only has one tape drive. (It may be necessary to upgrade your backup application to support libraries.)
N
NAS Shares
Devices on HP StoreOnce Backup Systems may be configured as Virtual Tape devices or as NAS (Network Attached Storage) targets for backup applications. NAS target devices on an HP StoreOnce Backup System provide network file share access that is optimized for backup to disk and are referred to as NAS Shares in the Web Management Interface.
All HP StoreOnce devices that are configured for NAS automatically make use of HP deduplication, ensuring efficient and cost-effective use of disk space.
It is important to understand that the HP StoreOnce network share is intended to be used ON by backup applications that "back up to disk". Do not use the device as a drag-and-drop grid file store.
NFS Network File System (NFS) is a protocol for interfacing to hosts on a Linux or UNIX network. The HP StoreOnce Backup System supports this interface for connecting to NAS targets on the HP StoreOnce appliance from a Linux or UNIX network host.
NTP Network Time Protocol (NTP) provides support for automatic time synchronization. See also Page 86.
R
RAID RAID stands for Redundant Array of Inexpensive (or Independent) Devices, which is a data storage scheme that divides data among multiple hard drives, increasing data reliability and throughput. The HP D2D2500 Series Backup System is a RAID 5 device. It has four disks, but if one of disks fails, no data is lost and the HP StoreOnce Backup System continues to operate correctly. The HP D2D4100/4300 Series Backup System is a RAID 6 device, which offers the best combination of data protection and capacity for disk arrays. It provides protection against dual disk failures and failures while a single disk is rebuilding. HP D2D4100 and 4300 Series Ba Systems also have an online spare disk (in the appliance itself and on each expansion shelf), which further enhances the reliability of the product. If one disk fails, the online spare disk immediately takes its place.
Replication Replication is a standard term used to describe a way of synchronizing data between hardware in two physical locations. HP StoreOnce Replication allows users to replicate data from cartridge on one HP StoreOnce Backup System to mapped slots on another HP StoreOnce Backup System on a remote site or the same system. Once configured (using the simple-to-use wizard), replicated occurs automatically, ensuring data is mirrored from the source to the target HP StoreOnce Ba Systems. Deduplication ensures that network traffic is minimized. See also the HP StoreOnce Backup System Concepts Guide.
S
Storage capacity The physical storage capacity of the HP StoreOnce Backup System is:
- HP D2D2502: 2 TB (4 × 500 GB); HP D2D2504: 4 TB (4 × 1 TB)
- HP D2D4106: 6 TB (12 x 500 GB). One additional shelf may be connected to the unit, which increases the total capacity to 12 TB (24 x 500 GB).
- HP D2D4112: 12 TB (12 x 1 TB). One additional shelf may be connected to the unit, which increases the total capacity to 24 TB (24 x 1 TB).
- HP D2D4312: 12 TB (12 x 1 TB). Up to three additional shelves may be connected to the unit, which increases the total capacity to 48 TB (48 x 1 TB)
- HP D2D4324: 24 TB (12 x 2 TB). Up to three additional shelves may be connected to the unit, which increases the total capacity to 96 TB (48 x 2 TB)
However, in order to ensure a high level of data integrity, the disks use RAID protection. This reduces the available capacity but ensures that, in the event of a disk failure in the device, it will be no data loss.
Actual storage capacity is approximately:
• HP D2D2502: 1.5 TB; HP D2D2504: 3 TB
- HP D2D4106: 4.5 TB, or 9 TB, if an extra shelf is installed
- HP D2D4112: 9 TB, or 18 TB, if an extra shelf is installed
- HP D2D4312: 9 TB, up to a maximum of 36 TB with three extra shelves installed
- HP D2D4324: 18 TB, up to a maximum of 72 TB with three extra shelves installed
T
Tape rotation strategies
Tape rotation strategies determine when backups are run, the number of cartridges that are required and how they are reused. Virtual Tape Library targets on an HP StoreOnce Backup System can easily be incorporated into most tape rotation strategies. If your organization does not yet have a tape rotation strategy in place, see the HP StoreOnce Backup System Concepts Guide for example configurations.
V
Virtual Tape Devices
Virtual Tape Devices are backup targets on the HP StoreOnce Backup System to which the backu application on the hosts write data. They appear to the host as network-attached or locally-attached physical tape library or autoloader, but physically, they use disk space on the HP StoreOnce Backup System which, as in tape terminology, is referred to as slots or cartridges.
About this guide
This guide provides information about:
• Using the HP StoreOnce D2D Backup System
- Troubleshooting the HP StoreOnce D2D Backup System
•Replacing a hot-plug hard disk
Intended audience
This guide is intended for users who install, operate and maintain the HP StoreOnce D2D Bac System.
Related documentation
In addition to this guide, the following document provides related information:
- Start here poster (printed): This document provides an overview of the installation process (available in English, French, German and Japanese)
- HP StoreOnce Backup System Concepts Guide (PDF): If you are new to the HP StoreOnce Backup System, it is a good idea to read this guide before you configure your system. It describes the StoreOnce technology and advises how to plan the workload being placed on the HP StoreOnce Backup System in order to optimize performance and minimize the impact of deduplication, replication and housekeeping operations competing for resources.
HP StoreOnce Backup System Installation and Configuration Guide (PDF): This guide describes how to install and carry out the initial configuration of your HP StoreOnce Backup System. - Linux and UNIX Configuration Guide (PDF): This guide contains information about configuring and using HP D2D Backup Systems with Linux and UNIX.
D2D Best Practices for VTL, NAS and Replication implementations: This guide describes best practices and also includes examples using different backup applications.
You can find these documents from the Manuals page of the HP Business Support Center web http://www.hp.com/support/manuals
In the Storage section, click Storage Solutions and then select your product.
Document conventions
Table 35 Document conventions
| ElementConvention | |
| Cross-reference links and e-mail addressesBlue text: Table 35 (page 171 | |
| website addressesBlue, underlined text: http://www.hp.com | |
| Bold text | Keys that are pressedText typed into a GUI element, such as a boxGUI elements that are clicked or selected, such as menu and list items, buttons, tabs, and check boxes |
| Text emphasisItalic text |
Table 35 Document conventions (continued)
| ElementConvention | |
| Monospace text | File and directory namesSystem outputCodeCommands, their arguments, and argument values |
| Monospace, italic text | Code variablesCommand variables |
| Emphasized monospace textMonospace, bold text |
!
!
Indicates that failure to follow directions could result in bodily harm or death.
△
:
Indicates that failure to follow directions could result in damage to equipment or data.
!
:
Provides clarifying information or specific instructions.
NOTE: Provides additional information.
HP technical support
For worldwide technical support information, see the HP support website:
http://www.hp.com/support
Before contacting HP, collect the following information:
•Product model names and numbers
•Technical support registration number (if applicable)
•Product serial numbers
- Error messages
- Operating system type and revision level
•Detailed questions
Customer self repair
HP customer self repair (CSR) programs allow you to repair your StoreOnce product. If a CSR po needs replacing, HP ships the part directly to you so that you can install it at your convenience. Some parts do not qualify for CSR. Your HP-authorized service provider will determine whether a repair can be accomplished by CSR.
For more information about CSR, contact your local service provider. For North America, see the CSR website:
http://www.hp.com/go/selfrepair
Registering your HP D2D Backup System
Once you have installed and tested your HP D2D Backup System please take a few minutes to register your product. You can register via the web (http://www.register.hp.com).
To ensure your registration is complete, there are a number of questions on the electronic form are mandatory. Other questions are optional. However, the more you feel able to complete, th better HP can meet your needs.
Subscription service
HP recommends that you register your product at the Subscriber's Choice for Business website: http://www.hp.com/go/e-updates
After registering, you will receive e-mail notification of product enhancements, new driver versio software updates, and other product resources.
HP websites
For additional information, see the following HP websites:
- http://www.hp.com
- http://www.hp.com/go/ebs
- http://www.hp.com/go/connect
- http://www.hp.com/go/storage
- http://www.hp.com/service_locator
- http://www.hp.com/support/manuals
- http://www.hp.com/support/downloads
Documentation feedback
HP welcomes your feedback.
To make comments and suggestions about product documentation, please send a message to storagedocs.feedback@hp.com. All submissions become the property of HP.
Index
Symbols
10Gb ports, 34
10Gbport, 35
A
active session, 7
AD authentication, 24
AD domain, leaving, 30
admin
software page, 88
administration
backup & restore page, 93
date & time page, 85
housekeeping page, 87
license page, 94
password,82
security page, 83
shutdown page, 88
support page, 91
appliance page
replication, 73
audience, 171
authentication
CIFS server, 22
autoloader, 13
see also devices
B
backup & restore page, 93
backup fails, 131
mapping deleted, 68
bandwidth limiting, 79
barcode, 18
barcode characters, 14
beacon LED, 52, 54
beacon mode, 36, 119
BIOSupgrading, 135
blackout windows, 80
housekeeping, 88
browser buttons not displayed, 7
C
cancel
tape drive job, 165
capacity upgrade kit
LEDs, 119
cartridge
copy, 158
export, 159
import, 160
in tape drive, 154
cartridges
after multiple disk failure, 152
creating, 20
editing max size, 19
in physical tape library, 155
moving/unloading, 20
removing, 19
write protecting, 19
cartridges page, 18
CIFS server
authentication, 22
configuring, 22
CIFS server page, 22
CIFS share
connecting to, 24
creating, 23
configuration
email alerts, 43
Fibre Channel page, 36
iSCSI, 36
Microsoft Exchange Server, 44
network, 33
SNMP, 37
troubleshoot, 134
configuration page
tape attach, 154
connect to
CIFS share, 24, 32
connecting from backup system
troubleshoot, 125
connecting to network
troubleshoot, 125
connection
status, 11
conventions
document, 171
text symbols, 172
copy cartridge, 158
create
cartridge, 20
cartridges, 152
CIFS share, 23
device, 13
NFS share, 31
schedule, 161
storage pool, 151
customer self repair, 172
D
D2DBS Generic Library, 11
date & time page, 85
date and time
editing, 85
date format
editing, 85
deduplication, 14
delete
cartridge, 19
device, 16
schedule, 164
storage pool, 150
devices
create new, 13
delete, 16
edit details, 15
view details, 13
devices page, 10
Devices tab
deleting cartridges on, 19
DHCP, 35
DHCP Gateway, 34
DHCP gateway, 35
diagnostic fibre channel device, 130
disk
failed, 137
installing, 143
multiple failed, 146
disk space
capacity reached, 130
disk status, 52, 54
disk usage, 53
identifying, 52
Disks status, 49
DNS server name, 34
document
conventions, 171
related documentation, 171
documentation
HP website, 171
providing feedback, 173
domain, 35
download support ticket, 92
drive emulation, 13
drives
defining number of, 14
E
edit
date format, 85
device details, 15
network settings, 34
NTP settings, 85
password, 82
schedule, 164
edit NAS share, 21
email alerts
configuring Exchange Server, 44
email alerts page, 43
EML-E series Library, 12
emulation type, 11, 13
error
job history, 165
log page, 57
tape drive job, 165
ESL-E series Library, 12
event history
replication, 81
export cartridge, 159
F
failed battery
identifying, 50
failed disk
identifying, 50, 52, 54, 137
more than one, 146
replacing, 142
serial number, 52, 54
Fibre Channel
configuration page, 36
LEDs, 119
status page, 55
firewalls
with replication, 79
firmware
upgrading tape storage device, 156
flexible emulation, 12
Force login, 7
G
gateway, 34
general settings
replication, 78
generate support ticket, 92
gui see web management interface
H
hard disk firmwareupgrading, 135
hardware monitoring, 121
hardware replacement, 134
help
obtaining, 172
host(A) record, 25
hot-plug drives
LEDs, 118
housekeeping
blackout windows, 88
housekeeping graph, 87
housekeeping page, 87
HP
technical support, 172
HP 1x8 G2 Autoloader, 12
HP D2D2504/2502 Backup System
LEDs, 117
HP D2D4112/4106 Backup System
LEDs, 116
HP D2D4324/4312 Backup System
LEDs, 115
|
import cartridge, 160
inactive logout time
setting, 83
initial logon, 7
Interface Information tab, 15
IP address, 35
iSCSI
initiator name, 14
status page, 55
troubleshoot, 130
iSCSI page, 36
J
job history page sorting and searching, 166 tape attach, 165
L
language pack description of, 89 upgrading, 90
last written, cartridges, 19
leave AD domain, 30
LEDs capacity upgrade kit, 119 Fibre Channel, 119 hot-plug drives, 118 HP D2D2504/2502, 117 HP D2D4112/4106, 116 HP D2D4324/4312, 115
library name, 11
library status, 11
license page, 94
local settings replication, 77
location, cartridges, 18
log page, 57 sorting, 57
login, 7
M
manual jobs page, 157
mapping deleted backup fails, 68
max size, cartridges, 18
maximum jobs replication, setting, 78
MIBs, 39
Microsoft Exchange Server, 44
MMC, 27
monitoring hardware, 121
move cartridge, 20
MSL G3 series (2x24) Library, 12
MSL G3 series (4x48) Library, 12
MSL G3 series (8x96) Library, 12
N
NAS
CIFS server page, 22
NFS server page, 30
shares page, 21
NAS mapping configuration replication, 66
NAS share
editing, 21
NetBIOS name resolution, 33
network edit settings, 34
reset settings and password, 35
status page, 54
troubleshooting, 127
network mode, 34
network name, 34
network page, 33
NFS server specifying NFS hosts, 30
NFS server page, 30
NFS share connecting to, 32 creating, 31
nfs share state handle error, 129
NTP server fails, 127
NTP server stops, 86
NTP settings editing, 8
O
other sources of information, 6
out of sync settings, 78
P
password default, 7 editing, 82 resetting, 82
pause housekeeping, 88
pause replication jobs, 81
performance troubleshoot, 126
permissions source appliance, 76
Pointer(PTR) record, 26
port, 11 defining number of, 14
power off cleanly, 88
power on/off troubleshoot, 128
R
RAID battery, 50, 134 RAID Parity Initialization, 7
RAID status, 50, 54
RAID5, 136
RAID6, 136
recovery replication, 96, 104
recovery wizard reverse replication, 96, 104
related documentation, 171
replace disk, 142
replication and firewalls, 79 appliance page, 73 blackout windows, 80
event history, 81
general settings, 78
local appliance, 77
NAS mappings page, 66
pause jobs, 81
recovering source, 96, 104
status page, 58
virtual tape mappings page, 59
replication fails, 131, 132
replication ports, 79
replication recovery
over WAN, 100, 107
using colocation, 101, 108
using wizard, 96, 104
replication wizard, 61
reset
network settings, 35
reset password, 82
restore
no tape drive connected, 112
replication, 96, 104
shares, 132
single files, 111
VTLs, 132
role, 11
running out of disk space, 130
S
schedule
create, 161
delete, 164
edit, 164
sorting and searching, 163
view, 164
schedule page, 160
search
schedule, 163
searching
job history, 166
log page, 57
replication event history, 81
security page, 83
share synchronization
logging progress, 78
shares
failed to start, 132
shares page, 21
shelves, 51
Shelves status, 51
Show/Hide Details, 10
shutdown page, 88
slots
defining number of, 11, 14
SNMP
configuration, 37
enabling, 38
MIBs, 39
SNMP status, 38
software page, 88
sort
schedule, 163
sorting
job history, 166
log page, 57
replication event history, 81
source appliance permissions, 76
SSL certificate, 83
status
disk page, 52
Fibre Channel page, 55
icons, 9
information, 8
iSCSI page, 55
log page, 57
network, 54
RAID page, 54
storage page, 46
storage reporting page, 56
Storage—Disks page, 49
Storage—RAID page, 50
Storage—Shelves page, 51
system activity, 46
status page
replication, 58
tape attach, 164
storage capacity, 136
storage pool
creating, 151
deleting, 150
storage pools, 47
storage reporting page, 56
storage shelf
troubleshoot, 131
storage status page, 46
Storage-Disks status, 49
Storage-RAID status, 50
Storage-Shelves status, 51
StoreOnce Backup System
logging on, 6
subnet mask, 35
Subscriber's Choice, HP, 173
summary page, 8
support page, 91
support ticket
download, 92
generate, 92
symbols in text, 172
system activity page, 46
system information, 91
system name, 38
T
tape attach
configuration page, 154
job history page, 165
manual jobs, 157
schedule page, 160
status page, 164
tape drive
cancel job, 165
viewing details, 154
tape storage device
upgrading firmware, 156
target libraries
making visible, 16
technical support
HP, 172
service locator website, 173
testing email alerts, 43
text symbols, 172
troubleshoot
backup or replication, 131
browser buttons missing, 7
configuration, 134
connecting from backup system, 125
connecting to network, 125
iSCSI, 130
network, 127
performance, 126
power on/off, 128
storage shelf, 131
using 10Gb ports, 126
Web Management Interface, 127, 129
troubleshooting
NTP server, 127
physical tape library, autoloader, 155
RAID battery, 134
U
Ultrium VT, 12
unload cartridge, 20
upgrade language pack, 90
upgrade licenses, 134
upgrade software, 90
upgrades
BIOS firmware, 135
used size, cartridges, 18
user account page, 82
using 10Gb ports
troubleshoot, 126
V
view
device details, 13
schedule, 164
virtual libraries
failed to start, 132
virtual tape devices
cartridges page, 18
devices page, 10
virtual tape mappings
replication, 59
visible target libraries, 16
W
Web Management Interface
troubleshoot, 127, 129
web management interface, 6
summary page, 8
websites
customer self repair, 172
HP, 173
HP Subscriber's Choice for Business, 173
product manuals, 171
welcome message, 88
disabling, enabling, 83
write protect, cartridges, 19
- G2 Backup System user guide
- Abstract
- Contents
- Getting started....6
- Home, Summary......8
- Virtual Tape Devices....10
- NAS....21
- Appliance Configuration....33
- Status....46
- Replication....58
- Administration....82
- Restore processes with replication....96
- Restore processes without replication....111
- Understanding LEDs....115
- Hardware monitoring....121
- Troubleshooting....125
- Hard disk replacement....136
- A Extra information for G1 products....153
- Glossary....167
- About this guide....171
- Index....174
- Getting started
- Introduction
- What is the Web Management interface?
- To run the Web Management Interface
- Initial logon and Welcome message
- Initial logon
- Welcome message
- Home, Summary
- Summary (Home)
- Status icons
- Virtual Tape Devices
- Devices (Virtual Tape Devices)
- Emulation types for tape devices
- Flexible emulation (G2 products only)
- Libraries, slots and storage capacity
- Source and target libraries
- To view device details
- To create a new device
- To edit device details
- To delete a device
- !
- Making Replication Target libraries visible to the host
- Why make target libraries visible?
- Best practices for using this feature
- △
- How is a target library made visible?
- Cartridges (Virtual Tape Devices)
- Empty slots
- To delete a cartridge
- To write protect a cartridge
- To edit maximum cartridge size
- To create a cartridge
- To move or unload cartridges
- NAS
- Shares (NAS)
- Creating NAS shares
- Editing share details
- Configuring NAS targets for CIFS
- Configuring the CIFS server
- Creating a CIFS share
- Procedure 1
- Connecting to the NAS target device on Windows
- Configuring users on AD (CIFS shares only)
- Prerequisites
- Adding the StoreOnce device to an AD Domain
- Procedure 2
- To configure entries manually if the DNS server does not update automatically
- Creating shares and granting access permission
- Leaving an AD Domain
- Configuring NAS shares for NFS
- Specifying NFS hosts
- Creating an NFS share
- Connecting to the NAS share on UNIX or Linux
- Problems connecting
- Appliance Configuration
- Network (Configuration)
- Network configuration
- 1Gb and 10Gb ports (HP D2D4300 Series only)
- To edit network settings
- Procedure 3
- More about the default gateway
- Resetting network settings and Web Management Interface password
- Beacon mode
- Fibre Channel (Configuration)
- To edit the FC configuration
- iSCSI (Configuration)
- SNMP (Configuration)
- Procedure 4
- Click Update to apply the parameters.
- HP Systems Insight Manager
- Register the MIB for the HP StoreOnce Backup System
- Update the system type database
- Discover the HP StoreOnce Backup System
- Email Alerts (Configuration)
- To configure Microsoft Exchange Server
- Status
- System Activity (Status)
- Storage (Status)
- Storage pool tab
- Storage Pool
- Configured shelves
- Disks tab
- Storage usage
- Tape device disk usage
- NAS shares disk usage
- RAID
- RAID controllers
- Logical units
- Shelves
- Physical disks
- Disk (Status)
- Disk usage
- NAS share disk usage
- RAID (Status)
- RAID status
- Network (Status)
- iSCSI (Status)
- Fibre Channel (Status)
- Devices section
- Library section
- Storage Reporting (Status)
- Log (Status)
- Sorting and searching the log
- Replication
- Status (Replication)
- Virtual Tape Mappings (Replication)
- Local library
- Slot mappings
- Slot mapping details
- Library Details tab
- Slot Details tab
- The replication wizards
- Running the replication wizard (virtual tape devices)
- NAS Mappings (Replication)
- Local shares
- Share mappings
- Share mapping details
- Share details tab
- File details tab
- Running the replication wizard (NAS)
- Partner Appliances (Replication)
- Summary Appliance details
- To add a target appliance
- Procedure 5
- Click Add Target Appliance.
- To edit or remove a Target Appliance
- Run Traceroute
- Target Appliance tab
- Summary Appliance tab
- Source Appliance Permissions tab
- To add a Source Appliance
- To enable permissions
- Local Appliance (Replication)
- General settings
- Bandwidth limiting
- Click Apply.
- Blackout windows
- Pause replication jobs
- Event History (Replication)
- Sorting and searching the event history
- Administration
- User Account (Administration)
- Password
- Resetting the password
- Procedure 6
- Inactive Logout Time
- Security (Administration)
- Date & Time (Administration)
- Date & Time settings
- Date Display format
- Network Time Protocol (NTP) settings
- Daylight Saving
- Housekeeping (Administration)
- Using the graph
- Configuring blackout windows
- #
- Pausing housekeeping
- Shutdown (Administration)
- Software (Administration)
- Language Pack
- Identifying the correct software for your product
- Upgrading the software
- Upgrading the language pack
- Support (Administration)
- System information
- Support ticket
- Backup & Restore (Administration)
- Recommendations
- Backing up the configuration file
- Restoring the configuration file
- Resetting factory defaults
- License (Administration)
- More about replication licensing
- More about capacity upgrade licensing
- To apply the license key
- Restore processes with replication
- Recovering a Source Appliance (Virtual Tape devices)
- Reverse replication using the wizard
- Promoting a Target Library over the WAN using iSCSI
- Promoting a target library using colocation
- Recovering a Source Appliance (NAS shares)
- Seeding
- Promoting a Target Share over the WAN using NAS
- Promoting a Target Share using colocation
- Restore processes without replication
- Restore scenarios
- Basic file restore
- Restore after host failure
- Bare Metal Disaster Recovery (NAS Shares)
- Restoring single files
- Restore and deduplication
- Reconnecting to the to iSCSI VTL devices after host failure
- Understanding LEDs
- HP D2D4324/4312 Backup System
- HP D2D4112/4106 Backup System
- Rear LEDs on the HP D2D4106/4112
- HP D2D2502/2504 Backup System
- Rear view of the HP D2D2502/2504 G2
- Hot-plug drive LEDs
- Fibre Channel card LEDs
- Capacity upgrade kit LEDs
- Hardware monitoring
- An example email alert
- An example Event log page
- An example SNMP trap
- Resolving problems
- What events are reported for head units?
- Location and ID values
- What events are reported for expansion shelves?
- Troubleshooting
- Connecting to the StoreOnce Backup System from the backup application
- Connecting to the network
- Using the 10Gb ports (HP D2D4300 Series only)
- Performance
- Network
- Web Management Interface errors and warnings
- Disk RAID errors and warnings
- Network warnings
- NTP server fails
- System state
- RAM Failure Warning
- CPU Faulty Warning
- Storage Pool messages
- Power On/Off Problems
- HP D2D shuts down automatically
- HP D2D does not boot up correctly
- HP D2D System Health LED is flashing RED (HP D2D4100 and D2D4300 Series)
- Cannot connect to Web Management Interface
- Cannot log in to the Web Management Interface
- NFS State handle error
- Cannot authenticate an iSCSI session
- Diagnostic Fibre Channel device
- If the HP StoreOnce Backup System runs out of disk space
- Cannot access a storage shelf (HP D2D4100 and 4300 Series Backup Systems)
- If backup or replication fails
- Backup fails
- Replication fails
- Recovering Devices that have 'failed to start' or have become read-only
- Further information about the Recover process:
- StoreOnce Backup System configuration problems
- I cannot see a newly created VTL device
- I cannot see additional slots from the backup application
- I cannot recover the configuration file
- Upgrade licenses
- Can I transfer the License To Use to a different HP D2D?
- More disks present than are licensed
- Replacement of hardware
- Event log displays 'Invalid BIOS Assembly name'
- If the RAID battery fails
- Upgrades to component parts
- Hard disk replacement
- RAID 6
- RAID 5
- How do I know a disk has failed?
- Identifying a failed disk on the Web Management Interface
- Summary page information
- Status page information (HP D2D2500 Series)
- If you have a system console
- If you are using iLO2
- If you have email alerts
- Example email from an HP D2D2500 Series Backup System
- The Event Log
- Replacing a hot-plug hard disk
- After replacing the failed disk
- Email alerts and Log
- If you have a system console or are using the iLO2 Remote Console
- If several disks fail
- Replacing the disks (HP D2D2500 Series)
- Initialising RAID
- Replacing the disks (HP D2D4300/4100 Series)
- Restoring the Storage Pool
- Creating cartridges (Virtual Tape Devices only)
- A Extra information for G1 products
- Overview
- Major differences
- VTL devices
- Creating cartridges
- NAS devices
- Tape Attach
- Seeding Virtual Tape Devices using Tape Attach
- Configuration (Tape Attach)
- Adding tape storage devices to the list
- IMPORTANT:
- Viewing and editing tape device details
- Viewing cartridge details
- Obtaining support
- Upgrading tape storage device firmware
- Manual jobs (Tape Attach)
- To select cartridges on the HP D2D library
- To copy to attached tape storage device
- To export to attached tape storage device
- Δ
- To import from attached tape storage device
- Click Create.
- Scheduled jobs (Tape Attach)
- To create a scheduled job
- Sorting and searching scheduled jobs
- To view, edit or delete existing schedules
- Active Jobs (Tape Attach)
- To cancel a job
- If an error occurs
- Job History (Tape Attach)
- Sorting and searching the job history
- Glossary
- A
- Autoloaders
- B
- Backup devices and slots
- C
- CIFS
- D
- Deduplication
- E
- Emulation types
- F
- Fibre Channel (FC)
- H
- Hosts
- Housekeeping
- |
- iSCSI
- L
- Library
- N
- NAS Shares
- R
- S
- Tape rotation strategies
- Virtual Tape Devices
- About this guide
- Intended audience
- Related documentation
- Document conventions
- HP technical support
- Customer self repair
- Registering your HP D2D Backup System
- Subscription service
- HP websites
- Documentation feedback
- Index
- Symbols
- G
- J
- M
- O
- P
- T
- U
- V
- W
Brand : HP
Model : StoreOnce G2
Category : NAS