
RCU800MS - Remote control RCA - Free user manual and instructions
Find the device manual for free RCU800MS RCA in PDF.


| Product Type | Remote Control |
| Brand | RCA |
| Model | RCU800MS |
| Dimensions | 20.3 x 5.1 x 2.5 cm |
| Weight | 100 g |
| Power Source | 2 AAA batteries (not included) |
| Compatible Devices | TV, DVD, Satellite, Cable, Streaming devices |
| Programming Method | Code search or direct code entry |
| Memory Backup | Retains settings during battery change |
| Range | Up to 10 meters |
| Cleaning | Wipe with soft dry cloth |
| Safety Precautions | Keep away from moisture and heat sources |
| Spare Parts | AAA batteries |
| Repairability | Not user-serviceable; contact support for issues |
| Warranty | 1 year limited warranty |
Frequently Asked Questions - RCU800MS RCA
User questions about RCU800MS RCA
0 question about this device. Answer the ones you know or ask your own.
Ask a new question about this device
Download the instructions for your Remote control in PDF format for free! Find your manual RCU800MS - RCA and take your electronic device back in hand. On this page are published all the documents necessary for the use of your device. RCU800MS by RCA.
USER MANUAL RCU800MS RCA
Cover/Front of Package
Do Not Print On Inside of Cover
Thank you for purchasing this RCA Universal Remote Control. This product is designed to provide years of service operating a wide variety of video and audio components.
Please retain this guide for future reference.
Table of Contents
Installing The Batteries ....2
Button Description ....3-4
Programming For TV....5
Code List For TV....5-6
Programming VCR 1 and VCR 2....7
Code List For VCR 7-8
Programming For DVD and Code List....9
Programming For DBS System and Code List ....10
Programming For Cable Box and Code List....11-12
Programming For Audio....12
Code List For Audio ....13
Operating Audio Functions ....14
Programming For AUX Button 15
Learning Functions....16-17
Sleep Function....18
Menu Function ....18
Programming With Codes Search ....19
Identifying Codes From Your Remote ....19
Trouble Shooting....20
Help Line....20
This Universal Remote Control is already programmed for most RCA, GE and ProScan TVs, VCRs, DBS Systems, DVD Players, and Audio Video Receivers.
Note: For users of RCA, GE and ProScan DBS Products, older DBS models require that the DISPLAY Button on this remote be used to make program selections. Use the SELECT button for making program selections on newer RCA, GE and ProScan DBS models.
Battery Installation
Your Universal Remote requires 2 new AAA alkaline batteries.
To install the batteries:
- Turn the remote over and push down on the cover and slide it off.
- Insert the batteries, matching the batteries to the (+) and (-) marks inside the battery case.
- Slide the battery cover back into place.
Note: Reprogramming may be required after batteries are removed.
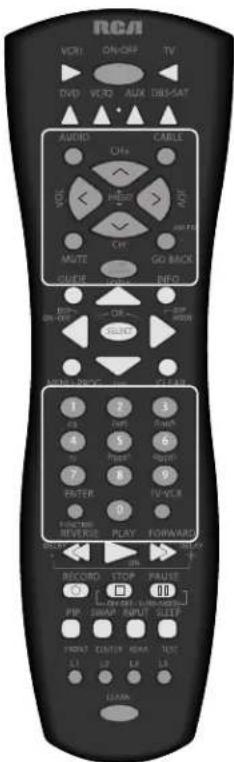
Button Description For Video Operation
INDICATOR LIGHT
The Indicator Light flashes to show that the remote is working.
ON·OFF
The ON•OFF button operates the same as your original remote
Note: Some RCA, GE and ProScan models require you to press the device button to turn the device on and the ON•OFF button to turn the device off.
TV, VCR1, DVD, VCR2, AUX, DBS-SAT, AUDIO, CABLE
The TV, VCR1, DVD, VCR2, AUX, DBS•SAT, AUDIO, and CABLE buttons are used to select the device you want to control.
VOL & CH
The VOL (Volume) and CH (Channel) buttons increase or decrease the channel numbers or volume.
MUTE
Mutes volume on the TV.
GO BACK
The GO BACK button allows you to go to the previous channel you selected. Operates the same as Last Channel, Previous Channel, or Recall button on your original remote.
CODE SEARCH
Used to program the remote or to search through codes.
GUIDE
Brings up the on-screen TV program guide if your TV has that feature.
INFO
Shows the date and the time if your TV or VCR has that feature. Functions the same as a Display button.
NAVIGATION BUTTONS & SELECT
Used to move through on screen menuing and guides. With some DBS models the INFO button should be used to select the highlighted item. Use the navigation buttons to move the highlighted choice up, down, left, or right.
MENU·PROG
Brings up the Main Menu. If you are already in the menu system, press SELECT to select a highlighted choice. Use the arrow buttons to move through the Menu Selections.
CLEAR
Removes the on screen display to return to normal viewing.
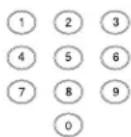
0-9
The number buttons operate the same as on your original remote, and are used for entering device codes.
ENTER
The ENTER button is used to complete channel selection for some brands of TV. It is also used to complete the code entry process.
TV·VCR
The TV•VCR button operates the TV•VCR function of your VCR.
REVERSE, PLAY, FORWARD, RECORD, STOP, PAUSE
These buttons operate the same as on your original VCR or remote. You must press the REC button twice to begin recording.
PIP, SWAP, & INPUT
PIP (Picture-in-Picture) and SWAP operate your Television's Picture-in-Picture features. INPUT selects the video inputs of your TV if equipped with this feature.
L1, L2, L3, L4
The L1–L4 buttons are used for storing learned functions from other remote controls.
LEARN
The LEARN button allows you to program and delete learned functions from your original remote control.
SLEEP
The SLEEP button allows you to set a time for you to turn off your TV automatically.
Button Description For Audio Operation
AUDIO OPERATION
This remote does not work all brands of audio equipment. See page 13 for the audio code and brand list to operate your brand of equipment. You may need to experiment with your system since manufactures products do not all work the same way.
Press AUDIO button to enable the AUDIO mode.
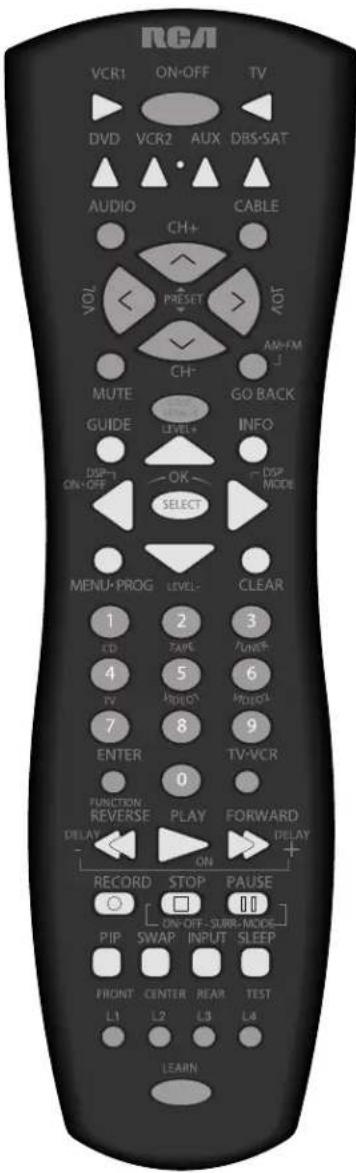
LEVEL+/LEVEL-
Sets the level of the speakers during test tone mode.
DSP ON·OFF
Enables the receiver's Digital Signal Processing mode.
DSP MODE
When the DSP mode is enabled, pressing this button allows the user to cycle through the various DSP modes.
The CD, TAPE, TUNER, TV, VIDEO 1, and VIDEO 2 buttons are used to directly select the device you want to control. (Works in AUDIO mode)
AM·FM
The AM•FM button allows you to select the AM•FM band on you audio receiver.
FUNCTION
Selects the different audio input devices. The number buttons also select the function labeled below the buttons when in AUDIO mode.
DELAY-, ON, DELAY+
Increases or decreases the delay between the surround and main speakers when the receiver is in the surround sound mode.
ON-OFF, SURR, MODE
ON•OFF SURR toggles the surround modes on and off. SURR MODE cycles through the receiver's various surround sound mode settings.
FRONT, CENTER, REAR, TEST
Adjust the levels of the front, center, and rear speakers respectively used with Level + / Level - . The test tone must be enabled first by pressing the TEST button.
PRESET
Used to operate preset channels while in Audio Mode.
Programming For TV
Most RCA, GE and ProScan TVs will not require programming. Check to see if your TV responds to the remote before you begin programming.
- Manually turn on the TV.
Find the three digit code for your TV in the code list below.
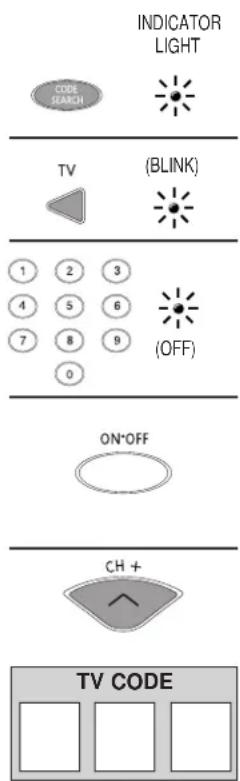
- Press and hold the CODE SEARCH button until the INDICATOR LIGHT lights (about 4 secs.), then release the CODE SEARCH button.
- Press and release the TV button (The INDICATOR LIGHT will blink then remain lit).
- Enter the code using the Number Buttons.
After your code is entered, the INDICATOR LIGHT will turn off. If the code is not valid, the INDICATOR LIGHT will blink. Check the code list and repeat process.
- Aim the remote at your TV and press the ON·OFF button. Your TV should turn off.
Note: If your TV does not respond, try all the codes for your brand. If the codes do not work, or your brand is not listed, try the Code Search method on page 19. - With your TV on, press CH+ (CHANNEL UP) If the TV responds, no further programming is required.
- Enter your code here for easy reference.
TV Code List
Abex 185
Acme 008,050
ADA 023
ADC....008,000
Admiral....001, 174
Adventura 174
Aiko....058
Alleron 046
Amark 020
Amtron 053
Akai 002
Amstrad 189
Anam National 003, 025, 042, 053, 193
AOC 004,005,007,009,014
132, 156, 175
Archer 020
Audiovox 053
Belcor....004
Bell & Howell 000, 001, 049
Bradford 053
Broksonic ....136, 147
Brokwood 004
Candle....004, 008, 009, 174
Capechart 175
Celebrity 002
Centurión 009
Cetronic....042
Citizen....001, 004, 008, 009, 042
053, 058, 105, 109, 177
Clairtone 014
Classic 042
CLP 059
Colortyme....004, 009, 010
Concerto 004,009
Contec/Conv....012, 013, 014, 042, 053
Craig 042, 053
Crown 042,053
Curtis Mathes ....000, 001, 004, 009, 015
031, 049, 105, 109
CXC 042,053
Daewoo....004, 005, 009, 017, 018
019, 042, 058, 082, 083
085,097,100,126,127
Daytron....004,009
Dimensia 000,031
Dumont....004, 121
Dynasty....042
Elektra 001
Electroband 002,014
Electrohome....003, 004, 009, 022, 133
Emerson 004, 009, 014, 023, 024, 025
026, 027, 030, 032, 033, 034
TV Code List Continued
035, 036, 037, 038, 039, 040 041, 042, 043, 045, 046, 049 053, 116, 135, 147, 177, 179
Envision 004, 009
Fisher 013, 049, 050, 180
Fujitso 046
Funai 042, 053, 046
Futuretec....042, 053 GE ....000, 003, 004, 009, 022, 031 ....044, 052, 054, 055, 087, 092 ....103, 107, 125, 164, 181
Gibraltar 004, 121 Grundy 046, 053
Hallmark....004, 009 Harvard....053
Hitachi ....001, 004, 009, 013, 059, 060 ....061, 137, 139, 140, 141, 142 ....143, 144, 145, 146, 179
IMA 053 Infinity 062
Integ....121
Janeil 174 JBL 062
JCB....002 JC Penny....000, 004, 005, 008, 009, 022
031, 052, 054, 055, 063, 087 105, 107, 109, 172, 181
Jensen 004,009
JVC 013,054,055,060,065,067,089
Kawasho....002, 004, 009 Kaypani....175
KEC 042 Kenwood 004, 009, 133
Kloss Novabeam 068, 069, 174 KTV 014, 021, 042, 053, 070, 116, 177
LG (Goldstar)....004, 005, 009, 056, 057 ....133, 155, 156, 172
Lodgenet....000, 001 Loewe....062
Logik....000, 001 Luxman....004, 009
LXI....000, 004, 009, 031, 049 ....062, 107, 109, 181
Megatron ....009, 059 Magnavox ....004, 008, 009, 062, 068
069, 074, 075, 076, 077 089, 133, 165
Majestic....000, 001
Marants....062 Marantz....004, 009, 062
Matsui 062
Megatron ....004 MEI ....014
Memorex 000, 001, 004, 009, 046 049, 051, 135
MGA 004,005,009,022,046,133,180
Midland 054, 055, 107, 121, 172, 181
Minutz 052
Mitsubishi ....004, 005, 009, 022, 046, 081 ....089, 132, 133, 180
Montgomery Ward 000,001
Motorola 003, 173
MTC 004,005,009,014,105,109
Multitech 053
Multivision 084
NAD 004,009,109,185
NEC ......003, 004, 005, 009, 010, 085, 089, 095
Nikei 042
Nikko 004,009,058
NTC 058
Onking 042
Onwa....042, 053
Optimus 170, 185
Optonica 095, 173
Orion 035, 121, 135
Panasonic ....003, 054, 055, 062, 149, 170
171
Philco ....003, 004, 005, 008, 009, 062 ....068, 069, 074, 075, 077, 133
Philips....003, 004, 006, 008, 062, 068, 069 ....074, 075, 076, 086, 087, 089, 133
Pilot 004
Pioneer 004, 009, 090, 179, 185
Portland 004, 005, 009, 058
Price Club 105
Precision 166
Prism 055
ProScan....000, 031, 107, 181
Proton 004, 009, 093, 175, 186
Pulsar 121
Pulser 004
Quasar....003, 054, 055, 070
Radio Shack/Realistic 000, 004, 009
031, 041, 042, 048, 049, 053 095, 155, 170, 172
RCA....000, 003, 004, 005, 007, 009, 011
031, 048, 078, 082, 083, 096, 098
099, 101, 102, 103, 107, 113, 129
133, 179, 181, 187, 188
Rhapsody 014
Runco 121
Sampo 004, 009, 172, 175
Samsung....004, 005, 009, 015, 104, 105
106, 109, 133, 172
Samsux 009
Sansui 135, 136
Sanyo 004, 013, 049, 108, 180
Scotch 004,009
Scott 004, 009, 024, 035, 042, 046, 053
Sears 000,004,009,013,031,046
049, 105, 107, 109, 110, 133
180, 181, 189
Sharp 004, 009, 095, 111, 112, 114
122, 123, 124, 173
Shogun 004
Signature 000, 001, 023
Simpson 008
Sonic 014
Sony....002, 006
Soundesign ....004, 008, 009, 042, 053, 046
Squareview....189
SSS 004, 042, 053
Starlite 053
Supre-Macy 174
Supreme 002
Sylvania 004, 008, 009, 062, 068, 069
074, 075, 076, 077, 133, 161
Symphonic 033, 053, 189
Tandy....173
Tatung 003
Technics 054, 055
Techwood 004,009,054,055
Teknika 000, 001, 004, 005, 008, 009
013, 042, 046, 053, 058, 076
105, 109, 170, 174
Telecaption ......117
Telerent 000,001
Tera 004,186
TMK 004,009
Toshiba 013, 049, 089, 105, 109, 117, 118
Universal 052,087
Victor 060
Vidtech 004,005,009
Viking 174
Wards 000,001,004,005,009,024,031
033, 046, 052, 062, 068, 069, 074
075, 076, 087, 095, 119, 133
White Westinghouse....097, 100
Yamaha 004,005,009,133
Yupiteru 042
Zenith 000,001,004,023,038,058
064, 121, 135, 136, 153
Programming For VCR1 & VCR2
Most RCA, GE and ProScan VCRs will not require programming. Check to see if your VCR responds to the remote before you begin programming.
- Manually turn on the VCR.
Find the three digit code for your VCR in the code list starting below.
- Press and hold the CODE SEARCH button until the INDICATOR LIGHT lights (about 4 secs.), then release the CODE SEARCH button.
- Press and release the VCR1 button (The INDICATOR LIGHT will blink then remain lit).
- Enter the code using the Number Buttons.
After your code is entered the INDICATOR LIGHT will turn off. If the code is not valid, the INDICATOR LIGHT will blink. Check the code list and repeat process.
- Aim the remote at your VCR and press the ON·OFF button. Your VCR should turn off.
Note: If your VCR does not respond, try all the codes for your brand. If the codes do not work, or your brand is not listed, try the Code Search method on page 19. - With your VCR on, press CH+ (CHANNEL UP). If the VCR responds, no further programming is required.
- Enter your code here for easy reference.
INDICATOR
LIGHT


VCR1

(BLINK)

① ② ③
4 5 6
7 8 9
0

(OFF)
VCR Code List
| Admiral......001 | Curtis-Mathes......000, 002, 022, 026, 029 |
| Adventura......026 | ......034, 037, 073, 128 |
| Aiko......027 | Cybernex......013 |
| Aiwa......002, 026, 044 | Daewoo......015, 017, 019, 025, 026, 027, 028, 110 |
| Akai......003, 004, 005, 006, 008, 029 | Daytron......110 |
| ......111, 112 | Dbx......009, 123 |
| Allegro......018, 022, 104 | Dimensia......000 |
| American High......021, 060 | Dynatech......002, 026 |
| Asha......013 | Electrohome......014, 029 |
| Audio Dynamics......009, 123 | Electrophonic......014 |
| Audiovox......014 | Emerson......002, 006, 012, 014, 015, 021, 024 |
| Bell & Howell......011 | ......025, 026, 029, 030, 031, 032, 033 |
| Beaumark......013 | ......034, 035, 036, 037, 038, 039, 040 |
| Broksonic......012, 025, 031, 064, 085 | ......041, 043, 044, 045, 047, 060, 065 |
| Calix......014 | ......105, 116 |
| Candle......009, 013, 014, 015, 016, 017, 019 | Fisher......009, 011, 023, 048, 049, 050, 062 |
| Cannon......021, 060, 114, 115 | Fuji......004, 021, 060 |
| Capehart......104, 110 | Funai......002, 008, 026 |
| Carver......062 | Garrard......026 |
| CCE......027, 061 | GE......000, 013, 021, 053, 060, 115, 117, 120 |
| Citizen......009, 013, 014, 015, 016, 017 | Gradiente......026 |
| ......019, 027 | Go-Video......134, 143 |
| Colortyme......009 | Harley Davidson......026 |
| Colt......061 | Harman Kardon......009, 068 |
| Craig......013, 014, 036, 074 | Harwood......061 |
VCR Code List Continued
Headquarter 011
Hitachi ....002, 055, 057, 107, 111, 120 ....122, 144, 145
HI-O 023
Instant Replay....008, 021, 060
Inteq 014
JCL 021,060
JC Penney ....009, 011, 013, 014, 055, 060
107, 123, 111, 115, 118
Jensen 055,111
JVC 009, 011, 022, 111, 123
Kenwood 009, 011, 016, 111, 123
KLH 061, 131
Kodak....014, 021, 060
LG (Goldstar) 009, 014, 121
Lloyd 002,026
Logik 061
LXI 014
Magnavox ......021, 060, 062, 104, 106, 115, 124
Magnin....013
Marantz 009, 011, 016, 021, 060, 062
064, 114, 123
Marta 014
Masushita 021.060
MEI 021,060
Memorex 001,002,011,013,014,021
023, 026, 043, 060, 104, 112
MGA 029.065
MGN Technology....013
Midland 053
Minolta....055, 107
Mitsubishi 029, 055, 065, 066, 068, 069
070, 071, 073, 074, 123
Montgomery Ward....001, 075
Motorola 001, 021, 060
MTC 002.013.026
Multitech 002, 013, 026, 053, 061
NEC 009,011,016,024,064
076, 077, 078, 111, 123
Nikko 014
Noblex 013
Olympus 021,060
Optimus....001, 014, 109, 136, 137
Optonica 075.134
Orion 031
Panasonic....021, 060, 109, 115, 125
Pentax 016,055,107,120
Pentex Research 009
Philco 021, 060, 062, 115
Philips 021, 060, 062, 075, 106, 124
Pilot 014
Pioneer....055, 080, 081, 123
Portland 016, 017, 019, 110
ProScan 000
Protec 061
Pulsar 104
Quarter....011
Quartz 011
Ouasar 021, 060, 115, 125
RCA 000,003,013,021,055,060,082,083
084, 086, 087, 088, 089, 090, 091, 107
-
- 125
Radioshack/Realistic....000, 001, 002, 011
013.014.021.023.026.029
049, 050, 060, 075, 109, 112
115, 136, 137, 138
Radix 014
Randex 014
Ricoh....128
Runco 104
Samsung 005, 013, 015, 033, 053
055.112.129.134
Sanky 001, 104
Sansui 092, 111, 123
Sanyo 011, 013, 023
Scott 012, 015, 025, 032
038.065.093.116
Sears....011, 014, 021, 023, 048, 049, 050
055, 060, 062, 107, 118
Sharp 001, 002, 017, 029, 075, 135, 136
Shintom 004, 055, 061, 128, 132
Shogun 013
Signature 002
Singer 021, 060, 061
Sony 004, 099, 128, 139, 140, 141
STS 021, 055, 060, 107
Sylvania 002, 026, 060, 062, 065, 115, 124
Symphonic 002, 026
Tandy 002, 011
Tashiko....014
Tatung....111
Teac 002, 026, 111
Technics 021,060,109
Teknika ....002, 014, 021, 026, 060, 100
Toshiba....015, 049, 055, 062, 065, 093, 116
Totevision 013, 014
TMK 013,024,047
Unitech....013
Vector Research 009.015.016.123
Victor 123
Video Concepts 009, 015, 016, 029, 123
Videosonic 013
Wards 001,002,013,014,015,021
023, 026, 029, 055, 060, 061, 075
-
- 116
White Westinghouse 002,008
XR-1000 021,026,060,061
Yamaha....009, 011, 111, 123
Zenith 004, 007, 010, 014, 018, 022, 085
104, 119, 123, 128, 133
Programming For DVD
Most RCA, GE and ProScan DVD systems will not require programming. Check to see if your DVD System responds to the remote before you begin programming.
- Manually turn on the DVD System.
Find the three digit code for your DVD System in the code list below.
-
Press and hold the CODE SEARCH button until the INDICATOR LIGHT lights (about 4 secs.), then release the CODE SEARCH button.
-
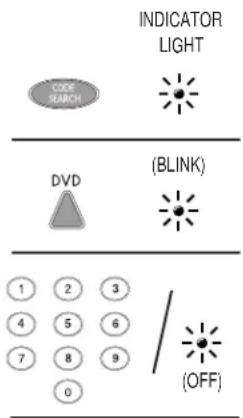
Press and release the DVD button (The INDICATOR LIGHT will blink then remain lit).
-
Enter the code using the Number Buttons.
After your code is entered, the INDICATOR LIGHT will turn off. If the code is not valid, the INDICATOR LIGHT will blink. Check the code list and repeat process.
-
Aim the remote at your DVD System and press the ON·OFF button. Your DVD System should turn off.
-
If the DVD System responds, no further programming is required.
Note: If your DVD does not respond, try all the codes for your brand. If the codes do not work, or your brand is not listed, try the Code Search method on page 19.
- Enter your code here for easy reference.
DVD Codes
Akai....152 Denon....157
Hitachi ....161
JVC 163
Magnavox....155, 165
Marantz 155
Mitsubishi....159
Panasonic 157, 158
Philips 155, 165
Pioneer 161 ProScan 166
RCA....166
Samsung 164
Sharp 154
Sony 156
Toshiba 155
Zenith 153, 162
Yamaha 157
Laser Disc's
Denon 080
Pioneer 080
ProScan 083
RCA....083
Sanyo....007
Sony....098
Zenith 007
Programming For DBS System
Most RCA, GE and ProScan Satellite systems will not require programming. Check to see if your DBS Satellite System responds to the remote before you begin programming.
- Manually turn on DBS System.
Find the three digit code for your DBS System in the code list below.
-
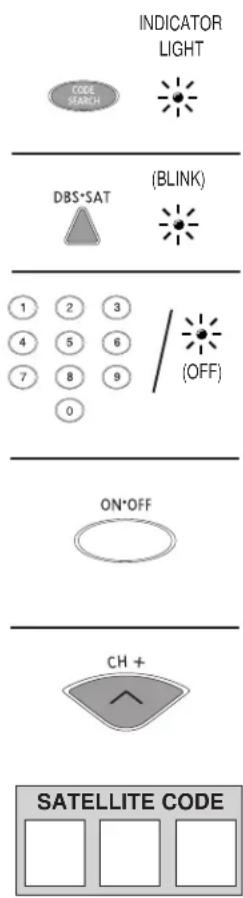
Press and hold the CODE SEARCH button until the INDICATOR LIGHT lights (about 4 secs.), then release the CODE SEARCH button.
-
Press and release the DBS·SAT button (The INDICATOR LIGHT will blink then remain lit).
-
Enter the code using the Number Buttons.
After your code is entered, the INDICATOR LIGHT will turn off. If the code is not valid, the INDICATOR LIGHT will blink. Check the code list and repeat process.
- Aim the remote at your DBS System and press the ON·OFF button. Your DBS System should turn off.
Note: If your DBS System does not respond, try all the codes for your brand. If the codes do not work, or your brand is not listed, try the Code Search method on page 19.
-
With your DBS System on, press CH+ (CHANNEL UP). If the satellite system responds, no further programming is required.
-
Enter your code here for easy reference.
Satellite Codes
Amplica 015
Channel Master....017, 018, 019
Chapparal....000, 001, 020
Cheyenne 001
Drake 002, 014, 027
Dish Network 068
DX Antenna 008, 022
Echosphere....068
Echostar 028, 029, 030, 068
Fujitsu 031, 032
GE 076,062
General Instruments....004, 005, 006, 033
082, 083, 084, 085
Hitachi 072,081
Hughes Satellite 069, 070, 072, 073, 078
Janeil 036
Jerrold 037
Kenwood 038
Luxor....039
Magnavox....079
Macom State 040
Norstat 041, 042
Panasonic 066
Primestar 067
Philips 079
ProScan....062, 076
RCA....062, 076, 077
Realistic 007,043
Scientific Atlanta 047
Sierra I, II, III 001
Sony 063
Star Sight 073
Star Trak 048
STS....008, 009, 010, 011
Super Guide....049
Toshiba 012, 064, 065, 071
Uniden 013, 051, 073
Video Cipher II 014
Zenith 002, 003, 014, 027, 074, 075, 086
Programming For Cable Box
- Manually turn on the Cable Box.
Find the three digit code for your Cable Box in the code list below
-
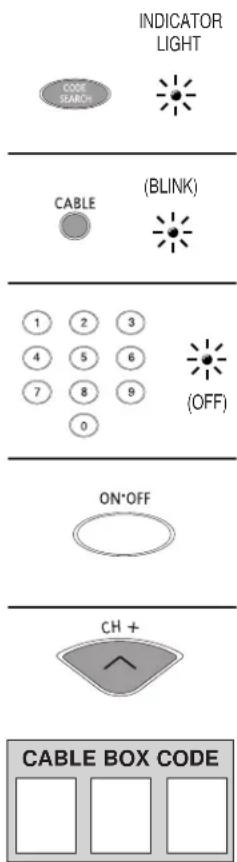
Press and hold the CODE SEARCH button until the INDICATOR LIGHT lights (about 4 secs.), then release the CODE SEARCH button.
-
Press and release the CABLE button (The INDICATOR LIGHT will blink then remain lit)
-
Enter the code using the Number Buttons.
After your code is entered, the INDICATOR LIGHT will turn off. If the code is not valid, the INDICATOR LIGHT will blink. Check the code list and repeat process.
- Aim the remote at your Cable Box and press the ON·OFF button. Your Cable Box should turn off.
Note: If your Cable Box does not respond, try all the codes for your brand. If the codes do not work, or your brand is not listed, try the Code Search method on page 19.
-
With your Cable Box on, press CH+ (CHANNEL UP). If the Cable Box responds, no further programming is required.
-
Enter your code here for easy reference.
Cable Box Code List
| ABC | 001, 002, 003, 004, 005, 006, 007 |
| Allegro | 064, 065 |
| Americast | 067 |
| Antronix | 008, 009 |
| Archer | 008, 009, 010, 011 |
| Cabletenna | 008 |
| Cableview | 008 |
| Century | 011 |
| Citizen | 011 |
| Colour Voice | 012, 013 |
| Comtronics | 014, 015 |
| Contec/Cony | 016 |
| Eastern | 017 |
| Garrard | 011 |
| GC Electronics | 009 |
| Gemini | 018, 019 |
| GE | 089 |
| General Instrument | 003, 049, 051, 053, 054 |
| 058, 068, 069, 070, 071 | |
| Hamlin | 020, 021, 022 |
| Hitachi | 003 |
| Hytex | 002 |
| Jasco | 011 |
| Jerrold | 001, 003, 004, 005, 007, 018 |
| 024, 049, 050, 066, 068, 069 | |
| Magnavox | 025 |
| Memorex | 026 |
| Movie Time | 002, 027 |
| NSC | 002, 027 |
| OAK | 002, 016, 029 |
| Panasonic | 000, 048 |
| Paragon | 026 |
| Philips | 011, 012, 013, 019, 025, 030, 031, 032 |
| Pioneer | 033, 034, 038 |
| Pulsar | 026 |
| Radio Shack | 045 |
| RCA | 000 |
| Realistic | 009 |
| Regal | 022 |
| Regency | 017 |
| Rembrandt | 003 |
| Runco | 026 |
| Samsung | 014, 034 |
| Scientific Atlanta | 006, 036, 037, 038 |
| Signal | 014, 018 |
| Signature | 003 |
| SL Marx | 014 |
| Sprucer | 000 |
| Standard Components | 039 |
| Starcom | 001, 007, 018 |
| Stargate | 014, 018 |
| Starsight | 060 |
| Star Sight Cable Service | 047 |
| Starquest | 018 |
| Star Trak | 056 |
Cable Box Code List Continued
| Tandy | 040 |
| Teleview | 014 |
| Texscan | 039 |
| Tocom | 004, 041, 053 |
| Toshiba | 026 |
| Tusa | 018 |
| TV86 | 027 |
| Unika | 008, 009, 011 |
| United Artists | 002 |
| United Cable | 001 |
| Universal | 008, 009, 010, 011, 042 |
| Videoway | 044 |
| Viewstar | 015, 025, 027, 040 |
| Video Tech | 090 |
| Zenith | 026, 028, 043, 057, 059, 060 |
| 061, 062, 063, 064, 065, 067 |
Programming For Audio
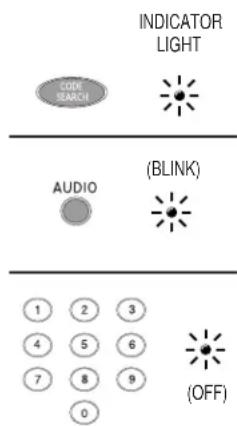
This remote control will operate many features found in audio/video receivers and mini-systems. Other brands of receivers and mini-systems need to be set up under the AUDIO button prior to using the device. See page 13 for the list of AUDIO codes.
- Manually turn on the device you wish to control.
Find the three digit code for your AUDIO system in the code list on the next page. - Press and hold the CODE SEARCH button until the INDICATOR LIGHT lights (about 4 seconds), then release the CODE SEARCH button.
- Press and release the AUDIO button (The INDICATOR LIGHT will blink then remain lit).
- Enter the code using the Number Buttons.
After your code is entered, the INDICATOR LIGHT will turn off. If the code is not valid, the INDICATOR LIGHT will blink. Check the code list and repeat process.
- Aim the remote at the device you wish to control and press the ON·OFF button. The device should turn off.
Note: If your device does not respond, try all the codes for your brand. If the codes do not work, or your brand is not listed, try the Code Search method on page 19.
6. With your device on, press VOL+ (VOLUME UP). If it responds, no further programming is required.
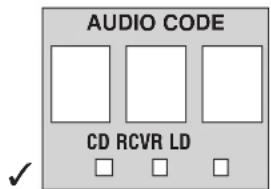
7. Enter your code and the type of device you programmed here for easy reference.
Note: The CD codes need to be programmed using the Audio or Aux keys.
Audio Component Code List
Audio Receiver (Tuner)
Aiwa 179
Carver 165
Citizen 166
Denon....143, 157
Fisher 154, 161
Goldstar 106
Harmon Kardon 144, 158
JVC 130, 153, 159
Kenwood....023, 148, 156, 168, 172
NAD....061,079
Magnavox 136, 154
Marantz 028,164
Onkvo 145, 151, 152
Optimus....007, 087, 088, 089, 090
091, 092, 094, 133
Panasonic....150, 155
Philips 154, 163, 164, 165
Pioneer 177
RCA 057, 112, 121, 135
Realistic 162
RS Original 046, 094, 133, 146
Sanyo 045
Scott 108
Sharp 011, 037, 149
Sherwood 046,159
Sony 118, 138, 137, 138, 139
173, 174, 175, 176
Teac....050, 147
Technics 131, 150, 155, 163
Venturer 085
Yamaha 141, 142, 178, 180, 181
Zenith....016, 070, 083, 089, 099
105, 106, 124, 154
CD Player
ADC 000
Adcom 001, 054
Aiwa....002,003
Akai 055,077,170
Audio Technica....005
California Audio Labs 056
Capetronic 009
Carver 006, 007, 008, 165
Casio....117
Citizen 166
Curtis Mathes 117
Denon....010
Emerson....001, 012, 013
Fisher 007, 015, 016, 017, 058
GE 065
Genexxa....012, 013, 018, 059
Goldstar 060
Harmon Kardon 020, 031
Hitachi 018
Inkel 021
JC Penney 030, 117
JVC 022,153
Kenwood....023, 024, 025, 067, 068, 168
Krell 006
Kyocera 000
Luxman 026, 027, 069, 078
LXI, 012, 117
Magnavox 006, 071, 140
Marantz 006, 028, 029, 072
MCS 030,117
MGA....031
Mission....006
Mitsubishi 031, 032
NAD 061
Nakamichi....033, 034, 171
NEC 030
Nikko 005, 013, 016
NSM 006
Onkyo 035, 036, 062, 151
Optimus....007, 008, 012, 018, 024
037, 038, 039, 040, 084
087,091
Panasonic....056, 073, 080
Philips 006, 071, 165
Pioneer....018, 041, 042, 059, 177
Proton....006
Quasar 056
RCA 001,007,012,043,063,135
Realistic 001, 007, 009, 012, 013
018, 029, 037, 039
Rotel 006
RS Originals 008,046
SAE....006
Samsung 081
Sansui....006, 012, 044, 063, 074
Sanyo 007,045,058,075,082
Scott 001, 012, 013
Sears 012, 024, 029, 117
Sharp 024, 019, 029
Sherwood 021, 029, 038, 046
Shure 030
Sony 047, 048, 132, 134, 140
STS 000
Sylvania 006
Symphonic....049
Teac 016, 029, 039, 049, 050, 051
Technics 056, 073, 076, 160
Theta Digital 071
Toshiba....061
Victor 022
Yamaha 005, 052, 053, 064
Zenith....016, 070, 083, 099, 124
Operating Audio Functions
Note: Not all functions work for all brands. See page 13 for the Audio code list to operate your brand of equipment.
TURNING ON THE RECEIVER OR MINI-SYSTEM
Point the remote control at the receiver and press the AUDIO button. The receiver should turn on. In some cases, it may require pressing the AUDIO button and then the ON·OFF button to turn the system on.
SELECTING A DEVICE INPUT
Device inputs such as CD Player or Tape Deck may be selected depending on the features of your receiver or mini-system. Input selection may be made either by pressing the labeled digit button, or by pressing the FUNCTION button to toggle through the inputs available on your system.
Note: You may need to experiment with your system since manufacturers products do not all work the same way.
USING THE NUMBER BUTTONS TO CHANGE AUDIO INPUTS
To select a device, press the number button (1-6) that corresponds with the device you want to operate (CD, TAPE, TUNER, TV, VIDEO 1, & VIDEO 2).
USING THE FUNCTION BUTTON TO CHANGE AUDIO DEVICES
To select a device, press the FUNCTION button until the input you want to operate appears on your system.
Use the Play, Forward, Reverse, Record, Stop, and Pause buttons for CD players and tape decks. In some cases, the Preset buttons (CH+/CH-) may work in changing tracks on CD players.
- Press the AUDIO button
- Press the TUNER (3) button
- Press the AM/FM button to toggle between AM and FM
- Use the Preset (CH+/CH-) buttons to move up and down channel presets.
With RCA receivers, a second press of the TV button should turn the receiver on.
- Turn the TV on.
- Press the AUDIO button.
- Select the Audio input either by using the labeled number buttons or the FUNCTION button
- Press the VOL+ or VOL- buttons to control volume
Note: The Volume buttons may operate both TV and receiver volume at the same time. If this presents a problem, it may be resolved by disabling the TV speakers by going into the TV menu.
The Surround Sound feature may be turned ON/OFF by pressing the SURR ON·OFF button.
- Press the SURR MODE button until the desired mode is found.
- Press DELAY+ or DELAY- to achieve the desired delay effect.
- Press the DSP ON·OFF button to turn DSP (Digital Signal Processor) ON or OFF.
- Press the DSP button until the desired effect is achieved.
- Press the TEST button to listen to speaker levels.
- Press FRONT, CENTER, or REAR buttons to select speakers.
- Press the LEVEL+ or LEVEL- buttons to adjust speaker levels.
Programming For AUX Button
You can assign any one of the following devices to the AUX button:
Audio Components (CD Player, Amplifier, Receiver, Tape Deck), Laser Disc Player or a second TV, VCR, DVD, DBS Satellite System or Cable Box.
- Manually turn on the device you wish to control.
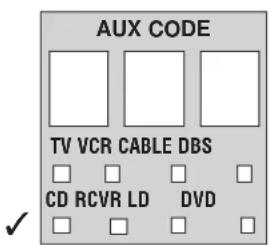
Find the three digit code for the device you wish to program in the code list. - Press and hold the CODE SEARCH button until the INDICATOR LIGHT lights (about 4 seconds), then release the CODE SEARCH button.
- Press and release the AUX button (The INDICATOR LIGHT will blink then remain lit). Then press the button for the device you want to program (TV, VCR, DBS•SAT, DVD) (Press CABLE to add another Cable Box and press AUDIO for CD).
- Enter the code using the Number Buttons.
After your code is entered, the INDICATOR LIGHT will turn off. If the code is not valid, the INDICATOR LIGHT will blink. Check the code list and repeat process.
- Aim the remote at the device you wish to control and press the ON·OFF button. The device should turn off.
Note: If the device you have programmed does not respond, try all the codes for your brand. If the codes do not work, or your brand is not listed, try the Code Search method on page 19. - With your device on, press CH+ (Channel UP) or ON-OFF button. If the device responds, no further programming is required.
- Enter your code and the type of device you programmed here for easy reference.
| Device Page | |
| TV | 5-6 |
| VCR | 7-8 |
| DVD | 9 |
| DBS System | 10 |
| Cable Box | 11-12 |
| Audio | 13 |

INDICATOR
LIGHT


(BLINK)


(OFF)
OR
Learning Function
The learning feature is used as a supplement to the standard preprogrammed library. The standard code library provides most of the functions needed, but you can add additional functions.
-
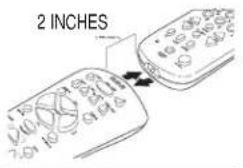
Place the RCA remote control unit and the Original remote control unit so that they face each other. They should not be any more than 2 inches apart.
-
Press and hold the CODE SEARCH button until the INDICATOR LIGHT lights, then release the CODE SEARCH button.
-
Press and release the desired Mode button (TV, VCR, CABLE, AUX, etc...). The INDICATOR LIGHT will blink, once button press is accepted.
-
Press and release the LEARN button.
-
Press and release the valid button to be learned on the RCA remote in which you will store a new function. The L1, L2, L3, L4, or other functions keys may be used in this programming mode.
NOTE: When learning the additional function buttons it is important to have the other remote in the same device mode as the RCA remote.
- Press and hold the button on the original remote control until INDICATOR LIGHT on the RCA remote blinks. Once the INDICATOR LIGHT blink you may continue with the next function.
If there is an error in learning the new function the INDICATOR LIGHT will flash for 3 seconds but remain in the learning mode. Return to step 5 if the INDICATOR LIGHT flashed.
NOTE: Hold the function key on your original remote for at least 3 seconds for the command to be successfully learned.
-
Repeat steps 5 and 6 to store more functions.
-
Once the selected functions are stored press the CODE SEARCH button and the remote will return to original operation mode.
NOTE:
- It is not possible to edit a function once it has been learned. The function must be cleared of any previously learned commands before new learned command can be added.
- No functions may be stored under the LEARN, SLEEP, CODE SEARCH or any of the device button.

INDICATOR LIGHT


(BLINK)





OR
Any Other Function Keys
(BLINK)


Clearing A Learned Button
To clear a learned button sequence, use the procedure below.
- Press and hold the CODE SEARCH button until the INDICATOR LIGHT lights (about 4 seconds), then release the CODE SEARCH button.
- Press and release the desired Mode button (TV, VCR, CABLE, AUX, etc...). The INDICATOR LIGHT will blink, once the button press is accepted.
- Press and release the LEARN button twice. The INDICATOR LIGHT will blink, once the button press is accepted.
- Press and release the CODE SEARCH button and the remote will return to original operation mode. All learned command functions under the device are now cleared.
NOTE:
- It is not possible to edit a function once it has been learned. The function must be cleared of any previously learned commands before new learned command can be added.
- No functions may be stored under the LEARN, SLEEP, CODE SEARCH or any of the device button.
INDICATOR LIGHT


VCR1

(BLINK)


TV

DBS·SAT


Clearing All Learned Functions
This procedure will erase all learned functions in every device mode. This step is recommended when attempting any learning of a new function from a new remote.
- Press and hold the CODE SEARCH button until the INDICATOR LIGHT lights (about 4 seconds), then release the CODE SEARCH button.
- Press and release the LEARN button twice. The INDICATOR LIGHT will blink, once the button press is accepted.
- Press and release the CODE SEARCH button and the remote will return to original operation mode. All learned command entries are now cleared.
INDICATOR LIGHT


Sleep Function
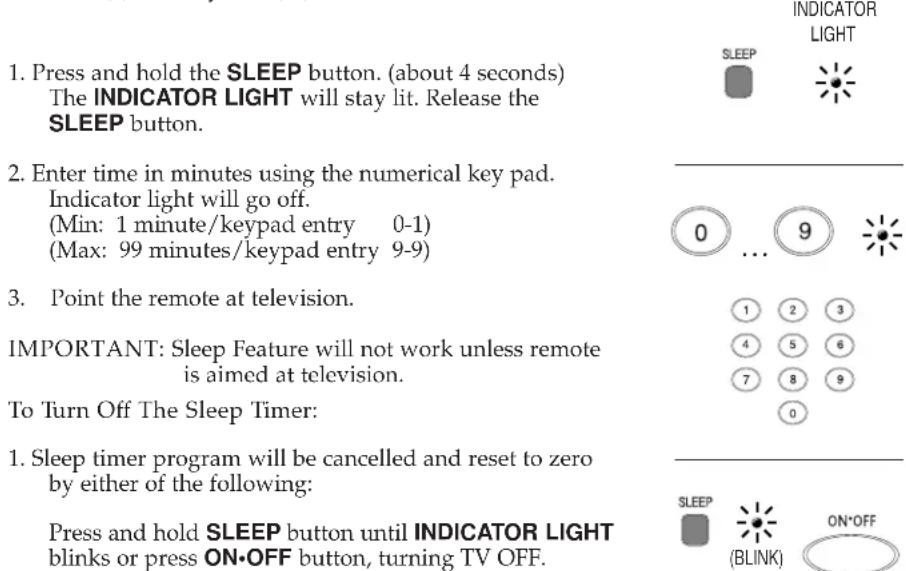
The Sleep Function will turn off your TV automatically after the user programs the time interval from one (1) to ninety-nine (99) minutes.
Menu Function
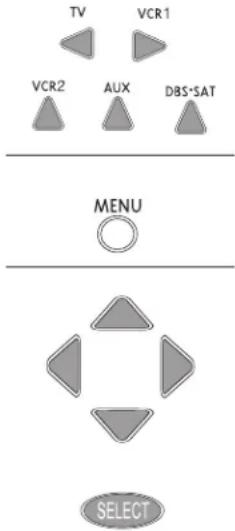
The Menu Function is used to make changes in the selected settings such as setting color, channels, timer, etc. The MENU button invokes TV, VCR, DVD and DBS•SAT Modes. Each menu will vary from brand to brand.
Entering the Menu Mode:
- Push the device button on the remote for the desired menu screen.
- Push the Menu button.
This allows you to view the menu of the device chosen.
The menu should now be visible on your television.
3 While in Menu Mode these buttons will function as follows:
Navigation Left/Right buttons will operate as cursor right and left.
Navigation UP/DOWN buttons will operate as cursor up and down.
SELECT button applies the highlighted menu item.
Not all functions in competitive models and brands of televisions may be fully supported. Some brands with Menu function my allow you to push the Menu button to select the mode.
EXITING THE MENU MODE
To exit the Menu Mode and clear the screen, push the CLEAR button you have chosen on the remote. Some brands with Menu function my allow you to push the Menu button to exit the mode.
SELECT

OR
MENU

Programming With Code Search
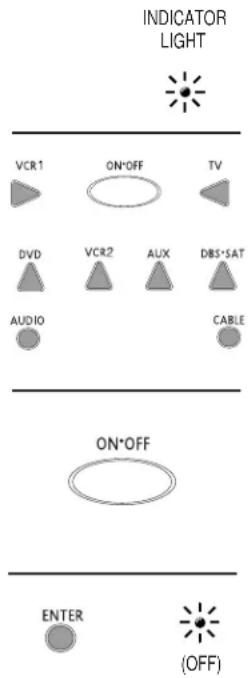
If your TV, VCR, DBS Satellite System, Cable Box or Audio System does not respond after you have tried all the codes for your brand, or if your brand is not listed, try searching for your code by following the steps below.
- Manually turn on the device you wish to program.
- Press and hold CODE SEARCH until the INDICATOR LIGHT lights, then release CODE SEARCH.
- Press and release the device button for the device you are programming. The INDICATOR LIGHT will blink once, then remain lit.
Note: For Aux programming (when not a TV code) press AUX followed by the device button. Use CABLE button for programming CABLE.
- Press and release ON·OFF until your device turns off.
Important: You may have to press ON•OFF up to 200 times.
- When your device turns off, press ENTER, the INDICATOR LIGHT will turn off.
Identifying Codes From Your Universal Remote
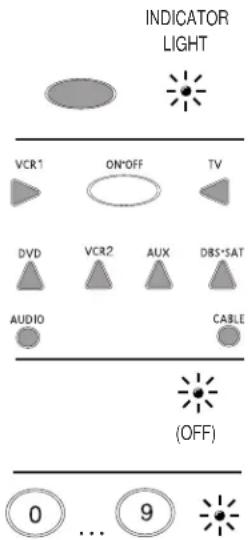
If you need to find the three-digit code for your TV, VCR, DBS System, Cable Box or Audio System after your device is set-up use this procedure.
- Press and hold CODE SEARCH until the INDICATOR LIGHT lights, then release CODE SEARCH.
- Press and release the device button for the code you are retrieving. The Indicator Light will blink once.
Note: For AUX retrieving press AUX button followed by the device button. - Press and release CODE SEARCH. The INDICATOR LIGHT will turn off.
- Starting with 0 on the keypad, press the number buttons in order (0-9) until the INDICATOR LIGHT blinks.
- The number which causes the indicator light to blink is the first digit of your code.
- Repeat step 4 until you have retrieved all three numbers in the code.
- Cover/Front of Package
- Do Not Print On Inside of Cover
- Table of Contents
- Battery Installation
- Button Description For Video Operation
- INDICATOR LIGHT
- ON·OFF
- TV, VCR1, DVD, VCR2, AUX, DBS-SAT, AUDIO, CABLE
- VOL & CH
- MUTE
- GO BACK
- CODE SEARCH
- GUIDE
- INFO
- NAVIGATION BUTTONS & SELECT
- MENU·PROG
- CLEAR
- 0-9
- ENTER
- TV·VCR
- REVERSE, PLAY, FORWARD, RECORD, STOP, PAUSE
- PIP, SWAP, & INPUT
- L1, L2, L3, L4
- LEARN
- SLEEP
- Button Description For Audio Operation
- AUDIO OPERATION
- LEVEL+/LEVEL-
- DSP ON·OFF
- DSP MODE
- AM·FM
- FUNCTION
- DELAY-, ON, DELAY+
- ON-OFF, SURR, MODE
- FRONT, CENTER, REAR, TEST
- PRESET
- Programming For TV
- TV Code List
- TV Code List Continued
- Programming For VCR1 & VCR2
- VCR Code List Continued
- Programming For DVD
- DVD Codes
- Laser Disc's
- Programming For DBS System
- Satellite Codes
- Programming For Cable Box
- Cable Box Code List
- Cable Box Code List Continued
- Programming For Audio
- Audio Component Code List
- Audio Receiver (Tuner)
- CD Player
- Operating Audio Functions
- TURNING ON THE RECEIVER OR MINI-SYSTEM
- SELECTING A DEVICE INPUT
- USING THE NUMBER BUTTONS TO CHANGE AUDIO INPUTS
- USING THE FUNCTION BUTTON TO CHANGE AUDIO DEVICES
- Programming For AUX Button
- Learning Function
- NOTE:
- Clearing A Learned Button
- Clearing All Learned Functions
- Sleep Function
- Menu Function
- EXITING THE MENU MODE
- Programming With Code Search
- Identifying Codes From Your Universal Remote
Brand : RCA
Model : RCU800MS
Category : Remote control