WAC18001W - Air-conditioner Koldfront - Free user manual and instructions
Find the device manual for free WAC18001W Koldfront in PDF.


| Product Type | Window Air Conditioner |
| Model Number | WAC18001W |
| Cooling Capacity | 18,000 BTU |
| Coverage Area | Up to 1,000 sq. ft. |
| Voltage | 115 V ~ 60 Hz |
| Power Consumption (Cooling) | Approx. 1,500 watts |
| Current | 12.5 A |
| Efficiency (EER) | 10.8 |
| Dimensions (W x H x D) | 26 x 18 x 28 inches |
| Net Weight | 75 lbs |
| Modes | Cool, Fan Only, Dehumidify |
| Fan Speeds | 3 (Low, Medium, High) |
| Thermostat | Digital, adjustable |
| Remote Control | Included |
| Timer | 24-hour programmable |
| Filter | Washable mesh filter |
| Energy Saver Mode | Yes |
| Installation Type | Window mounting kit included |
| Noise Level (dB) | 52-58 dB (approx.) |
| Maintenance | Clean filter every 30 days |
| Parts & Repairability | Replaceable filter, remote, and control board |
Frequently Asked Questions - WAC18001W Koldfront
User questions about WAC18001W Koldfront
0 question about this device. Answer the ones you know or ask your own.
Ask a new question about this device
Download the instructions for your Air-conditioner in PDF format for free! Find your manual WAC18001W - Koldfront and take your electronic device back in hand. On this page are published all the documents necessary for the use of your device. WAC18001W by Koldfront.
USER MANUAL WAC18001W Koldfront
Window Air Conditioner and Heater
natural_image
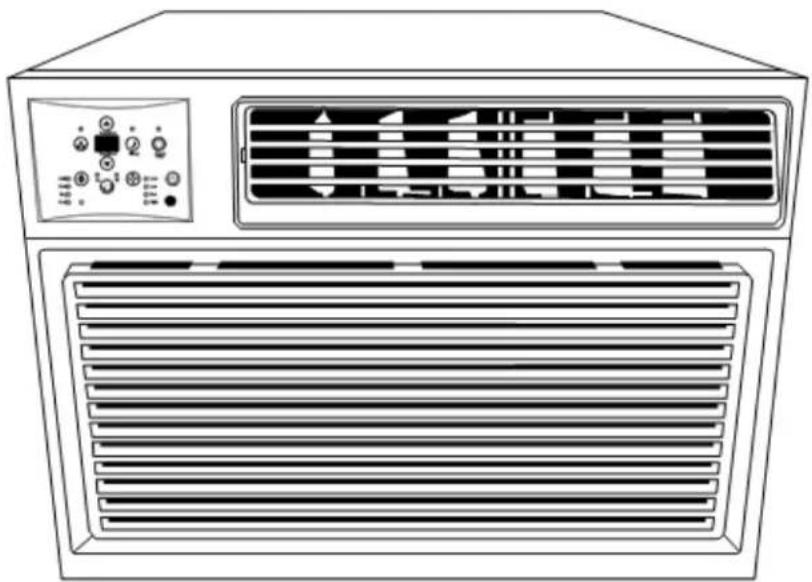
Line drawing of an air conditioner unit with ventilation grilles and control panel (no text or symbols)WAC18001W
Owner's Manual
Important Safety Information
Improper handling can cause serious damage to the appliance and/or to the user. Please read the following safety information.

Warning: The water produced by the window AC is not potable or suitable for drinking.
Do not drink the water drained from the unit as it contains contaminates and could make you sick.

Electrical Safety
- Make sure your hands are dry before operating the unit.
- Do not wet the front housing or control panel.
- Do not directly spray water on this Air Conditioner.
- Do not pull the unit by the cord.
• Always turn the unit off and unplug it from the socket when cleaning. - Unplug the unit if it is not going to be used for a long period of time.
- Do not operate the unit with a damaged or loose plug and / or socket.
- Use only the correct power supply with appropriate amperage.
- If the power cord is damaged, it must be replaced by the manufacturer, a service agent, or qualified technician.
- Do not turn the unit off or on by inserting or pulling the power plug.
- Do not modify the power cord length or share the outlet with another appliance.
- Do not use this unit with an extension cord and/or adapter plug.
- Do not use this unit near flammable gases/combustibles or close proximity to heating appliances.
- During operation do not remove any part of the outside casing.

General Safety
- Do not let people or pets sit or set an object directly in front of air flow.
- If a strange sound, smell, or smoke comes from the unit, turn it off and review the troubleshooting page of this manual.
- Stop operation and unplug unit in the event of a severe storm.
- To ensure proper air flow and intake, make sure the air vents are not obstructed.
- See instructions for cleaning air filters and how often cleaning should occur.
- Do not use strong detergents when cleaning.
- Children should be supervised when operating this unit.
- Do not allow children to play with the controls or drop any objects into the air outlets or vents.
- Do not place objects or let any person sit on top of the unit.
- Route the power cord carefully to avoid a tripping hazard.
- This unit is intended for domestic home use only. Do not use the window air conditioner for commercial or industrial use. Any other use may invalidate the warranty.
- Use caution when unpacking and installing the unit as there may be some sharp edges.
Operation of Safety Plug
Your window air conditioner is supplied with a Leakage-Current Detection and Interruption (LCDI) safety plug. This device provides protection to reduce the risk of fire due to arcing faults in the power supply cord. Before using your window air conditioner, follow the instructions below to ensure that the LCDI plug is working properly:
- Plug the power cord to a grounded outlet.
- Press the TEST button on the LCDI plug. This should trip the plug and cut the power to the air conditioner. If the plug does not trip and you are able to turn on the unit, please contact EdgeStar support.
DO NOT USE YOUR WINDOW AIR CONDITIONER IF THE TEST FAILS.
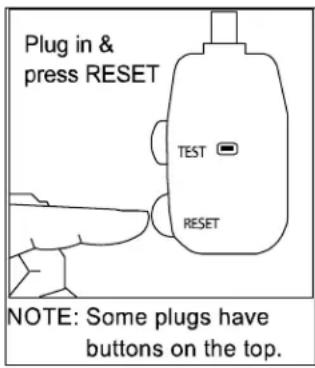
- Press the RESET button to start using your air conditioner.
NOTES:
- Always make sure the "Reset" button is pushed in for proper operation.
- The power supply cord with LCDI plug must be replaced if it fails to reset.
- Do not use the TEST and RESET buttons as an ON/OFF switch.
Electrical products should not be disposed of with household waste. Please contact your local recycling center for more information on how to recycle electronic waste.
Table of Contents
IMPORTANT SAFETY INFORMATION......I
PREPARATIONS FOR INSTALLATION ....3
WINDOW INSTALLATION INSTRUCTIONS....4
PREPARING THE UNIT FOR WINDOW INSTALLATION 4
Remove the Air Conditioner unit from Cabinet 4
Attaching the Top Channel and Side Curtains 5
INSTALLING THE CABINET INTO THE WINDOW....7
INSTALL THE SUPPORT BRACKET 8
EXTEND SIDE CURTAINS TO WINDOW FRAME 9
COMPLETING INSTALLATION....9
CONTROL PANEL OPERATIONS....10
TO TURN UNIT ON: 10
TO CHANGE TEMPERATURE: 10
TO ADJUST FAN SPEEDS: 10
TO SELECT OPERATING MODE: 10
To operate on Auto Feature: 11
To operate on Fan Only: 11
To operate on Dry mode: 11
TO USE ENERGY SAVER FEATURE: 11
TO USE THE SLEEP FEATURE: 11
TO USE TIMER (AUTO START/STOP) FEATURE: 12
TO CHECK FILTER FEATURE: 12
DIGITAL DISPLAY: 12
Error Codes 12
ADDITIONAL TIPS: 13
REMOTE OPERATIONSMAINTENANCE....14
AIR FILTER CLEANING 15
CABINET CLEANING....15
NORMAL SOUNDS....16
ENERGY SAVING GUIDE....16
TROUBLESHOOTING 17
SPECIFICATIONS....19
EDGESTAR LIMITED WARRANTY 20
Introduction
Thank you for purchasing this Koldfront by EdgeStar window air conditioner. We are glad you chose us. We believe that your purchase of this product opens a relationship between you and EdgeStar. We will provide the customer support needed to nurture that relationship.
This manual contains important information regarding the proper installation, use and maintenance of your window air conditioner. Following this manual will ensure that your product will work at its peak performance and efficiency.
Please save the original product packaging in case you need to safely transport your window air conditioner.
For Your Records:
Please write down the model number and serial number below for future reference. Both numbers are located on the ratings label on the back of your unit and are needed to obtain warranty service. You may also want to staple your receipt to this manual as it is the proof of your purchase, and is also needed for service under your warranty.
Model Number:
Serial Number:
Date of Purchase:
To better serve you, please do the following before contacting customer service:
- If you received a damaged product, immediately contact the dealer that sold you the product.
- Read and follow this instruction manual carefully to help you install, use and maintain your window air conditioner.
- Read the troubleshooting section of this manual as it will help you diagnose and solve common issues.
- Visit us on the web at http://www.edgestar.com for product guides, additional troubleshooting resources and up-to-date information. If you need service, our friendly customer service representatives are available via email at service@edgestar.com or by telephone at 1 (866) 319-5473.
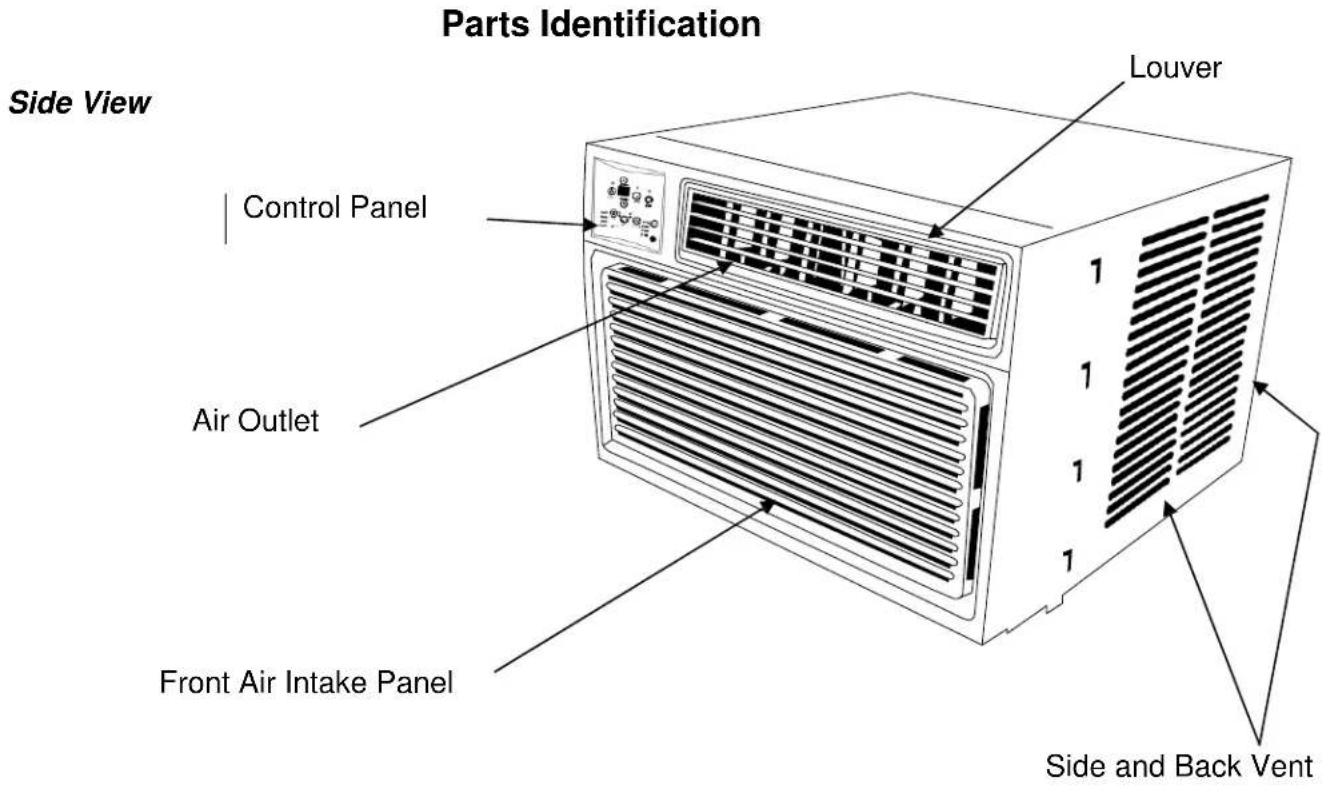
Front View
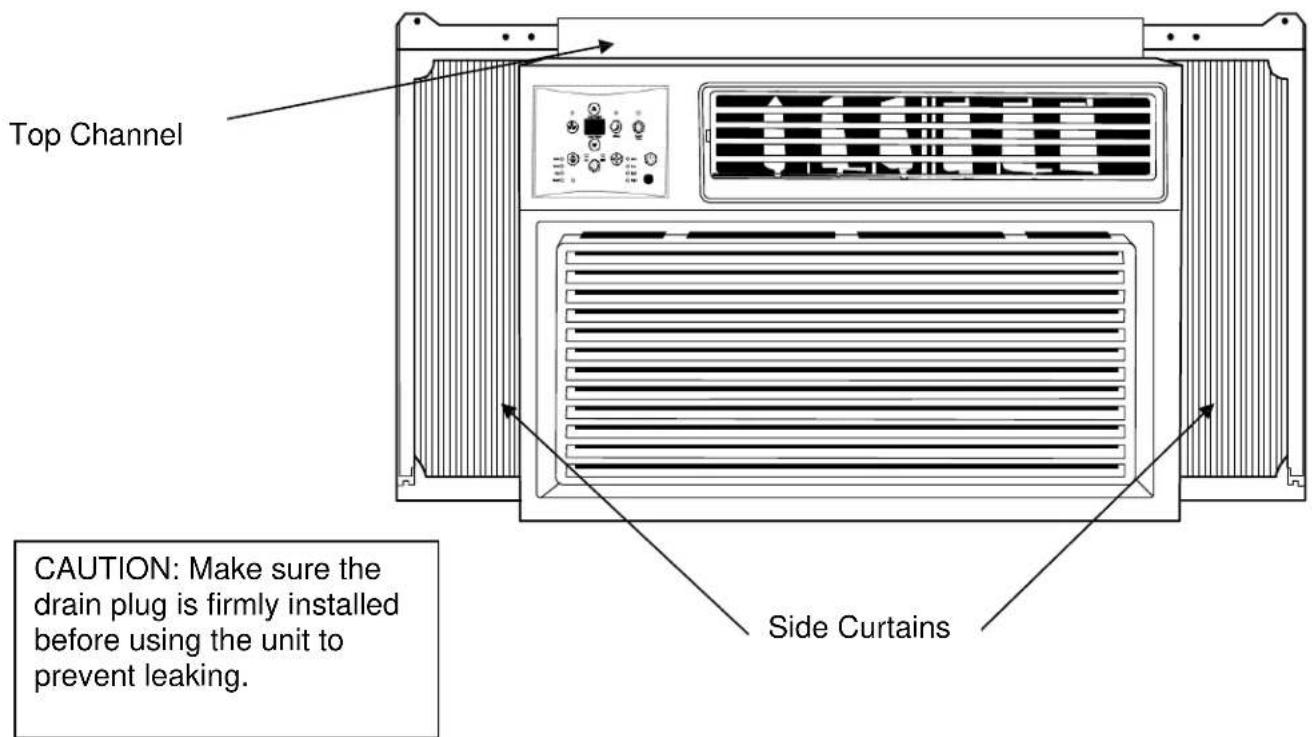
Preparations for Installation
Tools Needed:
Flat Screwdriver
Phillips Screwdriver
Tape Measure
Level
Drill
The following measurements are required to properly install the air conditioner.
• Window Width: 31" to 42"
• Window Minimum Height: 19 12 ”
NOTE: To avoid risk of injury and/or product/property damage, please take the following precautions:
- Two or more people are needed to properly handle and install.
- Before installation, make sure that the window and sill are able to handle the weight and size of this unit.
- Wear protective gloves to avoid injury from sharp edges.
- Use proper lifting and carrying techniques.
If you have multiple windows, choose the one closest to an electrical outlet that will be able to provide sufficient power to your unit. See the power requirements listed on the product label printed on the side, or on the back of your window air conditioner.
NOTE: You may need to contact your electrician if your room's circuit is not able to power your unit.
Before you begin, make sure you have all the parts necessary for installation.
Hardware (Packed with the unit)
 | 7/16 inch Locking screw and Flat washer for window panels | 2 ea. |
 | 3 / 4 inch (or 1/2) inch Long Hex-head Screw | 4 |
 | Safety Lock | 1 |
 | 1 / 2 inch Long screw and Locknut | 4ea. |
 | 3 / 4 inch Long Flat Head Bolt and Locknut | 2ea. |
 | Sill Angle Bracket | 2 |
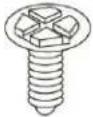 | Long hex-head locking screw for top angle, side retainer 5 /16 inch Long | 10 |
 | Foam insert | 2 |
 | Window sash | 1 |
Window Installation Instructions
Preparing the unit for window Installation
Remove the Air Conditioner unit from Cabinet
NOTE: When choosing your window make sure power supply cord is within 4 feet of a grounded 3-prong outlet
- Pull down the front grill and remove the filter. (Figure 1)
- Lift the front grill upwards to remove and place to the side.
- Remove the four front screws. These will be needed to re-install the front panel. (Figure 2)
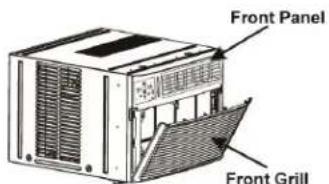
Fig.1
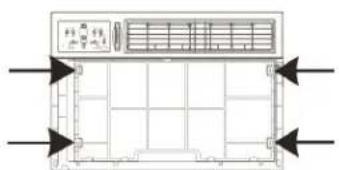
Fig.2
- Push both sides of the metal cabinet to release the plastic tabs on each side of the front panel. (See Figure 3)
-
Lift the front panel off of the unit. (Figure 3A)
-
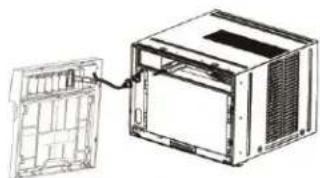
Disconnect the plug of the display panel from the unit and place the front panel to the side. (Figure 4)
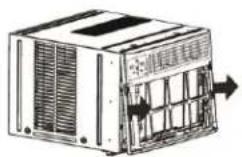
Fig.3
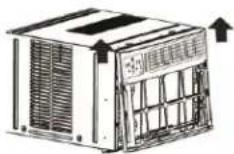
Fig.3A
natural_image
Technical line drawing of a device with a cable inserted into a housing (no text or symbols)Fig.4
- Take out the shipping screws from the top and sides of the unit. (Figure 5)
- Hold the cabinet while pulling on the base pan handle, and carefully remove the unit.
- Add two foam inserts to the holes where the shipping screws were removed at the top of the unit. (Figure 6)
- If the unit comes with internal packaging it must be removed prior to installing the air conditioner back into the cabinet. (Figure 7)
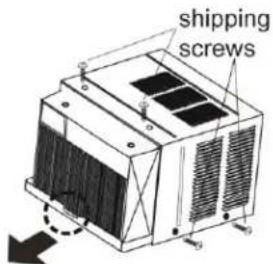
Fig.5
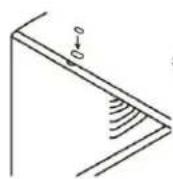
Fig.6
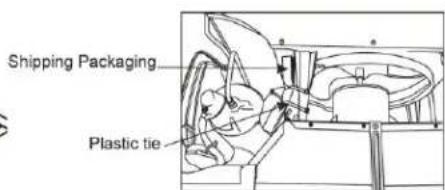
Fig.7
Attaching the Top Channel and Side Curtains
Make sure to attach the top channel and side curtains prior to installing the cabinet into the window.
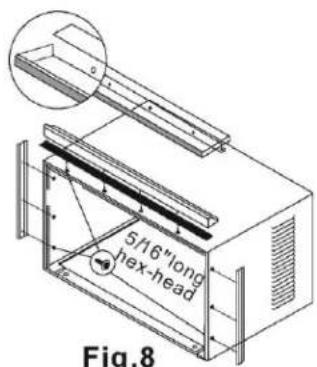
- Attach the foam gasket to the top channel above the holes as shown in Figure 8.
- Install the side curtains and top channel with the 10 (5/16") screws provided.
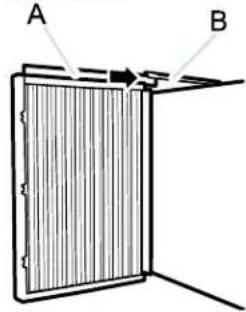
- To attach the side curtains to the air conditioner, insert the right-hand curtain connector tab into the curtain housing channels on the air conditioner.
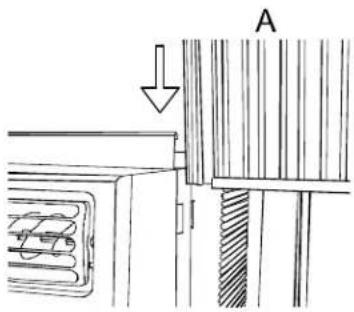
A. Side Curtain
- Insert the top of the right-hand curtain housing to the top curtain channel as shown below:
Top View:
natural_image
Diagram of a vertical panel with labeled points A and B, showing internal structure without any text or symbols.A. Curtain Housing
B. Curtain top channel on air conditioner
- Insert the bottom of the side curtain housing to the bottom channel on the air conditioner as shown below:
Bottom View:
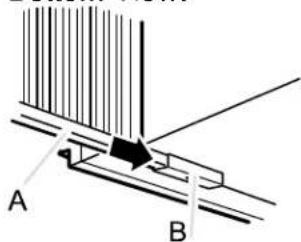
A. Curtain Housing
B. Curtain bottom channel on air conditioner
- Insert 2 washer head locking 7/16" screws into the holes located on the top leg of the window curtain frame. Do not tighten fully; the leg should slide freely. These will be tightened later in the installation.
NOTE: When choosing your window make sure power supply cord is within 4 feet of a grounded 3-prong outlet
Installing the Cabinet into the Window
Follow the steps listed below to install the cabinet into the window
-
Center empty cabinet into window:
-
Check that the lower rail of the air conditioner cabinet is behind and against the back side of the window sill.
- Maintain a firm hold on the cabinet and lower window sash.
-
Measure the distance between the right and left sides and adjust until equal distance.
-
Bring the window down temporarily, behind the top angle, to hold the cabinet in place.
- Fasten the cabinet to the window sill with 2 screws into the holes in the bottom of the unit. (The user may want to pre-drill pilot holes into the window sill.)
- Add the bottom rail seal over the screws to cover the window sill.
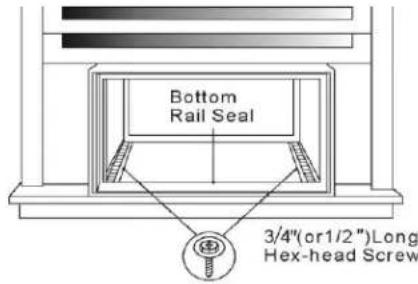
Fig.9
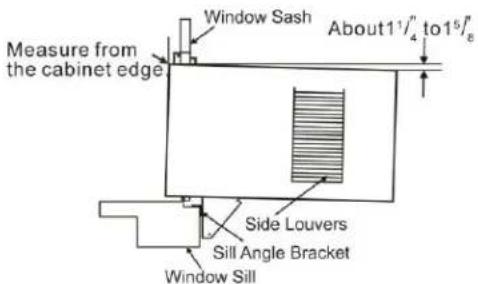
- Check that the air conditioner cabinet is tilted back about 1 18 to 1 12 , which should be about 3-4 degrees downward to the outside. After proper installation, condensation should not drain from the overflow drain hole during normal use installed at any angle.
Install the Support Bracket
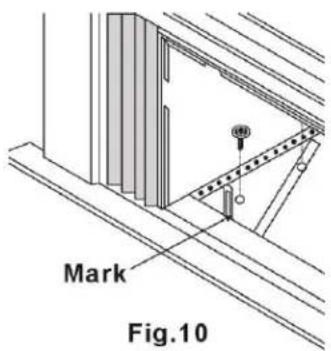
- Hold each support bracket against the outside of the window sill and tighten to the bottom of the cabinet as shown in Figure 10.
- Assemble the sill angle bracket to the support brackets at the marked position. (Figure 10B)
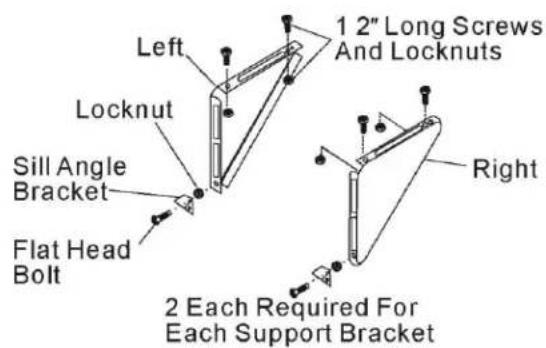
Fig.10B
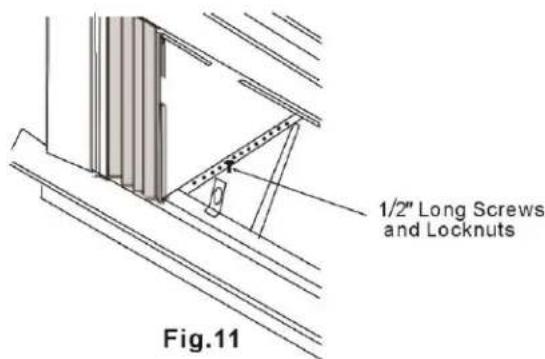
- Install the support brackets (with the sill angle brackets attached) to the correct holes in the bottom of the cabinet as shown below in Figure 11.
Extend Side Curtains to Window Frame
- Carefully raise the window to expose the window curtain panel locking screws. Loosen the screws so the curtains slide easily.
- Extend the panels to fill the window opening completely. Tighten the locking screws on top. (Figure 12)
- Close the window behind the top angle.
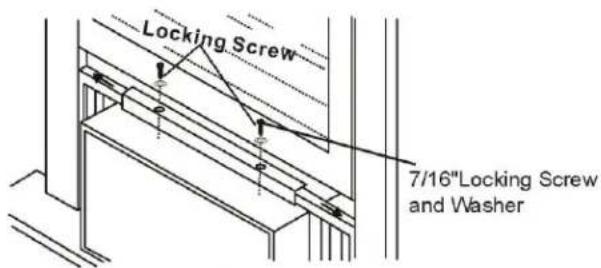
Fig.12
Completing Installation
- Trim the sash seal to fit the window width. Insert the seal into the space between the upper and lower sashes, as seen below.
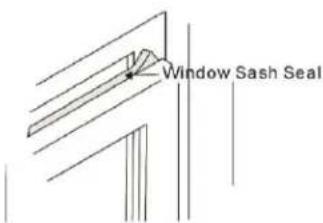
Fig.13
- Attach the right safety lock. (Figure 14)
- What goes here?
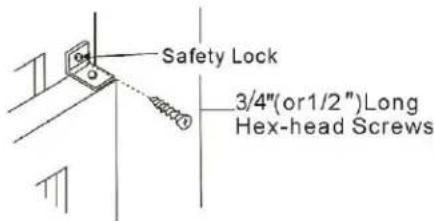
Fig.14
- Lift the air conditioner and carefully slide it into the cabinet leaving 6 inches protruding.
- DO NOT push on the controls or finned coils. Be sure that the chassis is firmly seated towards the rear of the cabinet.
- To reattach the front of the unit reversing the steps in Removing the Front.
- Plug into a grounded 3-prong outlet and press "Reset" on power cord supply. Lastly, press the on/off button to power on the unit.
Control Panel Operations
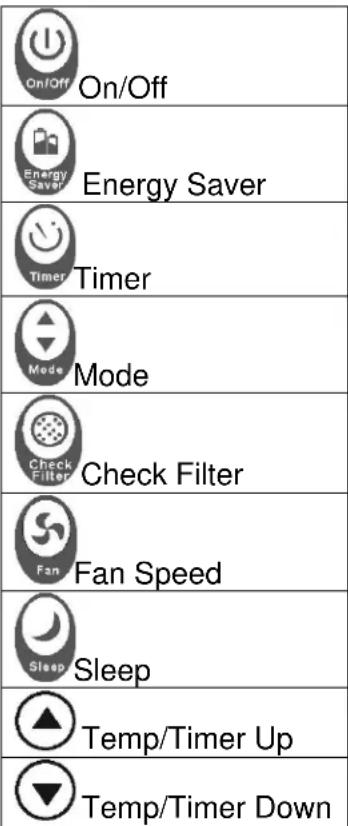
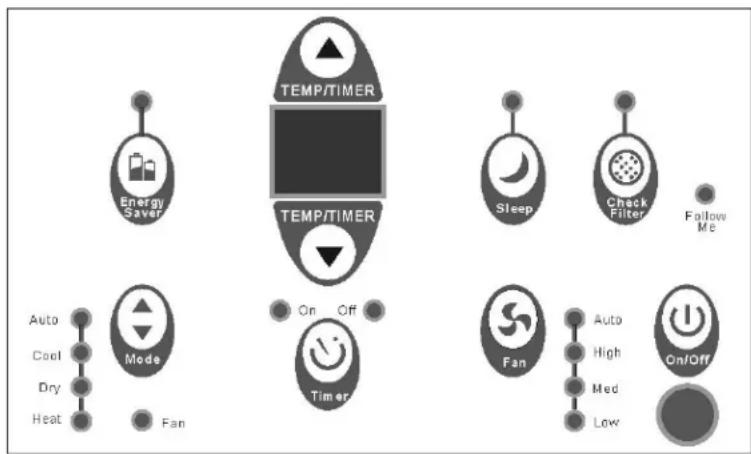
flowchart
graph TD
    A["Energy Saver"] --> B["TEMP/TIMER"]
    C["Mode"] --> D["On"]
    E["Timer"] --> F["Off"]
    G["Sleep"] --> H["Check Filter"]
    I["Fullow Me"] --> J["On/Off"]
    K["Auto"] --> L["Cool"]
    M["Dry"] --> N["Heat"]
    O["Fan"] --> P["Fear"]
Using the Control Panel
To Turn Unit on:

Press On/Off Button. NOTE- The Energy Saver feature will automatically turn on in "Cool", "Dry", and "Auto" mode.
To Change Temperature:
The temperature can be seen on the digital display. The temperature is automatically set anywhere between 62°F (17°C) and 86°F (30°C). If you want the display to read the actual room temperature, see “To Operate on Fan only” section.
To Adjust Fan Speeds:

To adjust the fan speed, press Fan Speed. Each time the button is pressed the fan speed mode is shifted – Auto, Low, Medium, or High. NOTE- During "Dry mode" the fan speed is controlled at Low automatically.
To Select Operating Mode:

To choose the operating mode press Mode . Each time you press the button, a mode is selected -Auto, Cool, Dry, Heat to Fan. The indicator light beside the button will be illuminated and remain on once the mode is selected.
To operate on Auto Feature:
- When you set the unit to "Auto" mode it will automatically select cooling, heating, or fan only operation depending on the desired temperature selected and the current room temperature.
- Once the desired temperature is reached, the unit will automatically maintain the room temperature.
- The fan speed will automatically adjust based on the current room temperature. If a different fan speed is desired, the mode will need to be adjusted.
To operate on Fan Only:
- The display will continue to show the actual room temperature as in the cooling mode.
- In Fan only mode, however, the temperature cannot be adjusted as the unit will not be cooling the air.
To operate on Dry mode:
- In this mode, the air conditioner will operate as a dehumidifier. If the room that the AC is placed in is sealed, some degree of cooling will continue.
To Use Energy Saver Feature:

To start the Energy Saver, press. This feature is available on "Cool", "Dry", and "Auto". The fan will continue to run for 3 minutes after the compressor shuts off. The fan then cycles on for 2 consecutive minutes at 10 minute intervals until the room temperature rises above the set temperature. At which time the compressor will turn back on to cool the room.
To Use the Sleep Feature:

Press the sleep button for long term automatic functioning. In this mode the selected temperature will increase (cooling) or decrease (heating) by 2^ F ( 1^ C) 30 minutes after the mode is selected. The temperature will then increase (cooling) or decrease (heating) by another 2^ F ( 1^ C) after an additional 30 minutes. This new temperature will be maintained for 6 hours before it returns to the original selected temperature. This ends the Sleep mode and the unit will continue to operate as originally programmed. The Sleep Mode program can be cancelled at any time during operation by pressing the Sleep button.
To Use Timer (Auto Start/Stop) Feature:

- Select the Timer button. The "Timer On" indicator light illuminates to indicate the Auto Start program has initiated.

- To switch the unit off press the Timer button again and the "Timer Off" indicator light illuminates. It indicates the Auto Stop program is initiated.
- Press or hold the Up or Down arrow to change the Auto Time by 12 hour increments up to 10 hours or 1 hour increments up to 24 hours. The control counts down the remaining time.
- The selected time will register in 5 seconds and the system will automatically revert back to display the previous temperature setting or room temperature when the unit is on. (NOTE-when the unit is off there is no display)
To Check Filter Feature:
This feature is a reminder to clean the Air Filter for more efficient operation. The LED light will illuminate after 250 hours of operation.
To reset after cleaning the filter press the Check Filter button and the light will go off.

Digital Display:
This will display the set temperature in Celcius "C" or Fahrenheit "F" as well as the Auto-Timer settings. While on Fan only mode it shows the room temperature.
Error Codes
AS- Room temperature sensor error
√ Unplug the unit and plug back in.
√ If error repeats call for service.
√ NOTE- In Fan only mode it will display "LO" or "HI".
- Evaporator temperature sensor error
√ Unplug the unit and plug back in.
√ If error repeats, call for service.
HS-Electric Heating sensor error
√ Unplug the unit and plug back in.
√ If error repeats, call for service.
Air Directional Louvers:
natural_image
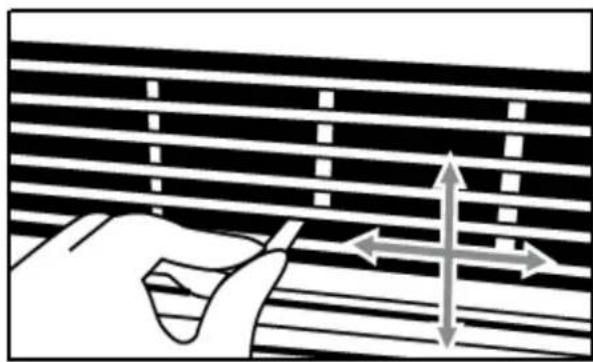
Illustration of a hand pressing down on a musical staff with directional arrows indicating motion (no text or symbols)The 4-way air directional louvers allow you to direct the air flow Up, Down, Left, and Right. To adjust the air directional louvers side to side use the center handles.
Additional Tips:
The “Cool” mode has an automatic 3 minute start delay if the unit is turned off and on too quickly. This prevents overheating of the compressor and possible circuit breaker tripping. The fan will continue to run during this time.
The control is capable of displaying the temperature in Fahrenheit or Celsius. To convert, press and hold the Up or Down
Temp and buttons at the same time for 3 seconds.
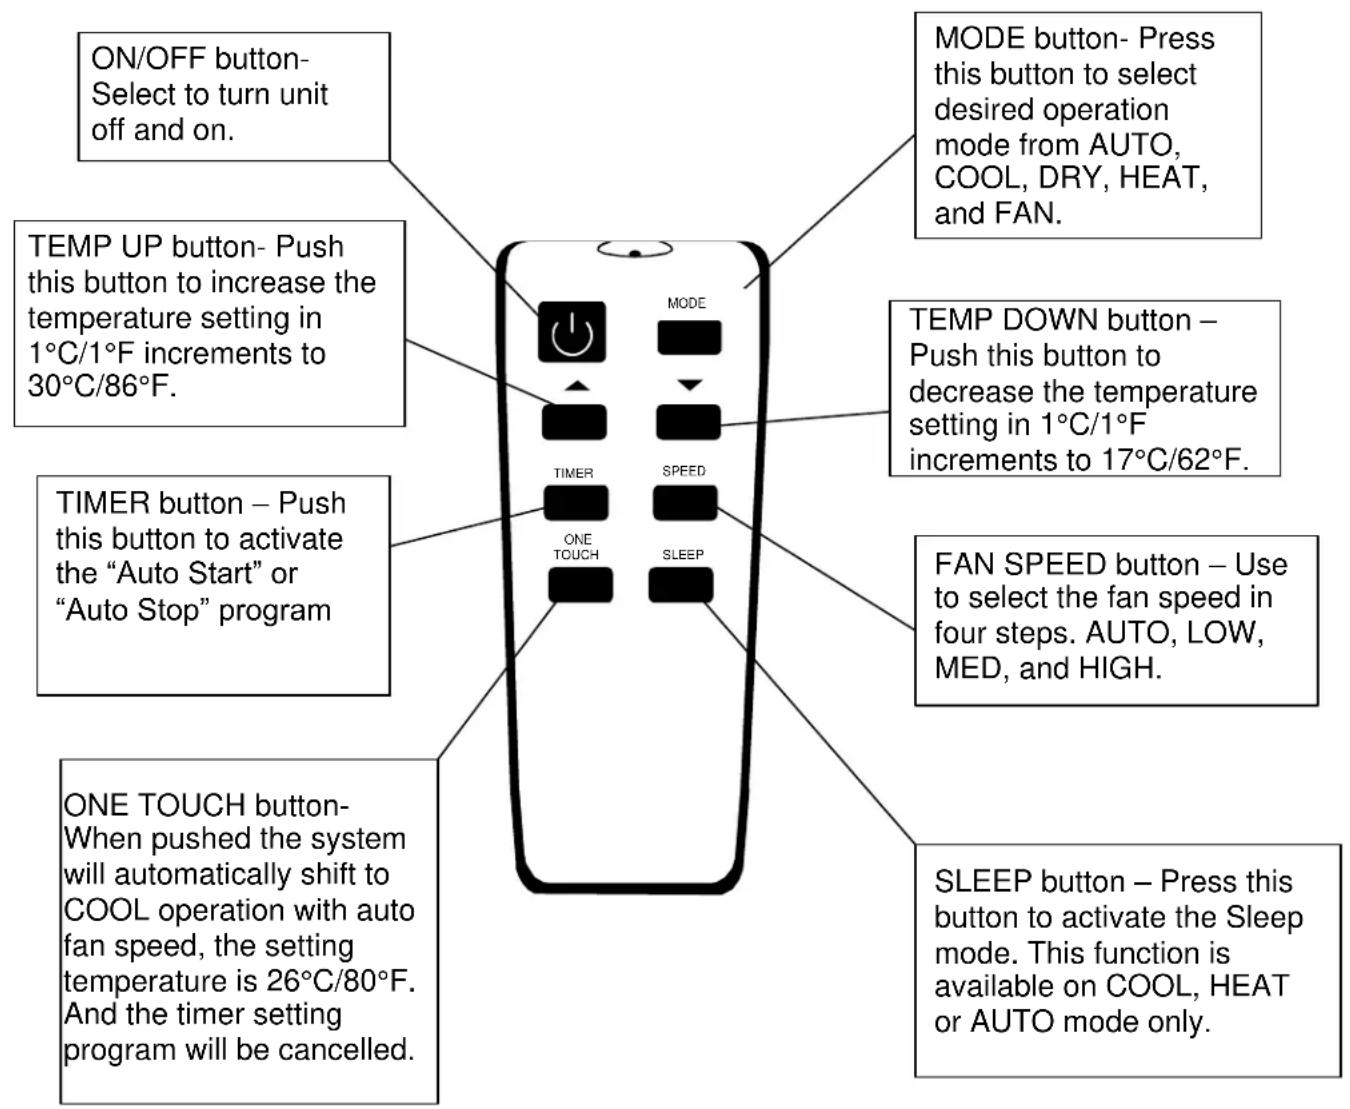
Remote Operations
Maintenance
Clean the air conditioner and filters regularly to maximize performance and efficiency, and prolong the unit's life. Be sure to always unplug the air conditioner from the power outlet before cleaning to prevent injury or damage to person or property.
Air Filter Cleaning
NOTE: Winter Storage-If you plan to store the air conditioner during the winter, remove it carefully from the window according to the installation instructions. Make sure to clean the unit thoroughly and cover it with plastic or return it to the original carton.
The air filter should be checked at least once a month to see if cleaning is necessary. Trapped particles in the filter can build up and potentially cause an accumulation of frost on the cooling coils.
- Push the vent handle to the "vent closed" position.
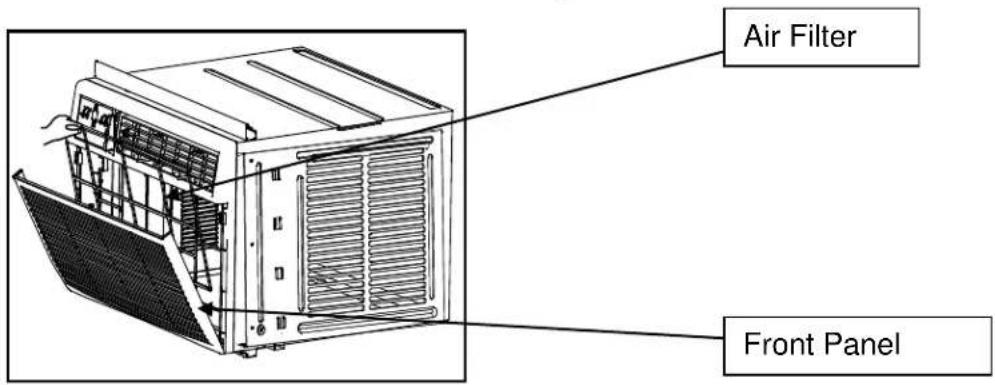
- Open the front panel.
- Grasp the filter, pull up and out.
- Wash the filter using liquid dishwashing detergent and warm water. Rinse filter thoroughly.
- Gently shake excess water from the filter. Be sure the filter is thoroughly dry before replacing.
- You also have the option of cleaning the filter with a vacuum.
Warning: Never use hot water over 40^ C ( 104^ F) to clean the air filter. Never attempt to operate the unit without the air filter.
Cabinet Cleaning
- Be sure to unplug the air conditioner to prevent injury or damage to person or property. The cabinet and front may be dusted with an oil-free cloth or wiped with a damp wash cloth. Rinse thoroughly and wipe dry.
- Never use harsh cleaners, wax, or polish on the cabinet front.
- Be sure to wring out excess water from the cloth before wiping around the controls. Excess water in or around the controls may cause damage to the air conditioner.
Normal Sounds
- High Pitched Chatter- High efficiency compressors may have a high pitched chatter during the cooling cycle.
- Sound of Rushing Air- At the front of the unit, you may hear the sound of rushing air being moved by the fan.
- Gurgle/Hiss- Gurgling or Hissing noise may be heard due to refrigerant passing through evaporator during normal operation.
- Vibration- Unit may vibrate and make noise because of poor wall or window construction or incorrect installation.
- Pinging or Switching- Droplets of water hitting condenser during normal operation may cause these sounds.
Energy Saving Guide
Read and follow the guide below to get the most efficient performance from your window air conditioner:
- Do not cover the air outlet (exhaust) while in use.
- Use the timer to operate the unit before it is needed. For example, set the timer to turn on the unit in cooling mode for 3 or more hours to cool the room before you arrive. You may want to operate the unit all day if you live in a warmer climate.
- Minimize the heat sources (direct sunlight, computers, servers, people, etc.) in the room.
- Close all windows and doors.
- Use the unit in a contained room. For example, a room with four walls and a ceiling, instead of a partitioned studio, or warehouse.
- Make sure the unit is secure with no gaps where air can escape.
- Minimize the amount of humidity in the room. For example, run the unit as a dehumidifier.
- To prolong the compressor's life, please wait at least 3 minutes before turning the unit back on after shutting it off.
- Inspect and keep the air filters clear by cleaning regularly.
- Perform routine maintenance.
Troubleshooting
Follow the troubleshooting guide below to resolve common issues.
| Issue | Possible Cause | Solution |
| My air conditioner is not functioning at all | Wall plug disconnected | Make sure the unit is plugged in. |
| LCDI power cord is tripped | Press the Reset button on the LCDI cord. | |
| House fuse blown or circuit breaker tripped. | Replace fuse with time delay type or reset circuit breaker. | |
| Control panel is off | Turn control panel ON and set to desired setting. | |
| Insufficient power | Move the unit to another outlet. Check your circuit breaker. (Refer to the rating label on the back of the unit to determine the Amperage draw). | |
| Air from unit does not feel cold enough | Room temperature below 17°C (62°F) | Cooling may not occur until room temperature rises above 17°C (62°F). |
| Temperature sensing element touching cold coil, located behind air filter | Straighten tube away from coil. | |
| Compressor shut-off by changing modes | Wait approximately 3 minutes and listen for compressor to restart when set in the COOL mode. | |
| Air conditioner is cooling but room is too warm, ice is forming on cooling coil behind decorative front. | Outdoor temperature below 18°C (64°F) | To defrost the coil, set FAN ONLY mode. |
| Air filter may be dirty | Clean Filter. Refer to maintenance section. To defrost set to FAN ONLY mode. | |
| Thermostat set too cold for night-time cooling. | To defrost the coil, set to FAN ONLY mode. Then, set temperature to higher setting. | |
| Air conditioner is cooling but room is too warm, NO ice is forming on cooling coil behind decorative front. | Dirty air filter, air restricted | Clean air filter. Refer to maintenance section. |
| Temperature is set too High | Set temperature to lower setting. | |
| Air directional louvers positioned improperly | Position louvers for better air distribution. | |
| Front of unit is blocked by drapes, blinds, furniture, etc., restricts air distribution | Clear blockage in front of unit. | |
| Air conditioner is cooling but room is too warm, NO ice is forming on cooling coil behind decorative front | Open doors, windows, etc. | Open = cold air escapes. Close doors, windows, etc. |
| Unit recently turned on in hot room | Allow additional time to remove “stored heat” from walls, ceiling, floor and furniture. | |
| Air conditioner turns on and off rapidly | Dirty air filter, air restricted | Clean air filter. |
| Outside temperature extremely hot | Set FAN speed to a higher setting to bring air past cooling coils more frequently. | |
| Outside temperature extremely hot | Set FAN speed to a higher setting to bring air past cooling coils more frequently. If too loud, set to a slower FAN setting. | |
| Air movement sound, this is normal | ||
| Window vibration, poor installation | Refer to installation instructions or check with installer. | |
| Water dripping INSIDE when unit is cooling | Improper installation | Tilt air conditioner slightly to the outside to allow water drainage. |
| Water dripping OUTSIDE when unit is cooling | Unit removing large quantity of moisture from humid room | This is normal during excessively humid days. |
| Remote not sensing | Remote control not located within range | Place remote control with 20 feet and 180 degrees radius of the front of the unit. |
| Remote control signal obstructed | Remove obstruction. | |
| Room too cold | Set temperature too low | Increase set temperature. |
Specifications
| Description of product | Window Air Conditioner and Heater |
| Model | WAC18001W |
| Voltage/Frequency | 208-230V / 60Hz |
| BTUs (Cooling / Heating) | 18,500 / 16,000 |
| Current (cooling / heating) | 7.7 / 20.0A |
| Color | White |
| Coolant | R410A: 31.75 oz. |
| Timer | 24 Hour |
| Dimensions W x D x H | 23.6" x 25.4" x 17.9" |
| Weight | 117 lbs. |
EdgeStar Limited Warranty
One (1) Year Parts & Ninety (90) Days Labor
This product is warranted by EdgeStar to be free from defective workmanship and materials, subject to any conditions set forth as follows:
WHAT IS COVERED:
LABOR: For a period of NINETY (90) DAYS from the date of original purchase, labor will be performed free of charge at an authorized EdgeStar repair facility. At its option, EdgeStar will repair the product with new or remanufactured parts, or exchange the defective product with a new, refurbished, or remanufactured product. If a product is replaced, it will carry the remaining warranty of the original product. After the ninety (90) day period, EdgeStar will no longer be responsible for labor charges incurred. All defective products and parts covered by this warranty will be repaired or replaced on a mail-in basis to an EdgeStar authorized repair facility.
PARTS: For a period of ONE (1) YEAR from the date of original purchase, EdgeStar will supply new, rebuilt, or refurbished parts free of charge. EdgeStar may request a defective part be returned in exchange for the replacement part. All replacement parts or products will be new, remanufactured, or refurbished. All products and parts replaced by EdgeStar under warranty service become the property of EdgeStar.
This warranty applies to the original purchaser only, and only covers defects in workmanship experienced during operation of the product under normal service, maintenance, and usage conditions. This warranty applies to the purchase and use of this product in residential settings within the United States of America.
WHAT IS NOT COVERED:
The following limitations apply to the coverage of this warranty. This warranty does not cover:
- Labor charges for installation, setup or training to use the product.
- Shipping damage, and any damage caused by improper packaging for shipment to an authorized service center, and any damaged caused by improper voltage or any other misuse, including abnormal service, handling, or usage.
- Cosmetic damage such as scratches and dents.
• Normal wear and tear on parts or replacement of parts designed to be replaced, e.g. filters, cartridges, batteries.
• Service trips to deliver, pick-up, or repair, install the product, or to instruct in proper usage of the product. - Damages or operating problems resulting from misuse, abuse, operation outside environmental specifications, uses contrary to instructions provided in the owner's manual, accidents, acts of God, vermin, fire, flood, improper installation, unauthorized service, maintenance negligence, unauthorized installation or modification, or commercial use.
- Labor charges incurred 91 days or more after the date of original purchase.
- The use of EdgeStar products in commercial settings.
- Optional accessories, attachments, and appearance items.
• Products that have been modified to perform outside of specifications without the prior written permission of EdgeStar. - Products lost in shipment, or theft.
- Products sold AS IS or from an unauthorized reseller.
• Products that have had their serial numbers removed or defaced. Products with serial numbers that have been invalidated.
OBTAINING WARRANTY SERVICE:
If you believe your product is defective, contact EdgeStar Customer Support for troubleshooting assistance and warranty service at 1-866-319-5473. Please have your serial number and proof of purchase available. Once an EdgeStar authorized representative has confirmed that your product is defective and eligible for warranty service, the product must be returned to an EdgeStar repair facility. The purchaser is solely responsible for prepaying all shipping related costs to and from the repair facility. EdgeStar is not responsible for damage resulting from shipper mishandling or improper packaging. Do not return a defective product to the place of purchase. Products received without a return authorization number will be refused.
THIS WARRANTY IS IN LIEU OF ANY OTHER WARRANTY, EXPRESSED OR IMPLIED, INCLUDING WITHOUT LIMITATION, ANY WARRANTY OF MERCHANTABILITY OR FITNESS FOR A PARTICULAR PURPOSE. TO THE EXTENT ANY IMPLIED WARRANTY IS REQUIRED BY LAW, IT IS LIMITED IN DURATION TO THE EXPRESS WARRANTY PERIOD ABOVE. NEITHER THE MANUFACTURER NOR ITS DISTRIBUTORS SHALL BE LIABLE FOR ANY INCIDENTAL, CONSEQUENTIAL, INDIRECT, SPECIAL, OR PUNITIVE DAMAGES OF ANY NATURE, INCLUDING WITHOUT LIMITATION, LOST REVENUES OR PROFITS, OR ANY OTHER DAMAGE WHETHER BASED IN CONTRACT, TORT, OR OTHERWISE. SOME STATES DO NOT ALLOW THE EXCLUSION OF INCIDENTAL OR CONSEQUENTIAL DAMAGES, SO THE ABOVE EXCLUSION MAY NOT APPLY TO YOU. THIS WARRANTY GIVES YOU SPECIFIC LEGAL RIGHTS. YOU MAY HAVE OTHER RIGHTS THAT VARY FROM STATE TO STATE.
Koldfront®
By
EdgeStar Products
500 N. Capital of TX Hwy, Bldg 5
Austin, TX 78746-3448
Toll Free: 1-866-319-5473
Web: http://www.edgestar.com
E-mail: service@edgestar.com
Register your product, download owner's manuals, access additional troubleshooting resources, and obtain more information on other great EdgeStar & Koldfront products on the web at: http://www.edgestar.com
Product contents and specifications may change without notice.
Copyright © 2014 Living Direct, Inc.
- Window Air Conditioner and Heater
- WAC18001W
- Important Safety Information
- Electrical Safety
- General Safety
- Operation of Safety Plug
- NOTES:
- Table of Contents
- IMPORTANT SAFETY INFORMATION......I
- PREPARATIONS FOR INSTALLATION ....3
- WINDOW INSTALLATION INSTRUCTIONS....4
- CONTROL PANEL OPERATIONS....10
- REMOTE OPERATIONSMAINTENANCE....14
- NORMAL SOUNDS....16
- ENERGY SAVING GUIDE....16
- TROUBLESHOOTING 17
- SPECIFICATIONS....19
- EDGESTAR LIMITED WARRANTY 20
- Introduction
- For Your Records:
- Preparations for Installation
- Window Installation Instructions
- Preparing the unit for window Installation
- Remove the Air Conditioner unit from Cabinet
- Attaching the Top Channel and Side Curtains
- Installing the Cabinet into the Window
- Install the Support Bracket
- Extend Side Curtains to Window Frame
- Completing Installation
- Control Panel Operations
- To Turn Unit on:
- To Change Temperature:
- To Adjust Fan Speeds:
- To Select Operating Mode:
- To operate on Auto Feature:
- To operate on Fan Only:
- To operate on Dry mode:
- To Use Energy Saver Feature:
- To Use the Sleep Feature:
- To Use Timer (Auto Start/Stop) Feature:
- To Check Filter Feature:
- Digital Display:
- Error Codes
- Air Directional Louvers:
- Additional Tips:
- Maintenance
- Air Filter Cleaning
- Cabinet Cleaning
- Normal Sounds
- Energy Saving Guide
- Troubleshooting
- EdgeStar Limited Warranty
- One (1) Year Parts & Ninety (90) Days Labor
- WHAT IS COVERED:
- WHAT IS NOT COVERED:
- OBTAINING WARRANTY SERVICE:
- Koldfront®
Brand : Koldfront
Model : WAC18001W
Category : Air-conditioner