WTC8001W - Air conditioner Koldfront - Free user manual and instructions
Find the device manual for free WTC8001W Koldfront in PDF.


| Product Type | Window Air Conditioner |
| Brand | Koldfront |
| Model | WTC8001W |
| Cooling Capacity (BTU) | 8,000 |
| Recommended Room Size | Up to 350 sq. ft. |
| Voltage | 115V, 60Hz |
| Current | 7.5 A |
| Power Consumption (Cooling) | 750 W |
| Energy Efficiency Ratio (EER) | 10.7 |
| Dimensions (W x H x D) | 21.5 x 14.5 x 17.5 in |
| Net Weight | 58 lbs |
| Modes | Cool, Fan, Dehumidify |
| Fan Speeds | 2 (High/Low) |
| Thermostat | Adjustable with remote control |
| Remote Control | Included |
| Filter Type | Washable mesh |
| Refrigerant | R-32 |
| Installation Type | Window mount (horizontal slider or double hung) |
| Special Features | Auto restart, timer, sleep mode |
| Maintenance | Clean filter every 2 weeks; store indoors in winter |
| Safety | Overheat protection, safety lock for window |
| Warranty | 1 year parts and labor |
Frequently Asked Questions - WTC8001W Koldfront
User questions about WTC8001W Koldfront
0 question about this device. Answer the ones you know or ask your own.
Ask a new question about this device
Download the instructions for your Air conditioner in PDF format for free! Find your manual WTC8001W - Koldfront and take your electronic device back in hand. On this page are published all the documents necessary for the use of your device. WTC8001W by Koldfront.
USER MANUAL WTC8001W Koldfront
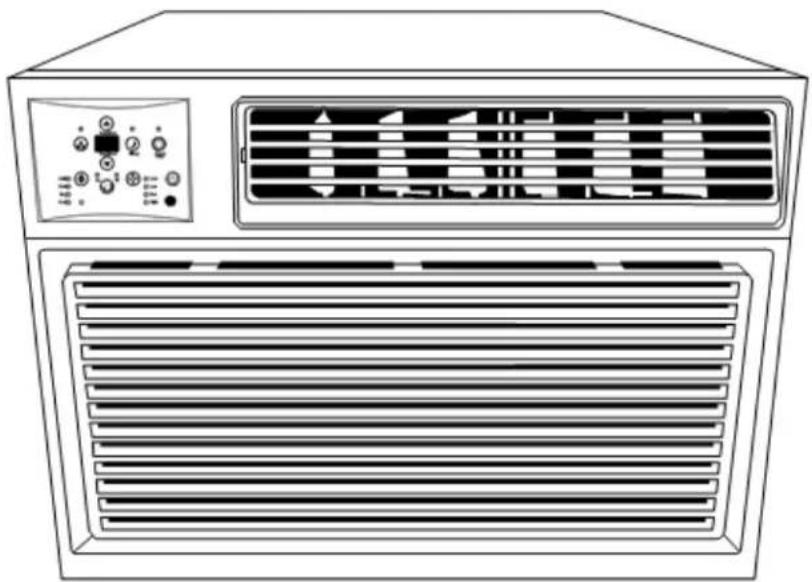
Wall Air Conditioner and Heater
natural_image
Line drawing of an air conditioner unit with ventilation grilles and control panel (no text or symbols)WTC8001W / WTC12001W
Owner's Manual
Important Safety Information
Improper handling can cause serious damage to the appliance and/or to the user. Please read the following safety information.

Warning: The water produced by the wall AC is not potable or suitable for drinking.
Do not drink the water drained from the unit as it contains contaminates and could make you sick.

Electrical Safety
- Make sure your hands are dry before operating the unit.
- Do not wet the front housing or control panel.
- Do not directly spray water on this Air Conditioner.
- Do not pull the unit by the cord.
• Always turn the unit off and unplug it from the socket when cleaning. - Unplug the unit if it is not going to be used for a long period of time.
- Do not operate the unit with a damaged or loose plug and / or socket.
- Use only the correct power supply with appropriate amperage.
- If the power cord is damaged, it must be replaced by the manufacturer, a service agent, or qualified technician.
- Do not turn the unit off or on by inserting or pulling the power plug.
- Do not modify the power cord length or share the outlet with another appliance.
- Do not use this unit with an extension cord and/or adapter plug.
- Do not use this unit near flammable gases/combustibles or close proximity to heating appliances.
- During operation do not remove any part of the outside casing.

General Safety
- Do not let people or pets sit or set an object directly in front of air flow.
- If a strange sound, smell, or smoke comes from the unit, turn it off and review the troubleshooting page of this manual.
- Stop operation and unplug unit in the event of a severe storm.
- To ensure proper air flow and intake, make sure the air vents are not obstructed.
- See instructions for cleaning air filters and how often cleaning should occur.
- Do not use strong detergents when cleaning.
- Children should be supervised when operating this unit.
- Do not allow children to play with the controls or drop any objects into the air outlets or vents.
- Do not place objects or let any person sit on top of the unit.
- Route the power cord carefully to avoid a tripping hazard.
- This unit is intended for domestic home use only. Do not use the wall air conditioner for commercial or industrial use. Any other use may invalidate the warranty.
- Use caution when unpacking and installing the unit as there may be some sharp edges.
Operation of Safety Plug
Your wall air conditioner is supplied with a Leakage-Current Detection and Interruption (LCDI) safety plug. This device provides protection to reduce the risk of fire due to arcing faults in the power supply cord. Before using your air conditioner, follow the instructions below to ensure that the LCDI plug is working properly:
- Plug the power cord to a grounded outlet.
- Press the TEST button on the LCDI plug. This should trip the plug and cut the power to the air conditioner. If the plug does not trip and you are able to turn on the unit, please contact EdgeStar support.
DO NOT USE YOUR WALL AIR CONDITIONER IF THE TEST FAILS.
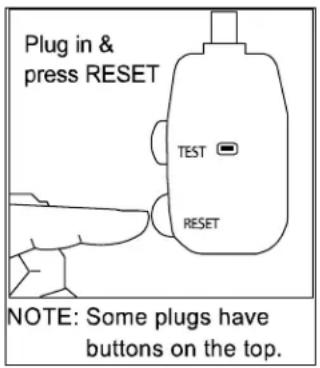
- Press the RESET button to start using your air conditioner.
NOTES:
- Always make sure the "Reset" button is pushed in for proper operation.
- The power supply cord with LCDI plug must be replaced if it fails to reset.
- Do not use the TEST and RESET buttons as an ON/OFF switch.
Electrical products should not be disposed of with household waste. Please contact your local recycling center for more information on how to recycle electronic waste.
Table of Contents
IMPORTANT SAFETY INFORMATION......I
PREPARATIONS FOR INSTALLATION ....3
WALL SLEEVE PREPARATIONS....4
ASSEMBLING THE KOLDFRONT SLEEVE 4
INSTALLATION INSTRUCTIONS....5
INSTALLING THE CABINET INTO THE WALL....5
INSTALLING THE GRILLE....5
DIRECT UNIT MOUNTING 6
COMPLETING INSTALLATION....6
COMPLETING INSTALLATION....6
CONTROL PANEL OPERATIONS ....7
REMOTE OPERATIONSTROUBLESHOOTING....11
SPECIFICATIONS....14
EDGESTAR LIMITED WARRANTY 15
Introduction
Thank you for purchasing this Koldfront by EdgeStar wall air conditioner. We are glad you chose us. We believe that your purchase of this product opens a relationship between you and EdgeStar. We will provide the customer support needed to nurture that relationship.
This manual contains important information regarding the proper installation, use and maintenance of your wall air conditioner. Following this manual will ensure that your product will work at its peak performance and efficiency.
Please save the original product packaging in case you need to safely transport your wall air conditioner.
For Your Records:
Please write down the model number and serial number below for future reference. Both numbers are located on the ratings label on the back of your unit and are needed to obtain warranty service. You may also want to staple your receipt to this manual as it is the proof of your purchase, and is also needed for service under your warranty.
Model Number:
Serial Number:
Date of Purchase:
To better serve you, please do the following before contacting customer service:
- If you received a damaged product, immediately contact the dealer that sold you the product.
- Read and follow this instruction manual carefully to help you install, use and maintain your wall air conditioner.
- Read the troubleshooting section of this manual as it will help you diagnose and solve common issues.
- Visit us on the web at http://www.edgestar.com for product guides, additional troubleshooting resources and up-to-date information. If you need service, our friendly customer service representatives are available via email at service@edgestar.com or by telephone at 1 (866) 319-5473.
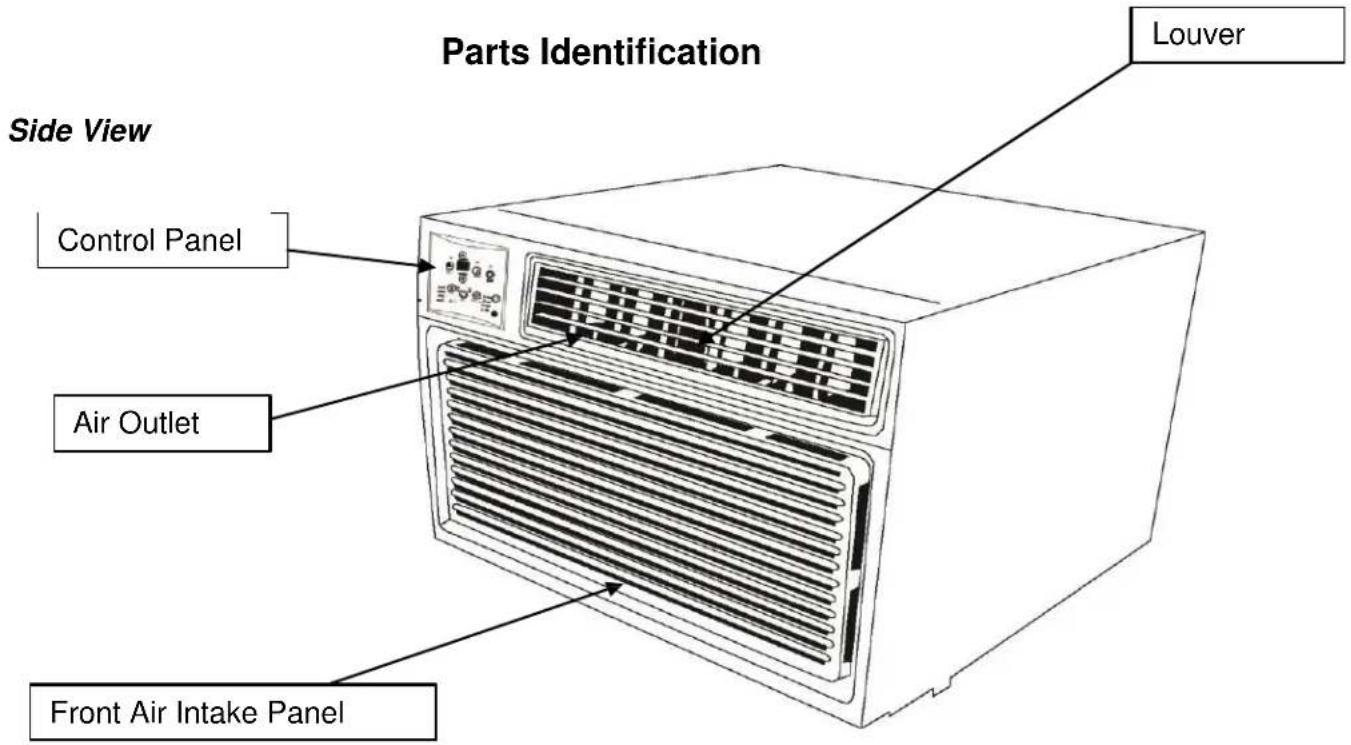
Front View
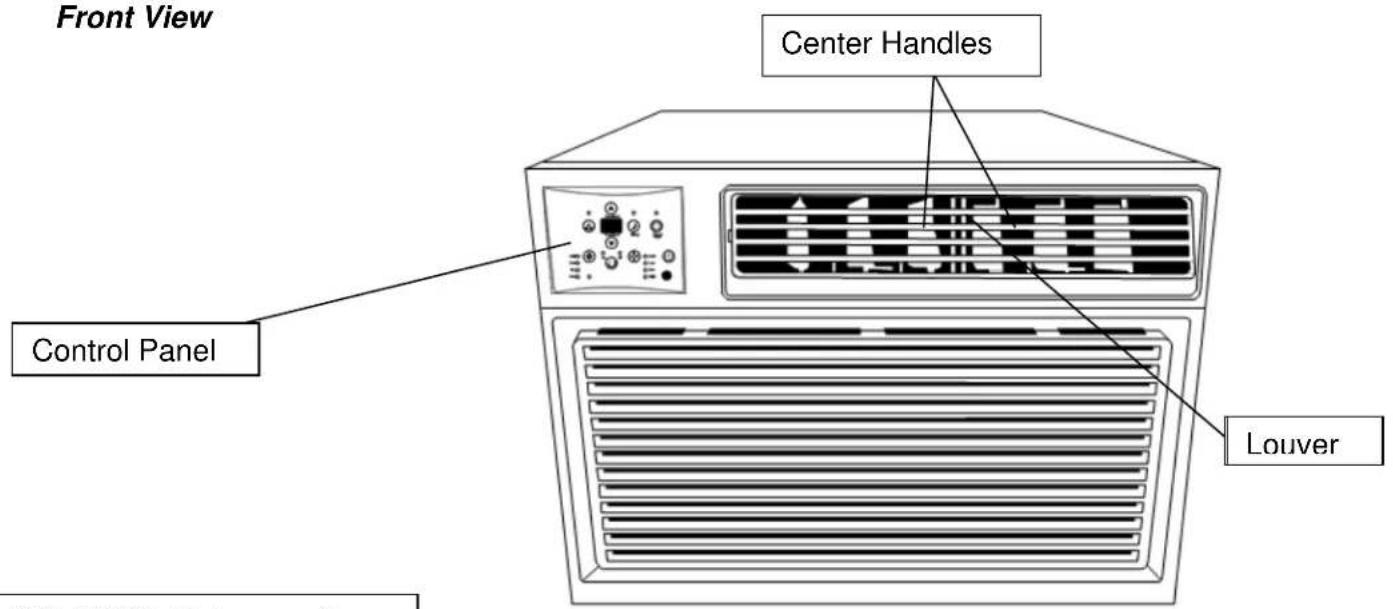
CAUTION: Make sure the drain plug is firmly installed before using the unit to prevent leaking.
Preparations for Installation
Tools Needed:
Flat Screwdriver
Phillips Screwdriver
Tape Measure
Level
Drill
NOTE: To avoid risk of injury and/or product/property damage, please take the following precautions:
- Two or more people are needed to properly handle and install.
- Use proper lifting and carrying techniques.
- Before installation, ensure the wall and sill are able to handle the weight and size of this unit.
- Wearing protective gloves will help to avoid injury from sharp edges.
Before you begin, make sure you have all the parts necessary for installation.
| Name | Spec. | Qty |
| Tapered Spacer Blocks | 17" Long | 2 |
| Centering/Support Blocks | 4 1⁄2" x 3 1⁄2" x 1 1⁄2" | 4 |
| Plastic Divider | 1⁄8 "x 4 1⁄2" x 14 1⁄2" | 2 |
| Stuffer Seal | 1" x 1 1⁄2" x 84" | 1 |
| Seal | 1" x 1 1⁄2" x 25" | 3 |
| Seal | 1" x 1 1⁄2" x 14 | 2 |
| Seal | 1" x 3⁄8" x 25" | 3 |
| Seal | 1" x 3⁄8" x 14" | 2 |
| Seal | 1" x 3⁄4" x 14" | 2 |
| Trim frame (side legs) | 2 | |
| Trim Frame (top & bottom legs) | 2 | |
| Ground Wire (green) | 1 | |
| Toothed Washer for grounding screw | 2 | |
| Grounding Screw | 1 | |
| Grille (plastic) | 1 | |
| Grille Aluminum | 1 | |
| Nuts (plastic) | 4 | |
| Screw Washer | 4 | |
| Screw | 4 |
Wall Sleeve Preparations
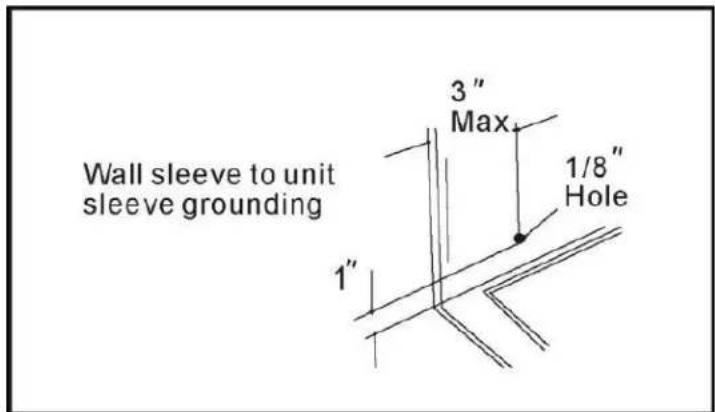
Assembling the Koldfront Sleeve
- Using the grounding screw and toothed washer, drill a 1/8" clearance hole (for the grounding screw) in a clear area about 3 inches back from the front edge of the sleeve through the left side.
- Pull the loose end of the ground wire (green) out of the front of the sleeve.
- Temporarily bend it down and around the lower edge of the sleeve.
- This ground wire will later be attached to the frame of the Air Conditioner once it is installed.
CAUTION: When installation is complete, the replacement unit MUST have a rearward slope as shown in the image to the left.
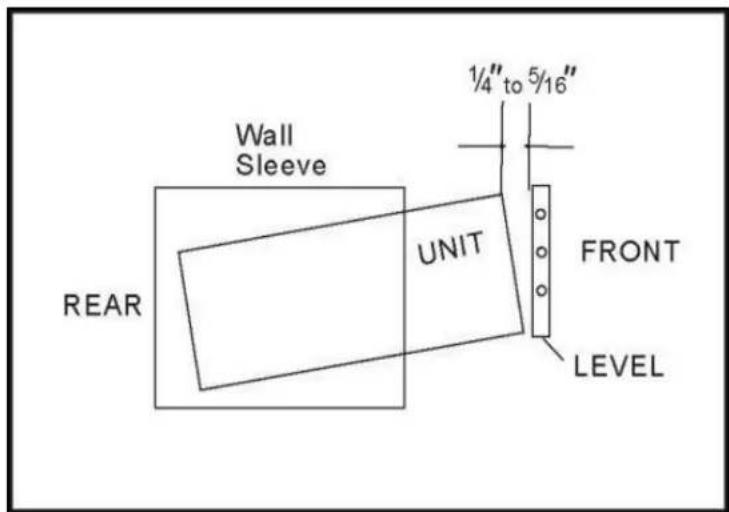
Installation Instructions
Installing the Cabinet into the Wall
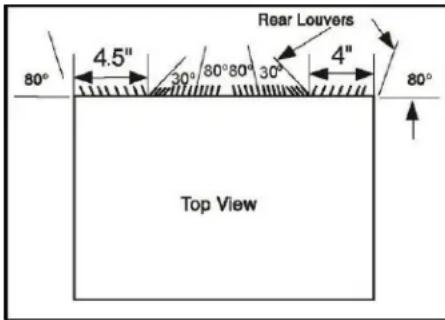
Follow the steps listed below to install the cabinet into the wall
- Remove existing rear grille as shown on Page 4 of this manual and replace with provided louvered rear panel.
- Attach (1) 1"x 38 " x 25" long seal in the center at the top of the sleeve. Remove the backing paper and press into position.
- Attach (2) 1" x 38 " x 14" seals to the left and right sides of the sleeve.
- Attach (2) 1" x 3/4" x 14" long seals vertically 4 1/2" from the left side of the sleeve .Attach the other 1" x 3/4" x 14" long seal 4" from the right side of the sleeve.
- Center unit and gently slide unit into sleeve.
- Before sliding all-the-way back, remove 2nd screw from front on left side of unit.
- Remove the plastic washer from the screw.
- Screw and attach the other end of the ground wire to the unit as shown in picture. Make sure that the toothed washer is against the cabinet.
- Slide the unit completely to the rear to ensure a good seal, making sure the ground wire does not become tangled.
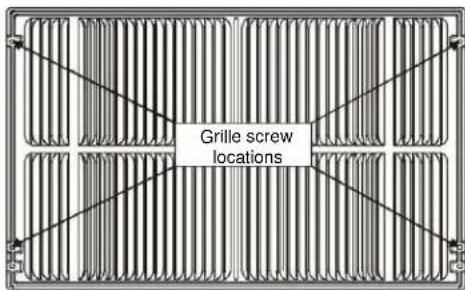
Installing the Grille
NOTE: You may need to drill holes in flange of existing sleeve to match new rear grille.
This units increased performance characteristics result from having two rear air intakes. It is very important that these installation instructions are followed so your unit can operate a maximum efficiency. If this is an existing sleeve, and there is an existing rear grille, it needs to be replaced by one that has been shipped with the unit in the accessory kit.
NOTE: For increased efficiency, utilize the provided louvered rear panel.
- Remove the existing grille.
- Place the grille included with the new air conditioner towards the rear of the sleeve.
- Mark through the hole positions.
- Drill through the sleeves flanges with a 18 " drill bit.
- Attached the new grille with self-threading screws and washers.
- It is VERY IMPORTANT that the grille is placed exactly as shown below.
- Most decorative exterior grilles may be left in place as long as the proper interior air direction grille is installed.
Direct Unit Mounting
The previous directions are the preferable way to mount the new rear grill. The unit's performance is slightly better and the possibility of draughts is reduced. As a last resort, direct mounting of the grille to the unit can be considered.
NOTE: The grille must be installed prior to inserting the unit into the sleeve.
-
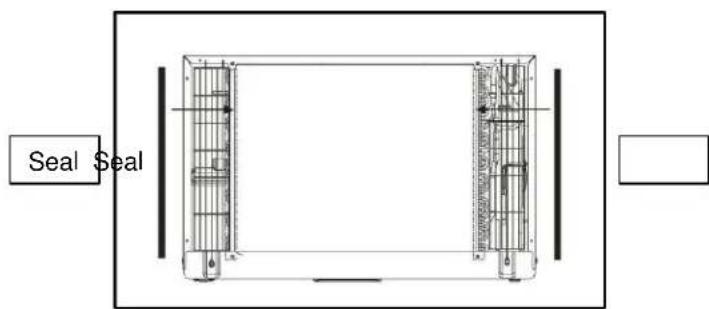
Attach the (2) seal pieces (1" x 3/8" x 14") as shown below.
-
Position the grille over the rear of the unit, making sure that:
a. The double set of screw holes are at the bottom.
b. The fins of the grill are pointed away from the unit.
-
Align the top of the grille with the top of the unit. The overhang on each side is equal.
-
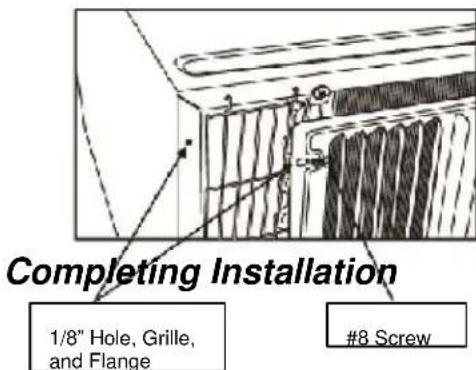
If the unit has not been pre-drilled (some models), carefully drill four 18 " holes through the grille and into the side flange of the unit approximately 1 12 " to 2" from the top and bottom as the images below. (Be careful not to drill into the copper heat exchanger coils.)
-
Install (4) #8 self- tapping screws to affix the grille to the unit.
-
Insert the unit into the sleeve.
Completing Installation
-
Install the 1" x1 1/2" x 84" long stuffer-seal between the wall-sleeve and the unit. A flat-bladed screwdriver or putty knife is recommended.
-
Assemble the trim frame by inserting top and bottom pieces into side pieces and snapping into place.
-
Pull cord through trim frame then slide over unit until flush with wall.
Control Panel Operations
flowchart
graph TD
    A["Energy Saver"] --> B["TEMP/TIMER"]
    C["Sleep"] --> D["Check Filter"]
    E["Mode"] --> F["Timer"]
    G["Fan"] --> H["On/off"]
    I["Hot"] --> J["Fan"]
    K["Auto"] --> L["Cool"]
    M["Dry"] --> N["Hot"]
    O["Temp/TIMER"] --> P["on off"]
    Q["On/off"] --> R["Low"]
    S["Max"] --> T["High"]
Using the Control Panel
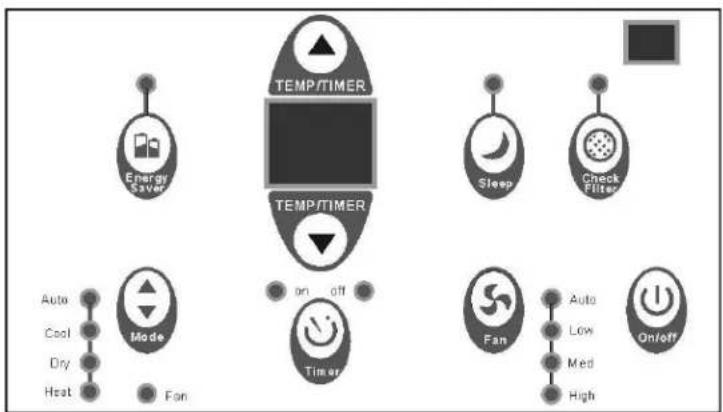
To Turn Unit on:
Press ⏻ On/Off Button
To Change Temperature:
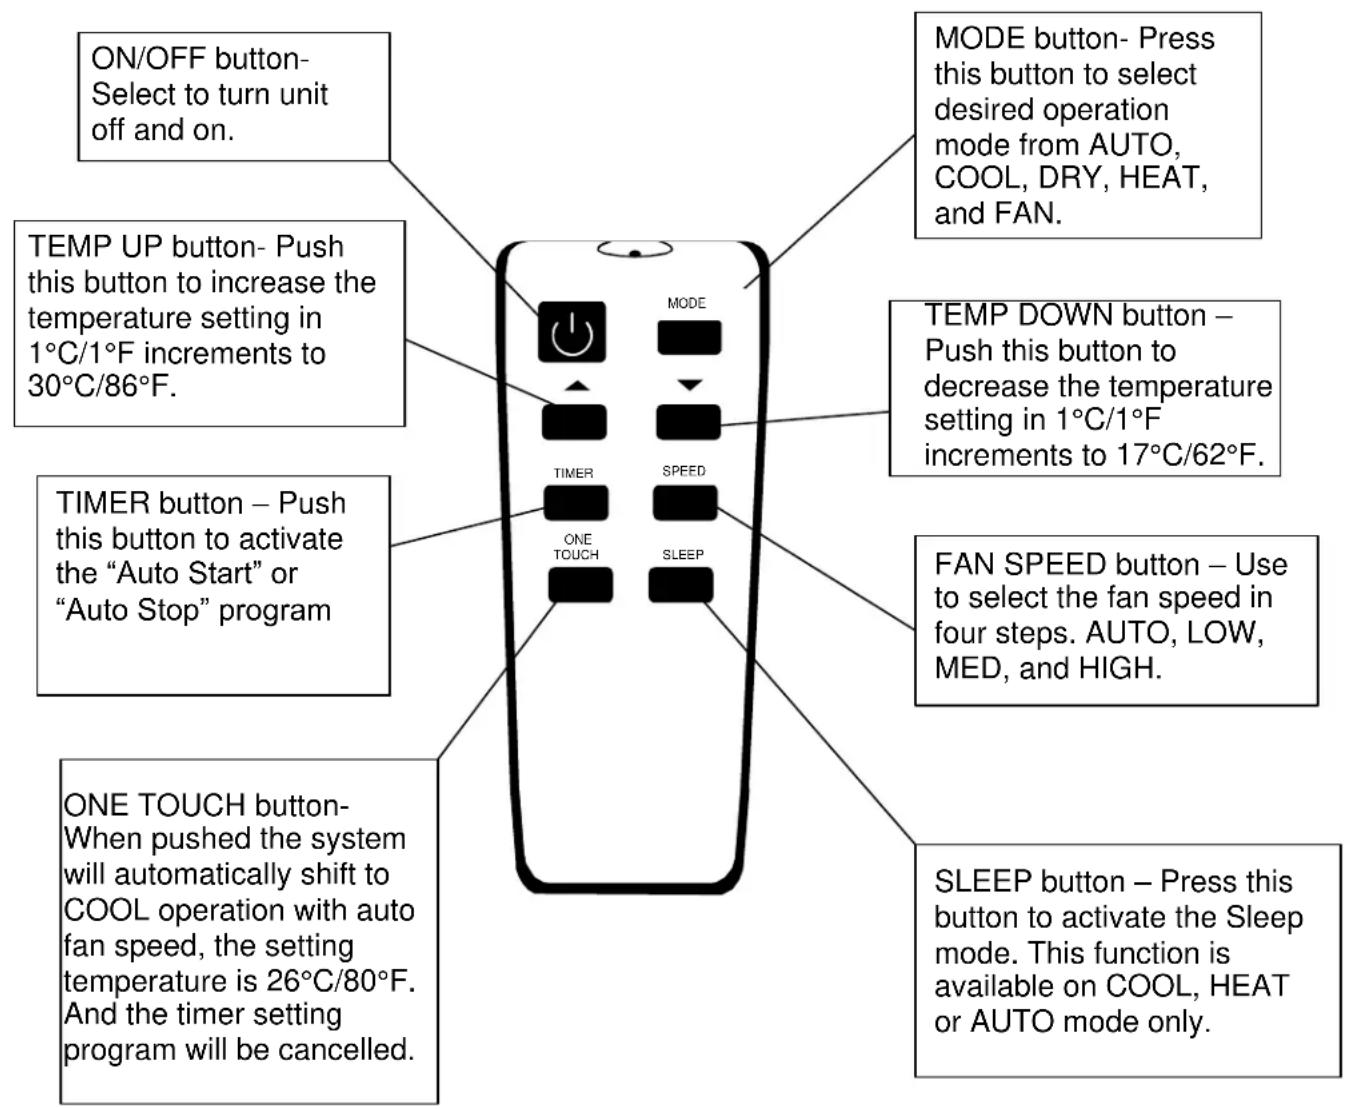
Press or hold either Up or Down button until desired temperature is seen on the digital display. This temperature will be automatically maintained anywhere between 62 °F (17°C) and 86°F (30°C). If you want the display to read the actual room temperature, see "To Operate in Fan only" section.
To Adjust Fan Speeds:

To select the speed of the fan press Fan Speed in four steps-Auto, Low, Medium, or High. Each time the button is pressed the fan speed mode is shifted. NOTE- During "Dry mode" the fan speed is controlled at Low automatically.
To Select Operating Mode:

To choose operating mode press Mode . Each time you press the button a mode is selected in a sequence that goes from Auto, Cool, Dry, Heat to Fan. The indicator light beside will be illuminated and remain on once the mode is selected.
To operate in Auto Mode:
- When you set the unit to "Auto" mode it will automatically select cooling, heating, or fan only operation depending on the temperature selected and the current room temperature.
- Once the temperature you selected is achieved the unit will automatically maintain the room temperature.
- In this mode the fan speed cannot be adjusted. It will start automatically at a speed according to the actual room temperature.
To operate in Fan Only:
- Use this function only when cooling is not desired, such as for room circulation or to exhaust air (remember to open the vent). You can choose any speed you prefer.
- During this function the display will show the actual room temperature as in the cooling mode.
• In Fan only mode, the temperature is not adjusted.
To operate in Dry Mode:
- In this mode, the air conditioner will operate as a dehumidifier. Because the conditioned space is a closed or sealed are some degree of cooling will continue.
To Use Energy Saver Feature:
This function is available on “Cool” mode, press Energy Saver. The fan will continue to run for 3 minutes after the compressor shuts off. The fan then cycles on for 2 minutes at 10 minute intervals until the room temperature is above the set temperature at which the compressor turns back on and cooling starts.
To Use the Sleep Feature:
At the time of sleep press the sleep button. In this mode the selected temperature will increase (cooling) or decrease (heating) by 2°F (1°C) 30 minutes after the mode is selected. The temperature will then increase (cooling) or decrease (heating) by another 2°F (1°C) after an additional 30 minutes. This new temperature will be maintained for 6 hours before it returns to the originally selected temperature. This ends the Sleep mode and the unit will continue to operate as originally programmed. The Sleep Mode program can be cancelled at any time during operation by again pressing the Sleep button.
To Use Timer (Auto Start/Stop) Feature:
- When the unit is on or off, press the Timer button ⏻ the "Timer On" indicator light illuminates. It indicates the Auto Start program is initiated.
-
To switch to off press the Timer button 🤕 again and the "Timer Off" indicator light illuminates. It indicates the Auto Stop program is initiated.
-
Press or hold the Up ▲ or Down ▼ to change the Auto Time by 12 hour increments up to 10 hours or 1 hour increments up to 24 hours. The control will count down the time remaining until start.
- The selected time will register in 5 seconds and the system will automatically revert back to display the previous temperature setting or room temperature when the unit is on. (NOTE-when the unit is off there is no display)
To Check Filter Feature:
This feature is a reminder to clean the Air Filter for more efficient operation. The LED light will illuminate after 250 hours of
operation. 📄 to reset after cleaning the filter press the Check Filter button and the light will go off.
Digital Display:
Displays the set temperature in "C" or "F" and the Auto-Timer settings. While on Fan only mode it shows the room temperature.
Error Codes
AS- Room temperature sensor error
√ Unplug the unit and plug back in.
√ If error repeats call for service.
√ NOTE- In Fan only mode it will display "LO" or "HI".
- Evaporator temperature sensor error
√ Unplug the unit and plug back in.
√ If error repeats, call for service.
HS-Electric Heating sensor error
√ Unplug the unit and plug back in.
√ If error repeats, call for service.
Air Directional Louvers:
natural_image
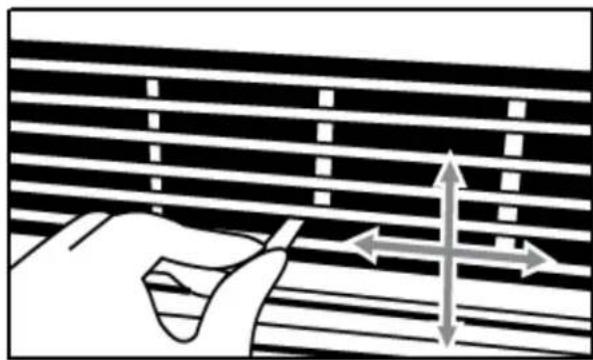
Illustration of a hand pressing down on a striped musical staff with directional arrows indicating motion (no text or symbols)The 4-way air directional louvers allow you to direct the air flow Up, Down, Left, and Right throughout the room as needed. To adjust the air directional louvers side to side use the center handles as you move side to side.
Additional Tips:
The “Cool” mode has an automatic 3 minute timed delay start if the unit is turned off and on quickly. This prevents overheating of the compressor and possible circuit breaker tripping. The fan will continue to run during this time.
The control is capable of displaying the temperature in degrees Fahrenheit or degrees Celsius. To convert from one to the other, press and hold the Up and Down Temp/Timer buttons at the same time for 3 seconds
Remote Operations
Troubleshooting
Follow the troubleshooting guide below to resolve common issues.
| Issue | Possible Cause | Solution |
| My air conditioner is not functioning at all | Wall plug disconnected | Make sure the unit is plugged in. |
| LCDI power cord is tripped | Press the Reset button on the LCDI cord. | |
| House fuse blown or circuit breaker tripped. | Replace fuse with time delay type or reset circuit breaker. | |
| Control panel is off | Turn control panel ON and set to desired setting. | |
| Insufficient power | Move the unit to another outlet. Check your circuit breaker. (Refer to the rating label on the back of the unit to determine the Amperage draw). | |
| Air from unit does not feel cold enough | Room temperature below 17°C (62°F) | Cooling may not occur until room temperature rises above 17°C (62°F). |
| Temperature sensing element touching cold coil, located behind air filter | Straighten tube away from coil. | |
| Compressor shut-off by changing modes | Wait approximately 3 minutes and listen for compressor to restart when set in the COOL mode. | |
| Air conditioner is cooling but room is too warm, ice is forming on cooling coil behind decorative front. | Outdoor temperature below 18°C (64°F) | To defrost the coil, set FAN ONLY mode. |
| Air filter may be dirty | Clean Filter. Refer to maintenance section. To defrost set to FAN ONLY mode. | |
| Thermostat set too cold for night-time cooling. | To defrost the coil, set to FAN ONLY mode. Then, set temperature to higher setting. | |
| Air conditioner is cooling but room is too warm, NO ice is forming on cooling coil behind decorative front. | Dirty air filter, air restricted | Clean air filter. Refer to maintenance section. |
| Temperature is set too High | Set temperature to lower setting. | |
| Air directional louvers positioned improperly | Position louvers for better air distribution. | |
| Front of unit is blocked by drapes, blinds, furniture, etc., restricts air distribution | Clear blockage in front of unit. | |
| Air conditioner is cooling but room is too warm, NO ice is forming on cooling coil behind decorative front | Open doors, windows, etc. | Open = cold air escapes. Close doors, windows, etc. |
| Unit recently turned on in hot room | Allow additional time to remove “stored heat” from windows, ceiling, floor and furniture. | |
| Air conditioner turns on and off rapidly | Dirty air filter, air restricted | Clean air filter. |
| Outside temperature extremely hot | Set FAN speed to a higher setting to bring air past cooling coils more frequently. | |
| Outside temperature extremely hot | Set FAN speed to a higher setting to bring air past cooling coils more frequently. If too loud, set to a slower FAN setting. | |
| Air movement sound, this is normal | ||
| Wall vibration, poor installation | Refer to installation instructions or check with installer. | |
| Water dripping INSIDE when unit is cooling | Improper installation | Tilt air conditioner slightly to the outside to allow water drainage. |
| Water dripping OUTSIDE when unit is cooling | Unit removing large quantity of moisture from humid room | This is normal during excessively humid days. |
| Remote not sensing | Remote control not located within range | Place remote control with 20 feet and 180 degrees radius of the front of the unit. |
| Remote control signal obstructed | Remove obstruction. | |
| Room too cold | Set temperature too low | Increase set temperature. |
Specifications
| Description of product | Wall Air Conditioner and Heater | Wall Air Conditioner and Heater |
| Model | WTC8001W | WTC12001W |
| Voltage/Frequency | 115V / 60Hz | 208-230 V / 60Hz |
| BTUs (cooling / heating) | 8,000 / 4,200 | 12,000 / 10,600 |
| Current (cooling / heating) | 7.8A / 12.0A | 6.6A / 15.5A |
| Color | White | White |
| Coolant | R410A: 13.76 oz. | R410A: 21.87 oz. |
| Timer | 24 Hour | 24 Hour |
| Dimensions W x D x H | 24.2" x 20.3" x 14.5" | 24.2" x 20.3" x 14.5" |
| Weight | 65 lbs. | 78.3 lbs. |
EdgeStar Limited Warranty
One (1) Year Parts & Ninety (90) Days Labor
This product is warranted by EdgeStar to be free from defective workmanship and materials, subject to any conditions set forth as follows:
WHAT IS COVERED:
LABOR: For a period of NINETY (90) DAYS from the date of original purchase, labor will be performed free of charge at an authorized EdgeStar repair facility. At its option, EdgeStar will repair the product with new or remanufactured parts, or exchange the defective product with a new, refurbished, or remanufactured product. If a product is replaced, it will carry the remaining warranty of the original product. After the ninety (90) day period, EdgeStar will no longer be responsible for labor charges incurred. All defective products and parts covered by this warranty will be repaired or replaced on a mail-in basis to an EdgeStar authorized repair facility.
PARTS: For a period of ONE (1) YEAR from the date of original purchase, EdgeStar will supply new, rebuilt, or refurbished parts free of charge. EdgeStar may request a defective part be returned in exchange for the replacement part. All replacement parts or products will be new, remanufactured, or refurbished. All products and parts replaced by EdgeStar under warranty service become the property of EdgeStar.
This warranty applies to the original purchaser only, and only covers defects in workmanship experienced during operation of the product under normal service, maintenance, and usage conditions. This warranty applies to the purchase and use of this product in residential settings within the United States of America.
WHAT IS NOT COVERED:
The following limitations apply to the coverage of this warranty. This warranty does not cover:
- Labor charges for installation, setup or training to use the product.
- Shipping damage, and any damage caused by improper packaging for shipment to an authorized service center, and any damaged caused by improper voltage or any other misuse, including abnormal service, handling, or usage.
- Cosmetic damage such as scratches and dents.
• Normal wear and tear on parts or replacement of parts designed to be replaced, e.g. filters, cartridges, batteries.
• Service trips to deliver, pick-up, or repair, install the product, or to instruct in proper usage of the product.
- Damages or operating problems resulting from misuse, abuse, operation outside environmental specifications, uses contrary to instructions provided in the owner's manual, accidents, acts of God, vermin, fire, flood, improper installation, unauthorized service, maintenance negligence, unauthorized installation or modification, or commercial use.
- Labor charges incurred 91 days or more after the date of original purchase.
- The use of EdgeStar products in commercial settings.
- Optional accessories, attachments, and appearance items.
• Products that have been modified to perform outside of specifications without the prior written permission of EdgeStar.
- Products lost in shipment, or theft.
- Products sold AS IS or from an unauthorized reseller.
• Products that have had their serial numbers removed or defaced. Products with serial numbers that have been invalidated.
OBTAINING WARRANTY SERVICE:
If you believe your product is defective, contact EdgeStar Customer Support for troubleshooting assistance and warranty service at 1-866-319-5473. Please have your serial number and proof of purchase available. Once an EdgeStar authorized representative has confirmed that your product is defective and eligible for warranty service, the product must be returned to an EdgeStar repair facility. The purchaser is solely responsible for prepaying all shipping related costs to and from the repair facility. EdgeStar is not responsible for damage resulting from shipper mishandling or improper packaging. Do not return a defective product to the place of purchase. Products received without a return authorization number will be refused.
THIS WARRANTY IS IN LIEU OF ANY OTHER WARRANTY, EXPRESSED OR IMPLIED, INCLUDING WITHOUT LIMITATION, ANY WARRANTY OF MERCHANTABILITY OR FITNESS FOR A PARTICULAR PURPOSE. TO THE EXTENT ANY IMPLIED WARRANTY IS REQUIRED BY LAW, IT IS LIMITED IN DURATION TO THE EXPRESS WARRANTY PERIOD ABOVE. NEITHER THE MANUFACTURER NOR ITS DISTRIBUTORS SHALL BE LIABLE FOR ANY INCIDENTAL, CONSEQUENTIAL, INDIRECT, SPECIAL, OR PUNITIVE DAMAGES OF ANY NATURE, INCLUDING WITHOUT LIMITATION, LOST REVENUES OR PROFITS, OR ANY OTHER DAMAGE WHETHER BASED IN CONTRACT, TORT, OR OTHERWISE. SOME STATES DO NOT ALLOW THE EXCLUSION OF INCIDENTAL OR CONSEQUENTIAL DAMAGES, SO THE ABOVE EXCLUSION MAY NOT APPLY TO YOU. THIS WARRANTY GIVES YOU SPECIFIC LEGAL RIGHTS. YOU MAY HAVE OTHER RIGHTS THAT VARY FROM STATE TO STATE.
Koldfront®
By
EdgeStar Products
500 N. Capital of TX Hwy, Bldg 5
Austin, TX 78746-3448
Toll Free: 1-866-319-5473
Web: http://www.edgestar.com
E-mail: service@edgestar.com
Register your product, download owner's manuals, access additional troubleshooting resources, and obtain more information on other great EdgeStar & Koldfront products on the web at: http://www.edgestar.com
Product contents and specifications may change without notice.
Copyright © 2014 Living Direct, Inc.
- Wall Air Conditioner and Heater
- Important Safety Information
- Electrical Safety
- General Safety
- Operation of Safety Plug
- NOTES:
- Table of Contents
- IMPORTANT SAFETY INFORMATION......I
- PREPARATIONS FOR INSTALLATION ....3
- WALL SLEEVE PREPARATIONS....4
- INSTALLATION INSTRUCTIONS....5
- CONTROL PANEL OPERATIONS ....7
- REMOTE OPERATIONSTROUBLESHOOTING....11
- SPECIFICATIONS....14
- EDGESTAR LIMITED WARRANTY 15
- Introduction
- For Your Records:
- Preparations for Installation
- Wall Sleeve Preparations
- Assembling the Koldfront Sleeve
- Installation Instructions
- Installing the Cabinet into the Wall
- Installing the Grille
- Direct Unit Mounting
- Completing Installation
- Control Panel Operations
- To Turn Unit on:
- To Change Temperature:
- To Adjust Fan Speeds:
- To Select Operating Mode:
- To operate in Auto Mode:
- To operate in Fan Only:
- To operate in Dry Mode:
- To Use Energy Saver Feature:
- To Use the Sleep Feature:
- To Use Timer (Auto Start/Stop) Feature:
- To Check Filter Feature:
- Digital Display:
- Error Codes
- AS- Room temperature sensor error
- - Evaporator temperature sensor error
- HS-Electric Heating sensor error
- Air Directional Louvers:
- Additional Tips:
- Troubleshooting
- EdgeStar Limited Warranty
- One (1) Year Parts & Ninety (90) Days Labor
- WHAT IS COVERED:
- WHAT IS NOT COVERED:
- OBTAINING WARRANTY SERVICE:
- Koldfront®
Brand : Koldfront
Model : WTC8001W
Category : Air conditioner