
HIS 3010 - Dishwasher HOTPOINT - Free user manual and instructions
Find the device manual for free HIS 3010 HOTPOINT in PDF.


| Product Type | Built-in Dishwasher |
| Brand | Hotpoint |
| Model | HIS 3010 |
| Width | 60 cm (standard) |
| Height | 85 cm (adjustable) |
| Depth | 60 cm |
| Weight | Approximately 45 kg |
| Power Supply | 220-240 V / 50 Hz |
| Energy Efficiency Class | E (EU energy label) |
| Water Consumption (Eco cycle) | 12.0 litres/cycle |
| Energy Consumption (Eco cycle) | 1.04 kWh/cycle |
| Number of Place Settings | 10 (standard) |
| Number of Programs | 5: Eco, Intensive, Mixed, Fast Wash, Delicate |
| Noise Level | 49 dB(A) (estimated) |
| Water Softener | Yes, with adjustable hardness setting |
| Rinse Aid Dispenser | Yes, adjustable dosage |
| Salt Reservoir Capacity | Approximately 1 kg |
| Filter System | 3-piece filter assembly (cylindrical, cup, plate) |
| Upper Rack Height Adjustment | Yes, two positions |
| Foldable Flaps on Upper Rack | Yes, for wine glasses and small items |
| Cutlery Basket | Removable with top grille |
| Safety Features | Child lock not specified; door open detection; auto power-off |
| Maintenance | Clean filters monthly; check spray arms; run high-temp cycle monthly |
Frequently Asked Questions - HIS 3010 HOTPOINT
User questions about HIS 3010 HOTPOINT
0 question about this device. Answer the ones you know or ask your own.
Ask a new question about this device
Download the instructions for your Dishwasher in PDF format for free! Find your manual HIS 3010 - HOTPOINT and take your electronic device back in hand. On this page are published all the documents necessary for the use of your device. HIS 3010 by HOTPOINT.
USER MANUAL HIS 3010 HOTPOINT
THANK YOU FOR BUYING A HOTPOINT ARISTON PRODUCT.
In order to receive a more complete assistance, please register your appliance on: www.hotpoint.eu/register

You can download the Safety Instructions and the User Manual, by visiting our website docs.hotpoint.eu and following the Instructions on the back of this booklet.
Before using the appliance carefully read Safety Instructions guide.
PRODUCT DESCRIPTION
APPLIANCE
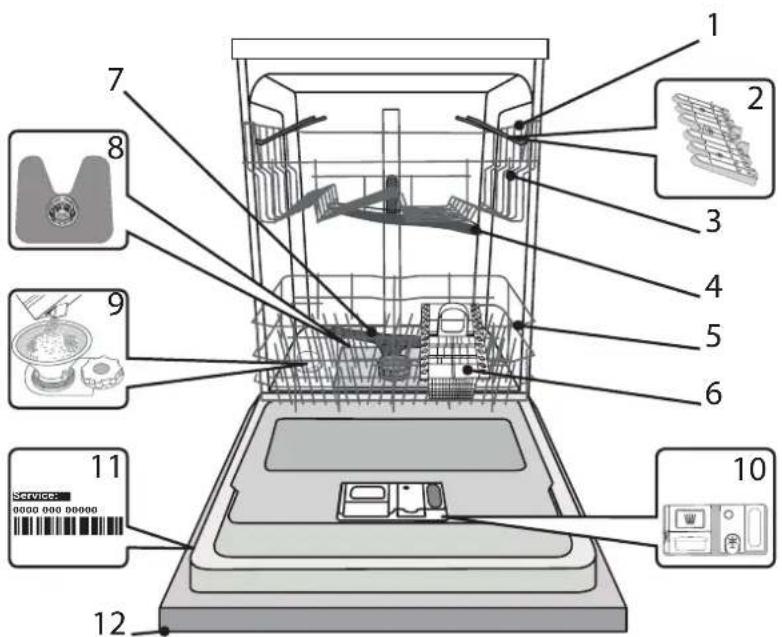
- Upper rack
- Foldable flaps
- Upper rack height adjuster
- Upper spray arm
- Lower rack
- Cutlery basket
- Lower spray arm
- Filter Assembly
- Salt reservoir
- Detergent and Rinse Aid dispensers
- Rating plate
- Control panel
CONTROL PANEL

- ON-OFF / Reset button with indicator light
- Program selection button
- Salt refill indicator light
- Rinse Aid refill indicator light
- Program indicator lights
- START/Pause button with indicator light
FIRST TIME USE
SALT, RINSE AID AND DETERGENT
ADVICE REGARDING THE FIRST TIME USE
After installation, remove the stoppers from the racks and the retaining elastic elements from the upper rack.
FILLING THE SALT RESERVOIR
The use of salt prevents the formation of LIMESCALE on the dishes and on the machine's functional components.
- It is mandatory that THE SALT RESERVOIR NEVER BE EMPTY.
- It is important to set the water hardness.
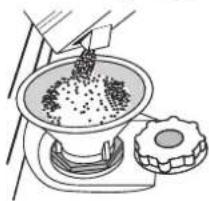
The salt reservoir is located in the lower part of the dishwasher (see PRODUCT DESCRIPTION) and must be filled when the SALT REFILL indicator light the control panel is lit..
natural_image
Illustration of a hand pouring granular material into a bowl on a stand next to a sliced seed or squash (no text or symbols)- Remove the lower rack and unscrew the reservoir cap (anticlockwise).
- Only the first time you do this: fill the salt reservoir with water.
- Position the funnel (see figure) and fill the salt reservoir right up to its edge (approximately 1 kg); it is not unusual for a little water to leak out.
- Remove the funnel and wipe any salt residue away from the opening.
Make sure the cap is screwed on tightly, so that no detergent can get into the container during the wash program (this could damage the water softener beyond repair).
Whenever you need to add salt, it is mandatory to complete the procedure before the beginning of the washing cycle to avoid corrosion.
SETTING THE WATER HARDNESS
To allow the water softener to work in a perfect way, it is essential that the water hardness setting is based on the actual water hardness in your house. This information can be obtained from your local water supplier.
The factory sets the default value for the water hardness
- Switch on the appliance by pressing the ON/OFF button.
- Switch off the appliance by pressing the ON/OFF button.
- Hold down button P for 5 seconds, until you hear a beep.
- Switch on the appliance by pressing the ON/OFF button.
- The program indicator light of the current set level flashes.
- Press button P to select the desired hardness level (see WATER HARDNESS TABLE).
| Water Hardness Table | ||||
| Level | °dHGerman degrees | °fHFrench degrees | °ClarkEnglish degrees | |
| 1 | Soft | 0 - 6 | 0 - 10 | 0 - 7 |
| 2 | Medium | 7 - 11 | 11 - 20 | 8 - 14 |
| 3 | Average | 12 - 16 | 21 - 29 | 15 - 20 |
| 4 | Hard | 17 - 34 | 30 - 60 | 21 - 42 |
| 5 | Very hard | 35 - 50 | 61 - 90 | 43 - 62 |
- Switch off the appliance by pressing the ON/OFF button.
Setting is complete!
As soon as this procedure is complete, run a program without loading.
Only use salt that has been specifically designed for dishwashers.
After the salt has been poured into the machine, the SALT REFILL indicator light switches off.
If the salt container is not filled, the water softener and the heating element may be damaged as a result of limescale accumulation.
Using of Salt is recommended with any type of dishwasher detergent.
FILLING THE RINSE AID DISPENSER
Rinse aid makes dish DRYING easier. The rinse aid dispenser A should be filled when the RINSE AID REFILL ✦ indicator light in the control panel is lit.
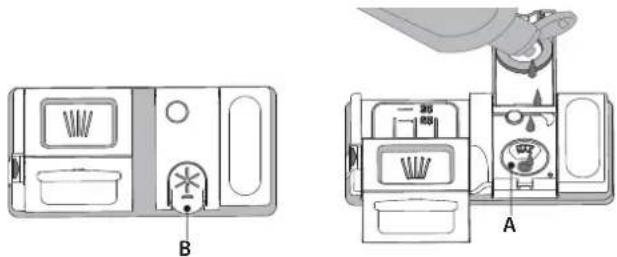
- Open the dispenser B by pressing and pulling up the tab on the lid.
- Pour in the rinse aid (max.110 ml), making sure it does not overflow from the dispenser. If this happens, clean the spill immediately with a dry cloth.
- Press the lid down until you hear a click to close it.
NEVER pour the rinse aid directly into the appliance tub.
ADJUSTING THE DOSAGE OF RINSE AID
If you are not completely satisfied with the drying results, you can adjust the quantity of rinse aid used.
- Switch the dishwasher on using the ON/OFF button.
- Switch it off using the ON/OFF button.
- Press button P three times - a beep will be heard.
- Switch it on using the ON/OFF button.
• The program indicator light of the current set level flashes. - Press button P to select the level of rinse aid quantity to be supplied.
- Switch it off using the ON/OFF button
Setting is complete!
If the rinse aid level is set to 1 (ECO), no rinse aid will be supplied.
The LOW RINSE AID indicator light will not be lit if you run out of rinse aid. A maximum of 5 levels can be set according to the dishwasher model. The factory setting is specific to the model, please follow instruction above to check this for your machine.
- If you see bluish streaks on the dishes, set a low number (2-3).
- If there are drops of water or limescale marks on the dishes, set a mid-range number (4-5).
FILLING THE DETERGENT DISPENSER
To open the detergent dispenser use the opening device C. Introduce the detergent into the dry dispenser D only. Place the amount of detergent for pre-washing directly inside the tub.
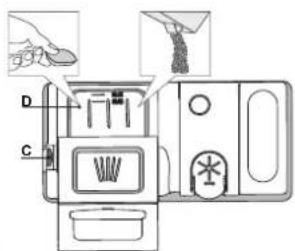
- When measuring out the detergent refer to the mentioned earlier information to add the proper quantity. Inside the dispenser D there are indications to help the detergent dosing.
- Remove detergent residues from the edges of the dispenser and close the cover until it clicks.
- Close the lid of the detergent dispenser by pulling it up until the closing device is secured in place.
The detergent dispenser automatically opens up at the right time according to the program.
Usage of detergent not designed for dishwashers may cause malfunction or damage to the appliance.
PROGRAMS TABLE
| Program | Drying phase | Duration of wash program (h:min) ^a) | Water consumption (litres/cycle) | Energy consumption (kWh/cycle) | |
| 1. Eco 50° |  | √ | 3:20 12.0 1.04 | ||
2. Intensive 65° 2:30 16,  | √ | ||||
3. Mixed 55° 2:25 16.0 1..  | √ | ||||
| 4. Fast Wash |  50° 50° | - | 1:00 11.5 1,10 | ||
| 5. Delicate 45° |  | √ | 1:30 11,5 1.10 | ||
ECO program data is measured under laboratory conditions according to European Standard EN 60436:2020.
Note for Test Laboratories:
For information on comparative EN testing conditions, please send an email to the following address: dw_test_support@whirlpool.com
Pre-treatment of the dishes is not needed before any of the programs.
*) Values given for programmes other than the eco programme are indicative only. The actual time may vary depending on many factors such as temperature and pressure of the incoming water, room temperature, amount of detergent, quantity and type of load, load balancing, additional selected options and sensor calibration. The sensor calibration can increase program duration up to 20 min.
PROGRAMS DESCRIPTION
Instructions on wash cycle selection.
1 ECO
Eco program is suitable to clean normally soiled tableware, that for this use, it is the most efficient program in terms of its combined energy and water consumption, and that it is used to assess compliance with the EU Ecodesign legislation.
2 INTENSIVE
Program recommended for heavily soiled crockery, especially suitable for pans and saucepans (not to be used for delicate items).
3 MIXED
Mixed soil. For normally soiled dishes with dried food residues.
4 FAST WASH
Program for limited quantity of normally soiled crockery. Ensures optimal cleaning performance in shorter time.
5 DELICATE
Program for delicate items, which are more sensitive to high temperatures, for example glasses and cups.
LOADING THE RACKS
UPPER RACK
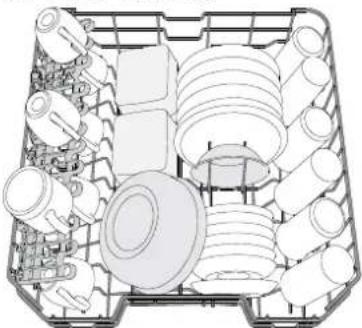
natural_image
Top-down technical drawing of a mechanical assembly with multiple components (no text or labels)(loading example for the upper rack)
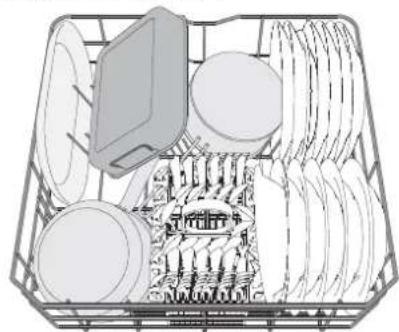
Load delicate and light dishes: glasses, cups, saucers, low salad bowls.
ADJUSTING THE HEIGHT OF THE UPPER RACK
The height of the upper basket can be adjusted: high position to place bulky crockery in the lower basket and low position to make the most of the tip-up compartments by creating more space upwards.
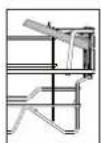
The upper rack is equipped with a Upper Rack height adjuster (see figure), without pressing the levers, lift it up by simply holding the rack sides, as soon as the rack is stable in its upper position. To restore to the lower position, press the levers (A) at the sides of the rack and move the basket downwards.
We strongly recommend that you do not adjust the height of the rack when it is loaded.
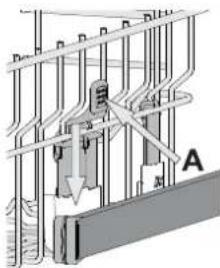
NEVER raise or lower the basket on one side only.
FOLDABLE FLAPS WITH ADJUSTABLE POSITION
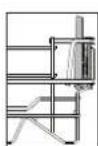
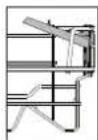
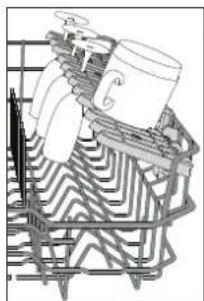
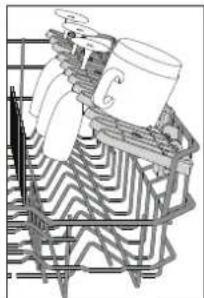
The side foldable flaps can be fold or unfold to optimize the arrangement of crockery inside the rack.
Wine glasses can be placed safely in the foldable flaps by inserting the stem of each glass into the corresponding slots.
Depending on the model:
- to unfold the flaps there is needed to slide it up and rotate or release it from the snaps and pull it down.
- to fold the flaps there is needed to rotate it and slide flaps down or pull it up and attach flaps to the snaps.
natural_image
Illustration of a person in a container with wavy patterned background (no text or symbols)LOWER RACK
natural_image
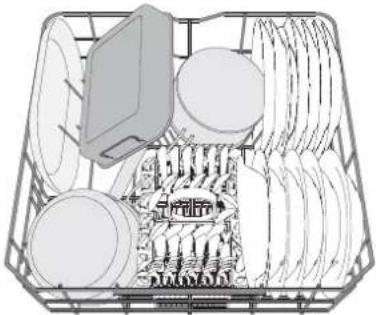
Diagram of a shopping basket with coins and a computer monitor, showing internal components (no text or symbols)(loading example for the lower rack)
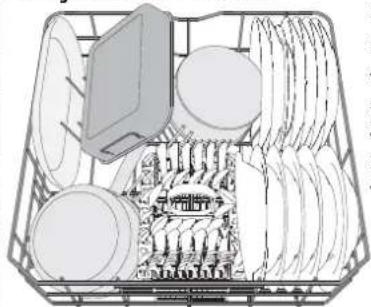
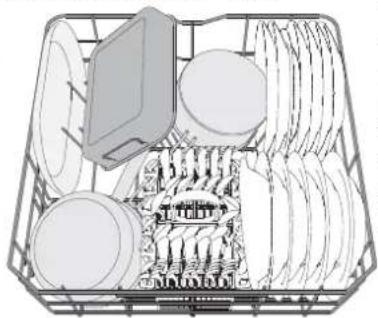
For pots, lids, plates, salad bowls, cutlery etc... Large plates and lids should ideally be placed at the sides to avoid interferences with the spray arm.
CUTLERY BASKET
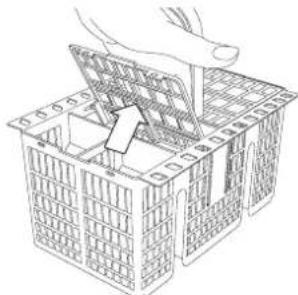
The basket is equipped with top grilles for improved cutlery arrangement. The cutlery basket should be positioned only at the front of the lower rack.
natural_image
Line drawing of a hand placing a card into a grid-patterned basket (no text or symbols)Knives and other utensils with sharp edges must be placed in the cutlery basket with the points facing downwards or they must be positioned horizontally in the tip-up compartments on the upper rack.
DAILY USE
1. CHECK WATER CONNECTION
Check that the dishwasher is connected to the water supply and that the tap is open.
2. SWITCH ON THE DISHWASHER
Open the door and press the ON/OFF button.
3. LOAD THE RACKS (see LOADING THE RACKS)
4. FILLING THE DETERGENT DISPENSER
5. CHOOSE THE PROGRAM AND CUSTOMISE THE CYCLE
Select the most appropriate program in accordance with the type of crockery and its soiling level (see PROGRAMS DESCRIPTION) by pressing the P button.
6. START
Start the wash cycle by pressing START/Pause button (led is lit) and closing the door within 4 sec. When the program starts you hear a single beep. If the door was not closed within 4sec., the alarm sound will be played. In this case, open the door, press START/Pause button and close the door again within 4 sec.
7. END OF WASH CYCLE
The end of the wash cycle is indicated by beeps and by the flashing of the indicator light of the selected program. Open the door and switch off the appliance by pressing the ON/OFF button.
Wait for a few minutes before removing the crockery - to avoid burns. Unload the racks, beginning with the lower one.
The machine will switch off automatically during certain extended periods of inactivity, in order to minimise electricity consumption. If the crockery is only lightly soiled or if it has been rinsed with water before being placed in the dishwasher, reduce the amount of detergent used accordingly.
MODIFYING A RUNNING PROGRAM
If a wrong program was selected, it is possible to change it, provided that it has only just begun: open the door, press and hold the ON/OFF button, the machine will switch off.
Switch the machine back on using the ON/OFF button and select the new wash cycle and any desired options; Start the wash cycle by pressing START/Pause button and closing the door within 4 sec.
ADDING EXTRA CROCKERY
Without switching off the machine, open the door (START/Pause led starts blinking) (be ware of HOT steam!) and place the crockery inside the dishwasher. Press the START/Pause button and close the door within 4 sec., the cycle will resume from the point at which it was interrupted.
ACCIDENTAL INTERRUPTIONS
If the door is opened during the wash cycle, or if there is a power cut, the cycle stops. Press the START/Pause button and close the door within 4 sec., the cycle will resume from the point at which it was interrupted.
ADVICE AND TIPS
TIPS
Before loading the baskets, remove all food residues from the crockery and empty the glasses. You do not need to rinse beforehand under running water.
Arrange the crockery so that it is held in place firmly and does not tip over; and arrange the containers with the openings facing downwards and the concave/convex parts placed obliquely, thus allowing the water to reach every surface and flow freely.
Warning: lids, handles, trays and frying pans do not prevent the sprayer arms from rotating.
Place any small items in the cutlery basket.
Very soiled dishes and pans should be placed in the lower basket because in this sector the water sprays are stronger and allow a higher washing performance.
After loading the appliance, make sure that the sprayer arms can rotate freely.
UNSUITABLE CROCKERY
- Wooden crockery and cutlery.
- Delicate decorated glasses, artistic handicraft and antique crockery. Their decorations are not resistant.
- Parts in synthetic material which do not withstand high temperatures.
• Copper and tin crockery. - Crockery soiled with ash, wax, lubricating grease or ink.
The colours of glass decorations and aluminium/silver pieces can change and fade during the washing process. Some types of glass (e.g. crystal objects) can become opaque after a number of wash cycles too.
DAMAGE TO GLASS AND CROCKERY
- Only use glasses and porcelain guaranteed by the manufacturer as dishwasher safe.
- Use a delicate detergent suitable for crockery
- Collect glasses and cutlery from the dishwasher as soon as the wash cycle is over.
TIPS ON ENERGY SAVING
- When the household dishwasher is used according to the manufacturer's instructions, washing tableware in a dishwasher usually consumes less energy and water than hand dishwashing.
- In order to maximize dishwasher efficiency it is recommended to initiate the wash cycle once dishwasher is fully loaded. Loading the household dishwasher up to the capacity indicated by the manufacturer will contribute to energy and water savings. Information on correct loading of tableware can be found in Loading chapter. In case of partial loading it is recommended to use dedicated wash options if available (Half load/ Zone Wash, Multizone), filling up only selected racks. Incorrect loading or overloading the dishwasher may increase resources usage (such as water, energy and time, as well as increase noise level), reducing cleaning and drying performance.
- Manual pre-rinsing of tableware items leads to increased water and energy consumption and is not recommended.
HYGIENE
To avoid odour and sediment which can be accumulated in the dishwasher please run a high temperature program at least one a month. Use a tea spoon of detergent and run it without the loading to clean your appliance.
CARE AND MAINTENANCE
CLEANING THE FILTER ASSEMBLY
Regularly clean the filter assembly so that the filters do not clog and that the waste water flows away correctly.
Using dishwasher with clogged filters or foreign objects inside filtration system or sprayarms may cause unit malfunction resulting in lose of performance, noisy work or higher resources usage.
The filter assembly consists of three filters which remove food residues from the washing water and then recirculate the water.
The dishwasher must not be used without filters or if the filter is loose.
At least once per month or after each 30 cycles, check the filter assembly and if necessary clean it thoroughly under running water, using a non-metallic brush and following the instructions below:
- Turn the cylindrical filter A in an anti-clockwise direction and pull it out (Fig 1).
- Remove the cup filter B by exerting a slight pressure on the side flaps (Fig 2).
- Slide out the stainless-steel plate filter C (Fig 3).
- In case you find foreign objects (such as broken glass, porcelain, bones, fruit seeds etc.) please remove them carefully.
- Inspect the trap and remove any food residues. NEVER REMOVE the wash-cycle pump protection (black detail) (Fig 4).
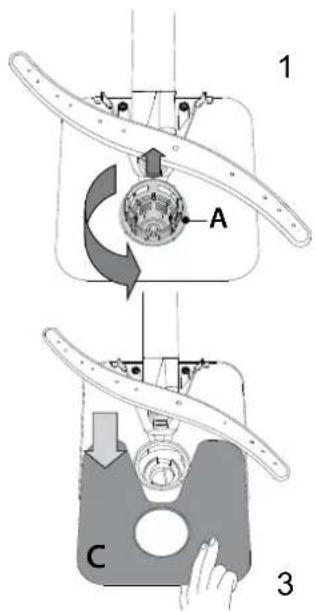
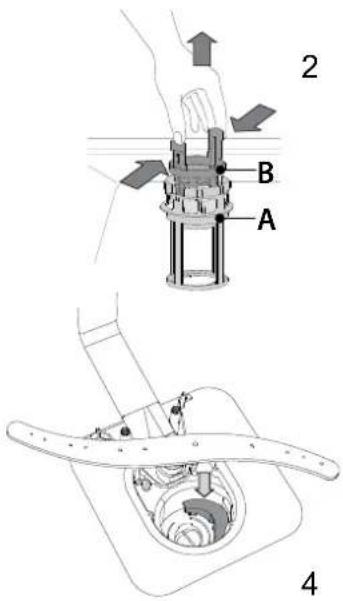
After cleaning the filters, re-place the filter assembly and fix it in position correctly; this is essential for maintaining the efficient operation of the dishwasher.
CLEANING THE WATER INLET HOSE
If the water hoses are new or have not been used for an extended period of time, let the water run to make sure it is clear and free of impurities before performing the necessary connections. If this precaution is not taken, the water inlet could become blocked and damage the dishwasher.
CLEANING THE SPRAY ARMS
On occasions, food residue may become encrusted onto the spray arms and block the holes used to spray the water. It is therefore recommended that you check the arms from time to time and clean them with a small non-metallic brush.
natural_image
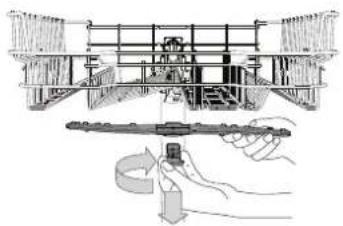
Technical line drawing of a mechanical assembly with a hand holding a tool, no visible text or symbolsTo remove the upper spray arm, turn the plastic locking ring in a clockwise direction. The upper spray arm should be replaced so that the side with the greater number of holes is facing upwards.
natural_image
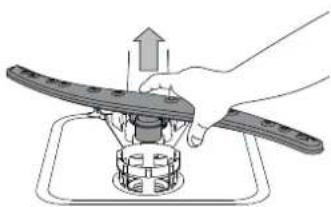
Illustration of a hand using a tool to press or install a mechanical component on a stovetop (no text or symbols visible)The lower spray arm may be removed by pulling it upwards.
WATER SOFTENING SYSTEM
Water softener automatically reduces water hardness, consequently preventing scale buildup on heater, contributing also to better cleaning efficiency.
This system regenerates itself with salt, therefore it is required to refill salt container when empty.
Frequency of regeneration depends on water hardness level setting - regeneration takes place once per 5 Eco cycles with water hardness level set to 3.
Regeneration process starts in final rinse and finishes in drying phase, before cycle ends.
- Single regeneration consumes: 3.5L of water;
• Takes up to 5 additional minutes for the cycle; - Consumes below 0.005kWh of energy.
TROUBLESHOOTING
In case your dishwasher doesn't work properly, check if the problem can be solved by going through the following list. For other errors or issues please contact authorized After-sales Service which contact details can be found in the warranty booklet. Spare parts will be available for a period of either up to 7 or up to 10 years, according to the specific Regulation requirements..
| PROBLEMS POSSIBLE CAUSES SOLUTIONS | ||
| Salt indicator is lit | Salt reservoir is empty.(After refill the salt indicator may remain lit for several wash cycles). | Refill reservoir with salt (for more information - see page 2).Adjust water hardness - see table, page 2. |
| Rinse aid indicator is lit | Rinse aid dispenser is empty (after refill the rinse aid indicator may remain lit for several wash cycles). | Refill dispenser with rinse aid (for more information - see page 2). |
| The dishwasher won't start or does not respond to commands. | The appliance has not been plugged in properly. In | Insert the plug into the socket. |
| Power outage. | For safety reasons, dishwasher will not re-start automatically when power returns. Open dishwasher door, press START/Pause button and close the door within 4 seconds. . | |
| The dishwasher door is not closed. Vigorously push the door until you hear the "click". | ||
| Cycle is interrupted by door opening for more than 4 seconds. | Press START/Pause and close the door within 4 seconds. | |
| It does not respond to commands. | Switch off the appliance by pressing the ON/OFF button, switch it back on after approximately one minute and restart the program. If problem persists, unplug the appliance for 1 minute, then plug it back in. | |
| The dishwasher won't drain. | The wash cycle has not finished yet. Wait until the wash cycle finishes. | |
| The drain hose is bent. Check that the drain hose is not bent (see INSTALLATION INSTRUCTION). | ||
| The sink drain pipe is blocked. Clean the sink drain pipe. | ||
| The filter is clogged up with food residues. Clean the filter (see CLEANING THE FILTER ASSEMBLY). | ||
| The dishwasher makes excessive noise. | The dishes are rattling against each other. | Position the crockery correctly (see LOADING THE RACKS). |
| An excessive amount of foam has been produced. | The detergent has not been measured out correctly or it is not suitable for use in dishwashers (see FILLING THE DETERGENT DISPENSER). Restart the current cycle by switching OFF the dishwasher, then switch it on again, select a new program, press START/ Pause and close the door within 4 seconds. Please do not add any detergent. | |
| The dishes are not clean. | The crockery has not been arranged properly. | Arrange the crockery correctly (see LOADING THE RACKS). |
| The spray arms cannot rotate freely, being hindered by the dishes. | Arrange the crockery correctly (see LOADING THE RACKS). | |
| The wash cycle is too gentle. Select an appropriate wash cycle (see PROGRAMS TABLE). | ||
| An excessive amount of foam has been produced. | The detergent has not been measured out correctly or it is not suitable for use in dishwashers (see FILLING THE DETERGENT DISPENSER). | |
| The cap on the rinse aid compartment has not been shut correctly. | Make sure the cap of the rinse aid dispenser is closed. | |
| The filter is soiled or clogged. Clean the filter assembly (see CARE AND MAINTENANCE). | ||
| There is no salt. | Fill the salt reservoir (see FILLING THE SALT RESERVOIR). | |
| The dishwasher does not fill the water. All LEDs are blinking rapidly | No water in the water supply or the tap is closed. | Make sure there is water in the water supply or the tap running. |
| The inlet hose is bent. | Make sure the inlet hose is not bent (see INSTALLATION) reprogram the dishwasher and reboot. | |
| The sieve in the water inlet hose is clogged; it is necessary to clean it | After having carried out the verification and cleaning, turn off and turn on the dishwasher and restart a new program. | |
| Dishwasher finishes the cycle prematurely. | Drain hose positioned too low or siphoning into home sewage system. | Check if end of drain hose is placed at correct height (see INSTALLATION).Check for siphoning into home sewage system, install air admittance valve if necessary. |
| Air in water supply. | Check water supply for leaks or other issues letting air inside. | |

Policy and standard documentation and additional product information can be found by:
- Visiting our website: docs.hotpoint.eu and parts-selfservice.whirlpool.com
• Using QR Code
- Alternatively, contact our After-sales Service (See phone number in the warranty booklet). When contacting our After-sales Service, please state the codes provided on your product's identification plate.
The model information can be retrieved using the QR-Code reported in the energy label. The label also includes the model identifier that can be used to consult the portal of the registry at https://eprel.ec.europa.eu.
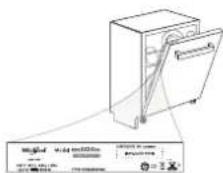
400011514471B
08/2023 ks - Xerox Fabriano

GUIDA RAPIDA
GUASTI

GRAZIE PER AVER ACQUISTATO UN PRODOTTO
natural_image
Illustration of a hand pouring dark granular material into a bowl on a stand, with a sliced seed or nut nearby (no text or symbols)natural_image
Top-down schematic of a multi-level mechanical or electrical component layout (no text or symbols)natural_image
Pure electrical circuit lines without any symbolsSPONDE RIBALTABILI CON POSIZIONE REGOLABILE
natural_image
Illustration of a person carrying a large container with a wavy patterned background (no text or symbols)natural_image
Diagram of a washing machine with multiple circular components and a central rack (no text or symbols)natural_image
Line drawing of a hand placing a grid-patterned object into a wireframe basket (no text or symbols)natural_image
Technical line drawing of a mechanical assembly with a hand holding a tool, no visible text or symbolsnatural_image
Illustration of a hand using a tool to press or install a mechanical component on a base (no text or symbols present)natural_image
Illustration of a hand pouring granular material into a bowl on a stand next to a bread roll (no text or symbols)natural_image
Technical line drawing of a mechanical assembly with multiple components (no text or labels)SKŁADANE PÓŁECZKI Z REGULOWANYM POŁOŻENIEM
natural_image
Technical line drawing of a mechanical assembly with no visible text or symbolsDOLNY KOSZ
natural_image
Line drawing of a multi-tiered kitchen sink with plates and a plastic cover (no text or symbols)natural_image
Line drawing of a hand placing a grid-like object into a rectangular frame (no text or symbols)natural_image
Technical line drawing of a mechanical assembly with a lever and rotating component (no text or symbols)natural_image
Illustration of a hand using a tool to press or install a mechanical component on a base (no text or symbols present)natural_image
Illustration of a hand pouring granular material into a bowl on a stand, with a separate plate nearby (no text or symbols)SETAREA DURITĂȚII APEI
natural_image
Top-down technical diagram of a mechanical assembly with multiple components (no text or labels visible)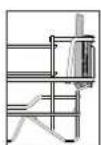
natural_image
Illustration of a person in a container with patterned fabric, no visible text or symbolsCOŞUL INFERIOR
natural_image
Cross-sectional diagram of a shopping basket with coins and a tray, no text or symbols presentnatural_image
Line drawing of a hand using a pliers to cut or install a grid-patterned structure inside a container (no text or symbols)natural_image
Technical line drawing of a mechanical assembly with a lever and base, no visible text or symbolsnatural_image
Illustration of a hand using a tool to press or install a mechanical component on a base (no text or symbols visible)400011514471B
08/2023 ks - Xerox Fabriano

ЩОДЕННИЙ ДОВІДНИК
natural_image
Technical line drawing of a mechanical assembly with multiple components (no text or labels)natural_image
Illustration of a mechanical device with a gear and mesh structure (no text or symbols)НИЖНІЙ КОШИК
natural_image
Diagram of a kitchen sink with multiple circular dishes and a central rack (no text or labels)natural_image
Line drawing of a hand placing a card into a wireframe basket (no text or symbols)natural_image
Technical line drawing of a mechanical assembly with a rotating tool and a magnified view of the component (no text or symbols)natural_image
Illustration of a hand using a tool to press or install a mechanical component on a stovetop (no text or symbols present)- THANK YOU FOR BUYING A HOTPOINT ARISTON PRODUCT.
- PRODUCT DESCRIPTION
- FIRST TIME USE
- SALT, RINSE AID AND DETERGENT
- ADVICE REGARDING THE FIRST TIME USE
- FILLING THE SALT RESERVOIR
- SETTING THE WATER HARDNESS
- Only use salt that has been specifically designed for dishwashers.
- FILLING THE RINSE AID DISPENSER
- ADJUSTING THE DOSAGE OF RINSE AID
- FILLING THE DETERGENT DISPENSER
- PROGRAMS DESCRIPTION
- Instructions on wash cycle selection.
- ECO
- INTENSIVE
- MIXED
- FAST WASH
- DELICATE
- LOADING THE RACKS
- ADJUSTING THE HEIGHT OF THE UPPER RACK
- FOLDABLE FLAPS WITH ADJUSTABLE POSITION
- CUTLERY BASKET
- DAILY USE
- CHECK WATER CONNECTION
- SWITCH ON THE DISHWASHER
- LOAD THE RACKS (see LOADING THE RACKS)
- FILLING THE DETERGENT DISPENSER
- CHOOSE THE PROGRAM AND CUSTOMISE THE CYCLE
- START
- END OF WASH CYCLE
- MODIFYING A RUNNING PROGRAM
- ADDING EXTRA CROCKERY
- ACCIDENTAL INTERRUPTIONS
- ADVICE AND TIPS
- TIPS
- UNSUITABLE CROCKERY
- DAMAGE TO GLASS AND CROCKERY
- TIPS ON ENERGY SAVING
- HYGIENE
- CARE AND MAINTENANCE
- CLEANING THE FILTER ASSEMBLY
- The dishwasher must not be used without filters or if the filter is loose.
- CLEANING THE WATER INLET HOSE
- CLEANING THE SPRAY ARMS
- WATER SOFTENING SYSTEM
- TROUBLESHOOTING
- Policy and standard documentation and additional product information can be found by:
- GUIDA RAPIDA
- GUASTI
- SPONDE RIBALTABILI CON POSIZIONE REGOLABILE
- SKŁADANE PÓŁECZKI Z REGULOWANYM POŁOŻENIEM
- SETAREA DURITĂȚII APEI
- ЩОДЕННИЙ ДОВІДНИК
Brand : HOTPOINT
Model : HIS 3010
Category : Dishwasher