
C790 - Smartphone PANTECH - Free user manual and instructions
Find the device manual for free C790 PANTECH in PDF.


| Product Type | Smartphone |
| Brand | Pantech |
| Model | C790 |
| Dimensions | 110 x 50 x 12 mm |
| Weight | 90 g |
| Display | 2.0 inches TFT, 240x320 pixels |
| Processor | Single-core 200 MHz |
| RAM | 64 MB |
| Internal Storage | 128 MB |
| Battery | Li-Ion 1000 mAh, removable |
| Standby Time | Up to 300 hours |
| Talk Time | Up to 4 hours |
| Camera | 1.3 MP |
| Connectivity | Bluetooth 2.0, USB 2.0 |
| Audio | MP3 player, FM radio |
| Messaging | SMS, MMS |
| Power Input | micro-USB 5V/500mA |
| Cleaning | Dry cloth, avoid liquids |
| Safety | Avoid water, use original charger |
| Repairability | Battery removable, limited spare parts |
Frequently Asked Questions - C790 PANTECH
User questions about C790 PANTECH
0 question about this device. Answer the ones you know or ask your own.
Ask a new question about this device
Download the instructions for your Smartphone in PDF format for free! Find your manual C790 - PANTECH and take your electronic device back in hand. On this page are published all the documents necessary for the use of your device. C790 by PANTECH.
USER MANUAL C790 PANTECH
2009 ACTI Iатель Property, as businesses subsidiaries, de serles
PANTECH Reveal User Guide
5U000242C0A REV.01
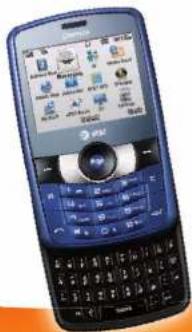
natural_image
Front view of a blue and orange mobile phone with control panel and keyboard (no visible text or symbols)PANTECH REVEAL
User Guide

at&t
Some of the contents in this manual may differ from your phone
depending on the software of the phone or your service provider
© 2003 AT&T Intellectual Property, All rights reserved, subsidiaries and affiliates of AT&T Inc provide products and services under the AT&T brand.
Your phone is designed to make it easy for you to access a wide variety of content. For your protection, we want you to be aware that some applications that you enable may involve the location of your phone being shared. For applications available through AT&T, we offer privacy controls that let you decide how an application may use the location of your phone and other phones on your account. However, the AT&T privacy tools do not apply to applications available outside of AT&T. Please review the terms and conditions and the associated privacy policy for each location-based service to learn how location information will be used and protected. In addition, your AT&T phone may be used to access the Internet and to download, and/or purchase goods, applications, and services from AT&T or elsewhere from third parties. AT&T provides tools for you to control access to the Internet and certain Internet content. These controls may not be available for certain devices which bypass AT&T controls.
REVEAL USER MANUAL
Thank you for choosing the Pantech Reveal, our latest 3G mobile phone.
The Pantech Reveal has many features designed to enhance your mobile experience. From its unique, stylish design and QWERTY keypad, we know you will enjoy the entire Reveal experience.
This User Guide contains important and useful information that will maximize your familiarity with all that the Pantech Reveal has to offer.
Specifications
Design
Single slider with QWERTY keypad
Displays
• 260k colors TFT LCD with 2.2" internal display
- 320*240 resolution
- 5 lines for text in basic mode with 16-point font
- Three soft keys and four-way scroll and selection 🔗 keys
Melodies
MP3, MIDI, iMelody, MMF, WAV, SMAF, AAC+
Camera
Integrated 1.3M CMOS Camera
• Resolution up to 1280 x 1024 (1,310,720 pixels)
- Mpeg4 Video recording/playing up to 15f/s(QVGA size)
- Self-timer function (5 seconds or 10 seconds)
• Photo album and video album
Dimensions & Weight
• Weight: 112g/3.950oz (with standard battery)
• Dimensions: 99.3 mm x 59.9 mm x 14.8 mm
3.90" × 2.35" × 0.58"
Power Management (Performance)
| Battery Type | Capacity Standby | Time Talk Time | |
| Standard Lithium-Ion (Li-ion) | Up to 930 mAh | Up to 11 days(290 hours) | Up to 4.5(4.8) hours |
Operating Frequency
- GSM 850Mhz, GSM 900Mhz, GSM 1800Mhz, GSM 1900Mhz, UMTS 850Mhz, UMTS 1900 Mhz, and UMTS 2100Mhz networks in North America, South America, Europe, Africa, and Asia-Pacific where these networks are supported.
• Automatic band switching.
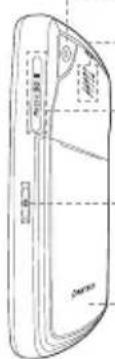
Phone overview
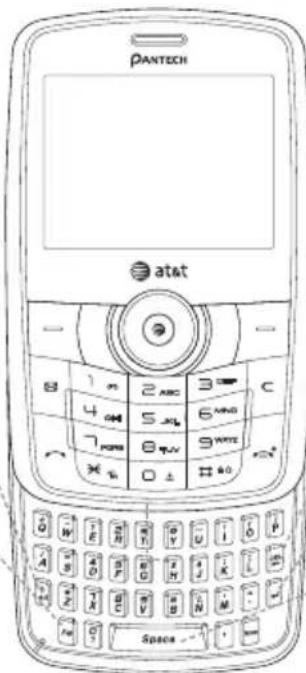
Number pad view
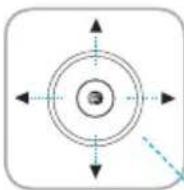
5 way navigation
Up: Write New SMS
Down: Contact List
Left: E-mail
Right: IM
Center: / Mobile
Web
Messaging
Key
Send key
QWERTY
Keypad
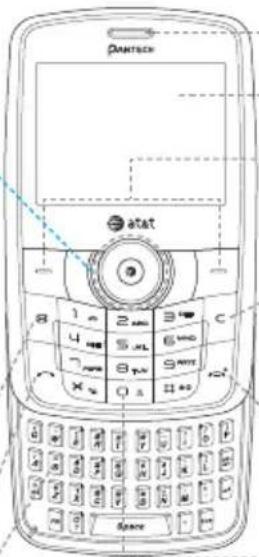
Receiver
Display
Left/Right Soft key
Perform the functions shown At the bottom line of the display
Clear key
Return to previous screen or delete characters in text mode
Power on&off/Menu exit key/End key
Turn phone on/off, end calls, exit menus
International call prefix key
Charger slot/Ear mic
natural_image
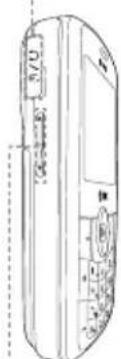
Line drawing of a smartphone showing front panel, screen, and keypad (no text or symbols)Camera
Speaker
MicroSD slot
Camera key
Internal antenna
Side key
note: Holding the device by the internal antenna area might affect the quality of all calls.
Menu features
| Address Book Messaging IM | |
| Mobile Email Mobile Web AppCenter | |
| AT&T GPS YPmobile My Stuff | |
| AT&T Music CV Settings |
QWERTY keypad view
CAPS/Shift key
To type a single uppercase letter, press this key then a letter.
Function key
To enter a number or a symbol, press the function key, and press the corresponding key.
Delete key
Press to delete a number or letter.
Enter key
Press to create new line while writing a message.
Space key
Press to enter a space.
note: To use the QWERTY keypad, hold the phone horizontally and slide the screen up.
Using shortcuts
Numbered menu items, such as menus, sub-menus, and options can be quickly accessed by using their shortcut numbers. In Menu mode, Main Menus can be accessed by pressing the number keys (1 to 0, *, □□) corresponding to their location on the screen.
Example: Accessing the Language menu.
- Press the Menu.
- Press the □♦♦ for Settings.
- Press the 4_5-1 for Phone.
- Press the 1 for Language.
- Press Select for Screen Text.
- Press the▲ or ▼ scroll key to display the list of available languages.
note: In main menu screen the number keypad is matched with the menus as follows.
Keys Functions
| 1∞ | Address Book |
| 2 ABC | Messaging |
| 3DEF | IM |
| 4GHI | Mobile Email |
| 5JKL | Mobile Web |
| 6_MND | AppCenter |
| 7PCRS | AT&T GPS |
| 8TUV | YPmobile |
| 9wxyz | My Stuff |
| □ ± | CV |
| * | AT&T Music |
| # 80 | Settings |
Menu overview

Address Book
Contacts
Add Contact
Speed Dial
Groups
My Business Card
Memory in Use
My Phone Number
Used Space
Service Numbers\$
FDN List ^s

Messaging
Inbox
Create Message
Mobile Email
IM
Sent
Outbox
Drafts
Voice Mail
Settings
Templates
Used Space

IM Mobile Email


Mobile Web AppCenter


AT&T GPS
AT&T Navigator
Where
AllSport GPS Platinum

YPmobile

My Stuff
Applications
Audio
Games
Picture
Video
Tools
Other Files
Used Space

AT&T Music
Music Player
Shop Music
MusicID
XM Radio
Music Videos
Make -UR-Tones
Community
Music Apps

CV Settings

Profiles
Display
Call
Phone
Network Connections
Network ^n
Connectivity
Security ^s
Software
Reset
TTY
^s SIM dependent ^n Network dependent
Quick & easy
Keys Functions
| Perform the functions shown at the bottom line of the display by using these soft keys. | |
 | Scroll through the menu options in Menu mode. In standby mode,Left: Access E-mail menuRight: Access IM menuUp: Access Create Message menuDown: Access Contacts menuWork in Word search mode if pressed in the Predictive text input mode. |
| (3482) | Select a menu function or store user-input information, such as names.Also use this key for confirmation as the 🔗 key.Launch the Mobile Web directly if pressed in standby mode. |
| (20KC) | Delete characters from the display, or return to previous menu. |
| (H67T) | Send or receive a call. Show the recent call list in standby mode. |
Keys Functions
| Complete the current call. Turn on/off the phone if pressed and heldCancel user input and return to main screen while in Menu mode. | |
| 1∞ | Quickly connect to the voice mail server if pressed and held in standby mode. |
| 0±~9xyz | Enter numbers, letters or special characters. Go to the dial screen if pressed in standby mode. |
| Enter or exit from vibrate mode if pressed and held in standby mode.Show the symbol input screen if pressed in text input mode. | |
| Enter an international dialing prefix if pressed and held in standby mode.Enter the space character in text input mode. | |
| Change various text input modes if pressed at the text-editing screen. | |
| Adjust the earpiece volume while making a call.Control the Ringtone volume, vibrate mode and silent all mode in standby.Mute the ringtone of an incoming call. | |
| Press and hold to access the Multitask menu. | |
| Turn camera capture mode on.Work as a camera shutter in capture mode. |
Contents
Specifications....2
Phone overview 3
Using shortcuts ....5
Menu overview 6
Quick & easy 9
1. Getting Started
SIM card and battery .....16
Turn phone on/off 17
Keypad lock
Essential display indications .....17
Memory card
Assigning the menu ....20
Updating software 20
Using the QWERTY key pad .....20
Using the multitask menu .....21
2. Calls and address book
Make, receive and end calls .....24
Using video share 25
Options during a call 26
Call settings 28
Settings for video share .....28
Checking all calls 29
Speed dialing
Using the address book ....31
Caller identification
Using your headset 32
Service numbers and fixed dialing 32
3. Messaging
Entering text 36
Messaging 37
Receiving messages ....38
Creating and sending text messages....39
Creating multimedia messages .....39
.30 Message templates 42
Message settings 42
32Voice message settings .....43
Email 43
Using instant messenger ....43
4. Multimedia
Camera 48
Photo album 50
Video album....51
Audio album....52
Music Player
Music player settings ....56
Media player 57
Other files 58
Managing memory 58
Playing games ....58
5. Useful Features
Alarm 62
Calendar 62
Notepad and voice memo ......63
Calculator, tip calculator and converter 63
Stop watch 64
Business card 64
Memory information 65
6. Connectivity
Bluetooth 68
53Using the Mobile Web 69
Using the browser 69
Profile settings
58. Settings
Language....74
Time and date 74
Ringtones
Decorating the display .....74
Locks 75
Security 76
Reset 76
TTY 76
8. Appendix
Alert message....80
Troubleshooting checklist 80
Safety information 81
...76 safety precautions ....81
About the battery usage .....82
FCC Hearing-Aid Compatibility
(HAC) Regulations for Wireless
Devices....83
4FCC Regulatory Compliance .....84
Warranty 85
Reveal
1
natural_image
Blue line drawing of a vintage mobile phone with keypad and control buttons (no text or symbols)Getting Started
Calls and address book
Messaging
Multimedia
Useful Features
Connectivity
Settings
Appendix
01
02
03
04
05
06
07
08
Getting Started
SIM card and battery
About your SIM card
When you subscribe to your network operator, you receive a SIM (Subscriber Identity Module) card containing your registration information, PIN code, etc.
Like a credit card, it should be kept secure and handled carefully. Do not bend, scratch or expose it to moisture. Avoid static electricity.
To avoid corrupting your SIM card's memory, always switch off your phone before removing or inserting your SIM card.
About your battery
Your phone uses a Li-Ion battery. Make sure to use an authorized battery and charger only. For more details, please inquire at your nearest dealer.
note: Your phone is powered by a Lithium Ion (Li-Ion) battery. Unlike other forms of battery technology, you can recharge your battery while some charge remains without reducing your phone's autonomy due to the "battery memory effect" inherent in those technologies.
Installing/removing SIM card and battery
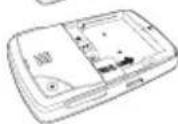
- Remove the battery cover from the unit.
- To fit the battery cover, put it on the guide rail and push up.
- Insert the SIM card into the slot. The gold contacts of the SIM card should go against the metal contacts of the phone. Put the contacts of the battery into the hole located at the bottom of the unit insert and press the upper side of the battery until you hear the "click".
- To remove the battery push the bottom of the battery to upwards(1) and remove(2) the battery. Push the SIM card in the direction of the arrow as shown.
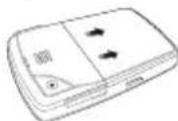
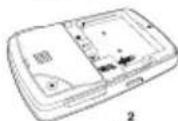
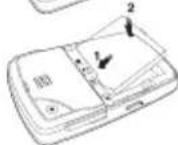
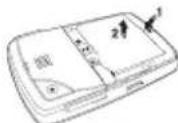
To charge your battery
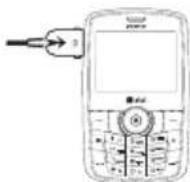
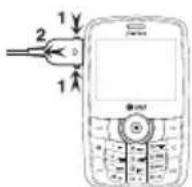
- To charge, open the protective cover on the top right side and connect the charger adapter. Make sure you align the connector as the image. If not, it will damage the charging connector on the phone and will not charge.
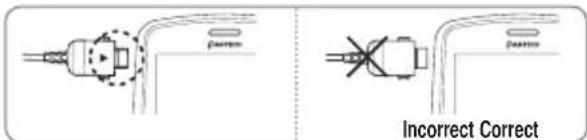
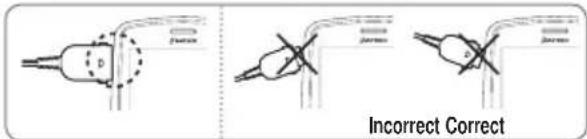
- To remove the adapter connection press the adapter's side buttons (1) and pull the adapter away (2).
Turn phone on/off
To turn on
- Press and hold 📞.
To turn off
- Press and hold 📞.
Keypad lock
Locking the keypad
- Press hold ☐ ∞.
Unlocking the keypad
- Press Unlock > * to unlock.
Essential display indications
| Yall | Signal strength. The greater the number of bars, the stronger the signalWhen network is in searching mode Yis displayed |
| A call is being made. When you are in no service area Xis displayed | |
| Call forwarding ^a is active | |
| Incoming calls set to ring only (Normal) | |
| Incoming calls set toVibrate and Ring | |
| Incoming calls set toVibrate Only | |
| Incoming calls set toSilent | |
| Flight Modeis active | |
| Received one or more text messages | |
| Received one or more multimedia messages | |
| Received one or more WAP push messages | |
| Received one or more configuration messages | |
| Received one or more voice messages | |
| A message is being sent | |
| A message is being received | |
| An alarm is set | |
| Schedule Alarm is set | |
| Browser is Active, Secured and being downloaded | |
| Bluetooth is active | |
| Bluetooth is Transfer | |
| Bluetooth headset is connected | |
| Headset is connected |
| USB is connected | |
| TTY is active | |
| A GPRS signal is available. It is displayed when there is an active GPRS session | |
| An EDGE signal is available. It is displayed when there is an active EDGE session | |
| A 3G signal is available. It is displayed when there is an active 3G session | |
| microSD card is insert | |
| Battery strengthWhen the battery charge is low, is displayed | |
| Available, Away, Invisible Status of AIM | |
| Online, Away, Busy, Offline Status of MSN | |
| Available, Busy, Invisible Status of YAHOO | |
| You have received one or more IM messages | |
| BGM is play, pause and being stopped |
^a Network dependent
Memory card
You can use microSD card as a memory card. It gives you more space to save pictures, videos, music, etc.
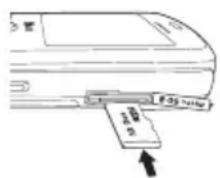
Inserting and removing the memory card
- Open the memory card slot.
- Insert the card. The "icon will be display."
- Press the card to remove.
Using memory card
You can save, move and delete the files between your phone and external memory card. You can also move and copy the files to computer from your phone.
Resetting the card
- Press Menu > Settings > Reset.
- Enter the password > External Memory Reset.
note: The default password is '1234'.
To copy the file to the card
-
Select the file > Options > Copy to External Memory.
-
To copy the file back to phone, press Options > Copy to Phone.
To move the file to the card
- Select the file > Options > Move to External Memory.
- To move the file back to phone, press Options > Move to Phone.
To delete the file from the card
- Select the file from the card > Options > Delete.
To move the file from the card to the computer
- Connect the data cable with mobile and the computer.
- Press Menu > Settings > Connectivity.
- Press Select USB Mode.
- Select Music Player, Mass Storage or Ask on Connection.
- Follow the instruction on your computer screen.
note: Select Music Player when you want to add music to the playlist in your device. When you select Ask on Connection, it will ask you to select either the Music Player or Mass Storage every time you connect your device with your computer.
Assigning the menu
You can set the most commonly used menu in Options in standby mode.
- Press Shortcuts in standby mode > select Unassigned.
- Press Add.
- Select the menu and sub menu.
Updating software
You can update your software without visiting your nearest dealer.
To update the software
- Press Menu > Settings > Software > Software Update.
- Press Check for Update > Yes to check whether or not you need to update the software.
note: After downloading the software, the device will ask you whether to update the software now or later. If you choose to update the software now, it will restart the handset. If you postpone updating the software, you can select between 30 mins, 1 hour or 4 hours in the Options. After selecting the updating time, you will be sent back to standby mode. If you go to Software Update while you are in postponing, press Continue Update.
To view the version of software
- Press Menu > Settings > Software.
- Press Phone Information and scroll down to Software Version.
Using the QWERTY key pad
Your phone has QWERTY keypad which provides a superior typing experience on a small handheld for easy and comfortable texting. You can use all of the phone functions with the QWERTY keypad opened.
note: QWERTY keypad can be used when the number pad is closed. With the number pad is opened, the QWERTY keypad can not be opened.
| Key Function | |
| Perform the functions shown at the bottom line of the display by using these soft keys | |
| Press to change ab Ab AB at the text editing screenabcABC(all small caps / first letter caps / all caps) | |
| Press to type a special character or number, at the applicable key pad. To enter symbols and numbers continually, press until displays | |
| Enter the space character in text input mode | |
| Insert a carriage return in text input mode | |
| Delete a character to the left of the text cursor in text editing screen | |
| Press to type a special character that is not placed on the keypad | |
Using the multitask menu
Press and hold to launch the Multitask menu that can be activated from within any active window or page on the phone. There is no need to stop what you are doing, if you quickly want to jump out and activate another common feature. The idea is to allow you to temporarily exit from your current location to access a group of common functions such as: Call, Messaging, Mobil Web, Music player and Games & Apps. This key keeps you from having to completely exit from your current task or window, whether that be a text message, a web page, or an active call, quickly do something else.
![08/11 [TUE] PM 05:22 450-01](/content/2026/05/973397/images/f970e12d1a7722e4377af082dca4cd5bc867e662accdf215555839763b3a8522.jpg)
Multitask functions
To using multitask function, press and hold the side up key 1. You can choose from one of the following function:
- Call: Make a voice call while using the handset for other tasks. If Music Player is active, it is muted during the call.
- Messaging: Send a text or multimedia message while using the handset for other tasks.
- MobilWeb: Launch the browser while using the handset for other tasks.
- MusicPlayer: Launch the Music Player while using the handset for other tasks. If an incoming call is received or you want to make a call, the Music Player is muted.
• Games & Apps: Access Games and Applications while using the handset for other tasks.
Reveal
2
natural_image
Blue line drawings of various mobile phones including a flip phone, keyboard, and smartphone (no text or symbols visible)Getting Started
Calls and address book
Messaging
Multimedia
Useful Features
Connectivity
Settings
Appendix
01
02
03
04
05
06
07
08
Calls and address book
Make, receive and end calls
Making a call
- Enter the area code and phone number.
- Press ☐.
Answering a call
- Press ☐.
Ending a call
- Press ☐.
Once the call is complete, a call summary is displayed.
Rejecting a call
- Press 📞 or Ignore.
Making a call using call list
Your phone logs up to 20 dialed, received and missed call numbers.
- Press 📞 to display the Recent Calls list.
-
Select All Calls, Missed Calls, Received Calls, or Dialed Calls pressing the ◀/▶.
-
Select a number.
- Press ☐ to dial the selected number.
note: To redial the last number in the Recent Calls list, press 📄.
Making a call during a call
- Enter the phone number or look it up in Address Book.
- Press ☐ to dial the second call. The first call is automatically put on hold.
Switching between two calls
- Press Swap.
Making an international call
- Press and hold ☐ ± key for the international prefix until the '+' character appears.
- Type the country code, area code, and phone number.
- Press ☐.
Making an emergency call
You can make emergency calls even if your phone does not have a SIM card.
- Press Emergency Number, or press SOS if your phone does not have a SIM card.
- Press ☐.
Replying to a missed call
- Press View to display the list of missed calls.
- Select a number to call by pressing the ▲/▼ key.
- Press ☐.
Answering a second call ^n
- Press ☐. The first call is automatically put on hold.
- Press ☐ to end the second call.
The call on hold is automatically reconnected.
Using video share
You can share live or recorded video while on a call. You can send or receive video.
note: Video Share is not available in all markets. Both parties must be in a 3G service area—a 3G icon must appear by the signal bars prior to a call being placed, and both parties must remain in the 3G coverage area for the duration of the Video Share.
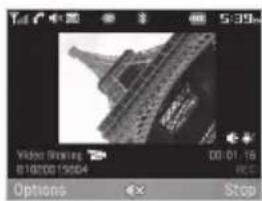
Making video share call
- Enter the area code and phone number > ☐.
- Press Options > Video Share.
- Select Live or Recorded.
note: To use video share in the Recent Calls, press Options >Video Share.
Turning off the speakerphone
- Press 🎨 or press Options > Speakerphone Off during video share mode.
- Press Options > Mute to mute the sound.
Stopping video share
-
Press Stop to end.
-
To end a call press 📞.
Increasing or decreasing the brightness
- Press Options > Brightness.
- Adjust the brightness by pressing ◀/▶.
Zoom in and out
- Press Options > Zoom. It ranges from x1 to x3.
Stopping the recording
- Press Options > Stop Record.
For details on setting for automatic recording, see page 39.
Ending video share
- Press Stop to end the video share.
- It will ask you whether you will stop video share > Yes to stop.
note: Even you end video share, the call will not be ended.
Press 📄 to end the call. The recorded video will be saved in My Stuff > Video.
Receiving video share
- After receiving video share, it will ask you whether to accept or reject the video share > Yes to accept and No for reject.
- Press Options > Full Screen to landscape the screen.
Options during a call
Microphone off and on
Switching your phone's microphone off
- Press Options > Mute [ ✉].
Switching your phone's microphone back on
- Press Options > Unmute.
Talking on speaker
- Press Speaker Phone [ ]
Putting a call on hold and returning ^n
Putting a call on hold
- Press Options > Hold or press ↗.
Returning to a held call
- Press Options > Unhold or press 📄 again.
Multi-party calls ^®
You can talk with more than one person or have conference call.
Making a multi-party call
- Call the first participant.
- Call the second participant. The first call is automatically put on hold.
- Press Options > Join.
Having a private conversation with one participant
- Press Options > Split.
- Press
- Select the participant and press 📄.
All of the multi-party call participants can now hear each other.
Removing one participant from a multi-party call
- Press Options > End.
- Select the participant and press 🔒.
The call ends with that participant, but you can continue to talk to the other participants.
Searching for a number in the address book during a call
- Press ▼ or press 🔒 or press Options > View Contacts > Contacts.
- Select a number > ☐ .
Searching for a name or group in the address book Enter the first letters of the name for Name Search. The entries are displayed starting with the first entry matching your input.
Finding a name manually in the address book
- Press the ▲/▼ key.
Viewing the details of the highlighted entry in the address book
- Press View.
Reading a message during a call
-
Press Options > View Message.
-
Select a message > 📄.
Entering a message during a call
- Press Options > Send Message.
For details on creating a text message, see page 39.
Viewing calendar during a call
- Press Options > View Calendar.
Entering a notepad during a call
- Press Options > Notepad.
Voice recording
- Press Options > Voice Recording.
Setting DTMF
- Press Option > DTMF On or Off.
Call settings
Setting auto redial
-
Press Menu > Settings > Call > Auto Redial.
-
Select On or Off.
Answering by pressing any key
- Press Menu > Settings > Call > Any Key Answer.
- Select Answer with Any Key.
note: You can answer with any key except 🔍 and Ignore.
Settings for video share
Turning the alert on/ off
- Press Menu > Settings > Call > Video Share.
- Press Alerts.
- Select On or Off > Select.
Setting for automatic recording
- Press Menu > Settings > Call > Video Share.
- Press Auto Record.
- Select On or Off > Select.
Setting for service
- Press Menu > Settings > Call > Video Share.
-
Press Service.
-
Select On or Off > Select.
Setting for profile
- Press Menu > Settings > Call > Video Share.
- Press Profile.
- Select AT&T IMS or Media Net > Select.
Setting recording location
- Press Menu > Settings > Call > Video Share.
- Press Recording Location.
- Select Phone Memory or External Memory > Select.
Checking all calls
You can view information about all Recent Calls. For more options for all, missed, received and dialed calls press Options. You can also view the call history simply by pressing ↻.
Viewing missed calls
- Press Shortcuts in standby mode or press Menu > My Stuff > Tools.
- Press Recent Calls > Missed Calls.
Viewing received calls
- Press Shortcuts in standby mode or press Menu > My Stuff > Tools.
- Press Recent Calls > Received Calls.
Viewing dialed calls
- Press Shortcuts in standby mode or press Menu > My Stuff > Tools.
- Press Recent Calls > Dialed Calls.
Viewing Ranking calls
- Press Shortcuts in standby mode or press Menu > My Stuff > Tools.
- Press Recent Calls > Call Ranking.
Deleting call logs
- Press Shortcuts in standby mode or press Menu > My Stuff > Tools.
- Press Recent Calls > Delete Call Logs.
- Select All Calls > Yes.
Viewing call time
- Press Shortcuts in standby mode or press Menu > My Stuff > Tools.
Calls & address book
- Press Recent Calls > Call Time.
- Press ▲/▼ to view Last Call, Received Calls, Dialed Calls and Total Calls.
Resetting all call times
- Press Shortcuts in standby mode or press Menu > My Stuff > Tools.
- Press Recent Calls > Call Time.
- Press Reset > Yes.
- Enter password > 📄.
note: The default password is '1234'.
Viewing data transmitted information
- Press Shortcuts in standby mode or press Menu > My Stuff > Tools.
-
Press Recent Calls > Packet Counter.
-
Current Info: You can view transmitted data in the current session, in Kbytes. Sent, Received and Total information are also available.
-
Last Info: You can view Sent, Received, Total and Duration information of the previous session's transmitted in Kbytes.
-
Total Info: You can view all the Sent, Received, Total and Duration transmitted data in Kbytes.
- Clear Logs: The default password is '1234'.
Speed dialing
You can dial quickly using speed dialing. Up to 8 phone numbers can be programmed using numbers 2 to 9.
1 : Voice mail
☐ : Prefix for international call
Setting speed dial
- Press Menu > Address Book > Speed Dial.
- Select an empty entry and press Add.
- Select a person and press 🎯 or Select.
Changing speed dialing person
- Press Menu > Address Book > Speed Dial.
- Select a number > Change or 📄 .
- Select a person > 🎯 or Select.
Removing from speed dial
- Press Menu > Address Book > Speed Dial.
- Select a number > Delete.
Using the address book
You can save names, phone numbers, and information on the SIM or phone. Entries can depend on the capacity of the SIM card.
Viewing the contact list
- Press ▼ or press Menu > Address Book > Contacts.
Searching for a phone number
- Press ▼ or press Menu > Address Book > Contacts.
- Input the first letter or two of the person's name and scroll with ▲/▼.
- Press 📋 to view the detailed information.
- To update information, press Edit.
Calling from the contact list
- Press ▼ or press Menu > Address Book > Contacts.
- Select a person to call.
- Press ☐.
Forwarding contact details
- Press ▼ or press Menu > Address Book > Contacts.
-
Select a contact > Options > Send This Card.
-
You can send the information using Multimedia Message or Bluetooth.
Deleting a contact
- Press ▼ or press Menu > Address Book > Contacts.
- Select a contact > Options > Delete.
Adding a contact
- Press Menu > Address Book > Add Contact.
- Select Phone or SIM.
- Input the fields.
- Press 📄 or Save.
Making groups
- Press Menu > Address Book > Groups.
- You can select group either on phone or SIM. There will be defaulted groups.
- To add new group, press Options > Add Group.
- To edit group press, Edit Group. You can also set a specific ringtone by selecting Ringtone > Select > select the ringtone.
Caller identification
Caller identification ^n
- Press Menu > Settings > Call > Display My Number.
- Select Network Default, Show or Hide > Select.
Using your headset
You can send or receive a call using your headset.
When you connect your headset to the jack the button on the headset works as follows.
note: You need to use the headset designed for this device, and it is optional item. Also not every headset has a button.
While in standby mode
- Press the button once to list recent calls.
- Press the button twice to redial the last call.
While the phone is closed
- Press the button once to receive a call.
- Press the button once to end the call.
Service numbers and fixed dialing
Calling your service numbers\$
You can see the service number to reach the service provider.
- Press Menu > Address Book > Service Numbers.
- Select a number > press 📞.
Viewing the fixed dialing list
Fixed dialing is a service that limits your access to specific numbers in the address book list recorded on the SIM. Input the PIN2 to set up or cancel this service.
- Press Menu > Address Book > FDN List.
- Select a number > press 📞.
note: PIN2 must be correctly entered within 3 attempts. If you input the incorrect code three times in a row the PIN2 code will be blocked. If the PIN2 code is blocked please contact your service provider. PIN2 code supplied with the SIM card.
01
02
03
04
05
06
07
08
Calls & address book
Reveal
3
natural_image
Line drawing of a mobile phone with keypad and control panel (no text or symbols)Getting Started
Calls and address book
Messaging
Multimedia
Useful Features
Connectivity
Settings
Appendix
01
02
03
04
05
06
07
08
Messaging
Entering text
Messaging
Receiving messages
Creating and sending text messages
Creating multimedia messages
Message templates
Message settings
Voice message settings
Using instant messenger
Entering text
You can enter text with multi-tap, predictive, numeric or symbol.
Useful keys
Functions only work when the slide is closed.
| * * | Display symbols |
| □ □ | Adding space |
| Press to change capital modePress to change ab Ab AB and press to change from multi to predictive to NumberMulti-tapabcABC(all small caps / first letter caps / all caps)PredictiveabABAB(all small caps / first letter caps / all caps)Number123 |
For details on using QWERTY key pad, see page 20.
Key characters by language
Each of the following keys will scroll through these sequential options listed by language.
| Key English French Spanish | |||
| 1. , | - ? ! / ' @ : | ||
| 2 | a b c ç à | ä á ã ç | |
| 3 | d e f é è | é | |
| 4 | g h i í | ||
| 5 | j k l | ||
| 6 | m n o ö ñ ó ñ | ||
| 7 | p q r s β | ||
| 8 | t u v ù ü | ú ü | |
| 9 | w x y z | ||
Predictive mode
The predictive mode automatically compares your keystrokes with an internal linguistic dictionary to determine the correct word. It will display the most commonly used word first. The most commonly used word will appear first. To save a word not listed in phone's dictionary, press Options > Predictive Settings > Selection List > On.
- Press ☐ to change the mode to predictive.
- Press 2_ABC to 9_WXZ to input text. For example, to write 'hello' press 4_3-1 3_DSF 5_KL 5_KL 6_MND .
Alphabet input mode
Press the key labeled with the target letter once for the first letter; press it twice for the second letter, and so on.
- Press ☐ to change the mode as multi-tap.
- Press 2_ABC to 9_WAYZ to input text repeatedly. To write the letter "C", press 2_ABC 3 times. To write number 2 press 2_ABC 4 times.
Numeric mode
You can input numbers in this mode.
- Press ☐ to change the mode to 123.
- Press 1 to 9 and □ to input numbers.
Symbol mode
You can input symbols.
- Press ☒ to view the symbols.
- Press ▲/▼/◄/► to select symbol and press Insert.
Messaging
You can send, receive and save the text messages and multimedia messages.
Managing memory
When the message box is full the messages full icon will appear. All messages share memory.
| When It | means |
| Text message is full (SIM and Phone messages) |
Moving a message to SIM
- Press Menu > Messaging > Inbox.
- Select a message > Options > Move to SIM.
Deleting a message in a mailbox
- Select a message > Options > Delete > Selected >
Deleting multiple messages
- Press Options > Delete > Multiple.
- Select the message to erase by pressing 📄.
- Press Options > Delete.
- To select all message, press Options > Select All.
- To deselect message, press Options > Deselect All.
Replying to a message
- Select a message > Options > Reply.
Viewing memory space information
- Press Menu > Messaging > Used Space.
- Press ◀/▶ to view SIM and Phone memory.
Receiving messages
Viewing a new message
- Press View or press 📄.
Reading a message from the inbox
- Press Menu > Messaging > Inbox.
- Select a received message > View.
Saving the sender address from a received message
- Select a received message > View.
- Press Options > Save.
- Select New Contact or Update Contact.
Saving the object in the received multimedia message
- Open the multimedia message.
- Select an object.
- Press Options > Use > Save.
It will be saved in one of the categories in the My Stuff folder.
For details on photo album, see page 50.
Listening to voice message
- Press and hold 1 or press Menu > Messaging > Voice Mail.
It will automatically call the voice mail center.
Loading URL using Push message
- Press Menu > Messaging > Inbox > 📄.
- Press Options > Load URL.
Save connection setting using Configuration message
- Press Menu > Messaging > Inbox > 📄.
- Press Options > Install.
Creating and sending text messages
Sending new text message
- Press ▲ or press Menu > Messaging > Create Message.
- Write the message.
- To save the message as draft, press Options > Save to Drafts.
- Press > Send to and select the person to send message and press Select or 🔒.
- Press Send.
- To view sent message, press Menu > Messaging > Sent. note: All successfully send messages will be saved in Sent while the messages that failed to be sent will save in the Outbox.
Finding all sent messages
- Press Menu > Messaging > Sent.
Creating multimedia messages
You can create new multimedia message. Capacity is 100Kb, 300Kb, 600Kb and an error message will alert you once you exceed the capacity.
Adding a saved picture to the message
- Press ▲ or press Menu > Messaging > Create Message.
- Write a message.
- Press Insert > Picture > Picture > Camera.
- Scroll to the saved picture and press Select or 📷.
- To preview the current page, press Options > Preview > Current.
- To preview the whole message, press Options >Preview >Whole Message. To go back to text editor page, press Stop.
- To edit the text message, press [▲/▼] to select the text box.
- Press Send to and select the person to send message and press Select or 🔒.
- Press Send.
Adding a new picture to the message
- Press ▲ or press Menu > Messaging > Create Message.
- Write a message.
- Press Insert > Take New Picture.
- Focus on the object >
- To preview the current page, press Options > Preview > Current.
- To preview the whole message, press Options > Preview > Whole Message. To go back to text editor page, press Stop.
- To edit the text message, press [▲/▼] to select the text box.
- Press Send to and select the person to send message and press Select or 📄.
- Press Send.
For the taking picture, see page 49.
Adding a saved video to the message
- Press ▲ or press Menu > Messaging > Create Message.
- Write a message.
- Press Insert > Video > Video.
-
Scroll to the saved video clip and press Select or 📄.
-
To preview the current page, press Options > Preview > Current.
- To preview the whole message, press Options > Preview > Whole Message. To go back to text editor page, press Stop.
- To edit the text message, press [▲/▼] to select the text box.
- Press Send to and select the person to send message and press Select or 📷.
- Press Send.
Adding a new video to the message
- Press ▲ or press Menu > Messaging > Create Message.
- Write a message.
- Press Insert > Record New Video.
- Focus on the object > Options > Record.
- To stop recording and save press Stop.
- To edit the text message, press [▲/▼] to select the text box.
- To preview the current page, press Options > Preview > Current.
- To preview the whole message, press Options > Preview > Whole Message. To go back to text editor page, press
Stop.
-
Press Send to and select the person to send message and press Select or 📄.
-
Press Send.
For the recording video, see page 50.
Adding a recorded voice memo to the message
-
Press ▲ or press Menu > Messaging > Create Message.
-
Write a message.
-
Press Insert > Sound.
-
Select Audio > My Voice.
-
Scroll to the saved audio clip and press Select or 📄.
-
To edit the text message, press [▲/▼] to select the text box.
-
To preview the current page, press Options > Preview > Current.
-
Press Pause to stop listening.
-
To preview the whole message, press Options > Preview > Whole Message. To go back to text editor page, press Stop.
-
PressSend to and select the person to send message and press Select or 🔒.
-
Press Send.
Adding a new voice memo to the message
-
Press ▲ or press Menu > Messaging > Create Message.
-
Write a message.
-
Press Insert > Record New Sound.
-
Press Record or 📋 to record the sound.
-
To stop and save press Stop.
-
To edit the text message, press [▲/▼] to select the text box.
-
To preview the current page, press Options > Preview > Current.
-
Press Pause to stop listening.
-
To preview the whole message, press Options >Preview >Whole Message. To go back to text editor page, press Stop.
-
PressSend to and select the person to send message and press Select or 🔒.
-
Press Send.
For the recording voice memo, see page 63.
Adding other file to the message
-
Press ▲ or press Menu > Messaging > Create Message.
-
Write a message.
-
Press Insert > Other Files > Other Files.
-
Select the file and press Select or 📄.
- To edit the text message, press [▲/▼] to select the text box.
- To preview the current page, press Options > Preview > Current.
- To preview the whole message, press Options > Preview > Whole Message. To go back to text editor page, press Stop.
- Press Send to and select the person to send message and press Select or 📄.
- Press Send.
Message templates
When you often use the same phrases, you can save the message under template messages.
Adding the message as a template
- Press Menu > Messaging > Templates.
- Press Options > Add New.
- Write the frequently used message > Options > Save.
Sending a message with template
- Press Menu > Messaging > Templates.
- Select the message to send.
- Press Send or 📋 to add more messages.
- Press Send to and select the person to send message and press Select or 📄.
- Press Send.
note: You can add a template while entering a message.
Write a message > Insert > Templates. Select the message to add.
Message settings
Setting message center
- Press Menu > Messaging > Settings.
- Press Text Message.
- Enter new Center Address.
- Press Save.
Setting profiles for multimedia message
- Press Menu > Messaging > Settings.
- Press Multimedia Message > MMS Profiles.
- Select a profile.
Setting for sending multimedia message
- Press Menu > Messaging > Settings.
- Press Multimedia Message > Sending Settings.
- You can set the Validity Period, Delivery Time, Priority, Creation Mode and Max Message Size.
Setting for receiving multimedia message
- Press Menu > Messaging > Settings.
- Press Multimedia Message > Receiving Settings.
- You can set the Automatic Download, Allow Delivery Reply, Allow Read Reply and Accepted Messages.
Setting e-mail gateway
- Press Menu > Messaging > Settings.
- Press Email Gateway.
- Enter new gateway for sending text message by email address.
- Press Save.
Setting for receiving notice for push message
- Press Menu > Messaging > Settings.
- Press Push Message >Receive.
- Select On or Off.
note: When you receive push message the [icon will] displays.
Voice message settings
Setting for receiving voice message
- Press Menu > Messaging > Settings.
- Press Voice Mail.
- Enter the number of the voice mail center > Save.
note: This number may be pre-configured by the service provider upon activation.
You can receive emails from your service provider.
Receiving an email
- Press Menu > Messaging > Mobile Email.
- Select an email >
Using instant messenger
Use Instant Messenger (IM) to send and receive short, simple messages that are delivered immediately.
Messaging
Starting an instant messenger
- Press Menu > Messaging > IM.
- Select the IM application > Select.
- Enter login and password > Sign In.
Viewing the conversation log
You can view the conversations log in the Instant Messenger Saved History.
Reveal
4
natural_image
Line drawing of a mobile phone with keypad and control panel (no text or symbols)Getting Started
Calls and address book
Messaging
Multimedia
Useful Features
Connectivity
Settings
Appendix
01
02
03
04
05
06
07
08
Multimedia
Camera
You can take pictures and record movies using the built-in camera. The photos and video clips can be saved and sent via multimedia messages.
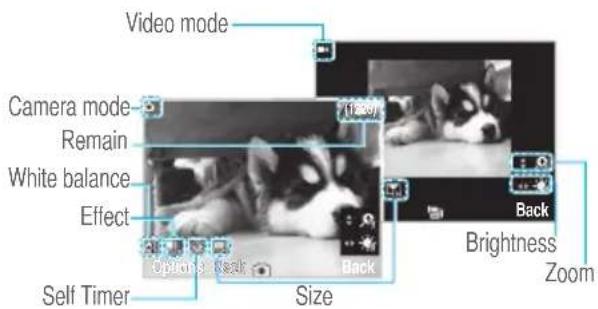
Setting camera settings
- Press Menu > My Stuff > Tools.
- Press Camera.
- Press Options > Settings to change settings prior to taking a picture.
In the options menu for camera
| Icons Name Description | |
 | |
| Self Timer Off ( ), 5 secs ( ), 10 secs ( ) | |
 |
In the options menu for video camera
| Icons Name Description | ||
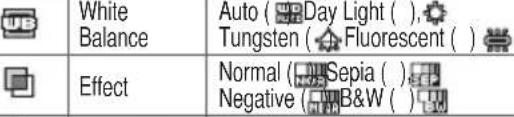
| White Balance | Auto ( Day Light ( ),Tungsten ( Fluorescent ( ) | |
| Effect | Normal ( Sepia ( ),Negative ( B&W ( ) | |
| Self Timer Off ( ), 5 secs( ), 10 secs( ) | ||
| Resolution | 176x144 (MMS) ( ),176x144 (320x240 ( ),Video Share( ) | |
| Advanced | Video Quality, Sound Recording, Save Location, Timer Sound, File Format, Default File Name | |
Zoom in and out
- Press ▲/▼. It ranges from x1 to x4.
Increasing or decreasing the brightness
- Press ◀/▶. It ranges from -2 to +2.
Taking a picture
- Press ☐ in standby mode or press Menu > My Stuff > Tools.
- Press Camera.
- Focus on the object > 🎨 or press Options > Capture.
note: Your photo will be saved automatically to My Stuff > Picture > Camera.
Changing to video camera mode
- Press 📄 in standby mode or press Menu > My Stuff > Tools > Camera.
- Press Options while camera mode is activated.
-
Press Video Camera Mode.
-
Focus on the object > 🎨 or press Options > Record.
- Record the motion > Stop.
note: Your video will be saved automatically to My Stuff > Video.
Viewing the taken picture
- Press ☐ in standby mode or press Menu > My Stuff > Tools > Camera.
- Press Options > Photo Album.
- Select the picture >
After taking pictures
| To Press | |
| Send a multimedia message | Options > Send > as Multimedia Message |
| Send using Bluetooth | Options > Send > via Bluetooth |
| Upload photos on the web | Options > Send > to HP's Snapfish |
| Set as wallpaper | Options > Set as > Wallpaper |
| Set as address book | Options > Set as > Caller ID |
| Delete | Options > Delete |
| Rename | Options > Rename |
To Press
View photo's information Options > Properties
Recording a video
- Press Menu > My Stuff > Tools > Video Camera.
- Focus on the object > 🎨 or press Options > Record.
- Press Stop to stop.
- Press Options > Play to play the video clip.
- Press ☐ to go back to preview mode.
Changing to camera mode
- Press Menu > My Stuff > Tools > Video Camera.
- Press Options while video camera mode is activated.
- Press Camera Mode.
For details on taking a picture, see page 49.
Viewing the recorded video clip
- Press Menu > My Stuff > Tools > Video Camera.
- Press Options > Video Album.
- Select the video clip > 🎨.
After saving recorded video clips
| To Press | |
| Send a multimedia message | Options > Send > as Multimedia Message |
| Send using Bluetooth | Options > Send > via Bluetooth |
| View recorded video clip | Options > Play |
| Delete | Options > Delete |
| Rename | Options > Rename |
| View the information | Options > Properties |
During recording a video
| To Press |
| Receive an incoming call ↻ |
| Stop recording Stop |
Photoalbum
You can view, send, save to your phone or an external memory card and also delete photos. JPEG format is supported, and other formats are saved in the Picture folder.
note: To access Picture, press Menu > My Stuff > Picture.
Viewing the saved pictures
- Press Menu > My Stuff.
- Press Picture > Camera.
- Select a picture > 🎨.
Setting as wallpaper in the display
- Press Menu > My Stuff.
- Press Picture > Camera.
- Select a picture > Options > Set as > Wallpaper.
Setting as caller identification
- Press Menu > My Stuff.
- Press Picture > Camera.
- Select a picture > Options > Set as > Caller ID.
Sending pictures using multimedia message
- Press Menu > My Stuff.
- Press Picture > Camera.
- Select a picture.
- Press Options > Send > as Multimedia Message.
For details on creating multimedia message, see page 39.
Uploading pictures on the web
- Press Menu > My Stuff.
- Press Picture > Camera.
- Select a picture > Options > Send > to HP's Snapfish.
Deleting multiple pictures
- Press Menu > My Stuff.
- Press Picture > Camera.
- Press Options > Multiple Select.
- Press 🎨 to select more than one picture.
- Press 🔒 to unselect.
- Press Options > Delete.
Viewing file information
- Press Menu > My Stuff.
- Press Picture > Camera.
- Select a picture.
- Press Options > Properties.
Video album
You can view, send, save and delete videos.
Playing the saved video clips
- Press Menu > My Stuff.
- Press Video.
- Select a video clip > 🎨.
Using video player controls
| To Press | |
| Pause | |
| Play | |
| Rewind | Hold ▲ |
| Fast forward | Hold ▲ |
| Control volume | Side key up or down or ▲/▼ |
Sending video clip using multimedia message
- Press Menu > My Stuff.
- Press Video.
- Select a video clip.
- Press Options > Send > as Multimedia Message.
For details on creating multimedia message, see page 39.
Deleting multiple video clips
- Press Menu > My Stuff.
- Press Video.
- Press Options > Multiple Select.
- Press 📄 to select more than one video.
- Press 📋 to unselect.
- Press Options > Delete.
Audio album
You can play, send, delete, moves to external memory or to phone the saved sounds. The supported formats are MP3, AAC, AAC+, and WMA.
Listening the recorded sound
- Press Menu > My Stuff > Audio.
- Press My Voice > select a sound > 📄.
Using sound controls
| To Press | |
| Play & Pause | |
| Stop | Options > Stop |
| Rewind | Hold ◀ |
To Press
| Fast forward | Hold ▶ |
| Control volume | Side key up or down or ▲/▼ |
Setting as a ring tone
- Press Menu > My Stuff > Audio.
- Select a sound > Options > Set as Ring Tone.
Moving or copying multiple sound to external memory
- Press Menu > My Stuff > Audio.
- Select a sound and press Options > Multiple Select.
- Press 📄 to select more than one sound file.
- Press Options > Copy to External Memory or Move to External Memory. The selected sound will copy to Audio folder in external memory card.
Sending sound file using multimedia message
- Press Menu > My Stuff > Audio.
- Select a sound file.
- Press Options > Send > as Multimedia Message.
Music Player
You can listen MP3 and audio files even your device is closed. It can be only play audio files saved in MP3, .AAC, .AAC+, and .WMA.
| When It means | |
| Music is playing | |
| Music has been paused | |
| Music has been stopped | |
note: microSD card must be inserted to transfer music to your device.
Adding music from Windows Media Player™
- Connect the USB cable to the device and the computer.
- Select Music Player > Yes.
- Open the Sync tab in Windows Media Player ^TM in your computer.
- Select the music from the list and drag and drop to your device.
note: Windows Media Player™ 10, 11 and Window XP version is required.
Playing the music
- Press Menu > AT&T Music > Music Player.
- Select the categorize using ▲/▼ to play the music.
- Select the file using ▲/▼ then press 🔒.
- Press Options > Add to Playlist to add to the playlist.
- Press Options > Stop to stop playing.
note: Music will pause when you receive an incoming call and Music will resume when the call ends.
Icons for player
| Icon Name Description | ||
| #-? | Volume 7 | |
| I | Pause | |
| ▶ | Play | |
| << | Fast Rewind | Long Press : Fast Rewind, Fast Forward |
| >> | Fast Forward | |
| << | Previous Track | Short Press : Previous, Next |
| >> | Next Track | |
| Icon Name Description | ||
| Repeat all tracks | ||
| Repeat off | ||
| Repeat Single Track | ||
| Shuffle On / Off | ON: the current list of songs are randomly shuffled for playbackOFF: songs play in order and are not shuffled | |
Making playlist
- Press Menu > AT&T Music > Music Player.
- Press Playlists > New Playlist.
- Input Playlist Name.
- Select All Music, Albums, Artists or Genres.
- Select the music file using [▲/▼] then press 🔒 to add to playlist.
- Press Done > Saved.
Add music to playlist
- Press Menu > AT&T Music > Music Player.
-
Press Playlists.
-
Select the playlist to add music > Options > Add Tracks.
- Select the music to add > 🎨 > Done.
- To remove tracks press Options > Remove Tracks > select the music by pressing 🎨 > Remove.
- To rename the playlist press Options > Rename Playlist.
- To delete the playlist press Options > Delete.
Listening music with Bluetooth headset
- While music is playing in the standby mode, press Menu > AT&T Music > Music Player.
- Press Now Playing > Options > Transfer to B/T Headset.
Viewing the information
- Press Menu > AT&T Music > Music Player.
- Select the categorize using [▲/▼] to play the music.
- Select the file using [▲/▼] then press 🔒.
- Press Options > Properties.
- Use [▲/▼] to view Title, Artist, Album, Genre, Duration, File Name, File Size, Location, Format, Bit Rate, Created, License and Sharing.
Setting as ringtone
-
Press Menu > AT&T Music > Music Player.
-
Select the categorize using [▲/▼].
-
Select the file using [▲/▼].
-
Press Options > Set as Ring Tone.
note: During playing the music the fi le can not be set as ring tone. You cannot set a fi le which is larger than 300 Kb as a ringtone.
Deleting music
- Press Menu > AT&T Music > Music Player.
- Select the music from the list.
- Press Options > Delete.
note: If the music is playing you cannot delete.
Shopping the music
- Press Menu > AT&T Music.
- Press Shop Music.
- To go to previous page press ☐.
Using music identification
- Press Menu > AT&T Music.
- Press MusicID.
- Hold the phone close to the music. Your phone will analyze the music and display the artist, title and album.
note: For the cost plan contact your nearest carrier.
Listening the radio
- Press Menu > AT&T Music.
- Press XM Radio.
Watching the music video
- Press Menu > AT&T Music.
- Press Music Videos.
Viewing Billboard information
- Press Menu > AT&T Music.
- Press Make - UR - Tones.
Launching to community
- Press Menu > AT&T Music.
- Press Community.
Launching more applications
- Press Menu > AT&T Music.
- Press Music Apps.
Music player settings
Shuffling music
- Press Menu > AT&T Music > Music Player.
- Press Settings.
- Select Shuffle.
- Select Shuffle On or Shuffle Off > 📄.
Repeating the music
- Press Menu > AT&T Music > Music Player.
- Press Settings.
- Select Repeat.
- Select Repeat All Tracks, Repeat Single Track or Repeat Off > 🎨.
Setting equalizer
- Press Menu > AT&T Music > Music Player.
- Press Settings.
- Select Equalizer.
- Select the category by using ◀/▶ > 📄.
Auto Full Screen
-
Press Menu > AT&T Music > Music Player.
-
Press Settings.
- Select Auto Full Screen.
- Select Auto Full Screen On or Auto Full Screen Off >
Removing
- Press Menu > AT&T Music > Music Player.
- Press Settings.
- Select Remove.
- Select License Data File or All Music Contents > 📄.
Media player
You can play video clips with the media player.
note: Do not use this feature illegally. Sound and video can be protected by copyright. It is illegal to copy such sound / video tracks for the purpose of selling or distribution.
Pantech does not in any way support the unauthorized use of content on your phone media player.
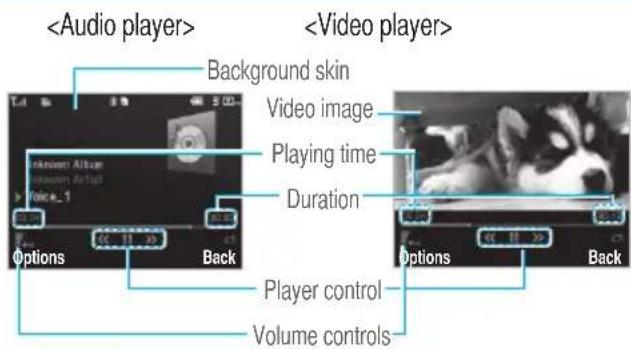
Icons for player
| Icon Name Description | ||
| Volume | ||
| Previous Next | Long Press : Fast Rewind, Fast Forward | |
| Pause Play | ||
| Repeat On | ||
Playing the video clip
- Press Menu > My Stuff.
- Press Tools > Media Player.
- Press Video.
- Select a file > Play or 📄.
- Select a file > Options > Send or Rename or Multiple Select or Delete or Delete All or Properties or View by Grid.
Playing the audio file
- Press Menu > My Stuff.
- Press Tools > Media Player.
- Press Audio.
- Select the folder > select a file > Play.
For the audio player control see page 52.
Other files
You can manage files in unsupported formats saved on your phone. It also lists files received via Bluetooth from other devices.
Viewing the list of the files
- Press Menu > My Stuff.
- Press Other Files.
Managing memory
Viewing memory status
- Press Menu > My Stuff.
- Press Used Space.
- Use ▲/▼ to view the information.
Playing games
You can download games to play with. It is easy to download and you can preview them beforehand. You will only be able to view games that are available on your mobile.
Shop games
- Press Menu > My Stuff.
- Press Games.
- Select Shop Games > Select.
- Play the demo and press BUY to download the complete game.
Reveal
5
natural_image
Blue line drawings of various mobile phones including a AT&T, a smartphone, and a C-16 phone (no text or symbols on the phones themselves)Getting Started
Calls and address book
Messaging
Multimedia
Useful Features
Connectivity
Settings
Appendix
01
02
03
04
05
06
07
08
Useful Features
Alarm
Setting an alarm
- Press Menu > My Stuff > Tools > Alarms.
- Press Select for new alarm for the first time.
- Set the Cycle, Time, Alarm Sound, Alert Type, Volume, Snooze and Power Alarm > Save.
Viewing the saved alarms
- Press Menu > My Stuff > Tools > Alarms.
Editing existing alarms
- Press Menu > My Stuff > Tools > Alarms.
- Select an alarm > Edit.
- Press Options > Delete to delete an alarm.
- Press Options > Create New to add new alarm.
Setting a simple alarm
- Press Menu > My Stuff > Tools > Alarms.
- Select Simple Alarm > Edit.
- Set the alarm schedule and press Save.
Calendar
Calendar helps you manage your schedule including your time for calls or special days. You can set a reminder on any given date with this function.
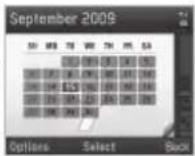
Viewing calendar
- Press Menu > My Stuff > Tools > Calendar.
note: Monthly view is displayed as default.
In the monthly view
| To Press | |
| Move to another day | ◀ for Previous▶ for Next |
| Move to another week | ▲ for Previous▼ for Next |
| Move to another month | Side key up for PreviousSide key down for Next |
Creating a new event and edit
- Select a day > Options > New Event.
-
Select Schedule, Task or Note.
-
Input the events > Save.
note: You can create events for dates from 01/01/2000 to 12/31/2099.
Notepad and voice memo
Using notepad
- Press Menu > My Stuff > Tools > Notepad.
- Press Select for the first time. To add new note press Create New.
- Write a message. Press Save or 📷.
Recording voice memo
- Press Menu > My Stuff > Tools > Voice Memo.
- Press or Record.
- Press Stop to stop recording. It will automatically save on My Voice.
Listening the recorded sound
- Press Menu > My Stuff > Audio > My Voice.
- Select a sound > Play.
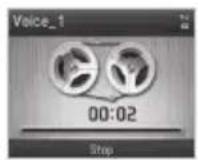
Using sound controls
- Press Menu > My Stuff > Tools > Voice Memo.
- Select to Play.
| To Press | |
| Pause | |
| Play | |
| StopOptions > Stop | |
| Control volume | Side key up or down or ▲/▼ |
Calculator, tip calculator and converter
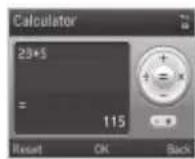
Using the calculator
- Press Menu > My Stuff > Tools > Calculator.
- Use [◀/▶/ ▲/▼/ ●] to calculate.
- Press ☐ to erase one digit.
- Press Reset to reset.
- Press ☐ to use the decimal point.
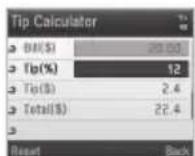
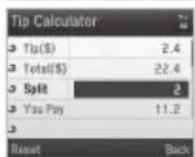
Using tip calculator
- Press Menu > My Stuff > Tools > Tip Calculator.
- Enter values for all variable fields (Bill(\), Tip(%), Split) and the corresponding calculation fields (Tip(\), Total(\$), You Pay) are updated automatically.
- Press Reset to reset.
- Press ☒ to use the decimal point.
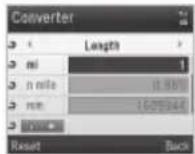
Using the converter
- Press Menu > My Stuff > Tools > Converter.
- Select the categories
- Select current unit and enter figure.
- The result will be displayed in all other unit.
Stop watch
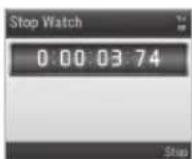
Using stop watch
- Press Menu > My Stuff > Tools > Stop Watch.
- Press Start or 📄.
- Press Stop to stop.
- Press Continue to restart.
- Press Reset to clear.
- To change to lap time, press Mode > Lap Time Mode.
- To split the stopwatch, press Mode > Split Time Mode.
Business card
You can send your information by sending it as multimedia message.
Creating your own business card
- Press Menu > Address Book > My Business Card.
- Edit the fields > Save or press 📄.
Forwarding
-
Press Menu > Address Book > My Business Card.
-
Press Options > Send This Card > Multimedia Message or Bluetooth.
- Search for device or choose the device to send via Bluetooth and press Select. Write a message for Multimedia Message.
- Press Send to and select the person to send message and press Select or 📄.
- Press Send.
Updating information
- Press Menu > Address Book > My Business Card.
- Press Edit.
- Update information.
- Press Save.
Memory information
You can view the information of your phone for Used, Audio, Games, Applications, Picture, Video, Other Files and System.
Viewing the information
- Press Menu > My Stuff > Used Space.
Reveal
6
natural_image
Blue line drawings of various mobile phones including a AT&T, a 3G remote, and a smartphone with a logo (no text or symbols on the phones themselves)Getting Started
Calls and address book
Messaging
Multimedia
Useful Features
Connectivity
Settings
Appendix
01
02
03
04
05
06
07
08
Connectivity
Bluetooth
Using the Mobile Web
Using the browser
Profile settings
Bluetooth
Bluetooth technology enables free wireless connections between electronic devices within a maximum range of 33 feet (10 meters). Bluetooth connection can be used to send images, text, business cards, calendar and notes or to connect to computers using Bluetooth technology.
Your mobile phone supports:
- Connect to PC to access internet.
- Connect to Hands-Free.
- Connect to electronic devices.
Icons for Bluetooth
| [6C=2] | Bluetooth is active |
 | Transmitting file using Bluetooth |
 | Bluetooth is active and the headset is connected |
| [76K=2] | USB is connected |
Activating
- Press Menu > Settings > Connectivity > Bluetooth > Activation.
- Select On or Off.
Adding a device
- Press Menu > Settings > Connectivity > Bluetooth > My Devices.
- Press Search or press
- The available device will display.
- To select the device press > Select. To view the details press View.
- Enter password.
note: The other device must be in pairing mode.
Sending an object
- Select the file from Menu > My Stuff > Picture, Video, Audio or Other Files.
- Press Options > Send > via Bluetooth.
- Press Search or press 📄.
- Select the device > Select.
note: If the other Bluetooth device requests pairing, the object is sent after pairing is completed. Locked object or ones containing original rights may not be forwarded.
Receiving an object
The receiving an object starts only when the receipt has been approved.
The received file will be saved in each place. For example, if you received contacts information from the sender, it will be saved in your phone's memory.
Setting the visibility
- Press Menu > Settings > Connectivity > Bluetooth > Visibility.
- Select Hide or Show.
Naming the phone
- Press Menu > Settings > Connectivity > Bluetooth > My Bluetooth Info.
- Select the Name > Edit > edit the field > Save.
note: This is what others will see in their device's display for your phone when searching for your device.
Using the Mobile Web
Accessing Mobile Web
- Press 📋 in standby mode or press Menu > Mobile Web.
note: It will access the Mobile Web homepage.
Using the browser
Accessing browser
- Press Menu > My Stuff > Applications > Browser > Home.
note: It will access provider's homepage.
Viewing bookmarks
- Press Menu > My Stuff > Applications > Browser > Bookmarks.
- To open the site, press Go.
- To send via text message, press Options > Send by MSG.
Setting new bookmarks
- Press Menu > My Stuff > Applications > Browser > Bookmarks.
- Press Options > Create New.
- Enter the field > Save or press OK.
Entering address
- Press Menu > My Stuff > Applications > Browser > Enter Address.
Connectivity
- Enter the web address > Go.
Viewing history
- Press Menu > My Stuff > Applications > Browser > History.
Setting advanced options
- Press Menu > My Stuff > Applications > Browser > Manage > Options.
- Select the category > Select.
- Select On or Off.
Viewing certificates
- Press Menu > My Stuff > Applications > Browser > Manage > Security > Certificates.
Using memory operations
- Press Menu > My Stuff > Applications > Browser > Manage > Private Data.
- To clear the cache, press Clear Cache > Yes.
- To clear the cookies, press Clear Cookies > Yes.
- To clear the history, press Clear History > Yes.
Viewing status of downloading
- Press Menu > My Stuff > Applications > Browser > Manage > Download Manager.
Profile settings
You can set profile and view Profile Name, Home URL, Connection Type, Proxy Address and Proxy Port.
Adding new profile
- Press Menu > My Stuff > Applications > Browser > Manage > Profiles.
- Press Options > Create.
- Enter the fields > Save or press OK.
Editing profile
- Press Menu > My Stuff > Applications > Browser > Manage > Profiles.
- Select other profile > Options > Edit.
Viewing default profile
- Press Menu > My Stuff > Applications > Browser > Manage > Profiles.
- Select Mobile Web > Options > View.
Deleting profile
- Press Menu > My Stuff > Applications > Browser > Manage > Profiles.
- Select a profile > Options > Delete.
01
02
03
04
05
06
07
08
Reveal
7
natural_image
Blue line drawings of various mobile phones including a flip phone, keyboard, and smartphone (no text or symbols visible)| Getting Started | 01 |
| Calls and address book | 02 |
| Messaging | 03 |
| Multimedia | 04 |
| Useful Features | 05 |
| Connectivity | 06 |
| Settings | 07 |
| Appendix | 08 |
Settings
Language
Setting up
- Press Menu > Settings > Phone > Language.
- Select Screen Text or Predictive.
- Select the language > Select.
Time and date
Setting up
- Press Menu > Settings > Phone > Time & Date.
- Select Auto Update, Time, Time Format, Date or Date Format > Select.
- Select the options > Select.
Ringtones
Setting ringtones
- Press Menu > My Stuff > Audio.
- Select the folder > select a file > Options > Set as Ring Tone.
Setting sound profile
- Press Menu > Settings > Profiles.
- Select Normal, Vibrate and Ring, Vibrate only, Silent or Flight Mode.
Decorating the display
Setting the display
You can set the Wallpaper, Clock Type and Text.
1. Press Menu > Settings > Display > Home Screen.
Setting the menu type
- Press Menu > Settings > Display > Menu Type.
Setting the color theme
- Press Menu > Settings > Display > Color Theme.
Setting the font
- Press Menu > Settings > Display > Font Style.
Setting the brightness
- Press Menu > Settings > Display > Brightness. note: Modifying brightness may affect battery life.
Setting time for backlight
- Press Menu > Settings > Display > Backlight Timer.
note: Modifying backlight time may affect battery life.
Locks
Locking the phone
- Press Menu > Settings > Security > Phone Lock > Phone Lock.
- Select On.
note: The default password is '1234'. To change the password press Menu > Settings > Security > Phone Lock > Change Password.
Locking the PIN
The Personal Identification Number is the security code that protects the phone or SIM against unauthorized use.
- Press Menu > Settings > Security > PIN > PIN Lock.
- Enter PIN code >
note: To change the PIN code press Menu > Settings > Security > PIN > Change PIN. The default PIN is '1111'.
Changing PIN 2
- Press Menu > Settings > Security > Change PIN2.
Locking the keypad automatically
You can set locking keypad automatically to prevent mistaken key presses.
- Press Menu > Settings > Security > Auto Key Lock.
- Select On.
Unlocking Auto Key Lock
- Press Menu > Settings > Security > Auto Key Lock.
- Select Off.
Changing hidden key
The hidden key is a security code for USIM Contact. You can lock the person's information in the USIM Contacts with the hidden key.
- Press Menu > Settings > Security > Change Hidden Key.
note: The default password is dependent by SIM card. (either depends on the SIM card or determined by the SIM card).
Security
Enabling and disabling
- Press Menu > Settings > Security > FDN.
- Select On or Off.
For details on fixed dialing, see page 32.
Reset
Resetting the phone
- Press Menu > Settings > Reset.
- Enter password > Master Reset.
note: It will return configuration settings to default. The default password is '1234'.
Clearing the phone
- Press Menu > Settings > Reset.
- Enter password > Master Clear.
note: It will change the setting as default and erase all personal data. The default password is '1234'.
TTY
The teletypewriter (TTY) is a telecommunications device that allows people who are deaf or hard of hearing, or who have speech or language disabilities, to communicate via a telephone.
Setting teletypewriter
- Press Menu > Settings > TTY.
- Select Disable, TTY Full, TTY Talk or TTY Hear.
- Disable: TTY mode is disabled.
- TTY Full: User who cannot talk and hear, sends and receives a text message.
- TTY Talk: User who can talk but cannot hear, receive a text message and send voice message.
- TTY Hear: User who can hear but cannot talk, sends a text message and receive voice message.
Reveal
8
natural_image
Blue line drawing of a mobile phone with keypad and buttons (no text or symbols)Getting Started
Calls and address book
Messaging
Multimedia
Useful Features
Connectivity
Settings
Appendix
01
02
03
04
05
06
07
08
Appendix
Alert message
Troubleshooting checklist
Safety information
Safety precautions
About the battery usage
FCC Hearing-Aid Compatibility (HAC) Regulations for Wireless Devices
FCC Regulatory Compliance
Warranty
Alert message
If you experience any problem while using your mobile phone, please refer to the following checklist. If the problem still persists, contact your dealer or nearest carrier.
When the "Insert SIM Card" message appears:
Make sure the SIM card is correctly installed. Check to see if the SIM card is working properly. If it does not work, try to clean the contact points of the card with a dry cloth. If it is out of order, take it to your service provider.
When the "Messages full" message appears:
The received or saved messages are full in your phone memory. You need to delete the message.
When the "Phone and SIM messages is full. Delete Messages" message appears:
The received or saved messages are full in your phone and SIM card memory. You need to delete the message.
When the "Password" message appears in Phone locked state:
Enter the phone password. The default password is "1234". If you cannot remember the password, contact the nearest carrier.
When the "Enter PIN1" message appears:
Input PIN1. If you cannot remember it, contact your service provider. You can still receive calls even if your mobile phone becomes locked after entering the incorrect PIN1 on three consecutive attempts.
When the "No Service" or "Network Search" appears:
If you cannot make/receive a call when you are indoors or undergrounds where the signal strength is poor, move toward a window or go out to an open area. If you still cannot make a connection, contact your service provider.
Troubleshooting checklist
When audio quality is poor:
End a call and try again.
When the other party cannot hear you speaking:
Your phone may be set to MUTE. Disable the MUTE function. Or your hand may be covering the microphone located below the ✗* key.
When battery lifetime is shorter than usual:
This may happen when you are in an area with low signal strength. Turn off your phone when it is not in use. Change the battery when battery energy is exhausted.
When your mobile phone does not turn on:
Make sure your battery is charged. Check to see if your phone works while recharging the battery.
When you are unable to send a message:
Either you are not registered to receive an SMS service, or you may be in an area where your network service provider cannot provide such a service.
When you are unable to make a call:
Your phone may be set to "fixed dial." Cancel the "fixed dial" function.
When you are unable to charge the battery:
This may be the result of one of the following three cases.
- Your charger may be out of order. Contact your nearest dealer.
- You may be attempting to use the phone in an overly hot/cold temperature. Try changing the charging environment.
- Your battery may have not been connected to the charger properly. Check the connector.
When you are unable to input data into your Address Book:
Your Address Book memory may be full. Try deleting some entries from your Address Book.
When you are unable to select a certain function:
You may not have subscribed to that function, or your network service provider may be in an area where such service cannot be provided. Contact your local service provider.

Safety information
The following list shows how to maintain your mobile phone, together with precautions to take.
- Keep your mobile phone and its accessories out of the reach of children and pets.
-
Maintain your mobile phone in dry conditions and keep it within normal operating temperatures. Temperatures higher than 55^ (131°F) or lower than -20^ (-4°F) may damage your phone.
-
Do not try to dry your phone in a microwave oven. If not, sparks can occur and cause an explosion or fire.
- Do not use or store your mobile phone in dusty, dirty areas.
- Do not attempt to disassemble your mobile phone.
- Do not drop or cause severe impact to your mobile phone.
- Do not use chemical products, cleaning solvents or detergents to clean your mobile phone.
- If your mobile phone does not work properly, contact your dealer immediately.
- Use only authorized batteries, battery chargers and accessories. Any malfunction or damage caused by the use of unauthorized batteries, battery chargers and accessories will void the limited product warranty.
- Ensure that the battery and battery charger do not come in contact with conductive objects.
Safety precautions
Using a mobile phone while driving may be prohibited.
Please check local laws and regulations with regard to the prohibition of mobile phone use while driving, and comply with them.
Use of your phone while you are driving may disturb your concentration and so cause an accident. Always switch your phone off to drive safely. You should use your phone in an emergency, either use a hands free device built into your car or pull over in a safe place first.

Switch off in restricted areas
Always switch your phone off in areas where mobile phone use is restricted.

Switch off in explosive or dangerous areas
Always switch your phone off in areas with explosive or dangerous materials (such as fuels, fuel stations or areas containing chemical goods) and obey any instructions or signals. Do not remove your mobile phone's battery in such areas.

Switch off in aircraft
Always switch your phone off or select Flight Mode (press the Menu > Settings > Profiles > Flight Mode) when you are in an aircraft. The electromagnetic waves emitted by your phone may affect the electronic navigation equipment in the aircraft.

Switch off in hospitals and near medical equipment
Always switch your phone off in hospitals, and obey the regulations or rules of the hospital. Switch your phone off when using medical equipment for private purposes, if possible. Always consult with the medical equipment's manufacturer or an expert regarding phone use near the medical equipment.

Installing a hands free device in your vehicle
Install vehicle hands free devices away from the steering wheel and airbag expansion area, otherwise injury may result.

Mobile phones and other electronic devices
Mobile phones emit electromagnetic waves that may affect nearby electronic devices. When it is switched on, do not place your phone close to delicate electronic equipment.

About the battery usage
Your phone is powered by a Lithium Ion (Li-Ion) battery. This means that, unlike other forms of battery technology, you can recharge your battery while some charge remains without reducing your phone's autonomy due to the "battery memory effect" inherent in those technologies.
- Do not use a damaged battery or charger.
- Do not disassemble or open crush, bend or deform, puncture or shred.
- Do not modify or remanufacture, attempt to insert foreign objects into the battery, immerse or expose to water or other liquids, expose to fire, explosion or other hazard.
- Do not put your battery into contact with conductive objects.
- Dispose of and recycle used batteries in accordance with local regulations. Do not dispose of batteries by burning; they may explode.
- Do not use an unauthorized charger.
- Only use the battery for the device for which it is specified.
- Only use the battery with a charging device that has been qualified with the device per this standard. Use of an unqualified battery or charger may present a risk of fire, explosion, leakage, or other hazard.
- Do not short circuit a battery or allow metallic conductive objects to contact battery terminals.
- Replace the battery only with another battery that has been qualified with the device per this standard, IEEE-Std-1725-2006. Use of an unqualified battery may present a risk of fire, explosion, leakage or other hazard.
– Promptly dispose of used batteries in accordance with local regulations -
Battery usage by children should be supervised.
-
Avoid dropping the phone or battery. If the phone or battery is dropped, especially on a hard surface, and the user suspects damage, take it to a service center for inspection.
- Use your battery for the specified purpose only.
– The closer you are to your network's base station, the longer your phone usage time because less battery power is consumed for the connection. - The battery recharging time varies depending on the remaining battery capacity and the battery and charger type you use.
– Battery life inevitably shortens over time. - Use an authorized battery and charger only.
- Since overcharging may shorten battery life, remove the phone from its charger once it is fully charged. Unplug the charger, once charging is complete. Leaving the battery in hot or cold places, especially inside a car in summer or winter, may reduce the capacity and life of the battery. Always keep the battery within normal temperatures.
- To prevent injury or burns, ensure that no metal objects come into contact with the + and - terminals of the battery.
FCC Hearing-Aid Compatibility (HAC) Regulations for Wireless Devices
On July 10, 2003, the U.S. Federal Communications Commission (FCC) Report and Order in WT Docket 01-309 modified the exception of wireless phones under the Hearing Aid Compatibility Act of 1988 (HAC Act) to require digital wireless phones be compatible with hearing-aids. The intent of the HAC Act is to ensure reasonable access to telecommunications services for persons with hearing disabilities.
While some wireless phones are used near some hearing devices (hearing aids and cochlear implants), users may detect a buzzing, humming, or whining noise. Some hearing devices are more immune than others to this interference noise, and phones also vary in the amount of interference they generate.
The wireless telephone industry has developed a rating system for wireless phones, to assist hearing device users find phones that may be compatible with their hearing devices. Not all phones have been rated. Phones that are rated have the rating on their box or a label located on the box.
The ratings are not guarantees. Results will vary depending on the user's hearing device and hearing loss. If your hearing device happens to be vulnerable to interference, you may not be able to use a rated phone successfully. Trying out the phone with your hearing device is the best way to evaluate it for your personal needs.
- M-Ratings: Phones rated M3 or M4 meet FCC requirements and are likely to generate less interference to hearing devices than phones that are not labeled. M4 is the better/higher of the two ratings.
•T-Ratings: Phones rated T3 or T4 meet FCC requirements and are likely to generate less interference to hearing devices than phones that are not labeled. T4 is the better/higher of the two ratings.
Hearing devices may also be rated. Your hearing device manufacturer or hearing health professional may help you find this rating. Higher ratings mean that the hearing device is relatively immune to interference noise. The hearing aid and wireless phone rating values are then added
Appendix
together. A sum of 5 is considered acceptable for normal use. A sum of 6 is considered for best use.
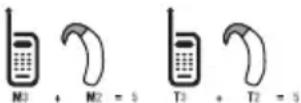
In the above example, if a hearing aid meets the M2 level rating and the wireless phone meets the M3 level rating, the sum of the two values equal M5. This is synonymous for T ratings. This should provide the hearing aid user with “normal usage” while using their hearing aid with the particular wireless phone. “Normal usage” in this context is defined as a signal quality that is acceptable for normal operation.
The M mark is intended to be synonymous with the U mark. The T mark is intended to be synonymous with the UT mark. The M and T marks are recommended by the Alliance for Telecommunications Industries Solutions (ATIS). The U and UT marks are referenced in Section 20.19 of the FCC Rules. The HAC rating and measurement procedure are described in the American National Standards Institute (ANSI) C63.19 standard.
To ensure that the Hearing Aid Compatibility rating for your phone is maintained, secondary transmitters such as Bluetooth and WLAN components must be disabled during a call. See page 68 for instructions to disable these components.
FCC Regulatory Compliance
FCC Regulatory Compliance
This device complies with Part 15 of the FCC Rules. Operation is subject to the following two conditions: (1) this device may not cause harmful interference, and (2) this device must accept any interference received, including interference that may cause undesired operation.
Your mobile device is a low power radio transmitter and receiver. When it is ON, it receives and also sends out radio frequency (RF) signals. In August 1996, the Federal Communications Commission (FCC) adopted RF exposure guidelines with safety levels for mobile devices. Those guidelines are consistent with safety standards previously set by both U.S. and international standards bodies: American National Standard Institute (ANSI), National Council of Radiation Protection and Measurements (NCRP), and International Commission on Non-Ionizing Radiation Protection (ICNRP). Those standards were based on comprehensive and periodic evaluations of the relevant scientific literature. The design of your phone complies with the FCC guidelines and applicable.
Statement according to FCC part 15.105
NOTE: This equipment has been tested and found to comply with the limits for a Class B digital device, pursuant to Part 15 of the FCC Rules. These limits are designed to provide reasonable protection against harmful interference in a residential installation. This equipment generates uses and can radiate radio frequency energy and, if not installed and used in accordance with the instructions, may cause harmful interference to radio communications. However, there is no
guarantee that interference will not occur in a particular installation. If this equipment does cause harmful interference to radio or television reception, which can be determined by turning the equipment off and on, the user is encouraged to try to correct the interference by one or more of the following measures:
– Reorient or relocate the receiving antenna.
– Increase the separation between the equipment and receiver.
- Connect the equipment into an outlet on a circuit different from that to which the receiver is connected.
- Consult the dealer or an experienced radio/TV technician for help.
Statement according to FCC part 15.21
Modifications not expressly approved by this company could void the user's authority to operate the equipment.
RF exposure FCC
For body worn operation, to maintain compliance with FCC RF exposure guidelines, use only accessories that contain no metallic components and provide a separation distance of 15mm (0.6 inches) to the body. Use of other accessories may violate FCC RF exposure guidelines and should be avoided.
This device and its antenna must not be co-located or operating in conjunction with any other antenna or transmitter.
Health and Safety Information FCC
This EUT has been shown to be capable of compliance for localized specific absorption rate (SAR) for uncontrolled environment/general population exposure limits specified in ANSI/IEEE Std. C95.1-1992 and had been tested in accordance with the measurement procedures
specified in FCC/OET Bulletin 65 Supplement C (2001) and IEEE Std. 1528-2003 Ministry of Health (Canada), Safety Code 6. The standards include a substantial safety margin designed to assure the safety of all persons, regardless of age and health. The exposure standard for wireless mobile phones employs a unit of measurement known as the Specific Absorption Rate, or SAR. The SAR limit set by the FCC is 1.6W/kg*.
* In the U.S. and Canada, the SAR limit for mobile phones used by the public is 1.6 watts/kg (W/kg) averaged over one gram of tissue. The standard incorporates a substantial margin of safety to give additional protection for the public and to account for any variations in.
** This device contains 1800 MHz GSM functions that are not operational in U.S. Territories; this filing is applicable only for 850 MHz GSM and 1900 MHz PCS operations.
Warranty
Protect Your Warranty
Read your Warranty carefully, with the special consideration to paragraph seven of the Limited Warranty for your unit.
"Warranty does not apply to... or to any product or part thereof which has suffered through alteration... mishandling, misuse, neglect or accident".
Many companies are making look alike accessories and in some cases, promoting that their product is equal to or better than the Pantech product. Be careful. Some of these products may not be compatible to use with your Pantech product and may damage the unit or cause it to malfunction.
Appendix
If service is required on your unit and it is determined that a non-Pantech accessory has created the problem with your unit, the Warranty will not apply. In addition, if the unit has already suffered irreversible damage by reason of a non-compatible accessory, the Warranty will be voided. To protect your Warranty, use only compatible accessories which cannot damage or interfere with the functioning of your Pantech product.
12 Month Limited Warranty
Pantech Wireless, Inc. (the Company) warrants to the original retail purchaser of this Pantech handheld portable cellular telephone, that should this product or any part thereof during normal consumer usage and conditions, be proven defective in material or workmanship that results in product failure within the first twelve (12) months period from the date of purchase, such defect(s) will be repaired or replaced (with new or rebuilt parts) at the Company's option, without charge for parts or labor directly related to the defect(s).
The antenna, key pad, display, rechargeable battery and battery charger, if included, are similarly warranted for twelve (12) months from date of purchase. This Warranty extends only to consumers who purchase the product in the United States or Canada and it is not transferable or assignable.
This Warranty does not apply to:
(a) Product subjected to abnormal use or conditions, accident, mishandling, neglect, unauthorized alteration, misuse, improper installation or repair or improper storage;
(b) Product whose mechanical serial number or electronic serial number has been removed, altered or defaced.
(c) Damage from exposure to moisture, humidity, excessive temperatures or extreme environmental conditions;
(d) Damage resulting from connection to, or use of any accessory or other product not approved or authorized by the Company;
(e) Defects in appearance, cosmetic, decorative or structural items such as framing and non-operative parts;
(f) Product damaged from external causes such as fire, flooding, dirt, sand, weather conditions, battery leakage, blown fuse, theft or improper usage of any electrical source.
The Company disclaims liability for removal or reinstallation of the product, for geographic coverage, for inadequate signal reception by the antenna or for communications range or operation of the cellular system as a whole.
To obtain repairs or replacement within the terms of this Warranty, the product should be delivered with proof of Warranty coverage (e.g. dated bill of sale), the consumer's return address, daytime phone number and/or fax number and complete description of the problem, transportation prepaid, to the Company by calling the number listed below or to the place of purchase for repair or replacement processing.
To locate Pantech Authorized Service Center, call: (800) 962-8622 or email HandsetHelp@Pantech.com.
Please have the following information available when you send the phone in for repair:
– A valid original Proof of Purchase
- Return address
– Daytime phone number or fax number
- Model #
- IMEI # (Look for the 15 digit IMEI # behind the battery of the device.)
– Complete description of the problem - Transportation prepaid
Other Warranty Program
You may have other warranty program with your purchase, such as warranty exchange. If so, please refer to equipment package or the original point of sale.
THE EXTENT OF THE COMPANY'S LIABILITY UNDER THIS WARRANTY IS LIMITED TO THE REPAIR OR REPLACEMENT PROVIDED ABOVE AND, IN NO EVENT, SHALL THE COMPANY'S LIABILITY EXCEED THE PURCHASE PRICE PAID BY PURCHASER FOR THE PRODUCT.
ANY IMPLIED WARRANTIES, INCLUDING ANY IMPLIED WARRANTY OF MERCHANTABILITY OR FITNESS FOR A PARTICULAR PURPOSE, SHALL BE LIMITED TO THE DURATION OF THIS WRITTEN WARRANTY. ANY ACTION FOR BREACH OF ANY WARRANTY MUST BE BROUGHT WITHIN A PERIOD OF 18 MONTHS FROM DATE OF ORIGINAL PURCHASE. IN NO CASE SHALL THE COMPANY BE LIABLE FOR ANY SPECIAL CONSEQUENTIAL OR INCIDENTAL DAMAGES FOR BREACH OF THIS OR ANY OTHER WARRANTY, EXPRESS OR IMPLIED, WHATSOEVER. THE COMPANY SHALL NOT BE LIABLE FOR THE DELAY IN RENDERING SERVICE UNDER THIS WARRANTY OR LOSS OF USE DURING THE TIME THE PRODUCT IS BEING REPAIRED OR REPLACED.
No person or representative is authorized to assume for the Company any liability other than expressed herein in connection with the sale of this product.
Some states or provinces do not allow limitations on how long an implied warranty lasts or the exclusion or limitation of incidental or consequential damage so the above limitation or exclusions may not apply to you. This Warranty gives you specific legal rights, and you may also have other rights which vary from state to state or province to province.
For technical support in the U.S. & Canada, call (800) 962-8622.
Or email: HandsetHelp@Pantech.com.
Or visit the web site: www.pantechusa.com
For all other inquiry, write to:
PANTECH WIRELESS, INC.
5607 Glenridge Dr. Suite 500 Atlanta, GA 30342
MANUAL DEL USUARIO DE REVEAL
MP3, MIDI, iMelody, MMF, WAV, SMAF, AAC+
Cámara
Cámara CMOS integrada de 1.3M
natural_image
Pure geometric diagram with concentric circles and arrows, no text or symbols presentnatural_image
Line drawing of a mobile phone showing front and side views (no text or symbols)Cámara
Altavoz
Ranura para microSD
Tecla de cámara
Antena interna
Tecla lateral
Tecla Supr
natural_image
Blue line drawings of various mobile phones including a flip phone, keyboard, and smartphone (no text or symbols visible)Inicio
natural_image
Blue line drawings of various mobile phones including a flip phone, keyboard, and smartphone (no text or symbols visible)Inicio
natural_image
Blue line drawings of various mobile phones including a AT&T, a 3G remote, and a smartphone with a logo (no text or symbols on the phones themselves)Inicio
natural_image
Line drawing of a mobile phone with keypad and control panel (no text or symbols)Inicio
natural_image
Blue line drawings of various mobile phones including a AT&T, a smartphone, and a C-16 phone (no text or symbols on the phones themselves)Inicio
natural_image
Blue line drawings of various mobile phones including a AT&T, a 3G remote, and a smartphone with a logo (no text or symbols on the phones themselves)Inicio
natural_image
Blue line drawings of various mobile phones including a flip phone, keyboard, and smartphone (no text or symbols visible)Inicio
natural_image
Blue line drawings of various mobile phones including a rotary keypad, keyboard, and a smartphone (no text or symbols visible)Inicio
- REVEAL USER MANUAL
- Specifications
- Design
- Displays
- Melodies
- Camera
- Dimensions & Weight
- Operating Frequency
- Phone overview
- Side key
- QWERTY keypad view
- CAPS/Shift key
- Function key
- Delete key
- Enter key
- Space key
- Using shortcuts
- Menu overview
- Address Book
- Messaging
- IM Mobile Email
- AT&T GPS
- My Stuff
- AT&T Music
- CV Settings
- Quick & easy
- Contents
- Getting Started
- Calls and address book
- Messaging
- Multimedia
- Useful Features
- Connectivity
- Settings
- Appendix
- Reveal
- 1
- Getting Started
- SIM card and battery
- About your SIM card
- About your battery
- Installing/removing SIM card and battery
- To charge your battery
- Turn phone on/off
- To turn on
- To turn off
- Keypad lock
- Locking the keypad
- Unlocking the keypad
- Memory card
- Inserting and removing the memory card
- Using memory card
- Resetting the card
- To copy the file to the card
- To move the file to the card
- To delete the file from the card
- To move the file from the card to the computer
- Assigning the menu
- Updating software
- To update the software
- To view the version of software
- Using the QWERTY key pad
- Using the multitask menu
- Multitask functions
- 2
- Calls and address book
- Make, receive and end calls
- Making a call
- Answering a call
- Ending a call
- Rejecting a call
- Making a call using call list
- Making a call during a call
- Switching between two calls
- Making an international call
- Making an emergency call
- Replying to a missed call
- Answering a second call n
- Using video share
- Making video share call
- Turning off the speakerphone
- Stopping video share
- Increasing or decreasing the brightness
- Zoom in and out
- Stopping the recording
- Ending video share
- Receiving video share
- Options during a call
- Microphone off and on
- Talking on speaker
- Putting a call on hold and returning n
- Returning to a held call
- Multi-party calls ®
- Making a multi-party call
- Having a private conversation with one participant
- Removing one participant from a multi-party call
- Searching for a number in the address book during a call
- Finding a name manually in the address book
- Viewing the details of the highlighted entry in the address book
- Reading a message during a call
- Entering a message during a call
- Viewing calendar during a call
- Entering a notepad during a call
- Voice recording
- Setting DTMF
- Call settings
- Setting auto redial
- Answering by pressing any key
- Settings for video share
- Turning the alert on/ off
- Setting for automatic recording
- Setting for service
- Setting for profile
- Setting recording location
- Checking all calls
- Viewing missed calls
- Viewing received calls
- Viewing dialed calls
- Viewing Ranking calls
- Deleting call logs
- Viewing call time
- Resetting all call times
- Viewing data transmitted information
- Speed dialing
- Setting speed dial
- Changing speed dialing person
- Removing from speed dial
- Using the address book
- Viewing the contact list
- Searching for a phone number
- Calling from the contact list
- Forwarding contact details
- Deleting a contact
- Adding a contact
- Making groups
- Caller identification
- Caller identification n
- Using your headset
- While in standby mode
- While the phone is closed
- Service numbers and fixed dialing
- Calling your service numbers\$
- Viewing the fixed dialing list
- 3
- Entering text
- Useful keys
- Key characters by language
- Predictive mode
- Alphabet input mode
- Numeric mode
- Symbol mode
- Managing memory
- Moving a message to SIM
- Deleting a message in a mailbox
- Deleting multiple messages
- Replying to a message
- Viewing memory space information
- Receiving messages
- Viewing a new message
- Reading a message from the inbox
- Saving the sender address from a received message
- Saving the object in the received multimedia message
- Listening to voice message
- Loading URL using Push message
- Save connection setting using Configuration message
- Creating and sending text messages
- Sending new text message
- Finding all sent messages
- Creating multimedia messages
- Adding a saved picture to the message
- Adding a new picture to the message
- Adding a saved video to the message
- Adding a new video to the message
- Stop.
- Adding a recorded voice memo to the message
- Adding a new voice memo to the message
- Adding other file to the message
- Message templates
- Adding the message as a template
- Sending a message with template
- Message settings
- Setting message center
- Setting profiles for multimedia message
- Setting for sending multimedia message
- Setting for receiving multimedia message
- Setting e-mail gateway
- Setting for receiving notice for push message
- Voice message settings
- Setting for receiving voice message
- Receiving an email
- Using instant messenger
- Starting an instant messenger
- Viewing the conversation log
- 4
- Multimedia
- Setting camera settings
- Taking a picture
- Changing to video camera mode
- Viewing the taken picture
- To Press
- Recording a video
- Changing to camera mode
- Viewing the recorded video clip
- Photoalbum
- Viewing the saved pictures
- Setting as wallpaper in the display
- Setting as caller identification
- Sending pictures using multimedia message
- Uploading pictures on the web
- Deleting multiple pictures
- Viewing file information
- Video album
- Playing the saved video clips
- Sending video clip using multimedia message
- Deleting multiple video clips
- Audio album
- Listening the recorded sound
- Setting as a ring tone
- Moving or copying multiple sound to external memory
- Sending sound file using multimedia message
- Music Player
- Adding music from Windows Media Player™
- Playing the music
- Making playlist
- Add music to playlist
- Listening music with Bluetooth headset
- Viewing the information
- Setting as ringtone
- Deleting music
- Shopping the music
- Using music identification
- Listening the radio
- Watching the music video
- Viewing Billboard information
- Launching to community
- Launching more applications
- Music player settings
- Shuffling music
- Repeating the music
- Setting equalizer
- Auto Full Screen
- Removing
- Media player
- Playing the video clip
- Playing the audio file
- Other files
- Viewing the list of the files
- Viewing memory status
- Playing games
- Shop games
- 5
- Useful Features
- Alarm
- Setting an alarm
- Viewing the saved alarms
- Editing existing alarms
- Setting a simple alarm
- Calendar
- Viewing calendar
- Creating a new event and edit
- Notepad and voice memo
- Using notepad
- Recording voice memo
- Using sound controls
- Calculator, tip calculator and converter
- Using the calculator
- Using tip calculator
- Using the converter
- Stop watch
- Using stop watch
- Business card
- Creating your own business card
- Forwarding
- Updating information
- Memory information
- 6
- Connectivity
- Bluetooth
- Activating
- Adding a device
- Sending an object
- Receiving an object
- Setting the visibility
- Naming the phone
- Using the Mobile Web
- Accessing Mobile Web
- Using the browser
- Accessing browser
- Viewing bookmarks
- Setting new bookmarks
- Entering address
- Viewing history
- Setting advanced options
- Viewing certificates
- Using memory operations
- Viewing status of downloading
- Profile settings
- Adding new profile
- Editing profile
- Viewing default profile
- Deleting profile
- 7
- Settings
- Language
- Setting up
- Time and date
- Ringtones
- Setting ringtones
- Setting sound profile
- Decorating the display
- Setting the display
- Setting the menu type
- Setting the color theme
- Setting the font
- Setting the brightness
- Setting time for backlight
- Locks
- Locking the phone
- Locking the PIN
- Changing PIN 2
- Locking the keypad automatically
- Unlocking Auto Key Lock
- Changing hidden key
- Security
- Enabling and disabling
- Reset
- Resetting the phone
- Clearing the phone
- TTY
- Setting teletypewriter
- 8
- Appendix
- Alert message
- Troubleshooting checklist
- When you are unable to make a call:
- When you are unable to charge the battery:
- When you are unable to input data into your Address Book:
- When you are unable to select a certain function:
- Safety information
- Safety precautions
- Using a mobile phone while driving may be prohibited.
- Switch off in restricted areas
- Switch off in explosive or dangerous areas
- Switch off in aircraft
- Switch off in hospitals and near medical equipment
- Installing a hands free device in your vehicle
- Mobile phones and other electronic devices
- About the battery usage
- FCC Hearing-Aid Compatibility (HAC) Regulations for Wireless Devices
- FCC Regulatory Compliance
- Statement according to FCC part 15.105
- Statement according to FCC part 15.21
- RF exposure FCC
- Health and Safety Information FCC
- Warranty
- Protect Your Warranty
- Month Limited Warranty
- This Warranty does not apply to:
- Other Warranty Program
- PANTECH WIRELESS, INC.
- MANUAL DEL USUARIO DE REVEAL
- Cámara
- Tecla lateral
- Tecla Supr
Brand : PANTECH
Model : C790
Category : Smartphone