
RCD628B - Multicooker BLACK & DECKER - Free user manual and instructions
Find the device manual for free RCD628B BLACK & DECKER in PDF.


| Product Type | Multicooker |
| Brand | Black & Decker |
| Model | RCD628B |
| Capacity | 6 quarts (approx. 5.7 liters) |
| Power Consumption | 1000 watts |
| Voltage | 120 V AC, 60 Hz |
| Cooking Functions | Slow cook, rice, steam, warm, roast, sauté |
| Control Type | Digital display with push-button controls |
| Timer | Programmable up to 24 hours |
| Inner Pot | Removable non-stick aluminum pot |
| Lid | Tempered glass lid with steam vent |
| Dimensions (H x W x D) | 10 x 14 x 12 inches |
| Weight | 8 lbs (3.6 kg) |
| Cord Length | 30 inches (76 cm) |
| Housing Material | Stainless steel with plastic handles |
| Safety Features | Auto shut-off, cool-touch handles, overheat protection |
| Cleaning & Maintenance | Inner pot is dishwasher safe; exterior wipe clean with damp cloth |
| Accessories Included | Rice measuring cup, serving spatula, steam basket |
| Warranty | 2-year limited warranty |
| Repairability | Replacement parts available via customer service |
Frequently Asked Questions - RCD628B BLACK & DECKER
User questions about RCD628B BLACK & DECKER
0 question about this device. Answer the ones you know or ask your own.
Ask a new question about this device
Download the instructions for your Multicooker in PDF format for free! Find your manual RCD628B - BLACK & DECKER and take your electronic device back in hand. On this page are published all the documents necessary for the use of your device. RCD628B by BLACK & DECKER.
USER MANUAL RCD628B BLACK & DECKER
C.A.B.A. - Argentina
Chile
Carrera 17 No. 89-40
Bogotá, Colombia
Col. Centro, Cuauhtemoc,
México, D.F.
Tel. 01 800 714 2503
Nicaragua
LRM ELECTRONICA
Managua - Sinsa
Nivel Plaza Local 153
Diagonal Hotel Melia,
Caracas.
Tel. (582) 324-0969
WELCOME!
Congratulations on your purchase of the Black+Decker™ Rice Cooker. We have developed this use and care guide to ensure optimal performance and your satisfaction. Save this use and care book and register your appliance online at www.prodprotect.com/applica.
CONTENTS
Important Safeguards....18-19
Getting to Know Your Rice Cooker....20-21
Operating Instructions 21-27
Steam Cooking Chart 26
Care and Cleaning 28
Warranty 29
Please Read and Save this Use and Care Book.
IMPORTANT SAFEGUARDS.
When using electrical appliances, basic safety precautions should always be followed to reduce the risk of fire, electric shock, and/or injury, including the following:
- Read all instructions.
- Do not touch hot surfaces. Use handles or knobs.
• To protect against electrical shock, do not immerse cord, plug or base unit in water or other liquid. - Close supervision is necessary when any appliance is used by or near children.
- Do not operate appliance with a damaged cord or plug, or after the appliance malfunctions or has been damaged in any manner. Contact Consumer Support at the toll-free number listed in the warranty section.
- The use of accessory attachments not recommended by this appliance manufacturer may cause injuries.
- Do not use outdoors.
- Do not let cord hang over edge of table or counter, or touch hot surfaces.
- Do not place on or near a hot gas or electric burner, or in a heated oven.
- Extreme caution must be used when moving an appliance containing hot oil or other hot liquids.
- To disconnect, press the start/stop (apagado/encendido) button and then remove the plug from the outlet.
- Do not use appliance for other than intended use.
• This appliance is not intended for use by persons (including children) with reduced physical, sensory or mental
capabilities, or lack of experience and knowledge, unless they have been given supervision or instruction concerning use of the appliance by a person responsible for their safety.
- Unplug from outlet when not in use and before cleaning. Allow to cool before putting on or taking off parts.
- The appliance is not intended to be operated by means of an external timer or separate remote control system.
- Do not use this appliance on an unstable surface.
- Do not attempt to heat or cook non-food items in this appliance.
• Children should be supervised to ensure that they do not play with the appliance.
• This appliance is not intended for deep frying foods.
Additional Safeguards:
• To prevent damage or shock hazard, do not cook directly in cooking base. Cook only in cooking bowl provided.
- This appliance generates heat and escaping steam during use. Lift off glass lid carefully to avoid scalding, and allow water to drip into cooking bowl.
- Never use the cooking bowl on a gas or electric cooktop or on an open flame.
- Do not cut foods directly in the cooking bowl to avoid scratching.
SAVE THESE INSTRUCTIONS.
This product is for household use only.
POLARIZED PLUG (120V models only)
This appliance has a polarized plug (one blade is wider than the other). To reduce the risk of electric shock, this plug is intended to fit into a polarized outlet only one way. If the plug does not fit fully into the outlet, reverse the plug. If it still does not fit, contact a qualified electrician. Do not attempt to modify the plug in any way.
TAMPER-RESISTANT SCREW
Warning: This appliance is equipped with a tamper-resistant screw to prevent removal of the outer cover. To reduce the risk of fire or electric shock, do not attempt to remove the outer cover. There are no user-serviceable parts inside. Repair should be done only by authorized service personnel. For service, repair or any questions regarding your appliance, please call our Customer Service Line at 1-800-231-9786 (US and Canada).
ELECTRICAL CORD
- A short power-supply cord is provided to reduce the risk resulting from becoming entangled in or tripping over a longer cord.
- Longer detachable power-supply cords or extension cords are available and may be used if care is exercised in their use.
- If a long detachable power-supply cord or extension cord is used:
a) The marked electrical rating of the power cord or extension cord should be at least as great as the electrical rating of the appliance.
b) The longer cord should be arranged so that it will not drape over the countertop or tabletop where it can be pulled on by children or tripped over unintentionally.
Note: If the power cord is damaged, please contact the warranty department listed in these instructions.
GETTING TO KNOW YOUR RICE COOKER
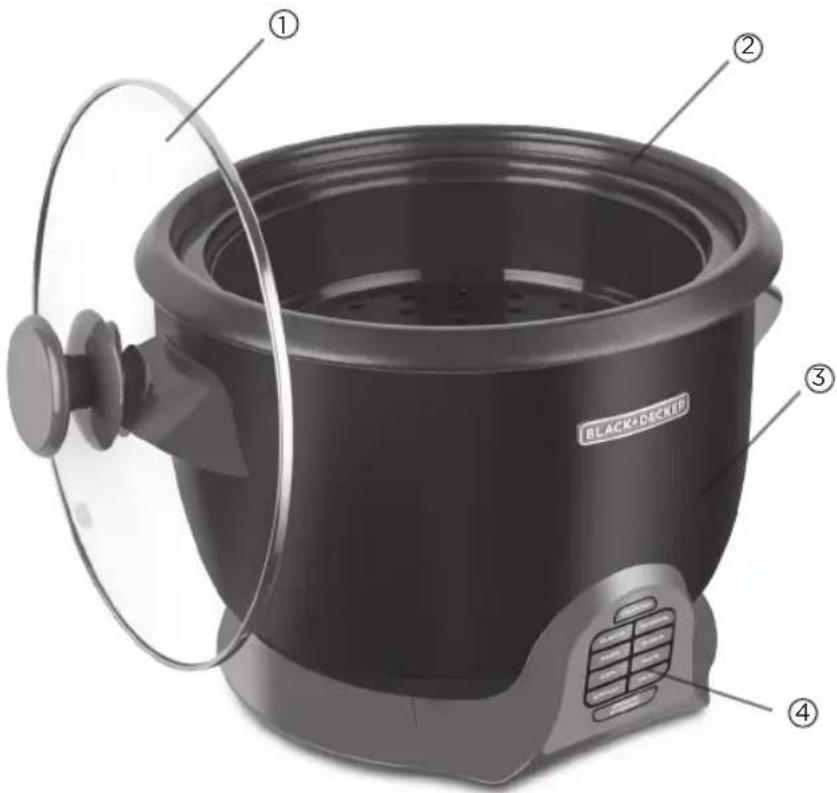
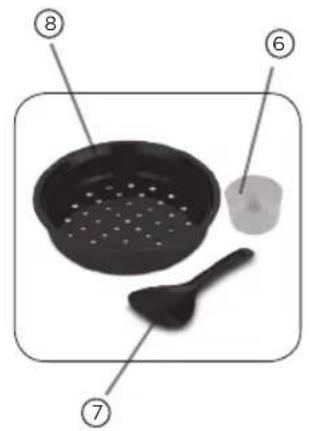
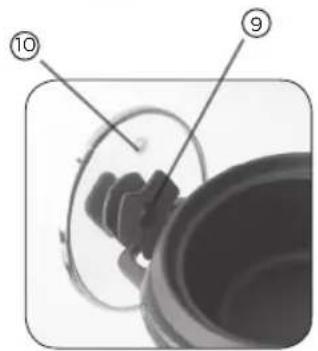

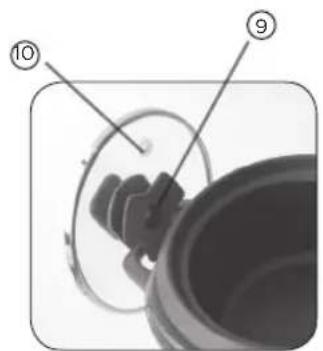
- Glass Lid with Steam Vent
- Inner Pot
- Heating Body
- Control Panel
- Power Cord (not shown)
- Measuring Cup
- Serving Spoon
- Steam Basket
- Lid Support
- Steam Vent
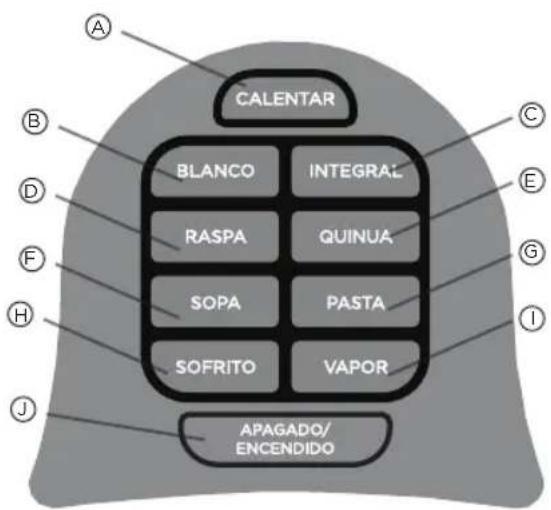
PANEL DE CONTROL
A. Keep Warm Button (Calentar)
B. White Rice Button (Arroz Blanco)
C. Brown Rice Button (Arroz Integral)
D. Crost Button (Raspa)
E. Quinoa Button (Quinua)
F. Soup Button (Sopa)
G. Pasta Button
H. Sauté Button (Sofrito)
I. Steam Cooking Button (Vapor)
J. Stop/Start Button (Apagado/Encendido)
Product may vary slightly from what is illustrated.
LEARNING ABOUT YOUR RICE COOKER
This appliance is intended for household use only.
- Multifunctions for ultimate versatility, including white rice, brown rice, quinoa, soup, pasta, stew, sauté, steam cooking, keep warm and crust.
- Crust setting for customized rice texture at bottom of pot
- Signals which clearly communicate when functions complete.
- Glass lid to monitor cooking progress without having to remove lid.
- Steaming tray for added versatility.
- 2.8-liter/15-cup inner pot with Double Nonstick coating 3 times more durable/scratch resistant than standard non-stick coatings.
- Outer metal housing with plastic stay-cool handles.
- Stable base design which keeps appliance in place on counter.
- Digital soft touch control panel with indicator lights.
BEFORE USING YOUR RICE COOKER
Before using your Multifunction Rice Cooker for first time, please follow instructions below:
- Remove any stickers and packaging materials from product.
- DO NOT IMMERSE BASE/HOUSING IN WATER OR ANY OTHER LIQUID.
- Wash inner pot and lid with soft sponge with hot, soapy water. Rinse and dry well.
NOTE: When using unit for first time, you may notice a fine smoke haze coming out from unit. This is normal. It is due to initial heating of internal components and will not impact the performance.
OPERATING INSTRUCTIONS
HOW TO USE THE CONTROL PANEL
-
Plug appliance into appropriate electrical outlet. The light on the buttons will start blinking until one of the function buttons is selected.
-
Cooking Function Buttons- press to select desired cooking function:
• White Rice (Arroz Blanco)
• Brown Rice (Arroz Integral)
- Quinoa
- Soup (Sopa)
- Pasta
• Sauté (Sofrito)
- Steam (Vapor)
- Keep Warm (Calentar)
- Crust (Raspa)
Press Start/Stop button (Encendido/Apagado) to start or stop a cooking function. It must be pressed to change from one cooking function to another.
USING THE MULTIFUNCTION RICE COOKER
SAUTÉ FUNCTION
A This function was designed to give you control when sautéing and needs to be controlled manually as follows:
- Remove lid and place food inside unit.
- Plug unit into appropriate electrical outlet. The light on the buttons will start blinking.
- Press Sauté Button (Sofrito) and then press Start/Stop Button (Encendido/Apagado). Both Sauté and Start/Stop Button Lights will be solid, indicating selected function has started.
- Unit will pre-heat the inner pot and signal sound when ready. You can now start sautéing.
- This function requires close supervision and needs to be controlled manually.
- Skip this step if you are planning to cook rice. If you wish to sauté only, press Start/Stop Button when you achieve desired results.
NOTE: Do not use a metal spoon to stir food inside inner pot since that might damage ceramic non-stick coating, which could affect performance in the long term.
- Until will turn off automatically after one hour and go back to the stand by mode. Disconnect plug from wall outlet when not in use.
WHITE RICE AND BROWN RICE FUNCTIONS
If you would like to sauté prior to cooking white rice or brown rice, please refer to Sauté Function section. Once you are done sautéing your ingredients, follow instructions below.
Your Multifunction Rice Cooker allows you to choose whether or not you would like a crust on the bottom.
IF YOU WISH TO HAVE A CRUST ON THE BOTTOM, PRESS THE CRUST BUTTON RASPA BEFORE PRESSING THE WHITE RICE OR BROWN RICE BUTTON. THE CRUST LIGHT WILL BE SOLID.
IF YOU DO NOT WISH TO HAVE A CRUST ON THE BOTTOM, YOU WILL NOT HAVE TO PRESS ANY BUTTON. THE KEEP WARM FUNCTION IS THE DEFAULT.
You may also use the white rice or brown rice functions without sautéing any ingredients by simply following these instructions:
- Place rice and water inside inner pot.
-
Measure raw rice for desired amount with measuring cup (160 ml) provided. One cup of uncooked rice will make about two cups of cooked rice. Add rice to inner pot. NOTE: Wash rice in a separate bowl, prior to cooking, if desired.
-
For white rice, fill the cooking bowl with water to the line that matches the number of rice cups being cooked. Add butter, oil, or seasonings as desired. When cooking brown rice add one more cup of water.
-
Set inner pot into rice cooker. Make sure inner pot sits directly in contact with heating plate by turning it slightly from right to left until seated properly. Cover with lid.
WHEN USING WHITE RICE AND BROWN RICE MODES, DO NOT OPERATE UNIT UNCOVERED. STEAM IS GENERATED DURING USE.
-
Plug unit into appropriate electrical outlet.
-
The light on the buttons will start blinking.
-
Press White Rice Button "Arroz Blanco" or Brown Rice Button "Arroz Integral" and then press Start/Stop Button (Encendido/Apagado) to start automatic cooking process. The lights for selected function button and Start/Stop button will be solid, indicating selected function has started. IMPORTANT: Lift and remove lid carefully to avoid scalding and allow water to drip into inner pot. Use paddle or another long handheld utensil to scoop and mix rice. After mixing, cover inner pot with lid.
-
IF YOU INITIALLY SELECTED TO HAVE A CRUST ON THE BOTTOM, the unit will switch to Crust Function and stay on for 27-33 minutes, depending on the quantity of rice. When finished, it will signal, the Crust light will go off, and the Keep Warm light will go on. IF YOU DID NOT INITIALLY SELECT TO HAVE A CRUST ON THE BOTTOM, the unit will switch automatically to the default Keep Warm function. The rice cooker will signal sound when the rice is ready and the Keep Warm light will turn on. Rice cooker will keep rice warm for up to 3 hours and then will turn off.
NOTE: You can interrupt, at any time, cooking or keep warm modes by pressing Start/Stop Button(Encendido/Apagado). Unit will go back into standby mode with the Start/Stop Button light blinking.
- Allow appliance to cool completely before cleaning. Disconnect plug from wall outlet when not in use.
QUINOA FUNCTION
-
Place quinoa and water inside pot.
-
Measure raw quinoa for desired amount with measuring cup (160 ml) provided. One cup of uncooked quinoa will make about two cups of quinoa for a maximum of 12 cups uncooked quinoa. Add quinoa to inner pot.
NOTE: Wash quinoa in a separate bowl, prior to cooking, if desired. For softer quinoa, we suggest preparing quinoa and water in the inner pot and letting soak for 10-20 minutes before cooking.
- Using measuring cup, add amount of water to quinoa inside inner pot.
| For Every Cup* Type | Water Quantity | |
| 180 ml Raw Qu | noa 2 cups of water |
*The cup provided with the unit.
NOTE: You may need to adjust quantity of water depending on kind of quinoa you are cooking and how moist you prefer it. For stickier quinoa, add slightly more water. For fluffier quinoa, use slightly less water. You may also need to adjust water quantity by adding more water if you are using rice cooker at a high altitude.
-
Set inner pot into unit. Make sure inner pot sits directly in contact with heating plate by turning it slightly from right to left until seated properly. Cover with lid. WHEN USING QUINOA MODE, DO NOT OPERATE UNIT UNCOVERED. STEAM IS GENERATED DURING USE.
-
Plug unit into appropriate electrical outlet.
-
The buttons will start blinking.
-
Press Quinoa Button and then press Encendido/Apagado Button to start automatic cooking process. The lights for Quinoa Button and Start/Stop Button will be solid, indicating selected function has started.
IMPORTANT: If you use sauté function, you must manually turn off sauté function by pressing Encendido/Apagado Button before cooking quinoa. Lift and remove lid carefully to avoid scalding and allow water to drip into inner pot. Use paddle or another long handheld utensil to scoop and mix rice. After mixing, cover inner pot with lid.
- Quinoa cooking signal sound indicates when quinoa is ready and will automatically switch to Keep Warm mode. The Keep Warm light will turn on. Rice cooker will keep quinoa warm for up to 3 hours and then will turn off and go back to standby mode.
NOTE: You can interrupt, at any time, cooking or keep warm modes by pressing Encendido/Apagado Button. Unit will go back into standby mode with the Encendido/Apagado Button lights blinking.
- Allow appliance to cool completely before cleaning. Disconnect plug from wall outlet when not in use.
SOUP FUNCTION
-
Place soup ingredients and water inside inner pot.
-
Set inner pot into unit. Make sure inner pot sits directly in contact with heating plate by turning it slightly from right to left until seated properly. Cover with lid. WHEN USING SOUP COOKING MODE, DO NOT OPERATE UNIT UNCOVERED. STEAM IS GENERATED DURING USE.
-
Plug unit into appropriate electrical outlet.
-
The buttons will start blinking.
-
Press Soup Button and then press Encendido/Apagado button to start soup cooking process. Both Soup and Encendido/Apagado button lights will be solid, indicating selected function has started. To mix ingredients, lift and remove lid carefully to avoid scalding and allow water to drip into inner pot. Use paddle or another long handheld utensil to scoop and mix soup ingredients. After mixing, cover inner pot with lid.
-
Unit will cook soup for 50-60 minutes. Once it finishes the cooking process, unit signal will sound, indicating soup is ready. It will automatically switch to Keep Warm mode. The Keep Warm light will turn on. Unit will keep soup warm for up to 3 hours and then it will turn off and go back to standby mode.
NOTE: You can interrupt at any time by pressing Start/ Stop Button . Unit will go back into standby mode with the Start/Stop Button light blinking.
- Allow appliance to cool completely before cleaning. Disconnect plug from wall outlet when not in use.
PASTA FUNCTION
-
Place desired amount of water inside inner pot. Avoid adding more water than 10 cup water level to prevent spillage.
-
Set inner pot into unit. Make sure inner pot sits directly in contact with heating plate by turning it slightly from right to left until seated properly. Cover with lid to boil faster.
-
Plug unit into appropriate electrical outlet.
-
Encendido/Apagado Light will start blinking.
-
Press Pasta Button and then press Encendido/Apagado Button to start boiling water. Both Pasta and Encendido/Apagado Button Lights will be solid, indicating selected function has started.
-
Once unit signal sounds, lift and remove lid carefully to avoid scalding and allow water to drip into inner pot. Add pasta to boiling water. Unit will cook pasta for 10 minutes. Do not cover with lid. To stir pasta, use paddle or another long, handheld utensil.
-
Once it finishes, unit signal will sound, indicating that pasta is ready. It will automatically turn off, going back into the standby mode with the lights blinking. For softer pasta, keep pasta in hot water for a little longer. Filled pasta, like ravioli, may also need to be cooked for a longer period. Fresh pasta may need to be cooked for a shorter period.
NOTE: You can use the Steam Tray as a strainer to drain the water.
NOTE: You can interrupt at any time by pressing Encendido/Apagado Button. Unit will go back into standby mode with the Encendido/Apagado Button light blinking. Allow appliance to cool completely before cleaning. Disconnect plug from wall outlet when not in use.
-
Place desired amount of water inside inner pot between the 4 and 8 cups water level.
-
Place foods to be steamed on steam tray.
-
Set inner pot into unit. Make sure inner pot sits directly in contact with heating plate by turning it slightly from right to left until seated properly. Cover with lid.
WHEN USING AUTOMATIC STEAM COOKING MODE, DO NOT OPERATE UNIT UNCOVERED. STEAM IS GENERATED DURING USE.
-
Plug unit into appropriate electrical outlet.
-
Lights will start blinking.
-
Press Steam Cooking (Vapor) Button and then press Encendido/Apagado Button to start steam cooking process. Both Steam Cooking and Start Stop Button Lights will be solid indicating selected function has started. Place the steam tray on the inner pot when you hear the first signal. This signal indicates that the steam has started.
NOTE: If you wish to turn foods inside steam tray, lift and remove lid carefully to avoid scalding and allow water to drip into steam tray. Use paddle or another long, handheld utensil to scoop and mix foods. When done, cover steam tray with lid. Use protection for your hands to avoid direct contact with steam being released by unit.
- Unit will signal every 15 minutes and turn off at one hour. It will then signal and go back into standby mode with the lights blinking.
Please check food for readiness every 15 minutes. See chart bellow for approximate cooking times of different food types.
NOTE: You can interrupt at any time by pressing Encendido/Apagado Button. Unit will go back into standby mode with the lights blinking.
- Allow appliance to cool completely before cleaning. Disconnect plug from wall electrical outlet when not in use.
STEAM COOKING CHART
| FOOD AMOUNT AMOUNT OF WATER | PRE-PREP APPROX. TIME (MINUTES) | |||
| VEGETABLES | ||||
| Artichokes 4 to | 61 Liter Whole/ | trimmed | 30-32 | |
| Asparagus 0.5 kg | 2^1/2 cups | Whole/ trimmed | 10-14 | |
| Broccoli 1 bunch | 3 cups 2-inch | florets 10-14 | ||
| Carrots | 0.5 kg | 3 cups Peeled and trimmed | 10-14 | |
| Coliflor 1 medium head | 3 cups 2-inch pieces 10-14 | |||
| Corn on the cob | 4 | 3 cups 6-inches 25-30 | ||
| Green beans | 0.5 kg | 2^1/2 cups | Whole/ trimmed | 10-16 |
| Snow peas | 0.5 kg | 2^1/2 cups | Whole/ trimmed | 12-13 |
| Potatoes | 0.5 kg | 3 cups | Whole | 35-45 |
| Yellow squash or zucchini | 0.5 kg | 2^1/2 cups | Thickly sliced | 12-14 |
| POULTRY | ||||
| Chicken breasts | 700 g | 3^1/2 cups | Whole | 26-30 |
| SEAFOOD | ||||
| Lobster tails | Large | 2^1/2 cups | In shell | 12-18 |
| Large Shrimp O | 0.5 kg | 2^1/2 cups | Peeled and deveined | 16-18 |
| Salmon | 0.5 kg | 2^1/2 cups | Cut in serving size pieces | 16-18 |
| HUEVOS | ||||
| Huevos 8 | 3 cups | Whole in shell 18-25 | ||
KEEP WARM FUNCTION
- If food is not in unit yet, place food to be reheated in inner pot.
- Set the inner pot into unit. Make sure inner pot sits directly in contact with heating plate by turning it slightly from right to left until it is seated properly. Cover with lid.
- Plug unit into appropriate electrical outlet.
- The lights will start to blink.
- Press the Calentar Button and then press the Apagado/Encendido Button. Both Keep Warm and Apagado/Encendido Button Lights will be solid, indicating selected function has started.
NOTE: If you wish to turn or stir food, lift and remove lid carefully to avoid scalding and allow water to drip into inner pot. Use paddle or another long, handheld utensil to stir. When done, place lid back in unit.
NOTE: Add a small amount of water, if necessary, to avoid drying the food.
- This function needs to be controlled manually. When you achieve the desired result, press the Apagado/Encendido Button to stop the keep warm process. It will keep foods warm for up to 3 hours and then it will turn off and go back to standby mode.
NOTE: You can interrupt at any time, by pressing Apagado/Encendido Button. Unit will go back into standby mode with lights blinking. Allow appliance to cool completely before cleaning. Disconnect plug from electrical outlet when not in use.
CRUST FUNCTION
THIS FUNCTION SHOULD ONLY BE USED TO CREATE A CRUST FOR WHITE OR BROWN RICE WHICH HAS ALREADY BEEN COOKED.
- Place rice at room temperature in inner pot.
- Set the inner pot into rice cooker. Make sure inner pot sits directly in contact with heating plate by turning it slightly from right to left until it is seated properly. Cover with lid.
- Plug unit into appropriate electrical outlet.
- The lights will start to blink.
- Press the Crust Button (Raspa) and then press the Apagado/Encendido Button. Both Crust and Apagado/Encendido Button lights will be solid, indicating selected function has started.
- The unit will stay on for 45 minutes. When finished, it will signal, the Crust light will go off, and the Keep Warm light will go on. Rice cooker will keep rice warm for up to 3 hours and then will turn off and go back to standby mode.
NOTE: You can interrupt at any time by pressing Start/ Stop Button. Unit will go back into standby mode with lights blinking. Allow appliance to cool completely before cleaning. Disconnect plug from electrical outlet when not in use.
CARE AND CLEANING
This appliance should be cleaned after every use.
- Unplug unit from electrical outlet when not in use or before cleaning. Never immerse heating body in water or any other liquid. Allow rice cooker to cool completely before cleaning.
- Do not use abrasive cleaners or scouring pads or steel wool to clean rice cooker.
- Heating Body: lightly wipe exterior with a damp cloth or sponge. DO NOT IMMERSE HEATING BODY INTO WATER OR ANY OTHER LIQUID. Dry thoroughly with a soft cloth.
- Inner Pot: fill with hot water and let it sit for a while. Then wash with hot, soapy water using a sponge and dry thoroughly with a cloth. Although inner pot is dishwasher safe, we recommend hand washing.
- Lid, Measuring Cup and Paddle: wash in warm, soapy water, or use dishwasher. Rinse thoroughly and dry. CAUTION: handle lid with extreme care, as it may become slippery when wet.
- Heating Plate: grains of rice or other foreign matter may stick to heating plate. These must be removed to prevent inadequate cooking. To remove cooked rice, smooth sandpaper can be used. Smooth out and polish the spot for good contact between heating plate and bottom of inner pot.
- There are no user serviceable parts inside appliance. Do not attempt to repair appliance yourself as you could render it dangerous to use.
WARRANTY AND CUSTOMER SERVICE INFORMATION
Two-Year Limited Warranty (Applies only in the United States and Canada)
For service, repair or any questions regarding your appliance, call the appropriate 800 number listed within this section. Please DO NOT return the product to the place of purchase. Also, please DO NOT mail product back to manufacturer, nor bring it to a service center. You may also want to consult the website listed on the cover of this manual.
What does it cover?
- Any defect in material or workmanship provided; however, Spectrum Brands, Inc.'s liability will not exceed the purchase price of product.
For how long?
- Two years from the date of original purchase with proof of purchase.
What will we do to help you?
- Provide you with a reasonably similar replacement product that is either new or factory refurbished.
How do you get service?
- Save your receipt as proof of date of sale.
- Visit the online service website at www.prodprotect.com/blackanddecker, or call toll-free 1-800-465-6070, for general warranty service.
• If you need parts or accessories, please call 1-800-738-0245.
What does your warranty not cover?
• Damage from commercial use
• Damage from misuse, abuse or neglect
• Products that have been modified in any way
- Products used or serviced outside the country of purchase
• Glass parts and other accessory items that are packed with the unit
• Shipping and handling costs associated with the replacement of the unit
- Consequential or incidental damages (Please note, however, that some states do not allow the exclusion or limitation of consequential or incidental damages, so this limitation may not apply to you.)
How does state law relate to this warranty?
- This warranty gives you specific legal rights. You may also have other rights that vary from state to state or province to province.
This warranty shall not be valid where it is contrary to U.S. and other applicable laws, or where the warranty would be prohibited under any economic sanctions, export control laws, embargos, or other restrictive trade measures enforced by the United States or other applicable jurisdictions. This includes, without limitation, any warranty claims implicating parties from, or otherwise located in, Cuba, Iran, North Korea, Syria, and the disputed Crimea region.



NOTAS / NOTES





NOTAS / NOTES



www.BlackAndDeckerHome.com
RCD628B 1000 W 120 V\~ 60 Hz
Rayovac Argentina S.R.L.
Humboldt 2495 Piso# 3
C1425FUG) C.A.B.A. Argentina
C.U.I.T No. 30-70706168-1
Importado por / Imported by:
SPECTRUM BRANDS
DE MEXICO, S.A. DE C.V.
Avenida 1° de Mayo No. 120
BLACK+DECKER and the BLACK+DECKER logos and product names are trademarks of The Black & Decker Corporation, used under license. All rights reserved.
All other marks are Trademarks of Spectrum Brands, Inc.
© 2019 The Black & Decker Corporation and Spectrum Brands, Inc.
Middleton, WI 53562.
Made in China
Hecho en China
2019/10/22
T22-9001405
- Chile
- Nicaragua
- WELCOME!
- CONTENTS
- IMPORTANT SAFEGUARDS.
- Additional Safeguards:
- SAVE THESE INSTRUCTIONS.
- POLARIZED PLUG (120V models only)
- TAMPER-RESISTANT SCREW
- ELECTRICAL CORD
- GETTING TO KNOW YOUR RICE COOKER
- PANEL DE CONTROL
- LEARNING ABOUT YOUR RICE COOKER
- BEFORE USING YOUR RICE COOKER
- OPERATING INSTRUCTIONS
- HOW TO USE THE CONTROL PANEL
- USING THE MULTIFUNCTION RICE COOKER
- SAUTÉ FUNCTION
- WHITE RICE AND BROWN RICE FUNCTIONS
- QUINOA FUNCTION
- SOUP FUNCTION
- PASTA FUNCTION
- KEEP WARM FUNCTION
- CRUST FUNCTION
- CARE AND CLEANING
- This appliance should be cleaned after every use.
- WARRANTY AND CUSTOMER SERVICE INFORMATION
- What does it cover?
- For how long?
- What will we do to help you?
- How do you get service?
- What does your warranty not cover?
- How does state law relate to this warranty?
- Importado por / Imported by:
Brand : BLACK & DECKER
Model : RCD628B
Category : Multicooker