eiQ-24FHD75IS - Screen ElectriQ - Free user manual and instructions
Find the device manual for free eiQ-24FHD75IS ElectriQ in PDF.


| Product Type | LED Monitor |
| Model | eiQ-24FHD75IS |
| Screen Size | 24 inches (diagonal) |
| Resolution | 1920 x 1080 (Full HD) |
| Refresh Rate | 75 Hz |
| Panel Type | IPS (In-Plane Switching) |
| Aspect Ratio | 16:9 |
| Brightness | 250 cd/m² (typical) |
| Contrast Ratio | 1000:1 (static) |
| Response Time | 5 ms (GTG) |
| Viewing Angle | 178° horizontal / 178° vertical |
| Connectivity | HDMI, VGA, Audio Out |
| Power Supply | 100-240V AC, 50/60 Hz |
| Power Consumption | ≤ 25 W (typical), ≤ 0.5 W standby |
| Dimensions (with stand) | 540 x 410 x 180 mm (approx.) |
| Weight (with stand) | 3.5 kg (approx.) |
| VESA Mount | 75 x 75 mm |
| Stand Features | Tilt: -5° to +15° |
| Built-in Speakers | 2 x 2W |
| Cleaning Instructions | Use a soft, dry cloth; do not use liquid cleaners |
| Safety Features | Anti-glare coating, Kensington lock slot |
| Spare Parts | Power cord, HDMI cable, stand screws (included) |
| Repairability | User-replaceable stand; internal components not user-serviceable |
| General Information | Manual available in PDF at notice-facile.com |
Frequently Asked Questions - eiQ-24FHD75IS ElectriQ
User questions about eiQ-24FHD75IS ElectriQ
0 question about this device. Answer the ones you know or ask your own.
Ask a new question about this device
Download the instructions for your Screen in PDF format for free! Find your manual eiQ-24FHD75IS - ElectriQ and take your electronic device back in hand. On this page are published all the documents necessary for the use of your device. eiQ-24FHD75IS by ElectriQ.
USER MANUAL eiQ-24FHD75IS ElectriQ
natural_image
Line drawing of a flat-screen monitor with 'electric' label and stand (no text or symbols on screen)23.8 INCH SLIM LED MONITOR eiQ-24FHD75IS
Thank you for choosing electriQ Please read the user manual before using this monitor and keep it safe for future reference
Visit www.electriQ.co.uk to view our entire range of Intelligent Electricals.
CONTENTS
SAFETY INFORMATION 2
WHATS INCLUDED 4
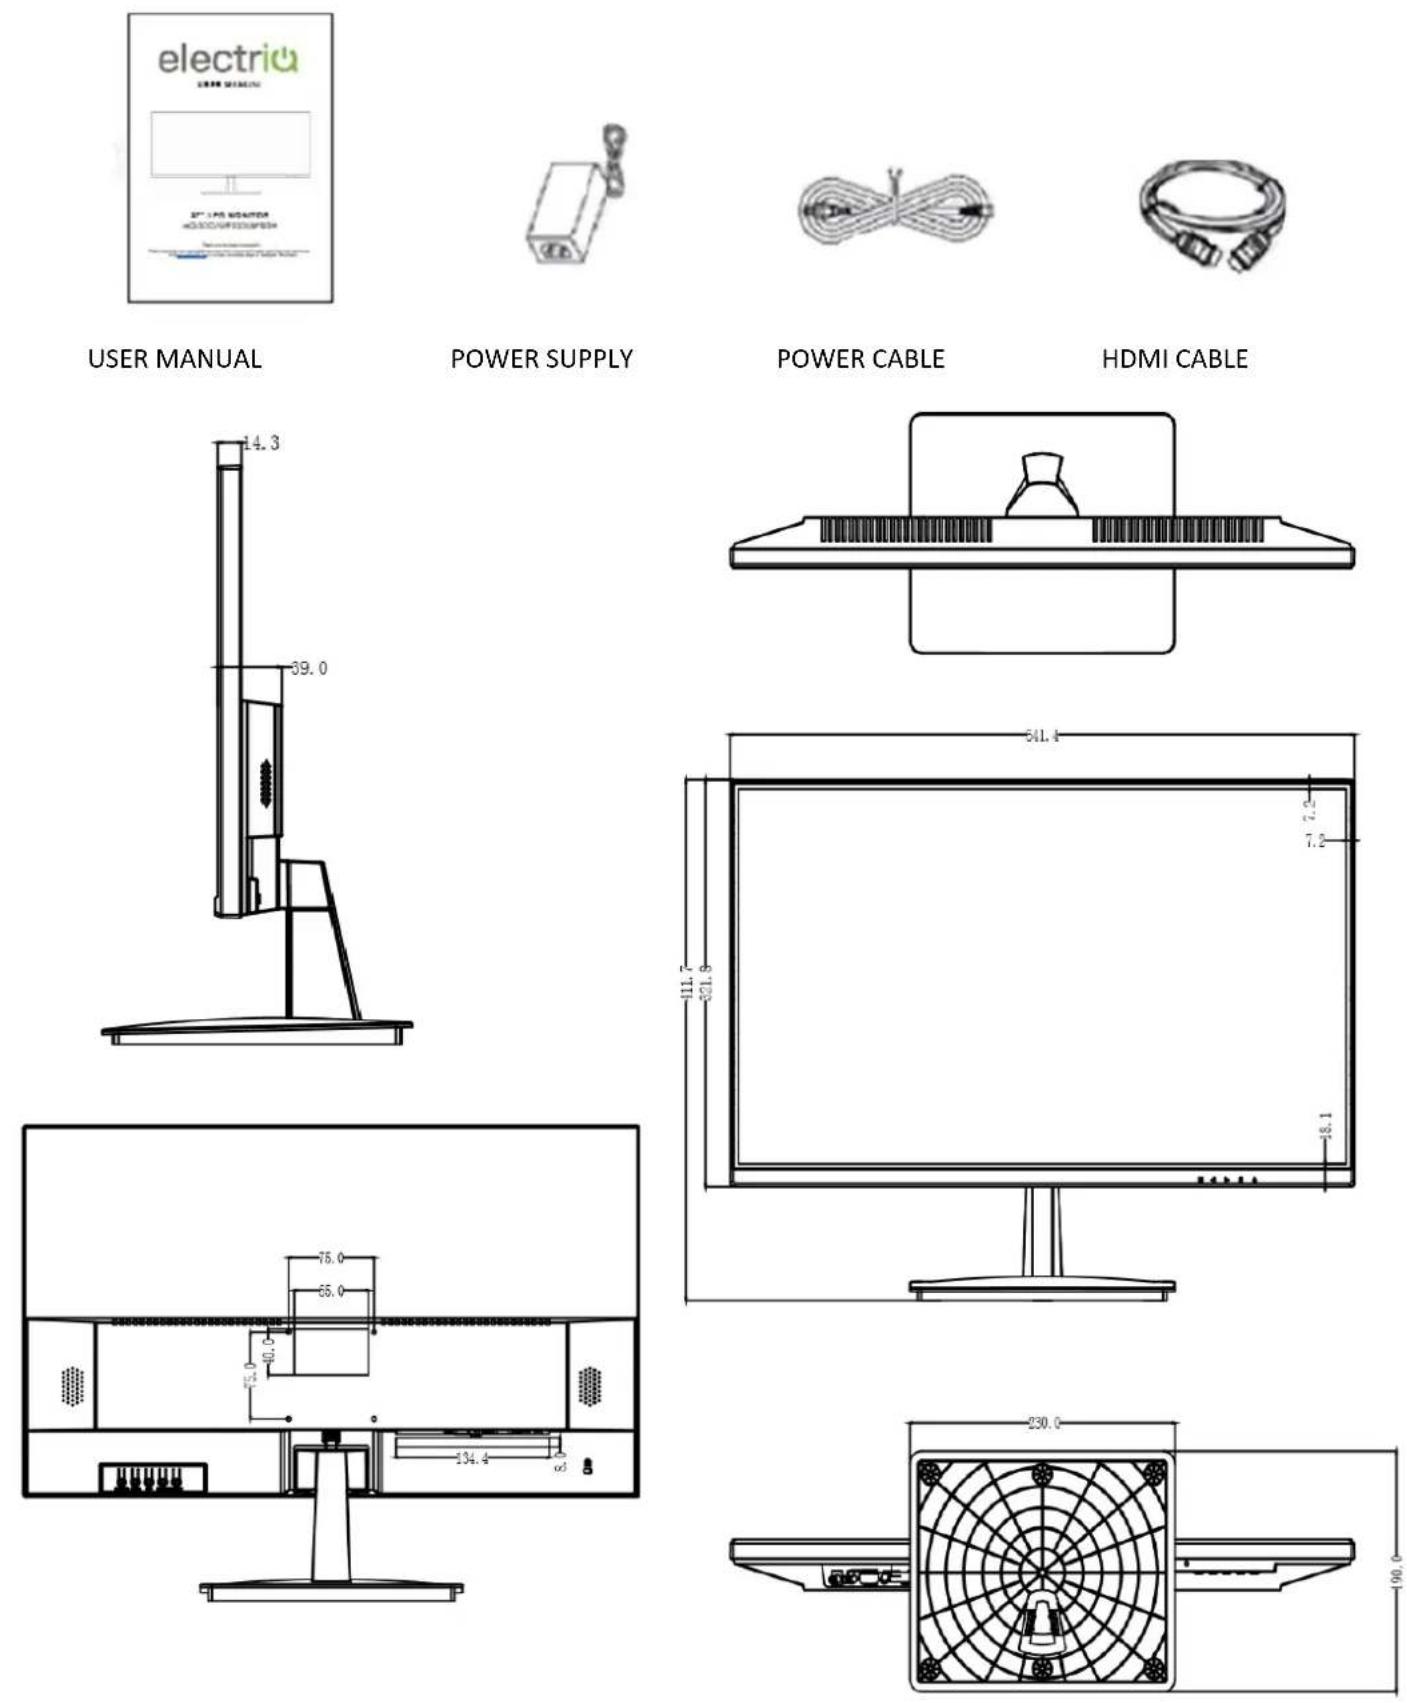
MONITOR DIMENSIONS 4
CONNECTIONS AVAILABLE ON THE MONITOR 5
WALL MOUNTING 5
GETTING STARTED 5
INITIAL SET UP 6
MENU OPTIONS 6
BRIGHTNESS 6
IMAGE SETUP 7
COLOUR SETUP 7
OSD SETUP 8
RESET 8
EXTRA 9
TECHNICAL SPECIFICATION 10
SUPPORT 11
SAFETY INFORMATION
- Read these instructions - All the safety and operating instructions should be read before this product is operated.
- Keep these instructions - The safety and operating instructions should be retained for future reference.
- Heed all warnings - All warnings on the appliance and in the operating instructions should be adhered to.
- Follow all instructions - All operating and usage instructions should be followed.
- Do not use this equipment near water, or in humid environments - The appliance should not be used near water or moisture e.g. in a wet basement or near a swimming pool.
- Clean only with a dry cloth. Do not use solvents or petroleum-based fluids.
- Do not block any ventilation openings.
- Do not install near any heat sources such as radiators, stoves or other apparatus (including amplifiers) that produce heat.
- Do not tamper with the supplied plug. This plug is a BS1363 standard plug.
- Protect the power cord from being walked on or trapped, particularly at the plug and at the point where it exits from the appliance.
• Only use attachments/accessories specified by the manufacturer. - Use only with a cart, stand, tripod, bracket or table specified by the manufacturer or sold with the apparatus. When a cart or stand is used, use caution when moving it to avoid any injuries or damage from it tipping over.
- Unplug the apparatus during lightning storms or when unused for long periods of time.
- Refer all servicing to qualified personnel. Servicing is required when the apparatus has been damaged in any way, such as if the power cord or plug is damaged, liquid has been spilled or objects have fallen into the apparatus or it has been exposed to rain or moisture, it does not operate normally or has been dropped.
- Please keep the unit in a well-ventilated environment.
- The monitor should only be connected to a mains power supply as rated on the back of the equipment.
- To prevent overload, do not share the same power socket with too many other electronic components.
- Do not place any connecting wires where they may be stepped on or tripped over.
- Do not place heavy items on the cable as this may cause damage.
-
When removing from a socket hold by the plug and not the wires.
-
Disconnect the power immediately and seek professional help if the plug or cable is damaged, liquid has spilt onto the unit, if accidentally exposed to water or moisture, if anything accidentally penetrates the ventilation slots or if the unit does not work normally.
- Do not remove the safety covers. There are no user serviceable parts inside. Trying to service the unit yourself is dangerous and may invalidate the product's warranty. Only qualified personnel should service this apparatus.
- Do not block ventilation slots on the back cover. The monitor can be placed in a cabinet but ensure at least 5cm (2") clearance all around. Do not tap or shake the screen, this may damage internal components.
- WARNING: To reduce the risk of fire or electric shock, do not expose this apparatus to rain or moisture. The apparatus shall not be exposed to dripping or splashing and objects filled with liquids, such as vases, shall not be placed on the apparatus.
- WARNING: The wall socket is used as a disconnection device and should remain readily accessible.
- WARNING: The batteries shall not be exposed to excessive heat such as direct sunlight or fire.
- Although every effort is made to maintain the accuracy of the manual, due to continuous product development, some variation from the manual is possible.
- The availability of features and settings may vary depending on the input source and method of connection.
- The available resolutions and refresh rates may be limited by the capabilities and/or settings of the source device.

AT FULL VOLUME, PROLONGED LISTENING MAY DAMAGE THE USER'S HEARING.

This warning sign is to warn of dangerous voltage inside the product.

CAUTION: To reduce the risk of electric shock, DO NOT remove the cover (or back). No user serviceable parts inside. Refer servicing to qualified service personnel.

This warning sign is to alert you of important instructions accompanying the product.
WHATS INCLUDED
CONNECTIONS AVAILABLE ON THE MONITOR

natural_image
Front panel of a computer interface showing four labeled buttons: two connected ports, one with a dotted line, one with an 'O' symbol, and one with a solid circle (no text or labels beyond icons)HDMI VGA AUDIO DC 12V
- HDMI port: Used to connect a compatible device. Supports HDMI 1.4 & 2.0;
- VGA: Used to connect a compatible VGA device.
- Audio Output Port: Used for connecting headphones, or external speakers.
- DC Input Port: Connect the supplied power supply to power the monitor
WALL MOUNTING
- The monitor is provided with mounting holes for a VESA approved wall mounting bracket (not supplied).
- The VESA mounting pattern is: 100x100mm and the size of the screws is 4 x M6 x 10 (not supplied)
- Do not use screws longer than specified or damage will occur to the internal components.
NOTE: As the monitor is considered heavy, please consult with a professional wall mount installer to perform the installation.
GETTING STARTED
MONITOR CONTROLS
M
Enter the Main OSD (On Screen Display) Menu; (Within OSD) Select submenu.

Display the HDR Menu; (Within OSD) Go Up or increase the value of the selected item.

Display LOS (Crosshairs); (Within OSD) Go Down or decrease the value of the selected item.

Display the Source menu; (Within OSD) Select signal source or Exit the menu.
POWER Turn the monitor On or Off.
INITIAL SETUP
Connect the monitor to a power outlet.
- Press the POWER button to turn it on (The indicator will be blue)
-
Connect the relevant cable to the corresponding input on the monitor. The source will be automatically detected.
-
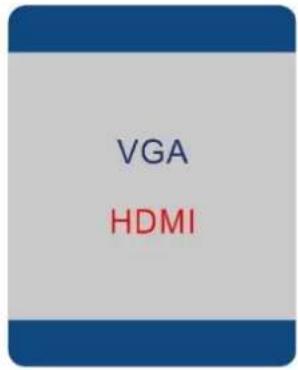
To change between inputs, press E to enter the source menu. Then use the ◀ and ▶ buttons to choose the input source between VGA and HDMI.
MENU OPTIONS
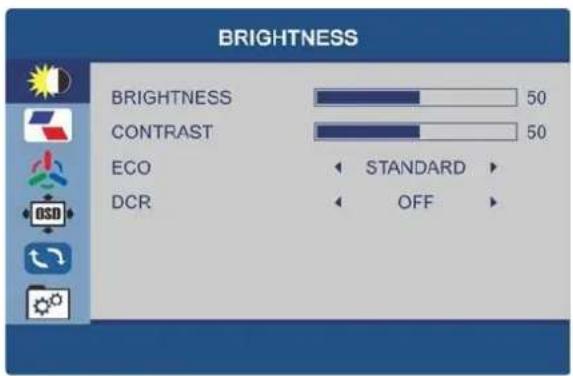
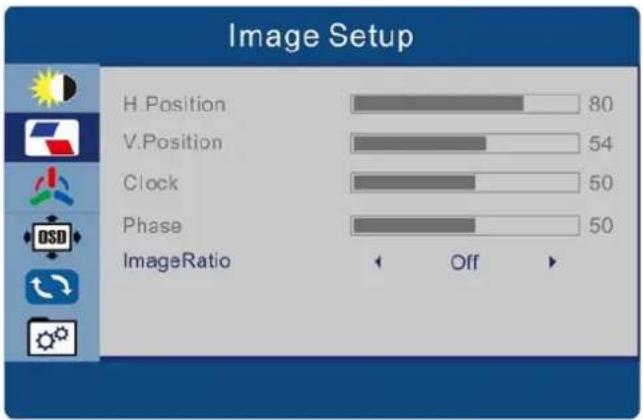
The menu for the monitor can be accessed by pressing the M button on the control panel. This menu is separated into the following sub menus: Brightness, Image Setup, Colour Setup, OSD Setup, Reset and extra. Details of the options within each menu can be found in the following section
BRIGHTNESS SETTINGS
BRIGHTNESS
Allows the adjustment of the image brightness, according to ambient light in the room between 0 and 100.
CONTRAST
Allows the adjustment of contrast between white and black areas of the image between 0 and 100.
ECO MODE
Allows selection of image settings between the following: STANDARD, TEXT, MOVIE, GAME, FPS, and RTS.
DCR
Allows the dynamic contrast of the picture to be turned ON and OFF.
IMAGE SETUP
H. POSITION (VGA ONLY)
Allows adjustment of the horizontal position of the image. Use the ◀ and ▶ buttons to horizontally move the image.
V. POSITION (VGA ONLY)
Allows adjustment of the vertical position of the image. Use the ◀ and ▶ buttons to vertically move the image.
CLOCK (VGA ONLY)
Allows adjustment of the CLOCK setting between the values of 0 and 100.
PHASE (VGA ONLY)
Can reduce video distortion and instability. Adjust between 0 and 100.
IMAGE RATIO
Allows the Image Ratio of the picture to be locked. Can be turned ON and OFF.
COLOUR SETUP
COLOR TEMP.
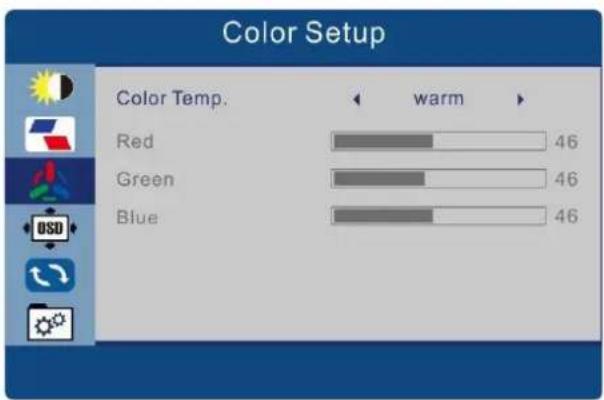
Allows adjustment of the colour settings between the following options: Warm, SRGB, User and Cool.
Within the User Colour Temp the following can be adjusted:
RED
Allows adjustment of the red element of colour for the image.
GREEN
Allows adjustment of the green element of colour for the image.
BLUE
Allows adjustment of the blue element of colour for the image.
OSD SETUP
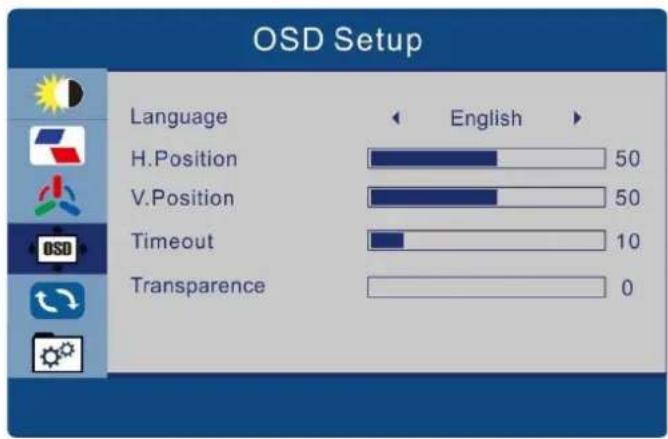
LANGUAGE
Allows selection of desired language for the OSD between ENGLISH, FRENCH, TURKISH, ITALIAN, SPANISH, PORTUGUESE, CHINESE, GERMAN, JAPANESE, POLISH, KOREAN AND DUTCH".
H. POSITION
Allows adjustment of the horizontal position of the OSD menu.
V. POSITION
Allows adjustment of the vertical position of the OSD menu.
TIMEOUT
Allows adjustment of the duration the OSD remains on the screen between 0 and 60.
TRANSPARENCY
Allows adjustment of the transparency of the OSD menu between 0 and 100.
RESET
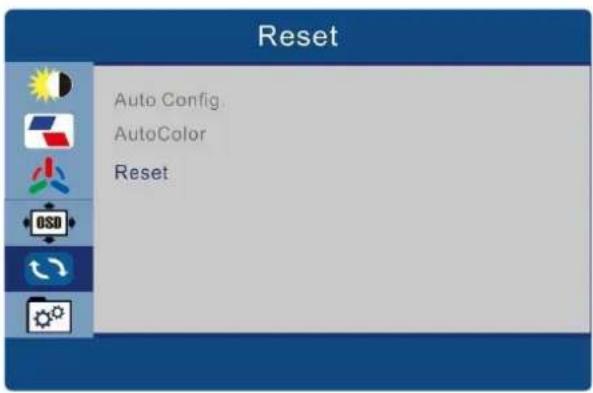
AUTO CONFIG.
Auto adjusts the image.
AUTO COLOR
Auto adjusts the colour of the image.
RESET
Returns the monitor to its factory default settings.
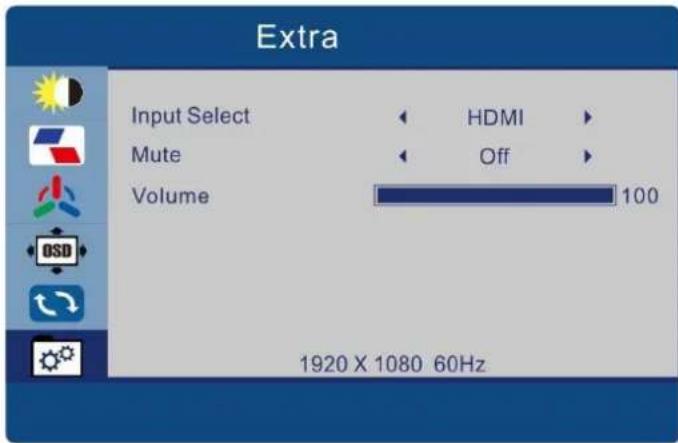
EXTRA
INPUT SELECT
Allows user to choose the signal source for the display between HDMI and VGA.
MUTE
Allows the audio output to be turned ON and OFF
VOLUME
Allows adjustment of the volume of the monitor between 0 and 100.
TROUBLESHOOTING
| Problem | Solution |
| No power | Insert the plug securely into the power outlet. |
| No picture | Ensure that the equipment is connected properly. |
| Ensure the correct input is selected. | |
| No response when buttons are pressed. | Disconnect the power and then reconnect. (The unit may not be operating properly due to lightning, static, or other factors.) |
| Noise or other interference | Electronic equipment near the unit may be causing interference. Relocate the unit or move the equipment. |
TECHNICAL SPECIFICATION
| eiQ-24FHD75IS | |
| Panel Type | 23.8 " |
| Case Type | Plastic |
| Best Resolution | 1920(H) x 1080(V) |
| Active Display Area | 527.04 (H) X 296.46 (V) |
| Pixel Pitch | 0.2475 (H) x 0.2475 (V) |
| Contrast Ratio | 1000:1 Typical |
| Brightness | 250 cd/m2 |
| Response Time | 5ms(G2G) |
| Viewing Angle | U/D: 89° / 89°, L/R: 89° / 89° |
| Display Colours | 16.7M |
| Adjustable Colour Temperature | WARM/ COOL /USER |
| Video Compatibility | Multi-Standard for NTSC / PAL |
| Aspect Ratio | 16: 9 |
| Speaker Multimedia Speakers | Right x 1 Left x 1, 2 X 3W |
| Sound Demodulation | Stereo. Audio |
| Mute | Yes |
| Operating Humidity | 20% - 70% |
| Operating Temperature | - 10 to 50 °C |
| IN/OUT INTERFACE | |
| Video Interface | HDMI + VGA |
| Audio Interface | Audio In x 1 |
| Stand Type | Desktop |
| Button Position | Right Hand Side |
| Power Voltage | DC12V / 3A |
| Power Consumption | ≤20W |
ENVIRONMENTAL PROTECTION

Recycling facilities are now available for all customers at which you can deposit your old electrical products. Customers will be able to take any old electrical equipment to participating civic amenity sites run by their local councils. Please remember that this equipment will be further handled during the recycling process, so please be considerate when depositing your equipment. Please contact the local council for details of your local household waste recycling centres.
electriQ UK SUPPORT
www.electriQ.co.uk/support
Call: 0871 620 1057
Office hours: 9AM - 5PM Monday to Friday
www.electriQ.co.uk
Unit J6, Lowfields Business Park
Lowfields Way, Elland
West Yorkshire, HX5 9DA
- INCH SLIM LED MONITOR eiQ-24FHD75IS
- CONTENTS
- SAFETY INFORMATION
- AT FULL VOLUME, PROLONGED LISTENING MAY DAMAGE THE USER'S HEARING.
- CONNECTIONS AVAILABLE ON THE MONITOR
- WALL MOUNTING
- GETTING STARTED
- MONITOR CONTROLS
- INITIAL SETUP
- MENU OPTIONS
- BRIGHTNESS SETTINGS
- BRIGHTNESS
- CONTRAST
- ECO MODE
- DCR
- IMAGE SETUP
- POSITION (VGA ONLY)
- POSITION (VGA ONLY)
- CLOCK (VGA ONLY)
- PHASE (VGA ONLY)
- IMAGE RATIO
- COLOUR SETUP
- COLOR TEMP.
- RED
- GREEN
- BLUE
- OSD SETUP
- LANGUAGE
- POSITION
- POSITION
- TIMEOUT
- TRANSPARENCY
- RESET
- AUTO CONFIG.
- AUTO COLOR
- EXTRA
- INPUT SELECT
- MUTE
- VOLUME
- ENVIRONMENTAL PROTECTION
- electriQ UK SUPPORT
Brand : ElectriQ
Model : eiQ-24FHD75IS
Category : Screen