eiQ-49SUWD144FSHQ - Screen ElectriQ - Free user manual and instructions
Find the device manual for free eiQ-49SUWD144FSHQ ElectriQ in PDF.


| Product Type | 49" Curved QLED Monitor |
| Brand | ElectriQ |
| Model | eiQ-49SUWD144FSHQ-V2 |
| Screen Size | 49" Diagonal |
| Panel Type | QLED VA Panel |
| Aspect Ratio | 32:9 |
| Maximum Resolution | 3840 x 1080 DFHD |
| Brightness | 350 cd/m² |
| Static Contrast Ratio | 3000:1 |
| Response Time (GTG) | 8ms |
| Viewing Angle (H/V) | 178° / 178° |
| Audio Output | 3W Internal Speaker |
| Power Supply | AC 100-240V~50/60Hz 2.0A |
| Power Consumption (Typical) | 65W |
| Dimensions (with Stand) | 1198.5 x 471 x 245.6 mm |
| Net Weight | 10.9 kg |
| Inputs | HDMI 1.4 (x2), HDMI 2.0 (x1), DisplayPort 1.2 (x1), Audio Out |
| Special Features | HDR, Adaptive-Sync, Multi-Window (PIP/PBP), Low Blue Light, Game Modes |
| Wall Mount Compatible | VESA compliant (extension bolts supplied) |
| Safety | Indoor use only; clean with dry cloth; do not block ventilation; no user serviceable parts |
| Care | Use dry cloth; avoid solvents; handle with two hands; do not press screen |
Frequently Asked Questions - eiQ-49SUWD144FSHQ ElectriQ
User questions about eiQ-49SUWD144FSHQ ElectriQ
0 question about this device. Answer the ones you know or ask your own.
Ask a new question about this device
Download the instructions for your Screen in PDF format for free! Find your manual eiQ-49SUWD144FSHQ - ElectriQ and take your electronic device back in hand. On this page are published all the documents necessary for the use of your device. eiQ-49SUWD144FSHQ by ElectriQ.
USER MANUAL eiQ-49SUWD144FSHQ ElectriQ
natural_image
Front view of a modern black horizontal monitor with three legs and a flat top (no visible text or symbols)eiQ-49SUWD144FSH
eiQ-49SUWD144FSHQ-V2
49 INCH
CURVED LED MONITOR
49 INCH
CURVED QLED MONITOR
Thank you for choosing electriQ
Please read the user manual before using this monitor and keep it safe for future reference
Visit www.electriQ.co.uk to view our entire range of Intelligent Electricals
CONTENTS
SAFETY INFORMATION 3
CONNECTION AND PREPARATION OF THE MONITOR 5
WHAT IS INCLUDED 5
ATTACHING THE STAND 6
WALL MOUNTING 7
CONTROL PANEL 7
INPUT / OUTPUT TERMINALS 8
INITIAL SETUP 8
QUICK MENU 9
MENU OPTIONS 9
INPUT SOURCE 10
BRIGHTNESS / CONTRAST 10
COLOUR SETTINGS 11
PICTURE QUALITY SETTINGS 12
DISPLAY 13
AUDIO 13
MULTI WINDOW 14
OSD 15
OTHER 16
TECHNICAL SPECIFICATION 17
SIMPLE TROUBLESHOOTING 18
MANUFACTURER SUPPORT 18
SAFETY INFORMATION
- Read these instructions – All the safety and operating instructions should be read before this product is installed or operated.
- Keep these instructions – The safety and operating instructions should be retained for future reference.
- Heed all warnings – All warnings on the appliance and in the operating instructions should be adhered to.
- Follow all instructions – All operating and usage instructions should be followed.
- Do not use this equipment near water – The appliance should not be used near water or moisture e.g. in a wet basement or near a swimming pool.
• This monitor is designed for indoor use only. - Clean only with a dry cloth. Do not use solvents or petroleum based fluids.
- Do not block any ventilation openings.
- Do not install near any heat sources such as radiators, stoves or other apparatus (including amplifiers) that produce heat.
- Do not tamper with the supplied plug. This plug is a BS1363 standard plug.
- Protect the power cord from being walked on or pinched, particularly at the plug and at the point where they exit from the appliance.
- Only use attachments/accessories specified by the manufacturer.
- Unplug the apparatus during lightning storms or when unused for long periods of time.
- Refer all servicing to qualified personnel. Servicing is required when the apparatus has been damaged in any way, such as power supply cord or plug is damaged, liquid has been spilled or objects have fallen into the apparatus or it has been exposed to rain or moisture, it does not operate normally or has been dropped.
- Please keep the unit in a well ventilated environment.
- The monitor should only be connected to a mains power supply with AC 100-240V\~50/60Hz
- To prevent overload, do not share the same power supply socket with too many other electronic components.
- Do not place any connecting wires where they may be stepped on or tripped over.
- Do not place heavy items on the cable as this may cause damage.
- Hold the main plug, not the wires, when removing from a socket.
- Unplug immediately and seek professional help if the plug or cable is damaged, liquid has spilt onto the monitor, if accidentally exposed to water or moisture, if anything accidentally penetrates the ventilation slots or if the set does not work normally.
- Do not remove the safety covers. There are no user serviceable parts inside.
- Do not block ventilation slots on the back cover. The monitor can be placed in a cabinet but ensure the guidance on clearances are followed.
- Do not tap or shake the screen, this may damage internal components.
- Diagrams within the manual are for illustrative purposes only, and as such there may be differences to the actual product received.
- This is a CLASS I product and as such requires an earth connection.
WARNING
Never place a monitor in an unstable location. A monitor may fall, causing serious personal injury or death. Many injuries, particularly to children, can be avoided by taking simple precautions such as:
- Use cabinets or stands recommended by the manufacturer of the monitor.
- Only use furniture that can safely support the monitor.
- Ensure the monitor is not overhanging the edge of the supporting furniture.
- Do not place the monitor on tall furniture (for example, cupboards or bookcases) without anchoring both the furniture and the monitor to a suitable support.
- Do not place the monitor on cloth or other materials that may be located between the monitor and the supporting furniture.
- Educate children about the dangers of climbing on furniture to reach the monitor or its controls.
If your existing monitor is being retained and relocated, the same considerations as above should be applied.
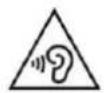
AT FULL VOLUME, PROLONGED LISTENING MAY DAMAGE THE USER'S HEARING.

This warning sign is to warn of dangerous voltage inside the product.
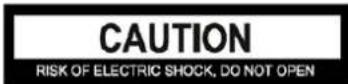
CAUTION: To reduce the risk of electric shock, DO NOT remove the cover (or back). No user serviceable parts inside. Refer servicing to qualified service personnel.

This warning sign is to alert you of important instructions accompanying the product.
ATTENTION
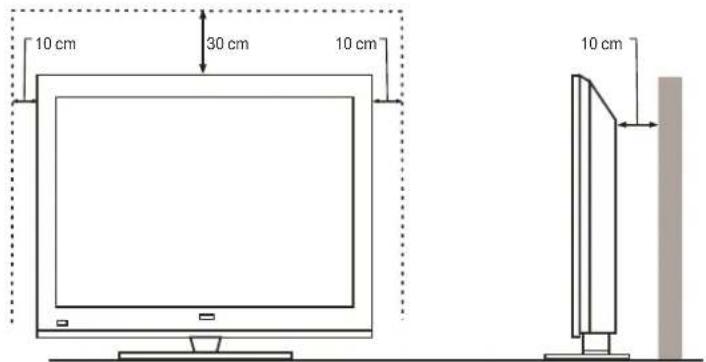
- Place the monitor on a firm and flat surface, leaving a space of at least 10cm around the unit and 30cm from the top of the unit to the ceiling or cabinet. Ensure the monitor is positioned close to the wall to avoid it falling when pushed.
natural_image
Diagram showing a hand interacting with a monitor and a cross symbol, no text or labels present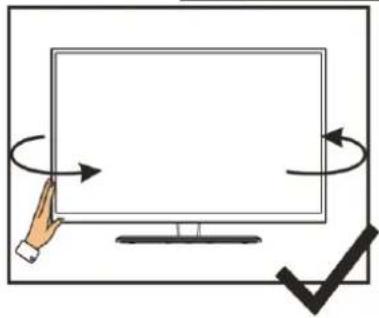
natural_image
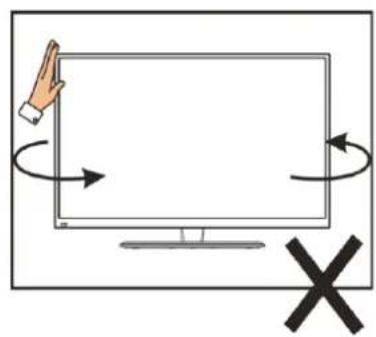
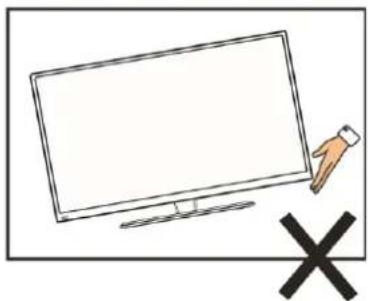
Illustration of a hand interacting with a monitor and directional arrows, no text or symbols present- When twisting the monitor, do not hold by the top, you should twist from the base.
- When lifting the monitor, do not use one hand to handle it, you should lift the monitor using two hands, ensuring pressure is not put on the screen itself.
natural_image
Simple line drawing of a flat-screen monitor with a hand pointing at it and a black X symbol below (no text or symbols on the monitor itself)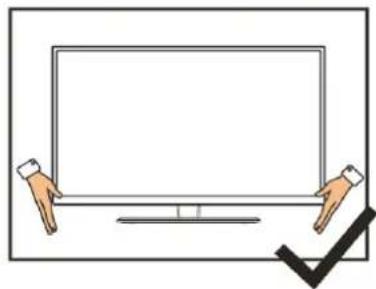
natural_image
Illustration of a monitor with hands holding it, next to a checkmark (no text or symbols present)CONNECTION AND PREPARATION OF THE MONITOR
WHAT IS INCLUDED
natural_image
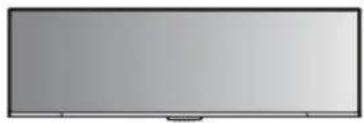
Front view of a blank flat-screen monitor with no visible text, symbols, or markingsMonitor
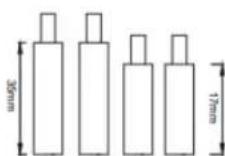
Bolts (for Mounting)
ATTACHING THE STAND
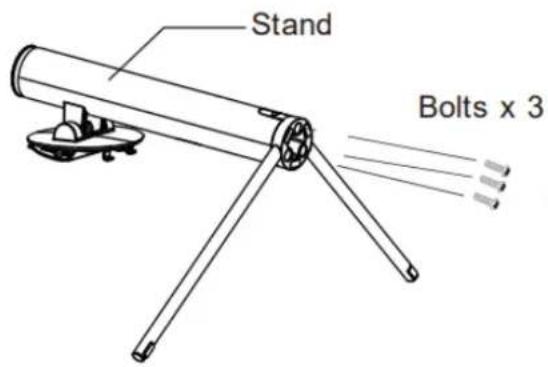
Attach the base of the stand to the upright section of the stand using the three bolts provided.
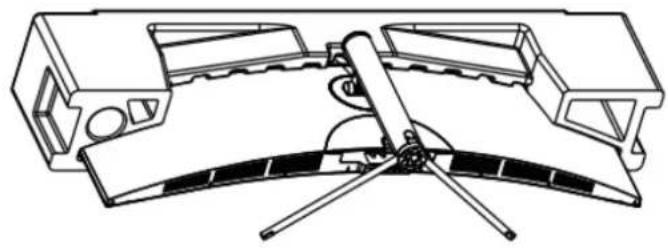
Carefully take the monitor out of the box and place upside down within the polystyrene insert, before locking the assembled stand onto the rear of the monitor.
Before removing the monitor, ensure that the stand is securely locked onto the rear of the monitor
natural_image
Technical line drawing of a mechanical component with no visible text or symbolsNOTES:
- Due to the heavy weight and dimensions of the LCD screens and their fragile nature, we recommend that they are unpacked and assembled by 2 people.
- electriQ and its distributors and dealers are not liable or responsible for damage or injury caused by improper installation, improper use or failure to observe these safety instructions. In such cases any guarantee will expire.
- The stand can be removed from the rear of the monitor by pressing the quick release button on the rear of the monitor.
CABLE MANAGEMENT
The cover can be removed from the rear of the stand. Cables can then be threaded through the stand, up to the terminals. Once the cables are in position, replace the cover on the rear of the stand.
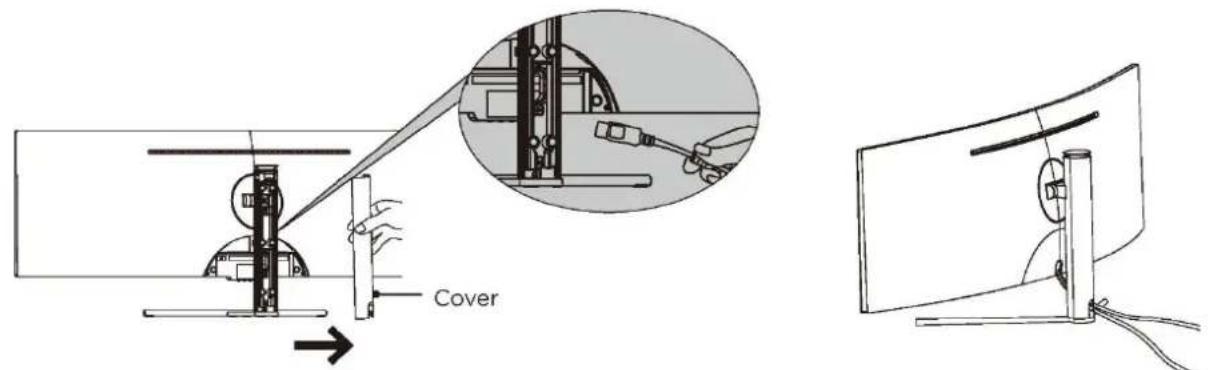
DO NOT put pressure on the screen when moving or positioning the monitor.
WALL MOUNTING
- The monitor is provided with mounting holes for a VESA approved wall mounting bracket (not supplied).
- When wall mounting, the supplied extension bolts must be fitted to the rear of the monitor to allow the bracket to fix firmly to the rear of the monitor.
- M4 x 12 bolts should be used to attach the bracket to the extension bolts.
- Do not use bolts longer than the size specified above for your model or damage will occur to the internal components.
NOTES:
- Due to the heavy weight and dimensions of the LCD screens and their fragile nature, we recommend that they are unpacked and assembled by 2 people and professional installers are used to wall mount them (Wall mounting is optional). If you do not understand the instructions, or are unsure how to install this product, please contact a professional for assembly advice and assistance.
- Careful consideration should be made regarding the location the monitor is to be wall mounted as some walls are not suitable for installation. If the monitor is to be mounted on drywall, the mount must be anchored into a wooden stud, concrete block or brick behind the drywall. Installing on drywall alone may not support the weight of the display.
- When drilling holes it is particularly important to take care of electrical cables, water or gas pipes in the wall. Please follow the instructions provided by the wall bracket manufacturer and ensure that all fixing screws supplied are used.
- electriQ and its distributors and dealers are not liable or responsible for damage or injury caused by improper installation, improper use or failure to observe these safety instructions. In such cases any guarantee will expire.
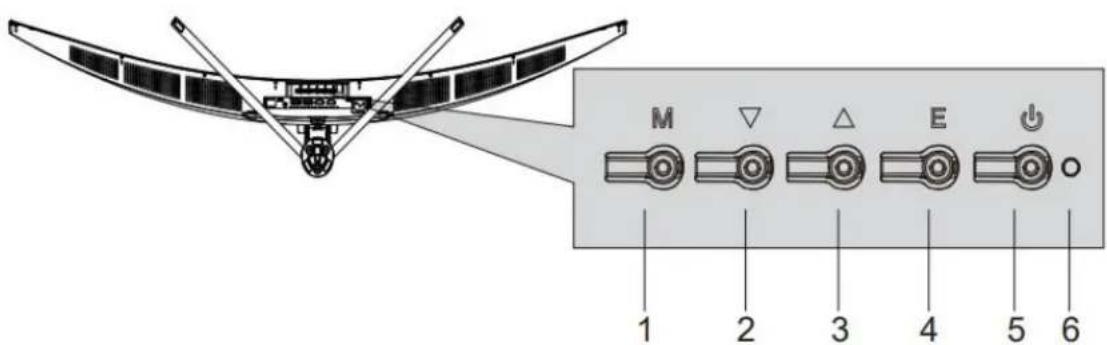
CONTROL PANEL
The controls are located centrally at the base of the monitor. Pressing any button when the On screen display is not visible will display the Quick Menu
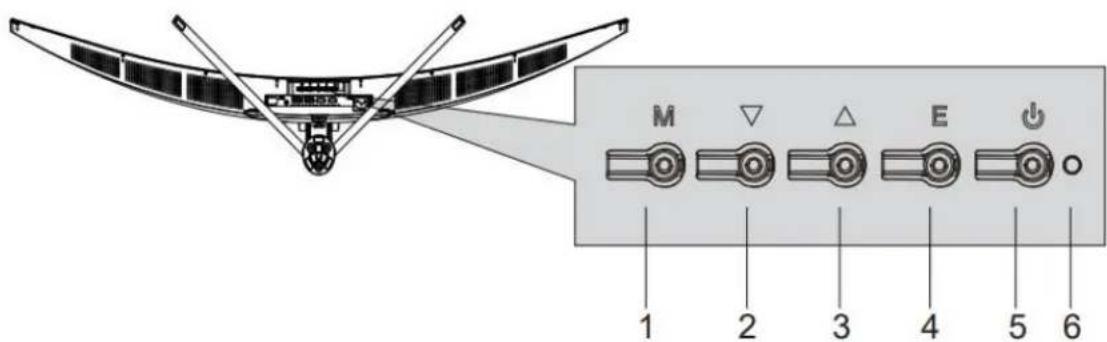
| 1 | Menu |
| 2 | Down |
| 3 | Up |
| 4 | Exit |
| 5 | Power |
| 6 | Power indicator |
INPUT / OUTPUT TERMINALS
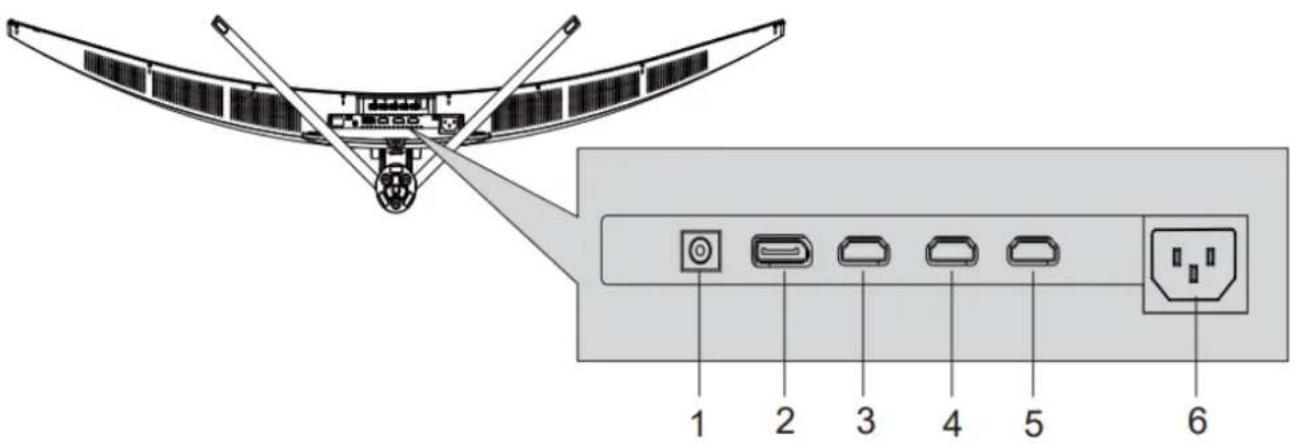
| 1 | Audio Output Socket |
| 2 | DISPLAY PORT (DP) Supports DP 1.2, 144Hz, Adaptive-sync |
| 3 | HDMI 1: Supports HDMI 2.0,120 Hz, Adaptive-sync |
| 4 | HDMI 2: Supports HDMI 1.4,60Hz, Adaptive-Sync |
| 5 | HDMI 3: Supports HDMI 1.4,60Hz, Adaptive-Sync |
| 6 | AC Power Socket |
INITIAL SETUP
natural_image
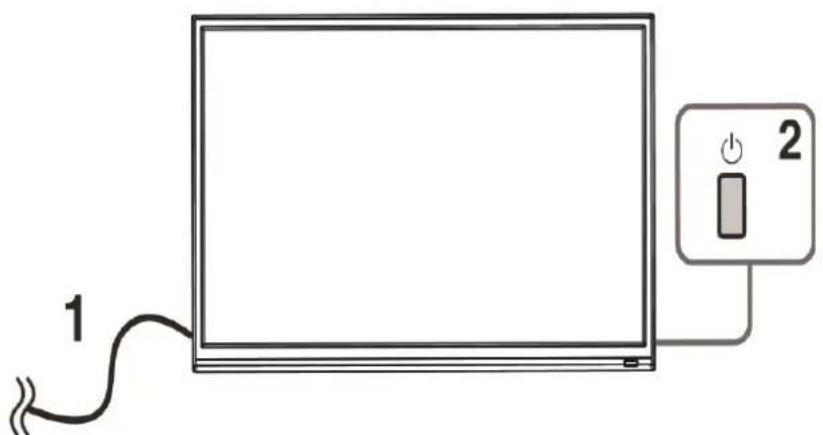
Simple line drawing of a monitor connected to a power outlet with labeled ports 1 and 2 (no text or symbols on the device itself)Connect the monitor to a power outlet.
- Press the POWER button on the monitor or to turn it on (The indicator will be blue)
- Connect the relevant cable to the corresponding input on the monitor. The source will be automatically detected.
QUICK MENU
Press any button when the on screen display is not visible to display the Quick Menu. Then Press the button below the item in the quick menu to select.
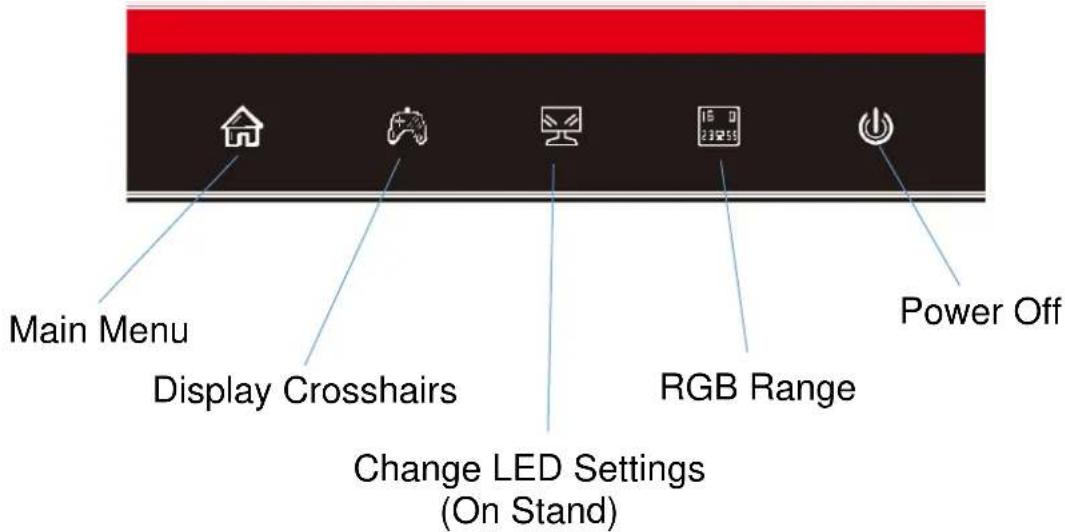
MENU OPTIONS
The main menu for the monitor can be accessed by selecting it within the Quick menu (See previous page). This menu is separated into the following sub menus: Picture Settings, Image Settings, Colour Temperature, OSD, Reset, and Miscellaneous options, details of each menu can be found in the following sections.
Within the Menu use:
| UP (3) and DOWN (2) | Press to go up and down the current menu or to adjust the selected value. |
| MENU (1) | Press to select the currently highlighted item / enter the submenu. Once changes have been made to a value, press to save the changes. |
| EXIT (4) | Press to navigate to the previous menu. When at the highest level of the Menu, press to close the Menu. After changing a value within the menu, press to cancel the change. |
INPUT SOURCE
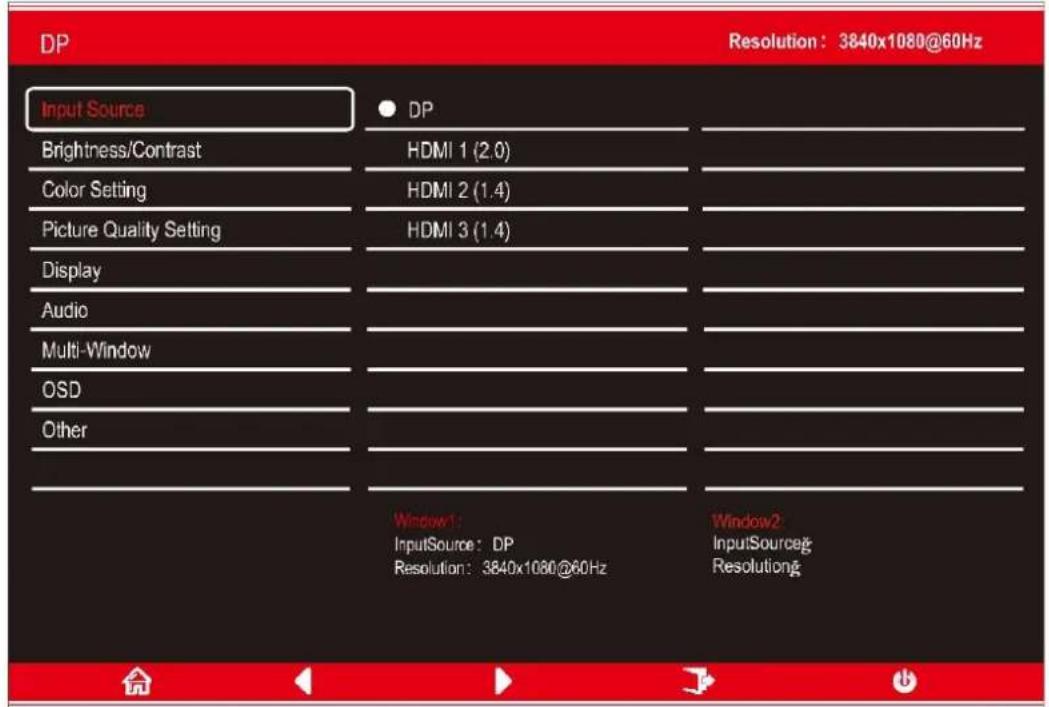
Change the input between DisplayPort (DP), HDMI 1, HDMI 2, or HDMI 3.
BRIGHTNESS/CONTRAST
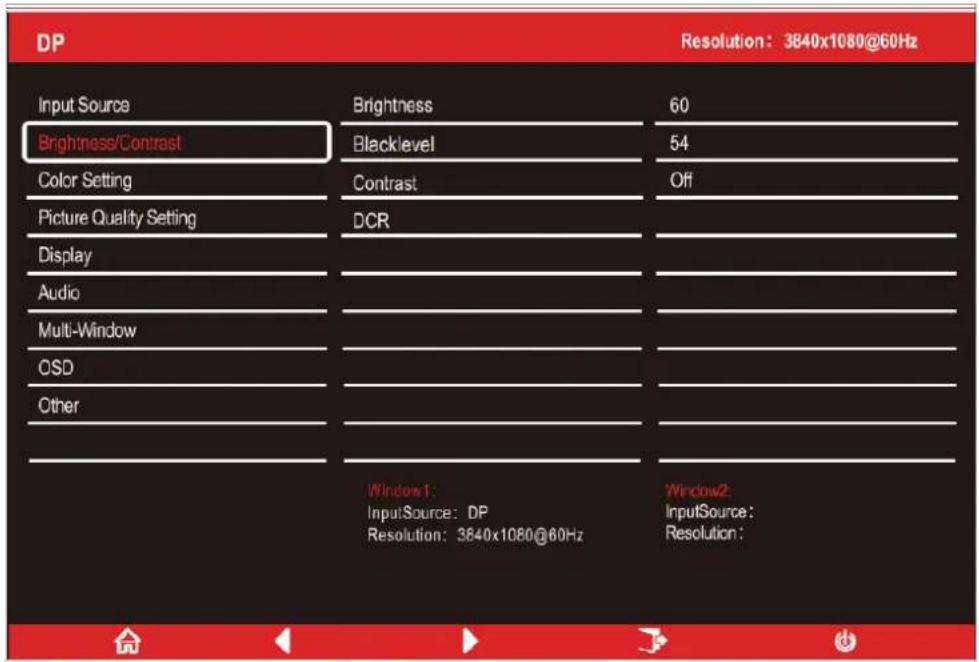
| Brightness | Adjust the brightness of the display between 0 and 100. |
| Blacklevel | Adjust the blacklevel of the display between 0 and 100. |
| Contrast | Adjust the contrast of the display between 0 and 100. |
| DCR | Turn the Dynamic Contrast Ratio feature On or Off. |
COLOUR SETTINGS
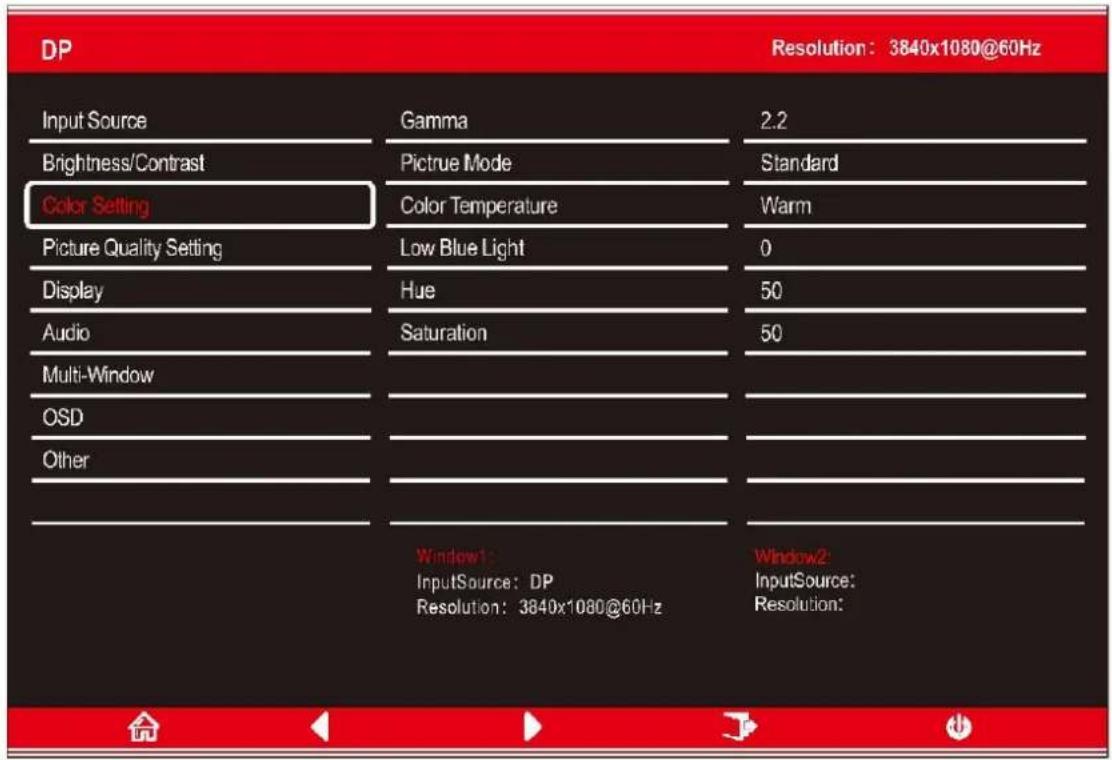
| Gamma | Change the Gamma value for the display between 1.8, 2.0, 2.2, 2.4, or 2.6. |
| Picture Mode | Change the picture mode between Standard, Photo, Movie, Game, FPS and RTS |
| Colour Temperature | Change the Colour Temperature of the display to Warm, Cool or User. When the User Mode is selected, the Red, Green, and Blue values can be adjusted independently between 0 and 100. |
| Low Blue Light | Change the blue light emitted by the display between0 and 100. |
| Hue | Change the Hue value between 0 and 100. |
| Saturation | Change the Saturation of the display between 0 and 100. |
PICTURE QUALITY SETTING
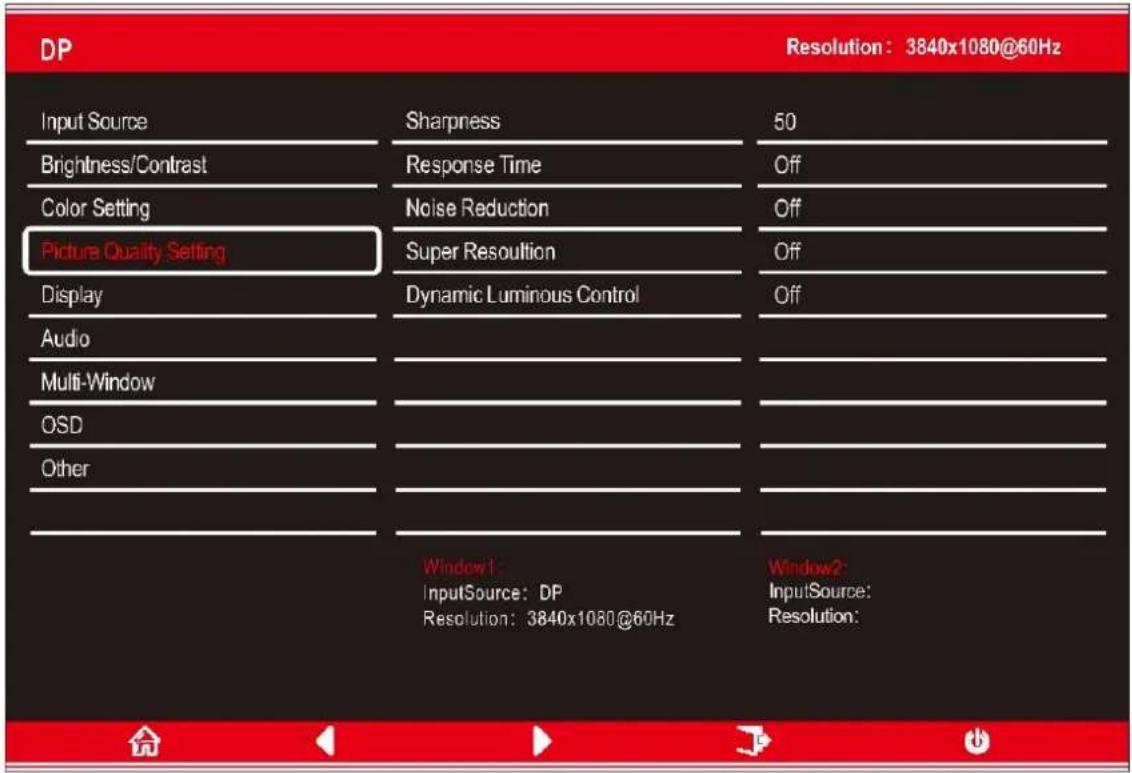
| Sharpness | Change the display Sharpness between 0 and 100. |
| Response Time | Turn the Response OverDrive feature between Off, High, Middle of low |
| Noise Reduction | Adjust the level of Noise Reduction between Low, Medium, High, or Off. |
| Super Resolution | Change the Super Resolution between Off, High, Middle, or Low. |
| Dynamic Luminance Control | Turn the Dynamic Luminance Control feature On or Off. |
DISPLAY
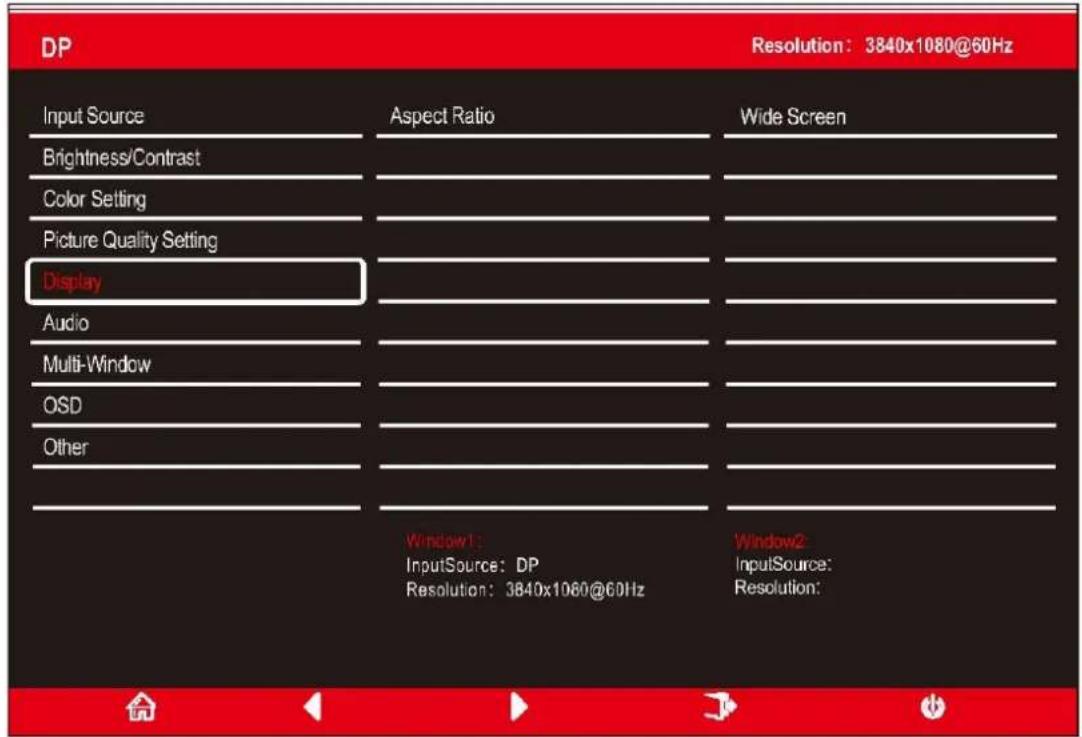
| Aspect Ratio | Change the image aspect ratio to Wide screen, Auto, 4:3, or 1:1. |
AUDIO
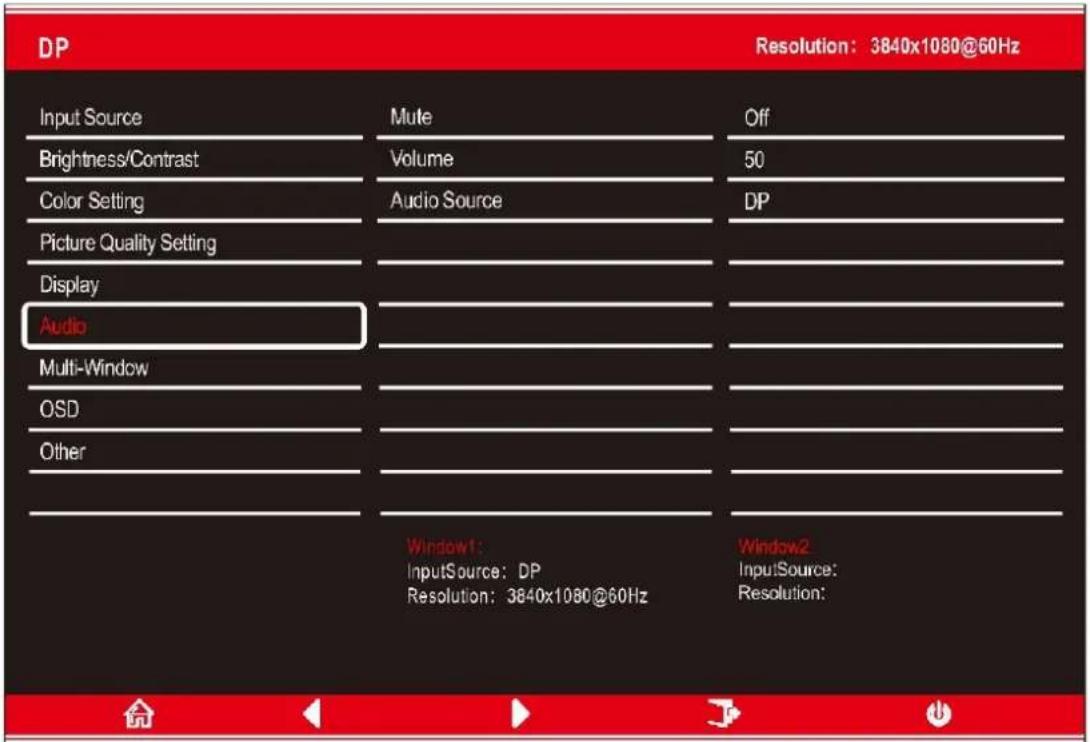
| Mute | Turn On and off to mute and unmute the audio output. |
| Volume | Adjust the output volume between 0 and 100. |
| Audio Source | Chose which source the audio is output from. |
MULTI-WINDOW
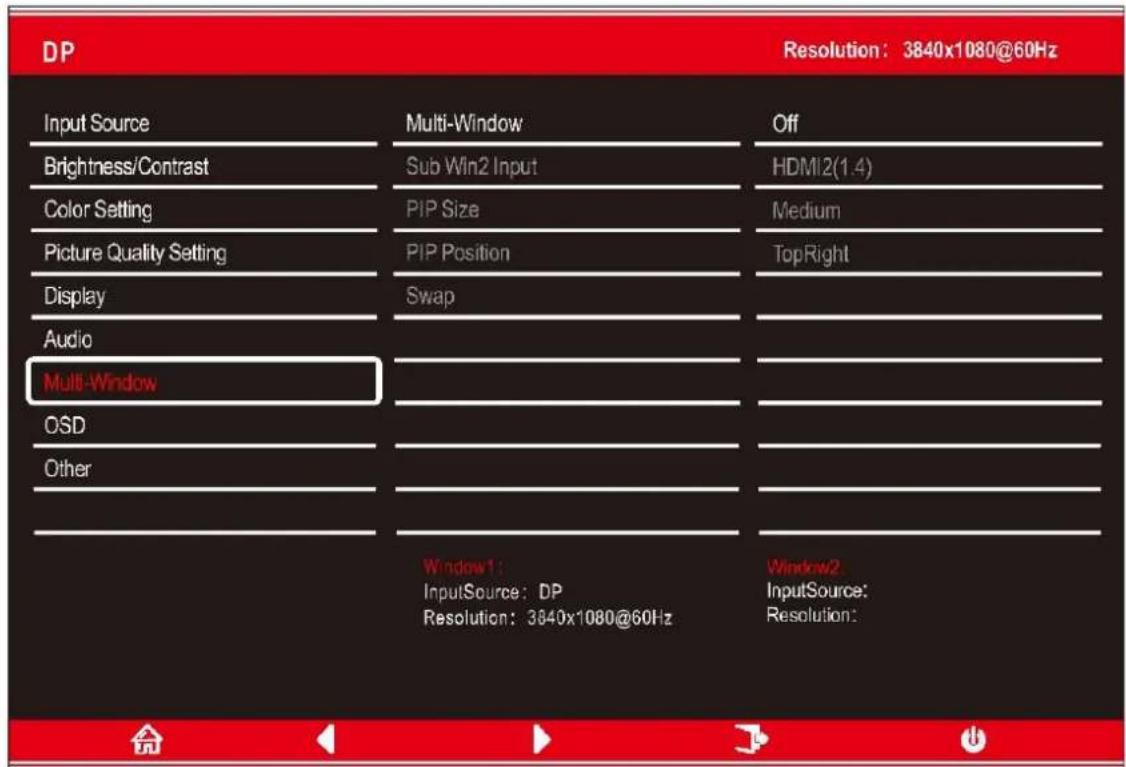
| Multi-Window | Choose the different formats of multi window display between Off, Picture in Picture (PIP) and Picture By Picture (PBP 2Win) |
| Sub Win2 Input | Choose the source of the second window between DP, HDMI 1, HDMI 2, and HDMI 3. |
| PIP Size | Adjust the size of the secondary source in PIP and PBP modes between Small, Medium and Large |
| PIP Position | Set the position of the secondary source in PIP and PBP modes between Top Right, Top Left, Bottom Right and Bottom Left. |
| SWAP | Swap the Primary and Secondary inputs on screen. |
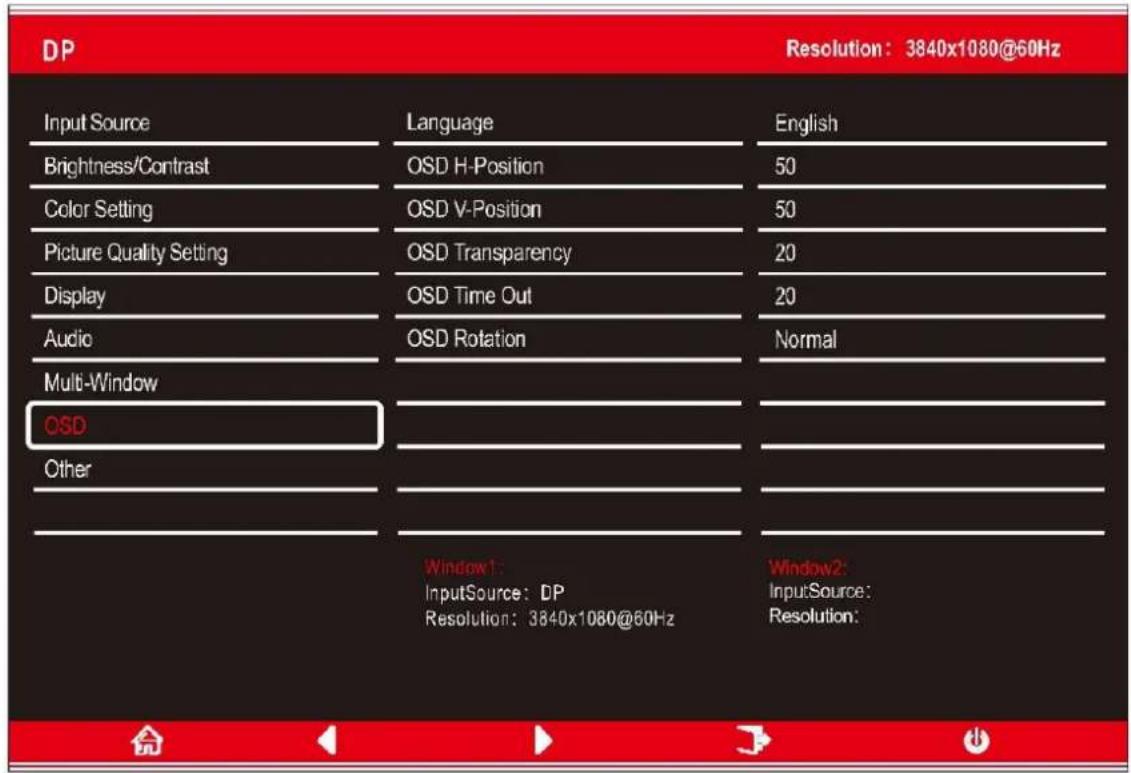
| Language | Change the OSD Menu display language between English, Chinese, Korean, Russian, Spanish, Japanese and French. |
| OSD H Position | Change the horizontal position of the OSD Menu. |
| OSD V Position | Change the vertical position of the OSD Menu. |
| OSD Transparency | Change the transparency value of the OSD Menu between 0 and 100. |
| OSD Time Out | Change how long the OSD Menu is on before it automatically exits. |
| OSD Rotation: | Rotate the OSD Menu for ease of use on rotated screens. |
OTHER
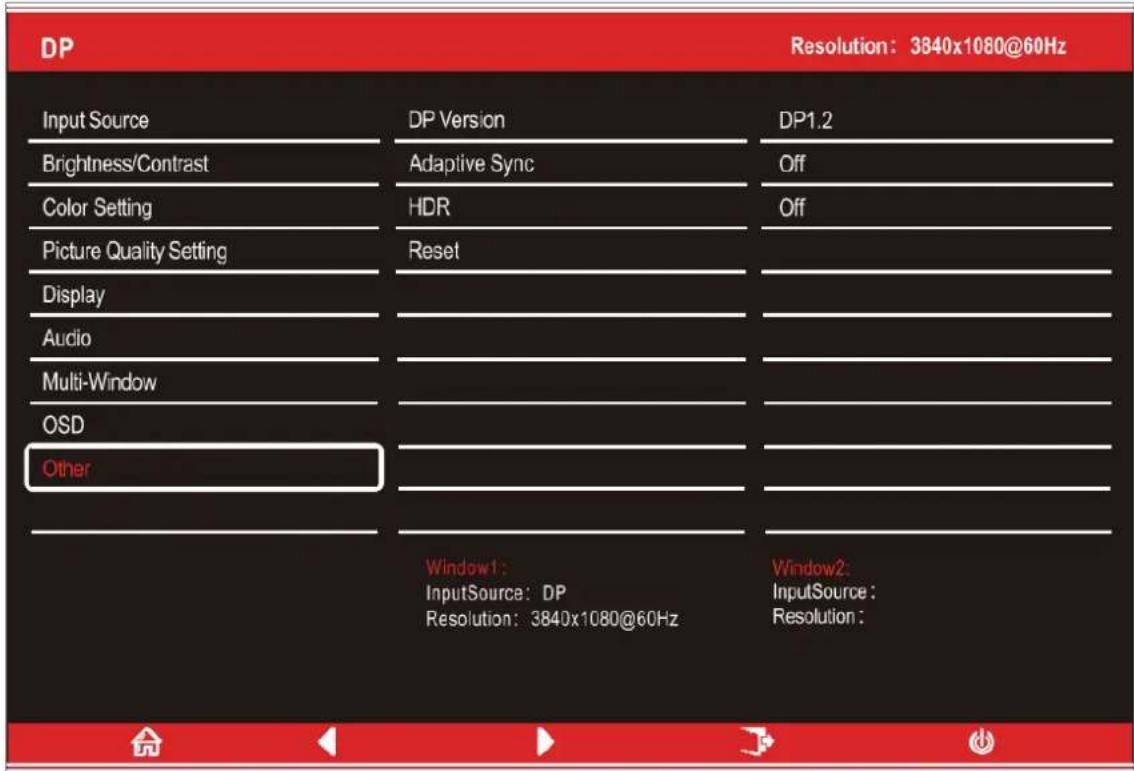
| DP Version | Set the DP version between 1.1 and 1.2 |
| Adaptive-Sync | Turn Adaptive-Sync On or Off. |
| HDR | HDR can be set to On, Off or Autodetect. |
| Reset | Restore factory default setting. |
TECHNICAL SPECIFICATION
| Product Model | eiQ-49SUWD144FSH | eiQ-49SUWD144FSHQ-V2 | |
| Screen Size | 49" Diagonal | 49" Diagonal | |
| Panel Type | VA Panel | QLED VA Panel | |
| Aspect Ratio | 32:9 | 32:9 | |
| Power Supply | AC 100-240V~50/60Hz 2.0A | AC 100-240V~50/60Hz 2.0A | |
| Power Consumption | 65W (Typical) | 65W (Typical) | |
| Dimensions | 1198.5 x 471 x 245.6 mm | 1198.5 x 471 x 245.6 mm | |
| Net/Gross Weight | 10.9kg / 14.5kg | 10.9kg / 14.5kg | |
| Audio Output Power (Internal) | 3W | 3W | |
| Picture | Maximum Resolution | 3840 x 1080 DFHD | 3840 x 1080 DFHD |
| Brightness | 320 cd/m2 | 350 cd/m2 | |
| Static Contrast | 3000:1 | 3000:1 | |
| Response time | 8ms (GTG) | 8ms (GTG) | |
| Viewing Angle (H/V) | 178°/178° | 178°/178° | |
| Terminals | USB Input | N/A | N/A |
| HDMI Input | HDMI 1.4 x 2, HDMI 2.0 x 1 | HDMI 1.4 x 2, HDMI 2.0 x 1 | |
| Display Port Input | DP 1.2 x 1 | DP 1.2 x 1 | |
| Audio Output | x1 | x1 | |
| Working Temperature | 0°C ~40°C | 0°C ~40°C | |
| Working Humidity | 10% ~ 85% Non-condensing | 10% ~ 85% Non-condensing | |
Note: Due to continued product development the specification shown above may change without notice.
PRODUCT DISPOSAL

Do not dispose this product as unsorted municipal waste. Collection of such waste must be handled separately as special treatment is necessary.
Recycling facilities are now available for all customers at which you can deposit your old electrical products. Customers will be able to take any old electrical equipment to participating civic amenity sites run by their local councils. Please remember that this equipment will be further handled during the recycling process, so please be considerate when depositing your equipment. Please contact the local council for details of your local household waste recycling centres.

HIGH-DEFINITION MULTIMEDIA INTERFACE
The terms HDMI and HDMI High-Definition Multimedia Interface, and the HDMI Logo are trademarks or registered trademarks of HDMI Licensing Administrator, Inc. in the United States and other countries.
SIMPLE TROUBLESHOOTING
If the display fails or the performance changes dramatically, check the display in accordance with the following instructions. Remember to check the peripherals to pinpoint the source of the failure.
| Symptom | Solution |
| Power cannot be turned on. (Power indicator does not illuminate.) | Check that both ends of the power cable are plugged into the socket appropriately and the wall socket is operational |
| No Input Signal message appears. | Check that the input cable is connected properly.Check that the power of the relevant peripherals is turned on.Check that the selected source matches the input.Factory reset the monitor, using the RESET option within the Main menu. |
| Flashing spots or stripes appear on the screen. | Check that there are no emission (Car, HV cable or Neor lamp) or other possible interference sources. |
| Image colour or quality deteriorates. | Check that all the video settings are adjusted appropriately, such as brightness, contrast, colour etc.For more information about video settings, refer to OSD Functions |
| Screen position and size are incorrect. | Check that the screen position and size is adjusted appropriately. |
| Image or colour is incorrect. | Check that the signal line is connected properly.When connecting to a PC, you can change the resolution of the PC to acquire the correct image. Discrepancies in the PC output signal may affect the display of the image. |
| Display warning message. | Check that the input signal line is properly fixed.Select the correct input sourceFor more information, refer to Supported Signal Modes |
electriQ UK SUPPORT
Complete online support form on www.electriQ.co.uk/support
Service Line: 0330 390 3061
Office hours: 9AM - 5PM Monday to Friday
www.electriQ.co.uk
Unit J6, Lowfields Business Park,
Lowfields Way, Elland
West Yorkshire, HX5 9DA
- CONTENTS
- SAFETY INFORMATION
- WARNING
- AT FULL VOLUME, PROLONGED LISTENING MAY DAMAGE THE USER'S HEARING.
- ATTENTION
- CONNECTION AND PREPARATION OF THE MONITOR
- ATTACHING THE STAND
- NOTES:
- CABLE MANAGEMENT
- WALL MOUNTING
- CONTROL PANEL
- INPUT / OUTPUT TERMINALS
- INITIAL SETUP
- QUICK MENU
- MENU OPTIONS
- MULTI-WINDOW
- TECHNICAL SPECIFICATION
- PRODUCT DISPOSAL
- SIMPLE TROUBLESHOOTING
- electriQ UK SUPPORT
Brand : ElectriQ
Model : eiQ-49SUWD144FSHQ
Category : Screen