
RLDEDV3289 - Television RCA - Free user manual and instructions
Find the device manual for free RLDEDV3289 RCA in PDF.


| Product Type | LED TV / DVD Combo |
| Model | RLDEDV3289 |
| Screen Size | 32 inches |
| Resolution | 1920 x 1080 (Full HD) |
| Contrast Ratio | 1200:1 |
| Viewing Angle | 178° (H) / 178° (V) |
| Response Time | 8 ms |
| Maximum Colors | 16.7 million |
| Power Consumption | 50 W |
| Power Requirement | AC 100-240 V ~ 50/60 Hz |
| Inputs | RF, HDMI (2, one with ARC), Component, Composite, VGA, PC Audio, Headphone |
| Audio Output | Digital coaxial (S/PDIF) |
| DVD Region Code | 1 |
| Compatible Disc Types | DVD, DVD±R, DVD±RW, VCD, CD, CD-R, CD-RW |
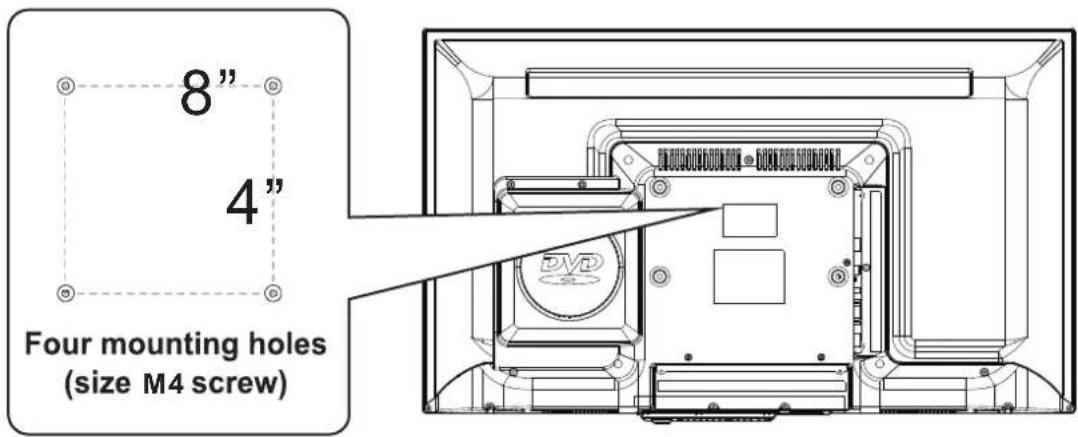
| VESA Mount Pattern | 200 mm x 100 mm (8" x 4") |
| Remote Control Code | 1218 |
| Audio Output (Speakers) | 8 W + 8 W |
| Color System | ATSC / QAM / NTSC |
Frequently Asked Questions - RLDEDV3289 RCA
User questions about RLDEDV3289 RCA
0 question about this device. Answer the ones you know or ask your own.
Ask a new question about this device
Download the instructions for your Television in PDF format for free! Find your manual RLDEDV3289 - RCA and take your electronic device back in hand. On this page are published all the documents necessary for the use of your device. RLDEDV3289 by RCA.
USER MANUAL RLDEDV3289 RCA
Before using the TV, please read this manual thoroughly, and retain it for future reference.
LED TV/DVD COMBO
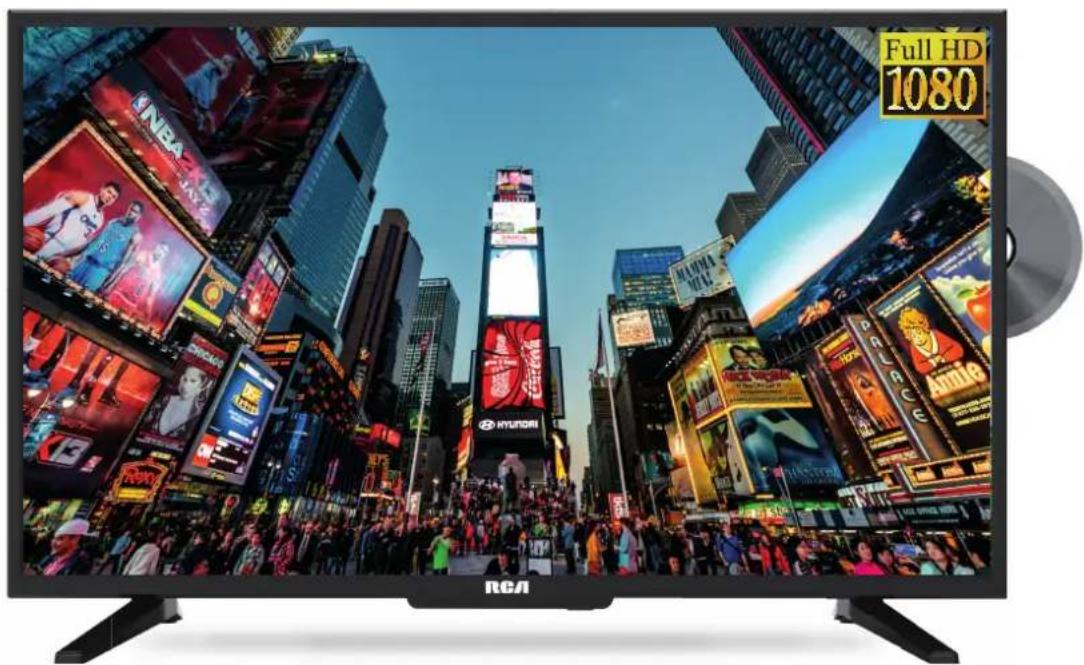

Model:RLDEDV3289
CONTENTS
| 1 | SAFETY PRECAUTION | 1 | |
| 2 | IMPORTANT SAFETY INSTRUCTION | 2 | |
| 3 | ACCESSORIES | 3 | |
| 4 | GETTING STARTED | 3 | |
| 5 | CONTROL REFERENCE GUIDE | Remote Control | 4 |
| Front View | 6 | ||
| Back View | 6 | ||
| Side View/ Front View | 7 | ||
| 6 | CONNECTIONS | Antenna Connection | 8 |
| AV Connection | 8 | ||
| YPbPr Connection | 9 | ||
| HDMI Connection | 9 | ||
| VGA Connection | 10 | ||
| Headphone Connection | 10 | ||
| Power Cord Connection | 10 | ||
| Digital Audio out Connection | 11 | ||
| 7 | WALL MOUNT INSTALLATION | 12 | |
| 8 | ATTACHING THE STAND | 13 | |
| 9 | INITIAL SETUP | Putting The Unit On A Proper Place | 14 |
| Source Selection | 14 | ||
| Turning The Unit On For The First Time | 14 | ||
| 10 | TV SETUP | Picture Menu | 16 |
| Audio Menu | 18 | ||
| Time Menu | 20 | ||
| Setup Menu | 21 | ||
| LOCK(Parental) Menu | 24 | ||
| TV(CHANNEL) Menu | 27 | ||
| Zoom Function | 28 |
CONTENTS
| 11 | DISC FORMATS | 29 | |
| 12 | CD / DVD OPERATION | Basic Operations | 30 |
| Special Functions | 33 | ||
| Mp3 / JPEG Playback | 35 | ||
| 13 | CUSTOMIZING THE DVD FUNCTION SETTINGS | DVD Menu | 36 |
| 14 | MAINTENANCE | 38 | |
| 15 | DISPLAY MODE | PC Formats | 39 |
| Video Formats | 40 | ||
| 16 | SPECIFICATION | 41 | |
| 17 | TROUBLE-SHOOTING GUIDE | DVD Symptom | 42 |
| TV Symptom | 43 |
SAFETY PRECAUTION
* CAUTION MARKING WAS LOCATED AT THE REAR OF THE APPARATUS.

DO NOT EXPOSE THIS UNIT TO RAIN OR MOISTURE AVIS RISQUE DE CHOC ÉLECTRIQUE—NE PAS OUVRIR
WARNING: TO REDUCE THE RISK OF ELECTRIC
NO USER SERVICEABLE PARTS INSIDE. REFER SERVICING TO QUALIFIED SERVICE PERSONNEL.
The lightning flash with arrowhead symbol, within an equilateral triangle, is intended to alert the user to the presence of uninsulated "dangerous voltage" within the product's enclosure that may be of sufficient magnitude to constitute a risk of electric shock to persons.
The exclamation point within an equilateral Triangle is intended to alert the user to The presence of important operating and
maintenance (servicing) instructions in the literature accompanying the appliance.
CAUTION
INVISIBLE LASER RADIATION WHEN OPEN AND INTERLOCKS DEFEATED AVOID EXPOSURE TO BEAM

This product Contains a low power laser device

CAUTION
- DANGER OF EXPLOSION IF BATTERY IS INCORRECTLY REPLACED. REPLACE ONLY WITH THE SAME OR EQUIVALENT TYPE.
- USE OF CONTROLS OR ADJUSTMENTS OR PERFORMANCE OF PROCEDURES OTHER THAN THOSE SPECIFIED MAY RESULT IN HAZARDOUS RADIATION EXPOSURE.

WARNING:
• TO REDUCE THE RISK OF FIRE OR ELECTRIC SHOCK, DO NOT EXPOSE THIS APPLIANCE TO RAIN OR MOISTURE.
TO REVENT FIRE OR SHOCK HAZARD, DO NOT
- EXPOSE THIS UNIT TO RAIN OR MOISTURE. DO NOT PLACE OBJECTS FILLED WITH LIQUIDS ON OR NEAR THIS UNIT.
- SHOULD ANY TROUBLE OCCUR, DISCONNECT THE AC POWER CORD AND REFER SERVICING TO A QUALIFIED TECHNICIAN.

HIGH-DEFINITION MULTIMEDIA INTERFACE
"HDMI, the HDMI logo and High-Definition Multimedia Interface are trademarks or registered trademarks of HDMI Licensing LLC."
PLACEMENT INFORMATION
- Do not use this unit in places that are extremely hot, cold, dusty or humid.
- Do not restrict the airflow of this unit by placing it somewhere with poor airflow, by covering it with a cloth, by placing it on bedding or carpeting.
SAFETY INFORMATION
- When connecting or disconnecting the AC power cord, grip the plug and not the cord itself. Pulling the cord may damage it and create a hazard.
- When you are not going to use the unit for a long period of time, disconnect the AC power cord.
CONDENSATION INFORMATION
- When left in a heated room where it is warm and damp, water droplets or condensation may form inside the equipment. When there is condensation inside the unit, the unit may not function normally. Let the unit stand for 1-2 hours before turning the power on or gradually heat the room and let the unit dry before use.
RATING PLATE LOCATION
The rating plate is located on the rear of the unit. FCC STATEMENTS
NOTE: This unit has been tested and found to comply with the limits for a Class B digital device, pursuant to Part 15 of the FCC Rules. These limits are designed to provide reasonable protection against harmful interference in a residential installation.
This unit generates, uses and can radiate radio frequency energy and, if not installed and used in accordance with the instructions, may cause harmful interference to radio communication. However, there is no guarantee that interference will not occur in a particular installation. If this unit does cause harmful interference to radio or television reception, which can be determined by turning the unit off and on, the user is encouraged to try to correct the interference by one or more of the following measures:
- Reorient or relocate the receiving antenna.
- Increase the separation between the unit and receiver.
-Connect the unit into an outlet on a circuit different from that to which the receiver is connected. - Consult the dealer or an experienced radio/TV technician for help.

WARNING:
Changes or modifications to this unit not expressly approved by the party responsible for compliance could void the user authority to operate the unit.
IMPORTANT SAFETY INSTRUCTIONS
1) Read these instructions.
2) Keep these instructions.
3) Heed all warnings.
4) Follow all instructions.
5) Do not use this apparatus near water.
6) Clean only with a dry cloth.
7) Do not block any ventilation openings. Install in accordance with the manufacturer's instructions.
8) Do not install near any heat sources such as radiators, heat registers, stoves, or other apparatus (Including amplifiers) that produce heat.
9) Do not defeat the safety purpose of the polarized or grounding-type plug.
A polarized plug has two blades with one wider than the other.
A groundingtype plug has two blades and a third grounding prong.
The wide blade or the third prong is provided for your safety.
If the provided plug does not fit into your wall outlet, consult an electrician for replacement of the obsolete outlet.
10) Protect the power cord from being walked on or pinched particularly at plugs, convenience receptacles, and the point where they exit from the apparatus.
11) Only use attachments / accessories specified by the manufacturer.
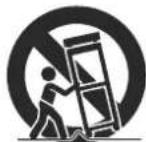
12) Use only with the cart, stand, tripod, bracket, or tabl e specified by the manufacturer, or sold with the apparatus. When a cart is used, use caution when moving the cart / apparatus combination to avoid injury from tip-over.
13) Unplug this apparatus during lightning Storms or when unused for long periods of time.
14) Refer all servicing to qualified service personnel. Servicing is required when the apparatus has been damaged in any way, such as the power cord or plug is damaged, liquid has been spilled or objects have fallen into the apparatus, the apparatus has been exposed to rain or moisture, does not operate normally, or has been dropped.
Basic Operations
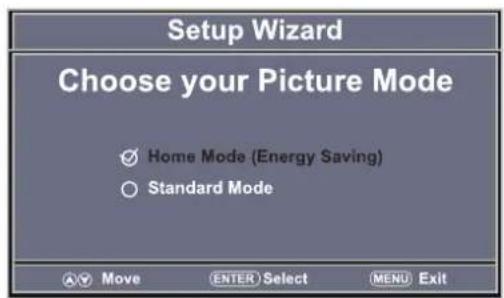
Press ▲ /▼ button to select your desired mode, then press ENTER button to enter.



ACCESSORIES
Please check and identify the supplied accessories.
Remote control x 1
Battery(AAA) x 2
Warranty Card x 1
Instruction Manual x 1
2 Base stands and 4 base stand screws x 1
GETTING STARTED
USING THE REMOTE CONTROL
- Point the remote control at the remote sensor located on the unit.
When there is a strong ambient light source, the performance of the infrared remote sensor
·may be degraded, causing unreliable operation.
The recommended effective distance for remote operation is about 16 feet (5 meters).
TO INSTALL THE BATTERIES
-
Open the battery door.
-
Insert 2"AAA"batteries.
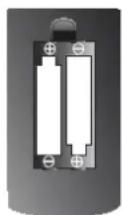
BATTERY REPLACEMENT
When the batteries become weak he, operating distance of the remote control is greatly reduced and you will need to replace the batteries.

CAUTION : Danger of explosion if batter y is incorrectly replaced.
NOTES
- If the remote control is not going to be used for a long time enove the batteries to avoid damage caused by battery leakage corrosion.
·Do not mix old and new batteries.Do not mix ALKALINE , standard (CARBON ZINC) or rechargeable (NICKEL -CADMIUM) batteries.
·Always remove batteries as soon as they become weak. - Weak batteries can leak and severely damage the remote control.

WARNING :
Do not dispose batteries in a fire. Batteries may explode or leak.
Batteries shall not be exposed to excessive heat such as sunshine , fire or the like.
CONTROL REFERENCE GUIDE
REMOTE CONTROL
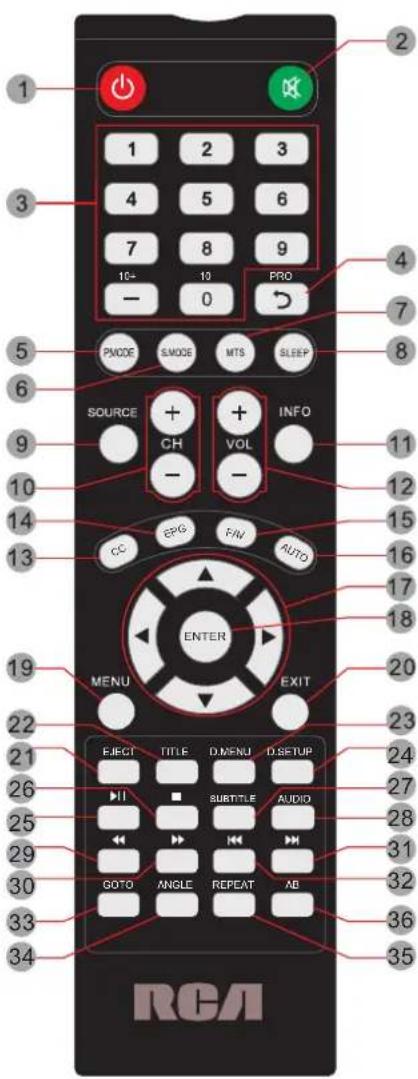
1.STANDBY
To switch on the TV or make the TV into standby mode.
2.MUTE
Press this button to mute or restore sound.
3.0-9
Allows you to change the channel of the TV.
4.
Switches back and forth between the current and previous channels, or to edit the program list of your DVD disc in DVD mode.
5.P.MODE
Press this button to select a picture mode for different picture qualities.
6.S.MODE
Press this button to select sound setting for different sound effects.
7.MTS
To change among STEREO, MONO and SAP. If there is no second language available for the signal received, LED Display audio will output to mono.
8.SLEEP
To select the amount of time before your TV turns Off automatically.
9.SOURCE
Press this button to select an input source.
10.CH+/CH-
Skips to the next/previous channel on TV mode.
11.INFO
Show the information of the program you are watching.
12.VOL+/VOL-
Increases/Decreases the Volume control.
13.CC
Press the button to enter into the CC mode.
14.EPG
Press this button to select the electronic programme guide in DTV mode.
15.FAV
Press this button enter the favourite list.
16. AUTO
Press this button to autoadjust the screen in PC mode.
Moves the cursor upward/downward/to the left/to the right when making a selection.
18. ENTER
Press to confirm selections on a menu screen.
19. MENU
Displays the OSD Menu of the TV.
20. Exit
Press this button to exit the on screen display.
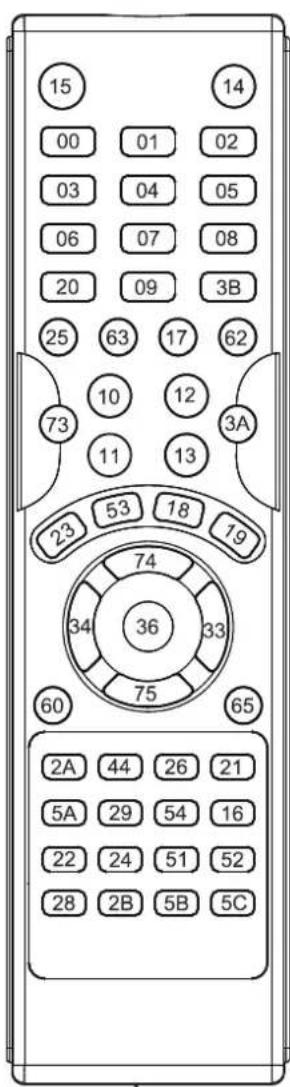
Universal remote code
This is the code for remote control of if you want to change to a universal remote control, you can edit this code into your universal remote control.
Universal Remote Code: 1218
(Universal Remote Control is not included.)
CONTROL REFERENCE GUIDE
REMOTE CONTROL
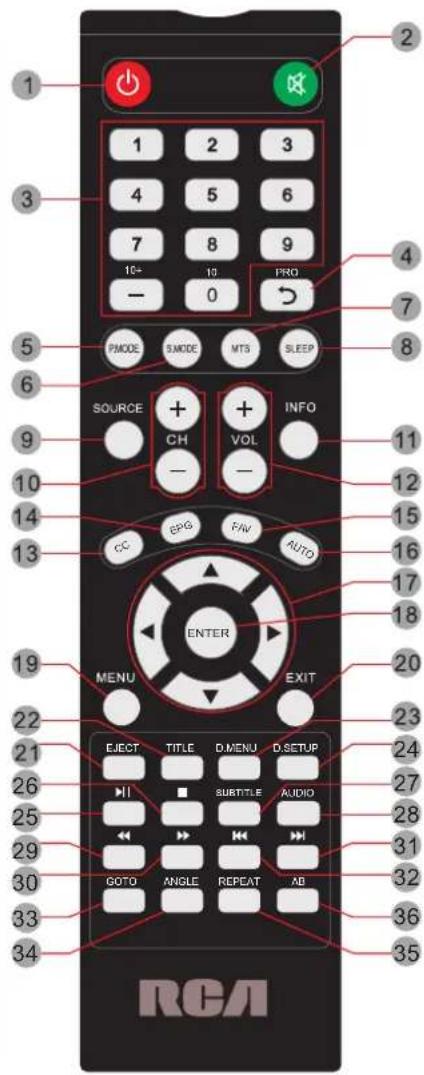
21.EJECT
To eject a disc.
- TITLE
To goto the title menu if the DVD disc has a title page.
23.D.MENU
To show the menu of the DVD disc.
24.D.SETUP
Press this button to show the DVD SETUP menu.
25.
Press this button to play or pause the DVD you're watching.
26.
Press this button to stop playing the DVD you're watching.
27.SUBTITLE
To show the subtitle for the program you're watching.
28.AUDIO
Press this button to change the audio language of the DVD.
29.
Fast reverse in DVD mode.
30.
Fast forward in DVD mode.
31.
Next chapter in DVD mode.
32.
Previo us chapter in DVD mode.
33.GOTO
Press this button to start playing the disc program from the time you want.
34.ANGLE
To select different angles to which the picture suits your preference.
35.REPEAT
Press this button for repeat the program.
36.AB
Press this button for repeat play point A and B.
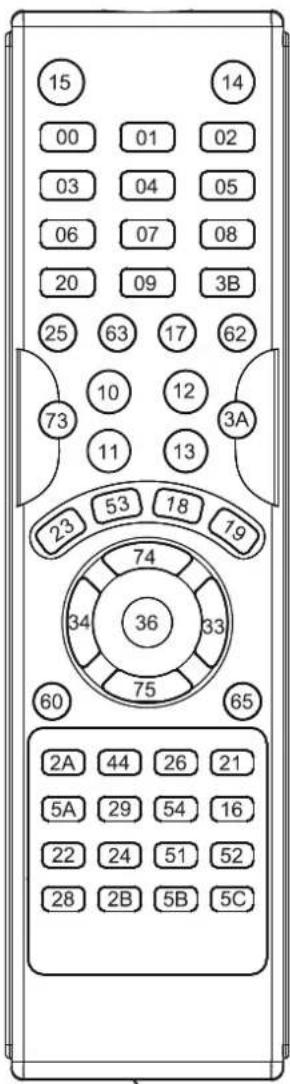
Universal remote code
This is the code for remote control of if you want to change to a universal remote control, you can edit this code into your universal remote control.
Universal Remote Code: 1218
(Universal Remote Control is not included.)
CONTROL REFERENCE GUIDE
FRONT VIEW
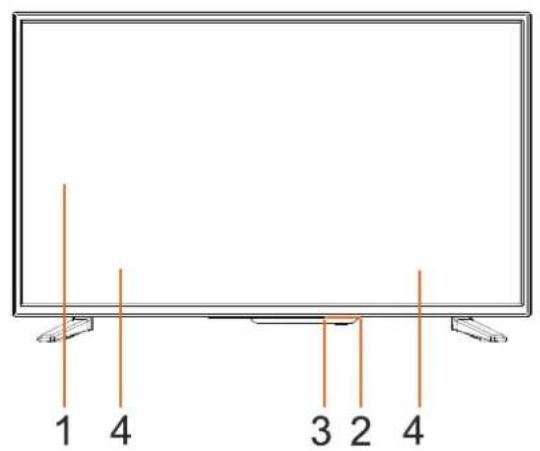
1.Color Screen
2.Remote Sensor
Do not block this sensor or the remote control will not work.
- Standby Indicator
Indicates whether the unit is ON or in STANDBY (OFF) mode.
Light in red : The unit is in STANDBY.
Light in blue: The unit is turned ON.
- Speakers
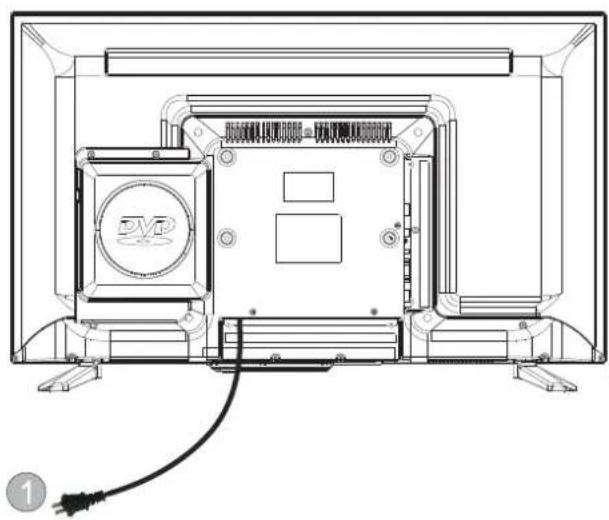
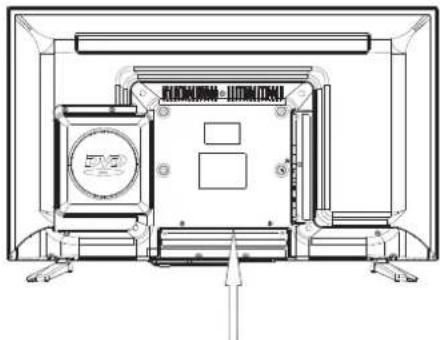
BACK VIEW
natural_image
Technical line drawing of a computer monitor rear panel with cable and power outlet (no text or symbols)- Power Cor d
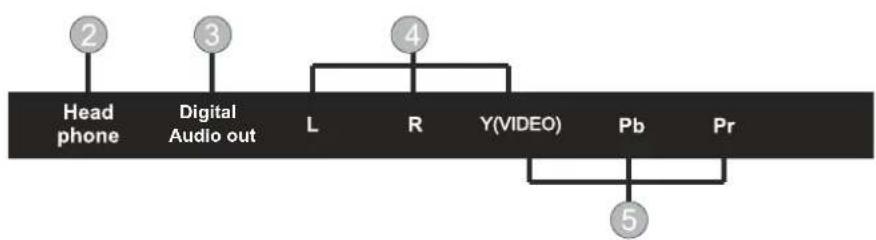
- Headphone Jack
- Digital Audio Output Jack
4.AV IN Jack
5.COMPONENT IN Jack
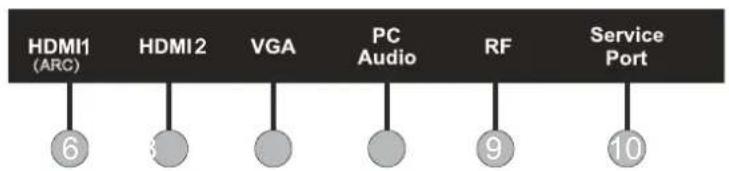
6.HDMI IN Jack(Connect to HDMI 1 for
7.VGA IN Jack
8.PC AUDIO IN Jack
9.TV ANTENNA Terminal
- Service Port: Software upgrade port.
(The Service Port is intended for service use only. Please do not connect any device to the port).
flowchart
graph LR
    A["Head phone"] --> B["Digital Audio out"]
    B --> C["L"]
    C --> D["R"]
    D --> E["Y(VIDEO)"]
    E --> F["Pb"]
    F --> G["Pr"]
    G --> H["5"]
flowchart
graph TD
    A["HDMI1 (ARC)"] --> B["6"]
    C["HDMI2"] --> D["8"]
    E["VGA"] --> F["8"]
    G["PC Audio"] --> H["8"]
    I["RF"] --> J["9"]
    K["Service Port"] --> L["10"]
CONTROL REFERENCE GUIDE
SIDE VIEW /FRONT VIEW
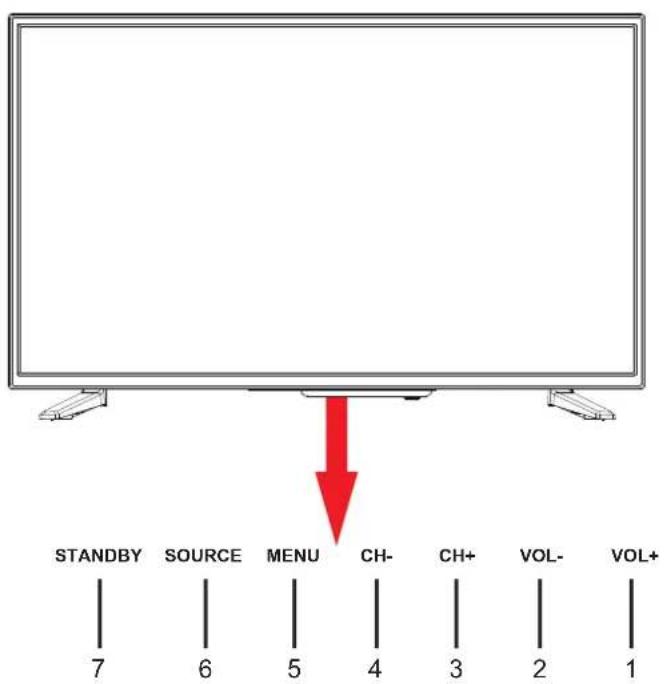
1. VOL+ Button
This button increases the TV's volume. If a sub-menu is active, pressing this button will move the select right.
2. VOL- Button
This button decreases the TV's volume. If a sub-menu is active, pressing this button will move the selection left.
3. CH+ Button
This button changes the TV channel up. If the OSD is active, this button functions as up for the menu.
4. CH- Button
This button changes the TV channel down. If the OSD is active, this button functions as down for the menu.
5. Menu Button
This button activates the On Screen Display (OSD). If a sub-menu is active, pressing this button will exit the OSD.
6. SOURCE Button
Press to select the input source of the TV.
7. STANDBY Button
Turn on the TV by pressing the button once.
Press the button again to turn off the TV.
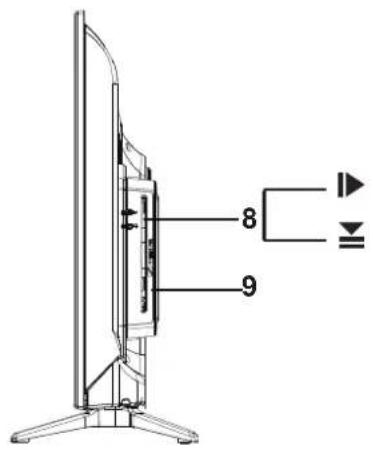
8.

Press to eject a disc.

Press this start pause or resume playback of a disc.
9. Disc Slot
Insert discs to disc slot
Note: When inserting a disc, please take note of the indication of direction around the disc slot for operation.
(Right direction put the side of the disc facing yourself
CONNECTIONS
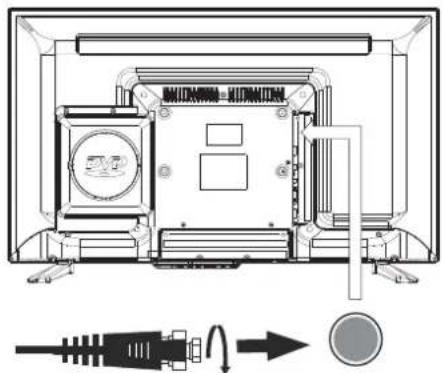
CONNECTING A TV ANTENNA / CABLE / SATELLITE
To view television channels correctly, a signal must be received from one of the following sources:
- An indoor or outdoor aerial antenna
- A cable system
- A satellite system
NOTE
For receiving over-the-air TV broadcasts, we recommend that you use an external fixed antenna. Should you require the use of a temporary antenna, please ensure that you purchase an antenna with sufficient ability to receive in weak signal areas.
Only when you are in close proximity to a transmitter will a temporar y antenna reproduce a signal as strongly as a fixed antenna.
natural_image
Technical diagram of an electronic device showing internal components and a close-up of a connector (no text or symbols present)Satellite, cable or TV antenna cable to TV ANTENNA terminal (cable not included)
CONNECTING AN A/V DEVICE
To connect to other equipment such as a VCR, camcorder, satellite system or cable, etc.
CONNECTING DEVICES WITH A COMPOSITE (GREEN RCA-TYPE) VIDEO OUTPUT
To connect A/V devices such as a VCR, video game system or camcorder.
Connecting to a VCR / Video Game System / Camcorder
Connect the AUDIO / VIDEO cable (not included) as shown.
Make sure you connect the cable from the other equipment ( and )AUDIO VIDEO OUT (AV in)
NOTE
- Please refer to the user manual for the other equipment for more information.
- Composite video input (shared with component)
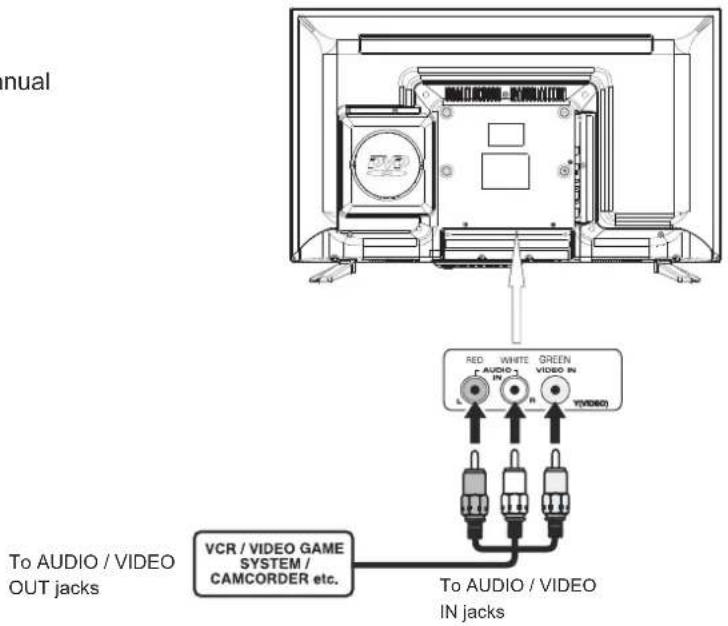
CONNECTIONS
CONNECTING A HIGH-DEFINITION (HD) SOURCE USING CONDEMPONENT
High-Definition (HD) Devices with component video output must be connected to the Y inputPbPr
Connect the component video cable and audio cable (not included) as shown.
Make sure you connect the component video cable and audio cable from the other equipment
NOTE
When connecting a DVD player to the television, the picture resolution is solely dependent upon the resolution supported by the DVD player attached. DVD player resolutions vary from 480i to 1080p. and this television can support DVD players up to a maximum resolution of 1080p.
* May require a subscription for receiving HD channels, check with your cable/satellite service provider for details.
COMPONENT IN
To COMPONENT AUDIO IN jacks
To COMPONENT
VIDEO OUT jacks
To COMPONENT AUDIO OUT jacks
HD SOURCE
With component video output (Digital Cable Box*, Satellite Receiver* or external over-the-air HD-Tuner)
natural_image
Technical line drawing of a mechanical assembly with no visible text or symbols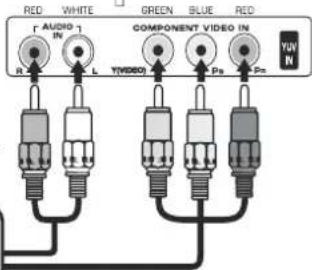
To COMPONENT
VIDEO IN jacks
CONNECTING A HIGH-DEFINITION (HD) SOURCE USING HDMI CONNECTION
HDMI (High Definition Multimedia Interface) supports both video and audio on a single digital connection for use with DVD players, DTV, set-top boxes and other digital AV devices. HDMI was developed to provide the technologies of High Bandwidth Digital Content Protection (HDCP) as well as Digital Visual Interface (DVI) in one specification. HDCP is used to protect digital content transmitted and received by DVI-compliant or HDMI compliant displays.
HDMI has the capability to support standard, enhanced or high-definition video plus standard to multi-channel surround-sound audio. HDMI features include uncompressed digital video, a bandwidth of up to 2.2 gigabytes per second (with HDTV signals), one connector (instead of several cables and connectors), and communication between the AV source and AV devices such as DTVs.
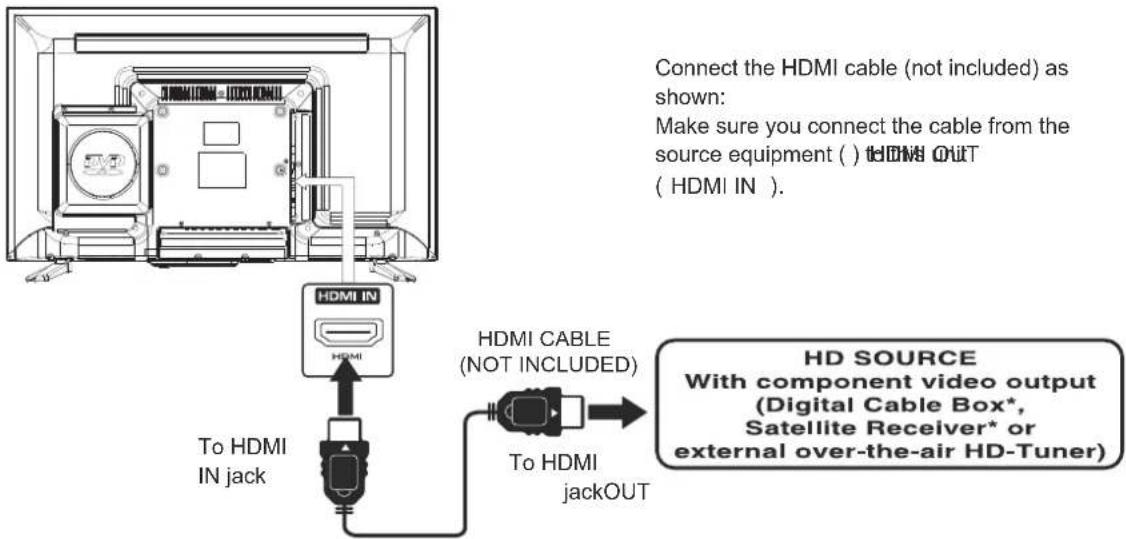
Connect the HDMI cable (not included) as shown:
Make sure you connect the cable from the source equipment ( ) TOWN OUT
( HDMI IN ).
CONNECTIONS
CONNECTING A PC
Connect the 15-pin D-SUB PC/VGA connector from your computer to the 15-pin D-SUB PC/VGA input on this unit using a monitor cable and an audio cable (not included) as shown.
Make sure you connect the cable from the computer (VGA and AUDIO - PC OUT) to this unit (VGA and AUDIO - PC IN).
![Levels for prolonged period of time. This may be harmful to you and may cause hearing loss. PC AUDIO VGA TO PC Connector TO AUDIO OUT jacks Headphones (1/8"[3.5mm]diameter plug) NOT INCLUDED](/content/2026/05/972609/images/a15622ec7a5beaade2764ed213f8017d3ff7bfaa9a1a64147986261973bc486a.jpg)
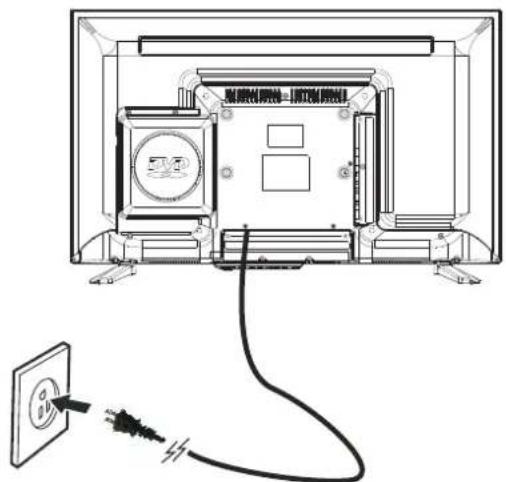
You can power on your TV unit before you make sure the power cord is inserted well. At the same time, please check that the rated voltage of your unit matches your local Voltage.
NOTE
the power plug fully into the sock outlet. (If the power plug is loose could generate heat cause fire.)
Ensure that the power plug is easily accessible. Ensure the earth pin on the power plug is securely connected to prevent electrical shock.
Do not touch the power plug with a wet hand. (This may cause electrical shock.)
Do oxide the any power cord other than that pr with this TV. This e may cause fir or electrical shock.)
Do not damage the power cord. (A damaged cord may cause fire or electrical shock.) not move the TV with the cord plugged in the socket .outlet
the cord near a high-temperature object.
To AC wall outlet
CONNECTING HEADPHONES
- Turn down the volume before connecting headphones to the unit, then adjust the volume to your desired level.
- When headphones are connected, no sound will come from the front speakers.
NOTE
Avoiding listening to sound at high Levels for prolonged period of time. This may be harmful to you and may cause hearing loss.
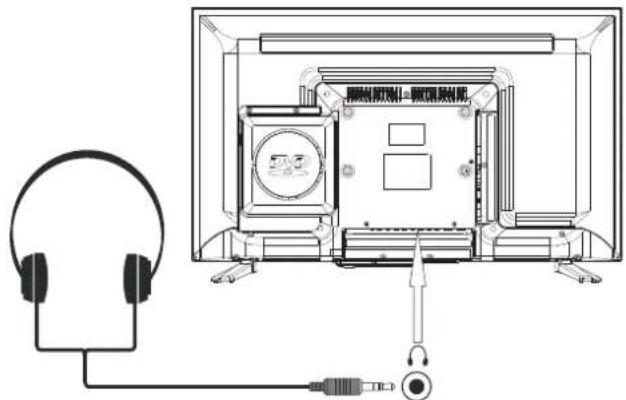
, bend it excessively, or stretch it. not pull on the cord. Hold onto the power plug body when disconnecting cord.
CONNECTIONS
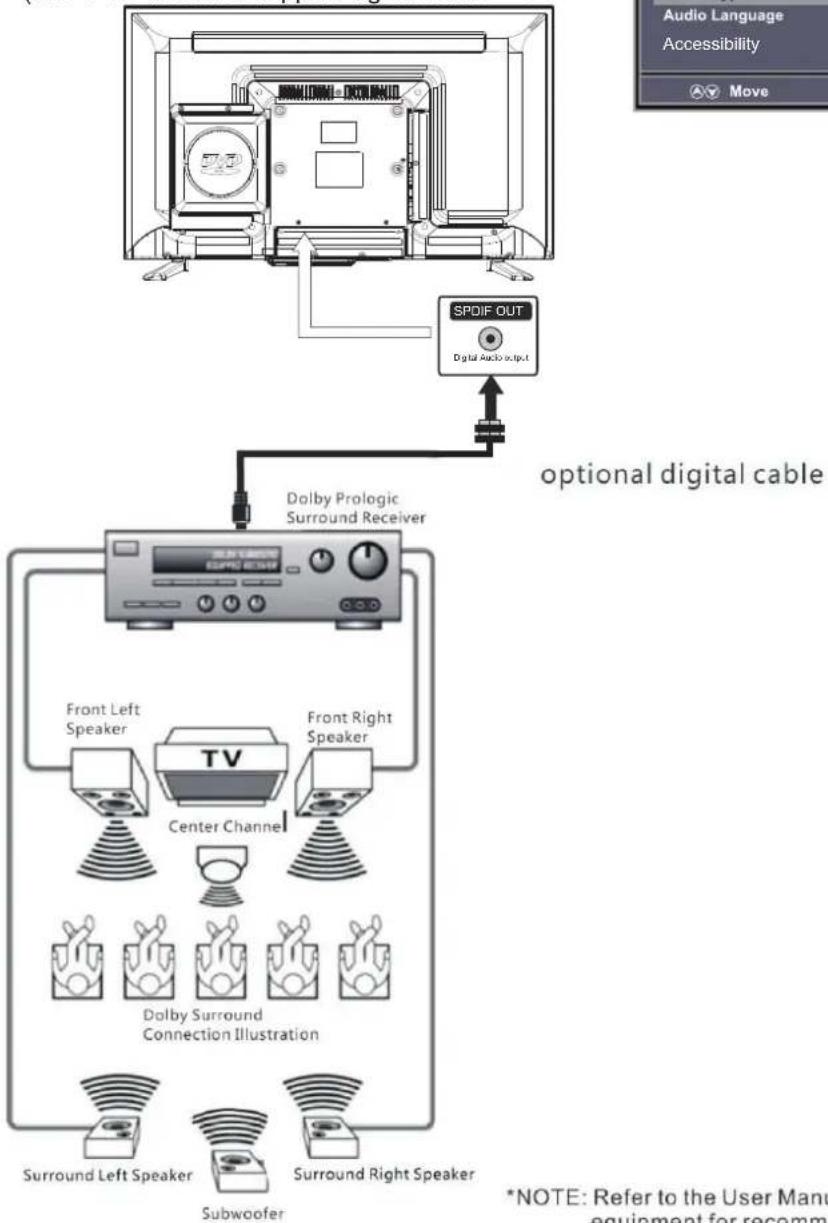
Connection to a Home Theater Audio System
For BEST audio performance
Connecting to a Home Theater System Dolby Digital can deliver optimal 2 channel stereo or surround sound with five discrete full range channels plus a sixth channel for a subwoofer.
Enjoy optimal sound reproduction from your system with a Dolby Digital amplifier that incorporates a digital coaxial input. Connect an optional digital cable directly to the television's Digital Audio uo tput to listen through all inputs except VGA.
(The VGA does not support digital audio)
flowchart
graph TD
    A["TV"] --> B["Center Channel"]
    B --> C["Dolby Surround Connection Illustration"]
    C --> D["Surround Left Speaker"]
    C --> E["Surround Right Speaker"]
    F["SpDIF OUT"] --> G["Digital Audio output"]
    H["Front Left Speaker"] --> I["Center Channel"]
    J["Front Right Speaker"] --> K["Center Channel"]
    L["SpDIF OUT"] --> M["Digital Audio output"]
    N["SpDIF OUT"] --> O["Digital Audio output"]
    P["SpDIF OUT"] --> Q["Digital Audio output"]
    R["SpDIF OUT"] --> S["Digital Audio output"]
    T["SpDIF OUT"] --> U["Digital Audio output"]
    V["SpDIF OUT"] --> W["Digital Audio output"]
    X["SpDIF OUT"] --> Y["Digital Audio output"]
    Z["SpDIF OUT"] --> AA["Digital Audio output"]
    AB["SpDIF OUT"] --> AC["Digital Audio output"]
    AD["SpDIF OUT"] --> AE["Digital Audio output"]
    AF["SpDIF OUT"] --> AG["Digital Audio output"]
    AH["SpDIF OUT"] --> AI["Digital Audio output"]
    AJ["SpDIF OUT"] --> AK["Digital Audio output"]
    AL["SpDIF OUT"] --> AM["Digital Audio output"]
    AN["SpDIF OUT"] --> AO["Digital Audio output"]
    AP["SpDIF OUT"] --> AQ["Digital Audio output"]
    AR["SpDIF OUT"] --> AS["Digital Audio output"]
    AT["SpDIF OUT"] --> AU["Digital Audio output"]
    AV["SpDIF OUT"] --> AW["Digital Audio output"]
    AX["SpDIF OUT"] --> AY["Digital Audio output"]
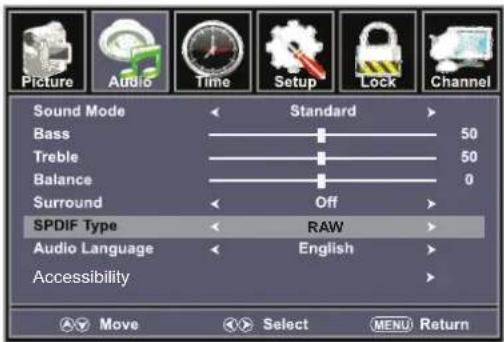
How To Setup Digital Output
Press the MENU button on the remote control Press the right ▶ arrow button to select AUDIO Press the down ▼ arrow button to highlight SPDIF Type right ▶ Raw or PCM
*NOTE: Refer to the User Manual from your home theater equipment for recommended audio settings.
WALL MOUNT INSTALLATION
INSTALLING REMOVING THE BASE STAND
WARNING : The TV Display is very fragile and must be protected at all times when removing the base Stand.
Be sure that no hard or sharp object or anything that could scratch or damage the TV display comes into contact with it. Do NOT exert pressure on the front of the unit at any time because the screen could crack
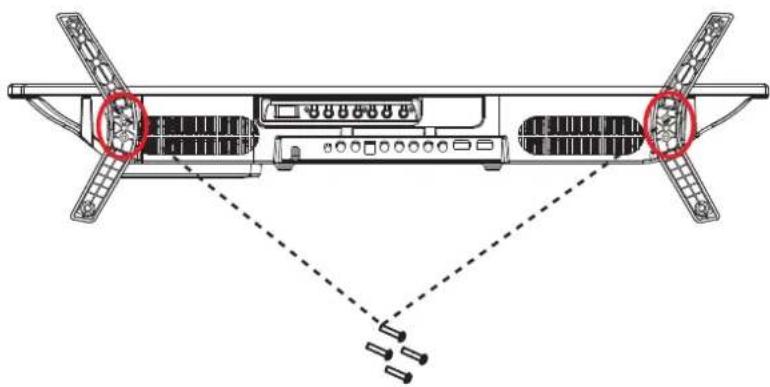
- Disconnect all cables or cords connected to the unit
- Lay the unit down on a flat surface with the back side facing down.
- To remove the base stand loosen screws off the holes then pull downwards to release the base stand.
natural_image
Diagram of a dual-panel electronic device with labeled ports and connections (no text or symbols present)MOUNTING ON THE WALL
This unit is VESA-compliant, and is designed to be wall-mounted with a VESA-compliant 8"x4" (200mm x 100mm) mounting kit designed for flat-panel TVs (not supplied). Mount this unit according to the instructions included in the mounting kit. Length of screw should not exceed 8 mm.
NOTE
Remove the base stand before mounting the unit on the wall.
ATTACHING THE STAND
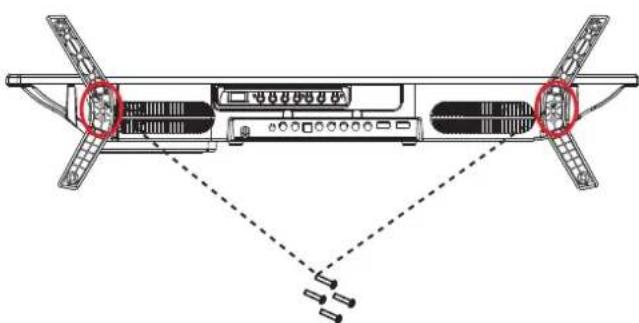
Place the stand on the TV, insert and tighten the screws B4x16Fmm (found in the accessories bag) in the circled area with the screwdriver (not provided).
natural_image
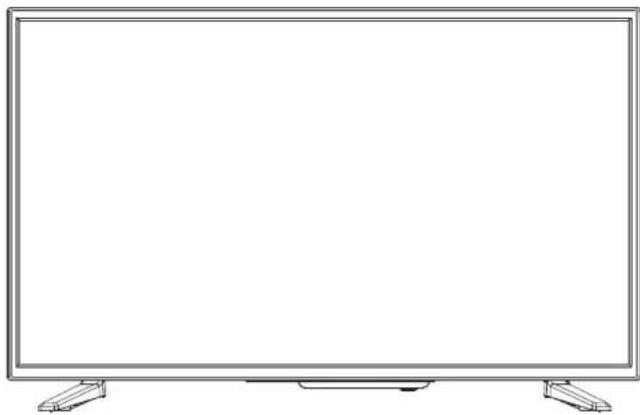
Diagram of a device rack with two connectors and internal components, showing alignment between top and side views (no text or symbols)Then the TV is ready for use now.
natural_image
Front view of a flat-screen television displaying (no text or symbols visible)INITIAL SETUP
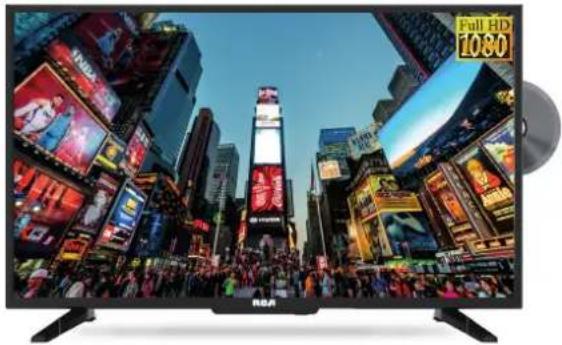
PUTTING THE UNIT ON A PROPER PLACE
When you turn on your television set for the first time, be sure to place it on a solid stable surface.
To avoid danger, do not expose the TV to water, or a heat source (e.g. lamp, candle, radiator).
Do not obstruct the ventilation grid at the rear and be sure to leave sufficient gaps around the unit.
natural_image
Large television displaying in a brightly lit urban cityscape with numerous billboards and crowds (no visible text or symbols on screens)TURNING THE UNIT ON FOR THE FIRST TIME
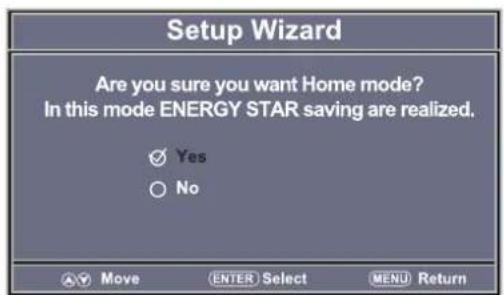
After you have initially connected your TV antenna or cable, turn the television ON.
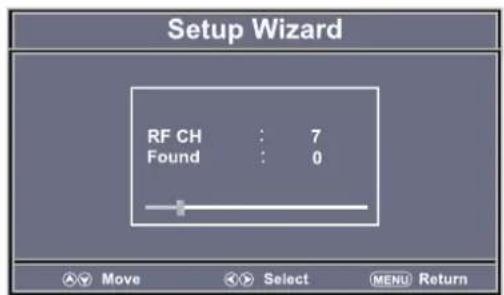
A screen will display asking you to run a Channel Auto Scan to search and receive available local digital channels.
It is here where you will select antenna options and run Channel Auto Scan.
Please Run Channel Auto Scan
Channels will be stored in the TV tuner.
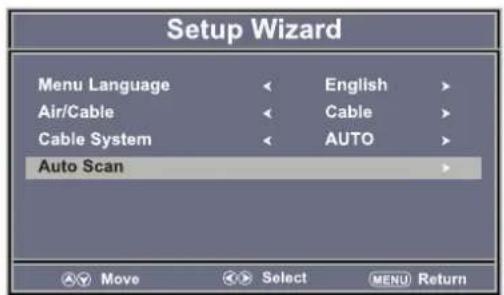
Press the MENU button on the remote control. Using the ◀▶ buttons, scroll to highlight channel mode. Press the ▼ button to highlight AIR/CABLE.
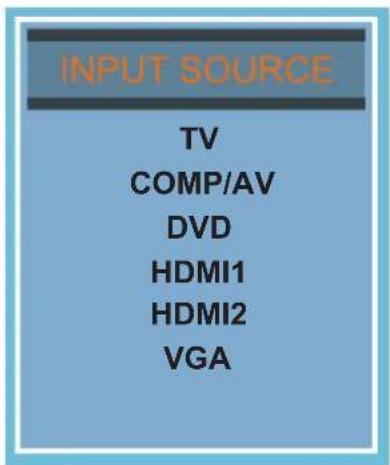
SOURCE SELECTION
- Press the SOURCE button on the remote control.
- Use the ▲ or ▼ button to select the options (TV,COMP/AV,DVD,HDMI1/2,VGA)
and select any of them using the ▶ button or the ENTER button.
(The screen will change to your desired source).
Note: Before watching please make sure all necessary cables and devices are connected.
TV SETUP
Air Mode: Select AIR when connected to an indoor/outdoor antenna.
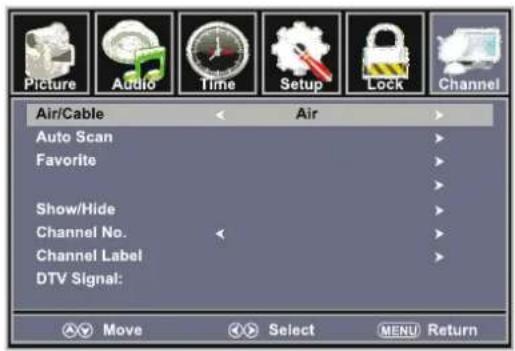
Press the ▼ button to highlight AIR.
Press the ▼ button to select AUTO SCAN then press the ▶ button to start Channel Auto Scan.
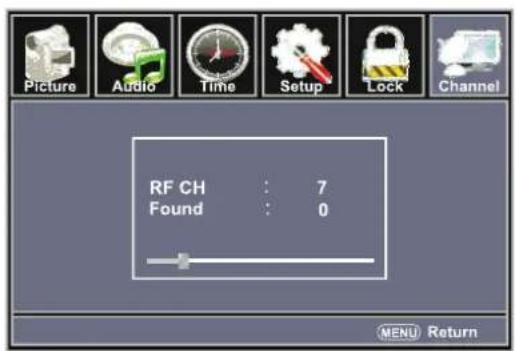
Channel Auto Scan may take several minutes to complete.
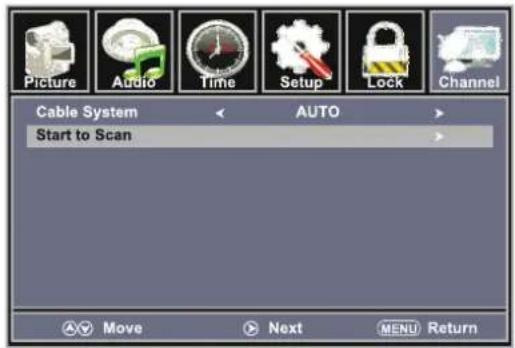
Cable Mode: Select CABLE if you subscribe to a pay television service including satellite.
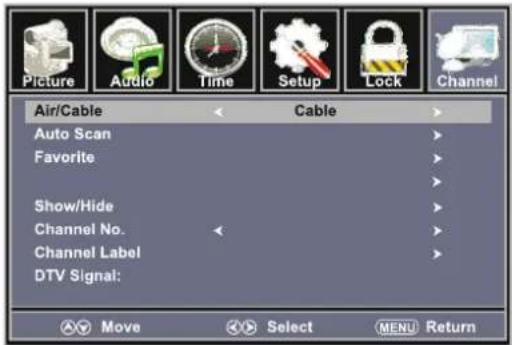
Using the ◀▶ button to highlight CABLE.
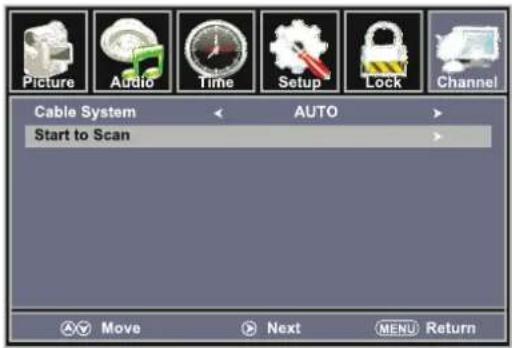
Press the ▼ button to select AUTO SCAN. Press the ENTER button and the cursor will move up and CABLE SYSTEM will be displayed next. Press ▶ the button to select STD > IRC > HRC > Auto (Auto is recommended). Press the ▼ button to select Auto Scan and press ENTER to start Channel Auto Scan.
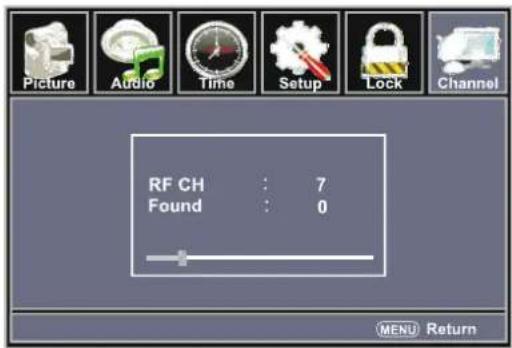
Channel Auto Scan may take several minutes to complete.
NOTE: For cable or satellite users with no TV antenna, there no need to run Channel Auto Scan. Connect your cable or satellite set top box to one of the available inputs on the TV for viewing.
TV SETUP

PICTURE MENU
The PICTURE menu offers options to enhance and refine the picture displayed on your TV based on ambient room light and personal preferences. Adjustment options include contrast, brightness, color, tint, sharpness and color temp.
How to Navigate:
Press the MENU button on the remote control. Navigate using the ◀▶ buttons to select PICTURE.
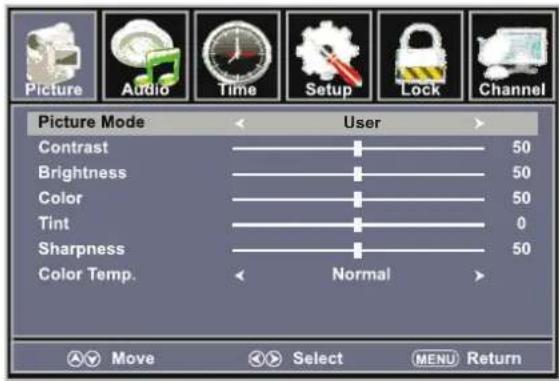
Press the ▼ button to highlight, then press the ▶ button to select your viewing preference from 5 factory options: STANDARD > DYNAMIC > MILD > USER > ENERGY SAVING.
The STANDARD setting is recommended for most viewing environments.
Depending on the ambient light level in the room, you may find one of the other options more pleasing.
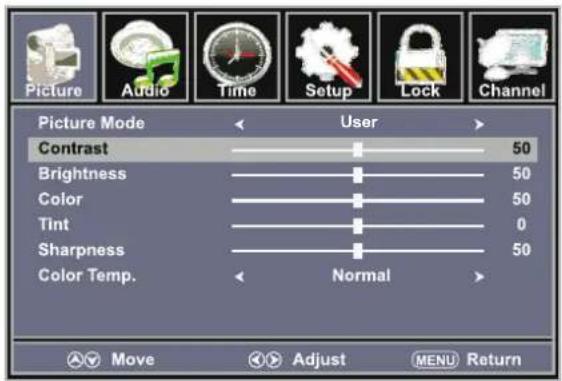
To make more critical picture adjustments based on your own preferences in USER:
Use the ▼ button to highlight Contrast. Navigate using the ◀▶ buttons to increase or decrease contrast intensity.
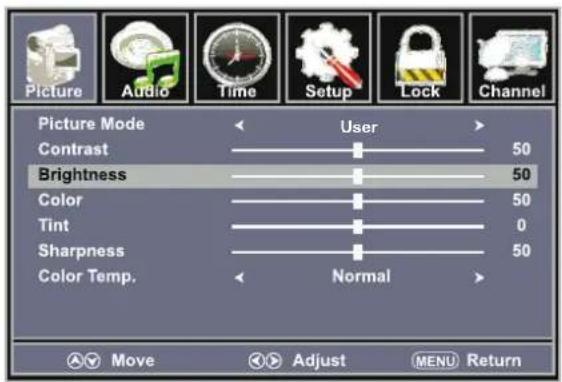
Use the ▼ button to highlight Brightness. Navigate using the ◀▶ buttons to increase or decrease overall brightness.

PICTURE MENU
The PICTURE menu offers options to enhance and refine the picture displayed on your TV based on ambient room light and personal preferences.
Adjustment options include contrast, brightness, color, tint, sharpness and color mode.
Press the MENU button on the remote control. Navigate using the ◀▶ buttons to select PICTURE.
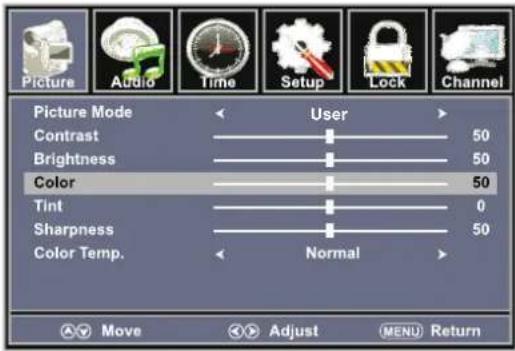
Use the ▼ button to highlight Color. Navigate using the ◀▶ buttons to increase or decrease color intensity.
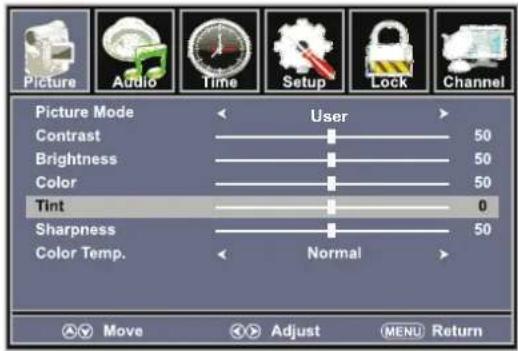
The "Tint" item only works in user mode.
Adjusting tint will affect the skin tone. -50 will increase red, +50 will increase green. Ideally, the tint scale on the TV OSD should show the red/green color for easy adjustment.
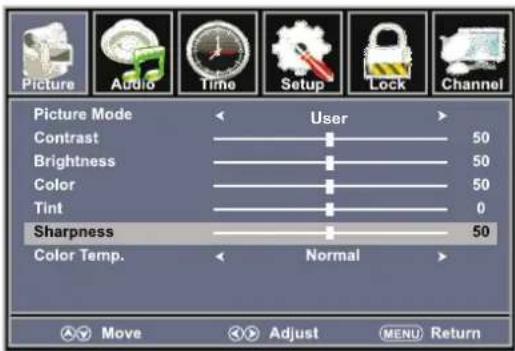
Use the ▼ button to highlight Sharpness. Navigate using the ◀▶ buttons to soften or view crisper edges in the picture.
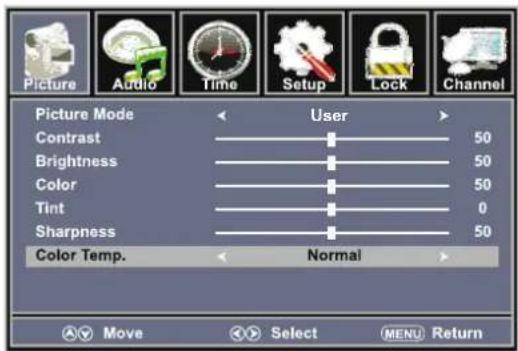
Use the ▼ button to highlight Color Temp. Navigate using the ◀▶ buttons to select COOL (more bluish tone), NORMAL or WARM. The default setting is NORMAL. WARM mode will provide color that is calibrated to D6500° Kelvin, the standard color that broadcast stations and the Motion Picture industry consider as the most accurate to view programming.
Note:
When adjustments are completed, you may select another menu by pressing the Menu button.
TV SETUP

SOUND MENU
The SOUND menu offers options to make sound enhancements while listening through the built-in speakers and personal preferences.
Adjustment options include Sound Mode, Bass, Treble.
How to Navigate:
Press the MENU button on the remote control. Navigate using the ◀▶ buttons to select Sound.
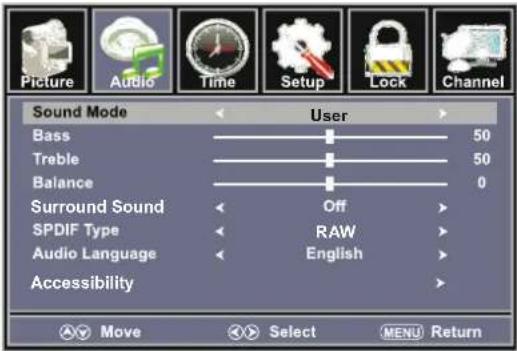
Press the ▼ button to highlight Sound Mode, then press the ▶ button to select your sound preference from 5 factory options:
STANDARD > MUSIC > MOVIE > USER >SPORT.
The STANDARD setting is recommended for most sound environments.
Depending on the surroundings in the room, you may find one of the other options more pleasing.
To make more critical audio adjustments based on your own preferences in USER:
Use the ▼ button to highlight Bass/Treble. Navigate using the ◀▶ buttons to increase or decrease low frequency intensity.
How to Navigate:
Press the MENU button on the remote control. Navigate using the ◀▶ buttons to select SOUND.
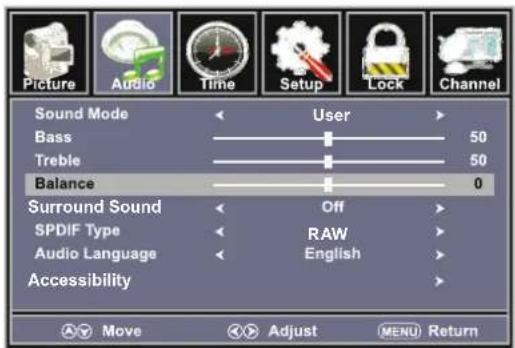
Use the ▼ button to highlight Balance.
Navigate using the ◀▶ buttons to adjust sound towards the right or left speaker.
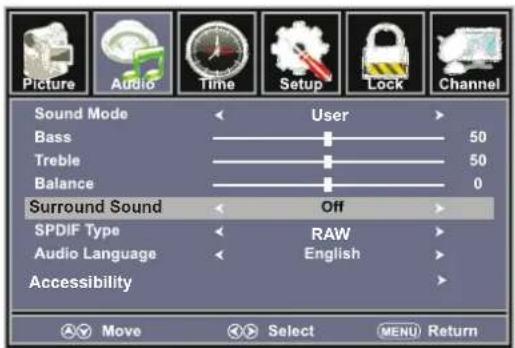
Use the ▼ button to highlight Surround. Navigate using the ▶ button to turn the dimensional surround effect ON or OFF. (for built-in speakers only).
TV SETUP

SOUND MENU
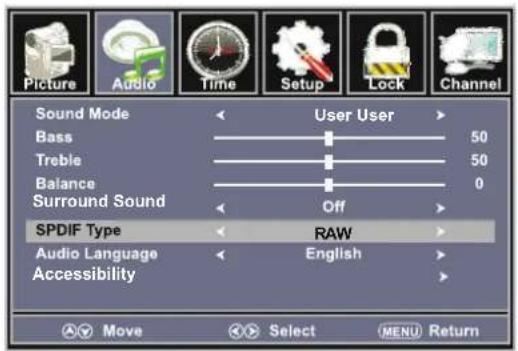
Use the ▼ button to highlight SPDIF Type. Navigate using the ▶ button to adjust.
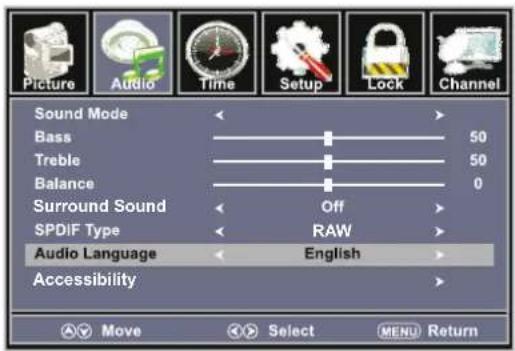
Use the ▼ button to highlight Audio Language. Navigate using the ◀▶ buttons to select to listen to an alternative language broadcast (if available) English > Spanish > French. You may select an alternative language using the remote control by pressing MTS)
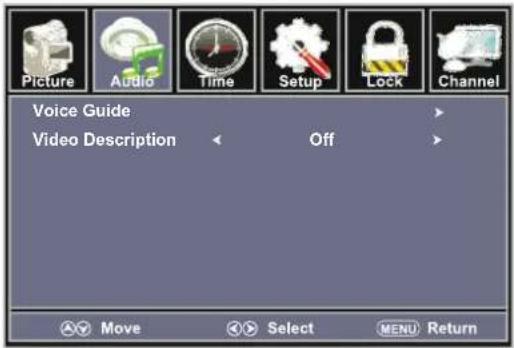
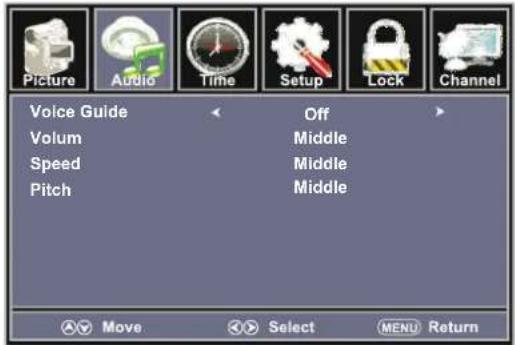
Video Description
The default is OFF. This option can be used only on the DTV mode.
Voice Guidance
The default is OFF. When you want to use this function, you can select On, and adjust the Volume, Speed, Pitch.
Note:
When adjustments are completed, you may select another menu by pressing the Menu button.
TV SETUP

TIME MENU
The TIME menu includes adjustment of settings for your local time zone and daylight savings time. The clock will adjust automatically after the initial Channel Auto Scan of available broadcast channels in your area.
How to Navigate:
Press the MENU button on the remote control. Navigate using the ◀▶ buttons to select TIME.
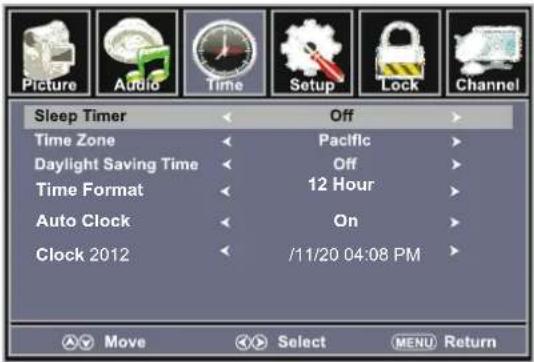
Use the ▼ button to highlight SleepTimer, then press the ▶ button to select among: 5min, 10min, 15min, 30min, 45min, 60min, 90min, 120min, 180min, 240min and off.
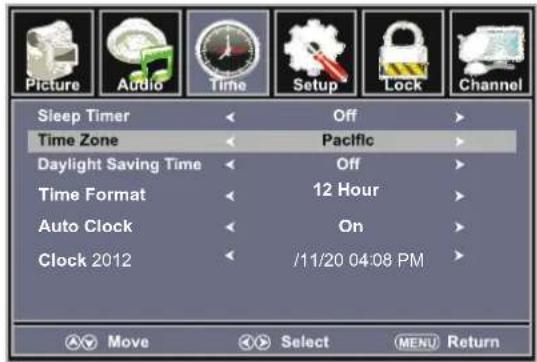
Use the ▼ button to highlight TimeZone, then press the ▶ button to select among: EASTERN > CENTRAL > MOUNTAIN > PACIFIC > ALASKA > HAWAII > ATLANTIC.
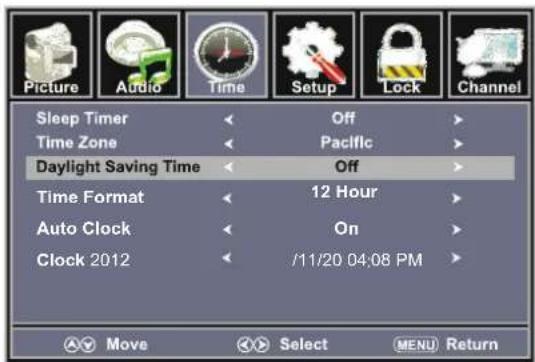
Use the ▼ button to highlight
Daylight Saving Time.
Navigate using the ◀▶ buttons to turn
this feature on or off.
Note:
When adjustments are completed, you may select another menu by pressing the Menu button.
TV SETUP

SETUP MENU
In the SETUP menu you may change the initial set up of preferences that include settings for language, menu display, computer monitoring, closed captions, enhancement of black detail in the picture and resetting your TV back to its factory default status.
How to Navigate:
Press the MENU button on the remote control. Navigate using the ◀▶ buttons to select SETUP.
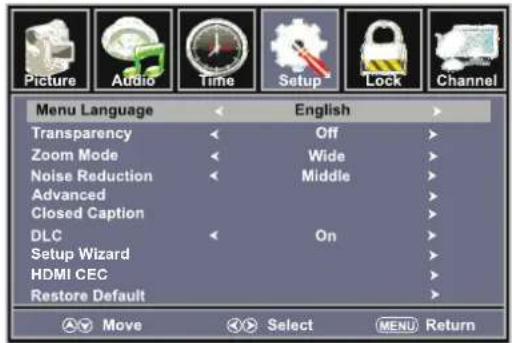
Use the ▼ button to highlight Menu Language, Press the ▶ button to select the language you prefer among English, French and Spanish.
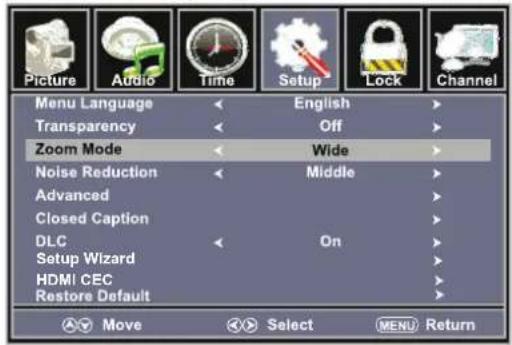
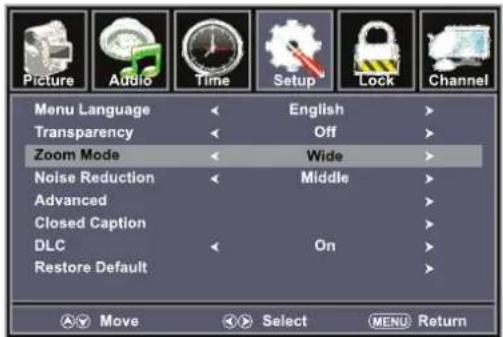
Use the ▼ button to highlight Zoom Mode. Navigate using the ◀▶ buttons to turn this feature Wide, Normal, Cinema or Zoom.
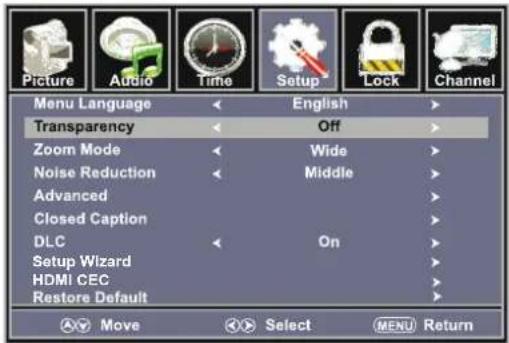
Use the ▼ button to highlight Transparency. Navigate using the ◀▶ buttons to turn this feature on or off.
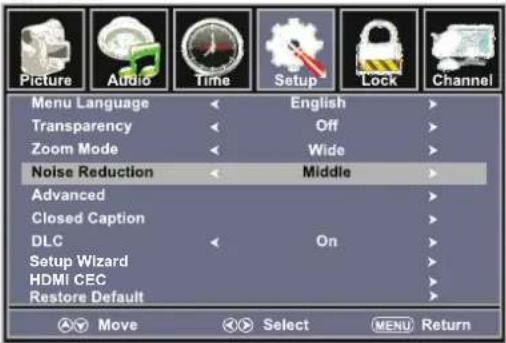
Use the ▼ button to highlight Noise Reduction. Navigate using the ◀▶ buttons to turn this feature Middle,weak,off,or Stong.
How to Navigate:
After connecting to a PC, press the SOURCE button and highlight VGA, then press the ENTER button.
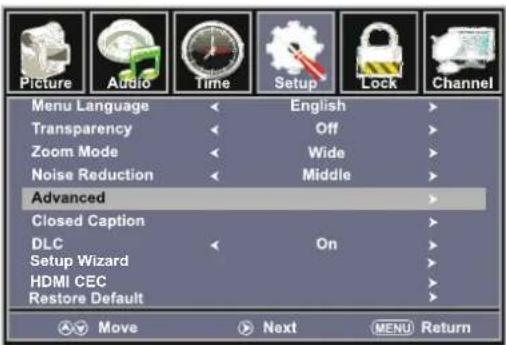
Press the MENU button on the remote control and navigate using the ◀▶ buttons to select SETUP. Press the ▼ button to highlight PC Settings, then press the ▶ button to select from the following options.
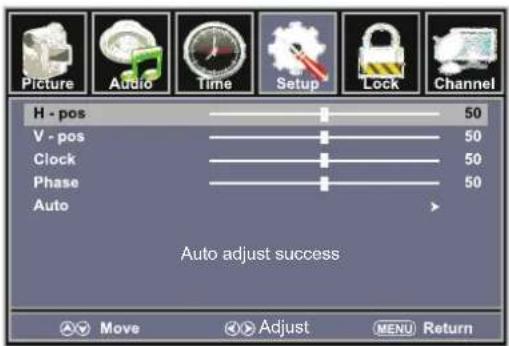
Use the ▼ button to highlight H-POS. Navigate using the ◀▶ but tons to adjust the position of images displayed from side to side.
TV SETUP

SETUP MENU
In the SETUP menu you may adjust the position of images displayed on screen once you connect an input signal from your PC. Recommended resolution is 1920 x 1080.
If your PC system uses a standard signal mode, the screen will adjust automatically. Connect an optional 3.5mm audio cable for stereo sound.
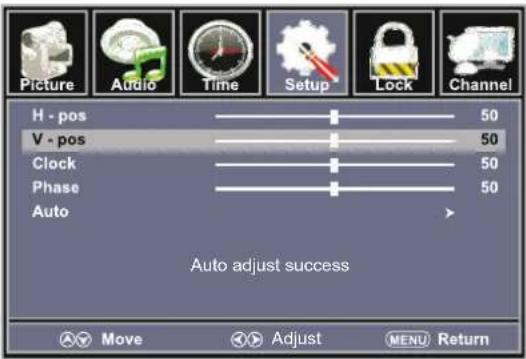
Use the ▼ button to highlight V-POS. Navigate using the ◀▶ buttons to adjust the position of images displayed up and down.
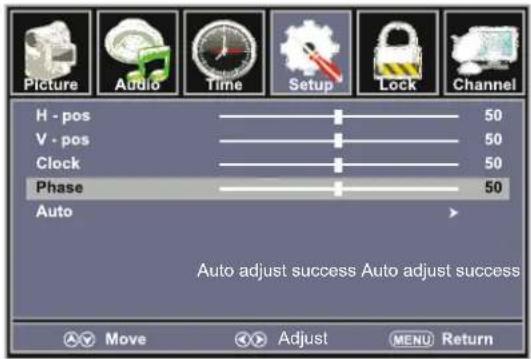
Use the ▼ button to highlight Phase. Navigate using the ◀▶ buttons to improve focus and image stability.
How to Navigate:
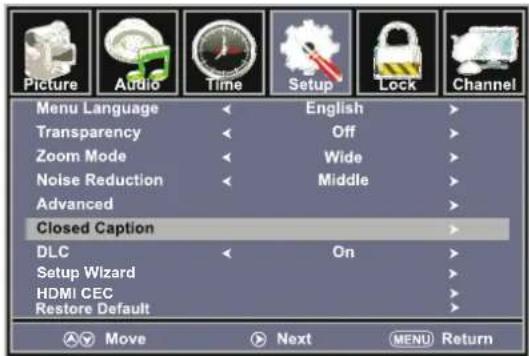
Press the MENU button on the remote control. Navigate using the ◀▶ buttons to select SETUP. Press the ▼ button to highlight Closed Caption then press the ▶ button to select from the following options.
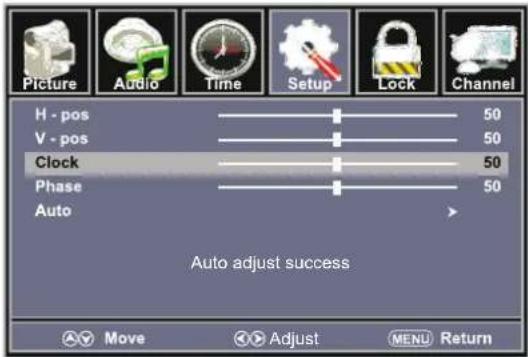
Use the ▼ button to highlight Clock. Navigate using the ◀▶ buttons to control the width of the image.
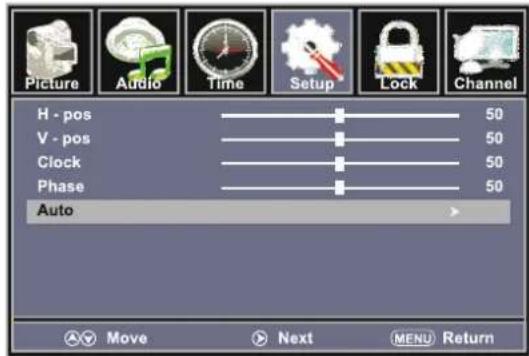
Use the ▼ button to highlight AUTO. Press the ▶ button to automatically adjust the display to the best setting.
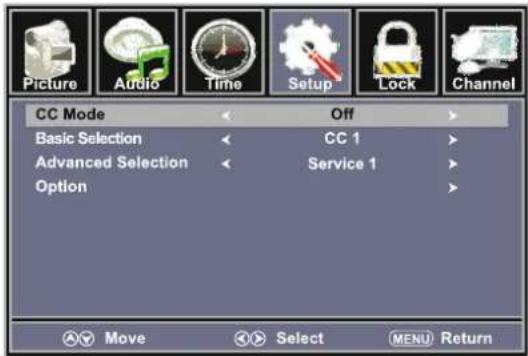
Use the ▼ button to highlight CC Mode. Navigate using the ◀▶ buttons to select Off > On > CC on Mute.
TV SETUP

SETUP MENU
The SETUP menu includes adjustments for activating the Closed Caption feature for display on the television and customizing CC display types and font styles.
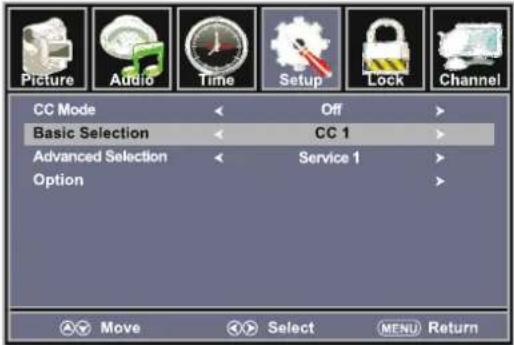
Use the ▼ button to highlight Analog CC. Navigate using the ◀▶ buttons to select CC 1-4, Text 1-4.
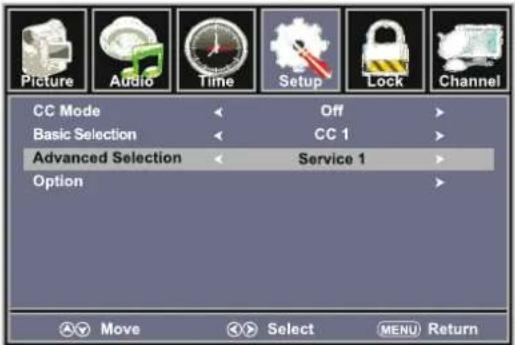
Use the ▼ button to highlight Digital CC. Navigate using the ◀▶ buttons to select Service 1 - 6.
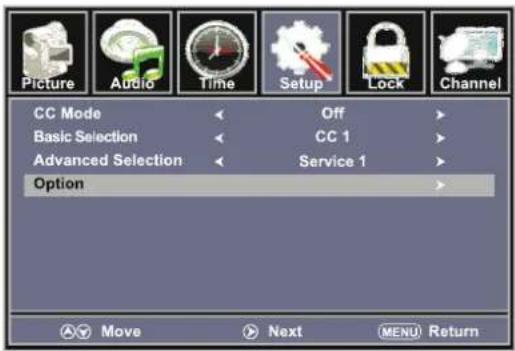
Use the ▼ button to highlight Option. Press the ▶ button to enter a menu with options to cus tomize text fonts, colors and opacities.
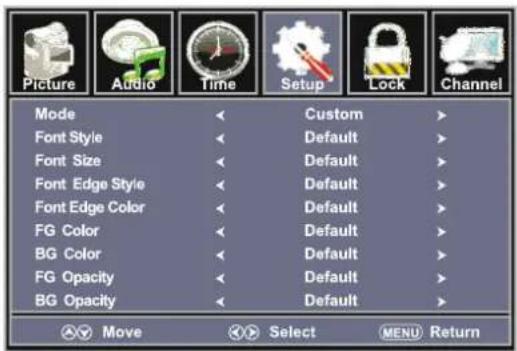
Note:
When adjustments are completed, you may select another menu by pressing the Menu button.
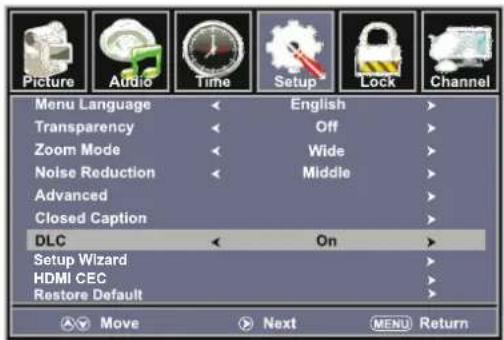
Use the ▼ button to highlight DLC. Navigate using the ◀▶ buttons to turn this feature On or Off.
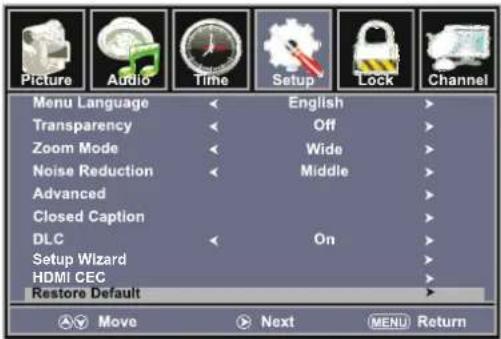
Use the ▼ button to highlight Restore Default. Press the ▶ button to automatically set all adjustments back to their original settings.
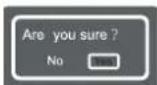
When prompted, Select "Yes" to confirm.

LOCK(PARENTAL) MENU
In the LOCK(PARENTAL) menu you may block television by inputting passwords. To gain access and select your preferences within the LOCK(PARENTAL) menu make certain your input is set to TV.
How to Navigate:
Press the MENU button on the remote control. Navigate using the ◀▶ buttons to select LOCK.
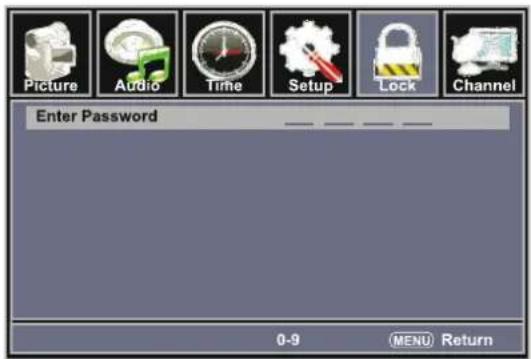
Press the ▼ button to highlight Enter Password. Enter your 4 digit code (factory default code is "0000") unless previously changed.
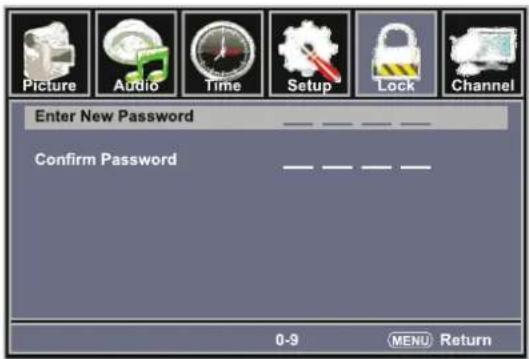
Use the numeric buttons to input a new 4 digit code by two times.
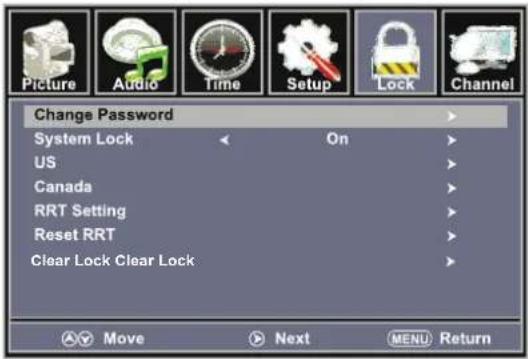
To change the password, press the ▶ button to display a screen to enter your new password, then confirm again.
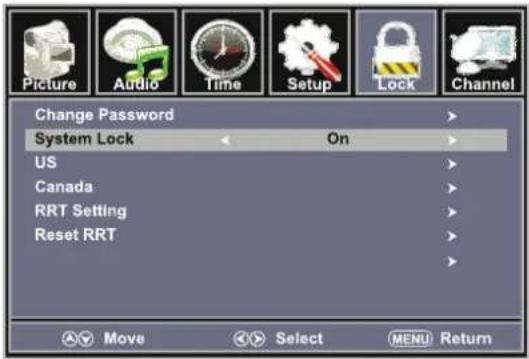
To make changes to PARENTAL controls, Highlight SYSTEM LOCK then press the ▶ button to ON.
NOTE:
RRT Setting is not user's adjustable settings.

LOCK(PARENTAL) MENU
In the LOCK(PARENTAL) menu you may block television and movie programming based on U.S TV and movie rating guidelines. To gain access and select your preferences within the LOCK(Parental) menu make certain your input is set to TV.
How to Navigate:
Press the MENU button on the remote control. Navigate using the ◀▶ buttons to select LOCK (Parental).
Press the ▼ button to highlight ENTER PASSWORD. Enter your 4 digit code (factory default code is "0000") unless previously changed.
To set parental controls for television programming or DVD movies, press the ▲▼buttons to highlight US. Navigate using the ◀▶ buttons to highlight TV/MPAA menu.
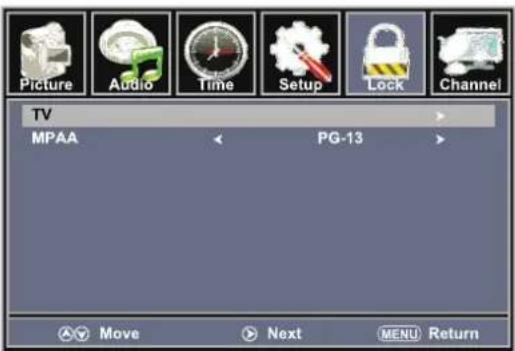
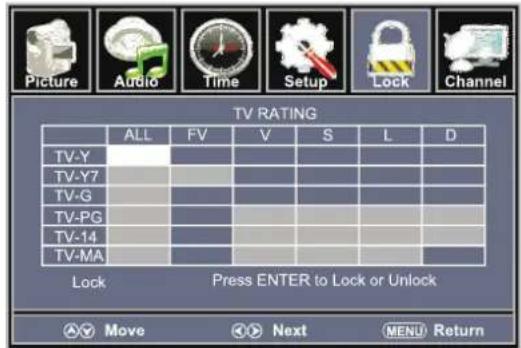
Highlight TV, then press the ▶ button to enter the TV Ratings menu to select your preference.
| Age | Defined as |
| TV-Y | Recommended for all children. |
| TV-Y7 | Directed to older children. |
| TV-G | General Audience. |
| TV-PG | Parental Guidance Suggested. |
| TV-14 | Parental Strongly Cautioned. |
| TV-MA | Mature Audience only. |
| Contents | Defined as |
| FV | Fantasy Violence |
| D | Suggestive Dialogue |
| L | Strong Language |
| S | Sexual Situations |
| V | Violence |
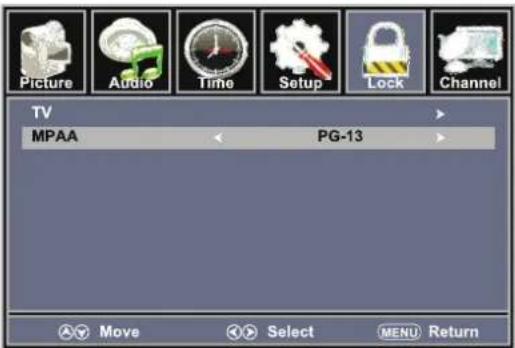
| Rating | Defined as |
| N/A | Not rated. |
| G | GENERAL AUDIENCES, Suitable for all ages. |
| PG | PARENTAL GUIDANCE SUGGESTED- Some material may not be suitable for children. |
| PG-13 | PARENTS STRONGLY CAUTIONED- Some material may be inappropriate for children under 13. |
| R | RESTRICTED, Under 17 requires accompanying parent or adult guardian for viewing in movie theaters. |
| NC-17 | No one 17 or under admitted in movie theater. |
| X | Adult audience only. |
Highlight MPAA then press the ▶ button repeatedly to select your movie rating preference.

LOCK(PARENTAL) MENU
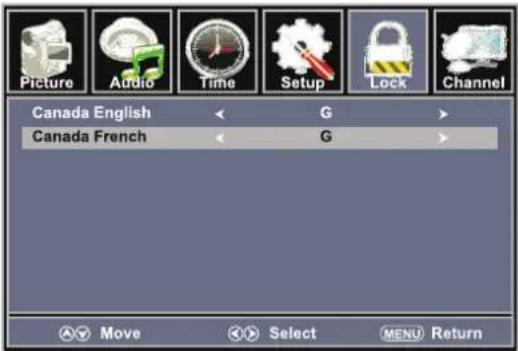
In the LOCK(PARENTAL) menu you may block television and movie programming based on Canadian TV and movie rating guidelines. To gain access and select your preferences within the LOCK(Parental) menu make certain your input is set to TV.
How to Navigate:
Press the MENU button on the remote control. Navigate using the ◀▶ buttons to select LOCK. Press the button to highlight ENTER PASSWORD. Enter your 4 digit code (factory default code is "0000") unless previously changed.
To set parental controls for television programming or DVD movies, press the ▲▼ buttons to highlight Canada. Navigate using the ◀▶ buttons to highlight Canada English/Canada French menu.
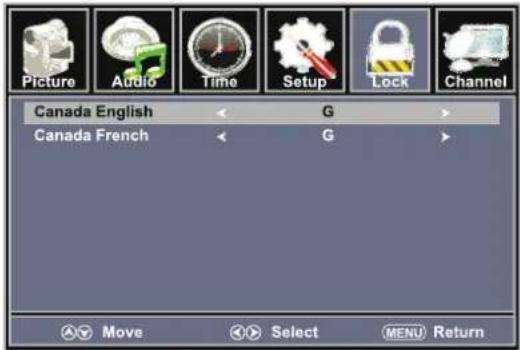
| Rating | Description |
| E | Exempt. |
| C | Children. |
| C8 + | Recommended for children age 8 and older. |
| G | GENERAL AUDIENCES, Suitable for all ages |
| PG | PARENTAL GUIDANCE SUGGESTEDSome material may not be suitable for children. |
| 14 + | Viewers 14 years and older |
| 18 + | Adult Programming. |
Navigate using the ▼ button to highlight CANADA ENGLISH, then press the ▶ button repeatedly to select your ratings preference.
| Rating | Description |
| E | Exempt. |
| G | GENERAL AUDIENCES, Suitable for all ages. |
| 8 ans+ | Not recommended for young children. |
| 13 ans+ | Not suitable for children under the age of 13. |
| 16 ans+ | Not suitable for children under the age of 16. |
| 18 ans+ | Adult Programming. |
Navigate using the ▼ button to highlight CANADA FRENCH, then press the ▶ button repeatedly to select your ratings preference.
NOTE:
When adjustments are completed, you may select another menu by pressing the Menu button.

TV(CHANNEL) MENU
The TV(CHANNEL) menu provides for the setup of your television to receive TV channels, store your favorites, add or skip channels and label them by their call letters.
How to Navigate:
Press the MENU button on the remote control. Navigate using the ◀▶ buttons to select TV. Press the ▼ button to highlight your preferences.
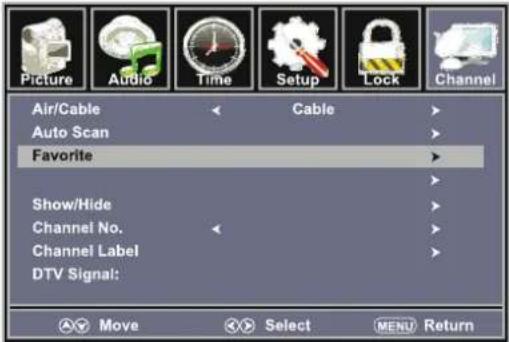
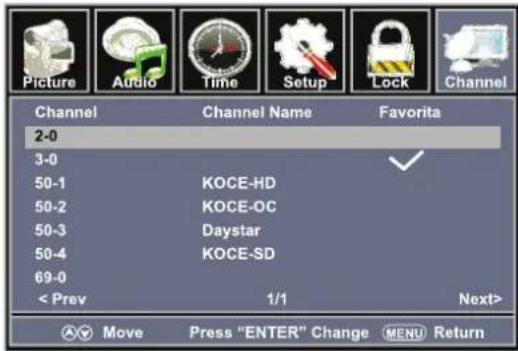
Highlight FAVORITE to add channels to your Favorites List. Navigate using the ▲▼◀▶ buttons to select channels to be added or deleted from your list. Press the ENTER button to add or delete a channel. A checkmark indicates a channel has been added. You may also display your favourite list from the remote control by pressing FAV.
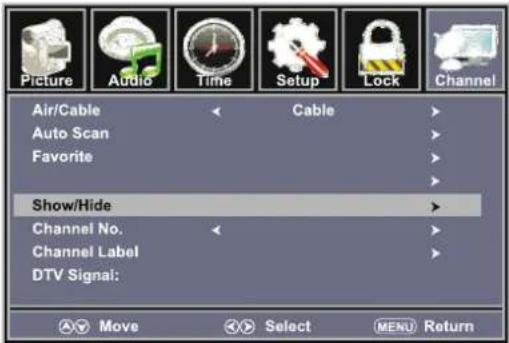
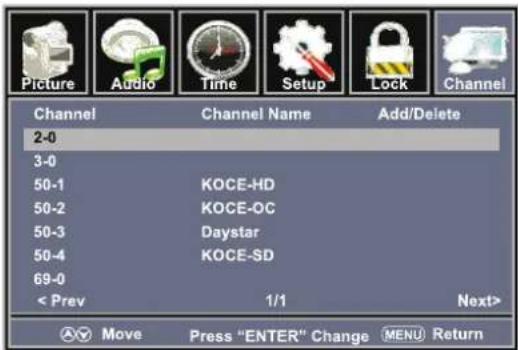
Highlight to select Show/Hide or skip channels already in memory. Navigate using the ▲▼◀▶ buttons to access the list of available channels. Press the ENTER button to change the channels status. A checkmark indicates a channel has been added.
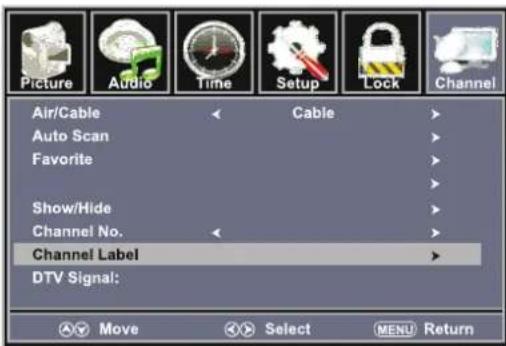
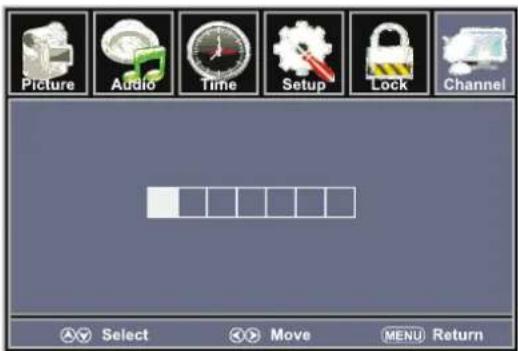
Highlight CHANNEL LABEL to name or rename a broadcast channel. Navigate using the ▶ button to enter the screen menu to re-label a channel. Use the ▲▼ buttons to spell out each letter, number or character. Use the ◀▶ buttons to advance to the next space.
TV SETUP
ZOOM MODE
Press the MENU button on the remote control. Navigate using the ◀▶ buttons to select Picture. Use the ▼ button to highlight Zoom Mode. Navigate using the ◀▶ buttons to select the viewing mode: Normal > Wide > Zoom > Cinema.
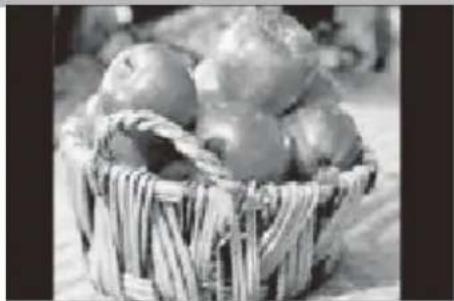
1. NORMAL
Recommended for viewing native widescreen content and undistorted 4:3 images. (With Black Bars)
natural_image
Black-and-white photo of a woven basket filled with apples, no visible text or symbols2. WIDE
Stretches certain 4:3 content and may reduce the black bars.

natural_image
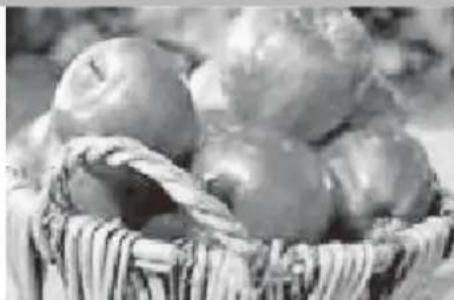
Black-and-white photo of a woven basket filled with round fruits, no visible text or symbols3. ZOOM
Stretches the image both vertically and horizontally to fill the screen when viewing widescreen content. The zoom effect will crop images somewhat.
natural_image
Black-and-white photo of a woven basket filled with fresh apples (no text or symbols visible)4. CINEMA
When viewing 4:3 content, Cinema mode will fill the entire screen eliminating the side black bars. It may also eliminate or reduce black bars on certain widescreen movies.

natural_image
Black-and-white photo of a woven basket filled with round fruits, placed on a textured surface (no text or symbols visible)DISC FORMATS
NOTES ON COPYRIGHT
It is forbidden by law to copy, broadcast, show, broadcast on cable, play in public or rent copyrighted material without permission.
Apparatus Claims of U.S. Patent Nos. 6,836,549; 6,381,747; 7,050,698; 6,516,132; and 5,583,936 licensed for limited viewing uses only.
DVDs are copy protected, and any recordings made from these discs will be distorted. This product incorporates copyright protection technology that is protected by method claims of certain U.S. patents and other int-lectual property rights owned by Macrovision Corporation and other rights owners. Use of this copyright protection technology must be authorized by Macrovision Corporation, and is intended for home and other limited viewing uses only, unless otherwise authorized by Macrovision Corporation. Reverse engineering or disassembly is prohibited.
The unit can play :

DVDs
[12cm disc]

Audio CDs
[12cm disc]

CD-R CD RW
Compatible
REGION MANAGEMENT INFORMATION
Region Management Information : This unit is designed and manufactured to respond to the Region Management Information that is encoded on DVDs. If the region number printed on the DVD does not correspond to the region number of this unit, this unit cannot play that disc.
The region number of this equipment is

When the "INVALID KEY" symbol appears on the screen, it indicates that the function or operation attempted is not available at that time.
This occurs because the DVD manufacturer determines the specific functions.
Certain functions may not be available on some discs. Be sure to read the documentation provided with the DVD.
ICONS USED ON DVDs
Sample Icons
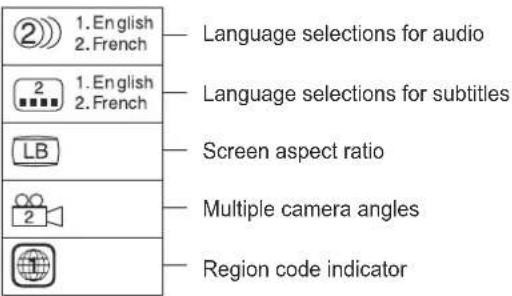
NOTE
When playing back a CD-G (Graphics) or CD EXTRA disc, the audio portion will be played, but the graphic images may not be shown.
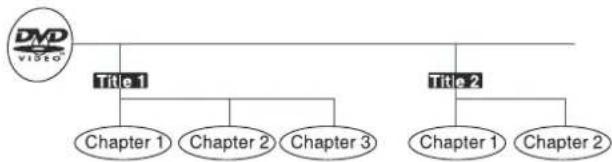
TITLES, CHAPTERS AND TRACKS
If the disc has more than one movie on it, each movie would be a separate TITLE. "CHAPTERS" are sections of titles.
flowchart
graph TD
    A[" DVD video "] --> B["Title 1 "]
    A --> C["Title 2 "]
    B --> D["Chapter 1 "]
    B --> E["Chapter 2 "]
    B --> F["Chapter 3 "]
    C --> G["Chapter 1 "]
    C --> H["Chapter 2 "]
A TRACK is"usually one song on an Audio CD.

flowchart
graph LR
    A["Track 1"] --> B["Track 2"]
    B --> C["Track 3"]
    C --> D["Track 4"]
    D --> E["Track 5"]
NOTE
Numbers identify each title, chapter and track on a disc. Most discs have these numbers record on them, but some do not.
NOTES ON UNAUTHORIZED DISCS
You may not be able to playback some DVDs on this equipment if they were purchased from outside your geographic area or made for business purposes.
CD/DVD OPERATION
This owner's manual explains the basic instructions of this unit. Some DVDs are produced with limited operation during playback. For example, many DVDs do not allow users to skip government warnings, or in some cases previews or other features. This is not a defect in the unit. Refer to the instruction notes of discs.
" INVALID KEY "may appear on the screen during operation. " INVALID KEY " means that the desired operation is not permitted by the unit or disc.
BASIC OPERATIONS
TURN ON AND OFF THE DVD FUNCTION
Turn on the LCD TV and then press the SOURCE button repeatedly to select DVD mode.
INSERT DISC TO DVD
Insert the disc to the disc slot (mirror side of the disc has to face yourself), the player will load the disc automatically. There will have an on screen indication "CLOSE" then "READ". After loading the disc content, it will switch to play mode automatically. If the disc is already placed inside, the disc will be read automatically.
NOTE: For some discs, after loading the content of the disc, need to press the ▶ or select from the disc menu to start.
Please make sure when inserting the Disc, the label side of the disc should be facing yourself when inserting the Disc incorrectly, you may damage the DVD mechanism.
PLAYING A PICTURE FILE DISC
This unit can play JPG files recorded on CD-R and CD-RW discs.
- Hold the disc by its edge and gently push it into the door, with the mirror side facing yourself.
- The unit will load the disc and automatically display the contents of the disc on the screen, while also beginning to play the picture file. These files will then be played back one by one.
- Press the ■ button to go to the folder list.
- Press the ▲ or ▼button to highlight a file to play. Press the ▶ll button to start playback.
Press the ▶Ibutton to switch between pausing and playing.
STOPPING PLAYBACK
Press the button ■ at the location where you want to interrupt playback. To resume playback at the position where the disc was stopped, press the button ▶II.
If you press the button ■ twice, the unit's memory will be cleared and pressing the button ▶ll will reset the disc to the beginning.
Press the ◀ PREV button to go back to previous chapters/tracks.
Press the ▶NEXT button to advance chapters/tracks.
For an Audio CD, use the number buttons (remote control only) to jump directly to that track number.
TITLE (for DVD disc only)
Press the TITLE button, there will have an on screen indication "TITLE".
Press the direction or numeric buttons to select your favorite title.
CD/DVD OPERATION
VOLUME
- Press the VOL - / VOL + buttons to adjust the output volume. NOTE: Playback DVD discs in original code, is not adjustable.
MUTE
- Press the MUTE button to mute the audio output. There will have an on screen symbol indicate "MUTE".
- Press again to cancel, or Press the VOL + button to cancel and adjust the volume.
- In case there is no audiooutput, try to press the MUTE button to cancel mute.
PROGRAM
- Press the PRO button to display the program menu as shown:
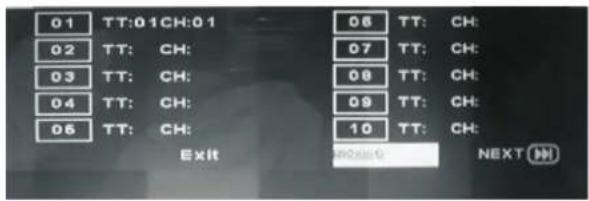
- Using numeric keys to set the TT and CH, then move to the START button, press ENTER button to start.
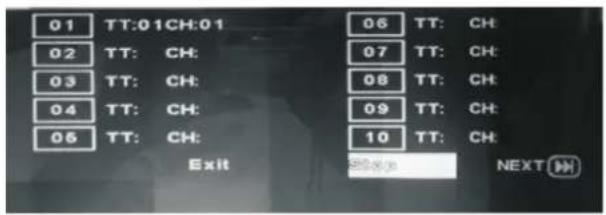
- While playing the program, you may press the PRO button to display the program menu for edit. To stop the program by moving to STOP button, then press ENTER button to end the program.
CD/DVD OPERATION
- Press the ◀◀ or ▶▶ button when a disc is playing.
Each time the ◀ or ▶ button is pressed, the speed of fast scan changes in the following sequence:
FORWARD X 2 --> FORWARD X 4 --> FORWARD X 8 --> FORWARD X 16 --> FORWARD X 32 --> PLAY
BACKWARD X 2 --> BACKWARD X 4 --> BACKWARD X 8 --> BACKWARD X 16 --> BACKWARD X 32 --> PLAY
- Press the ▶II button to play when you reach the desired point to resume playback at normal speed
Subtitle 02/32:
SUBTITLE SELECTION (DVD)
- While a DVD is playing, press the SUBTITLE button to display the current the language setting, as shown in the example.
- Press the SUBTITLE button repeatedly to select the desired subtitle language.
NOTE
- If only one language is recorded, the language does not change.
- About two seconds later, playback continues with the new subtitle you selected.
- If no button is pressed within a few seconds, playback continues without changing the current subtitle.
•The number of languages recorded differs depending on thedisc.
•This function can only be used for discs on which subtitles have been recorded in multiple languages.
Audio 3/3:AC3 2CH
AUDIO SELECTION (DVD)
On some discs, the sound is recorded in two or more formats. Follow the directions below to select the preferred language and sound system.
- While a disc is playing, press the AUDIO button to show the current audio format number.
- Press the AUDIO button repeatedly to select the desired audio format.
Note
- If only oneaudio format is recorded, the number does not change.
- About two seconds later, playback continues in the new audio format.
ANGLE SELECTION (DVD)
Some DVDs contain scenes which have been shot from a number of different angles. For these discs, the same scene can be viewed from each of these different angles.
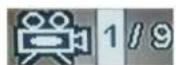
- While you are playing a DVD with different angles recorded, press the ANGLE button to view the number of the current angle available.
- Press the ANGLE button repeatedly to change the scene to the next angle in those recorded.
- About two seconds later, playback continues from the new angle you selected.
- If no button is pressed within 10 seconds, playback continues without changing the current angle.
Sequenceofangleshots
(Example)
NOTE
This function can only be used for discs on which scenes shot from multiple angles have been recorded.
CD/DVD OPERATION
SPECIAL FUNCTIONS
DISPLAY function (DVD) INFO Button
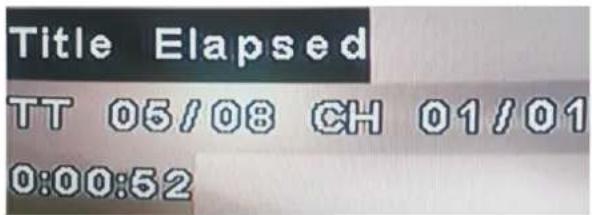
Using INFO button, you can check the current settings of the following items: ANGLE, AUDIO and SUBTITLE. While the disc is playing, press the INFO button repeatedly to display information on operation status.
LOCATING A SPECIFIC TITLE (DVD)
If a DVD contains title numbers, you can locate a specific title by directly selecting a title number.
-
Press the GOTO button.
-
Press the ◀ or ▶ button to highlight a specific field and press the corresponding number button(s) for the title you want.
-
Press the ENTER button to confirm. The Unit will start playback about 3 seconds later.
TT: 06/08 Time 1:11:1
LOCATING A SPECIFIC CHAPTER /TRACK
If you know the chapter / track number you want to play, you can locate a specific chapter / track by directly selecting a chapter / track number.
-
Press the GOTO button to search for your desired chapter / track.
-
You can directly press 0-9 number button to highlight a chapter/track. If you want the chapters / tracks greater than 10, you can press the 10+ button and press the corresponding number button(s) for the chapter/track you want.
-
Press the ENTER button to confirm. Playback starts from the selected chapter / track.
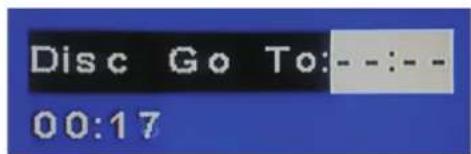
LOCATING A SPECIFIC TIME
You can move to a specific location by entering its corresponding time (hours, minutes, seconds)
-
Press the GOTO button.
-
Press the ◀ or ▶ button to highlight time.
-
Press the corresponding number buttons for the setting point you want.
-
Press the ENTER button to confirm. The Unit will start playback about 3 seconds later.
NOTE
• Some discs may not respond to this process.
• Some scenes may not be located as precisely as specified.
- This method for accessing specific locations is available only within the current title of the DVD.
TT: 06/08 Time 1:11:1
CD/DVD OPERATION
DVD REPEATING
You can play a specific title or chapter repeatedly. (Title repeat, chapter repeat, A-B repeat)
REPEATING A CHAPTER
You can play the same chapter repeatedly.
- While the disc is playing, press the REPEAT button until the [Chapter] indicator displays on the screen.
The current chapter is played repeatedly.
REPEATING A TITLE
You can play the same title repeatedly.
- While the disc is playing, press the REPEAT button until the 📄Title indicator displays on the screen. The current title is played repeatedly.
REPEATING ALL
- While the disc is playing, press the REPEAT button until the ALL indicator displays on the screen.
CD REPEATING
You can play a single track and whole disc repeatedly.
REPEATING A SINGLE TRACK
You can play the same track repeatedly.
- While the disc is playing, press the REPEAT button until the Track indicator displays on the screen. The current track is played repeatedly.
REPEATING A WHOLE DISC
- While the disc is playing, press the REPEAT button until the All indicator displays on the screen. The whole disc is played repeatedly.
REPEATING A SPECIFIC SECTION (DVD) (CD)
You can play a specific section repeatedly.
-
While the disc is playing, press the A-B button at the beginning of the section (A is displayed) you want to play repeatedly.
-
Press the A-B button again at the end of the section (AB is displayed).
-
The Unit will immediately begin replaying your selection.
REPEATING A SINGLE TRACK
- While the disc is playing, press the A-B button until the Track indicator displays on the screen.
NOTE
- A-B repeat can only be used within the same title. If the start and end of the section to be repeated are in different titles, A-B repeat is cancelled.
- The A-B repeat function does not operate in scenes where different camera angles are recorded.
CD/DVD OPERATION
MP3/JPEG PLAYBACK
After loading the MP3 / JPEG disc, it wil start to scan for the stored MP3 / JPEG folders.
Then will firstly display the MP3 contents automatically and start to play the first file (highlighted file).
Screen as follow:
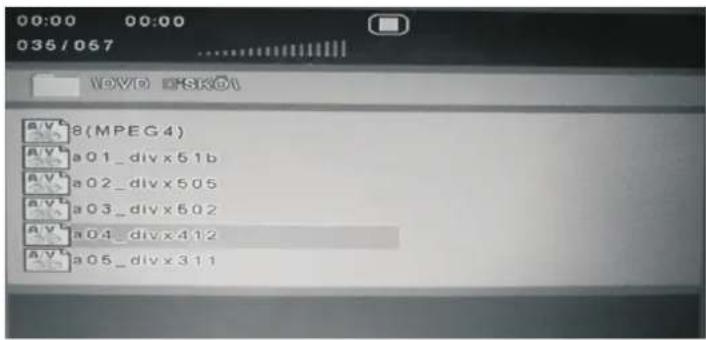
Use the ▲/▼ buttons to select the folder you want to play.
NOTE:
When playback MP3 files, there is no picture display, only audio output.
Playing the JPEG discs, press the button to select slide effects. There are 16 slide modes,
press the button to toggle among different modes in sequence.
(Wipe top, Wipe bottom, Wipe left, Wipe right, Diagonal wipe left top, Diagonal wipe right top, Diagonal
wipe left bottom, Diagonal wipe right bottom, Extend from center H, Extend from center V, Compress to
center H, Compress to center V, Window H, Window V, Wipe from , None )
When play or pause with picture playback, you may use the navigation buttons to flip / rotate the picture.
▲ button to flip horizontally.
▼ button to flip vertically.
◀ button to rotate left 90°.
▶ button to rotate right 90°.
Press the |◀ /▶▶buttons to select next / previous page or press numeric buttons to
view the corresponding pictures.
CUSTOMIZING THE DVD FUNCTION SETTINGS
1.General Setup Page
Press the D.SETUP button and then press the ◀/▶ to display the system setup menu page when in DVD mode.
Press the ▲/▼ button to move the highlight to select the following option.
Press the ▶ button to enter the following menu and use the ▲/▼ button to select a menu item.
Press the ENTER button to confirm, press the ◀ button to return to sub-menu.
Press the D.SETUP to exit the DVD setup menu.
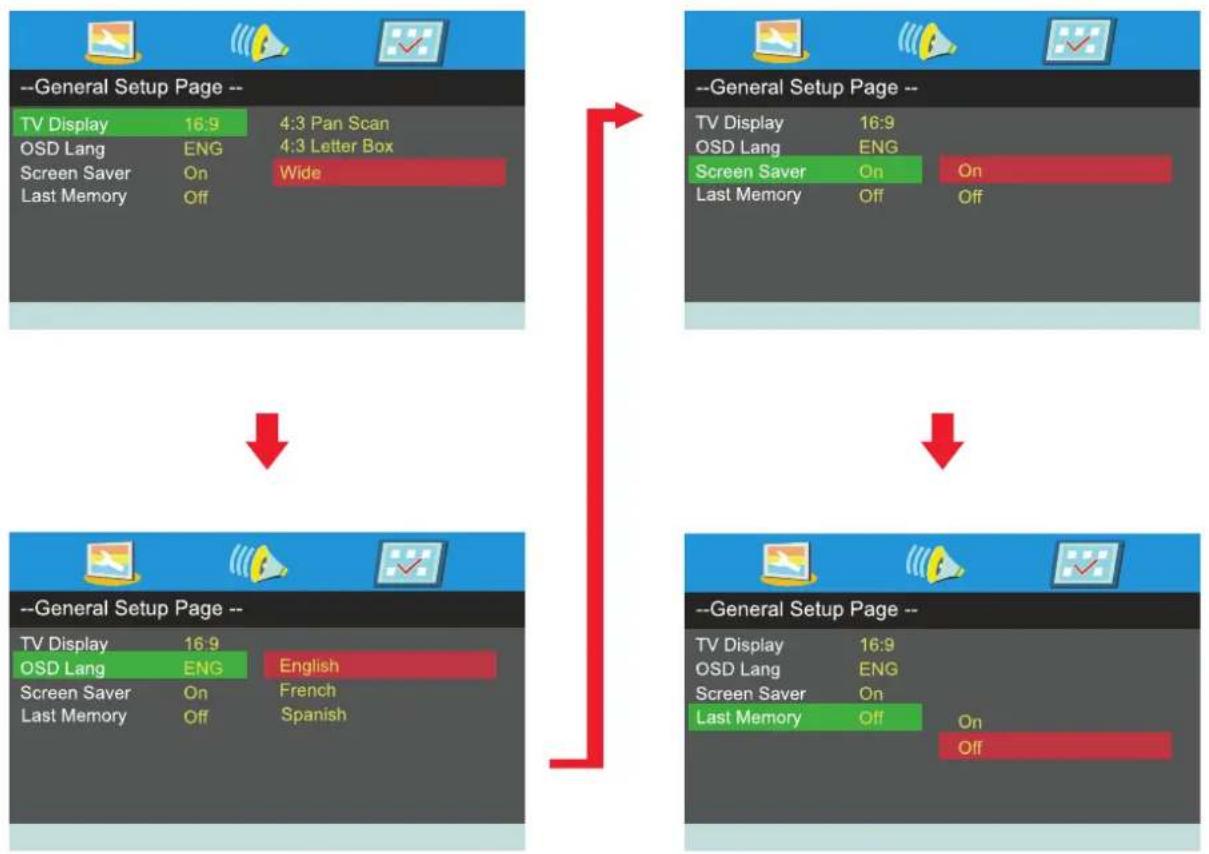
flowchart
graph TD
    A["--General Setup Page --"] --> B["TV Display 16:9"]
    A --> C["OSD Lang ENG"]
    A --> D["Screen Saver On"]
    A --> E["Last Memory Off"]
    F["--General Setup Page --"] --> G["TV Display 16:9"]
    F --> H["OSD Lang ENG"]
    F --> I["Screen Saver On"]
    F --> J["Last Memory Off"]
    K["--General Setup Page --"] --> L["TV Display 16:9"]
    K --> M["OSD Lang ENG"]
    K --> N["Screen Saver On"]
    K --> O["Last Memory Off"]
    P["--General Setup Page --"] --> Q["TV Display 16:9"]
    P --> R["OSD Lang ENG"]
    P --> S["Screen Saver On"]
    P --> T["Last Memory Off"]
CUSTOMIZING THE DVD FUNCTION SETTINGS
2. Audio Setup Page
Press the D.SETUP button and then press the ◀/▶ to display the audio menu page when in DVD mode.
Press the ▲/▼ button to move the highlight to select the following option.
Press the ▶ button to enter the following menu and use the ▲/▼ button to select a menu item.
Press the ENTER button to confirm, press the ◀ button to return to sub-menu.
Press the D.SETUP to exit the DVD setup menu.
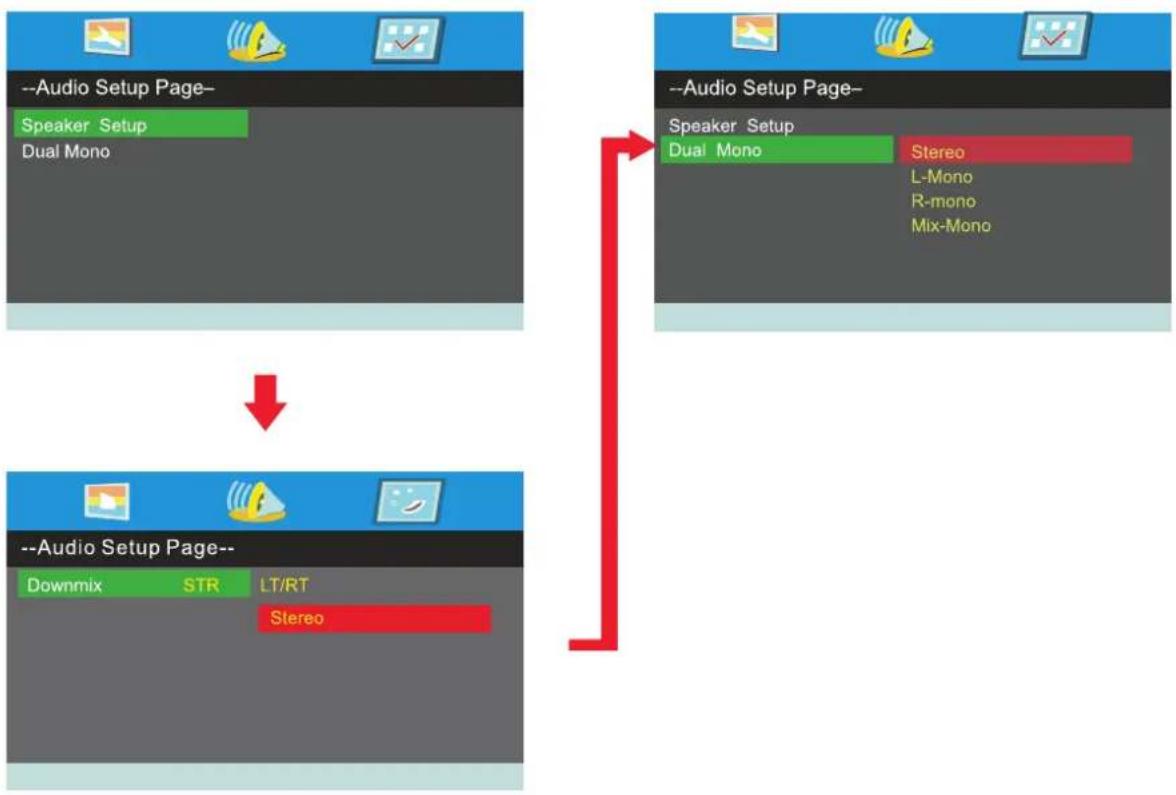
flowchart
graph TD
    A["-->"] --> B["-->"]
    B --> C["-->"]
CUSTOMIZING THE DVD FUNCTION SETTINGS
3. Preference Page
Press the D.SETUP button and then press the ◀/▶ to display the preference page when in DVD mode.
Press the ▲/▼ button to move the highlight to select the following option.
Press the ▶ button to enter the following menu and use the ▲/▼ button to select a menu item.
Press the ENTER button to confirm, press the ◀ button to return to sub-menu.
Press the D.SETUP to exit the DVD setup menu.
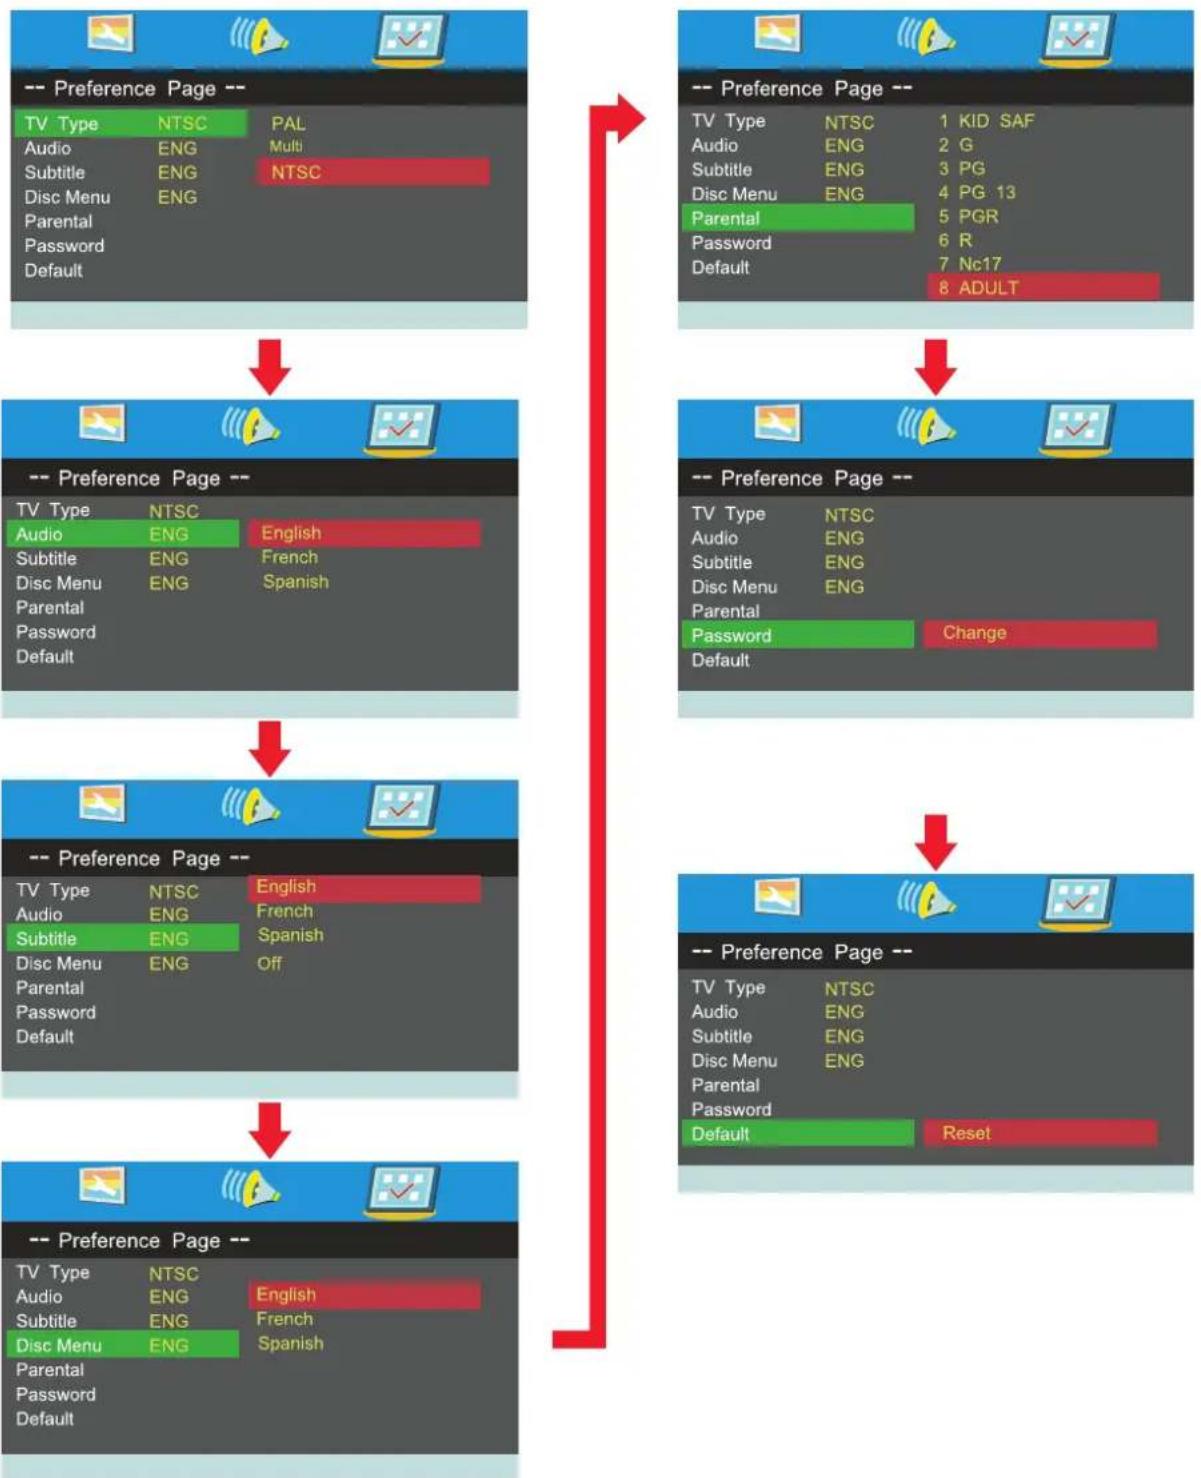
flowchart
graph TD
    A["-- Preference Page --"] --> B["TV Type NTSC PAL"]
    A --> C["Audio ENG Multi"]
    A --> D["Subtitle ENG NTSC"]
    A --> E["Disc Menu ENG"]
    A --> F["Parental"]
    A --> G["Password"]
    A --> H["Default"]

    I["-- Preference Page --"] --> J["TV Type NTSC 1 KID SAF"]
    I --> K["Audio ENG 2 G"]
    I --> L["Subtitle ENG 3 PG"]
    I --> M["Disc Menu ENG 4 PG 13"]
    I --> N["Parental 5 PGR"]
    I --> O["Password 6 R"]
    I --> P["Default 7 Nc17 8 ADULT"]

    Q["-- Preference Page --"] --> R["TV Type NTSC"]
    Q --> S["Audio ENG English"]
    Q --> T["Subtitle ENG French"]
    Q --> U["Disc Menu ENG Spanish"]
    Q --> V["Parental"]
    Q --> W["Password"]
    Q --> X["Default"]

    Y["-- Preference Page --"] --> Z["TV Type NTSC"]
    Y --> AA["Audio ENG English"]
    Y --> AB["Subtitle ENG French"]
    Y --> AC["Disc Menu ENG Spanish Off"]

    AD["-- Preference Page --"] --> AE["TV Type NTSC"]
    AD --> AF["Audio ENG English"]
    AD --> AG["Subtitle ENG French"]
    AD --> AH["Disc Menu ENG Spanish Off"]

    AI["-- Preference Page --"] --> AJ["TV Type NTSC"]
    AI --> AK["Audio ENG English"]
    AI --> AL["Subtitle ENG French"]
    AI --> AM["Disc Menu ENG Spanish Off"]

    AQ["-- Preference Page --"] --> AR["TV Type NTSC"]
    AQ --> AS["Audio ENG English"]
    AQ --> AT["Subtitle ENG French"]
    AQ --> AU["Disc Menu ENG Spanish Off"]

    AV["-- Preference Page --"] --> AW["TV Type NTSC"]
    AV --> AX["Audio ENG English"]
    AV --> AY["Subtitle ENG French"]
    AV --> AZ["Disc Menu ENG Spanish Off"]

    BA["-- Preference Page --"] --> BB["TV Type NTSC"]
    BA --> BC["Audio ENG English"]
    BA --> BD["Subtitle ENG French"]
    BA --> BE["Disc Menu ENG Spanish Off"]

    BC --> BF["Parental"]
    BC --> BG["Password"]
    BC --> BH["Default"]

    BI["-- Preference Page --"] --> BJ["TV Type NTSC"]
    BI --> BK["Audio ENG English"]
    BI --> BL["Subtitle ENG French"]
    BI --> BM["Disc Menu ENG Spanish Off"]

    BN["-- Preference Page --"] --> BO["TV Type NTSC"]
    BN --> BP["Audio ENG English"]
    BN --> BQ["Subtitle ENG French"]
    BN --> BR["Disc Menu ENG Spanish Off"]

    BS["-- Preference Page --"] --> BT["TV Type NTSC"]
    BS --> BU["Audio ENG English"]
    BS --> BV["Subtitle ENG French"]
    BS --> BW["Disc Menu ENG Spanish Off"]

    BX["-- Preference Page --"] --> BY["TV Type NTSC"]
    BX --> BZ["Audio ENG English"]
    BX --> CA["Subtitle ENG French"]
    BX --> CB["Disc Menu ENG Spanish Off"]

    CC["-- Preference Page --"] --> CD["TV Type NTSC"]
    CC --> CE["Audio ENG English"]
    CC --> CF["Subtitle ENG French"]
    CC --> CG["Disc Menu ENG Spanish Off"]

    DH["-- Preference Page --"] --> DI["TV Type NTSC"]
    DH --> DJ["Audio ENG English"]
    DH --> DK["Subtitle ENG French"]
    DH --> DL["Disc Menu ENG Spanish Off"]

    DM["-- Preference Page --"] --> DE["TV Type NTSC"]
    DM --> DF["Audio ENG English"]
    DM --> DG["Subtitle ENG French"]
    DM --> DH
DISPLAY MODE
PC FORMATS
| SUPPORTED PC INPUT MODE | |||
| 640 480 | 31. 5 | 60.0 | DOS |
| 800 600 | 35.1 | 56.2 | VESA |
| 800 600 | 37.9 | 60.0 | VESA |
| 1024 768 | 48.4 | 60.0 | VESA |
| 1360 768 | 47. 7 | 60.0 | VESA |
| 1920 x 1080 | 66. 6 | 60.0 | VESA |
NOTE:
This product does not support the display mode not listed above. In order to achieve the best display effect, please select the above-listed 6 display modes input signal.
Because of the difference of display drivers output signal (especially non-standard signal output), the display image may appear little disturbance which can be adjusted on the PC menu.
To prolong this unit's service life, please set your computer to power management mode.
DISPLAY MODE
VIDEO FORMATS
| SUPPORTED COMPONENT / HDMI INPUT MODE | |||
| Resolution | Horizontal Scanning Frequency (KHz) | Vertical Scanning Frequency (Hz) | Format |
| 720 480 | 31. 47 | 59. 94 | 480 i |
| 720 480 | 15. 734 | 59. 94 | 480 p |
| 1280 720 | 37. 5 | 50 | 720 p |
| 1280 720 | 45 | 60 | 720 p |
| 1920 1080 | 31. 25 | 50 | 1080 i |
| 1920 1080 | 33. 75 | 60 | 1080 i |
| 1920 1080 | 27 | 24 | 1080 p |
| 1920 1080 | 56. 25 | 50 | 1080 p |
| 1920 1080 | 67. 50 | 60 | 1080 p |
NOTE:
The above listed formats are also related to the AV devices you are about to connect. Before you connect this unit with others please read all instructions carefully and make sure all necessary cables are connected.
This unit may be incompatible with some other formats which are not meet the above conditions.
SPECIFICATION
| Model Description | 32"LED TV / DVD COMBO | |
| Panel | Panel Type | LED Panel |
| Diagonal Size | 32 inches | |
| Screen Format 16 9: | ||
| Resolution | 1920 x 1080 | |
| Brightness | ||
| Contrast | 1200:1 | |
| View Angle | 178(H)/178V) | |
| Response Time | 8 ms | |
| Maximum Color | 16.7M colors | |
| Systems | Color System | ATSC/QAM/NTSC |
| Sound System | M | |
| Audio System | BTSC | |
| Sound Output | L/R Speaker:8 W + 8 W | |
| Input / Output Jacks | RF Input 75 ohm external terminal | |
| HDMI Input (HDMI 1 has Audio Return Channel function only) | Video 480i 480p 720p 1080i,1080p.: , , , ,Audio: Two channel linear PCM 32, 44.1 and 48kHz, 16, 20 and 24 bits | |
| PC RGB Input | D-sub 15pinG: 0.7Vp-p, 75ohmsB: 0.7Vp-p, 75ohmsR: 0.7Vp-p, 75ohms | |
| Composite Video Input | 1.0 Vp-p, 75ohms RCA | |
| Component/Y Pb Pr Input | Y: 1.0 Vp-p, 75ohms, 0.3V negative syncPb: 0.7Vp-p, 75ohmsPr: 0.7Vp-p, 75ohms | |
| Sound Input | Component AUDIO: For Component Audio inputAV AUDIO: For CVBSPC AUDIO: For PC RGB Audio input500mV rms, Impedance: 20k ohms | |
| Digital Audio Out | S/PDIF Coaxial | |
| DVD | Region Code | 1 |
| Disc Size | 12cm disc | |
| Compatible Disc Type | DVD, DVD-R/+R, DVD-RW/+RW, VCD, CD, CD-R, CD-RW | |
| Power | Power Requirement | AC100-240V~ 50/60Hz |
| Rated power consumption | 50 W | |
This manual is only for your reference.
Specifications are subject to update without prior notice.
TROUBLESHOOTING GUIDE
SYMPTOM CAUSE AND REMEDY( )
| No power. | Make sure the power cord is connected.Turn on the unit. |
| The remote does not function.DVD | Remove any obstacles between the remote and the unit.Use the remote near the unit.Point the remote at the remote sensor on the unit.Replace the batteries in the remote with new ones. |
| No sound or only a very low-level sound is heard. | Make sure that you've selected DVD mode.The system is in pause mode.Press the ▶ button to return to normal play mode.Fast forward or fast reverse is performed.Press the button to return to normal play mode.Make sure the AUDIO / VIDEO output and AV IN input connections are correct.This unit is too hot. Power off the unit for 30 minutes to cool down. |
| No picture | The region number of the disc doesn't match the region number of this unit. |
| The picture is not clear | Clean the disc.The disc is scratched |
| Severe hum or noiseis heard. | The plugs and jacks are dirty.Wipe them with a cloth slightly moistened with alcohol.Clean the disc |
| The disc does not play. | There is no disc inside(“No Disc”appears on the screen).Insert the disc correctly with the label side facing yourself.Clean the disc.A non-NTSC disc has been inserted.The unit and disc region number are incompatible.Condensation may have formed inside the unit due to a sudden change in temperature.Wait about an hour for it to clean and try again. |
TROUBLESHOOTING GUIDE
SYMPTOM CAUSE AND REMEDY( )
| TV | |
| Bad Picture (snow, multiple images distortion, blurry) | Check the location of the antenna and adjust it if necessary.Make sure the antenna cable is firmly connected.Make sure all input cables are firmly connected. |
| No sound. | Increase the volume.Check whether the mute function has been activated on the Remote Control. |
| Black and White picture. | Check the PICTURE setting within the PICTURE menu.Check to make sure the program you are watching is broadcast in Color and not Black & White. |
| No picture or sound. | Make sure the unit is plugged in and turned on.Make sure that the ATV mode is selected.Try a new channel to check for possible station trouble.Make sure the antenna is connected properly.Increase the volume.Make sure the antenna or audio/video source device is working properly.Make sure all cables are firmly connected.Check for local interference. |
| Coloredpatches of picture. | Make sure there are no unshielded electrical devices nearby that are causing interference.Turn the TV off for 30 minutes, then try it again. |
| Panel function key does not respond correctly. | Under the influence of electrostatic phenomenon, the product may malfunction and require usertopowerreset.Unplug and re-plug the power cord. |
| The display monitor's panel goes hot. | LED TV takes inside lighten phosphor. It may increase the temperature of the screen in some occasions. It's not a defect. |
| Unusual dots | Black dots and Bright points may appear on the LED screen.This is a structural property of the LED panel and is not a defect. |
| Stripes on screen | Adjust the impulse phase may decrease stripes. RGB in |
| The top of the monitor gets hot. | It may occur during long-time working. It's not a defect. |
| Unable to select a certain channel. | The channel may be skipped. Choose this channel by directly selecting the buttons from the remote control. |
| Disorder display at power on. | This may be caused because of a very short interval between STANDBY OFF and ON.Unplug the power and restart. |
- LED TV/DVD COMBO
- SAFETY PRECAUTION
- CAUTION
- WARNING:
- PLACEMENT INFORMATION
- SAFETY INFORMATION
- CONDENSATION INFORMATION
- RATING PLATE LOCATION
- IMPORTANT SAFETY INSTRUCTIONS
- Basic Operations
- ACCESSORIES
- GETTING STARTED
- USING THE REMOTE CONTROL
- TO INSTALL THE BATTERIES
- BATTERY REPLACEMENT
- NOTES
- WARNING :
- CONTROL REFERENCE GUIDE
- REMOTE CONTROL
- 1.STANDBY
- 2.MUTE
- 3.0-9
- 4.
- 5.P.MODE
- 6.S.MODE
- 7.MTS
- 8.SLEEP
- 9.SOURCE
- 10.CH+/CH-
- 11.INFO
- 12.VOL+/VOL-
- 13.CC
- 14.EPG
- 15.FAV
- AUTO
- ENTER
- MENU
- Exit
- Universal remote code
- FRONT VIEW
- BACK VIEW
- VOL+ Button
- VOL- Button
- CH+ Button
- CH- Button
- Menu Button
- SOURCE Button
- STANDBY Button
- Disc Slot
- CONNECTIONS
- CONNECTING A TV ANTENNA / CABLE / SATELLITE
- NOTE
- CONNECTING AN A/V DEVICE
- CONNECTING DEVICES WITH A COMPOSITE (GREEN RCA-TYPE) VIDEO OUTPUT
- CONNECTING A HIGH-DEFINITION (HD) SOURCE USING CONDEMPONENT
- CONNECTING A HIGH-DEFINITION (HD) SOURCE USING HDMI CONNECTION
- CONNECTING A PC
- CONNECTING HEADPHONES
- Connection to a Home Theater Audio System
- For BEST audio performance
- How To Setup Digital Output
- WALL MOUNT INSTALLATION
- MOUNTING ON THE WALL
- ATTACHING THE STAND
- INITIAL SETUP
- PUTTING THE UNIT ON A PROPER PLACE
- TURNING THE UNIT ON FOR THE FIRST TIME
- Please Run Channel Auto Scan
- SOURCE SELECTION
- TV SETUP
- PICTURE MENU
- How to Navigate:
- Note:
- SOUND MENU
- Video Description
- Voice Guidance
- TIME MENU
- SETUP MENU
- LOCK(PARENTAL) MENU
- TV(CHANNEL) MENU
- ZOOM MODE
- NORMAL
- WIDE
- ZOOM
- CINEMA
- DISC FORMATS
- NOTES ON COPYRIGHT
- REGION MANAGEMENT INFORMATION
- ICONS USED ON DVDs
- TITLES, CHAPTERS AND TRACKS
- NOTES ON UNAUTHORIZED DISCS
- CD/DVD OPERATION
- TURN ON AND OFF THE DVD FUNCTION
- INSERT DISC TO DVD
- PLAYING A PICTURE FILE DISC
- STOPPING PLAYBACK
- TITLE (for DVD disc only)
- VOLUME
- MUTE
- PROGRAM
- SUBTITLE SELECTION (DVD)
- AUDIO SELECTION (DVD)
- ANGLE SELECTION (DVD)
- SPECIAL FUNCTIONS
- LOCATING A SPECIFIC TITLE (DVD)
- LOCATING A SPECIFIC CHAPTER /TRACK
- LOCATING A SPECIFIC TIME
- DVD REPEATING
- REPEATING A CHAPTER
- REPEATING A TITLE
- REPEATING ALL
- CD REPEATING
- REPEATING A SINGLE TRACK
- REPEATING A WHOLE DISC
- REPEATING A SPECIFIC SECTION (DVD) (CD)
- MP3/JPEG PLAYBACK
- CUSTOMIZING THE DVD FUNCTION SETTINGS
- 1.General Setup Page
- Audio Setup Page
- Preference Page
- DISPLAY MODE
- SPECIFICATION
- TROUBLESHOOTING GUIDE
Brand : RCA
Model : RLDEDV3289
Category : Television