HD50LPW42 - Television RCA - Free user manual and instructions
Find the device manual for free HD50LPW42 RCA in PDF.

User questions about HD50LPW42 RCA
0 question about this device. Answer the ones you know or ask your own.
Ask a new question about this device
Download the instructions for your Television in PDF format for free! Find your manual HD50LPW42 - RCA and take your electronic device back in hand. On this page are published all the documents necessary for the use of your device. HD50LPW42 by RCA.
USER MANUAL HD50LPW42 RCA
text_image
HDTV with DLP technology High Definition Television User's Guide DLP® A TEXAS INSTRUMENTS TECHNOLOGY GUIDEPlus®
natural_image
Black-and-white photo of a flat-screen TV displaying a close-up of a woman's face, with two stacked CDs on the front (no visible text or symbols)WARNING
To reduce the risk of fire or electric shock, do not expose this product to rain or moisture. The apparatus shall not be exposed to dripping or splashing and no objects filled with liquids, such as vases, shall be placed on the apparatus.
CAUTION
RISK OF ELECTRIC SHOCK DO NOT OPEN
Caution: To reduce the risk of electric shock, do not remove cover (or back). No user serviceable parts inside. Refer servicing to qualified service personnel.

This symbol indicates "dangerous voltage" inside the product that presents a risk of electric shock or personal injury.

This symbol indicates important instructions accompanying the product.
Refer to the identification/rating label located on the back panel of your product for its proper operating voltage.
FCC Regulations state that unauthorized changes or modifications to this equipment may void the user's authority to operate it.
Cable TV Installer: This reminder is provided to call your attention to Article 820-40 of the National Electrical Code (Section 54 of the Canadian Electrical Code, Part 1) which provides guidelines for proper grounding and, in particular, specifies that the cable ground shall be connected to the grounding system of the building as close to the point of cable entry as practical.
Warning: The apparatus shall not be exposed to dripping or splashing and that no objects filled with liquids, such as vases, shall be placed on the apparatus.
Important: This television is a table model and is designed to sit on a firm, flat, surface. Don't place the TV on soft carpeting or similar surface because the ventilation slots on the bottom of the unit will be blocked resulting in reduced lifetime from overheating. To assure adequate ventilation for this product, maintain a spacing of 4 inches from the top and sides of the TV receiver and 2 inches from the rear of the TV receiver and other surfaces. Also, make sure the stand or base you use is of adequate size and strength to prevent the TV from being accidentally tipped over, pushed off, or pulled off. This could cause personal injury and/or damage the TV. Refer to the Important Safety Instructions packed separately.
Product Registration
Please fill out the product registration card (packed separately) and return it immediately. Returning the card allows us to contact you if needed. For U.S. customers: Your RCA Scenium Consumer Electronics product may also be registered at www.rcascenium.com/productregistration. Returning the card allows us to contact you if needed.
Product Information
Keep your sales receipt to obtain warranty parts and service and for proof of purchase. Attach it here and record the serial and model numbers in case you need them. These numbers are located on the product.
Model No.
Serial No.
Purchase Date:
Dealer/Address/Phone:
VCR Plus+, C ^3 , PlusCode, G-LINK, and GUIDE Plus+ are trademarks of Gemstar-TV Guide International, Inc. and/or its related affiliates. Patent 6,331,877; 6,239,794; 6,154,203; 5,940,073; 4,908,713; 4,751,578; 4,706,121; 6,466,734; 6,430,359; 6,091,882; 6,049,652; 5,335,079; 5,307,173.
The VCR Plus+ and GUIDE Plus+ systems are manufactured under license from Gemstar-TV Guide International, Inc. and/or its related affiliates.
THOMSON INC. AND GEMSTAR-TV GUIDE INTERNATIONAL AND/OR ITS RELATED AFFILIATES ARE NOT IN ANY WAY LIABLE FOR THE ACCURACY OF THE PROGRAM SCHEDULE INFORMATION PROVIDED BY THE GUIDE PLUS+ SYSTEM. IN NO EVENT SHALL THOMSON INC. OR GEMSTAR-TV GUIDE INTERNATIONAL BE LIABLE FOR ANY AMOUNTS REPRESENTING LOSS OF PROFITS, LOSS OF BUSINESS, OR INDIRECT, SPECIAL, OR CONSEQUENTIAL DAMAGES IN CONNECTION WITH THE PROVISION OR USE OF ANY INFORMATION EQUIPMENT, OR SERVICES RELATING TO THE GUIDE PLUS+ SYSTEM.
VCR required for recording.
Thank you for choosing RCA Scenium
Congratulations on purchasing this RCA Scenium High Definition Television (HDTV) featuring DLP ^™ (Digital Light Processing ^™ ) technology—a true viewing experience. Your purchase decision represents an investment in a new generation of technology—DLP ^™ and HDTV. Even though this is a technologically advanced HDTV, it is the most user-friendly of its kind—with comprehensive on-screen instructions that guide you through all of the TV's features.
This introduction describes three reasons why an RCA Scenium HDTV featuring DLP ^™ technology is an excellent choice:
DLP™—brilliance in color, design, and technology
Why RCA Scenium DLP™ is better?
Other Key Features of owning an RCA Scenium HDTV
Part 1: DLP™—brilliance, in color, design, and technology
RCA Scenium brings you brilliant pictures with Digital Light Processing ^™ system (DLP ^™ ) — a brilliantly choreographed, engineering marvel that combines microscopic mirrors, light, and color to bring you the best and brightest pictures possible.

flowchart
graph TD
    A["Color Wheel"] --> B["Light Pipe"]
    B --> C["UV/IR Filter"]
    C --> D["Fold Mirror"]
    D --> E["Condenser Lens"]
    E --> F["Arc Lamp"]
    G["Relay Lens"] --> H["TIR Prism"]
    I["Projection Lens"] --> J["Photography System"]
    K["CDM™ Chip with DMD Window Assembly"] --> L["DMD™ Chip with DMD Window Assembly"]
Lamp Replacement
DLP technology uses a special lamp. Eventually, you'll need to replace this lamp. To order the correct lamp, you'll need to know your TV's model number, serial number, and lamp type—this information is listed on the Service Model Number sticker (example of the sticker is shown at right). The sticker is located on the right side of the TV. For quick reference, write down the information in the space provided at the right.
How DLP™ Works
In general, DLP™ combines microscopic mirrors, a specially designed semiconductor, and a color wheel to adjust light to display the most brilliant, accurate images! Your DLP™ HDTV doesn't use Cathode Ray Tubes (CRTs), which means you don't have to worry about screen burn (fixed video images burning onto the screen permanently) or convergence (realigning the CRTs). The diagram on the left illustrates the complex system.
Thin and Light
The efficiency of DLP ^™ technology enabled our design team to create a high-performance HDTV that is about 16 inches thin and weighs less than 100 pounds.

EXAMPLE: Service Model Number sticker with lamp type listed.
Model No.
Lamp Type
Date_
Digital Light Processing, DLP and DLP Cinema are trademarks of Texas Instruments. All other products and names may or may not be trademarks or registered trademarks of their respective companies.
Part 2: Why RCA Scenium DLP™ is better?
DLP ^™ is just part of the story. You have chosen to embark on the next generation of TV viewing—HDTV. There are many technological advancements that make HDTV better than analog TV, but there are basically three things about HDTV that bring you a superior viewing experience: (1) resolution, (2) aspect ratio, and (3) digital signal and sound.
Resolution (it's math...that works for you)
The crisp, lifelike picture people rave about when experiencing true HDTV is due to the resolution this technology provides. The resolution is measured by calculating the number of active lines of pixels. A pixel (which stands for picture element) is a small dot. The picture you see on your TV is composed of these dots.
A regular, analog television (called analog) only has a resolution of about 200,000 pixels (480 vertical pixels x 440 horizontal pixels = 211,200 pixels). The HDTV format is capable of more than 2 million pixels (1,920 x 1,080 = 2,073,600).
More pixels equals more detail. In summary, HDTV is capable of resolution that is up to 10 times the resolution of the picture on a regular, analog TV!
| Format Analog (NTSC) HD Digital (ATSC) |
| Total Scan Lines 525 1125 |
| Effective Scan Lines 480 1080 |
| Aspect Ratio 4 : 3 16 : 9 |
| Max Resolution 720 x 480 1920 x 1080 |
| Sound 2-ch Stereo 5.1 ch Surround |

natural_image
Black-and-white photo of a young boy in a white martial arts uniform with arms raised (no text or symbols visible)16:9 Aspect Ratio

natural_image
Portrait of a young boy in traditional attire, hands clasped (no visible text or symbols)4:3 Aspect Ratio
Aspect Ratio
Aspect ratio is simply the width and height of the picture. Regular TVs use a 4 x 3 (also written 4:3) aspect ratio, which means the picture is a little wider than it is tall (a screen that is 20 inches wide is about 15 inches tall).
When the standards were being developed for television broadcasting in 1941 by the NTSC (the National Television Standards Committee), it made sense to adopt the 4 x 3 aspect ratio that the film industry was using at that time.
As TVs dropped in price and people prospered in the 1950s, the movie industry had to find a way to get people out of their living rooms and back to the movie theatres. That's when they created the 16 x 9 (also written 16:9) aspect ratio (also called widescreen format). When the standards for HDTV were being developed by the ATSC (Advanced Television Standards Committee), the 16 x 9 aspect ratio was chosen as the format for HDTV.
This widescreen format makes sense because it's much closer to the way we see. Our field of vision is actually much wider than tall because of our peripheral vision. Not only is it closer to the way we see, but the pictures are crisper and cleaner with more detail in the close-up and panoramic views.
Digital Signal and Sound
The analog television broadcast system that has been used in the United States for the past 50 years transmits signals as electronic waves. These waves can suffer degradation as the signal travels to your home. Additionally, the analog waves are susceptible to interference from planes passing overhead, weather, and household appliances.
Digital signals, in contrast to analog signals, can be reproduced precisely because the images are transmitted and received using the computer language of 1s and 0s. Such precision yields a signal that is capable of displaying studio-quality picture and Dolby Digital 5.1 channel sound.
Part 3: Other Key Features of owning an RCA Scenium HDTV
There are other HDTVs on the market— even some that use DLP technology. But your RCA Scenium HDTV has been designed with features that will enhance your TV viewing, and features that provide flexibility to build on the digital revolution that is taking place. A summary of your TV's most unique features follows. Chapter 3 provides more detail about these features and information about additional features.
Integrated HDTV Tuner with QAM
RCA was the first to offer an integrated tuner with its HDTVs (no need for a set-top box to receive digital programming). Now, we've gone one better—your HDTV's tuner is ready for digital cable (no need for a cable box to view unscrambled, digital cable, programming). The tuner is able to decode all 16 formats of digital television broadcasts and it can interpret digital cable signals because it includes the ability to decode QAM (Quadrature Amplitude Modulation) encoded programming.
Note: A cable box may be necessary to view scrambled and/or premium channels. Contact your cable provider for more information.
TruScan Digital Reality
Optimum picture performance occurs when the picture intended is the picture presented. TruScan Digital Reality intelligent signal processing recognizes incoming video signals and progressively converts them to achieve optimum digital picture performance. It also recognizes when original film sources have been modified and automatically converts the analog frame rate back to its original format to bring out the detail—a process commonly referred to as reverse 3:2 pulldown.

text_image
My Work This is a version of a web-based web tool, which is used to use the Web. It is also used to create a new Web tool, but it is not used to create a new Web tool. The Web is used to create a new Web tool, but it is not used to create a new Web tool. The Web is used to create a new Web tool, but it is not used to create a new Web tool. The Web is used to create a new Web tool, but it is not used to create a new Web tool. The Web is used to create a new Web tool, but it is not used to create a new Web tool. The Web is used to create a new Web tool. The Web is used to create a new Web tool, but it is not used to create a new Web tool. The Web is used to create a new Web tool, but it is not used to create a new Web tool. The Web is used to create a new Web tool, but it is not used to create a new Web tool. The Web is used to create a new Web tool, but it is not used to create a new Web tool.
text_image
CBS (4) 8:30pm (2hr Wm) Time 1:00pm News 5:00pm Promotion Schedule Last Log Crazy The Drew Carey... Norm 20/20 FOX Green The Series Fox 25 News at... CBS Sabrina The West Wing Law & Order Open Star Trek Voyager Star Trek Voya... PBS live/Lincoln Cap Paul Taylor CBC Baseball HBO SphereUser-friendly Features Help You Personalize Your TV
- You can customize your TV to fit your viewing taste and match the lighting where you watch TV by using Personal Presets and/or the automatic picture quality settings: Vibrant, Natural, and Cinematic. You can adjust different Input Jacks to different settings and the TV will automatically adjust the picture accordingly.
- Help Text: The elaborate, on-screen help describes your TV's features and explains how to use them.
- GUIDE. Plus+ System: The on-screen programming guide helps you navigate through hundreds of channels so you can quickly see what's on and tune directly to a specific show from the guide! You can use the Sort feature to search listings. You can even set up reminders to watch a certain show via the GUIDE. Plus+ system's Watch menu.
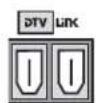
FireWire® with Two-Way DTVLink®
Control your IEEE-1394 components via your HDTV! Just link them together via the 2-way DTVLink jacks and you can network your high-speed compatible 1394 digital components. The two-way jacks allow the audio and video signals to flow into and out from the 1394 components, such as the DVR10 (see below).
Compatible with the Optional DVR10 Hard Disk Drive — Pause Live Digital TV and record digital programs
RCA offers an Audio Video Hard Disk Drive (model DVR10) with IEEE 1394, available at your local RCA dealer or www.rca.com. The DVR10 Audio Video Hard Disk Drive (AVHDD) component lets you pause live TV, record shows, and play them back (digital broadcasts only—ATSC and QAM signals).

natural_image
Front view of a silver RENR keyboard with control buttons and a small screen (no visible text or symbols)To get the most out of your HDTV's web browser, purchase the keyboard (model KBR755TA1) designed specifically for your TV (go to page 84 for ordering information).
NetConnect
With an Ethernet connection and a web browser built into your TV, you can access the Internet from your TV*. To use the web browser, you'll need a high-speed connection, such as a DSL (Digital Subscriber Line) unit or cable modem and a subscription to an ISP (Internet Service Provider). DSL, cable modem, and ISP subscription sold separately.
*The browser has limitations and might not be able to interpret all files, such as streaming audio and video.
Audio System
Enjoy the great sound system in your HDTV with 60 watts total power. Your HDTV has front speakers with two 1" tweeters and two 5" midrange drivers to create incredible sound. A 7-band on-screen graphic equalizer allows customization of the sound quality. TruSurround XT™ solves the problem of playing 6.1 multichannel content over two speakers. It delivers a compelling, virtual, surround sound experience through any internal television speakers.
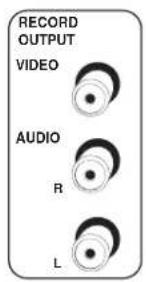
Record Output Jacks
Because the VCRs in most households are analog and can't interpret digital signals, recording HDTV broadcasts wasn't possible without purchasing additional equipment. That's why RCA added Record Output Jacks to this HDTV — the RECORD OUTPUT with its AUDIO OUT L/R jacks enable you to record both analog and digital programs to an analog VCR. RCA understands how you watch TV and what is necessary to make the transition to HDTV seamless.
CinemaScreen™
Check out the black, borderless frame around your HDTV's screen. This is not just a design feature—the CinemaScreen actually enhances contrast. Feel like you're part of the picture with CinemaScreen.
What's Next?
If you didn't have your HDTV professionally installed, go to Chapter 1 for instructions. The rest of this User's Guide explains the features in more detail, the remote control, and the menu system.
Note: For U.S. customers: If you prefer, we can provide you with the name of an Authorized Service Representative who will visit your home for a fee to install your electronics entertainment system and to instruct you in its operation. For details about this service, call 1-888-206-3359.
DTVLink® Certification Logo is a U.S. registered mark of CEA.
FireWire is a trademark of Apple Computer, Inc., registered in the U.S. and other countries.
TruSurround XT, SRS and the (o) symbol are trademarks or registered trademarks of SRS Labs, Inc.
Introduction
Key Features Overview 1
Chapter 1: Connections & Setup
Things to Consider Before You Connect 8
Choose Your Connection....9
How to Connect: TV + VCR + DVD Player 10
How to Connect: TV + Satellite Receiver + VCR 11
How to Connect: TV + Receiver with Dolby Digital + Speakers 12
How to Connect: TV + A/V/Receiver + Speakers + Use TV as Center Channel 12
How to Connect: TV + Speakers Without A/V Receiver 14
How to Connect: TV + Router via the HDTV's ETHERNET Jack 15
How to Connect: TV + DTVLink® and/or 1394 Components 16
How to Connect: TV + Set-top Box Using DVI-HDTV (Digital Visual Interface) 17
Explanation of Input Jacks and Cables 18
Back of the TV 20
Why You Should Connect the G-LINK™ Cable 23
How to Find the Remote Sensor 23
Placing the G-LINK Wands 23
The Front of Your TV 24
Front Input Jacks 24
Front Panel 24
Plug in the TV 25
Put batteries in the remote.... 25
Turn on the TV 25
Use the Remote Control to Complete the Assisted Setup.... 25
Complete the Assisted Setup.... 26
Set the Menu Language 26
Complete Channel Search 26
The GUIDE Plus+ System™ Setup 26
What to Expect 30
Next Steps 30
Chapter 2: Using the Remote Control
The Buttons on the Remote Control 32
Programming the Remote to Operate Other Components 34
How to Use the Remote After You've Programmed It 36
Volume Punchthrough Feature 37
Using the Input Button 38
Remote Code List 39
Chapter 3: Using the TV's Features
About the Channel Banner 42
Digital or Analog TV Channels 43
About the GUIDE Plus+ System 44
Parental Controls 48
How V-Chip Works for the USA and Canada.... 49
Auto Tuning Feature 55
PIP (Picture-in-Picture) Operation 56
Using the Web Browser 58
1394 Recording 59
Chapter 4: Using the TV's Menu System
Menus, On-screen Help, and Control Panels 62
Picture Quality Menu 64
Picture Settings 64
Picture Presets 64
Auto Color 65
Color Warmth 65
Noise Reduction 65
Advanced Settings 65
Reset Controls 66
Audio Menu 66
Equalizer Presets 67
Audio Processor 67
Sound Logic....68
Audio Language 68
SAP (Second Audio Program) 68
Balance 68
Fixed/Variable Out 69
Digital Audio Out 69
Time Menu 70
Connections Menu 70
Antenna Info....70
Channel Search 71
Software Upgrade 71
Signal Source 71
Signal Type 71
Auto Tuning 72
1394 Setup 72
Special Features 72
Ethernet Setup 72
Preferences Menu 73
Closed Captioning 73
Screen Format 74
Record Output 75
Color Scheme 75
Translucency 76
Menu Language 76
Digital Channel Info 76
Lamp Power 76
Chapter 5: Reference
Troubleshooting....78
HDTV Specifications 82
Accessory Information 84
Limited Warranty 87
Care and Cleaning 88
FCC Information 89
Index 90
Connections & Setup
Chapter Overview:
- Things to Consider Before You Connect
- Choose Your Connection
• How To Connect - Explanation of Input Jacks and Cables
- Back of the TV
• Why You Should Connect the G-LINK Cable
• The Front of Your TV - Plug in the TV
- Put Batteries in the Remote
- T urn on the TV
- Use the Remote Control to Complete the Assisted Setup
- Complete the Assisted Setup
• What to Expect - Next Steps
Things to Consider Before You Connect
Protect Against Power Surges
- Connect all components before you plug any of their power cords into the wall outlet or power strip. NEVER plug your TV into an outlet that is controlled by a wall switch.
- T urn off the TV and/or component(s) before you connect or disconnect any cables.
- Make sure all antennas and cables are properly grounded. Refer to the Important Safeguards sheet packed with your TV.
Protect Components from Overheating
- Don't block ventilation holes on any of the components. Arrange the components so that air can circulate freely.
- Don't stack components.
- If you place components in a stand, make sure you allow adequate ventilation.
- If you connect an audio receiver or amplifier, place it on the top shelf so the heated air from it won't flow around other components.
Position Cables Properly to Avoid Audio Interference
- Insert each cable firmly into the designated jack.
Use Indirect Light
Don't place the TV where sunlight or room lighting will be directed toward the screen. Use soft or indirect lighting.
Using a Stand
This television is a table model and is designed to set on a firm, flat surface. Placing the TV on soft carpeting or a like surface can block the bottom ventilation slots and result in reduced lifetime due to overheating. Make sure the stand or base you use is of adequate size and strength to prevent the TV from being accidentally tipped over, pushed off, or pulled off. This could cause personal injury and/or damage the TV. Refer to the Important Safety Instructions packed separately.
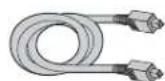
Cables You Need to Connect Components to Your TV
The pictures below show the cables (not supplied) you may need for the connections represented in this book.
Note: Please locate the G-LINK cable (provided) when you're getting ready to set up your TV. You need to connect this cable to your TV and to your VCR and/or cable box in order for all of the features of the program guide to work properly.

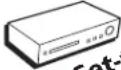
G-LINK cable
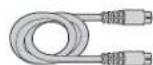
S-Video cable

Ethernet Cable
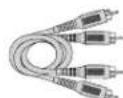
A/V Cable

Composite Video
Audio/ Video cable

Component Video
Y•Pb•Pr cable
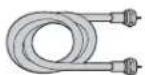
Coaxial cable DVI-D cable

Digital Optical Cable
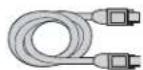
1394 Cable
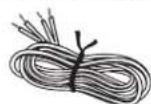
Speaker Wire
Choose Your Connection
There are several ways to connect your HIDTV, depending on the components you want to connect and the quality of the signal you want to achieve. Please use the following chart to determine which connection is best for you. Proceed to the appropriate page and connect your TV. For more information about the relationship between the cables, jacks, and the quality of the signal you see on your TV, go to page 18.
| Components Cables Needed | Connection Title Go | to... | |||
| Video Connections | CoaxialAudio/videoComponentCompositeG-LINK | TV + DVD + VCR | page 10 | ||
 |  |  | |||
| TV | DVD | VCR | |||
 |  |  | CoaxialAudio/videoComponentCompositeG-LINK | TV + SatelliteReceiver + VCR | page 11 |
| TV | Satellite Receiver | VCR | |||
| Audio Connections | Speaker wire | TV + Speakers UsingHDTV's Center Channel | page 14 | ||
 |  | ||||
| TV | Speakers | ||||
 |  |  | CoaxialAudio/videoSpeaker wire | TV + A/V Receiver +Speakers Using HDTV'sCenter Channel | pages 12,13 |
| TV | A/V Receiver | Speakers | |||
| Digital/Network Connections | CoaxialEthernet | TV + Router +Computer + CableModem | page 15 | ||
 |  |  | |||
| TV | Route. | Computer Cable Modem | |||
 |  |  | Coaxial1394 6-pin(no power) | TV + Digital VCR1 +Digital DVD1 + DigitalVideo Recorder +Digital VCR2 + DigitalDVD2 | page 16 |
| TV | 1394 Components | ||||
 |  | top  | CoaxialDigital VisualInterface (DVI) | TV + HD Set-top Box | page 17 |
| TV | HD > | top | |||

text_image
Note for U.S. Customers: If you prefer, we can provide you with the name of an Authorized Service Representative who will visit your home for a fee to install your electronic entertainment system and to instruct you in its operation. For details about this service, call 1-888-206-3359. For additional assistance while using your RCA product, please visit www.rcascenium.com/customer support. TV DVD VCR 3A 3B Connect G-LINK Cable (see page 23)- Connect your cable or off-air signal to ANTENNA A.
If you have cable and an off-air antenna, connect the cable signal to ANTENNA A INPUT (antenna A is the only source for the GUIDE Plus+ system). Connect the off-air antenna to ANTENNA B INPUT. If you have only an off-air antenna, connect it to ANTENNA A INPUT.
- Connect your DVD Player to your TV.
Connect the DVD player's component (Y P R P R ) and audio outputs to INPUT 3 on the TV using component cables. If your DVD player has composite audio/video and an S-Video output, use INPUTs 1 or 2 and use the S-VIDEO jack instead of the VIDEO jack.
Notes: If you are using an S-Video cable (INPUT 1 or 2) or component video cables, you must also use audio cables. The S-Video cable and component video cables only transfer video information.
If your DVD player has a component video output, we recommend you use the component video input on the TV instead of the composite video or S-Video connection. Don't forget to also connect audio cables when using the component video cables.
- Connect your VCR to your TV.
A. Connect the VCR's audio/video outputs to INPUT 1 (audio/video) on the TV using composite audio/video cables.
B. Connect the VCR's audio/video inputs to RECORD OUTPUT on the TV. This enables recording of digital programs (unless copy protected, using DVI HDTV or component video formats), as well as analog programs.
Viewing the Components
- Turn on the TV and the component(s) you want to view.
- Press the TV button on the remote control.
- Press the INPUT button on the remote control to scroll through the Video Input Channels.
• The VCR can be viewed on the INPUT 1 channel.
- The DVD player can be viewed on the INPUT 3 channel.
Note: You can set up the TV to automatically tune to the correct Video Input Channel. This is called Auto Tuning. (See Chapter 3 for more information.)
Go to page 23

flowchart
graph TD
    TV["TV"] --> SatelliteReceiver["Satellite Receiver"]
    SatelliteReceiver --> VCR["VCR"]
    VCR --> SatelliteReceiver
    SatelliteReceiver --> ConnectGINKCable["Connect G-LINK Cable (see page 23)"]

    SatelliteReceiver -->|2A| TV1["TV"]
    SatelliteReceiver -->|2B| TV2["TV"]

    TV1 -->|3| SatelliteReceiver
    TV1 -->|1| Cable["CABLE"]

    Cable -->|1| TV2
    TV2 -->|2A| SatelliteReceiver
    TV2 -->|2B| ConnectGINKCable

    subgraph SatelliteReceiver
        SatelliteReceiver1["Satellite Receiver"]
        SatelliteReceiver2["Satellite Receiver"]
        SatelliteReceiver3["Satellite Receiver"]
    end

    subgraph VCR
        VCR1["VCR"]
        VCR2["VCR"]
    end

    subgraph ConnectGINKCable
        ConnectGINKCable1["Connect G-LINK Cable"]
        ConnectGINKCable2["Connect G-LINK Cable"]
        ConnectGINKCable3["Connect G-LINK Cable"]
    end

    subgraph SatelliteReceiver
        SatelliteReceiver1
        SatelliteReceiver2
        SatelliteReceiver3
    end

    subgraph VCR
        VCR1["VCR"]
        VCR2["VCR"]
    end

    subgraph ConnectGINKCable
        ConnectGINKCable1
        ConnectGINKCable2
        ConnectGINKCable3
    end

    subgraph SatelliteReceiver
        SatelliteReceiver1
        Satellite receiver1
        Satellite receiver2
        Satellite receiver3
    end

    subgraph VCR
          VCR1["VCR"]
        VCR2["VBR"]
    end

    subgraph ConnectGINKCable
        ConnectGINKCable1
        ConnectGINKCable2
        ConnectGINKCable3
    end
How to Connect: TV + Satellite Receiver + VCR
1. Connect your cable or off-air signal to ANTENNA A.
If you have cable and an off-air antenna, connect the cable signal to ANTENNA A INPUT (antenna A is the only source for the GUIDE Plus+ system). Connect the off-air antenna to ANTENNA B INPUT. If you have only an off-air antenna, connect it to ANTENNA A INPUT.
2. Connect your VCR to your TV.
A. Connect the VCR's audio/video outputs to INPUT 1 (audio/video) on the TV using composite audio/video cables.
B. Connect the VCR's audio/video inputs to RECORD OUTPUT on the TV. This enables recording of digital programs (unless copy protected, using DVI HDTV or component video formats), as well as analog programs.
3. Connect your Satellite Receiver to your TV.
Connect the satellite receiver's audio/video output jacks to the INPUT 2 AUDIO (R and L) and VIDEO jacks on the TV using composite cables. If your satellite receiver has an S-Video output, you can make the video connection by using the S-VIDEO jacks instead. If your satellite receiver has component outputs, then use INPUT 3 or 4.
Note: If you are using an S-Video cable or component video cables, you must also use audio cables. The S-Video cable and component video cables only transfer video information.
Viewing the Components
- Turn on the TV and the component(s) you want to view.
- Press the TV button on the remote control.
- Press the INPUT button on the remote control to scroll through the Video Input Channels.
• The VCR can be viewed on the INPUT 1 channel.
- The satellite receiver can be viewed on the INPUT 2 channel.
Note: You can set up the TV to automatically tune to the correct Video Input Channel. This is called Auto Tuning. (See Chapter 3 for more information.)
Audio Connections
With the audio versatility of your HDTV, you can choose various connection options depending on the type and quality of sound that you want. Choose one of the options or refer to the user's manual of each component that you are connecting to get the best results.
- Connect audio/video receiver (speakers connected to receiver) using the digital audio output jack to your TV (best sound).
- Connect audio/video receiver (speakers connected to receiver) to your TV (better sound).
- Connect speakers to your TV (good sound).
How to Connect: TV + Receiver with Dolby Digital + Speakers + Use TV as Center Channel
If you own a receiver with Dolby Digital® or PCM (Pulse-Code Modulation) audio receiver that uses an optical cable-type input, connect an optical cable for excellent audio quality (shown on opposite page).
-
Connect one end of the optical cable to the DIGITAL AUDIO OUT jack on your TV to the DIGITAL OPTICAL INPUT Jack on your receiver/amplifier receiver.
-
If your receiver can decode Dolby Digital and PCM, go to Audio menu, select Digital Audio Output, and select AutoSelect (recommended) or PCM option.
-
If your receiver can decode only PCM, go to Audio menu, select Digital Audio Output, and select PCM option.
-
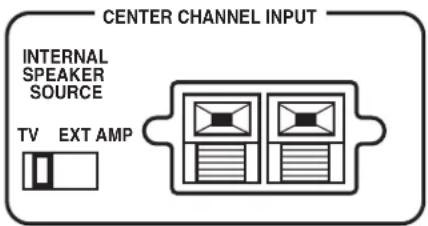
If you want to use your TV as the Center Channel, use speaker wire to connect the audio receiver's CENTER SPEAKER OUTPUT to the TV's CENTER CHANNEL INPUT as shown on the opposite page.
- Switch INTERNAL SPEAKER SOURCE to EXT AMP.
- Use speaker wire to connect the Audio/Video receiver to external front and rear speakers. Refer to your audio receiver manual to complete speaker hookup to the receiver.
Caution: DO NOT connect your audio/video receiver's outputs or center channel output to the red and black EXTERNAL SPEAKERS OUTPUT on the TV. Damage to the TV may result.
OR
How to Connect: TV + A/V Receiver + Speakers + Use TV as Center Channel
- Connect the FIXED/VARIABLE AUDIO OUTPUT from the TV to an A/V receiver using audio cables.
- Be sure to go to the Fixed/Variable Out screen in the Audio menu and select whether you want the FIXED/VARIABLE AUDIO OUTPUT jacks to send fixed volume audio or variable volume audio.
- Fixed Output provides fixed-level audio output from the TV. This audio output is ideal for connecting to an A/V receiver that has its own volume control.
- Variable Output provides variable-level audio output. Volume levels are controlled by the volume controls on the TV and TV remote control.
- If you want to use your TV as the Center Channel, use speaker wire to connect the audio receiver's CENTER SPEAKER OUTPUT to the TV's CENTER CHANNEL INPUT as shown on the opposite page.
- Switch INTERNAL SPEAKER SOURCE to EXT AMP.
- Use speaker wire to connect the Audio/Video receiver to external front and rear speakers. Refer to your audio receiver manual to complete speaker hookup to the receiver.
Caution: DO NOT connect your audio/video receiver's outputs or center channel output to the red and black EXTERNAL SPEAKERS OUTPUT on the TV. Damage to the TV may result.
*Manufactured under license from Dolby Laboratories. "Dolby" and the double-D symbol are trademarks of Dolby Laboratories.

flowchart
graph TD
    subgraph Back of Right Rear Speaker
        A["Back of Right Rear Speaker"] --> B["Back of Left Rear Speaker"]
    end

    subgraph Back of Right Front Speaker
        C["Back of Right Front Speaker"] --> D["A/V Amplifier"]
        D --> E["DVI-HDTV"]
    end

    B --> F["TV"]
    D --> G["A/V Amplifier"]
    F --> H["Speaker Selection"]
    F --> I["Center Channel Input"]
    F --> J["Audio Channel Input"]
    F --> K["Microcontroller"]
    F --> L["Microcontroller"]
    F --> M["Microcontroller"]
    F --> N["Microcontroller"]
    F --> O["Microcontroller"]
    F --> P["Microcontroller"]
    F --> Q["Microcontroller"]
    F --> R["Microcontroller"]
    F --> S["Microcontroller"]
    F --> T["Microcontroller"]
    F --> U["Microcontroller"]
    F --> V["Microcontroller"]
    F --> W["Microcontroller"]
    F --> X["Microcontroller"]
    F --> Y["Microcontroller"]
    F --> Z["Microcontroller"]
    F --> AA["Microcontroller"]
    F --> AB["Microcontroller"]
    F --> AC["Microcontroller"]
    F --> AD["Microcontroller"]
    F --> AE["Microcontroller"]
    F --> AF["Microcontroller"]
    F --> AG["Microcontroller"]
    F --> AH["Microcontroller"]
    F --> AI["Microcontroller"]
    F --> AJ["Microcontroller"]
    F --> AK["Microcontroller"]
    F --> AL["Microcontroller"]
    F --> AM["Microcontroller"]
    F --> AN["Microcontroller"]
    F --> AO["Microcontroller"]
    F --> AP["Microcontroller"]
    F --> AQ["Microcontroller"]
    F --> AR["Microcontroller"]
    F --> AS["Microcontroller"]
    F --> AT["Microcontroller"]
    F --> AU["Microcontroller"]
    F --> AV["Microcontroller"]
    F --> AW["Microcontroller"]
    F --> AX["Microcontroller"]
    F --> AY["Microcontroller"]
    F --> AZ["Microcontroller"]
    F --> BA["Microcontroller"]
    F --> BB["Microcontroller"]
    F --> BC["Microcontroller"]
    F --> BD["Microcontroller"]
    F --> BE["Microcontroller"]
    F --> BF["Microcontroller"]
    F --> BG["Microcontroller"]
    F --> BH["Microcontroller"]
    F --> BI["Microcontroller"]
    F --> BJ["Microcontroller"]
    F --> BK["Microcontroller"]
    F --> BL["Microcontroller"]
    F --> BM["Microcontroller"]
    F --> BN["Microcontroller"]
    F --> BO["Microcontroller"]
    F --> BP["Microcontroller"]
    F --> BQ["Microcontroller"]
    F --> BR["Microcontroller"]
    F --> BS["Microcontroller"]
    F --> BT["Microcontroller"]
    F --> BU["Microcontroller"]
    F --> BV["Microcontroller"]
    F --> BW["Microcontroller"]
    F --> BX["Microcontroller"]
    F --> BY["Microcontroller"]
    F --> BZ["Microcontroller"]
    F --> CA["Microcontroller"]
    F --> CB["Microcontroller"]
    F --> CC["Microcontroller"]
    F --> CD["Microcontroller"]
    F --> CE["Microcontroller"]
    F --> CF["Microcontroller"]
    F --> CG["Microcontroller"]
    F --> CH["Microcontroller"]
    F --> CI["Microcontroller"]
    F --> CJ["Microcontroller"]
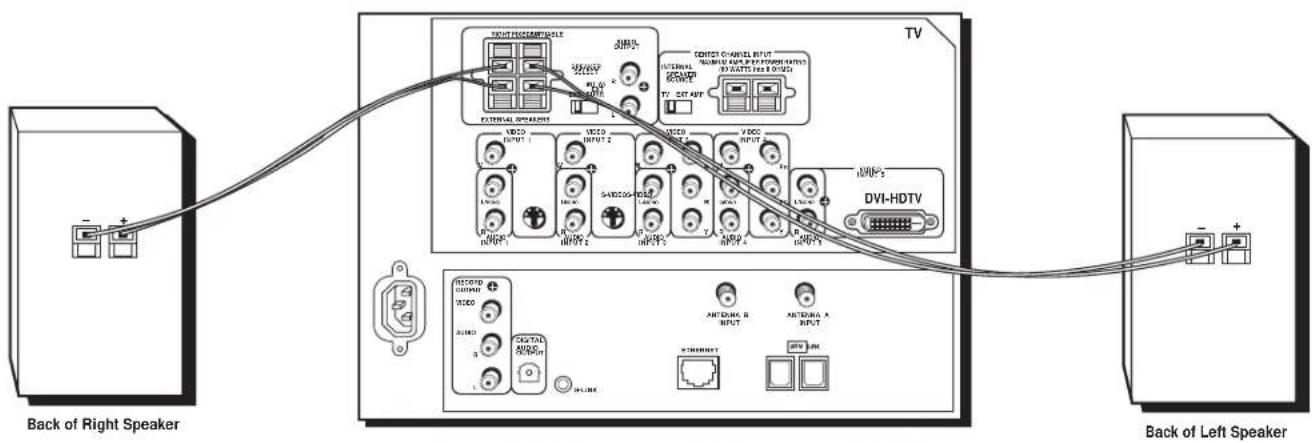
How to Connect: TV + Speakers Without A/V Receiver
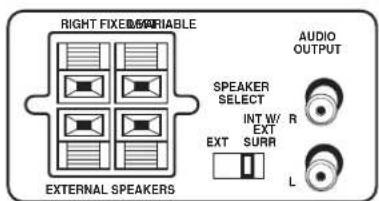
You can connect two external speakers to the TV: one to the RIGHT terminal, and one to the LEFT terminal.
- If necessary, remove the vinyl covering from the ends of the speaker wire and twist the wire core.
- Open the lever on the speaker terminal.
- Insert the wire core into the hole. Be sure to connect the (+) to (+) and (-) to (-).
- Close the lever. Pull gently on the wire to see that it's connected securely.
-
Set the SPEAKER SELECT switch:
-
If you connect speakers and place the EXT/INT W/EXT SURR switch on the TV back panel in the INT W/EXT SURR position, you get audio from the internal speakers as well as L minus R from both external speakers. This connection gives you a matrix surround effect.
- If you connect speakers and place the switch in the EXT position, you get audio from the external speakers only. The TV's internal speakers are turned off.
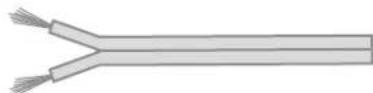
Speaker wire
text_image
RIGHT FIXED/MARIABLE EXTERNAL SPEAKERS AUDIO OUTPUT SPEAKER SELECT INT W/ R EXT SURR L- Go to the Audio menu and Fixed/Variable Out screen and make sure Variable Out - Speakers On is selected.
Notes:
When connecting the speaker wire, make sure you connect the positive (+) terminal on the TV to the positive (+) terminal on the speaker. One side of the speaker wire is usually marked with a white stripe to help you match the terminals correctly. If the (+) and (-) terminals are not matched properly, the speakers will not be "in phase," causing reduction in bass frequencies.
Do not allow the wire core to touch other wires or terminals. Damage to components could result if the cores of two wires touch.
Arrange the speakers in your TV room to achieve maximum sound quality. The external speaker rating is 8 ohms with 30 watts total power handling capabilities.
text_image
Back of Right Speaker Back of Left Speaker TV HOTTER EXCOMPENSATE OUTPUT CONTROL CONTROL CONTROL CONTROL CONTROL CONTROL CONTROL CONTROL CONTROL CONTROL CONTROL CONTROL CONTROL CONTROL CONTROL CONTROL CONTROL CONTROL CONTROL CONTROL CONTROL CONTROL CONTROL CONTROL CONTROL CONTROL CONTROL CONTROL CONTROL CONTROL CONTROL CONTROL CONTROL CONTROL CONTROL CONTROL CONTROL CONTROL CONTROL CONTROL CONTROL CONTROL CONTROL CONTROL CONTROL Control Channel Input Control Channel Output (R/W) (R/W) (R/W) (R/W) (R/W) (R/W) (R/W) (R/W) (R/W) (R/W) (R/W) (R/W) (R/W) VDDO INPUT 1 VDDO INPUT 2 VDDO INPUT 3 VDDO INPUT 4 VDDO INPUT 5 VDDO INPUT 6 VDDO INPUT 7 VDDO INPUT 8 VDDO INPUT 9 VDDO INPUT 10 VDDO INPUT 11 VDDO INPUT 12 VDDO INPUT 13 VDDO INPUT 14 VDDO INPUT 15 VDDO INPUT 16 VDDO INPUT 17 VDDO INPUT 18 VDDO INPUT 19 VDDO INPUT 20 VDDO INPUT 21 VDDO INPUT 22 VDDO INPUT 23 VDDO INPUT 24 VDDO INPUT 25 VDDO INPUT 26 VDDO INPUT 27 VDDO INPUT 28 VDDO INPUT 29 VDDO INPUT 30 VDDO INPUT 31 VDDO INPUT 32 VDDO INPUT 33 VDDO INPUT 34 VDDO INPUT 35 VDDO INPUT 36 VDDO INPUT 37 VDDO INPUT 38 VDDO INPUT 39 VDDO INPUT 40 VDDO INPUT 41 VDDO INPUT 42 VDDO INPUT 43 VDDO INPUT 44 VDDO INPUT 45 VDDO INPUT 46 VDDO INPUT 47 VDDO INPUT 48 VDDO INPUT 49 VDDO INPUT 50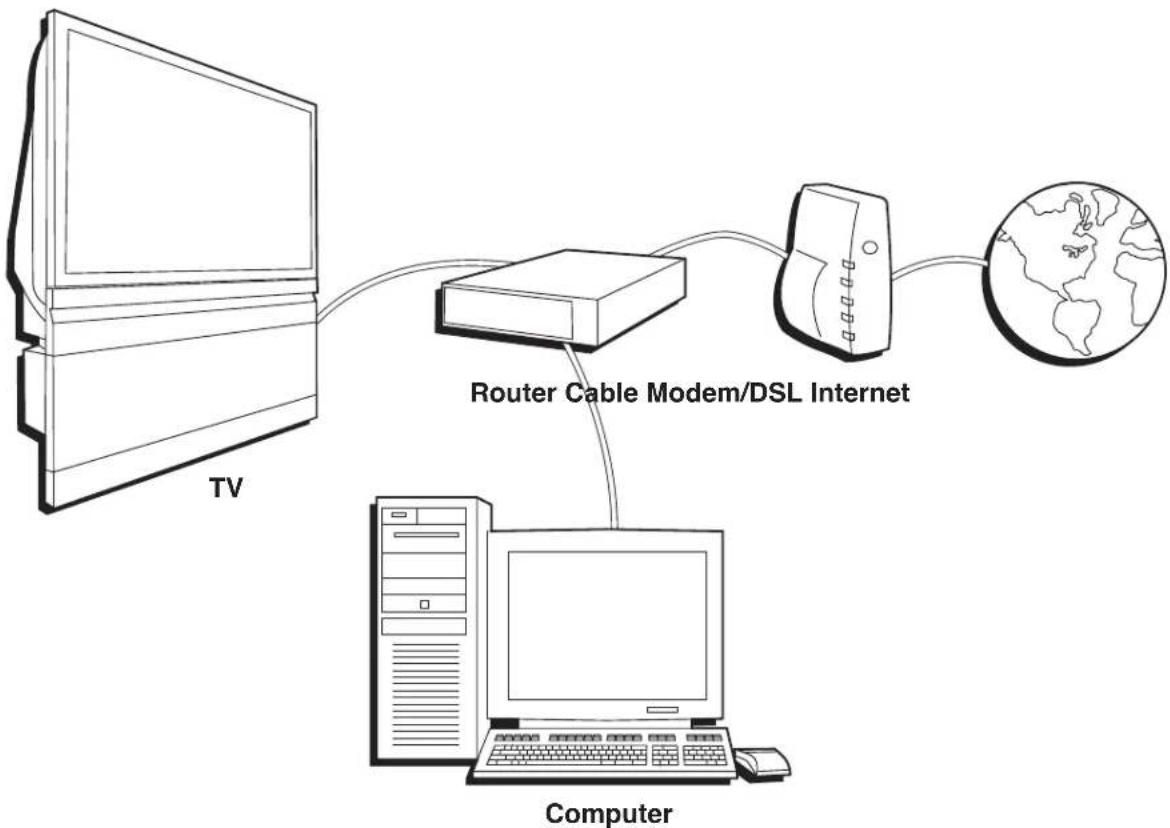
flowchart
graph TD
    TV["TV"] --> Router["CRouter Cable Modem/DSL Internet"]
    Router --> Computer["Computer"]
    Computer --> Internet["Global Map Connection"]
    Internet --> Server["Server"]
    Server --> TV
How to Connect: TV + Router via the HDTV's ETHERNET Jack
The illustration above provides you with a general connection to the TV's ETHERNET jack so you can maximize your HDTV's browser to surf the Internet. You don't need to connect a computer to the router to surf the Internet. A computer is only needed if you want to view photos or graphics on your TV that are stored on your computer. An Internet Service Provider subscription is necessary to access the Internet.
You should know:
- Only use the Ethernet connection, if you are connecting a router to the TV's ETHERNET jack.
• A router with DHCP capability is recommended. - Only use this connection if you have purchased the keyboard designed for this HDTV (page 58 has ordering information) because a keyboard is needed to effectively surf the Internet via your HDTV's internal web browser.
- You'll need to use the manuals that accompany your router and other Internet components for specific instructions.
A router enables you to network several components, such as a computer, cable modem, or DSL modem. You will need to set up each component that is connected to the router. See the manuals that came with the router and the components you are connecting for specific instructions.
To connect the router to the TV, use a CAT 5 cable (not provided) to connect the ETHERNET Input Jack on the back of your HDTV to the ETHERNET Output Jack on the router.
The complexity of the setup required to make all of the components and the router work with your HDTV depends upon your Internet Service Provider (ISP). Most ISPs will automatically fill in the information needed during setup, but if you are asked for specific information while setting up the router and other components you will need to contact your ISP.

text_image
TV Digital Video Recorder Digital VCR Digital VCR Other 1394 Component Hub Connection Digital VCR Digital VCR Digital VCR Con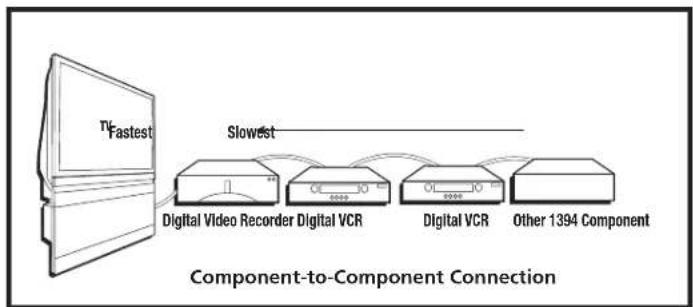
flowchart
graph LR
    A["Fastest"] -->|Slowest| B["Digital Video Recorder"]
    B --> C["Digital VCR"]
    C --> D["Digital VCR"]
    D --> E["Other 1394 Component"]
    style A fill:#f9f,stroke:#333
    style B fill:#ccf,stroke:#333
    style C fill:#cfc,stroke:#333
    style D fill:#fcc,stroke:#333
    style E fill:#cff,stroke:#333
How to Connect: TV + DTVLink and/or IEEE-1394 Components
Two connection methods when connecting IEEE-1394 and DTVLink components are: component-to-component or hub. The component-to-component method is each component connected in a chain-like fashion, one to the other with the first component in the chain connected to the DTVLink jack on the TV. The hub method is basically the same but using both 1394 jacks with two chains of components connected. Your TV is a control center for the connected compatible components, automatically recognizing each component and placing it in the Input list.
Note: If you've tuned to a 1394 input, you can control some basic transport functions on the component like RECORD, STOP, FAST FORWARD, REVERSE, PAUSE, and PLAY when remote is in TV mode.
Three types of 1394 connectors are available on 1394 components; 4-pin connector (no power); 6-pin connector (with power) and 6-pin connector (without power supplied). Your HDTV has a 6-pin connector (without power supplied). Both the 4-pin and 6-pin connectors are capable of sending digital audio, digital video, and digital control signals back and forth between components. In addition, the 6-pin connector is capable of sending low voltage electrical power. If you should have some components with 4-pin connectors, 4-to-6 pin adapter cables are available from your local electronic stores.
You should know:
- Connect your 1394 components to either DTVLink (1394) jack.
- Only compatible 1394 components are to be connected to the DTVLink (1394) input/output jack.
- Do not loop the 1394 components back to the TV. That is, each 1394 connection chain should have only one connection point to the TV, or the network might not work.
- Place the slower components at the end of the chain and the faster ones closest to the TV in the chain for faster communication speed. See component's manual for 1394 network speed.
- The TV can't decode DV format of some camcorders, but it can decode/accept MPEG2 format from some camcorders.
Note: The TV sends audio/video through the 1394 jack (labeled DTVLink) only to a component that enforces video copy protection.

text_image
TV HD Set Top BoxHow to Connect: TV + Set-top Box Using DVI-HDTV (Digital Visual Interface)

DVI-D Connector
Digital Visual Interface is a specification created by the Digital Display Working Group to support analog and digital signals on a single interface. This uncompressed digital video interface is becoming more prevalent and is expected to become widely used for digital display components. The idea behind the connector is that it could eventually replace the 15-pin VGA connector in consumer electronic components.

DVI Cable (not provided)
There are three different DVI formats: DVI-A for analog signals, DVI-D for digital signals, and DVI-I for integrated signals (both analog and digital).
Your TV has a DVI-D format connector and supports some digital signals. The format is used for direct digital connections between source video and provides a higher-quality image than analog. It eliminates the analog conversion process and improves the connection.
You should know:
• A DVI cable has a 15 feet (5 meters) distance limitation.
- Audio information is carried separately; therefore, connect audio left and right cables.
Explanation of Input Jacks and Cables
This section describes the jacks and cables you might use to make connections (cables may be ordered separately by using the order form on page 85). There are several ways to connect components to your TV.
Different jacks and cables provide a different level of performance. It's important to remember the different degrees of picture improvement for comparison. The component jacks are considered an excellent improvement; S-Video and composite jacks are considered very good, while connecting components with the antenna RF connection is good.

text_image
VIDEO INPUT S DVI-HDTV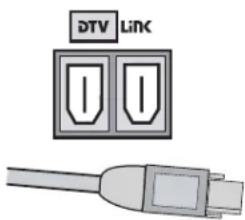
text_image
DTV Link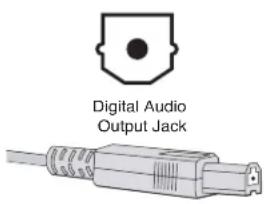
text_image
Digital Audio Output Jack
DVI-HDTV (Digital Visual Interface-High Definition Television) Connector
DVI-HDTV is an uncompressed, high-speed digital visual interface designed to deliver digital video in its native format. It supports the overlay of high-resolution graphics used by some program guides and interactive components.
Note: Remember to connect the left and right audio cables for Input 5 (DVI-HDTV) because the DVI-HDTV cable carries only the picture signal, not the sound.
DTVLink® (Digital Television Link) Connectors
DTVLink uses a format better known to some as IEEE-1394 or FireWire®. DTVLink is a compressed digital video input/output offering an IEEE 1394-type connection that meets the CEA specifications. This connection is a high-speed and inexpensive way of interconnecting 1394 compliant consumer electronic components. If your 1394 component has the DTVLink logo on it, it should work with this TV. You can use either or both connectors to link your components but don't connect the components in a loop.
Notes: Audio and video information is carried on a single wire.
The TV outputs audio/video through the 1394 jack (labeled DTVLink) only to a component that enforces video copy protection.
Digital Audio Out Jack and Optical Cable
The optical cable is used to connect an audio receiver with Dolby Digital or PCM (Pulse-Code Modulation) audio receiver to your TV. If you own a receiver that uses an optical cable input, you can use an optical cable to connect the TV to that receiver for the best sound quality.
Note: This TV's optical digital output jack fully complies with the international standard governing this type of jack (IEC958), and is designed for connection to a Dolby Digital (AC-3 ^ or PCM) receiver or Dolby Digital (AC-3 or PCM) decoder. Older equipment, some of which is not fully compliant with IEC958, may not be compatible with the Dolby Digital bitstream. Such a connection using anything other than a Dolby Digital (AC-3 or PCM) receiver or decoder could create a high noise level, causing damage to headphones or speakers.
Ethernet Jack and Cable
This jack is used to connect a router, cable modem or DSL (Digital Subscriber Line) unit with a CAT 5 (ethernet) cable (not provided). It is recommended that you only connect a router to this jack although you could connect a DSL/cable modem directly.
DTVLink® Certification Logo is a U.S. registered mark of CEA.
FireWire® is a trademark of Apple Computer, Inc., registered in the U.S. and other countries.
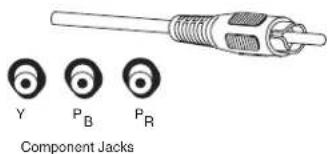
text_image
Y P_B P_R Component Jacks
text_image
S-Video Jack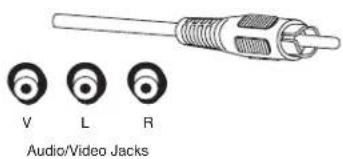
text_image
V L R Audio/Video Jacks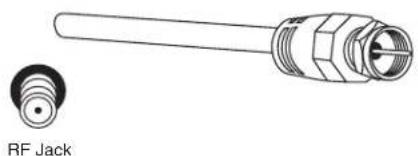
natural_image
Technical illustration of a RF jack component with threaded leads and a close-up view (no text or symbols)Component Video (Y•Pb•Pr) Jacks and Cables
The Y, Pb, Pr jacks allow you to connect a component, such as a DVD player. This connection provides excellent picture quality because the video is separated into three signals. To ensure maximum picture quality, use three video-grade cables for the connection.
Note: Also, remember to connect the left and right audio cables because the Y•Pb•Pr cables carry only the picture signal, not the sound.
S-Video Jacks and Cables
The S-Video (separate video) jacks provide better picture quality than the regular video jacks because the color (chrominance, also called chroma) part of the signal is separated from the black and white (luminance) part of the picture.
If a component you're connecting to your TV (like a DVD player) has an S-VIDEO jack and composite video, connect the component to the TV with an S-Video cable (not provided) for a better quality picture.
Note: Remember to connect the left and right audio cables because the S-Video cable carries only the picture signal, not the sound.
Composite Audio/Video Jacks and Cables (RCA-type)
These jacks are used for most audio/video connections between components. The audio/video jacks are often color coded (yellow for video, red for right audio, and white for left audio). This is also called composite video.
Note: If your component has only one output for audio (mono), connect it to the left (white L/Mono) audio jack on the TV and don't connect the right (red) audio part of the cable.
RF Jacks and Coaxial Cables (F-type)
RF jacks are primarily used for reception of off-air broadcasts and cable signals (possibly older VCRs or cable boxes). The RF and coaxial jacks on the TV are labeled ANTENNA A INPUT and ANTENNA B INPUT.
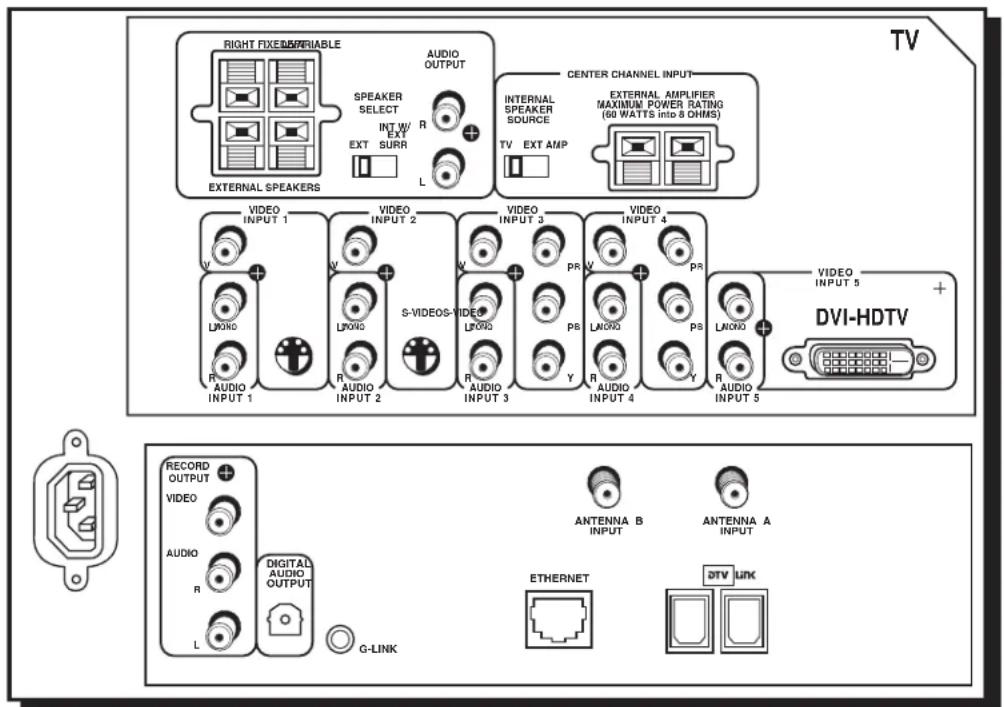
Back of the TV
The diagrams below illustrate jacks found on the back of the TV. When connecting cables, be sure to connect corresponding outputs and inputs (video in to video out, right audio in to right audio out, etc.).
text_image
RIGHT FIXED/PERIABLE SPEAKER SELECT INT W/ EXT EXT SURR AUDIO OUTPUT L EXTERNAL SPEAKERS CENTER CHANNEL INPUT INTERNAL SPEAKER SOURCE TV EXT AMP EXTERNAL AMPLIFIER MAXIMUM POWER RATING (60 WATTS into 8 OWMS) VIDEO INPUT 1 VIDEO INPUT 2 VIDEO INPUT 3 VIDEO INPUT 4 VIDEO INPUT 5 VIDEO INPUT 1 LXORD R AUDIO INPUT 1 LXORD R AUDIO INPUT 2 S-VIDEOS VIDEO LXORD R AUDIO INPUT 3 PR V LXORD Y LXORD R AUDIO INPUT 4 PR V LXORD Y LXORD R AUDIO INPUT 5 DVI-HDTV + - RECORD OUTPUT VIDEO AUDIO R DIGITAL AUDIO OUTPUT G-LINK ANTENNA B INPUT ANTENNA A INPUT ETHERNET DTV LINK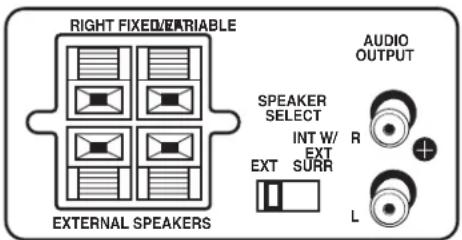
text_image
RIGHT FIXED/ERIABLE EXTERNAL SPEAKERS SPEAKER SELECT INT W/ EXT EXT SURR AUDIO OUTPUT LTV's AUDIO OUTPUTS except for RECORD OUTPUT audio
Caution: Connect external speakers only to the TV's EXTERNAL SPEAKERS terminals. DO NOT connect your audio/video receiver to the red and black EXTERNAL SPEAKERS terminals. Damage to TV may occur.
AUDIO OUTPUTS
- RIGHT and LEFT EXTERNAL SPEAKER Terminals Used to connect external speakers if you don't have an audio amplifier or receiver. For use, if you want better sound than the TV's speakers. See page 14.
- SPEAKER SELECT - EXT. or INT W/EXT SURR Switch Lets you direct where the output of the TV's internal speakers goes. With the switch in the EXT position, you hear the external speakers connected to the TV. In INT W/EXT SURR position, you hear the TV's internal speakers and external speakers connected to the TV for a matrix surround sound effect.
Note: To turn the TV's internal speakers on and off, press MENU on the remote control and choose Audio. Then choose Fixed/Variable Out from the menu and choose an option.
- FIXED/VARIABLE AUDIO OUTPUT L/R Provides fixed-level or variable-level audio output from the television. Fixed/Variable is an option in the Audio menu, details on page 66.
- Fixed controls the volume through the audio/video receiver.
- V variable controls the volume through TV.
text_image
CENTER CHANNEL INPUT INTERNAL SPEAKER SOURCE TV EXT AMPTV's CENTER CHANNEL INPUTS
Caution: Do not connect the A/V receiver's CENTER CHANNEL output to the TV's EXTERNAL SPEAKERS terminals. Damage to TV may occur.
text_image
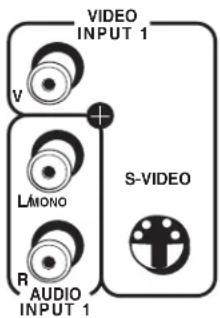
VIDEO INPUT 1 V + L/MONO R AUDIO INPUT 1 S-VIDEO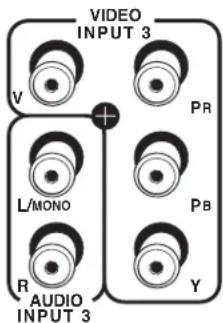
text_image
VIDEO INPUT 3 V PR L/MONO Pb R AUDIO INPUT 3 YTips
Inputs 3/4 can be used as either a component video ( Y P_B P_R ) input or a composite video (V) input. The TV auto detects the connection with Y P_B P_R having highest priority.
PIP cannot be displayed from component (Y•Pb•Pr) inputs.
CENTER SPEAKER INPUT
• INTERNAL SPEAKER SOURCE - TV / EXT AMP Switch
- TV Position Sound comes from TV's internal speakers.
- EXT AMP Position Internal speakers are used for an external center channel. When an external audio/video receiver's center channel output is connected to the TV's center channel input, center channel audio comes out of the TV's internal speakers.
- CENTER CHANNEL TERMINALS Connect the audio/video receiver's center channel output to the TV's center channel input. Switch the INTERNAL SPEAKER SOURCE to EXT AMP position.
VIDEO/AUDIO INPUTS
VIDEO INPUT 1/AUDIO INPUT 1 Connect an NTSC (analog) component.
- V (VIDEO) provides composite video connection and connector is usually yellow.
- L/MONO AUDIO provides left audio connection and connector is usually white.
Note: If your component has only one output for audio (mono), connect it to the left (white L/Mono) audio jack on the TV and don't connect the right audio part of the cable.
• R AUDIO provides right audio connection and connector is usually red.
- S-VIDEO lets you connect an S-Video cable for better video quality picture to a component with S-Video capability, such as a VCR or DVD player. When using S-Video, make sure to connect the two audio cables as well as the S-Video connector.
VIDEO INPUT 2/AUDIO INPUT 2 Provides connection to a second NTSC (analog) video component such as a VCR. The jacks are as described for INPUT 1.
VIDEO INPUT 3/AUDIO INPUT 3 Connect an optional component (Y P B P R ) video source, such as a DVD player or satellite receiver. Note that it is essential to match the color coded connectors between a compatible component and the TV.
- AUDIO R/L/MONO The audio jacks provide stereo sound. When connected, audio volume from the main front and rear speakers are variable.
• V (VIDEO) provides composite video connection and connector is usually yellow. - Y P_B P_R . Unlike a single video input, component video maintains the video signal as three separate parts through these three jacks. To ensure maximum picture quality, use three video-grade cables for the Y P_B P_R connections. Accepts 480i, 480p, 1080i signals. Has priority over V connection.
VIDEO INPUT 4/AUDIO INPUT 4 Provides connection to a second optional component video source, such as a DVD player or satellite receiver. The jacks are the same as described in INPUT 3.

text_image
VIDEO INPUT 5 Lmono R AUDIO INPUT 5 DVI-HDTVVIDEO INPUT 5/AUDIO INPUT 5 Provides DVI-HDTV and analog audio connections.
- L/MONO AUDIO provides left audio connection and connector is usually white.
• R AUDIO provides right audio connection and connector is usually red. - DVI-HDTV provides a digital video connection from a video source to the TV.
text_image
RECORD OUTPUT VIDEO AUDIO R LRECORD OUTPUT Connect a VCR or DVD-recorder to record mainly digital (or analog) programs from Antenna A or B and inputs (excluding DVI-HDTV and some component video formats) while TV is turned on. You must leave TV on same channel you are recording.
• VIDEO provides composite video connection and connector is usually yellow.
- AUDIO L provides left audio connection and connector is usually white.
- AUDIO R provides right audio connection and connector is usually red.
Notes: When recording from this output, remember to tune to the channel you are recording.
If an unusual pattern appears when you connect your VCR input to the RECORD OUTPUT, playing a tape or switching to the VCR's tuner removes the pattern.

DIGITAL AUDIO OUTPUT Use a digital optical cable (or SPDIF cable) to connect your TV to a compatible Dolby Digital or PCM receiver or decoder. Dolby Digital offers theatre-quality sound (six audio channels). Use the Digital Audio Out screen in the Audio menu to select Auto Select or PCM as the output for this jack.

ETHERNET Connect a router, cable modem, or Digital Subscriber Line to the TV using an Ethernet cable (CAT 5). Do not connect a telephone cable because of risk of fire or shock. A green light on the jack means that an active network has been detected. An orange light means the data is either being sent or received.
DTVLink Use either or both connectors to connect compatible DTVLink (IEEE-1394) components but don't loop the components together. When connecting several components, use a hub or component-to component method. Be sure to connect the fastest of the 1394 components closer to the connection point of the TV and the slower components furthest away. Details on page 16.

ANTENNA A INPUT / ANTENNA B INPUTs Used to connect an off-air antenna and/or cable TV signal to the TV. If you have both cable and air, connect cable to ANTENNA A and off-air to ANTENNA B. If you have air only, connect it to ANTENNA A. These inputs are also used to receive programming and connect older components.

G-LINK Connect the G-LINK cable for VCR one touch recording and/or cable box control with GUIDE Plus+ system.
Why You Should Connect the G-LINK Cable
The G-LINK cable enables the GUIDE Plus+ system (the on-screen interactive program guide) to work with your VCR and/or cable box.
Cable Box – If your TV is connected to a cable box, you must connect the G-LINK cable to receive TV program listings for your area and to tune directly to a channel when the program guide is on your TV screen.
VCR – If your TV is connected to a VCR and you don't connect the G-LINK cable, one-touch VCR recording and timed recordings won't work. The other features of the guide will work properly.

text_image
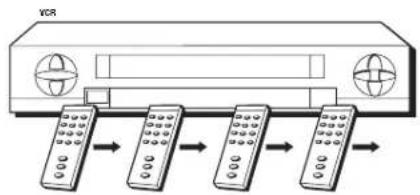
G-LINK cable G-LINK wandsHow to Find the Remote Sensor
You have to place the G-LINK wands in front of the remote sensor on the VCR and/or cable box. Some cable boxes and VCRs have the remote sensor labeled on the unit. If the remote sensor isn't labeled on your VCR and/or cable box, you need to use the remote control that came with the VCR and/or cable box to locate the sensor.
- Turn off the VCR and/or cable box.
- Hold the remote control (not the one that came with your TV, but the one that came with the cable box and/or VCR to which you're attaching the G-LINK cable) so that it is touching the front of the component.
- Slowly move the remote control across the front of the component (VCR or cable box) while you press the power button on and off. You must press and release the power button each time you move the remote (holding down the button won't work).
flowchart
graph LR
    A["Device 1"] --> B["Device 2"]
    B --> C["Device 3"]
    C --> D["Device 4"]

- When the component turns on, you've located the VCR's or cable box's remote sensor.
Placing the G-LINK Wands
Place the G-LINK wands in front of the remote sensor on your VCR and/or cable box approximately one inch away from the remote sensor (see below).
Tips
If you have both a VCR and a cable box, it doesn't matter which wand is connected to which box.
If you don't have both a cable box and a VCR connected to your TV, just coil the cable of the extra G-LINK wand with a twist tie and leave it behind the TV.
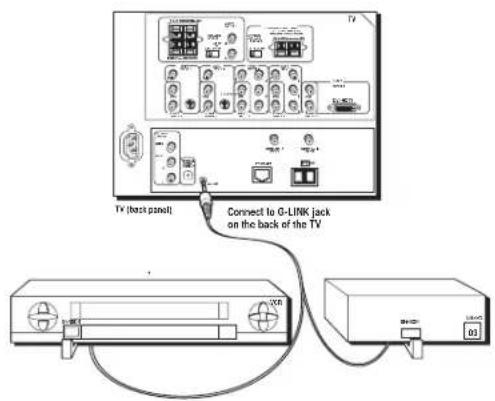
text_image
TV (back panel) Connect to G-LINK jack on the back of the TVThe Front of Your TV
Button Lighting
Your HDTV with DLP technology has a top-light feature above the buttons on the front of the TV. You can adjust the brightness (including off) of the light through the TV's menu system. Go to the Main Menu, highlight and select Preferences. Go to the Button Lighting feature and make your adjustments by using the left and right arrow buttons on the remote.
Front Input Jacks
The TV has front input jacks for convenience in connecting a camcorder, digital camera, or video game: an S-VIDEO input, one set of composite AUDIO/VIDEO inputs, and a headphone jack. Look for a hinged door and press to open the cover. Please note the illustration below is just an example of how jacks might appear.
Notes: When you plug in headphones, the TV's internal and external speakers, Fixed/Variable Audio Output, and Digital Audio Output are automatically turned off.
When connecting a component that uses a monaural cable, such as some camcorders, use the Left (mono) input jack to get sound from both speakers.

text_image
A U B O I N L/MOND R I N S-M DBO H E A D P H O N E MENU+OK CH ▼ CH ▲ VOL ◀ VOL ▶Power Indicator Light Status
| On | TV is on |
| Off | TV is off (standby mode) |
| Blinks | If the power light blinks slowly, you've tried to turn on the TV during the lamp cooldown cycle. Wait approximately 30 seconds, and the TV will turn on automatically. |
| Blinks and pauses | Light blinks, pauses for about a minute, and blinks again: the lamp is trying to turn on (TV will turn on when successful). If TV doesn't turn on and sequence continues, the lamp needs to be replaced. See page 84 for ordering information. |
Notes: The front panel illustration shows a typical front panel layout. The exact look may be different from the one on the front of your TV.
If you use the Front Button Block feature, the front panel no longer provides access to the menus. The Front Button Block feature disables all front panel buttons but not the jacks. For more information, see Chapter 3.
Buttons on the Front of the TV
If you cannot locate your remote, you can use the front panel of your TV to operate many of the TV's features.
MENU/OK Brings up the Main menu. When the menu system is displayed, pressing MENU/OK selects highlighted items.
CH▲ Scans up through the current channel list. In the menu system, it moves the highlight up in the menu and adjusts menu controls.
CH▼ Scans down through the channel list. In the menu system, it moves the highlight down in the menu and adjusts menu controls.
VOL Decreases the volume. In the menu system, it moves the highlight left to items and adjusts menu controls.
VOL▶ Increases the volume. In the menu system, it moves the highlight right to items and adjusts menu controls.
(Power) Turns the TV on and off. The indicator light provides status of the TV and the DLP lamp. See chart above.
24 Chapter 1
Plug in the TV
Plug the flat end of the cable into the power jack on the back of the TV. Then plug the other end of the power cord into an appropriate wall outlet. Be sure to insert the plug completely. Do not plug into an outlet controlled by a light switch.
Note: When you first plug your TV into an outlet, the Power indicator on the front panel will light for approximately 15 seconds and then go off during the initialization of the TV. The TV can only be turned on after the Power indicator goes off. This happens every time power is reapplied to the TV.
natural_image
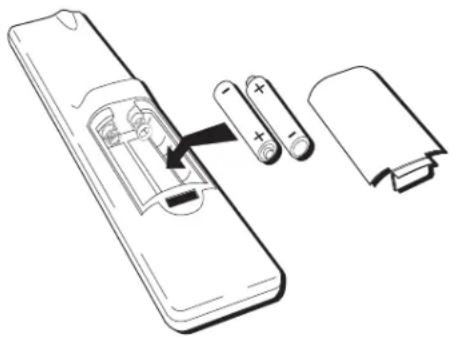
Diagram of a remote control panel with battery and battery casing, showing internal components (no text or symbols)Tip
When remote batteries are low, the component button(s) corresponding to the mode you're in flashes when you press a button. Also, a message might appear on the TV screen and disappear within a few seconds. Press CLEAR to remove.
text_image
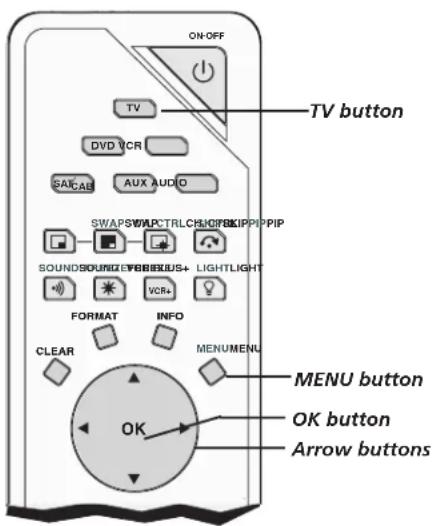
ON-OFF TV DVD VCR SASCAB AUX AUDIO TV button SWAPSWWPCTRLCHUOPKIPPIP SOUNDSOUNDYFEBRUUS+ LIGHTLIGHT VCR+ FORMAT INFO CLEAR MENUMENU MENU button OK button Arrow buttonsPut Batteries in the Remote
- Remove the battery compartment cover from the back of the remote by pushing down on the tab and lifting cover.
- Insert 2 fresh "AA" batteries. Make sure the polarities (+ and -) are aligned correctly.
- Replace the cover.
Turn on the TV
Press TV on the remote, or press POWER on the TV's front panel.
Note: Pressing the TV button turns on the TV and puts the remote into TV mode. "TV mode" means that the buttons on the remote control operate the TV's functions.
Use the Remote Control to Complete the Assisted Setup
The technical term is "Navigation" – how you move through the on-screen menus. The method is the same throughout the menu screens: highlight your choice and select it.
To highlight a menu item, put the remote into TV mode by pressing the TV button then MENU. Press the arrow buttons on the remote to highlight one of the items listed in the menu. Use the up or down arrow button to move up or down. Use the right or left arrow button to move right or left.
To select the item that you've highlighted, press OK.
Note: Highlighted means that the menu item stands out from other menu items on the list (appears darker, brighter, or a different color).
Tip
To access the setup menus, press MENU and choose Assisted Setup.
Complete the Assisted Setup
Your TV's menu system allows you to adjust your TV's features to be configured to work properly. On-screen information helps you choose settings to match your setup. The first time you turn on your TV, the Assisted Setup screens appear automatically. Select Begin Setup to start or select Cancel Setup to exit.
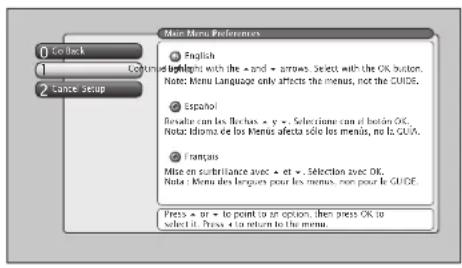
- Use arrow buttons to highlight your preferred language for the menu system.
- Press OK to select that language.
- Select Continue Setup.
text_image
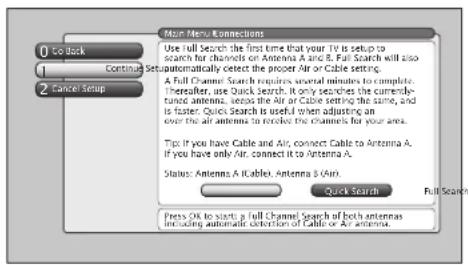
Close Continue Cancel Setup Use full search the first time that your TV is setup to search for channels on Antenna A and B. Full Search will also A full Channel Search requires several minutes to complete. thereafter, use Quick Search. It only searches the currently- tune antenna, unless the Air or Cable setting the same, and is faster. Quick Search is useful when adjusting an over the all-antenna to resolve the channels for your area. Tips: If you have Cable and Air, connect Cable to Antenna A. If you have only Air, connect it to Antenna A. Status: Antenna A & Cable, Antenna B (Air) Quick Search Full Search Press OK to start a full Channel search of both antennas including automatic detection of Cable or Air antenna.Complete Channel Search
Even though this initial channel search can take several minutes, it is important to complete in order for your TV to display channels and programming.
- Highlight Full Search with arrow button and press OK to tell the TV to begin searching for channels. A progress report appears on the screen.
- When search is complete, press OK.
- Select Continue Setup.
Notes: If you skip Channel Search now, you can access it later through the Connections menu. See Chapter 4 for more details.
If cable box is connected to ANTENNA A, Channel Search cannot work.
Tip
Channel Search takes several minutes because the TV is searching for all possible analog and digital channels. You may want to leave and come back later.
Tip
If you move to a new ZIP or postal code, or if any of your information changes and you need to access the setup screens from the TV's main menu—press MENU, choose GUIDE Plus+ Menu, and choose GUIDE Plus+ Setup, then choose "No, repeat setup process."
text_image
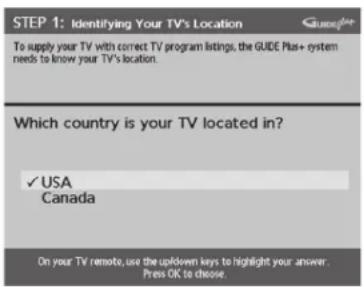
STEP 1: Identifying Your TV's Location To supply your TV with correct TV program listings, the GUIDE Plus+ system needs to know your TV's location. Which country is your TV located in? ✓ USA Canada On your TV remote, use the updown keys to highlight your answer. Press OK to choose.The GUIDE Plus+ System Setup
Important Notes: If you have a VCR and/or cable box connected to the TV, you need to connect the G-LINK cable to use the GUIDE Plus+ system. If you didn't connect the G-LINK cable, go to page 23. Disregard the screen that tells you to refer to the Quick Setup sheet—all of the instructions are included in this User's Guide.
The TV must be off to download information. Leave your TV off overnight, for at least 10 hours to receive the initial download for your area.
The GUIDE Plus+ system is a no-fee, on-screen interactive program guide that lists what shows are on TV in your area. In order to receive program listings, you need to complete the following steps after you read the introductory screens.
Step 1: Identifying Your TV's Location
- If your country is highlighted, press OK on the remote control.
If your country isn't highlighted, press the up or down arrow button on the remote control to highlight your country and press OK.

text_image
STEP 1: Identifying Your TV's Location Please enter the 5-digit ZIP code where your TV is located. ---- On your TV remote, use the number keys to enter your information. Press OK to confirm.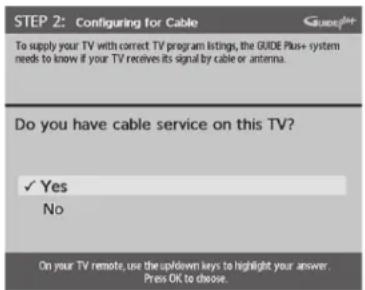
text_image
STEP 2: Configuring for Cable To supply your TV with correct TV program listings, the GUIDE Plus+ system needs to know if your TV receives its signal by cable or antenna. Do you have cable service on this TV? ✓ Yes No On your TV remote, use the up/down keys to highlight your answer. Press OK to choose.- Use the number buttons and/or the arrows on your remote to enter your zip code or postal code. Press OK when you're finished.
Note: If your postal code contains letters, press the up and down arrow buttons on your remote to enter letters, and press the right arrow button to go to the next space. The left arrow button also moves the highlight to the left.
Step 2: Configuring for Cable
The next series of screens asks you about your cable setup. To supply your TV with the correct TV program listings, the GUIDE Plus+ system needs to know if your TV is connected to a cable TV connection.
Notes: If you're using a cable box, leave it on so you can receive program information.
If you have two off-air antennas connected (one to ANTENNA A and one to ANTENNA B) and you aren't getting the guide listings, try swapping the antennas.
You cannot tune to digital channels from the GUIDE Plus+ system if you have cable service or a cable box connected unless an off-air antenna is connected to Antenna B.

text_image
STEP 2: Configuring for Cable You have indicated that you have cable service. Now the GUIDE Plus+ system needs some additional information. Is a cable box connected to this TV? ✓ Yes No On your TV remote, use the updown keys to highlight your answer. Press OK to choose.- If your TV is connected to cable, highlight Yes and press OK.
If your TV isn't connected to cable, highlight No and press OK. (STEP 3: Configuring for a VCR appears--go to page 28.)
- If you have a cable box connected to this TV, highlight Yes and press OK
Notes: The next series of screens is very important because the GUIDE Plus+ system must find the correct cable box information in order to receive the correct TV program listings.
If you don't have a cable box connected to this TV, highlight No and press OK (STEP 3: Configuring for a VCR appears--go to page 28).
text_image
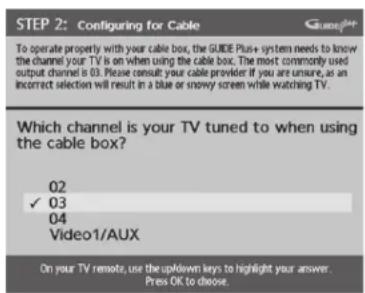
STEP 2: Configuring for Cable To operate properly with your cable box, the GUIDE Plus+ system needs to know the channel your TV is on when using the cable box. The most commonly used output channel is 03. Please consult your cable provider if you are unsure, as an incorrect selection will result in a blue or snowy screen while watching TV. Which channel is your TV tuned to when using the cable box? 02 ✓ 03 04 Video1/AUX On your TV remote, use the up/down keys to highlight your answer. Press OK to choose.- Highlight the channel on ANTENNA A where you have to tune your TV to see cable box programming, and press OK (a screen appears reminding you to connect your G-LINK cable to your TV and cable box).
Notes: If not using INPUT1 (VIDEO1/AUX), you must connect to ANTENNA A not B.
Channel 03 is the most common.
Choose Video1/AUX if your cable box is connected to your TV with audio/video cables instead of a coaxial cable. Go to page 8 for pictures of these cables. If you choose Video 1/Aux, then connect the cable box to the INPUT 1 on back of TV.
text_image
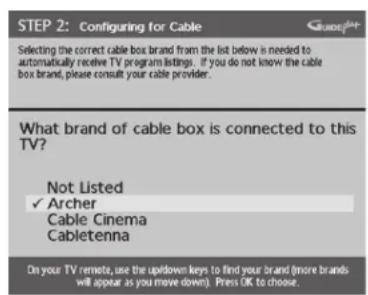
STEP 2: Configuring for Cable Selecting the correct cable box brand from the list below is needed to automatically receive TV program listings. If you do not know the cable box brand, please consult your cable provider. What brand of cable box is connected to this TV? Not Listed ✓ Archer Cable Cinema Cabletenna On your TV remote, use the updown keys to find your brand (more brands will appear as you move down). Press OK to choose.
text_image
STEP 2: Configuring for Cable The GUIDE Plus system will conduct a series of tests to find the correct code to control your cable box. Follow steps A and B below: A. Please tune your cable box to channel 02 B. Make sure to leave your cable box ON Once you have completed these steps press OK on the TV remote to begin testing.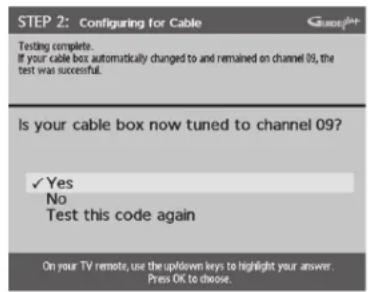
text_image
STEP 2: Configuring for Cable Testing complete. If your cable box automatically changed to and remained on channel 09, the test was successful. Is your cable box now tuned to channel 09? ✓ Yes No Test this code again On your TV remote, use the up/down keys to highlight your answer. Press OK to choose.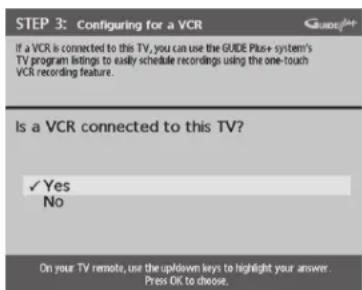
text_image
STEP 3: Configuring for a VCR If a VCR is connected to this TV, you can use the GUIDE Plus+ system's TV program listings to easily schedule recordings using the one-touch VCR recording feature. Is a VCR connected to this TV? ✓ Yes No On your TV remote, use the up/down keys to highlight your answer. Press OK to choose.- Highlight your brand of cable box, and press OK.
If your brand isn't listed, highlight Not Listed and press OK.
Important Note: Cable box may only be connected to ANTENNA A or INPUT 1 if it is to be controlled by GUIDE Plus+ system.
- Make sure your cable box is on.
Tune the cable box to channel 02 (use the remote control that came with your cable box, or press the channel buttons on the cable box).
Press OK (the GUIDE Plus+ system starts testing codes).
Important Note: When code testing is in progress, don't touch your TV, VCR, cable box or any of the remote controls for these products.
- Look at your cable box. If it is still on and changed to channel 09, the test was successful. Highlight Yes, and press OK (STEP 3: Configuring for a VCR appears).
If your cable box didn't change to channel 09 or turned itself off, you have two choices: No and Test this code again.
Test this code again: If you think the TV, the cable box, or any of the remote controls might have been touched or bumped during the test, highlight Test this code again and press OK (the GUIDE Plus+ system runs the same set of codes).
No: If you don't think the test was interrupted, highlight No and press OK (GUIDE Plus+ system tests the next code).
Repeat the previous instructions until the TV finds the correct cable box code. Follow the instructions on the screen.
Note: If the TV can't find your cable box code, a troubleshooting checklist appears. Carefully review each checklist and follow the instructions on the screen.
Step 3: Configuring for a VCR
- If your TV is connected to a VCR, press OK (a screen appears reminding you to connect your G-LINK cable to your TV and VCR).
If it is not, highlight No and press OK. Go to Step 4: Confirming Your Settings on page 29.

text_image
STEP 3: Configuring for a VCR To operate properly with your VCR, the GUIDE Pin+ system needs to know the VCR brand. An incorrect brand selection may result in program recording errors. What brand of VCR is connected to this TV? ✓ Not Listed Admiral Adventura On your TV remote, use the up/down keys to find your brand (more brands will appear as you move down). Press OK to choose.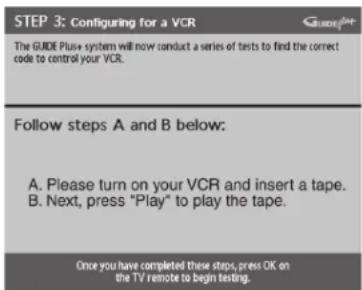
text_image
STEP 3: Configuring for a VCR The GUIDE Plus system will now conduct a series of tests to find the correct code to control your VCR. Follow steps A and B below: A. Please turn on your VCR and insert a tape. B. Next, press "Play" to play the tape. Once you have completed these steps, press OK on the TV remote to begin testing.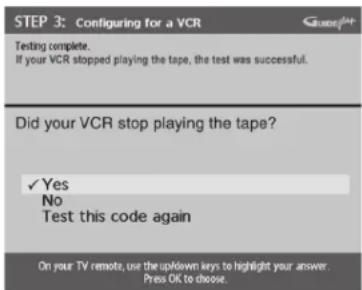
text_image
STEP 3: Configuring for a VCR Testing complete. If your VCR stopped playing the tape, the test was successful. Did your VCR stop playing the tape? ✓ Yes No Test this code again On your TV remote, use the up/down keys to highlight your answer. Press OK to choose.Tip
Leave your cable box turned ON to download program information.
Leave your VCR turned OFF to record programs.
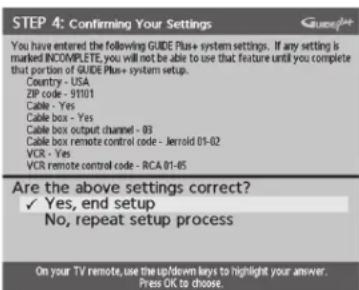
text_image
STEP 4: Confirming Your Settings You have entered the following GUIDE Plus+ system settings. If any setting is marked INCOMPLETE, you will not be able to use that feature until you complete that portion of GUIDE Plus+ system setup. Country - USA ZIP code - 9101 Cable - Yes Cable box - Yes Cable box output channel - 83 Cable box remote control code - Jerrold 01-02 VCR - Yes VCR remote control code - RCA 01-05 Are the above settings correct? ✓ Yes, end setup No, repeat setup process On your TV remote, use the up/down keys to highlight your answer. Press OK to choose.- Use the up and down arrow buttons to highlight the brand of your VCR that is connected to the TV and press OK.
If your brand isn't listed, highlight Not Listed and press OK.
- Keep the VCR on. When you complete these steps, press OK to begin testing.
Important Note: When code testing is in progress, don't touch your TV, VCR, or any of the remote controls for these products.
- Look at the front of your VCR. If your VCR stopped playing the tape, the test was successful. Highlight Yes and press OK.
If your VCR didn't stop playing a tape, you can either choose No or Test this code again.
If you think your TV or remote might have been touched during the test, make sure the VCR is on and playing a tape. Highlight Test this code again.
If you don't think the test was interrupted, highlight No. Make sure the VCR is playing a tape and is on. Press OK (the GUIDE Plus+ system starts testing another set of codes.)
Keep following the previous instructions until the TV finds the correct code for the VCR.
Note: If the GUIDE Plus+ system can't locate the correct code for the VCR, a list of troubleshooting instructions appears to help you before you try again.
• T ry VCR configuration again: repeat VCR setup.
- T est alternate codes: tests selected brands and if this fails, the test continues with all codes in the system.
- Skip this step: the GUIDE Plus+ system won't be able to automatically schedule programs to record on your VCR.
Step 4: Confirming Your Settings
- Check to make sure all settings are complete and correct. If all settings are complete, highlight Yes, end setup and press OK. If your cable box and/or VCR code testing failed, you should see INCOMPLETE where the cable box and VCR codes are listed. Once setup is complete, additional screens appear.
Disregard the screen that tells you to refer to the Quick Setup sheet because all of the necessary information is in this User's Guide.
If any settings are incomplete or incorrect, highlight No, repeat setup process and press OK. Follow the instructions on the screen.
What to Expect
The next time you turn on your TV after setting up the GUIDE Plus+ system, the guide will appear on the screen. The following examples explain what you might see:
- If all of the program information has been sent to your TV, the GUIDE Plus+ system appears with all of your TV program listings.
- If the program information hasn't been sent to your TV yet, an outline of the GUIDE (without TV program listings) will appear on the screen. Program information is usually sent to your TV at night.
- If more than one cable company services your area, you may be prompted with a Channel Mapping screen after the first GUIDE Plus+ system download. You will need to identify your cable company by selecting the correct channel numbers for the stations in question.
Features of the GUIDE Plus+ system are explained in Chapter 3.
To clear the guide from your screen, press CLEAR or GUIDE on the remote control.
Changing Channels
Depending upon the type of signals you have connected to your HDTV, you might notice that the channels change slower than you're used to. This is perfectly normal. Your HDTV is able to interpret and display both analog (NTSC) and digital (ATSC) signals and the digital subchannels (when available). Also, you may notice that the size of the Channel Banner changes as you scan through analog and digital channels.
Turning the TV On and Off
Your HDTV is equipped with a lamp system that is part of the technology that enables us to design such a thin, light-weight TV with a crisp, bright picture. To prolong the life of the lamp, the TV must properly warm up and cool down. Therefore, the TV doesn't turn off completely right away—it fades from blue to black. In case you accidentally turn off the TV, you can still turn it on while the screen is blue. Once the screen goes black, the lamp's cool-down cycle begins (you may hear a slight humming noise as the lamp cools down). If you try to turn on the TV during the cool-down cycle, the power light on the front of the TV will blink to alert you that you need to wait (when the cool-down cycle is complete—about 30 seconds—the TV turns back on automatically).
Next Steps
Now that you've finished the Assisted Setup, you're ready to watch TV. This might be a good time to program your remote control. The remote control that came with this TV can be programmed to operate other components. Go to the next chapter to find out how to program your remote.
• Chapter 2: Using the Remote Control
• Chapter 3: Using the TV's Features
• Chapter 4: Using the TV's Menu System
• Chapter 5: Reference
Using the Remote Control
Overview:
- The Buttons on the Remote Control
- Programming the Remote to Operate Other Components
- How To Use the Remote After You've Programmed It
• The Learning Feature
• V olume Punchthrough Feature - Remote Code List
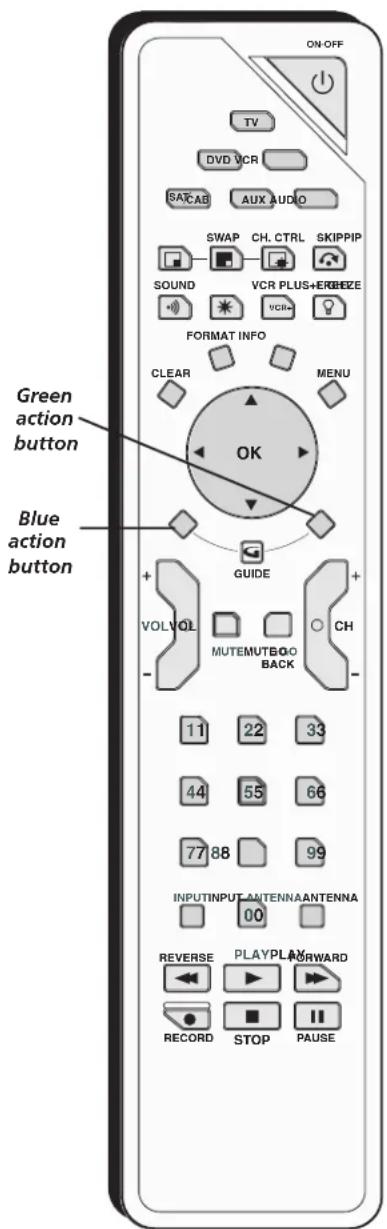
text_image
ON-OFF TV DVD VCR SACAB AUX AUDIO SWAP CH. CTRL SKIPPIP SOUND VCR PLUS+EREBZE FORMAT INFO CLEAR MENU OK GREEN ACTION button BLUE ACTION button GUIDE VOLVOL CH MUTEMUTBQO BACK 11 22 33 44 55 66 77 88 99 INPUTINPUT ANTENNA ANTENNA 00 REVERSE PLAYPLA FORWARD RECORD STOP PAUSETips
The VCR, DVD, AUDIO and SAT/CAB buttons also turn on most RCA, GE, and Proscan products.
Some remote buttons are used with the Web Browser and have different functions; see page 59 for details.
The Buttons on the Remote Control
Blue Action Button In the GUIDE Plus+ system, activates features (located in the Action bar on TV screen).
Green Action Button In the GUIDE Plus+ system, activates features (located in the Action bar on TV screen).
LIGHT (☑) Press to illuminate some of the remote control's buttons. To conserve battery power, the light turns off after several seconds. Backlight won't activate if batteries are low, but blinks on and off quickly.
(0-9) Number Buttons Enter channel numbers and time settings. Also used in the GUIDE Plus+ system and in the TV menu to make selections.
ANTENNA Switches between Antenna A and Antenna B. In the VCR mode, functions as a TV/VCR button. In SAT mode, functions as a TV/SAT button.
Arrows (up, down, left, right) Used to move through the on-screen menus. Also moves the PIP window, see page 56 for more information.
AUDIO Places the remote in audio mode to operate a component (such as a audio receiver, or amplifier receiver) that you've programmed to work with this button.
AUX Places the remote in auxiliary mode to operate a component (such as a cable box, satellite receiver, VCR, DVD, or audio receiver) that you've programmed to work with this button. AUX by default is set up for a second RCA VCR.
CH + or CH - Scrolls up or down through the channel or input list. Press once to change the channel up or down; press and hold to continue changing channels. In the GUIDE Plus+ system and some menus, scrolls a page at a time.
CH CTRL (Channel control) Toggles the channel control between the main TV picture and the PIP window. Use channel up, channel down, INPUT, component buttons, or number buttons to change channels in PIP. You can tell which picture changes by looking at the channel banner. CH CTRL is marked by a triangle (▷) in the banner.
CLEAR Removes on-screen menus and displays. Cancels the commercial skip timer. Quits the browser.
DVD Places the remote in DVD mode. If Auto Tuning is enabled, pressing the DVD button turns on the TV and tunes to the correct Video Input Channel.
FORMAT Toggles through the 4:3 video screen formats (Normal, Zoom, and Stretch) for some 4:3 signals—not applicable to 16:9 signals. In browser mode, toggles through three different view sizes: full-size video, video window on the left, and video window on the right.
FREEZE Freezes entire screen, including the main picture and PIP window, if PIP is displayed. Does not support all inputs. Freezes RECORD OUTPUT but not 1394 output.
GO BACK Returns you to the previous channel or previous screen in the menu system. Also, toggles between antenna and input sources.
Tips
The component button corresponding to the mode you're in flashes when the remote batteries are low and you press a button on the remote. A warning banner may also appear on the screen when you press a remote button and your batteries are low.
To turn off most RCA, GE, and Proscan components that are connected to the TV, press ON•OFF twice within two seconds and hold remote steady until indicator turns off.
This feature only works with most RCA, GE, and Proscan products.
GUIDE Brings up the Listings screen for the GUIDE Plus+ system.
INFO Brings up the Channel Banner with channel and viewing information. Press again to remove the banner. In the GUIDE Plus+ system, brings up more program information.
INPUT Toggles through the TV's available input sources (Front Input, INPUT 1, INPUT 2, INPUT 3, INPUT 4, INPUT 5, DTVLink (if available), last-active antenna).
MENU Makes Main Menu appear and disappear.
MUTE Reduces the TV's volume to its minimum level. Press again to restore volume.
OK When a menu item is highlighted, press OK to select the item.
ON•OFF Turns the TV on or off. Your HDTV is equipped with a special lamp system. In order to preserve the life of the lamp, the TV must warm up and cool down properly when you turn the TV on and off. When you turn the TV off, the screen turns blue and fades to black. While the screen is blue, you can still turn the TV back on. If the screen is black and the light on the front of the TV blinks when you try to turn it on, the TV's lamp is in its cool-down cycle—wait about 30 seconds and then the TV will turn back on automatically.
In other modes (VCR, DVD, SAT/CAB, AUX, AUDIO), if programmed, turns the component on and off.
PIP Makes the PIP window appear and disappear (See Chapter 3 for more information about using PIP.) Locks/unlocks video window in GUIDE Plus+ system.
REVERSE, PLAY, FORWARD, RECORD, STOP, PAUSE If programmed, provides transport control for some remote-controllable VCRs and DVD players. In TV mode, can control 1394 component when tuned to the 1394 input.
SAT/CAB Places the remote in SAT/CAB mode. If Auto Tuning is enabled, turns on the TV and tunes it to the correct Video Input Channel.
SKIP Press once before changing channels and the TV returns to the original channel after 30 seconds. Press repeatedly to add more time. Cannot be used with the browser. Use CLEAR to cancel.
SOUND On digital channels/inputs, toggles the audio language (if available for that channel). For analog channels, toggles SAP on or off. Does not affect default menu settings for SAP or Audio Language.
SWAP When using PIP, switches the main picture with the PIP window.
TV Places the remote in TV mode. Turns on the TV and tunes to the last-viewed TV channel or input.
VCR Places the remote in VCR mode. If Auto Tuning is enabled, turns on the TV and tunes to the VCR Video Input Channel.
VCR PLUS+ Only used with RECORD OUTPUT jacks. Press VCR PLUS+ to set a one touch recording when a VCR is connected to the RECORD OUTPUT jacks—not a 1394 recording.
VOL - or VOL + Decreases or increases the TV's volume. The TV Audio Output menu must be set to Variable Speakers On.
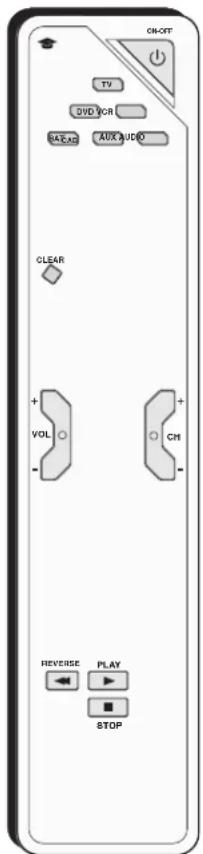
text_image
ON-OLT TV DVD VCR RAREX AUX VIDEO CLEAR + VOL - + CM - + REVERSE PLAY STOPYou'll use these buttons when you program the remote for other components.
Important Note: The remote may not be compatible with all models of all brands of components. It also may not operate all functions of your component.
Tip
By default, the AUX button is programmed for a second RCA VCR. If auto tuning is set up, it will tune to VCR2 input channel.
Programming the Remote to Operate Other Components
The universal remote can be programmed to operate many brands of remote-controllable VCRs, audio components, DVD players, cable boxes, satellite receivers and other components. In addition to being programmed to operate your television, it's already programmed to operate most RCA, GE, and Proscan components.
The AUX button can be programmed to operate most brands of an additional remote-controllable component: satellite receiver, cable box, DVD, VCR, and audio.
Note: The TV button can't be programmed on this remote to control any component; it controls only this TV.
Find Out If You Need to Program the Remote
To determine whether the universal remote needs to be programmed to operate one of the components connected to your TV, such as a VCR, do the following:
- Turn on the component (in this example, a VCR).
- Point the remote at the component.
- Press the corresponding component button (in this example, VCR).
- Press ON•OFF to see if the VCR responds. If the VCR doesn't respond, you need to program the remote to operate it.
Programming the Remote
There are two ways to program the remote control to operate other components: Direct Entry and Automatic Code Search.
Using Direct Entry
- Turn on the component you want to operate (VCR, DVD player, etc.)
- Look up the brand and code number(s) for the component on the code list in this section.
- Press and hold the component button you want to program on the remote.
- Enter the 4-digit code from the remote control code list on the following pages. If the indicator flashes, you have either entered an invalid code or the button isn't programmable.
- Release the component button, point remote at component, and then press ON•OFF to see if the component responds to the command. If it doesn't, try pressing the component button and then ON•OFF again.
- If you get no response, repeat these steps using the next code listed for your brand, until the component responds to the remote commands.
- If you try all the codes for your component brand and none work, try the automatic code search method. If automatic code search doesn't find the code, the remote is not compatible with your component.
Using Automatic Code Search
Note: The AUX button can only search VCR codes, but can be used for a non-VCR device by programming it with direct entry method.
If Direct Entry does not work for your component, try Auto Code Search. The following instructions can be used to program the remote to operate each of your components. If you want to stop the automatic code search without programming any of your components, press and hold CLEAR until the indicator on the remote turns off.
- Turn on the component you want to operate (VCR, DVD player, etc.)
- Press and hold the component button you want to program (VCR, DVD, etc.). While holding the component button, press and hold ON•OFF until the component button on the remote turns on, then release both buttons.
- Point the remote at the component.
- Press and release PLAY, then wait 5 seconds or until the component button stops flashing.
At this point the remote is searching for the correct code to program. If, after 5 seconds, the component you want to operate does not turn off, press PLAY again to tell the remote to search the next set of codes.
Continue pressing and releasing PLAY until the component turns off or you have searched through all of the codes. The component buttons flash when all codes have been searched, the component button turns off, and remote exits Automatic Code Search.
If the component you want to control does turn off:
-
Press and release REVERSE, then wait 2 seconds. Repeat this step until the component turns back ON.
-
To finish, press and hold STOP until the component button on the remote turns off.
Tip
To stop the automatic code search without programming any components, press and hold CLEAR until the indicator on the remote turns off.
How to Use the Remote After You've Programmed It
Because this universal remote can control several different components (TV, DVD, VCR, satellite receiver, etc.), it uses operational modes triggered by the component buttons.
- Press the appropriate component button (DVD, TV, VCR, SAT/CAB, AUDIO, AUX) to set the remote to control the component.
- Press ON•OFF to turn the component ON or OFF.
- Use the remote buttons that apply to that component.
Notes: The remote control may not be compatible with all brands and models of components.
If you keep pressing buttons and nothing happens, the remote is probably in the wrong mode. You must press the component button that matches the component you want to operate (i.e., if you want to operate the VCR, press VCR on the remote control to put the remote in VCR mode.)
Tip
Some of the remote's buttons might operate differently for other components, especially when you're using another component's menu system.
The Learning Feature
Before using the learning feature, make sure this TV's remote control is programmed to control other components you have connected to the TV. Programming the remote control erases all learned commands for that component mode.
After you program the TV's remote control to operate the other component, the TV's remote provides most of the operations you need. However, there may be some functions on the component's original remote control that your TV's remote control doesn't have. For example, your DVD remote control might have a ZOOM button that enables you to enlarge the picture, but your TV remote doesn't have that button. The learning feature enables you to record the functionality of a specific button from the original remote control to one of the TV's remote control buttons.
Note: All learned functions for a mode can be erased if you program a different component to that mode.

text_image
Up to 2 inches apartAdding a Learned Function
There are several things to consider before you begin the learning process:
- You can't record a learned function to the following buttons on the TV's remote control: component buttons (TV, VCR, DVD, SAT/CAB, AUX, and AUDIO), the CLEAR button, and the LIGHT button.
- Before adding a Learned Function, you must program this TV's remote control to operate that component because programming the remote control erases all learned commands for that component mode.
- Do the learning process in low light areas because too much natural light or fluorescent light might cause the learning feature to fail because the remote control functions are recorded (learned) by sending infrared (IR) signals.
- The TV's remote and the original remote should be no more than 2 inches apart.
- In order to record (learn) a function from one remote to the other, you must make sure the Infrared (IR) transmitter of the original remote is facing the IR receiver on the top of the TV's remote (see illustration). To accomplish this, you may have to hold a remote in each hand instead of laying both on the table.
-
The learned buttons are mode specific—if you add a button function from your DVD player's remote control, you must press the DVD button first before the learned function will work (in TV mode, the button where you've stored the learned function will continue to work as it always has).
-
Press and hold the component button on the TV's remote that applies to the function you will be adding (DVD, VCR, SAT/CAB, AUDIO, or AUX). The component button lights.
- On the TV remote, press and hold the RECORD button.
- Keep pressing both of the buttons (the component button and the RECORD button) until the component button light turns off, flashes, and turns off. Release both buttons.
- On the TV's remote control, press and release the button where you want to store the new function (the component button turns off and then back on).
Note: If you press an invalid button on the TV remote, one of the component button flashes 4 times to alert you. You'll have to repeat step 4.
- With the remote controls facing each other and no more than 2 inches apart, press and hold the button of the component's remote control that has the functionality you are recording to the TV's remote control. Keep pressing the button until the TV remote's component button light turns off and back on (the function has been saved to the TV remote). If all component buttons flash 4 times, the function wasn't learned. Try again, starting with Step 4.
- The TV remote control remains in "learning mode" so you can continue adding functions to different buttons by repeating steps 4 and 5. Or, press CLEAR to exit learning mode.
Notes: If you want a new function on a button, you must record (learn) over it.
The amount of memory each learned function uses in the TV's remote control varies. If your TV remote is out of memory, the component button(s) light flashes 4 times and turn off, exiting you from the Learning mode.
Clearing a Learned Function
To delete a learned button function, use the procedure below.
- Press and hold the component button (the component button lights). Then press and hold the CLEAR button for 3 seconds. Continue depressing both buttons (the component mode button flashes—turns on and off again).
- Release the component and CLEAR buttons (the component button being programmed turns on). Remote is now in Clear learned function mode.
- Press and release the button where learning is to be cleared. The component button blinks off then back on—the learned function was cleared successfully.
- Repeat steps 1 through 3 until all buttons' learned functions have been cleared.
Note: If an invalid button is pressed, the component mode button(s) flashes 4 times and the selected component button stays on and remote remains in Clear Learned Function mode. Repeat step 3.
- Press the CLEAR button and your TV remote returns to its original operation mode.
Deleting ALL Learned Functions
This procedure erases all learned functions in every component mode of the remote.
- Press and hold the CLEAR button (the current component button lights). Then press and hold the ON•OFF button (component button light turns off for 3 seconds, flashes, turns on and off) while continuing to hold CLEAR.
- Release both buttons (current component button turns on).
- Press any component button to delete all learned functions in all modes. Remote is automatically exited from this mode.
Note: Pressing the CLEAR button will NOT delete all learned functions, but will exit the Delete mode.
Volume Punchthrough Feature
You may find this feature helpful if you've connected your components to an audio/video receiver (A/V receiver) or amplifier, but you want to use the TV's remote control to operate the volume for a component that is connected to the audio/video receiver. An example follows:
Let's say you've connected your DVD player to your audio/video receiver. You've also programmed your TV remote control to operate your DVD player. Since the DVD player gets its volume through the audio/video receiver, you would have to bounce back and forth between two remote controls: the A/V receiver's remote to adjust the volume and the TV's remote control to operate the DVD player.
The Volume Punchthrough feature eliminates the need for you to use two remote controls and saves a button press when you're using the TV remote to adjust the volume. In effect, you are telling the TV remote to retrieve and send volume commands from the a/v receiver whenever the TV remote is in DVD mode.
Therefore, after you've successfully set up the Volume Punchthrough feature, whenever the TV remote is in DVD mode (press the DVD button) and you want to adjust the volume, you only have to press the VOL + or VOL- buttons. Follow the instructions below to set up Volume Punchthrough.
- IMPORTANT: First, you must program the AUDIO button on the TV's remote control to operate your audio receiver or amplifier. Go to page 34 for instructions. If you can't program this remote to operate your audio receiver, Volume Punchthrough won't work.
- While setting up Volume Punchthrough, it's best to point the remote away from components.
- Decide which mode the remote will be in when the volume from the audio receiver "punches through." The mode will be one of the component buttons (TV, DVD, SAT/CAB, VCR, or AUX).
- Press and hold the VOL- button. Keep pressing VOL- while you press and release the component button you chose in step 3 (TV, DVD, SAT/CAB, or AUX).
- Press and release the AUDIO button since the sound will be coming from the audio/video receiver. Release the VOL-button.
- Now, test it by turning on your audio receiver or amplifier.
- Turn on the component that is connected to the audio/video receiver or amplifier (a DVD player, for example).
- Put the TV's remote in DVD mode by pressing the DVD button, and play a disc.
- Press VOL+ or VOL-. The volume from the audio receiver should increase or decrease accordingly.
Deleting ALL Volume Punchthrough Commands
To delete all programmed Volume Punchthrough settings and return the remote control back to the factory defaults, press and hold the VOL- button (the component button of the Volume Punchthrough lights). While holding the VOL- button, enter the code, 000, using the number buttons. All component buttons turn on for 2 seconds and then turn off. The remote returns to the factory settings.
Note: If an invalid button is pressed, all component buttons blink 4 times and turn off. At this point, you must start over.
Input source
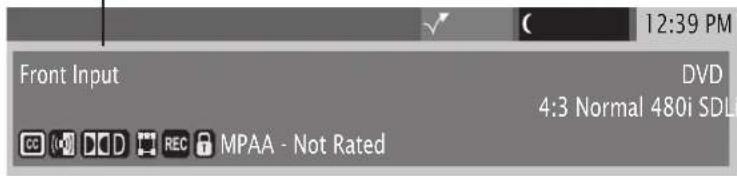
text_image
Front Input DVD 4:3 Normal 480i SDL MPAA - Not RatedNote: Watch the Channel Banner to see the input sources change each time you press the INPUT button.
Using the INPUT Button
-
Repeatedly press the INPUT button to scroll through the available input sources until you find the input associated with the component (such as VCR or DVD player) you want to view.
-
Once you find the input source you want, stop pressing INPUT.
- If you tune to INPUT 1 and your VCR is connected to that input, you will be able to view your VCR. To play, stop, or rewind the VCR tape using the remote that came with your TV, you must first press the VCR, or AUX button (if AUX is programmed to VCR) to put the remote control in VCR mode.
There are other ways of selecting a Video Input Channel:
- Program the component (VCR, DVD, etc.) buttons on the remote control to automatically tune to the correct Video Input Channel when pressed. For more details on Auto Tuning, see Chapter 3.
- When viewing an input, press ANTENNA, GO BACK, or INPUT to go back to viewing channels or use the number buttons to enter the channel number.
Remote Code List
Audio Codes
Programmable for the AUDIO and AUX buttons.
AUX/Dimensia/Lyra Wireless
| RCA | 1001 |
Audio Cassette
| GE | 1006 |
| RCA | 1006 |
CD Players
| ADC | 4055, 4056, 4066 |
| Aiwa | 4049, 4057 |
| Akai | 4058 |
| Denon | 4060 |
| Emerson | 1040 |
| Fisher | 4041, 4063, 4064 |
| GE | 4007, 4065 |
| Hitachi | 4042 |
| JVC | 1043 |
| Kenwood | 4044, 4067, 4068 |
| Luxman | 4069 |
| Marantz | 1046 |
| MCS | 1070 |
| Mitsubishi | 4071, 4072 |
| NEC | 4045 |
| Onkyo | 4047 |
| Panasonic | 4188 |
| Pioneer | 4049 |
| RCA | 4007, 1050, 1062 |
| Sears | 4059 |
| Sony | 4051, 1061 |
| Technics | 4052 |
| Toshiba | 4073 |
| Yamaha | 4053, 1054 |
Phono
| GE | 4005 |
| RCA | 4005 |
Receiver/Tuner/AMP
| Aiwa | 4008, 4009, 4010, 4011, 4012, 4021 |
| Denon | 4027 |
| GE | 4003 |
| Haman Kardon | 4020 |
| JBI | 4020 |
| JVC | 4013 |
| Kenwood | 4014 |
| Onkyo | 4022 |
| Optimus | 4028 |
| Panasonic | 4023, 4024 |
| RCA | 4003, 4015, 4029, 4030 |
| Sherwood | 4026 |
| Sony | 4016, 4017, 4025 |
| Technics | 4023, 4024 |
| Yamaha | 4018, 4019 |
Cable Box Codes
Programmable for SAT/CAB and AUX buttons.
| ABC | 5002, 5003, 5004, 5006, 5015 |
| Archer | 5008, 5009 |
| Cableview | 5007 |
| Contec | 5015 |
| Eastern | 5016 |
| GE | 5002, 5003 |
| Gemini | 5017, 5018 |
| General Instruments | 5003 |
| Hamlin | 5019, 5020, 5021, 5026, 5033 |
| Hitachi | 5003 |
| Jerrold | 5003, 5017, 5022, 5023, 5039, 5045 |
| Magnavox | 5024 |
| Memorex | 5026 |
| Movie Time | 5025 |
| NEC | 5005 |
| NSC | 5025 |
| Oak | 5015, 5027 |
| Panasonic | 5041, 5044 |
| Philips | 5011, 5012, 5013, 5014, 5018, 5024, 5028, 5029, 5030 |
| Pioneer | 5031, 5032 |
| Proscan | 5002, 5003 |
| RCA | 5007, 5040, 5042, 5044 |
| Realistic | 5009 |
| Samsung | 5032 |
| Scientific Atlanta | 5006, 5031, 5035, 5036 |
| Signature | 5003 |
Cable Box codes (cont'd)
| Sprimer | 5044 |
| Standard Component | 5037, 5038 |
| Starcom | 5017, 5045 |
| Stargate | 5017 |
| Tocom | 5004, 5022 |
| United Cable | 5015 |
| Universal | 5008, 5009, 5010 |
| View Star | 5015, 5024, 5025 |
| Zenith | 5043 |
DVD codes
Programmable for DVD and AUX buttons.
| DVD | ||
| Aiwa | 3010, 3021 | |
| Apex | 3023, 3024 | |
| Broksonic | 3027, 3075 | |
| Dacwoo | 3028 | |
| Denon | 3029, 3030, 3031 | |
| Emerson | 3052, 3053, 3076 | |
| Funai | 3033 | |
| GE | 3000, 3034, 3035 | |
| Go Video | 3077 | |
| Hitachi | 3009, 3067, 3068, 3069, 3070 | |
| JVC | 3003, 3011, 3078 | |
| Kenwood | 3071 | |
| Konka | 3012, 3013 | |
| Koss | 3085 | |
| Lasonic | 3087 | |
| Magnavox | 3001, 3036 | |
| Memorex | 3037 | |
| Mintek | 3038 | |
| Mitsubishi | 3005 | |
| NAD | 3032 | |
| Norcent | 3039, 3040 | |
| Onkyo | 3041 | |
| Oritron | 3047 | |
| Panasonic | 3014, 3042 | |
| Philips | 3001, 3020 | |
| Pioneer | 3006, 3013, 3041, 3045 | |
| Proscan | 3000, 3046 | |
| Qwestar | 3047 | |
| RCA | 3000, 3002, 3048, 3079, 3086 | |
| Samsung | 3072, 3073, 3074, 3080, 3081, | |
| Sansui | 3049 | |
| Sanyo | 3015, 3082 | |
| Sharp | 3050, 3052, 3053 | |
| Sony | 3007, 3016, 3017, 3054, 3055, 3056, 3083 | |
| Sylvania | 3033 | |
| Teac | 3057 | |
| Technics | 3058 | |
| Toshiba | 3008, 3018, 3059, 3060, 3061 | |
| Yamaha | 3062, 3063, 3064 | |
| Zenith | 3019, 3065, 3084 | |
| Portable DVD | |
| Aiwa | 3022 |
| Audiovox | 3025, 3026 |
| Panasonic | 3030 |
| RCA | 3066 |
| Sharp | 3051 |
DVD/VCR Combo Codes
| DVD and AUX buttons can use DVD codes;VCR and AUX buttons can use VCR codes | ||
| DVD | VCR | |
| Broksonic | 3075 | 2075 |
| Emerson | 3076 | 2076 |
| Go Video | 3077 | 2077 |
| JVC | 3078 | 2078 |
| RCA | 3079 | 2079 |
| Samsung | 3080, 3081 | 2080, 2081 |
| Sanyo | 3082 | 2082 |
| Sony | 3083 | 2083 |
| Zenith | 3084 | 2084 |
PVR Codes
| Programmable for the VCR and AUX buttons. | |
| PVR | |
| Replay | 2086 |
| Phillips Tivo | 2085 |
Home Theatre in a Box (DVD Receiver) Codes
AUDIO and AUX buttons can use Audio codes; DVD and AUX buttons can use DVD codes
| Audio | DVD | |
| JBL | 4051 | 3088 |
| JVC | 4052 | 3089 |
| Koss | 4033 | 3090 |
| Onkyo | 4034 | 3091 |
| Panasonic | 4035 | 3092 |
| Pioneer | 4036 | 3093 |
| RCA | 4037 | 3094 |
| Venturer | 4038 | 3095 |
Satellite Receiver Codes
| Programmable for SAT/CAB and AUX buttons. | |
| Alphastar | 5061 |
| Chapparal | 5046, 5047 |
| Dishnet | 5063 |
| Drake | 5018, 5019 |
| Echostar | 5070 |
| GE | 5000, 5001, 5072 |
| General Instruments | 5050, 5051, 5052 |
| Hitachi | 5066, 5067 |
| Hughes | 5062, 5071 |
| JVC | 5065 |
| Panasonic | 5060 |
| Philips | 5068 |
| Primestar | 5061 |
| Proscan | 5000, 5001, 5072 |
| RCA | 5000, 5001, 5072 |
| Realistic | 5053 |
| Sony | 5058 |
| STS1 | 5054 |
| STS3 | 5055 |
| STS4 | 5056 |
| Toshiba | 5057, 5059 |
| Uniden | 5069 |
VCR Codes
| Programmable for VCR and AUX buttons. | |
| Admiral | 2068 |
| Aiko | 2023 |
| Aiwa | 2022 |
| Akai | 2002, 2003, 2004, 2057, 2058, 2059 |
| Audiovox | 2010 |
| Bell & Howell | 2007 |
| Broksonic | 2008, 2021, 2075 |
| Calix | 2010 |
| Canon | 2017, 2018 |
| Capehart | 2016, 2056 |
| Carver | 2037 |
| CCE | 2023, 2036 |
| Citizen | 2009, 2010, 2011, 2012, 2013, 2014, 2015, 2023 |
| Colortyme | 2005 |
| Craig | 2009, 2010, 2019, 2036 |
| Curtis-Mathes | 2005, 2009, 2012, 2014, 2017, 2018, 2020, 2060, 2072 |
| Daewoo | 2011, 2013, 2015, 2021, 2022, 2023, 2056 |
| Daytron | 2056 |
| Dimensia | 2072 |
| Electrohome | 2010, 2024 |
| Emerson | 2002, 2008, 2010, 2011, 2017, 2020, 2021, 2022, 2024, 2025, 2026, 2027, 2028, 2039, 2059, 2061, 2067, 2069, 2076 |
| Fisher | 2007, 2019, 2029, 2030 |
| Fuji | 2003, 2017, 2062 |
| Funai | 2022 | |
| Garrard | 2022 | |
| GE | 2000, 2001, 2009, 2017, 2018, 2060, 2063, 2072 | 2022 |
| Gradiente | 2022 | |
| Harman Kardon | 2005 | |
| Harwood | 2036 | |
| Hitachi | 2033, 2034, 2035, 2053, 2057, 2063 | 2036 |
| JC Penney | 2005, 2006, 2007, 2008, 2009, 2010, 2017, 2018, 2030, 2033, 2031, 2036, 2037, 2053 | 2036 |
| Jensen | 2036 | |
| JVC | 2005, 2006, 2007, 2014, 2057, 2064, 2078 | 2036 |
| Kenwood | 2005, 2006, 2007, 2012, 2014, 2057, 2064 | 2036 |
| KLH | 2010, 2017 | |
| Kodak | 2010 | |
| LG | 2010 | |
| Logik | 2036 | |
| LXI | 2010 | |
| Magnavox | 2017, 2018, 2037, 2038, 2052, 2054, 2065 | 2036 |
| Marantz | 2005, 2006, 2007, 2012, 2014, 2017, 2037 | 2036 |
| Matsushita | 2017 | |
| Memorex | 2007, 2009, 2010, 2017, 2019, 2022, 2052, 2068 | 2036 |
| MGA | 2036 | |
| Minolta | 2036 | |
| Mitsubishi | 2036 | |
| Montgomery Ward | 2036 | |
| Motorola | 2017, 2068 | |
| MTC | 2009 | |
| Multitech | 2009 | |
| NEC | 2005, 2006, 2007, 2012, 2014, 2057, 2061 | 2036 |
| Nikko | 2010 | |
| Noblex | 2009 | |
| Olympus | 2017 | |
| Optimus | 2010, 2068 | |
| Optonica | 2047 | |
| Panasonic | 2017, 2018, 2055, 2066 | |
| Pentax | 2012, 2033, 2034, 2053, 2063 | 2036 |
| Pentex Research | 2014 | |
| Philco | 2017, 2018, 2037, 2038 | |
| Philips | 2017, 2037, 2047, 2065 | |
| Pioneer | 2006, 2033, 2042, 2061 | |
| Portland | 2012, 2013, 2015, 2056 | |
| Proscan | 2000, 2001, 2072 | |
| Quasar | 2017, 2018, 2066 | |
| RCA | 2000, 2001, 2002, 2009, 2017, 2033, 2034, 2043, 2044, 2045, 2053, 2060, 2063, 2066, 2070, 2072, 2073, 2079 | 2036 |
| Radio Shack | 2010, 2047, 2068 | |
| Radioshack/Realistic | 2007, 2009, 2010, 2017, 2018, 2019, 2022, 2024, 2029, 2047 | |
| Realistic | 2007, 2009, 2010, 2011, 2017, 2018, 2019, 2022, 2024, 2029, 2047, 2068 | |
| Radix | 2010 | |
| Ricoh | 2071 | |
| Runco | 2052 | |
| Samsung | 2004, 2009, 2011, 2027, 2031, 2058, 2080, 2081 | 2058, 2080, 2081 |
| Sansui | 2006, 2046, 2057, 2064 | |
| Sanyo | 2007, 2009, 2019, 2082 | |
| Scott | 2008, 2011, 2021, 2026, 2028, 2039, 2061 | 2039, 2061 |
| Scars | 2007, 2010, 2017, 2019, 2029, 2030, 2033, 2034, 2053 | |
| Sharp | 2013, 2024, 2047, 2048, 2068 | |
| Shintom | 2003, 2034, 2036, 2049 | |
| Signature | 2068 | |
| Singer | 2017, 2036, 2071 | |
| Sony | 2003, 2049, 2050, 2062, 2083 | |
| SYS | 2017, 2053 | |
| Sylvania | 2017, 2018, 2022, 2037, 2038, 2039, 2065 | 2039, 2065 |
| Symphonic | 2022 | |
| Tandy | 2007 | |
| Tashiko | 2010 | |
| Tatung | 2057 | |
| TEAC | 2022, 2057 | |
| Technics | 2017, 2055 | |
| Teknika | 2010, 2017, 2022, 2051 | |
| Toshiba | 2011, 2029, 2030, 2033, 2039, 2059 | |
| Totevson | 2009, 2010 | |
| Unitech | 2009 | |
| Vector Research | 2005, 2006, 2011, 2012 | |
| Video Concepts | 2005, 2006, 2011, 2012, 2059 | |
| Wards | 2009, 2010, 2011, 2017, 2019, 2022, 2024, 2033, 2034, 2036, 2047, 2053, 2061, 2068, 2070 | |
| XR-1000 | 2017, 2022, 2036 | |
| Yamaha | 2005, 2006, 2007, 2011, 2057 | |
| Zenith | 2003, 2049, 2052, 2062, 2071, 2084 |
Using the TV's Features
Chapter Overview:
- About the Channel Banner
• Digital or Analog TV Channels - About the GUIDE Plus+ System
- Parental Controls
• How V-Chip Works for the USA and Canada - Auto Tuning Feature
- PIP (Picture-In-Picture) Operation
• Using the Web Browser
• 1394 Recording

text_image
Ch 888-888 WWWW CC ( ) DCD REC MPAA - Not Rated Antenna A (Air) 16:9 Normal 1080i HDLi 00h:00m:00s 12:39 PMAbout the Channel Banner
The Channel Banner appears when you press the TV or INFO button on the remote. If an icon in the channel banner is grayed out (dim), the feature is not available. The following list describes the items on the Channel Banner screen (left to right and top to bottom). Other displays that are not described here are self-explanatory.
Note: You may notice the size of the channel banner changes when you change channels. This is perfectly normal and occurs because analog (NTSC) broadcasts and digital (ATSC) broadcasts use different formats. Your HDTV can display both types and adjusts the picture accordingly.
The icons change appearance to show the item's status or availability.
Program Title/Acquiring Channel Title of program or track (if available) or Acquiring Channel appears when tuning a channel.
00:30 Displays the time remaining before the TV tunes back to the channel where Commercial Skip was activated.
(12:30 AM) The time when the TV shuts off as set by the Sleep Timer in Time menu.
12:39 PM Current time if the Time feature is set in Time menu or GUIDE Plus+ system is set up.
888 - 888 WWW Current channel, subchannel and the station call letters, if available.
Notes: The station call letters may be unfamiliar to you; this is normal.
The channel number display in the GUIDE Plus+ system and the banner may not match because the GUIDE Plus+ system and banner may use different tuning mechanisms.

Antenna/Auto Tuning/DTVLink
Channel logo or label (if available) and if the GUIDE Plus+ Label has been turned ON in the GUIDE Plus+ menu. Tracks for 1394 recordings.
Type of signal (Antenna A/B, Air/Cable) you're viewing, what input jack has a component connected.


Displays when Closed Captioning is available on the current channel and matches the format selected in the Caption Priority menu.
SAP or Audio language icon appears when the current analog channel is broadcasting SAP (Second Audio Program) information or when current digital channel is broadcasting an alternate audio track, respectively.
Listening to:
Displays when SAP is available for analog channel. For a digital channel, displays the currently playing audio language. Changes with SOUND button. Also, shows Audio Processor setting only when set to Variable Output.
Audio Format Icon
Sound mode icons (mono, stereo, Dolby surround, four-channel surround, 4.1-channel surround, five-channel surround), etc.
REC Appears when a program can be recorded; otherwise, it is grayed out.
Parental Controls Icon
Red when the TV is locked, Green when the TV is unlocked, and Yellow when the TV is temporarily unlocked.
MPAA - Not Rated
V-chip program rating (not the TV's rating set up in Parental Control menu).
16:9 1080i HD
Aspect ratio (4:3 or 16:9); original resolution of the broadcast, not the resolution of the TV; HD or SD. For more information about aspect ratio and broadcast resolution, go to page 2.
Digital or Analog TV Channels
A single off-air antenna can pick up both analog and digital channels. Digital channels can be made up of primary channels and subchannels.
Note: Subchannels (sometimes called minor channels) are channels associated with the Primary channel (sometimes called the major channel). A primary channel may have just one subchannel or multiple subchannels.
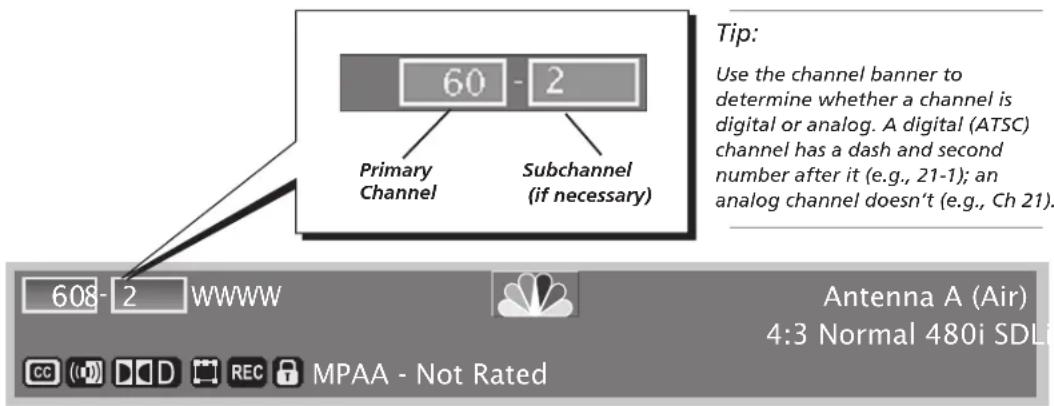
text_image
60 - 2 Primary Channel Subchannel (if necessary) 608-2 WWW Antenna A (Air) 4:3 Normal 480i SDLi CC (D) D D REC MPAA - Not Rated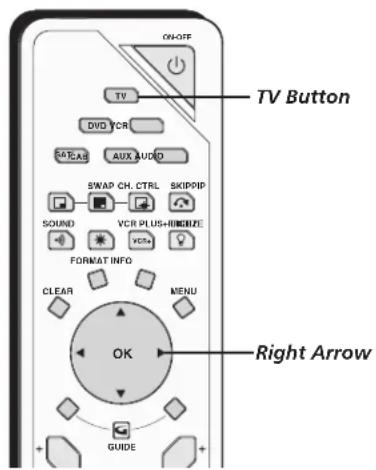
text_image
ON/OFF TV DVD VCR CATRAS AUX AUDIO SWAP CH. CTRL SKIPPIP SOUND VCR PLUS+RHOIZE VCS+ FORMAT INFO CLEAR MENU OK GUIDE Right Arrow TV ButtonTip
If a digital and analog channel have the same primary channel number, tune to the analog channel by entering the analog channel number or entering the analog channel number and then a subchannel of "0."
- Make sure the TV is in TV mode by pressing TV on the remote control.
- Enter the primary channel number (up to three digits). This number appears in the primary channel entry box. Press OK or wait a few seconds. If you don't enter a subchannel, the TV tunes to the lowest subchannel.
- If the primary channel number has fewer than three digits and you want to enter subchannel numbers, press the right arrow button to advance to the subchannel entry box.
- Enter the number of the subchannel. This number appears in the subchannel entry box.
- Press OK to tune to the channel or wait a few seconds.
Notes:
You can always use the channel up and down buttons on the remote control to change channels within the TV mode.
You may notice the size of the channel banner changes when you change channels. This is perfectly normal and occurs because analog (NTSC) broadcasts and digital (ATSC) broadcasts use different formats. Your HDTV can display both types and adjusts the picture accordingly.
If you wait too long before entering the subchannel, the TV tunes to the lowest subchannel.
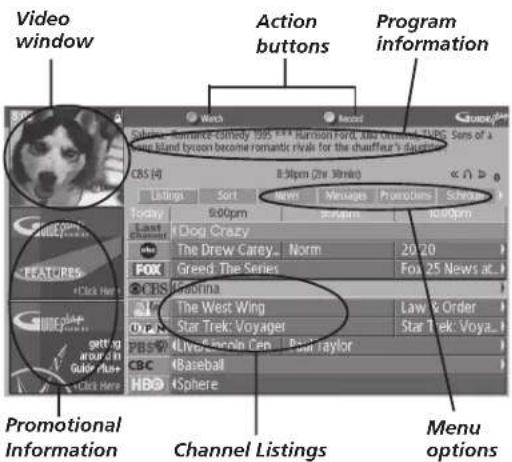
text_image
Video window Action buttons Program information CBS (4) 8:30pm (2hr 30min) << > Listings Sort News Messages Protocians Selines Today 9:00pm 30pm 6:00pm Dog Crazy The Drew Carey. Norm 20/20 FOX Greed The Series Fox 25 News at... CPS Prozina The West Wing Law & Order Star Trek: Voyager Star Trek: Voya... PBS Live: Sercoin Cap Paul raylor BBC Baseball HBO Sphere Promotional Information Channel Listings Menu optionsTips
The GUIDE Plus+ system automatically comes up when you use the TV or ON/OFF button on the remote to turn on the TV. You can turn off this feature by selecting Setup from the GUIDE Plus+ menu options, selecting Options, then setting Auto Display to Off.
Also, since the program information provided by the GUIDE Plus+ system is based on your locale, you will need to run Setup again if you move to a different ZIP or postal code.
About the GUIDE Plus+ System
The GUIDE Plus+ system is a no-fee, on-screen program guide that lists TV schedules for your area and allows your TV direct control of a cable box and/or VCR. You must first set up the GUIDE Plus+ system in order to view this on-screen program guide (see Chapter 1 for details).
There are six sections of the GUIDE Plus+ system:
• A video window
- Blue and Green Action buttons at the top of the screen
• Program information
- Promotional information
- Channel listings
- Menu options (Listings, Sort, News, Messages, Promotions, Schedule, Channels, Setup)
Notes: If you have cable and air signals, connect cable to Antenna A. If you have air signal only, connect it to Antenna A. Antenna A is where the GUIDE Plus+ system gets its Listings.
Whenever the GUIDE Plus+ system is activated in the TV, the last-viewed channel of Antenna A appears in the video window.
The GUIDE Plus+ system screens illustrated in this book are representations of what you are likely to see. Not all channels, programs, and GUIDE Plus+ information depicted will be available in your area. New features and options can be downloaded to the GUIDE Plus+ system, so these are subject to change also. The GUIDE Plus+ system doesn't display program listings for satellite TV.
Using the GUIDE Plus+ System
To enter the GUIDE Plus+ system:
- Press GUIDE on the remote or press MENU on remote and select GUIDE Plus+ menu. Then select GUIDE Plus+, press MENU, then OK twice.
To exit the GUIDE Plus+ system:
- Highlight a program and press OK to exit the GUIDE Plus+ system and tune to the program (channel).
- Press GUIDE to exit the GUIDE Plus+ system and tune to the program (channel) displayed in the video window.
- Press CLEAR to exit the GUIDE Plus+ system and return to the original channel except when the channel is an analog channel on Antenna B. Pressing CLEAR will switch you to Antenna A, same channel.
The GUIDE Plus+ System Menus
The GUIDE. Plus+ system offers different options on the Menu bar: Listings, Sort, News, Schedule, Messages, Promotions, Channels, and Setup. To access the Menu bar:
- Press GUIDE (the GUIDE Plus+ programming guide appears).
- Press MENU or up and down arrow buttons to select the Menu bar (the Grid Guide appears by default).
- Use the left and right arrow buttons to access other menus.
- Press OK, or MENU, or use the down arrow button to see the menu options.

text_image
Sabrina: Romance-cornemy 1995 ***Harrison Ford, Julia Ormond, TVPG: Sets of a Long Island tycoon become romantic rivals for the chauffeur's daughter. 8:30pm (2hr 10min) CIS [4] 8:30pm (2hr 10min) Settings Sort News Messages Promotions Schedule 9:00pm 9:30pm $0.00pm Lobby The Dog Crazy The Drew Carey... Norm 20/20 FOX Greed: The Series Fox 25 News at... CBS Sabrina The West Wing Law & Order O'PM Star Trek: Voyager Star Trek: Voya... PBS (Live/Lincoln Cen... Paul Taylor) CBC Baseball HBO SphereIf you are highlighting a digital channel, the channel label will include a subchannel, such as CBS [4-08].
Listings
The Listings appear each time you enter the GUIDE Plus+ system. They display the current programming for each channel. The current program of Antenna A is displayed in the video window.
- Press the up and down arrow buttons on the remote to browse channel listings and the channel up and down buttons to page through the listings. Use the right and left arrow buttons to browse future program listings.
- Press the Green button to skip ahead 24 hours; press the Blue button to go back 24 hours only when Listings is highlighted.
- To tune to a channel, highlight the program you want to view in the channel listings and press OK.
- Directly access a channel by using the number buttons. To access a digital channel, enter major # (13), right arrow button, then subchannel #.
Use the Guide Action Buttons as described below.

text_image
Listings menu selection Action buttons Sabina: Romance-Conorsy 1358 **** Fashion Nord, Julia Ormend, TVPG. Some of a Long Island tycoon become romantic revas for the chauffeur's daughter. CBS 16 8:30pm (2hr 30min) < / > b Today 9:00pm 9:30pm Promotion Schedule Last I Dog Crazy The Drew Carey... Norm 20/20 FOX Greed: The Series Fox 25 News at... CBS Sabrina The West Wing Law & Order Star Trek: Voyager Star Trek: Voya... PBS Live/Lincoln Gen... Paul Taylor CBC Baseball HBOI SphereNetwork logos (if available) or labels
Tip
You can also record a currently tuned program by pressing VCR Plus+ without entering the GUIDE Plus+ system.
Guide Action Buttons
The Blue and Green action buttons' actions or commands change according to where you are in the GUIDE Plus+ system. Be sure to look at the action bar before pressing the action buttons.
When highlighting a program, the following Action buttons appear:
- Watch Press the Blue button on the remote to place a timer into the Schedule so the TV turns on and tunes to the program highlighted in the channel listing.
- Record Press the Green button on the remote to place a timer into the Schedule so the VCR records the program highlighted in the channel listing. Or, highlight a program and press the VCR PLUS+ button.
If you have a cable box, changing channels on the TV causes the cable box channel to change while recording.
Record appears only if you have set up the GUIDE Plus+ system and specified your VCR type.
Important Notes: Pressing the VCR PLUS+ button begins recording the currently tuned program without entering the guide (similar to express recording). The recording stops when the program ends. The GUIDE Plus+ system must be set up.
You need to make sure that your VCR is tuned to the Line INPUT, and is turned off prior to recording start time. Do not change channels on the TV or VCR when making a recording.
Expanded Information
Press INFO on the remote to see additional program information.
Locking the Video Window
When highlighting the channel names (the left column on the channel listing), the following Action buttons appear:
- Lock/Unlock Press the Blue action button to lock or unlock the video window to either stay at one channel as you browse the GUIDE Plus+ system (lock) or change as you browse through different channels (unlock). The PIP button also locks/unlocks the video window.
Note: When the video window is unlocked, changing channels in the GUIDE might switch the video window to the same channel on the other antenna.

text_image
Sort menu selection Sort options Press the Enter button on your remote to see a list of Action Movies. Listings Sort News Messages Promotions Schedule Movies Sports Children All Action Adventure Animated Biography Comedy Documentary Drama FantasySort
The Sort menu lets you browse programs by different categories, such as Sports, Movies, and Children's programs. You can sort alphabetically by selecting "A-B-C."
- Use the arrow buttons to select the sort option.
- Use the Action buttons to schedule a watch timer or a record timer.
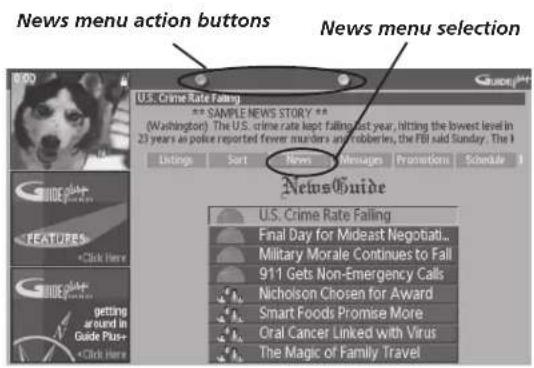
text_image
News menu action buttons News menu selection U.S. Crime Rate Falling ** SAMPLE NEWS STORY ** (Washington) The U.S. crime rate kept falling last year, hitting the lowest level in 23 years as police reported fewer murders and robberies, the FBI said Sunday. The I Listings Sort News Messages Promotions Schedule NewsGuide U.S. Crime Rate Falling Final Day for Mideast Negotiat... Military Morale Continues to Fall 911 Gets Non-Emergency Calls Nicholson Chosen for Award Smart Foods Promise More Oral Cancer Linked With Virus The Magic of Family TravelNews
The News menu lets you browse current news stories by headline.
-
Use the up and down arrow buttons to highlight a story.
-
Use the up and down arrows to browse the list one story at a time.
-
Use the channel up and down buttons to browse through the list one page at a time.
-
Press the right arrow button or the INFO button to see all of the text for the story.
Note: If available, MSNBC is tuned while using the News feature.
Messages
Occasionally you receive messages regarding your GUIDE Plus+ system, as well as special programming information. You can access these messages from the Messages menu on the Menu bar.
Promotions
The Promotions menu displays a list of all the promotions available through the GUIDE. Plus+ system. Highlight the Promotions menu and then use the down arrow to scroll through the list. When the promotion you want to view is highlighted, press INFO (the promotional information appears on-screen). Press the right arrow button to return to the Promotions list.
Schedule
The Schedule menu allows you to alter the programs for either viewing or recording programs.
Schedule Menu Action Buttons
- Remove Highlight the Watch or Record timer you wish to remove from the schedule and press the Blue button on the remote.
- Change Highlight the Watch or Record timer you wish to change and press the Green button on the remote to toggle the frequency between the following choices:
DAILY records the same program each day Monday through Friday.
ONCE records only on that day.
WEEKLY records each week at the same day and time.
REGULARLY records the program each week at the same day and time (only if the title is the same).
Channels
You can customize the channel listing by enabling or disabling the display of certain channels. For instance, you may disable channels that you never watch. Use the action buttons to remove, replace, or change channels. Any changes in the guide Channels only affect the program guide display and not the channel lists in the television's Main Menu.
Setup
The Setup menu allows you to access the GUIDE Plus+ setup information. You can do the following in the Setup menu:
- Change system settings Confirms the settings you completed in the GUIDE Plus+ system setup are correct.
- Change channel display Displays the Channel Editor which lets you choose which channels are highlighted.
- Review options Displays the GUIDE Plus+ auto display options.
On Automatically displays the GUIDE Plus+ system when you press the ON•OFF or TV button on the remote control.
Off Disables the GUIDE Plus+ system from being displayed automatically each time you turn on the TV.
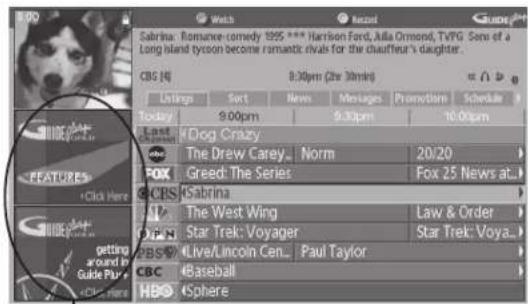
text_image
Sabrina: Romance comedy 1995 **** Harrison Ford, Julia Ormond, TVPG Sen of a Long Island tycoon become romantic rivals for the chauffeur's daughter. CBS [4] 8:30pm (2hr 30mins) < img src="box" Last Last Time *Dog Crazy The Drew Carey... Norm 20/20 FOX Greed: The Series Fox 25 News at... CBS Sabrina The West Wing Law & Order Star Trek: Voyager Star Trek: Voya... PBS Live/Lincoln Cen... Paul Taylor CBC Baseball HBO SpherePromotional Information
Promotions and Advertising
To find out more information about a program, advertisement or special use the left arrow button to highlight the channel listing or promotional information box. Press INFO for more information.
You can view a list of all advertisements and promotions by selecting Promotions from the menu bar.

text_image
0 Go Back 1 Lock TV 2 Video Input List 3 Antenna A List 4 Antenna B List 5 VChip TV Rating 6 VChip Movie Rating 7 VChip Unrated 8 Front Button Block 9 Web Browser Block Main Menu Panel Controls Locking the TV puts into effect all of the rating limits, the Locked List, and blocking features that you have set up in the Panel Control's menu. In order to lock the TV, enter the four-digit password you would like to use. Locking the TV puts into effect the rating limits, the Locked List, and blocking features. Press OK to continue.Tip
You must lock the TV for the parental controls settings to be enforced.
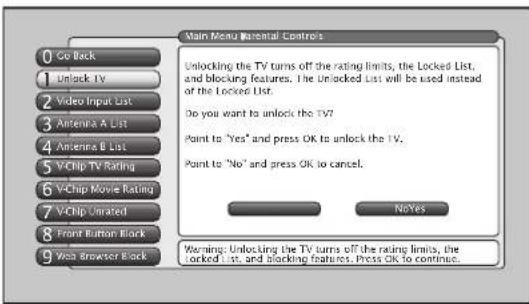
text_image
0 Go Back 1 Unlock TV 2 Video Input List 3 Antenna A List 4 Antenna B List 5 VChip TV Rating 6 VChip Movie Rating 7 VChip Untitled 8 Front Button Block 9 Web Browser Back Main Menu Maternal Controls Unlocking the TV turns off the rating limits, the Locked List, and blocking features. The Unlocked List will be used instead of the Locked List. Do you want to unlock the TV? Point to "Yes" and press OK to unlock the TV. Point to "No" and press OK to cancel. NoYes Warning: Unlocking the TV turns off the rating limits, the Locked List, and blocking features. Press OK to continue.Parental Controls
The Parental Controls menu allows you to program your TV so that children cannot see certain programs, channels, browser, or use the buttons on the front of the TV. The Parental Controls menu also involves software inside your TV (referred to as V-Chip) which lets you program your TV so it won't display certain programs and movies based on violence, sex, or other content you may believe children should not view. Once you block programs, you or other adults can unblock programs by entering a password to unlock video or enter the password to edit the features in the Parental Controls menu. By default, the software inside your TV is turned "off," so if you don't want to use this feature, you can just ignore it.
The options of the Parental Controls menu are Unlock/Lock TV, Video Input List, Antenna A List, Antenna B List, USA V-Chip, Canada V-Chip, V-Chip Unrated, Front Button Block, and Web Browser Block.
Lock/Unlock TV
Selecting this option lets you lock and unlock the parental controls and the TV using a password. It also affects the channel lists. If you select the Unlock option when watching TV, you see the channels that have a check mark in the Unlocked List. If you select Lock when watching TV, you see the channels that are Viewable in the Locked List. If the TV is locked, all channels can still be accessed by using the number buttons on the remote control but may not be viewed if they are blocked (enter password to see program).
Notes: When locking the TV, you'll be asked to enter a password and then to re-enter the password a second time to re-confirm your password choice.
If you do not lock the TV, none of the settings for V-Chip, channel block, front panel block, and web browser block take effect.
If you forget your password, simultaneously press and hold the MENU/OK button on the front panel and VOLUME down button on the remote for three seconds. This resets the password only and unlocks the TV; all other settings in Parental Controls are not changed.
If you've locked the TV, set a record timer in the GUIDE Plus+ system and you aren't there to provide your password, the recording takes place only if the program doesn't exceed the V-Chip ratings, and channel is in the unlocked list.

text_image
Main Menu Parental Controls 0 Go Back 1 Lock TV 2 Video Input List 3 Antenna A List 4 Antenna B List 5 V Chip TV Rating 6 V Chip Movie Rating 7 V Chip Untrated 8 Front Button Block 9 Web Browser® Block All Channels And A (All) 0 0-1 0.2 0-3 0-4 0.5 0-6 to 0-999 1 1-1 Unlocked List 1 2 Locked List 1 Visible Visible Visible Visible Visible Visible Visible Visible Visible Visible Visible Visible Visible Visible Visible Visible Press OK to edit the Antenna A List. Each channel can be added or deleted in the list and made blocked or viewable.Channel Lists (Video Input List, Antenna A List, Antenna B List)
The channel lists contain the following information: major channel number (with subchannel number only if a digital channel), channel call letters (when channel is tuned), Locked List, and Unlocked List. The major channels listed in Antenna A List and Antenna B List for off-air or cable sources are based on the channel search results. If a major channel is not found by Channel Search, then it is not listed. A Channel Search does not affect the Video Input List; all video inputs are listed.
For each major channel 0 through 125 found through channel search in Antenna A and B Lists, there are six subchannels (1, 2, 3, 4, 5, and 6 to 999). The subchannels are the same for every major channel and are not based on which subchannels a broadcaster is actually broadcasting. Subchannels are not supported for major channels 126 through 999. Even if a subchannel is checked in Antenna A/B List, it won't be tuned to when you press CH + if the channel doesn't exist. An analog channel (major) and a digital channel (subchannel) can share the same channel number and are both listed in the Antenna A/B List screens.
Editing Channels in the Channel Lists
All the lists are only editable through the Unlocked List and Locked List in the Parental Controls menu You can remove or "hide" a channel from the Unlocked List by removing the checkmark in the checkbox. Also, you can remove or "hide" a channel from the Locked List by selecting Blocked in the Locked List. When you press the channel buttons, that channel will be skipped. When the TV is locked, you can still access the channel directly by using the number buttons on the remote control but may not be able to see the video until a valid password is entered.
You can also add ALL or delete ALL channels in a list by changing the checkbox or choice field in the line that says All channels, but be very careful because you could erase all of your selections.
Notes: The Guide Plus+ system and Parental Controls both have a channel selection feature.
The Channel feature in the GUIDE Plus+ system controls which channels appear in the guide and has no effect on which channels appear in the channel lists, and vice versa.
If a cable box is connected to Antenna A, the channel list can be edited for Antenna A in the Parental Controls menu. If a cable box is connected via INPUT1, the channel list cannot be edited. You can only use channel up/down or use the number buttons.
How V-Chip Works for the USA and Canada
The V-Chip software reads a code that most broadcasters send with programs. That code tells the TV software the program's age-based rating (TV-MA, TV-14, etc.) and content themes [(Violence (V), Adult Language (L), etc.)]. If you have blocked the rating and/or content themes that the program contains and the TV is locked and you tune to a program whose rating exceeds the rating limit you set, you will receive a message telling you that the program is not approved for viewing.
Broadcasters are not required to provide content themes, so programs received with no content themes will only be blocked if you block their age-based rating and the TV is locked. You can also block out programs that have been given a rating of "Not Rated," or "Exempt" and programs that are considered "unrated" with the V-Chip Unrated menu. The TV age-based ratings and content themes you can block are in the table on the next page.
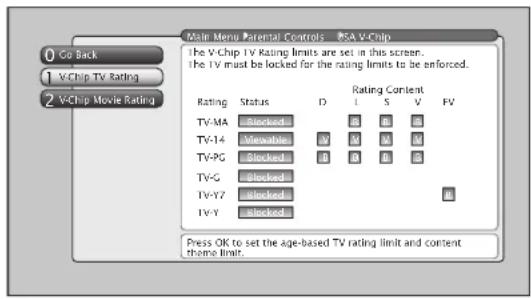
text_image
Main Menu Parental Controls 85A V-Chip 0 Go Back 1 V-Chip TV Rating 2 V-Chip Movie Rating The V-Chip TV Rating limits are set in this screen. The TV must be locked for the rating limits to be enforced. Rating Status Rating Content TV-MA Blocked D L S V FV TV-14 Membrates DV DV DV DV TV-PG Blocked DV DV DV TV-G Blocked TV-Y7 Blocked TV-Y blocked Press OK to set the age-based TV rating limit and content theme limit.USA V-Chip TV Ratings
The USA V-Chip TV Rating lets you decide which TV programs can and cannot be viewed. To set TV programming limits:
- Choose Parental Controls from the Main menu. If Parental Controls (TV) have previously been locked, you must enter your password.
- Highlight and select USA V-Chip.
- Highlight and select V-Chip TV Rating.
- Once you get to the V-Chip TV Rating screen, use the arrow buttons and OK on your remote to change the status of a TV program rating or content theme from Viewable to Blocked.
Proceed to the next sections for more details about how to change the status of TV program limits.
USA V-Chip Rating Limit Screen
The following is an example of where items are located within the V-Chip TV Rating screen below the USA V-Chip menu.

text_image
Rating Field Lets you select from a list of age-based ratings you can block or view. Rating Settings Area Lets you see the current block/view state of age- based ratings and associated content. The Viewable (V) settings are coded in green, and the Blocked (B) settings are coded in red. 0 Go Back 1 V-Chip TV Rating 2 V-Chip Movie Rating Main Menu Parental Controls NSA V-Chip The V-Chip TV Rating limits are set in this screen. The TV must be locked for the rating limits to be enforced. Rating Status D L S V TS TV-MA Blocked R B D TV-14 Viewable M M M TV-PC Blocked R R R D TV-G Blocked TV-Y7 Blocked TV-Y Blocked Press OK to set the age-based TV rating limit and content theme limit. Rating Status Field Lets you select whether the status of the age-based rating limit to the left is Viewable or Blocked. Content Themes Lists the content themes you can block or view. Content Status Fields Lets you select which content themes to view for the selected rating, and whether the status of the content theme is currently Viewable (V) or Blocked (B). Rating Settings| Age-Based Rating | USA Description and Content Themes for Age-Based Ratings |
| TV-MA | Mature Audience Only. Specifically designed to be viewed by adults and may be unsuitable for children under 17. It contains one or more of the following content themes: crude indecent language (L), explicit sexual activity (S), or graphic violence (V). |
| TV-14 | Parents Strongly Cautioned. Contains some material that many parents would find unsuitable for children under 14. Parents are strongly urged to exercise greater care in monitoring this program and are cautioned against letting children under the age of 14 watch unattended. This program contains one or more of the following content themes: intensely suggestive dialogue (D), strong coarse language (L), intense sexual situations (S), or intense violence (V). |
| TV-PG | Parental Guidance Suggested. Contains material that parents may find unsuitable for younger children. Many parents may want to watch it with their younger children. The program contains one or more of the following content themes: some suggestive dialogue (D), infrequent coarse language (L), some sexual situations (S), or moderate violence (V). |
| TV-G | General Audience. Most parents would find this program suitable for all ages. It contains little or no sexual dialogue (D) or situations (S), no strong language (L), and little or no violence (V). |
| TV-Y7 | Directed to Children 7 years and older. Designed for children ages 7 and above. It may be more appropriate for children who have acquired the developmental skills needed to distinguish between make-believe and reality. Themes and elements in this program may include mild fantasy violence (FV) or comedic violence, or may frighten children under the age of 7. |
| TV-Y | All Children. Themes and elements in this program are designed for a young audience, including children from ages 2-6. It is not expected to frighten younger children. |
Blocking Age-Based Ratings
You can automatically block all program ratings above a specified age-based rating level. For example, if you only want your child to watch programs that have a TV-G rating and lower (in other words, you want the child to watch TV-G, TV-Y7, and TV-Y), then you need to block out higher ratings.
To block programs with higher ratings:
- First, determine the lowest level rating you don't want the child to watch (see chart of age-based ratings on previous page).
- Highlight the lowest rating you do not want the child to watch. In the example discussed above, you would highlight TV-PG, since the highest rating you want the child to watch is TV-G.
- Press the OK button to toggle between Viewable and Blocked. The status for the rating listed to the right and all higher ratings automatically change to Blocked (and B).
- Select Lock TV from the Parental Controls menu. Enter a password and re-enter password a second time to confirm the password.
| Hierarchy of Age-Based Ratings | |
| TV-MA Mature Audience Only | |
| TV-14 Parents Strongly Cautioned | |
| TV-PG Parental Guidance Suggested | |
| TV-G General Audience | |
| TV-Y7 Directed to Children 7 years and older | |
| TV-Y All Children |
Viewing Age-Based Ratings
After you block age-based ratings, you have the option of changing some of the ratings back to Viewable (V).
- Determine which blocked rating you want to view.
- Use the up and down arrow buttons to highlight the rating with a status of Blocked.
- Press the OK button to select Viewable.
Notes: The content status fields corresponding to the unblocked rating become Viewable as well. They and the age-based rating status are the only fields that automatically change back to Viewable when you complete this process.
You must remember to lock the TV for rating limits to take effect.
Blocking Specific Content Themes
You can block programs based on their content. When you block a content theme for a particular rating, you automatically block that content theme for higher rated programs as well.
For example, if you do not want your child to watch programs that have adult language (L) rated TV-PG or higher, then you could block out all programming TV-PG and above containing adult language.
To block program content:
- Determine the lowest level of content you don't want the child to watch.
- Use the up and down arrow buttons on the remote to highlight the age-based ratings that correspond with the lowest content you do not want the child to watch. (In the example above, you would highlight TV-PG.)
- Press the OK button to change content status from (V) Viewable to (B) Blocked. All higher ratings' content themes change to Blocked.
Notes: Broadcasters are not required to provide content themes or age-based ratings.
You must remember to lock the TV for rating limits to take effect.
Viewing Specific Content Themes
If you block specific content themes, you have the option of going back and changing some of the content themes back to (V) Viewable:
| Content Themes | |
| D Sexually explicit dialogue | |
| L Adult language | |
| S Sexual situations | |
| V | V i o l |
| FV Fantasy Violence | |
-
Determine the content themes you want to change to (V) Viewable.
-
Use the up and down arrow buttons to highlight the age-based rating whose content theme you want to change to Viewable
-
Press the OK button to change its status back to V. Your child would then be able to watch programs with TV-14 adult language content, but not programs with TV-PG or TV-MA language content.
n Note: cOnly the content theme status corresponding to TV-14 (L) language changes to (V) View. Higher rated content themes, such as that for TV-MA language, do not change.
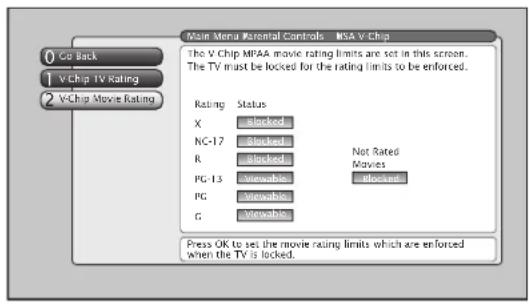
text_image
Main Menu Parental Controls NSA v Chip 0 Go Back 1 V Chip TV Rating 2 V Chip Movie Rating The V Chip MPAA movie rating limits are set in this screen. The TV must be locked for the rating limits to be enforced. Rating Status X blocked NC-17 blocked Not Rated R blocked Movies PG-13 non-dated PG non-dated G non-dated Press OK to set the movie rating limits which are enforced when the TV is locked.V-Chip Movie Rating Limit
You set movie (MPAA) rating limits by blocking movies rated above a specified rating. How to block movie ratings and view movie ratings is explained in the next two sections.
To access the V-Chip Movie Rating menu:
-
Press MENU on the remote control (the Main Menu appears).
-
Select Parental Controls.
-
Select USA V-Chip.
-
Select V-Chip Movie Rating.
Blocking Movie Ratings
If you only want your child to watch movies that have a PG rating and lower (in other words, movies rated PG and G), then you could automatically block out all other movies with higher ratings.
To block movies:
- Highlight the rating that is the lowest rating you don't want the child to watch. (In the example above, you would highlight the rating status button corresponding to PG-13, since the highest rating you want the child to watch is PG.)
- Press the OK button to change the button from Viewable to Blocked. All higher ratings automatically change to Blocked.
- If the TV is not locked, you must lock it so the movie rating limits will take effect.
Note: Some movies may be given a Not Rated (NR) rating. After blocking movie ratings, you must set NR to Viewable separately to view NR movies.
Viewing Movie Ratings
After you block movie ratings, you have the option of changing some of the rating status buttons back to Viewable.
- Highlight the rating you want to view.
- Press the OK button to change the button from Blocked to Viewable.
For example, if movies with a rating of PG-13 and higher are blocked, you can change the rating status corresponding with NC-17. Your child would then be able to watch all movies with a G, PG, and NC-17 Rating.
- Exit the screen, and be sure the TV is locked.
Canada V-Chip
Canadian TV V-Chip supports two different Canadian rating systems: English and French.
| Age-Based Rating | Canada V-Chip English Rating System |
| 18+ | Adults. Programming intended for adults 18 and older. It may contain elements of violence, language, and sexual content which could make it unsuitable for viewers under 18. Violence guidelines: may contain violence integral to the development of the plot, character or theme, intended for adult audiences. Other content guidelines: may contain graphic language and explicit portrayals of nudity and/or sex. |
| 14+ | Viewers 14 and over. Programming contains themes or content which may not be suitable for viewers under the age of 14. Parents are strongly cautioned to exercise discretion in permitting viewing by pre-teens and early teens. Violence guidelines: may contain intense scenes of violence. Could deal with mature themes and societal issues in a realistic fashion. Other content guidelines: may contain scenes of nudity and/or sexual activity. There could be frequent use of profanity. |
| PG | Parental Guidance. Programming intended for a general audience but which may not be suitable for younger children (under the age of 8). Parents may consider some content inappropriate for unsupervised viewing by children aged 8-13. Violence guidelines: depictions of conflict and/or aggression will be limited and moderate; may include physical, fantasy, or supernatural violence. Other content guidelines: may contain infrequent mild profanity, or mildly suggestive language. Could also contain brief scenes of nudity. |
| G | General Audience. Programming considered acceptable for all ages groups. While not designed specifically for children, it is understood younger viewers may be part of the audience. Violence guidelines: will contain very little violence, either physical or verbal or emotional. Will be sensitive to themes which could frighten a younger child, will not depict realistic scenes of violence which minimize or gloss over the effects of violent acts. Other content guidelines: there may be some inoffensive slang, no profanity and no nudity. |
| C8+ | Children 8 and Older. Programming generally considered acceptable for children 8 years and over to watch on their own. Violence guidelines: violence will not be portrayed as the preferred, acceptable, or only way to resolve conflict or encourage children to imitate dangerous acts which they may see on television. Any realistic depictions of violence will be infrequent, discreet, of low intensity and will show the consequences of the acts. Other content guidelines: there will be no profanity, nudity or sexual content. |
| C | C (Children) Programming intended for children under age 8. Violence guidelines: careful attention is paid to themes which could threaten children's sense of security and well being. There will be no realistic scenes of violence. Depictions of aggressive behavior will be infrequent and limited to portrayals that are clearly imaginary, comedic or unrealistic in nature. Other content guidelines: there will be no offensive language, nudity or sexual content. |
| Age-Based Rating | Canada V-Chip French Rating System |
| 18+ | Adults. Programming is for adults only. This program contains sustained violence or extremely violent scenes. |
| 16+ | Viewers 16 and over. Programming is not suitable for those under age 16. This program contains frequent scenes of violence or intensely violent scenes. |
| 13+ | 13+ (Viewers 13 and over) Programming may not be suitable for children under the age of 13. This program either contains several violent scenes or one or more scenes that are violent enough to affect them. Viewing in the company of an adult is therefore strongly recommended for children under the age of 13. |
| 8+ | 8+ (Viewers 8 and over) Not recommended for young children. This program is suitable for most audiences, but it contains mild or occasional violence that could upset young children. Viewing in the company of an adult is therefore recommended for young children (under the age of 8) who do not distinguish between reality and imagination. |
| G | G (General Audience) This program is suitable for audiences of all ages. It contains no violence, or any violence that it does contain is either minimal or is presented in a humorous manner, as a caricature, or in an unrealistic way. |
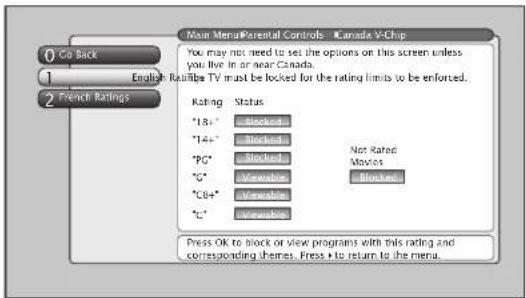
text_image
Main MentalParental Controls - Canada V-Chip You may not need to set the options on this screen unless you live in or near Canada. English ReAillibe TV must be locked for the rating limits to be enforced. Rating Status *18+ *Blocked *14+ *Blocked *PG* Blocked *G* Viewable *C6+* Viewable *C* Viewable Not Rated Movies Blocked Press OK to block or view programs with this rating and corresponding themes. Press + to return to the menu.Canada V-Chip
The English or French Canada V-Chip TV Rating lets you decide which TV programs can and cannot be viewed. To set TV programming limits:
- Choose Parental Controls from the Main menu. If Parental Controls (TV) have previously been locked, you must enter your password.
- Highlight Canada V-Chip and select either Canada's English Ratings or French Ratings.
- Once you get to the English or French Ratings screen, use the arrow buttons and OK on your remote to change the status of a TV program rating or content theme from Viewable to Blocked.
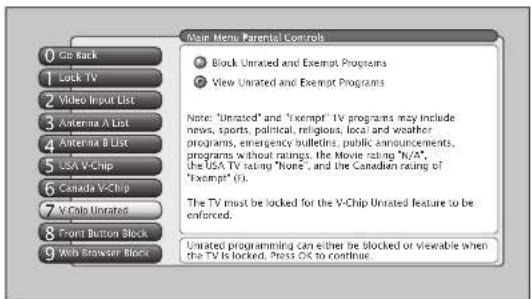
text_image
0 Get Back 1 Lock TV 2 Video Input List 3 Antenna A List 4 Antenna B List 5 USA V-Chip 6 Canada V-Chip 7 V-Clu Untreated 8 Front Button Block 9 Web Browser Block Main Menu/Parental Controls ● Block Untreated and Exempt Programs ● View Untreated and Exempt Programs Note: "Unrated" and "Exempt" TV programs may include news, sports, political, religious, local and weather programs, emergency bulletins, public announcements, programs without ratings, the Movie rating "N/A", the USA TV rating "None", and the Canadian rating of "Exempt" (E). The TV must be locked for the V-Chip Untreated feature to be enforced. Untreated programming can either be blocked or visuable when the TV is locked. Press OK to continueV-Chip Unrated Program Block
Selecting this option lets you decide if programs that the V-Chip recognizes as “Unrated” (USA) and “Exempt” (Canada can be viewed. Note that “Unrated” and “Exempt” TV programs may include news, sports, political, religious, local and weather programs, emergency bulletins, public announcements, and programs without ratings, the movie rating “N/A,” and the TV rating “None” and the Canadian rating of “Exempt.”
Block Unrated and Exempt Programs All unrated and exempt programs are available.
View Unrated and Exempt Programs All unrated and exempt programs are not available.
Note: You must remember to lock the TV for rating limits to take effect.

text_image
Main Menu Borental Controls 0 Call Back 1 Lock TV 2 Video Input List 3 Antenna A List 4 Antenna B List 5 LSA V Chip 6 Canada V Chip 7 V Chip Unrated 8 Front Button Block 9 Web Browser Block Front Buttons blocked Front Buttons Unblocked When the buttons on the TV are blocked and the TV is locked, only the remote or keyboard will control the TV. This keeps children from playing with the buttons. It also keeps children from watching TV when a guardian is not present (you must hide the remote for this to be effective.) Note: If power to the TV is lost for more than an hour (for example, a power outage) the buttons become unblocked. Press OK to block (disable) the buttons on the front of the TV. Only the remote or keyboard will control the TV.Front Button Block
Selecting this option lets you block (disable) or unblock (enable) the TV's front buttons. The remote still tunes to any channel. Front Panel Block can:
- Keep children from watching TV when the parent is not present.
- Keep young children from playing with the buttons on the TV.
(When using this as a Parental Control method, you should remove access to any remote that is capable of operating the television.)
Don't forget to lock the TV after you select Blocked. If you do not, the front panel block will not take effect.
Note: If power to the TV is lost for an extended period, the buttons become unblocked. Blocking the front buttons does not disable the front input.
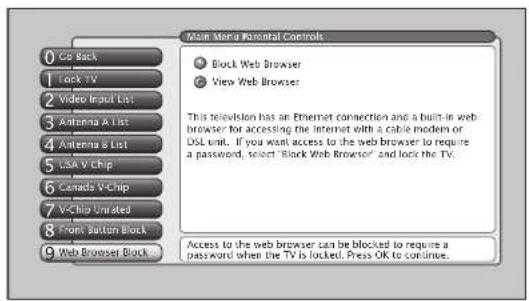
text_image
Main Menu Parental Controls ● Block Web Browser ○ View Web Browser This television has an Ethernet connection and a built-in web browser for accessing the Internet with a cable modem or DSL unit. If you want access to the web browser to require a password, select "Block Web Browser" and lock the TV. Access to the web browser can be blocked to require a password when the TV is locked. Press OK to continue.Web Browser Block
Selecting this option lets you decide if the web browser can be accessed. Block Web Browser Need a password to view web content when TV is locked.
View Web Browser Web browser is accessible without a password when TV is locked.
Make sure the TV is locked. If you do not, Web Browser Block will not block browser access even if you set Block Web Browser.
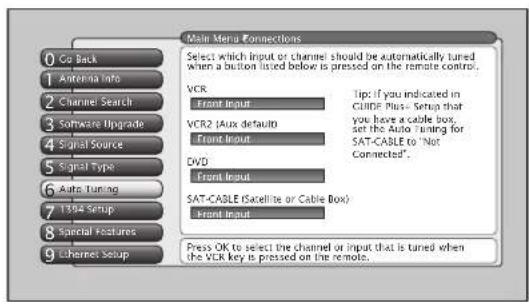
text_image
Main Menu Connections 0 Co Back 1 Antenna Info 2 Channel Search 3 Software Upgrade 4 Signal Source 5 Signal Type 6 Auto Tuning 7 1394 Setup 8 Special Features 9 Ethernet Setup Select which input or channel should be automatically tuned when a button listed below is pressed on the remote control. VCR Front Input VCR2 (Aux default) Front Input DVD Front Input SAT-CABLE (Satellite or Cable Box) Front Input Press OK to select the channel or input that is tuned when the VCR key is pressed on the remote. Tip: If you indicated in GUIDE Plus - Setup that you have a cable box, set the Auto Tuning for SAT-CABLE to "Not Connected".
With the Auto Tuning feature, you can set up the TV to tune to the channel you want to watch by pressing that component's button. Auto Tuning for the TV button cannot be set.
Auto Tuning Feature
The way you set up the Auto Tuning feature in the TV's menu corresponds to the component buttons on the remote and the way you have each component connected to your TV. When you set auto tuning, you're telling the TV what channel to tune to when you press the VCR, DVD, or SAT/CAB button on the remote control. This is especially useful for going directly to an input like a 1394 input.
Note: AUX by default is set up for a second RCA VCR. Or, you can program VCR or AUX to operate a second RCA VCR with the 2001 code. Also, any VCR programmed to the AUX button becomes "VCR2" button and controllable by auto tuning.
- Press MENU (the MAIN MENU appears)
- Highlight Connections and press OK.
- Highlight Auto Tuning and press OK
- Highlight the component button field and continually press OK to scroll through the selection of inputs.
The choices and a brief explanation follow:
Not Connected Choose this if you don't have this particular component connected to the TV, or if you don't want the TV to automatically tune to the correct channel when you press one of the component buttons on the remote.
Channel 2, 3 or 4 Antenna A Component is connected to the ANTENNA A jack on the back of the TV, and you want the TV to tune to channel 2, 3, or 4 when you press the corresponding button on the remote. Reminder: make sure the component's Channel 2/3 or 3/4 switch is set to match the channel you choose in Auto Tuning.
Channel 2, 3 or 4 Antenna B Component is connected to the ANTENNA B jack on the back of the TV, and you want the TV to tune to channel 2, 3, or 4 when you press the corresponding button on the remote. Reminder: make sure the component's Channel 2/3 or 3/4 switch is set to match the channel you choose in Auto Tuning.
Front Input Component is connected to the S-VIDEO IN or VIDEO IN jack on the front of the TV and you want the TV to tune to the front Video Input Channel when you press the corresponding button.
Input 1, Input 2 Component is connected to a VIDEO or S-Video jack on the back of the TV and you want the TV to tune to the Video Input Channel when you press the corresponding button.
Input 3, Input 4 Compatible component video source, such as a DVD player or satellite receiver, is connected to the composite/component VIDEO INPUT jacks (Y•Pb•Pr) on the back of the TV and you want the TV to tune to the composite/component video input when you press the corresponding button.
Input 5 Component is connected to the DVI-HDTV jack on the back of the TV and you want the TV to tune to this input when you press the corresponding button.
DTVLink 1394 components connected to the DTVLink jacks on the back of the TV can also be autotuned.
PIP (Picture-in-Picture) Operation
The PIP (Picture-In-Picture) feature lets you display a second, smaller analog (NTSC format) picture on top of the main analog picture. The main and PIP channels must be from the same antenna A or B; you cannot have the main picture from Antenna A and the PIP picture from Antenna B. However, inputs can use PIP regardless if Antenna A or B is used for the main or PIP picture. You will only be able to use the PIP window and main picture with analog channels.

text_image
PIP buttons Arrow buttons SWAP CH. CTRL SKIPPIP GOUND VCR PLUS FLRIZE FORMAT INFO CLEAR MENU OKTip
If you want to go directly to an input or channel in PIP (or main), set up auto tuning and press the component button.
PIP Buttons
There are certain remote buttons that control the way the PIP window works:
PIP Brings up the PIP window. Press PIP again to remove the window.
Arrows Let you move the PIP window to different areas of the screen.
SWAP Switches the video from the PIP window to the main picture.
FREEZE Freezes entire screen, including the main picture and PIP window, if PIP is displayed. Does not support all inputs.
CH CTRL (Channel Control) Lets you switch channel control between the PIP window and the main picture. To determine whether you are controlling the PIP or the main picture, look at the channel banner as you change channels or press INFO button. The triangular indicator (▷) beside the channel number lets you know which picture you're controlling with channel up/down, number buttons, etc.

text_image
12:39 PM 12 Main picture channel number Ch 888-888 WWW Antenna A (Air) 4:3 Normal 480i SDLiSten CC (D) DCD REC MPAA - Not Rated Channel control indicator PTP Ch 8 Unrated Antenna A (Air) PIP channel numberUsing the PIP Feature
The PIP feature is only available for analog (NTSC) channels. PIP won't work when tuned to a digital (ATSC) channel. Use the channel banner to determine whether a channel is digital or analog. A digital (ATSC) channel has a dash and second number after it (e.g., 21-1); an analog channel doesn't (e.g., Ch 21). While you may use PIP in different ways, this basic PIP scenario should get you started. When watching an analog channel, follow these steps.
- Press the PIP button on the remote control. The PIP window appears on the screen and Channel Control is automatically set to the PIP window.
- Use the channel up and down or number buttons to change the PIP channel.
- To change the program in the main picture window, press CH CTRL. Then use the channel up and down or number buttons. To go back and forth between controlling the PIP window and the main picture, press the CH CTRL button.
PIP Problems?
- If you are channel surfing and the PIP disappears, you may have tuned to a digital channel. To view PIP and the main picture, make sure that both the main and PIP channels are analog inputs, or signals. Continue changing the channel until you find an analog (NTSC format) channel. The PIP window will reappear.

text_image
gram Title/Acquiring Channel 00:30 [2:30 AM 12:39 PM Ch 888-888 WWW Antenna A (Air) 4:3 Normal 480i SDListe MPAA - Not Rated PIP Not Viewable Antenna A (Air)The message "PIP Not Viewable or Exceeds Rating" in the channel banner lets you know that PIP is not available on this channel and you should tune to another channel.
- If you press PIP and the PIP window is gray, you may have activated the Parental Control feature and the program exceeds the rating limits you set. For information on removing limits, see the section "Parental Controls."
• You cannot view closed captioning in the PIP window. - PIP channel skips all digital (ATSC) TV channels and tunes to analog channels.
- PIP cannot be displayed from component (Y•Pb•Pr) inputs.
Tip
A typical use of SWAP is to scan through channels in the PIP window, and when you find a channel you like, press SWAP to display that channel in the main picture.
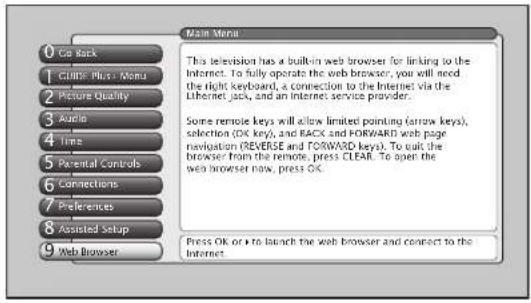
text_image
0 Call Back 1 Climb Plus - Menu 2 Picture Quality 3 Audio 4 Time 5 Parental Controls 6 Connections 7 Preferences 8 Assisted Setup 9 Web Browser Main Menu This television has a built-in web browser for linking to the Internet. To fully operate the web browser, you will need the right keyboard, a connection to the Internet via the Ethernet jack, and an Internet service provider. Some remote keys will allow limited pointing (arrow keys), selection (OK key), and RACK and FORWARD web page navigation (REVERSE and FORWARD keys). To suit the browser from the remote, press CLEAR. To open the web browser now, press OK. Press OK or ▶ to launch the web browser and connect to the Internet.Important: To use the TV's web browser, you must have your TV connected to the Internet (e.g., cable modem or DSL) and subscribe to an Internet Service Provider (ISP).
You can start the browser on your TV by selecting it from the main menu. The TV front panel and remote control provide basic navigation without a keyboard. If you launch the browser from the main menu, a message pops up to suggest that you use a keyboard to use with this TV to connect to the Internet.
The optional keyboard will allow you to get optimum use of web browser features. The keyboard (model number KBR755TA1) is available at www.rca.com/keyboard or 800-798-5875.
When you start the browser for the first time, it goes to an RCA website. All FAV keyboard buttons are also initially programmed to that site. The FAV SEARCH and FAV HOME buttons on the keyboard default to a search site but you can reprogram them.
The FORMAT button on your remote (or keyboard) allows you to cycle through various combinations of a less than full screen browser and some TV video. Just press the button again to use a different format.
To close the browser entirely, press CLEAR on the remote.
You may discover that other browser windows are open. This may be the result of a pop-up window being delivered from the site you were viewing. Press "Close Window" button to close it or click the "Close Window icon" on the window.
Note: The browser won't display streaming video or audio, and some animated graphics.
Browser Times Out Automatically
If the browser is idle for a period of time, a pop-up message appears to remind you to turn it off when you are not using it and/or the browser closes automatically.
You may notice that the usual browser menu and on-screen buttons that you may be accustomed to using with your PC are not displayed on-screen. Instead, these functions are provided on your remote or optional keyboard.
Tips
If you use the video window in the browser and you press channel up/down and the video window seems to disappear, this means you've either tuned to a channel which is blocked or has a weak signal. Use the channel up/down to go to another channel.
Sometimes the browser locks onto an incompatible website and it won't open. Exiting the browser will not correct this condition. When the browser is restarted, the browser returns to the last-used website. To correct this condition, either press a FAV button to go to a known good website or press "Address" and enter a good website.
Inputs cannot be viewed in the video window of the browser.
You can use channel up/down to tune to a different channel in the video window. Number keys cannot be used to tune channels in the video window.
Saving Your Favorite URLs
Program any favorite (FAV) key, including HOME and SEARCH, to any URL (website address). After you've browsed to a favorite URL, just press the desired key and hold it until a message appears. That site's URL will be assigned to the key you pressed and saved in the TV. The next time you press the key briefly, the browser will automatically go to the site you saved.
You can store 32 additional URLs (websites) by using the following buttons together: SHIFT and FAV, CTRL and FAV, ALT and FAV.
If you have the optional keyboard, previously visited sites are also available as a drop-down listing from the address bar. The list can hold only a certain number of addresses, so at some point a new address will replace the oldest one.
Controlling the Web Browser
As stated previously, the remote control and front panel buttons support only basic browser functions. However, the optional keyboard makes browser navigation much easier and is the only way to enter a URL address. Below is a table that shows which remote buttons work what function.
| Web Browser Button Interaction | ||
| Remote: Front Panel: | Browser Function: | |
| MENU MENU/OK Closes browser and opens main menu | ||
| CLEAR Quits the browser | ||
| SWAP Displays the previous browser window, if multiple windows are displayed | ||
| CH CTRL Displays the next browser window, if multiple windows are displayed | ||
| STOP Stops loading the current page; STOP | ||
| PLAY Reloads the current page; REFRESH | ||
| REVERSE Go to the previous page if one exists; BACK equivalent on optional keyboard | ||
| FORWARD | Go to the next page if one exists; FORWARD equivalent on optional keyboard | |
| FORMAT Toggles between Full-Size browser and browser plus video in multiple layouts | ||
| Up/Down/Left/Right Arrow Moves the cursor in the web page | ||
| GUIDE Closes the browser and opens the guide | ||
| CH Up/Down CH Up/Down Changes channels if video window is displayed | ||
| VOL Up/Down | VOL Up/Down | Changes volume if video window is displayed |
1394 Recording
The 2-way 1394 DTVLink jacks enable you to connect a compatible Audio/Video Hard Disk Drive (AVHDD) and/or a Digital VCR (DVCR) so you can record and play digital content. The recommended AVHDD component is model DVR10, available at your local RCA dealer or www.rca.com. The DVR10 is an IEEE-1394 hard disk drive that includes time-shift features, such as recording and pausing TV (digital signals only).
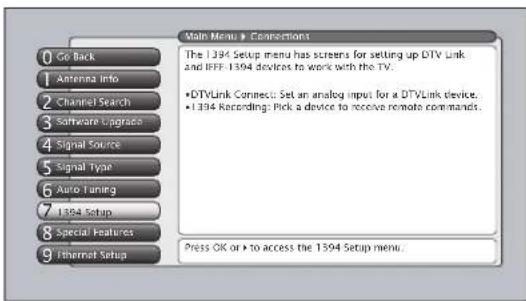
text_image
0 Go Back 1 Antenna Info 2 Channel Search 3 Software Upgrade 4 Signal Source 5 Signal Type 6 Auto Tuning 7 I394 Setup 8 Special Features 9 Ethernet Setup Main Menu > Connections The 1394 Setup menu has screens for setting up DTV Link and IEEE 1394 devices to work with the TV. •DTVLink Connect: Set an analog input for a DTVLink device. •1394 Recording: Pick a device to receive remote commands. Press OK or > to access the 1394 Setup menu.You should know:
- Only digital content can be recorded. Analog TV programs cannot be recorded through the TV's 1394 jack.
- You can only record content if the IEEE-1394 component connected enforces copy protection standards (check your DVCR or AVHDD manual).
- When the TV is tuned to the 1394 input channel and the remote is in the TV mode, you can use the remote for some basic transport controls, such as RECORD, STOP, FAST FORWARD, REVERSE, PAUSE, and PLAY.
-
Don't change channels when you are recording because recording will automatically stop. However, you can tune to one of the TV's Video Input Channels (for instance, if you want to watch a DVD or videotape that's in a DVD player or VCR that you connected to your TV).
-
A dialogue box appears when you press the RECORD button to let you know the 1394 component is recording the channel that you selected.
- You can select a default recording preference: record all subchannels on a major channel or record only a specific subchannel.
Recording just the subchannel saves space on the AVHDD. Also, a DVCR may not be able to record more than one subchannel because of the DVCR's data rate.
However, if you're recording to an AVHDD or DVCR and choose to record only to a specific subchannel, you may see a blank screen when playing back at first. You'll need to use the CH+ or CH- button to go through the subchannels before you get to the subchannel you recorded. This happens because the data of all the subchannels is recorded, but not the content—only the content (or complete signal) for the specified subchannel is recorded.
- The program name, channel, track number, DTVLink-model name, and elapsed time for 1394 recordings appear in the channel banner (some information only available for AVHDD and not for DVCR). To access the channel banner, press INFO on the remote control. Press the up/down arrow buttons to scroll through the track numbers (recordings) in the channel banner. For the different subchannels, press the CH+ or CH-. In addition, pressing the left arrow allows instant replay and pressing the right arrow skips ahead on an AVHDD.Program tracks can be deleted by using the CLEAR button when the track to be removed is selected. Use the arrow button to select yes in the alert panel and press OK.

text_image
Subchannel 1 Track 1/10 DTVLink (Model Name) 16:9 Normal 1080i HD MPAA - Not Rated 00h:00m:00s of 00h:00m:00s- To do a 1394 timer recording, schedule it through the Record/Wake Timer screen. Once the timed recording is set up, the TV automatically makes a timed 1394 recording if the channel is digital, no matter what signal source is selected. The recording takes place every day for the duration that is selected in the Record/Wake menu.
Set up 1394 Recording Preferences
To successfully record digital content via the 1394 DTVLink Input/Output Jack, you need to set up the 1394 Recording screen.

text_image
Main Menu Connections P394 Setup AHHD4 Model Pressing RECORD tunes to the device selected above. If more than one IEEE-1394 recorder is connected, you can select which one will record a digital channel when RECORD is pressed on the TV remote. You can also select if the TV should "Auto tune to that input when RECORD is pressed. The device can respond to RECORD and STOP commands even if the TV is not tuned to that device's input on the TV. Select a default recording preference: Record all subchannels (May exceed a DVR's bitrate). Record only currently-tuned subchannel* "Saves space when recording to a hard disk drive (HDD): playback on a digital VCR or from HDD to another TV may require changing subchannels to view the recorded one. Press ▲ or ▼ to point to an option, then press OK to select it. Press ▲ to return to the menu.- Go to the 1394 Setup menu.
- Highlight 1394 Recording, and press the OK button (only 1394 components that are capable of recording appear). If you have more than one 1394 recording component, you need to pick the 1394 default recording component (i.e., the component which records when you press RECORD on the remote or set up a Record/Wake Timer).
- If you have an AVHDD connected, put a check in the box for auto tuning because auto tuning lets you see the digital channel being recorded and you can use instant replay, pause, etc.
Note: If you don't check the auto tuning box, pressing RECORD will only start recording—it doesn't switch the TV to the 1394 input—you'll need to use the INPUT button to channel through the inputs.
Using the TV's Menu System
Chapter Overview:
- Menus, On-Screen Help, and Control Panels
• Picture Quality Menu - Audio Menu
- Time Menu
- Connections Menu
- P r eferences Menu
Menus, On-screen Help, and Control Panels
This section highlights your TV's on-screen menu system. The menu system has several types of screens. An overview follows.
Note: The GUIDE Plus+ Menu, Parental Controls, Web Browser, and 1394 Recording menu items are discussed in the Features chapter while Assisted Setup is discussed in the Connections and Setup Chapter.
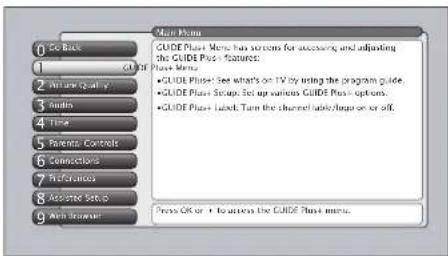
text_image
Main Menu CODE PLush Menu has screen for accessories and adjusting the GUIDE Plus features. PLush Menu. •GUIDE PLush: See what's on TV by using the program guide. •GUIDE PLush Setup: Set up various GUIDE Plus options. •GUIDE PLush Label: Turn the channel labels on or off. Press OK or 1 to access the GUIDE Plus menu.Tips
A shortcut method to access a menu item is to press the number button on the remote that matches the number next to the on-screen menu. For example, in the Main Menu, press 3 to go straight to the Audio menu.
Feel free to explore the menu system. If you're ever unsure where you are in the menu system, look at the menu path at the top (for example, Main Menu, Picture Quality) or if you're just plain tired of exploring, press CLEAR to remove the menus from the screen and start over again.

text_image
Menu Path Main Menu Preferences 1 To Rare 2 Master Exploring 3 Stream Format 4 Record Output 5 Color Scheme 6 Transparency 7 Menu Language 8 Digital Channel Info or an input to acquire the info, put a checkmark next to it: Antenna A Antenna B T10 (link 1/24) If you are having difficulty tuning to a digital channel that you know exists, what may help is to disclose acquisition of Digital Channel Info. However, you should know that this will affect the acquisition of taipinp, program sites, and channels names for digital channels. It may also affect the ability to locate to the current channel from the Guide (See Watch or Record time, for example). Whenever possible you should sell the Digital Channels Info to be acquired. Stauding Digital Channel Information does not affect the acquisition of the Guide. Please change this help. Use Oil to add/remove the check, a check will provide the Digital Chg. Use it for this copy. This check will not access it. Highlighted Menu Selection Help TextNavigating the Menu System
The first menu you see when you press the MENU button on the remote is called the Main Menu. To access the Main Menu:
-
Press the MENU button (the Main Menu appears).
-
Use the arrow buttons (left,right,up,down) to move through the menu and highlight different options.
Note: Press the number buttons on the remote that matches the number next to the on-screen menu selection.
- Press the OK button to select a highlighted item.
Exiting a menu
There are three ways to exit a menu:
- Press CLEAR. The on-screen displays are cleared from the screen and you return to TV viewing.
- Press 0 on the remote when you are highlighting the left side of the menu.
- Highlight 0 (Go Back) menu button and press OK, or press GO BACK on the remote.
On-Screen Help
Information appears on the screen to assist you in understanding your menu selection. To the right of the highlighted menu item is a display area that might provide text for the item selected along with any submenu items. In addition, a menu path appears at the top of the screen to let you know where you are in the menu system. At the bottom of the screen are two lines of help text that explain the currently highlighted item.
Controls
Controls let you adjust the default settings of your TV. You can choose a setting, enter a number, or adjust a level such as tint or brightness. There are four types of controls:
- Sliders
- Choice lists (check boxes, radio buttons)
- Alpha/numeric entries,
- Menu (action, choice fields)

bar
| Balance (%) | | :--- | | 3.1 | | 6.1 | | 4.8 | | 4.5 | | 1.3 |
text_image
Check Boxes Radio Buttons


Sliders
Sliders are used to select a specific point of a control that has continuous levels. To make adjustments:
- Press the left or right arrow button on the remote to highlight the slider for the feature you want to adjust.
- Press the up or down arrow button to adjust the indicator on the vertical slider.
Note: Some sliders are positioned horizontally; for example, Translucency, Balance, and Initial Volume.
Choice Lists
Check boxes and radio buttons are used to select options from a list. Check boxes let you select one or more options. A radio button lets you select only one option.
- Use the arrow buttons to move left/right/up/down.
- Press OK to select or de-select the option.
Numeric Entries
Numeric entry fields are used to enter numbers, passwords, and time values. The number buttons on the remote and the arrow, channel up/down, volume up/down, MENU and OK buttons on the front panel can be used to enter the information.
- Use the left/right arrow button to highlight the field.
- Use the up/down arrows, number buttons, or OK button to enter information.
On-screen Menu Items
The on-screen menu items are used to access the information and/or change the settings of the specific item highlighted. Highlight the item either by using the number buttons on the remote or the up and down arrow buttons. Then press OK or right arrow button to select.
Continue Action Buttons
An on-screen button that performs the action labelled on the button. Press the right arrow button to highlight and press OK to select.
Choice Fields
A choice field cycles through at least two or more choices. Press OK to select the next entry in the choice field.

text_image
Main Menu: 0 Edit Back 1 CODE Plus" Menu 2 Picture Quality 3 Audio 4 Time 5 Forward Controls 6 Connections 7 Preferences 8 Applied Image 9 Ask Browser The Picture Quality menu has screens for optimizing the picture for each of the TV's icons. • Picture Settings: Adjust the levels that affect the picture. • Picture Presets: Create screen levels of Picture Settings. • Auto Color: Connect the color from channel to channel. • Color Warmish: Adjust the color to Cool, Warm, or Normal. • Active Reduction: Reduce picture static or interference. • Advanced Settings: Fine tune the picture and its position. • Active CMPS: Set this Impact Settings to history defaults. Press OK or > to access the Picture Quality menu.Picture Quality Menu
The Picture Quality menu contains menus to configure video settings: Picture Settings, Picture Presels, Auto Color, Color Warmth, Noise Reduction, Advanced Settings, and Reset Controls. Each one is described below.
To access the Picture Quality menu:
-
Press MENU on the remote control (the Main Menu appears).
-
Press 2. The Picture Quality options appear. Each is described below.
Note: When making Picture Quality changes, digital inputs (Input5, digital TV on Antenna A/B, DTVLink, 1394) are all adjusted together. Also, Antenna A/B inputs for analog TV are adjusted together. Picture Quality settings for Inputs 1 through 4 and front inputs are set independently.

bar
Main Name Picture Quality | Category | Percentage (%) | |---|---| | Contrast | 31 | | Color | 81 | | Text | 43 | | Back Level | 45 | | Dimensions | 13 | Picture Settings list you adjust aspects of the picture you are viewing. Press Off to adjust the picture settings.Picture Settings
The Picture Settings menu displays five slider controls for adjusting the way the picture looks. Your options under the Picture Settings menu are:
- Contrast Difference between the light and dark areas of the picture.
• Color The richness of the color.
- Tint The balance between the red and green levels.
- Black Level The brightness of the picture.
- Sharpness The crispness of the edges in the picture.
To create picture settings for the video inputs:
-
Press the INPUT button while in the Picture Settings menu until the correct Video Input Channel appears in the upper right corner.
-
Press the right and left arrow buttons on the remote control to select the slider.
-
Press the up and down arrow buttons to operate the slider.
Notes: When changing an item in the Picture Settings menu, the graphics become transparent so you can see how your adjustments affect the picture.

text_image
Main Menu Picture Quality Vibrant Natural Cinematic Personal A change in this system is applied to input 1. The most recent picture presents are: Color: Vibrant - Cool Contrast Color Help All Levels Wavelength Press + or - to point to an option, then press OK to select it. Press + to return to the menu.Picture Presets
Picture Presets displays a choice list that lets you select one of the four preset picture settings: Vibrant, Natural, Cinematic, and Personal.
Choose your setting based on the degree of lighting in your room. After you select a setting, the contrast, color, tint, black level and sharpness and color warmth settings found under the Picture Settings menu are adjusted automatically.
If you choose Personal Picture Preset, you can customize color, tint, black level, and sharpness to your desired level, and the TV saves those settings. After you've done this, you can go back into the menu and select Vibrant, Natural, Cinematic, or Personal. For example, if you normally use Personal Picture Preset but want to watch a show in Vibrant lighting, you can choose Vibrant, watch the show, and then afterwards return to your customized settings by choosing Personal Picture Preset.

text_image
Main Menu Picture Quality ● Auto Color On ● Auto Color Off When Auto Color is set to On, it minimizes flash tone variations. A change in this screen is applied to Input 2. Press > or < to select to an option, then press OK to select it. Press, it is Return to the menu.Auto Color
Auto Color minimizes the flesh tone variations of the TV picture. A different Auto Color setting can be stored for each input. Choose On or Off, depending on your preference.
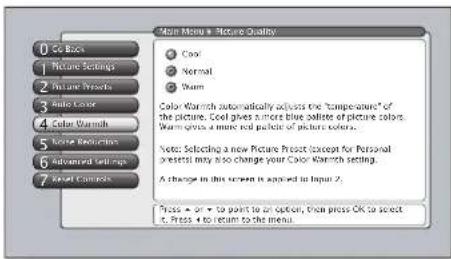
text_image
Main Menu - Picture Quality ● Cool ○ Normal ● Warm Color Warmth automatically adjusts the "Temperature" of the picture. Cool gives a more blue saline of picture colors. Warm gross a more red packet of picture colors. Note: Selecting a new Picture Post (except for Personal present) may also change your Color Warmth setting. A change in this screen is added to Input 2. Press + on + to point to an option, then press OK to select it. Press + to return to the menu.Color Warmth
Color Warmth automatically adjusts the color temperature of the picture. Color Warmth can be stored for each input. The feature lets you set one of three automatic color adjustments:
- Cool More blue.
• Normal Standard picture color. - Warm More red.
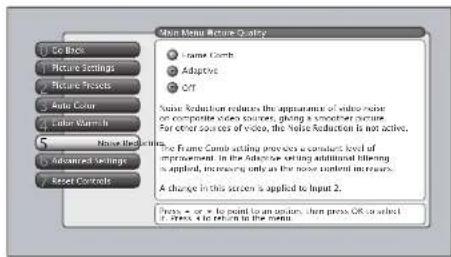
text_image
Main Menu Picture Quality Frame Comb Adaptive Off Noise Reduction reduces the appearance of video noise on composite case cases, giving a smoother effect. For other cases of video, the Noise Reduction is not active. The Frame Comb setting previous constraint level of improvement. In the After-Order setting additional filtering is applied, increasing only as the noise content increases. A change in this screen is applied to Input 2. Press = or = to point on system, then press OR to select if you are not in the form.Noise Reduction
Noise Reduction displays a list that lets you set one of the three settings that allows you to reduce picture "static" or any type of interference. A Noise Reduction setting can be stored for each input. You can set the Noise Reduction to Frame Comb, Off or Adaptive. The settings are explained in the on-screen help text.

text_image
Main Menu Picture Quality 1 Co Back 2 Picture Settings 3 Picture Texture 4 Auto Color 5 Color Warmish 6 Select Elements 7 Advanced Settings 8 Reset Controls The Advanced Settings menu has screens that let you enhance picture performance and adjust picture position. • Help Environmental: Make the picture's edges sharper • Green Stretch: Intensity and enhance choices of green • Content: Invariant intensity and enhance shades of black. • Film Mode: Improves the quality of movie playback. • Non-circular Position: Center the image is left. • Vertical Position: Center the image is up/down. Press > or < to select to an option, then press OK to select it. Press 4 to return to the menu.Advanced Settings
The Advanced Settings menu contains menus that allow you to fine tune the picture and adjust the picture position for a "bigger than life" experience. The settings available are: Edge enhancement, Green Stretch, Contrast Expand, Film Mode, Horizontal Position, and Vertical Position. Each one is described below.
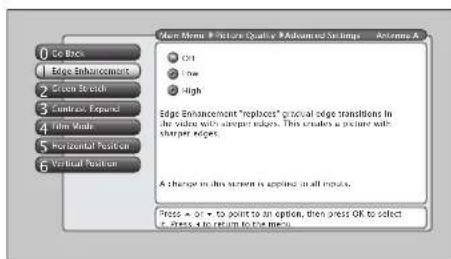
text_image
Go Back Edge Enhancement Cross Section Contract Expand Film Mode Horizontal Position Vertical Position Main Menu Picture Quality Advanced Settings Antenna A Off Low High Edge Enhancement "replace" gravel edge transitions in the video with sharper edges. This creates a picture with sharper edges. A change in this view is applied in all inputs. Press → or → to point to an option, then press OK to select it. Press & to return to the menu.Edge Enhancement
Edge Enhancement makes the edges of the video steeper and sharper. There are three options for the edge enhancement: Off, Low, or High. The default setting is High—the picture should appear sharper with crisper edges. If artifacts appear in the video, change the setting to Low or Off.
Any change to this feature is applicable to all video inputs and does not affect the Picture Settings.
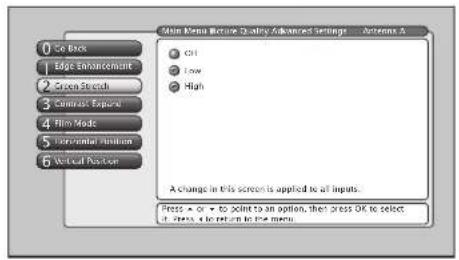
text_image
Main Menu Picture Quality Advanced Settings Options A Off Low High A change in this screen is applied to all inputs. Press > or < to point to an option, then press OK to select it. Press, e to return on the menu.Green Stretch
Green Stretch makes green "greener" and increases the saturation. Nature shows and sporting events are especially enhanced by this feature. The options are Off, Low, and High.
Any change to this feature is applicable to all video inputs and does not affect the Picture Settings.
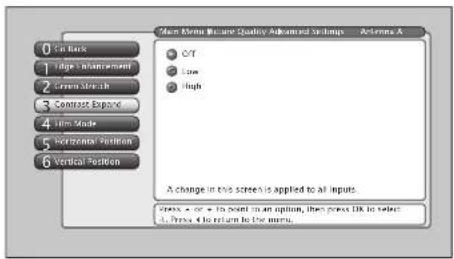
text_image
Main Menu Picture Quality Advanced Settings Actions A On Back Edge Environment Screen Mode Contexts Explore Film Mode Horizontal Position Vertical Position C/T Low High A change in this screen is applied to all inputs. Press x + or + to point in an option, then press EKC to select a. Press 4 to return to the menu.Contrast Expand
Contrast Expand makes the picture appear brighter by deepening the black parts of the picture. This also helps to maintain a more consistent black level from one scene to the next. The options are Off, Low, and High.
Any change to this feature is applicable to all video inputs and does not affect the Picture Settings.
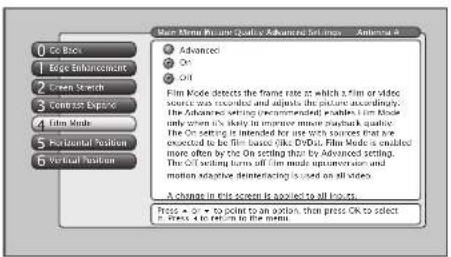
text_image
Main Time Picture Quality: Advanced Film Lines - Antimark Advanced On Off Film Mode detects the frame rate at which a film or video source has recorded and adjusts the picture accordingly. The Advanced setting (Recommended) unless it does only when it's likely in immersive music playback quality. The On setting is intended for one video source that is selected to be film based on like Drift. Film Mode is enabled more often by the On setting than by Advanced setting. The On setting turns off film mode upconversion and motion automatic demonstrating is used on all videos. A change in this screen is applied to all videos. Press > 0 → to point to an action, then press OK to select in words to return to the form.Film Mode
The Film Mode feature automatically detects video sources that have been converted to a different format. Film mode modifies the converted signal so it looks as close as possible to the original, a process called reverse 3:2 pulldown. Options are Advanced, On, and Off.
- Advanced The default and recommended setting.
- On Used in circumstances when the TV is is to be used solely with film-based sources.
- Off Use this setting if you think the reverse 3:2 pulldown is causing distortions in your picture.

text_image
New Model Picture Quality Advertiser Settings - Antenna A 1 Se Back 2 Edge Enhancement 3 Screen Stretch 4 Contrast Expand 5 Film Make 6 Digital Version 7 Vertical Version A change in this scope is applied in Antenna A - Digital. Press + or * to point by an option, then press OK to select C. Press + to return to the home.Horizontal Position
If you don't like the position of the picture on the screen, try using the Horizontal Position menu to move the picture right or left. This feature is available for all inputs. When you set this feature for a single 1394 input, it is applied to all the 1394 inputs.

text_image
Main Menu: a Picture Quality Advanced Settings - Antenna A 1 Go Back 2 Edge Enhancement 3 Green Stretch 4 Contrast Sand 5 Film Mode 6 Image Provisions Vertical Options A Change in this screen is applied to Antenna A - Digital Press → or → be press, in an option, then press OK to select it, then get up to return to the menu.Vertical Position
If you don't like the position of the picture on the screen, try using the Vertical Position menu to move the picture up or down. This feature is available for all inputs. When you set this feature for a single 1394 input, it is applied to all the 1394 inputs.

text_image
Main Menu Picture Quality 1 Get Back 1 Picture Settings 2 Picture Resets 3 Audio Color 4 Color Warmsh 5 Noise Resolution 6 Advanced Settings 7 Reset Controls Reset Controls will change all Picture Quality settings back to their initial values except for Horizontal and Vertical Position settings. The settings for digital source inputs (Input 5, digital TV, DVD link aperture) and are reset as one. The settings for analog TV from both antennas operate and are reset as one. Inputs 1-4 and the frame input process and are reset independently. SvK and Film Mouse apply to all inputs and are reset across all inputs. Select "Reset" to continue or select "Cancel" Reset Cancel Press = or → to point to an option, then press OK to select if. Press is returned in the menu.Reset Controls
The Reset Controls menu button resets all picture quality controls to their original factory settings (except Horizontal Position and Vertical Position) for the currently tuned input or group of input sources (see on-screen text).
- Tune to the "input" you would like to reset.
- Press MENU to access the Main Menu.
- Select Picture Quality, and then select Reset Controls to set reset the settings for the currently tuned input.

text_image
1 Go Back 2 CMNT Plastic Menu 3 Nature Quality 4 Audio 5 Time 6 Structural Controls 7 Connections 8 Preferences 9 Assisted Setup Main Menu The Audio menu has screens for adding the audio features and for breaking the sound. • Equalizer Presses: Select a preset or adjust the equilizer. • Audio Processors: Choose the way for programs to sound. • Sound Logic: Turn 1 to minimize variations in volume. • Audio Language: Select a default or a current audio track. • SAP: Turn on SAP to reach a efficient audio track. • Alliance from the audio between the left and right speakers. • Fixed/Variable Out: Choose output for an amp or receiver. • Digital Audio Out: Choose other Audio Select or PCM output. Press OK or to access the Audio menu.Audio Menu
The Audio menu lets you adjust audio output. To access the Audio menu, press MENU on the remote, and then select Audio from the main menu. The following audio items can be adjusted: Graphic Equalizer, Audio Processor, Sound Logic, Audio Language, SAP, Balance, Fixed/Variable Out, and Digital Audio Out.
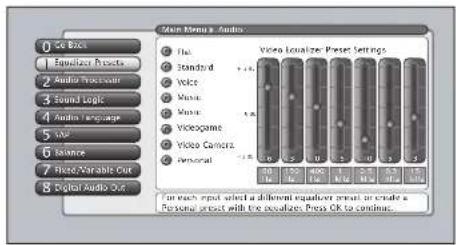
text_image
Main Menu: Audio File Standard Voice Voice Voice VideGame Video Camera Personal Video Localize Press Settings 50 Hz 120 Hz 40 Hz 1 Hz 3.5 Hz 6.5 Hz 12.5 Hz For each input select a different equalizer press or create a Personal project with the optional Press OK to continue.Equalizer Presets
You can select one of the seven-band Equalizer Presets or create your own personal preset. The seven-band graphic equalizer lets you adjust the audio frequency settings. The equalizer can only be changed if the Fixed/Variable Audio Output is set to Variable Output. If the Fixed/Variable Audio Output is set to Fixed Output, you cannot make changes to the equalizer and the bands are set to 0dB. However, the graphic equalizer levels for Variable Output are stored in memory in case you switch to Fixed Output then back to Variable Output.
Notes: If the internal speakers are used as the center channel audio speaker from an external audio receiver, the graphic equalizer settings do not apply. Equalizer Presets are stored for each input. All other audio feature settings are stored globally across all inputs and not per input.
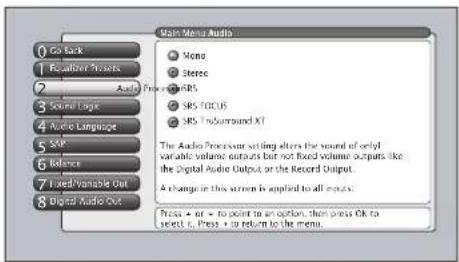
text_image
0 Go Back 1 Recalizer Presets 2 Audio From 3 Source Logic 4 Audio Language 5 SVP 6 Balance 7 Fixed Variable Out 8 Digital Audio Out Main Menu Audio Mono Stereo SRS FOCUS SRS Endurrounded XT The Audio Processor setting alters the sound of only variable volume outputs but not fixed volume outputs like the Digital Audio Output or the Record Output. A change in this screen is applied to all menus. Press + or - to point to an option, then press Ok to select it. Press + or return to the menu.Audio Processor
The Audio Processor displays a choice list of available audio modes, which control the way the sound comes through your speakers when TV is set to using the Variable Output. The selected setting affects all inputs and antennas.
To create the settings:
- Press the MENU button to access the main menu.
- Select Audio, and then Audio Processor. Depending on your speaker setup, any combination of the following options appear:
-
Mono plays the sound in monophonic audio only. This should only be used when receiving broadcasts where distance from the broadcasters makes the stereo signal weak. The channel banner displays the word Mono when you tune to a program that is broadcast in mono.
-
Stereo Splits the incoming stereo audio signal into left and right front channels. Most TV programs and recorded materials have stereo audio. The channel banner displays the word Stereo when you tune to a program that is broadcast in stereo.
- SRS(●) Adds greater depth and stereo separation to stereo audio signals. Delivers a panoramic 3D sound stage from stereo material.
- SRS(●) Redirects the treble portion of the audio in the speaker system to make dialog more understandable. Repositions and elevates the audio to the center of the TV.
- SRS(●) Creates a virtual surround sound from multichannel source material through any two-speaker playback system.

text_image
Sound Logic Only Sound Logic Off Sound Logic On Turning Sound Logic on will monitor a program's audio track and limit volume excursions to a minimum and maximum volume range from the current volume setting. Acting like a dynamic range limit, it compresses the dynamic range to limit audio volume increases. The example, this sudden increase in volume you sometimes hear when a commercial stand. A change in this screen is applied to all links. Press - A + - to point to an option, then press OK to select it. Press - A to return to the menu.Sound Logic
Monitors a program's audio track and limits volume excursions to a minimum and maximum volume range from current volume setting. Acting like a dynamic range limiter; it compresses the dynamic range to limit suggested volume increases (for example, the sudden increase in volume you sometimes hear when a commercial starts). Choose Sound Logic On or Sound Logic Off, depending on your preference.
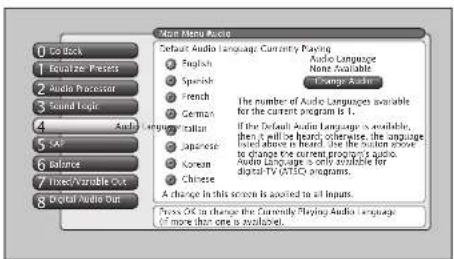
text_image
Main Menu Audio Default Audio Language: Currently Pacing English Spanish French German Change Audio The number of Audio Languages available for the current program is 1. If the Default Audio Language is available, then it will be heard otherwise, the language level above is heard, the system will move to change the current program's audio. Audio Language is only available for digital TV V4/3C programs. A change in this screen is applied to all inputs. Press OK to change the Currently Playing Audio Language (if more than one is available)Audio Language
The Audio Language menu lets you choose the default audio language you want to hear for ATSC (digital TV) programs. If the Audio Language icon (☐) in the banner lights, it means there is more than one audio language or audio format (Dolby Digital, DTS, etc.) available. The system automatically sets the audio program to the default audio language when the channel you are viewing is a digital terrestrial channel and the specified language is available for that program.
In the Audio Language menu, highlight the default audio language you want by pressing the up and down arrow buttons on your remote control. Press OK to select whenever available on a channel to hear that Audio Language.
Some programs may have audio languages available that you can hear but can't be set as the default. To select and hear those audio languages, navigate to the "Change Audio" action button and select OK, or use SOUND button on remote.
Note: You can change the Audio Language temporarily by pressing SOUND button on the remote control. Changing channels reverts the channel back to the default Audio Language original selected in the menu.

text_image
Go Back Equifax Results Audio Processor Lunar Logic Audio Language SAP Balance Fixed/Varise Out Digital Audio Out Non-Music Music SAP ON SAP ON SAP cards for "Secure Audio Program*. When SAP is available for a program, the SAP can in the channel buffer will light up. SAP cannot be another language, descriptions for the visually impaired, or audio not related to the program that example. music or news. If you see "SAP On" and SAP is available for a program, you will have SAP for any changes where it is available. SAP is only available for analog I/PCI programs. A change in this program is applied as follows: Press + or - to point for an option, then press OK to select it. Press + to return to the button.SAP (Second Audio Program)
When turned on, Second Audio Program plays the program's audio in a second language, if one is available. SAP is also used to broadcast a program's audio with descriptions of the video for the visually impaired. Or, SAP might contain audio which is totally unrelated to the video.
Notes: SAP is broadcast in mono and is only available for analog programs, not digital programs.
You can activate SAP (if available) temporarily with the SOUND button. Changing channels reverts SAP back to original SAP menu setting.
TruSurround XT, SRS and (o) symbol are trademarks of SRS Labs, Inc. TruSurround XT technology is incorporated under license from SRS Labs, Inc.

text_image
Main Menu Audio 0 Set Back 1 Equalize Presses 2 Audio Processor 3 Sound Logic 4 Audio Language 5 S&P 6 Balance 7 Format/Variable Cut 8 Digital Audio Dot Set the balance for the internal and external speakers using the left and right arrows on the remote control. A change in this section is applied to all inputs. Balance allows you to adjust speaker balance output. Since the but left or right to adjust the speaker balance.Balance
The Balance setting applies to the internal speakers, rear external speakers, and the headphone output. Balance does not affect any other audio output. Balance is how much audio (loudness) gets sent to the left and right speakers.
Note: Balance setting affects only variable-volume outputs.
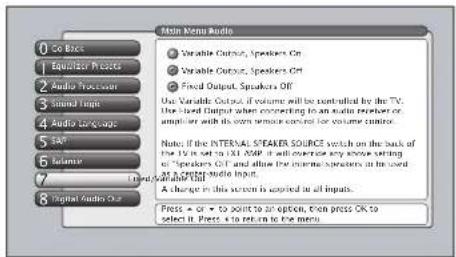
text_image
Main Menu Radio 0 Co Block 1 Equilibor Pro Costs 2 Audio Transcass 3 Sound Image 4 Audio Language 5 SRF 6 Latiner 7 Digital Audio Out ● Variable Output, Speakers On ● Variable Output, Speakers Off ● Fixed Output, Speakers Off Use Variable Output if volume will be controlled by the TV. Use Hand Output when connecting to an audio producer or amplifier with its own remote control for volume control. Note: If the INTERNAL STEAKER SOURCE switch on the back of the TV is set to 1.01. SRF it will override any other setting of "Speakers Off" and allow the internal speakers at the level of 1.01. The Media Input. A change in this section is applied as all inputs. Press + o - to point to an option, then press OK to select it. Press + o to return to the menu.Fixed/Variable Out
The Fixed/Variable Out menu displays a choice list that lets you turn the TV's front internal and external speakers on or off and set the Fixed/Variable audio output to a fixed- or variable-control level. The choices are:
- Variable Output, Speakers On This setting turns the TV's front speakers On and allows variable output from the TV's Fixed/Variable Audio Output jacks. Use this setting if the TV is not connected to an audio receiver or amplifier and the volume is controlled by the TV.
- Variable Output, Speakers Off This setting turns the TV's front speakers Off and allows variable output from the TV's Fixed/Variable Audio Output jacks. Use this setting if the TV is connected to an audio receiver or amplifier and the volume is controlled by the TV.
- Fixed Output, Speakers Off This setting turns the TV's front speakers Off and provides fixed output from the TV's Fixed/Variable Audio Output jack to a receiver or amplifier. With the Fixed Output, the TV's volume control, graphic equalizer, and mute are disabled. This output is ideal when connecting to an audio receiver or amplifier that has its own remote control for controlling the volume.
Note: If the Internal Speaker source switch on the back of the TV is set to EXT AMP, it overrides any above setting of Speakers Off and allows the internal speakers to be used as a center speaker input.
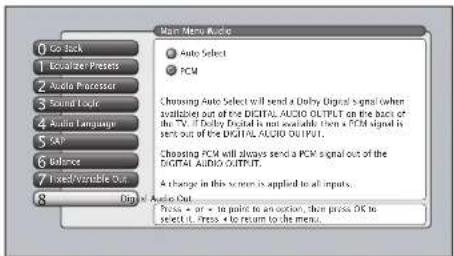
text_image
Main Menu Audio 0 Go Stock 1 Localizer Presets 2 Audio Comparator 3 Sound Logic 4 Audio Language 5 SGP 6 Balance 7 Fixed/Variable Out 8 On Auto Select PCM Choosing Auto Select will send a Unity Digital audio when utilized out of the DIGITAL AUDIO OUTPUT on the back of the TV. If Unity Digital is not available then a PCM signal is send out of the DIGITAL AUDIO OUTPUT. Choosing PCM will always send a PCM signal out of the DIGITAL AUDIO OUTPUT. A change in this screen is applied to all inputs. Press + or - to point to an option, then press OK to select it. Press + to return to the menu.Digital Audio Out
If you've connected a six-channel receiver to the TV's DIGITAL AUDIO OUTPUT jack with a digital optical cable, you can receive Dolby Digital ^® surround sound if transmitted. Choose the correct setting in the Digital Audio Out menu:
- Auto Select If selected, your TV automatically chooses between Dolby Digital and PCM based on the audio signal it is receiving. This is the best selection if you have a decoder with Dolby Digital* and PCM that was manufactured in the last several years.
- PCM (Pulse Code Modulation) If selected, the TV sends all signals through the Digital Audio Output in PCM.
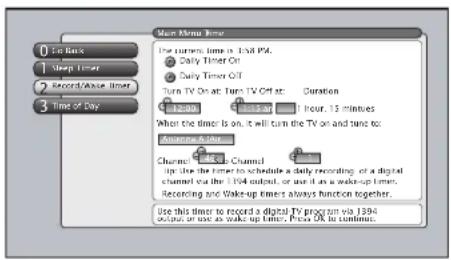
text_image
0 For Back 1 Sleep Timer 2 Record/Abuse Timer 3 Time of Day Main Menu Time The turners timer is 154 PA. ● Daily Timer Off ● Daily Timer Off Turn TV On at: Turn TV Off at: Duration 12:00: 13:33:30 hour, 15 minutes When the timer is on, it will turn the TV on and tune to: Anamara Active Channel: Live at: Channel Up the time to schedule a daily recording of a digital channel via the 1994 output, or use if an wake-up timer. Recording and Wake-up timer always function together. Use this timer to record a digital TV program via 1394 occup or use as wake-up timer, please OK in common.Time Menu
The Time menu lets you set up time-related features and a 1394 timed recording. Time menu consists of Sleep Timer, Record/Wake Timer, and Time of Day.
- Sleep Timer A one-time event that is used to set the TV to turn off at a specific time.
- Record/Wake Timer Used to turn the TV on and off at a specific time every day of the week and tune to a specific channel. In addition, it sets the TV to make a 1394 recording if a 1394 component is connected, set up, and the channel selected is digital. See pages 59, 60, and 72 for more information on a 1394 recording.
- Time of Day Enables you to enter the correct time manually if it hasn't been acquired automatically.
Note: If your TV does not automatically acquire the time, you must remember to set your TV's time when the time changes to Daylight Saving Time. Sleep Timer and Record/Wake Timer will not function as you expect if you forget to change the TV's time.
Connections Menu
The Connections menu specifies various ways to adjust the inputs to your television. Items in the Connections menu are: Antenna Info, Channel Search, Software Upgrade, Signal Source, Signal Type, Auto Tuning, 1394 Setup, Special Features, and Ethernet Setup.
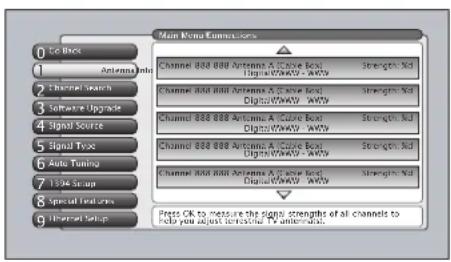
text_image
Main Menu Connections 0 Get Back 1 Antenna Roll 2 Thermal Search 3 Software Upgrade 4 Signal Source 5 Signal Type 6 Auto Tuning 7 11:04 Setup 8 Special Features 9 Internet Setup Channel 888 888 Antenna A/2 Case Box Digital/WAVW - AWY Channel 888 888 Antenna A/2 Case Box Digital/WAVW - AWY Channel 888 888 Antenna A/2 Case Box Digital/WAVW - AWY Channel 888 888 Antenna A/2 Case Box Digital/WAVW - AWY Channel 888 888 Antenna A/2 Case Box Digital/WAVW - AWV Channel 888 888 Antenna A/2 Case Box Digital/WAVW - AWV Channel 888 888 Antenna A/2 Case Box Digital/WAVW - AWV Channel 888 888 Antenna A/2 Case Box Digital/WAVW - AWV Channel 888 888 Antenna A/2 Case Box Digital/WAVW - AWY Channel 888 888 Antenna A/2 Case Box Digital/WAVW - AWY Channel 888 888 Antenna A/2 Case Box Digital/WAVW - AWY Channel 888 888 Antenna A/2 Case Box Digital/WAVW - AWX Channel 888 888 Antenna A/2 Case Box Digital/WAVW - AWX Channel 888 888 Antenna A/2 Case Box Digital/WAVW - AWX Channel 888 888 Antenna A/2 Case Box Digital/WAVW - AWX Channel 888 888 Antenna A/2 Case Box Digital/WAVW - AWY Channel 888 888 Antenna A/2 Case Box Digital/WAVW - AWY Channel 888 888 Antenna A/2 Case Box Digital/WAVW - AWY Channel 888 888 Antenna A/2 Case Box Digital/WAVW - AWW Channel 888 888 Antenna A/2 Case Box Digital/WAVW - AWW Channel 888 888 Antenna A/2 Case Box Digital/WAVW - AWW Channel 888 888 Antenna A/2 Case Box Digital/WAVW - AWW Channel 888 888 Antenna A/2 Case Box Digital/WAVW - AWY Channel 888 888 Antenna A/2 Case Box Digital/WAVW - AWY Channel 888 888 Antenna A/2 Case Box Digital/WAVW - AWY Channel 888 888 Antenna A/2 Case Box Digital/WAVW - AWZ Channel 888 888 Antenna A/2 Case Box Digital/WAVW - AWZ Channel 888 888 Antenna A/2 Case Box Digital/WAVW - AWZ Channel 88B 10000000000000000000000000000000000000000000000000000000000000000000000000000000000000000000000000000Tip
You can still add a channel that was not found by Channel Search, just tune to it by using the number buttons on the remote. If the channel can be locked, it will be added to the channel list.
Antenna Info
This screen lists any channel EVER added to the TV. The list shows the channel number, the station name when tuned, e.g. NBC, whether the channel is digital or analog, which antenna is picking up the channel, and current signal strength of digital channels.
When you move the highlight to the Antenna Info list, the TV attempts to tune to the channel. You can then adjust your off-air antenna for maximum signal strength (largest number) for the selected channel. The signal strength for a digital channel will be shown as “- -” until the signal is strong enough for use, then numbers will appear. Analog channels will always have the display, “N/A”, since analog signal strength is not measured.
Only primary channels appear in the list. Subchannels, e.g. 8-1, 8-2, do not appear.

text_image
Main Menu Connections 0 Get Back 1 Antenna Info 2 Channel Search 3 Software Upgrade 4 Signal Source 5 Signal Type 6 Auto Turing 7 13ne Setup 8 Special Features 9 Ethernet Setup Use all search the first time that your TV is setup to access for channels on Antenna A and E. Full Search will also automatically delete the proper Air or Cable setting. A Full Channel Search requires several minutes to complete. Thereafter, use Quick Search, if only searches the currently-closed antenna, keeps the Air or Cable setting the same, and is clear. Quick Search is useful when adjusting an over the air antenna to receive the channels for your area. Tip: If you have Cable and Air, connect Cable to Antenna A, if you have only Air, connect it to Antenna A. Status: Antenna A (Cable), Antenna B (Air) Quick Search Tool Press OK to start a full Channel search of both antennas including automatic detection of Cable or Air antennas.Channel Search
Engaging in a channel search tells the TV to search for all the terrestrial TV channels available through the antenna inputs. When the TV finds an active channel, it places it in the channel list. Inactive channels (weak stations or channels with no signal at all) aren't placed in the channel list.
The Channel Search screen lets you choose a Full Search or a Quick Search.
Full Search Searches both Antenna A and B, and automatically detects whether they are cable or off-air.
Note: A Full Search can take several minutes.
Quick Search Searches only for channels on the antenna you're currently using and uses the current Air or Cable setting. For optimum reception, you need to conduct a Quick Search after you've adjusted a terrestrial antenna because the TV might pick up new channels.
Notes: Channel Search takes a long time to complete because all possible analog and digital channels are being searched.
If a cable box is connected to Antenna A and GUIDE Plus+ Setup was performed, a channel search will not be permitted.

text_image
Main Menu & Connections Current Software Version and Date: 01/24/5/12/2013 If you have a connection to the TV's Internet Jack, your TV may potentially alert you to the availability of a TV. Software upgrade which can be downloaded through the Internet Jack. Smart Software upgrade is not available at this time. If we're available, you would be able to select a button on this screen to acquire it. You can view your current -Software version and check if a new software version is available. Press is to continue.Software Upgrade
The Software Upgrade screen contains current software information and indicates if a new upgrade is available. The software information and upgrades can be accomplished only if you have the TV connected via the Ethernet cable to the Internet with ISP subscription.
Note: If using a dialup service via a router connected at a dialup speed of 56K, the Software Upgrade could take several hours or more. If TV is unplugged while doing a Software Upgrade during this time, it could render the TV inoperable. You may want to decline a software upgrade if you have this setup.
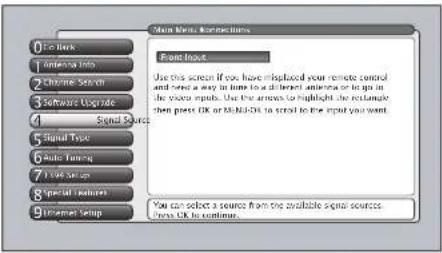
text_image
Main Menu: Structures 0 File Mount 1 Internet Info 2 Chrome Service 3 Software Upgrade 4 Signal Sources 5 Signal Type 6 Audio Timing 7 TV4 Setup 8 Special Features 9 Environment Setup Front Inact Use this screen if you have replaced your remote control and set up any in home to deliver antenna or to go in the video inputs. Use the arrows or highlight the external, then press OK or MDNOK to coral to the input you want. You can select a source from the available signal sources. Press OK to continue.Signal Source
The Signal Source menu allows you to choose the source from which you would like the signal to come: Antenna A, Antenna B, or Video Inputs. The same can be accomplished using the component buttons if you've set up Auto Tuning on the remote or the INPUT button. But, if you misplace the remote, this feature gives you another way to tune to a signal source.
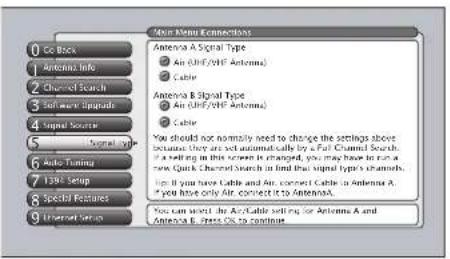
text_image
Scan Menu Connections 0 CC Book 1 Antenna Info 2 Channel Search 3 Software Ratings 4 Signal Sources 5 Signal Type 6 Auto Timing 7 13Hz Setup 8 Special Features 9 Internet Setup Antenna A Signal Type Air (dB/CF/Amenna) Cable Antenna B Signal Type Air (dB/CF/Amenna) Cable You should not normally need to change the settings above because they are not automatically by a Fast Channel Search. It is setting in this screen is changed, you may have to run a new Quick Channel Search in find that signal type's channels. Sign if you have Cable and Air, connect Cable in Antenna A, "I you have only Air, connect it to AntennaA." You can select the Air/Cable setting for Antenna A and Antenna B, less Oil to continueSignal Type
The Signal Type screen lets you choose whether you are receiving a signal from cable TV or an off-air antenna for Ant A or Ant B. When you run a Full Search in Channel Search, the TV automatically detects your signal and you don't have to specify it here. However, if you decide to change the source, you can use the Signal Type screen. Changing the source on Antenna A may mean that you will have to make changes to your GUIDE Plus+ Setup settings.
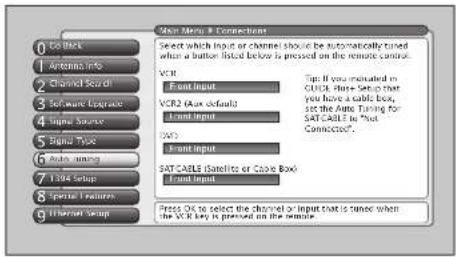
text_image
New Menu & Connection Select which input or channel should be automatically tuned what a better listed below is pressed on the remote control. VCT: Front Input VCR2 (Main default) Front Input SAT CABLE (Satellite or Cable Box) Front Input Press OK to select the channel or input that is tuned when the VCT key is pressed on the remote.Auto Tuning
This menu lets you specify the various components you have connected to your TV. It lets you program a component button on the remote control (VCR, VCR2 (AUX default), DVD, or SAT/CAB) so that pressing the button automatically turns on the TV and turns the TV to the correct Video Input Channel (see the Features chapter on page 55 for detailed information).
Note: AUX by default is set up for a second RCA VCR. Or, you can program VCR or AUX to operate a second RCA VCR with the 2001 code. Also, any VCR programmed to the AUX button becomes "VCR2" button and controllable by auto tuning.
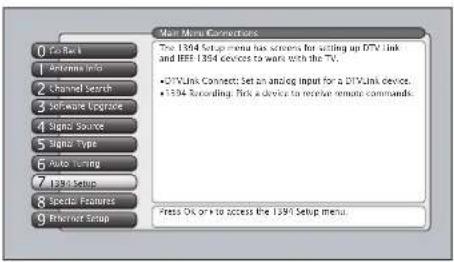
text_image
Main Menu Connections The 1394 Setup menu has screen for setting up DTV Link and IEE 1394 devices to work with the TV. • 2D Link Connect: Set an analog input for a 2D Link device. • 1394 Recording: Park a device to receive remote commands. Press OK or +to access the 1394 Setup menu.1394 Setup (DTVLink®)
The 1394 Setup menu consists of DTVLink Connect and 1394 Recording options to set up DTVLink and IEEE-1394 components to work with your TV.
DTVLink Connect Some DTVLink set-top components (IEA-775 compliant) need an additional analog video connection to the TV. The screen tells you which component needs this connection. You then select which of the TV's analog inputs is used for the analog connection from the DTVLink component.
Note: When a component is plugged in or unplugged, the DTVLink Connect screen is updated automatically.
1394 Recording Set up the component that can be controlled by the remote and which will be the default recording component when you press RECORD and STOP. Only the 1394 components capable of 1394 recording will be displayed. See page 60 for more details.
Notes: Some IEEE-1394 components supply power to other components. This TV does not supply power to other components.
The TV only outputs 1394 video and audio to a component which enforces copy-protection measures.
Some components that do not support Digital Copy Protection may cause errors on the DTVLink connection if another source that supports Digital Copy Protected material is connected to the DTVLink.
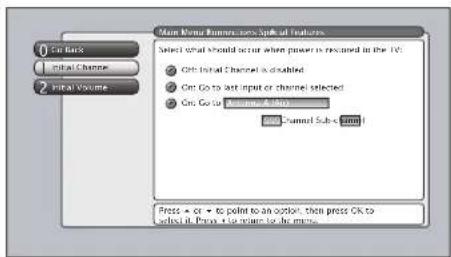
text_image
Main Home Channels and Topics of Features Select what should occur when power is restored in the TV: ● On Initial Channel is disabled ● On Go to last input or channel selected ● On Go to Member Activity Open Channel Sub-Form1 Press → or → to point to an option, then press OK to check it. Press → to return to the menu.Special Features
Initial Channel and Initial Volume are two special features that are intended for commercial/retail use only.
Initial Channel You can select the channel that your TV tunes to each time the TV is turned on or plugged in.
Initial Volume This features works only if the Initial Channel feature is set to On. Select the volume level that you want when the TV is turned on.
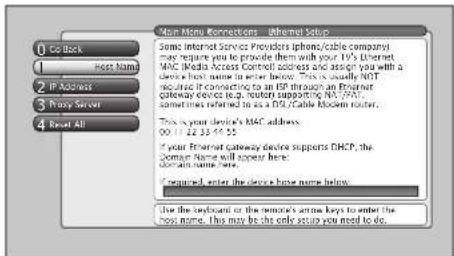
text_image
Home More Connection - Internet Status Some Internet Service Providers (iphone/cable company) may require you to provide them with your IPv6 Internet MAC/ Media Access Control address and assign you with a device's host name to either below. This is usually NIT to access IP connecting to an ISP through an Internet gateway device (e.g., router, supporting MA, 2950, sometimes referred to as a DOS/Cable Modem router). This is your device's MAC address. 00:17:22:33:54:55 If your Internet gateway device supports DHCP, the Domain Name will support Home domain name here. I generated, enter the device home name below. Use the playground or the remote's active keys to enter the home name. This may be the only setup you need to do.Ethernet Setup
If you have a NAT/PAT component with DHCP capability (router, etc.), no setup is required. The TV automatically sets itself up for Ethernet use. If you do not have a NAT/PAT router, you may need to establish some settings in conjunction with your ISP (Internet Service Provider) before you can connect to the Internet. See Ethernet connection on page 15 for more information.
A Reset All selection is provided for your convenience if you move the TV to another city and must enter new information, or enter some incorrect information.
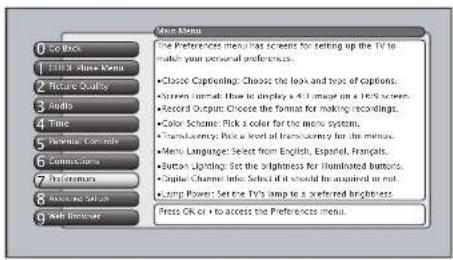
text_image
Open Menu 0 Get Back 1 Print Share Menu 2 Picture Quality 3 Audio 4 Time 5 Personal Controls 6 Communications 7 Preferences 8 Audio/Share Station 9 Audio Browser The Preferences menu has screens for setting up the TV to touch your personal preferences. • Close Captioning: Choose the look and type of captions. • Screen format: How to display a 4.1 image on a 1.5X screen. • Record Output: Choose the format for making recordings. • Color Scheme: Pick a color for the menu system. • Transparency: Pick a level of transparency for the menu. • Menu Language: Select from English, Español, Français. • Button Lighting: Set the brightness for illuminated buttons. • Digital Channels Info: Select if it should be acquired or not. • Jump Power: Set the TV's ramp to a preferred brightness. Press OK or + to access the Preferences menu.Preferences Menu
The Preferences menu allows you to change some aspects of your TV to fit your personal preferences. Features in the Preferences menu are: Closed Captioning, Screen Format, Record Output, Color Scheme, Translucency, Menu Language, Button Lighting (some models), and Digital Channel Info.
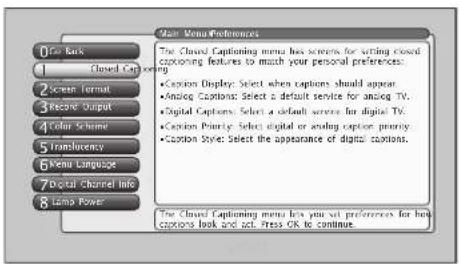
text_image
View Menu Preferences 0 Open Back 1 Closed Caption 2 Screen Format 3 Receive Output 4 Color Scheme 5 Transparency 6 Menu Language 7 Digital Channel Info 8 Long Power The Cloud Captioning menu has screens for setting closed captioning features to match your personal preferences. • Caption Display: Select when captions should appear. • Analog Captions: Select a default service for analog TV. • Digital Captions: Select a default service for digital TV. • Caption Priority: Select digital or analog option priority. • Caption Style: Select the appearance of digital captions. The Cloud Captioning menu lets you set preferences for how captions look and act. Press OK to continue.Closed Captioning
You may set the type of captioning displayed from the main tuner. Captioning is not available from the PIP tuner. Choices within the Closed Captioning menu are: Caption Display, Analog Captions, Digital Captions, Caption Priority, and Caption Style.

text_image
Main Menu Preferences: Open Captioning 0 Get Back 1 Caption Display 2 Analog Captions 3 Digital Captions 4 Caption Power 5 Caption Style ● Closed Captioning On ● Closed Captioning Off ● On when Mated You can choose when closed captioning information should be displayed on the screen. Note: Not all programs have closed captioning and closed captioning is not supported on input 3 (CA/NDTV). Caption Display is your wire, whether closed captioning is displayed when it is available. Direct OK to continue.Caption Display
The Caption Display menu displays a choice list that lets you choose when closed captioning information is shown on the screen. Input 5 (DVI-HDTV) is not supported by Closed Captioning.
Closed Captioning On Captioning information is always shown, when available.
Closed Captioning Off No captioning information is displayed.
On When Muted Captioning information is only shown when the TV's sound is muted, when available. (To mute the sound, press the MUTE button on the remote control and captioning information will appear on the screen, if available.)
Note: If you turned off the speakers in the Audio menu (Fixed Output, Speakers Off), Closed Captioning won't appear when you press the MUTE button on the remote even when you choose On When Muted.

text_image
Main Menu Preferences Included Capturing 0 Get Back 1 Click on Display 2 Analog Capsules 3 Digital Captions 4 Caption Priority 5 Caption Save CCI CC1 CC2 RCT 3 CC4 Text 1 Text 2 Text 3 Text 4 You can select a mode or source of closed captions for analog TV programs. If the "Caption Priority" volume is set to "Use the analog captions", then the analog caption made you select it also used for digital TV programs. Note: CCI and Text I are the primary caption and text services. Press ▲ or ▼ to prompt to an option, then press OK to select if Press 4 is required for more.Analog Captions
You can select a closed caption mode, which is the mode, or source, used for displaying captioning information for analog channels or digital channels, if available. The content of CC and Text are different; you can select which one you want to see on the screen.
CC CC displays information at any position on the screen. It overlays the text on top of the picture as it is received.
Text Text displays information at one particular position (such as the bottom third) of the screen. You cannot see the picture underneath the text.
You can choose between eight closed caption modes, or sources:
- CC1 and Text 1 are the primary caption and text services. The captioning or text is displayed in the same language as the program's dialog.
- CC3 and Text 3 serve as the preferred data channels. The captioning or text is often a secondary language translation, simplified English, or displayed at a slower rate.
- CC2 and CC4 and Text 2 and Text 4 are rarely available and broadcasters use them only in special conditions, such as when CC1 and CC3 are not available, or Text1 and Text3 are not available.
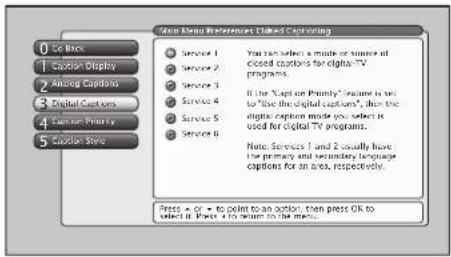
text_image
Main Menu Preferences Clued Contouring 0 Get Back 1 Action Display 2 Analog Captions 3 Digital Captions 4 Action Priority 5 Action Save Service 1 Service 2 Service 3 Service 4 Service 5 Service 6 If the "Capt on Priority" voice is set to "live the digital captions", then the digital caption inside you. Select it used for digital TV programs. Note: Services 1 and 2 usually have the primary and secondary language captions for an area, respectively. Press + or - to point to an option, then press OK to select if Press is to return in the menu.Digital Captions
You can select a closed caption, service mode (1-6) for digital channels. The service modes support MPEG-2 based transport sources such as DTVLink.
Service 1 and Service 2 are the primary and secondary languages, respectively.
Service 3 and Service 4, 5, 6 are additional caption sources that may be available. Specific label names may be displayed (e.g., Spanish) instead of a generic label (e.g., Service 1), if available.

text_image
Main Menu Investments Included Consuming 1 Digital TV program has both analog and digital captions. 2 Use the digital captions. Never use analog captions. 3 Use the analog captions. Never use digital captions. 4 Analog captions will include analog TV captions and digital TV captions, either one or two, or neither on the tool. The setting above will determine which type of captions the TV will display. 5 Analog captions will be used more often in the early years of digital TV broadcasting. Digital captions are more advanced and have new adaptations. Press > on > to select to an option, then press OK to select if it is able to return to the menu.Caption Priority
You can choose whether the TV uses digital or analog captions for digital TV programs that have both or either.
If you select analog on digital captions and they are available for a digital TV program, the CC icon in the banner lights. The captions are displayed if turned on in Caption Display.

text_image
User Menu Preferences: Click-Connecting 1 On Back 2 Custom Display 3 Analog Captors 4 Digital Captors 5 Custom Priority 6 Custom Style When to choose digital captions can be displayed using: ● Your custom settings below: ○ The caption provides default settings. ● Document Color on Font ● Font Color on Font ● Background Color ● Background Color ● Background Overlay ● Background Overlay Press OK to select one of the three Caption sizes. Press it to return to the menu.Caption Style
Customize closed captioning for the digital captions by choosing the settings for the following options:
Caption Size is the font size (Standard, Large, Small) of the text characters.
Caption Font is a complete assortment of letters, numbers, punctuation marks, etc. of a given font design. You have eight fonts with varying styles of spacing from which to choose.
Note: A preview graphic of the caption font appears on the right of the screen.
Caption Color allows you to choose the font color: White, Black, Red, Green, Blue, Yellow, Magenta, and Cyan.
Background Color allows you to choose the background color: White, Black, Red, Green, Blue, Yellow, Magenta, and Cyan.
Background Opacity allows you to change the see-through options: Solid, Transparent, Translucent, and Flashing. Solid is the default setting.
Caption Opacity allows you to change the see-through options: Solid, Transparent, Translucent, and Flashing.
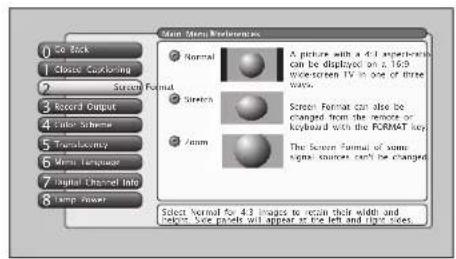
text_image
Main Screen Preferences 1 Se stick 2 Close Coupling 3 Screen Format 4 Board Output 5 Color Subway 6 Touch/Match 7 Match/Sequence 8 Digital Channel Into 9 Temp Power Normal A picture with a 4.3 experience can be displayed on 2.169 mice screen IV in one or three times. Stretch Screen Format can also be changed from the lenses or keyboard with the FORMAT key. Form The Screen Format of some images contains each be changed. Select Format for 4.3 images to retain their width and bottom. Size panels will appear to be left and right sides.Screen Format
The Screen Format feature allows you to change how the image of a 4:3 picture is displayed on your 16:9 screen. The options are Normal, Zoom or Stretch. If your TV receives an image with a 4:3 aspect ratio, the image can be displayed in one of three ways:
Normal The image of a 4:3 video signal is centered with black bars on the right and left sides of the screen.
Stretch The image of a 4:3 video signal is stretched horizontally by approximately 33% while the vertical size stays the same.
Zoom The image of a 4:3 video signal increases by approximately 33% and the vertical size increases by approximately 33%.
Notes: There is no ability provided to change the screen format for a 16:9 video signal since it fills up the entire area of the TV's screen.
The FORMAT button on the remote gives you access to change the format with a one-button press rather than navigating through the menu system.
Normal and Stretch do not affect Record Output; Zoom may alter the original video.
Some programs are copy protected and cannot be recorded. If the REC icon in the banner is dim, a recording cannot be made because of copy protection limits. If REC icon is bright, the program can be recorded.
The format of some video cannot be changed even though it appears to be a 4:3 aspect-ratio picture.
Use the FORMAT button to view screen formats (Zoom, Stretch) other than those with side panels. Some video formats may not be able to be changed with the FORMAT button.

text_image
Main Menu Preferences 0 Ce Back 1 Close Scattering 2 Screen Format 3 Record Output 4 Substrate 5 Transparency 6 Multi Language 7 Digital Channel Info 8 Lamp Angle ● Cropped Recording (Enter Cut) ● Aromatic Video Recording You can record audio and digital programs by connecting the RECORD OUTPUT jacks to a video recorder. All signal outputs can be recorded except for input 4.0MHz/12V, and some component video formats. 16.0 images can be recorded in one of two ways. "Cropped records the better of a 1.0x image and a best or quickboard on a standard 4.3" X. Aromatic Image appears a 16.0 image into a 2.3 area during playback on this wide-street. 189.1X apply the "Switch" format to recreate a 16.0 "wide" image. Press > or > to point to an option, then press OK to select it. Press is to return to the menu.Tip
Pressing FREEZE button also freezes RECORD OUTPUT, but not 1394 output.
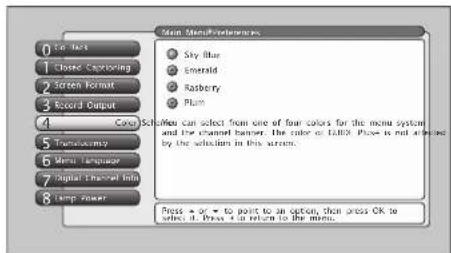
text_image
Main Menu Preferences ● Sky Blue ● Emerald ● Raspberry ● Plum Menu Color can select from one of four colors for the menu system and the channel banner. The color of TABLEX: Please not allowed by the selections in this section. Press → or → to point to an option, then press OK to select it. Press → to return to the menu.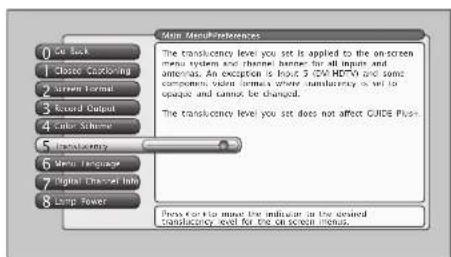
text_image
Main MenuPreferences 1 Close Controlling 2 Screen Formal 3 Record Output 4 Color Scheme 5 Transconductance 6 Mini-Transpacing 7 Digital Channel Info 8 Clamp Power The transconductency level you set is applied to the on-screen menu system and theme banner for all inputs and outputs. An exception is known 2.0% HOURS and some components, void norms where transconductance is set to opaque and cannot be changed. The transconductance level you set does not affect GUIDE Push. Press for help master the indicator in the desired transconductance level for the on-screen menus.Record Output
16:9 signals can be recorded in one of two ways: Cropped Recording (Center Cut) and Anamorphic Mode Recording. Cropped Recording records the center of a 16:9 signal and the Anamorphic Mode Recording compresses the 16:9 signal into a 4:3 area.
Notes: To make the "cleanest" recording, avoid using PIP, the GUIDE Plus+ system, freeze function, browser, or zoom screen format. Doing so will have unwanted effects on the recorded video.
The TV does not need to be on to make a recording as long as the recording being made was set up in the GUIDE Plus+ system. When the TV is off, the Record Output may show the TV tuning channels in a data acquisition activity. This is normal.
If an unusual pattern appears when you connect your VCR input to the RECORD OUTPUT, playing a tape or switching to the VCR's tuner removes the pattern.
Color Scheme
Select from among four colors (Sky Blue, Emerald, Raspberry, and Plum) to change the color of the menu system and banner.
Note: The guide and browser colors are unaffected.
Translucency
You can change the translucency (see-through) level of the menu screens. Adjust the slider by using the left and right arrow buttons.
Notes: This does not apply to GUIDE Plus+ system and browser.
Some video formats do not support the display of translucency on-screen displays.

text_image
Main Menu Preferences ● English English with the "and" button. Select with the Off button. Menu Language only effects the menus, not the GUIDE. ● Export Browse can be tracked - y - selected from the border OK. New: New or be New due to this mode, no is 50%. ● France Mise on surveillance gives - at - Section zone OK. New: New or be new language for the menu, no plus in QUCF. Press - or - to sign to an option, then press OK to select it. Press: This return to the menu.Menu Language
The menu language can be changed to one of three languages: English, Spanish or French. The menu language can also be selected when using the Assisted Setup menu.
Note: Spanish and French are not available in the guide, browser, or in some software upgrade pop-up message screens.

text_image
Media Menu Preferences 1 On Back 2 Closed Screening 3 Screen Format 4 Audio Output 5 Social Server 6 Ter Madagascar 7 Button Lighting 8 Digital Channels Info 9 Lamp Power The buttons on the front of the TV are illuminated from the input to a small light. You can change the rightmost of the light by pressing it and on the remote. The setting of the video format is highlighted. Use the ring at the camera, right is the maximum length of press settings. Present that I should be an image based for the top-lighted buttons on the front of the TV "OFF" is at the very left.Button Lighting
You can adjust the brightness of the light that illuminates the buttons on the front of the TV. Press the left arrow on the remote to dim the light or turn it off completely by moving the slider all the way to the left. Press the right arrow button on the remote to brighten the light.

text_image
Map Maps# Foecevans For an input to manage the video call a custom mask to 1 • America A • Internet B • DVD 20, 1964. I you are saving difficulty using a digital channel that you know what, who may help us in which a custom Digital Channel Info. However, you should once that this and after the creation of images, square icons, and columns matches for digital channels. I may also affect the ability in time in the power channel from the Guide Line's Watch or Record door, for example. Whenever possible you should not use the Digital Channel. Note to be obtained. Digital Channel Information does not affect the makeup of GPIO. Please check details. Use OK to refresh your track. A check will begin the Channel Of: We do the next. No check will start again.Digital Channel Info
The Digital Channel Info option allows the TV to receive information about digital TV channels, such as program titles. The default is set to Acquire Digital Channel Information for Antenna A, B, and DTVLink/1394 inputs. Disabling acquisition of Digital Channel Info option should be reserved as a last resort because you may not receive important program guide information. You can elect to receive or not receive Digital Channel Info for Antenna A, Antenna B, and DTVLink/1394 independently. A new Quick Channel Search will occur for Antenna A and Antenna B when changing its Digital Channel Info setting.
Notes: When the TV is locked and you try to access the Digital Channel Info screen, the Password Entry screen appears (enter the password).
Disabling Digital Channel Info for an input source does not affect the acquisition of GUIDE Plus+ channel listings.
Channels remain blocked or viewable in the Parental Control feature regardless of the Digital Channel Info setting although the channels may appear to have changed.
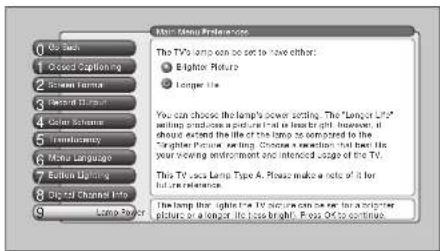
text_image
Main Media Preference 0 On Back 1 Closed Captioning 2 Screen Format 3 Audio/Video 4 Color Scheme 5 Transparency 6 Menu Language 7 Euktron Ordering 8 Digital Channel Info 9 Large Player The TV's lamp can be set to have other: ● Elightor Picture ○ Longer file. You can choose the lamp's power setting. The "Langer LRF" setting is closed and set up at least bright. However, it should extend the life of the lamp as compared to the "Langer Picture setting." Choose a resolution that then the year's viewing environment can be intended to use the TV. This TV's lamp Type A. Please make a note of it for future reference. The lamp that lights the TV picture can be set to a brighter picture or a longer its light brightness. Pos Off to continue.Lamp Power
Your HDTV is equipped with a special lamp system. Eventually, the lamp (like a light bulb) will need to be replaced. The Lamp Power menu enables you to extend the life of the lamp (choose Longer Life), or provide the brightest possible picture and keep the lamp at its normal operating duration (choose Brighter Picture).
Additionally, this menu tells you which type of lamp your TV has. To order a new lamp, you'll need to know your TV's model number, serial number, and lamp type—this information is listed on the Service Model Number sticker (example of the sticker is shown at left). The sticker is located on the right side of the TV.
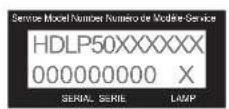
EXAMPLE: Service Model Number sticker with lamp type listed.
Reference
Chapter Overview:
- Troubleshooting
- Specifications
- Accessory Information
- Limited Warranty
- Care and Cleaning
- FCC Information
- Index
Troubleshooting
Most problems you encounter with your TV can be corrected by consulting the following troubleshooting list.
Note for U.S. customers: If you prefer, we can provide you with the name of an Authorized Service Representative who will visit you home for a fee to install your electronic entertainment system and to instruct you in its operation. For details about this service, call 1-888-206-3359. For additional assistance while using your RCA Scenium product, please visit www.rcascenium.com/customersupport.
TV Problems
TV won't turn on
- Press the TV button or ON/OFF button while remote is in TV mode and there's a source of power to the outlet or outlet strip.
- Make sure the TV is plugged in.
- Does the power light on the front of the TV blink several times? If so, the TV is in its cool-down cycle. Wait 30 seconds. If the TV doesn't turn on automatically after 30 seconds, turn it on manually.
- Check the wall receptacle (or extension cord) to make sure it is "live" by plugging in something else.
- Something might be wrong with your remote control. Press the POWER button on the front of the TV. If the TV turns on, check the remote control solutions on page 80.
- When you first plug your TV into an outlet, the Power LED on the front panel will light for approximately 15 seconds and then go off during the initialization of the TV. The TV can only be turned on after the Power LED goes off. This happens every time power is reapplied to the TV.
Power Light is blinking or flashing
The power light serves as an indicator. There are two scenarios for why the power light would blink:
Light blinks slowly: you've tried to turn on the TV when the lamp unit is cooling. Wait approximately 30
seconds and the TV will turn on automatically when the cooldown cycle is complete.
Light blinks slowly for several seconds, pauses for about a minute, blinks again, and pauses for about a
minute: the TV is trying to connect with the lamp unit. One of two things will happen:
- The power light will start flashing for approximately 1 minute — this means the lamp unit needs to be replaced (go to page 84 for ordering information).
- The TV will turn on (the TV has successfully connected with the lamp unit).
Buttons don't work
- If you're using the remote control, press the TV button first to make sure the remote is in TV mode.
- The front panel controls may be locked (disabled). Use the remote control to unlock the front panel controls by selecting the Front Button Block in the Parental Controls menu and choosing Front Buttons Unblocked.
- Unplug the TV for five minutes and then plug it back in. Turn the TV on and try again.
TV turns off while playing
- Sleep Timer, Wake-up Timer, or Watch feature may have been activated. Go to page 45 or 69 for instructions.
- Electronic protection circuit may have been activated because of a power surge. Wait 30 seconds and then turn on again. If this happens frequently, the voltage in your house may be abnormally high or low.
• The sleep timer may be set. - Unplug. Wait five minutes. Plug in again.
TV turns on unexpectedly
- Wake-up Timer feature or Watch from the GUIDE Plus+ system may have been activated. Go to page 45 or 69 for instructions.
Video and audio are out of sync
- If your TV is connected to an audio/video (A/V) receiver or home theatre system via the DIGITAL AUDIO OUT jack, read the following information.
If you've connected a component to your A/V receiver, such as a DVD player or satellite receiver, you may experience a slight delay between the audio heard and the video seen. This occurs because the digital audio is sent directly to the speakers while the video must be processed inside the TV before it is displayed.
- If the component has Component Video (Y, Pb, Pr) jacks, connect these jacks to the TV's Y, Pb, Pr jacks to minimize the discrepancy. This works best if the component supports Progressive Scan technology.
- If necessary, you can connect the component directly to the TV using L/R audio jacks and bypassing the A/V receiver or you can program an audio delay in the A/V receiver so the audio and video match up (not all audio equipment has the ability to program delays). Check the Audio/Video Receiver's manual.
Blank screen
- Make sure you have connected the component to the TV correctly.
- Make sure the component connected to the TV is turned on and tuned to the corresponding Video Input Channel.
• Try another channel.
- When you first turn off TV, the screen fades from blue to black. Once the screen goes black, the TV's internal lamp starts its cool-down cycle. If you try to turn on the TV during the cool-down cycle, the power light on the front of the TV will blink to alert you that you need to wait (when the cool-down cycle is complete—about 30 seconds—the TV turns back on automatically).
- If you're trying to tune to a digital (ATSC) channel that you know exists, you may need to disable the Digital Channel Info. Go to the Main Menu (press MENU); choose Preferences (press 7); choose Digital Channel Info (press 8). If you're using the TV's Web Browser, it times out automatically when idle for a period of time.
- If you're trying to play a 1394 Recording, you may have accessed an "unrecorded" subchannel. Press the CH+ or CH- buttons to go through the subchannels before you get to the subchannel you recorded. This occurs even when you've selected to record only a specific subchannel because of how digital (ATSC) channels are broadcast and recorded by your 1394 device—the data for the subchannel is recorded, but not the content.
Unusual sound quality
- Check the Graphic Equalizer, SRS, and Sound Logic settings.
Humming or buzzing noise
- The TV is in its lamp cool-down cycle. To prolong the life of the TV's lamp system, the TV must warm up and cool down properly. You may notice additional noise during these cycles.
- Maybe the speakers are turned off. Check the FIXED/VARIABLE OUT control panel in the Audio menu.
No picture, sound okay
- If the indicator on the front of the TV is blinking, the lamp inside of your TV may need to be changed. Go to page 84 for ordering information.
No sound, picture okay
- Maybe the sound is muted. Try pressing the volume up button to restore sound.
- Maybe the speakers are turned off in the Audio menu. Check the FIXED/VARIABLE OUT control panel in the Audio menu.
- If using an S-Video connection, DVI-HDTV, component video and composite video, remember to also connect the component's L and R AUDIO OUT jacks to the TV's L and R INPUT jacks.
- Check the position of the INT' W/EXT' SURR and EXT' switch on the back of the TV.
• Make sure the correct Audio Processor mode (Mono, Stereo, SRS, SRS FOCUS and SRS TruSurround XT) is selected.
Can't select certain channel
- May be blocked or not approved in the Parental Controls menu.
- If using a VCR, check to make sure the TV/VCR button on the VCR is in the correct mode (press the TV/VCR button on your VCR).
- You can't change channels when a menu is on the screen (press the CLEAR button).
Noisy stereo reception
- May be a weak station. Use Audio menu to choose Mono sound.
No picture, no sound but TV is on
- Maybe the cable/air function is set to the wrong position. Select GUIDE Plus+ Menu from the Main menu, select the GUIDE Plus+ Setup option, and provide the correct information on the following screens. Go to pages 46-47 for detailed instructions.
- The channel might be blank — change channels.
- If you're watching your VCR and it's connected with coaxial cable to the CABLE/ANTENNA jack, tune the TV to channel 3 or 4 (whichever channel is selected on the 3/4 switch on the back of your VCR). Also check to make sure the TV/VCR button on the VCR is in the correct mode (press the TV/VCR button on your VCR).
- If a channel doesn't exist and you tune to scrambled QAM channel or a 720p input, Unusable Signal appears.
Sound okay, picture poor
- Check antenna and video connections. Make sure all of the cables are firmly connected to the jacks.
- Try adjusting sharpness function to improve weak signals. Go to page 64 for more instructions.
- Press the FORMAT button repeatedly to view the picture in different video formats. Analog channels may look better when you use the Normal video format (the video format appears on the right side of the channel banner).
Black box appears on the screen
- Closed-captioning might be on. Check the Caption Display control panel in the Preferences menu. Go to page 72 for more instructions.
Every time I turn on the TV, the Guide is on the screen
- The GUIDE Plus+ system automatically appears on the screen when you use the TV button on the remote to turn on the TV. You can turn off this feature by pressing GUIDE on your remote control and then select the Menu bar. Press the right arrow button to select Setup. Choose Review options and select OFF.
GUIDE Plus+ System Problems
GUIDE Plus+ setup won't turn off tape for VCR setup and/or channel 02 cable box
- Check to see if the G-LINK wands are positioned correctly in front of components' remote sensors.
• GUIDE Plus+ system control of cable box is slower than direct control of the box itself. Keep this in mind when changing channels. - You may have an incorrect GUIDE Plus+ Channel Lineup. The guide may get out of sync with the cable provider. Use the GUIDE Plus+ Setup in the GUIDE Plus+ Menu to change the zip code to 99999. Turn the TV off for 10 minutes. Use Setup again to change the zip code back to the correct value. If asked, be sure to select the correct channel lineup from the on-screen list.
Program information doesn't download
- Review your setup information and make sure it's correct. Press MENU on the remote and select GUIDE Plus+ System menu and then Setup. Go to page 47 for detailed instructions about the GUIDE Plus+ Setup menus.
- The TV must be off to download information. Leave your TV off overnight, for at least 10 hours, to receive the initial download for your area.
- If you're using a cable box, leave it on so you can receive program information.
- The GUIDE Plus+ system doesn't display program listings for satellite TV.
Scheduled Watch or Record doesn't occur
- Check Schedule for timer conflicts. Go to page 46 for instructions.
• Make sure the wands of the G-LINK cable are placed in front of the remote sensor(s) on the component(s). -
Make sure your VCR is turned off during the time you've scheduled to record a program because the system turns the VCR on when it starts recording (if it's already on when recording starts, the system will turn it off).
-
Make sure there is a tape in the VCR and that the VCR is connected properly.
- Make sure VCR is tuned to the line input. Don't change channels.
- Be sure that you set up the VCR in the GUIDE Plus+ Setup menus. If you don't complete the Configuring for a VCR steps successfully, the Record option won't be available. Go to page 28 for detailed instructions.
- If a cable box is attached to your TV, make sure you set it up correctly in the GUIDE Plus+ Setup menus. Go to page 27 for detailed instructions.
- The guide comes up each time you turn on the TV. You can disable the guide by going to the Auto-on feature in the GUIDE Setup menu and select Review Options.
Doesn't tune to correct antenna input
- Because of occasional irregular data, the guide may inadvertently tune to the incorrect antenna input in the video window or when using CLEAR to exit the guide.
The Remote Control Doesn't Work
- Something might be between the remote and the remote sensor on the component. Make sure there is a clear path.
- Maybe the remote isn't aimed directly at the component (TV or VCR) that you're trying to operate.
- Maybe remote is not in TV Mode. Press the TV button so the remote controls the TV.
- Maybe batteries in remote are weak, dead, or installed incorrectly. If batteries are weak, you will not be able to activate backlighting on the remote; instead, backlight will blink once when activated. Put new batteries in the remote. (Note, if you remove the batteries, you may have to reprogram the remote to operate other components.)
- When using the Learning feature, do the learning process in low light areas to prevent natural light and fluorescent light interfering with the infrared signals.
- For Volume Punchthrough, remember to program the AUDIO button on the TV's remote control to operate your audio receiver or amplifier. Go to page 34 for instructions. If you can't program this remote to operate your audio receiver, Volume Punchthrough won't work.
Problems with V-Chip/Parental Controls
The rating limits don't work
- You must lock the settings. Go to the MAIN MENU (press MENU on your remote), select Parental Controls (press 5 on your remote), select Lock TV (press 1 on your remote).
I don't remember my password and I want to unlock the TV
- If you forget your password, simultaneously press and hold MENU/OK on the television and VOL down on the remote for 3 seconds. Nothing appears on the screen, Parental Controls simply unlock and you can re-enter a password via Lock TV.
The V-Chip won't let me watch a program even though it's not rated as violent.
- Maybe the movie was given an NR (Not Rated) status. After you block movie ratings, you must set V-Chip Unrated to View separately in order to view movies with an NR rating.
Problems with 1394 Recording/Playback
- Make sure the 1394 components are not looped. See page 16.
- If the network speed seems slow, make sure the 1394 component that has the fastest speed is first at point of connection to TV. Check component manual's for network speed. See page 16 for more information.
- Make sure the program is digital (ATSC) or no recording will take place.
- If a program is not recorded, it could be the 139% component enforces copy protection standards.
- If you cannot find the program you recorded, channel through the subchannels.
HDTV Specifications\*\*
Tuning Capability
Channel Tuning ....NTSC/ATSC/64 QAM - 256 QAM
Digital Cable Compatibility 1394 (DTVLink), 64 QAM - 256
QAM, DVI/HDTV, Component
Video
3:2 Pull Down (Film Mode)......Reverse Diagonal
4:3 Format Control (Screen) Normal, Zoom, Stretch
Adaptive Video Noise Reduction ....Yes
Adjustable Color Warmth.....Yes
Adjustable Picture Control ....Yes
Auto Color Control ....Yes
Auto Flesh Yes
Comb Filter......Digital Frame Comb (3D Y/C)
Contrast Expand ....Off, Low, High
Optimum Contrast, High-Resolution Screen ....Yes
Edge Replacement ......Off, Low, High
Green Stretch ....Off, Low, High
Horizontal Resolution (Picture Width)....1280
Horizontal Viewing Angle (Alpha H) 85°
Hybrid Lens System Yes
Integrated Shield Yes
Picture Presets ....Vibrant, Natural, Cinematic ....Personal
Light Engine Type ....DLP Light Engine
Picture Screen Pitch ....Screen .155mm
Scan Rate Converter ....Yes
Smart Lamp System Yes
Vertical Viewing Angle (Alpha V) 40°
Wide Band Video Amplifier ....Yes
Sound
Audio Power (Watts) Front Speakers....15 Watts/Channel
Balance Control.....Yes
Broadcast Stereo w/dbx† Noise Reduction ....Yes
Sound Presets 7 plus Personal
Front Speakers ....2 Mid/Tweeter/Pass Rad
Fully Enclosed Speaker System ....Yes
Graphic Equalizer 7 band
† dbx is a registered trademark of Carillon Electronics Corporation.
^** Specifications are subject to change.
Matrix Surround Sound .... Yes
Second Audio Program (SAP) Yes
Sound Logic Audio Leveler .... Yes
SRS Labs TruSurround XT .... Yes
SRS Labs Focus .... Yes
Convenience
Web Browser Yes
Auto Channel Search (Full and Quick) .... Yes
Multilingual On-screen Display .... English, French, Spanish
Auto Tuning .... Yes
Closed Captioning ...... Analog & Digital
Front Button Block Yes
Commercial Skip.... Yes
Parental Control with USA & Canada V-Chip .... Yes
Picture Reset Yes, in Menu
Picture-in-Picture (PIP) Analog on Analog
Picture Memory Presets for Video Inputs .... Yes (Individual Memory)
GUIDE Plus+ System with Digital Channels .... Yes
One Touch VCR Record w/GUIDE Plus+ System .... Yes
Picture in GUIDE Plus+ System .... Yes
Clock (Time), Sleep and Wake-up Timers .... Yes
Front Panel
Stereo Headphone Jack 3.5mm Stereo Mini-jack
Front A/V Input ...... Composite with S-Video
Variable "Top-Lighted" Front Panel Buttons .... Yes
Back Panel Inputs/Outputs
Composite A/V Inputs with Autodetect S-Videos...... 2 sets
Component with composite audio/video inputs .... 2 - Y PrPb (RCA Jacks) SYNCHROSCAN
Antenna/Cable Inputs 2 - RF
DVI-HDTV Input with Audio Inputs 1
Broadband Connection (Ethernet RJ45) 1
DTVLink (IEEE 1394) 2
Record Output (Composite with Audio) .... 1
Digital Audio Output 1
External Speaker Terminals .... Yes
Fixed or Variable Audio Outputs .... 1 set, menu switchable
External Center Channel Input ...... Maximum amplifier power ...... rating 60 watts into 8 ohms
G-LINK Jack Yes
Accessory Information
The following accessories are available from most dealers and electronics supply stores in case you want to position your components farther apart or need additional cables.
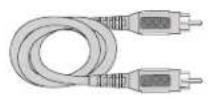
Monaural VCR Dubbing Audio/
Video Cable is a double cable that lets you connect the video and audio jacks of two VHS VCRs to duplicate tapes. It can also be used to connect a VCR to your TV. The cable is color-coded and shielded. It has RCA-type phono plugs on each end. Gold-Tipped cable, VH83 (6-ft)

Screw-on Cable* attaches to the round antenna connectors (called 75-ohm F-type) on the back of your VCR or TV. The ends screw onto the connectors for a secure connection. VH82 (6-ft), VH81 (3-ft)

Stereo VCR Dubbing Audio/Video Cable is a triple cable that lets you connect the VIDEO and AUDIO jacks of stereo components. Gold-Tipped cable, VII84 (6-ft)
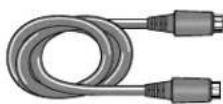
S-Video Cable has multi-pin connectors on each end for connecting S-Video components to your TV. VH976 (6-ft), VH913 (12-ft)

natural_image
Coiled network of five connected audio/video cables (no text or symbols visible)Push-on Cable* attaches to the round antenna connectors (called 75-ohm F-type) on the back of your VCR or TV. The ends push on for a quick connection. VI89 (6-ft)
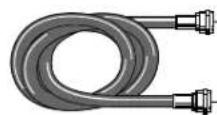
RG-6 Coaxial Burial Cable with weatherproof "F" connectors. D905
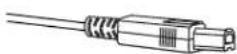
Optical/SPDIF cables help you connect to a component with an Optical Audio In jack, such as a Dolby Digital decoder or receiver. DV3 (3-ft), DV6 (6-ft)

Network Category 6 cables help you connect to a component with an ethernet jack. High performance 500MHz Bandwidth, 5x bandwidth of standard Category 5 cable TP603N (3-ft), TP607N (6-ft), TP625N (25-ft)
* This accessory is intended for use with an off-air or cable TV signal distribution and is not suitable for distribution of the satellite signal originating from your satellite dish antenna.
Custom DLP HDTV Accessories
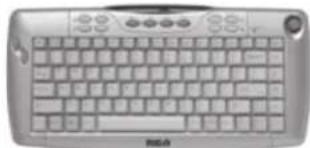
natural_image
Front view of a silver keyboard with control buttons and a 'Routa' logo (no visible text or symbols on the main body)To get the most out of your TV's web browser, purchase the keyboard (model KBR755TA1).
Call 1-800-798-5875 or order on-line at www.rca.com/keyboard
Replacement Lamp
Your DLP is equipped with a special lamp unit. If you have sound, no picture, and the light on the front of the TV blinks, you need to change the lamp. To order, call 1-800-338-0376. Have your TV serial number and lamp type available (you'll find this information on the sticker that's on the right side of the TV).
DVR10 (AVHDD) Audio Visual Hard Disk Drive
Connect to your TV's DTVLink jack to record and store digital (ATSC) programs.
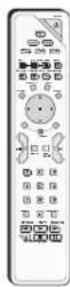
RCN615TBEM1
Remote Control This is the remote control that came packed with your TV. Replacements or spares can be ordered as needed.
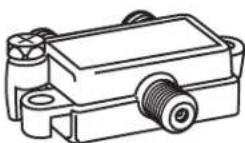
2-way Splitter (VH47)
4-way Splitter (VH49)
2-way Signal Splitter, 4-way Signal Splitter* helps you connect to other components.
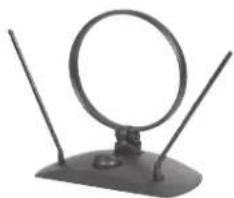
natural_image
Simple black-and-white photo of a circular antenna mounted on a base with two antennas (no text or symbols visible)ANT200
Amplified VHF/UHF/FM Antenna allows you to easily switch from the antenna signal to cable or satellite easily without disconnecting antenna.
* This accessory is intended for use with an off-air or cable TV signal distribution and is not suitable for distribution of the satellite signal originating from your satellite dish antenna.
Accessory Order Form
| Description | Part No. | Price | Qty | Total |
| Screw-on antenna cable* (3-ft) VH81 | 3.95 | |||
| Screw-on antenna cable* (6-ft) VH82 | 4.95 | |||
| Push-on antenna cable* (6-ft) VH89 | 5.95 | |||
| Weatherproof "F" Connector (2) D905 | 5.95 | |||
| Monaural VCR Dubbing Cable (6-ft) VH83 | 5.95 | |||
| Stereo VCR Dubbing Cable (6-ft) VH84 | 9.95 | |||
| S-Video Cable (6-ft) VH976 | 7.95 | |||
| S-Video Cable (12-ft) VH913 | 14.95 | |||
| 2-way Signal Splitter* VH47 | 3.95 | |||
| 4-way Signal Splitter* VH49 | 6.95 | |||
| Amplified Antenna | ANT200 | 49.95 | ||
| Antenna Mixer | 193984 | 11.15 | ||
| Remote Control (RCN615TBEM1) | 260957 | 34.99 | ||
| Optical/SPDIF Cable (3-ft) | DV3 | 15.95 | ||
| Optical/SPDIF Cable (6-ft) | DV6 | 19.95 | ||
| Audio•Video Adapter | 228449 | 4.45 | ||
| Diplexer | D920 | 19.95 | ||
| Network Category 6 Cable (3-ft) TP603 | 14.95 | |||
| Network Category 6 Cable (6-ft) TP606N | 19.95 | |||
| Network Category 6 Cable (25-ft) | TP625N | 29.95 | ||
| Total Merchandise......Sales Tax......We are required by law to collect the appropriate sales tax for each individual state, country, and locality to which the merchandise is being sent.Shipping and Handling*......Total Amount Enclosed......Use VISA, MasterCard, or Discover Card preferably. Money order or check must be in U.S. currency only. No COD or CASH. | ________5.00____ |
Detach Here
Prices are subject to change without notice.
All accessories are subject to availability.
Where applicable, we will ship a superseding model.
Please complete other side also
Charge your order on your VISA,
MasterCard, or Discover Card by
filling in below
USE YOUR CREDIT CARD
IMPORTANT: Copy complete account number
from your VISA card


My card expires:


IMPORTANT: Copy complete account number
from your MasterCard

Copy Number
above your
name on
MasterCard
My card
expires:

IMPORTANT: Copy complete account number
from your Discover Card

My card expires:

AUTHORIZED SIGNATURE
(Credit card order will not be processed without signature)
Print or type your name and address clearly.

A complete and correct
order will save you days
of waiting.
Name:
Street:
Apt:
City:
State: Zip
Daytime Phone Number:
Please make sure that both sides of this form have been filled out completely.
- Allow 4 weeks for delivery.
- All accessories are subject to availability.
• Prices are subject to change.
Placing an Order
BY PHONE: Have your Visa, MasterCard or Discover Card ready and call 1-800-338-0376. Use this number only to place an order for accessory items listed on the order form.
BY MAIL: Detach and mail the completed order form with credit card information, money order or check in US currency (made payable to Thomson Inc.) to the following address:
Video Accessories
PO Box 8419
Ronks, PA 17573
For more information about accessories, go to www.rca.com.
Limited Warranty
What your warranty covers:
- Defects in materials or workmanship.
For how long after your purchase:
• One year from date of purchase for labor.
• One year from date of purchase for parts.
- One year from date of purchase for light engine and lamp assembly.
The warranty period for rental units begins with the first rental or 45 days from date of shipment to the rental firm, whichever comes first.
What we will do:
Pay an Authorized Service Center the labor charges to repair your unit.
Pay an Authorized Service Center for the new, or at our option, refurbished replacement parts, light engine, and lamp assembly required to repair your unit.
How you get service:
- Call 1-866-SCENIUM and have your unit's date of purchase and model/serial number ready.
• A representative will troubleshoot your problem over the phone. - If the representative determines that you should receive service, they will provide you with the name(s) of the Authorized Service Center in your area.
- Contact the Service Center and arrange for home or pick up, repair, and return service, provided that your unit is located within the geographic territory covered by an Authorized Service Center. If not, you must take your unit to the Service Center location at your own expense, or pay for the cost the Service Center may charge to transport your unit to and from your home.
- Proof of purchase in the form of a bill of sale or receipted invoice which is evidence that the product is within the warranty period must be presented to obtain warranty service. For rental firms, proof of first rental is also required.
What your warranty does not cover:
- Customer instruction. (Your Owner's Manual describes how to install, adjust, and operate your unit. Any additional information should be obtained from your dealer.)
• Installation and related adjustments. - Damage resulting from non-approved installation methods.
• Signal reception problems not caused by your unit. - Damage from misuse or neglect.
- Batteries.
• Labor to replace the light engine and lamp assembly after one year from the date of purchase. - A television that has been modified or incorporated into other products or is used for institutional or other commercial purposes.
• A unit purchased or serviced outside the U.S.A. - Acts of nature, such as but not limited to lightning damage.
Product Registration:
- Please complete and mail the Product Registration Card packed with your unit. It will make it easier to contact you should it ever be necessary. The return of the card is not required for warranty coverage.
Limitation of Warranty:
- THE WARRANTY STATED ABOVE IS THE ONLY WARRANTY APPLICABLE TO THIS PRODUCT. ALL OTHER WARRANTIES, EXPRESS OR IMPLED (INCLUDING ALL IMPLIED WARRANTIES OF MERCHANTABILITY OR FITNESS FOR A PARTICULAR PURPOSE) ARE HEREBY DISCLAIMED. NO VERBAL OR WRITTEN INFORMATION GIVEN BY THOMSON INC., ITS AGENTS OR EMPOLOYEES SHALL CREATE A GUARANTY OR IN ANY WAY INCREASE THE SCOPE OF THIS WARRANTY. - REPAIR OR REPLACEMENT AS PROVIDED UNDER THIS WARRANTY IS THE EXCLUSIVE REMEDY OF THE CONSUMER. THOMSON INC. SHALL NOT BE LIABLE FOR INCIDENTAL OR CONSEQUENTIAL DAMAGES RESULTING FROM THE USE OF THIS PRODUCT OR ARISING OUT OF ANY BREACH OF ANY EXPRESS OR IMPLIED WARRANTY ON THIS PRODUCT. THIS DISCLAIMER OF WARRANTIES AND LIMITED WARRANTY ARE GOVERNED BY THE LAWS OF THE STATE OF INDIANA. EXCEPT TO THE EXTENT PROHIBITED BY APPLICABLE LAW, ANY IMPLIED WARRANTY OF MERCHANTABILITY OR FITNESS FOR A PARTICULAR PURPOSE ON THIS PRODUCT IS LIMITED TO THE APPLICABLE WARRANTY PERIOD SET FORTH ABOVE.
How State Law relates to warranty:
- Some states do not allow the exclusion nor limitation of incidental or consequential damages, or limitations on how long an implied warranty lasts, so the above limitations or exclusions may not apply to you.
- This warranty gives you specific legal rights, and you also may have other rights that vary from state to state.
If you purchased your unit outside the United States:
- This warranty does not apply. Contact your dealer for warranty information.
Service calls which do not involve defective materials or workmanship are not covered by this warranty. Costs of such service calls are the sole responsibility of the purchaser.
Care and Cleaning
CAUTION: Turn OFF your TV before cleaning.
You can clean the TV as required, using a soft lint-free cloth. Be sure to occasionally dust the ventilation slots in the cabinet to help assure adequate ventilation.
The TV's screen may be cleaned with a soft, lint-free cloth as well. Take care not to scratch or mar the screen. If necessary, you may use a cloth dampened with warm water.
Never use strong cleaning agents, such as ammonia-based cleaners, or abrasive powder. These types of cleaners will damage the TV.
While cleaning do not spray liquid directly on the screen, or allow liquid to run down the screen and inside the TV. Also, avoid placing drinks or vases with water on top of the TV. This could increase the risk of fire or shock hazard or damage to the TV.
FCC Information
This equipment has been tested and found to comply with the limits for a Class B digital device, pursuant to Part 15 of the FCC Rules. These limits are designed to provide reasonable protection against harmful interference in a residential installation. This equipment generates, uses, and can radiate radio frequency energy and, if not installed and used in accordance with the instructions, may cause harmful interference to radio communications. However, there is no guarantee that interference will not occur in a particular installation. If this equipment does cause harmful interference to radio or television reception, which can be determined by turning the equipment off and on, the user is encouraged to try to correct the interference by one or more of the following measures:
- Reorient or relocate the receiving antenna.
- Increase the separation between the equipment and receiver.
- Connect the equipment into an outlet on a circuit different from that to which the receiver is connected.
- Consult the dealer or an experienced radio/TV technician for help.
This Class B digital apparatus complies with Canadian ICES-003
Symbols
1394 3
Cable 8
Jacks 22
Recording 59, 72
Problems 81
Setup 72
16:9 Aspect ratio 1, 42
3:2 pulldown 2, 66
4:3 Aspect ratio 1
Normal 74
Stretch 75
Zoom 75
6-pin connector 16
A
AVR 2
Accessories 84
Antenna 85
Order form 85
Splitters 85
Action buttons 63
GUIDE Plus+ system 45
Adding a learned function 36
Advertising, GUIDE Plus+ system 47
Age-based rating
Blocking 51
Viewing 51
Age-Based Ratings 50, 53, 54
Amplifier 8
Analog
Signals 1, 17
Captions 73
Channels 43
ANTENNA A 10, 11, 19, 22
ANTENNA B 10, 11, 19, 22
ANTENNA button 32
Antenna Info 70
Antenna type 42
Arrow buttons 56
Aspect ratio 1,42
Assisted setup 25, 26
AUDIO
Button 39
Codes 39
Connections 9
Format icon 42
INPUT 3 / VIDEO INPUT 5 22
INPUT1/VIDEO INPUT 1 21
Language 68
Processor 67
Receiver 8
Remote codes 39
System 1
Audio menu 66
Audio language 68
Audio Processor 67
Balance 68
Digital audio out 69
Equalizer presets 67
Fixed/Variable out 69
SAP 68
Sound logic 68
AUDIO OUTPUT
Digital 22
Audio/video cables 8
Authorized service 10, 78, 87
Auto color 65
Auto tuning 55,72
Front Input 56
Automatic code search 35
AUX button 32, 35, 39
AVHDD 59
B
Back of the TV 20
Backlight button 32
Balance 68
Batteries, installing 25
Remote 81
Black Level 64
Block
Age-Based Ratings 51
Front Panel 55
Movie ratings 52
Specific Content Themes 51
V-Chip Unrated Program 54
Web browser 55
Browser, web 58, 59
Button lighting, front panel (select
models only 24
Buttons
ANTENNA 32
Arrows 56
AUDIO 39
AUX 32, 39
Backlight 32
Cable 33
CH CTRL 32,56
Channel down 24, 32
Channel up 24, 32
CLEAR 32
DVD 32,40
FORMAT 32,58
FORWARD 33
FREEZE 32,56
Front panel 24
GO BACK 32
GUIDE 33
INFO 33
INPUT 33, 39
MENU 24,33
Number 32
OK 24,33
ON•OFF 33
PAUSE 33
PIP 33,56
PLAY 33
POWER 24
RECORD 33
Remote control 32
REVERSE 33, 34
SAT CABLE 39
SAT/CABLE 33
Satellite receiver 33, 40
SOUND 33
STOP 33
SWAP 33,56
TV 33
VCR 33,40
VCR PLUS+ 33
VCR2 (AUX default) 32, 55, 72
Volume down 24
Volume up/down 33
C
Cable box 23
Cable remote codes 39
Cable button 33
Cables 18, 84
1394 8,22
Audio/video 8,19
CAT-5 15
Coaxial 8,84
COMPONENT VIDEO 19
Digital optical 18
DVT 8,17,18
Ethernet 15, 18, 22
Y, Pb, Pr jacks 19
G-LINK 8
Network 84
Optical 18, 84
RF 19,84
S-Video 8,19,84
Canada
English ratings 54
French ratings 54
V-Chip unrated program 54
V-Chip 53
Caption display 73
Caption priority 74
Caption style 74
Captions
Analog 73
Color 74
Digital 74
Font 74
Opacity 74
Size 74
Care and Cleaning 88
Center channel connections 12
CENTER CHANNEL INPUT 21
Center speaker input 12 21
CH CTRL button 32,56
Channel 3 56
Banner 42
Information 42
Initial 72
Lists 48
Logo 42
Numbers 43
Search 71
Channel down button 24
Channel up button 24
Channels
Analog or digital 43
Digital or Analog 43
Channels lists, GUIDE Plus+ system 47
Chart, of connections 9
Choice fields 63
Choice lists 63
Choose Your Connection 9
CinemaScreen 3
Cinematic picture setting 64
Cleaning and care 88
CLEAR button 32
Clearning a learned function 37
Clock display 42
Closed captioning 73
Closed captioning displays 42
Coaxial cable 8
Code List
Audio 39
Cable box 39
DVD 40
DVD/VCR 40
Home Theatre in a Box 40
PVR 40
Satellite receiver 40
VCR 40
Color warmth 65
Color scheme 75
Commercial skip 42
Component to component 16
Component Video cables 8
Components, connecting 9
Composite jacks 19
Connections
1394 16
A/V receiver 9, 12
Audio 9
Center channel 12
DTVLink 16
DVD player, TV, VCR 10
DVI-HDTV 17
Internet 15
Network 9
Router, TV 15
Satellite Receiver, TV, VCR 11
TV, DTVLink 16
TV, Receiver, Speakers 12
TV, Set-top box using DVI-HDTV
17
TV, Satellite Receiver, VCR 11
VCR, TV, DVD player 10
VCR, TV, Satellite Receiver 11
HD Set-top Box 17
Connections menu 70
1394 Setup 72
Antenna info 70
Audio tuning 72
Channel search 71
Ethernet setup 72
Signal source 71
Signal type 71
Software upgrade 71
Special features 72
Content Themes 50
Blocking 51
Viewing 52
Contrast 64
Control panels 62
Controls
Mcnus 62
Parental 48
Reset 66
D
Deleting ALL learned functions 37
Digit buttons 32
Digital
Audio Out 69
AUDIO OUT jack 18, 22
Captions 74
Channels 43, 76
Connections 9
Optical input 12
Signals 1, 2, 17
Visual interface connection 17
Direct entry programming 34
DLP, 1, 2
Dolby Digital 12
Dolby Digital receiver 18
DSL modem 15
DTVLink
Auto tuning 56
Connect 72
Connector 18, 22
Jacks 18
Recording 59
DVD button 32, 40
DVD player, VCR, TV
Connection 10
DVD remote codes 40
DVD/VCR remote codes 40
DVI cable 8
DVI-HDTV
Connector 18
Connections 17
E
Equalizer presets 67
Ethernet
Cable 8, 22
Jack 18, 22
Setup 72
Exiting a menu 62
EXT / INT w/EXT SURR switch 13
External speakers 20
EXTERNAL SPEAKERS OUTPUT 13, 14
F
Favorite URLs 58
FCC information 89
Finding the sensor 23
Fixed output 12
FIXED/VARIABLE AUDIO OUTPUT L/R 20
Fixed/variable out 69
Format
Button 32, 58 75
Screen 74
FORWARD button 33
FREEZE button 32, 56
Front and rear speaker jacks 21
Front panel
Block 55
Button lighting 24
Buttons 24
Inputs 24
Full search 71
G
G-LINK 22
cable 8
connecting 23
G-Link cable 28
GO BACK button 32
Graphic equalizer 67
GUIDE button 33
GUIDE Plus+ setup
Configuring for cable 27
GUIDE Plus+ System 2, 26, 30,
44,
Action buttons 45
Channels 47
Configuring for VCR 28
Expanded information 45
Listings 45
Lock/Unlock 46
Menus 44
Messages 46
News 46
Promotions 46
Promotions and advertising 47
Schedule 46, 47
Setup 26, 47
Sort 46
H
HDTV specifications 82
Help text 2, 62
High definition 1
Home Theatre box
remote codes 40
Hub connection 16
|
Icons
Channel banner 42
Indirect light 8
INFO button 33, 42
Initial channel 72
Initial volume 72
INPUT
2 jacks 21, 22
3 jacks 21
ANTENNA A 22
Center channel 21
Button 33, 64 39
INPUT 5
Auto tuning 56
Inputs
Auto tuning 56
Front panel 24
Internet connection 15
Internet service provider 15
J
Jacks
1394 16, 22, 59
Audio/video 19
Composite 19
DIGITAL AUDIO OUT 18
DIGITAL AUDIO OUTPUT 22
Digital optical 12
DTVLink 16, 18, 22
DVI-HDTV 18
Ethernet 18, 22
EXTERNAL SPEAKERS 13, 14
Front panel 24
Input 18
RF 19
S-VIDEO 19
S-Video 21
Y•Pb•Pr 19
K
Keyboard, optional 58
L
Lamp, 1, 30, 76, 84
Language
Audio 68
Display 42
Menu 26,76
Learning feature 36
Adding a function 36
Clearing a function 37
Deleting ALL functions 37
LED, front panel 25, 78
Limited warranty 87
Listings, GUIDE Plus+ system 45
Locating remote sensor 23
Logo, channel 42
M
Main Menu 62
MENU button 24, 33, 62
Menu controls 62
Action buttons 63
Choice fields 63
Choice lists 63
Numeric entries 63
Sliders 63
Menu language 26,76
Menus 62
Audio 66
Connections 70
GUIDE Plus+ system 44
GUIDE Plus+ system setup 26
Moving through 62
Picture Quality 64
Preferences 73
Time 70
Messages menu, GUIDE Plus+
system 46
Modes, remote control 35
Mono 67
Mute button 33
Mute, closed captioning 73
N
Natural picture setting 64
NetConnect 3
Network connections 9
News menu 46
Noise reduction 65
Normal, screen format 74
Number buttons 32
Numeric entries 63
0
OK button 24, 33
ON•OFF button 33
On-screen help 62
On-screen help text 62
Optical cable 18
Order form
Accessory 85
Output
RECORD 22
OUTPUTS
Audio 20
Overheating 8
P
Parental controls 48
Channel lists 48
Editing channels 49
Lock/unlock 48
Parental controls icon 42
Password, v-chip 81
PAUSE button 33
PCM 12,69
PCM receiver 12
Personal picture setting 64
Personal presets 2, 64
Picture quality menu 64
Auto color 65
Color warmth 65
Noise reduction 65
Picture presets 64
Picture settings 64
Reset controls 66
SVM 66
Picture settings 64
Picture-in-Picture 56
PIP (Picture in Picture)
Buttons 33, 56
Channel control 32
Operation 56
Problems 57
Using 57
PIP button 33
PLAY button 33
POWER button 24
Power surges 8
Preferences menu 73
Analog captions 73
Caption style 74
Captions Priority 74
Closed captioning 73
Color scheme 75
Digital captions 74
Digital channel info 76
Menu language 76
Record output 75
Screen format 74
Translucency 76
Problems
1394 Recording 81
Audio 79
GUIDE Plus+ system 80
Parental controls 81
Remote control 81
Timer 78
TV 78
V-Chip 81
Program title 42
Programming
Cable box codes 39
DVD codes 40
DVD/VCR codes 40
PVR codes 40
VCR codes 40
Programming codes
Audio 39
Programming the remote 34
Automatic code search 35
Direct entry 34
Home Theatre in a Box 40
Satellite receiver codes 40
Projection system 2
Promotions, GUIDE Plus+ system
46, 47
Pulse code modulation 18, 69
Punchthrough feature 38, 81
PVR remote codes 40
QAM 2
Quick search 71
Rating Limits
movies 52
Ratings
Blocking movie 52
Viewing movie 52
RCA-type cables 19
REC icon 42
Receiver with
Dolby Digital 12, 18
RECORD button 33
Record Output 3, 75
RECORD OUTPUT jack 3, 22
Record/Wake timer 70
Record/Wake timer screen 60
Recording
1394 59,72
DTVLink 59
Remote Control
Accessory 85
Buttons 32
Code list 39
Q
R
Installing the Batteries 25
Learning feature 36
Programming 34
Programming codes 40
Sensor 23
Reset controls 66
Resolution 1, 2
REVERSE button 33
RF jacks 19
S
S-VIDEO
Cable 8
Jacks 19, 21
SAP 68
SAP display 42
SAT/CABLE
Button 33, 39
Satellite receiver
Button 33, 40
Codes 40
Connection 11
Schedule menu, GUIDE Plus+
system 47
Search
Automatic code 35
Channels 26, 71
Full 26,71
Quick 71
Second audio program 68
Service, authorized 10
Setup
Ethernet 72
GUIDE Plus+ system menus 26
Setup, assisted 25
Setup menu, GUIDE Plus+ system 47
Sharpness 64
Signal source 71
Signal type 71
Signals
Analog 17
Digital 17
SKIP button 33
Sleep timer 42, 70
Sliders 63
Software ungrade 71
Sort menu, GUIDE Plus+ system 46
Sound 79
SOUND button 33
Sound logic 68
Speaker
Center input 21
Speaker connection 12
SPEAKER SELECGT
EXT. or INT W/EXT SURR switch
20
Speaker wire 8
Speakers
Fixed and variable 69
Special features 72
Specifications 82
Back panel 83
Convenience 83
Front panel 83
Sound 82
Video 82
Splitters 85
Stand 8
Stereo 67
STOP button 33
Stretch, screen format 75
Subchannel
1394 recording 60
Subchannels 70
SWAP button 33, 56
T
Things to Consider Before You
Connect 8
Time display 42
Time menu 70
Time of day 70
Timer
Record/Wake 70
Sleep 70, 78
Wake-up 78
Tint 64
Translucency 76
Troubleshooting 78
TruScan digital reality 2
Turn on TV 25
TV + audio receiver
Connection 12
TV button 33
TV connection 11
TV mode 25
TV problems 78
TV, VCR, DVD Player
Connection 10
U
Universal remote
programming to control other
brands of components 35
URLs, saving 58
USA
V-Chip TV ratings 49
V
V-Chip 48
Age-Based Ratings 49
Blocking age-based 51
Blocking Movies 52
Canada 49, 53
Content Themes 49
USA 49
USA TV ratings 49
Viewing age-based rating 51
V-chip display 42
V-Chip rating screen 50
V-Chip unrated program 54
Variable Output 12
Variable/Fixed out 69
VCR 23
Guide Plus+ system 28
VCR button 40
VCR connection 11
VCR PLUS+ button 33
VCR remote codes 40
VCR1 button 33
Vibrant picture setting 64
VIDEO 21
Video connections 9
VIDEO INPUT 2 / AUDIO INPUT 2 21
VIDEO INPUT 3 21
VIDEO INPUT1/AUDIO INPUT 1 21
VIDEO INPUT4/AUDIO INPUT 4 21
Viewing
Movie ratings 52
Specific content themes 52
Volume
Initial 72
Volume down button 24
Volume punchthrough 81
Deleting commands 38
Volume up button 24
Volume up/down buttons 33
W
Warranty, limited 87
Web browser 58, 59
controlling 59
Web browser block 55
Web browser, using 58
Y
Y Pb Pr jacks 19
Z
Zoom, screen format 75
Visit the RCA Scenium website at www.rcascenium.com
Please do not send any products to the Indianapolis address listed in this manual or on the carton. This will only add delays in service for your product.
Thomson Inc.
10330 North Meridian Street
Indianapolis, IN 46290
©2004 Thomson Inc.
Trademark(s)® Registered
Marca(s) Registrada(s)
Printed in USA
TOCOM 1614682B

THOMSON
THOMSON
