
PCT 64 F L SS - Range hood HOTPOINT - Free user manual and instructions
Find the device manual for free PCT 64 F L SS HOTPOINT in PDF.


| Product Type | Range Hood (Under-Cabinet / Wall-Mounted) |
| Brand | Hotpoint |
| Model | PCT 64 F L SS |
| Width | 60 cm (23.6 inches) |
| Depth | Approx. 50 cm (19.7 inches) |
| Height (Minimum-Maximum) | 60 - 110 cm (23.6 - 43.3 inches) |
| Net Weight | Approx. 12 kg (26.5 lbs) |
| Power Supply | 220-240 V ~ 50/60 Hz |
| Motor Power | 200 W |
| Max Extraction Rate (Free Outlet) | 600 m³/h |
| Noise Level (Max Speed) | 65 dB(A) |
| Number of Speeds | 3 + Intensive |
| Type of Control | Push Button |
| Lighting | 2 x LED (3 W each) |
| Filter Type | Aluminum Grease Filter (Reusable) |
| Ducting Diameter | 150 mm (6 inches) |
| Energy Class | A |
| Annual Energy Consumption | 50 kWh/year |
| Grease Filter Cleaning | Wash in dishwasher or by hand monthly |
| Activated Charcoal Filter (Recirculation) | Optional, replace every 3-6 months |
| Installation Type | Ducted (recirculation possible with charcoal filter) |
| Spare Parts Availability | Grease filters, charcoal filters, LED lamps available online |
Frequently Asked Questions - PCT 64 F L SS HOTPOINT
User questions about PCT 64 F L SS HOTPOINT
0 question about this device. Answer the ones you know or ask your own.
Ask a new question about this device
Download the instructions for your Range hood in PDF format for free! Find your manual PCT 64 F L SS - HOTPOINT and take your electronic device back in hand. On this page are published all the documents necessary for the use of your device. PCT 64 F L SS by HOTPOINT.
USER MANUAL PCT 64 F L SS HOTPOINT
THANK YOU FOR BUYING AN HOTPOINT PRODUCT In order to receive a more complete assistance, please register your product on www.hotpoint.eu/register

Before using the appliance carefully read the Safety Instruction.
PRODUCT DESCRIPTION
FIRST TIME USE
AIR VENT (FOR THE SUCTION VERSIONS)
Connect the hood and discharge holes on the walls with a diameter equivalent to the air outlet (connection flange).
Using the tubes and discharge holes on walls with smaller dimensions will cause a diminution of the suction performance and a drastic increase in noise.
Any responsibility in the matter is therefore declined.
! Use a duct of the minimum indispensable length.
! Use a duct with as few elbows as possible (maximum elbow angle: 90°).
! Avoid drastic changes in the duct cross-section.
! The company declines any responsibility whenever these regulations are not respected.
FILTERING OR DUCTING?
! Your cooker hood is ready to be used in suction version.
To use the hood in filtering version the special ACCESSORY KIT must be installed.
Check if the ACCESSORY KIT is furnished or must be bought separately.
Note: If furnished, in certain cases, the additional activated carbon filtering system may be installed on the hood. Information about the conversion of the hood from suction version to filtering version is present in the Manual "Safety Instructions & Installation".

DUCTING VERSION
In this case the fumes are conveyed outside of the building by means of a special pipe connected with the connection ring located on top of the hood.
Attention! The exhausting pipe is not supplied and must be purchased apart. Diameter of the exhausting pipe must be equal to that of the connection ring.
Attention! If the hood is supplied with active charcoal filter, then it must be removed.

FILTER VERSION
The aspirated air will be degreased and deodorised before being fed back into the room.
In order to use the hood in this version, you have to install a system of additional filtering based on activated charcoal.
CONTROL PANEL
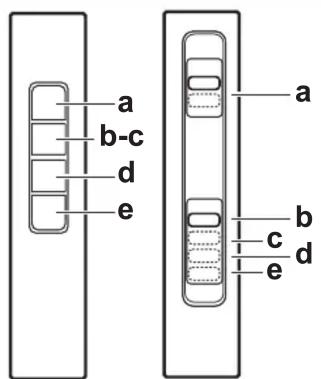
The hood is fitted with a control panel with aspiration speed selection control and a light switch to control cooking area lights.
a. ON/OFF lighting
b. OFF motors
c. - d. - e. Minimum suction power (c.), medium (d.), maximum (e.).

Height (cm) Width (cm) Depht (cm) ∅ of exhaust tube (cm)
| 17.2 | 49.3 - 69.3 | 25.7 | 12.5 |
* Available only on certain models
CLEANING AND MAINTENANCE
CLEANING
- Do not use steam-cleaning equipment.
- Disconnect the appliance from the mains.
Important: do not use corrosive or abrasive detergents. If any such products unintentionally come into contact with the appliance, clean the appliance immediately with a damp cloth. Do not use alcohol.
- Clean the surfaces with a damp cloth. If it is very dirty, add a few drops of washing-up detergent to the water. Finish off with a dry cloth.
Important: do not use abrasive sponges or metallic scrapers or scourers. Over time, these can ruin the enamel surfaces.
- Use detergents specifically designed for cleaning the appliance and follow the manufacturer's instructions.
Important: clean the filters at least once a month to remove oil and grease residue.
MAINTENANCE OF THE GREASE FILTERS
This must be cleaned once a month using non aggressive detergents, either by hand or in the dishwasher, which must be set to a low temperature and a short cycle.
When washed in a dishwasher, the grease filter may discolour slightly, but this does not affect its filtering capacity.
Pull out the handle to remove the filter.
Once the filter has been washed and left to dry, proceed in reverse order to refit the filter.

natural_image
Pure diagram of a downward arrow and a lightning bolt symbol without any text or labelsThis filter retains the unpleasant odours produced during cooking. Saturation of the carbon filter occurs after a relatively long use, however this depends on the type of cooking and how regularly the grease filter is cleaned. Regardless, it is necessary to replace the cartridge every 4 months. It CANNOT be washed or recycled.
Fitting or replacing the carbon filter
- Disconnect the hood from the mains.
- Remove the grease filters.
- Fit 2 carchoal filters (one each side of the conveyour), snap into place.
- Reinstall the grease filter in place. Proceed in reverse order to remove.

natural_image
Technical line drawing of a mechanical assembly with a cylindrical component mounted on a base plate (no text or symbols)
REPLACING THE LAMPS
Disconnect the appliance from the electricity.
Prior to touching the light bulbs ensure they are cooled down.
Remove the grease filters to access the lamp area.
Replace the damaged lamp.
Use E14 3W max LED lamps only. For more details, check enclosed leaflet "ILCOS D" (alfanumeric position "1d").
Note: For replacement LED, please contact the Technical After-sales Service Centre.
TROUBLESHOOTING
Problem Solutions
| The appliance does not work. • Check the mains voltage and whether the appliance is connected to the power supply;• Check that a speed has been selected;• Switch the appliance off and on again to see if the fault persists. |
| The hood is not extracting air sufficiently. • Check that the air extraction speed is set to the desired level;• Check that the filters are clean;• Check the air vents for any obstructions. |
| The hood has turned off during normal functioning. • Check that the power has not been disconnected;• Check that the omnipolar disconnection device has not tripped. |
* Available only on certain models

You can download the Safety Instructions, User Manual, Product Fiche and Energy data by:
- Visiting our website docs.hotpoint.eu
- Using QR Code
- Alternatively, contact our After-sales Service (See phone number in the warranty booklet). When contacting our After-sales Service, please state the codes provided on your product's identification plate.

Hotpoint

400011282330


Brand : HOTPOINT
Model : PCT 64 F L SS
Category : Range hood