
IFW 6230 IX - Oven INDESIT - Free user manual and instructions
Find the device manual for free IFW 6230 IX INDESIT in PDF.


| Brand | Indesit |
| Model | IFW 6230 IX |
| Product Type | Built-in Electric Oven |
| Dimensions (approx.) | 595 x 595 x 549 mm (width x height x depth) |
| Weight (approx.) | 30 kg |
| Power Supply | 230 V ~ 50 Hz, 2.5-3.0 kW (estimated) |
| Functions | Conventional, Convection Bake, Grill, Gratin, Defrosting, Light |
| Control Type | Mechanical knobs (selection, thermostat, timer) |
| Number of Functions | 6 (including light and off) |
| Temperature Range | 50°C - 250°C (approximately) |
| Timer | Mechanical timer (up to 120 minutes, estimated) |
| Interior Capacity | 65 L (estimated for built-in oven) |
| Number of Shelf Levels | 5 (indicated on side runners) |
| Accessories Included | Wire shelf, baking tray, drip tray (may vary by model) |
| Cleaning | Manual cleaning; removable door for glass cleaning; lowerable upper heating element |
| Door Type | Drop-down door, removable for cleaning |
| Energy Class | Not specified (refer to product fiche online) |
| Safety Features | Automatic shut-off? (not specified); thermostat indicator light for preheating |
| Usage Guide | Download Use and Care Guide from docs.indesit.eu |
| Warranty | Refer to warranty manual for details |
Frequently Asked Questions - IFW 6230 IX INDESIT
User questions about IFW 6230 IX INDESIT
0 question about this device. Answer the ones you know or ask your own.
Ask a new question about this device
Download the instructions for your Oven in PDF format for free! Find your manual IFW 6230 IX - INDESIT and take your electronic device back in hand. On this page are published all the documents necessary for the use of your device. IFW 6230 IX by INDESIT.
USER MANUAL IFW 6230 IX INDESIT
MERCI D'AVOIR ACHETER UN PRODUIT INDESIT
natural_image
Simple line drawing of a rectangular plate with horizontal slats (no text or symbols)PLAQUE DE CUISSON
(SELON LE MODÈLE)

natural_image
Simple line drawing of a square frame with a small bracket at the bottom right corner (no text or symbols)LÈCHEFRITE (SELON LE
MODÈLE)

natural_image
3D diagram of a rectangular frame with a shaded inner area and a separate curved line on the right side (no text or symbols)natural_image
Diagram of a mechanical or electrical component with curved and straight lines, no visible text or symbolsnatural_image
Diagram of a mechanical assembly with a black arrow indicating direction (no text or symbols present)natural_image
Illustration of two hands holding a tablet device, one with a magnified view showing the screen (no text or symbols present)
natural_image
Illustration of a hand holding a tablet device with a stylus, no text or symbols presentnatural_image
Diagram showing a mechanical setup with an arrow indicating motion, no text or symbols presentnatural_image
Illustration of hands using a tablet to interact with a screen (no text or symbols visible)GUIDE DE DÉPANNAGE

1234
natural_image
Simple line drawing of a rectangular grid with a handle, no text or symbols presentTEGLIA (SE PRESENTE)
natural_image
Pure geometric diagram of a square frame with a small curved line on the right side (no text or symbols)LECCARDA (SE PRESENTE)
natural_image
3D diagram of a square frame with a gray inner panel and a separate curved line on the right (no text or symbols)natural_image
Diagram showing car interior components with arrows indicating movement, including a hand adjusting a component (no text or symbols present)natural_image
Diagram of a mechanical or electrical component with curved and straight lines, no visible text or symbolsTOGLIERE E RIMONTARE LA PORTA
natural_image
Diagram of a mechanical assembly with a black arrow indicating direction (no text or symbols present)natural_image
Illustration of hands holding a tablet device, showing the screen and hand gesture (no text or symbols)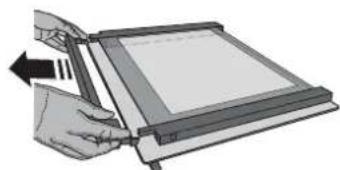
natural_image
Illustration of a hand holding a tablet device with a scroll wheel (no text or symbols)natural_image
Diagram showing a person using a device to interact with a screen, with no visible text or symbols.natural_image
Illustration of hands using a tablet to interact with a screen (no text or symbols visible)1234
1. BOTÃO SELETOR
natural_image
Simple line drawing of a rectangular grid or panel with a handle, no text or symbols present.TABULEIRO PARA ASSAR
(CASO EXISTA)

natural_image
Pure geometric diagram of a square frame with a small notch at the bottom right (no text or symbols)TABULEIRO COLETOR
(CASO EXISTA)
natural_image
3D diagram of a square plate with a small U-shaped cutout at the bottom right corner (no text or symbols)natural_image
Diagram of a mechanical or electrical component with curved and straight lines, no visible text or symbolsREMOVER E REPOR A PORTA
natural_image
Diagram of a mechanical assembly with a black arrow indicating direction (no text or symbols present)natural_image
Illustration of two hands holding a tablet device, one with a magnified view showing the screen (no text or symbols present)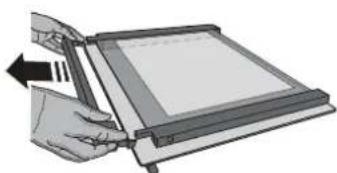
natural_image
Illustration of a hand holding a tablet device with an arrow indicating the process (no text or symbols present)natural_image
Diagram showing a device with an arrow pointing to a seated chair, no text or symbols presentnatural_image
Illustration of hands using a folding paper device to interact with a blank sheet (no text or symbols visible)natural_image
Simple line drawing of a rectangular plate with horizontal slats (no text or symbols)natural_image
Pure geometric diagram of a square frame with a small curved line on the right side (no text or symbols)ЛОТОК (ЗА НАЯВНОСТИ)

natural_image
3D rendering of a rectangular tray with a gray inner area and a separate curved bracket on the right (no text or symbols)natural_image
Diagram of a mechanical or electrical component with curved and straight lines, no visible text or symbols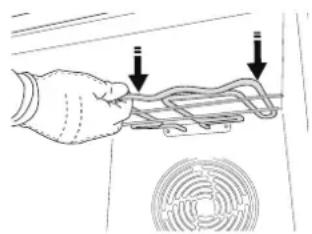
natural_image
Hand holding a coiled cable or wire with two arrows pointing to it, next to a circular fan (no text or symbols)natural_image
Diagram of a mechanical or electrical component with curved and straight lines, no visible text or symbolsnatural_image
Technical line drawing of a mechanical component with an arrow indicating direction (no text or symbols)natural_image
Illustration of hands holding a tablet device, showing the screen and hand gesture (no text or symbols)
natural_image
Illustration of a hand using a tablet to press or write on a blank sheet (no text or symbols visible)natural_image
Diagram showing a mechanical assembly with a slide and clamping mechanism, no text or symbols presentnatural_image
Illustration of hands using a folding paper device to adjust or install a blank sheet (no text or symbols visible)natural_image
Simple line drawing of a rectangular plate with horizontal slats, no text or symbols presentBAKPLAAT (INDIEN AANWEZIG)
natural_image
Pure geometric diagram of a square frame with a small curved line on the right side (no text or symbols)DRUIPPLAAT (INDIEN AANWEZIG)

natural_image
3D diagram of a rectangular frame with a shaded inner region and a separate curved line on the right side (no text or symbols)natural_image
Diagram showing car interior components with arrows indicating movement, no text or symbols presentnatural_image
Diagram of a mechanical or electrical component with curved and straight lines, no visible text or symbolsnatural_image
Diagram of a mechanical component with an arrow indicating direction (no text or symbols present)natural_image
Illustration showing two hands holding a tablet device, one with a magnified view of the screen (no text or symbols present)
natural_image
Illustration of a hand holding a tablet device with an arrow pointing to it (no text or symbols present)natural_image
Diagram showing a device interacting with a mechanical component, no text or symbols presentnatural_image
Illustration of hands using a digital drawing tablet to interact with a screen (no text or symbols visible)chemical
Simple diagram showing a central circle with dashed lines and surrounding symbols including a light bulb, two negative charges, and a positive charge.


1234
1. OVLADAČ VÝBĚRU
natural_image
Simple line drawing of a rectangular plate with horizontal slats, no text or symbols presentPEČICÍ PLECH (JE-LI SOUČÁSTÍ)

natural_image
Simple line drawing of a square frame with a small bracket at the bottom right (no text or symbols)ODKAPÁVACÍ (HLUBOKÝ)
PLECH (JE-LI SOUČÁSTÍ)

natural_image
3D diagram of a square plate with a gray inner square and a small curved bracket on the right (no text or symbols)natural_image
Diagram showing car interior and hand tool interacting with a car (no text or symbols)natural_image
Pure mechanical diagram showing curved and straight components without any text, numbers, or symbolsDEMONTÁŽ A ZPĚTNÁ MONTÁŽ DVÍŘEK
natural_image
Diagram of a train track with a handrail and directional arrow indicating motion (no text or symbols)natural_image
Illustration of two hands holding a tablet device, one with a magnified view and the other showing a close-up of the screen (no text or symbols present)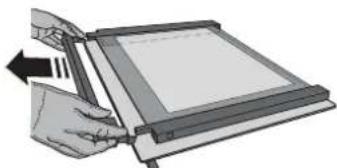
natural_image
Illustration of a hand using a pen to press or write on a digital tablet device (no text or symbols visible)natural_image
Diagram showing a mechanical assembly with a cutting tool interacting with a slide, no text or symbols presentnatural_image
Illustration of hands using a tablet device to interact with a screen (no text or symbols visible)ODSTRAŇOVÁNÍ ZÁVAD

natural_image
Simple line drawing of a rectangular plate with horizontal slats, no text or symbols presentPLECH NA PEČENIE(AK JE PRILOŽENÝ)
natural_image
Simple line drawing of a square frame with a small curved line on the right side (no text or symbols)ODKVAPKÁVACIA
NÁDOBA(AK JE PRILOŽENÁ)

natural_image
3D rendering of a square metal tray with a gray inner panel and a small curved bracket on the right side (no text or symbols)natural_image
Pure mechanical diagram showing curved and straight components without any text, numbers, or symbolsVYBRATIE A NASADENIE DVIEROK
natural_image
Diagram of a vehicle suspension system with an arrow indicating direction (no text or labels)- Zatvorte dvierka, pokial'to ide.
Pevne dvierka chytte oboma rukami – nedržte ich za rukovät.
natural_image
Illustration of two hands holding a tablet device, one with a magnified view showing the screen (no text or symbols present)
natural_image
Illustration of a hand using a tablet to interact with a screen (no text or symbols visible)natural_image
Diagram showing a person seated on a chair facing a screen with an arrow indicating motion (no text or symbols present)natural_image
Illustration of hands using a computer to interact with a screen (no text or symbols visible)RIEŠENIE PROBLÉMOV

1234
1. ΚΟΥΜΠΙ ΕΠΙΛΟΓΗΣ
natural_image
Simple line drawing of a rectangular grid pattern with no text or symbolsnatural_image
Pure geometric diagram of a square frame with a small curved line on the right side (no text or symbols)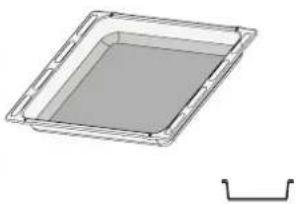
natural_image
3D rendering of a rectangular tray with a shaded interior and a separate U-shaped outline on the right (no text or symbols)natural_image
Diagram showing car interior and hand tool interacting with a device (no text or symbols)natural_image
Pure mechanical diagram showing pipe connections without any text, numbers, or symbolsnatural_image
Diagram of a mechanical component with an arrow indicating direction (no text or symbols present)natural_image
Illustration of two hands holding a tablet device, one with a magnified view and the other showing a close-up of its screen (no text or symbols present)
natural_image
Illustration of a hand using a tablet to press or write on a screen (no text or symbols visible)natural_image
Diagram showing a device interacting with a person using a device on a platform, with no visible text or symbols.natural_image
Illustration of hands using a ruler to cut or spread a blank sheet on a flat surface (no text or symbols visible)1234
1. GUMB ZA ODABIR
Za uključivanje pećnice odabirom funkcije.
natural_image
Simple line drawing of a rectangular grid with horizontal lines, no text or symbols presentPLITICA ZA PEČENJE (AKO JE UREĐAJ OPREMLJEN)
natural_image
Simple line drawing of a square frame with a small curved extension on the right side (no text or symbols)PLITICA ZA SKUPLJANJE SUVIŠNE TEKUĆINE (AKO JE UREĐAJ OPREMLJEN)

natural_image
3D diagram of a rectangular tray with a shaded interior and a separate U-shaped outline on the right side (no text or symbols)Broj komada i vrsta dodatnog pribora može varirati, ovisno o kupljenom modelu.
- Grijač vratite u njegov položaj tako da ga podignete, lagano povučete prema sebi i provjerite je li nosač jezičca u odgovarajućem sjedištu.
natural_image
Diagram of a mechanical or electrical component with curved and straight lines, no visible text or symbolsSKIDANJE I POSTAVLJANJE VRATA
- Vrata skinite tako da ih do kraja otvorite i spustite zasune dok ne dođu u položaj za odbravljivanje.

natural_image
Line drawing of a mechanical component with an arrow indicating direction (no text or symbols)- Zatvorite vrata koliko god to možete. Čvrsto uhvatite vrata s obje ruke; ne držite ih za ručku. Vrata jednostavno skinite tako da ih nastavljate zatvarati dok ih istovremeno vučete prema gore (a) dok se ne otpuste iz svog ležišta (b).
natural_image
Illustration of two hands holding a tablet device, one with a magnified view and the other showing a close-up of its screen (no text or symbols present)
natural_image
Illustration of a hand holding a tablet device with an arrow indicating the process (no text or symbols present)natural_image
Diagram showing a mechanical assembly with an arrow indicating motion, no text or symbols presentnatural_image
Illustration of hands using a tablet to interact with a screen (no text or symbols visible)RJEŠAVANJE PROBLEMA
1234
1. IZBIRNI GUMB
natural_image
Simple line drawing of a rectangular plate with horizontal slats, no text or symbols presentORIGINALNI PEKAČ (ČE JE NA VOLJO)

natural_image
Simple line drawing of a rectangular frame with a small curved line on the right side (no text or symbols)PRESTREZNI PEKAČ (ČE JE NA VOLJO)

natural_image
3D diagram of a square plate with a small U-shaped cutout on the right side (no text or symbols)natural_image
Technical diagram showing mechanical assembly and hand tool interacting with a component (no text or symbols)- Da grelnik znova namestite v prvotni položaj, ga dvignite in rahlo potegnite proti sebi, pri čemer mora biti jeziček v pravem vpetju.

natural_image
Diagram of a mechanical assembly with curved components and a central circular feature (no text or symbols)DEMONTAŽA IN MONTAŽA VRAT
natural_image
Diagram of a mechanical assembly with a black arrow indicating direction (no text or symbols present)- Vrata zaprite, kolikor je mogoče.
natural_image
Illustration of two hands holding a tablet device, one pointing at the screen (no text or symbols present)
natural_image
Illustration of a hand holding a tablet device with an arrow indicating the process (no text or symbols present)natural_image
Diagram showing a mechanical device interacting with a tool, with no visible text or symbols.- Ponovno namestite zgornji rob: će zaslišite klik, to pomeni, da se je rob pravilno zaskočil. Prepričajte se, da je tesnilo na pravem mestu, preden namestite vrata.
natural_image
Illustration of hands using a ruler to cut a flatboard (no text or symbols visible)ODPRAVLJANJE TEŽAV

1234
1. DUGME ZA ODABIR
natural_image
Simple line drawing of a rectangular grid with a handle, no text or symbols presentPLEH ZA PEČENJE (AKO POSTOJI)
natural_image
Pure geometric diagram of a square plate with a small curved line on the right side (no text or symbols)PLEH ZA SAKUPLJANJE MASNOĆE (AKO POSTOJI)

natural_image
3D rendering of a square metal tray with a gray inner panel and a separate curved bracket on the right (no text or symbols)Količina i vrsta pribora može se razlikovati u zavisnosti od kupljenog modela. Dodaci se mogu nabaviti i posebno, preko postprodajnog servisa za korisnike.
KORIŠĆENJE DODATNOG PRIBORA
- Da biste vratili grejač na svoju poziciju, podignite ga,povucite lagano ka sebi i proverite da li je žljeb na svom ležištu.
natural_image
Pure mechanical diagram showing a gear or cam mechanism without any text, numbers, or symbolsSKIDANJE I PONOVO POSTAVLJANJE VRATA
natural_image
Diagram of a mechanical assembly with a black arrow indicating direction (no text or symbols present)natural_image
Illustration of two hands holding a tablet device, one pointing at the screen (no text or symbols present)
natural_image
Illustration of a hand holding a tablet device with an arrow indicating the process (no text or symbols present)-
Podignite i čvrsto držite unutrašnje staklo sa obe ruke, skinite ga i postavite na mekanu površinu pre nego što počnete sa čišćenjem.
-
Da biste ispravno vratili unutrašnje staklo, obratite pažnju da je znak „R“ vidljiv u levom uglu a da je čista površina (ne ona sa natpisima) okrenuta ka gore. Prvo ubacite dužu stranu stakla obeleženu sa „R“ sa strane, a potom ga spustite na poziciju.
natural_image
Diagram showing a mechanical assembly with an arrow indicating motion, no text or symbols present- Vraćanje gornje ivice vrata: kliknuće ukoliko ste je pravilno postavili. Proverite da li je dobro pričvršćena pre nego što vratite vrata na mesto.
natural_image
Illustration of hands using a tablet device to interact with a screen (no text or symbols visible)OTKLANJANJE PROBLEMA

Za više informacija preuzmite uputstvo za upotrebu i održavanje sa veb stranice docs.indesit.eu
| Problem Mogući uzrok Rešenje | ||
| Rerna ne radi. | Nestanak struje.Isključenje iz električne mreže. | Proverite da li postoji dovod električne energije i da li je rerna priključena na električnu mrežu.Isključite rernu i ponovo je uključite kako biste proverili da li je kvar i dalje prisutan. |
DOKUMENTACIJA UREĐAJA
www Dokumentaciju proizvoda koja uključuje i podatke o energetskoj potrošnji možete preuzeti na veb stranici docs.indesit.eu
KAKO PREUZETI UPUTSTVO ZA UPOTREBU I ODRŽAVANJE
www Uputstvo za upotrebu i održavanje možete preuzeti na našoj veb stranici docs.indesit.eu (možete da koristite ovaj QR kôd), tako što ćete navesti komercijalnu šifru proizvoda.
Takođe, možete kontaktirati naš Postprodajni servis za klijente.

STUPANJE U KONTAKT SA POSTPRODAJNIM SERVISOM ZA KLIJENTE
THANK YOU FOR PURCHASING AN INDESIT PRODUCT
To receive more comprehensive help and support, please register your product at www.indesit.com/register

You can download the Safety Instructions and the Use and Care Guide by visiting our website docs.indesit.eu and following the instructions on the back of this booklet.

Before using the appliance carefully read the Health and Safety guide.
PRODUCT DESCRIPTION

- Control panel
- Fan
3.Lamp - Runners for accessories (the level is indicated on the wall of the cooking compartment)
- Door
- Upper heating element / grill
- Identification plate (do not remove)
- Lower heating element (not visible)
CONTROL PANEL
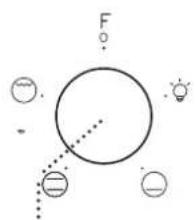
For switching the oven on by selecting a function. Turn to theO position to switch the oven off.
2. TIMER KNOB
Useful as a timer. Does not activate or interrupt cooking.
3. THERMOSTAT KNOB
Turn to select a desired temperature, activating the selected function.
4. LED THERMOSTAT / PREHEATING
Switches on during the heating process. Switches off once the desired temperature is reached.
WIRE SHELF

natural_image
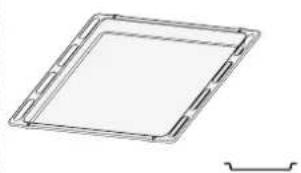
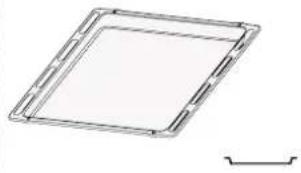
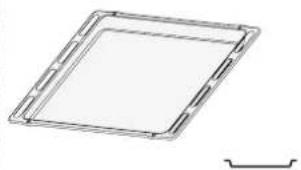
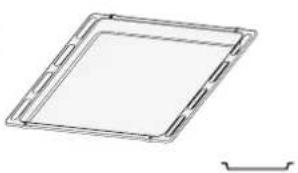
Simple line drawing of a rectangular plate with horizontal slats and a small protrusion on top (no text or symbols)BAKING TRAY (IF PRESENT)

natural_image
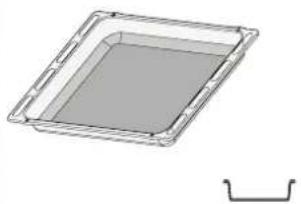
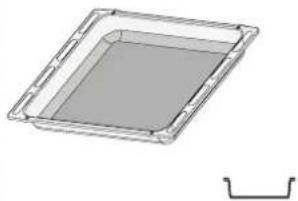
Pure geometric diagram of a square frame with a small curved line on the right side (no text or symbols)DRIP TRAY (IF PRESENT)

natural_image
3D diagram of a rectangular tray with a shaded interior and a separate curved line on the right side (no text or symbols)The number of accessories may vary depending on which model is purchased.
Other accessories can be purchased separately from the After-sales Service.
INSERTING THE WIRE SHELF AND OTHER ACCESSORIES
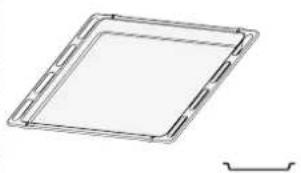
- Insert the wire shelf onto the level you require by holding it tilted slightly upwards and resting the raised rear side (pointing upwards) down first. Afterwards, slide it horizontally along the runners as far as possible.
- The other accessories, such as the baking tray, are inserted horizontally by sliding them along the runners.
FUNCTIONS

Download the Use and Care Guide from
docs.indesit.eu for more information

OFF
For switching off the oven.

LIGHT
For switching on the light in the compartment.

CONVENTIONAL
For cooking any kind of dish on one shelf only. It is advisable to place food on 2nd level.

CONVENCTION BAKE
For baking cakes with juicy fillings on a single shelf. This function can also be used for cooking on two shelves. Switch the position of the dishes to cook food more evenly.

GRILL
For grilling steaks, kebabs and sausages, cooking vegetables au gratin or toasting bread. When grilling meat, we recommend using a Baking tray to collect the cooking juices: position the pan on any of the levels below the wire shelf and add 200 ml of drinking water.

GRATIN
For roasting large joints of meat (legs, roast beef, chicken). We recommend using a drip tray to collect the cooking juices: Position the tray on any of the levels below the wire shelf and add 500 ml of drinking water.

DEFROSTING
For defrosting food more quickly.
USING THE APPLIANCE FOR THE FIRST TIME
. HEAT THE OVEN
A new oven may release odours that have been left behind during manufacturing: this is completely normal.
Before starting to cook food, we therefore recommend heating the oven with it empty in order to remove any possible odours.
Remove any protective cardboard or transparent film from the oven and remove any accessories from inside it.
Heat the oven to 250^ C for about one hour, preferably using the "Convection bake" function. The oven must be empty during this time.
Follow the instructions for setting the function correctly.
Notes: it is advisable to air the room after using the appliance for the first time.
DAILY USE
1. SELECT A FUNCTION
To select a function, turn the selection knob to the symbol for the function you require.
2. ACTIVATE A FUNCTION
MANUAL
To start the function you have selected, turn the thermostat knob to set the temperature you require.
To interrupt the function at any time, switch off the oven, turn the selection knob and the thermostat knob to to O and
3. PREHEATING
Once the function has been activated, the LED thermostat will switch on signalling that the preheating process has begun. At the end of this process, the LED thermostat switches off indicating that the oven has reached the set temperature: at this point, place the food inside and proceed with cooking.
Please note: Placing the food in the oven before preheating has finished may have an adverse effect on the final cooking result.
. SETTING THE TIMER
This option does not interrupt or activate cooking but allows you to use the display as a timer, both while a function is active and when the oven is off.
To activate the timer, turn the timer knob to the desired length of time: an acoustic signal will warn you when the count-down is finished.
COOKING TABLE
| RECIPE FUNCTION PREHEAT | TEMPERATURE(°C) | DURATION(MIN) | LEVELAND ACCESSORIES | ||
| Leavened cakes |  | Sì 150 - 170 30 - 90 | 2 | ||
 | Sì 150 - 170 30 - 90 *** | 4 | 1 | ||
| Filled cake(cheese cake, strudel, fruit pie) |  | Sì 160 - 200 35 - 90 | 2 | ||
 | Sì 160 - 200 35 - 90 *** | 4 | 2 | ||
| Biscuits/tartlets |  | Sì 160 - 180 15 - 35 | 2 / 3 | ||
 | Sì 150 - 170 20 - 40 *** | 4 | 2 | ||
 | Sì 180 - 200 40 - 60 | 2 | |||
| Choux buns |  | Sì 170 - 190 35 - 50 *** | 4 | 2 | |
| [DZDX] | Sì 90 150 - 200 | 2 | |||
 | Sì 90 140 - 200 *** | 4 | 2 | ||
| Meringues |  | Sì 220 - 250 10 - 25 | 1 / 2 | ||
 | Sì 200 - 240 15 - 30 *** | 4 | 2 | ||
 | Sì 180 - 200 30 - 45 | 2 | |||
| Bread loaf 500 g | [2TH2] | Sì 180 | 50 - 70 | 1 / 2 | |
| Bread |  | Sì 180 - 200 30 - 80 *** | 4 | 2 | |
| Frozen pizzas |  | Sì 250 | 10 - 20 | 2 | |
 | Sì 250 | 10 - 20 *** | 4 | 2 | |
| Salty cakes(vegetable pie,quiche) |  | Sì 180 - 200 30 - 45 | 2 | ||
 | Sì 170 - 200 40 - 60 *** | 4 | 2 | ||
| Vols-au-vents / puff pastry crackers |  | Sì 190 - 200 20 - 30 | 2 | ||
 | Sì 180 - 190 15 - 40 *** | 4 | 2 | ||
| Lasagne / baked pasta/canneloni / flans |  | Sì 190 - 200 45 - 65 | 2 | ||
| Lamb / veal / beef /pork 1 kg |  | Sì 190 - 200 | 80 - 110 | 2 | |
| Roast pork with crackling 2 kg | [X8SZ] | Sì 180 - 190 | 110 - 150 | 2 | |
| Chicken/rabbit/duck 1 kg |  | Sì 200 - 230 | 50 - 100 | 2 | |
| Turkey / goose 3 kg | [Y8SZ] | Sì 180 - 200 | 150 - 200 | 2 | |
| Baked fish/en papillote 0,5 kg(fillets, whole) |  | Sì 170 - 190 30 - 45 | 2 | ||
| Stuffed vegetables(tomatoes, courgettes, aubergines) | [7757] | Sì 180 - 200 50 - 70 | 2 |
| ACCESSORIES | Wire shelf | Baking dish or baking tray on the wire shelf | Baking tray/Drip tray or baking tray on the wire shelf | Drip tray / Baking tray | Drip tray / Baking tray with 200 ml of water |
| RECIPE FUNCTION PREHEAT | TEMPERATURE(°C) | DURATION(MIN) | LEVELAND ACCESSORIES | ||
| Toasted bread 5' 250 2 - 6 |  | 5 | |||
| Fish fillets/slices |  | 5' | 250 | 15 - 30 * | 4 3 |
| Sausages/kebabs/spare ribs/hamburgers |  | 5' 250 | 15 - 30 * | 5 4 | |
| Roast chicken 1-1,3 kg |  | - | 200 - 220 | 60 - 80 ** | 3 1 |
| Roast beef rare 1 kg |  | - | 200 | 35 - 50 ** | 3 |
| Leg of lamb/knuckle |  | - | 200 | 60 - 90 ** | 3 |
| Roast potatoes |  | - | 200 - 220 | 35 - 55 ** | 3 |
| Vegetable gratin |  | - | 200 - 220 | 25 - 55 | 3 |
| Lasagne and meat |  | Si | 200 | 50 - 100 **** | 4 1 |
| Meat and potatoes |  | Si | 190 - 200 | 45 - 100 **** | 4 1 |
| Fish and vegetables |  | Si | 180 | 30 - 50 **** | 4 2 |
* Turn food halfway through cooking.
** Turn food two thirds of the way through cooking (if necessary).
*** Switch levels halfway through cooking.
**** Estimated length of time: dishes can be removed from the oven at different times depending on personal preference. Switch shelves two-thirds of the way through cooking, if necessary.
Download the Use and Care Guide from docs.indesit.eu for the table of tested recipes, compiled for the certification authorities in accordance with the standard IEC 60350-1.
| FUNCTIONS |  |  |  |  |
| Conventional | Grill | Gratin | Convencion bake |
HOW TO READ THE COOKING TABLE
The table lists the best function, accessories and level to use to cook different types of food. Cooking times start from the moment food is placed in the oven, excluding preheating (where required). Cooking temperatures and times are approximate and depend on the amount of food and the type of accessory used. Use the lowest recommended settings to begin with and, if the food is not cooked enough, then switch to higher settings. Use the accessories supplied and preferably dark-coloured metal cake tins and baking trays. You can also use Pyrex or stoneware pans and accessories, but bear in mind that cooking times will be slightly longer.
COOKING DIFFERENT FOODS AT THE SAME TIME
Using the "Convection Bake" function, you can cook different foods simultaneously (for example: fish and vegetables), on different levels. Remove the food which requires a shorter cooking time and leave the food which requires a longer cooking time in the oven.
MAINTENANCE AND CLEANING

Download the Use and Care Guide from docs.indesit.eu for more information
Do not use steam cleaning equipment.
Use protective gloves during all operations.
Carry out the required operations with the oven cold.
Disconnect the appliance from the power supply.
Do not use wire wool, abrasive scourers or abrasive/corrosive cleaning agents, as these could damage the surfaces of the appliance.
EXTERIOR SURFACES
- Clean the surfaces with a damp microfibre cloth. If they are very dirty, add a few drops of pH-neutral detergent. Finish off with a dry cloth.
- Do not use corrosive or abrasive detergents. If any of these products inadvertently comes into contact with the surfaces of the appliance, clean immediately with a damp microfibre cloth.
INTERIOR SURFACES
• After every use, leave the oven to cool and then clean it, preferably while it is still warm, to remove any deposits or stains caused by food residues To dry any condensation that has formed as a result of cooking foods with a high water content, let the oven to cool completely and then wipe it with a cloth or sponge.
- The door can be easily removed and refitted to facilitate cleaning of the glass. www
- Clean the glass in the door with a suitable liquid detergent.
- The top heating element of the grill can be lowered to clean the upper panel of the oven www.
ACCESSORIES
Soak the accessories in a washing-up liquid solution after use, handling them with oven gloves if they are still hot. Food residues can be removed using a washing-up brush or a sponge.
LOWERING THE UPPER HEATING ELEMENT
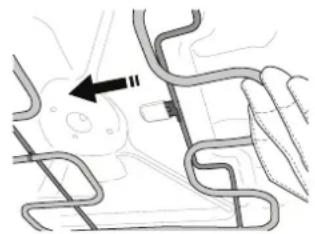
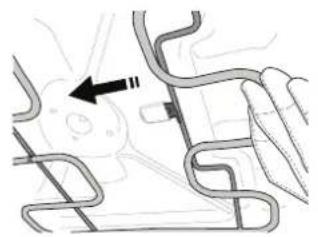
- Extract the heating element from its seating, then lower it.

natural_image
Technical illustration showing a car interior with a hand adjusting a component, alongside a magnified view of the handle (no text or symbols present)- To return the heating element to its position, lift it up, pull it slightly towards you and make sure that the tab support is in its proper seating.

natural_image
Diagram of a mechanical or electrical component with curved and straight lines, no visible text or symbolsREMOVING AND REFITTING THE DOOR
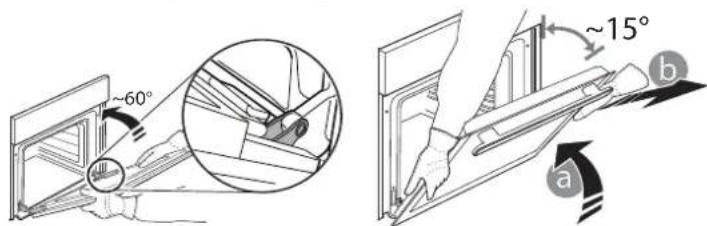
- To remove the door, open it fully and lower the catches until they are in the unlock position.

natural_image
Diagram of a mechanical component with an arrow indicating direction (no text or symbols present)- Close the door as much as you can.
Take a firm hold of the door with both hands – do not hold it by the handle.
Simply remove the door by continuing to close it while pulling it upwards (a) at the same time until it is released from its seating (b).

Put the door to one side, resting it on a soft surface.
-
Refit the door by moving it towards the oven, aligning the hooks of the hinges with their seating and securing the upper part onto its seating.
-
Lower the door and then open it fully. Lower the catches into their original position: Make sure that you lower them down completely.
-
Try closing the door and check to make sure that it lines up with the control panel. If it does not, repeat the steps above.
CLICK TO CLEAN - CLEANING THE GLASS
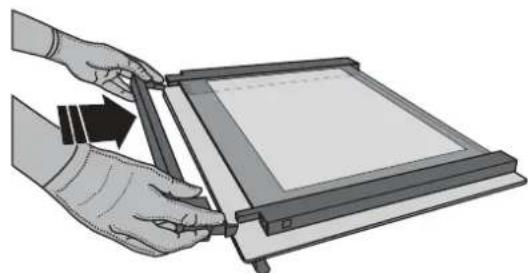
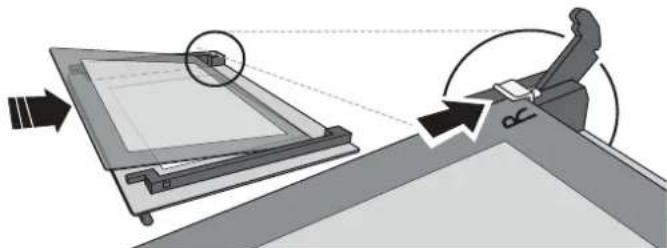
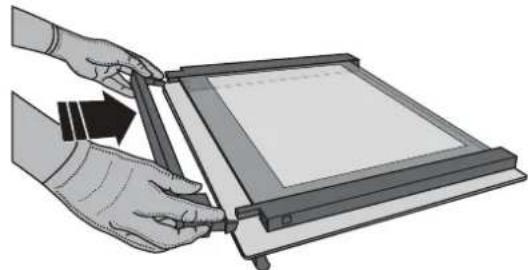
- After removing the door and resting it on a soft surface with the handle downwards, simultaneously press the two retaining clips and remove the upper edge of the door by pulling it towards you.

natural_image
Illustration of two hands holding a metal bracket, showing the process with a tool and alignment (no text or symbols present)-
Lift and firmly hold the inner glass with both hands, remove it and place it on a soft surface before cleaning it.
-
To reposition the internal glass properly, be sure that the "R" can be seen in the left corner. First insert the long side of the glass indicated by "R" into the support seats, then lower it into position.

natural_image
Diagram showing a mechanical device interacting with a chair, with no visible text or symbols- Refit the upper edge: A click will indicate correct positioning. Make sure the seal is secure before refitting the door.
| Problem Possible cause Solution | ||
| The oven does not work. | Power cut.Disconnection from the mains. | Check for the presence of mains electrical power and whether the oven is connected to the electricity supply.Switch off the oven and restart it to see if the fault persists. |
PRODUCT FICHE
www The product fiche with energy data of this appliance can be downloaded from the website docs.indesit.eu
HOW TO OBTAIN THE USE AND CARE GUIDE
www Download the Use and Care Guide from our website docs.indesit.eu(you can use this QR Code), specifying the product's commercial code.
Alternatively, contact our Client After-sales Service.

CE EAC √ ≡
CONTACTING OUR AFTER-SALES SERVICE
You can find our contact details in the warranty manual. When
contacting our Client After-sales Service, please state the codes provided on your product's identification plate.


- MERCI D'AVOIR ACHETER UN PRODUIT INDESIT
- GUIDE DE DÉPANNAGE
- TOGLIERE E RIMONTARE LA PORTA
- 1234
- BOTÃO SELETOR
- REMOVER E REPOR A PORTA
- OVLADAČ VÝBĚRU
- DEMONTÁŽ A ZPĚTNÁ MONTÁŽ DVÍŘEK
- ODSTRAŇOVÁNÍ ZÁVAD
- VYBRATIE A NASADENIE DVIEROK
- RIEŠENIE PROBLÉMOV
- ΚΟΥΜΠΙ ΕΠΙΛΟΓΗΣ
- GUMB ZA ODABIR
- SKIDANJE I POSTAVLJANJE VRATA
- RJEŠAVANJE PROBLEMA
- IZBIRNI GUMB
- DEMONTAŽA IN MONTAŽA VRAT
- ODPRAVLJANJE TEŽAV
- DUGME ZA ODABIR
- KORIŠĆENJE DODATNOG PRIBORA
- SKIDANJE I PONOVO POSTAVLJANJE VRATA
- OTKLANJANJE PROBLEMA
- DOKUMENTACIJA UREĐAJA
- KAKO PREUZETI UPUTSTVO ZA UPOTREBU I ODRŽAVANJE
- STUPANJE U KONTAKT SA POSTPRODAJNIM SERVISOM ZA KLIJENTE
- THANK YOU FOR PURCHASING AN INDESIT PRODUCT
- PRODUCT DESCRIPTION
- CONTROL PANEL
- TIMER KNOB
- THERMOSTAT KNOB
- LED THERMOSTAT / PREHEATING
- INSERTING THE WIRE SHELF AND OTHER ACCESSORIES
- FUNCTIONS
- OFF
- LIGHT
- CONVENTIONAL
- CONVENCTION BAKE
- GRILL
- GRATIN
- DEFROSTING
- USING THE APPLIANCE FOR THE FIRST TIME
- HEAT THE OVEN
- DAILY USE
- SELECT A FUNCTION
- ACTIVATE A FUNCTION
- PREHEATING
- SETTING THE TIMER
- HOW TO READ THE COOKING TABLE
- COOKING DIFFERENT FOODS AT THE SAME TIME
- MAINTENANCE AND CLEANING
- EXTERIOR SURFACES
- INTERIOR SURFACES
- ACCESSORIES
- LOWERING THE UPPER HEATING ELEMENT
- REMOVING AND REFITTING THE DOOR
- CLICK TO CLEAN - CLEANING THE GLASS
- PRODUCT FICHE
- HOW TO OBTAIN THE USE AND CARE GUIDE
- CONTACTING OUR AFTER-SALES SERVICE
Brand : INDESIT
Model : IFW 6230 IX
Category : Oven