
kapp 42 - Interactive whiteboard SMART Technologies - Free user manual and instructions
Find the device manual for free kapp 42 SMART Technologies in PDF.


| Product Type | Interactive Whiteboard |
| Model | kapp 42 |
| Brand | SMART Technologies |
| Display Size (Diagonal) | 42 inches |
| Aspect Ratio | 4:3 |
| Dimensions (W x H x D) | 33.6 x 25.2 x 2.5 inches (approx.) |
| Weight | 50 lbs (approx.) |
| Touch Technology | Infrared (IR) |
| Resolution | 1920 x 1080 (Full HD) |
| Power Supply | 100-240V AC, 50/60 Hz |
| Power Consumption | ≤ 100 W |
| Connectivity | USB 2.0, HDMI, VGA, Audio Out |
| Included Accessories | 2 pens, eraser, USB cable, mounting kit, user manual |
| Compatible Software | SMART Notebook, SMART Ink, Windows, Mac, Linux |
| Mounting Options | Wall mount or floor stand (VESA compatible) |
| Operating Temperature | 32°F to 104°F (0°C to 40°C) |
| Storage Temperature | -4°F to 140°F (-20°C to 60°C) |
| Cleaning Instructions | Clean with a soft, dry cloth. Avoid abrasive cleaners or liquids. |
| Safety Certifications | FCC, CE, UL, RoHS |
| Warranty | 2 years limited |
Frequently Asked Questions - kapp 42 SMART Technologies
User questions about kapp 42 SMART Technologies
0 question about this device. Answer the ones you know or ask your own.
Ask a new question about this device
Download the instructions for your Interactive whiteboard in PDF format for free! Find your manual kapp 42 - SMART Technologies and take your electronic device back in hand. On this page are published all the documents necessary for the use of your device. kapp 42 by SMART Technologies.
USER MANUAL kapp 42 SMART Technologies
natural_image
Line drawing of two electronic devices, one front and one side, with no text or symbols present.SMART kapp
USER'S GUIDE
FOR MODELS KAPP42 AND KAPP84
Product registration
If you register your SMART product, we'll notify you of new features and software upgra
Register online at smarttech.com/registration.
Keep the following information available in case you need to contact SMART Support.
Serial number:
Date of purchase:
Trademark notice
DVit, Kapp, smarttech, the SMART logo and all SMART taglines are trademarks or registered trademarks of SMART Technologies ULC in the U.S. and/or other countries. Apple, App Store, iPhone and iPad are trademarks of Apple Inc., registered in the U.S. and other countries. Android and Google Play are trademarks of Google Inc. The Android robot is reproduced or modified from work created and shared by Google and used according to terms described in the Creative Commons 3.0 Attribution License. The Bluetooth word mark is owned by the Bluetooth SIG, Inc. and any use of such marks by SMART Technologies ULC is under license. All other third-party product and company names may be trademarks of their respective owners.
Copyright notice
© 2017 SMART Technologies ULC. All rights reserved. No part of this publication may be reproduced, transmitted, transcribed, stored in a retrieval system or translated into any language in any form by any means without the prior written consent of SMART Technologies ULC. Information in this manual is subject to change without notice and does not represent a commitment on the part of SMART.
This product and/or use thereof is covered by one or more of the following U.S. patents:
www.smarttech.com/patents
06/2017
Important information

WARNING
- The capture board includes instructions for installation on metal and wood stud walls certain masonry wall types only. A SMART hardware kit is available for these types installation. In the event that you need to install the board on reinforced concrete walls with plaster lath finishing or other types of walls, refer to your local building for instructions, recommendations and safe work practices.
- Do not open or disassemble the board. You risk electrical shock from the high volt inside the casing. Opening the casing also voids the warranty.
- Ensure that any cables that cross the floor to the board are properly bundled and marked to avoid a trip hazard.
- Ensure your installation complies with local building and electrical codes.
- Failure to follow the installation instructions shipped with the board could result in injury and product damage which may not be covered by the warranty.
- To reduce the risk of fire or electric shock, do not expose the board to rain or moisture.
- Use SMART supplied mounting hardware or hardware that is designed to properly sup the weight of the capture board.
- Use the power cable provided with the capture board. If a power cable is not supplied with the capture board, please contact your supplier. Use only power cables that match voltage of the power outlet and that comply with your country's safety standards.
- Do not place any heavy objects on the power cable. Damage to the cable could be shock, fire or product damage which may not be covered by the warranty.
Federal Communication Commission interference statement
This device complies with Part 15 of the FCC Rules. Operation is subject to the following two conditions: (1) This device may not cause harmful interference, and (2) this device must accept any interference received, including interference that may cause undesired operation.
This equipment has been tested and found to comply with the limits for a Class A digital device, pursuant to Part 15 of the FCC Rules. These limits are designed to provide reasonable protection against harmful interference in a residential installation. This equipment generates, uses and can radiate radio frequency energy and, if not installed and used in accordance instructions, may cause harmful interference to radio communications. However, there is no guarantee that interference will not occur in a particular installation. If this equipment does cause harmful interference to radio or television reception, which can be determined by turning the equipment off and on, the user is encouraged to try to correct the interference by one of the following measures:
- Reorient or relocate the receiving antenna.
- Increase the separation between the equipment and receiver.
- Connect the equipment into an outlet on a circuit different from that to which the receiver is connected.
- Consult the dealer or an experienced radio/TV technician for help.
FCC Caution: Any changes or modifications not expressly approved by the party responsible for compliance could user's authority to operate this equipment.
This transmitter must not be co-located or operating in conjunction with any other antenna or transmitter.
5.15–5.25 GHz frequency band operation is restricted to indoor use only. Outdoor operations in the 5150\~5250 prohibited.
Radiation exposure statement
This equipment complies with FCC radiation exposure limits set forth for an uncontrolled environment. This equipment should be installed and operated with minimum distance 20 cm between the radiator and your body. Note: The country code selection is for the non-U.S. model only and is not available to all U.S. models. Per FCC regulations, all Wi-Fi products marketed in U.S. must be fixed to U.S. operation channels only.
Innovation, Science and Economic Development Canada
This device complies with RSS-247 of the ISED. Operation is subject to the following two conditions: (1) This device may not cause harmful interference, and (2) this device must accept any interference received, including interference that may cause undesired operation.
(i) the device for operation in the band 5150-5250 MHz is only for indoor use to reduce the potential for harmful interference to co-channel mobile satellite systems;
(ii) the maximum antenna gain permitted for devices in the bands 5250-5350 MHz and 5470-5725 MHz shall c.e.i.r.p. limit; and
(iii) the maximum antenna gain permitted for devices in the band 5725-5825 MHz shall comply with the e.i.r.p. limits specified for point-to-point and non point-to-point operation as appropriate.
(iv) Users should also be advised that high-power radars are allocated as primary users (i.e., priority users) of the bands 5250-5350 MHz and 5650-5850 MHz and that these radars could cause interference and/or damage to LE-LAN device
Avertissement
Radiation exposure statement
This equipment complies with IC radiation exposure limits set forth for an uncontrolled environment. This equipment should be installed and operated with minimum distance 20 cm between the radiator and your body.
EU Declaration of Conformity
Hereby, SMART Technologies ULC declares that the radio equipment type Dry Erase Whiteboard, Kapp42 and Ka compliance with Directive 2014/53/EU. The full text of the EU declaration of conformity is available at the following internet address: www.smarttech.com/compliance
Warning: This equipment is compliant with Class A of CISPR 32. In a residential environment this equipment may cause radio interference.
The frequency band and the maximum transmitted power in EU are listed below:
2400MHz - 2483.5MHz: 17dBm (EIRP)
Caution: This equipment complies with EU radiation exposure limits set forth for an uncontrolled environment. This equipment should be installed and operated with minimum distance 20cm between the radiator and your body.
Contents
Important information...i....
Federal Communication Commission interference statement_j....
Innovation, Science and Economic Development Canada...ii......
EU Declaration of Conformity iii
Chapter 1: Welcome 1
About this guide...1....
About the SMART kapp 42 board 2
About the SMART kapp 84 board 3.
About the SMART kapp app 4
Other documentation and resources.... 5
Chapter 2: Using the SMART kapp...app....7
Installing the app and starting it for the first time.
Connecting and disconnecting the app 9
Writing, erasing and viewing notes 12
Saving and working with snapshots.... 13
Sharing sessions 18
Chapter 3: Maintaining the SMART kapp board 23
Cleaning the SMART kapp board 23
Transporting the SMART kapp board 25
Replacing the markers and eraser.... 26
Chapter 4: Troubleshooting.... 29
What the indicator lights mean 29
Troubleshooting the app.... 31
Appendix A: Hardware environmental compliance 33
Waste Electrical and Electronic Equipment (WEEE) 33
More information.... 33
Chapter 1
About this guide...1.....
About the SMART kapp 42 board 2
SMART kapp board 2
Dry erase markers and eraser 2
Mounting bracket and hardware...3.....
About the SMART kapp 84 board 3
SMART kapp board 4
Dry erase markers and eraser 4
Mounting bracket and hardware...4....
About the SMART kapp app 4
Other documentation and resources 5
Specifications 5
Installation instructions.... 5
Tutorial and Help 5
Training 5
Frequently asked questions 5
Security information 5
Support center and knowledge base 6
This chapter introduces you to your SMART kapp® board and this guide.
About this guide
This guide explains how to use your SMART kapp board. It includes the following information:
• How to use your board and the SMART kapp app
• How to maintain your board for years of use
• How to troubleshoot issues with your board
This guide is intended for individuals who use and maintain the board. Other documentation and resources are available for individuals who install the board.
About the SMART kapp 42 board
You can use the SMART kapp 42 board to collaborate with others in a simple but pow Write and draw on the as you would on a regular dry erase board. You can then cc Bluetooth®-enabled mobile device to the board by scanning a Quick Response (QR) code c tapping the Near Field Communication (NFC) tag. When you connect your mobile device fo first time, you're directed to the Apple App Store™ or Google Play™ store to download the SMART kapp app. After you download and install the app, you can use it to connect to and share content with others.
The SMART kapp 42 board consists of the following components:
• SMART kapp board
• Dry erase markers and eraser
- Mounting bracket and hardware
SMART kapp board
The SMART kapp board features SMART's proprietary DViT® (Digital Vision Touch) technology on a 42" (107 cm) writing surface. DViT technology captures the notes you make on the board using the dry erase markers and eraser. The board's Bluetooth 4.0 wireless technology (for Apple mobile devices) or Bluetooth 2.1 + EDR wireless technology (for Android™ mobile devices) then transfers your notes as a digital image to a connected mobile device. Alternatively, you can save your notes to a FAT-formatted USB drive by connecting it to the board's USB 2.0 Type-A receptacle. You can also use the board's standard 500 mA USB 2.0 Type-A receptacle to charge your smart phone.
Dry erase markers and eraser
The SMART kapp board comes with three dry erase markers and a special eraser designed to work with the board.
CHAPTER 1 WELCOME
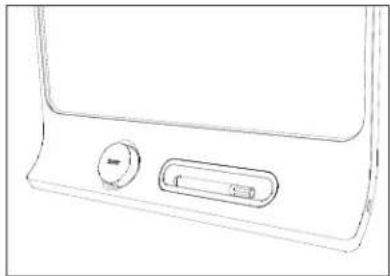
The board includes holders for one marker and the eraser as well as a storage area the board) for the other two markers.
natural_image
Line drawing of a device handle panel with a circular knob and slider (no text or symbols)
natural_image
Technical line drawing of a mechanical component with no visible text or symbolsMounting bracket and hardware
You can use the supplied mounting bracket and hardware to mount the SMART kapp board wall. Alternatively, you can mount the board using a standard VESA® 400 mm × 400 m bracket.
About the SMART kapp 84 board
You can use the SMART kapp 84 board to collaborate with others in a simple but pow Write and draw on the board as you would on a regular dry erase board. Two people the same time. You can then connect a Bluetooth-enabled mobile device to the board by a Quick Response (QR) code or by tapping the Near Field Communication (NFC) tag. When connect your mobile device for the first time, you're directed to the Apple App Store or Play store to download the SMART kapp app. After you download and install the app, you it to connect to the board and share content with others.
The SMART kapp 84 board consists of the following components:
• SMART kapp board
• Dry erase markers and eraser
- Mounting bracket and hardware
SMART kapp board
The SMART kapp board features SMART's proprietary
DViT technology on a 84" (213 cm) writing surface.
DViT technology captures the notes you make on the
board using the dry erase markers and eraser. The
board's Bluetooth 4.0 wireless technology (for Apple
mobile devices) or Bluetooth 2.1 + EDR wireless
technology (for Android mobile devices) then
transfers your notes as a digital image to a connected
mobile device. Alternatively, you can save your notes
to a FAT-formatted USB drive by connecting it to the
board's USB 2.0 Type-A receptacle. You can also use
the board's standard 500 mA USB 2.0 Type-A
receptacle to charge your smart phone.
Dry erase markers and eraser
The SMART kapp board comes with six dry erase markers and a special eraser designed with the board.
Mounting bracket and hardware
You can use the supplied mounting bracket and hardware to mount the SMART kapp board wall. Alternatively, you can mount the board using a standard VESA 600 mm × 400 mm bracket.
About the SMART kapp app
The SMART kapp app enables you to connect your mobile device to a SMART kapp board, then do the following:
• View notes you write on the board on your mobile device
- Save and export your notes
- Start a session and invite others to join and collaborate
Other documentation and resources
SMART provides an extensive library of documentation and resources for the SMART kapp
Specifications
The specifications include the board's dimensions, weight, recommended operating and storage temperatures, power specifications and other important information:
Model Specifications
SMART kapp 42 board smarttech.com/kb/170770
SMART kapp 84 board smarttech.com/kb/170868
Installation instructions
The board comes with installation instructions that explain how to mount the board using supplied mounting bracket and hardware.
If you misplaced the installation instructions, you can download them:
Model Installation instructions
SMART kapp 42 board smarttech.com/kb/170768
SMART kapp 84 board smarttech.com/kb/170870
Tutorial and Help
When you first start the SMART kapp app on your mobile device, a tutorial opens. This explains how to connect your mobile device to the board and share and save your no Installing the app and starting it for the first time on page 7).
Training
The SMART training website (smarttech.com/trainingforbusiness) includes an extensive library of training resources you can refer to when learning how to use the board.
Frequently asked questions
For answers to common questions about the board, see SMART kapp board frequently ask questions (smarttech.com/kb/170793).
Security information
For information about the SMART kapp security features, see SMART kapp security information (smarttech.com/kb/170892).
CHAPTER 1
WELCOME
Support center and knowledge base
The Support center (smartkapp.com/support) includes documentation and a knowledge base that
you can refer to when performing maintenance on the board or troubleshooting issues with board.
Chapter 2
Installing the app and starting it for the...first...time...7.....
Installing the app 8.
Starting the app for the first_time...9....
Connecting and disconnecting the app 9
Connecting .9.
Connecting by QR code 10
Connecting by NFC 10
Connecting by Board ID 11
Disconnecting 11
Writing, erasing and viewing notes 12
Writing and erasing notes.... 12
Viewing notes 13
Saving and working with snapshots.... 13
Saving snapshots to the app 14
Saving snapshots to a USB drive 14
Viewing snapshots 14
Exporting snapshots.... 16
Deleting snapshots 17
Sharing sessions.... 18
Sharing sessions 18
Setting the shared session link...type.... 19
Securing shared sessions 20
Stopping sharing 21
Connecting to another session 21
This chapter explains how to use the SMART kapp app with the SMART kapp iQ board.
Installing the app and starting it for the first time
You can download and install the SMART kapp app by visiting the Apple App Store or Play™, or you can install the app on your mobile device by scanning your board's QR code or by tapping its NFC tag.
The app is compatible with the following devices:
| Device type Requirements Connection options | |
| Apple iOS 8.1 or later operating system software50 MB of storageiPhone 4S or laterThird generation iPad or laterFirst generation iPad mini or laterFifth generation iPod touch or later | |
| Android Android 4.4.4 (KitKat) or later operating system50 MB of storage (internal or SD card)1024 MB of RAM720p or better screen resolutionBluetooth 2.1 + EDRNFC (recommended)3 megapixel or better rear-facing camera (recommended) | Scan the board's unique QR codeEnter the board's IDScan the board's unique QR codeTap the board's NFC tagEnter the board's ID |
Installing the app
To install the app
-
Do one of the following:
-
Visit the Apple App Store or Google Play on your mobile device and search fo SMART kapp.
- Start the QR code scanning app on your mobile device, and then hold your mobile device's rear-facing camera over your board's QR code to scan it.
- Enable NFC in your mobile device's settings (if it isn't already enabled), and then your mobile device near your board's NFC tag (Android mobile devices only).
The Apple App Store or Google Play opens.
- Download and install the app.
CHAPTER 2
USING THE SMART KAPP APP
Starting the app for the first time
To start the app for the first time
- Start the SMART kapp app on your mobile device.
The app tutorial appears.
- Use the swipe gestures to progress through the screens of the tutorial.
Previous screen Next screen
- Tap Close when you have completed the tutorial.
The app home screen appears.

If you want to view the tutorial again, do the following:
On an Apple mobile device, tap Settings on the app home screen and then's Tutorial.
On an Android mobile device, tap Menu, select Settings, and then select Tutorial.
Connecting and disconnecting the app
The SMART kapp app enables you to connect your mobile device to a SMART kapp board then do the following:
• View notes you write on the board on your mobile device
- Save and export your notes
- Start a session and invite others to join and collaborate
Connecting
Start a session by connecting your mobile device to a SMART kapp board.

NOTE
To get the best experience while using the SMART kapp app and to access all the lat features, make sure you have the latest version of the app on your mobile device. So features listed in this documentation may not be available with older versions of the ap
Connecting by QR code
A QR code is a type of bar code. If your mobile device has a real-facing camera and a QR code scanning app, you can scan QR codes like the one with the board. Your mobile device then executes the QR codes' commands. Typically, QR codes' commands display messages or open web pages.
To connect by QR code
- Start the SMART kapp app on your mobile device.
- Hold your mobile device's rear-facing camera still over the board's QR code so that code appears in the center of the app screen.
The app connects your mobile device to the board.

TIP
If the app doesn't connect your mobile device to the board, move your mobile dev closer to or farther away from the board so that the app can capture the QR cc

NOTE
Some Android mobile devices require you to accept a pairing request to connect to board. Swipe down on the screen to access the notification drawer and accept the request.

Connecting by NFC
NFC is a wireless technology that enables you to connect your Android mobile device at device, such as the board, by holding your mobile device a short distance from (or "tap" other device.

NOTE
Currently, you are unable to connect the board to Apple mobile devices using the mob device's NFC support.

TIP
Refer to your mobile device's documentation for the location of its NFC radio. When cc your mobile device to the board, you might need to move the mobile device back and its NFC radio detects the board's NFC tag.
To connect by NFC
-
Enable NFC in your mobile device's settings (if it isn't already enabled).
-
Hold your mobile device near the board's NFC tag.
The app starts and connects your mobile device to the board.
Connecting by Board ID
Each board has a unique Board ID that you can use to connect your mobile device m
To connect by Board ID
- Locate the board's 10-character ID.

TIP
The Board ID is located by the QR code.
-
Start the SMART kapp app on your mobile device.
-
On an Apple mobile device, tap Settings.
OR
On an Android mobile device, tap Menu, and select Settings.
- Tap Advanced, and then tap Connect Manually.
The Manually Connect screen appears.
-
Type the Board ID in the Enter ID box.
-
Tap Connect.
The app connects your mobile device to the board.
Disconnecting
The app disconnects from the current session in the following situations:
- When you close the app
• Automatically after a period of non-use
- When the board is outside of your mobile device's Bluetooth communication range, what approximately 33' (10 m)

NOTE
- When you connect an Android mobile device to the board, an icon appears in the notification area. This icon indicates when the mobile device is connected to the bo


Connected Disconnected
- When you disconnect, the SMART kapp app takes a final snapshot of the board if t content has changed since the last snapshot.
To disconnect the app manually
Tap Disconnect in the top left corner of the SMART kapp app screen, and then tap
Disconnect.
OR
Hold Bluetooth* on the board until it turns solid red.
Writing, erasing and viewing notes
You can write and erase notes on the SMART kapp board just like you do on a traditi board. You can view your notes on the board or in the app.
Writing and erasing notes
You can write and erase notes on the board just like you do on a traditional dry era the best performance out of the board, follow these best practices:
- Wait for the icons on the board to stop flashing before you begin writing.
- Write and draw using the markers provided with your board or a third-party marker recommended by SMART. For a list of recommended third-party markers see Replacing markers and eraser on page 26.
- Hold the pen away from the tip and at a right (90°) angle to the board's surface.
- Ensure your palm, hand, arm and any loose clothing doesn't touch the board while writing.
- Write clearly with large text and spaced out ink strokes.
- Avoid writing too close to the edges and corners of the board.
CHAPTER 2
USING THE SMART KAPP APP
- While connected with the app, use only the eraser provided with the board.
- While erasing, hold the eraser flat against the board.
- Clean the eraser and board periodically following the instructions provided in this guide (see Cleaning the SMART kapp board on page 23).
Viewing notes
During a session, you can view the notes you've written on the board on your mobile you write or erase notes, the changes appear on your mobile device automatically.
By default, your mobile device displays the board's entire writing surface. You can use zoom in, zoom out and pan:
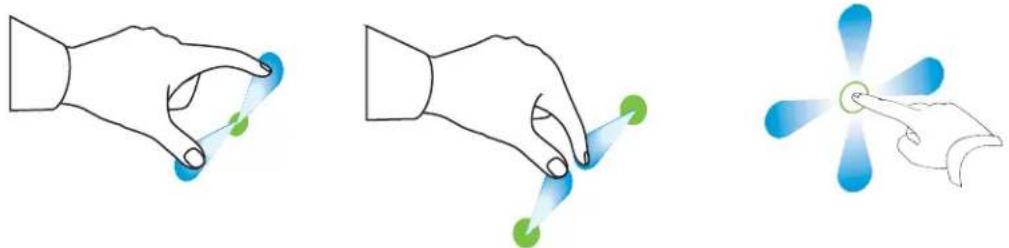
Zoom in Zoom out Pan

NOTE
As you zoom in or out, grid lines appear on the writing surface to indicate the level magnification.
Saving and working with snapshots
As you write notes on a SMART kapp board, you might want to save snapshots of you time to time during the session.
After you save snapshots, you can do the following:
• View the snapshots
- Export the snapshots as JPEG or PDF files
- Delete the snapshots
CHAPTER 2
USING THE SMART KAPP APP
Saving snapshots to the app
To save a snapshot
-
Start or connect to a session (see Connecting and disconnecting the app on page 9).
-
Press Capture on the board.
OR
Press Capture in the app.
The app saves a snapshot of your notes.
NOTES
The Sessions button in the bottom-right corner of the screen indicates how many snapshots have been saved in the current session.
Notes are always saved as black ink.
Saving snapshots to a USB drive
If you don't have access to a mobile device or would prefer to save snapshots of you another means, you can save PDF snapshots to a FAT-formatted USB drive.
NOTE
Notes are always saved as black ink.
To save a snapshot
-
Connect the USB drive to the USB 2.0 Type-A receptacle on the side of the boar
-
Press Capture or USB on the board.
The board saves a snapshot of your notes to the USB drive.
- Disconnect the USB drive from the board when you're done saving snapshots.
Viewing snapshots
When you save a snapshot, the app saves it to your session's library. Access your current or a previous session's library to view your saved snapshots.

TIP
You can use the zoom in, zoom out and pan gestures when viewing snapshots (see 1 notes on page 13).
To view snapshots in the current session
-
Take one or more snapshots in the current session (see Saving snapshots to the app on the previous page).
-
On an Apple mobile device, tap Sessions.
OR
On an Android mobile device, tap Sessions.
The Sessions screen appears.
- Tap a snapshot's thumbnail image to view it.
To view snapshots in previous sessions
-
If you're currently in a session, disconnect (see Disconnecting on page 11).
-
On an Apple mobile device, tap Sessions.
OR
On an Android mobile device, tap Sessions.
The Sessions screen appears.
- Select a session to view the snapshots saved for that session.
The session's snapshot library appears.
- Select a snapshot's thumbnail image to view it.
Exporting snapshots
If you want to share any snapshots of your notes, you can use the app to export a third-party app on your phone to share your snapshots as a PDF or JPEG file.
To export a snapshot
-
View the snapshot you want to export (see Viewing snapshots on page 14).
-
On an Apple mobile device, tap Export 🔒, and then select Save to Camera Roll, Share as PDF or a cloud service.
OR
On an Android mobile device, tap Menu, and then select Save to Camera Roll, Share as PDF or a cloud service.
-
If you selected Share as Image or Share as PDF, select the app you want to use to share the snapshot.
-
Use the selected app to share the snapshot.
To export all snapshots saved in the current session
-
Save one or more snapshots in the current session (see Saving snapshots to the app on page 14).
-
Tap Sessions.
The Sessions screen appears.
- On an Apple mobile device, tapExport.
OR
On an Android mobile device, tap Menu, and then select Share as Image or Share as PDF.
-
Select the app you want to use to export the snapshots.
-
Use the selected app to export the snapshots.
To export all snapshots saved in a previous session
-
If you're currently in a session, disconnect (see Disconnecting on page 11).
-
On an Apple mobile device, tap Sessions.
OR
On an Android mobile device, tap Sessions.
The Sessions screen appears.
- Select a session to view the snapshots saved for that session.
The session's snapshot gallery appears.
- On an Apple mobile device, tapExport.
OR
On an Android mobile device, tap Menu, and then select Share as PDF.
-
Select the app you want to use to export the snapshots.
-
Use the selected app to export the snapshots.
Deleting snapshots
You can either delete snapshots individually or delete an entire session and all of its same snapshots.
To delete a snapshot from a previous session
-
If you're currently in a session, disconnect (see Disconnecting on page 11).
-
On an Apple mobile device, tap Sessions.
OR
On an Android mobile device, tap Sessions.
The Sessions screen appears.
- Select the session that contains the snapshot you want to delete.
The session's snapshot gallery appears.
-
Select the snapshot you want to delete.
-
Tap Delete 📄, and then tap Delete.
CHAPTER 2
USING THE SMART KAPP APP

To delete a previous session on an Apple mobile device
-
If you're currently in a session, disconnect (see Disconnecting on page 11).
-
Tap Session.
The Sessions screen appears.
-
Select Edit.
-
Tap the session's Delete button, and then tap Delete.
-
Tap Done.

To delete a previous session on an Android mobile device
-
If you're currently in a session, disconnect (see Disconnecting on page 11).
-
Tap Sessions.
The Sessions screen appears.
-
Tap Menu, and then select Select.
-
Select the session.
-
Tap Delete Ⓞ, and then tap Delete.
Sharing sessions
During a session, you can use the SMART kapp app to invite up to 250 people to vie on their mobile or desktop devices.

NOTE
You can share notes only as long as the SMART kapp app is running on your mobile your mobile device is connected to a board.
Sharing sessions
When you share a session with others, they can tap or click a link to view your sess browsers; they don't need to install additional software or otherwise configure their devices. Alternatively, others can choose to install the SMART kapp app on their mobile devices are to connect to your session.
As you make changes to your notes, others see these changes in real time. They can or out, and save, view and export snapshots.

NOTE
- The SMART kapp web viewer supports the following browsers:
Mobile devices Safari for iOS 8.1 or later operating system software Chrome™ for Android 39.0.2171.93 or later
Computers Internet Explorer ^® 10 or later Chrome 39.0.2171.95 or later Firefox ^® 34.0.5 or later Safari 8.0 or later
- You can share notes only as long as the SMART kapp app is running on your mol and your mobile device is connected to a board.
- You can export saved snapshots of notes without connecting your mobile device to (see Exporting snapshots on page 16).
To share your session
- Connect your mobile device to a board (see Connecting and disconnecting the app on page 9).
- Tap Invite ^+ , and then select Send Link.
- Select the app you want to use to send the invitation.
- Use the selected app to send the invitation.
Setting the shared session link type
When you invite others to join your session, the app sends them a dynamic link by de you use a dynamic link, the app creates a new link each time you send an invite for your session. However, the app also provides you with the option of sending a static link your session. A static link provides a permanent link to your sessions so that the link each time you send an invite. With a static link, you can send the link before meeting simplify meeting startup. If you want to use a static link instead of a dynamic link, then change your invitation link preferences from the app's settings.
To use a static link
-
If you're currently in a session, stop sharing the session (see Stopping sharing on page 21).
-
On an Apple mobile device, tap Settings.
OR
On an Android mobile device, tap Menu, and select Settings.
-
Select Sharing, and then select Static Link.
-
Optionally, select Send Link, and then select a method to send the static link to others.
Securing shared sessions
In the SMART kapp app, you can add password security to protect your sessions before out a link sharing them. This means that others will have to use the password you set shared session.
To use a password
-
If you're currently in a session, stop sharing the session (see Stopping sharing on the facing page).
-
On an Apple mobile device, tap Settings.
OR
On an Android mobile device, tap Menu, and select Settings.
- Select Sharing, and then select Password.
The Enter Password screen appears.
-
Select Require a Password.
-
Type up to 32 characters for a password.
-
Tap OK.
To remove the password
-
If you're currently in a session, stop sharing the session (see Stopping sharing on the facing page).
-
On an Apple mobile device, tap Settings.
OR
On an Android mobile device, tap Menu, and select Settings.
CHAPTER 2
USING THE SMART KAPP APP
- Select Sharing, and then select Password.
The Enter Password screen appears.
-
Deselect Require a Password.
-
Tap Done.
Stopping sharing
You can stay connected to the board but stop sharing the current session.
To stop sharing a session
-
Tap Invite ^+ , and then tap Options.
-
Tap Stop Sharing.
-
Tap Stop Sharing to end sharing the session.
Connecting to another session
If another person shares a session with you, you can connect to that session using the app on your mobile device. Once connected, you can do everything in the other person that you can do in your own sessions:
• Write and erase notes
- View notes
- Save snapshots of notes
- Share snapshots
To connect to another session on a mobile device
- From your mobile device, open the email that the session's host sent you.
- Tap the link in the email.
If you have the SMART kapp app installed, the app opens and displays the notes that person is sharing.

NOTE
If the SMART kapp app isn't installed on your mobile device, follow the on-screen instructions to install it.
CHAPTER 2
USING THE SMART KAPP APP
To connect to another session on a desktop
-
From your computer, open the email that the session's host sent you.
-
Click the link in the email.
The SMART kapp app opens in your computer's default browser, displaying the notes other person is sharing.
Chapter 3
Cleaning the SMART kapp board.23....
Recommended cleaners 23
Cleaning the writing surface 24
Cleaning the frame and corner sensors 24
Cleaning the eraser...25....
Transporting the SMART kapp board 25
Replacing the markers and eraser.... 26
Purchasing replacement markers and erasers from the Store for SMART Parts
Purchasing replacement markers from other sources....
26
This chapter explains how to maintain the SMART kapp board for years of use.
Cleaning the SMART kapp board
With proper care, the SMART kapp board will provide years of trouble-free service. SMART recommends you clean the board monthly to help ensure optimal performance.
Recommended cleaners
To clean the board's writing surface, frame and cameras, use one of the following clean
- Water
- Dry erase cleaners
- EXPO® Whiteboard Care cleaner
- Windex® glass cleaner (for SMART kapp 42 only)
- Isopropyl alcohol

CAUTION
Do not use whiteboard conditioners to clean the writing surface.
Cleaning the writing surface
Follow the instructions below to clean your board's writing surface.
To clean the writing surface
- Disconnect the board from its power source.
- Spray a small amount of water or cleaner onto a clean lint-free cloth or paper tow
- Clean the board's surface.
CAUTION
As you clean the writing surface:
- Do not spray the cleaner directly onto the board.
Do not allow excess cleaner to flow into the frame's corners where the camera located.
Do not allow excess cleaner to flow onto the reflective tape that lines the insi frame.
Cleaning the frame and corner sensors
The SMART kapp board uses cameras located in the corners of the frame and reflective along the inside of the frame to capture your writing. Although the cameras are protected windows, dust or dry erase residue can build up on frame's reflective tape and in the impairing the board's performance.

TIP
SMART recommends that you clean the corner sensors last in case the previous cleaning instructions left debris on the sensors.
To clean the frame's reflective tape and corners—Method 1
- Disconnect the board from its power source.
- Carefully vacuum the areas where dust and dry erase residue have built up.
CAUTION
Do not use compressed air to clean the corner cameras or the frame.
To clean the frame's reflective tape and corners—Method 2
-
Disconnect the board from its power source.
-
Spray a small amount of water or cleaner onto a clean lint-free cloth or paper tow

When you clean the windows in the corners, use a cotton swab rather than a clo towel to get any residue and dust out of the smaller areas.

Do not use compressed air to clean the corner cameras or the frame.
- Starting at one of the corners, gently wipe the camera's window and then continue wipe toward the center along the reflective tape. This helps to avoid wiping dry era and dust onto the corner sensors as you clean.

As you clean, do not apply too much pressure. Applying too much pressure could the reflective tape or cameras.
- Repeat the previous step for each corner. Pay particular attention to the bottom corr they're the most likely to collect dust and debris.
Cleaning the eraser
Over time, the eraser can become less effective as its felt edge collects dry erase ink clean the eraser, use the following instructions.
To clean the eraser's felt
- Rinse the eraser's felt edge under cold running water.
- While wearing gloves, apply a mild soap or detergent and rub the felt with your fi
- Rinse the felt thoroughly under cold running water.
- Remove excess water by pressing the felt against a towel or paper towel.
- Allow the felt to air dry completely.
Transporting the SMART kapp board
When you need to uninstall the SMART kapp board from its mobile stand or wall mount transport it to another location, make sure you use the original packaging to repack the
packaging was designed with optimal shock and vibration protection. If the original package available, you can purchase the same packaging directly from your authorized SMART reset (smarttech.com/where).

CAUTION
Transport the board only in original or replaced packaging. Transporting the board without correct packaging voids the warranty and could lead to product damage.
For instructions on how to repack the board for transportation, see How to package a SMART kapp 42 for return.
Replacing the markers and eraser
The SMART kapp 42 board comes with three dry erase markers and one eraser.
The SMART kapp 84 board comes with six dry erase markers and one eraser.
Purchasing replacement markers and erasers from the Store for SMART Parts
If you need to replace the dry erase markers or eraser, visit the Store for SMART Par (smarttech.com/Support/PartsStore).
Purchasing replacement markers from other sources
Alternatively, you can also replace the dry erase markers with third-party dry erase marker barrel of third-party dry erase markers can be any length and diameter, but the tip and within the following dimensions:

For best results, SMART recommends these third-party replacement markers:
- BIC ^ Magic Marker ^ dry erase liquid markers, fine tip
- EXPO® low odor fine tip dry erase markers
- Staples® Remarx™ dry erase markers, bullet tip
- Melissa & Doug® dry erase markers

CAUTION
The following pens are not recommended for use with the board.
- BIC Great Erase Grip® dry erase markers
- Board Dudes®
- Liqui-Mark®
- Quartet®
Chapter 4
What the indicator lights .mean..29....
Startup 29
After startup...30
Troubleshooting the app 31
This chapter explains how to troubleshoot common issues with the SMART kapp board and SMART kapp app.
What the indicator lights mean
SMART kapp boards have four indicator lights. The indicator lights are in the bottom-right corner of SMART kapp 42 boards and on the pen ledge of SMART kapp 84 boards.
Startup
When you first connect the board to a power source, the indicator lights turn on and off in the following order until the board is ready for use:
- Status
- Bluetooth
• USB - Capture
After startup
When the board is ready for use, you can use the indicator lights to see the board's diagnose common issues.
Light What it means What to do
| Status | ||
| Off The board isn't receiving power. Ensure the board is connected to a power supply and is receiving power.If the Status light is still off, contact SMART Support for assistance. | ||
| On The board is receiving power and is working properly. | [N/A] | |
| Flashing(after startup)The board is receiving power working properly. | bWrite isn't on the board using only compatible markers.Ensure there are no obstructions (including markers) in the frame.Clean the writing surface and frame.If the Status light continues to flash, contact SMART Support for assistance. | |
Bluetooth
| Off The board isn't connected to a mobile device. | If you previously connected the mobile device, ensure the SMART kapp app is running and the device is within the board's Bluetooth communication range. |
| The board was previously connected to a mobile device but the SMART kapp app on the mobile device isn't running or the device has moved out of the board's Bluetooth communication range. | |
| Flashing The board is connecting to a mobile device. | [N/A] |
| On The board is connected to a mobile device. | [N/A] |
| Flashing red The board is disconnecting from the N/A mobile device. | |
| Solid red The board has disconnected from the [N/A] mobile device. | |
Light What it means What to do

USB
Off The board isn't connected to a USB drive. Connect only USB drives to the USB receptacle. The board doesn't recognize the connected device as a USB drive.
Flashing The board is connecting to a USB [N/A] drive. The board is saving a snapshot of your notes to the connected USB drive.
On The board is connected to a USB drive. [N/A]
Flashing red The board is unable to save Disconnect the USB drive, and then snapshots of your notes to the connect a different USB drive. connected USB drive because the USB drive is full, is not FAT formatted or there's another problem with it.

Capture
Off The board isn't connected to a USB drive or a mobile device. [N/A]
Flashing The board is saving a snapshot of [N/A] your notes to the connected mobile device.
On The board is connected to a USB drive or a mobile device. [N/A]
Troubleshooting the app
The following are issues that you might encounter while using the SMART kapp app and SMART kapp board.
Your mobile device doesn't make sure no other mobile devices are connected to the connect to the board. (The board can connect to only one mobile device a time.)
| Your mobile device doesn't connect when you use the QR code. | Make sure your device's rear-facing camera is working and Bluetooth is enabled.Ensure the QR code is clean and fully visible.Position your mobile device so that your board's QR code appears in the center of the SMART kapp app screen. |
| Your Android mobile device doesn't connect when you use NFC. | Ensure your Android mobile device supports NFC.Ensure NFC and Bluetooth are enabled in your Android mob device's settings.Position your Android mobile device as close as possible to the NFC tag on your board when connecting. |
| When you write on the board, your writing doesn't appear in the SMART kapp app, or extra lines or other visual noise appear in the SMART kapp app. | Ensure the board's cameras and frame are clean.Check for and remove any objects in the frame.Ensure your hands, arms or loose clothing aren't touching the board as you write.Write on the boards using only compatible markers.Keep your board away from bright light sources, such as disunlight and incandescent lighting.Download and install the latest firmware. |
| The SMART kapp app displays the "Object blocking frame" message. | The SMART kapp app displays this message when dirt on the board's frame obscures the sensors. To fix this, clean the board's cameras and frame. |
| My issue isn't listed here. | Download and install the latest firmware.If the issue still persists, contact SMART Support for assistance |
Appendix A
compliance
SMART Technologies supports global efforts to ensure that electronic equipment is manufactured and disposed of in a safe and environmentally friendly manner.
Waste Electrical and Electronic Equipment (WEI)
Electrical and electronic equipment and batteries contain substances that can be harmful to the environment and to human health. The crossed-out wheeled bin symbol indicates that products should be disposed of in the appropriate recycling stream and not as regu waste.
More information
See smarttech.com/compliance for more information.
SMART TECHNOLOGIES
smarttech.com/support
smarttech.com/contactsupport
smarttech.com/kb/170769



- SMART kapp
- Product registration
- Trademark notice
- Copyright notice
- Important information
- WARNING
- Federal Communication Commission interference statement
- Radiation exposure statement
- Innovation, Science and Economic Development Canada
- Avertissement
- EU Declaration of Conformity
- Contents
- Important information...i....
- Chapter 1: Welcome 1
- Chapter 2: Using the SMART kapp...app....7
- Chapter 3: Maintaining the SMART kapp board 23
- Chapter 4: Troubleshooting.... 29
- Appendix A: Hardware environmental compliance 33
- Chapter 1
- About this guide
- About the SMART kapp 42 board
- SMART kapp board
- Dry erase markers and eraser
- CHAPTER 1 WELCOME
- Mounting bracket and hardware
- About the SMART kapp 84 board
- About the SMART kapp app
- Other documentation and resources
- Specifications
- Model Specifications
- Installation instructions
- Model Installation instructions
- Tutorial and Help
- Training
- Frequently asked questions
- Security information
- Support center and knowledge base
- Chapter 2
- Installing the app and starting it for the first time
- Installing the app
- To install the app
- To start the app for the first time
- Connecting and disconnecting the app
- Connecting
- NOTE
- Connecting by QR code
- To connect by QR code
- TIP
- Connecting by NFC
- To connect by NFC
- Connecting by Board ID
- To connect by Board ID
- Disconnecting
- Connected Disconnected
- To disconnect the app manually
- Disconnect.
- Writing, erasing and viewing notes
- Writing and erasing notes
- USING THE SMART KAPP APP
- Viewing notes
- Saving and working with snapshots
- Saving snapshots to the app
- To save a snapshot
- NOTES
- Saving snapshots to a USB drive
- Viewing snapshots
- To view snapshots in the current session
- To view snapshots in previous sessions
- Exporting snapshots
- To export a snapshot
- To export all snapshots saved in the current session
- To export all snapshots saved in a previous session
- Deleting snapshots
- To delete a snapshot from a previous session
- Sharing sessions
- To share your session
- Setting the shared session link type
- To use a static link
- Securing shared sessions
- To use a password
- To remove the password
- Stopping sharing
- To stop sharing a session
- Connecting to another session
- To connect to another session on a mobile device
- To connect to another session on a desktop
- Chapter 3
- Cleaning the SMART kapp board
- Recommended cleaners
- CAUTION
- Cleaning the writing surface
- To clean the writing surface
- Cleaning the frame and corner sensors
- To clean the frame's reflective tape and corners—Method 1
- To clean the frame's reflective tape and corners—Method 2
- Cleaning the eraser
- To clean the eraser's felt
- Transporting the SMART kapp board
- Replacing the markers and eraser
- Purchasing replacement markers and erasers from the Store for SMART Parts
- Purchasing replacement markers from other sources
- Chapter 4
- What the indicator lights mean
- Startup
- After startup
- Light What it means What to do
- USB
- Capture
- Troubleshooting the app
- Appendix A
- compliance
- Waste Electrical and Electronic Equipment (WEI)
- More information
- SMART TECHNOLOGIES
Brand : SMART Technologies
Model : kapp 42
Category : Interactive whiteboard