EV-55D - Oven German Pool - Free user manual and instructions
Find the device manual for free EV-55D German Pool in PDF.


| Product Type | Built-in Electric Oven |
| Brand | German Pool |
| Model | EV-55D |
| Dimensions (H x W x D) | 595 mm x 595 mm x 575 mm |
| Interior Dimensions (H x W x D) | 470 mm x 380 mm x 430 mm |
| Cut-out Dimensions (H x W x D) | 588 mm x 565 mm x 585 mm |
| Net Weight | 41.0 kg |
| Voltage | 220-240 V / 50-60 Hz |
| Rated Power | 2900-3200 W |
| Electric Current | 13.5 A |
| Temperature Range | 100-250 °C |
| Interior Capacity | 84 L |
| Color | Stainless Steel |
| Cooking Functions | Rapid Heat, Heat With Fan, Heat Only, Base Heat, Defrost, Grill With Fan, Grill, Turbo Grill |
| Timer Setting | Up to 150 minutes (adjustable in 5 min increments) |
| Door Removal for Cleaning | Yes |
| Removable Side Racks | Yes |
| Removable Fan Cover | Yes |
| Oven Light Replacement | Yes (side and top) |
| Warranty | 12 months from purchase date |
Frequently Asked Questions - EV-55D German Pool
User questions about EV-55D German Pool
0 question about this device. Answer the ones you know or ask your own.
Ask a new question about this device
Download the instructions for your Oven in PDF format for free! Find your manual EV-55D - German Pool and take your electronic device back in hand. On this page are published all the documents necessary for the use of your device. EV-55D by German Pool.
USER MANUAL EV-55D German Pool
Please read these instructions and warranty information carefully before use and keep them handy for future reference.
目錄
| Product Structure | 03 |
| Main Body | |
| Control Panel & Display | |
| Basic Control | |
| Installation | 05 |
| Function Descriptions | 06 |
| Operating Instructions | 08 |
| Precautions | |
| Operating Procedures | |
| Cautions | 11 |
| Care & Maintenance | 12 |
| Notes About Cleaning | 13 |
| Troubleshooting | 14 |
| Technical Specifications | 15 |
Product Structure
- Main Body

Product Structure
II. Control Panel & Display
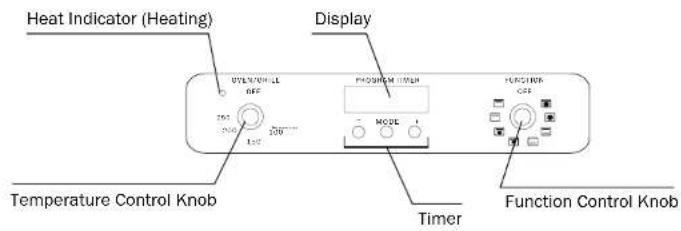
III. Basic Control
Set Timer
Press any button to show the timer setting on the display (default value is 60 min). Press right button to add 5 min and left button to reduce 5 min (Maximum timer setting is 150 min).
Set Temperature
Using [ Temperature ] control knob (left), set temperature from 100-250°C.
Select Function
Turn | Function | control knob (right) to desired position (Please refer to p.06 "Function Descriptions" in this manual for details about each function).
Start
Press [Set] (middle button) to start. Timer will begin counting down from the set time and operation will stop when it reaches "0". During operation, press the left button [-] to display the timer for 5 seconds.
Installation
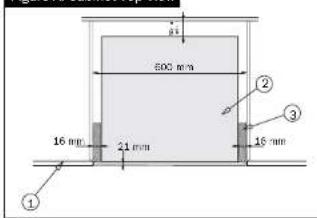
- For best integration within a kitchen, mount oven in a standard 600 mm wide cabinet that gives a flush fit with the surrounding cabinet front panels (Figure A).
- It can also be mounted with a proud fit with the surrounding cabinet (Figure B).
Figure A: Cabinet Top View
∴ m = 3/11

① Cabinet Front ② Oven Top ③ Filling Plate

Note: - Oven must be installed on a flat and level surface; venting space must be present. Non-flammable material is recommended for the surrounding cabinet panels and filling plates - Power socket should be conveniently accessible and properly earthed
Function Descriptions

Rapid Heat
Heat comes from the element around the circulating fan as well as the smaller element above food. This helps to preheat oven 30% quicker than on standard heating. Simply place food in oven straight from the freezer. Ideal for: cooking frozen (pre-cooked) food, e.g. savoury pastries, pizzas, meat pies and fruit pies. Note: Cook in the upper half of the oven for best results.

Heat With Fan
Heat comes from the element around the fan, with fan circulating hot air within the oven chamber. Food can be placed in several different positions in the oven at the same time. And this function is quicker than standard non-fan [ Heat Only ] function.
Note: Some variation in browning is normal.

Heat Only
Heat comes from two elements, one above and one below food. Both elements are controlled by thermostat and will turn on and off to maintain the desired temperature. Ideal for: Baking single trays of biscuits, scones, muffins, cakes, casseroles, egg pudding, etc.

Base Heat
Heat comes from element below food. The element is controlled by thermostat and will turn on and off to maintain desired temperature. Ideal for: Adding extra browning to the bottoms of pizzas, pies and pastries.

Defrost
The "Defrost" function uses low temperature air that is circulated by the fan. Ideal for: defrost/thaw food before cooking. "Defrost" function can also be used to raise yeast dough and dry fruit, vegetables and herbs.

Grill With Fan
Heat comes from two heating elements above food. It combines the benefits of both "Heating" and "Grill" functions. The grill element switches on and off to maintain the desired temperature while the fan circulates heated air. The oven door remains closed for this function. Ideal for: Grill large cuts of meat, which gives you a result that is similar to "rotisserie" cooked meat.
Note: Place on a rack in the second lowest level. Put baking pan on the lowest level to catch any spills and droppings. It is not necessary to turn over during "Grill With Fan" cooking cycle.
Function Descriptions

Grill
Radiant heat is directed from the powerful upper element onto food. Ideal for: Grill tender cuts of meat, steak, chops, open toasts and other quick cooking foods.
Note: Preheat oven for 3 minutes to get the best results.

Turbo Grill
"Turbo Grill" directs radiant heat from two powerful upper elements onto the food. Ideal for: Grill tender cuts of meat, sausages, open toasts and other quick cooking foods.
Note: Preheat oven for 3 minutes to get the best results.
Operating Instructions
I. Precautions
- When using oven for the first time, clean the oven interior with warm water (with or without soap). Then heat empty oven at 180°C for 2 to 4 hours to dispel any manufacturing odor - Room must be well ventilated during use
II. Operating Procedures
1. Pre-heat Oven Chamber
Pre-heating of oven is recommended for some of the grilling functions. Pre-heating allows oven to reach required temperature quickly and efficiently.
2. Pre-heat Grill Rack
Preheat grill rack for at least 3 minutes to obtain best results. It helps to seal juice and flavour in meat items such as steak, pork chops and lamb.
3. Set Temperature
Set desired temperature (refer to table below).
| Oven Status | Reference Temperature |
| Cool | 80°C / 175°F |
| Warm | 100~110°C / 210~230°F |
| Very Warm | 130~140°C / 265~285°F |
| Moderate Hot | 150~160°C / 300~320°F |
| Medium Hot | 170~180°C / 340~355°F |
| Hot | 190~200°C / 375~390°F |
| Very Hot | 200~210°C / 390~416°F |
| Extra Hot | 220~230°C / 430~450°F |
| Extremely Hot | 240~250°C / 465~480°F |
4. Adjust Settings
A. Cake & Pastry
| Pastry Type | Pastry Name | Temperature | Rack Level* | Time |
| Scones | Dried Fruit Scones | 210 °C | 3 | 10-12 min |
| Biscuits / Cookies | Rolls | 170-180 °C | 3 or 4 | 10-15 min |
| Butter Cookies | 170-180 °C | 3 or 4 | 10-15 min | |
| Shortbreads | 150 °C | 3 or 4 | 15-20 min | |
| Cakes | Patty Cakes | 180 °C | 3 or 4 | 15-20 min |
| Sponge Cakes | 170-180 °C | 3 | 18-20 min | |
| Nut Loaves | 170 °C | 3 | 45-50 min | |
| Boiled Fruit Pies | 160-170 °C | 3 | 60-90 min | |
| Rich Fruit Cakes | 140 °C | 3 | 180-210 min | |
| Pastries | Custard Tarls | 180-160 °C | 3 | 10/30 min |
| Cream Puffs | 220-180 °C | 3 or 4 | 20/30 min | |
| Danish Stick | 210-180 °C | 3 or 4 | 15/30-40 min | |
| Yeast Breads | Buns | 200 °C | 3 or 4 | 20/30 min |
| Breads | 220 °C | 3 | 25-30 min | |
| Puddings | Chocolate | 190 °C | 3 or 4 | 40 min |
| Cheese Sourle | 180 °C | 3 | 35 min |
* Counting from bottom to top
B. Meat
- Place meat in oven and set temperature between 180°C and 200°C. It is recommended to wrap meat in a roasting bag or foil to prevent fats and oil from splattering.
- Use baking pan and/or grill rack insert; place meat on the insert.
- Do not pierce meat, as it will allow meat juice to escape.
- When meat is cooked, remove meat from oven.
- Wrap meat in aluminium foil and leave to stand for about 10 minutes. It will help retain meat juice when the meat is carved.
| Meat | Temperature | Grilling Level | Time |
| Steak | 200 °C | Medium Rare | 35-40 min |
| 200 °C | Medium | 45-50 min | |
| 200 °C | Medium Cooked | 55-60 min | |
| Lamb Rack | 200 °C | Medium Rare | 40 min |
| 200 °C | Medium | 60 min | |
| Veal | 180 °C | Normal | 60 min |
| Pork Chop | 200 °C | Normal | 60 min |
Note: Above table is for reference only. Actual grill time must be adjusted depending on the thickness of meat, size of bones and other ingredients in the dish.
Operating Instructions
C. Fish / Poultry
- Place poultry or fish in oven. Set temperature at 180° C.
- Lay a sheet of foil on top of fish and grill for 20-45 min.
| Fish / Poultry | Temperature | Time |
| Chicken | 180 °C | 45-50 min |
| Duck | 180-200 °C | 60-70 min |
| Turkey | 180 °C | 40-45 min (<10kg) |
| 180 °C | 35-40 min (>10kg) | |
| Fish | 180 °C | 20 min |
Note: Above table is for reference only. Actual grill time must be adjusted depending on the thickness of fish/poultry and other ingredients in the dish.
5. Operating Tips
- Seasoning is not necessary when grilling. However, to enrich meat flavour, you can grill fish on top of a bed of herbs, or add a bunch of rosemary or tarragon to your poultry dish
- Food cooks faster and more evenly when cut into pieces
- To make poultry, veal and pork look more appetizing, apply a small amount of fat in baking pan and heat meat on all sides
Cautions
- Children under 12 should not operate oven alone. Oven must not be unattended at any time during operation
- Do not touch heating element and other hot surfaces (e.g. oven door) to avoid burns and injuries
- This appliance cannot be used as a space heater
- In order to avoid a fire, oven should be kept clean and vents unobstructed
- Do not spray aerosols in the vicinity of the appliance during operation
- Do not store flammable materials in or under the appliance
- Shut off power immediately after use
- Do not place thick portions of food under the grill. Foods may curl
- If the supplied power cord is damaged, contact a German Pool-authorized or licensed technician for a replacement
- When oven will not be used for an extended period, unplug power cord
Care & Maintenance
Important:
- Always make sure that the power is disconnected before cleaning
- Do not use steam cleaners
- Do not block heat circulation within the oven chamber by lining the bottom or grill racks with foil
or cookware
1. Enamel Surface
- Rub persistent stains vigorously with a nylon scourer or creamed powder cleansers
- Do not use harsh abrasive cleaners, powder cleaners, steel wool or wax polishes
Note: User may use household oven enamel cleaners - follow the manufacturer's instructions carefully
II. Stainless Steel
Stainless steel of any grade can be stained, discolored or greasy. In order to maintain oven's best performance and appearance, clean those areas regularly by following the procedures below.
- Wash with warm soap water and then rinse with clean water
- For a better, shiny look, wipe stainless steel areas with a stainless steel cleaner, then wipe with a soft lint-free cloth
- Use a stainless steel cleaner when the stainless steel part is extremely dirty and/or discolored
Note: Please follow the polish or brush lines of the stainless steel.
III. Paint (Control Panel)
- Wash with warm soap water and then rinse with clean water. Then wipe it dry with a soft, lint-free cloth
- Do not use harsh abrasive cleaners, powder cleaners, steel wool or wax polishes
IV. Glass (Door & Control Panel)
- Glass surfaces on oven door and control panel are best cleaned immediately after being soiled
- Use a damped cloth to remove baked-on food deposits
- Oven cleaners may be used to remove stubborn marks and stains
V. Oven Interior
- Always keep your appliance clean. Ensure that grease do not accumulate around heating elements or circulating fan
Always keep the oven dish, bake trays and smokeless grill insert clean, as any fat deposits may catch fire
Always wrap meats in foil or an roasting bag to minimize cleaning effort. Any poly-unsaturated fats can leave a varnish-like residue which is very hard to remove
VI. Grill Rack
- Always keep the baking pan and grill rack inserts clean. Any fat deposits may catch fire
Notes About Cleaning
Follow the following steps to get better access to the oven interior for cleaning: Note: Make sure power is connected when removing or positioning any parts.
I. Removing Oven Door
- Rotate the two stirrups forward so that they are engaged together onto the hooks on the hinge arms.
- Hold both stirrups in place and slightly close the door. The stirrups will now remain engaged.
- Close the door half way and lift it away from the oven.
- Do not lift the door by the handle. Keep one hand on either side of the door (Keep fingers away from the hinge arms).
II. Positioning Oven Door
- Position both hinge arms at the same time into the front.
- Ensure that the location notches on the bottom of the hinge arms are positioned onto the lower cutout lip.
- Close the door partially to ensure that the location notch drops into place.
- When the hinges are located, open the door fully and ensure the stirrups are disengaged.
Caustion:
- Do not use force and always ensure that the location notch is correctly engaged before
you operate the door
- Do not lift or carry oven door by the handle when removing or positioning
- Do not immerse oven door in water
III. Removing Baking Pans & Grill Racks
- Slide out baking pan and grill racks towards you until they reach the end.
- Pull and lift them out.
- Tilt up baking pan and grill racks at the front to the side supports. Be careful not to spill the contents.
- Wash pan and racks with warm soap water.
- Reverse the above steps to put the pan and racks back. Make sure they are placed between
2 support wires.
IV. Removing Side Rack
- Grasp the rack supports at the front.
- Pull them firmly inwards.
- To install the rack supports, first insert the rear hook to the rear hole.
- Locate the front peg into the front hole and push in firmly.
Note: Rack support wires should be on top
V. Removing & Re-positioning Fan
- Hold fan cover by the two sides and pull towards yourself.
- Insert the two tabs at the bottom of the fan into their corresponding holes.
- Push the top back.
Note: The fan baffle must be replaced after cleaning.
VI. Removing & Re-positioning Lighting
- Turn lighting glass anti-clockwise and remove it for bulb replacement.
- To remove side light, place a spoon under the light glass and lever off. Replace bulb and snap glass.
Troubleshooting
| Problem | Possible Cause |
| Oven or grill not working | - Power not turned on- Controls are incorrectly set- Household fuse has blown or power supply is offNote: If the fuse continues to blow, contact technician for a replacement |
| Lighting not working | - Light bulb blows out or loose in socket- Household fuse has blownNote: If the fuse continues to blow, contact technician for a replacement |
| Oven not heating up enoughOven not working | - Foil or trays lining on bottom of oven- Household fuse has blownNote: If the fuse continues to blow, contact technician for a replacement |
| Condensation building up | - Reduce amount of water used in cooking (Some condensation is normal) |
| Door cannot be replaced after removal | - Stirrup not engaged properly |
| Solid heating element has been discolored | - Discoloration of heating elements and trimming is normal |
Technical Specifications
| Model | EV-55D | EV-15D |
| Voltage | 220 - 240 V / 50 - 60 Hz | 220 - 240 V / 50 - 60 Hz |
| Rated Power | 2900 - 3200 W | 2900 - 3200 W |
| Electric Current | 13.5 A | 13.5 A |
| Temperature Range | 100 - 250 °C | 100 - 250 °C |
| Colour | Stainless Steel | Black |
| Interior Capacity | 84 L | 84 L |
| Dimensions | (H) 595 mm(W) 595 mm(D) 575 mm | (H) 595 mm(W) 595 mm(D) 575 mm |
| Interior Dimensions | (H) 470 mm(W) 380 mm(D) 430 mm | (H) 470 mm(W) 380 mm(D) 430 mm |
| Cut-out Dimensions | (H) 588 mm(W) 565 mm(D) 585 mm | (H) 588 mm(W) 565 mm(D) 585 mm |
| Net Weight | 41.0 kg | 41.0 kg |
If there is any inconsistency or ambiguity between the English version and the Chinese version of these operating instructions, the Chinese version shall prevail.
Product appearance, structure and specifications are subject to change without prior notice.
Refer to www.gemmanpool.com for the most up-to-date version of the operating instructions.
请填妥以下空格正误发票,以便保存,以便维护条款对资料。用厂提供本公司之所有资料必须正配电线,否则免费保用将舍粗数。Please fill out the form below. This information and the purchase invoice will be required for any repairs. Warranty will be invalid if information provided is found to be inaccurate.
型號 Model No.: □ EV-15D □ EV-55D
機身號碼 Serial No.: 發天號碼 Invoice No.:
Warranty Terms & Conditions
Our Repairs & Customer Service Centre will provide rectification of any defect of manufacturing materials free of charge given that such defect is reported within 12 months from purchase date.
This warranty is not valid until Customer's registration information is returned to and received by our Service Centre within 10 days of purchase via one of the following methods:
1) Visit our website and register online: www.germanpool.com/warranty
2) Complete all fields on the attached Warranty Card and mail it back to our Repairs & Customer Service Centre along with a photocopy of the purchase invoice (Warranty Card and invoice copy will not be returned to Customer)
* Product must be used solely for domestic purposes. Customer should always follow the operating instructions. This warranty does not apply to: replacement of accessories and parts; damages caused by incorrect voltage, improper operations, unauthorized installation or repairs as well as accidents.
** Service area includes Hong Kong Island, Kowloon and New Territories. Repairs in Tung Chung, Discovery Bay or other areas are subject to extra service charge.
客戶服務及維修中心
Customer Service & Repair Centre
German Pool (Hong Kong) Limited 8/F, China Travel (Cargo) Logistics Centre 1 Choong Tung Road
1 Cheong Tung Road
Hung Hom, Kowloon, Hong Kong
Tel: +852 2333 6249
Fax: +852 2356 9798
Email: repairs@germanpool.com
此保用證只適用於香港
This warranty card is valid only in Hong Kong
Kok Road. Tokwawan. Kowloon. Hong Kong.
電話 Tel: +852 2773 2888
傳真 Fax:+852 2765 8215
中國
China
廣東省佛山市順德區
大良南國東路德順廣場三層
3/F, Takshun Plaza, Nanguo East Road,
Shunde, Foshan, Guangdong
Alameda Dr. Carlos D'Assumpcao No. 263,
Edif. China Civil Plaza, 15 Andar, I. Macau
© All rights reserved. Copying, reproducing or using the contents of this manual is not allowed without prior authorization from German Pool, violators will be prosecuted.
www.germanpool.com
- 目錄
- PRODUCT STRUCTURE
- BASIC CONTROL
- SET TIMER
- SET TEMPERATURE
- SELECT FUNCTION
- START
- INSTALLATION
- FUNCTION DESCRIPTIONS
- RAPID HEAT
- HEAT WITH FAN
- HEAT ONLY
- BASE HEAT
- DEFROST
- GRILL WITH FAN
- GRILL
- TURBO GRILL
- OPERATING INSTRUCTIONS
- PRECAUTIONS
- OPERATING PROCEDURES
- PRE-HEAT OVEN CHAMBER
- PRE-HEAT GRILL RACK
- ADJUST SETTINGS
- MEAT
- FISH / POULTRY
- OPERATING TIPS
- CAUTIONS
- CARE & MAINTENANCE
- IMPORTANT
- ENAMEL SURFACE
- STAINLESS STEEL
- PAINT (CONTROL PANEL)
- GLASS (DOOR & CONTROL PANEL)
- OVEN INTERIOR
- GRILL RACK
- NOTES ABOUT CLEANING
- REMOVING OVEN DOOR
- POSITIONING OVEN DOOR
- REMOVING BAKING PANS & GRILL RACKS
- REMOVING SIDE RACK
- REMOVING & RE-POSITIONING FAN
- REMOVING & RE-POSITIONING LIGHTING
- WARRANTY TERMS & CONDITIONS
- 客戶服務及維修中心
- CUSTOMER SERVICE & REPAIR CENTRE
- 中國
- CHINA
Brand : German Pool
Model : EV-55D
Category : Oven