
RH60GH403SS - Cooker RUSSELL HOBBS - Free user manual and instructions
Find the device manual for free RH60GH403SS RUSSELL HOBBS in PDF.


| Product Type | Freestanding Cooker |
| Brand | Russell Hobbs |
| Model | RH60GH403SS |
| Width | 60 cm |
| Height | 85-90 cm |
| Depth | 60 cm |
| Weight | Approximately 50 kg |
| Energy Source | Gas hob + Electric oven |
| Gas Type | Natural Gas / LPG (convertible) |
| Number of Gas Burners | 4 |
| Burner Safety | Flame failure device on all burners |
| Oven Type | Electric fan oven |
| Oven Functions | Conventional, grill, fan, defrost |
| Oven Capacity | Approximately 65 liters |
| Oven Cleaning | Enamel interior, easy clean |
| Grill | Integrated grill element |
| Control Type | Knobs for hob and oven |
| Timer | Mechanical timer with alarm |
| Child Lock | Yes (control lock) |
| Energy Class | A |
| Spare Parts Availability | Yes, via authorized service centers |
| Repairability | Modular design, repairable |
| Manual Included | Yes, 28-page user manual |
Frequently Asked Questions - RH60GH403SS RUSSELL HOBBS
User questions about RH60GH403SS RUSSELL HOBBS
0 question about this device. Answer the ones you know or ask your own.
Ask a new question about this device
Download the instructions for your Cooker in PDF format for free! Find your manual RH60GH403SS - RUSSELL HOBBS and take your electronic device back in hand. On this page are published all the documents necessary for the use of your device. RH60GH403SS by RUSSELL HOBBS.
USER MANUAL RH60GH403SS RUSSELL HOBBS
Gas Hob
Instruction Manual
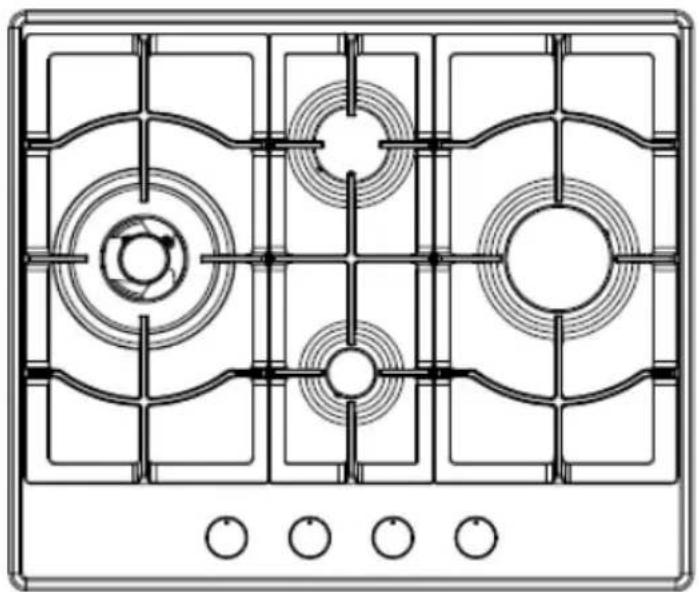
natural_image
Pure electrical circuit lines without any symbolsModelnumber(s): RH60GH403SS
For Customer Services & Spare Parts please call 0345 208 8750 or visit us at https://mda.russellhobbs.com
IMPORTANT: RETAIN FOR FUTURE REFERENCE
Contents
Safety Instructions 3-5
Product Overview 6
Positioning 7-8
Installation 9-13
Usage 14-18
Cleaning & Maintenance 19-21
Trouble shooting 22-24
Connection to the mains 25
Guarantee 26
Technical specification 27
Safety Instructions
Important note:
Please read this booklet before installing and switching on this appliance. The manufacturer assumes no responsibility for incorrect installation and usage as described in this booklet.
This appliance can be used by children aged from 8 years and above and persons with reduced physical, sensory or mental capabilities or lack of experience and knowledge if they have been given supervision or instruction concerning use of the appliance in a safe way and understand the hazards involved. Children shall not play with the appliance.
Gas appliances must be disconnected and installed by a Gas Safe registered engineer. This scheme has replaced the Corgi registration scheme. For details visit www.gassaferegister.co.uk or call 0800 408 5500. Failure to do so will invalidate your guarantee, liability claims and could lead to criminal prosecution
The use of a gas cooking appliance results in the production of heat, moisture and products of combustion in the room in which it is installed. Ensure that the kitchen is well ventilated especially when the appliance is in use: keep natural ventilation holes open or install a mechanical ventilation device (mechanical extractor hood).
In case of glass or steel hotplate breakage: shut immediately off all burners and any electrical heating element and isolate the appliance from the power supply. Do not touch the appliance surface and do not use the appliance.
- Children should be supervised to ensure that they do not play with the appliance.
- If the supply lead is damaged it must be replaced by a qualified person using the correct lead, available from 0345 208 8750.
Safety Instructions
- Packaging material is dangerous to children. Never allow children to play with packaging material.
- Check the appliance for damage after unpacking it. Do not connect the appliance if it has been damaged in transport.
- The appliance can only be used safely if it is correctly installed according to the safety instructions. The installer is responsible for ensuring that the appliance works correctly after installation.
- All operations relating to installation, regulation and conversion to other types of gas must be carried out by an authorised installation engineer, respecting applicable regulations, standards and the specifications of the local gas and electricity providers.
- You are recommended to contact the Technical Assistance Service to convert to another type of gas. Before installing your new hob, ensure that it is being installed according to the assembly instructions.
- Prior to installation, ensure that the local distribution conditions (nature of the gas and gas pressure) and the adjustment of the appliance are compatible.
• The adjustment conditions for this appliance are stated on the rating label. - This appliance is not connected to a combustion products evacuation device. It shall be installed and connected in accordance with current installation regulations. Particular attention shall be given to the relevant requirements regarding ventilation.
- This appliance can only be installed in a well-ventilated place in accordance with existing regulations and ventilation specifications.
- The appliance must not be connected to a combustion product removal device.
- Do not subject the appliance to draughts. These might blow out the burners.
- This appliance leaves the factory set to the type of gas that is indicated on the specifications plate. If this must be changed, read the assembly instructions.
- Do not tamper with the appliance's interior. If necessary, call our customer helpline
- Do not switch on the appliance if it is damaged in any way. Contact our customer helpline
- Caution: This appliance is only intended for cooking purposes. It is not to be used for other purposes, for example not as a heating system or room heating
Safety Instructions
- Do not leave the appliance unattended during operation. The manufacturer is not liable for damage which is caused by improper use or incorrect operation.
- Hot oil and fat can ignite very quickly. Never leave hot fat or oil unattended. Never use water to put out burning oil or fat. Switch off the appliance. Extinguish flames carefully using a lid, fire blanket or something similar.
- When gas burners are in operation without any cookware placed on them, they can build up a lot of heat. Only operate the gas burners with cookware on them.
- Operating several gas burners at the same time gives rise to a great deal of heat.
- The accessible parts become very hot when in operation. Never touch hot parts. Keep children at a safe distance.
- Do not use covers. These can cause accidents, due to overheating, catching fire or materials shattering, for example.
- Do not use inappropriate child safety shields or hob guards. These can cause accidents.
- The hob will become very hot. Never place combustible items on the hob. Never place objects on the hob.
- Incorrect repairs are dangerous. Repairs may only be carried out by a gas safe registered engineer
- Components inside the appliance may have sharp edges. Wear protective gloves.
- Do not use any high-pressure cleaners or steam cleaners, which can result in an electric shock.
- Never use strong and abrasive cleaning agents as they will cause surface damage.
- In the event of a malfunction, turn off the appliance's gas and electricity supply. For repairs, call customer services
• Warning: Do not use cooking vessel on the cooking zones that overlap its edges - Warning: Do not use hob guards, inappropriate use of hob guards can cause accidents.
Product overview
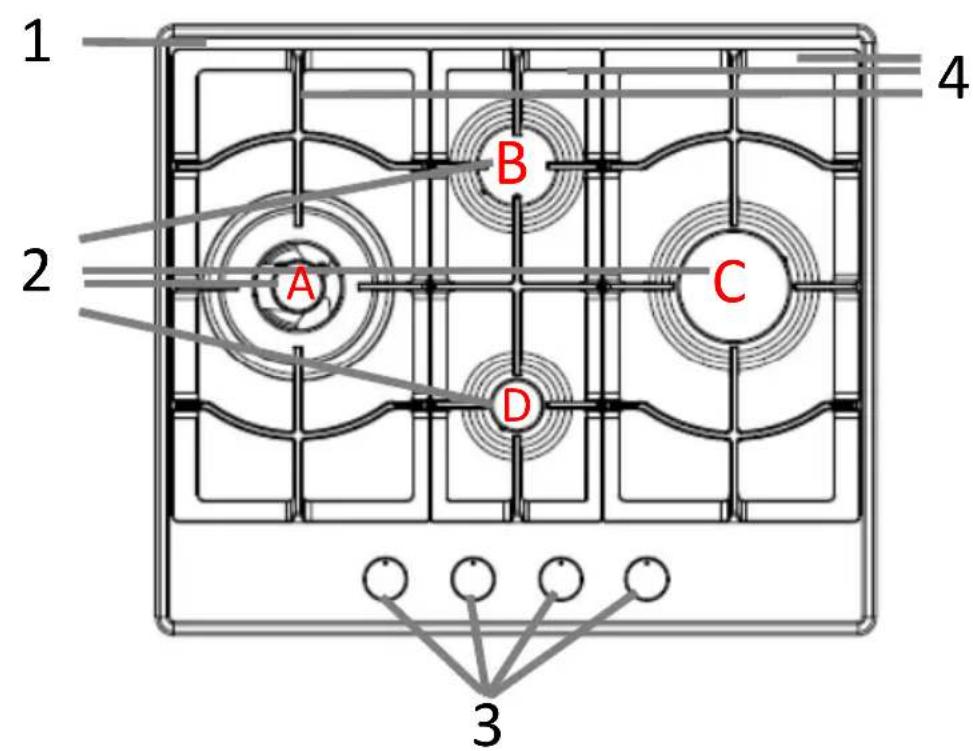
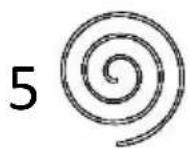
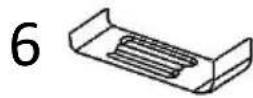
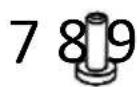

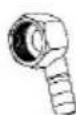
- Hob
- Burners
A. Triple burner
B. Semi rapid burner
C. Rapid burner
D. Auxiliary burner
- 3 x Pan support
- 4 × Sponge
- 4 × Bracket
- 4 × Screws
- 4 × Injector
-
Gas pipe bend
-
Dials
Unit & Spare Parts
If any of the above parts are missing please contact the customer service team on 0345 208 8750 or visit us at https://mda.russellhobbs.com
Positioning
• This appliance is to be installed in a counter top.
- Avoid damaging the product during installation.
- The appliance can only be used safely if it is correctly installed according to the safety instructions. The installer is responsible for ensuring that the appliance works correct when installed.
- Gas appliances must be disconnected and installed by a Gas Safe registered engineer. This scheme has replaced the Corgi registration scheme. For details visit www.gassaferegister.co.uk or call 0800 408 5500. Failure to do so will invalidate your guarantee, liability claims and could lead to criminal prosecution.
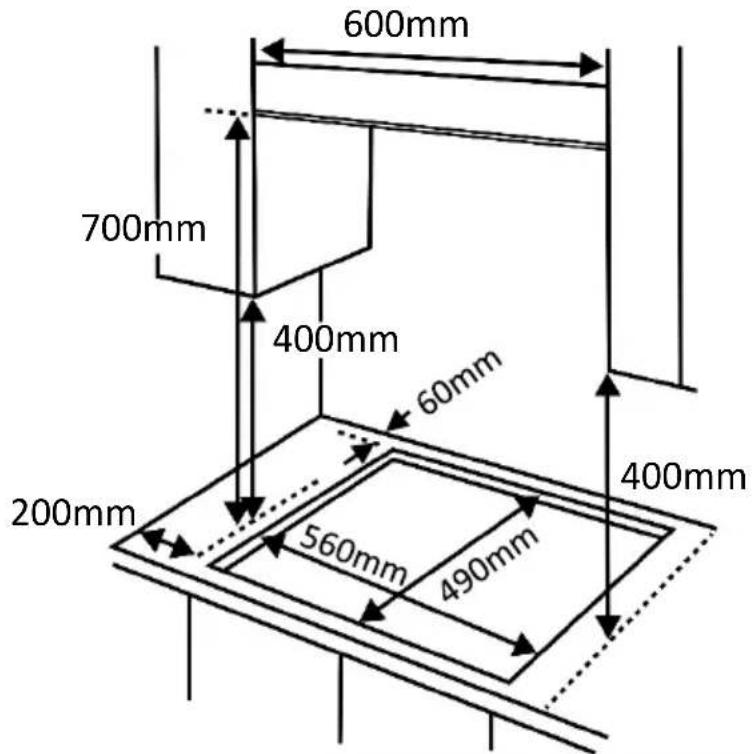
- The edges of the hob must be a minimum of 60mm from a side or rear wall.
- The highest point of the hob (including the burners) must be a minimum of 700mm from the underside of any surface directly above it.
- The highest point of the hob (including the burners) must be a minimum of 400mm from the underside of any surface either side of the hob. If any surface either side of the hob is lower than 400mm, then it must be at least 50mm from the outer edges of the hob.
- There must be a minimum of 50mm of clearance around the hob and any combustible materials.
Positioning
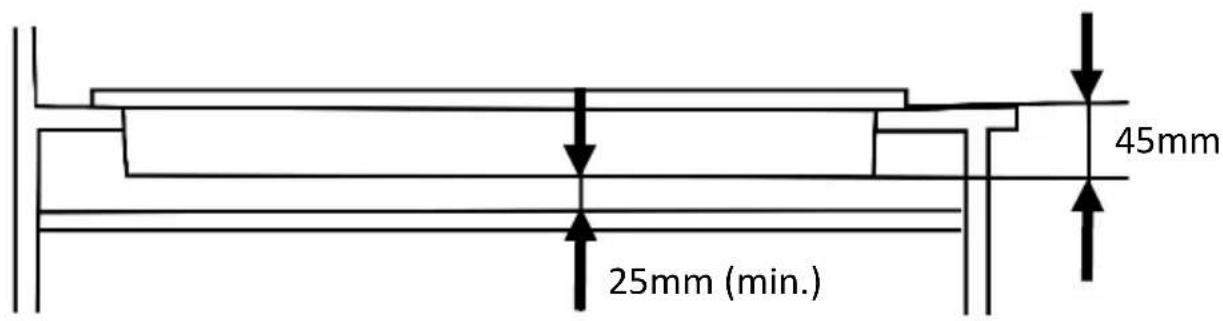
- You must have a gap of a minimum gap of 25mm and a maximum gap of 74mm between the underside of the appliance and any surface below it.
Note:
- Select heat-resistant work surface material to avoid larger deformation caused by the heat radiation from the appliance.
• To install a hob above an oven, the oven must have forced ventilation. - Check the dimensions of the oven when being installed with the hob
Installation
Preparation & installation
Ensure that there are no electric wires, gas or water pipes in the area where holes are to be made.
Components of the appliance may have sharp edges. Wear protective gloves.
- Ensure that there is an electrical plug socket and gas supply within adequate distance of the hob after it has been installed.
- Cut out the aperture that measure 560mm by 490mm deep, in accordance with the positioning instructions detailed on the previous page.
- Remove the pan supports, burner lid, flame spreader and carefully turn the appliance upside down and place it on a cushioned mat.
- Apply the sponge provided around the edge of the appliance: the thickness of the sponge is 1.5mm and width of it is 10mm.
- Do not leave a gap in the sealing agent or overlap the thickness
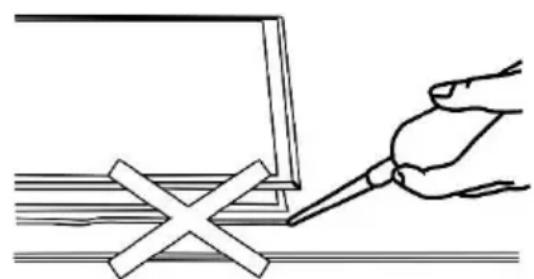
- Place the bracket over the holes in each corner of the hob that match the size of the screws that have been provided.
- Slightly tighten a screw through the bracket so that the bracket is attached to the hob: you should still be able to adjust the position of the bracket.
- Carefully turn the hob back over and gently lower it into the aperture hole that you have cut out
- On the underside of the hob, adjust the brackets into a position that is suitable for your worktop.
- Fully tighten the screws to secure the hob into position
natural_image
Illustration of a hand using a screwdriver to mark a cross-shaped object on a horizontal line (no text or symbols)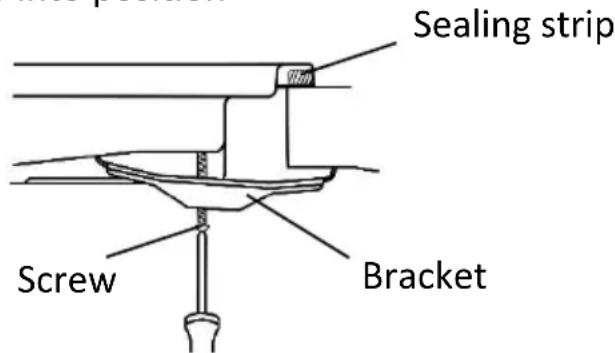
Note: Do not use silicon sealant to seal the appliance against the aperture, as this will make it difficult to remove the appliance in the future.
Installation
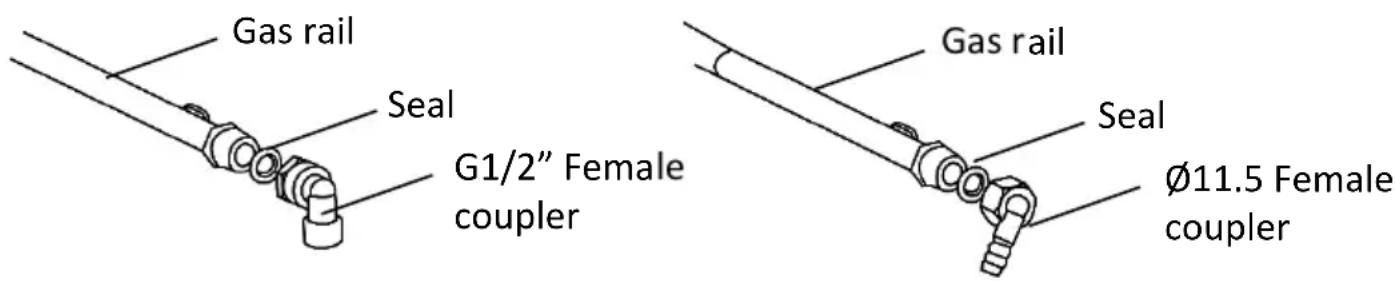
Gas connection
- Gas appliances must be disconnected and installed by a Gas Safe registered engineer. This scheme has replaced the Corgi registration scheme. For details visit www.gassaferegister.co.uk or call 0800 408 5500. Failure to do so will invalidate your guarantee, liability claims and could lead to criminal prosecution.
- This appliance is supplied to run on LPG and natural gas, conversion to LPG or natural gas must be undertaken by a Gas Safe registered engineer. This scheme has replaced the Corgi registration scheme. For details visit www.gassaferegister.co.uk or call 0800 408 5500. Failure to do so will invalidate your guarantee, liability claims and could lead to criminal prosecution
Gas supply replacement and installation guidelines
Electrical connection
- This appliance is designed to be connected to a 220-240V\~50Hz AC electricity supply.
- Before proceeding with the electrical connection, verify that the current carrying capacity of the system and the isolator / main switch is adequate for the maximum power rating of the hob.
- Electrical installation of the residence and of the appliance's isolator must be earthed and conform with the required safety regulations.
Installation
- If there is no suitable circuit and a fused switch, they must be installed by a qualified electrician before the hob is connected.
- Do not use adaptors, multiple sockets and/or extension leads.
- During installation, please ensure that insulated cables are used. An incorrect connection might damage your appliance and will void the manufacturer's guarantee.
- All repairs must be carried out by an authorised service personal or a qualified electrician.
- Switch off/isolate your appliance before each maintenance.
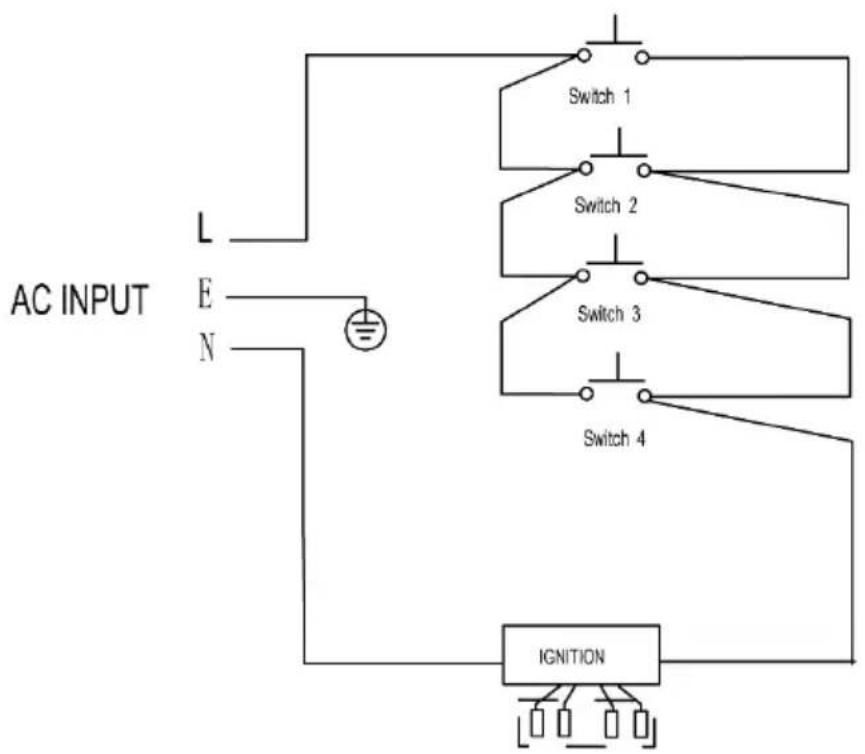
flowchart
graph TD
    A["AC INPUT"] --> B["L"]
    A --> C["E"]
    A --> D["N"]
    B --> E["Switch 1"]
    C --> F["Switch 2"]
    D --> G["Switch 3"]
    E --> H["Switch 4"]
    F --> I["Switch 4"]
    G --> J["Switch 4"]
    H --> K["IGNITION"]
    I --> K
    J --> K
    K --> L["Ground"]
Installation
Gas adjustment
Before any adjustment is started the gas and electricity supply to the appliance must be turned off.
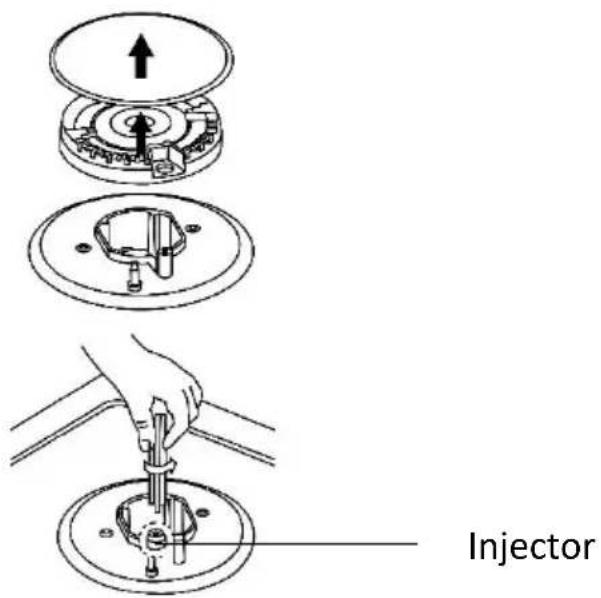
Change the injector of the burners
- Remove the pan support, burner cover and flame spreader
- Unscrew the injector using a spanner and replace it with the stipulated injector for the new gas supply.
- Carefully reassemble all of the components.
• After the injectors are replaced, you must ensure the replacement injectors are fully tightened.
Adjustment of the minimum flame level
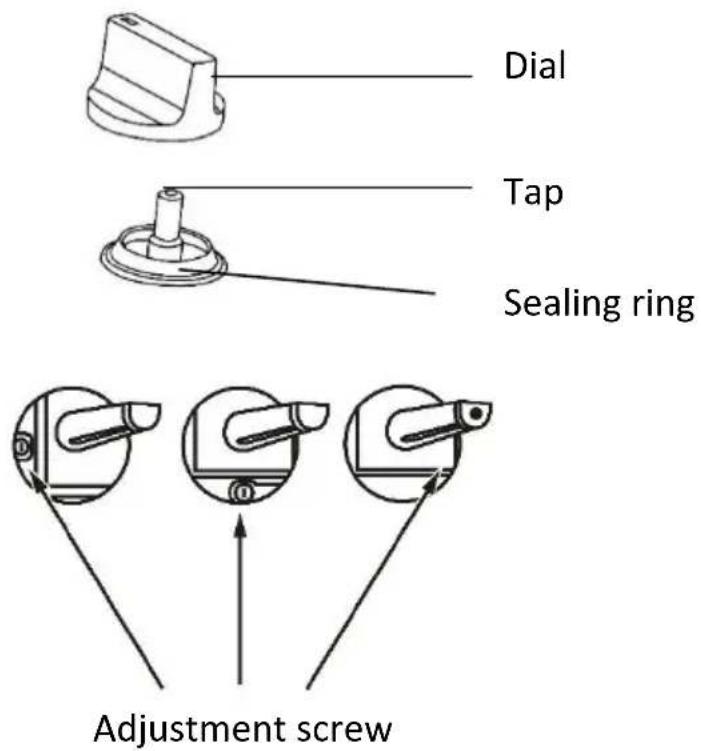
• Turn the taps down to the minimum level
- Remove the dial from the tap and place a small bladed screw driver in the centre of the tap shaft
- The correct adjustment is obtained when the flame has a length of 3mm - 4mm (for butane/propane gas the adjustment screw must be tightly screwed in).
Installation
- Refit the dial and make sure that the flame does not go out by quickly turning from maximum flame to minimum flame. If it does then remove the dial and make further adjustments to the gas flow, testing it again once the adjustment has been made.
- Repeat this process for each one of the dials/gas taps
Note:
- Do note dismantle the tap shaft, in the event of a malfunction change the whole tap.
• Before placing the burners back, make sure that the injector is not blocked. - A full operational test and leakage test must be carried out after a gas conversion.
- After completing a conversion a qualified installer must mark a "V" on the correct gas category to match with the setting in the rating label (remove the previous "V" mark
Usage
Note: The appliance is fitted with a flame failure safety device on each burner, which is designed to stop the flow of gas to the burner head in the event of the flame going out.
Dials
The appliance has 4 dials and these control the 4 burners, at the bottom left of each dial there is an illustration that shows the burner that each dial controls:
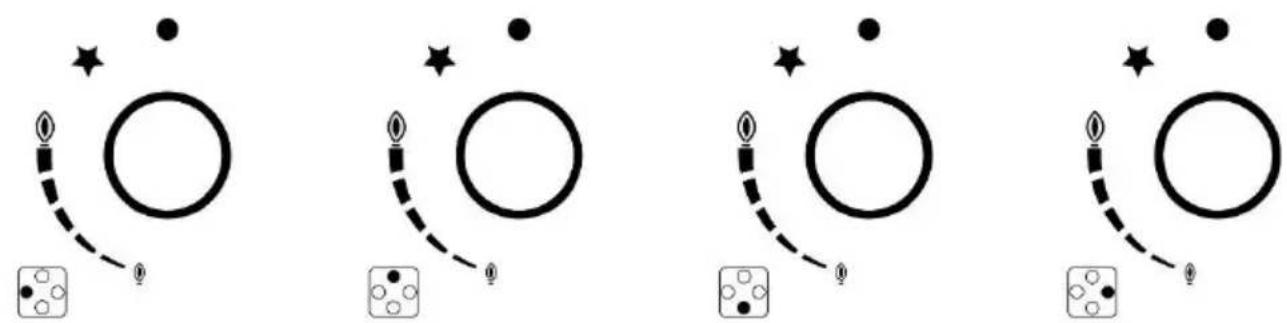
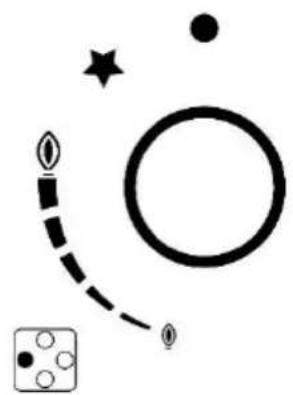
Each dial has 4 icons, these are explained below:
natural_image
Simple line drawing of a moon with a crescent, stars, and a circle, alongside a dice (no text or symbols)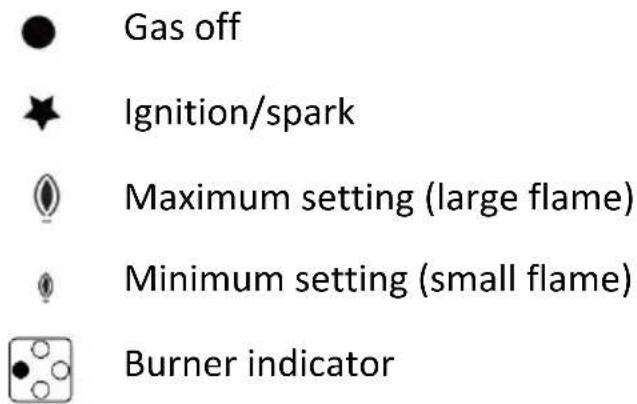
To use a burner
- Turn on the appliance at the plug.
- Place a suitable pan on the pan support that is over the burner you wish to use. Make sure the bottom of the pan and the surface of the pan support are clean and dry.
- Press the dial of the burner that you wish to light downwards and turn it anticlockwise to the maximum setting (large flame).
Usage
- You must keep the dial depressed so that the automatic ignition for the burner operates.
- You should hold down the control knob for 15 seconds after the flame has ignited on the burner. If after 15 seconds the burner has not lit, stop operating the device and wait at least 1 min before trying to ignite the burner again.
- After this 15-second interval, you will be able to release the dial and set the flame to your required level by turning the dial anti-clockwise.
- The operating position MUST be at a position between the maximum and minimum position.
- To switch the burner off, turn the control dial clockwise to the gas off position.
Note: In case of power cut, the burners can be lit carefully by using a match.
Warnings:
- It is normal to hear a slight whistling noise while the burner is operating.
- When it is first used, it is normal for the burner to give off odours; this does not pose any risk and does not indicate a malfunction; they will disappear in time.
- A few seconds after the burner is switched off, a sound (thud) will be produced. This is not a fault - this means that the safety device is no longer operating.
- Keep the burner as clean as possible. If the ignition sparkers are dirty they will not light properly. Clean them periodically using a small non-wire brush. Bear in mind that the ignition sparkers must not suffer any serious impacts.
- An orange-coloured flame is normal. This is caused by the presence of dust in the atmosphere, spilt liquids, etc.
- The kitchen will become hot and humid when this gas appliance is used. You must therefore ensure that the kitchen is well ventilated: either keep the natural ventilation apertures open, or install a ventilation system (extractor hood).
- If using the appliance intensively for prolonged periods, you may require additional ventilation (e.g. by opening a window) or more effective ventilation (e.g. by increasing the hob's ventilation, if possible).
- If the burner flames are accidentally blown out, switch off the burner operating control knob and do not try to relight it for at least one minute.
Usage
Pans & energy saving
The following advice is to prevent damage to pans and help you save energy:
| Burners | Suitable pan sizes (diameter) | |
| Minimum diameter (mm) M | Maximum diameter (mm) | |
| Triple 220mm 260mm | ||
| Rapid 200mm 240mm | ||
| Semi-rapid 160mm 180mm | ||
| Auxiliary 120mm 160mm | ||
| √ | X | |
| Always use pans that are the right size for each burner to avoid wasting gas and discolouring the pans | 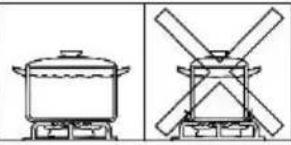 | Do not use small pans on large burners, the flame should never touch the sides of the pans |
| Place a lid on pans | 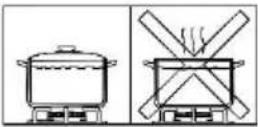 | Do not cook without a lid or with the lid half off, as this wastes energy |
| Only use pans with a thick, flat bottom. | 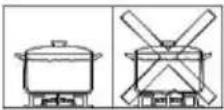 | Do not use damaged pans, which do not sit evenly on the hob: pans may tip over. |
| Always place pans centrally over the burners not to one side | 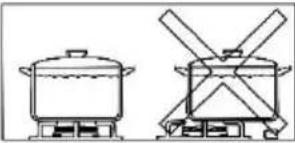 | Do not place pans on one side of a burner, as it could tip over |
| Do not use large pans on burners near the controls, as they may be damaged by the high temperatures | ||
| Pans must always be put on the pan supports. Always ensure the pan supports and burner covers are correctly positioned before use | 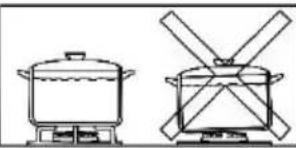 | Never place pans directly on the burners |
| Do not place anything between pan and pan support | ||
| Be careful when handling pans when they are on the burner or have just be taken away from the burner | 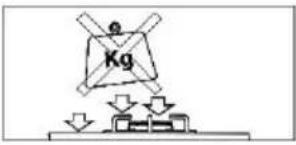 | Do not use excessive weight or strike the hob with heavy objects |
Usage
Cooking recommendations:
The following advice is to help you get the best cooking performance/results:
| Burner Very high, High Medium Low | |||
| Triple or Rapid burner | Boiling, steaming, griddling, toasting, paellas, Escalopes, steaks, omelettes, frying, Asian food (Wok cooking) | Reheating and keeping things hot: cooked and pre-cooked dishes. | |
| Rice, white sauce and ragout. | Steaming: fish, vegetables. | ||
| Semi-rapid burner | Steamed potatoes, fresh vegetables, stews, pasta, etc. | Reheating and keeping things hot: pre-cooked dishes and delicate casseroles. | |
| Auxiliary burner | Casseroles, rice pudding and caramels. | Defrosting and slow cooking: vegetables, fruits and frozen products. | Melting: butter, chocolate, gelatine |
Usage
Pan supports:
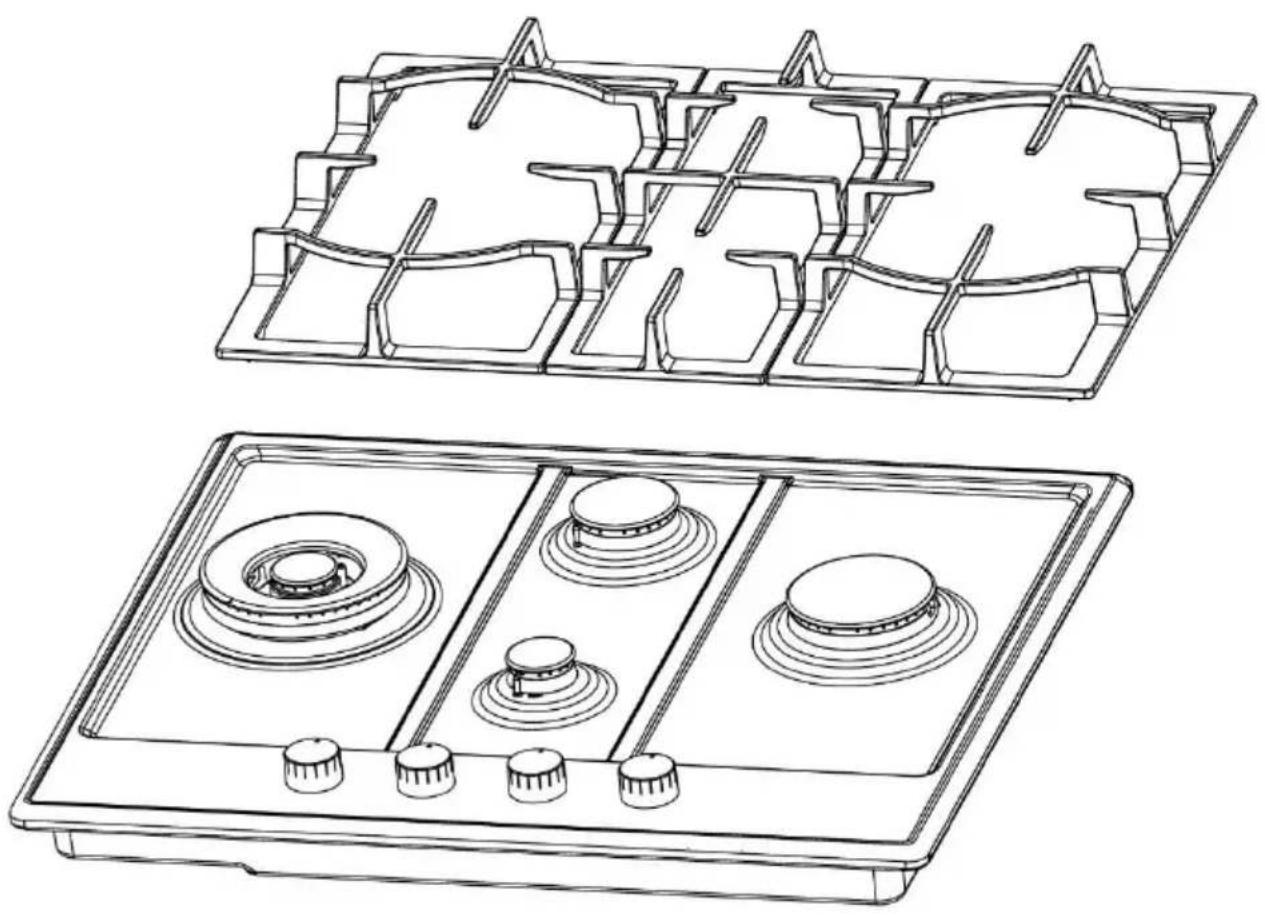
The pan supports will only align with the burners if they are put on the hob correctly. The smallest pan support is for the middle 2 burners and can be placed on the hob in any orientation.
The left and right pan supports are interchangeable, but you must ensure that the thickest side of these pan supports are placed on the outside of the hob.
natural_image
Technical line drawings of a gas stove with internal components and control knobs (no text or symbols)Cleaning and Maintenance:
Important notes:
- The appliance will become hot during operation, allow the appliance to cool down before cleaning.
- Do not use any high-pressure cleaners or steam cleaners.
- Wash new sponge cloths thoroughly before use.
- Follow all instructions and warnings included with the cleaning agents.
How to clean
Observe the information in the table below to ensure that the different surfaces are not damaged by using the wrong type of cleaning agent. Do not use:
• Harsh or abrasive cleaning agents,
• Cleaning agents with a high concentration of alcohol,
• Hard scouring pads or sponges,
• High-pressure cleaners or steam cleaners.
| Surface type How to clean | |
| Stainless Steel Hot soapy | water: Clean with a dish cloth and dry with a soft cloth.Clean stainless steel surfaces in the direction of the grain only.Special stainless steel cleaning products are available from specialist retailers. Apply a very thin layer of the cleaning product with a soft cloth. |
| Painted surfaces Hot soapy | water: Clean using a damp dish cloth and dry with a soft cloth/towel. Do not use any stainless steel cleaners. |
| Aluminium and plastic Glass cleaner: Clean with a soft cloth. | Glass cleaner: Clean with a soft cloth. |
| Glass Glass cleaner: Clean with a soft cloth. Do not use a glass scraper. |
Cleaning and Maintenance:
How to clean:
- After each use, clean the surface of the respective burner parts once they have cooled down. If any residue is left (baked-on food, drops of grease etc.), however little, it will become stuck to the surface and more difficult to remove later. The holes and grooves must be clean for the flame to ignite properly.
- The movement of some pans may leave metal residue on the pan supports.
- Clean the burners and pan supports using soapy water and scrub with a non-wire brush.
- If the pan supports are fitted with rubber rests, ensure that these are also cleaned. The rests may come loose and the pan support may scratch the hob.
• Always dry the burners and pan supports completely. - Water droplets or damp patches on the hob at the start of cooking may damage the enamel.
- After cleaning and drying the burners, make sure the burner covers are correctly placed on the diffuser.
- Always clean off any liquid as soon as it is spilt: you will save yourself any unnecessary effort.
- Do not leave acidic liquids (e.g. lemon juice, vinegar, etc.) on the hob.
- The ring cover of the double or triple flame burner and stainless steel parts such as hotplate rings, top sheet and the area around the burners may become discoloured over time. This is normal because of the high temperatures. Each time the appliance is used these parts should be cleaned with a product that is suitable for stainless steel.
CAUTION: The use of a gas cooking appliance results in the production of heat, moisture and products of combustion" in the room in which it is installed. Ensure that the kitchen. is well ventilated especially when the appliance is in use": keep natural ventilation holes open or install a mechanical ventilation device (mechanical extractor hood).
Cleaning and Maintenance:
Cleaning the burners:
- Remove the burner cover and spreader by pulling them upwards and away from the hob.
- Soak them in hot soapy water.
- Clean them before drying them carefully, ensuring that the flame holes are clean and completely dry.
- Wipe the fixed parts of each burner with a damp cloth and dry them afterwards.
- Gently wipe the ignition device and a damp cloth and dry them carefully, ensuring they are clean and completely dry.
- Before placing the burners back on the hob you must ensure that the injector is not blocked.
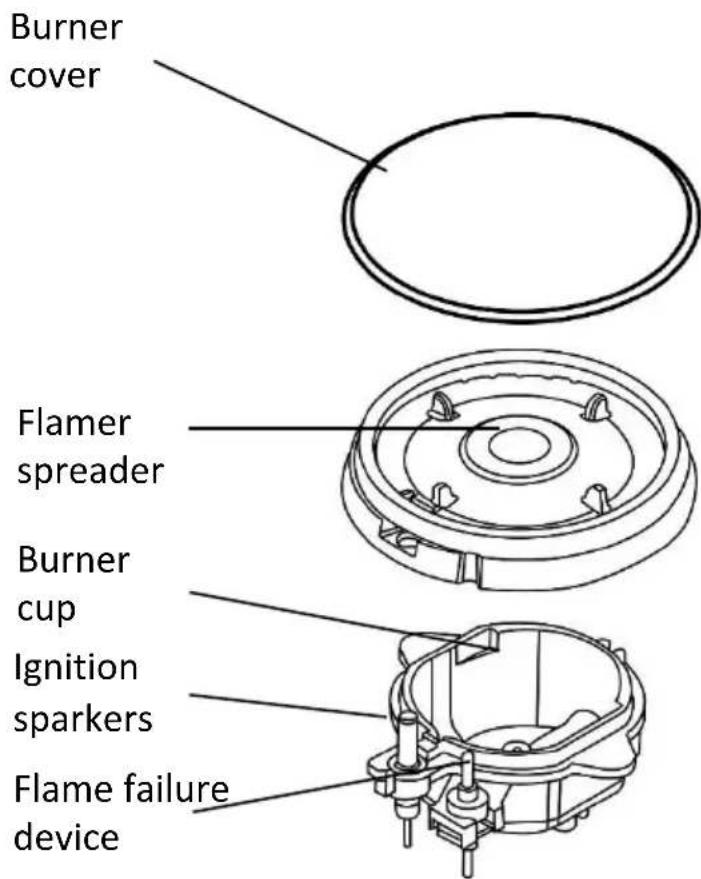
-
Place the flame spreader on to the burner cup so that the ignition device and the flame failure device extend through their respective holes in the flame spreader (the flame spreader must click into place correctly).
-
Position the burner cover onto the flame spreader so that the retaining pins fit into the their respective recesses.
Trouble Shooting:
| Problem Solution | |
| Not ignited | The plug is not plugged inConnect the appliance to the electricity supply |
| Power cut or faulty fuseCheck whether other kitchen appliances are working or check in the fuse box to make sure that the fuse for the appliance is working | |
| The burner cover is badly assembledAssemble the burner cover correctly | |
| The gas supply is closedOpen the gas supply | |
| Badly ignited | The burner cover is badly assembledAssemble the burner cover correctly |
| The gas supply is closedOpen the gas supply | |
| The burners are wetDry the burner cup, flame spreader and burner cover | |
| The holes in the burner spreader are clogged or the igniter is cloggedClean the burner spreader and igniter |
Trouble Shooting:
| Problem Solution | |
| Flame goes out when in use | The flame failure device is cloggedClean the flame failure device |
| Food that is being cooked has boiled over and extinguished the flameTurn off the burner, wait for 1 minute and reignite the zone | |
| The burner cover is badly assembledAssemble the burner cover correctly | |
| Flame has been blown out by a strong draughtTurn off the burner, check the cooking area for the source of the draught (open window, etc.). Stop the source of the draft, wait 1 minute and reignite the burner | |
| Excessive noise | The burners make a noise during ignition and useThis is normal |
| The noise during operation is excessiveThe burner cup, flame spreader or burner cover may be badly assembled: Assemble correctly | |
| Unstable flame | The burner cup, flame spreader or burner cover may be badly assembledAssemble correctly |
Trouble Shooting:
| Problem Solution | |
| Yellow/orange flame | The holes in the burner spreader are clogged or the igniter is cloggedClean the burner spreader and igniter |
| Orange flameThis is caused by the presence of dust in the atmosphere, spilt liquids, etc. | |
| A different type of gas is being usedCheck gas supply | |
| Gas smell | Gas leakageStop using the appliance, close the gas supply and open a window or windows for ventilationVacate the area and contact customer services |
Connection to the mains supply
WARNING- THIS APPLIANCE MUST BE EARTHED
This appliance is designed to operate from a mains supply of AC220 - 240V \~ 50HZ. Check that the voltage marked on the product corresponds with your supply voltage.
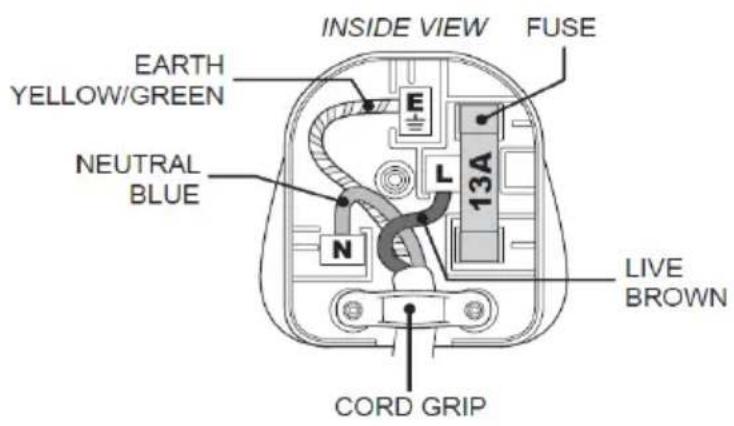
For UK use only – Plug fitting details for rewireable plugs only (where applicable): As the colours of the wires in the mains lead of this appliance may not correspond with the coloured markings identifying the terminals in your plug, proceed as follows:
The GREEN/YELLOW wire is the EARTH and must be connected to the terminal which is marked with the letter E or by the earth symbol or coloured GREEN or GREEN/YELLOW.
The BLUE wire is the NEUTRAL and must be connected to the terminal marked with the letter N or coloured BLACK.
The BROWN wire is the LIVE wire and must be connected to the terminal marked with the letter L or coloured RED.
Always ensure that the plug cord grip is fastened correctly.
natural_image
Warning symbol depicting a lightning bolt inside a triangle (no text or numbers)DANGER Electric Shock Risk
If a 13A (BS1363) fused plug is used it must be fitted with a 13amp fuse conforming to BS1362 and be BSI or ASTA approved.

Russell Hobbs
Guarantee
This product is guaranteed for 12 months from the date of the original purchase. If any defect arises due to faulty materials or workmanship you must contact Russell Hobbs with the original proof of purchase so a replacement or refund can be arranged.
Refund or replacement is at the discretion of Russell Hobbs.
The following conditions apply:
- Russell Hobbs will require a valid proof of purchase at the point of replacement or refund.
- The product must be installed and used in accordance with the instructions contained in this instruction guide and any other instructions for use which has been supplied.
- It must be used for domestic purposes only and for its intended use.
- This guarantee does not cover wear and tear, damage, misuse or consumable parts.
This does not affect your statutory rights.
Imported by
G2S LIMITED
WIGAN
WN2 4AY
Technical Specification
Model number RH60GH403SS
Rated Voltage 220V – 240V \~ 50Hz
External Dimensions(HxWxD) 90mm x 600mm x 510mm
Burner Power (KW) Wok burner - 3.8 (277g/h)
Auxiliary burner - 1.0 (73g/h)
Rapid burner - 3.3 (241g/h)
Semi rapid burner – 2.0 (146g/h)
Gas hob class Class 3
Pin 2531CT-0116
| Gas type & Pressure | Electrical power | Heat input and orifice size marked(mm) | Total | |||
| Wok burner | Auxiliary rapid | Rapid | Semi-rapid | |||
| 220-240Vac 50Hz | 3.8kW (277g/h) | 1.0kW (73g/h) | 3.3kW (241g/h) | 2.0kW (146g/h) | 10.1kW (737g/h) | |
| G30, 29mbar | 0.99 0.5 | 0.90 0.70 | ||||
| G20, 20mbar √ | 1.41 0.78 | 1.33 1.06 | ||||
| Gas Category | I3+(28-30/37) | I2H/I2E/I2E+(20) √ | II2H3+ | |
| Gas Type G30 | G31 G20 | G20/(G30/G31) | ||
| Gas Pressure | 28-30mbar | 37mbar | 20mbar | (20/(28-30/37)mbar |
| Country of Destination | GB | |||
For Customer Services & Spare
Parts please call 0345 208 8750
or visit us at
https://mda.russellhobbs.com

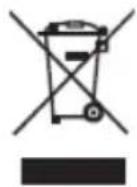
This symbol is known as the 'Crossed-out wheelie bin Symbol'. When this symbol is marked on a product/batteries, it means that the product/batteries should not be disposed of with your general household waste. Only discard electrical/electronic/battery items in separate collection schemes, which cater for the recovery and recycling of materials contained within. Your co-operation is vital to make sure the success of these schemes and for the protection of the environment. For your nearest disposal facility, visit www.recycle-more.co.uk or ask in store for details.
We reserve the right due to possible changes to design to alter the instruction manual without prior notice.
- Contents
- Safety Instructions
- Important note:
- Product overview
- Unit & Spare Parts
- Positioning
- Note:
- Installation
- Preparation & installation
- Gas connection
- Electrical connection
- Gas adjustment
- Change the injector of the burners
- Adjustment of the minimum flame level
- Usage
- Dials
- To use a burner
- Warnings:
- Pans & energy saving
- Cooking recommendations:
- Pan supports:
- Cleaning and Maintenance:
- Important notes:
- How to clean
- How to clean:
- Cleaning the burners:
- Connection to the mains supply
- Russell Hobbs
- Guarantee
- The following conditions apply:
- Technical Specification
Brand : RUSSELL HOBBS
Model : RH60GH403SS
Category : Cooker