
13824-10 - Cooker RUSSELL HOBBS - Free user manual and instructions
Find the device manual for free 13824-10 RUSSELL HOBBS in PDF.


| Type | Countertop mini oven/cooker |
| Brand | Russell Hobbs |
| Model | 13824-10 |
| Power Supply | 220-240 V ~ 50/60 Hz, 13 A, earthed |
| Fuse | 13 A BS1362 |
| Hotplates | 2 (large and small), control from 0 to 6 |
| Oven Elements | Top and bottom elements, with fan on bottom |
| Oven Temperature Range | 50 °C to 240 °C (approx.) |
| Temperature Control | Rotary dial with markings in Celsius |
| Signal Lights | Indicate when elements are on, cycle with thermostat |
| Interior Capacity | Approximately 20 liters |
| Accessories Included | Wire rack, baking tray, removable handle |
| Door | Glass front, must be closed during oven use |
| Safety Features | Earthing, child supervision required, hot surfaces warning |
| Cleaning | Hand wash tray and rack; wipe surfaces with damp cloth; use oven cleaner for interior |
| Maintenance | Non-user-serviceable; check plug fuse if issues |
| Dimensions (approx.) | 50 x 35 x 30 cm (width x depth x height) |
| Weight (approx.) | 10 kg |
| Warranty | 1 year from purchase date against functional defects |
| Country of Origin | Not specified |
Frequently Asked Questions - 13824-10 RUSSELL HOBBS
User questions about 13824-10 RUSSELL HOBBS
0 question about this device. Answer the ones you know or ask your own.
Ask a new question about this device
Download the instructions for your Cooker in PDF format for free! Find your manual 13824-10 - RUSSELL HOBBS and take your electronic device back in hand. On this page are published all the documents necessary for the use of your device. 13824-10 by RUSSELL HOBBS.
USER MANUAL 13824-10 RUSSELL HOBBS
Smart in the kitchen...
natural_image
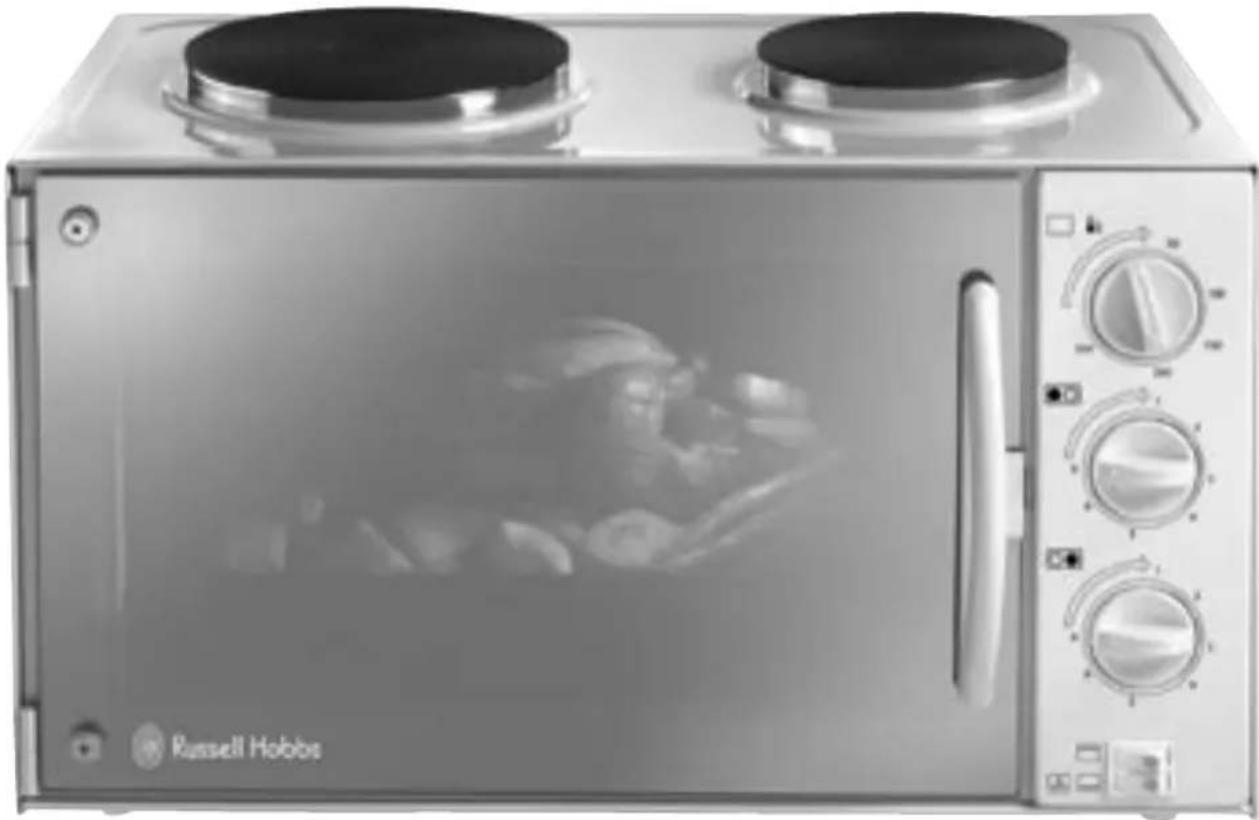
Front view of a stainless steel microwave oven with two top ovens and control knobs (no visible text or symbols)instructions and guarantee
Read the instructions and keep them safe. Pass them on if you pass the mini oven on.
Remove all packaging, but keep it till you're satisfied the mini oven works.
important safeguards
Follow basic safety precautions, including:
1 The mini oven must only be used by or under the supervision of a responsible adult. Use and store the mini oven out of reach of children.
2 Don't put the mini oven in liquid, don't use it in a bathroom, near water, or outdoors.
3 Sit the mini oven on a stable, level, heat-resistant surface, at least 75cm (30") above floor level, and leave 50mm (2") of clear space all round.
4 Food, fat, and oil, when heated, may burn. Don't use the mini oven near or below curtains or other combustible materials.
5 Check that you can open the door without causing an obstruction.
6 Use oven gloves, or a folded towel, when filling or emptying the oven.
7 The door and all surfaces of the mini oven will get hot whether you're using the oven or hotplates – don't touch, and keep children away.
8 Don't use cold water or a cold wet cloth on the glass door when it's hot. It may break.
9 Keep pan handles out of the way, so they can't be caught or knocked.
10 This appliance must not be operated by an external timer or remote control system.
11 Route the cable so it doesn't overhang, and can't be tripped over or caught.
12 Cook meat, poultry, and derivatives (mince, burgers, etc.) till the juices run clear. Cook fish till the flesh is opaque throughout.
13 Keep the mini oven and the cable away from hotplates, hobs or burners.
14 Unplug the mini oven when not in use, before moving and before cleaning.
15 Don't use the mini oven for any purpose other than cooking food.
16 Don't use the mini oven if it's damaged or malfunctions.
17 If the cable is damaged, return the mini oven, in order to avoid hazard.
household use only
before using for the first time
Check that you've removed all the packaging from inside the mini oven. Make sure there's nothing wedged round the top element, on the mini oven ceiling.
Now you must burn the protective coatings off the elements. This generates fumes, so if you suffer from any breathing problems, get someone else to do it (even if you don't suffer from anything, it's not a bad idea to get someone else to do the dirty jobs).
1 Open the kitchen windows, and make sure the room is adequately ventilated.
2 Plug the mini oven into the power socket (switch the socket on, if it's switchable).
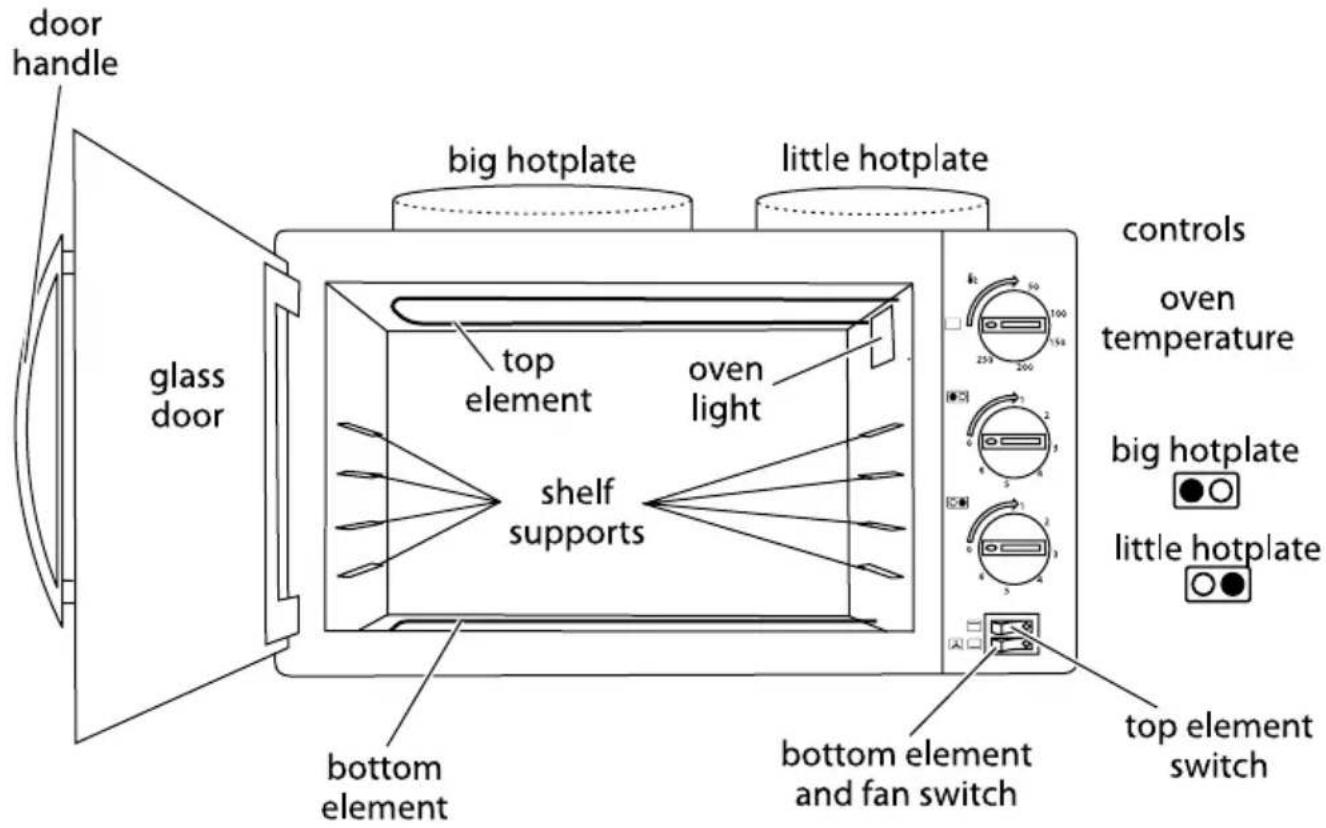
3 The oven light will come on and stay on as long as the mini oven is plugged in.
4 Turn both hotplate controls ●○ and ○● to 6, leave them for 8 minutes, then turn them to 0, and let the hotplates cool.
5 Switch the top and bottom elements on by pressing the left side of both switches.
6 Turn the oven temperature control Ⓞ to 200, leave it for 8 minutes, then turn it back as far as it'll go
7 Switch both elements off by pressing the right side of the switches, and let the oven cool.
door
Keep the door closed.
Whether you're using the top element □ on its own to keep food warm, or both the top □ and bottom ⚙️ ≡ elements together to cook food, the door must be closed, otherwise the thermostat won't be able to control the oven temperature.
The door gets hot – even though you're using the handle, wear oven gloves.
rack and tray
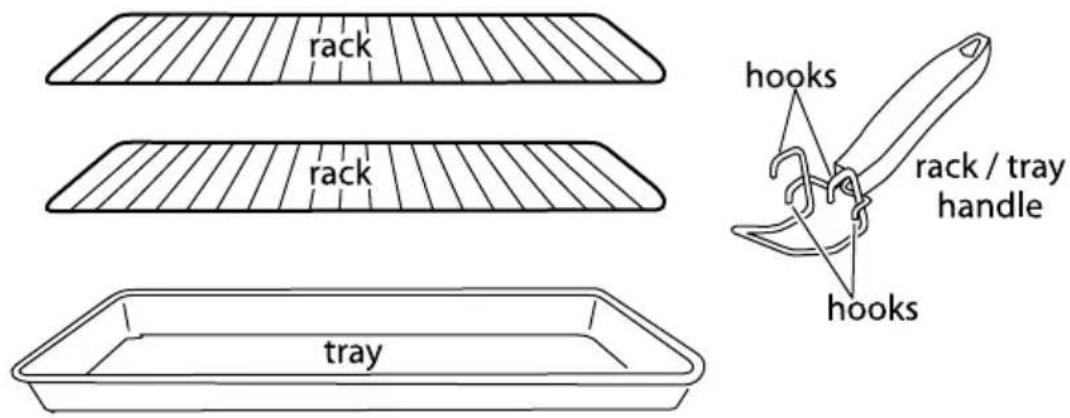
The racks and tray slide on the shelf supports at the sides of the oven. Use the supports to hold the food you're cooking as near to the centre of the oven as you can manage, given the constraints imposed by your cookware.
If you don't need the tray to cook on, leave it on the bottom shelf support, to catch drips.
To fit the rack/tray handle, catch the hooks on the top of the rack/tray, then lower the handle till the bottom catches the underside of the rack/tray, then lift. The upper set of hooks fits the tray, the lower set fits the rack.
lights
There's a signal light on the end of each element switch.
The lights will cycle on and off as the oven thermostat operates to maintain the temperature.
hotplates
The middle knob ●○ operates the big hotplate, the next one down ○● operates the small hotplate. The range is from 0 (off) to 6 (maximum).
pans
Use good quality, flat bottomed pans which make good contact with the hotplate. The base of the pan should be the same size as the hotplate or slightly wider.
If it's too small, you'll lose heat, you'll overheat the pan sides and handle.
If it's too large, the pan may distort. In either case, you may also damage the mini oven.
Don't use a pan that covers both hotplates at the same time (e.g. a catering-size pan).
This, too, may damage the mini oven.
oven
temperature control
- Turn the temperature control to the cooking temperature you need.
element switches
- The top switch controls the top element – press the left side ☐ to turn it on
- The bottom switch controls the bottom element – press the left side 📁 to turn it on. The fan comes on when the bottom element is working.
oven gloves
Use oven gloves to open and close the door, use them to insert and remove the racks and tray. We've even made the knobs big enough to use while wearing oven gloves, so you've no excuse for burning your fingers.
oven temperatures
Oven temperatures are comparable with those of a standard electric oven. As the oven is small, cooking times will generally be slightly shorter than with a conventional oven.
oven settings
| food setting | food setting | |
| beef 190-210 | pastry 190-210 | |
| bread 200-220 | pork 190-210 | |
| casseroles 140-160 | quiche/flan 160-180 | |
| chicken 190-210 | rich fruit cake 140-160 | |
| fish 170-190 | scones | 190-220 |
| lamb 190-210 | sponge cake | 160-180 |
| meringue 90-110 | Yorkshire pudding | 200-220 |
| milk pudding 140-160 | ||
These settings are for guidance only. They're for fresh or fully defrosted food, using both elements, with the door closed (and they're Celcius).
- Check food is cooked through before serving. If in doubt, cook it a bit more.
- Cook meat, poultry, and any derivatives (mince, burgers, etc.) till the juices run clear.
- Cook fish till the flesh is opaque throughout.
- When cooking pre-packed foods, follow any guidelines on the package or label.
conversion chart
| Celsius | Fahrenheit | gas mark | description | |
| 50 | 122 | - | for plate warming | |
| 100 | 212 | 14 | extremely cool | |
| 130 | 250 | 12 | very cool | |
| 140 | 275 | 1 | very cool | |
| 150 | 300 | 2 | cool | |
| 160-170 | 325 | 3 | warm | |
| 180 | 350 | 4 | moderate | |
| 190 | 375 | 5 | fairly hot | |
| 200 | 400 | 6 | fairly hot | |
| 210-220 425 | 7 | hot | ||
| 230 | 450 | 8 very hot | ||
| 240 | 475 | 9 very hot | ||
care and maintenance
1 Unplug the mini oven and let it cool before cleaning and storing away.
2 Wipe up all spillages, to avoid discolouring the surfaces and corroding the hotplates.
3 Hand wash the tray, racks, and handle in warm soapy water.
4 Wipe the white enamelled surfaces with a damp cloth. If necessary, you may use a little non-abrasive cream cleaner.
5 You may use a proprietary brand of oven cleaner on the internal surfaces of the oven. Leave the oven door open afterwards, to dry the oven thoroughly.
6 Clean the glass with a proprietary glass cleaner. Don't use cold water or a cold wet cloth on the glass door when it's hot – It may break.
Don't put the mini oven in liquid.
Don't use harsh or abrasive cleaning agents or solvents.
Don't use scourers, wire wool, or soap pads.
discolouration
Over time, the heat produced will cause discolouration of the surfaces. This is inevitable, unavoidable, and will not affect the operation of the mini oven.
connection
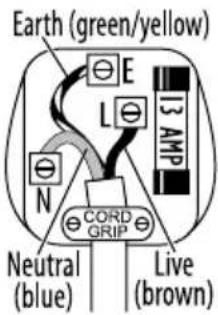
The product must be earthed. It has a 13A BS1362 fuse in a 13A BS1363 plug. To replace the plug, fit the green/yellow wire to ⏻ or E, the blue wire to N, and the brown wire to L. Fit the cord grip.
If in doubt, call an electrician.
Don't use a non-rewireable/moulded plug unless the fuse cover is in place. If you remove the plug, dispose of it.
service
The product isn't user-serviceable. If it's not working, read the instructions, check the plug fuse and main fuse/circuit breaker. If it's still not working, consult your retailer. If that doesn't solve the problem:
Pack carefully, with a note of your name, address, day phone number, and what's wrong. If under guarantee, say where and when purchased, and include proof of purchase (till receipt). Send it to Customer Returns (address below right).
Customer Service Customer Returns
(correspondence only) Salton Europe Ltd
Salton Europe Ltd Heath Mill Road
Failsworth Wombourne
Manchester Wolverhampton
M35 0HS WV5 8AQ
Customer Service (service@saltoneurope.com)
telephone 0845 658 9700 (local rate number)
guarantee
Defects affecting product functionality (excluding bulbs) appearing within one year of purchase will be corrected by replacement or repair provided the product is used and maintained in accordance with the instructions. Your statutory rights are not affected. Documentation, packaging, and product specifications may change without notice.
online
Hit www.russellhobbs.co.uk for more products.
Brand : RUSSELL HOBBS
Model : 13824-10
Category : Cooker